
PLMB 4 A1 - Rangefinder PARKSIDE - Free user manual and instructions
Find the device manual for free PLMB 4 A1 PARKSIDE in PDF.

| Brand | Parkside |
| Model | PLMB 4 A1 |
| Product type | Laser distance measurer with tape measure |
| Power supply | Built-in Li-ion battery 3.7 V, 300 mAh (0.3 Ah) |
| Charging voltage | 5 V (USB-C), max charging current 1 A |
| Laser class | 2 (wavelength 630-670 nm, power < 1 mW) |
| Laser measuring range | 0.05 m to 50 m |
| Laser measuring accuracy | ± 2 mm |
| Tape measure length | 3 m |
| Protection rating | IP20 (use in dry indoor areas) |
| Measuring functions | Distance, area, volume, simple/double/triple Pythagoras, continuous measurement |
| Memory | Last 100 values |
| Measurement units | m, ft, in, inch (switchable) |
| Spirit level | 2 bubbles at 90° for horizontal and vertical |
| Auto-off | After 3 minutes of inactivity |
| Charging | USB-C port, cable included |
| Included accessories | USB-C charging cable, instruction manual |
| Maintenance | Clean with a dry, soft cloth; no harsh chemicals |
| Safety | Laser class 2 – do not stare into beam; keep out of reach of children |
| Customer service (France) | Tel. 0800 919270, email: grizzly@lidl.fr |
| Customer service (Belgium) | Tel. 070 270 171 (0.15 EUR/min), email: grizzly@lidl.be |
| Repairability | Built-in battery not replaceable; contact after-sales service |
| Approximate weight | Approx. 200 g (with battery) |
Frequently Asked Questions - PLMB 4 A1 PARKSIDE
User questions about PLMB 4 A1 PARKSIDE
0 question about this device. Answer the ones you know or ask your own.
Ask a new question about this device
Download the instructions for your Rangefinder in PDF format for free! Find your manual PLMB 4 A1 - PARKSIDE and take your electronic device back in hand. On this page are published all the documents necessary for the use of your device. PLMB 4 A1 by PARKSIDE.
USER MANUAL PLMB 4 A1 PARKSIDE
Laser Distance Measure with Tape Measure
NL BE
Laser-afstandsmeter metrolmaat
a
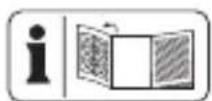
Before reading, unfold the page containing the illustrations and familiarise yourself with all functions of the device.
FR BE
The tape measure with laser and spirit level is designed for measuring distances. The device is intended for use by adults. The operator or user is responsible for any accidents or personal injury and/or material damage to third parties or their property. The manufacturer is not liable for damage caused by improper use or incorrect operation. This device is not suitable for commercial use. The warranty is void in the case of commercial use. The device is suitable for use in dry rooms only.
Description of functions
Please refer to the descriptions below for information on how the operating elements work.

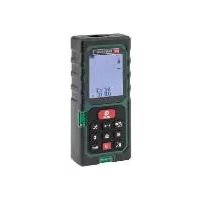
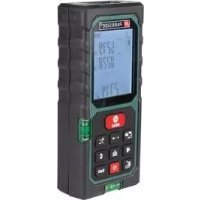
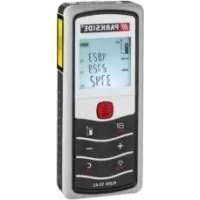
Overview
1 Spirit level
2 Display
3 "Mode" button
4 "Laser" button
5 Belt clip
6 Charging socket
7 USB-C charging cable
8 USB plug
9 USB-C plug
10 Roller tape measure
11 Release button
12 Laser aperture
General description
Technical data
The illustrations can be found on
the fold-out page.
Scope of delivery
Unpack the device and check for completeness.
Dispose of the packaging material properly.
- Laser range fi nder with tape measure
- USB-C charging cable
- Instruction manual
Laser range fi nder with tape measure....PLMB 4 A1
Operating voltage U 3.7 V =
Capacity. 0.3 Ah Supply voltage/
Charging voltage U_IN 5 ~V =
Charging current. 1 A Battery capacity..300 mAh
Protection type IP20
Roller tape measure length 3 m
Laser
Laser class 2
Wavelength
630-670 nm
Total radiant power P_0 .< 1 mW Accuracy ± 2 mm Measuring range .0.05 - 50 m
Safety information
Graphical symbols on the device
Do not dispose of devices with a built-in battery in the household waste.

DC voltage
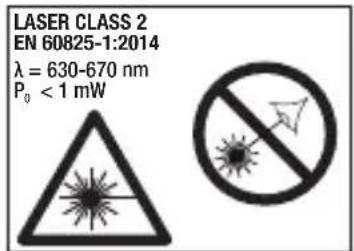
Caution! Laser beam Do not look into the beam! Laser class 2
Graphical symbols on the display
Starting point of the measurement at the rear edge of the device
Laser beam active

Battery level indicator

Measure area
Measure volume
Measure simple Pythagoras
Measure double Pythagoras
Measure triple Pythagoras
Measure continuous distance
Save the last 100 measurements
Symbols used in the instruction manual
Hazard symbol with information on the prevention of personal injury or property damage
Hazard symbol with information on the prevention of personal injury caused by electric shock
i Advisory symbol with information on how to best use the device
General safety instructions
- Observe the information on operation, cleaning, storage and disposal in
the operating instructions.
- Keep children away from the device.
- Check the device each time before using. If damaged, have the device repaired. Do not use the device if damaged.
- Turn off the device when not in use. Do not leave the device unsupervised.
- Keep the device away from medical devices, magnetic data storage media and magnetically sensitive devices.
Safety Instructions for Handling the Laser
- Caution: Leaser beam - Do not look into the beam! Laser class 2 Danger of eye injury!
- Do not aim the laser beam at people. Danger of eye injury!
- Markings and warnings are located on the back of the device.
Safety instructions for battery-powered devices
-
In order to minimise the risk of electric shock, pull the charger plug out of the socket prior to cleaning it.
-
Do not expose the battery/device to direct sunlight for long periods and do not place the device on a radiator. Heat damages the battery and there is a risk of explosion.
- If warm, allow the battery to cool before charging.
- Do not open the battery and avoid mechanical damage to the battery. There is a risk of a short circuit and vapours may leak out, causing irritation to the respiratory tract. Seek fresh air and medical assistance.
Roller tape measure
When extracting, the roller tape measure (10) locks automatically. To retract, press the locking button (12).
Spirit level
The 2 spirit levels (1) are at a 90^ angle to each other. Place the device upright on a surface and check that the device is level using the spirit level (1) on top. This ensures that the laser takes an accurate measurement horizontally or vertically.
Measuring with the laser

Caution! Laser beam.
Do not look into the
beam. Turn your head away or close your eyes to prevent looking into the laser beam. Danger of eye injury!

Measurements through plastic or glass panes
distort the measurement result.
Switching on and off
To switch on, press the "Laser" button (4) for 2 seconds.
To switch off, press the "Laser" button (4) for 2 seconds.

The device turns off automatically after 3
minutes of inactivity.
Changing the measuring unit
You can display the measurements in metres (m), feet (ft), inches (in) or inches (").
You can change the measuring unit by pressing the "Mode" button (3) for 2 seconds.
Selecting modes
You can switch through the modes using the "Mode" button (3) in the following order:
- Measure distance
- Measure area
- Measure volume
- Measure simple Pythagoras
- Measure double Pythagoras
- Measure triple Pythagoras
- Measure continuous distance
- Save the last 100 measurements

On switching on, the device will be in
"Measure distance" mode.
Explanation of the modes
Measure distance
The current measurement is always shown in the bottom line of the display (2). When the next measurement is taken, the previously measured value slides up one line.
Measure area
Take two measurements. The individual measurements are displayed in the upper lines. The area is then
calculated from the length and width and displayed in the bottom line.
Measure volume
Take three measurements. The individual measurements are displayed in small font in the upper lines. The volume is then calculated from the length, width and height and is displayed in the bottom line.
Simple Pythagoras/ double Pythagoras/triple Pythagoras
For calculating the distance in a right-angled triangle. As soon as you press the "Laser" button (4) to take the measurement, the value to be measured will assist by flashing on the small mode icon.
Measure continuous distance
To record a maximum and minimum distance with continuous measurement. Press the "Laser" button (4) to record the maximum distance. Press the "Laser" button (4) again to record the minimum distance. As the complete measurement is taken, the current distance is displayed in the bottom line.
Save the last 100 measurements
Press the "Laser" button (4) to go backwards through the stored values.
Measuring
- Select the required mode.
- Press the "Laser" button (4) to measure.
- Aim the laser at the point to which you want to measure the distance.
- Press the "Laser" button (4) again. The measured value is now displayed.
Error codes
Error 08 - Pythagorean theorem cannot be used, no right-angled triangle
Error 10 - Battery empty
Error 15 - Value is outside the measuring range
Error 00/44 - Distance to be measured is too close
Belt clip
During breaks in work, the device can be hung from a belt, using the integrated belt clip (5). Ensure that the device is switched off.
Charging the battery
Do not expose the battery to extreme conditions such as heat and shocks. There is a risk of injury caused by leaking electrolyte solution! In the case of contact, rinse with water or neutraliser. Seek medical advice if the solution has come into contact with the eyes etc.
The battery must only be charged up in dry areas.
-
Charge the built-in battery before using it for the first time.
Defects resulting from improper handling are not covered by the warranty.
The battery is not replaceable. If you have any problems with the battery, please contact the service centre. -
Insert the USB-C plug (9) into the charging socket (6) on the device.
- Connect the USB plug (8) to a USB port/power supply. The supply voltage / charging voltage must not be more than 5V , the
charging current must not be more than 1 A.
The battery status indicator remains on the display when the battery is fully charged.
- After charging, first disconnect the USB plug (8) from the USB port/ power supply.
- Then pull the USB-C plug (9) out of the charging socket (6).
Maintenance
The unit is maintenance-free.
Cleaning
Switch off the device before cleaning.
- Clean the device, using a soft dry cloth so as not to scratch the display (2).
- Do not use any abrasive cleaning agents or solvents. These could damage the device irreparably.
- Do not use water or metallic aids. There is a risk of a short circuit.
Storage
Store the device in a dry place, out of reach of
children. The device must not be exposed to direct sunlight during storage.
Disposal / Environmental protection
The device and packaging should be properly recycled.
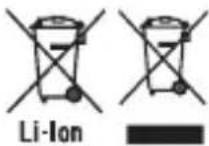
Do not dispose of devices with a built-in
battery in the household waste, a fire (risk of explosion) or water. Damaged batteries can harm the environment and your health if poisonous fumes or liquids escape.
- Dispose of the device with the battery discharged. Do not open the device or battery.
- Dispose of the device in accordance with the local regulations. Take the device to a recycling plant. The plastic and metal parts used on your device can be properly sorted according to materials and grades and effi cientsly recycled. Inform the collection point about the fi xed-installed rechargeable battery. Please contact our service centre for more
information.
- Disposal of your sent in defective devices is carried out free of charge.
Accessories
You can get accessories from www.grizzlytools-service.eu
If you have problems with the ordering process, please use the contact form If you have any further questions, please contact the "Service Center". USB-C charging cable, item number: 80001029
Service-Center
GB Service Great Britain
Tel.: 0800 404 7657 E-Mail: grizzly@lidl.co.uk IAN 361673_2007
IE Service Ireland
Tel.: 1890 930 034
(0,08 EUR/Min., (peak))
(0,06 EUR/Min., (off peak)
E-Mail: grizzlyy@lidl.ie
IAN 361673 2007
Importer
Please note that the following address is not a service address. Please initially con
tact the service centre specified above.
| Translation of the original EC declaration of conformity |
| We hereby confi rm that the Laser range fi nder with tape measure, model PLMB 4 A1, Serial number: 000001 - 075000 conforms with the following applicable relevant version of the EU guidelines: |
| 2014/30/EU • 2011/65/EU* & (EU) 2015/863 |
| In order to guarantee consistency, the following harmoni- sed standards as well as national standards and stipula- tions have been applied: |
| EN 61326-1:2013 • EN 61326-2-2:2013 EN 61010-1:2010/A1:2019 • EN 60825-1:2014 EN IEC 63000:2018 |
| This declaration of conformity is issued under the sole responsibility of the manufacturer: |
| CE M 21 0071 ** Grizzly Tools GmbH & Co. KG Stockstädter Straße 20 63762 Großbostheim, GERMANY, 15.04.2021 |
- The object of the declaration described above satisfies the provisions of Directive 2011/65/EU of the European Parliament and the Council of 8 June 2011 on limiting the use of certain harmful substances in electrical and electronic appliances.
** Metrology marking M 21 means: Attachment in 2021 + the notifi ed body
Mereni trojite Pythagory
Paper from responsible sources
FSC* C150223

FSC
www.fsc.org
MIXTE
Papier Issu
de sources
responsible
FSC* C150223
- FR BE
- Description of functions
- Overview
- General description
- Technical data
- Scope of delivery
- Safety information
- Graphical symbols on the device
- Graphical symbols on the display
- Symbols used in the instruction manual
- General safety instructions
- Safety Instructions for Handling the Laser
- Safety instructions for battery-powered devices
- Roller tape measure
- Spirit level
- Measuring with the laser
- Switching on and off
- Changing the measuring unit
- Selecting modes
- Explanation of the modes
- Measure distance
- Measure area
- Measure volume
- Simple Pythagoras/ double Pythagoras/triple Pythagoras
- Measure continuous distance
- Save the last 100 measurements
- Measuring
- Error codes
- Belt clip
- Charging the battery
- Maintenance
- Cleaning
- Storage
- Disposal / Environmental protection
- Accessories
- Service-Center
- GB Service Great Britain
- IE Service Ireland
- Importer
- Mereni trojite Pythagory
Brand : PARKSIDE
Model : PLMB 4 A1
Category : Rangefinder