
Rangemaster CRF 2800.COM - Rangefinder LEICA - Free user manual and instructions
Find the device manual for free Rangemaster CRF 2800.COM LEICA in PDF.
| Product type | Laser rangefinder |
| Brand | Leica |
| Model | Rangemaster CRF 2800.COM |
| Magnification | 7x |
| Objective lens diameter | 24 mm |
| Exit pupil | 3.4 mm |
| Field of view at 1000 m | 115.6 m |
| Maximum measuring range | Approx. 2500 m (depending on conditions) |
| Minimum measuring range | 10 m |
| Measurement accuracy (10-200 m) | ± 0.5 m |
| Measurement accuracy (200-400 m) | ± 1 m |
| Measurement accuracy (400-800 m) | ± 2 m |
| Measurement accuracy (beyond 800 m) | 0.5% |
| Laser class | Class 1 (eye-safe) |
| Laser wavelength | 897 nm |
| Wireless interface | Bluetooth® 4.1 |
| Power supply | 1 CR2 type 3 V cylindrical lithium battery |
| Battery life | Approx. 1700 measurements at 20 °C |
| Housing material | Carbon fiber reinforced synthetic / die-cast magnesium |
| Waterproofness | Water pressure resistant up to 1 m for 30 min |
| Operating temperature | -20 to 55 °C |
| Dimensions (L x H x W) | Approx. 75 x 34 x 113 mm |
| Weight (with battery) | Approx. 185 g |
| Main functions | Distance measurement, Scan mode, Advanced Ballistic Compensation (ABC), atmospheric conditions display (inclination, temperature, pressure), 12 ballistic curves, connection to Leica Sportoptics app, compatibility with Kestrel Elite |
| Included accessories | CR2 battery, carrying strap, Cordura case, warranty card, inspection certificate, free mobile app |
| Maintenance | Clean the lenses with a damp cloth and a soft chamois leather; do not use alcohol or chemicals; do not open the device |
| Safety | Class 1 laser, do not point into eyes, do not disassemble, keep out of reach of children |
| Spare parts and repairability | Eyecups and strap available from Leica Customer Care; repairs to be carried out by after-sales service |
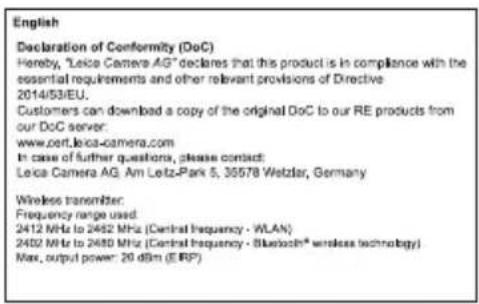
| General information | Manufactured under license from Leupold & Stevens, Inc.; compliant with Directive 2014/53/EU |
Frequently Asked Questions - Rangemaster CRF 2800.COM LEICA
User questions about Rangemaster CRF 2800.COM LEICA
0 question about this device. Answer the ones you know or ask your own.
Ask a new question about this device
Download the instructions for your Rangefinder in PDF format for free! Find your manual Rangemaster CRF 2800.COM - LEICA and take your electronic device back in hand. On this page are published all the documents necessary for the use of your device. Rangemaster CRF 2800.COM by LEICA.
USER MANUAL Rangemaster CRF 2800.COM LEICA
This equipment has been tested and found to comply with the limits for a Class B digital device, pursuant to Part 15 of the FCC Rules. These limits are designed to provide reasonable protection against harmful interference in a residential installation. This equipment generates, uses, and can radiate radio frequency energy and, if not installed and used in accordance with the instructions, may cause harmful interference to radio communications. However, there is no guarantee that interference will not occur in a particular installation. If this equipment does cause harmful interference to radio or television reception, which can be determined by turning the equipment off and on, the user is encouraged to try to correct the interference by one or more of the following measures:
- Reorient or relocate the receiving antenna.
- Increase the separation between the equipment and receiver.
- Connect the equipment into an outlet on a circuit different from that to which the receiver is connected.
- Consult the dealer or an experienced radio/TV technician for help.
FCC CAUTION:
To assure continued compliance, follow the attached installation instructions and use only shielded interface cables with ferrite core when connecting to computer or peripheral devices. Any changes or modifications not expressly approved by the party responsible for compliance could void the user's authority to operate this equipment.
Declaration of Conformity
Trade Name: Leica
Model No.: 8042
Responsible party/Support
contact: Leica Camera Inc.
1 Pearl Court, Unit A
Allendale, New Jersey 07401
Tel.: +1 201 995 0051
Fax: +1 201 995 1684
technicalinfo@leicacamerausa.com
Type No.: 8042

To Comply
SC Standards
FOR HOME OR OFFICE USE
This device complies with Part 15 of the FCC Rules. Operation is subject to the following two conditions: (1) This device may not cause harmful interference, and (2) this device must accept any interference received, including interference that may cause undesired operation.
Contains FCC ID: T7V1740
This transmitter must not be co-located or operated in conjunction with any other antenna or transmitter.
This equipment complies with FCC radiation exposure limits set forth for an uncontrolled environment and meets the FCC radio frequency (RF) Exposure Guidelines.
This equipment has very low levels of RF energy that are deemed to comply without testing of specific absorption ratio (SAR).
This product is in conformity with performance standards for laser products under 21 CFR 1040, except with respect to those characteristics authorized by Variance Number FDA-2016-V-3483 effective November 4, 2016
FOREWORD
We wish you a great deal of enjoyment and every success with your new Leica Rangemaster. The Rangemaster emits invisible, harmless infrared impulses and uses an integrated microprocessor to calculate the distance to an object from the reflected signal component. In addition, it registers ambient and situational parameters. With these - and the measured distance - it calculates the respective holdover values for different, selectable ballistic curves and displays them. It features an outstanding scope with 7x magnification, ensuring a reliable bearing even under difficult conditions. Plus, the Leica Rangemaster is easy to handle and operate. We strongly recommend reading this manual before using this device for the first time to ensure that you can make the most of this high-quality and versatile laser rangefinder.
SCOPE OF DELIVERY
Rangemaster
- 1 lithium battery 3V, type CR 2
- Carry strap
Cordura case
Warranty card
- Test certificate
- Download your free iOS or Android app from the AppleTM App-StoreTM or the GoogleTM Play StoreTM.
SPARE PARTS
Please contact our customer service or your regional Leica representative (please visit the Leica Camera AG homepage for addresses) if you ever need any replacement parts (e.g. an eyecup or a carry strap) for your Leica Rangemaster.
DISPOSAL OF ELECTRICAL AND ELECTRONIC EQUIPMENT
(Appplies within the EU, and for other European countries with segregated waste collection systems)
This device contains electrical and/or electronic components and must therefore not be disposed of in general household waste! Make sure you bring this device to an approved electronic waste collection point for recycling. This service is free of charge. Any standard or rechargeable batteries used in this device must be removed and disposed of separately in accordance with local regulations (please read the device manual for details). Please contact your local authorities, waste disposal collection point or the retailer, from whom you purchased the device for more information on correct waste disposal.
SAFETY PRECAUTIONS
RECHARGEABLE BATTERY
- The exclusive use of the battery type stated and described in this manual (3 V lithium cell; e.g. Duracell DL CR2, Ucar CR2, Varta CR2, or other CR2 types) is mandatory.
- Any improper use of the batteries or the use of unapproved battery types may result in an explosion!
- These batteries must be protected against prolonged exposure to heat or direct sunlight, as well as moisture or liquids. The batteries must not be placed in a microwave oven or a high-pressure container as this would pose a fire or explosion hazard.
- Batteries should never be put in a fire, heated, recharged, taken apart or forced open.
- Depleted batteries must never be disposed of in household waste as they contain toxic materials that are harmful to the environment. Battery collection points are provided at most large retail outlets; alternatively you can dispose of old batteries at a local special waste collection point to ensure correct recycling.
LASER
The Leica Rangemaster uses an invisible laser beam. Please note the following:
WARNING:
Non-compliance with the following points may result in serious injury or death.
- The use of any operations not described in this manual or any alterations on the device may result in hazardous radiation exposure.
- The laser device is active and emitting an invisible laser beam as long as the display in the eyepiece is active. Never point the laser focusing optics at a person or animal.
- Do not attempt to disassemble or modify the Leica Rangemaster; exposing the internal electronics may cause damage, injury or electric shock.
- Do not depress any of the two buttons while aiming at a human eye or while looking into the optics from the lens side.
- Keep the Leica Rangemaster out of the reach of small children.
ATTENTION:
Non-compliance with the following points may result in personal injury or damage to the device.
- Never aim the laser at an eye.
- Do not aim the laser at people or animals.
- Avoid looking directly at bright light sources with your Leica Rangemaster to prevent eye injury.
- Do not combine the operation of your Leica Rangemaster with other optical components, e.g. lenses or binoculars. Using the Leica Rangemaster in conjunction with another optical device increases the danger of damaging your eyes.
- Avoid touching any of the two buttons while the distance measurement function is not in use to prevent an accidental activation of the laser beam.
- Remove the battery if you will not be using your Leica Rangemaster for an extended period of time.
- Do not attempt to disassemble, reassemble or repair the Leica Rangemaster yourself. Emitting laser radiation may pose a serious health risk. The manufacturer warranty is void, once a device was disassembled, reassembled or repaired.
- Remove the battery immediately and stop using the device if the housing of the Leica Rangemaster is damaged or if it emits a strange sound after being dropped or behaves unexpectedly for any other reason.
With the exception of the characteristics permitted under Variance Number FDA-2016-V-3483, effective November 4, 2016, this product complies with the performance standards for laser products under 21 CFR 1040.
You will find the manufacturing date on the stickers in the Warranty Card and/or on the packaging. The date format is year/month/day.
FOR SINGAPORE ONLY:
Complies with IMDA Standards DA106734
FOR CANADA ONLY: CAN ICES-3 (B)/NMB-3(B)
This device complies with RSS-210 of the IC Rules. Operation is subject to the following two conditions:
(1) This device may not cause harmful interference, (2) This device must accept any interference received, including interference that may cause undesired operation of the device. This equipment complies with IC radiation exposure limits set forth for an uncontrolled environment and meets RSS-102 of the IC radio frequency (RF) Exposure rules. This equipment has very low levels of RF energy that are deemed to comply without testing of specific absorption ratio (SAR).
TABLE OF CONTENTS
FOREWORD 32
SCOPE OF DELIVERY 32
SPARE PARTS 32
SAFETY PRECAUTIONS 33
PARTDESIGNATIONS. 37
ATTACHING THE CARRY STRAP. 38
CHANGING THE BATTERY 38
BATTERY CHARGE LEVEL 39
USE WITH AND WITHOUT EYE GLASSES. 40
DIOPTER COMPENSATION. 40
BASIC INFORMATION ON MENU CONTROL 41
CONTROL/OPERATION VIA THE
LEICA SPORTOPTICS APP. 41
SETTING THE DISPLAY BRIGHTNESS (brtn) 42
SETTING THE UNIT OF MEASURE 43
RANGE MEASUREMENT 44
SCAN MODE. 45
MEASURING RANGE & ACCURACY 46
ATMOSPHERIC CONDITIONS DISPLAY 47
DETERMINING THE BALLISTIC CURVE 48
NIELSEN-KELLERMANN/KESTREL/
APPLIED BALLISTICS (LA+) 50
SETTING THE ZEROING DISTANCE (5id) 5
BALLISTIC OUTPUT FORMATS (RBCTM) 51
BALLISTIC OUTPUT FORMATS (LR) 52
SETTING AND SELECTION OF BALLISTIC OUTPUT FORMATS. 53
EQUIVALENT HORIZONTAL RANGE (EHr) 53
HOLDOVER (HOLD) 54
IMPACT POINT CORRECTION USING ELEVATION ADJUSTMENT. 54
DISPLAYING AND CHECKING THE SET BALLISTIC PARAMETERS 55
INSTALLING FIRMWARE UPDATES. 55
CARE/CLEANING. 56
FAQ. 57
TECHNICAL DATA. 58
LEICA CUSTOMER CARE 60
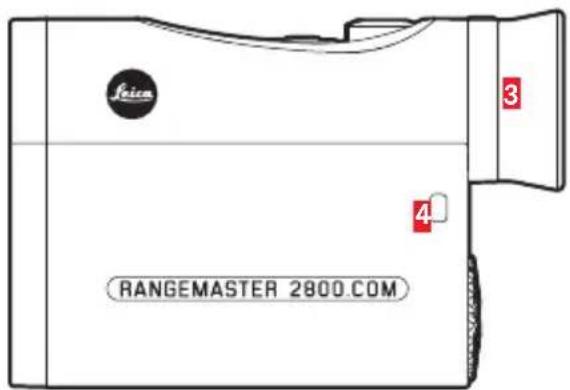
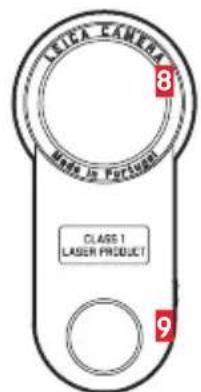
PART DESIGNATIONS
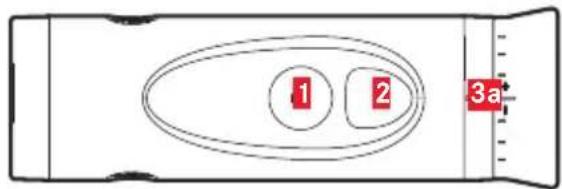
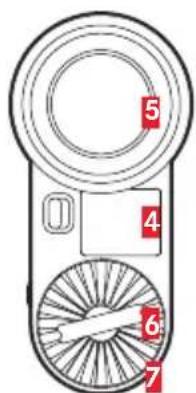
1 Secondary button
2 Main button
3Eyecup
a Diopter scale
4 Eyelet for carry strap
5 Eyepiece
6 Battery compartment cover
7 Battery compartment
8 Lens
9 Laser transmission lens
This product is manufactured under license by Leupold & Stevens, Inc.
ATTACHING THE CARRY STRAP
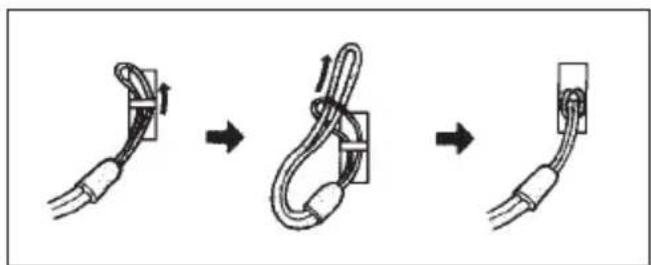
Feed the small loop on the carry strap through the eyelet 4 on the housing of the Leica Rangemaster.
Then thread the end of the strap through the small loop created and pull tight, so that the resulting loop is secured on the eyelet on the housing.
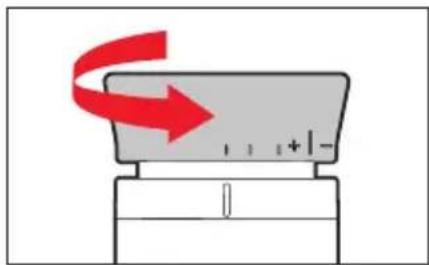
CHANGING THE BATTERY
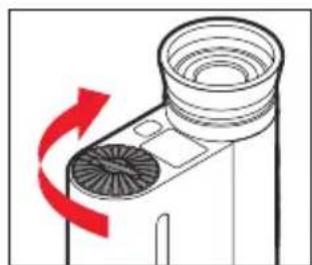
The Leica Rangemaster is powered by a cylindrical 3 Volt lithium cell (e.g. Duracell DL CR2, Ucar CR2, Varta CR2, or other CR2 types).
- Open the cover on the battery compartment by turning it counter-clockwise.
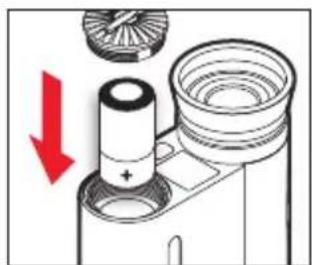
- Insert the battery with the positive contact going in first (as per the markings in the battery compartment).
- Close the cover by turning it clockwise.
Notes
- Low temperatures impair battery performance. Carry the Leica Rangemaster close to the body in low ambient temperatures and insert a fresh battery.
- Remove the battery if you will not be using your Leica Rangemaster for an extended period of time.
- Make sure to store the batteries in a cool, dry place.
BATTERY CHARGE LEVEL
The measured value and reticule display will flash when the battery nears depletion. You will still have enough power for another 100 measurements - but with a gradually reducing range - after the display initially begins flashing.
USE WITH AND WITHOUT EYE GLASSES
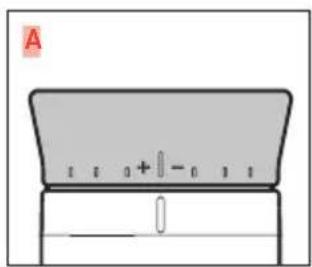
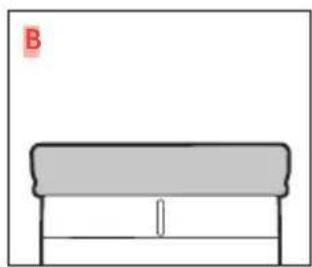
Users who do not wear glasses can leave the rubber eyecup 3 folded out (Figure A, as supplied). This position ensures the correct distance between your Leica Rangemaster and your eye. The rubber eyecup should be folded down (Figure B) when using the Leica Rangemaster while wearing glasses.
DIOPTERCOMPENSATION
Diopter compensation allows you to adjust the sharpness of the reticule to a value that is best for your vision. Simply aim the Leica Rangemaster at a distant object and turn the eyecup 3 to adjust the sharpness of the reticule. It is displayed in the viewfi nder when you press the main button 2. Check the set value on the scale 3a visible on the eyecup. Diopter compensation is available for vision defects of up to ± 3.5 diopters.
BASIC INFORMATION ON MENU CONTROL
The main menu consists of the following menu items:
-Meter/Yard display (USELI)
-Bluetooth-ready(bf).
- Ballistic curve (ball)
- Zeroing distance (Sld)
- Ballistic output formats (FBC)
-Display brightness (brtn)
Please read the relevant sections in this manual for details on their function.
Both the main menu and the setting options are set up as a continuous loop - i.e. all items/settings are accessible by continually pressing the button.
CONTROL/OPERATION VIA THE LEICA SPORTOPTICS APP
In addition to direct menu control via the two buttons as described on the left, you can optionally configure these settings via the Leica Sportoptics app on a smartphone or tablet PC. The same applies for all functions and displays described in this manual. The app is available as a free download from the Google™ Play Store™ for Android™ devices and the Apple™ App-Store™ for iOS™ devices.
App use is based on a wireless Bluetooth connection. The Bluetooth receiver installed in the Leica Rangefinder must be activated:
- Press and hold the secondary button ≥ 3 s).
EeuU5 appears.
-
Press the secondary button 1 time (<2 s).
-
The display switches to 出 + . Press the main button 2 to select a setting (OFF, APP or LAH).
The display will appear, once the function is activated.
Notes
- Please refer to the Leica Sportoptics app for more details on Bluetooth® use.
- The distance between the Rangemaster and the smartphone/tablet PC should be as short as possible to ensure optimal device connection.
- A Bluetooth® connection is also required for data transfers using a relevantly equipped Nielsen-Kellermann device (Kestrel Elite model with calculation software by Applied Ballistics).
- Display brightness can be adjusted via the app as well to e.g. optimize visibility in various lighting conditions.
SETTING THE DISPLAY BRIGHTNESS (brtn)
The Leica Rangemaster adapts the brightness automatically to ambient conditions via an ambient light sensor, which can then controlled manually in multiple increments.
- Press and hold the secondary button ≥ 3 s).
ELWS appears. - Press the secondary button 5 times (<2 s each).
The display changes from bt, ball, Sld and ABC to brtn. - Pressing the main button repeatedly allows the selection of the desired brightness level.
- Select Rtol to utilize the fully automated brightness control
- Press the secondary button to save the setting.
SETTING THE UNIT OF MEASURE
The Leica Rangemaster can be set to metric or imperial units of measure, i.e. for distance/temperature/ atmospheric pressure either meters/Celsius/millibar or yards/Fahrenheit/InHg (Inches of Mercury). This setting also determines the details of the holdover, the ballistic curves and the zeroing distance.
- Press and hold the secondary button ≥ 3 s).
USEU appears (flashing) in the display.
- Press the main button to select your preferred unit of measure.
US = display in yards
EU = display in meters
Note
The current setting is always visible in the display: (for meters) or (for yards) appears with the digits displayed.
-
Save your setting by briefly pressing the secondary button (< 2s)
-
The saved setting is initially lit continuously as confirmation, then the display switches to the next item in the menu (ballistic curve ball) and then disappears if no further settings have been made.
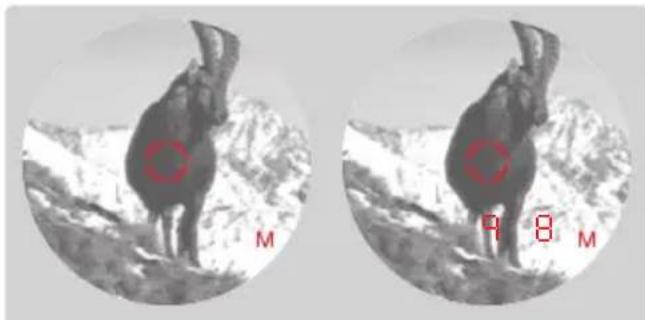
RANGEMEASUREMENT
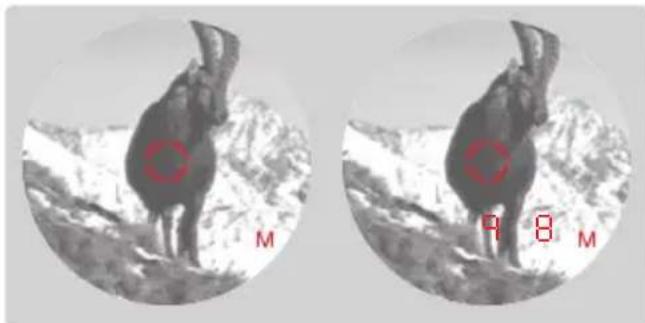
Aim directly at an object to measure its distance. Proceed as follows:
-
Press the main button
-
This switches on the device.
The reticule appears.
The reticule remains lit for another 6 s after you release the main button. The reticule remains lit continuously while the button is pressed and held.
- Aim at the object while the reticule is lit.
-
Press the main button again.
-
The reticule disappears briefly during the measurement.
The measured value is displayed.
You can do another measurement at any time by pressing the main button while the reticule remains lit.
-
-
- appears, if
-
-
the distance to the object is less than 10 yards, or
the range is exceeded or - the object is not sufficiently reflective.
The Leica Rangemaster powers down automatically after a few seconds.
SCANMODE
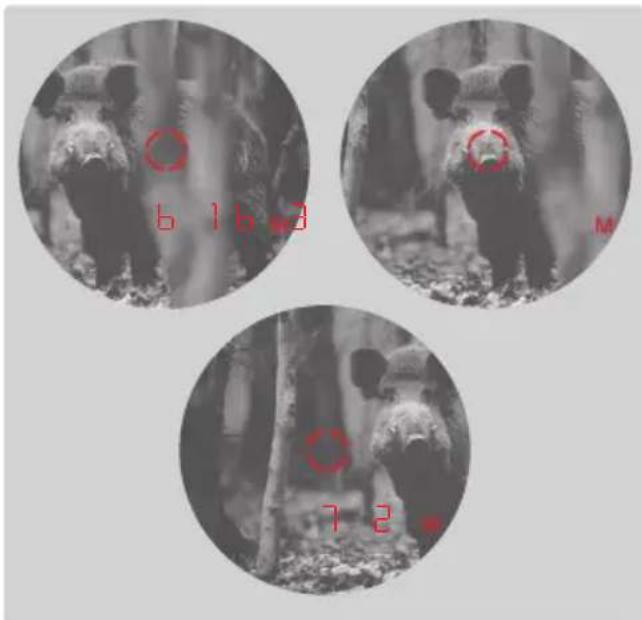
The Leica Rangemaster can also be used for
continuous measurements (scan mode):
Press and hold the main button 2 at the second press.
After around 2.5 seconds, the device switches to scan mode and then carries out continuous measurements.
Scan mode is indicated by a change in the display.
Around every 0.5 seconds, a new measured value is shown.
Scan mode is particularly useful for measuring the distance to small, moving targets.
Notes
In scan mode, the ABC compensation value (see p. 45) appears only after the last measurement.
- Power consumption is much higher in scan mode than for single measurements.
MEASURING RANGE & ACCURACY
The maximum range is achieved with highly reflective target objects and a visual range of sight of around 10 km/11,000 yards. Long ranges can be reliably measured / achieved by holding the Leica Rangemaster very steadily and/or placing it on a solid surface. The measuring range is influenced by the following factors:
| Highly reflective targets | 2500 m |
| Trees | 1500 m |
| Game | 500 m |
| Range longer shorter | ||
| Color | white black | |
| Angle to lens | perpendicular acute | |
| Object size | large small | |
| Sunlight | low (Cloudy) | high (midday sun) |
| Atmospheric conditions | clear hazy | |
The following ranges/tolerances apply for cloudy skies with good visibility:
| Range in meters | Accuracy (1σ) Normal Mode | Accuracy (1σ) Scan Mode |
| 10-200 | +/- 0.5 +/- 1.5 | |
| 200-400 | +/- 1 +/- 2 | |
| 400-800 | +/- 2 +/- 3 | |
| Above 800 | 0.5 % 0.5 % |
Note
Distances below 200m are displayed with an accuracy of one decimal place, e.g. 1645.
ATMOSPHERICCONDITIONSDISPLAY
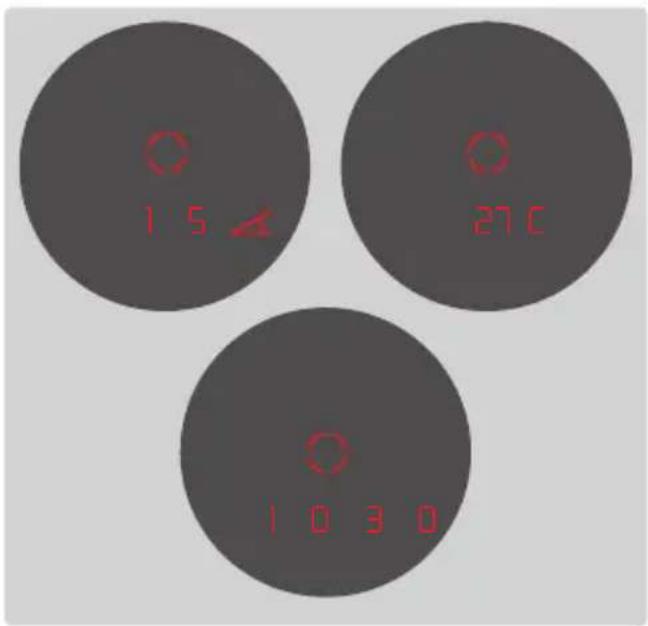
To accurately calculate the point of impact (see following section), the Leica Rangemaster also determines three crucial pieces of additional information during the range measurement:
- the inclination of the unit
-temperature
-atmospheric pressure
Current values can be displayed at any time.
Press the secondary button 1 briefy 1x.
- The reticule appears briefly (if distance measurement was not previously activated) and then the following items appear in succession for around 2 s each instead of the range:
- inclination (indicated by an additional angle symbol)
-temperature
-atmospheric pressure
Note
If the housing of the Leica Rangemaster initially has a signifi cantly diff erent temperature than the surroundings, for example when moving from inside to outside, it can take up to 30 minutes before the internal sensor can display the correct ambient temperature again.
DETERMINING THE BALLISTIC CURVE
For the precise determination of the impact point correction, the Leica Rangemaster includes the bullet trajectory on the basis of the used caliber, as well as the bullet type and weight in the calculation. This can optionally include the calculation adjustment for the equivalent horizontal distance (EHr, see p. 53) the holdover (HOLD, see p. 22) or the sight adjustment (1/1-4/1-3/10/5, see p. 54). Twelve different ballistic curves are available for adaptation to the equipment you are using. Look for the ballistic curve that is closest to the zeroing distance specified by the ammunition manufacturer as the point of impact.
Example
The rifle scope is zeroed to 100 meters, which means that Table 1 is applicable. The specified point of impact for the ammunition used is -15.0 cm at 200 m. In the relevant column, this is closest to the value 14.5 cm in row EU7 - and is therefore the correct ballistic curve.
Note
We recommend determining ballistic data in practical tests to select an appropriate curve when using the Leica Rangemaster's ballistic function at distances longer than 300m / yds and/or ammunition types that are not included in the internal device settings.
Alternatively, you can calculate a curve using the Leica ballistics calculator and then transfer the information to the device via Bluetooth®.
Alternatively, ballistic data can be transferred to your Leica Rangemaster via Bluetooth using an appropriately equipped Nielsen-Kellermann/Kestrel device (Elie models or similar, with software by Applied Ballistics),
Setting the ballistic curve
Start with step 1 if you have not previously opened the menu control, or with step 3 if you have just set the unit of measure and b_all is still flashing in the display.
- Press and hold the secondary button ( ≥ 3 ) .
EUJ5 appears.
-
Press the secondary button briefly (≥ 3s)
-
b+ is displayed.
-
Press the secondary button briefly (<2 s) 1 time.
The display switches to the ballistic curves ball.
- Press the main button
The display switches to EUI or USI
-
Select a ballistic curve by pressing the main button repeatedly.
-
EUI to EUI2 or US1 to US12, or
-CCs+ if you wish to use a curve previously stored by the app
-
Select BFF if you don't want to display an impact setting shown on the distance display (ABC, see p. 53 ff).
-
under bt, menu item Lrt if you wish to transfer data from a relevantly equipped Nielsen-Kellermann device (Kestrel Elite models) via Bluetooth® or
-
Save your setting by briefly pressing the secondary button.
-
The saved setting is initially lit continuously for 4 s as confirmation, then the display changes first to the zeroing distance setting (Sd) and then disappears.
Once a ballistic curve is set, the device will display the range value for 2 s and then the calculated correction value for 6 s after each distance measurement.
NIELSEN-KELLERMANN/KESTREL/APPLIEDBALLISTICS (LH)
The LRT setting allows you to use ballistic correction values calculated by Applied Ballistics as an alternative for Leica ballistics (ABC, see p. 53 ff). This requires a relevantly equipped Nielsen-Kellermann device (Kestrel Elite models). It can contact your Leica Rangemaster, once you have activated its Bluetooth® function (see p. 10). The Leica Rangemaster will then measure the range and the angle and sends the information to the Kestrel Elite device. That device will include the received data in its calculation of the ballistic values and will subsequently deliver the relevant correction values to your Leica Rangemaster. Make sure to configure the Kestrel Elite device before use. Please refer to the device manual for further details on its operation.
Notes
-
Leica Camera AG cannot accept liability for the accuracy of values transmitted to the Leica Rangemaster.
Please note the following: -
Powerful electric fields, e.g. emanating from radar systems, may cause errors and/or faulty values.
- The geomagnetic field can similarly cause deviations.
- Please also not the ranges applicable for the Nielsen-Kellermann/Kestrel device used, which are provided in the device manual.
Start with step 1 if you have not previously opened the menu control, or with step 3 if you have just set the ballistic curve and S_d is still flashing in the display.
- Press and hold the secondary button ≥ 3 s).
EUUS appears. - Press the secondary button briefly 3x (< 2s) The display will switch from b+ and ball to Sld.
- By pressing the main button repeatedly, select the desired zeroing distance.
-100[m],
-800 [m] or
GEE [m] or
-100 [y] or
-800 [y] or
-300 [y].
-
Save your setting by briefly pressing the secondary button.
-
The saved setting is initially lit continuously for 4 s as confirmation, then the display switches to FBC and then disappears.
BALLISTIC OUTPUT FORMATS (ABC™)
The advanced ballistic compensation (FbC) on the Leica Rangemaster allows you to display one of the following three ballistic values after the measured range if required:
- the equivalent horizontal range (EH-)
- the corresponding holdover (HOLD)
- the number of clicks required on the rapid reticle adjustment (MOA clicks)
Both the displayed holdover and EH-values factor in:
a. the measured range to the target
b. the angle of inclination of the weapon
c. the ballistic curve set,
d. the zeroing distance set
Notes
- The calculation of the stated values is based on the currently set ballistic curve, i.e. the curve must be selected first (see p. 48).
- For safety reasons, ballistic output values are only specified up to a range of 800m/yds . The actual measured range is also specified.
Important
- Please note that the influence of all ballistically relevant influencing factors is greatly increased at longer ranges and considerable variations may occur. The ballistic values displayed should therefore only be viewed as a guideline.
- Regardless of whether this information is used, you are responsible for assessing the relevant hunting situation.
BALLISTIC OUTPUT FORMATS (LR+)
The displays in Lat mode consist of the following:
| U | Up (i.e. upward correction) |
| d | down (i.e. downward correction) |
| L | left (i.e. correction to the left) |
| r | right (i.e. correction to the right) |
SETTINGS AND SELECTION OF BALLISTIC OUTPUT FORMATS
Start with step 1 if you have not previously opened the menu control, or with step 3 if you have just set the zeroing distance and ABC is still flashing in the display.
- Press and hold the secondary button (≥ 3s)
USEU appears.
- Press the secondary button briefly 4 times (< 2s)
The display switches from b+ bALL and Sld to ABC.
-
By pressing the main button repeatedly, the desired ballistic setting is selected.
-
or
HOLD or
11 (1 MOA), (display in absolute values)
HH (1/4 MOA), (display in clicks) or
-13 (1/3 MOA), (display in clicks) or
mm or
-5mm.
-
Save your setting by briefly pressing the secondary button.
-
The saved setting is initially lit continuously for 4 s as confirmation, then the display disappears.
EQUIVALENT HORIZONTAL RANGE (EH)
Shots at higher or lower elevation targets are subject to changed ballistic conditions. They require knowledge of the equivalent horizontal range, which is relevant for hunting. Knowledge of the EH is important for using e.g. ballistic reticles. EH values are indicated by the additional EH display.
Note
Horizontal EH measurements may also result in values that differ from the "straight line" measured range.
HOLDOVER (HOLD)
Holdover is defined as the point that you aim at with the weapon instead of the actual target point to compensate for the variation caused by the trajectory of the bullet (e.g. when using classic hunting reticles). By displaying the holdover, the Leica Rangemaster can provide valuable support in achieving the most accurate shots possible when hunting. In addition to the range, the calculation is based on the general conditions discussed in the previous section and the ballistic curve you have selected.
Note
The holdover/elevation is always shown with reference to the range to the target. Example: You would have to aim 30 cm higher on the object than without compensation if 300 m 30 is displayed.
IMPACT POINT CORRECTION USING ELEVATION ADJUSTMENT
(Click/MoA adjustment)
Variations in the point of impact can be compensated by adjusting the reticle on your rifle scope accordingly. Based on the bullet trajectory and the zeroing distance (see p. 51), the Leica Rangemaster can show you the required adjustment, i.e. the relevant number of clicks. For different elevations, you can specify whether the click levels will be
- based on the international standard MOA (minutes of angle) graduation, or
displayed in 5 or 10 millimeter increments.
DISPLAYING AND CHECKING THE SET BALLISTIC PARAMETERS
The following values can be displayed at any time if you want to check your settings:
Press the secondary button 1 briefly 1x.
The display shows:
Angle
temperature and
-atmospheric pressure
Press the secondary button 1 briefly 2x.
- Bluetooth® activated
-APP or EAT
-brtn
-
Bluetooth® deactivated/BALL activated
-
EU1...EUI2 or cust
-std
- compensation value
-bttn
- Bluetooth® deactivated/BRALL deactivated
-0FF
-brtn
INSTALLING FIRMWARE UPDATES
Leica is continuously working on the further development and optimization of its products. Since many of the functions of your Leica Rangemaster are controlled exclusively by software, some of these improvements and expansions of the functional scope can be installed at a later time. That is why so-called firmware updates are introduced. This device is supplied with the latest firmware ex factory. You can implement these updates yourself using the Leica Sportoptics app, which is available as a free download at the Google Play StoreTM for AndroidTM devices and the Apple App StoreTM for iOSTM devices.
Important
Do not switch off the device during the update process!
Note
The information contained in this manual references the most current firmware version at the time of market launch.
CARE/CLEANING
Your Leica Rangemaster requires no special care. Coarse dirt particles like sand can be removed with a soft brush or simply blown off. Fingerprints, etc. on lenses and eyepieces can be removed with a damp cloth, and the surfaces must then be wiped with a clean leather or lint-free cloth.
Important
- Avoid rigorous rubbing on lens surfaces even in case of stubborn dirt. Although the coating is highly abrasion-resistant, it can nevertheless be damaged by sand or salt crystals.
- The housing should be cleaned with a damp cloth only. Using a dry cloth may cause friction, which may result in a static discharge. Never use alcohol and other chemical solutions for cleaning the lenses or the housing. Each Leica Rangemaster has an individual serial number in addition to its type designation. Please take note of this number as a safety measure.
Attention
Do not attempt to open the device under any circumstances!
FAQ
| Problem Cause Remedy | ||
| The image seen viewing through the binoculars is not perfectly circular. | a) Your pupil is not in line with the exit pupil of the eyepiece. b) Eyecup setting not correct for use with/ without glasses. | a) Adjust eye-to-eyepiece alignment c) Adjust the settings: Wearers of eye glasses fold back the eyecup; the eyecup remains folded out for users without eye glasses (see p. 40). |
| Image is blurred Incorrect diopter compensation | Repeat diopter compensation procedure (see p. 40) | |
| “- - ” Is displayed during distance measurement | a) Minimum/maximum measuring range exceeded b) Target object's reflectivity is insufficient | Observe the specified measuring range limits (see p. 44) |
| The display flashes or no measurement possible | Battery is depleted Replace the battery (see p. 38) |
TECHNICAL DATA
| Device designation | LEICA RANGEMASTER CRF 2800.COM |
| Type No. | 8042 |
| Magnification | 7x |
| Lens diameter | 24 mm |
| Exit pupil | 3.4 mm |
| Twilight factor | 13 |
| Relative brightness | 11.8 |
| Field of view (at 1,000 m/yds) | 115.6 m |
| Subjective viewing angle | 6.6° |
| Eye relief | 15 mm |
| Prism system | Roof |
| Coating | |
| on lenses | High Durable Coating (HDCTM) and Aqua-Dura coating on external lenses |
| on prisms | Phase correction coating P 40 |
| Diopter compensation | ±3.5 dpt. |
| Suitable for use with eye-glasses | Yes, equipped with fold-down rubber eyecup |
| Range measurement | |
| Maximum range | approx. 2500 m |
| Equivalent horizontal distance | approx. to 1,100 m/1203 yds |
| Ballistic output values | max. approx. 800 m |
| Minimum range | approx. 10 m |
| Measuring accuracy | 10-200: +/- 0.5; 200-400: +/- 1; 400-800: +/- 2; Above 800: 0.5 % |
| Display/Unit of measure | LED with 4 numbers plus additional characters/choice of meter/centimeter or yard/inch |
| Max. measurement time | approx. 0.3 s |
| Metering methods | Single measurement, scan mode |
| Laser Laser beam divergence | Invisible, safe for eyes in compliance with EN and FDA Class 1 approx. 0.85 x 1.28 mrad |
| Housing/chassis material | Carbon fiber reinforced plastic, softcoated / cast magnesium |
| Interfaces Bluetooth® | Bluetooth® 4.1 |
| Waterproofing Housing Memory card slot | For 30 min: waterproof to 1 m/3 ft depth Splash water protected |
| Operating temperature range | -20 to 55°C |
| Storage temperature | -40 to 85°C |
| Battery | Cylindrical 3V lithium cell, type CR2 |
| Battery life | approx. 1,700 measurements at 20°C |
| Dimensions (W x H x D) | approx. 75 x 34 x 113 mm |
| Weight (with battery) | approx. 185 g / 6.5 oz |
Subject to changes in design, production, and scope of delivery.
LEICA CUSTOMER CARE
Please contact Leica Camera AG Customer Care for the maintenance of your Leica equipment and for help and advice regarding Leica products and how to order them. You can also contact Customer Care or the repair service of your regional Leica subsidiary directly for repairs or warranty claims.
Leica Camera AG
Leica Customer Care
Am Leitz-Park 5
35578 Wetzlar
Germany
Phone: +49 (0)6441 2080-189
Fax: +49 (0)6441 2080-339
Email: customer.care@leica-camera.com
www.leica-camera.com
Remarks about the appendix
-
Tables 1, 2 and 3 show the ranges in meters and the bullet drop values in centimeters, while tables 4 and 5 and 6 use yards and inches.
-
All values are applicable for:
-
a barometric pressure of 1013 mbar
- a temperature of 20^ / 68^
- horizontal shots
CANADA UNIQUEMENT
CAN ICES-3 (B)/NMB-3(B)
REEMPLACEMENT DES ACCESSOIRES
CLASS 1 ASER PRODUCT
EU 1... EU12 of cust
-sid
- Correctiewaarde
-btm
TEXHnueCKNE DAHHbIE (A3EP)
CoOTBETCTByUOaHaNCTPOKa 6yJeT BCERda OTo6paKataBcRa HaIncPiEe: PAnOM C uHpamn 6yDyT OTo6paXaTbCra (MeTpbl) nnY (rPdb).
-
CoxpaHnte HacTpoKy KOpOTKm (< 2 c) HaxKaTneM BCnOMOraTeJIbHOJ KlaBnIu.
-
Chauana coxpanenHna HactpoKa C celbIO nOITBepKdEHHa CBETNCa NOCToHNO, 3aTeM INnKaunpePexoNT B CneIyUoNINpyHKT MeHIO (6aJIInCTnuecka KpNBaB bALL I rachET, ecn dpyrHe HactpoKn He BblONHJANCb.
H3MEPEHENEPACCTOHHN
IINH3MepeHHpaCCTOHHNdoOBekTa daJIbHOMep DOJXeH 6bTb TOHHO HabeHeH Ha Hero. BbINOHnTe CNeNyUOUIne DeiCTBn:
- Haxmnte rnaBHyIO KnaBnWy
IЯ pacctoHm MeHee 200 MeTpoB pe3yNbTaTbI
H3MpeHn OTo6paXaOTcC ToUHOCTbIO Do OJHO
decaTuHOrO pa3Pra, HapnMpE, b45.
HДнКALИАТМОСФЕPHыX YСЛOBИ

Дя.Tochoro pauchetaTockn nonaHaNna (cM. cnedyuon pa3den) npn n3mepenHn pacctoHn Laica Rangemaster dononHntbHo onpeJeT prn Baxhix dononHntbHbIX napametpa:
OFF,ecnBbIXOTHe OTo6paKaTaPacCToHne 6e3 KoppeKun ToKN IOnaHaHna (RbC,cm. ctp.233 ff).
BbI NyHKT MeHIO LHT,ecN BbIXOTITE npePaTb daHHbIE C NOMOUI COOTBECTBYUIM o6pa30M OCHaueHHoro yctpoiCTBa Nielsen-Kellermann (Kestrel anTHbIe moEJI) uepe3 coeINHeHne Bluetooth® ,nn
-
CoxpaHnte HactpoNky KopoTknM HaKaTneM BCnOMOraTeNbHO KnabuHn.
-
Chayana coxpanenHna Hactpoika c ceIbnoTBePckJeHn CBeITc4 cekyHdbI, 3aTeMHnKaun NepexoHT K HactpoKe paCtOHHnIaTOHOro IOnaHaHn (Sd) n noCne 3TOrO rachET.
EcIn 6aillnctuueckKa KpBaHa HAcTpoeHa, nocLe KaJdOrO u3MepeHn PaCCToHn CHaJaA B TeueHne 2 cekyH oTo6paXaetc 3HaueHne paCCToHn, a nocIe 3TOrO B TeueHne 6 cekyHd - BbUncJIeHHbIe 3HaueHn KoppeKznn.
NIELSEN-KELLERMANN/KESTREL/APPLIEDBALLISTICS (LH)
C nMOuHACTPOKn LHT, B KaueCTBe aJIbTePHaTHBbI
6aJIInCTNuueCKn DaHHbIM Leica (ABC, cm. cTp. 233 ff),
Bbl MoKeTe NcNoJIb3OBAbTB 6aJIInCTNuueCKne 3HaueHnra
KorpeKunn KomnaHn Applied Ballistics. DnA 3ToR
Heo6xOJIMO mHeIOUe COOTBeTCTByIOUe OCHaUeHnE
yCTPOINTO pOns3BOvOCTBa Nielsen-Kellermann (MoJIY
Kestrel Elite). 3To yCTPOINCTBO MOKeT yCTAHOBNTB
coeINHeHn C BaUM dALbHomepOM Leica
Rangemaster nocLe akTbAUzHN FyHKUNn Bluteoth
(cm. cTp. 10). PocLe 3tOrO Leica Rangemaster
NImepReT kAK IInCTaHUN, TAK N yrOI n nepeJaET
DaHHbIe Ha yCTPOINCTBO Kestrel Elite. 3aTeM 3To
yCTPOINCTBO npI paCuTe 6aJIInCTNuueCKnx 3HaueHn
PnHHMaET BO BHIMAHNE NOJUeHHbIe DAHHbIe, N nocLe
3tOrO nepeJaET COOTBEiCTByIOUne 3HaueHnRA
KorpeKUnn Ha BAu LEica Rangemaster.
PiPeD BBInONHeHEm TAKNX OEPaUH CNaH
Heo6xOJIMO npABINbHO HAcTPOITb yCTPOINCTBO Kestrel Elite. DOnoJIInTeJIbHaN INΦOpMaUH o6 NcNoJIb3OBAHNN
3tOrO yCTPOINCTBa COePKITCB B ERO INHCTpyKUnn no
3KnPIyatauHn.
Yka3aHn
KOMnAHHa Leica Camera AG He MoKeT HecTu KaKoH-1n60 OTBeTCTBeHHOCTu 3a npaBnIbHOCTb DaHHbIX, NpeJaBaEmbIX TaKM O6pa3OM Ha daNbHomep Leica Rangemaster.
Heo6xmo yuHtBaTa CneDyioee: -CnIbHbIe 3JIeKTpOMaHTHbIe NOIa, HApPIMep, paapHy x yCTaHOBOK, MOrTy CTaTb npUHHoN NOMex I/INn NOnyueHn He npaBnIbHbIX 3HaueHn. -OTKNoHEHn TaKke MOrTy BO3HKnHYb BCNeDCTBHe BO3JeCTBnREOMaHTHOrO NOIa.
Takke cnejdyet yuHTbBaTb 3HaueHnMaKcImaJIbHOJ daJIbHOCTn H3MepeHn IcNoJIb3yEmOro YcTPOIcTBa Nielsen-Kellermann/Kestrel. TaKe daHHbIe yKa3aHbB INHCtpyKUnn 3TOrO yCTPOINCTBa.
HACTPOIKA PACCTOAHNIA TOHORIOIOPADAHNIA (Sd)
Haunite c 1, ecn MeHIO eue He 6bIIO Bb3BaHO paHee, nC 3, ecn BToBko yTO onpeDennn 6aJIInCTnueckyIO KpNByIO, INHdkaUra Sid BCE eue Muraet.
- Haxmte BCnOMoTaIbHyIO KnaBnUy I nTeHoe Bpem (≥3cekyHd).
-ПовьяетсЕUUS.
2.БьICTpo HaxMMTe BCNOMORAteIbHyIO KlaBnUy 3 pa3a (< 2ceKyuH).
HnDnKaunb,bALL3aMeHReTcHaSld.
- MHorokpaTHbIM HaxaTneM rnaBHOJ KnaBnBn BbI6epHte Heo6xOuHmoe pacCToHHe dIy ToHOro nopaHnA.
-100 [m],
-200 [m], nnn
-6EE [m], nnn
-100 [y], nnn
-200 [y], nnn
-300 [y].
- CoxpaHnte HacTPOkny KOpOTKm HaxaTneM BCnOMOrTaTeNbHO KnabuNt.
CoxpaHeHHaHaCTpoKa CcIeIbIO nOITBepKJeHnraCBETTc4CEkyHdbI,3aTeM INnKaunpepeXoNT K ABc HnocLe 3TOrO rachet.
BAJIINCTNUECKNE OFOPMATbIBBIBODIMbIX DAHHbIX (LHT)
Bpekime Lat npoan3boaNTcraJeNyUOuaHnDnKaUa:
(1/4 MOA), (which is also the square) 10
113(1/3MOA),(轉默以理)
mm, 1
-5mm.
C5F: 7.1.4.5.6.7.8.9.10.11.12.13.14.15.16.17.18.19.20.21.22.23.24.25.26.27.28.29.30.31.32.33.34.35.36.37.38.39.40.41.42.43.44.45.46.47.48.49.50.51.52.53.54.55.56.57.58.59.60.61.62.63.64.65.66.67.68.69.70.71.72.73.74.75.76.77.78.79.80.81.82.83.84.85.86.87.88.89.90.91.92.93.94.95.96.97.98.99.00

- FCC CAUTION:
- Declaration of Conformity
- Type No.: 8042
- Contains FCC ID: T7V1740
- FOREWORD
- SCOPE OF DELIVERY
- SPARE PARTS
- DISPOSAL OF ELECTRICAL AND ELECTRONIC EQUIPMENT
- SAFETY PRECAUTIONS
- RECHARGEABLE BATTERY
- LASER
- WARNING:
- ATTENTION:
- FOR SINGAPORE ONLY:
- FOR CANADA ONLY: CAN ICES-3 (B)/NMB-3(B)
- TABLE OF CONTENTS
- PART DESIGNATIONS
- ATTACHING THE CARRY STRAP
- CHANGING THE BATTERY
- Notes
- BATTERY CHARGE LEVEL
- USE WITH AND WITHOUT EYE GLASSES
- DIOPTERCOMPENSATION
- BASIC INFORMATION ON MENU CONTROL
- CONTROL/OPERATION VIA THE LEICA SPORTOPTICS APP
- SETTING THE DISPLAY BRIGHTNESS (brtn)
- SETTING THE UNIT OF MEASURE
- Note
- RANGEMEASUREMENT
- SCANMODE
- MEASURING RANGE & ACCURACY
- ATMOSPHERICCONDITIONSDISPLAY
- DETERMINING THE BALLISTIC CURVE
- Example
- Setting the ballistic curve
- NIELSEN-KELLERMANN/KESTREL/APPLIEDBALLISTICS (LH)
- BALLISTIC OUTPUT FORMATS (ABC™)
- Important
- BALLISTIC OUTPUT FORMATS (LR+)
- SETTINGS AND SELECTION OF BALLISTIC OUTPUT FORMATS
- EQUIVALENT HORIZONTAL RANGE (EH)
- HOLDOVER (HOLD)
- IMPACT POINT CORRECTION USING ELEVATION ADJUSTMENT
- DISPLAYING AND CHECKING THE SET BALLISTIC PARAMETERS
- INSTALLING FIRMWARE UPDATES
- CARE/CLEANING
- Attention
- LEICA CUSTOMER CARE
- Leica Camera AG
- Remarks about the appendix
- CANADA UNIQUEMENT
- CAN ICES-3 (B)/NMB-3(B)
- REEMPLACEMENT DES ACCESSOIRES
- CLASS 1 ASER PRODUCT
- H3MEPEHENEPACCTOHHN
- HДнКALИАТМОСФЕPHыX YСЛOBИ
- Yka3aHn
- HACTPOIKA PACCTOAHNIA TOHORIOIOPADAHNIA (Sd)
- BAJIINCTNUECKNE OFOPMATbIBBIBODIMbIX DAHHbIX (LHT)
Brand : LEICA
Model : Rangemaster CRF 2800.COM
Category : Rangefinder