
AF 5079PS - Digital photo frame SAGEM - Free user manual and instructions
Find the device manual for free AF 5079PS SAGEM in PDF.
| Product type | Digital photo frame |
| Brand | Sagem |
| Model | AF 5079PS |
| Dimensions (W x H x D) | 195 x 135 x 75 mm |
| Weight | 0.34 kg |
| Screen size | 7 inches (16.2 cm) |
| Aspect ratio | 16:10 |
| Screen resolution | 720 x 480 pixels |
| Supported photo formats | JPEG (.jpg) |
| Compatible memory cards | SD, SDHC, MMC, MS |
| USB port | USB Host (USB flash drive) |
| Internal memory | Up to 5 photos (internal copy) |
| Power supply | Power adapter 100-240 V ~ 50/60 Hz, output 5V / 1A |
| Power consumption (slideshow) | 3.3 W |
| Remote control | Yes, with CR2025 battery included |
| Operating temperature | 5 °C to 45 °C |
| Relative humidity | 20% to 80% |
| Main functions | Slideshow, zoom, rotation, copy, delete, screen settings (brightness, contrast, color) |
| Cleaning | Soft, dry cloth; do not use liquid or abrasive cleaners |
| Warranty | Refer to the warranty card provided |
| Included accessories | Frame, stand, remote control, power adapter, quick start guide, warranty card |
Frequently Asked Questions - AF 5079PS SAGEM
User questions about AF 5079PS SAGEM
0 question about this device. Answer the ones you know or ask your own.
Ask a new question about this device
Download the instructions for your Digital photo frame in PDF format for free! Find your manual AF 5079PS - SAGEM and take your electronic device back in hand. On this page are published all the documents necessary for the use of your device. AF 5079PS by SAGEM.
USER MANUAL AF 5079PS SAGEM
natural_image
Black tablet displaying a photo of four people running on a beach at sunset, with no visible text or symbols.
natural_image
A man and a young boy smiling on a beach, looking at the camera frame (no text or symbols visible)
flowchart
graph TD
    A["4a"] --> B["1"]
    B --> C["OK"]
    C --> D["2"]
    D --> E["OK"]
    E --> F["3"]
    F --> G["OK"]
DE
Copyright © 2011 Sagemcom
FR
Copyright © 2011 Sagemcom

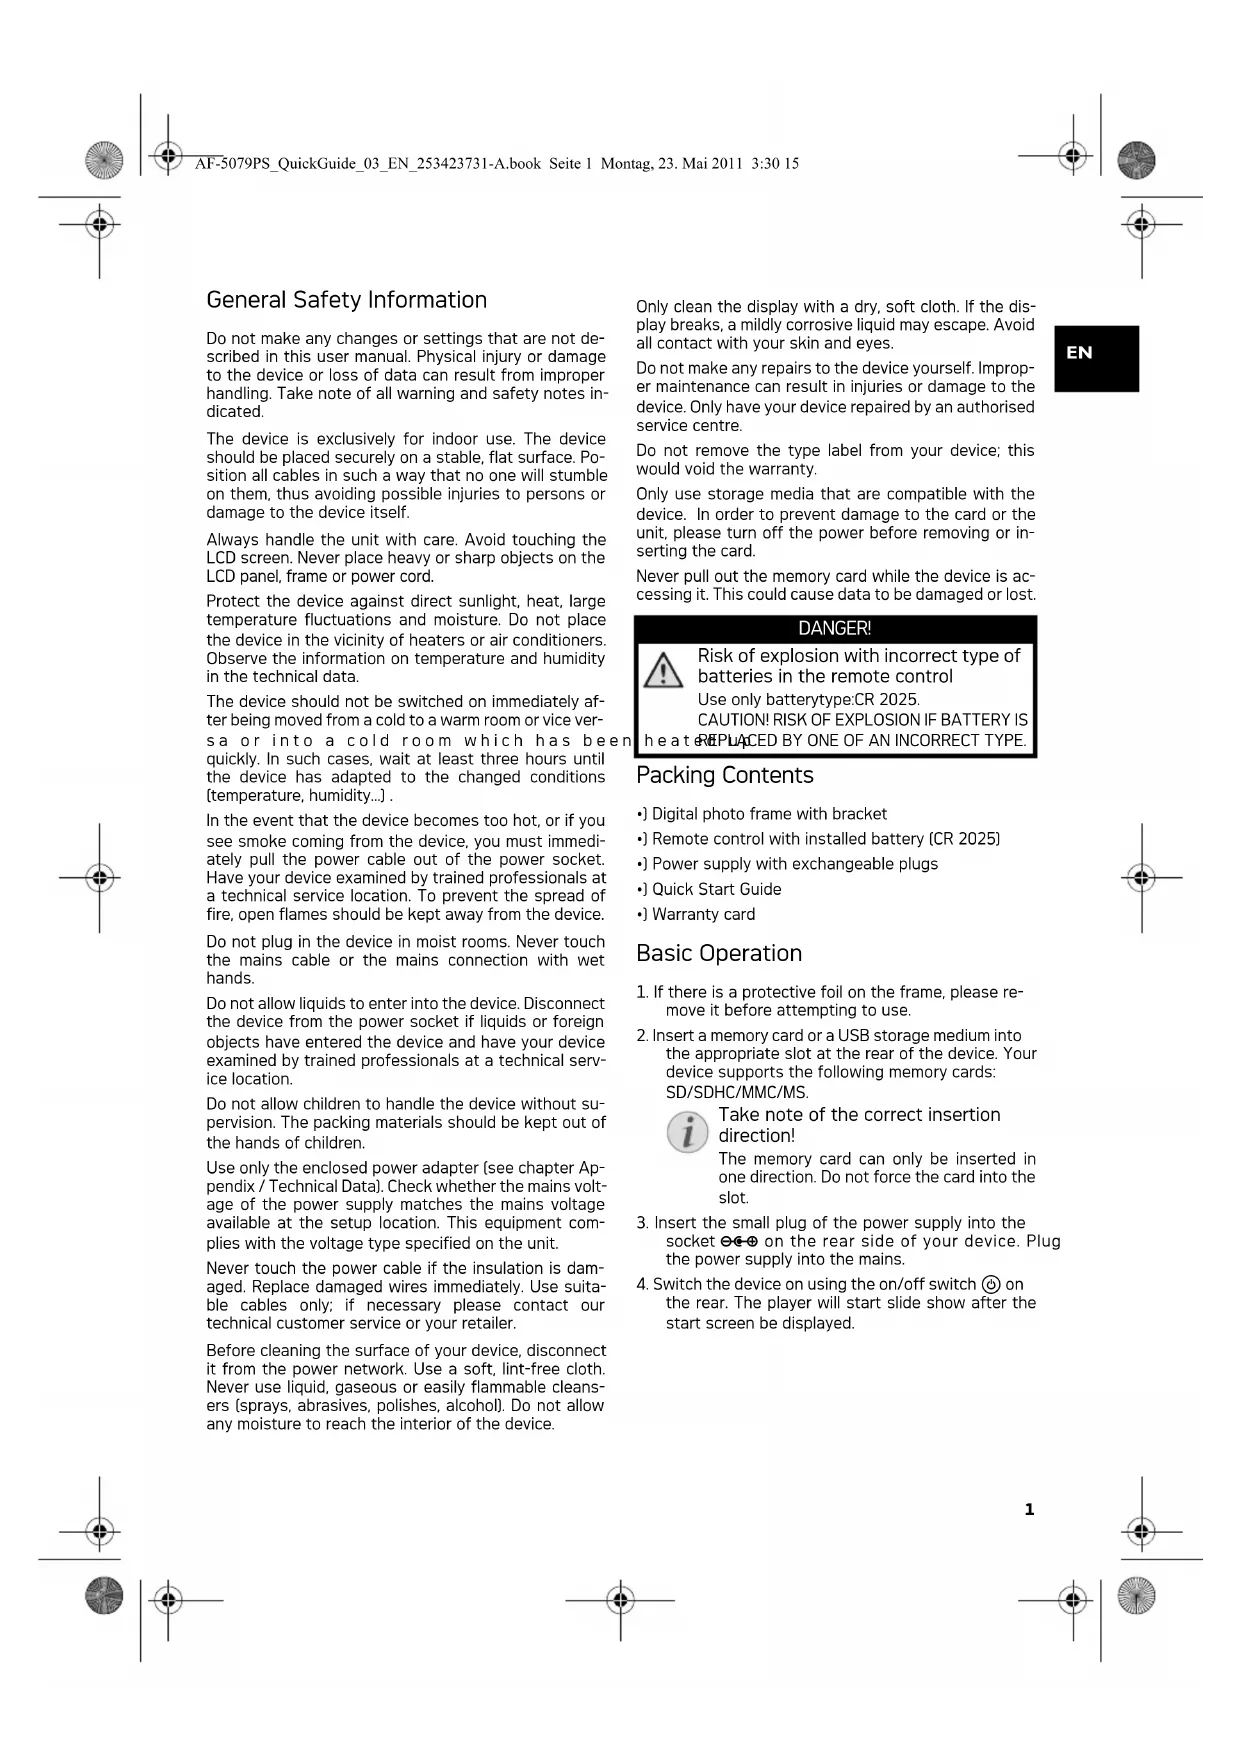
General Safety Information
Do not make any changes or settings that are not described in this user manual. Physical injury or damage to the device or loss of data can result from improper handling. Take note of all warning and safety notes indicated.
The device is exclusively for indoor use. The device should be placed securely on a stable, flat surface. Position all cables in such a way that no one will stumble on them, thus avoiding possible injuries to persons or damage to the device itself.
Always handle the unit with care. Avoid touching the LCD screen. Never place heavy or sharp objects on the LCD panel, frame or power cord.
Protect the device against direct sunlight, heat, large temperature fluctuations and moisture. Do not place the device in the vicinity of heaters or air conditioners. Observe the information on temperature and humidity in the technical data.
The device should not be switched on immediately after being moved from a cold to a warm room or vice versa or into a cold room which has been quickly. In such cases, wait at least three hours until the device has adapted to the changed conditions [temperature, humidity...].
In the event that the device becomes too hot, or if you see smoke coming from the device, you must immediately pull the power cable out of the power socket. Have your device examined by trained professionals at a technical service location. To prevent the spread of fire, open flames should be kept away from the device.
Do not plug in the device in moist rooms. Never touch the mains cable or the mains connection with wet hands.
Do not allow liquids to enter into the device. Disconnect the device from the power socket if liquids or foreign objects have entered the device and have your device examined by trained professionals at a technical service location.
Do not allow children to handle the device without supervision. The packing materials should be kept out of the hands of children.
Use only the enclosed power adapter (see chapter Appendix / Technical Data). Check whether the mains voltage of the power supply matches the mains voltage available at the setup location. This equipment complies with the voltage type specified on the unit.
Never touch the power cable if the insulation is damaged. Replace damaged wires immediately. Use suitable cables only; if necessary please contact our technical customer service or your retailer.
Before cleaning the surface of your device, disconnect it from the power network. Use a soft, lint-free cloth. Never use liquid, gaseous or easily flammable cleansers (sprays, abrasives, polishes, alcohol). Do not allow any moisture to reach the interior of the device.
Only clean the display with a dry, soft cloth. If the display breaks, a mildly corrosive liquid may escape. Avoid all contact with your skin and eyes.
Do not make any repairs to the device yourself. Improper maintenance can result in injuries or damage to the device. Only have your device repaired by an authorised service centre.
Do not remove the type label from your device; this would void the warranty.
Only use storage media that are compatible with the device. In order to prevent damage to the card or the unit, please turn off the power before removing or inserting the card.
Never pull out the memory card while the device is accessing it. This could cause data to be damaged or lost.
DANGER!

Risk of explosion with incorrect type of batteries in the remote control Use only batterytype:CR 2025. CAUTION! RISK OF EXPLOSION IF BATTERY IS
heate REPLACED BY ONE OF AN INCORRECT TYPE
Packing Contents
• Digital photo frame with bracket
•] Remote control with installed battery (CR 2025)
• Power supply with exchangeable plugs
•] Quick Start Guide
•] Warranty card
Basic Operation
- If there is a protective foil on the frame, please remove it before attempting to use.
- Insert a memory card or a USB storage medium into the appropriate slot at the rear of the device. Your device supports the following memory cards: SD/SDHC/MMC/MS.

Take note of the correct insertion direction!
The memory card can only be inserted in one direction. Do not force the card into the slot.
-
Insert the small plug of the power supply into the socket ⊖⊕ on the rear side of your device. Plug the power supply into the mains.
-
Switch the device on using the on/off switch ⏻ on the rear. The player will start slide show after the start screen be displayed.


Buttons and Sockets on the Reverse Side of the Device (fig. 1)
SD/SDHC/MS/MMC—Slot for Memory card
Socket—USB port for a storage medium
- Power supply connection
Switches the device on/off If the device is switched off with this button, it can not be switched on using the remote control.
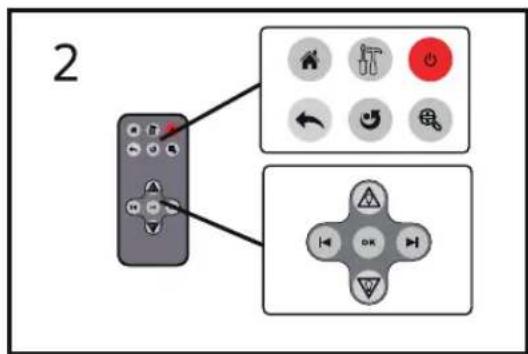
Buttons on the Remote Control (fig. 2)
- Calling the menu functions
①—Modifying the Basic Settings
◎—Switching On and Off (Standby mode) Device must be switched on using the button ⏻ on the rear side.
One menu step back / cancelling a function
◎—Pause the slide show and rotate the current image by 90°
①—Pause the slide show and magnify the current image
☑/☑—Navigating in the Menu / Skips to the previous or next image
☑/☑—Navigating in the Menu, changing the backlight
OK—Confirms the selection / Starting, interrupting the slide show
Battery: A battery (CR 2025) is already loaded into the remote control at the factory. Remove the plastic stripe from the underside of the remote control to activate it.
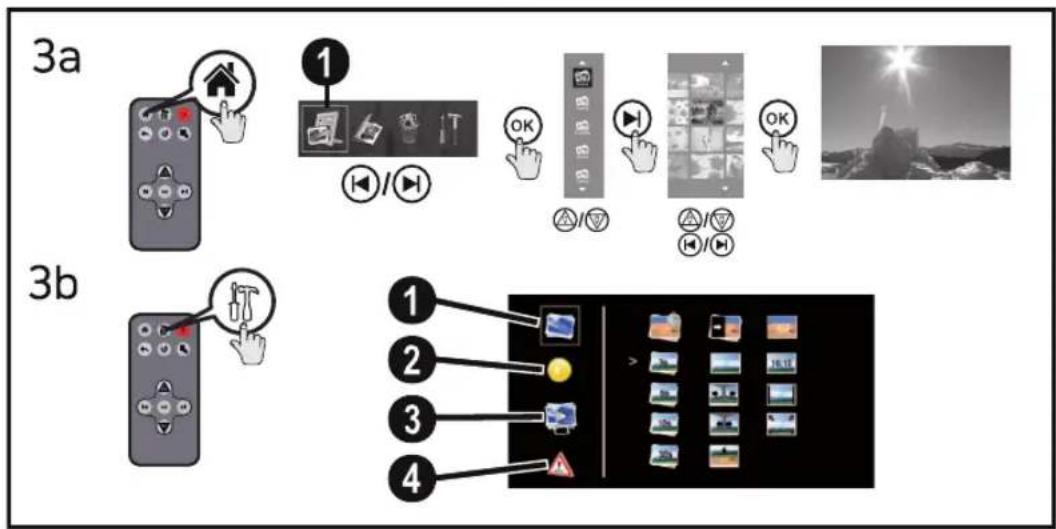
Menu Overview (Playback) (fig. 3a)
Using ⓤ you can switch between main menu and slide show.
Menu Overview (Settings) [fig. 3b]
- Press Ⓜ on the remote control.
- Use Ⓐ/▽ to select from the following settings:
① [ ] Photo Settings [slide show speed, transition effects, aspect ratio]
② [1] Display Settings (brightness, contrast, color saturation, backlight)
③ [ ]Playback Mode of the slide show (Slideshow by sorted, slideshow by random)
④ [1] Factory default (Restore the settings to the factory default)
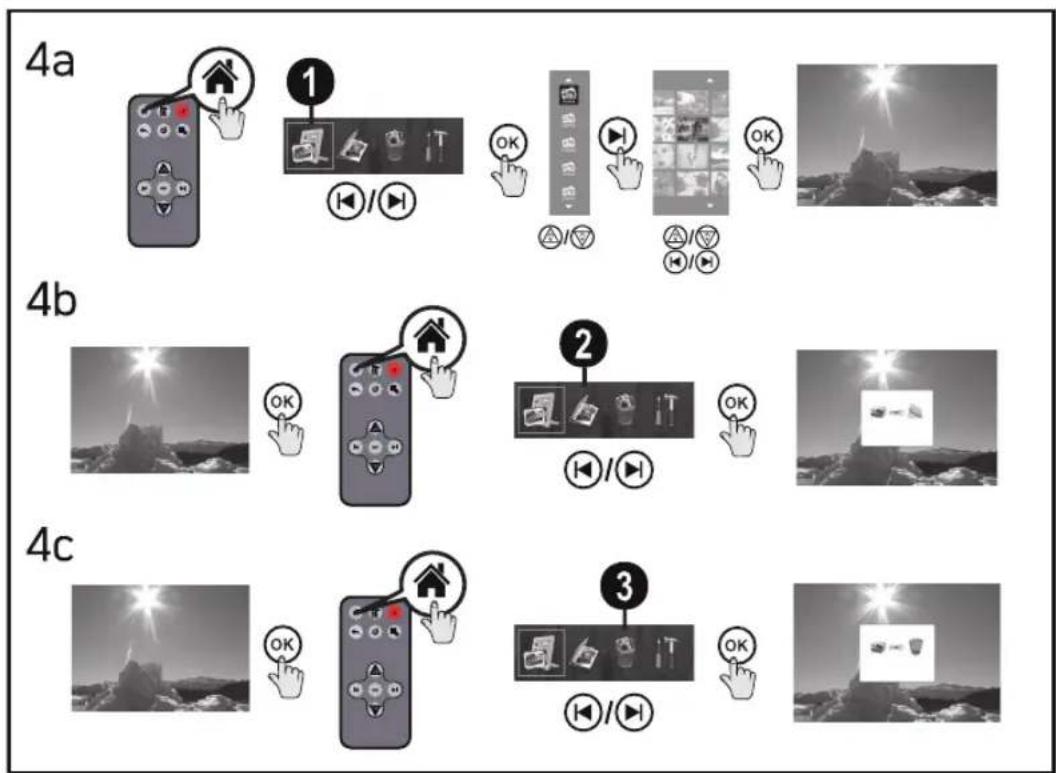
Photo Playback (fig. 4a)
- Press ⬇ on the remote control.
- Using ⏻/▶ select the symbol for the preview mode [1] and confirm with OK.
- Using Ⓐ/▽ select a folder or source, and confirm with ▶.
- Use Ⓗ/▽ or ◀/▶ to select the image from which to start the slide show an confirm using ⏻.
- Press ⏻/▶ to skip to the previous or next image.
- Use Ⓐ/▽ to select the brightness of the backlight.
- Press Ⓞ to stop the slide show and to continue.
Copy or Delete Photos (fig. 4b/4c)
- Press Ⓞ to pause the slide show.
- Using ⏻/▶ select the photo you want to copy or delete.
- Press ⏰ on the remote control.
- Using ⏻/▶ select:
[2]—Copy the displayed photo to the internal memory
(3)—Delete the displayed photo from the internal memory
- Confirm with OK.
Zoom in / Zoom out
- Press 🔒 on the remote control to magnify the current image.
- Using the buttons ⏻/▶ and △/▽ to move around the magnified image.
- Press ⬇ several times, to reduce the current image.
- Press OK to continue the slide show.
Rotate the Image
- Press ⚙ on the remote control, to rotate the current image anticlockwise by 90°. This information is store in the image.
- Using ⬇ you can cancel the function.
- Press OK to continue the slide show.

Menu Overview (Settings) [fig. 3b]
![SAGEM AF 5079PS - Menu Overview (Settings) [fig. 3b] - 1](/content/2026/03/536791/images/3753e3571c471b08842474d0a01e3c0c72e2ed472a74d109abb38075871b1dba.jpg)
![SAGEM AF 5079PS - Menu Overview (Settings) [fig. 3b] - 2](/content/2026/03/536791/images/d8f879cc1586764266cac193791e0731c40e836eeef79a48e6d8375b19f05903.jpg)
![SAGEM AF 5079PS - Menu Overview (Settings) [fig. 3b] - 3](/content/2026/03/536791/images/bff0423ea3e44333d433456d95b4e1e7f1b5ef3f5344291f68e701059b691d1c.jpg)
Technical Data
Dimensions (L × H × W) 195 × 135 × 75 mm
Weight 0,34 kg
Recommended Ambient 5-45°C
Relative Humidity 20–80%
Power Consumption
Device is switched on [slide show] 3,3W
Screen size 7" / 16.2 cm
Aspect ratio 16:10
Resolution 720×480 pixel
Internal memory
up to 5 photos (with internal copy function)
USB Port USB-Host
max. current load < 250mA
Compatible Memory Cards SD/SDHC/MMC/MS
Photo formats JPEG
File format *.jpg
Power supply
Manufacturer
Shenzhen HONOR Electronic Co., Ltd.
| Model No. | ADS-5N-06 05005G-A0 |
| Input | 100 - 240V ~ / 50/60Hz |
Output 5V==/1A
All data are provided for reference purposes only. AgfaPhoto reserves the right to make any changes without prior notice.
AgfaPhoto is used under license of Agfa-Gevaert NV & Co. KG or Agfa-Gevaert NV. Neither Agfa-Gevaert NV & Co KG nor Agfa-Gevaert NV manufacture this product or provide any product warranty or support.
For service, support and warranty information, contact the distributor or manufacturer.
Contact:AgfaPhoto Holding GmbH, www.agfaphoto.com
Manufacturer: Sagemcom, www.sagemcom.com
CE
The CE marking certifies that the product meets the main requirements of the European Parliament and Council directive 1999/5/CE on telecommunications terminal equipment, regarding safety and health of users and regarding electromagnetic interference.
The declaration of compliance can be consulted on the site www.agfaphoto.com


Packaging: To facilitate packaging recycling, please conform to your local selective recycling rules.
Batteries: Old batteries have to be deposited in designated collection areas.
Product: The crossed out dustbin logo on your product signifies it is classified as Electrical and Electronic Equipment covered by special disposal regulations.
To enforce recycling, recovery of The Waste Electrical and Electronic Equipment (WEEE) and to protect the environment and human health, European regulations requires that you selectively collect waste equipment using one of the following options:
- Your retailer will take your equipment back if you are buying a replacement product.
Waste equipment can also be deposited in designated collection areas.
The paper and cardboard packaging used can be disposed of as recyclable paper. Have the plastic wrapping and Styrofoam packaging recycled or dispose of it in the non-recyclable waste, depending on the requirements in your country.
All rights reserved. No part of this publication may be reproduced, stored in a retrieval system or transmitted in any form or by any means, electronic, mechanical, photocopying, recording, or otherwise, without the prior written permission of AgfaPhoto. The information contained herein is designed only for use with this product. AgfaPhoto is not responsible, if this information is applied to other devices.
This user manual is a document that does not represent a contract.
Errors, printing errors and changes are reserved.
Copyright © 2011 Sagemcom
EN


IT
Copyright © 2011 Sagemcom


Apparaat is ingeschakeld (diashow) 3,3W
Fotodiagonaal 7" / 16,2 cm
Copyright © 2011 Sagemcom


ES
Copyright © 2011 Sagemcom

Copyright © 2011 Sagemcom


Copyright © 2011 Sagemcom


Copyright © 2011 Sagemcom

Copyright © 2011 Sagemcom


Copyright © 2011 Sagemcom


Copyright © 2011 Sagemcom


Copyright © 2011 Sagemcom


Copyright © 2011 Sagemcom
TR


Copyright © 2011 Sagemcom
GR


Copyright © 2011 Sagemcom
RU
AgfaPhoto is used under license of Agfa-Gevaert NV & Co. KG or Agfa-Gevaert NV. Neither Agfa-Gevaert NV & Co. KG nor Agfa-Gevaert NV manufacture this product or provide any product warranty or support. For service, support and warranty information, contact the distributor or manufacturer.
AF5079PS
Booklet
253423731-A

- FR
- General Safety Information
- DANGER!
- Packing Contents
- Basic Operation
- Buttons and Sockets on the Reverse Side of the Device (fig. 1)
- Buttons on the Remote Control (fig. 2)
- Menu Overview (Playback) (fig. 3a)
- Menu Overview (Settings) [fig. 3b]
- Photo Playback (fig. 4a)
- Copy or Delete Photos (fig. 4b/4c)
- Zoom in / Zoom out
- Rotate the Image
- Technical Data
- Power supply
- IT
- ES
- RU
Brand : SAGEM
Model : AF 5079PS
Category : Digital photo frame