
GDS 5460 B - Basket GRUNDIG - Free user manual and instructions
Find the device manual for free GDS 5460 B GRUNDIG in PDF.
| Product Type | Range hood |
| Brand | Grundig |
| Model | GDS 5460 B |
| Electrical supply | 220-240 V ~ 50 Hz |
| Number of speeds | 3 (levels 1, 2, 3) |
| Lighting type | LED |
| Lighting power | 3 x 3 W (9 W total) |
| Grease filter type | Washable aluminum filter |
| Charcoal filter type | Activated charcoal filter (optional) |
| Backdraft prevention system | Yes (N-RV) |
| Automatic shut-off | Yes, 15 minutes |
| Minimum installation distance | 65 cm between hood and cooking surface |
| Duct diameter | 120 or 150 mm |
| Material | Stainless steel and glass |
| Control | Digital electronic push-button |
| Use | With or without duct (recirculation) |
| Cleaning frequency of aluminum filter | Every month (or 60 operating hours) |
| Charcoal filter replacement | Every 3 to 6 months depending on use |
| Number of bulbs | 3 |
| Bulb type | LED 3 W |
Frequently Asked Questions - GDS 5460 B GRUNDIG
User questions about GDS 5460 B GRUNDIG
0 question about this device. Answer the ones you know or ask your own.
Ask a new question about this device
Download the instructions for your Basket in PDF format for free! Find your manual GDS 5460 B - GRUNDIG and take your electronic device back in hand. On this page are published all the documents necessary for the use of your device. GDS 5460 B by GRUNDIG.
USER MANUAL GDS 5460 B GRUNDIG
1 Important Safety and Environmental Instructions
1.1 General Safety
Important Safety Instructions Read Carefully And Keep For Future Reference This section contains safety instructions that will help protect from risk of fire, electric shock, exposure to leak microwave energy, personal injury or property damage. Failure to follow these instructions shall void any warranty.
- Grundig products comply with the applicable safety standards; therefore, in case of any damage on the appliance or power cable, it should be repaired or replaced by the dealer, service center or a specialist and authorized service alike to avoid any danger. Faulty or unqualified repair work may be dangerous and cause risk to the user.
- This appliance is intended to be used in household and similar applications such as:
- Staff kitchen areas in shops, offices and other working environments;
- Farm houses
- By clients in hotels, and other residential type environments;
-
Bed and Breakfast type environments.
-
Operate the appliance for its intended purpose only as described in this manual.
- The manufacturer cannot be held liable for damages resulting from improper installation or misuse of the product.
- This appliance can be used by children aged from 8 years and above and persons with reduced physical, sensory or mental capabilities or lack of experience and knowledge if they have been given supervision or instruction concerning use of the appliance in a safe way and understand the hazards involved.
- Children shall not be allowed play with the appliance. Cleaning and user maintenance shall not be made by children without supervision.
- The minimum distance between the supporting surface for the cooking vessels on the hob and the lowest part of your product must be at least 65~cm .
- If the instructions for installation for the gas hob specify a greater distance, this has to be taken into account.
Make sure that your mains power supply complies with the
1 Important Safety and Environmental Instructions
information supplied on the rating plate of the appliance.
- Never use the appliance if the power cable or the appliance itself is damaged.
- Prevent damage to the power cable by not squeezing, bending, or rubbing it on sharp edges. Keep the power cable away from hot surfaces and naked flame.
- Use the appliance with a grounded outlet only.
WARNING: Do not connect the appliance to the mains until the installation is fully complete.
- Place the appliance in a way so that the plug is always accessible.
- Do not touch the lamps if they have operated for a long time. They can burn your hands since they will be hot.
- Follow the regulations set out by competent authorities on discharge of the exhaust air (this warning is not applicable for use without flue).
-
Operate your appliance after putting a pot, pan etc. on the hob. Otherwise, highheat may cause deformation in some parts of your product.
-
Turn off the hob before taking the pot, pan etc. from it.
- Do not leave hot oil on the hob. Pans with hot oil may cause self combustion.
- Pay attention to your curtains and covers since oil may catch fire while cooking food such as fries.
- Grease filter must be replaced at least monthly. Carbon filter must be replaced at least every 3 months.
- Product shall be cleaned accordance with user manual. If cleaning was not carried out in accordance with user manual, there may be fire risk.
- Do not use non-fire-resistant filtering materials instead of the current filter.
- Only use the original parts or parts recommended by the manufacturer.
- Do not operate the product without the filter and do not remove the filters while the product is running.
- In the event of be started any flame, de-energize your product and cooking appliances.
In the event of be started any
1 Important Safety and Environmental Instructions
flame, cover the flame and never use water to extinguish.
- Unplug the appliance before each cleaning and when the appliance is not in use.
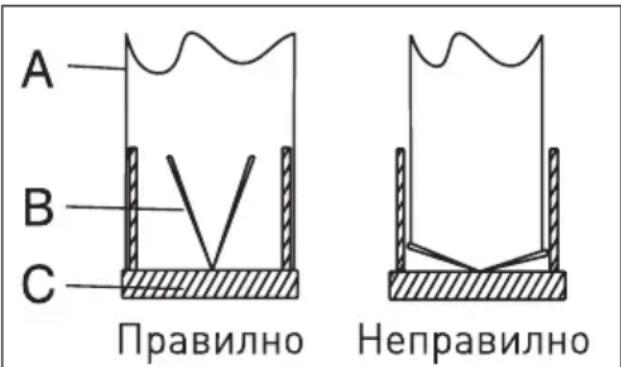
- The negative pressure in the environment should not exceed 4Pa (4 x 10 bar) while the hood for electric hob and appliances running on another type of energy but electricity operate simultaneously.
- In the environment where the appliance is being used, the exhaust of devices running on fuel oil or gas, such as room heater must be absolutely isolated or device must be hermetical type.
- When connecting the flue, use pipes with a diameter of 120 or 150~mm . Pipe connection must be as short as possible and have as few elbows as possible.
Danger of choking! Keep all the packaging materials away from children.
CAUTION: Accessible parts may become hot when used with cooking appliances.
-
The product outlet must not be connected to air channels that include other smoke.
-
The ventilation in the room may be insufficient when the hood for electric hob is used simultaneously with the devices operating on gas or other fuels (this may not apply to appliances that only discharge the air back into the room).
- Objects placed on the product may fall. Do not place any objects on the product.
- Do not flambe under the your product.
WARNING: Before installing the Hood, remove the protective films.
-
Never leave high naked flames under the hood when it is in operation
-
Deep fat fryers must be continuously monitored during use: overheated oil can burst into flames.
1 Important Safety and Environmental Instructions
1.2 Compliance with the WEEE Directive and Disposing of the Waste Product:
This product complies with EU WEEE Directive (2012/19/EU). This product bears a classification symbol for waste electrical and electronic equipment (WEEE).
This symbol indicates that this product shall not be disposed with other household wastes at the
end of its service life. Used device must be returned to offical collection point for recycling of electrical and electronic devices. To find these collection systems please contact to your local authorities or retailer where the product was purchased. Each household performs important role
in recovering and recycling of old appliance. Appropriate disposal of used appliance helps prevent potential negative consequences for the environment and human health.
1.3 Compliance with RoHS Directive
The product you have purchased complies with EU RoHS Directive (2011/65/EU). It does not contain
harmful and prohibited materials specified in the Directive.
1.4 Package Information

Packaging materials of the product are manufactured from
recyclable materials in accordance with our National
Environment Regulations. Do not dispose of the packaging materials together with the domestic or other wastes. Take them to the packaging material collection points designated by the local authorities.
2 General Appearance
2.1 Machine Overview
- Inner Flue
- Outer Flue
- Oil Filters (Behind Glass Cover)
- Control Panel
- Cooker Lighting
2.2 Technical Data
| Model GDS 2460 B GDS 5460 B | ||
| Supply voltage 220-240V ~ 50 Hz | ||
| Lamp Power (W) 2 x 3 W | ||
| Motor Power (W) 210 W: | ||
| Flow rate (m3/h) - 3. Level 632 632 | ||
| Insulation Class of Motor Class I | ||
| Insulation Class Class I | ||
3 Using the Appliance
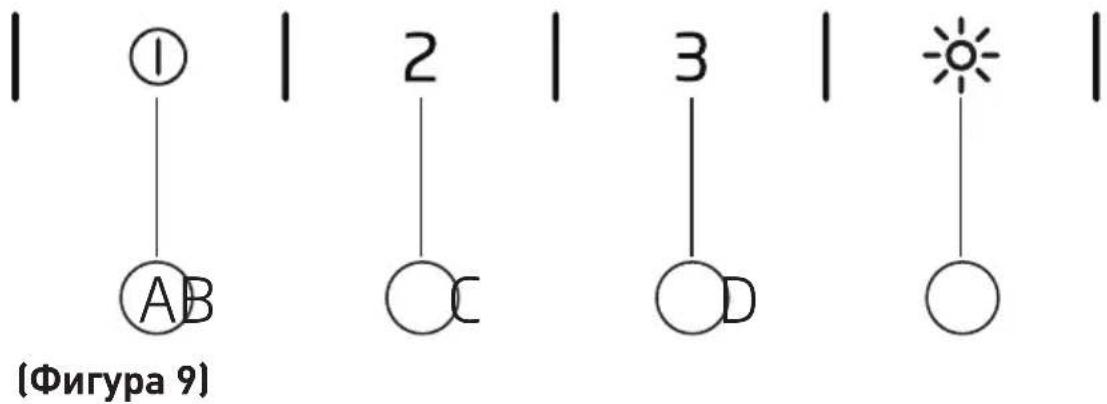
3.1 Controlling the Appliance
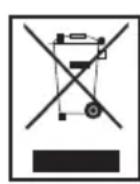
| (A) 1st Stage Button Operates the appliance on 1st speed. When you press this button again to turn off the appliance, the screen and speed stage turn off. |
| (B) 2nd Stage Button Operates the appliance on 2nd speed. When you press this button again to turn off the appliance, the screen and speed stage turn off. |
| (C) 3rd Stage Button Operates the appliance on 3rd speed. When you press this button again to turn off the appliance, the screen and speed stage turn off. |
| (D) Lamp On / Off You can illuminate the cooking area by pressing this button. To turn the lights off, you can press the button again. |
3.2 Energy Efficient Use
- When using your appliance, adjust the speed settings according to vapour and odour intensity, in order to save energy.
- Use low speeds (1-2) under normal conditions, and high speeds (3) in intense odour and vapour.
-
- The lamps on the hood are placed for illuminating the cooking area.
Using them for environmental lighting shall cause unnecessary energy expenditure and insufficient lighting.
3.3 Operating Instructions
- Your appliance contains a motor that has various speeds.
- For better performance, we recommend using low speeds
under normal conditions and high speeds in cases of strong odours and intense vapour.
- You can start your appliance by pressing on the desired speed setting button. (A, B, C)
- You can illuminate the cooking area by pressing the lamp.
- To turn the lights off, you can press the button again.
3.4 Automatic Stop
Your appliance has Automatic Stop feature, enabling it to ventilate for a bit more and remove the unwanted odours and vapour inside the environment and turn off automatically after the cooking is done. To enable Automatic Stop feature, press the any speed stage button (A, B, C) on the control panel for longer than 2 seconds; the 15-minute timer function shall be activated. When the automatic stop feature is active, pressing the same speed button shall disable the automatic stop function and the appliance's motor shall
3 Using the Appliance
stop. This feature is disables when you switch between different speed stages. If you want the appliance to stop automatically, you need to enable the automatic stop feature again.
3.5 Replacement of Lamp
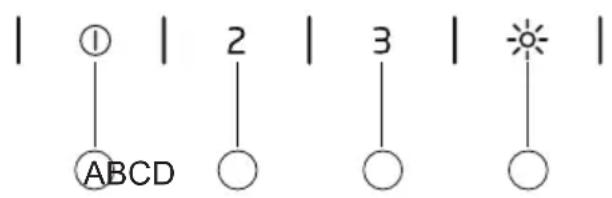
Figure 2
Make the electrical connections of the appliance. Your appliance uses 3W spot LED lamp. For replacing the lamps, push downwards on the holder from its behind, turn it counterclockwise, and take it out downwards. Apply the above operation in reverse to install new lamps (Figure 2).
| BULB | |
| Bulb Power (W) 3 | |
| Holder / Socket GZ 10 | |
| Bulb Voltage (V) 220 240 | |
| Size (mm) 53 x 50 | |
| ILCOS Code DR/F3-220 | 240-GZ10-50-53 |

3.6 Connected to a Flue
Vapour is extracted through the flue
duct, which is fastened to the connection head on the hood.
- The diameter of the flue duct must be the same as the connection ring. In horizontal settings, the pipe has to have a slight upward slope (around 10^ ) so that the air can exit the room easily.
3.7 Using Without Flue
Air is filtered through the charcoal filter and recirculated in the room. Charcoal filter is used when it
is impossible to use a flue in the house.
- In flueless use, remove the flaps inside the flue adapter.
- Remove the oil filter. To install the carbon filter, fit the filter to the tabs by centring it on the plastic piece on both sides of the fan body. Tighten it by turning right or left.
- Replace aluminium oil filter.
4 Cleaning and Maintenance

Before cleaning and maintenance, unplug the product or turn off the switch.
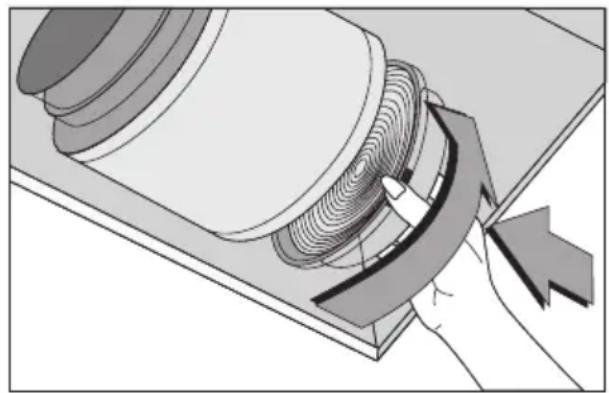
4.1 Cleaning of Aluminium Oil Filters
This filter retains the oil particles in the air. Aluminium oil filters may change colour as they are washed; this is normal and does not require replacing your filters.
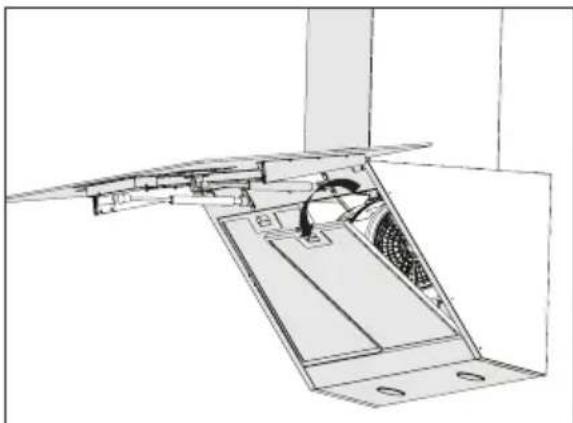
Figure 3
- Push the aluminium oil filter lock forward.
- Then pull it slightly down and pull out (Figure 3). Otherwise, you can bend the filter. Wash and rinse aluminium oil filters with liquid detergent and replace aluminium oilt filters to their sockets by inversely carrying out the steps above.

You can also wash the aluminium oil filters in the washing machine.

CAUTION
In normal use, clean your aluminium oil filter once in a month.
4.2 Change of Carbon Filters
Odour removing filters contain charcoal (Active carbon). Aluminium oil filters must be installed in the product, regardless of whether or not carbon filters are used.
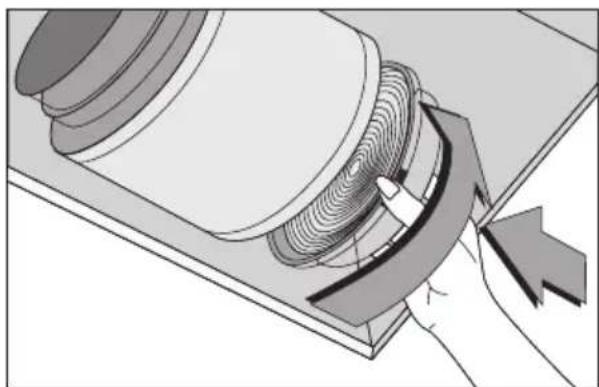
Figure 4
- Remove aluminium oil filters (Figure 3).
-
To remove the charcoal filter, remove the charcoal filter from its housing by rotating it counterclockwise from the tab (Figure 4).
Install the new charcoal filter. -
Attach the aluminium oil filters.

CAUTION
Charcoal filter must never be washed.

CAUTION
Change carbon filters once every 3 months.

CAUTION
You can obtain the charcoal filter from Authorized service dealers.
5 Installation Of Appliance

To install the hood, please contact the nearest Authorized Service. It is the customer's responsibility to prepare the product location and electrical installation.
5.1 Position of the Appliance
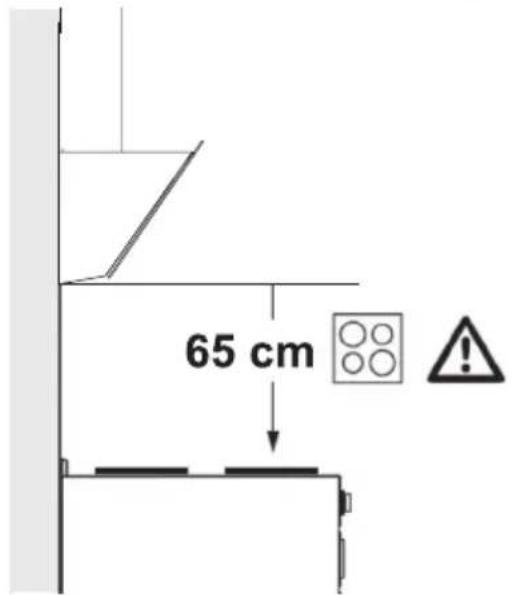
Figure 5
5.1 Installation
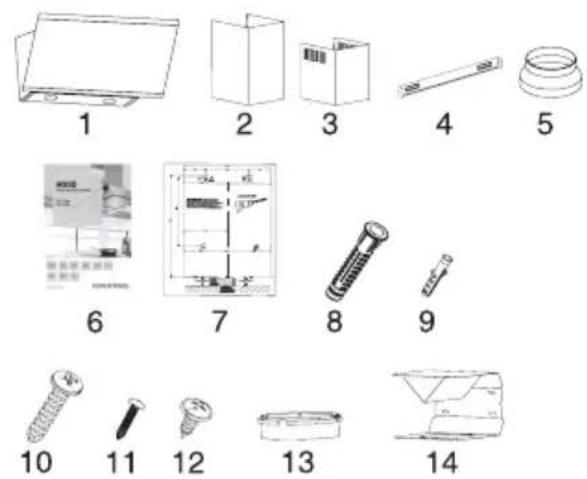
Accessories
- Hood
- Outer Flue
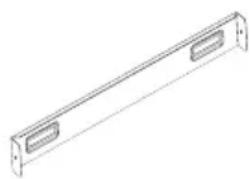
- Inner Flue
- Flue Connection Plate
- 0150/120mm Plastic Flue Adapter
- User Manual
- Assembly Pattern
- 08 mm Plastic Dowel
- 06 mm Plastic Dowel
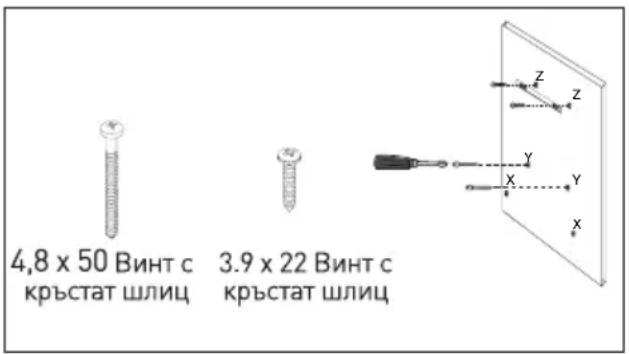
- 4,8 x 50 Screws
- 3,9 × 22 Screws
- 3,5 × 9.5 Screws
- Plastic Flue Adapter
- Air Baffle
The information necessary to make the location suitable for the appliance installation is given below.
5.2 Wall Mounting
- Wall must be flat, straight and have the sufficient bearing capacity.
- Depth of drilling holes must comply with the length of bolts.
5 Installation Of Appliance
The bolts and dowels provide a piece 4.8x50 suspension screw are suitable for brick walls. For with a clearance of 5mm between other construction material (e.g. the screw head and the wall (Figure drywall, plate, porous concrete), 6/b). suitable fixing dowels and nuts shall be used.
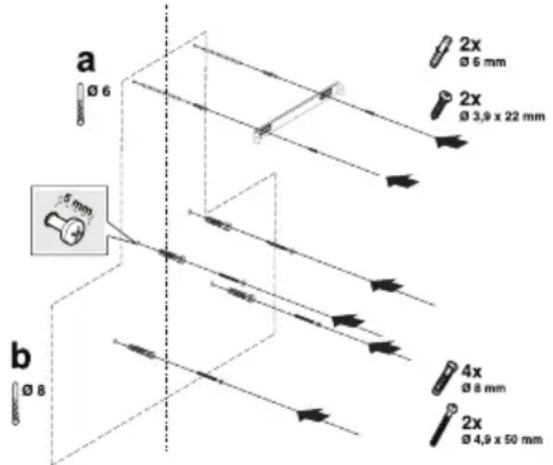
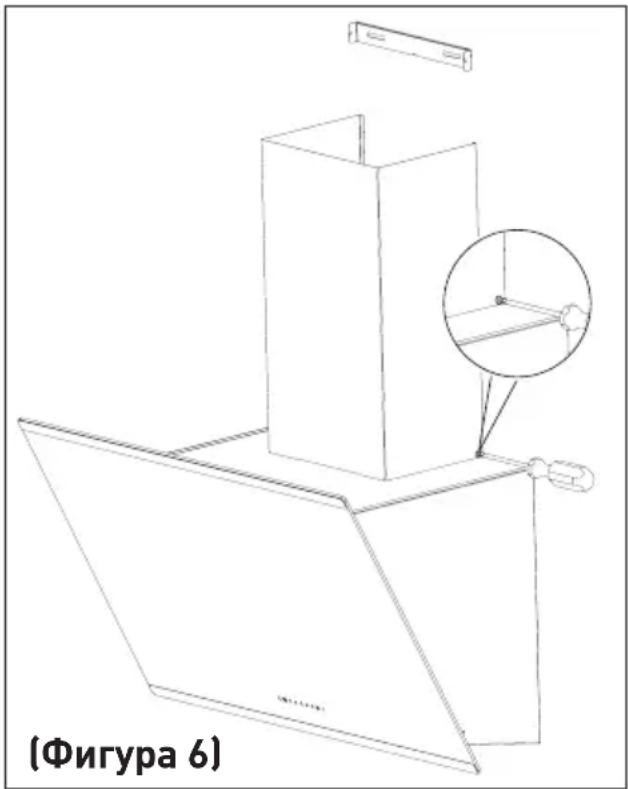
Figure 6
Draw a mid location line from the ceiling perpendicular to the lower edge of the hood ( ).
Paste the installing template provided within the accessories on the surface where the hood is to be mounted. In doing this operation, observe the mounting height of the hood (Page 14).
There is a tab in the middle of the flue connection plate. Place the middle point of this tab on the line that is drawn perpendicular to the wall. In doing this operation, adjust the hood according to the maximum height (Page 10/ Figure 1). Mark the holes where the flue connection plate will be mounted with the help of a pen (Figure 6/a). Drill the marked points with 6 mm drill and insert 2 plastic dowels in the drilled holes (Figure 6/a). Fix the flue connection plate to the wall with 3,9 × 22 screws (Figure 6/a).
To assemble the hood body, you can use the A, B, C, D 08 mm drill on the assembly template, and insert 4.8 × 50 ~mm plastic dowels at these points. (Figure 6/b).
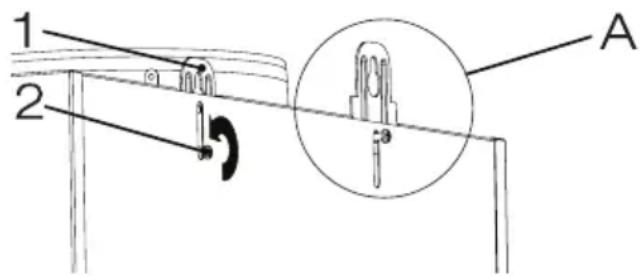
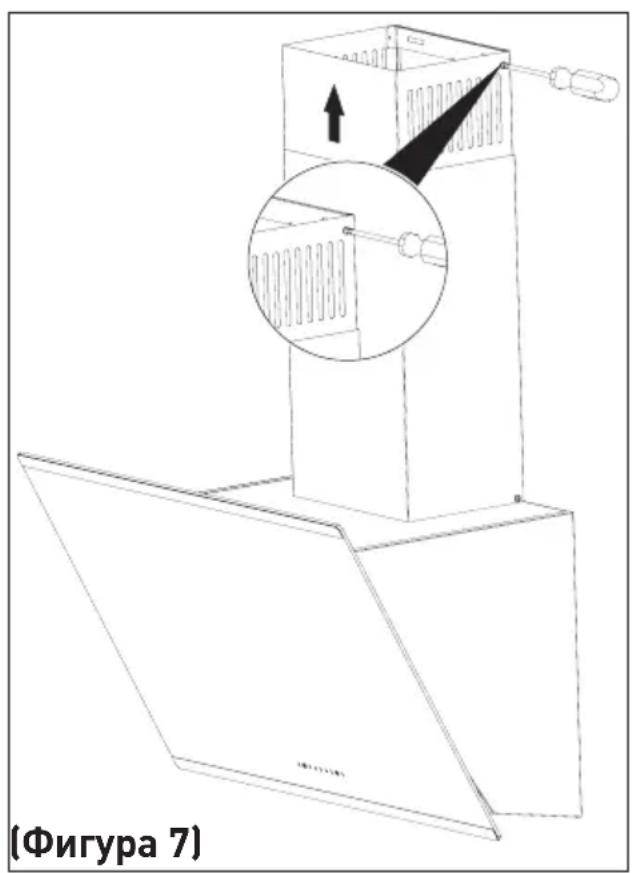
Figure 7
- Hanger Plate
- Hanging Plate Connection Screw
In order to install your hood to the wall, loosen the screws on the hanger plates mounted on the motor cabin and pull them up, and then fasten again (Figure 7 / A).
Turn on the suction glass of the hood and remove the aluminum oil filter (Page 13 / Figure 3).

CAUTION
Before drilling, ensure that there are no power, gas or water pipes in the close proximity of the drilling locations.
5 Installation Of Appliance
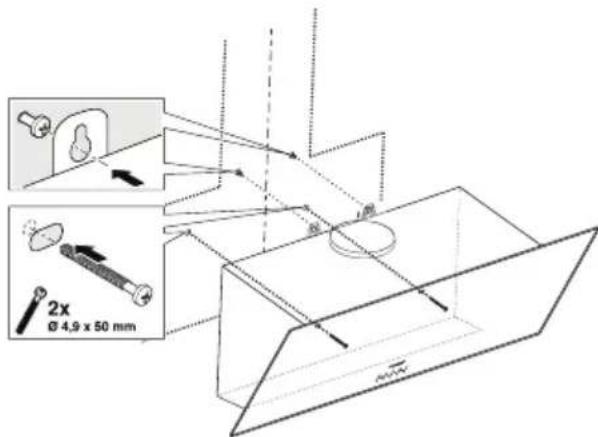
Figure 8
Hold the cooker hood by its body and place it on the suspension screws on the wall and tighten the screws (Figure 8).
Fix the cooker hood with 4.8 × 50 screws through the mounting hole on the interior of the appliance (Figure 8).
5.3 Connecting to Flue
If you are going to use the 120/150 mm plastic flue adapter, connect one end of the pipe to this adapter, if you are not going to use it, to the direct output on the product. Connect the other end of the pipe to your flue. Check that these two connections are tight enough so they will not come out when the appliance runs on full power. Ensure that the flaps inside the flue work when tightened with clamp. Connect the flue connection duct outside the adapter. If the connection duct is fitted inside the adapter, the covers that prevent air return shall remain closed and air won't be sucked in. The length of the pipe connection as well as the number of elbows must be as minimum as possible.
A:Flue exit pipe
B:Non return flaps
C: Plastic Flue
The covers are closed then the appliance is not operating and
prevent possible outside odour and dust from entering inside.
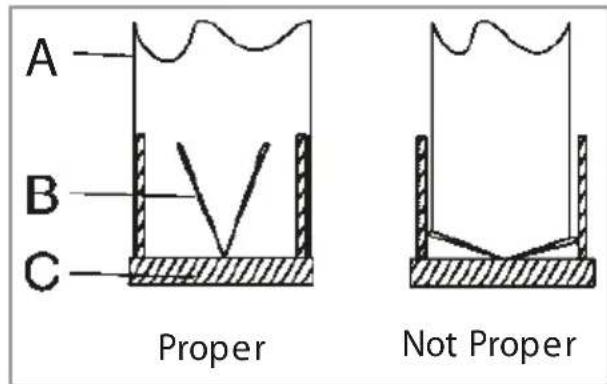

Figure 9
1- Inner Flue
2- Inner Flue Connection Screws
3- Flue Connection Plate
4- Outer Flue Connection Screws
5.4 Mounting the Flue
Make the electrical connection of your product before starting flue installation. Insert the flue plates Around the body. Screw the outer flue to the outer flue fastening plates which are on the motor cabin. (Figure 9). Extend the inner flue to the flue fastening plate fixed to the wall from its upper outer edge, and screw.
5 Installation Of Appliance
5.5 Installation of Air Baffle
While using with the carbon filter, air baffle is provided with your appliance with the aim of re-releasing the air which is cleaned with carbon filter from the perforated located on the flue. Assemble the air baffle as follows.
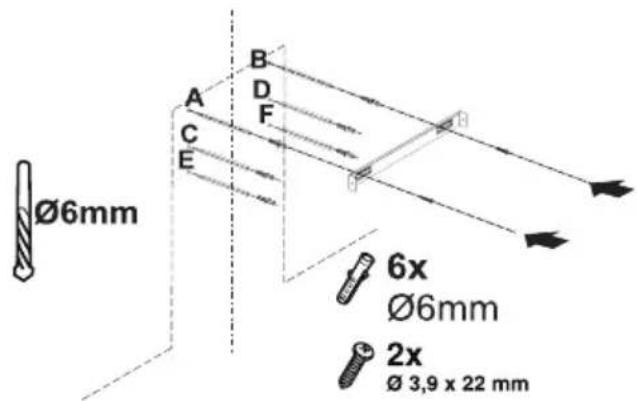
Figure 10
There is a tab in the middle of the flue connection plate. Place the middle point of this tab on the line that is drawn perpendicular to the wall. Align horizontally and mark the holes where the connection plate will be mounted via a pen (Figure 10/A,B).
Drill the marked points with 0.6mm drill and insert 2 plastic dowels in the drilled holes (Figure 10/A,B). Fix the flue connection plate to the wall with 3.9x22 screws (Figure 10/A,B).
For air baffle assembly, install point C, D, E, F with 06mm drill and 06mm plastic dowels (Figure 9).
Assemble cooker hood's body (Page 16 / Figure 8).
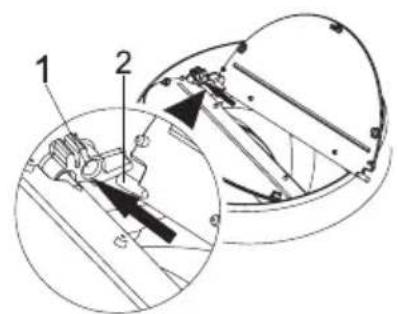
Figure 11)
1- Flap Pin Socket
2- Flap Pin
Attach the flue flaps to the plastic flue adapter in the package content as follows.
Insert the plastic pin (Figure 11 / area no. 2) on the pin socket on the motor exhaust (Figure 11 / area no.1). Then bend the flap lightly to insert the other pin on the flap and insert the other pin to its socket (Figure 11).
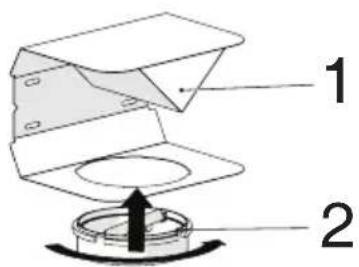
Figure 12
1-Air Baffle
2- Plastic Flue
Attach the plastic flue adapter, which is included in the package, in the direction of the air baffle. Lock the flue adapter by turning it in the direction of the arrow (Figure 12).
5 Installation Of Appliance
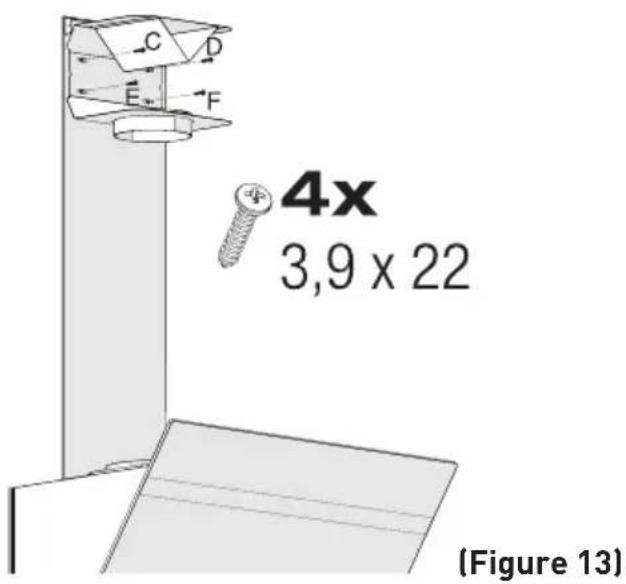
Assemble the air baffle group with 3.9 x 22 screws from point C, D, E, F that you have already prepared (Figure 13).
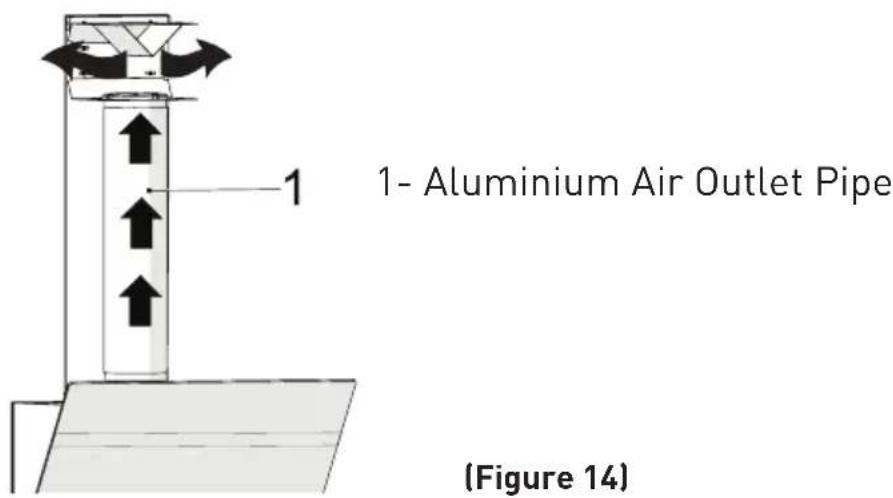
Make the air outlet pipe assembly (Figure 14).

Install plate flues of the cooker hood (Page 16 / Figure 9)
Appropriate nonappropriate
Figure 8
3 Montering of apparatus
3 Montering of apparatus
3.1 Installationstilbehør
3 Montering of apparatus
3 Montering of apparatus
3 Montering of apparatus
3 Montering of apparatus
5.1 Aluminiumsfilter
(A): Tast for niva 1
(B): Tast for niva 2
(C): Tast for niva 3
(D): Tast for lys pã/av
4.1 Digital elektronisk kontroll med tre nivær
(A) Trykk på这部分 tasten for á starter viften i hastighet 1.
5.1 Aluminiumsfilter
(A): 1. tasopainike
(B): 2. tasopainike
(C): 3. tasopainike
(D): Valo pääle / pois -painike
3.5 MoNTaЖ Ha BnHTObTe 3a OKaUBaHe
MOnTnpaIte BnHTOBe 3a OkaUBa-He 4,8 x 50 B cTeHnTe IIO6eI N O 8 MM (Y), KOnTO cTe Ha6nIN B cTeHa-ta. Heo6xOIMo e Ida IMa MeKdInHa OT 5 MM MeKdy IlaBata Ha BnHTa n cTeHata. (ФИrypa 5)
CbpxeTe BbtpeHata nlaactnHa 3a Cbbp3BaHe Ha dIMMOOTB0da KbM IIO6eHa 6 MM Ha cTeHata [Z], KaTo N3PON3BaTe BnHTOBe 0 3.9x22. (Фигура5)
(Фигура 5)
3.6 Crlo6yBaHe Ha a6cop6aTopa Ha cTeHaTa
- Okaute ДИМоТВОДа Ha BИНTO-BeTe, KOnTo Cte MOHTIpaJIb B OT-BopIte Y.
- OTbopete ctpaHnUHHBcMyKATElen npo3opeu Ha a6cop6aTopa, KaTo rO n3dIbpNaTe KbM ce6e cn. MoHTnpaIte BnHTa 4,8 x 50 npe3 OTbOpnte X, pa3noJoxeHN HABbTpe, 3a da fNkCnPaTe ypeDa.
3.7 Crno6BaHe Ha dIMoOTbOda ha a6cop6aTopa
Ipei Da 3aOnuHete MoHTaKa Ha dm0oTbOda, N3KJIOnuTe UpeDa OT 3axpaHbaHeto. IocTaBeTe Yactnte Ha Tpb6OpPoBOda OKJIo TAnoto.
3aBnTe BbHnHn Tpb6OpoBOJ KbM BbHnHTe PnactnH 3aCBbp3BaHe Ha Tpb6OpBoDa,HaMnpaun Ce Ha Kopnyca Ha MoTopa. (Фура 36/6)
3 MoNTaЖ Ha ypeDa
Pa3wnpeTe n 3aBnTe BbTppeHnra Tpb6OpBoOd OT BbHsHnTe n KpaN- ua Bbpxu PnaCTnHaTa 3a Cbbp3BaHe Ha Tpb6OpBoOda, KoTo e 3aKpepeHa KbM CteHaT (Furpa 7).
3.8 YnOTope6a c Tpb6a 3a Cbbp3BaHe KbM dNMOOTBOd
- Napata ce otctpaHЯBa ue3 Tpb-6o npoBOda, KoTo e 3aKpeNeH KbM cBeiHHTeHaTa rJaBa Ha dIIMO-OTBOda.
-ДиametbpbT HaДИMOOTBOda Tp86Ba Da 6bde paBEN HaДиametbpaHa Cbbp3BaUng npbcTeH.3a Da ce N03BOJN JecHOTO OTBeKDaHe Ha Bb3dYxa OT NOMeUeHNeTO B Xopn3oHTaJIHo NOLOXKeHne, Tpb-6ata Tp86Ba Da 6bde Jeko HAKIo-HeHa Harope (npn6IIN3nteJHo Ha 10^
3.9 YnOTope6a 6e3 Tpb6a 3a CBbp3BaHe KbM dIM0OTBOD
Bb3duyxbT ce fNtnpa BbB Bb- rIepoJeH fNtbp n Ce Bpbua B nOmeuHneTo. BbrlepoDnraT fNtbp ce n3noJ3Ba B cnyaN, KOrato B nOmeueHneTo HMa dIMoOTBOd.
Ako abcop6aTopbT 7e ce n3- noJ3Ba 6e3 Bpb3Ka c dIMoOTBOiN, PpeMaxHeTe PpeBkIIOuBaTeJIte B aJaNTepa 3a dIMoOTBeJdaHe.
- OtctpaheTe anyMnHneBnte nItpn. 3a da nHCTaInpate BbIpePoHNy nITbp, ceHTpnpaTe rO Bbpxy nlaactMacOBata qacT OTDbete cTpaHn Ha TJIto Ha BeHTnlaTopa n rO NKcnpaTe Bbpxy yuNkNTe. 3akpenete nITbpa, KaTO 3aBbPTnTe yuNckNTe BdrcHO nnHaJBO.
- MoHTnpaIte anyMnHneBnA nI-Tbp.
3 MoNTaK Ha ypeDa
3.10 CBbp3BaHe Ha dIIMO-OTBODa:
MOnTnpaIe aIaItepa, IocTaBeH 3aeIHO C dIMOOITBOda, BBB BeHTnlaUIOHHN OTBOp, pa3noLoJKeH B rOpHaT auct Ha a6cop6aTo- pa. OcIpypeTe Tpb6a c dNaMeTbP 120/150 MM. CbbpXeTe eINHnKpaI Ha Tpb6aTa c aIaItepa, a npYrna KpaI c Tpb6oIPOBoDa.
YBepete ce,Ye nDBeTe Bpb3Kn ca doCTaTbUHO cnrypHn,
Taka, ye KOrato abCop6aTopbT pa-60Tu Ha MaKcImaJIHa cKOpocT, HMa Da ce pa3MeCTn. IpOBepe Te daJI KlaIInTe BbTpE B dIMoOTBoJa, KoRato ca 3aTeHATn Cbc cKo6aTa, ca YHKcNoHaJIHn. IocTabeTe Tpb6aTa 3a CBbp3BaHe Ha dIMoOTBoJa KbMa aIaIInPeA. Ako nocTabeTe Tpb6a-Ta 3a CBbp3BaHe Ha dIMoOTBoJa B aIaIInTepa, HMa Da ce 3acMyKBa Bb3dUx, Tb' KaTo KlaIInTe, KOtO npedotBpataBat o6paTHnI NOtOK Ha Bb3dUxa, ige OCTaHaT 3aTBOpEHn.
He ce npenopbUba dIMooTBoNDte Da ce Cbbp3BaT c roTBapcKn neKn nn c n3nyckaTeHN Klaapan. He npaBeTe Bpb3KN MeJy TaKnBA Tpb-6o npoBOn.
Tp6hata Bp3Ka Tpa6Ba Da 6bde Bb3MOxHo Hau-Kbca N da mMa MNHmAlehen 6pouynkn.
A: Tpb6a 3a n3Bexkdahe Ha Bb3dyxa
B: Klaann, konTo npedotbpaTBAt o6paTHnnoTOK
C:ПлacrMacoBТрббОпровД
3.11 Cnctema 3a npeIoTbpaTЯBaHe Ha o6paTHnia noToK (N-RV)
Korato a6cop6aTopbT pa60TN, Kla- nITE ce 3aTBaprT, 3a da ce npedeoTBPaTN Bb3MOxHocTTa OT Bn3aHe Ha Mnpu3Mn I npax OTBbH HaBbTpe.
[Фигура 8]
4 Pa6ota c ypeda
(A): ByToH 3a 1-Bo HnBO
(B): BytoH 3a 2-po HnBO
(C): ByToH 3a 3-TO HnBO
(D): ByToH 3a BkJI./n3KJI. Ha oCBeTJIeHHeTo
4.1ДигntaJIHo eIeKtpoHHO ynpaBJIeHne c HnBa
(A) C haTnCKaHeto Ha To3n 6yToH, MoXeTe Da BkJIouHTe Ba7nA a6-cop6aTOp Da pa60Tu CbC cKOpocT Ha 1-BO HnBO.
Korato HaTnchTe 6byToHa OTHOBO, 3a Da N3KJIouHrTe UpeDa, INHdNKaTOpBT 3a HNBOTo Ha cKOpocT Ie N3-ye3He OT DnCnIeJ.
(B) 6yToH: C HaTnCKaHeTo Ha To3n 6yToH, MoKeTe Da BkJIouHTe BaIINr a6cop6aTop da pa60Tu cbc ckopocT Ha 2-po HnBO.
Korato HATnchete 6yToHa OTHOBO, 3a Da N3KJIouHte UpeDa, INHdNKaTOpBT 3a HNBOTo Ha CKOpocT ige n3-ye3He OT DnCnpeJ.
(C) 6yToH: C HaTnCKaHeTo Ha To3n 6yToH, MoXeTe Da BKJIouHTe BaIINa 6cOp6aTop Da pa6OTn cbc ckopocT Ha 3-TO HnBO.
Korato HaTnchete 6yToHa OTHOBO, 3a Da N3KJIIOUHTe UpeDa, INHdNKaTOpBT 3a HNBOTO Ha CKOpocT ige N3-ue3He OT DnCnpeJ.
(D) 6byToH: ByToH 3a BkI./n3KJI. Ha OCBetJIeHHeTO C HATnCKaHe Ha To3N 6byToH MoXeTe Da BKJIouHTe OCBetJIeHHeTO I Da OCBETHTe 30HaT a 3a rotBeHe.
ABTOMaTnHc cnpaHe cne15 MNHyTu:
To3n ypeJe o6OpyDbAn cФyHKcIa aBTOMaTuHNo cnpaHe, KOrTo n03B0JIbRa Ha ypeJa Da BeHTNJpa NOMEuEHNeTo 3a DOnbJIHnTeJen nepoO ot BpeMe, 3a Da npemaxHe OT Hero HePnTTHMaMpcN u3- napEnra Cnei PrNKIOUvBaHe Ha rotBeHeTo. Cnei onpeJeIeH nepoO ot BpeMe, ypeBcT cnpa pa6ota aBTOMaTuHNo.
3a da BkIouHte yHKuYra 3a aB- TOMaTHUHO CnnpaHe, HATNCHeTe HrKOJ ot 6yToHnte 3a HNBO Ha CKOpocT
4 Pa6ota c ypeda
BbIepoHnTe HnTpHn HnKora He ce MnT.
Mokete da noIyUHTe BbIepoHn 0nItpn OT yIbIhOMOseHnte cepBn3n Ha Grundig.
- MoHTnpaIte HOBnB BbRJIepoJc p
Hnkora He n3noJ3BaIte a6pa3nBn Hnn HaapckBaun Maepnaan 3a. nouchTaHe.
- MoHTnpaIte anyMnHneBnTe fNITpn.
(Фигура 11)
ΦnItpnte npoTnB MnnpN3Ma cbDbp- kat BbIeH (aKTHBeH BbIeH).
Te Tp86Ba Da ce noDMMeHr Ha nepiOOn No np6Jn3nteJHo 6 Meceua.
He3aBnCmO daJIH nI3NoJ3BaTe Bb- rIepoJeH fNITbp nIi He, BNHaRn TpI6Ba Da ce MoHTnpaT aIyMnHneBnTe fNITpn.
He n3noJ3BaIte BaIyra,6e3 MoHTnpaHn anyMHHneBn 0nITpn. H3noJ3BaHeTo c BbIepoJeH oJnTbp ige HaMaJIi 3acMyKBaHeTo Ha ypeDa.
5.4Почистванe
He 3a6paBryTe da nouchnte a6-cop6aTopa He3a6abHo cIeI nbpxKe-He
I3noJ3BaIte MeKa Kbpna HaTopeHa B TeueH npenapat 3a NouchTbaHe n I36bpweTe BbHsHaTa NOBbpXHOCT
Mozte da n3noJ3BaTe npedlaHnTe B TbpROBcKaTa MpeXa npenaPapTu 3a NouchTbAHe 3a OTCpaHraBa-He Ha ynpuTu 3ambpcaBaHna KaTo CnAsBaTe npedynpexKeHnTa Bbp-xy npoDyKta. 3a Da He HndpacKe Kopnyca OT MaTnpaHa CTomHa, Ro 6bpWeTe B NocOKaTa Ha MaTnpaHe.
He n3noJ3BaITe noUcTbaUn npe- napata, cBdbpkaun XnDPOXLOPHa Kncelina, 6eHna nn a6pa3NBn npaxOBe, 3a Da noDbpxKe Ta Ka- yeCTBOTo Ha NOBbPxHOCTTa Ha npo- dykTa. N3noJ3BaIte HABlaJxHeHa BCanyHeHa BODa KbPa NN Cneu- aHn NoUcTBAUcN CnpEioBe 3a He- pbKdaema CTOMaHa pni noUcTba- He Ha CTOMaHEnTe NOBbPxHOCTN. OTCpaHete 3aUHTHOto foJIINO OTypeDa.
BHMaHne!
Bb3mOxHo e da npuHnTe noXap, aKO He cna3BaTe nHcTpkyKuNTe 3a NouchTbaHe n CmHa Ha cnItpnte Ha a6cop6aTopa.
Ako e Heo6xOIMo Da TpaHcnpTnpaTe ypeHa.
3ana3eOpnHaHaTaMy onaKOBka.TpaHcnpTnpaIte ypeDaB opnHaHaTa onaKOBkaN cJeDBaITe TpaHCnOpTHnte N MapKnPobKn.
Ako HЯMaTe opuRnHaJHaTa ona-KOBka:

- Important Safety and Environmental Instructions
- General Safety
- General Appearance
- Machine Overview
- Technical Data
- Using the Appliance
- Controlling the Appliance
- Energy Efficient Use
- Operating Instructions
- Automatic Stop
- Replacement of Lamp
- Connected to a Flue
- Using Without Flue
- Cleaning and Maintenance
- Cleaning of Aluminium Oil Filters
- Figure 3
- CAUTION
- Change of Carbon Filters
- Installation Of Appliance
- Position of the Appliance
- Installation
- Accessories
- Wall Mounting
- Connecting to Flue
- Mounting the Flue
- Installation of Air Baffle
- Montering of apparatus
- Installationstilbehør
- Aluminiumsfilter
- Digital elektronisk kontroll med tre nivær
- MoNTaЖ Ha BnHTObTe 3a OKaUBaHe
- Crlo6yBaHe Ha a6cop6aTopa Ha cTeHaTa
- Crno6BaHe Ha dIMoOTbOda ha a6cop6aTopa
- MoNTaЖ Ha ypeDa
- YnOTope6a c Tpb6a 3a Cbbp3BaHe KbM dNMOOTBOd
- YnOTope6a 6e3 Tpb6a 3a CBbp3BaHe KbM dIM0OTBOD
- MoNTaK Ha ypeDa
- CBbp3BaHe Ha dIIMO-OTBODa:
- Cnctema 3a npeIoTbpaTЯBaHe Ha o6paTHnia noToK (N-RV)
- Pa6ota c ypeda
- 4.1ДигntaJIHo eIeKtpoHHO ynpaBJIeHne c HnBa
- ABTOMaTnHc cnpaHe cne15 MNHyTu:
- Mokete da noIyUHTe BbIepoHn 0nItpn OT yIbIhOMOseHnte cepBn3n Ha Grundig.
- 5.4Почистванe
- BHMaHne!
Brand : GRUNDIG
Model : GDS 5460 B
Category : Basket