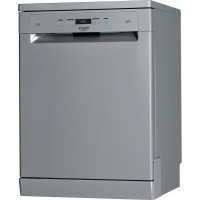
USER MANUAL HFC 3C41 CW X HOTPOINT
PRODUCT. In order to receive a more complete
assistance, please register your appliance on:
www.hotpoint.eu/register
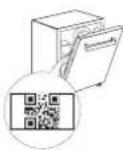
PLEASE SCAN THE QR CODE ON YOUR
APPLIANCE IN ORDER TO HAVE MORE
DETAILED INFORMATION


Before using the appliance carefully read Safety Instructions guide.
PRODUCT DESCRIPTION
APPLIANCE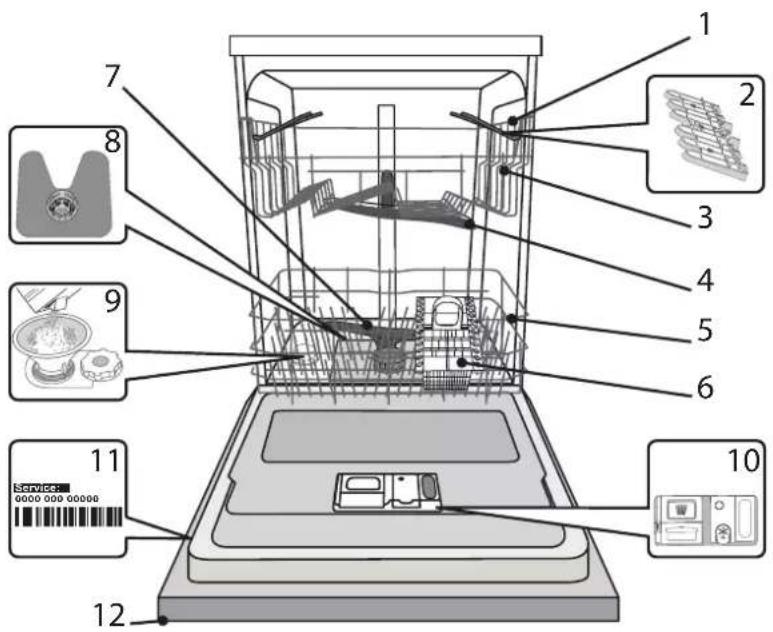
- Upper rack
- Foldable flaps
- Upper rack height adjuster
- Upper spray arm
- Lower rack
- Cutlery basket
- Lower spray arm
- Filter Assembly
- Salt reservoir
- Detergent and Rinse Aid dispensers
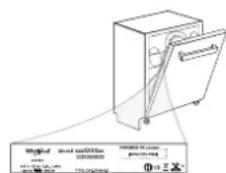
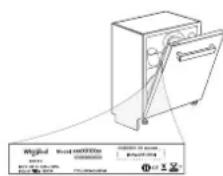
- Rating plate
- Control panel
CONTROL PANEL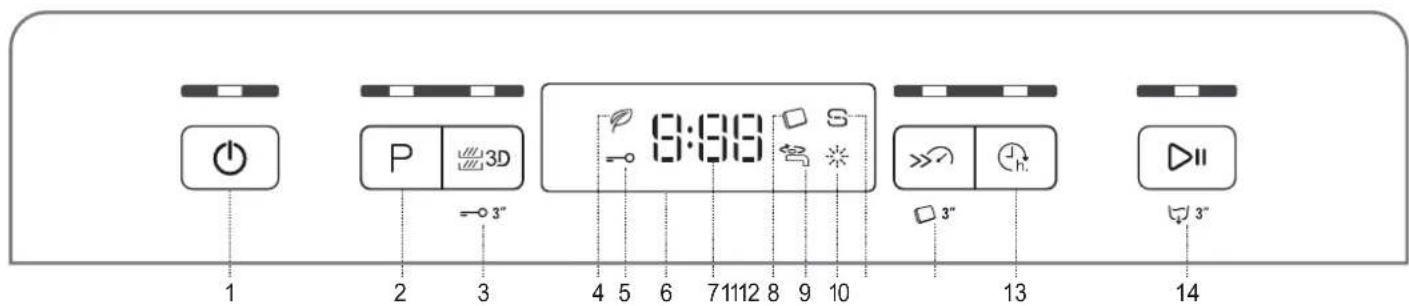
- On-Off / Reset button with indicator light
- Program selection button with indicator light
- 3D Zone Wash button with indicator light / Keylock
- Eco program indicator light
- Keylock indicator light
- Display
- Program number and remaining time indicator
- Tablet (Tab) indicator light
- Closed water tap indicator light
- Rinse Aid refill indicator light
- Salt refill indicator light
- Short Time button with indicator light / Tablet (Tab)
- Delay button with indicator light
- Start/Pause button with indicator light / Drain out
FIRST TIME USE
SALT, RINSE AID AND DETERGENT
ADVICE REGARDING THE FIRST TIME USE
After installation, remove the stoppers from the racks and the retaining elastic elements from the upper rack.
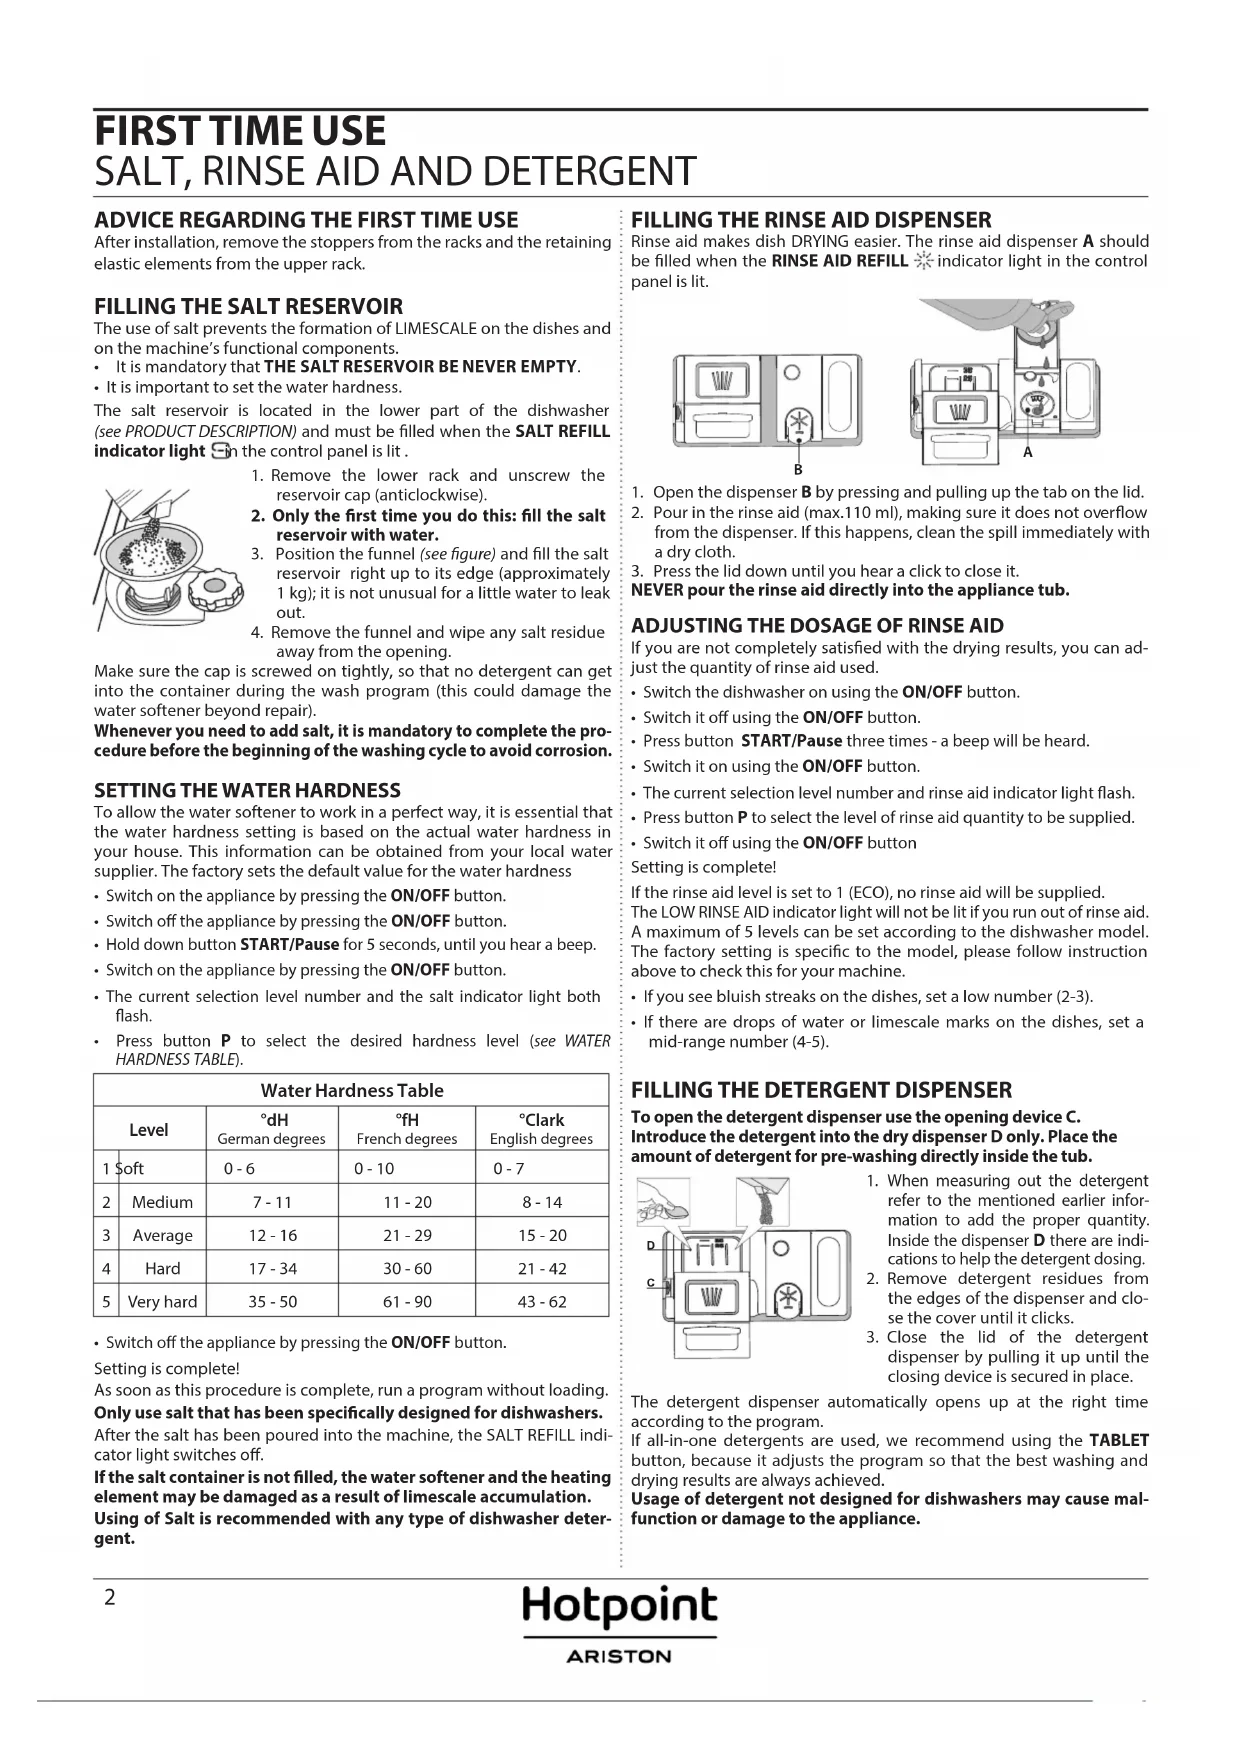
FILLING THE SALT RESERVOIR
The use of salt prevents the formation of LIMESCALE on the dishes and on the machine's functional components.
It is mandatory that THE SALT RESERVOIR BE NEVER EMPTY. It is important to set the water hardness.
The salt reservoir is located in the lower part of the dishwasher (see PRODUCT DESCRIPTION) and must be filled when the SALT REFILL indicator light in the control panel is lit.
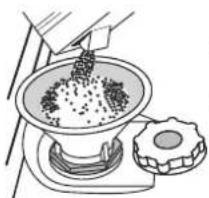
- Remove the lower rack and unscrew the reservoir cap (anticlockwise).
- Only the first time you do this: fill the salt reservoir with water.
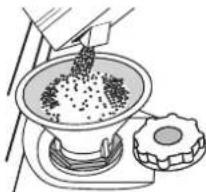
- Position the funnel (see figure) and fill the salt reservoir right up to its edge (approximately 1 kg); it is not unusual for a little water to leak out.
- Remove the funnel and wipe any salt residue away from the opening.
Make sure the cap is screwed on tightly, so that no detergent can get into the container during the wash program (this could damage the water softener beyond repair).
Whenever you need to add salt, it is mandatory to complete the procedure before the beginning of the washing cycle to avoid corrosion.
SETTING THE WATER HARDNESS
To allow the water softener to work in a perfect way, it is essential that the water hardness setting is based on the actual water hardness in your house. This information can be obtained from your local water supplier. The factory sets the default value for the water hardness.
- Switch on the appliance by pressing the ON/OFF button.
- Switch off the appliance by pressing the ON/OFF button.
- Hold down button START/Pause for 5 seconds, until you hear a beep.
- Switch on the appliance by pressing the ON/OFF button.
- The current selection level number and the salt indicator light both flash.
- Press button P to select the desired hardness level (see WATER HARDNESS TABLE).
| Water Hardness Table |
| Level | °dH German degrees | °fH French degrees | °Clark English degrees |
| 1 Soft | 0-6 | 0-10 | 0-7 |
| 2 | Medium | 7-11 | 11-20 | 8-14 |
| 3 | Average | 12-16 | 21-29 | 15-20 |
| 4 | Hard | 17-34 | 30-60 | 21-42 |
| 5 | Very hard | 35-50 | 61-90 | 43-62 |
- Switch off the appliance by pressing the ON/OFF button.
Setting is complete!
As soon as this procedure is complete, run a program without loading. Only use salt that has been specifically designed for dishwashers.
After the salt has been poured into the machine, the SALT REFILL indicator light switches off.
If the salt container is not filled, the water softener and the heating element may be damaged as a result of limescale accumulation. Using salt is recommended with any type of dishwasher detergent.
FILLING THE RINSE AID DISPENSER
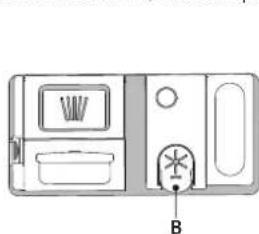
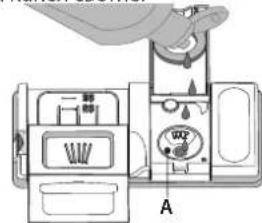
Rinse aid makes dish DRYING easier. The rinse aid dispenser A should be filled when the RINSE AID REFILL indicator light in the control panel is lit.
B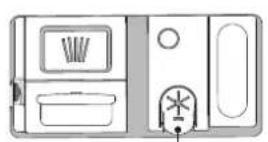
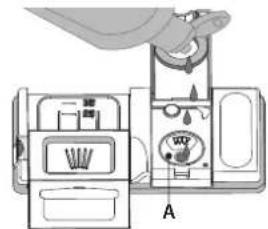
- Open the dispenser B by pressing and pulling up the tab on the lid.
- Pour in the rinse aid (max. 110 ml), making sure it does not overflow from the dispenser. If this happens, clean the spill immediately with a dry cloth.
- Press the lid down until you hear a click to close it.
NEVER pour the rinse aid directly into the appliance tub.
ADJUSTING THE DOSAGE OF RINSE AID
If you are not completely satisfied with the drying results, you can adjust the quantity of rinse aid used.
- Switch the dishwasher on using the ON/OFF button.
- Switch it off using the ON/OFF button.
- Press the START/Pause button three times - a beep will be heard.
- Switch it on using the ON/OFF button.
- The current selection level number and rinse aid indicator light flash.
- Press button P to select the level of rinse aid quantity to be supplied.
- Switch it off using the ON/OFF button.
Setting is complete!
If the rinse aid level is set to 1 (ECO), no rinse aid will be supplied. The LOW RINSE AID indicator light will not be lit if you run out of rinse aid. A maximum of 5 levels can be set according to the dishwasher model. The factory setting is specific to the model, please follow the instruction above to check this for your machine.
- If you see bluish streaks on the dishes, set a low number (2-3).
- If there are drops of water or limescale marks on the dishes, set a mid-range number (4-5).
FILLING THE DETERGENT DISPENSER
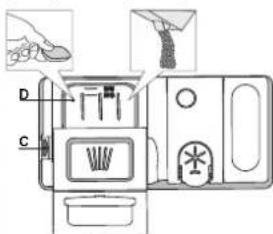
To open the detergent dispenser, use the opening device C. Introduce the detergent into the dry dispenser D only. Place the amount of detergent for pre-washing directly inside the tub.
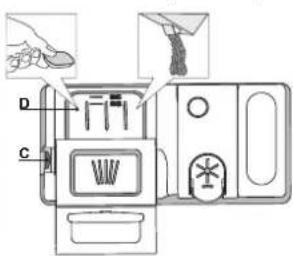
- When measuring out the detergent, refer to the information mentioned earlier to add the proper quantity. Inside the dispenser D there are indications to help with detergent dosing.
- Remove detergent residues from the edges of the dispenser and close the cover until it clicks.
- Close the lid of the detergent dispenser by pulling it up until the closing device is secured in place.
The detergent dispenser automatically opens up at the right time according to the program.
If all-in-one detergents are used, we recommend using the TABLET button, because it adjusts the program so that the best washing and drying results are always achieved.
Usage of detergent not designed for dishwashers may cause malfunction or damage to the appliance.
PROGRAM TABLE
| Program | Drying phase | ActiveDry | Available options* | Duration of wash program (h:min)** | Water consumption (litres/cycle) | Energy consumption (kWh/cycle) |
| 1. Eco ECO 50° | ✓ | ✓ | □ □ h. | 3:10 9.5 0.75 | | |
| 2. Auto Intensive 65° A | ✓ | ✓ | 3D > □ □ h. | 2:00 - 3:10 14.0 | -17.0 1.50 - 1.85 | |
| 3. Auto Mixed 55° □ □ A | ✓ | ✓ | 3D > □ □ h. | 1:30 - 2:30 14.5 | -16.0 1.15 - 1.30 | |
| 4. Auto Fast Wash □ □ A 50° | - | - | □ □ h. | 0:55 - 1:20 13.0 | -14.5 1.15 - 1.25 | |
| 5. Rapid 30' 50° | - | - | 3D □ □ h. | 0:30 9.0 0.50 | | |
| 6. Good Night 50° | ✓ | ✓ | □ □ h. | 3:30 15.0 1.15 | | |
| 7. Sanitizing 65° | ✓ | - | □ □ h. | 1:40 10.0 1.30 | | |
| 8. Soak 65° - | - | - | 3D □ □ h. | 0:12 4.5 0.01 | | |
| 9. Self-Clean 65° | - | - | □ □ h. | 0:50 8.0 0.85 | | |
ECO program data is measured under laboratory conditions according to European Standard EN 60436:2020. Note for Test Laboratories: For information on comparative EN testing conditions, please send an email to the following address: dw_test_support@whirlpool.com Pre-treatment of the dishes is not needed before any of the programs. Not all options can be used simultaneously. Values given for programs other than the Eco program are indicative only. The actual time may vary depending on many factors such as temperature and pressure of the incoming water, room temperature, amount of detergent, quantity and type of load, load balancing, additional selected options and sensor calibration. The sensor calibration can increase program duration up to 20 min.
PROGRAMS DESCRIPTION
Instructions on wash cycle selection.
1 ECO
Eco programme is suitable to clean normally soiled tableware, that for this use, it is the most efficient programme in terms of its combined energy and water consumption, and that it is used to assess compliance with the EU Ecodesign legislation.
2 AUTO INTENSIVE
Automatic program for heavily soiled dishes and pans (not to be used for delicate items).
3 AUTO MIXED
Automatic program for normally soiled pans and dishes.
4 AUTO FAST WASH
Automatic program for limited quantity of normally soiled crockery. Ensures optimal cleaning performance in shorter time.
5 RAPID 30'
Program to be used for half load of lightly-soiled dishes with no dried food residues. Does not have drying phase.
6 GOOD NIGHT
Suitable for night-time operation of the appliance. Ensures optimal cleaning and drying performance with the lowest noise emission.
7 SANITIZING
Normally or heavily soiled crockery, with additional antibacterial wash. Can be used to perform maintenance of the dishwasher.
8 SOAK
Use to refresh crockery planned to be washed later. No detergent to be used with this program.
9 SELF-CLEAN
Program to be used to perform maintenance of the dishwasher, to be carried out only when the dishwasher is EMPTY using specific detergents designed for dishwasher maintenance.
Notes:
Please note that cycle Rapid 30' is dedicated for lightly soiled dishes.
OPTIONS AND FUNCTIONS
OPTIONS can be selected directly by pressing the corresponding button (see CONTROL PANEL).
If an option is not compatible with the selected program see PROGRAMS TABLE, the corresponding LED flashes rapidly 3 times and beeps will sound. The option will not be enabled.
3D ZONE WASH
This option works with one rack at a time. In particular, we recommend using it with the Mixed and Intensive cycles. Thanks to the additional 3D water jets placed on the bottom of the cavity, the 3D ZONE WASH option allows you to save energy or increase the washing performance of the dishwasher:
- 3D ZONE WASH + MIXED CYCLE: reduces energy consumption by up to 40%.
- 3D ZONE WASH + INTENSIVE CYCLE: increases washing performance by up to 40%. Ideal for heavily soiled mixed loads, e.g., pans and saucepans, dishes with heavy encrustation, or difficult-to-clean crockery (grater, vegetable mill, dirty cutlery).
How to activate the option: 1. Select a compatible cycle. 2. By default, the appliance washes dishes in all racks. To wash only a specific rack, press this button repeatedly:
1 shown on the display (only lower rack)
-1 shown on the display (only upper rack). OFF shown on the display (option is OFF and the appliance will wash dishes in all racks).
Remember to load the upper or lower rack only, and to reduce the amount of detergent accordingly.
If the upper rack is removed, apply detergent directly to the tub instead of the detergent dispenser.
KEYLOCK
A long press (for 3 seconds) of the 3D ZONE WASH button will activate the KEYLOCK function. The KEYLOCK function will block the control panel except the ON/OFF button. To deactivate the KEYLOCK, long press again.

WATER TAP CLOSED - Alarm
Flashes when there is no inlet water or the water tap is closed.
SHORT TIME
This option can be used to reduce the duration of the main programs while maintaining the same washing and drying performance levels.
After selecting the program, press the SHORT TIME button and the indicator light will switch on. To deselect the option, press the same button again.
TABLET (Tab) This setting allows
This setting allows you to optimize the performance of the program according to the type of detergent used.
A long press (for 3 seconds) of the SHORT TIME button (the corresponding symbol will light up), will activate the function if you use combined detergents in tablet form (rinse aid, salt and detergent in 1 dose).
If you use powder or liquid detergent, this option should be off.
DELAY h. The start of
DELAY
The start of the program may be delayed for a period of time between 0:30 and 24 hours.
- Select the program and any desired options. Press the DELAY button (repeatedly) to delay the start of the program. Adjustable from 0:30 to 24 hours. With each press of the button, the delay start increases by: 0:30 if selection below 4 hours, 1:00 if selection is below 12 hours, 4 hours if selection is above 12 hours. If 24 hours reached, and the button is pressed, the delayed start is deactivated.
- Press the START/PAUSE button: the timer will begin counting down;
- Once this time has elapsed, the indicator light switches off and the program begins automatically.
If at the time of the countdown the START/PAUSE button is pressed again the DELAY option is cancelled and the selected program starts automatically.
The DELAY function cannot be set once a program has been started.
DRAIN OUT To stop and car
To stop and cancel the active cycle, the Drain Out function can be used.
A long press of the START/PAUSE button will activate the DRAIN OUT function. The active program will be stopped and the water in the dishwasher will be drained out.
ActiveDry
ActiveDry is a convection drying system which automatically opens the door during/after the drying phase to ensure exceptional drying performance every day. The door opens at a temperature that is safe for your kitchen furniture, thus the door will not be opened when the SHORT TIME option is on.
As additional steam protection, a special protection foil is provided with the dishwasher (depending on the model, it may need to be purchased). To see how to mount the protection foil, please refer to the INSTALLATION GUIDE.
ActiveDry functionality can be disabled by the user as follows: - To DISABLE: Switch On, then switch Off. Keep the P button pressed for 5 sec. At the end of 5 sec, the dishwasher plays a short beep. Switch On the machine, the display shows "0OF". - To ENABLE: Switch On, then switch Off the machine. Keep the P button pressed for 5 sec. At the end of 5 sec, the dishwasher plays a short beep. Switch On the machine, the display shows "oOn".
LOADING THE RACKS
UPPER RACK
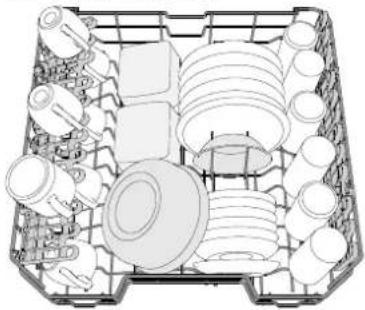
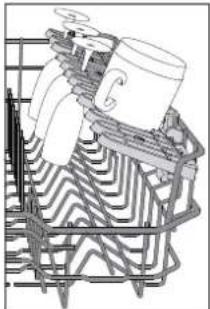
Load delicate and light dishes: glasses, cups, saucers, low salad bowls.
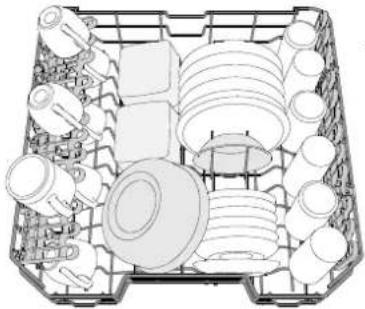
(loading example for the upper rack)
ADJUSTING THE HEIGHT OF THE UPPER RACK
The height of the upper rack can be adjusted: high position to place bulky crockery in the lower basket and low position to make the most of the tip-up supports by creating more space upwards and avoid collision with
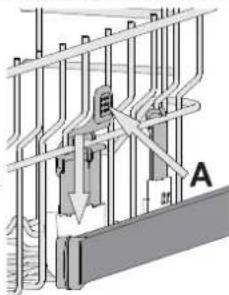
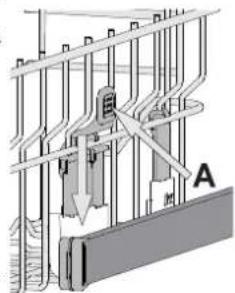
The upper rack is equipped with an Upper Rack height adjuster (see figure). Without pressing the levers, lift it up by simply holding the rack sides, as soon as the rack is stable in its upper position. To restore to the lower position, press the levers A at the sides of the rack and move the basket downwards.
We strongly recommend that you do not adjust the height of the rack when it is loaded. NEVER raise or lower the basket on one side only.
FOLDABLE FLAPS WITH ADJUSTABLE POSITION
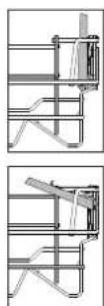
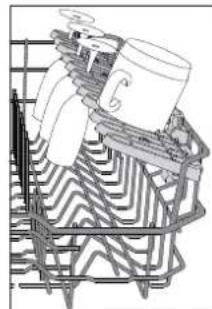
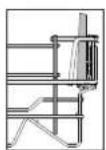
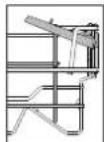
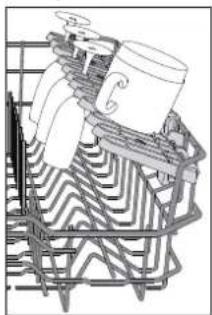
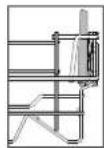
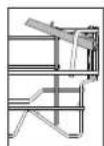
The side foldable flaps can be folded or unfolded to optimize the arrangement of crockery inside the rack.
Wine glasses can be placed safely in the foldable flaps by inserting the stem of each glass into the corresponding slots.
Depending on the model:
To unfold the flaps, slide them up and rotate, or release them from the snaps and pull them down.
- To fold the flaps, rotate them and slide them down, or pull them up and attach them to the snaps.
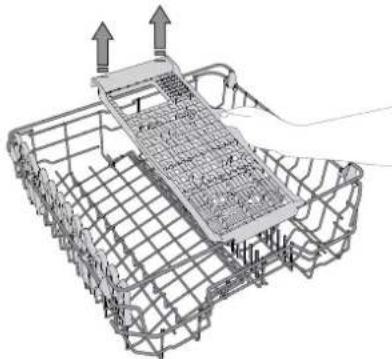
SLIDING TRAY
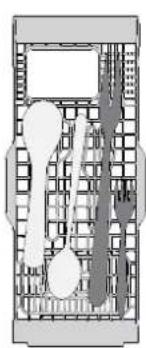
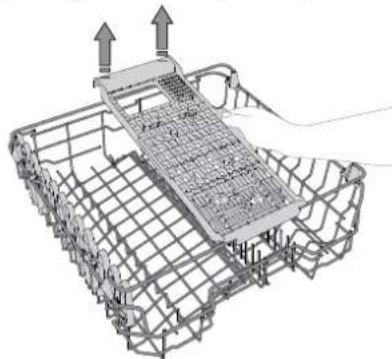
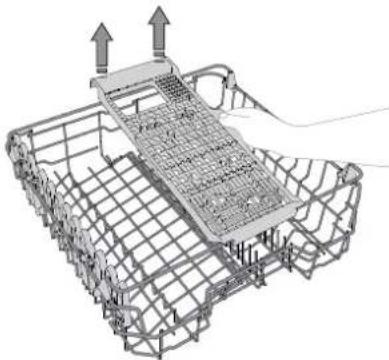
The upper rack is fitted with a sliding tray which can be used to hold small crockery and cutlery. For optimum washing performance, avoid positioning bulky crockery directly below the tray. The tray is removable.
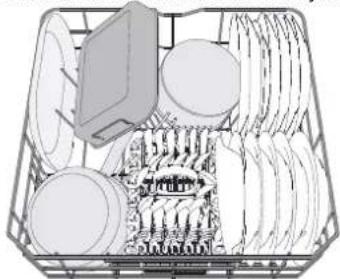
LOWER RACK
For pots, lids, plates, salad bowls, cutlery, etc. Large plates and lids should ideally be placed at the sides to avoid interference with the spray arm.
The lower rack has tip-up supports which can be used in a vertical position when arranging plates or in a horizontal position (lower) to load pans and salad bowls easily.
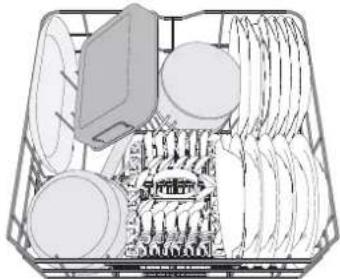
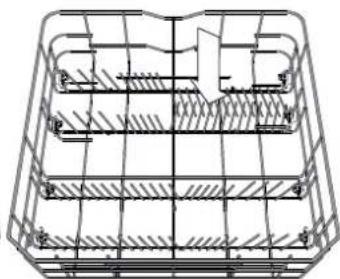
(Loading example for the lower rack)
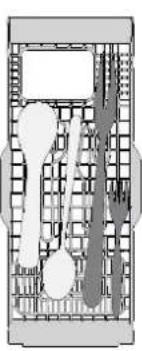
CUTLERY BASKET
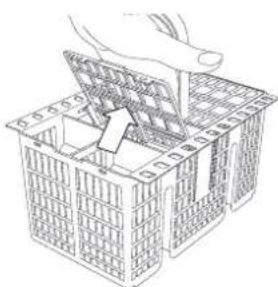
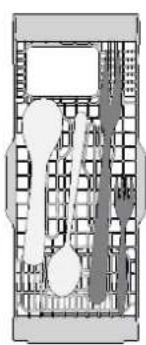
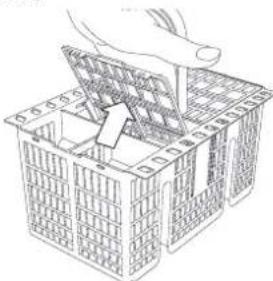
The basket is equipped with top grilles for improved cutlery arrangement. The cutlery basket should be positioned only at the front of the lower rack.
Knives and other utensils with sharp edges must be placed in the cutlery basket with the points facing downwards, or they must be positioned horizontally in the tip-up compartments on the upper rack.
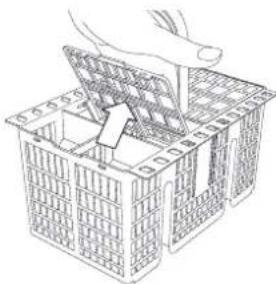
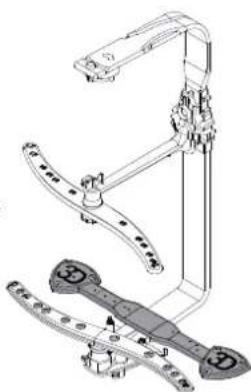
3D ZONE WASH
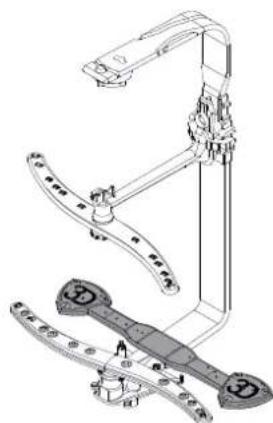
3D Zone Wash uses additional water jets located both in the lower and upper part of the dishwasher (marked with orange color) to wash more intensively heavily soiled items by increasing water coverage on dishes.
Example: Load pots and casseroles facing the lower part of the 3D Zone Wash components and activate the 3D Zone Wash option on the panel.
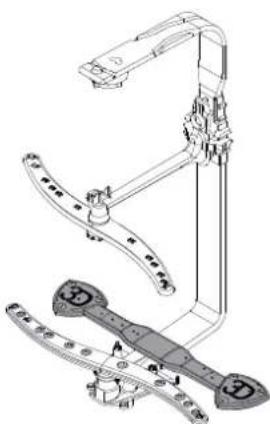
DAILY USE
1. CHECK WATER CONNECTION
Check that the dishwasher is connected to the water supply and that the tap is open.
2. SWITCH ON THE DISHWASHER
Press the ON/OFF button.
3. LOAD THE RACKS
(see LOADING THE RACKS).
4. FILLING THE DETERGENT DISPENSER
5. CHOOSE THE PROGRAM AND CUSTOMISE THE CYCLE
Select the most appropriate program in accordance with the type of crockery and its soiling level (see PROGRAMS DESCRIPTION) by pressing the P button.
Select the desired options (see OPTIONS AND FUNCTIONS).
6. START
Start the wash cycle by pressing the START/Pause button. When the program starts you hear a beep.
7. END OF WASH CYCLE
The end of the wash cycle is indicated by beeps and the display shows End. Open the door and switch off the appliance by pressing the ON/OFF button.
Wait for a few minutes before removing the crockery to avoid burns. Unload the racks, beginning with the lower one.
The machine will switch off automatically during certain extended periods of inactivity, in order to minimise electricity consumption. If the crockery is only lightly soiled or if it has been rinsed with water before being placed in the dishwasher, reduce the amount of detergent used accordingly.
MODIFYING A RUNNING PROGRAM
If a wrong program was selected, it is possible to change it, provided that it has only just begun: press and hold the ON/OFF button, the machine will switch off. Switch the machine back on using the
ON/OFF button and select the new wash cycle and any desired options; start the cycle by pressing the START/PAUSE button.
Without switching off the machine, open the door (beware of HOT steam!) and place the crockery inside the dishwasher. Close the door and press the START/PAUSE button; the cycle will begin from the point at which it was interrupted.
ACCIDENTAL INTERRUPTIONS
If the door is opened during the wash cycle, or if there is a power cut, the cycle stops. Once the door has been closed or the electricity supply is restored, to start again the cycle from where it was interrupted, press the START/PAUSE button.
To disable the DEMO MODE the following actions must be carried out in sequence, without breaks. Switch the machine ON and then switch it OFF again. Press the DELAY button until the buzzer is heard. Switch the machine on again. The "dOF" indicator flashes and then turns OFF.
ADVICE AND TIPS
TIPS
Before loading the baskets, remove all food residues from the crockery and empty the glasses. You do not need to rinse beforehand under running water.
Arrange the crockery so that it is held in place firmly and does not tip over; and arrange the containers with the openings facing downwards and the concave/convex parts placed obliquely, thus allowing the water to reach every surface and flow freely.
Warning: lids, handles, trays, and frying pans do not prevent the sprayer arms from rotating.
Place any small items in the cutlery basket.
Very soiled dishes and pans should be placed in the lower basket because in this sector the water sprays are stronger and allow a higher washing performance.
After loading the appliance, make sure that the sprayer arms can rotate freely.
UNSUITABLE CROCKERY
- Wooden crockery and cutlery.
- Delicate decorated glasses, artistic handicraft, and antique crockery. Their decorations are not resistant.
- Parts in synthetic material which do not withstand high temperatures. Copper and tin crockery. Crockery soiled with ash, wax, lubricating grease, or ink.
The colours of glass decorations and aluminium/silver pieces can change and fade during the washing process. Some types of glass (e.g. crystal objects) can become opaque after a number of wash cycles too.
DAMAGE TO GLASS AND CROCKERY
- Only use glasses and porcelain guaranteed by the manufacturer as dishwasher safe.
- Use a delicate detergent suitable for crockery.
- Collect glasses and cutlery from the dishwasher as soon as the wash cycle is over.
TIPS ON ENERGY SAVING
- When the household dishwasher is used according to the manufacturer's instructions, washing tableware in a dishwasher usually consumes less energy and water than hand dishwashing.
- To maximize dishwasher efficiency, it is recommended to start the wash cycle once the dishwasher is fully loaded. Loading the household dishwasher up to the capacity indicated by the manufacturer will contribute to energy and water savings. Information on correct loading of tableware can be found in the LOADING THE RACKS chapter.
- In case of partial loading, it is recommended to use dedicated wash options if available (Half load/Zone Wash, Multizone), filling up only selected racks. Incorrect loading or overloading the dishwasher may increase resource usage (such as water, energy, and time, as well as increase noise level), reducing cleaning and drying performance.
- Manual pre-rinsing of tableware items leads to increased water and energy consumption and is not recommended.
HYGIENE
To avoid odor and sediment that can accumulate in the dishwasher, run a high-temperature program at least once a month. Use a teaspoon of detergent and run it without loading to clean your appliance.
CARE AND MAINTENANCE
CLEANING THE FILTER ASSEMBLY
Regularly clean the filter assembly so that the filters do not clog and that the waste water flows away correctly.
Using the dishwasher with clogged filters or foreign objects inside the filtration system or spray arms may cause unit malfunction, resulting in loss of performance, noisy operation, or higher resource usage.
The filter assembly consists of three filters which remove food residues from the washing water and then recirculate the water.
The dishwasher must not be used without filters or if the filter is loose.
At least once per month or after each 30 cycles, check the filter assembly and if necessary clean it thoroughly under running water, using a non-metallic brush and following the instructions below:
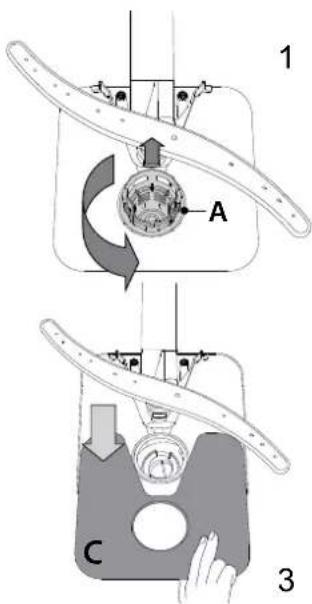
- Turn the cylindrical filter A in an anti-clockwise direction and pull it out (Fig 1).
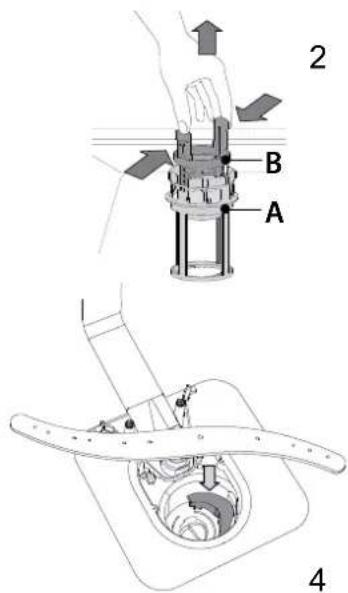
- Remove the cup filter B by exerting a slight pressure on the side flaps (Fig 2).
- Slide out the stainless-steel plate filter C (Fig 3).
- In case you find foreign objects (such as broken glass, porcelain, bones, fruit seeds, etc.), please remove them carefully.
- Inspect the trap and remove any food residues. NEVER REMOVE the wash-cycle pump protection (black detail) (Fig 4).
After cleaning the filters, re-place the filter assembly and fix it in position correctly; this is essential for maintaining the efficient operation of the dishwasher.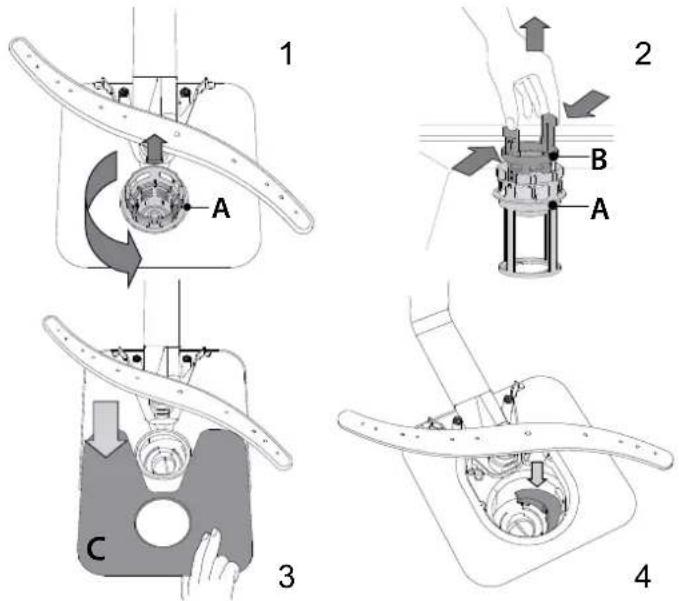
CLEANING THE WATER INLET HOSE
If the water hoses are new or have not been used for an extended period of time, let the water run to make sure it is clear and free of impurities before performing the necessary connections. If this precaution is not taken, the water inlet could become blocked and damage the dishwasher.
CLEANING THE SPRAY ARMS
On occasions, food residue may become encrusted onto the spray arms and block the holes used to spray the water. It is therefore recommended that you check the arms from time to time and clean them with a small non-metallic brush.
To remove the upper spray arm, turn the plastic locking ring in a clockwise direction. The upper spray arm should be replaced so that the side with the greater number of holes is facing upwards.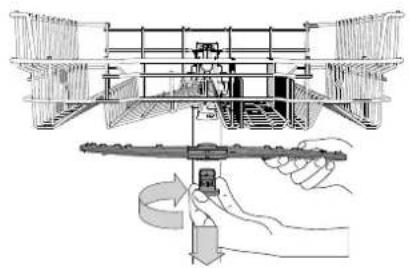
The lower spray arm may be removed by pulling it upwards.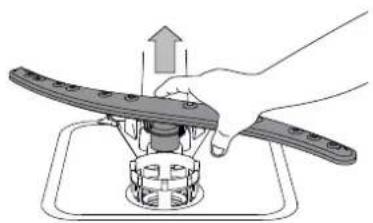
WATER SOFTENING SYSTEM
Water softener automatically reduces water hardness, consequently preventing scale buildup on heater, contributing also to better cleaning efficiency.
This system regenerates itself with salt, therefore it is required to refill salt container when empty.
Frequency of regeneration depends on water hardness level setting - regeneration takes place once per 6 Eco cycles with water hardness level set to 3.
Regeneration process starts in final rinse and finishes in drying phase, before cycle ends.
- Single regeneration consumes: ~3.5 L of water;
- Takes up to 5 additional minutes for the cycle; Consumes below 0.005kWh of energy.
TROUBLESHOOTING
In case your dishwasher doesn't work properly, check if the problem can be solved by going through the following list.
For other errors or issues please contact authorized After-sales Service which contact details can be found in the warranty booklet.
Spare parts will be available for a period of either up to 7 or up to 10 years, according to the specific Regulation requirements.
| PROBLEMS POSSIBLE CAUSES SOLUTIONS | |
| Salt indicator is lit | Salt reservoir is empty (after refill the salt indicator may remain lit for several wash cycles). | Refill reservoir with salt (for more information - see page 2). Adjust water hardness (see table, page 2). |
| Rinse aid indicator is lit | Rinse aid dispenser is empty (after refill the rinse aid indicator may remain lit for several wash cycles). | Refill dispenser with rinse aid (for more information - see page 2). |
| The dishwasher won't start or does not respond to commands. | The appliance has not been plugged in properly. Insert the plug into the socket. |
| Power outage. | For safety reasons, dishwasher will not restart automatically when power returns. Press the START/Pause button to resume the cycle. |
| The dishwasher door is not closed.ActiveDry pin is not pulled in. | Vigorously push the door until you hear the "click". |
| Cycle is interrupted by door opening for >4 sec. | Close the door and press START/Pause. |
| It does not respond to commands.Display shows: F9 or F12 and both On/Off and START/Pause LEDs are blinking rapidly. | Switch off the appliance by pressing the ON/OFF button, switch it back on after approximately one minute and restart the program. If problem persists, unplug the appliance for 1 minute, then plug it back in. |
| The dishwasher won't drain. Display shows: F3 and both On/Off and START/Pause LEDs are blinking rapidly. | The wash cycle has not finished yet. Wait until the wash cycle finishes. |
| The drain hose is bent. Check that the drain hose is not bent (see INSTALLATION INSTRUCTION). |
| The sink drain pipe is blocked. Clean the sink drain pipe. |
| The filter is clogged up with food residues. Clean the filter (see CLEANING THE FILTER ASSEMBLY). |
| The dishwasher makes excessive noise. | The dishes are rattling against each other. | Position the crockery correctly (see LOADING THE RACKS). |
| An excessive amount of foam has been produced. | The detergent has not been measured out correctly or it is not suitable for use in dishwashers (see FILLING THE DETERGENT DISPENSER). Restart dishwasher by pressing the DRAIN button (see OPTIONS AND FUNCTIONS) and run new program without detergent. |
| The dishes are not clean. | The crockery has not been arranged properly. | Arrange the crockery correctly (see LOADING THE RACKS). |
| The spray arms cannot rotate freely, being hindered by the dishes. | Arrange the crockery correctly (see LOADING THE RACKS). |
| The wash cycle is too gentle. Select an appropriate wash cycle (see PROGRAMS TABLE). |
| An excessive amount of foam has been produced. | The detergent has not been measured out correctly or it is not suitable for use in dishwashers (see FILLING THE DETERGENT DISPENSER). |
| The cap on the rinse aid compartment has not been shut correctly. | Make sure the cap of the rinse aid dispenser is closed. |
| The filter is soiled or clogged. Clean the filter assembly (see CARE AND MAINTENANCE). |
| There is no salt. Fill the salt reservoir (see FILLING THE SALT RESERVOIR). |
| The dishwasher does not fill the water. Display shows: and F6, both On/Off and START/Pause LEDs are blinking rapidly. | No water in the water supply or the tap is closed. | Make sure there is water in the water supply or the tap running. |
| The inlet hose is bent. | Make sure the inlet hose is not bent (see INSTALLATION) reprogram the dishwasher and reboot. |
| The sieve in the water inlet hose is clogged; it is necessary to clean it. | After having carried out the verification and cleaning, turn off and turn on the dishwasher and restart a new program. |
| Dishwasher finishes the cycle prematurely. Display shows: F15 and both On/Off and START/Pause LEDs are blinking rapidly. | Drain hose positioned too low or siphoning into home sewage system. | Check if end of drain hose is placed at correct height (see INSTALLATION). Check for siphoning into home sewage system, install air admittance valve if necessary. |
| Air in water supply. | Check water supply for leaks or other issues letting air inside. |
Policies, standard documentation, ordering of spare parts and additional product information can be found by:
Using QR code on your product. - Visiting our website docs.hotpoint.eu and parts-selfservice.whirlpool.com - Alternatively, contact our After-sales Service (See phone number in the warranty booklet).
When contacting our After-sales Service, please state the codes provided on your product's
identification plate.
The model information can be retrieved using the QR-Code reported in the energy label. The label also
includes the model identifier that can be used to consult the portal of the registry at
https://eprel.ec.europa.eu.

3A NOLUyABAHHE HA NO-NOPO6HA INHOPMALUN,MOJIA,CKAHHPAUTE QR KODA HABAUYPEI

Ipei Da n3non3BaTe ypeDa, npooyete BnHMaTeJHo IHCTpyKuInTe 3a 6e3OnacHOCT.
Product description
Device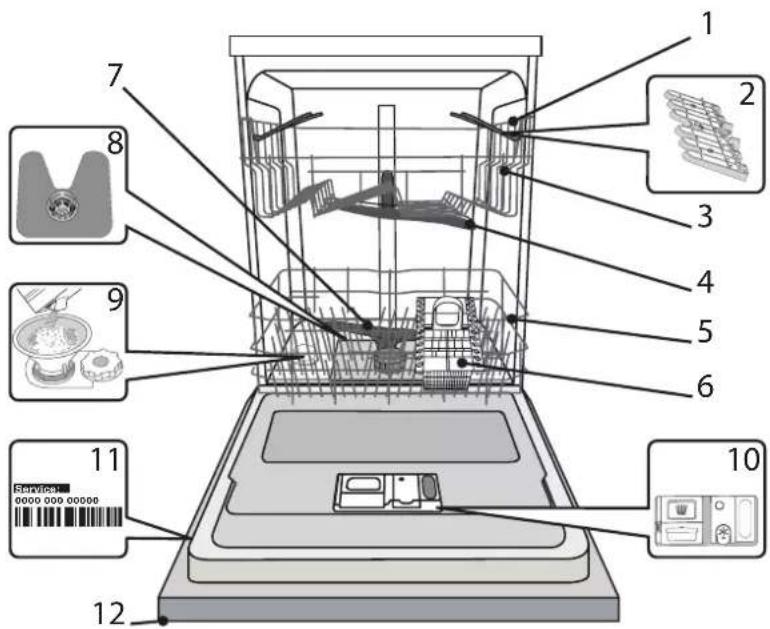
- Hot water connection
- Cold water connection
- Regulator for the hot water temperature
- Upper spray arm 5. Lower basket
- Cutlery basket 7. Lower spray arm 8. Filter
- Salt reservoir 10. Dispensers for rinse aid and
detergent
- Data plate
- Control panel
Control panel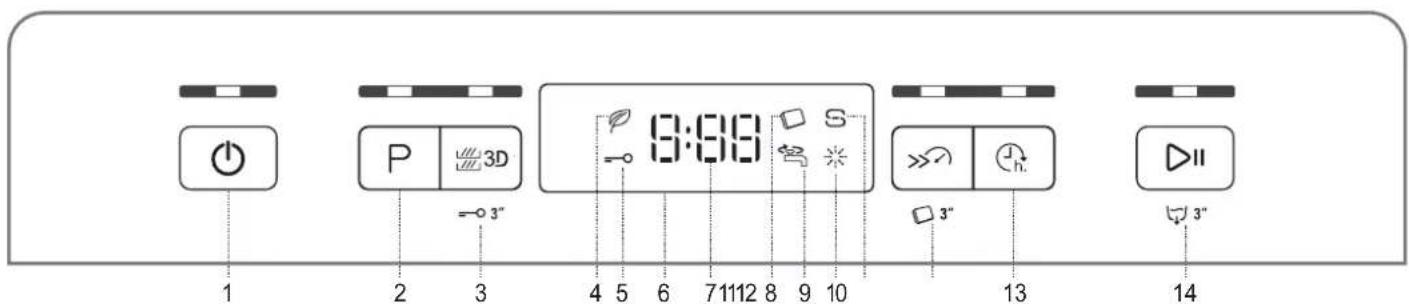
- On/Off button with indicator light
- Program selection button with indicator light
- Button "3D Zone Wash" with light indicator / lock button
- Light indicator for Eco program. 5. Light indicator for lock button 6. Dispenser. 7. Indicator for program number and remaining time
- Light indicator for tablets
- Light indicator for water supply tap closed
- Light indicator for rinse aid refill 11. Light indicator for salt refill
- Button for "Short Time" with light indicator / tablet
- Button for delay with light indicator
- Button Start/Pause with light indicator / stop
USE FOR FIRST WASH
Salt, rinse aid and detergent
LIGHT USE FOR FIRST WASH
After installation, remove the protective elements from the ends and keep the parts for the top end.
REFILLING THE SALT RESERVOIR
The salt container prevents the formation of limescale on the heating elements and functional components of the machine.
The salt reservoir must never be left empty. It is important to set the water hardness. The salt reservoir is located in the lower part of the machine (see PRODUCT DESCRIPTION) and must be filled when the salt indicator light comes on.
- Remove the lower basket and unscrew the cap of the reservoir (counterclockwise). 2. Only do this the first time: fill the salt reservoir with water.
- Place the funnel (supplied) into the salt reservoir opening (about 1 kg); it is not necessary to add water.
- Remove the funnel and wipe away any salt residue.
Make sure the cap is screwed on correctly, so that during the washing program the detergent cannot enter the reservoir (this could irreparably damage the water softener).
When it is necessary to add salt, it is essential to do this before starting a washing cycle, to avoid corrosion.
SETTING THE WATER HARDNESS
For the water softener to work perfectly, it is especially important that the water hardness setting is based on the actual hardness of the water in your home. You can obtain this information from your local water supplier.
The water hardness level is set by default.
Turn on the appliance by pressing the ON/OFF button. - Turn off the appliance by pressing the ON/OFF button. Press and hold the START/PAUSE button for 5 seconds, until you hear an acoustic signal. Turn on the appliance by pressing the ON/OFF button. The level of the currently selected hardness and the salt indicator light will flash. - Press the P button to select the desired hardness level (see WATER HARDNESS TABLE).
| Таблиca Ha Тьрдостта на ВODаТа |
| НИВО | °dH
Германский
Градусn | °fH
ФерECHN
Градусn | °Clark
Англиский
Градусa |
| 1 | Мека 0-60-100-7 | | | |
| 2 | Умeperна 7-1111-20 | 8-14 | | |
| 3 | Среда Na 12-16 | 21-29 | 15-20 | |
| 4 | Тьрда | 17-34 | 30-60 | 21-42 |
| 5 | Мною Тьрда | 35-50 | 61-90 | 43-62 |
- Turn on the appliance by pressing the ON/OFF button.
The setting is saved!
After completing the procedure, run a program without dishes.
Use only salt that is specifically designed for household appliances.
When the machine is on, the indicator light for the detergent compartment is on.
If the detergent compartment is not filled, it is possible that the water inlet valve for the heating element may be damaged due to pressure.
The use of detergent is recommended for all types of baby products.
FILLING THE DISPENSER FOR RINSE AID
Rinse aid helps the drying process. The rinse aid dispenser must be filled when the indicator light for rinse aid is on.
For checking the light.
- Open the dispenser by pressing the button on the lid and pulling it out.
- Carefully add rinse aid up to the maximum (110 ml) level mark on the filling opening. If this happens, wipe up the spill immediately with a dry cloth.
- Press the lid down until it clicks, to close it. Never pour rinse aid directly into the tub.
ADJUSTING THE AMOUNT OF RINSE AID
If you are not completely satisfied with the drying results, you can adjust the amount of rinse aid used.
Turn on the dishwasher with the ON/OFF button. - Turn it off with the ON/OFF button. - Press the START/PAUSE button three times - you will hear a sound signal. Turn on the ON/OFF button. The number of the currently selected program and the rinse aid indicator light will flash. Press the START/PAUSE button to select the desired program and the amount of rinse aid. - Turn off the ON/OFF button.
The cycle is finished!
If the rinse aid level is set to 1 (ECO), rinse aid will be dispensed. The rinse aid indicator light will come on if the rinse aid is depleted. Depending on the model of the dishwasher, up to 5 levels can be set. The factory setting is specific for each model; follow the instructions above to check the setting on your machine. - If you see water stains or spots on the dishes, set a lower number (2-3). - If there are water drops or limescale on the dishes, set a higher number (4-5).
FILLING THE DISPENSER FOR DETERGENT
To administer the drug, use the device. Place the drug only in the dry reservoir D. Insert the required amount of the drug after first removing the syringe.
- When measuring the drug, refer to the information in the manual to add the appropriate amount. The reservoir D has an indicator to help with dosing the minimum amount of drug.
- Any remaining drug from the syringe should be discarded after use.
- Close the drug reservoir cap by pressing it upward until the locking mechanism engages securely.
The drug reservoirs are disposed of automatically at the correct time according to the program.
If multi-functional drugs are used, we recommend pressing the button labeled with the symbol that corresponds to the desired program for best results in washing and drying.
Using a drug that is not intended for this dishwasher may cause malfunction or damage to the device.
LOADING THE BASKETS
UPPER BASKET
Place the dishes and cutlery as follows: glasses, cups, bowls, and plates for the salad.
(Example of loading the upper basket)
ADJUSTING THE HEIGHT OF THE UPPER BASKET
The height of the upper basket can be adjusted: high position for placing large dishes in the lower basket, and low position for more convenient loading of the upper basket, creating more space above and avoiding
collision with the lower basket. The upper basket is equipped with a height adjuster.
To adjust the height of the upper basket (see figure), without pressing the buttons, simply pull the basket upward and release it once it is stable in the higher position.
3a Da Bb3CTaHOBHTe NO-HNCKATA NO3NUJATa, HAITNCHETe IIOCTOBETe AOTCTpaHn HA KOHNuTaI N PpeMeCTeKoWNuTaHaDony.
Cnilno npenopbVbame da he perynipate Bucounhata Ha KowHncaTa, Korato e 3apeDeHa. HNKORA He nobDraTe nn cnyckaTc KoWncaTa caMo ot eHaTa ctpaHa.
CfBAEMN KANALIN C PEGYINPYEMA NO3UN
CtpaHmHHTe Kaanu Morat da ce CbBbAT Nn pa3BbAT, 3 da ce ONIMM3npaNopeKdaHeTo h cboDBeB KOWHnUcTa.
YaHHTe 3a BINO MOrT Da Ce NoCTaBRT 6e3oNACHO CBrBaEMITE KaNAU, KaTO CTOnHeTo HA BCRA KaHa Ce BMbKHe B CbOTBeTHNI Poouen. B 3aBcIMOCT OT MoDA:
3a da pa3fheTe KaunaHte, e Heo6xOIMMo Da rN Nb3Hete HArope n Da rN 3aBbPTnE nn da rN OCB0bOJTe OT 3akOnyAkanTE NM dA rN N3dbPaTe HADONY.
3a da cTbHeTe KaNaUte, e Heo6xOIMMo Da rN 3aBbPTnTe N da nIb3HeTe KaNaUte HADONY Nn Da rN dPbHHeTe HaRope N da rN 3aKaaHTe 3a KaONuJIKNTE.
ПльзгашаCEТАВИКА
TOPHATA KOUHnua e O60pyDbaHa c nB3raa Ce TaNyka, KOrTo MoKe da ce N3NON3Ba 3a Dpe6HN CbDObe IN npIN6OpN. 3a ONTMaJIHa eEeKTHBNOCT PnMnHe N36BraTe Da pa3nonaraTe ObEMHcDObe NOd TaNvKata.TaNvKata e NoDnXHa.
ДОЛHA KОшниа
3a TeHJKePN, Kanau, uHHn, Kyn 3a Canata n T.H. Edpnte uHHn u Kanaun CneBBA uHea Hc Ce NOCTABT OTCpaHn, 3a da He Bb3PpenrTcBAT pa3npbCKBaUTo pAmo. DonHaT KaOHnua mHa pa3rBbAun ce ONOpN, KOHTO MoRat Da ce N3NON3BaT BbB BepTKKaIHO NOLOXeHne npu NoDPexJaHe Ha uHHm uIN B XOpN3OHTaIIHa N03uHn 3a JecHO NOCTABRe Ha Tabu N Kyu 3a CaIata.
(npumep 3a 3apekxdane Ha dohama kouhuua)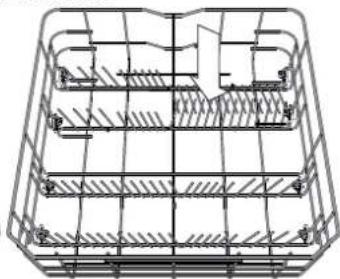
KOWHnUKA 3A INPUN5OPN
O6opyBaHa e c roHn peWetKn 3a no- do6po nopeXdaHe Ha np6opnte. Ta Tp6Ba da ce no3nIOHnpca camo ot npedHata cTpaHa ha DOHATA KOUHnua. HoxOBete n dpyrnte np6Opnc octpm pb6Obe Tpr6Ba da ce NoCTABRT B KooHHckata 3a np6Opnc octPTeTa HADONY nn Da ce no3nIOHnpat XOPHNOTJALHO B HAKJIahNtce OTDeHnHa HTopHaTc KOUHnua.
3D ZONE WASH
3D Zone Wash: non-abrasive cleaning agents, placed in the dispenser and sprayed onto the laundry in the washing machine (for orange stains) to remove heavy soiling, while increasing the water coverage on the fabrics. Example: for greasy pans and casseroles (non-stick surfaces), apply directly to the components of 3D Zone Wash and activate the 3D Zone Wash function from the tablet.
DAILY USE
1. CHECKING THE WATER CONNECTION
Make sure the washing machine is connected to the water supply and the tap is open.
2. SWITCHING ON THE WASHING MACHINE
Press the ON/OFF button.
3. LOADING THE LAUNDRY (SEE LOADING THE LAUNDRY)
4. ADDING THE DETERGENT
5. SELECTING THE PROGRAM AND OPTIONS
Select the appropriate program according to the type of fabrics and degree of soiling (see PROGRAM DESCRIPTION) by pressing the P button.
Select the desired options (see OPTIONS AND FUNCTIONS).
6. START
Start the program by pressing the START/PAUSE button. An audible signal is heard when the program starts.
7. END OF PROGRAM
The end of the program is signaled by an audible signal and END is displayed on the display. Open the door and unload the appliance by pressing the ON/OFF button.
Use a little detergent, spread the dishes, to avoid evaporation. Remove the dishes, starting from the bottom rack.
The machine switches off automatically after a certain period of inactivity, to reduce energy consumption to a minimum. If the dishes are only slightly dirty or if they have been rinsed with water before being placed in the dishwasher, reduce the amount of detergent used accordingly.
USEFUL TIPS
TIPS
Before loading the dishes, remove all leftover food from the dishes and wipe the dishes. It is not necessary to rinse them beforehand with hot water.
Arrange the dishes so that they are well covered and do not turn over; place the dishes with the openings facing down and arrange the bowls/plates so that the water can reach every surface and flow freely.
Warning: knives, forks, spoons and other utensils must not protrude above the top of the spray arms.
Place the small items in the cutlery basket. Very dirty pans should be placed in the lower basket, as the water jet is stronger there and allows for better cleaning efficiency. Before starting the program, check that the spray arms can rotate freely.
DISHES NOT SUITABLE
- Wooden dishes and utensils.
- Decorative items, handcrafted dishes and antiques. Their decorations are not resistant. - Parts made of synthetic material that are not resistant to high temperatures. - Copper and tin dishes. Dishes with glued parts, or dishes made of porous material.
The colors of glass decorations and parts made of aluminum/silver may change and fade during the washing process. Some types of glass (e.g., crystal glasses) may become opaque after several washes.
DAMAGE TO GLASS AND DISHES
- Use only glass and porcelain dishes for which the manufacturer guarantees that they are suitable for dishwashers. - Use a mild detergent suitable for your dishes. - Remove dishes and utensils from the dishwasher as soon as the washing program ends.
PROGRAMMING THE WASHING PROGRAM
If you have selected the wrong program, you can change it provided you have not started it yet: Press and hold the BKN./MKN. button, the machine turns off. Turn the machine back on with the BKN./MKN. button and select the new program for washing and drying; start the program by pressing the START/PAUSE button.
ADDING LAUNDRY
To add laundry, open the door (be careful of the hot water), place the laundry inside the drum. Close the door and press the START/PAUSE button, the program resumes from the point where it was interrupted.
INTERRUPTING THE PROGRAM
If the door was opened during a washing or drying program, the program stops. After closing the door and resuming the program, press the START/PAUSE button to resume the program from the point where it was interrupted.
To activate the demonstration mode "DEMO MODE", perform the following steps in sequence, without interruption. Turn the machine on and off. Press the DELAY button until you hear a confirmation beep. Turn the machine on again. The "dOF" indicator lights up, after which it goes out.
ENERGY SAVING TIPS
When the dishwasher is used according to the manufacturer's instructions, washing dishes in the dishwasher usually consumes less energy and water compared to washing by hand. To maximize the efficiency of the dishwasher, it is recommended to start a full load, after the machine is fully loaded. Loading the dishwasher to its capacity, as recommended by the manufacturer, helps save energy and water. Information about the correct loading of the dishes can be found in the LOADING THE DISHES section. For partial loads, it is recommended to use the specially designed programs (Half load/ Zone Wash/ Multizone), filling only the selected baskets. Incorrect loading or overloading the dishwasher may increase consumption of resources (such as water, energy, and time, as well as increase the noise level), which reduces the efficiency of washing and drying. - Pre-rinsing dishes by hand leads to increased consumption of water and energy, therefore it is not recommended.
MAINTENANCE
To prevent limescale and odors that can accumulate in the dishwasher, run a program at a high temperature at least once a month. Use a dishwasher cleaner and run an empty cycle, without loading dishes, to clean it.
CARE AND MAINTENANCE
CLEANING THE FILTER ASSEMBLY
Clean the filter assembly regularly, so that the filters do not clog and the water drains properly.
Using the dishwasher with clogged filters or foreign objects in the filter system or the spray arms can affect the operation and lead to a reduction in performance, noise during operation, or increased resource consumption.
The filter assembly consists of three filters that remove food residues from the wash water and then purify the water.
The dishwasher must not be used without a filter if the filter is damaged.
At least once a month, and after every 30 cycles, check the filter and, if necessary, clean it carefully with warm water, using a soft brush and following the instructions below:
1. Turn the coarse filter counterclockwise and remove it (Fig. 2.1). 2. Remove the fine filter by pressing it down on the side tabs (Fig. 2.2). 3. Pull the fine filter plate away from the bottom of the tub (Fig. 2.3). 4. If there are any foreign objects (such as broken glass, porcelain, bones, fruit seeds, etc.), carefully remove them. 5. Rinse the filters and put them back in place. NEVER place the filters in the dishwasher for washing (black element) (Fig. 4).
After cleaning the filter, replace the filter block and close the coarse filter properly; this is essential for the correct operation of the dishwasher.
CLEANING THE WATER INLET HOSE
If the water inlet hose is new or has not been used for a long time, let the water run to make sure it is clear and free of blockages before connecting the hose. If this precaution is not taken, the water inlet may become blocked and damage the dishwasher.
CLEANING THE SPRAY ARMS
Sometimes, food residues can dry on the spray arms and block the water spray holes. It is therefore recommended to check the arms from time to time and clean them with a soft brush.
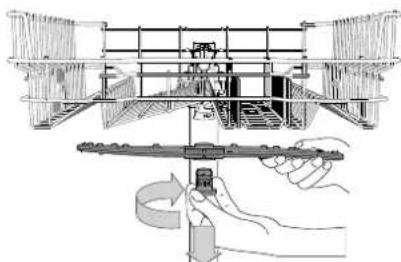
To remove the upper spray arm, turn the plastic locking ring clockwise. The upper spray arm should be positioned so that the side with more holes faces upward.
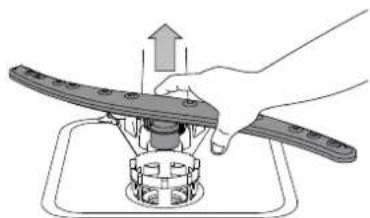
You can remove the lower spray arm by pulling it upward.
WATER SOFTENING SYSTEM
The water softener automatically reduces water hardness, thereby preventing scale buildup on the heating element and improving cleaning efficiency.
The system regenerates itself with salt, so it is necessary to refill the salt container when it is empty.
The frequency of regeneration depends on the water hardness setting - regeneration occurs after every cycle when the water hardness level is set to 3. The regeneration process starts during the final rinse and ends during the drying phase, before the cycle ends.
- Each regeneration uses approximately 3.5 liters of water; 5 additional minutes are added to the cycle; less than 0.005 kWh of energy is consumed.
TROUBLESHOOTING
In case of a malfunction, the machine may not operate normally. Check if the problem can be resolved by following the simple list. For other faults or malfunctions, contact the after-sales service department. You can find the contact details in the warranty booklet. Spare parts will be available for a period of 7 to 10 years, in accordance with the specific requirements of the regulations.
| ПОНБЛЕМВВБЗМОЖН ПИЧИНРЕŠЕНIA |
| S Иndикаторьтза сол CBETN | Pe3eRbOaRbT 3a сол e пазен. (След ддьлване на сол ИndикаторьТ можеда оостане д CBETN OUIE HЯКOLKO ZICKЛВа на MIIeHé). | Hanghnete OTHOBO pe3eRbOapara cIc scol (3a NOBee INHΦOPMAZIN - Bx. cIrp.2).Pergunpaite TBpIooCTTa Na BOATA - BIXTE Ta6NIzCuata, cIrp.2. |
| Иndикаторьтза петралata 3a 6blsckCBETN | Доэторьтза петралat 3a 6blsck e пazhen. (След ддьлване на петралat 3a 6blsck INHДИСКТВМОJOde остане д CBETN OUIE HЯКOLKO ZICKЛВа Na MIIeHé). | Hanghnete OTHOBOdo3aTopaNa pетралata 3a 6blsck (3a NOBee INHΦOPMAZIN - Bx. cIrp.2). |
| Сыdomинната машлиа Heсторпа иппrelрага на komанд. | UpeIbT He e BKNIOUeB KONTAKTA KaKTTo TPr6Ba.В | Klouche tsüencena B KOHTAKTA. |
| Спиране на зхранванeto. | От сбобразения 3a 6beONACHOCT sbDOMINHLATA MAIMINA MОJOse Ддсгетра abTOMATUHNo cIed nUCKAne Ha neEkeTPO3axPANBAHTo. HATINCHete bTyTOHa CTAPT/Play3a, 3a da b3ozbHOBITE ZICKJIbA. |
| ВразчкATA Na CBdOMINHLATA He e 3aTbOpeHua. | HATINCHete BratYkCATA cIINHO, DOKATOуeTe uPakBaHe. |
| СИФТВActiveDry He e I3dIpbnAH. | 3aTbOpeTe BratYkCATA B pAMKITE Ha 4 cekyni n HATINCHete CTAPT/Play3a. |
| СИKbIbT e PReKbCSHAT OT OBAPRNe Ha BpTAYKATA 3a Nobeue ot 4 cekyni. | ИЗкLIOуe Uyeda, kato HATINCHete 6byTOHa BKL./M3KJI, BKNIOуe To OTHOBO cIed okolo eda MInHya n PecrTAPRIAPITe npORpAMATA. Ako npObIeMbT He 6bde ot cTpanen, M3KIOuTe Uyeda ot ΜIeCENcela 3a 1 MInHya n OTHOBO BKNIOUe ΜIeCENcela. |
| Сыdomинната машлиа He StOToYBa.Ha dinclnnre ce no-KAZBaF3 i CBETOДnOДITE 3a BkL./I3KJn. n 3a CTAPT/Play3a MIRAT 6bl3o. | Пограма Тс оше He e 3abByPruHnla. ИЗчakaite | пограма DA zabpym. |
| Маркут 3a ИЗTObVAH e npERbHAT. | Погерete Ддм Маркут 3a ИЗTObVAH He e npERbHAT (Ex. INHCTPYKLIYRA 3A MOHTAX). |
| Трьбота 3a ИЗTObVAH He MIBKATA e 3anyuHema.П | чichtete Trb6aTza 3a I3TObVAH Ha MIBKATA. |
| ФIMТьрь e 3anyuH e cOstaTbUoi ot XpHа | Почichtete ФIMТьрь (Ex. IIOYNTBAHE HA OIIITbPHNA MEXAHIN3bM). |
| Сыdomинната Сбддьапrelkomерно Mногошum. | Сыддьапсгота Трakт Edin B Idrug. | Пог德ete Сыдоветe nprabINho (Ex. 3APEXDAHE HA KOLINUZITE). |
| Сбддоое се e релкалero ГOLMO KolINueCTBOЯHA. | Погерат БНЕ E ImeMepEN nprabINHO IMI He e NODXODUII 3A IN3NOB3BAH B CbDOMINHIMaIMHN (Ex. IDOTbBAHE HA DO3ATOPA 3A IIOYCTBAUIIPEPIAPAT). PecrTAPRIe MIMHATA MaIMHIA, kato HATINCHete 6byTOHa IN3TOBVAH (Ex. OIIUIVI N OIVHKUIN) n STApriPaiTe HOBA npORpAMBe 6ez noocntBaU qnpelapat. |
| Сыддье He ca louchteHi. | Сыддье He ca loudereHи KaKTo TPr6Ba. | Пог德ete Сыдоветe nprabINHO (Ex. 3APEXDAHE HA KOLINUZITE). |
| Раимьсвд�е рамене He MOrat da ce BvRptTcB6OJIoH, Ть кato ca TbB3PpeYanTcBAHn ot cBIOBete. | Пог德ete Сыдоветe nprabINHO (Ex. 3APEXDAHE HA KOLINUZITE). |
| СИКьТнHa ИЗМВВaH e TBbPde Iek. | ИЗберete похдУц LOKьнHa ИЗМВВaH (Ex.TABILULA C IPOPTPAMI). |
| Сбддоое сe PrelkaLero ГOLMO KolINueCTBOЯHA. | Погерат БНЕ E ImeMepEN nprabINHO IMI He e NODXODUII 3A IN3NOB3BAH B CbDOMINHIMaIMHN (Ex. IDOTbBAHE HA DO3ATOPA 3A IIOYCTBAUIIPEPIAPAT). |
| КадачATER Na OTdelenHToTo 3a NOMOUnH copeCTBO 3a IN3NIAKBAHne He e 3aTbOpeHaN ppabINHO. | Уberete ce, Que kanaquata Na Do3aTbOpara 3a NOMOUnH copeCTBO 3a IN3NIAKBAHne (Ex. OIIUIVI N OIVHKUIN) n StApriPaiTe HOBA npORpAMBe 6ez noocntBaU qnpelapat. |
| ФIMТьрь e 3ambRpceHиЗanyuHem.ПочichteteФ | Погньete Cыдьогетe nprabINHO (Ex. FRIKA N IOIDIPBXKA). |
| HЯma con. | Домьнгетe pe3eRbOapara 3a coN (Ex. IDOTbBAHE HA PE3EPBOAPARA 3A COJI). |
| Сыддье Машлиа на не заюда Ворд. | He ce podaba Ворда И Крань t e 3aTbOpeH. | Уberete ce, Que ce podaba Ворда И Крань t e OTbOpeH. |
| Маркут 3a podabaHа Ворда e npERbHAT. | Уberete ce, Que mapkytB 3a podabaHа Ворда He npERbHAT (Ex.kme INHCTALINIPAHE), BKVIOuChete HOBA npORpAMa Ha CbDOMINHATA n R pocrpatrie. |
| МржecтariatФIMТьВ Маркуta 3a podabaHа Ворда e 3anyuHem; HeobokOmo e da ro noocntIte. | След ИЗьнLBHBAHа npOBeRPaTa n NoocntBaHTo IN3KIOuTe E BKVIOuChete CbDOMINHATA MaIMHNa n Pocrpatrie HOBa npORpAMa. |
| Сыддье Машлиа спра рindупддьа пух dedуВ remeHIO.Ha dinclnnre ce noKAZBaI n 3a CTAPT/Play3a MIRAT 6bl3o. | MapkytB 3a IN3TOBArE e NOCTABeH TBbPde HIXKO IIN YOBATA ce IN3TOBVA B DMAMHATA KANAIINZAUINOHNA CnSTema. | Погерete Ддм КрагТ ha MAPkytA 3a IN3TOBVAe E NOCTABeH Ha pabINHATA BINOCHINHA (Ex.kme INHCTALINIPAHE). Погерete 3a IN3TOBVA B DMAMHATA KAHAMINZAQUINHNA CnSTema m ako e NeoboxOIMO, MONTpatrie To B3duuH vENTIL. |
| Вьзdux B CnSTemata 3a PodabaHа Ворда. | Погерete Спtemа 3a PodabaHа Ворда 3a TeOBoe Или dpyru nПробими, ВODEssdoDoNoHn Da HabIN3Ane H BVDyX. |
Apply the plate, standard documentation, spare parts list and additional information for the product. You can find them at:
- Use of the QR code on the appliance. - Visit the websites docs.hotpoint.eu and parts-selfservice.whirlpool.com. Alternatively, you can contact the after-sales service department (see the telephone number in the warranty booklet). When contacting the after-sales service department, please have the codes, indicated on the rating plate of your appliance, ready.
The model information can be extracted by scanning the QR code on the energy label. The label also provides the model identifier, which can be used to search the registry at the address https://eprel.ec.europa.eu.
THANK YOU FOR CHOOSING A HOTPOINT PRODUCT
www.hotpoint.eu/register
PLEASE SCAN THE QR CODE ON
YOUR APPLIANCE TO GET MORE
DETAILED INFORMATION.


OPTIONS AND FUNCTIONS
UNEXPECTED INTERRUPTIONS
www.hotpoint.eu/register
SCAN THE QR CODE ON THE APPLIANCE TO VIEW MORE DETAILED INFORMATION

MODIFYING A RUNNING PROGRAM
SETTING WATER HARDNESS
CHANGING THE DETERGENT DOSAGE
To open the detergent dispenser, use the mechanical opening C. Add the detergent only into the dry dispenser D. Add the correct amount of detergent before starting the MTT8 directly into the tank.
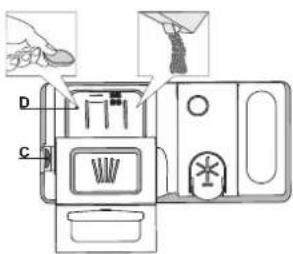
- To add the required amount, when measuring the detergent, refer to the standard given above. Inside the dispenser D there are indicators that ensure correct detergent dosing.
- Remove the detergent residue from the dispenser D and close the lid until it clicks.
- Close the detergent dispenser lid, pushing it down until the mechanical lock engages.
The detergent dispenser opens automatically at the right moment according to the program. In case of using liquid detergents (all in one), we recommend using the liquid detergent container, because according to the program, the entire rinse phase is set so that any detergent can achieve the best results. Using a detergent not intended for dishwashers can lead to malfunction or damage to the appliance.
PROGRAM TABLE
| Порогама | Стаду Слива | Актунебу Слива | Доступни onцii" | ТравалICTь поррами митг (г:хВ)*** | Стожвань под (літрив/цикп) | Стожвань под (кВтг/цикп) |
| 1.Ек 50° ECO | ✓ | ✓ | ☐ h. | 3:10 9,5 0,75 | | |
| 2.Ин teч b nii pexim a bTo | A 65° | ✓ | ✓ | 3D > ☐ h. | 2:00 - 3:10 14,0 | - 17,0 1,50 - 1,85 |
| 3.З mіш anii pexim a bTo | A 55° | ✓ | ✓ | 3D > ☐ h. | 1:30 - 2:30 14,5 | - 16,0 1,15 - 1,30 |
| 4.Ш bndka mittя pexim a bTo | A 50° | - | - | ☐ h. | 0:55 - 1:20 13,0 | - 14,5 1,15 - 1,25 |
| 5.Присcopeна 30' 50° | - | - | 3D ☐ h. | 0:30 9,0 0,50 | | |
| 6.Ha dobpani! 50° | ✓ | ✓ | ☐ h. | 3:30 15,0 1,15 | | |
| 7.Образka 65° | ✓ | - | ☐ h. | 1:40 10,0 1,30 | | |
| 8.Зamоч b anя | - | - | 3D ☐ h. | 0:12 4,5 0,01 | | |
| 9.Camоочи龟ня 65° | - | - | ☐ h. | 0:50 8,0 0,85 | | |
The "ECO" program data is measured in laboratory conditions in accordance with the European standard EN 60436:2020. Note for the control and testing laboratories: for information on the conditions for conducting the EN tests, refer to the address: dw_test_support@whirlpool.com The program does not include a preliminary rinse of the dishes. *) Not all options can be used simultaneously. *Values given for other programs, except the "ECO" program, are approximate. Some values may vary depending on several factors, such as inlet water temperature, room temperature, amount of detergent, amount of dishes loaded, degree of soiling, additional options and calibration of the sensor. When calibrating the sensor, the duration of the program may increase by up to 20 minutes.
PROGRAM DESCRIPTION
Instructions for selecting the wash cycle.
1 ECO
The ECO program is suitable for cleaning normally soiled dishes, as it is the most energy and water efficient combination, and because it uses detergents in accordance with the ecological requirements for construction within European standards.
2 INTENSIVE MODE AUTO
Automatic program for heavily soiled pots and pans (do not use for delicate dishes).
3 INTENSIVE AUTO
Automatic program for pots and pans with medium level of soiling.
4 QUICK AUTO
Automatic program for normal quantity of lightly soiled dishes. Ensures optimal efficiency in the shortest time.
5 RINSE HOLD 30'
Program designed for full or lightly soiled dishes without dried-on residues, without drying phase.
6 STEAM!
Use for cleaning dishes in a short time. Ensures optimal efficiency of washing and drying at the lowest level.
7 SOAK
For dishes with a high level of soiling, with additional antibacterial rinse. Can be used for technical maintenance of the dishwasher.
8 DELAY START
Use to delay the start of the dishwasher if you plan to run it later. In all programs, the rinse aid is not used.
9 SELF-CLEAN
Program intended for technical maintenance of the dishwasher. It must be activated before the dishwasher is used with special cleaning agents designed for dishwasher maintenance.
Check the water inlet, it may be clogged or the pressure is too low for the intended use.
Select the appropriate cycle by pressing the corresponding button (see "CONTROL PANEL")
If the selected program is not suitable (see "PROGRAMS"), the indicator light will only blink once and then turn off. The program will not be activated.

MULTI 3D ZONE WASH
The right side of the machine with the 3D Zone Wash option is separate, and we recommend using it during mixed and intensive washing — thanks to the additional 3D water jets that come from the top of the chamber, the "3D ZONE WASH" option allows you to save energy or increase the effectiveness of washing in the dishwasher:
3D ZONE WASH + MIXED CYCLE: allows energy saving (up to 40%). 3D ZONE WASH + INTENSIVE CYCLE: increases washing effectiveness (up to 40%). Ideally suited for very dirty mixed-type dishes, for example, pots and pans, dishes with dried food residues, or dishes that need to be cleaned thoroughly (grater, food processor for vegetables, large tableware).
Activation:
1. Select the desired cycle. 2. By default, the machine washes dishes in all baskets. To wash dishes in only one specific basket, press the corresponding button the appropriate number of times:
Press once (only lower basket) - 1. Press twice (only upper basket) - 2. Press three times (only cutlery basket) - 3. Press four times (the selected program will wash dishes in all baskets).
Remember that you need to load only the upper or lower basket and adjust the amount of detergent accordingly.
If the upper basket is loaded, add detergent directly to the dispenser, not to the pre-wash compartment.

BLOCKING THE BUTTONS
Press and hold the button for 3 seconds to activate the button lock. The button lock function blocks the control panel, except for the ON/OFF button. To deactivate the button lock function, press and hold the button again.

WARNING: WATER SUPPLY. Alarm
If water does not enter the machine or the inlet valve is closed.

SHORT TIME
This option can be used to shorten the duration of the main programs while maintaining productivity and drying.
To select the program, press the SHORT TIME button; the indicator lamp will light up. To deactivate the option, press the button again.
INVERTER

TABLET (Tab)
This parameter allows optimizing the program productivity according to the type of detergent used.
Press and hold the SHORT TIME button for 3 seconds (the corresponding symbol will flash) if you use combined detergents in tablet form (following the instructions, the detergent tablet is placed in the drum).
When using powder or liquid detergent, the option should be turned off.

DELAY
The program start can be delayed by 0:30 to 24 hours.
- Select the program and any additional options. Press the DELAY button (several times) to set the start delay. The delay time is set from 0:30 to 24 hours. With each press of the button, the delay time increases by: 0:30 (if the total time is up to 4 hours); 1:00 (if the total time is up to 12 hours); 4:00 (if the total time is more than 12 hours). When 24 hours are reached, if the button is pressed again, the delayed start will be activated.
- Press the START/PAUSE button: the timer will start the countdown; after the set delay time has elapsed, the indicator lamp will turn off automatically and the program will start. If during the countdown the START/PAUSE button is pressed, the DELAY option is cancelled and the saved program starts automatically.
The DELAY function cannot be set if the program is already running.

DRAIN
To activate the active drying function, the "DRAIN" function can be used.
After pressing the "START/PAUSE" button, the DRAIN function will be activated. The active program will be completed and the dishwasher will be drained.
ActiveDry
ActiveDry is a convection drying system that automatically opens the dishwasher door during the drying phase to ensure perfect drying results. The door opens when the temperature drops below the set threshold, and the door remains locked during the rest of the program.
A special protective plate is supplied with the dishwasher to protect against steam (depending on the model, it may need to be installed). To install the protective plate, refer to the installation instructions.
To activate ActiveDry, proceed as follows:
To deactivate: Press and hold the "P" button for 5 seconds. After 5 seconds, the dishwasher emits a short audible signal. The dishwasher is now deactivated. To activate: Press and hold the "P" button for 5 seconds. After 5 seconds, the dishwasher emits a short audible signal. The dishwasher is now activated.
Loading the baskets
Upper basket
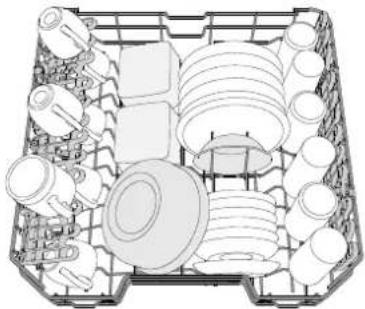
Load the upper basket with glasses, cups, plates, bowls, and small saucers.
(example of loading the upper basket)
Adjusting the height of the upper basket
The height of the upper basket can be adjusted: the upper position allows for larger items in the lower basket, while the lower position allows for more space in the upper basket.
To adjust the height, pull the upper basket out, press the levers on both sides of the basket, and move it up or down. It is recommended not to adjust the height while the basket is loaded.
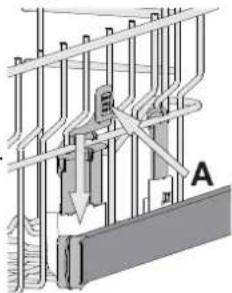
Never lift or lower the basket by only one side.
The dishes can be folded or unfolded, using the unfolding force on the grid.
The dishes can be installed on the dish racks by inserting each dish into the corresponding slot.
Dependent on the model:
To unfold the dishes, it is necessary to push them upwards and turn them, or remove them from the slots and pull them down.
- To fold the dishes, it is necessary to turn them and push them down, or pull them upwards and cover the dishes with the slots.
UPPER RACK
The upper rack is equipped with a folding grid, which can be used for holding dishes and cutlery. For optimal productivity, do not place bulky items between the grid. The grid folds away.
LOWER RACK
Designed for pots, hooks, plates, salad bowls, cutlery, etc. Large plates and hooks must be ideally positioned so that they do not interfere with the spray arm.
The lower rack has folding supports, which can be used in the vertical position for placing plates or in the horizontal (lowered) position for loading pots and salad bowls.
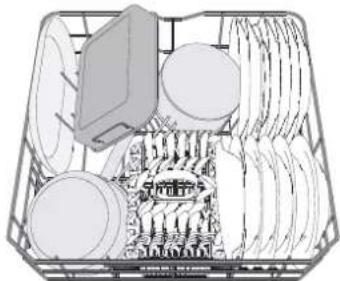
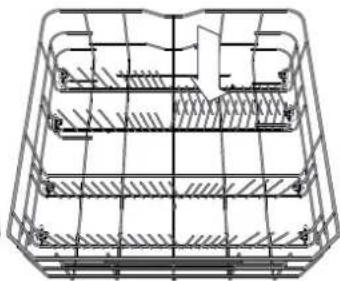
(Example of loading the lower rack)
CUTLERY RACK
The rack is equipped with upper grids for easy arrangement of cutlery. The cutlery rack is usually installed on the front part of the lower rack. Knives and other cutlery with sharp edges should be placed in the cutlery rack with the points facing down, or they should be placed horizontally in the cutlery rack with the sharp edges facing the upper rack.
3D COMPONENTS ZONE MUTTR
The 3D and 30Hi MHTT modes provide intensive washing with water jets that enter through the lower and upper parts of the dishwasher (marked with orange color), which effectively removes heavy soiling thanks to better water coverage. Tip: Load the baskets and cutlery, turning them towards the lower 3D components of the MHTT zone and activate the 3D zone MHTT on the panel.
INSTRUCTIONS FOR USE
1. PREPARING THE DISHES
It is recommended that the dishwasher is connected to the water supply and the door is open.
2. SWITCHING ON THE DISHWASHER
4. FILLING WITH DETERGENT
5. SELECTING THE PROGRAM AND STARTING
Select the most suitable program according to the type of dishes and the degree of soiling (see "PROGRAM DESCRIPTION"), by pressing button P.
Select the required options (see "OPTIONS")
6. START
Start the MHTT cycle by pressing the START/PAUSE button.
At the start of the program, an audible signal is emitted.
7. END OF THE MHTT CYCLE
The end of the MHTT cycle is accompanied by an audible signal and a display on the screen. Open the door slightly and switch off the appliance by pressing the ON/OFF button. Wait a few minutes before removing the dishes to avoid burns. Unload the baskets, starting from the lower one.
After a certain period of inactivity, the appliance automatically switches off to minimize energy consumption. If the dishes are not heavily soiled or if you have to wait before starting the dishwasher, you should adjust the amount of detergent accordingly.
3MIHA DIOYOI IPOPTPAMN
Y pa3i HebipHO rB60py nporpam MoKHa 3miHtN II 3a yMOBN, 10 II BnKoHaHH TINbKn NOaIoc: HATNCHTb I yTPMMyTe KONKy «YBMKH./BUMKH.》,MaUNHa BmKHeTbCra. 3HOBy yBIMKHITb MaunHy 3a DOONMOHO KHNK Y YBMKH./BUMKH. i O6epiTB HOBNI ZIKN MMTTa 6yDb-ki 6axkai onci; 3anyctIb LKN, HATNCHBYWN KHONKY CTAPT/NAY3A.
OoDABAHnIocydy
He Bmkaoun MaunHy, BiKpnnte DBepuTa (ocTepiraTecra TAPQIO npu!) i noknaitb nocyd do nocydomnHOi MaunHn. 3aKpIteDBePcTAtiHaTNCHITb KHOKNyCTAPT/NAV3A》,UKNJIIOUHeTBcR 3 TOrO MOMeHTy,HaKOMy Bih6yB NepepeBaHN.
HENPEDEBAUHEI BMMKHEHHA
Akiu nuiac uiknly mttta 6yde biDunHeNo DBePcTa a6o kkuO cTHeBc8 36i y eneKtpomepexki, ukn 6yde 3ynHeno. KoJn DBepcTa 6yde 3aunHeNo a6o 6yde BiNHO He NoctaHaHH eNeKTPoeHeprii, uo6 3HOBy 3aNyCTNTU KKL 3 TOO MOMeHTy, HaKaOMy BIn 6yB NepepBaHm, HATNCITb KHONKY (CTAPT/NAY3A').
ДлгВдкнioчehнЯ DEMOPEKIMY BИKOHAHTe HAcTyNnI DiI NO cep3I. YbIMKHITb MaunHy, NOTIM 3HOBy BUMKHITb. HaTCHITb KHONky 3ATPUMKA, NOKN He npolya€ 3BYKOBu CINHaI. 3HOBy YbIMKHITb MaunHy. INdNKaTOp «dOF» 6JIIMa€, a NOTIM BUMKAcETbCra.
IOPAДI I PEKOMEHNDAUJI
IOPADN
Ipeed 3aBaHTaKeHHM KOuNkIB BnDaJIbT 3 nOcy dy yci 3aIIuKni ix ta OuchTtB CkJIHNIOBepxHi. He notpi6Ho npommbaTIx 3a3daleriNb iND npOTouHO BOIOJ.
Po3aIbOByIte NocyD TaKIM YHOM, 106 BIH MiHO UTPMByBaCBHa MCIi i He mI nepeKInHyTnc; I po3aIbOByIte KOHeNHePn TAKIM YHOM, 106 OTbOp 6byn3Hm3y, ayBirHyTI/OnyKIIu actHnH HaxnHeH, pna TORO, 106 Boa NotpanJlha BcI nobepxHi bINbHO CTkAna.
NonepaeknHa: KpuK, pyuK, nioHn i cKOBopi3 pyKaMn He nobHHi nepekoJxatn o6eTaHHIO po3NIIOBaivB.
KnaiTb 6ydb-ki npDhi npEmTyn kowik nra cTOnOBnx npnbopib. Dyke 3a6pudneHn nocdy i CKOBopiKn Heo6XiHNO po3miyyatu n HxNkhbomy Kowky, Tomy y o y tachni Maunnn BogaHi CTpymehi Cnblhhi, 3aBDAKU OOy DOcRAeTsBua pNDyKTNBHlCTMNTT.
Iicra 3aBaTaXeHHNocydy npnlaad nepekoHATeca,po03nnHObaui MoKyTB BilbHO o6epTaTcra.
HEPINADTHNIOCYD
- These are decorative items and antique dishes. Thin decorative glass dishes, samples of decorative antique dishes. Their decoration is not durable.
- Parts made of synthetic material that cannot withstand high temperatures. Microwave-safe dishes.
- Dishes decorated with gold, wax, oil, or dirt.
Colored decorations on silver/gold-plated items may change color during dishwasher use. Some types of glass (e.g., crystal glass) may also become opaque after several dishwasher cycles.
DISHWASHER LOADING
Use only dishwasher-safe dishes and cutlery as recommended by the manufacturer. Use a delicate cycle suitable for delicate dishes. Load the dishwasher immediately after the cycle ends.
ENERGY SAVING RECOMMENDATIONS
- When the household dishwasher is used according to the manufacturer's instructions, washing dishes in the dishwasher uses less energy and water than manual washing. To achieve maximum efficiency of the dishwasher, it is recommended to run the cycle after fully loading the dishwasher. Loading the household dishwasher to the capacity specified by the manufacturer saves energy and water. Normal loading of the dishwasher is indicated by the 'LOADED' indicator.
Partial load programs are recommended to use special options if available (half load/zone wash/multizone), otherwise load the baskets. Incorrect loading or overloading the dishwasher may lead to increased resource consumption (such as water, energy, and time, as well as increased noise), reducing productivity and quality. Pre-rinsing dishes by hand leads to increased water and energy consumption and is not recommended.
HYGIENE
To prevent odors and residue that can accumulate in the dishwasher, it is necessary to run a high-temperature program once a month. To clean the appliance, use a special cleaning agent and run an empty cycle.
TROUBLESHOOTING
If the dishwasher does not work properly, check if you can fix the problem using the following list. In case of malfunctions or problems, contact an authorized service center; contact details can be found in the warranty card. Spare parts will be available for up to 7 or 10 years, depending on specific regulatory requirements.
| ПОНБЛЕМИ | MOЖЛВИ ПОНNUH NII PIUSHЕНЯ | |
| Бориь
IIndikatop coni | Релервар coni поожим. (Пля пооченness
indikatop coni може залишатся уовкнени
постaramд ekilьков ecilknib miiknk). | Заловиит контейнорд coni (dochnadiwi bIDomocci diVB. Na stcp. 2).
Hалашутpe ribeь karstскоти Bodи (dVB. tablinzuho Na stcp. 2). |
| Бориь
IIndikatop
onolickvbaa | Диссерсд дд олOLICKУСА рОржим. (Пля no-
новеня indikatop onolickvbaч с�ме залишат-
ся увIMКнEDM ростaramд ekilьков ecilknib miiknk). | Заловиит контейнорд coni (dochnadiwi bIDomocci diVB. Na stcp. 2). |
| Посydомина
maшина He
3anycakctbca abo He
pearye Ha komан. | Пробад He nizkluchenien do pozetkn. Bставешte | Керу poze tek leektrpoxmbinlenn.
3mpkyabah6be3nekn noocdyomna Maшина He bSydeabotomatuNHO nepe3aunckatncb nicla
nodachJXWBENH.NATINCHK KONKU «CTAP/TAY3A」, zu6npodobkmit npoprampy. |
| Bidiklouchernie alektroponeactaunn.
Дерцета maшина He zaрит.
ШтфТ Ахшуне Cyushн�е BTaYcTbC.
Зкгп лоррпьсьсь prny bIDkpmbahni Diberцат
6iBsh nix Ha 4 cekuydn.
Пrelad He peayure Ha komandi.
Позачесн ha dinclnei: F9 a60 F12 i cbtIoiodiy
YBMK/BIMK. I Пуск/Playa3 blmamotb shvdko. | Енegrпino Hatиckayte Ha dberpata, noKn He noCuTe 3byk «KlnauhHn.
3akprite Deberpata i HATINCHB KONKU «CTAP/TAY3A».
BIMKHIT prinapad, natichyubn KHONK «YBMKH./BIMKH.», priupbni3no chepe3xbvinHn
yimkhHlt yoro 3HOBV I nepe3anyctlb npoprampy. Raioce ue He daC baxanHOr peshnybTaTy,
Bld'eHdai Te prinapad Ha 1 xblinHv Bld eektpomepexki, a notim 3HOBV niDknlyitb. |
| 3nosydominnoi Ma-
shinne He bttikaes Boda.
Позачесн ha
dincnnei: F3 i
cBtIOIOJIy YBMK.
BIMK. i Пуск/Playa3
6blmamotb shvdko. | Lizkn MTTT size He zakihyeNo. 3auekaite, noKn 3az
3lnBnHn shanr BvHHTyn.
Tpby6y 3lnBnOoi CnSTemn 3a6lOKOBaHo. OunchTb Tr
Фылгт зakyporeheni Зalmskamn iIXi
Посydемпь Пreladny Po3aTuYte Nocud
BivobSIAEbca NaHdmpirha KInbKcTb NiHn.
HepabunHBOBIMDAmpaHNOptiHy BIKKICTb MIOKOHOr 3aco6y abo BIn He nipxo-
dntb JIANBUNKOPINCTAHN y noCsydomnHmMaunHax (duB. «HANOBEHHNJO3AOTPA
MIOOYTO 3ACO6y'). Ппес苹псTiB noCsydomnHmMaunHy,HaTINCHBKNOHKONKU
«3JIIBAHN» (duB. «OPILI T A OYHKLI»), i zanctiHb HOBy npoprampy 6ez MIOuOro 3aco6y | |
| Посydомиь
maшина поpondуve
надирный shum. | Посyd dupehunb. Р��иьно розашуITE nocud
Вурбягьtsя наhdmpirha KInbKcTb NiHn.
HepabunHBOBIMDAmpaHNOptiHy BIKKICTb MIOKOHOr 3aco6y abo BIn He nipxo-
dntb JIANBUNKOPINCTAHN y noCsydomnHmMaunHax (duB. «HANOBEHHNJO3AOTPA
MIOOyTO 3ACO6y'). Ппес苹псTiB noCsydomnHmMaunHy,HaTINCHBKNOHKONKU
«3JIIBAHN» (duB. «OPILI T A OYHKLI»), i zanctiHb HOBy npoprampy 6ez MIOuOro 3aco6y | |
| Посyd He ouhneho.
maшина He habipac
bodу. Позачесн
надincnnei: i F6, i cBtIOIOJy YBMK./BIMK. i
Pusk/Playa3 blmamotb shvdko. | Посyd duOу He nprabavnbo
RozbipuBauChy Me noke BILbNo o6eTatucnca, myOy
pepeukokdaec nocud.
Lizkn MTTT zhanTo M'rank.
BivobSIAEbca NaHdmpirha KInbKcTb NiHn.
HepabunHBOBIMDAmpaHNOptiHy BIKKICTb MIOKOHOr 3aco6y abo BIn He nipxo-
dntb JIANBUNKOPINCTAHN y noCsydomnHmMaunHax (duB. «HANOBEHEHNJO3AOTPA
MIOOYTO 3ACO6y'). Ппес苹псTiB noCsydomnHmMaunHy,HaTINCHBKNOHKONKU
«3JIIBAHN» (duB. «OPILI T A OYHKLI»), i zanctiHb HOBy npoprampy 6ez MIOuOro 3aco66 | |
| Фылгт zabpydunenii abo 3a6bntn.
Bidcytph cInb.
Hemae BODn y cintem BoDOnocTauHAn a60
3aOKPITNI Kpan.
Bvyschni shaHr nepergHuTn.
3aCmueHa cItka Ha BvuckHomu shaHry; iI
notri6ho OunchTn.
3aHdTO Hn3bKO pOZaTswobAHn 3ZbHnBn 3aOKPITN
3aHdTO Hn3bKO pOZaTswobAHn 3ZbHnBn 3ZbHnBn 3ZbHnBn 3ZbHnBn 3ZbHnBn 3ZbHnBn 3ZbHnBn 3ZbHnBn 3ZbHnBn 3ZbHnBn 3ZbHnBn 3ZbHnBn 3ZbHnBn 32 | П配电ipte, qui é Hanip y cintem BoDOnocTauHAn a60 Ch v Dikpurtni kpan.
П配电�аэтся, qui злвньшанг He nepergHuTn (duB. po3dIn «BCTAHOBLEHHN»)
Зakerpompuyte nocSydomnHmMaunHy i nepezabantkxtte II.
Псял prpvobdennhy pepeiprk i ouchuenn BIMKHITb I yBvIMKHITb nocSydomnHmMaunHy
i zanctiHb HOBy nocSyTPOA HOBy nocSydomnHmMaunHy |
| Посydомиь
maшина zakihyue
zuklnepepepepepepepepepepepepepepepepepepepepepepepepepepepepepepepepepepepepepepepepepepepepepepepepepepepepepepepepepepepepepepepepepepepepepepepepepepepepepepepepepepepepepepepepepepepepepepepepepepepepe pepepepepepepepepepepepepepepepepepepepepepepepepepepepepepepepepepepepepepepepepepepepepepepepepepepepepepepepepepepepepepepepepepepepepepepepepepepepepepepepepepepepepepepepepepepepepepepepepepepepePepepepepepepepepepepepepepepepepepepepepepepepepepepepepepepepepepepepepepepepepepepepepepepepepepepepepepepepepepepepepepepepepepepepepepepepepepepepepepepepepepepepepepepepepepepepepepepepepepepepeopepepepepepepepepepepepepepepepepepepepepepepepepepepepepepepepepepepepepepepepepepepepepepepepepepepepepepepepepepepepepepepepepepepepepepepepepepepepepepepepepepepepepepepepepepepepepepepepepepepepe-pepepepepepepepepepepepepepepepepepepepepepepepepepepepepepepepepepepepepepepepepepepepepepepepepepepepepepepepepepepepepepepepepepepepepepepepepepepepepepepepepepepepepepepepepepepepepepepepepepepepePEPEPEPEPEPEPEPEPEPEPEPEPEPEPEPEPEPEPEPEPEPEPEPEPEPEPEPEPEPEPEPEPEPEPEPEPEPEPEPEPEPEPEPEPEPEPEPEPEPEPEPEPEPEPEPEPEPEPEPEPEPEPEPEPEPEPEPEPEPEPEPEPEPEPEPEPEPEPEPEPEPEPEPEPEPEPEPEPEPEPEPEPEPEPEPEPEPEPEPE PEPEPEPEPEPEPEPEPEPEPEPEPEPEPEPEPEPEPEPEPEPEPEPEPEPEPEPEPEPEPEPEPEPEPEPEPEPEPEPEPEPEPEPEPEPEPEPEPEPEPEPEPEPEPEPEPEPEPEPEPEPEPEPEPEPEPEPEPEPEPEPEPEPEPEPEPEPEPEPEPEPEPEPEPEPEPEPEPEPEPEPEPEPEPEPEPEPEPEPEPAPEPEPEPEPEPEPEPEPEPEPEPEPEPEPEPEPEPEPEPEPEPEPEPEPEPEPEPEPEPEPEPEPEPEPEPEPEPEPEPEPEPEPEPEPEPEPEPEPEPEPEPEPEPEPEPEPEPEPEPEPEPEPEPEPEPEPEPEPEPEPEPEPEPEPEPEPEPEPEPEPEPEPEPEPEPEPEPEPEPEPEPEPEPEPEPEPEPEPEPPEPEPEPEPEPEPEPEPEPEPEPEPEPEPEPEPEPEPEPEPEPEPEPEPEPEPEPEPEPEPEPEPEPEPEPEPEPEPEPEPEPEPEPEPEPEPEPEPEPEPEPEPEPEPEPEPEPEPEPEPEPEPEPEPEPEPEPEPEPEPEPEPEPEPEPEPEPEPEPEPEPEPEPEPEPEPEPEPEPEPEPEPEPEPEPEPEPEPEPC
3aOKPITN
3aOKPITN
3aOKPITN
3aOKPITN
3aOKPITN
3aOKPITN
3aOKPITN
3aOKPITN
3aOKPITN
3aOKPITN
3aOKPITN
3aOKPITN
3aOKPITN
3aOKPITN
3aOKPITN
BIMK. i Pusk/Playa3 blmamotb shvdko. | П配电чесн
П配电чесн
П配电чесн
П配电чесн
П配电чесн
П配电чесн
П配电чесн
П配电чесн
П配电чесн
П配电чесн
П配电чесн
П配电чесн
П配电чесн
П配电чесн
П配电чесн
П配电чесн
П配电чесн
П配电чessн
П配电чessн
П配电чessн
П配电чessн
П配电чessн
П配电чessн
П配电чessн
П配电чessн
П配电чessн
П配电чessн
П配电чessн
П配电чessн
П配电чessн
П配电чessн
П配电чessн
П配电чessн
П配电чessн
П配電
П配电
П配电
П配电
П配电
П配电
П配电
П配电
П配电
П配电
П配电
П配电
П配电
П配电
П配电
П配电
П配电
П配电
П配电
П配电
П配电
П配电
П配电
П配电
П配电
П配电
П配电
П配电
П配电
П配电
П配电
П配电
П配电
П配电
П配电 | П配电чесн
П配电чесн
П配电чесн
П配电
П配电
П配电
П配电
П配电
П配电
П配电
П配电
П配电
П配电
П配电
П配电
П配电
П配电
П配电
П配电
П配电
П配电
П配电
П配电
П配电
П配电
П配电
П配电
П配电
П配电
П配电
П配电
П配电
П配电
П配电
П配电
П配电 |
With the company's regulatory documentation, information about the availability of spare parts and additional product information can be found:
Use the QR code on your product. Visit our website docs.hotpoint.eu and parts-selfservice.whirlpool.com. Or contact our customer service (phone number provided in the warranty card). When contacting the service center, provide the code indicated on the rating plate with the product's serial number.
Information about the model can be obtained by scanning the energy efficiency label QR code. On the label of such devices, the model identifier can be used to search the register at the address: https://eprel.ec.europa.eu
400011695353B 10/2023 dk-Xerox Fabriano