
Predator Z271U - Monitor ACER - Free user manual and instructions
Find the device manual for free Predator Z271U ACER in PDF.
User questions about Predator Z271U ACER
0 question about this device. Answer the ones you know or ask your own.
Ask a new question about this device
Download the instructions for your Monitor in PDF format for free! Find your manual Predator Z271U - ACER and take your electronic device back in hand. On this page are published all the documents necessary for the use of your device. Predator Z271U by ACER.
USER MANUAL Predator Z271U ACER
Acer LCD Monitor Quick Start Guide (QSG)
Important safety instructions
Please read the following instructions carefully.
-
To clean the LCD monitor screen: Be sure that your monitor is electrically rated to operate with the AC power available in your location.
-
Turn off the LCD monitor and unplug the power cord.
- Spray a non-solvent cleaning solution onto a rag and clean the screen gently.
NEVER SPRAY OR POUR ANY LIQUID DIRECTLY ONTO THE SCREEN OR CASE. - PLEASE DO NOT USE ANY AMMONIA OR ALCOHOL-BASED CLEANERS ON THE LCD DISPLAY SCREEN OR CASE.
-
Acer will not be liable for damage resulting from use of any ammonia or alcohol-based cleaners.
-
Do not place the LCD monitor near a window. Exposing the monitor to rain, moisture or sunlight can severely damage it.
- Do not apply pressure to the LCD screen. Excessive pressure may cause permanent damage to the display.
- Do not remove the cover or attempt to service this unit yourself. An authorized technician should perform servicing of any nature.
- Store the LCD monitor in a room with a temperature of -20^ to 60^ C (-4° to 140° F). Storing the LCD monitor outside this range may result in permanent damage.
-
Immediately unplug your monitor and call an authorized technician if any of the following circumstances occur:
-
Monitor-to-PC signal cable is frayed or damaged.
- Liquid spills onto the LCD monitor or the monitor is exposed to rain.
The LCD monitor or case is damaged.
Attaching the monitor to the base
- Remove the monitor base from the packaging and place it on a stable and level workspace.
- Remove the monitor from the packaging.
-
Attach the monitor stand arm to the base.
-
Ensure that the base is locked onto the monitor stand arm. (for selected models)
- Secure the base to the monitor stand arm by turning the screw using the integrated tab or a suitable coin. (for selected models)
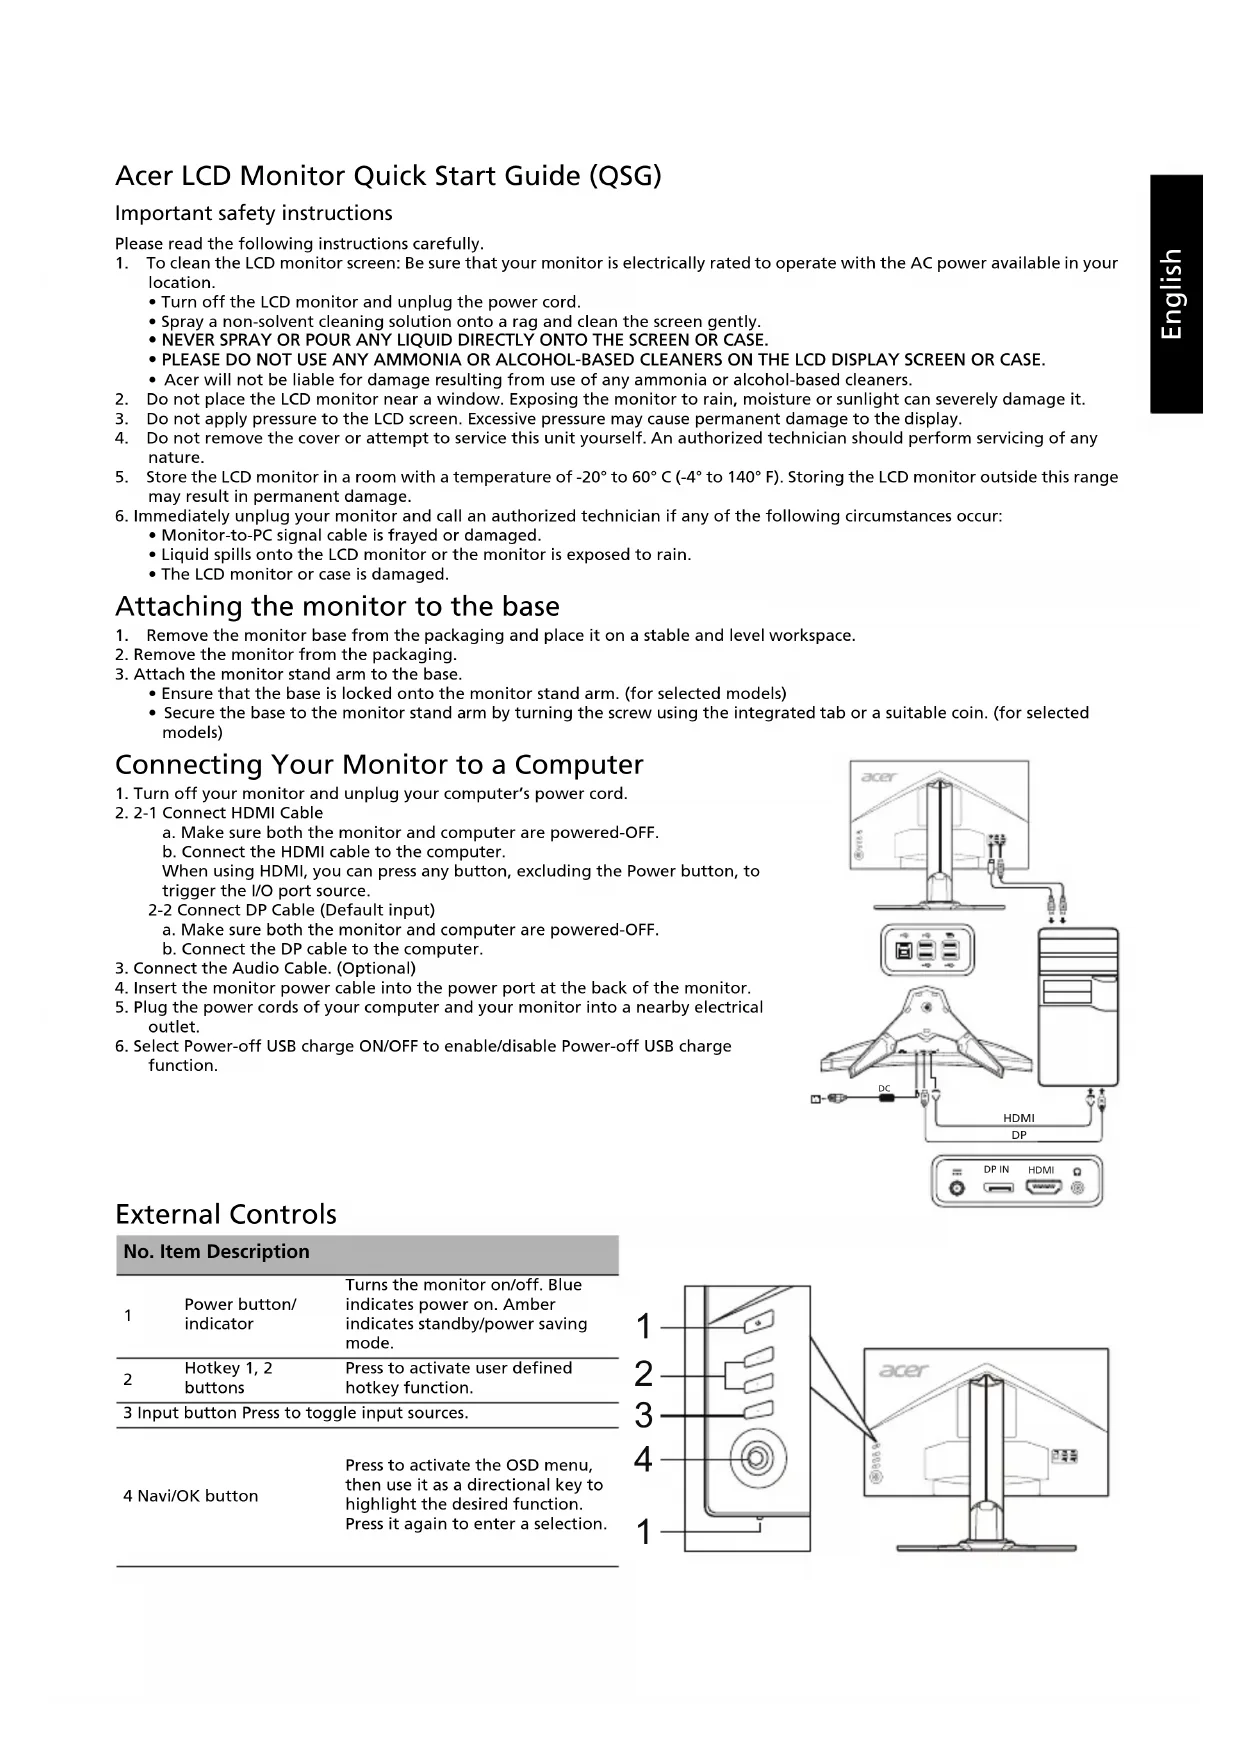
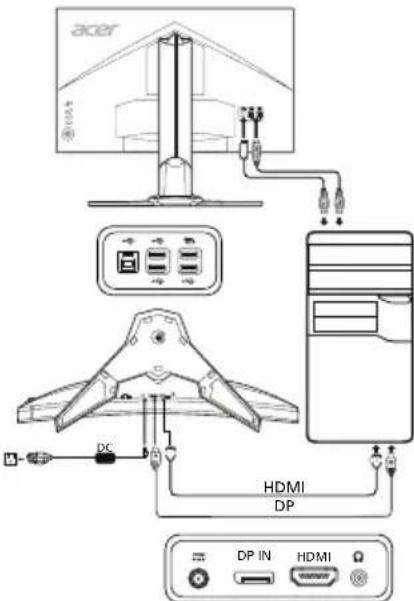
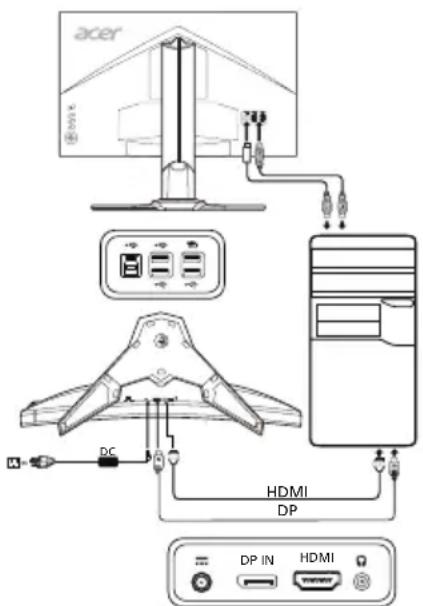
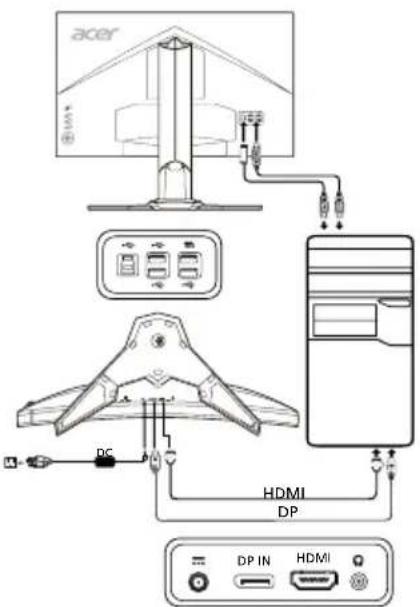
Connecting Your Monitor to a Computer
- Turn off your monitor and unplug your computer's power cord.
- 2-1 Connect HDMI Cable
a. Make sure both the monitor and computer are powered-OFF.
b. Connect the HDMI cable to the computer.
When using HDMI, you can press any button, excluding the Power button, to trigger the I/O port source.
2-2 Connect DP Cable (Default input)
a. Make sure both the monitor and computer are powered-OFF.
b. Connect the DP cable to the computer.
- Connect the Audio Cable. (Optional)
- Insert the monitor power cable into the power port at the back of the monitor.
- Plug the power cords of your computer and your monitor into a nearby electrical outlet.
- Select Power-off USB charge ON/OFF to enable/disable Power-off USB charge function.
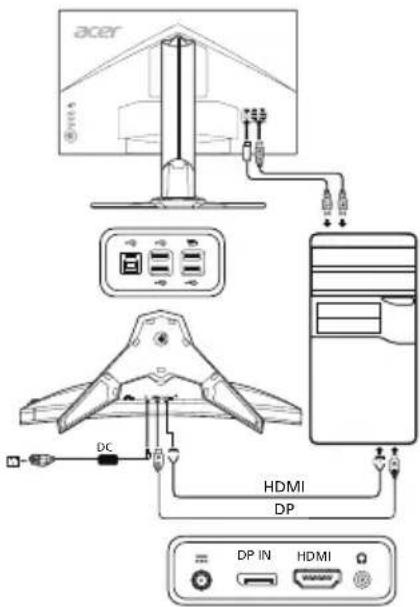
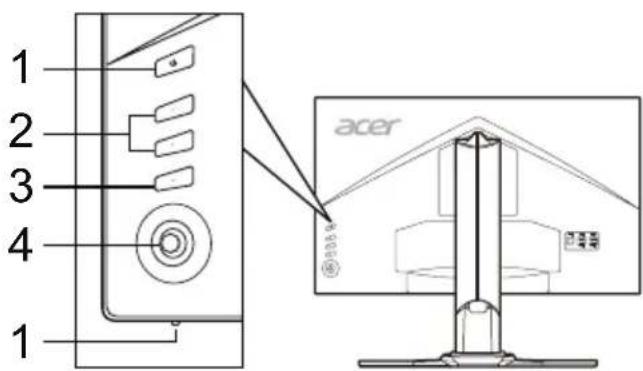
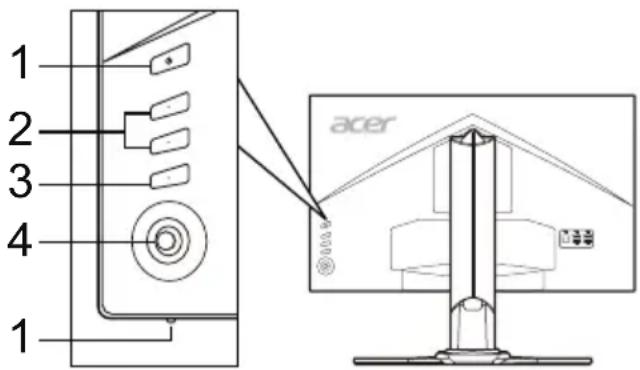
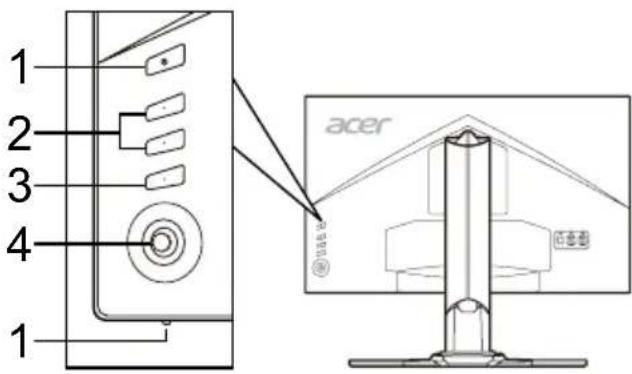
External Controls
| No. Item Description | ||
| 1 | Power button/indicator | Turns the monitor on/off. Blue indicates power on. Amber indicates standby/power saving mode. |
| 2 | Hotkey 1, 2 buttons | Press to activate user defined hotkey function. |
| 3 | Input button Press to toggle input sources. | |
| 4 | Navi/OK button | Press to activate the OSD menu, then use it as a directional key to highlight the desired function. Press it again to enter a selection. |
Adjusting the OSD settings

NOTE: The following content is for general reference only. Actual product specifications may vary.
The OSD (on-screen display) can be used to adjust the settings of your LCD monitor. Press the MENU key to open the OSD. You can use the OSD to adjust the picture quality, OSD position and general settings. For advanced settings, please refer to the following pages:
Main page
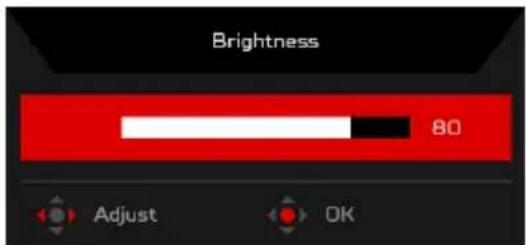
The default function for buttons 1 and 2 are Brightness and Volume. You can use the Hot Key Assignment function to set these buttons to your preferred functions.
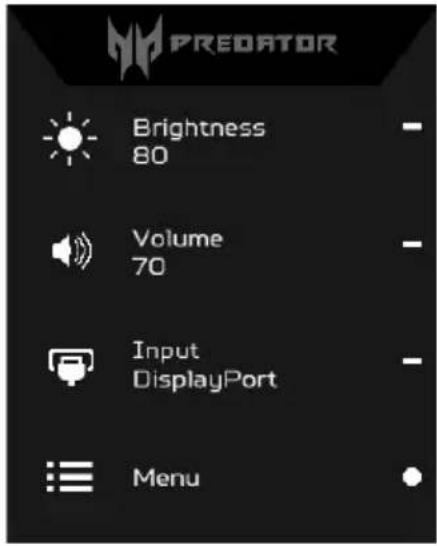
- Brightness
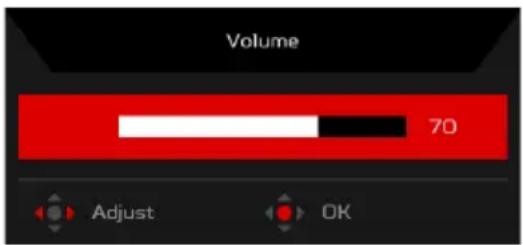
- Volume
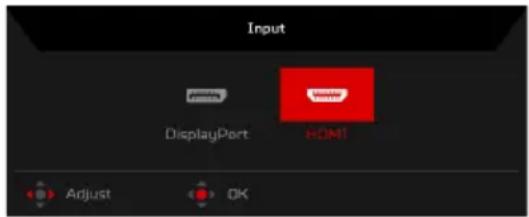
- Input
- Menu
Turning Modes on or off
From any function page, press to open the Modes control and select which user-defined profile to use (please see the OSD section for more information).

Adjusting the Brightness
Open the Brightness control and select the brightness setting using the Navi/OK button. When you are done, press the Navi/OK button to go back one level.
Adjusting the Volume
Open the Volume control and select the volume setting using the Navi/OK button. When you are done, press the Navi/OK button to go back one level.
Selecting the input
Open the Input control and select the desired input. When you are done, press the Navi/OK button to go back one level.
The Function page
Open the Function page to select the Picture, Color, Audio, Gaming, OSD, or System functions, and adjust the settings which you want using the Navi/OK button. When you are done, press the Navi/OK button or go back one level.
Picture
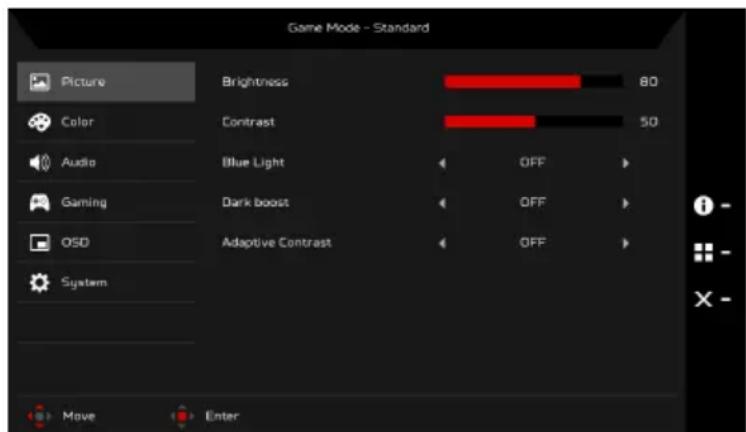
- Press the MENU key to open the OSD.
- Using the Navi/OK button, select Picture from the OSD. Then navigate to the picture element you wish to adjust.
- Use the Navi/OK button to adjust the sliding scales.
- The Picture menu can be used to adjust the Brightness, Contrast, Blue Light, Dark boost, and Adaptive Contrast.
- Brightness: Adjust the brightness from 0 to 100.
NOTE: Adjusts the balance between light and dark shades.
- Contrast: Adjust the contrast from 0 to 100.
NOTE: Sets the degree of difference between light and dark areas.
- Blue Light: Filters out blue light to protect your eyes by adjusting how much blue light is shown -- 80% , 70% , 60% , or 50% .
NOTE: Higher values allow more blue light through. For the best protection select a lower value.
- Dark boost: This boosts the amplitude of the dark color levels of the display- blacks will be less black. The higher the level, the higher the boost.
- Adaptive Contrast: This method usually increases the global contrast of many images, especially when the usable data of the image is represented by close contrast values. This allows for areas of lower local contrast to gain a higher contrast. The method is useful in images with backgrounds and foregrounds that are both bright or both dark. In particular, the method can lead to better views of bone structure in x-ray images, and to better detail in photographs that are over or under-exposed.
Color
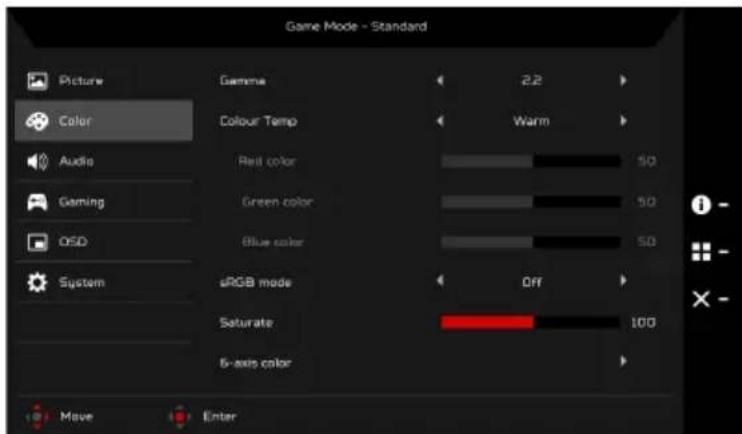
- Press the MENU key to open the OSD.
- Using the Navi/OK button, select Color from the OSD. Then navigate to the picture element you wish to adjust.
- Use the Navi/OK button to select the setting.
- Gamma mode allows you to adjust the luminance tone.The default value is 2.2 (standard value for Windows).
- Color Temperature: Default is warm. You can choose Cool, Warm, Normal, Bluelight or User.
- sRGB mode is for getting better color matching representation with the peripheral device, such as DSCs or printers.
- Saturate: Color brightness can be changed by 0~200 adjustment.
- 6-axis color: Chroma of red, green, blue, cyan, yellow and magenta can be independently adjusted from 0~100, changing the color quality of the image.
Audio
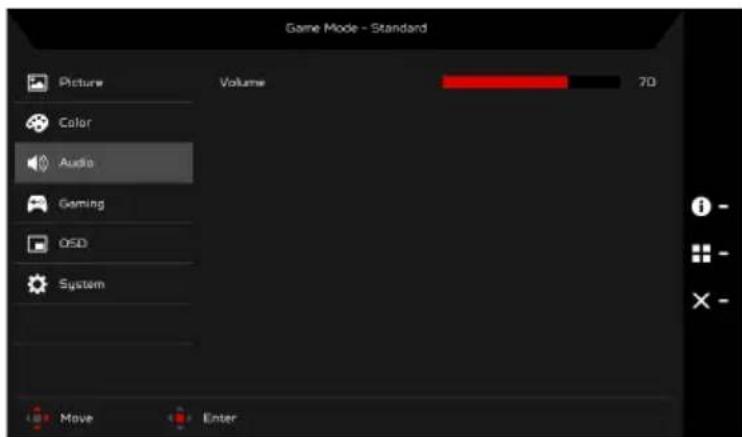
- Press the MENU key to open the OSD.
- Using the Navi/OK button, select Audio from the OSD. Then navigate to the setting you wish to change.
- Use the Navi/OK button to adjust any sliding scales.
- Volume: Adjust the volume.
Gaming
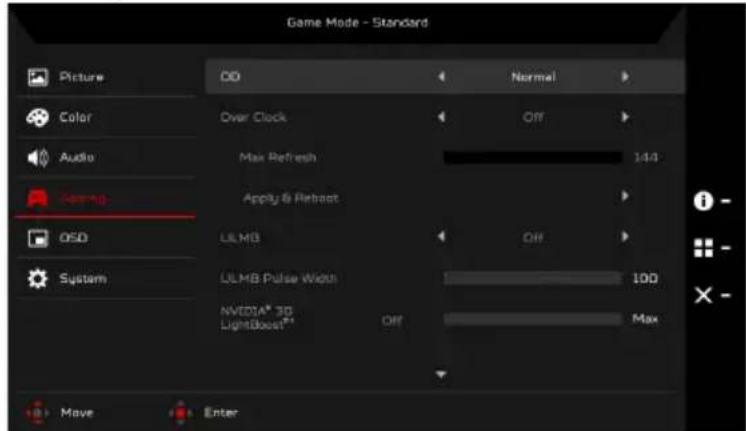
- Press the MENU key to open the OSD.
- Using the Navi/OK button, select Gaming from the OSD. Then navigate to the setting you wish to change.
- Use the Navi/OK button to adjust any sliding scales.
- OD: Select Off, Normal, or Extreme.
- Over Clock (selective models): The monitor can be over-clocked to a higher refresh rate than advertised by the panel specification.
*This function allows you to reset the maximum refresh rate in the NVIDIA Control Panel after rebooting. If nothing is displayed, disconnect the DisplayPort cable and use the monitor's on-screen display to select a default refresh rate.
IMPORTANT: Overclocking may result in flicker or other adverse effects that may derive from the total configuration of the system connected to the display, and possibly, in addition, the display's panel specifications. It may be possible to resolve or reduce such effects by setting a lower refresh rate.
- ULMB (Ultra Low Motion Blur): Turn ULMB function On or Off.
-
ULMB Pulse Width: Adjust the slider to reduce motion blur effect while you are watching fast-moving images. Please visit the NVIDIA website for more information.
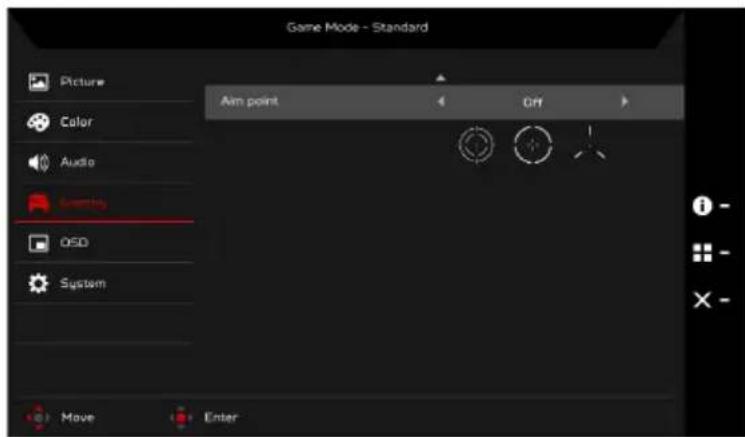
-
Aim point: Show an Aim point on the screen for shooting games.

OSD
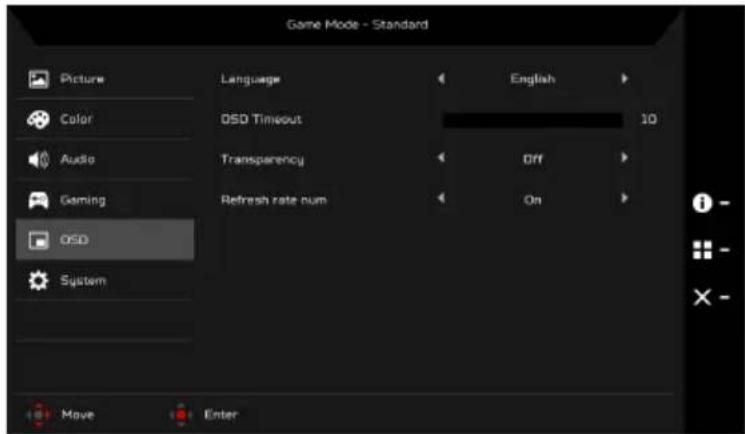
- Press the MENU key to open the OSD.
- Using the Navi/OK button, select OSD from the OSD. Then navigate to the setting you wish to change.
- Use the Navi/OK button to adjust any sliding scales.
- Language: Set the OSD menu language.
- OSD timeout: Adjust the delay before turning off the OSD menu.
- Transparency: Select the transparency when using gaming mode. The transparency can be 0% (OFF), 20% , 40% , 60% , or 80% .
- Refresh rate num: Display the panel's current refresh rate on the screen.
System
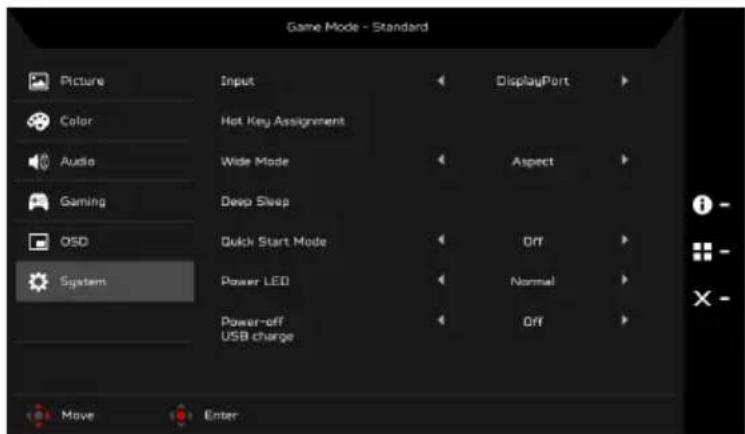
- This menu can be used to select the screen menu language and other important settings.
- Press the MENU key to open the OSD.
- Using the Navi/OK button, select System from the OSD. Then navigate to the setting yo wish to adjust.
- Use the Navi/OK button to select the setting.
- Input: Select the source from DisplayPort or HDMI.
- Hot Key Assignment: Select the function of Hot Key 1 or Hot Key 2.
- Wide mode: You can select which screen aspect you are using. The options are Aspect and 1:1.
- Deep Sleep: When Deep Sleep function is On, the monitor shuts down its core functions and goes into energy saving mode if the monitor is idle for a certain period of time, or if the user turns off the monitor DC power.

NOTE: Pressing any button (except the Power button) on the monitor may also wake up the monitor after it goes into deep sleep.
- Quick Start Mode: Enable monitor rapidly.
- Power LED: You can set the power LED indicator to glow, go dimmer, or go off.
- Power-off USB charge: Turn On or Off.
Product information
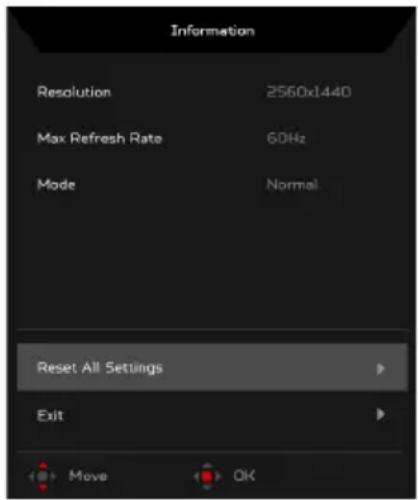
- From any function page, press the key to open the OSD.
- Reset All Settings: Reset all settings to the factory defaults.
Standard timing table
HDMI
| Mode Resolution Remark | |||
| 1 VGA 6 | 40 x 480 60 Hz | ||
| 2 SDTV | 720 x 480 60 Hz | ||
| 3 SDTV | 720 x 576 50 Hz | ||
| 4 VESA | 1280 x 720 50 Hz | ||
| 5 VESA | 1280 x 720 60 Hz | ||
| 6 SVGA | 800 x 600 60 Hz | ||
| 7 XGA 1 | 1024 x 768 60 Hz | ||
| 8 FHD 1920 x 1080 50 Hz | |||
| 9 FHD 1920 x 1080 60 Hz | |||
| 10 QHD 2560 x 1440 60 Hz | |||
DP
| Mode Resolution | Remark | |||
| 1 VGA | 640 x | 480 | 60 Hz | |
| 2 SVGA | 800 x 600 | 60 Hz | ||
| 3 XGA | 1024 x 768 | 60 Hz | ||
| 4 QHD | 2560 x | 1440 60 Hz | ||
| 5 QHD | 2560 x | 1440 85 Hz | ||
| 6 QHD | 2560 x | 1440 100 Hz | ||
| 7 QHD | 2560 x | 1440 120 Hz | ||
| 8 QHD | 2560 x | 1440 144 Hz | ||
| 9 QHD | 2560 x | 1440 165 Hz | ||

NOTE: To experience optimized picture quality, set the Vertical Frequency between 119 ~ 165 Hz.
G-SYNC and the 3D Experience
For the following resolution:
2560×1440@60Hz
2560 x 1440@85 Hz (DP only)
2560 x 1440@100 Hz (DP only)
2560 x 1440@120 Hz (DP only)
2560 x 1440@144 Hz (DP only)
3D visual effects require 3D-compatible software, nVidia® 3D Vision™ glasses and a compatible nVidia® 3D graphics card. G-SYNC requires an NVIDIA GeForce GTX650Ti BOOST or higher GeForce GTX graphics card with a DisplayPort output. For more information, visit the nVidia® Website: http://www.geforce.com/hardware/desktop-gpus
For the following resolution with Over Clock function (DP only):
2560×1440@165Hz
G-SYNC requires GPU powered by NVIDIA Maxwell architecture or higher GeForce GTX graphics card with a DisplayPort output. For more information, visit the nVidia® Website: http://www.geforce.com/hardware/desktop-gpus
Regulations and safety notices
FCC notice
This device has been tested and found to comply with the limits for a Class B digital device pursuant to Part 15 of the FCC rules. These limits are designed to provide reasonable protection against harmful interference in a residential installation. This device generates, uses, and can radiate radio frequency energy and, if not installed and used in accordance with the instructions, may cause harmful interference to radio communications.
However, there is no guarantee that interference will not occur in a particular installation. If this device does cause harmful interference to radio or television reception, which can be determined by turning the device off and on, the user is encouraged to try to correct the interference by one or more of the following measures:
Reorient or relocate the receiving antenna.
- Increase the separation between the device and receiver.
- Connect the device into an outlet on a circuit different from that to which the receiver is connected.
- Consult the dealer or an experienced radio/television technician for help.
CE declaration of Conformity
Hereby, Acer Inc., declares that this LCD monitor is in compliance with the essential requirements and other relevant provisions of EMC Directive 2014/30/EU, Low Voltage Directive 2014/35/EU, and RoHS Directive 2011/65/EU and Directive 2009/125/EC with regard to establishing a framework for the setting of ecodesign requirements for energy-related product.
Notice:
In order to prevent damage to the monitor, do not lift the monitor by its base.
Notice: Shielded cables
All connections to other computing devices must be made using shielded cables to maintain compliance with EMC regulations.
Notice: Peripheral devices
Only peripherals (input/output devices, terminals, printers, etc.) certified to comply with the Class B limits may be attached to this equipment. Operation with non-certified peripherals is likely to result in interference to radio and TV reception.
Caution
Changes or modifications not expressly approved by the manufacturer could void the user authority, which is granted by the Federal Communications Commission, to operate this product.
Operation conditions
This device complies with Part 15 of the FCC Rules. Operation is subject to the following two conditions: (1) this device may not cause harmful interference, and (2) this device must accept any interference received, including interference that may cause undesired operation.
Notice: Canadian users
This Class B digital apparatus complies with Canadian ICEs-003.
Disposal of Waste Equipment by Users in Private Household in the European Union
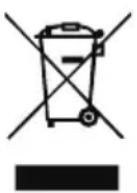
This symbol on the product or on its packaging indicates that this product must not be disposed of with your other household waste. Instead, it is your responsibility to dispose of your waste equipment by handing it over to a designated collection point for the recycling of waste electrical and electronic equipment. The separate collection and recycling of your waste equipment at the time of disposal will help to conserve natural resources and ensure that it is recycled in a manner that protects human health and the environment. For more information about where you can drop off your waste equipment for recycling, please contact your local city office, your household waste disposal service or the shop where you purchased the product.
SPECIFICATION
| LCD Panel | Driving System TFT Color LCD | |
| Size 27"W (68.47 cm) | ||
| Pixel Pitch 0.233 mm (H) x 0.233 mm (V) | ||
| Brightness | 400 cd/m² (Typical) | |
| Contrast 1000:1 | ||
| Viewable Angle 170° (H) 160° (V) (CR=10) | ||
| Response Time 1 ms (GTG) | ||
| Panel Type TN | ||
| H-Frequency | HDMI 1.4: 30-140 kHzDP: 88-222 kHz | |
| V-Frequency | HDMI 1.4: 24-60 HzDP: 30-144 Hz | |
| Display Colors 16.7 Million | ||
| Dot Clock HDMI 1.4: 300 MHz, DP: 590 MHz | ||
| Maximum Resolution | 2560 x 1440 @ 60 Hz (HDMI)2560 x 1440 @ 144 Hz (DP-over clock function = OFF)2560 x 1440 @ 165 Hz (DP-over clock function = ON) | |
| Plug & Play VESA DDCCI/DDC2B | ||
| Energy Efficiency Class B | ||
| *Annual Energy Consumption 57 (kWh) (for HDMI-input Model) | ||
| Power Consumption (at 200 nits) | On Mode 30.0 W (Typical) | |
| Sleep Mode 0.5 W (Typical) | ||
| Off Mode 0.5 W (Typical) | ||
| Input Connector | HDMI 19 pin (Only HDMI-Input Model)DP (Only DP-Input Model) | |
| Input Video Signal | HDMI signal (Only HDMI-Input Model) (Optional)DP (Only DP-Input Model) (Optional) | |
| Speakers | 7 W x 2 (Only Audio-Input Model) (Optional) | |
| Maximum Screen Size | Horizontal: 596.74 mmVertical: 335.66 mm | |
| Power Source | 100-240 V, 50/60 Hz | |
| Environmental Considerations | Operating Temp: 0° to 40°CStorage Temp: -20° to 60°COperating Humidity: 20% to 80% | |
| Dimensions | 613.68 (W) x 401.59 – 511.59 (H) x 268.38 (D) mm | |
| Weight (N. W.) | 8.5 kg (net) | |
| Mechanism Specifications | Tilt: -5° to +25° (Only at the highest point can 25 degrees of recline be offered for the angle of elevation)Swivel: -30° to +30°Height adjustment: 0 mm to 110 mm; 0 mm to 90 mm (For eye-tracking models)Pivot: NoDetachable foot stand: Yes | |
| External Controls | Switch/Buttons | Power ButtonInputHotkey 15 Navi KeyHotkey 2 |
| Functions | ContrastLanguageOSD TimeoutBlue LightDeep SleepODGammaODAdaptive contrastnVidia 3D Light BoostDark boostTransparencyWide ModeSaturateInputULMB (DP only)Hot Key AssignmentRefresh rate numQuick Start ModePower-off USB chargeModesOver clock (DP only)Display InformationResetVolumeExitColor Temperature | |
| All specifications are subject to change without notice. | ||
Find manuals and other documents for your Acer product on the official Acer support website.
*Annual energy consumption is calculated using the typical power consumption 4 hours per day, 365 days per year.
Panduan Praktis Monitor LCD Acer (QSG)
YCTaHOBka MOHHTopa Ha OCHOBaHne
- 13BNEKTE OCHOBAHNE NOCTaBMOHHTOPa IN3 ynaKOBKN pa3MeCTNe erO Ha POBHOu yTOUHBO pa6oey noBepxHOCTN.
- 13BnEKeNTe MOHHTOp u3 ynaKOBKn.
-
YCTAHOBITE CTOIKY MOHITOPA HA OCHOBAHNE.
-
Y6eHITcB, yTO OCHOBAHHe 3aФнКсИрОвАн Ho CTоIke MOHITopa (HeДЯ BCEx MoDEJIeN).
3aKePnTe OCHOBaHHe Ha CToIke MOHTopa, NOBepHyB BnHT C NOMOuBcNEUaJIbHOro INCTpyMeHTa IIN NOxOJaEe MoHEtB (He nIg BCex MoDenei).
IoiKIOUeHHe MOHTOPa K KOMNbIOTepy
- BbIKHIOHTe MOHITOP IN OTCOEINHHTe SHYP NITAHN KOMNbIOTepa OCTN.
- 2-1 PoiKnHouHrE HDMI-ka6eBb
a. Y6eNTecb, YTO NITAHNE MOHHTopa N KOMNbIOTepa OTKIOUHO.
b. NpoknIOuHTe HDMI-ka6eIb K KOMnbTepey.
ДяЗANyCKa INTOUHnKa IopTa BBOda-BBBOda BO BpEmЯINcNoJIb3OBaHnY HDMI
HAXMNTe IHO6yIO KONIKy, KPOME KHONKINITaHn
2-2ПоdkиючITEDP-ka6eь(BxOД noуmonuaHHIO)
a. Y6eNTecb, yTO nHTaHHe MOHTopa N KOMNbIePepo OTKIOHeHO.
b. IopKIIIOHTe DP-Ka6eIb K KOMMbIoTepy.
- NpoknouTe aydnoka6eIb. (Heo6a3aTeJbHo)
- NoknHte Kaebb NHTAHMOHTOPa KnpTy NHTAHHa 3aHei NaHei ycTPOCTBA.
- NooknHHTe WHybpi NtAHN KOMNbTepea MOnHTopa K 3JNeKTPuecko po3Etke.
- BbIepeNTe «3apJa qepe3 USB npB bIKNoeHOM nTahn BkJ./BbKJ.》,TO6bl BKNIOHTb/OTKIOHTb cyHKUHO 3apKn qepe3 USB npB bIKNoeHOM nTahn.
BHeuHne 3JeMeHTbI ynpabNeHnA
BaxkHn HNCTpyKcHn 3a 6e3oNaCHOCT
Mon, npoueTeTe BnMaTeHNo CJeIHNHe IHCTpyKcH.
-
3a da nouchte ekpaHa ha LCD MOHTopa: He 3a6paBraTe, Ye BAaIaT MOHTop e npedHa3Naueh 3a pa6oTa c npomeHnIBOTOKOB 3axpaHbAHe BbB BaWJa peNoH.
-
13KJIIOUeTe LCD MOHITOPa N IN3BaIeTe 3axpaHbAunrKa6eN OT KOHTaKTa.
- Hanpbckai Te nouchBaU pa3TBop 6e3 pa3TBopnteIN Bbpxy Kbpna I NOuHCTe BHMaTeHNO ekpaHa.
HE IN3JIINBAIHTE TEUHO EKPAHA IIN KOPNYCA.
HE N3IOJI3BAIte IOUHCTBAU INPENAPATN HA AMOHRAHA JIN CINPTHA OCHOBA 3A IIOUHCTBAHE HA LCD EKPAHA INI KOPNYCA. -
Acer He Hocn OTROBOPHOCT 3a NOBpei, HAcTbNIIIN B pe3yIITaH Na N3NOJ3BaHETo Ha NoCHCTBaU INpenapaHn HA amOHyaHa nn CInpTHA OCHOBA.
-
He nocTabaIe LCD moHToPA 6n3o do npo3opeu. I3naHaTe Ha MOHTopa Ha IbXkD, Bnara nn CnBHeBa CBETMaHOse cepno3Ho da ro nobpei.
- He npinaraTe HATnck Bbpxy LCD ekpana. Ppekomepnrt HATnck MoKe da Do BoBeDe Do TpaHOb yBpejDaHe Ha DmCnnJe.
- He oTcpaHbAte KaNaka H Ce OINBaTe Da pEmOHtPaTe TOBa yCTpoiCTBO Camn. YIbHOMOeH TexHk Tpr6Ba Da n3BbPbBa cepBn3HOTo 06CnYKbaHe OT BCaKaBO eCTBO.
- CbxaHbBaIe LCD MOHTopa B cTcA C TempepaTypa O -20o 60oC (-4o 140oF). CbxaHHeHTo Ha LCD MOHTopa N3BbH TO3n dnaHaON MoKe Da DOBeDe Do TpaHIO YBpeKdHe.
-
He3a6abHO u3BaTe 7eCena O T KOHTaKaTa Ha Baunr MOHtOp n Ce oBaTe Ha ybHOMoUeH TexHnK npu Bb3HnKBaHeTo Ha HRAKe OE CTneHNTE 0CTOReTcTB:
-
Ka6eIbT 3a CnHAn OT MOHITopa KbM KOMNtBpa e npoTpNT NIN NOBpeDeH.
Pa3nBaHe Ha TeuHocBbpxy LCD MOHTopa nn MoHTOpbTe n3IOKeH Ha Dbxk.
LCDMOHITOpbTJINKOPNcBtCaNOBpeHn.
3akpenBaHe Ha MOHITopa KbM OCHOBaTa
- ɪəBaʌdete ochoBɔtata Ha MOHITopa OT onaKOBkataɪ n oocTabete Bbpxy CtaBnHaɪ paBHa pa60Tha nobBpXHOCT.
- OTePaHete MOHTopa OT ONaKOBkata.
-
3akpenete pAMOTa Ha CToiKaTa Ha MOHITopa KbM OCHOBaTa.
-
YBepeTe Ce, Ye OCHOBATA e 3aKNIUHeHa Bbpxy paMOTO Ha CToNkata Ha MOHITopa. (3a N36paHN MoDEIN)
- 3aKpeTe OCHOBaTa KbM paMOTo Ha CTOnKaTa Ha MOHITopa KaTO 3aBbPTNTe BNHTa C NOMOuTa Ha BRpaDeHOTo e3Nue INIc NODXODyMa MOHeTa. (3a N36paHn MoDeJI)
Cbbp3BaHe Ha MOHITOPa KbM KOMNIOTBpa
- 13KJIIOHTOpa INI3BaIeTe 3axpaHbAunna Ka6eJHa KOMNIObTa pO KOHTAKTa.
- 2-1 CbpxteHDMI ka6ena
a. Ybepete ce, Ye KaKTo MOHITOpBt, Taka N KOMNHTbpbT ca N3KNIOUeHN.
b. Cbpxte HDMI ka6ena KbM KOMnIObpa.
Pn n3no3BaHe Ha HDMI moKeTe Da HATncHe TPOIN3BOJen 6yToH,
cN3KIOUeHHe Ha 6yToHa 3a BKNIOVAHe, 3a da 3aJeINCTBaTe npTa I/O
3a N3TOUHNIK.
2-2 CbpxeTe DP ka6eNa (BxO n o noDpa36pnahe)
a. YBepete ce, Ye KaKTo MOHITOpbT, Taka N KOMNIOTpbpbT Ca N3KNIOueHN.
b. Cbpxte DP ka6ena KbM KOMnHtbpa.
-
Cbpxteaynoka6ena.(onu)
-
NocTabeTe 3axpaHbauJa Ka6en Ha MOHITopa B 3axpaHbauJa NOPT OT 3aHaTa CTrpaHa Ha MOHITopa.
- BkHIOUeTe 3axpaHbauNTe Ka6eNHa KOMNHObpa N MOHHTopa B 6IIN3KIA eIeKTPueeCKN KOHTaKT.
- 136epTe BKN./M3KJI. HaФункцЯТа 3a 3apeKdAne npe3 USB npn n3KlOyeHO 3axpaHbHe, 3a daakTbnpate/daekTbnpate Ta3nФyHKuN.
BbHn6yToH3aynpaBneHne
| Homep | Elefembre | Описсiones |
| 1 | Бутон 3a Зхраивае/ ИндikаTop | Изк nullува/Вьлочьma MOHITOPа. СиньOTO показа,谁能 MOHITOp bT e Вьлочч. ОразжевOTо ознayaba ржим Ha �отовост/песене Ha сөргий. |
| 2 | Бырз клавиш 1, 2 Бутона | Нат生态系统а akтувира themselves Na Фуннцята с насторец NG NOTpe6итейся Бырз Клавиш. |
| 3Бутон 3a ВхOD | Нат生态系统а за превлочьане Ha Източницпte Ha вхOD. | |
| 4 | Бутон Navi (Hавиration)/OK | Нат生态系统а за akтувира themselves Na OSD Менино, слад Това ng Изэнзайты Като Бутон 3a на валигира themselves, за дэлмэр自来水 Желаянда Фуннця.Нат生态系统е ng OTHOBO За вьveжданe Ha Избор. |
Pa3npope6n n 6eJexKn 3a 6e3oNaChocT
Белека ot Фелераннatablekomся за komунkaци (ФКК)
ToBa yctpoiCTBO e TectBAHO nOTROBAPHa oRpaHHeHnTa 3a cHpOBO yctpoIcTBo OT KNaC B,cbTlaCHO aact 15 ot npabnata Ha KK Te3n orpaHneHn Ca npedHa3NaHeHn Da ocNpyBaT pa3ymHa 3aunTa CpeUy BpeHN CmUeHn B XINIIuHn INCTaJIaUN. ToBa yctpoiCTBO reHepnpa, H3NON3Ba n MoKe Da n3bYBa pAnOeCToTHa eHepnA n Ako He 6bDe MOHTnpaHO n H3NON3BaHO, B cbOTBeTCTBnE C NHCtpKUnITE, MoKe Da npuHn BpeHN CMUeHn Ha paINO KOMyHnKaUnITE.
BbnpkTOBa, Hama rapaHcN, Ye hma Da Bb3HNKHat CmUeHnB KOHKpeTHa HCTaJIaIaIaI. Ako yctpoCTBOTo npuHHBA BpeHn CmUeHnHa paIIO N TeBeUNoHNO pInemaHe, KoETO MOKe Da ce yCTaHOBn Ype3 N3KJIIOvBaHe N BKJIOvBaHe Ha yCTpoCTBOTo, NotpeBNTeJIr Ce HacbpVaBa Da ce ONtA da KOpINpca CmUeHnTo Ype3 EdHa OT cJeHnTe MEPK:
- PneopnHTnpaHe IINI pEmecTbaHe Ha aHTeHaTa Ha npEnMHnKa.
- YBeJIuHaBaHe Ha pa3CTOaHneTo MekJy ycTpoIcTBOTO n PnMeMHnka.
Cbbp3BaHe Ha ycTPOICTBOTO B KOHTAK BBB Bepura, KORTo e pa3NuHa OT Ta3N, B KORTo e Cbbp3AH pneMHKbT.
KohcyntaunC doCTabuHKn IIN ONIteH paINO/TeNEBn3NOHeH TexNk 3a NOMOu.
CE deknapaun 3a cbotBeTcTBne
C HactoJeTo, Acer Inc., DieKnappa, ye To3n LCD MOHTop e B cBoTBeCTBne Cbc CbIeCTBeHHeNt N3NCKBaHnN I npUIOxIMn pa3npope6n Ha DnpeKTHBaTa 3a eJekTpOMaHHTHa CbBMecTmOcT (EMC) 2014/30/EC, DnpeKTHBaTa 3a HnCKo HnpeXeHne 2014/35/EC n RoHS DnpeKTHBaTa 2011/65/EC, n DnpeKTHBa 2009/125/EO no OTHoSeHne Ha cb3daBaHeto Ha pAMka 3a onpeJeHne Ha N3NCKBaHnTa 3a ekOdn3aH 3a npOdyKTH, Cbbp3aHn C eHepronOTpe6JIeHne.
Belenkka:
3a da npedotbpatnte noBpeHa MoHITopa, He ro nobDnraIte OT OCHOBaTa My.
Белека:Екранирази Кабел.
BcHKn Bp3kn KbM dpny Hn3HnCnIeTbn YcTpoIcTa Tp86Ba Da ce n3BbPWBaT cNOMOuTa Ha ekpaHnpaHn Ka6eHn, 3a da OTrobaprHa pa3nopE6nte 3a eNeKtpomarHHTha CbBMecTmocT (EMC).
Белека: Периферни усторства.
EINCTBHeNO nepnepHn ycTpoNCTBa (BXoHN/3XoHN yCtpoNCTBa, TepMNHaI, npInTEpN nT.H.), KONTO IMAT cEPtnOHKaT 3a cbOTBeTCTBne C orpaHueHnra 3a knac B MOrat da ce cBbP3BaT KbM TOBa o6OpyDbaHe. Pa6oTaTc HceptnOuPaHn nepnepHn ycTpoNCTBa MoKe Da DOBeDe Do CMUeHn Ha paDNIO IN TEeBUNOHHO To pmeMaHe.
Bнманne
PpOMeHn MmMOuNkauH, KOHTo He ca n3pyHoo OdopeHn OT npOn3BODnteIaMOrat Da DOBeTa Do aHyIpHaHe Ha NtHOMOuTAta Ha Notpe6nteJ, KoTo ce pTeIOCTabr O T FepepaHATA KOMNCnIO KOMyHkaunTe 3a pa6ota C To3n IpoDyKT.
YcnoBnaHa pa6Ota
ToBa yCTpoiCTBO e B CBoTBeTCTBn e cact 15 ot npabunata Ha K K . Pa6oTa e npedMeHa cneHNteDBe ycNoBn: (1) ToBa yCTpoiCTBO He Tp6Ba Da npuHnRa BpeHn CMUeHn N (2) ToBa yCTpoiCTBO Tp6Ba Da npHeMa BCnKn nOnyehn CMUeHn, BKJIOHTeJIHO CMUeHn, KOINTo 6xHa MoTn Da npuHnT HHexeNa ha pa6Ota.
Белекka: Kaнадский notpe6nteJIi
ToBa zHpOBO yCTPOBCTBO OT Knac B OTRObAp Ha pa3nope6aTa ICES-003 Ha KaHaJa.
Olulised ohutusalased juhised
- nanaananaananaananaa anananaananaananaananaanana
- 1
- 1
- 1
n
1.
2.2-1 HDMI
a.
b. HDMI
aunnulluru Part 15 aunr FCC nnuuauuauuauuauu (1) unnuuauuuauuuuuuuuuuuuuuuuuuuuuuuuuuuuuuuuuuuuuuuuuuuuuuuuuuuuuuuuuuuuuuuuuuuuuuuuuuuuuuuuuuuuuuuuuuuuuuuuuuuuuuuuuuuuuuuuuuuuuuuuuuuuuuuuuuuuuuuuuuuuuuuuuuuuuuuuuuuuuuuuuuuuuuuuuuuuuuuuuuuuuuuuuuuuuuuuuUU
2. “a: y 1
Jusnsu Class B 1u nn Canadian ICES-003
Aaalalalalalalalalalalalalalalalalalalalalal
4
140 60 20-L
L
Aaill 6
.
LCD
A. CLCD A. CLCD B. CLCD C. CLCD D. CLCD
#
1
xill jia 2d
sucuuiuuljoljus
(jjll jssaaeae) .
Aa aaeaae aee aee aee eae ee ae eae eae eae
jbblae
jiigssll jiejia
j 1
HDMI 2-1 .2
j 1 j 1
HDMI
HDMI
()DPJ2-2
jssll jz 2aaii jzai jz
DP
(yj).
Aa aai 1
5
AalgEulaius USB jiajia jiajia/ jiai aalg Eulaius USB jiajia jiajia/ jiai .6
a
1k + 1 = 7
1
ai = bi = - 12
y
ai a ai 的最小值为 k .
j 1
a a a a a a a a a a a a a a a a a a a a a a a a a a a
1
(2),j(1):y
S OBC = S COD + S BOC - S BOC
ICES-003 《》
| TFT液晶LCD液晶 | 68.47"27 W (1000) | ||||
| (10=2000) | LCD LED LED LED LED LED LED LED LED LED LED LED LED LED LED LED LED LED LED LED LED LED LED LED LED LED LED LED LED LED LED LED LED LED LED LED LED LED LED LED LED LED LED LED LED LED LED LED LED LED LED L L L L L L L L L L L L L L L L L L L L L L L L L L L L L L L L L L L L L L L L L L L L L L L L L L 5 | ||||
Acer p 1
365 4 4
3 MeToH 3aNo6iraHH NoIiKoJKeHH MoHiTopa, He NiHimaTe MOHiTOp 3a NOro NiCTabKy.
Declaration of Conformity
We,
Acer Incorporated
8F, 88, Sec. 1, Xintai 5th Rd., Xizhi, New Taipei City 221, Taiwan
And,
Acer Italy s.r.l.
Via Lepetit, 40, 20020 Lainate (MI) Italy
Tel: +39-02-939-921, Fax: +39-02 9399-2913
www.acer.it
Product:
LCD Monitor
Trade Name:
ACER
Model Number:
Z271U
SKU Number:
Z271U xxxxxx;
(^^ ) = 0 9 a\~z,A\~Z,orblank
We, Acer Incorporated, hereby declare under our sole responsibility that the product described above is in conformity with the relevant Union harmonization legislations as below Directive and following harmonized standards and/or other relevant standards have been applied:
EMC Directive: 2014/30/EU
EN55032:2012/AC:2013 Class B
EN55024:2010
EN61000-3-2:2014 Class D
EN61000-3-3:2013
LVD Directive: 2014/35/EU
EN60950-1:2006/A11:2009/A1:2010/A12:2011/A2:2013
RoHS Directive: 2011/65/EU
EN50581:2012
ERP Directive: 2009/125/EC
Regulation (EC) No. 1275/ 2008; EN 50564:2011
Year to begin affixing CE marking: 2017.
8F, 88, Sec. 1, Xintai 5th Rd., Xizhi, New Taipei City 221, Taiwan
Und
Acer Italy s.r.l.
Via Lepetit, 40, 20020 Lainate (MI) Italy
Tel: +39-02-939-921, Fax: +39-02 9399-2913
www.acer.it
Produkt:
LCD-Monitor
Handelsbezeichnung:
ACER
Modellnummer:
Z271U
Artikelnummer:
Z271Uxxxxxx;
RU Jan / leitender Manager
Acer Incorporated (Taipeh, Taiwan)
Jul. 14, 2017
Datum
8F, 88, Sec. 1, Xintai 5th Rd., Xizhi, New Taipei City 221, Taiwan
Y,
Acer Italy s.r.l.
Via Lepetit, 40, 20020 Lainate (MI) Italy
Tel: +39-02-939-921, fax: +39-02 9399-2913
www.acer.it
Producto:
Monitor LCD
Nombre commercial:
ACER
Numero de modelos:
Z271U
8F, 88, Sec. 1, Xintai 5th Rd., Xizhi, New Taipei City 221, Taiwan
Et,
Acer Italy s.r.l.
Via Lepetit, 40, 20020 Lainate (MI) Italie
Tel: +39-02-939-921, Fax: +39-02 9399-2913
www.acer.it
Produit :
Moniteur LCD
Nom commercial :
ACER
Numero de modulo :
Z271U
Numero SKU:
Z271Uxxxxxxxx;
(^^ ) = 0 9 a~z,A~Z,oublanc)
8F, 88, Sec. 1, Xintai 5th Rd., Xizhi, New Taipei City 221, Taiwan
E,
Acer Italy s.r.l.
Via Lepetit, 40, 20020 Lainate (MI) Italy
Tel: +39-02-939-921, Fax: +39-02 9399-2913
www.acer.it
Prodotto:
Monitor LCD
8F, 88, Sec. 1, Xintai 5th Rd., Xizhi, New Taipei City 221, Taiwan
En,
Acer Italy s.r.l.
Via Lepetit, 40, 20020 Lainate (MI) Italy
Tel: +39-02-939-921, fax: +39-02 9399-2913
www.acer.it
Product:
LCD-monitor
Handelsnaam:
ACER
Modelnummer:
Z271U
SKU-nummer:
Z271Uxxxxxxxx;
(x = 0 9,a z,A Z, of leeg)
8F, 88, Sec. 1, Xintai 5th Rd., Xizhi, New Taipei City 221, Taiwan
E,
Acer Italy s.r.l.
Via Lepetit, 40, 20020 Lainate (MI) Italy
Tel: +39-02-939-921, Fax: +39-02 9399-2913
www.acer.it
Produco:
Monitor LCD
Regulatory Compliance


Bauart geort
Sichemeth
Regelmitlage
Produktions
Beratwathung
www.bu.com
ID 200200000

BllcualitSt ISO 9241-307 www.bjx.com C000507605


UA.TR.060
barcode
MC.TAN11.003
P/N: 4J.3Q101.071 (xx)