USER MANUAL BH4S69M6DB9JS HOOVER
BUILT-IN WASHING MACHINE
Prima accensione - Erstinbetriebnahme - First starting - Primer uso - Premier démarrage - Eerste start - Primeira'utilisation - Пьрв статуранe - Prvo uključenje Elso beinditás - Prvi zagon - PrvoPokretanje - Prvni start - Pierwsze uruchomienie Prima punere in functiune - Prve spustenie - Перше увимкенья - Рpwtn ekknivson

LANGUAGE
IT 3
DE 11
EN 19
ES 27
FR 35
NL 43
PT 51
BG 59
HR 67
HU 75
SL 83
SR 91
CS 99
PL 107
RO 115
SK 123
UKR 131
EL 139
IT
Spia "AI Weight Sense"***
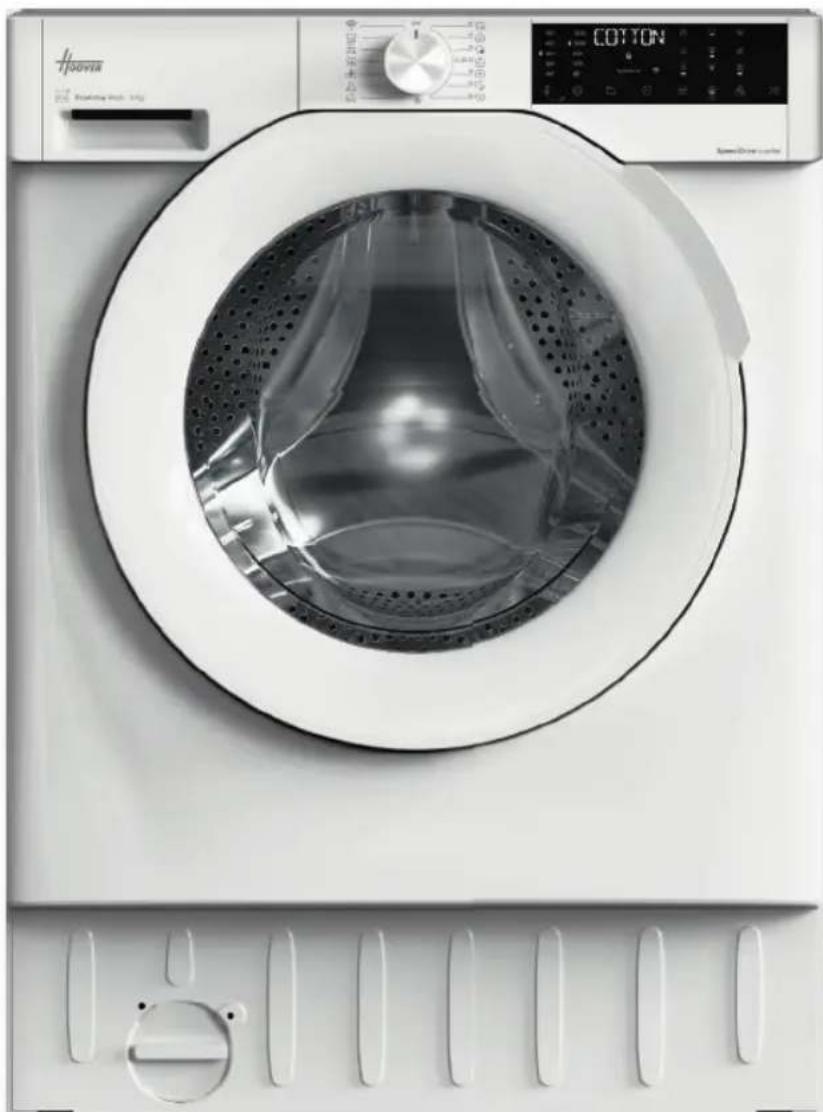
EN Built-in washing machine
Before using the appliance, carefully read the safety instructions. Before using the machine, it is absolutely necessary to remove the screws and transport lock spacers. For detailed instructions on the removal procedure, see the Installation Instructions.
Download and read the complete User Manual online for more details.
1. Installation

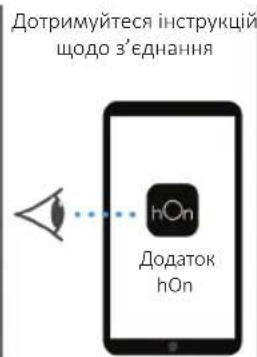
Download the hOn App

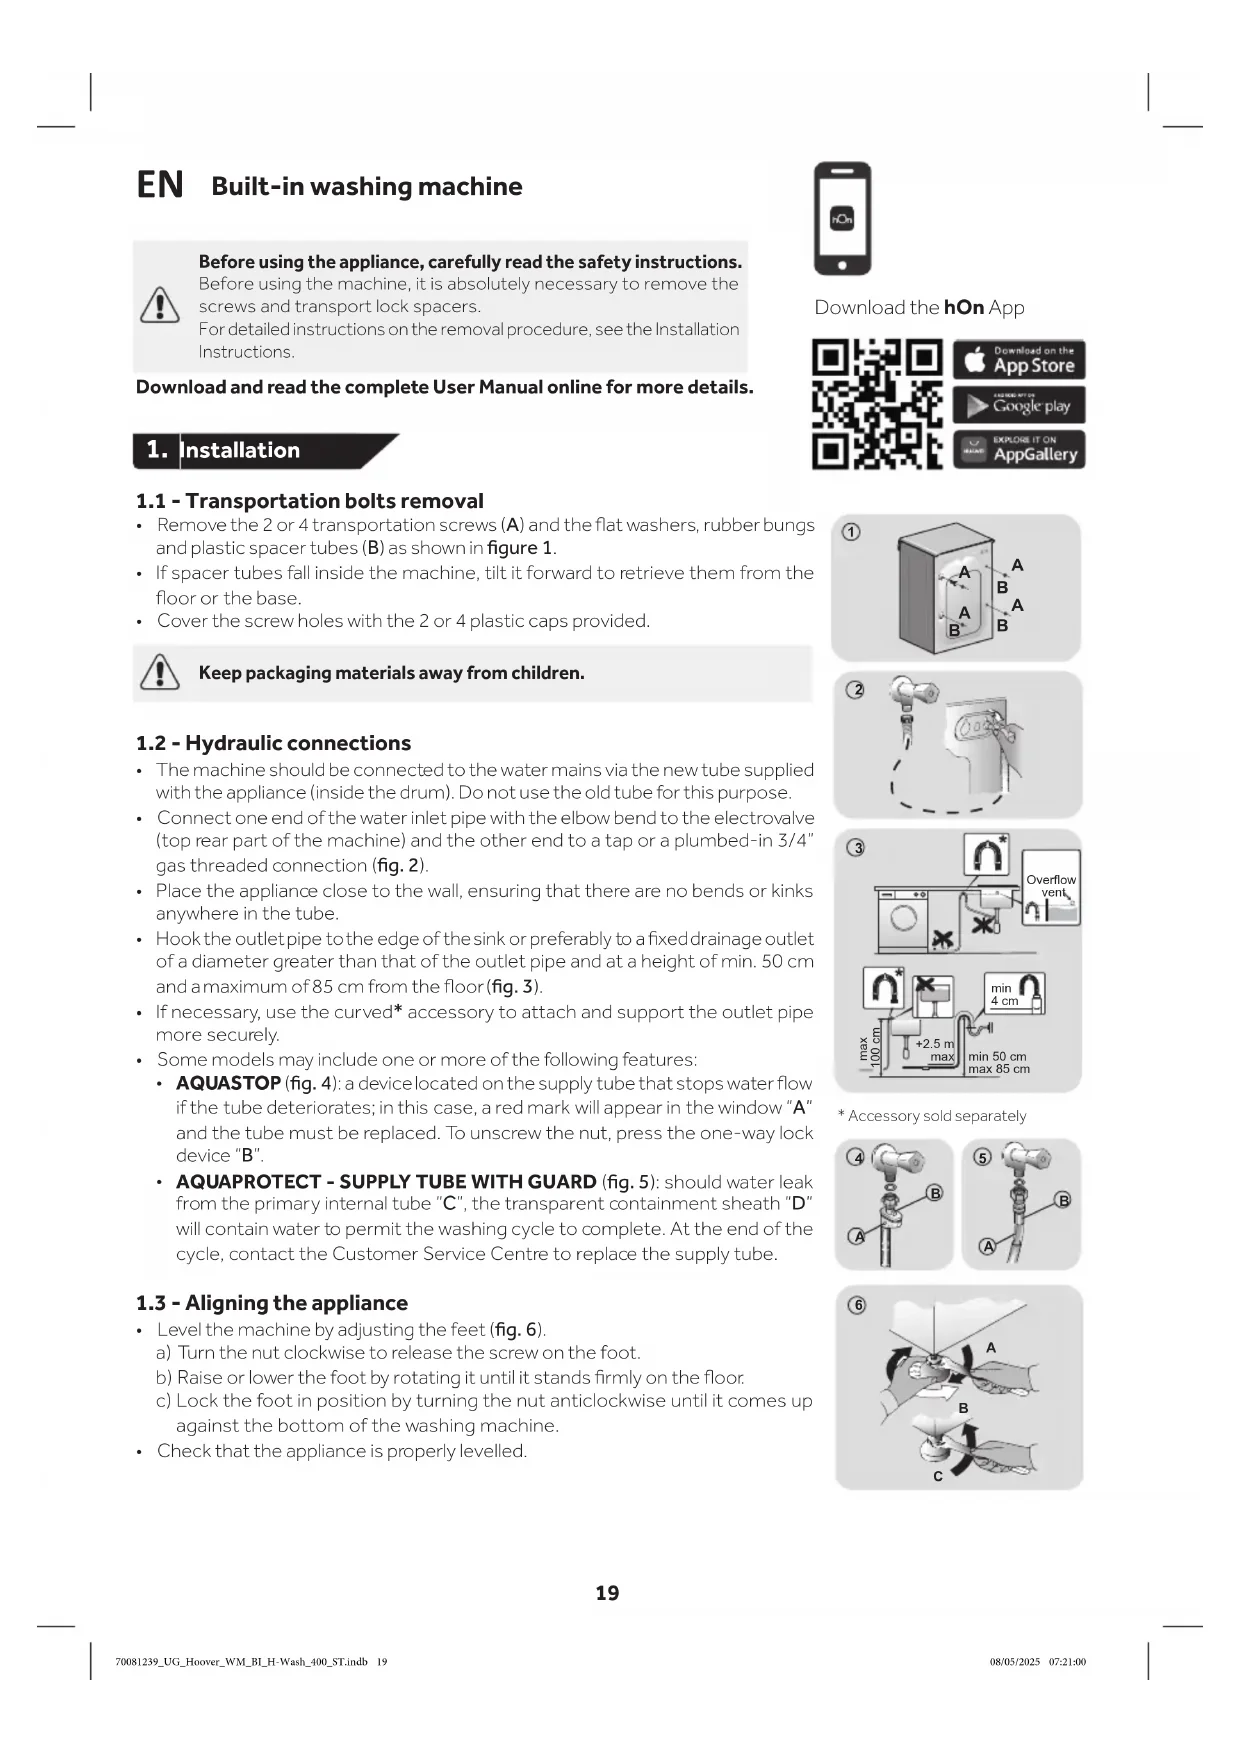
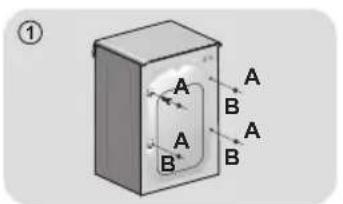
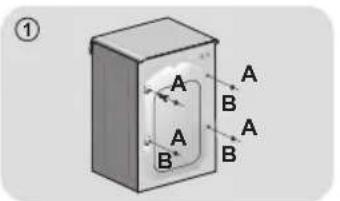
1.1 - Transportation bolts removal
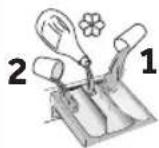
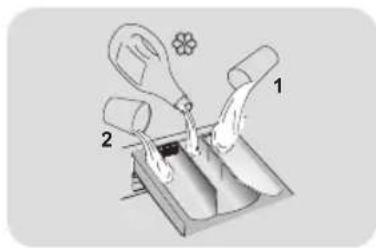
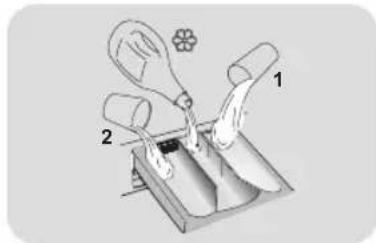
- Remove the 2 or 4 transportation screws (A) and the flat washers, rubber bungs and plastic spacer tubes (B) as shown in figure 1.
- If spacer tubes fall inside the machine, tilt it forward to retrieve them from the floor or the base.
- Cover the screw holes with the 2 or 4 plastic caps provided.

Keep packaging materials away from children.
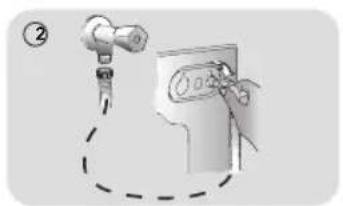
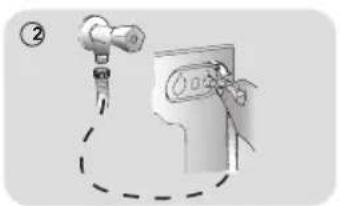
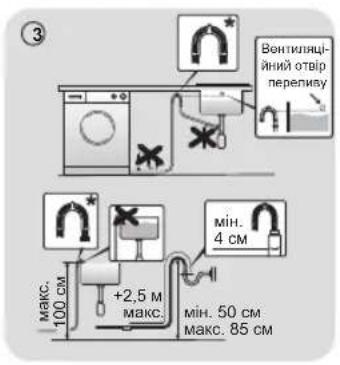
1.2 - Hydraulic connections
- The machine should be connected to the water mains via the new tube supplied with the appliance (inside the drum). Do not use the old tube for this purpose.
- Connect one end of the water inlet pipe with the elbow bend to the electrovalve (top rear part of the machine) and the other end to a tap or a plumed-in 3/4'' gas threaded connection (fig. 2).
- Place the appliance close to the wall, ensuring that there are no bends or kinks anywhere in the tube.
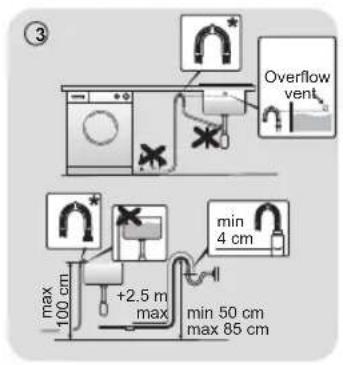
- Hook the outlet pipe to the edge of the sink or preferably to a fixed drainage outlet of a diameter greater than that of the outlet pipe and at a height of min. 50 cm and a maximum of 85 cm from the floor (fig. 3).
-
If necessary, use the curved* accessory to attach and support the outlet pipe more securely.
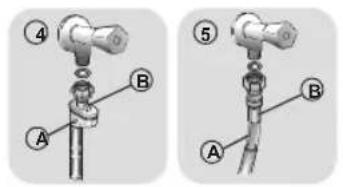
Some models may include one or more of the following features:
-
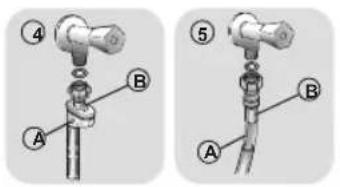
AQUASTOP (fig. 4): a device located on the supply tube that stops water flow if the tube deteriorates; in this case, a red mark will appear in the window "A" and the tube must be replaced. To unscrew the nut, press the one-way lock device "B".
-
AQUAPROTECT - SUPPLY TUBE WITH GUARD (fig. 5): should water leak from the primary internal tube "C", the transparent containment sheath "D" will contain water to permit the washing cycle to complete. At the end of the cycle, contact the Customer Service Centre to replace the supply tube.
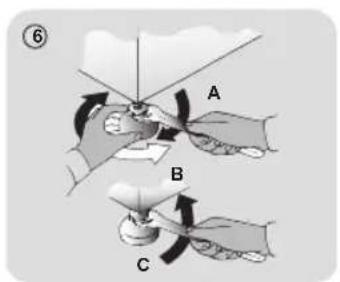
1.3 - Aligning the appliance
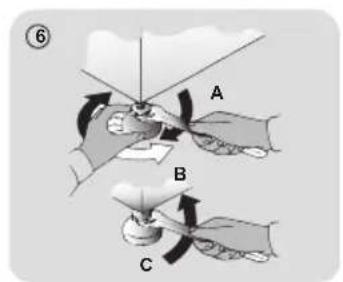
- Level the machine by adjusting the feet (fig. 6).
a) Turn the nut clockwise to release the screw on the foot.
b) Raise or lower the foot by rotating it until it stands firmly on the floor.
c) Lock the foot in position by turning the nut anticlockwise until it comes up against the bottom of the washing machine.
- Check that the appliance is properly levelled.
* Accessory sold separately
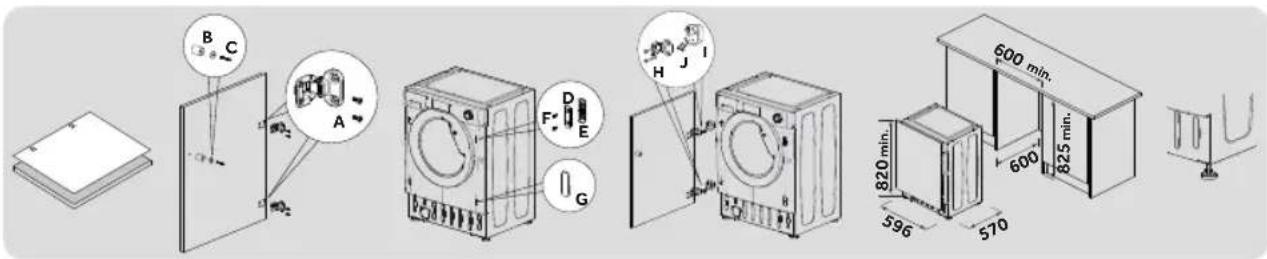
1.4 - Mounting the furniture door
- Position the template on the back of the door and mark the holes for the hinges and magnet (left or right side). Drill the holes and secure the hinges with the screws (A) provided.
Fix the magnet (B) in place using screw (C) then mount the plate (D) with the plastic support (E) under it and fix them in position with screw (F).
- Snap mount cap (G) in the lower position.
- Mount the furniture door to the front of the washer using the hinges. Fix the spacers (I) in place with the 2 screws (J) and then fix the hinges with 2 screws (H).
- Adjust the washer height (820-840 mm) using the 4 adjustable feet and secure them with the nuts.
- Slide the washer into place, adjusting the furniture plinth to the new height.

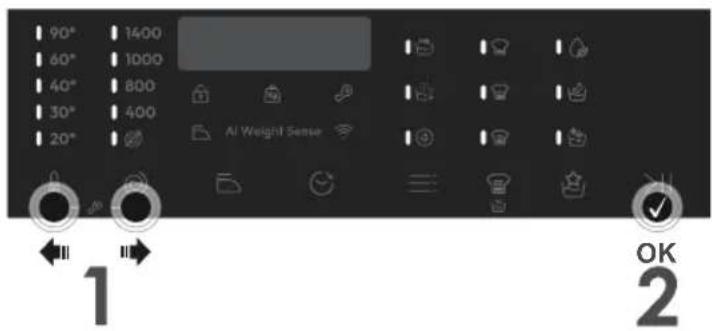
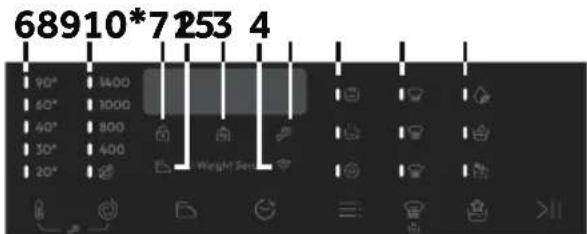
2. Control panel
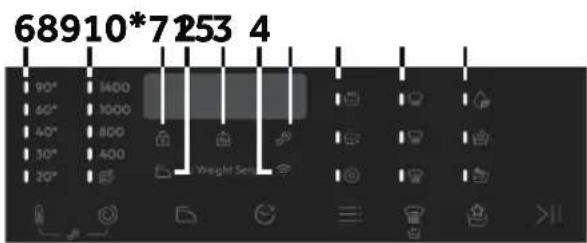


A Start/Pause
B Temperature selection
C Spin selection
D Anti-Creatase
E Delay start
F Options
G Stain level/Rapid/Steam level**
H Special programmes (only available on certain models)
B+C Child lock
- Only available in certain models
** Steam level (only available on certain models)
Indicator lights
1 Door locked indicator
5 Child lock indicator
9 Stain level indicators
2 Easy iron indicator
6 Wash temperature indicators
10 Special programmes indicators
3 "AI Weight Sense"indicator***
7 Spin speed indicators
*** Weight detector indicator
4 Wi-Fiindicator
8 Options indicators

Close the door BEFORE selecting the button START/PAUSE. To start the selected cycle with the preset parameters, press START/PAUSE. When the programme is running, the display will show the time to elapse.

This button allows you to change the temperature of the wash cycles. It is not possible to raise the temperature over the maximum allowed for the programme, in order to protect the fabrics. If you want carry out a cold wash all the indicators must be off.

By pressing this button, it is possible to reduce the maximum speed, and if you wish, the spin cycle can be cancelled.

Anti-Crease (D) - Available on some programmes only
This function allows you to minimize creases as much as possible, eliminating the intermediate spins or reducing the intensity of the last one.

This button allows you to pre-programme the wash cycle to delay the start of the cycle for up to 24 hours.

This button allows you to choose between different options (depending on the selected programme):
| PRE | Prewash (F) - This option allows you to make a prewash and it is particularly useful for heavily soiled loads (can be used only on some programmes). When activated, the indicator icon (E) lights up |
| Extra rinse (F) - This option allows you to add one rinse at the end of the washing cycle and is useful for people with delicate and sensitive skin. When activated, the indicator icon (F) lights up |
| # | Hygiene + (F) - This option allows deep cleaning of your clothes by maintaining the same temperature for the whole wash. |


This button allows you to choose between different options (depending on the selected programme):
Stain level (G) - This option allows you to choose between 3 levels of wash intensity modifying the length of the programme, depending on how much the fabrics are soiled (can only be used on some programmes as shown in the table of programmes).
Rapid (G) - The button becomes active when you select the RAPID CARE (14'/30'/44') programme on the knob and allows you to select one of three durations indicated, depending on the type of fabric.
Steam level\*G)
After selecting the STEAM CARE PRO programme, you can use this button to choose between three steam treatments of different intensities, designed for dry or wet garments and depending on the type of fabric.
- Only available on certain models

Special programmes (H) - Only available on certain models
This button allows you to choose between different options (depending on the selected programme):

Active Wash (H) - This option (which can be set in several programs) optimizes the water and energy consumption of the selected program, maintaining the washing performance unchanged.

Night & Day (H) - This option reduces the intermediate spin speed to 400 rpm, where applicable, increase the water level during rinsing and keep the laundry immersed in water after the final rinse, in order to spread the fiber perfectly.

Drum clean (H) - Developed to clean the washing machine drum. Use only powder detergent. Do not start the programme with laundry in the washing machine. It is suggested that this is carried out after every 50 washing cycles. The option can only be selected for the DRAIN & SPIN programme.

Child lock (B + C)
- Pressing simultaneously the buttons "TEMPERATURE SELECTION" and "SPIN SELECTION" for about 3 seconds, the machine allows you to lock the keys. In this way, you can avoid making accidental or unwanted changes if a button on the display is pressed accidentally during a cycle.
The key lock can be simply cancelled by pressing the two buttons simultaneously again or turning off the appliance.
2.2 - Indicator lights

Door lock indicator (1)
For safety reasons the door is locked partially during the washing cycle. It is only possible to open the door at the end of the program or after the program was cancelled correctly. In case of high water level, high water temperature and during spinning it is not possible to open the door.

Anti-Crease indicator light (2)
The indicator light shows the selection of the relevant option.

"AI Weight Sense" indicator light (3): (active only on certain programmes).
Through every wash phase "AI Weight Sense" allows to monitor information on the wash load in the drum and in the first minutes of the wash it:
- adjusts the amount of water required;
- determines the length of the wash cycle;
- controls rinsing according to the type of fabric selected to be washed it;
- adjusts the rhythm of drum rotation for the type of fabric being washed;
- recognises the presence of too much soap suds, and if necessary, adjust the amount of rinse water.
- adjusts the spin speed according to the load, thus avoiding any imbalance.

Wi-Fi indicator light (4): On models equipped with Wi-Fi, it indicates the status of the connection.

APPLIANCE PAIRING (ON APP)
NOTE: The frequency of the home Wi-Fi network has to be set on the 2.4 GHz band. (5 GHz band not allowed).
- Download the hOn App on your device by framing the following QR code or by the link:
go.haier-europe.com/download-app
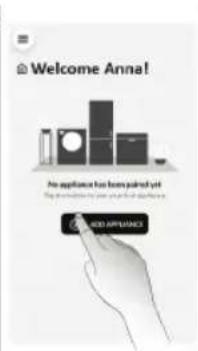
Create the user profile (or log-in) and pairing the appliance following the instructions on the device display.
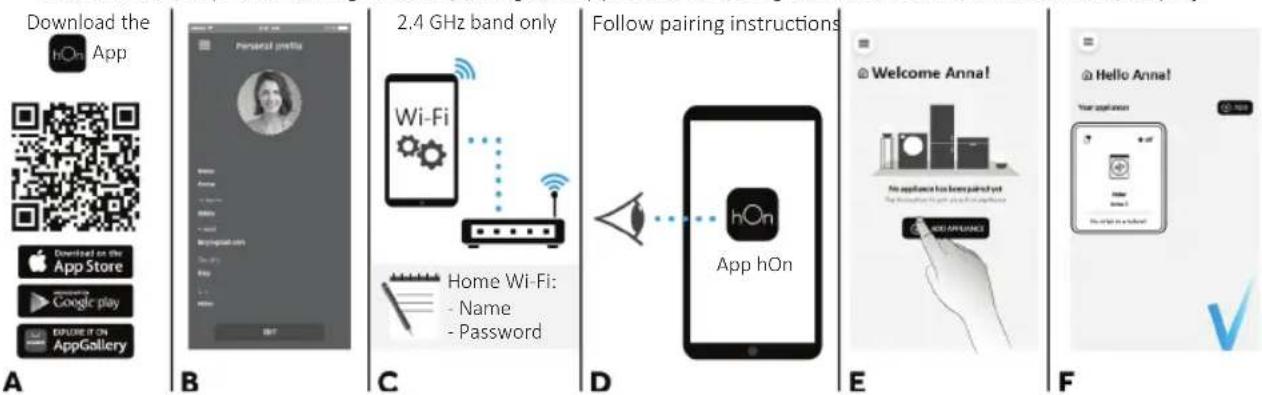
TO ENABLE REMOTE CONTROL
- Close the door and turn the knob to the REMOTE CONTROL (Wi-Fi) position.
You can now manage your product from the app.
TO DISABLE REMOTE CONTROL
- Turn the knob to any position other than REMOTE CONTROL (Wi-Fi), without going through the OFF. If there is a cycle underway, it will continue. From the app it is possible to view the status of the product but not to control it.

Key lock indicator light (5): The indicator light show that the keys are locked.

Wash temperature indicator lights (6)
The indicator lights show the washing temperature of the selected programme that can be changed (where allowed) by the relevant button. If you want carry out a cold wash all the indicators must be off.

Spin speed indicator lights (7)
The indicator lights show the spin speed of the selected programme, you can reduce or omit by the relevant button.


Options indicator lights (8)
The indicator lights show the options that can be selected by the relevant button.


Stain level indicator lights (9)
- Once the programme has been selected, the indicator light will automatically show the stain level set for that programme.
- Selecting a different stain level the relevant indicator will light up.


Special programmes indicator lights (10) - Only available on certain models
The indicator lights show the options that can be selected by the relevant button.
3. Programmes
Yes

Yes by pressing the button
O
Options
No
Detergent compartment for:
1
Prewash
2
Detergent
Softener or care product
| PROGRAMME | (MAX.) (depending on model) | ( MAX.) | DETERGENT | ANT-CREASE | DELAY START | PREWASH | EXTRA RINSE | HYGIENE+ | STAIN LEVEL |
| 6kg | 7kg | 8kg | 9kg | 2 | | 1 |
| COTTONS 6 | | 7.8 | 9.90° | | | ● | ● | (●) | / | ○ | ○ | | ○ | |
| ECO40-60 | ECO 40-60 | 6.7 | 8.9.60° | | | | ● | ● | | / | ○ | / | ○ | / | / |
| WOOL & HAND WASH | 1 | 1.2 | 2.30° | | | ● | ● | | ○ | | | | / | / |
| 20° | 20°C | 6.7 | 8.9.20° | | | | ● | ● | | / | ○ | / | ○ | / | ○ |
| SYNTHETIC AND COLOURED | 3 | 3.5 | 4 | 4.5 | 60° | ● | ● | (●) | ○ | ○ | | ○ | ○ | ○ |
| DRAIN & SPIN | --- | --- | - | | | | | | / | ○ | / | / | | |
| RINSE | --- | --- | - | | | | ● | /○ | / | / | | | | |
| 3 | FITNESS CARE | 2 | 2.5 | 2.5 | 2.5 | 40° | ● | ● | | / | ○ | / | ○ | / | / |
| SOFT CARE | 2 | 2.5 | 2.5 | 2.5 | 40° | ● | ● | | ○ | | / | / | / | / |
| STEAM CARE PRO | 1,5 | 1.5 | 1.5 | 1.5 | - | | | | / | ○ | / | / | | |
| PRO | ALLERGY CARE PRO | 3 | 3.5 | 4 | 4.5 | 60° | ● | ● | | / | ○ | / | ○ | / | / |
| 14'30'44' | RAPID CARE 14'30'44' | 1.1 | 1.5 | 1.5 | 40° | | ● | ● | | / | ○ | / | ○ | / | ○ |
| 2 | 2.5 | 2.5 | 2.5 | 40° | ● | ● | | / | ○ | / | ○ | / | ○ |
| 3 | 3.5 | 3.5 | 3.5 | 40° | ● | ● | | / | ○ | / | ○ | / | ○ |
| ALL IN ONE 59' | 6.7 | 8.9.40° | | | | ● | ● | | / | ○ | / | ○ | / | / |
| + | EXTRA CARE | 3 | 3.5 | 4 | 4.5 | 30° | ● | ● | /○ | / | / | / | | | |
3.1 - Programmes description
| COTTONS | This programme is suitable for washing coloured cotton garments at 40°C or for ensuring the highest degree of cleanliness for cotton resistant laundry washing at 60°C or 90°C. The final spin is at maximum speed that ensures excellent water removal. |
| ECO
40-60 | ECO 40-60 | The ECO 40-60 programme is able to clean normally soiled cotton laundry declared to be washable at 40°C or 60°C, together in the same cycle. This programme is used to assess the compliance with the EU Ecodesign legislation (environmentally friendly products design). |
| WOOL & HAND WASH | This programme performs a wash cycle dedicated to the wool fabrics that can be washed in a washing machine, the articles to be washed by hand or laundry items made from silk or specified as "Wash as Silk" on the fabric label. |
| 20° | 20°C | This innovative programme, allows you to wash different fabrics and colours together, such as cottons, synthetics and mixed fabrics at only 20°C and provides an excellent cleaning performance. Consumption on this program is about 40% of a conventional 40°C cottons wash. |
| SYNTHETIC AND COLOURED | This programme allows you to wash different type's fabrics and different colours all together. The rotation movement of the drum and the water levels are optimized, both during the washing the rinsing phase. The accurate spin action, ensures a reduced formation of creases in the fabrics. |
| DRAIN & SPIN | The program completes the drain and a maximum spin. It is possible to delete or reduce the spin through the SPIN SELECTION button. |
| RINSE | This program performs 3 rinses with an intermediate spin (which can be reduced or excluded by using the appropriate button). It is used for rinsing any type of fabric, for example after a wash carried out by hand. |
| FITNESS CARE | The perfect combination of time and performance. Created to eliminate dirt from athletic garments and sportswear. A low temperature wash recommended for small loads of synthetic items. |
| SOFT CARE | Developed to take good care of delicate items, this programme washes at a low temperature in 59 minutes. An extended, in-depth rinse nourishes fabric fibres. |
| STEAM CARE PRO | This programme uses a steam treatment to relax creases and achieve the ideal degree of humidity for easier ironing. Three different intensity levels can be selected via the STEAM LEVEL button, designed for dry or wet garments and depending on the type of fabric. |
| PRO | ALLERGY CARE PRO | This washing programme is capable of reaching a temperature of 60°C for an extended period of time, combining the steam action with a powerful rinsing action for thoroughly clean and hygienic clothing. Recommended for cotton fabrics. |
| 1/2
14' 30' 44' | RAPID CARE | Saving without compromising! This new programme may be used to obtain excellent results while saving water, energy, detergent and time. This option washes at a medium temperature suitable for any kind of fabric. Recommended for small loads and lightly soiled items. |
| ALL IN ONE 59' | This programme allows you to wash different fabrics together such as cottons, synthetics and mixed fabrics in only 59 minutes, using the full load of the washing machine, at 40°C (or less) temperature. This programme is particularly suited to slightly dirty fabrics. |
| + | EXTRA CARE | This new programme may be used to wash laundry of different colour fast colours and fabrics together without altering their original look and feel. Through a perfect emulsion of water and detergent, the best possible care of your clothes is guaranteed, with optimal washing performance at a temperature of 30°C. |
4. Daily use
- Connect the machine to a power supply and water connection (see installation chapter on user manual).
-
Prepare the laundry: Sort out clothes according to fabric (cotton, synthetics, wool or silk etc.) and how dirty they are. Check the labels on your garment. Separate white clothes from colored ones. Empty pockets from objects like keys, coins, etc. and remove harder decorative objects.
-
Put in the laundry piece by piece avoiding overloads (check the different maximum loadability according to program). Close the door carefully. Make sure that no pieces of laundry are pinched.
- Select the detergent and softener (when needed) and pour it into the correct compartments of the dispenser.
Open dispenser drawer, the following components can be seen:
- Compartment 1 is for prewash detergent.
- The compartment for fabric conditioners, scenting agents and special additives such as starch, blueing, etc.
- Compartment 2 is for washing detergent.
Some detergents are not designed for use in the dispenser drawer but are supplied with their own dispenser that is placed in the drum directly.
To use the right amount of detergent, softener or any other additives, carefully follow the manufacturer's instructions every time.
- Select a program by turning the knob, choosing the one that fits the most according to the loaded garments. The display will show the program name, the main options and the duration estimation.
- Add or remove options and change the parameters according to your specific needs.
- Press Start/Pause button to start the program.
- When the cycle is finished, "END" is shown on the display, Switch off the appliance by turning the selector to "OFF". Remove your laundry as soon as possible in order to prevent wrinkles, bad odors and bacteria to proliferate.
5. Care and maintenance
5.1 - General machine cleaning
- Unplug the machine during cleaning and maintenance.
- Use a soft cloth with soap liquid to clean the machine case and rubber components.
- Do not use organic chemicals or corrosive solvents.
5.2 - Pump filter cleaning
We recommend checking and cleaning the filter 5 or 6 times a year.
- Turn off and unplug the machine.
Prepare a flat container to catch leach water.
- Unscrew and remove counter-clockwise the pump filter and clean it carefully.
- Put the filter back in the machine and close it carefully.

5.3 -Drawer cleaning
Take always care there are no detergent residues. Clean the drawer regularly:
- Remove the drawer gently but firmly.
- Clean the drawer under running water and put it back into its compartment.
5.4 - Cleaning the drum
- Remove accidentally washed items, especially metal parts such as pins, coins, etc. from the drum and the groove of the door gasket (rubber ring) because they cause rust stains and damage.
- Use a non-chloride cleaner for removing rust stains. Observe the warning hints of the cleaning agent manufacturer.
- Do not use any hard objects or steel wool for cleaning.
After the procedure, open the door, use a towel to clean the stains and foam around the gasket, and keep the inside and outside of the gasket clean.

APPARAATKOPPELING (IN DE APP)
APPLIANCE PAIRING (NA APP)
Ja,CHaTnCKaHeHa6yToHa
PnoJKeJaanie
He

OTdeneHnE3a nepuHn npenapaTn 3a:
1
Ppeepane
2 Pepuien npenapat

OmeKOTeI nn npOdyk 3a rpnka
| ПОНТРАМA | (МAKC.) (В заимностомдулал) | (МAKC.) | ПЕРДLEH ПЕПAPAT | ПОТIVВпнк | OTLOЖЕСТAPT | ПЕДПАСЕ | ДOTьПИNTЕПСТДАКВАЕ | HYGIENE+ | НИВОHA 3AMырсEOCT |
| 6
КТ | 7
КТ | 8
КТ | 9
КТ | 2 | | 1 |
| ПAMУК 6 | | 7.8 | 9.90° | | | ● | ● | (●) | /○ | ○ | ○ | ○ | | |
| ECO
40-60 | ECO 40-60 | 6.7 | 8.9 | 60° | | | ● | ● | / | ○ | / | ○ | / | / | |
| ВыЛHA & Рыно ИЗПИРАЕ | 1 | 1.2 | 2.30° | | | ● | ● | ○ | ○ | / | / | / | | |
| 20° | 20°C | 6.7 | 8.9 | 20° | | | ● | ● | / | ○ | / | ○ | / | ○ | |
| СИNTETИКА ИЦБETHО | 3 | 3,5 | 4 | 4,5 | 60° | ● | ● | (●) | ○ | ○ | ○ | ○ | ○ | |
| ИЗПOMПВАЕ ИЦEHPOФУТA | - | - | - | - | - | | | /○ | / | / | / | / | / | |
| ИЗПЛAKBAHE | - | - | - | - | - | | ● | /○ | / | / | / | / | / | |
| 3 | ФИТHEС | 2 | 2,5 | 2,5 | 2,5 | 40° | ● | ● | / | ○ | / | ○ | / | / | |
| HEЖHA ГИЖА | 2 | 2,5 | 2,5 | 2,5 | 40° | ● | ● | ○ | ○ | / | / | / | / | |
| ТРЕТРАЕ СПAPА ПО | 1,5 | 1,5 | 1,5 | 1,5 | - | | | /○ | / | / | / | / | / | |
| PRO | ГИЖА ПИ АLEPGИ ПО | 3 | 3,5 | 4 | 4,5 | 60° | ● | ● | / | ○ | / | ○ | / | / | |
| 1/2
14' 30' 44' | ГИЖА 14' 30' 44' | 1.1 | 1,5 | 1,5 | 40° | | ● | ● | / | ○ | / | ○ | / | ○ | |
| 2 | 2,5 | 2,5 | 2,5 | 40° | ● | ● | / | ○ | / | ○ | / | ○ | |
| 3 | 3,5 | 3,5 | 3,5 | 40° | ● | ● | / | ○ | / | ○ | / | ○ | |
| ALL IN ONE 59' | 6.7 | 8.9 | 40° | | | ● | ● | / | ○ | / | ○ | / | / | |
| + | ДОПБЛНTEЛНАГИЖА | 3 | 3,5 | 4 | 4,5 | 30° | ● | ● | /○ | / | / | / | / | / | |
3.1 - OnncanHe Na nporpaMnte
| ПИМУК | Таши поportама e поховая за прае на цьевни пamyнни тькани рпс Tempepatура ог 40°C,
пли за прае на усточини пamyнни тькани на Tempepatура ог 60°C ил 90°C, за осигу-
рite повicoka стейен на Ичinctвае. Последна тцentpoуга e на мадсимални оборота за осигурп
да осигурп мадсимално прмавае на ворда. | |
| ECO
40-60 | Прогoramата ECO 40-60 може за поисваHopмално замырсян пamyн прае, за koeto
e пооченьо, чу може за се пени 40°C ил 60°C, за endo в сьшия сизьл. Тши поportама
ce lnnoлзba 3a olizhenka на сботBetCTBnTo c6c 3akohodatelntBOTo HA EC OTHOCHO Ecodesign
(пproektarpeна на ekологинни подукту). | |
| ВыЛHA & РынО
ИЗПИРАЕ | Таши поportама ИльлЯва сокьл на прае, поховая за вынени oblekkа, кочо могатда
се пета в перална машлиа, дрени, кочо Трябва на се пета рьунo, дрени о коррина лл
takimba с обознayенie „Да се пета кOTКОПРИ" на ekлікета на aptikул.
20°C
20°C
СИНТETИКА
LIFETHO | Таши поportама Ви поьлява дрете пазл宪ни тькани obetobe Заедно,
Като пamyк, синтейчни влakна и смесени паловец рпс edba 20°C и осигурьа олочь;
ефektibnoct. Потреблениою рпс Тати поportама e okolo 40% no-malko ot obuchайото за
40°C за пamyн поду.
СИНТETИКА
LIFETHO |
| ИЗПOMЛВАЕ
ИЗПOLФУТA | Прогoramата Ильлява Истоноветою мадсимално цHTPOФурпаре. LelHTPOФурпаре ом(
псд ce пемaxны ил hamалус bSYTOH NA 3БОР HA LIHTPOФуT.
ФИТHEC
ФИТHEC
HEKHDA
HEKHDA
HEKHDA
HEKHDA
HEKHDA
HEKHDA
HEKHDA
HEKHDA
HEKHDA
HEKHDA
HEKHDA
HEKHDA
HEKHDA
HEKHDA
HEKHDA
HEKHDA
HEKHDA
HEKHDA
HEKHDA
HEKHDA
HEKHDA
HEKHDA
HEKHDA
HEKHDA
HEKHDA
HEKHDB
HEKHDA
HEKHDA
HEKHDA
HEKHDA
HEKHDA
HEKHDA
HEKHDA
HEKHDA
HEKHDA
HEKHDA
HEKHDA
HEKHDA
HEKHDA
HEKHDA
HEKHDA
HEKHDA
HEKHDA
HEKHDA
HEKHDA
HEKHDA
HEKHDA
HEKHDA
HEKHDA
HEKHDA
HEKHWA
HEKHWA
HEKHWA
HEKHWA
HEKHWA
HEKHWA
HEKHWA
HEKHWA
HEKHWA
HEKHWA
HEKHWA
HEKHWA
HEKHWA
HEKHWA
HEKHWA
HEKHWA
HEKHWA
HEKHWA
HEKHWA
HEKHWA
HEKHWA
HEKHWA
HEKHWA
HEKHWA
HEKHWA
HEKH WA
HEKHWA
HEKHWA
HEKHWA
HEKHWA
HEKHWA
HEKHWA
HEKHWA
HEKHWA
HEKHWA
HEKHWA
HEKHWA
HEKHWA
HEKHWA
HEKHWA
HEKHWA
HEKHWA
HEKHWA
HEKHWA
HEKHWA
HEKHWA
HEKHWA
HEKHWA
HEKHWA
HEKHWA
HEKHwa
HEKHWA
HEKHWA
HEKHWA
HEKHWA
HEKHWA
HEKHWA
HEKHWA
HEKHWA
HEKHWA
HEKHWA
HEKHWA
HEKHWA
HEKHWA
HEKHWA
HEKHWA
HEKHWA
HEKHWA
HEKHWA
HEKHWA
HEKHWA
HEKHWA
HEKHWA
HEKHWA
HEKHWA
HEKHW
HEKHWA
HEKHWA
HEKHWA
HEKHWA
HEKHWA
HEKHWA
HEKHWA
HEKHWA
HEKHWA
HEKHWA
HEKHWA
HEKHWA
HEKHWA
HEKHWA
HEKHWA
HEKHWA
HEKHWA
HEKHWA
HEKHWA
HEKHWA
HEKHWA
HEKHWA
HEKHWA
HEKHWA
HEKHURA
HEKHWA
HEKHWA
HEKHWA
HEKHWA
HEKHWA
HEKHWA
HEKHWA
HEKHWA
HEKHWA
HEKHWA
HEKHWA
HEKHWA
HEKHWA
HEKHWA
HEKHWA
HEKHWA
HEKHWA
HEKHWA
HEKHWA
HEKHWA
HEKHWA
HEKHWA
HEKHWA
HEKHWA
HEKHWa
HEKHWA
HEKHWA
HEKHWA
HEKHWA
HEKHWA
HEKHWA
HEKHWA
HEKHWA
HEKHWA
HEKHWA
HEKHWA
HEKHWA
HEKHWA
HEKHWA
HEKHWA
HEKHWA
HEKHWA
HEKHWA
HEKHWA
HEKHWA
HEKHWA
HEKHWA
HEKHWA
HEKHWA
HEKHWC
HEKHWA
HEKHWA
HEKHWA
HEKHWA
HEKHWA
HEKHWA
HEKHWA
HEKHWA
HEKHWA
HEKHWA
HEKHWA
HEKHWA
HEKHWA
HEKHWA
HEKHWA
HEKHWA
HEKHWA
HEKHWA
HEKHWA
HEKHWA
HEKHWA
HEKHWA
HEKHWA
HEKHWA
HEKHWAR
HEKHWA
HEKHWA
HEKHWA
HEKHWA
HEKHWA
HEKHWA
HEKHWA
HEKHWA
HEKHWA
HEKHWA
HEKHWA
HEKHWA
HEKHWA
HEKHWA
HEKHWA
HEKHWA
HEKHWA
HEKHWA
HEKHWA
HEKHWA
HEKHWA
HEKHWA
HEKHWA
HEKHWA
HEKHWARE
HEKHWA
HEKHWA
HEKHWA
HEKHWA
HEKHWA
HEKHWA
HEKHWA
HEKHWA
HEKHWA
HEKHWA
HEKHWA
HEKHWA
HEKHWA
HEKHWA
HEKHWA
HEKHWA
HEKHWA
HEKHWA
HEKHWA
HEKHWA
HEKHWA
HEKHWA
HEKHWA
HEKHWA
HEKHWB
HEKHWA
HEKHWA
HEKHWA
HEKHWA
HEKHWA
HEKHWA
HEKHWA
HEKHWA
HEKHWA
HEKHWA
HEKHWA
HEKHWA
HEKHWA
HEKHWA
HEKHWA
HEKHWA
HEKHWA
HEKHWA
HEKHWA
HEKHWA
HEKHWA
HEKHWA
HEKHWA
HEKHWA
HEKHTRA
HEKHWA
HEKHWA
HEKHWA
HEKHWA
HEKHWA
HEKHWA
HEKHWA
HEKHWA
HEKHWA
HEKHWA
HEKHWA
HEKHWA
HEKHWA
HEKHWA
HEKHWA
HEKHWA
HEKHWA
HEKHWA
HEKHWA
HEKHWA
HEKHWA
HEKHWA
HEKHWA
HEKHWA
HEKHWE
HEKHWA
HEKHWA
HEKHWA
HEKHWA
HEKHWA
HEKHWA
HEKHWA
HEKHWA
HEKHWA
HEKHWA
HEKHWA
HEKHWA
HEKHWA
HEKHWA
HEKHWA
HEKHWA
HEKHWA
HEKHWA
HEKHWA
HEKHWA
HEKHWA
HEKHWA
HEKHWA
HEKHWA
HEKHWO
HEKHWA
HEKHWA
HEKHWA
HEKHWA
HEKHWA
HEKHWA
HEKHWA
HEKHWA
HEKHWA
HEKHWA
HEKHWA
HEKHWA
HEKHWA
HEKHWA
HEKHWA
HEKHWA
HEKHWA
HEKHWA
HEKHWA
HEKHWA
HEKHWA
HEKHWA
HEKHWA
HEKHWA
HEKHWI
HEKHWA
HEKHWA
HEKHWA
HEKHWA
HEKHWA
HEKHWA
HEKHWA
HEKHWA
HEKHWA
HEKHWA
HEKHWA
HEKHWA
HEKHWA
HEKHWA
HEKHWA
HEKHWA
HEKHWA
HEKHWA
HEKHWA
HEKHWA
HEKHWA
HEKHWA
HEKHWA
HEKHWA
HEKHYA
HEKHWA
HEKHWA
HEKHWA
HEKHWA
HEKHWA
HEKHWA
HEKHWA
HEKHWA
HEKHWA
HEKHWA
HEKHWA
HEKHWA
HEKHWA
HEKHWA
HEKHWA
HEKHWA
HEKHWA
HEKHWA
HEKHWA
HEKHWA
HEKHWA
HEKHWA
HEKHWA
HEKHWA
HEKHWS
HEKHWA
HEKHWA
HEKHWA
HEKHWA
HEKHWA
HEKHWA
HEKHWA
HEKHWA
HEKHWA
HEKHWA
HEKHWA
HEKHWA
HEKHWA
HEKHWA
HEKHWA
HEKHWA
HEKHWA
HEKHWA
HEKHWA
HEKHWA
HEKHWA
HEKHWA
HEKHWA
HEKHWA
HEKH wa
HEKHWA
HEKHWA
HEKHWA
HEKHWA
HEKHWA
HEKHWA
HEKHWA
HEKHWA
HEKHWA
HEKHWA
HEKHWA
HEKHWA
HEKHWA
HEKHWA
HEKHWA
HEKHWA
HEKHWA
HEKHWA
HEKHWA
HEKHWA
HEKHWA
HEKHWA
HEKHWA
HEKHWA
HEKHwA
HEKHWA
HEKHWA
HEKHWA
HEKHWA
HEKHWA
HEKHWA
HEKHWA
HEKHWA
HEKHWA
HEKHWA
HEKHWA
HEKHWA
HEKHWA
HEKHWA
HEKHWA
HEKHWA
HEKHWA
HEKHWA
HEKHWA
HEKHWA
HEKHWA
HEKHWA
HEKHWA
HEKHWA
HEKHRA
HEKHWA
HEKHWA
HEKHWA
HEKHWA
HEKHWA
HEKHWA
HEKHWA
HEKHWA
HEKHWA
HEKHWA
HEKHWA
HEKHWA
HEKHWA
HEKHWA
HEKHWA
HEKHWA
HEKHWA
HEKHWA
HEKHWA
HEKHWA
HEKHWA
HEKHWA
HEKHWA
HEKHWA
HEKHOA
HEKHWA
HEKHWA
HEKHWA
HEKHWA
HEKHWA
HEKHWA
HEKHWA
HEKHWA
HEKHWA
HEKHWA
HEKHWA
HEKHWA
HEKHWA
HEKHWA
HEKHWA
HEKHWA
HEKHWA
HEKHWA
HEKHWA
HEKHWA
HEKHWA
HEKHWA
HEKHWA
HEKHWA
HEKHUA
HEKHWA
HEKHWA
HEKHWA
HEKHWA
HEKHWA
HEKHWA
HEKHWA
HEKHWA
HEKHWA
HEKHWA
HEKHWA
HEKHWA
HEKHWA
HEKHWA
HEKHWA
HEKHWA
HEKHWA
HEKHWA
HEKHWA
HEKHWA
HEKHWA
HEKHWA
HEKHWA
HEKHWA
HEKHINA
HEKHWA
HEKHWA
HEKHWA
HEKHWA
HEKHWA
HEKHWA
HEKHWA
HEKHWA
HEKHWA
HEKHWA
HEKHWA
HEKHWA
HEKHWA
HEKHWA
HEKHWA
HEKHWA
HEKHWA
HEKHWA
HEKHWA
HEKHWA
HEKHWA
HEKHWA
HEKHWA
HEKHWA
HEKHREA
HEKHWA
HEKHWA
HEKHWA
HEKHWA
HEKHWA
HEKHWA
HEKHWA
HEKHWA
HEKHWA
HEKHWA
HEKHWA
HEKHWA
HEKHWA
HEKHWA
HEKHWA
HEKHWA
HEKHWA
HEKHWA
HEKHWA
HEKHWA
HEKHWA
HEKHWA
HEKHWA
HEKHWA
HEKHWL
HEKWA
HeKWA
HeKWA
HeKWA
HeKWA
HeKWA
HeKWA
HeKWA
HeKWA
HeKWA
HeKWA
HeKWA
HeKWA
HeKWA
HeKWA
HeKWA
HeKWA
HeKWA
HeKWA
HeKWA
HeKWA
HeKWA
HeKWA
HeKWA
HeKWA
HeKWA
NoKOLNBAE
HeKWA
HeKWA
HeKWA
HeKWA
HeKWA
HeKWA
HeKWA
HeKWA
HeKWA
HeKWA
HeKWA
HeKWA
HeKWA
HeKWA
HeKWA
HeKWA
HeKWA
HeKWA
HeKWA
HeKWA
HeKWA
HeKWA
HeKWA
HeKWA
HeK WA
HeKWA
HeKWA
HeKWA
HeKWA
HeKWA
HeKWA
HeKWA
HeKWA
HeKWA
HeKWA
HeKWA
HeKWA
HeKWA
HeKWA
HeKWA
HeKWA
HeKWA
HeKWA
HeKWA
HeKWA
HeKWA
HeKWA
HeKWA
HeKWA
HeKwa
HeKWA
HeKWA
HeKWA
HeKWA
HeKWA
HeKWA
HeKWA
HeKWA
HeKWA
HeKWA
HeKWA
HeKWA
HeKWA
HeKWA
HeKWA
HeKWA
HeKWA
HeKWA
HeKWA
HeKWA
HeKWA
HeKWA
HeKWA
HeKWA
HeKURA
HeKWA
HeKWA
HeKWA
HeKWA
HeKWA
HeKWA
HeKWA
HeKWA
HeKWA
HeKWA
HeKWA
HeKWA
HeKWA
HeKWA
HeKWA
HeKWA
HeKWA
HeKWA
HeKWA
HeKWA
HeKWA
HeKWA
HeKWA
HeKWA
HeKWa
HeKWA
HeKWA
HeKWA
HeKWA
HeKWA
HeKWA
HeKWA
HeKWA
HeKWA
HeKWA
HeKWA
HeKWA
HeKWA
HeKWA
HeKWA
HeKWA
HeKWA
HeKWA
HeKWA
HeKWA
HeKWA
HeKWA
HeKWA
HeKWA
HeKWU
HeKWA
HeKWA
HeKWA
HeKWA
HeKWA
HeKWA
HeKWA
HeKWA
HeKWA
HeKWA
HeKWA
HeKWA
HeKWA
HeKWA
HeKWA
HeKWA
HeKWA
HeKWA
HeKWA
HeKWA
HeKWA
HeKWA
HeKWA
HeKWA
HeKwA
HeKWA
HeKWA
HeKWA
HeKWA
HeKWA
HeKWA
HeKWA
HeKWA
HeKWA
HeKWA
HeKWA
HeKWA
HeKWA
HeKWA
HeKWA
HeKWA
HeKWA
HeKWA
HeKWA
HeKWA
HeKWA
HeKWA
HeKWA
HeKWA
HeKRA
HeKWA
HeKWA
HeKWA
HeKWA
HeKWA
HeKWA
HeKWA
HeKWA
HeKWA
HeKWA
HeKWA
HeKWA
HeKWA
HeKWA
HeKWA
HeKWA
HeKWA
HeKWA
HeKWA
HeKWA
HeKWA
HeKWA
HeKWA
HeKWA
HeKWB
HeKWA
HeKWA
HeKWA
HeKWA
HeKWA
HeKWA
HeKWA
HeKWA
HeKWA
HeKWA
HeKWA
HeKWA
HeKWA
HeKWA
HeKWA
HeKWA
HeKWA
HeKWA
HeKWA
HeKWA
HeKWA
HeKWA
HeKWA
HeKWA
HeKWAR
HeKWA
HeKWA
HeKWA
HeKWA
HeKWA
HeKWA
HeKWA
HeKWA
HeKWA
HeKWA
HeKWA
HeKWA
HeKWA
HeKWA
HeKWA
HeKWA
HeKWA
HeKWA
HeKWA
HeKWA
HeKWA
HeKWA
HeKWA
HeKWA
HeKWC
HeKWA
HeKWA
HeKWA
HeKWA
HeKWA
HeKWA
HeKWA
HeKWA
HeKWA
HeKWA
HeKWA
HeKWA
HeKWA
HeKWA
HeKWA
HeKWA
HeKWA
HeKWA
HeKWA
HeKWA
HeKWA
HeKWA
HeKWA
HeKWA
HeKERA
HeKWA
HeKWA
HeKWA
HeKWA
HeKWA
HeKWA
HeKWA
HeKWA
HeKWA
HeKWA
HeKWA
HeKWA
HeKWA
HeKWA
HeKWA
HeKWA
HeKWA
HeKWA
HeKWA
HeKWA
HeKWA
HeKWA
HeKWA
HeKWA
HeKKA
HeKWA
HeKWA
HeKWA
HeKWA
HeKWA
HeKWA
HeKWA
HeKWA
HeKWA
HeKWA
HeKWA
HeKWA
HeKWA
HeKWA
HeKWA
HeKWA
HeKWA
HeKWA
HeKWA
HeKWA
HeKWA
HeKWA
HeKWA
HeKWA
HeKLAH
HeKWA
HeKWA
HeKWA
HeKWA
HeKWA
HeKWA
HeKWA
HeKWA
HeKWA
HeKWA
HeKWA
HeKWA
HeKWA
HeKWA
HeKWA
HeKWA
HeKWA
HeKWA
HeKWA
HeKWA
HeKWA
HeKWA
HeKWA
HeKWA
HeKOA
HeKWA
HeKWA
HeKWA
HeKWA
HeKWA
HeKWA
HeKWA
HeKWA
HeKWA
HeKWA
HeKWA
HeKWA
HeKWA
HeKWA
HeKWA
HeKWA
HeKWA
HeKWA
HeKWA
HeKWA
HeKWA
HeKWA
HeKWA
HeKWA
HeKZA
HeKWA
HeKWA
HeKWA
HeKWA
HeKWA
HeKWA
HeKWA
HeKWA
HeKWA
HeKWA
HeKWA
HeKWA
HeKWA
HeKWA
HeKWA
HeKWA
HeKWA
HeKWA
HeKWA
HeKWA
HeKWA
HeKWA
HeKWA
HeKWA
HeKPAH
HeKWA
HeKWA
HeKWA
HeKWA
HeKWA
HeKWA
HeKWA
HeKWA
HeKWA
HeKWA
HeKWA
HeKWA
HeKWA
HeKWA
HeKWA
HeKWA
HeKWA
HeKWA
HeKWA
HeKWA
HeKWA
HeKWA
HeKWA
HeKWA
HekWA
HeKWA
HeKWA
HeKWA
HeKWA
HeKWA
HeKWA
HeKWA
HeKWA
HeKWA
HeKWA
HeKWA
HeKWA
HeKWA
HeKWA
HeKWA
HeKWA
HeKWA
HeKWA
HeKWA
HeKWA
HeKWA
HeKWA
HeKWA
HeKWA
HeLWU
HeLWU
HeLWU
HeLWU
HeLWU
HeLWU
HeLWU
HeLWU
HeLWU
HeLWU
HeLWU
HeLWU
HeLWU
HeLWU
HeLWU
HeLWU
HeLWU
HeLWU
HeLWU
HeLWU
HeLWu
HeLWU
HeLWU
HeLWU
HeLWU
HeLWU
HeLWU
HeLWU
HeLWU
HeLWU
HeLWU
HeLWU
HeLWU
HeLWU
HeLWU
HeLWU
HeLWU
HeLWU
HeLWU
HeLWU
HeLWlU
HeLWU
HeLWU
HeLWU
HeLWU
HeLWU
HeLWU
HeLWU
HeLWU
HeLWU
HeLWU
HeLWU
HeLWU
HeLWU
HeLWU
HeLWU
HeLWU
HeLWU
HeLWU
HeLWU
HeL WU
HeLWU
HeLWU
HeLWU
HeLWU
HeLWU
HeLWU
HeLWU
HeLWU
HeLWU
HeLWU
HeLWU
HeLWU
HeLWU
HeLWU
HeLWU
HeLWU
HeLWU
HeLWU
HeLWU
HeLwU
HeLWU
HeLWU
HeLWU
HeLWU
HeLWU
HeLWU
HeLWU
HeLWU
HeLWU
HeLWU
HeLWU
HeLWU
HeLWU
HeLWU
HeLWU
HeLWU
HeLWU
HeLWU
HeLWU
HeL.WU
HeLWU
HeLWU
HeLWU
HeLWU
HeLWU
HeLWU
HeLWU
HeLWU
HeLWU
HeLWU
HeLWU
HeLWU
HeLWU
HeLWU
HeLWU
HeLWU
HeLWU
HeLWU
HeLWU
HeLWsU HcSbTbHcTbHcTbHcTbHcTbHcTbHcTbHcTbHcTbHcTbHcTbHcTbHcTbHcTbHcTbHcTbHcTbHcTbHcTbHcTbHcTbHcTbHcTbHcTbHcTbHcTbHCtBbHcTbHcTbHcTbHcTbHcTbHcTbHcTbHcTbHcTbHcTbHcTbHcTbHcTbHcTbHcTbHcTbHcTbHcTbHcTbHcTbHcTbHcTbHcTbHcTbHc TbHcTbHcTbHcTbHcTbHcTbHcTbHcTbHcTbHcTbHcTbHcTbHcTbHcTbHcTbHcTbHcTbHcTbHcTbHcTbHcTbHcTbHcTbHcTbHcTbHcTAbHcTbHcTbHcTbHcTbHcTbHcTbHcTbHcTbHcTbHcTbHcTbHcTbHcTbHcTbHcTbHcTbHcTbHcTbHcTbHcTbHcTbHcTbHcTbHcTbHcTaHcTbHcTbHcTaHcTbHcTbHcTaHcTbHcTbHcTaHcTbHcTbHcTaHcTbHcTbHcTaHcTbHcTbHcTaHcTbHcTbHcTaHcTbHcTbHcTaHcTbHcTbHcTa HcTbHcTbHcTa HcTbHcTbHcTa HcTbHcTbHcTa HcTbHcTbHcTa HcTbHcTbHcTa HcTbHcTbHcTa HcTbHcTbHcTa HcTbHcTbHcTa HcTbHcTbHcTa HCtBbHcTbHcTa HcTbHcTbHcTa HcTbHcTbHcTa HcTbHcTbHcTa HcTbHcTbHcTa HcTbHcTbHcTa HcTbHcTbHcTa HcTbHcTbHcTa HcTbHcTbHcTa HcTlbHcTbHcTa HcTbHcTbHcTa HcTbHcTbHcTa HcTbHcTbHcTa HcTbHcTbHcTa HcTbHcTbHcTa HcTbHcTbHcTa HcTbHcTbHcTa HcTbHcTbHcTa HcTbHWU HcTbHWU HcTbHWU HcTbHWU HcTbHWU HcTbHWU HcTbHWU HcTbHWU HcTbHWU HcTbHWU HcTbHWU HcTbHWU HcTbHWU HcTbHWU HcTbHWU HcTbHWU HcTbHWU HcTlbHcTbHcTa HcTbHcTbHcTa HcTbHWU HcTbHWU HcTbHWU HcTbHWU HcTbHWU HcTbHWU HcTbHWU HcTbHWU HcTbHWU HcTbHWU HcTbHWU HcTbHWU HcTbHWU HcTlbHcTbHcTa HcTbHWU HcTbHWU HcTbHWU HcTbHWU HcTbHWU HcTbHWU HcTbHWU HcTbHWU HcTbHWU HcTbHWU HcTbHWU HcTbHWU HcTbHWU HcTbHWU HcTbHWU Hc TbHWU HcTbHWU HcTbHWU HcTbHWU HcTbHWU HcTbHWU HcTbHWU HcTbHWU HcTbHWU HcTbHWU HcTbHWU HcTbHWU HcTbHWU HcTbHWU HcTbHWU HcTbHWU HcTbHWU hTbHWU HcTbHWU HcTbHWU HcTbHWU HcTbHWU HcTbHWU HcTbHWU HcTbHWU HcTbHWU HcTbHWU HcTbHWU HcTbHWU HcTbHWU HcTbHWU HcTbHWU HcTbHWU HcTbHWVHcTbHWVHcTbHWVHcTbHWVHcTbHWVHcTbHWVHcTbHWVHcTbHWVHcTbHWVHcTbHWVHcTbHWVHcTbHWVHcTbHWVHcTbHWVHcTbHWVHcTbHWVHcTbHWVHcTbKWYHcTbKWYHcTbKWYHcTbKWYHcTbKWYHcTbKWYHcTbKWYHcTbKWYHcTbKWYHcTbKWYHcTbKWYHcTbKWYHcTbKWYHcTbKWYHcTbKWYHcTbKWYHcTbKWYHcTlbWU HcTbHWU HcTbHWU HcTbHWU HcTbHWU HcTbHWU HcTbHWU HcTbHWU HcTbHWU HcTbHWU HcTbHWU HcTbHWU HcTbHWU HcTbHWU HcTbHWU HcTbHWU HcTbHWU Hc TbHWU HcTlbWU HcTlbWU HcTlbWU HcTlbWU HcTlbWU HcTlbWU HcTlbWU HcTlbWU HcTlbWU HcTlbWU HcTlbWU HcTlbWU HcTlbWU HcTlbWU HcTlbWU HcTlbWU HcTlbWU Hc TlbWU Hc TlbWU Hc TlbWU Hc TlbWU Hc TlbWU Hc TlbWU Hc TlbWU Hc TlbWU Hc TlbWU Hc TlbWU Hc TlbWU Hc TlbWU Hc TlbWU Hc TlbWU Hc TlbWU Hc TlbWU Hc TlbWU hTlbWU Hc TlbWU Hc TlbWU Hc TlbWU Hc TlbWU Hc TlbWU Hc TlbWU Hc TlbWU Hc TlbWU Hc TlbWU Hc TlbWU Hc TlbWU Hc TlbWU Hc TlbWU Hc TlbWU Hc TlbWU Hc TlbW U Hc TlbWU Hc TlbWU Hc TlbWU Hc TlbWU Hc TlbWU Hc TlbWU Hc TlbWU Hc TlbWU Hc TlbWU Hc TlbWU Hc TlbWU Hc TlbWU Hc TlbWU Hc TlbWU Hc TlbWU Hc TlbWU Hc TbbWU Hc TlbWU Hc TlbWU Hc TlbWU Hc TlbWU Hc TlbWU Hc TlbWU Hc TlbWU Hc TlbWU Hc TlbWU Hc TlbWU Hc TlbWU Hc TlbWU Hc TlbWU Hc TlbWU Hc TlbWU Hc TlbWU HCtBbWU Hc TlbWU Hc TlbWU Hc TlbWU Hc TlbWU Hc TlbWU Hc TlbWU Hc TlbWU Hc TlbWU Hc TlbWU Hc TlbWU Hc TlbWU Hc TlbWU Hc TlbWU Hc TlbWU Hc TlbWU Hc TlbWU HsCtBbWU Hc TlbWU Hc TlbWU Hc TlbWU Hc TlbWU Hc TlbWU Hc TlbWU Hc TlbWU Hc TlbWU Hc TlbWU Hc TlbWU Hc TlbWU Hc TlbWU Hc TlbWU Hc TlbWU Hc TlbWU Hc TbbWU HsCtBbWU Hc TlbWU Hc TlbWU Hc TlbWU Hc TlbWU Hc TlbWU Hc TlbWU Hc TlbWU Hc TlbWU Hc TlbWU Hc TlbWU Hc TlbWU Hc TlbWU Hc TlbWU Hc TlbWU Hc TlbW U Hc TlbWU HsCtBbWU Hc TlbWU Hc TlbWU Hc TlbWU Hc TlbWU Hc TlbWU Hc TlbWU Hc TlbWU Hc TlbWU Hc TlbWU Hc TlbWU Hc TlbWU Hc TlbWU Hc TlbWU Hc TlbWU HsCtBbWU Hc TlbW U Hc TlbW U Hc TlbW U Hc TlbW U Hc TlbW U Hc TlbW U Hc TlbW U Hc TlbW U Hc TlbW U Hc TlbW U Hc TlbW U Hc TlbW U Hc TlbW U Hc TlbW U Hc TlbW U Hc TlbW U Hc TlbW U Hc TbbWU Hc TlbWU Hc TlbWU Hc TlbWU Hc TlbWU Hc TlbWU Hc TlbWU Hc TlbWU Hc TlbWU Hc TlbWU Hc TlbWU Hc TlbWU Hc TlbWU Hc TlbWU Hc TlbWU Hc TlbWU Hc TbbWU HcsBbWU Hc TlbWU Hc TlbWU Hc TlbWU Hc TlbWU Hc TlbWU Hc TlbWU Hc TlbWU Hc TlbWU Hc TlbWU Hc TlbWU Hc TlbWU Hc TlbWU Hc TlbWU Hc TlbWU Hc TlbWU Hc TlbW U HsCtBbWU Hc TlbWU Hc TlbWU Hc TlbWU Hc TlbWU Hc TlbWU Hc TlbWU Hc TlbWU Hc TlbWU Hc TlbWU Hc TlbWU Hc TlbWU Hc TlbWU Hc TlbWU Hc TlbWU Hc TlbWU HsCtBbWUs BbBbBbBbBbBbBbBbBbBbBbBbBbBbBbBbBbBbBbBbBbBbBbBbBbBbBbBbBbBbBbBbBbBbBbBbBbBbBbBbBbBbBbBbBbBbBbBbBbBbBb BbBbBbBbBbBbBbBbBbBbBbBbBbBbBbBbBbBbBbBbBbBbBbBbBbBbBbBbBbBbBbBbBbBbBbBbBbBbBbBbBbBbBbBbBbBbBbBbBbBbbBbBbBbBbBbBbBbBbBbBbBbBbBbBbBbBbBbBbBbBbBbBbBbBbBbBbBbBbBbBbBbBbBbBbBbBbBbBbBbBbBbBbBbBbBbBbBbBbBbBbbBaBbBbBbBbBbBbBbBbBbBbBbBbBbBbBbBbBbBbBbBbBbBbBbBbBbBbBbBbBbBbBbBbBbBbBbBbBbBbBbBbBbBbBbBbBbBbBbBbBbBbaBbBbBbBbBbBbBbBbBbBbBbBbBbBbBbBbBbBbBbBbBbBbBbBbBbBbBbBbBbBbBbBbBbBbBbBbBbBbBbBbBbBbBbBbBbBbBbBbBbB bBaBbBbBbBbBbBbBbBbBbBbBbBbBbBbBbBbBbBbBbBbBbBbBbBbBbBbBbBbBbBbBbBbBbBbBbBbBbBbBbBbBbBbBbBbBbBbBbBbBb BBaBbBbBbBbBbBbBbBbBbBbBbBbBbBbBbBbBbBbBbBbBbBbBbBbBbBbBbBbBbBbBbBbBbBbBbBbBbBbBbBbBbBbBbBbBbBbBbBbBbBBB bBaBbBbBbBbBbBbBbBbBbBbBbBbBbBbBbBbBbBbBbBbBbBbBbBbBbBbBbBbBbBbBbBbBbBbBbBbBbBbBbBbBbBbBbBbBbBbBbBb BBaBba BBaBba BBaBba BBaBba BBaBba BBaBba BBaBba BBaBba BBaBba BBaBba BBaBba BBaBba BBaBba BBaBba BBaBba BBaBba BBaBba BBaBba BBaBba BBaBba BBaBba BBaBba BBaBba BBaBba BBaBba BBaBBA BBaBBA BBaBBA BBaBBA BBaBBA BBaBBA BBaBBA BBaBBA BBaBBA BBaBBA BBaBBA BBaBBA BBaBBA BBaBBA BBaBBA BBaBBA BBaBBA BBaBBA BBaBBA BBaBBA BBaBBA BBaBBA BBaBBA BBaBBA BBaBBA BBaB BA BBaBBA BBaBBA BBaBBA BBaBBA BBaBBA BBaBBA BBaBBA BBaBBA BBaBBA BBaBBA BBaBBA BBaBBA BBaBBA BBaBBA BBaBBA BBaBBA BBaBBA BBaBBA BBaBBA BBaBBA BBaBBA BBaBBA BBaBBA BBaBBA BBaBAA BBaBBA BBaBBA BBaBBA BBaBBA BBaBBA BBaBBA BBaBBA BBaBBA BBaBBA BBaBBA BBaBBA BBaBBA BBaBBA BBaBBA BBaBBA BBaBBA BBaBBA BBaBBA BBaBBA BBaBBA BBaBBA BBaBBA BBaBBA BBaBBA BBaBHA BBaBBA BBaBBA BBaBBA BBaBBA BBaBBA BBaBBA BBaBBA BBaBBA BBaBBA BBaBBA BBaBBA BBaBBA BBaBBA BBaBBA BBaBBA BBaBBA BBaBBA BBaBBA BBaBBA BBaBBA BBaBBA BBaBBA BBaBBA BBaBBA BBaBNA BBaBBA BBaBBA BBaBBA BBaBBA BBaBBA BBaBBA BBaBBA BBaBBA BBaBBA BBaBBA BBaBBA BBaBBA BBaBBA BBaBBA BBaBBA BBaBBA BBaBBA BBaBBA BBaBBA BBaBBA BBaBBA BBaBBA BBaBBA BBaBBA BBaBGA BBaBBA BBaBBA BBaBBA BBaBBA BBaBBA BBaBBA BBaBBA BBaBBA BBaBBA BBaBBA BBaBBA BBaBBA BBaBBA BBaBBA BBaBBA BBaBBA BBaBBA BBaBBA BBaBBA BBaBBA BBaBBA BBaBBA BBaBBA BBaBBA BBaBFA BBaBBA BBaBBA BBaBBA BBaBBA BBaBBA BBaBBA BBaBBA BBaBBA BBaBBA BBaBBA BBaBBA BBaBBA BBaBBA BBaBBA BBaBBA BBaBBA BBaBBA BBaBBA BBaBBA BBaBBA BBaBBA BBaBBA BBaBBA BBaBBA BBaBPA BBaBBA BBaBBA BBaBBA BBaBBA BBaBBA BBaBBA BBaBBA BBaBBA BBaBBA BBaBBA BBaBBA BBaBBA BBaBBA BBaBBA BBaBBA BBaBBA BBaBBA BBaBBA BBaBBA BBaBBA BBaBBA BBaBBA BBaBBA BBaBBA BBaBRA BBaBBA BBaBBA BBaBBA BBaBBA BBaBBA BBaBBA BBaBBA BBaBBA BBaBBA BBaBBA BBaBBA BBaBBA BBaBBA BBaBBA BBaBBA BBaBBA BBaBBA BBaBBA BBaBBA BBaBBA BBaBBA BBaBBA BBaBBA BBaBBA BBaBMA BBaBBA BBaBBA BBaBBA BBaBBA BBaBBA BBaBBA BBaBBA BBaBBA BBaBBA BBaBBA BBaBBA BBaBBA BBaBBA BBaBBA BBaBBA BBaBBA BBaBBA BBaBBA BBaBBA BBaBBA BBaBBA BBaBBA BBaBBA BBaBBA BBaBCA BBaBBA BBaBBA BBaBBA BBaBBA BBaBBA BBaBBA BBaBBA BBaBBA BBaBBA BBaBBA BBaBBA BBaBBA BBaBBA BBaBBA BBaBBA BBaBBA BBaBBA BBaBBA BBaBBA BBaBBA BBaBBA BBaBBA BBaBBA BBaBBA BBaBQA BBaBBA BBaBBA BBaBBA BBaBBA BBaBBA BBaBBA BBaBBA BBaBBA BBaBBA BBaBBA BBaBBA BBaBBA BBaBBA BBaBBA BBaBBA BBaBBA BBaBBA BBaBBA BBaBBA BBaBBA BBaBBA BBaBBA BBaBBA BBaBBA BBaBXA BBaBBA BBaBBA BBaBBA BBaBBA BBaBBA BBaBBA BBaBBA BBaBBA BBaBBA BBaBBA BBaBBA BBaBBA BBaBBA BBaBBA BBaBBA BBaBBA BBaBBA BBaBBA BBaBBA BBaBBA BBaBBA BBaBBA BBaBBA BBaBBA BBaBIA BBaBBA BBaBBA BBaBBA BBaBBA BBaBBA BBaBBA BBaBBA BBaBBA BBaBBA BBaBBA BBaBBA BBaBBA BBaBBA BBaBBA BBaBBA BBaBBA BBaBBA BBaBBA BBaBBA BBaBBA BBaBBA BBaBBA BBaBBA BBaBBA BBaBTA BBaRBA BBaRBA BBaRBA BBaRBA BBaRBA BBaRBA BBaRBA BBaRBA BBaRBA BBaRBA BBaRBA BBaRBA BBaRBA BBaRBA BBaRBA BBaRBA BBaRBA BBaRBA BBaRBA BBaRBA BBaRBA BBaRBA BBaRBA BBaRBA BBaRBA BBaR BA BBaRBA BBaRBA BBaRBA BBaRBA BBaRBA BBaRBA BBaRBA BBaRBA BBaRBA BBaRBA BBaRBA BBaRBA BBaRBA BBaRBA BBaRBA BBaRBA BBaRBA BBaRBA BBaRBA BBaRBA BBaRBA BBaRBA BBaRBA BBaRBA BBaRRA BBaRBA BBaRBA BBaRBA BBaRBA BBaRBA BBaRBA BBaRBA BBaRBA BBaRBA BBaRBA BBaRBA BBaRBA BBaRBA BBaRBA BBaRBA BBaRBA BBaRBA BBaRBA BBaRBA BBaRBA BBaRBA BBaRBA BBaRBA BBaRBA BBaRABBA BBaRBA BBaRBA BBaRBA BBaRBA BBaRBA BBaRBA BBaRBA BBaRBA BBaRBA BBaRBA BBaRBA BBaRBA BBaRBA BBaRBA BBaRBA BBaRBA BBaRBA BBaRBA BBaRBA BBaRBA BBaRBA BBaRBA BBaRBA BBaRBA BBa RBA BBaRBA BBaRBA BBaRBA BBaRBA BBaRBA BBaRBA BBaRBA BBaRBA BBaRBA BBaRBA BBaRBA BBaRBA BBaRBA BBaRBA BBaRBA BBaRBA BBaRBA BBaRBA BBaRBA BBaRBA BBaRBA BBaRBA BBaRBA BBaRBA BBaRI BA BBaRI BA BBaRI BA BBaRI BA BBaRI BA BBaRI BA BBaRI BA BBaRI BA BBaRI BA BBaRI BA BBaRI BA BBaRI BA BBaRI BA BBaRI BA BBaRI BA BBaRI BA BBaRI BA BBaRI BA BBaRI BA BBaRI BA BBaRI BA BBaRI BA BBaRI BA BBaRI BA BBaRI BA BBaRI TA B BaR BA BBaRI BA BBaRI BA BBaRI BA BBaRI BA BBaRI BA BBaRI BA BBaRI BA BBaRI BA BBaRI BA BBaRI BA BBaRI BA BBaRI BA BBaRI BA BBaRI BA BBaRI BA BBaRI BA BBaRI BA BBaRI BA BBaRI BA BBaRI BA BBaRI BA BBaRI BA BBaRI BA BBaRI BA BBaI BA BBaRI BA BBaRI BA BBaRI BA BBaRI BA BBaRI BA BBaRI BA BBaRI BA BBaRI BA BBaRI BA BBaRI BA BBaRI BA BBaRI BA BBaRI BA BBaRI BA BBaRI BA BBaRI BA BBaRI BA BBaRI BA BBaRI BA BBaRI BA BBaRI BA BBaRI BA BBaRI BA BBaRI BA BBaIR BA BBaRI BA BBaRI BA BBaRI BA BBaRI BA BBaRI BA BBaRI BA BBaRI BA BBaRI BA BBaRI BA BBaRI BA BBaRI BA BBaRI BA BBaRI BA BBaRI BA BBaRI BA BBaRI BA BBaRI BA BBaRI BA BBaRI BA BBaRI BA BBaRI BA BBaRI BA BBaRI BA BBaRI BA BBaR BA BBaRI BA BBaRI BA BBaRI BA BBaRI BA BBaRI BA BBaRI BA BBaRI BA BBaRI BA BBaRI BA BBaRI BA BBaRI BA BBaRI BA BBaRI BA BBaRI BA BBaRI BA BBaRI BA BBaRI BA BBaRI BA BBaRI BA BBaRI BA BBaRI BA BBaRI BA BBaRI BA BBaRI BA B BaRI BA B BaRI BA B BaRI BA B BaRI BA B BaRI BA B BaRI BA B BaRI BA B BaRI BA B BaRI BA B BaRI BA B BaRI BA B BaRI BA B BaRI BA B BaRI BA B BaRI BA B BaRI BA B BaRI BA B BaRI BA B BaRI BA B BaRI BA B BaRI BA B BaRI BA B BaRI BA B BaRI BA B BaRI BA B baRI BA B BaRI BA B BaRI BA B BaRI BA B BaRI BA B BaRI BA B BaRI BA B BaRI BA B BaRI BA B BaRI BA B BaRI BA B BaRI BA B BaRI BA B BaRI BA B BaRI BA B BaRI BA B BaRI BA B BaRI BA B BaRI BA B BaRI BA B BaRI BA B BaRI BA B BaRI BA B BaRI BA B BaRI BA B BAIB A C BA BA BA BA BA BA BA BA BA BA BA BA BA BA BA BA BA BA BA BA BA BA BA BA BA BA BA BA BA BA BA BA BA BA BA BA BA BA BA BA BA BA BA BA BA BA BA BA BA BA BA BA BA BA BA BA BA BA BA BA BA BA BA BA BA BA BA BA BA BA BA BA BA BA BA BA BA BA BA BA BA BA BA BA BA BA BA BA BA BA BA BA BA BA BA BA BA BA BA BA BB BA BA BA BA BA BA BA BA BA BA BA BA BA BA BA BA BA BA BA BA BA BA BA BA BA BA BA BA BA BA BA BA BA BA BA BA BA BA BA BA BA BA BA BA BA BA BA BA BA BA BA BA BA BA BA BA BA BA BA BA BA BA BA BA BA BA BA BA BA BA BA BA BA BA BA BA BA BA BA BA BA BA BA BA BA BA BA BA BA BA BA BA BA BA BA BA BA BA BA NA BA N A NA NA NA NA NA NA NA NA NA NA NA NA NA NA NA NA NA NA NA NA NA NA NA NA NA NA NA NA NA NA NA NA NA NA NA NA NA NA NA NA NA NA NA NA NA NA NA NA NA NA NA NA NA NA NA NA NA NA NA NA NA NA NA NA NA NA NA NA NA NA NA NA NA NA NA NA NA NA NA NA NA NA NA NA NA NA NA NA NA NA NA NA NA NA NA NA NA NA NA NA Na NA NA NA NA NA NA NA NA NA NA NA NA NA NA NA NA NA NA NA NA NA NA NA NA NA NA NA NA NA NA NA NA NA NA NA NA NA NA NA NA NA NA NA NA NA NA NA NA NA NA NA NA NA NA NA NA NA NA NA NA NA NA NA NA NA NA NA NA NA NA NA NA NA NA NA NA NA NA NA NA NA NA NA NA NA NA NA NA NA NA NA NA NA NA NA NA NA NA NANA NA NA NA NA NA NA NA NA NA NA NA NA NA NA NA NA NA NA NA NA NA NA NA NA NA NA NA NA NA NA NA NA NA NA NA NA NA NA NA NA NA NA NA NA NA NA NA NA NA NA NA NA NA NA NA NA NA NA NA NA NA NA NA NA NA NA NA NA NA NA NA NA NA NA NA NA NA NA NA NA NA NA NA NA NA NA NA NA NA NA NA NA NA NA NA NA NA NA NA NNA NA NA NA NA NA NA NA NA NA NA NA NA NA NA NA NA NA NA NA NA NA NA NA NA NA NA NA NA NA NA NA NA NA NA NA NA NA NA NA NA NA NA NA NA NA NA NA NA NA NA NA NA NA NA NA NA NA NA NA NA NA NA NA NA NA NA NA NA NA NA NA NA NA NA NA NA NA NA NA NA NA NA NA NA NA NA NA NA NA NA NA NA NA NA NA NA NA NA N NA NA NA NA NA NA NA NA NA NA NA NA NA NA NA NA NA NA NA NA NA NA NA NA NA NA NA NA NA NA NA NA NA NA NA NA NA NA NA NA NA NA NA NA NA NA NA NA NA NA NA NA NA NA NA NA NA NA NA NA NA NA NA NA NA NA NA NA NA NA NA NA NA NA NA NA NA NA NA NA NA NA NA NA NA NA NA NA NA NA NA NA NA NA NA NA NA NA NA NBNA NBNA NBNA NBNA NBNA NBNA NBNA NBNA NBNA NBNA NBNA NBNA NBNA NBNA NBNA NBNA NBNA NBNA NBNA NBNA NBNA NBNA NBNA NBNA NBNA NBNA NBNA NBNA NBNA NBNA NBNA NBNA NBNA NBNA NBNA NBNA NBNA NBNA NBNA NBNA NBNA NBNA NBNA NBNA NBNA NBNA NBNA NBNA NBNA NBNA NBHA NBHA NBHA NBHA NBHA NBHA NBHA NBHA NBHA NBHA NBHA NBHA NBHA NBHA NBHA NBHA NBHA NBHA NBHA NBHA NBHA NBHA NBHA NBHA NBHA NBHA NBHA NBHA NBHA NBHA NBHA NBHA NBHA NBHA NBHA NBHA NBHA NBHA NBHA NBHA NBHA NBHA NBHA NBHA NBHA NBHA NBHA NBHA NBHA NBHA NBNA NBHA NBHA NBHA NBHA NBHA NBHA NBHA NBHA NBHA NBHA NBHA NBHA NBHA NBHA NBHA NBHA NBHA NBHA NBHA NBHA NBHA NBHA NBHA NBHA NBHA NBHA NBHA NBHA NBHA NBHA NBHA NBHA NBHA NBHA NBHA NBHA NBHA NBHA NBHA NBHA NBHA NBHA NBHA NBHA NBHA NBHA NBHA NBHA NBNA NBNA NBNA NBNA NBNA NBNA NBNA NBNA NBNA NBNA NBNA NBNA NBNA NBNA NBNA NBNA NBNA NBNA NBNA NBNA NBNA NBNA NBNA NBNA NBNA NBNA NBNA NBNA NBNA NBNA NBNA NBNA NBNA NBNA NBNA NBNA NBNA NBNA NBNA NBNA NBNA NBNA NBNA NBNA NBNA NBNA NBNA NBNA NBNA NBNBA NBNA NBNA NBNA NBNA NBNA NBNA NBNA NBNA NBNA NBNA NBNA NBNA NBNA NBNA NBNA NBNA NBNA NBNA NBNA NBNA NBNA NBNA NBNA NBNA NBNA NBNA NBNA NBNA NBNA NBNA NBNA NBNA NBNA NBNA NBNA NBNA NBNA NBNA NBNA NBNA NBNA NBNA NBNA NBNA NBNA NBNA NBNA NBNA NBNA NBNaNBNA NBNA NBNA NBNA NBNA NBNA NBNA NBNA NBNA NBNA NBNA NBNA NBNA NBNA NBNA NBNA NBNA NBNA NBNA NBNA NBNA NBNA NBNA NBNA NBNA NBNA NBNA NBNA NBNA NBNA NBNA NBNA NBNA NBNA NBNA NBNA NBNA NBNA NBNA NBNA NBNA NBNA NBNA NBNA NBNA NBNA NBNA NBNA NBNA NBNANBNA NBNA NBNA NBNA NBNA NBNA NBNA NBNA NBNA NBNA NBNA NBNA NBNA NBNA NBNA NBNA NBNA NBNA NBNA NBNA NBNA NBNA NBNA NBNA NBNA NBNA NBNA NBNA NBNA NBNA NBNA NBNA NBNA NBNA NBNA NBNA NBNA NBNA NBNA NBNA NBNA NBNA NBNA NBNA NBNA NBNA NBNA NBNA NBNA NBNAA NBNA NBNA NBNA NBNA NBNA NBNA NBNA NBNA NBNA NBNA NBNA NBNA NBNA NBNA NBNA NBNA NBNA NBNA NBNA NBNA NBNA NBNA NBNA NBNA NBNA NBNA NBNA NBNA NBNA NBNA NBNA NBNA NBNA NBNA NBNA NBNA NBNA NBNA NBNA NBNA NBNA NBNA NBNA NBNA NBNA NBNA NBNA NBNA NBNA NBnaNBNA NBNA NBNA NBNA NBNA NBNA NBNA NBNA NBNA NBNA NBNA NBNA NBNA NBNA NBNA NBNA NBNA NBNA NBNA NBNA NBNA NBNA NBNA NBNA NBNA NBNA NBNA NBNA NBNA NBNA NBNA NBNA NBNA NBNA NBNA NBNA NBNA NBNA NBNA NBNA NBNA NBNA NBNA NBNA NBNA NBNA NBNA NBNA NBNA NBHANBNA NBNA NBNA NBNA NBNA NBNA NBNA NBNA NBNA NBNA NBNA NBNA NBNA NBNA NBNA NBNA NBNA NBNA NBNA NBNA NBNA NBNA NBNA NBNA NBNA NBNA NBNA NBNA NBNA NBNA NBNA NBNA NBNA NBNA NBNA NBNA NBNA NBNA NBNA NBNA NBNA NBNA NBNA NBNA NBNA NBNA NBNA NBNA NBNA NBNa NBNA NBNA NBNA NBNA NBNA NBNA NBNA NBNA NBNA NBNA NBNA NBNA NBNA NBNA NBNA NBNA NBNA NBNA NBNA NBNA NBNA NBNA NBNA NBNA NBNA NBNA NBNA NBNA NBNA NBNA NBNA NBNA NBNA NBNA NBNA NBNA NBNA NBNA NBNA NBNA NBNA NBNA NBNA NBNA NBNA NBNA NBNA NBNA NBNA NBPANBPANBPANBPANBPANBPANBPANBPANBPANBPANBPANBPANBPANBPANBPANBPANBPANBPANBPANBPANBPANBPANBPANBPANBPANBPANBPANBPANBPANBPANBPANBPANBPANBPANBPANBPANBPANBPANBPANBPANBPANBPANBPANBPANBPANBPANBPANBPANBPANBPANBPANbHBaNBaNBaNBaNBaNBaNBaNBaNBaNBaNBaNBaNBaNBaNBaNBaNBaNBaNBaNBaNBaNBaNBaNBaNBaNBaNBaNBaNBaNBaNBaNBaNBaNBaNBaNBaNBaNBaNBaNBaNBaNBaNBaNBaNBaNBaNBaNBaNBaNBaNBaNbHBaNBaNBaNBaNBaNBaNBaNBaNBaNBaNBaNBaNBaNBaNBaNBaNBaNBaNBaNBaNBaNBaNBaNBaNBaNBaNBaNBaNBaNBaNBaNBaNBaNBaNBaNBaNBaNBaNBa | |
4. ExeDHeBHa ynoTpe6a
BkIOHeMaHnHaTaKbM eEeKtpueeCKOTo 3axpaHbaHe N Bpb3ka 3a BOda (BnKTe rnaBaTa 3a MOHTnpaHe B pkoBOCTBOTO 3a notpe6nten).
- PoirotBeTe npaHTo: CopTnpaIte dpexnte cnopeMaTePnTa (nMyK, cnHTeTKa, BbJHa nn KOpnPnHa nT.H.) nTOBa KOJIko ca 3ambpceH. PpOBepeTe etNKeTne Ha BaunTe dpexn. Pa3dJeTe 6eJIte dpexn OT CBETHne. N3npa3HeTe DKO6OBete OT ppeMeTu KaTo KIOHOBE, MOHETu NP. NTCTpaHete NO-TBbpNTe DEkopaTHBUH eJEMEHtU.
3apepepe npaheTo dpexa no dpexa, kato n368BaTe npetoBapBaHe (npoBepe pa3nHnTe MaKcMaJIHn Bb3MOxHOCTn 3a 3apejdahe cnped nporpaMata). 3aTbopeTe BHIMATEIHO Bpata. YBepeTe ce, Ye HMA npuunnaH npexu.
-136epete npenapata n OMEKOHTeIa (ako e Heo6xoDmo) ngn3cnTe B npabHnTe OTdeJeHnHa do3atopa.
OTBOpTe YekMeJxKeto HaNo3aTopa, MoRat Da Ce BnIaT CneHIne KOMnoHeHTN:
- OTeIeHHe 1 e3a npenapat 3a npednpaHe.
- OTeJIeHHeTo 3a6aIcAmn 3aTbKaHN, apOMaTI3aTopu n CneuaHn DoabKk KaTO HnWeCTe, H36eJIbAun npepapaTu np.
- OTeHene 2 e3a nepunen npenapat.
HЯко nepинн npenapaTH He ca npedha3HaeyH 3a H3no3BaHe B YekMeJKeTO Ha do3aTopa, a ce doCTaBt CbC co6CTBeH do3aTOp, KOTo Ce noCTaBn DInpeKTHO B 6apa6ana.
3a da n3no3BaTe npabnHTo KOJnueCTBO nepnIe Hnpenapat, OMeKOTte Inn dpytn Do6aBKn, BHNMaTeNHO CneBaTEnHCTpykunTe Ha npOn3BOIDTeJI BCEKNbT.
- 136epete nporpama cbc 3aBbptane Ha konutyo, kato n36epete Ta3n, kOTo Bn NacBa Hau-MHOro Cnpoei 3apeJeHte Dpexn. IINcIeTne NOkaxe IMeTO Ha nporpaMaTA, OCHOBHIne ONuN OChAKBaHaTa npOdbJIHKTeJHOCT.
-ДобавeteилпрMaxHeteОциИnpomHeTenapaMeTpIeCnopeiBaWnteCneuHnHyKdN.
- Hatnche 6yToHa CTap/Naay3a, 3a da cTapnpate nporpamata.
Korato zukbIbr npnkiouH,Ha dncnner ce noka3Ba,KPAU"13KIOUte ypea, KaTO 3aBbPTnte cilekTopa Ha "OFF"(N3KJI).N3BaTe npaHTo B63MOKHO Hau-6bp3O,3a da npedeOTbPaTNTe bHKIn,HePnA rTH MmPn3Mn pa3MHoxKaBaHe Ha 6akTepnn.
5. rpnka n nodpbxxka
5.1 - O6uo nouchtahe Ha Maunhata
- N3KJIIOHcTe MaUNHaTa OT KOHTaKa TNO BpeMe Ha NoYnCTBaHe I NOIdpbXkKa.
- ɪnənɪəBaiTe Meka KbPna C TeueH canyH, 3a Da noUHCTnTE Kopnyca Ha MaʌnHaTa I rMyeHNTe KOMnOHeHTN.
He n3no3BaIte opraHnHH XmMkaJI INJ Kopo3HBn pa3TBOpHTeJI.
-Ⅰ3BaTeTeYeKMeDKeToBHNMaTeJIHo,KaTOToIbPKeTc3paBO.
- Nounctete YeKMeJeKeTo NOI TeuA BOn IIOCTaBeTe O6paTHO BOTdEJIeHHeTo My.
5.4 -Почистван ha 6apa6аha
OctpaHete cIyauHa n3npaHTe npedMeTN,OC6eHO metaHn YaCTN KATOKapfU,MOHeTn np..OT 6apa6aHa nnke6a Ha yIbTHHeHnTo Ha Bpata (rmyeh npbCTe),3aIoTO pnuHHBaTneTHa OT pBxJa nIeTu.
- I3non3BaIte nouchTBAu npenapat 6e3 xnpiud 3a npemaxbahe Ha netHa ot pbkda. Cna3BaIte npedynpeinteHnTe CbBETn HA npoIN3BOIDNTEJHA NoCHCTBAUIN npenapat.
He n3no13BaIte HnKaBn TBbpDn PpeDMeTn nn CTOMaHea BbJHa 3a noHCTBaHe.
Cne npoueDypataoTbopete BpaTata,3nOlaBaiTe Kbpna,3a da noHCTte neHTaun HnHaTa OKoNo yNtTheHHeTo I NOdIbpKaTe BbTpewHOCTTa BbHnHaTa CtpaHa Ha yNtTheHHeTo YnCTn.

HR Ugradena perilica rublja

Prijepupotrebe urerdaja pazljivo procitajte upute u vezi sigurnosti.
Prijne upotrebe stroja, nužno je ukloniti vijke i odstojnike za blokadu u transportu.
Gumb Odabir temperature (B)
Ovim gumbom mistrjate temperaturc ciklusa pranja. Nije moguce podignuti temperatur iznad maksimalne dopustene temperature za program, kako bi se zaistile tkanine. Ako zeite izvrsti hladno pranje sv indicatorati trebaju biti iskljuceni.

Gumb Odabir brzine centrifuge (C)
Pritiskom ovog gumba mogue je sniziti maksimalnu brzinite, ako zeite, ciklus se centrifuge moze poniistiti.

Protiv gužvanja (D) - Dostupno samo na nekim programima
Ova funkcija smanjupe nabore na rublju koliko je god moguce, eliminarajuci prijelaznu centrifugu ili smanjujuci intenzitet zavrse.

Gumb OdgodaPokretanja (E)
Ovim gumbom mozte prethodno programirati ciklusa pranja i odgoditi poctaket ciklusa do 24 sata.

Gumb Mogucnosti (F)
Ovim gumbom mozete birati izmedu raziicitih mogucnosti (ovisno o odabranom programu):
| PRE | Pretpranje(F) - ova mogucnost omogucuje pretpranje i posebnoje korisna zajako zaprljano rublje (moze se koristiti samo s nekim programima). Kad se aktivira, ikona indicatora(E) svjetli |
| Dodatno ispiranje (F) - ova mogucnost omogucuje dodavanje jegnog ispiranja na kraju ciklusa pranja i korisna je za osobe s osjetljivom kožom. Kad se aktivira, ikona indicatora (F) svijetli |
Gumb Start/Pavza (A)
Vrata zaprite PRED izbiro gumba START/PAVZA. Za zaetek izbranega cikla z vnaprej nastavljenimiparametri pritisnite START/PAVZA. Med delovanjem programa se nazaslonu prikazuje preostaliCAS.

Gumb Izbira temperature (B)
Ta gumb vam omogoča spreminjanje temperature ciklov pranja. Za zašcit otkanin ni mogoče dvigniti temperature nad najvisjo, ki je dovoljena za program. ČeŽelite izvesti hladno pranje, morajo biti vsi indicatorji izklopljeni.

Gumb Izbiro ožemanja (C)
S pritiskom na ta gumb laho zmanjsate najecejohitrost, po zeJI pa laho cikel ozmanja tudi preklicete.

Proti gubam (D) - Na voljoismo prinekaterih programih
Ta funkcija poskrbi, da se perilo kar majmanj zmečka. Stroj opusti vmesnacentrifugiranja, ali pa zmanjsa intenzivnost zadnjega centrifugiranja.

Indicator luminos Anti-Cute (2)
Indicatorul luminos indicacselectarea optiunii relevante.

Indicator luminos „AI Weight Sense" (3): (activ numai la anumite programe).
3 Indikator, AI Weight Sense***
IeTaJIbHI IHCtpyKcII ⅢOIO npOceDpyn 3HHTB. B IHCTpyKcII 3i BCTaHOBJIeHHJ.
Ioo6 oTpMaTn DeTaIbHy iHΦopMaciIO,3aBaHTaXTe Ta npOHTaTe NOBHH Noci6Hnk KopNCTyBaaya.
1. BctaHOBJIeHHJ

3abaHTaXTe DoTaTOK hOn

1.1-BndaJIeHHra TpaHcnpTHnx 6oJIrB
BnkyTb 2 a6o 4 TpaHcnopTHI rHHTN (A) i3HIMt b nlocki wai6n, rymoBi 3aRnyuKn Ta nlaactNKoBI po3nipHI Tpy6k (B), k nokaahHO Ha MaIOHky 1.
Kpo p03nipH Tpy6Kn Bnadyb BCEpeHy Maunn, Haxnilt b II Bnepei, 0o6 dictaNix nIINr a6O OCHOBN
3akpiIteOTBOpnIaIgHTiB2-Ma a6o4-Ma INaactIKOBUMN KpnUkamu, LTO BXOJrTb Do KOMIIeKTy.

36epiraTe nakyBaIbHI MaTepiAIn B Micu, HeOcTyHmOy dIteN.
1.2 -IiPaBniHi 3'eHaHHa
MaunHy cnid niiknouHTn do BOonnpoBHOI Mepeki 3a donomoro HOBOITpy6kn, IIO nocTaHaecbca paOm 3 MaunHOIO (BcepeHHi 6apa6aHa). He BnKOpNCTOByte CTapy Tpy6ky dna liie metn.
PiEHaTeOINH KHeCb HANBHOITpy6KnIikTbOBUM 3rHOMdoeJekTpOKlanah (BepxHa 3aHn HaactHa MaunH), aIHn KHeCb Do KpaHa a6o pIsb6oBoro 3EHNHHa 3/4 DIOMa (Ma.2).
IomictiB npnnaD 6nn3bKO do CTIH, nepekoHaBuncB, IO Btpy6ci HeMaE BnHnHiB a0nepernHIB.
PiEHaHTe 3INBHy Tpy6ky Do KpaO paKOBHn a6o 6aKaHO Do fikcBOHOr OpehAKHoro OTBOPy diaMetpom 6JIbUWM, HIX diametp 3INBHOIT py6Kn, IHa BNCOT MiIMyM 50 cm i MaKcIMyM 85 cMbIg NiJNOr (MaN.3).
3a Heo6xidHocTi BnKOpNCToByTe BnHyTy npHaJIeXHiCtB*, IIO6 HaIiHIiJe 3akpiNTu Ta NiTpmyBaTu 3JINBHy Tpy6Ky.
-ДякMoDEJI MoKyb MaTn OHy a6O KIbKa 3 HabeJeHnx HIXKueФyHKi:
AQUASTOP (Ma.4): npucpii, po3miueHn Ha HauBn Tpy6ci. RaKIO Tpy6ka ncytbcra, Toi y BIKOHU (A) 3'ABnEeTbcra YepBOHa No3HaKa, I Tpy6ky Heo6xIDHO 3aMHTn. Lio6 BiIgBnHTnTn RaKy, HaTNCHiTb Ha ODHoxODoBn 6NoKYBaHbHn npucpii «B».
AQUAPROTECT-HAHINBHA TPY6KA 13 3AXNCHM KOKXYXOM (MaI. 5): RAIO BOda NOHc HbTIkaTn 3 FONOBHOI BHyTpIiHbOITpy6Kn «C», npo3opa 3OBHIshra Tpy6Ka «D» Byde yTPmByaTn BOdy nla 3aBepseHHra UKNky npaHn. HanpiKInu cIKny 3BepHiTbc Da LoeHTpy o6cnyroBaHnna KJIeHTIB, IIO6 3amHInu HAIINBHy Tpy6Ky.
1.3-BnpiBnOBaHH npnlaNy
BupiBnTeMaunHy,BidperyIbOBAuHnHiKk(Ma.6).
a) NObepHiTbraKy 3a rOduHHNKOBOKO CTpiIKKO, LIO6 BiJkpyTITN TBIHNT Ha HIXU.
b)Пдимить abo onyctnte HiKky,оберТаюч II,пOKи BOHa He cTaHe MIuHo Ha nДу罗.
c) 3aφikcyHixkky, noBepTaOuYraKy npOTn rOHHNKOBoi CTpiKN, NOKBOHa He TopKHeBcA Ha npalbHOI MaunHn.
- NepekoHaTeCra, 10 npuJa HaJeKHM uHOM BnpiBHAHO.
*PnHaNeKHiCtB npdaeTbca OkpMeO
1.4 - BctaHOBJIeHHr Me6JIeBnX DBepeyT
- Po3mictb 7a6loH ha 3aHbomy 6oui DBepuT I No3HaYe OTBOp nI neTeNb imarHity (3 JIBoro a6o npaboro 60ky).PocBepnltb OTBOp Ta 3akpinitb NeTJI rBuHTamu A,IO BXOJrB DO KOMNKeKTV.
3akpinitb MaHIT (B) Ha Micui 3a donomoroHO rBNHTa (C), Notim BCTaHObitb nlaCTnHy (D) 3 nlaCTNKOBIO ONOPOHO (E) nd Heio i 3aFikvnte ix Ha Micui rBNHTOM (F).
- HādārHīt bī 3aφiKcūyī Te Kpɪnʌk(y) G B HɪŋkHbɒm y NɔlɔŋkeHni.
- YctaHObITb Me6JIeBI dBePcTa nepeI npalbHOIO MaunHOIO 3a donomoroIO nTeJIb. 3akpinitb npoklaKn (I) niD netNI 2 GBNTAMU (J), a NotIM 3akpinitb netNI 2 GBNTAMU (H).
BidperyIHOte BnCOTy MaunHn (820-840 MM) 3a donomoro 4 perynboAHnx Hjokoi 3akpinitb ix raikam.
BCTABTE MaunHy Ha Micue, BIDPERyIIOBABuM Me6JIeBn LOKOJb Ha HOBY BUCOTy.
2. NaHeJb KepyBaHHa
B C DEF G H A
KhONKn
A Nyck/Play3a
B Bn6ip Tempeatypu
C Bu6ip WbNdkocti BiDkIMy
D PpoTnDiIO cKnadKaM
E BiKnaedeHn nyck
F DyHKUJ
G PiBHe 3a6pydHeHocTi /UuBnKe npaHHr /PiBeHb napu**
H CneuaJIbHI nporpaMn (doctynHi IInuey neBHX moJeJx)
B+C 3amokbidi dentei
- DocTyHNO JIINJE B NEBHX MOEJAX
** PibeHb napu (docTynHO JIWey neBHHX MoEJAX)
CbITIObi iHAnKaTOpN
1 HndkaTop6IOKyBaHHaBepuT
IHHaTopn Tempeatypn
9 HndnKaTOpnpBn
2 INdkaTOp JERKe npacyBaHHA
npaHH
3abpydHeHocTi
3 INDkaTOp《AI Weight Sense》***7
HДиKaTOnI WbNДkoCTi
10 INdkaTopn cneuiabhnx
4 IHHaTOpWi-Fi
BiDxIMaHHA
nporpaam
5 IHHaKApTo3aMkyBIDITei
8 IHdNKaTopn yHKui
***HДИΚAToPДeTeKToPaBaRn
2.1-KhONKn

Khonka Nyck/Na3a (A)
3aHnHbDBePHTa,NEPLU HIX HaNTCKaTN KHNKpy NYCK/NAY3A.ДЯ 3aNYcKy B6paHOrO uKNky 3 nonepeHbO 3aHaHMM npametpamHaNTCHITyNCK/NAY3A.ПID Yac BIKoHaHH nporpamHa DCnIe BiIO6paKaATMmETbCra c, LIO MNHyB.

Khonka Bn6ip TemnepaTypi (B)
LKHONKa DO3BOJAE 3MHOBaTN TEMNEpaTy uKKnIB npaHn.13 MeTOO 3axNCTy TKaHH HEMOXJIINBO NiBUNNTIe TMNEpaTy NOHaI MaKcMMy,DO3BOJeHn IJa nporpaMn. JKLIO Bu XoUeTe BUKOHaTn npaHn B XoJIoHn BOi, Bci iHdNkAToPi MaOTb ByTu BMKHeHi.

Khonka Bn6ip wBndkocti BiXmmy (C)
HaTnCKaHOH NIO KHOHKy,MOKHa 3MeHUNITM MaKcIMaJIbHy IuNkICTb,a TaKoX 3a BaKaHHrM cKacyBaTN UKNI BIDXIMaHH.

PpOtndiocknaikam(D)-OocTyHNO IINWEIeIeIeKnx nporpaM
Lz yHKZIaD03BOJAE 3BecTn Do MihIMy KJIbKICTb 3MOpWOK, 3HATN NOTpe6y B npOMIXHX BiJKIMax a6o 3HN3NTn IHTEHCNBICTb OCTaHHbOTo BiJKIMy.

Khonnka «BidklaeHn nyck» (E)
LKHONKa Do3BolJe 3aIporpaMyBaTn cIKJI npAH, Ic6 BiKNaCTn 3aNcK UHa cAdo 24 roHn.

Khoinka yHKui (F)
LJ KHOKnKa D03BOJRAE BUNBpaTNI MIX pI3HIMN fYHKJIaMn (3aJIeXHO BiD BN6paHOI nporpaMNI):
PonepeHne npaHHn (F) - cyHKuiI DO3BOJNE IPOBecTn NonepeHc npaHH, 0o oco6NIO nIXOAnITb DnIpeuey 3i 3NaHHmN 3a6pydHeHHmN (3actocOByCTBC JnIe B OKpemnx nporpaMax).KUIO BBIMKHHTn LIO cyHKuiIO, NOHc CBIITNCRA NIKTORpMa iHNkATopa (E)
I OdaTkoBne noocKaHHa(F)-yHKuiO3BOJNEoDAtnODHeNoLOCKAHBAKINKny npAHnIKopncHaIJIIOe3HixHOToTaUytNtNBOO uKipoi.KeuO yBIMKHyTuOphiHKui,NOueCBIITNCnIKTORpamaIHdkaTopa(F)
FirHnHa+ (F)-4yHKJ3a6e3neueYrnn6KeOuHpeey,ntpmyoOndHakoby TemepaTypy npOTAROMycbOrnpaHH.


Khonka PibeHb 3a6pydHeNocti / LiBnKe npaHr / PibeHb napu\* (G)
LcKhONka Do3B0JIaRe Bn6bIpaTm MIX pizHIMN fHyHKJIAMn (3aJeXHO BiD Bn6paHOI nporpaMn):

Pibeh 3a6pydhehocti (G) - cyfHKsI dONOMaE Bn6paTNI OINH i3 pIBHb IHTeHCNBHOCTI npaHH, 3mHIOUHTpBaIcTB nporpAm 3aJIeXHO BiD pIBHra 3a6pydHeoCTI peey (3acTOOBHa JInSe B OKpeMIX nporpamax, k3a3NaHeHO B Ta6LIpi nporpaM).

LbNKe npaHn (G)-KHOJa cTae aKTINBHOIO, KOJI N BI Bn BnBpaCe nporpaMy LJBNkI I0JIaD (14'/30'/44') pykoIO, iO3BOJc Bn6paTn Ondy 3 Tpbox Bka3aHx TpBaJIoCTe, 3aJIeXHO Bi Tnpy TkaHHN.
PibEnb napn\* (G)
Bn6paBnn nporpaMy DOIJI4 3 IAPOIO PRO, Bn MoKeTe cKOpNCtaTcNcIeIO KHOKNoHO, Uo6 Bn6paTNI OdHy 3 Tpbox napOBnx npoueypr p3Hoi iHTehCINBHOCTi, npu3HaueHnx dJa cyxoro a6o BOJorO rOdary Ta 3aJenKHO BiTtyn TkaHHN.
*OoctynHOIINeBnHxMoTeJX

CneuiIbHI nporpamn (H)-HaBHi IInuey neBHX moDeIax
LKHONKa DO3BOJRAE Bn6upaTm MIX p3HMMN fhyHKiAMy (3aJIeXHO BiD Bn6paHOI npoPpAMN):

AKnBHe PpaHn (H)-yfHKi (ky MoKHa BnKOpNCToByBaTN B KInbKOx nporpaMax) ONTm3ye CNOKBAHH BOIN eNEKTpoeHepri y Bu6paHni nporpami, He 3MIHOUOu eFeKTHBHCtB npaHH.

Hiu i Deh (H) - cy fynkui 3meHwyc npomixHy wBnDkiCTb BiXmHaHH do 400 o6/xb, de ce MOKlnBO, nIiBnuye pBeHb BOniPi cac noLoockaHH Ta TpMa e biN3Hy 3aHypeHO y BOy niCna OCTaTOHOro nIoockaHH, uOe iDealbHo po3noiInrBoJOKHO.

OuHcHb6ap6aHa (H)- po3pObeHa IJIy OUYeHHb6ap6aHa npalBoHIO Maunn. BkOpncToBynte TINbKn npalBn nopoWok. He 3anyckaTe nporpaM y 3 biN3HO B MaunHi. PeKomeHDoBaHO BIKoHyBaTn Chepe3 Koxhi 50 uKrib npaHH. Lio fhyKciIO MOxHa Bn6paTn NIIe dI nporpaM 3JIIB TA BIJKM.

3aMK BID iTei(B+C)
- Ondohache HaTnckaHHK Honok «BnBIP TEMNEPATyN» Ta «BnBIP LUBNKOCTI BIDKIMY » npoTARom np6n3Ho 3 cekHy 6bnokye KhoNkMaunH. Y uei cnocio BN MOKeTe yHnKHyTN BuNaIKOBHX HneBaXaHHx 3MH y pa3i BnnaKOBOrHaTnCKaHHK Honok Ha dncnne i ndac BnKOHHHzikny.
- 5nokybaHHKHOJOKMOXHaCKacyBaTn,3HOBy OJHOaCHO HaTNCHyBmNci DBIKHOJKN YIN BIMKHyBm NpaJIbHy MaLIHy.
2.2-CBITLOBIiHnKaTopn

IhikkaTop 6nokyBaHHaBepaT (1)
3mpkyBaHb 6eNn iD ac npaHH dBepraTa 6IokyOtbc. BiuHNHTn DBePcraT a MoXHa IInwe HapnkiH nporpaMn a6o nicna II npaBnHoro cKacyBaHH. Ppi BucOKOMy pIBHi BOi, BucOKi Tempeatyp BoOn Ta niD cac BiXMaHH BIDHNHTn DBepraT a HeMOxJIINBO.

CbitIOBn iHdkaTOp PpOtniO CKnaKam (2)
CbiTIOBNI INDnKaTOp BiIObopaXae Bn6ip BiINOBiDHOI cyHKuII.

CbitnoiHdkaTop AI Weight Sense3: (yHKiaKTnVBHa JIWe B NEBHX nporpaMax)
Pid yac koxhoi fo3n npaHRe AWeight Sense]do3boJre KOHTpOJIbAtn iHOpMaIIO 0oDo Baru 6iIN3HN B 6apa6aHi; KpIM TOrO, B nepxixBvInHH npaHH Bih:
-peryIHOe Heo6xIDHn 06EM BOIN;
Bn3HaayeTpnaJIcTbUKNy npaHHa
- peryIIOE NOLOCKaHHB BiIDNoBIIDHO DTO TINY TKAHNH, BIB6paHOI DIA npaHH;
- peryIIOe pITM o6epTAHH 6apabHa BiINOBiIDHO Do TnHy TkaHHN, rKa nepeTbc;
- po3ni3HaE HaBHCtB 3aBeNkoi KJIbKoCTI MInbHoi NiHi, 3a Heo6xHocTi, peryHoe o6'EM BoDn Dn noLoockaHH;
- pernylnc Wbndkictb BiJxIMAHH BIDNOBIDHO DO 3aBaHTaxeHH, 3anobiraoun dnc6baIahcy.

CbitnoiHdkatopWi-Fi(4):HaMOeJIax,OCHaUeHNXWi-Fi,BIOOpaKaεCTAH3'eDHaHHA.

ПОЕДHAHн ПИЛАу (У ДОДАТКУ)
PIMITKA. Bawy domaun Hmepeky Wi-Fi cnid hanaatbyahtn Ha ianaoh yactot 2,4 Tg. (ianaoh 5 Tg He do3BOJeHn).
3aBaHTaKeTe DoaToK hOn Ha cBi npucTpi, po3TaUyBaBUn QR-koD BCEpeHi paMkn abo nepeuOuBun 3a NocnilaHHm: go.haier-europe.com/download-app
CTBopitb npoipnbkopnctybaa (ab0 BBiDITb y cncTeMy) IBKHOaIe noeHaHHn npnaLy, dOtpmyouncb IHCTpykuH Ha dincnneipncTpoH.

A
B

C
D
E
F
YBIMKHEHHI DNTAHIO HOG KEPYBAHNA
3akpiTe DBepuTa i NobepHtB pyKu B NOIOKeHHA NCTAHUHe KEpyBAHHa (Wi-Fi) TenerB MoKeTe KepyBaTn CBOIM npNlaOM 3doaTKy.
BIMKHEHHI NICTAHIOHO KEPYBAH
- NObepHiTb pyuB 6yDb-Ke noLoxKeHHa, KpIM DnCTAHUHHE KEPYBAHHa (Wi-Fi), He npoxoJauK p3b noLoxKeHHA «OFF» (BUMK). RaIcUe IuKJI BKe PO3NoVABcR, BiH npOIOBxyBaTmEtbcR. YdoTaKU MOXHa nepeIraDaTn CTaN npiJaNy, aIe He KepyBaTu Hm.

CbITIOBn iHdNKaTOP 6JOKyBaHH KONOK (5): CbITIOBn iHdNKaTOP BKA3ye, LIO KHONK 3a6JIOKOBaHi.

CbitIObi iHdkaTopn Tempeatyp npaHn (6)
CbitIObi iHnkaTOpn nok3yKoTB TeMnepaTy ppaHH Bn6paHO nporpAMN, kY MoXHa 3MiHHTu 3a DOnOMoHOB iDnOBiDHOI KHOII (HKUO npnucMo).KUO Bu XOCHe BnKOHa TnpaHH B XOJOHn BOJI, BCI HnDKaTOp MAtOTb 6ytu BVIMKHeHi.

CbitIObi iHdkaTopn wbnkOcTi BiXmHaHHa (7)
CbitIOBI iHnKaTOpN nOKa3yOToB 1WbNdkicTb BiXkMHaHH Bn6paHOI nporpAMN,ky MoxHa 3MeHHTN CHCKacyBaTN 3a DOnOMOrOIO BiNobiDHOI KhoKN.


Cbitnobi iHnKaTopn fynKcii (8)
CbitIOBIiHnIKaTOpn noka3yOtB yHKcii, kIMoKHa Bn6paTn BiINOBiHOHO KhoNko.


CbitnoiHnKaTopn Bu6opy pibHa 3a6pydHeHHa (9)
-Пися образни nporpaMu nHДИКaTOp aBToMaTuHо nOKaKe BCTaHOBJIeHn pIBeH 3a6pydHeHocTi ДЯ zuiei nporpaMu.
- PnB6oPiHJOrO pIBH3a6pyDHeNocT3aOpuTbc8iDnOBiHmIHINHINKaTOp.


CbitIObi iHdkaTopn cneiaIbHnx nporpaam (10)-HaBbI Iuwe y neBHX moEJx
CbitnoB iHnukatopn nokayotb fyHKui, kIMoKHa Bn6paTn BiNObiHNOK HONKO.
3. NporpaMn
Tak
Tak,HaTnCHyBUN KNONKy
Heo6oB'3koBO
Hi

BidiHHe po3noiJIbHnka MIOUx 3acO6I:
1 PonepeHnpaHH
2 MIOUOyH 3ac6
KoHnioHep a6o 3acioIaIaIaIy
| ПОГРАМA | (MAKC.) (В залижност Вд морел) | (МAKC.) | MЛЮЧМ 3ACIБ | ПОНТДIO经СКЛДКAM | BIDKПАДЕНМПУС | ПOTЕРДИЕ ПИСНЯ | ДОДАТКOBЕ ПОДСКАНЯ | ПЕТИНСА+ | PIBE-нь ЗАрduINECHOSTI |
| 6 KF | 7 KF | 8 KF | 9 KF | 2 | | 1 |
| BABOBHA 6 | | 78 | 990° | | | ● | ● | (●) | / | ○ | ○ | ○ | ○ | |
| ECO 40-60 | ECO 40-60 | 6 | 78 | 960° | | | ● | ● | | / | ○ | / | ○ | / | / |
| BOBHA & PUCHE ПРАнья | 1 | 12 | 230° | | | ● | ● | | ○ | | ○ | |||| | | |
| 20° | 20°C | 6 | 78 | 920° | | | ● | ● | | / | ○ | / | ○ | / | ○ |
| СИNTETIKEТАТКOLБОВI | 33 | 544 | 560° | | | ● | ● | (●) | ○ | ○ | ○ | ○ | ○ | ○ |
| Злв ТА ВДЖIM | - | - | - | - | - | | | | / | |||| | | | | |
| ПОLOOCKAHНЯ | - | - | - | - | - | | ● | | / | |||| | | | | |
| ФITHEС | 22 | 52 | 52,5 | 40° | | ● | ● | | / | ○ | / | ○ | / | / |
| ДЕЛКATHПДОГЛД | 22 | 52 | 52,5 | 40° | | ● | ● | | ○ | | ○ | |||| | | |
| ДОГЛДЗ ПAPОЮ PRO | 1,5 | 1,5 | 1,5 | 1,5 | - | | | | / | |||| | | | | |
| PRO | ДОГЛДДЛАЛАLEPTIKIB PRO | 33 | 544 | 560° | | | ● | ● | | / | ○ | / | ○ | / | / |
| 1/2 14' 30' 44' | 14' 111,51,51,51,51,51,51,51,51,51,51,51,51,51,51,51,51,51,51,51,51,51,51,51,51,51,51,51,51,51,51,51,51,51,5 | 1 | 11,51,5 | 40° | | ● | ● | | / | ○ | / | ○ | / | ○ | |
| 22 | 52 | 52,5 | 40° | | ● | ● | | / | ○ | / | ○ | / | ○ |
| 33 | 53 | 53,5 | 40° | | ● | ● | | / | ○ | / | ○ | / | ○ |
| ALL IN ONE 59' | 6 | 78 | 940° | | | ● | ● | | / | ○ | / | ○ | / | / |
| + | ДОДАТКOBИДОГЛД | 33 | 544 | 530° | | | ● | ● | | / | |||| | | | | |
3.1 - Onnc nporpam
| 6ABOBHNA | LЯ поportама CTBOPENДУ ДУ ПAPПЕОДУ OДУ 3 KOЛБОВОД 6BAОВИЗ 3A TEMPEРATYPU 40°C IДУ ДUGСТНЕНHA HAIINIINIX PESUJI TATIB NID AC NPPANH RA STI KINIX 6BAOBHANIX TKAHIN 3A TEMPEP
TYPN 50°C I 90°C. OCTAHII BIDKIM BIKOHYEbCS HA MAKCIMALNBIX OBEpTaX, UO6 npinbpatn
YAKOMOA BILSHA EBOJON. |
| ECO
40-60 | Прорраха ECO 40-60 Надас можлбicьчы палпгуну Hopmaьно 3a6bydnehenix 6abovahnix
peeyi,як можпа пати зa Tempepatурь 40°C a6o 60°C pashmв одомуцлкii. LЯ ррогама
BIVKOPICSTOBYcBcRД LA OUIHKN BIDNOBIDHOCTI BIMORAM 3aOKHOdABCTBa EC Ecodesign (ekolno-
rHuHm DnizaiH npoodykui). |
| BOBH
& PYUH
IPAHHNA | LЯ поportама ВИКОнHy cIKNI PranHry,poZRoBleHMy dIy BoVBHAnx TKAHIN,як можну pratу y
пралын MaunHIn, BIVO6B 3 Wb6Bky a6o 3No3HaChkoIO ,ПрATY Ra Wb6B"Ha eTKeTci TKAHINH
ny peeyi,prinHauHexDIApyuHOrO ppaHry. |
| 20° | lHOBaJIHnA prorpama, lso DaE Bam MOxJIbICbT bPATA PI3Ht KaHINH pI3HOMaHITHX KOLbOpIB
paZOM, taki JYb SbOBHn, CINTEKHa Ta 3MIIaHHi TKAHINH, liuhe pny 20°C, 3a6e3neuOuyuBvCo-
Kni pe3yIbT aPpAHN. PIBeH cNoXHBaHn pyri prorpam i pr6bIa3HO CTaHOBHTB 40% BiD
3BVaHnHO rpanHry 6bOBHn npri 40°C. |
| CINTETNIKA
TA KOJIbOPOBI | LЯ поportама DoZBoVHb Bam BnPATA OndOchAO pI3HOMaHITH N TIGI TKAHIN H pI3HIX KOLbOpIB,
OBeptalbHpyx6bap6bany ta pireh bOBo DN OTHMIZOBaHiy kIpya TKAHIN Y ppaHry, taK iI pyraOnlcky-
BaHry. ToHni BIDKIM 3a6e3neuey MeHwE yTBOpEH Na TKAHINH. |
| 3JIbTB A
BIDJHIM | Проррау МAZEBPlye 3IINBAtn BOy npri MaKcIMaHbHII WbUdKoCTI BIDJHMY. lMOKINBO 3MeHUnHITN
abo CKAcByaTI, HATINCHyBUL KHNKBy BIDJHIM. |
| ПОLOCKAHN | LЯ поportама NepeIb6aue 3 onoIckyBaHnH 3 cepeHnem BIDJHmY (Як'mоЖнa
ЗрБИТМЕHII INTECHINHbM A6o 3OBCIM BIKIQUHTN 3a DOIOMOTOKO BIDINOIBINOH KONKII.
BnKopcTobByeTcI DIAI PPANHg 6yIb-YaKO TIN TY KAnHIN, HApNKlAld, nCJIpyuHOrO ppaHry. |
| ΦITHEC | IdeaJIbHa KOMbIaIaIaY acSy IpeZyIbTaTINBHOCTI. CTBOPeHa DIAI OUYIeHHN cIopTINBHNx peeyi.
PekomEnDDaBaHepaTPOpoI HebeIeKIM 3aBaHTaKeHHM dIa peeyi i3
CINTEUHIN TKAHIN. |
| ДELIKATNII
ДОЛЯД | PozroBSeHa DIAI BIDMIHORO DORJIaIy 3a DeIikaTHMIMpeaMn, Ze prorpama ppaHry 3
Hn3bKOTo TempepatyoI POIuIe 3a 59 XbUlnH. DoDAtkOe rIb6Oke onoIckyBaHnH NOKpaUH
ctAH BOLOKOH TKAHINH. |
| ДОЛЯД 3
ПАОЮ PRO | U LiJ prorpam i napoba o6b6ka BnKopcTobByeTcI DIAI NOM'KUHeHHN CkLAdOki I doceTHeHnH
IdeaJIbHO rPBH BOLOROCTI DIAI lerWTO npacvBaHnH. 3a doonomotokO KONKII PIBEHb ПAPN
Mozha Bn6bPrtI TpN pI3HI pIBH IHTeHCINBHOCTI, prs3NaueHdi I da cyuxHx abo BOYrNx peeyi, |
| ФОЛЯД Ⅱ
ALEPIKIB PRO | LЯ поportама пapнHa 3aATnA Docaratn TEmpepatурN 60°C Ha trpBaIaII nepeioJ uacy, noeDHy-
Iouy DiI npn 3 noTyKHM OnoIckyBaHnM Ida IpeTeHBOrO OUYIeHHN Ta ririeHNUO sbp6Kb
peeyi. PekomeHDoBaHO DIAI GbOBHAnx TKAHIN. |
| 1/2
14' 30' 44' | EkOHOMia 6e3KOMPcMiciB! Lya HOB a prorpama ekOHOMntB VOBy, eJeKtpoeHepriKIO, saciId I
ppaHry uac,dozBOJbOuHOnI OTPmAtn BIDMInH IpeZyIbTaTIN ppaHry. IppaHry BIKOHyETbCa I3 ce-
peDnHbO IO TempepatyoI POIyA kIqXoDHTB Ida BCIX TINIB TKAHIN. PekomeHDoBaHO dIa HebeIeKORO
3aBaHTaKeHHa peeyi i3 He3NauchHIM 3a6pudHnH
peeyi. PekomeHDoBaHO DIAI GbOBHAnx TKAHIN. |
| ALL IN ONE 59' | LЯ поportама DoZBoVHcIte TKAHINI pI3HIN pI3HINI HApNKlAld, B6aOBHAnH, CNTeTINH I Ta 3MiUaHl
TKaHINH I mIe 3a 59 XbUlnH I3 NOBHM 3aBaHTaKeHHM ppaHry MaUHINH 3a TempepatyrN
40°C (a6o MeHlle). L4 prorpama oco6JIbVO IIxOxDoyI dIpeeyi i3 He3NauchHIM 3a6pudHn-
HAMi. |
| ДОДТКOBИ
ДОЛЯД | LIO HOY prorpamу MoZHa BnKOpncSTOBvBaTn DIA Be3neueHOrO ib o6eKghoro TpaHnHpeyei 3I
pi3HINX TKAHINI pI3HINO KoJIbOpy,Як He LIINHIOITb. 3aBdAky IdeaJIbHi KOMbIaJIb VODIN BODIN 3a ZACOby
dIЯ паHRH rapaHTyETCBaHaiKpaUHIM MOKJIbVIII DoJIyad 3a BaUmmi peayam 3a TempepatyrN
30°C 3 ONTMAMALHIM pezyIbTaTOM. |