
THO286TM5-S - Washing machine HOOVER - Free user manual and instructions
Find the device manual for free THO286TM5-S HOOVER in PDF.
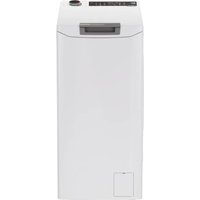


| Product type | Front-load washing machine |
| Brand | Hoover |
| Model | THO286TM5-S |
| Max washing capacity | 8.5 kg |
| Max spin speed | 1400 rpm |
| Programs | Cotton, Eco 40-60, Wool & Hand Wash, 20°C, Synthetics & Colours Mix, Drain & Spin, Rinse, Fitness Care, Gentle Care, Freshness Care, Allergy Care 60°, Quick Care (14'/30'/44'), All in One 59', Extra Care |
| Special functions | Delayed start, Anti-crease, Prewash, Rinse+, Hygiene+, Soil level, Quick, Kg Mode Plus, Steam level (on some models) |
| Safety | Child lock, Door lock, Aquastop, Aquaprotect |
| Connectivity | Wi-Fi, hOn app for remote control |
| Power supply | 220-240 V, 50 Hz |
| Dimensions (H x W x D) | 85 x 60 x 60 cm (approx) |
| Weight | Approx 70 kg |
| Maintenance | Cleaning the pump filter, detergent drawer, drum |
| Leak protection | Aquastop (emergency stop) and Aquaprotect (containment sleeve) |
Frequently Asked Questions - THO286TM5-S HOOVER
User questions about THO286TM5-S HOOVER
0 question about this device. Answer the ones you know or ask your own.
Ask a new question about this device
Download the instructions for your Washing machine in PDF format for free! Find your manual THO286TM5-S - HOOVER and take your electronic device back in hand. On this page are published all the documents necessary for the use of your device. THO286TM5-S by HOOVER.
USER MANUAL THO286TM5-S HOOVER
EN Washing machine Top loader
Before using the device, carefully read the safety instructions.

Before using the washing machine, it is absolutely necessary to remove the screws and transport lock spacers. For detailed instructions on the removal procedure, see the Installation Instructions
1. Installation
Download the hOn App

1.1 - Transportation bolts removal
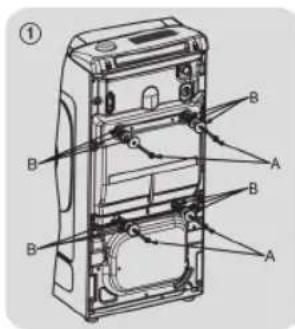
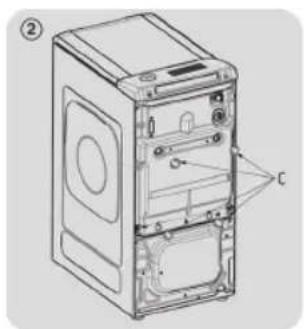
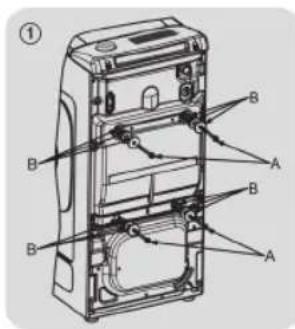
- Remove the 2 or 4 transportation screws (A) on the back and remove the 2 or 4 flat washers, rubber bungs and plastic spacer tubes (B) as illustrated in figure 1.
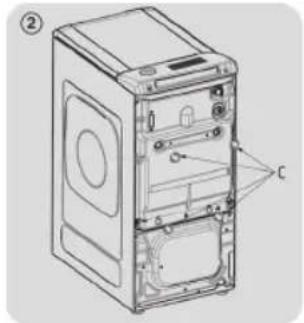
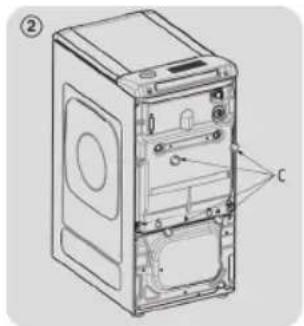
- Fit the trims provided "C" (fig. 2).
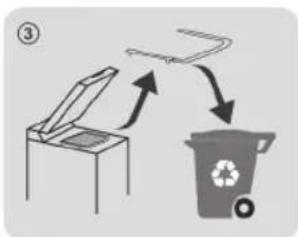
1.2 - Carefully remove and dispose of the protective profile located under the washing machine door (as shown in Figure 3).
1.3 - Aligning the appliance
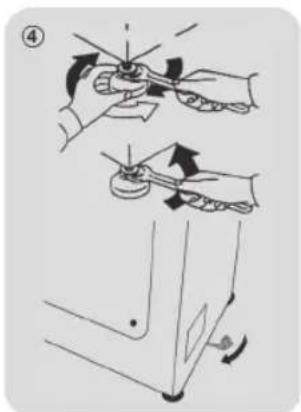
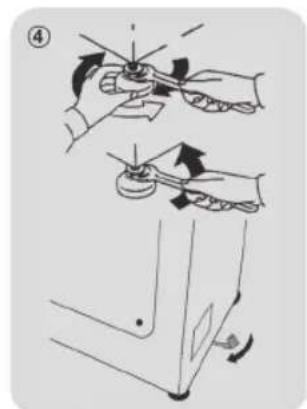
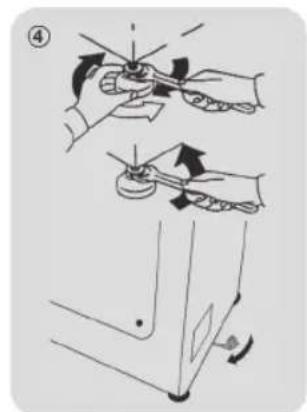
- Level the machine by adjusting the front feet (fig. 4).
a) Turn the nut clockwise to release the screw on the foot. b) Raise or lower the foot by rotating it until it stands firmly on the floor. c) Lock the foot in position by turning the nut anticlockwise until it comes up against the bottom of the washing machine.
- Check that the appliance is properly levelled.
- Check that the washing machine does not rock by trying to move two diagonally opposite top corners at the same time. If you move the washing machine from one place to another, you must level the feet again afterwards.
1.4 - Hydraulic connections
- The washing machine should be connected to the water mains via the new tube supplied with the appliance (inside the drum). Do not use the old tube for this purpose.
- Connect one end of the water inlet pipe with the elbow bend to the electrovalve (top rear part of the machine) and the other end to a tap or a plumbed-in 3/4" gas threaded connection.
- Place the washing machine close to the wall, ensuring that there are no bends or kinks anywhere in the tube.
- Hook the outlet pipe to the edge of the sink or preferably to a fixed drainage outlet of a diameter greater than that of the outlet pipe and at a height of min. 50 cm and a maximum of 75 cm from the floor (fig. 5).
- If necessary, use the curved* accessory to attach and support the outlet pipe more securely.
* Accessory sold separately.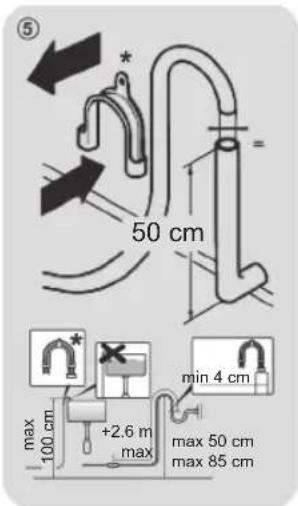
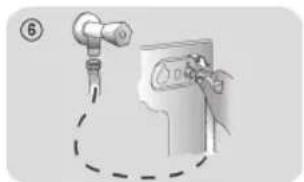
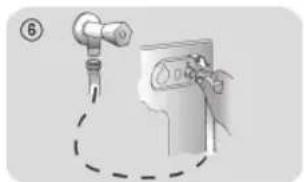
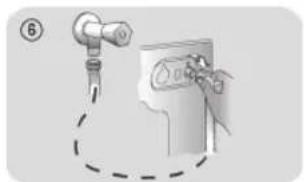
- Connect the water hose to the water supply tap (fig. 6) only using the hose supplied with the appliance (do not reuse old hose-sets). Some models may include one or more of the following features:
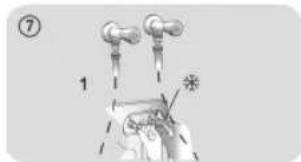
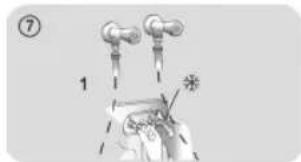
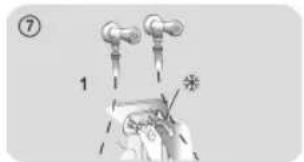
- HOT&COLD (fig. 7): water mains connection settings with hot and cold water for higher energy savings. Connect the grey tube to the cold water faucet and the red one to the hot water faucet. The machine can be connected to the cold water faucet only: in this case, some programs may start a few minutes later.
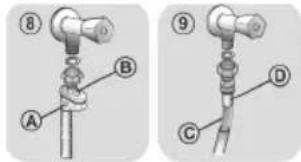
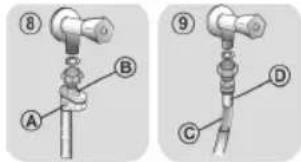
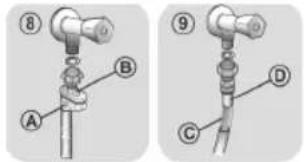
- AQUASTOP (fig. 8): a device located on the supply tube that stops water flow if the tube deteriorates; in this case, a red mark will appear in the window "A" and the tube must be replaced. To unscrew the nut, press the one-way lock device "B".
- AQUAPROTECT - SUPPLY TUBE WITH GUARD (fig. 9): should water leak from the primary internal tube "C", the transparent containment sheath "D" will contain water to permit the washing cycle to complete. At the end of the cycle, contact the Customer Service Centre to replace the supply tube.
2. Control panel
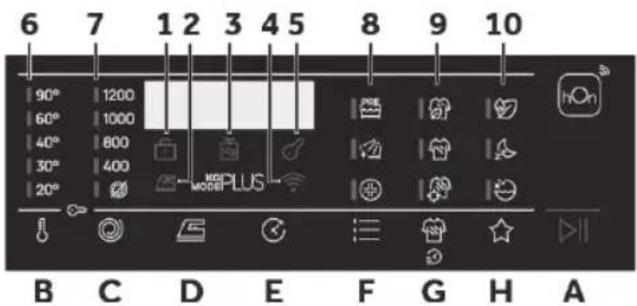
Buttons
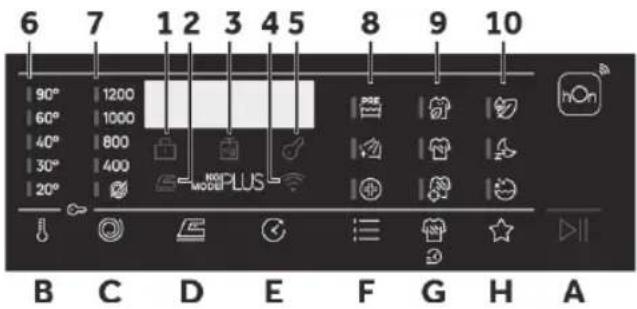
A Play/Pause B Temperature selection C Spin speed D Anti-crease E Delay start F Options G Stain level/Rapid/Steam level ** H Special programmes (only available on certain models) B+C Child lock ** Steam level (only available on certain models)
Icons
1 Door locked indicator
4 Wi-Fi indicator
9 Stain level indicators
2 Anti-crease indicator
5 Child lock indicator
10 Special programmes indicator
3 Kg Mode Plus indicator light (active only on certain programmes)
6 Wash temperature indicator 7 Spin speed indicator 8 Options indicator
1.1-Buttons

Play/Pause (A)
Close the door BEFORE selecting the button PLAY/PAUSE. To start the selected cycle with the preset parameters, press PLAY/PAUSE. When the programme is running, the display will show the time to elapse.

TEMPERATURE SELECTION button (B)
This button allows you to change the temperature of the wash cycles. It is not possible to raise the temperature over the maximum allowed for the programme, in order to protect the fabrics. If you want carry out a cold wash all the indicators must be off.

SPIN SPEED button (C)
By pressing this button, it is possible to reduce the maximum speed, and if you wish, the spin cycle can be cancelled.

ANTI-CREASE button (D) (Available on some programmes only)
This function allows you to minimize creases as much as possible, eliminating the intermediate spins or reducing the intensity of the last one.

DELAY START button (E)
This button allows you to pre-programme the wash cycle to delay the start of the cycle for up to 24 hours.

OPTIONS button (F)
This button allows you to choose between different options (depending on the selected programme):
| PRE | Prewash (F) - This option allows you to make a prewash and it is particularly useful for heavily soiled loads (can be used only on some programmes). When activated, the indicator icon (E) lights up |
| + | Extra rinse (F) - This option allows you to add one rinse at the end of the washing cycle and is useful for people with delicate and sensitive skin. When activated, the indicator icon (F) lights up |
| # | Hygiene + (F) - This option allows deep cleaning of your clothes by maintaining the same temperature for the whole wash. |

Stain level/Rapid/Steam level button (G)
This button allows you to choose between different options (depending on the selected programme):
| Stain level (G) - This option allows you to choose between 3 levels of wash intensity modifying the length of the programme, depending on how much the fabrics are soiled (can only be used on some programmes as shown in the table of programmes). | |
| Rapid (G) - The button becomes active when you select the RAPID (14'/30'/44') programme on the knob and allows you to select one of three durations indicated, depending on the type of fabric: |
STEAM LEVEL (G) (only available on certain models)
After selecting the EASY IRON PLUS programme, you can use this button to choose between three steam treatments of different intensities, designed for dry or wet garments and depending on the type of fabric.

Special programmes (H)
This button allows you to choose between different options (depending on the selected programme):
| Single item (H) - This option (which can be set in several programs) optimizes the water and energy consumption of the selected program, maintaining the washing performance unchanged. | |
| Night wash (H) - This option reduces the intermediate spin speed to 400 rpm, where applicable, increase the water level during rinsing and keep the laundry immersed in water after the final rinse, in order to spread the fiber perfectly. | |
| Drum clean (H) - Developed to clean the washing machine drum. Use only powder detergent. Do not start the programme with laundry in the washing machine. It is suggested that this is carried out after every 50 washing cycles. The option can only be selected for the DRAIN & SPIN programme. |

Child lock (B + C)
- Pressing simultaneously the buttons "TEMPERATURE SELECTION" and "SPIN SPEED" for about 3 seconds, the machine allows you to lock the keys. In this way, you can avoid making accidental or unwanted changes if a button on the display is pressed accidentally during a cycle.
- The key lock can be simply cancelled by pressing the two buttons simultaneously again or turning off the appliance.

APPLIANCE PAIRING (ON APP)
NOTE: The frequency of the home Wi-Fi network has to be set on the 2.4 GHz band. (5 GHz band not allowed).
Download the hOn App on your device by framing the following QR code or by the link: go.haier-europe.com/ download-app Create the user profile (or log-in) and pairing the appliance following the instructions on the device display.
Download the


A
B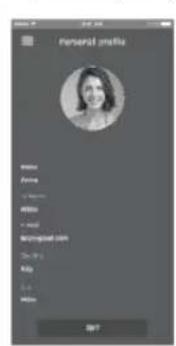
2.4 GHz band only
C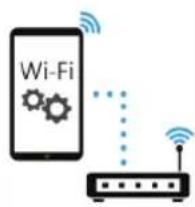
Home Wi-Fi: - Name - Password
Follow pairing instructions

D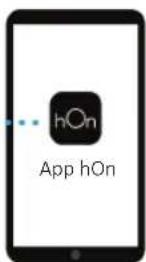
E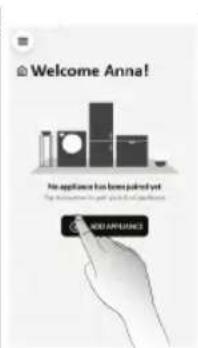
F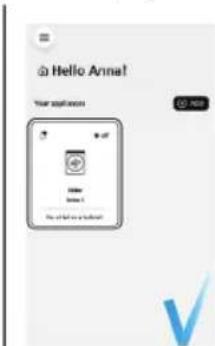
TO ENABLE REMOTE CONTROL
- Close the door and turn the knob to the REMOTE CONTROL (Wi-Fi) position. You can now manage your product from the app.
TO DISABLE REMOTE CONTROL
- Turn the knob to any position other than REMOTE CONTROL (Wi-Fi), without going through the OFF. If there is a cycle underway, it will continue. From the app it is possible to view the status of the product but not to control it.
1.2 - Icons

Door lock indicator (1)
For safety reasons the door is locked partially during the washing cycle. It is only possible to open the door at the end of the program or after the program was cancelled correctly. In case of high water level, high water temperature and during spinning it is not possible to open the door.

Anti-crease indicator light (2):
The indicator light shows the selection of the relevant option.

"Kg Mode Plus" indicator light (3): (active only on certain programmes).
Through every wash phase "Kg Mode Plus" allows to monitor information on the wash load in the drum and in the first minutes of the wash it:
- adjusts the amount of water required; -determines the length of the wash cycle;
- controls rinsing according to the type of fabric selected to be washed it;
- adjusts the rhythm of drum rotation for the type of fabric being washed;
- recognises the presence of too much soap suds, and if necessary, adjust the amount of rinse water.
- adjusts the spin speed according to the load, thus avoiding any imbalance.

Wi-Fi indicator light (4): On models equipped with Wi-Fi, it indicates the status of the connection.

Key lock indicator light (5): This indicator light shows that the keys are locked.

Wash temperature indicator light (6)
This shows the washing temperature of the selected programme, which can be changed (where allowed) by the relevant button. If you want to carry out a cold wash, all the indicators must be off.

Spin speed indicator light (7)
This shows the spin speed of the selected programme; you can reduce or omit it by using the relevant button.


Options indicator light (8)
The indicator lights show the options that can be selected by the relevant button.


Stain level indicator light (9)
- Once the programme has been selected, the indicator light will automatically show the stain level set for that programme.
- Selecting a different stain level will light up the relevant indicator.


Special programmes indicator light (10) *Only available on certain models
The indicator lights show the options that can be selected by the relevant button.
3. Programmes
Yes
Yes, by pressing the button.
Options
No
(A)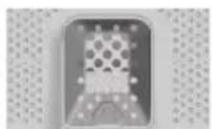
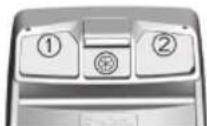
Detergent compartment for:

Detergent

Softener or care product

Prewash
| PROGRAMME | (Max.)(see control panel) | (D) | DETERGENT | PRE WASH | EXTRA RINSE | NIGHT WASH | HYGIENE+ | ANTI-CREASE | STAIN LEVEL | DELAY START | ||||||||||
| 5kg | 5.5kg | 6kg | 6.5kg | 7kg | 7.5kg | 8kg | 8.5kg | (MAX.) | 1 or 2 | |||||||||||
| COTTONS | 55.566.577.588.590° | ● | ● | (●) | ○ | ○ | ○ | ○ | ○ | ○ | ||||||||||
| ECO40-60 | ECO 40-60 | 55.566.577.588.560° | ● | ● | / / / / / | ○ | ○ | ○ | ○ | ○ | ○ | |||||||||
| WOOL & HANDWASH | 1111112230° | ● | ● | ○ | ○ | ○ | ○ | / o | ○ | / o | ||||||||||
| 20°C | 20°C | 55.566.577.588.520° | ● | ● | ○ | ○ | ○ | ○ | / / | ○ | ○ | |||||||||
| SYNTHETIC AND COLOURED | 2.52.5333.53.54460° | ● | ● | (●) | ○ | ○ | ○ | ○ | ○ | ○ | ||||||||||
| DRAIN & SPIN | - | - | - | - | - | - | - | - | - | / / / / / / | ○ | |||||||||
| RINSE | - | - | - | - | - | - | - | - | - | △ | ● | / / / / / o | ||||||||
| FITNESS CARE | 22222.52.52.52.540° | ● | ● | ○ | ○ | / / / / o | ||||||||||||||
| SOFT CARE | 22222.52.52.52.540° | ● | ● | ○ | / o | / o | / o | / o | / o | / o | ||||||||||
| FRESH CARE | 22222.52.52.52.540° | ● | ● | ○ | ○ | / / / / o | ||||||||||||||
| ALLERGY CARE60° | 2.52.5333.53.54460° | ● | ● | ○ | ○ | ○ | / / / / o | |||||||||||||
| RAPID CARE 30'44' | 1111111.51.540° | ● | ● | ○ | ○ | / / / / o | ○ | ○ | ○ | ○ | ||||||||||
| 11.5222.52.52.52.540° | ● | ● | ○ | ○ | / / / / o | ○ | ○ | ○ | ○ | |||||||||||
| 33333.53.53.53.540° | ● | ● | ○ | ○ | / / / / o | ○ | ○ | ○ | ○ | |||||||||||
| ALL IN ONE 59' | 55.566.577.588.540° | ● | ● | ○ | ○ | / / / / o | ||||||||||||||
| + | EXTRA CARE | 2.52.5333.53.54430° | ● | ● | / o | / / / / o | ||||||||||||||
| REMOTE CONTROL (Wi-Fi)Position that you have to select when you want to enable remote control through the App (via Wi-Fi). | ||||||||||||||||||||
3.1 - Program descriptions
| COTTONS | This programme is suitable for washing coloured cotton garments at 40°C or for ensuring the highest degree of cleanliness for cotton resistant laundry washing at 60°C or 90°C. The final spin is at maximum speed that ensures excellent water removal. | |
| ECO 40-60 | ECO 40-60 | The ECO 40-60 programme is able to clean normally soiled cotton laundry declared to be washable at 40C or 60C, together in the same cycle. This programme is used to assess the compliance with the EU Ecodesign legislation (environmentally friendly products design). |
| WOOL & HAND WASH | This programme performs a wash cycle dedicated to the wool fabrics that can be washed in a washing machine, the articles to be washed by hand or laundry items made from silk or specified as "Wash as Silk" on the fabric label. | |
| 20°C | 20°C | This innovative programme, allows you to wash different fabrics and colours together, such as cottons, synthetics and mixed fabrics at only 20°C and provides an excellent cleaning performance. Consumption on this program is about 40% of a conventional 40°C cottons wash. |
| SYNTHETIC AND COLOURED | This programme allows you to wash different type's fabrics and different colours all together. The rotation movement of the drum and the water levels are optimized, both during the washing the rinsing phase. The accurate spin action, ensures a reduced formation of creases in the fabrics. | |
| DRAIN & SPIN | The program completes the drain and a maximum spin. It is possible to delete or reduce the spin through the SPIN SELECTION button. | |
| RINSE | This program performs 3 rinses with an intermediate spin (which can be reduced or excluded by using the appropriate button). It is used for rinsing any type of fabric, for example after a wash carried out by hand. | |
| 7 | FITNESS CARE | The perfect combination of time and performance. Created to eliminate dirt from athletic garments and sportswear. A low temperature wash recommended for small loads of synthetic items. |
| SOFT CARE | Developed to take good care of delicate items, this programme washes at a low temperature in 59 minutes. An extended, in-depth rinse nourishes fabric fibres. | |
| FRESH CARE | This programme is designed to remove everyday stains with a refreshing action to guarantee outstanding laundry. Low temperature wash recommended for small loads. | |
| ALLERGY CARE 60° | This programme offers thorough cleaning of all cotton items, sanitising and eliminating bacteria. It is an efficient high temperature washing cycle. Recommended for small loads. | |
| RAPID CARE 14' - 30' - 44' | Saving without compromising! This new programme may be used to obtain excellent results while saving water, energy, detergent and time. This option washes at a medium temperature suitable for any kind of fabric. Recommended for small loads and lightly soiled items. | |
| ALL IN ONE 59' | This programme allows you to wash different fabrics together such as cottons, synthetics and mixed fabrics in only 59 minutes, using the full load of the washing machine, at 40°C (or less) temperature. This programme is particularly suited to slightly dirty fabrics. | |
| + | EXTRA CARE | This new programme may be used to wash laundry of different colourfast colours and fabrics together without altering their original look and feel. Through a perfect emulsion of water and detergent, the best possible care of your clothes is guaranteed, with optimal washing performance at a temperature of 30°C. |
4. Daily use
- Connect the washing machine to a power supply and water connection (see installation chapter in the user manual).
- Prepare the laundry: Sort clothes according to fabric (cotton, synthetics, wool, or silk, etc.) and how dirty they are. Check the labels on your garments. Separate white clothes from colored ones. Empty pockets of objects like keys, coins, etc., and remove harder decorative objects.
- Put in the laundry piece by piece, avoiding overloads (check the different maximum load capacities according to the program). Close the door carefully. Make sure no pieces of laundry are pinched.
- Select the detergent and softener (when needed) and pour it into the correct compartments of the dispenser.
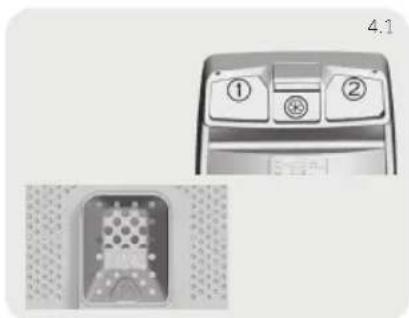
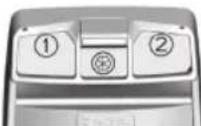
Open the dispenser drawer; the following components can be seen (Fig. 4.1):
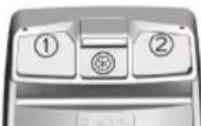
- Compartment 1 is for powder detergent
- Compartment 2 is for liquid detergent
- The compartment is for fabric conditioners, scenting agents and special additives such as starch, blueing, etc.
The recommendation on the type of detergents is suitable for the various washing temperatures, please refer to the manual of detergent (see ).
- Select a program by turning the knob, choosing the one that fits the most according to the loaded garments. The display will show the program name, the main options and the duration estimation.
- Add or remove options and change the parameters according to your specific needs.
- Press Start/Pause button to start the program.
- When the cycle is finished, "END" is shown on the display. Switch off the washing machine by turning the selector to OFF. Remove your laundry as soon as possible in order to prevent wrinkles, bad odors and bacteria to proliferate.
5. Care and maintenance
1.3 - General machine cleaning
- Unplug the machine during cleaning and maintenance.
- Use a soft cloth with soap liquid to clean the machine case and rubber components.
- Do not use organic chemicals or corrosive solvents.
1.4 - Pump filter cleaning
It is recommended to clean the pump filter once a month.
Turn off and unplug the machine and open the cover on the bottom of the appliance. Prepare a flat container to catch leach water.
- Pull the drain hose out and hold its end above the container and open it. After complete drainage, close the drain hose and push it back into the machine.
- Unscrew and remove counter-clockwise the pump filter and clean it carefully.
- Put the filter back in the machine and close it carefully.
5.1 - Cleaning the detergent dispenser and its compartments
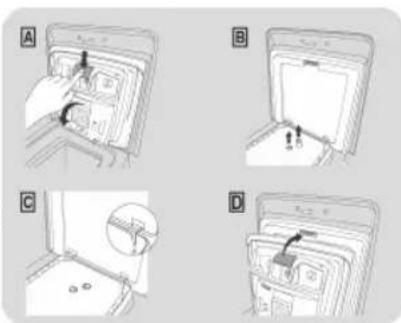
Always take care there are no detergent residues. Clean the drawer regularly:
- Press button (A).
- Hold down the button and turn the detergent dispenser outwards.
- Remove the dispenser and clean it. It is recommended to remove any remaining detergent in the compartments to avoid any build up that could cause blockages and restrict the water flow from the dispenser to drum.
- Pulling out and extract the trap/traps (B) that are located in the back part of the dispenser and clean them carefully.
- Remove any solid residue which could block the holes in the compartments.
1.5 - Cleaning the drum
- Remove accidentally washed items, especially metal parts such as pins, coins, etc. from the drum and the groove of the door gasket (rubber ring) because they cause rust stains and damage.
- Use a non-chloride cleaner for removing rust stains. Observe the warning hints of the cleaning agent manufacturer.
- Do not use any hard objects or steel wool for cleaning. After the procedure, open the door, use a towel to clean the stains and foam around the gasket, and keep the inside and outside of the gasket clean.
Download and read the complete User Manual online for more details on Care & Maintenance


Detergent compartment for:

2 Detergent

APPLIANCE PAIRING (IN THE APP)
APPLIANCE PAIRING (IN THE APP)
Washing machine installation
Before using the appliance, read the safety instructions carefully. To use the washing machine, it is absolutely necessary to remove the transport bolts and the plastic spacers. For detailed instructions on the removal procedure, see the installation instructions.
1. Installation
Remove the accessory bag

1.1 - Removing the transport bolts
- Remove the 2 or 4 transport bolts (A) and then remove the 2 or 4 spacers, rubber and plastic pipes (B), as shown in figure 1.
- Place the supplied caps "C" (Fig. 2).
1.2 - Carefully remove the protective foam placed under the washing machine lid (as shown in figure 3).
1.3 - Leveling
Level the machine by adjusting the front feet (4).
a) Turn the tap handle counterclockwise to open the tap fully. b) Move the tap lever by turning it until it stops at the end. c) Close the tap by turning the handle clockwise until it stops at the end.
Check that the drain hose is correctly positioned.
Check that the drain hose is not kinked by trying to move it from one place to another at the same time. If the hose moves from one place to another, the water level must be adjusted again.
1.4 Water connection
- The hose must be connected to the water supply through the new hose provided (included). Do not use the old hose for this purpose. Connect one end of the hose to the water inlet valve (the upper part of the machine), and the other end to the 3/4" threaded water connection.
- Place the hose close to the wall, making sure it is not bent or kinked. Connect the outlet hose to the drain pipe or to a fixed outlet with a diameter larger than the outlet hose and at a height of 50 cm to 75 cm from the floor (Fig. 5). If necessary, use the supplied accessories to secure and support the outlet hose more firmly.
* Accessories are sold separately.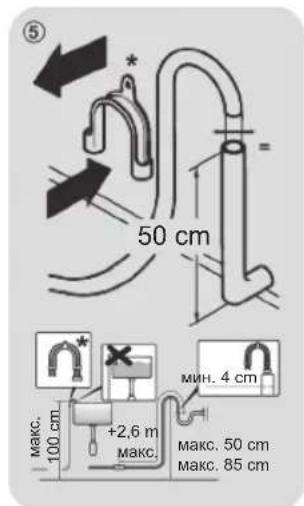
Connect the water inlet hose to the water inlet valve (Fig. 6) only using the supplied hose (do not reuse the old hose). Some models may include one or more of the following options:
- HOT&COLD (Fig. 7): Connection to both hot and cold water supply for better energy efficiency. Connect the hot water hose to the hot water inlet and the cold water hose to the cold water inlet. The machine can be connected only to the cold water inlet: in this case, some programs may start a few minutes later. AQUASTOP (Fig. 8): A device that stops the water supply if the hose is damaged; in this case, a red indicator appears in the transparent part, indicating that the hose needs to be replaced. To release the lock, press the release button. AQUAPROTECT - PROTECTED HOSE (Fig. 9): If there is a leak from the main internal hose, the transparent protective sleeve will fill with water, to ensure safe program operation. After the program ends, you must contact the customer service center to replace the protective hose.
2. Control panel

ON/OFF
1 Door lock indicator 2 Heating indicator 3 Light indicator for Mode Plus (active only for certain programs) 4 Wi-Fi indicator
Buttons
A Temperature selection knob with rotation B Start/Pause C Delay start D Heating indicator E End of cycle F On/Off G Level of dirt/rinse/extra rinse H Special programs (available only for specific models)
B+C Start
** Hnbo Ha npapa (npednara ce camo 3a onpepeJeHmOdeJI)
HouBaHe 9 HnDnKaTOpn 3a HnBO Ha IepaTypaHa 3aMbpceHOCT 10 INHdkatop 3a cneuaan HnocTHa nporpaMn
2.1 - ByToHn

Tpbrn/ny3a(A)
3aTbopeTe BpaataI PEPdN da n36epete 6byoHa 3a TpBfHN/AY3A. 3a da cTaptnape Te 36paHn IIKbl C npedBapntHo HactpoeHnTe napameTpni, HATncHeTe TPbFHN/AY3A. Korato nporpaMaTa Teue, Ha nCnJeIe ce nokaxe BpeMeTo, KOETO OCTBa.

BytoH 3a H3bOP HA TEMIePATyPA (B)
To3n 6yTOH NO3BOJRABa npOMraHa HA TempepaTpaTa 3a UKInTe Ha npaHe. He eBb3MOxHO da ce NOBmIe TEmpepaTpaTa HAD MaKcIMaJIHO dOlycSTMaTa 3a nporpaMaTa, 3a da ce 3aapan3r TBKaHInTe. Ako NCKaTe da nepete cbc CtydeHa BODa, BCINK INdikatopu Tp6Ba Da ca n3KIOUohEn.

BytoH OOBOTN HA LECTHTPOFyTATA (C)
Kato HaTnCHeTe To3n 6yToH, MoKeTe Da HamaJIte MaKcMmaJIHnte O6OpOTn I, Ako JeJaTe, MoKe Da OTMeHInTe LkBnaHa UeHTpOphiYra.

BytoH POTINB TbHKN (D) (PpeJlara ce camo 3a HkON nporpamn)
TaH KyHKnIyNBOJIbA da ce CBeDaT BHKTe do BB3MOKHO Ha-MaIKo, KaTo eINMInHpa MeKdINHHte UeHTpOpyr nn HAMJIBA uHTeH3NBHOCTTA Ha NocJeHaTa.

ByToH OTJIOXHECTAPT (E)
To3n6yToH no3B0JbA da nporpaIpaTe npedBaIteNoOTlaRaHe Ha cTApTpaHeTo Ha cnKbna 3a npaHe cdo 24 haca.

ByToH OIN (F)
To3n6yTOH no3BOLAba da ce n36epe MeKdy pa3JIHHOUPN (B 3aBNCIMOCT OT n36paHaTa nporpama):
HnBO Ha 3ambpcehoCT/Prnka/HnBOHa npapa * (G)
To3n6yToH n03BolraBa da ce n3bepe MeKdy pa3nuyn onuyn (B 3aBncmocT OT n3bpaHaTa nporpaMa):
HbHa 3aMbpcehoct (G)-Ta3n onuqna no3BOJRA Da ce u36epe Meky 3 HbHa HAHTENHBOCT Ha npaHTo, KaTO npOMEHrTe IpOdbJIHrTeHOCCTHa HpORpaMAATA B 3abCmOcT OT TOBA KOJIko Ca 3aMbpcEH TbKaHrTe (MOke da Ce nIIOJ3Ba cAmo 3a HkON IpOrpaMn, KaKTo e NOKa3aHO B TaBNIuTa Ha nporpaMnte).
Pnka(G)-ByoHbCTabaakTbeH,korato n36peTe PnKA(14'/30'/44)Ha konyetoBnIO3BOJBA da n36peTe eHa OT TpNTe NocOeHN pOdbNKeTEJIHOCTN B 3aBNCIMOCT OT BVa Ha TbKaHTa
HINBO HA IAPA*G (npedlaera ce camo npn onpegehen moen)
CneI KaTo n36peTe nporpaMaTaJI ECHO TIADEHE IINOC, MoKTe Da n3no3BaTe To3n 6yToH, 3a da n36peTe MeKdy TnpnpocuDpync pa3nUHH CTeNeHn Ha npap, PpeHa3NaueHn 3a cyxN nn MOKpn dpexn B 3aBNCIMoCT OT BnDa Ha nPaTa.

Cneuaann nporpamn (H)
To3n6yToH n03B0JIbA da ce n36epe MeJxdy pa3JIuHn onqun (B 3aBcIMoCT OT n36paHaTa nporpama):
EduenuHApTuKyI(H)-Ta3nOnu(KOToMOxpeJa6bde3aDaeHa3aHkoJIPOporpaM)oTUMN3npa paXOdaHaBOdaHepnHa H36paHaTa nporpama, KaTO CbUeBpeMeHHo He HaMaJIraeΦeKTUBHOCTTa Ha npaHeTo.
Houho npahe (H)-Ta3n Ongui HaamaiBa ckopocTTHa MeKdHHOTo CEHTPOpyrnpaHe 400 o6./mH, KOraTO e npuIOxmo, yBeJInuBa HbOTO Ha BODaTt NO BpEme Ha I3PakBaHETo Ndbpxn PpaHETo BBBBOda CneI NOcJIeDHO To I3PakBaHe, 3a Da ce pa3npdeJrNdeAALHO BnakHaTa.
IOnucTbaHe Ha 6apa6aHa (H)-Pa3pa6oTeHa da noocTba 6apa6aHa Ha nepaHra MaunHa. N3noL3BaIte cAmO npaxoo6pa3eH nepuHn npenapat.He cTaptnpaTe nporpamata,doKaTo mHa npaHe B nepaHra TaMaHnA. IpenopbHTeJIHO e Ta3n OOnuHa da ce BkInOuBa Ha Bcckn 50 npaHeta. OnuHa moKe da 6bJe n3paHa camo 3a nporpamata U3TIOMNBAHE UCEHTPOfYA.
CeHOBpeMeHHoTo HaTnCKaHe Ha 6yToHInTe .N35OP HA TEMNEPATYPA" n.0BOPOTn HA LIEHTPOOyfATA" 3a OKoNo 3 cekynMaunHaTa No3BOJRABa 3akIOuBaHe Ha KnaBnIte. ITO To3n HauHm MoKeTe Da N36eHHeTe HeBOJHn IJIr HeKeJALn IpOMeH, Ako NO BpeMe Ha N3bJIHeHne Ha Uckbl ClyuaHNO 6bJe HATnCHat 6yToH. 3akIOUbaHTo Ha KnaBnIte MoKe IpoCTo Da 6bJe OTMeHcO Ype3 IOBTOpHO HaTnCKaHe Ha DBaTa 6yToHa eHOBpeMeHHo IJIu Upe3 N3KIOUBAHe Ha ypeDa.

CDBOBAHE HA YCTPOICTBOTO (B INJIOXEHNETO)
3A6EJIEXKA: YecToTaHa IOMaHnHaTa Wi-Fi MpeXa Tp86Ba da e HacTpoEHa B dIina3OHa 2,4 GHz. (5 GHz dIina3OH he e pa3peWeH).
- Μιθηλενησακαργενενητο hOn Ha BaωεTo yctpɔiCTBO, KaTo cKaHπaTe cIeɪnɪ RQ Kɔd nɪn Upeə Bpɒkata: go.haier-europe.com/download-app Cb3dAnTe nTope6nTeNckn npoHn (nnn BnE3Te) nCDBOeTe yCTpoiCTBOTo, KaTO cNeDbaTe HcTpyKuInTe Ha dncnner Ha yCTpOiCTBOTO.

REMOTE CONTROL INSTALLATION
Close the door and set the knob to REMOTE CONTROL (Wi-Fi) position. Then you can control your product from the app.
TO DEACTIVATE REMOTE CONTROL
Set the knob to any position other than REMOTE CONTROL (Wi-Fi), without passing through OFF. If there is an ongoing cycle, it will continue. From the app it is possible to view the product status, but not to control it.
2.2 - Icons

Door lock indicator (1)
Safety display for the door partially locked during the washing cycle. It is possible to open the door only at the end of the program or if the program has been cancelled correctly. High water level, high water temperature during centrifugation cannot open the door.

Light indicator for anti-crease (2):
The light indicator shows the selected anti-crease option.

Light indicator "Kg Mode Plus" (3): (active only during a defined program).
During the entire washing cycle, the "Kg Mode Plus" program allows you to follow the information about the laundry and the washing in the drum, as in the first minutes of the washing cycle the mode:
- regulates the amount of necessary water; determines the duration of the washing cycle; - controls the rinsing depending on the selected washing cycles; - regulates the rhythm of the drum rotation for the type of laundry that is washed; recognizes the type of fabric, very delicate laundry and if necessary, regulates the amount of water for rinsing. - regulates the centrifuge speed according to the load, so as to avoid imbalance.

Wi-Fi indicator (4): For models equipped with Wi-Fi, shows the connection status. It may flash.

Light indicator for door lock (5): The light indicator shows that the door is locked.

Light indicator for washing temperature (6)
The water temperature for the selected program can be changed (if allowed) using the corresponding button. If you want to rinse with cold water, all indicators must be off.

Spin speed indicator (7)
This shows the spin speed of the selected program, which you can adjust or skip using the corresponding button.



Options indicator (8)
The indicators show the options that can be selected using the corresponding button.



Soil level indicator (9)
Once a program is selected, the indicator automatically shows the soil level set for the program. - Selecting different soil levels will cause the corresponding indicator to light up.


Special programs indicator (10) *Available only on certain models
The indicators show the options that can be selected using the corresponding button.
3. Programs

Button description
Delay
No
A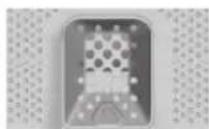
Section for pre-wash


Contents of the product for the user

Preface
| ПОНГРАМA | (МAKC.) (Винътейся за уравлике) | (МAKC.) | ПЕРДAPAT | (МAKC.) | 1 ил 2 | (МAKC.) | ПЕРДAPAT | (МAKC.) | 1 ил 2 | ||||||||||||||||
| 5 КГ | 5,5 КГ | 6 КГ | 6,5 КГ | 7 КГ | 7,5 КГ | 8 КГ | 8,5 КГ | (МAKC.) | 1 ил 2 | (МAKC.) | 1 ил 2 | ||||||||||||||
| ПAMUK | 55,566,577,588,590° | ● | ● | (●) | |||||||||||||||||||||
| ECO 40-60 | ЕКО 40-60 | 55,566,577,588,560° | ● | ● | ||||| | ○ | |||||||||||||||||||
| Былай Ильчно ИЗПИРАСЕ | 111111,2230° | ● | ● | ○ | |||||||||||||||||||||
| 20°C | 55,566,577,588,520° | ● | ● | ○ | |||||||||||||||||||||
| СИNTETИКА ЦВETHО | 2,52,5333,53,54460° | ● | ● | (●) | |||||||||||||||||||||
| ИЗTOUCHАНО ЦЕТROФУТA | - | - | - | - | - | - | - | - | ||||| | ○ | |||||||||||||||
| ИЗПЛAKBAСЕ | - | - | - | - | - | - | - | - | |||||||||||||||||
| ΦИТHEС | 22222,52,52,52,540° | ● | ● | ○ | |||||||||||||||||||||
| HEЖHA ГИЖА | 22222,52,52,52,540° | ● | ● | ○ | |||||||||||||||||||||
| СBEЖА ГИЖА | 22222,52,52,52,540° | ● | ● | ○ | |||||||||||||||||||||
| ГИЖА ПИ АLEРГИ 60° | 2,52,5333,53,54460° | ● | ● | ○ | |||||||||||||||||||||
| ГИЖА 14' | 111111,1,51,540° | ● | ● | ○ | |||||||||||||||||||||
| 11,5222,52,52,52,540° | ● | ● | ○ | ||||||||||||||||||||||
| 33333,53,53,540° | ● | ● | ○ | ||||||||||||||||||||||
| 55,566,577,588,540° | ● | ● | ○ | ||||||||||||||||||||||
| ДОПьДИНTEЛНА ГИЖА | 2,52,5333,53,54430° | ● | ● | /0 | |||||||||||||||||||||


A
B
TEMPERATURE SELECTION BUTTON (B)
Using this button you can change the temperature of the washing cycles. To protect the fabrics, it is not possible to increase the temperature above the maximum value allowed for a given program. If you want to wash in cold water, all the indicator lights must be off.

SPIN SPEED BUTTON (C)
DETAILED INSTRUCTIONS FOR THE PRODUCT INSTALLATION INSTRUCTIONS AND INSTALLATION
1. INSTALLATION
Load the detergent drawer

1.1 Removing the transport bolts
Unscrew the 2 or 4 transport bolts (A) on the back of the appliance and remove the 2 or 4 flat washers, rubber grommets and plastic spacer tubes (B), as shown in Figure 1. Install the caps that come with the kit "C" (Fig. 2).
1.2 - Safety instructions for proper use of the machine (see figure 3).
1.3 - Leveling the appliance
Level the machine by adjusting the front feet (fig. 4).
a) Turn the foot counterclockwise to lower it. b) Lift or lower the foot, turning it, until it stands firmly on the floor. c) Lock the foot by turning it clockwise until it is tight against the machine.
- Make sure the appliance is properly leveled. - Make sure the machine does not wobble; try moving it diagonally against the top corners. If you move the machine from one place to another, you must level it again.
1.4 - Water supply connection
- Connect the machine to the water supply using the new hose supplied with the machine (inside the drum). Do not use the old hose for installation. Attach one end of the hose with a 90° bend to the solenoid valve (upper rear part of the machine), and the other end to the tap or a 3/4" threaded connection. Place the machine near the tap, making sure the hose is not kinked or pinched. Attach the drain hose to the sink tap or, preferably, to a fixed drain outlet with a diameter larger than the drain hose, at a height of at least 50 cm and at most 75 cm from the floor (fig. 5). If necessary, use the accessories* to secure and support the drain hose.
Accessories sold separately
Connect the inlet hose to the water tap (fig. 6) using the hose supplied with the appliance (do not reuse old hoses) - to ensure proper operation of the following functions:
- HOT&COLD (fig. 7): Connect the inlet hose to both hot and cold water for greater energy efficiency. Connect the blue hose to the cold water tap and the red one to the hot water tap. The machine can be connected only to the cold water tap: in this case, some programs may start a few minutes later. AQUASTOP (fig. 8): a device located on the inlet hose. If the hose leaks, the indicator (A) will turn red, and the hose must be replaced. To release the lock, press the button on the device (B). AQUAPROTECT - INLET HOSE WITH PROTECTIVE SHEATH (fig. 9): If water leaks from the inner hose (C), the transparent outer hose (D) will contain the water until the end of the wash cycle. At the end of the cycle, contact the service center to replace the hose.
2. Control panel
Buttons
A On/Off B Temperature selection C Spin speed D Child lock E Delayed start
F Options
G Soil level/Extra rinse/Soil level with special programs (available on some models) B+C Key lock **Soil level (available on some models)
1 Indicator 2 Start/Pause button 3 Child lock indicator 4 Indicator for delayed start 5 Wi-Fi indicator 6 Door lock indicator 7 Temperature indicator 8 Spin speed indicator 9 Option indicator
4 Wi-Fi indicator 5 Door lock indicator 6 Temperature indicator 7 Spin speed indicator 8 Option indicator
9 Delay start indicator 10 Special program indicator
2.1-Buttons

Start/Pause button (A)
To start or pause the cycle, press the Start/Pause button. To start the selected cycle according to the set parameters, press Start/Pause. During the program execution, the remaining time is displayed on the display.

Temperature button (B)
This button allows you to change the temperature of the laundry. To protect the fabric, it is impossible to set the temperature above the maximum allowed for the program. If you want to run the laundry in cold water, all indicators must be turned off.

Spin speed button (C)
Pressing this button allows you to change the maximum spin speed, as well as, if desired, disable the spin cycle.

Child lock button (D) (available only for some programs)
This function allows you to minimize the formation of creases, eliminating intermediate spins or reducing their intensity.

Delayed start button (E)
This button allows you to program the start of the cycle, delaying the start of the wash for up to 24 hours.
Khonka ONU (F)
LHONKaD03BOJAE Bn6paTmMIXp3HMnOnLJIaMn(3aJeXHO BiD Bn6paHOI nporpaMn):
Nonepdne npaHn (F) -rOOniIO3BOJNE IPOBecTn nonepdHc npaHn, 0oOC6JIbNO iIXoNDtIpeuey 3i 3NaHmN 3abpyDHeHHMn (3actocOBcyTbcra NlWe B OKpeMnx nporpaMax).KuO BBIMKHyTu cfo yHKUHO, NOHc CbitNTca NIKTORpmaIHdkaTopa (E)
DoaTkoBe noocKaHHaF-4oONiIIO3BOJAE DOaTN OHe NOLOCKAHB KIHcI cIKLy npaHH i KopuHa IJIHOe 3 HIXHO Ta YyTnIBOIO WkipoIO. KaIO yBIMKHyTN CIO fYHKUIO, NOpHE CBITNTcN iKTOrpama IHNKaTopa (F)
IiriEHa + (F) -caonui 3a6e3neueyecrni6oke oHnueHHpeeu,niTpmyoohOndakoby Tempeatpy npotraom ycbofo npaHH.
Khonka Pibehb 3a6pydHeneHHa/luBnka/Pibehb nap* (G)
LcKhOpka Do3B0n8 Bn6bpaTm MIX p3HmMOnuMn (3aJexHo BiD Bn6paHOI nporpaMn):
Pibb3a6pydneHHg(G)-云onui donomarae Bn6paTNI OINH 3 pIBHBiHTeHCNBHOCTI npAH,3MHIOUHTpBbIcTB nporpamz aalekno BID pIBH3a6pydneHHpeey(3actocobna Iuue BOKpemnx nporpamax,RA3a3haeho B tabniporpam).
Ubnke npaHn (G)-zKHOIIaCTacAKTNBOIO,KOINBUNBbnpaTe nporpaMy UBNIKPE PAAHH (14'/30'/44') pykoIO, iO3BOJIe Bn6paTn Ondy 3 Tpbox Bka3aHnx TpnaJIoCTe, 3aJIeXHO Bi TNIy TKAHIN
PIBEHbIAPN*G) (doctynHO IInne IaI neBnX moJeIe)
Bn6paBn nporpamyJIIEIKE IIPACYBAHHNIIIOC,BNMOKTe cKOpNCtATNCHcIeKOKNHO,IOb BNbpaTNOHy 3 Tpbox napOBnx npoueDpy p3HOiHTeHCNBHocTi, npn3NaHeHx dny cyXoro a6o BOIOrO rO OJrty Ta 3aJeKHO BID TINyTKaHNH.
CneuaJIbHI nporpaMn (H)
LKHONKaD03B0JAE Bn6bpaTuMIXpI3HIMOnPJIIMN(3aIeXHO BiD Bn6paHOIporpaM):
OdnBpi6 (H)-rOOni (Aky MoXHa BnKOpNCTOBaTH B KIIbKOx nporpaMax) ONTm3yE CNOXBaHHBOHN eNEKTpoeHeprIy Bn6paHi nporpaMI, He 3MiHOIOHy eFekTNBHCtB npaHH.
Hicne npanha (H)-rOOni3MeHNyIpnomixHyWBnKicTs BiXmAHnHO 400o6/xB,deCe moKJBO,niBnUe pBeHb BOniNac NIOCKaHH Ta TpImae 6iIN3Hy 3aHypeHO y BOy nCnOCTaTOHOro NOLOCKAHn,IO6 iDeaJIbHO po3noDInTn BOJOKHO.
Drum cleaning (H) - Press the drum cleaning button on the machine. Use a special powder. Do not start the program near the machine. It is recommended to perform cleaning every 50 cycles. For this, you can select the cleaning program and start it.
Lock button (B+C)
The lock button prevents accidental pressing of the buttons during the washing cycle. You can unlock the buttons by pressing and holding the lock button for 3 seconds. The button lock can be activated or deactivated by pressing and holding the button while the machine is running.
Rinse level indicator (9)
The rinse level indicator automatically displays the level of rinsing set for the program. If you select a different rinse level, the corresponding indicator will light up.


Special programs indicator (10) *Available only on some models
The indicator shows the functions that can be selected according to the buttons.
3. Programs
Yes

Yes, after pressing the button
Optional
No
A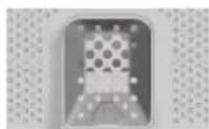
Select the type of detergent:

2 Detergent
Translation of the rules
MACHINE PAIRING (PA APP)
Button for dirt level/rapid/angle level* (G)
SELECTIONS button (F)
DEVICE PAIRING (PA APP)
NOTE: The frequency of the Wi-Fi home network must be set to the 2.4 GHz band. (The 5 GHz band is not allowed).
- EN WASHING MACHINE TOP LOADER
- BEFORE USING THE DEVICE, CAREFULLY READ THE SAFETY INSTRUCTIONS
- INSTALLATION
- TRANSPORTATION BOLTS REMOVAL
- CAREFULLY REMOVE AND DISPOSE OF THE PROTECTIVE PROFILE LOCATED UNDER THE WASHING MACHINE DOOR (AS SHOWN IN FIGURE 3)
- ALIGNING THE APPLIANCE
- HYDRAULIC CONNECTIONS
- CONTROL PANEL
- BUTTONS
- ICONS
- PLAY/PAUSE (A)
- TEMPERATURE SELECTION BUTTON (B)
- SPIN SPEED BUTTON (C)
- ANTI-CREASE BUTTON (D) (AVAILABLE ON SOME PROGRAMMES ONLY)
- DELAY START BUTTON (E)
- OPTIONS BUTTON (F)
- STAIN LEVEL/RAPID/STEAM LEVEL BUTTON (G)
- STEAM LEVEL (G) (ONLY AVAILABLE ON CERTAIN MODELS)
- SPECIAL PROGRAMMES (H)
- CHILD LOCK (B + C)
- APPLIANCE PAIRING (ON APP)
- TO ENABLE REMOTE CONTROL
- TO DISABLE REMOTE CONTROL
- DOOR LOCK INDICATOR (1)
- ANTI-CREASE INDICATOR LIGHT (2)
- KG MODE PLUS" INDICATOR LIGHT (3): (ACTIVE ONLY ON CERTAIN PROGRAMMES)
- WASH TEMPERATURE INDICATOR LIGHT (6)
- SPIN SPEED INDICATOR LIGHT (7)
- OPTIONS INDICATOR LIGHT (8)
- STAIN LEVEL INDICATOR LIGHT (9)
- SPECIAL PROGRAMMES INDICATOR LIGHT (10) *ONLY AVAILABLE ON CERTAIN MODELS
- PROGRAMMES
- PROGRAM DESCRIPTIONS
- DAILY USE
- CARE AND MAINTENANCE
- GENERAL MACHINE CLEANING
- PUMP FILTER CLEANING
- CLEANING THE DETERGENT DISPENSER AND ITS COMPARTMENTS
- CLEANING THE DRUM
- APPLIANCE PAIRING (IN THE APP)
- WASHING MACHINE INSTALLATION
- REMOVING THE TRANSPORT BOLTS
- CAREFULLY REMOVE THE PROTECTIVE FOAM PLACED UNDER THE WASHING MACHINE LID (AS SHOWN IN FIGURE 3)
- LEVELING
- WATER CONNECTION
- ON/OFF
- BYTOHN
- TPBRN/NY3A(A)
- BYTOH 3A H3BOP HA TEMIEPATYPA (B)
- BYTOH OOBOTN HA LECTHTPOFYTATA (C)
- BYTOH POTINB TBHKN (D) (PPEJLARA CE CAMO 3A HKON NPORPAMN)
- BYTOH OTJIOXHECTAPT (E)
- BYTOH OIN (F)
- HNBO HA 3AMBPCEHOCT/PRNKA/HNBOHA NPAPA * (G)
- HINBO HA IAPA*G (NPEDLAERA CE CAMO NPN ONPEGEHEN MOEN)
- CNEUAANN NPORPAMN (H)
- CDBOBAHE HA YCTPOICTBOTO (B INJIOXEHNETO)
- REMOTE CONTROL INSTALLATION
- TO DEACTIVATE REMOTE CONTROL
- LIGHT INDICATOR FOR ANTI-CREASE (2)
- LIGHT INDICATOR "KG MODE PLUS" (3): (ACTIVE ONLY DURING A DEFINED PROGRAM)
- WI-FI INDICATOR (4): FOR MODELS EQUIPPED WITH WI-FI, SHOWS THE CONNECTION STATUS. IT MAY FLASH
- LIGHT INDICATOR FOR DOOR LOCK (5): THE LIGHT INDICATOR SHOWS THAT THE DOOR IS LOCKED
- LIGHT INDICATOR FOR WASHING TEMPERATURE (6)
- SPIN SPEED INDICATOR (7)
- OPTIONS INDICATOR (8)
- SOIL LEVEL INDICATOR (9)
- SPECIAL PROGRAMS INDICATOR (10) *AVAILABLE ONLY ON CERTAIN MODELS
- PROGRAMS
- SAFETY INSTRUCTIONS FOR PROPER USE OF THE MACHINE (SEE FIGURE 3)
- LEVELING THE APPLIANCE
- WATER SUPPLY CONNECTION
- START/PAUSE BUTTON (A)
- TEMPERATURE BUTTON (B)
- CHILD LOCK BUTTON (D) (AVAILABLE ONLY FOR SOME PROGRAMS)
- DELAYED START BUTTON (E)
- KHONKA ONU (F)
- KHONKA PIBEHB 3A6PYDHENEHHA/LUBNKA/PIBEHB NAP* (G)
- PIBEHBIAPN*G) (DOCTYNHO IINNE IAI NEBNX MOJEIE)
- CNEUAJIBHI NPORPAMN (H)
- LOCK BUTTON (B+C)
- RINSE LEVEL INDICATOR (9)
- SPECIAL PROGRAMS INDICATOR (10) *AVAILABLE ONLY ON SOME MODELS
- MACHINE PAIRING (PA APP)
- BUTTON FOR DIRT LEVEL/RAPID/ANGLE LEVEL* (G)
- SELECTIONS BUTTON (F)
- DEVICE PAIRING (PA APP)
Brand : HOOVER
Model : THO286TM5-S
Category : Washing machine