PAA80BT - Receiver LTC - Free user manual and instructions
Find the device manual for free PAA80BT LTC in PDF.



| Product type | Amplified receiver |
| Brand | LTC |
| Model | PAA80BT |
| Output power | 80 W |
| Power supply | 220-240 V~, 50/60 Hz |
| Power consumption | 45 W |
| Dimensions (L x H x D) | 244 x 66 x 218 mm |
| Net weight | 3.1 kg |
| Inputs | 2 microphones (MIC1 with priority), 2 AUX lines, USB, SD, Bluetooth, FM |
| Outputs | Speakers (100V, 70V, 4-16 Ω), AUX |
| FM band | 87.5 - 108 MHz |
| Bluetooth | Band 2402-2480 MHz, max power 0.39 dBm |
| Supported audio formats | MP3 (max 320 kb/s), FAT12/16/32 systems |
| Signal-to-noise ratio (AUX) | ≥ 65 dB |
| Frequency response | 80 Hz - 12 kHz (±3 dB) |
| Distortion rate (THD) | ≤ 2% (1 kHz) |
| Tone controls | Bass ±12 dB (100 Hz), Treble ±12 dB (10 kHz) |
| Remote control | Infrared with AAA batteries (LR3) |
| Protection class | Class II (double insulation) |
| Usage | Indoors only, temperature 5-35 °C |
| Cleaning | Disconnect before cleaning, dry cloth |
| Batteries and environment | Used batteries to recycle, do not dispose of with household waste |
Frequently Asked Questions - PAA80BT LTC
User questions about PAA80BT LTC
0 question about this device. Answer the ones you know or ask your own.
Ask a new question about this device
Download the instructions for your Receiver in PDF format for free! Find your manual PAA80BT - LTC and take your electronic device back in hand. On this page are published all the documents necessary for the use of your device. PAA80BT by LTC.
USER MANUAL PAA80BT LTC
PUBLIC ADDRESS AMPLIFIER
WITH BLUETOOTH/USB/SD & FM TUNER
MANUAL
EN- Instruction Manual - p. 3
natural_image
Line drawing of an electronic device with ports and connectors, connected to a wall-mounted connector (no text or symbols present)FIG. 1.2
natural_image
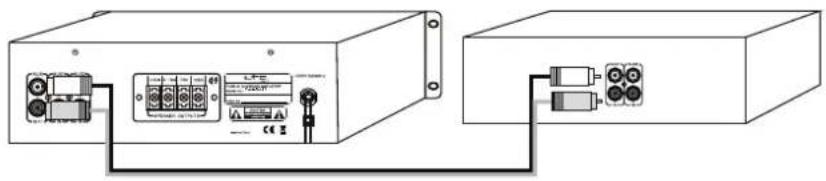
Two electronic device boxes connected by a cable, one with ports and connectors, the other with two connected components (no visible text or symbols)FIG. 1.3
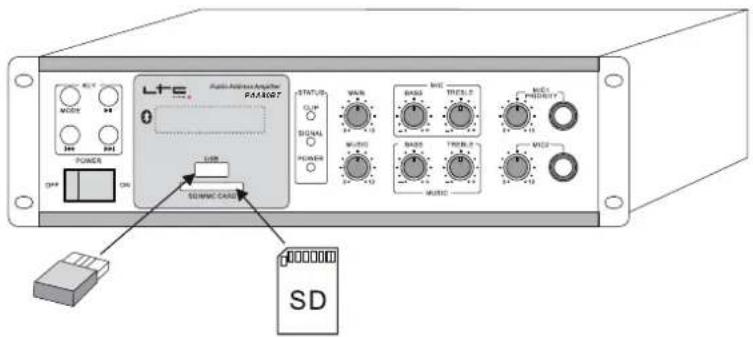
FIG. 2.1
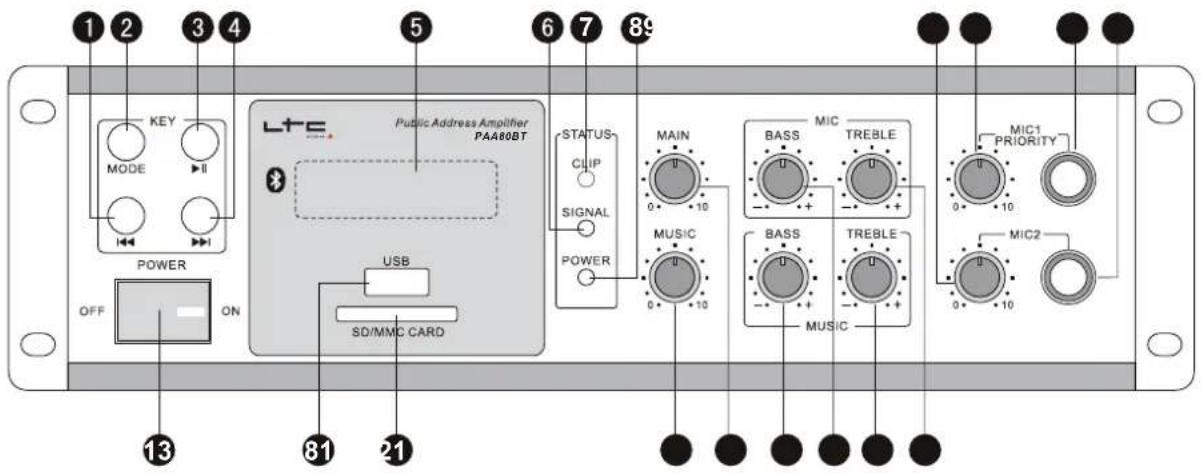
FIG. 2.2
PUBLIC ADDRESS AMPLIFIER
OPERATING INSTRUCTIONS
WARNINGS

CAUTION DO NOT OPEN THE HOUSING SHOCK HAZARD
EXPLANATION OF SIGNS

The triangle containing a lightning symbol is used to indicate whenever your health is at risk (due to electrocution, for example).

An exclamation mark in a triangle indicates particular risks in handling or operating the appliance.

Accordance with the requirements of UK standards

Class II protection without earth connection

The product is for indoor use only

This marking indicates that this product should not be disposed with other household wastes throughout the EU. To prevent possible harm to the environment or human health from uncontrolled waste disposal, recycle it responsibly to promote the sustainable reuse of material resources. To return your used device, ease use the return and collection systems or contact the retailer where the product was purchased. They can see this product for environmentally safe recycling.
IMPORTANT SAFETY INSTRUCTIONS AND DANGER WARNINGS
- Please read the manual carefully and keep it for future reference.
- All safety instructions and warnings must be adhered to. They are part of the manual and must be kept with the manual.
- Any warranty claims are rendered invalid if damage occurs due to non-observance of these operating instructions. We assume no liability for any consequent damage.
- We assume no liability for personal injury or damage to property caused by incorrect handling or non-observance of the safety instructions. Any warranty claims expire in such cases.
- Unauthorized conversions and/or modifications of the appliance are not permitted for safety and licensing reasons (CE).
- The appliance may not be exposed to extreme temperatures ( < +5^ / > +35^ ), strong vibrations or heavy mechanical strain during operation. The appliance is approved for operation in dry, closed rooms only. Do not operate the device near water, such as in bathrooms or swimming pools.
- The appliance may not be exposed to excessive moisture (due to dripping or sprayed water, for example).
- Do not place any recipients filled with liquids, such as glasses or vases, on top of or directly next to the appliance. They could fall over, causing water to enter the appliance. Never pour out liquids above the appliance. Do not place any small objects, such as coins or paper clips, on the appliance since they could fall inside the appliance. You run a high risk of causing a fire or life-threatening electrocution! If any liquid or objects enter the appliance, nevertheless, pull the mains plug out of the socket immediately and contact a specialist.
- Do not place any naked flames such as those of burning candles on or next to the appliance.
- 220-240 V\~ 50/60 Hz mains socket may be used as source of power for the appliance. Never try to operate the appliance with any other voltage.
- Only pull the mains plug out of the socket by the intended gripping surface. Do not pull the cable.
- Never plug the mains plug in or out with damp or wet hands.
• Always pull the mains plug out of the mains socket:
• Before cleaning the appliance -
If there is a thunderstorm
-
If you will not be using the appliance for a long period of time (>1 week)
- Electrical appliances must be kept out of the reach of children. Be particularly careful if children are present. Children are not aware of the hazards involved in handing electrical appliances improperly. Children could attempt to poke objects into the appliance. There is a life-threatening danger of electrocution.
- Do not leave the appliance unattended while operating it.
- Never place the appliance on an unstable or movable surface. People could be injured or the appliance damaged by it falling.
- When using a rack, make sure it is in a stable position and is transported securely. Installation on uneven, slanted surfaces or stopping the rack abruptly during transport can result in the rack overturning or appliances falling from or out of the rack and injuring people.
• Live components can be exposed by opening covers or removing components (unless this can be done - without tools). Contact points can also be live. If the appliance must be opened in order to calibrate, service, repair or replace components or assemblies, all of its poles must be disconnected from all sources of voltage first. If the appliance must be kept open and under voltage during maintenance or repairs, this work may only be carried out by a specialist who is familiar with the risks involved and the relevant regulations.
- Never connect the appliance directly after transferring it from a cold to a warm room. The condensation water that forms could destroy the appliance or result in an electric shock. Allow the device to reach room temperature before connecting it. Wait until the condensation water has evaporated. This can take some hours.
- Do not place the appliance on soft surfaces such as carpets or beds. Do not cover the air vents of the appliance. Do not obstruct the air circulation with objects such as magazines, tablecloths or curtains. This prevents the dissipation of heat from the appliance and can result in overheating.
- Only use the appliance in a moderate climate, not in tropical environments.
- All persons involved in operating, installing and servicing the appliance and putting it into service must be trained and qualified accordingly and observe these operating instructions.
- Defective mains cables may only be replaced by specialists. Danger of shock hazard!
- If you are not sure about the correct connection or if questions arise which are not answered by the operating instructions, please do not hesitate to contact support or a specialist of your choice. Consult a specialist if you are in doubt about the operating principle or the safety of the product.
- This product complies with European Low voltage (2014/35/EU) and Electromagnetic Compatibility (2014/30/EU) Directives when used according to this instruction manual.
DISCONNECT DEVICE: The power outlet must be installed near the equipment and be easily accessible.
FEATURES
• 100V, 70V voltage output and 4-16Ohm output
- Mic 1 has override function
- IR remote control
- USB/SD reader
- Digital FM RADIO
- Wireless Bluetooth receiver
• 2x MIC input and 2x LINE input
- Master volume control, independent mic, music volume control, bass & treble control
Plug the power cord into an appropriate AC outlet.
1.2 AUX INPUT
Connect the AUX input to an audio source (DVD/CD etc.) via the RCA lead.
1.3 USB INPUT
Plug a USB stick or an SD card into the appropriate port. Please note: For USB and SD, the latest input will have priority.
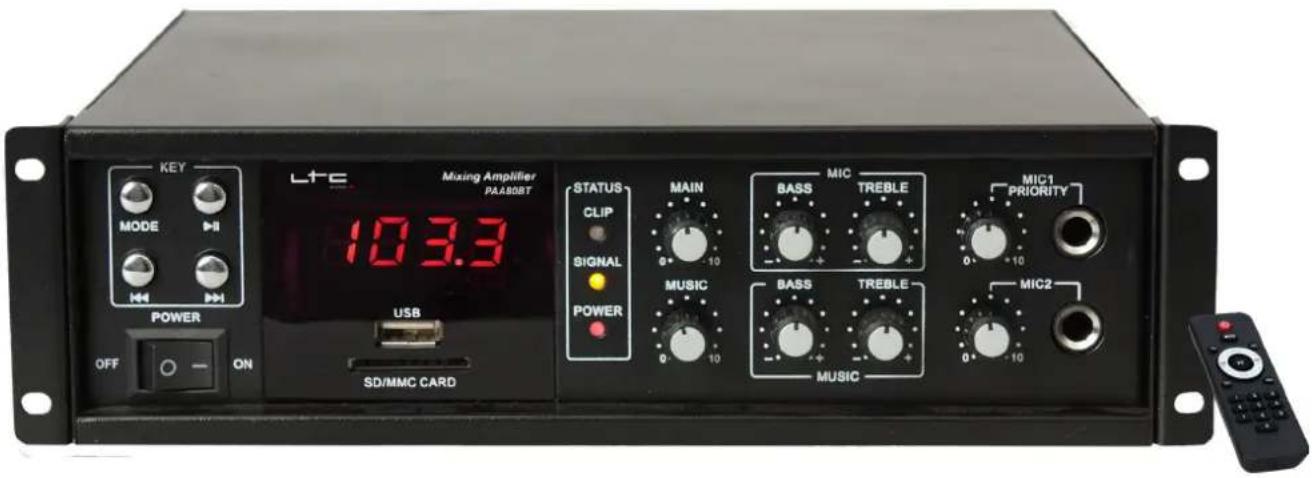
2.1 FRONT PANEL CONTROLS
-
PRE Button: Touch to select previous song. Long touch will decrease the volume. In FM mode it will search for previous stations.
-
MODE button: Input selector
- ▶||Play/Pause button
- ➤ NEXT button: Touch to select the next song/track. Long touch will increase the volume. In FM mode, it will search for the next stations
- DISPLAY
- Signal Led
- CLIP LED
- POWER LED
- MIC2 volume control
- MIC1 volume control
- MIC1 INPUT (with override function)
- MIC2 input
- ON/OFF switch
- USB input
- SD input
- MUSIC volume control
- MASTER Volume control
- MUSIC BASS control
- MIC BASS control
- MUSIC TREBLE control
- MIC TREBLE control
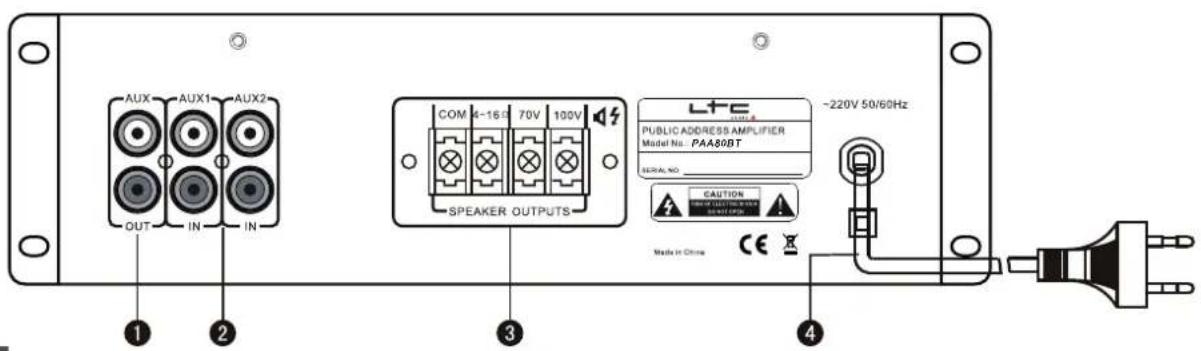
2.2 REAR PANEL
-
- AUX output
-
- AUX input
-
- Speaker output
-
- Power cord
WARNING! Impedance speakers and voltage speakers must be connected to the correspondent terminals or you will damage the amplifier!!!
FM Antenna
The speaker ground wire acts as an FM antenna. Please adjust the speaker wire direction to get better FM performance if needed.
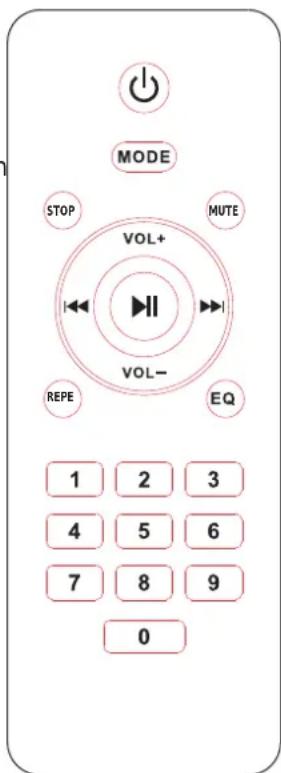
3. REMOTE CONTROL
STANDBY/ON: Switches the amplifier between ON and Standby mode
MODE: Selects: USB/SD, BLUETOOTH, FM, LINE inputs
STOP: Press this button to stop music playback from USB/SD
MUTE: Mute the audio on the amplifier; The mute mode is indicated by the source and speaker LEDs flashing. Press again to cancel mute.
VOL+: Press this button to increase the volume
VOL-: Press to decrease the volume
←CH-: Press to select previous song under USB/SD/BT input. Previous station under FM mode
▶ CH+: Press to select next song under USB/SD/BT input. In FM mode: select next station
▶: Play/pause music from USB/SD
REPE: First press to repeat current song in USB/SD, second press to repeat all songs in USB/SD
EQ: You can select among 7 preset EQ sets
Numerical track selection
Press the number of the desired track. The track will then play automatically.
INSTALLING THE BATTERIES IN THE REMOTE CONTROL
Remove the battery cover from the back of the remote control as shown and insert 2x AAA size batteries ensuring correct polarity

RECOMMENDATIONS FOR BATTERIES

This symbol indicates that used batteries should not be disposed of with household waste but deposed correctly in accordance with your local regulations.
Batteries shall not be exposed to excessive heat such as sunshine, fire or the like.
When the internal batteries are not to be used, remove them to avoid damage caused by battery leakage or corrosion.
ATTENTION: Danger of explosion if battery is incorrectly placed. Only replace by the same or equivalent type.
WARNING : Do not swallow the battery. Danger of chemical burns. Keep new and old batteries out of the reach of children. If the battery compartment doesn't close properly, stop using the product and keep it out of the reach of children.
If you are in doubt whether the batteries have been swallowed or introduced into any other part of the body, contact immediately a doctor.
4. BLUETOOTH PAIRING
Set the input mode to BLUETOOTH. Turn on the Bluetooth feature on your smartphone. Search for a Bluetooth device. The Bluetooth name of the amplifier is BLUETOOTH. Select the amplifier and pair it. After pairing you can play the music from your smartphone.
5. INPUT SELECTION
-
MP3 input: When you plug in an USB/SD media, it will play automatically the music from USB/SD device.
-
AUX input and MIC input: Touch the MODE button to select AUX input.
6. PLAYING FILES FROM THE USB STICK OR SD CARD
- As the USB industry develops quickly, our amplifier might not be able to read all formats. Please use USB sticks of ≥ 2GB size. Our amplifier only supports MP3 format files of a max. of 320kb/s. Other files might not be read nor played.
- To optimize the performance please store only MP3 songs in the memory stick and delete all other files.
- Supports FAT12, FAT16, FAT32 file system.
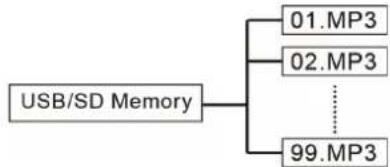
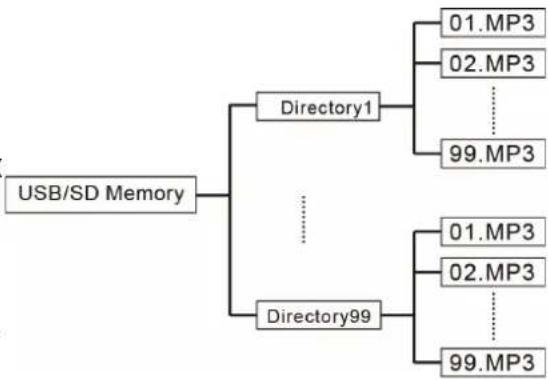
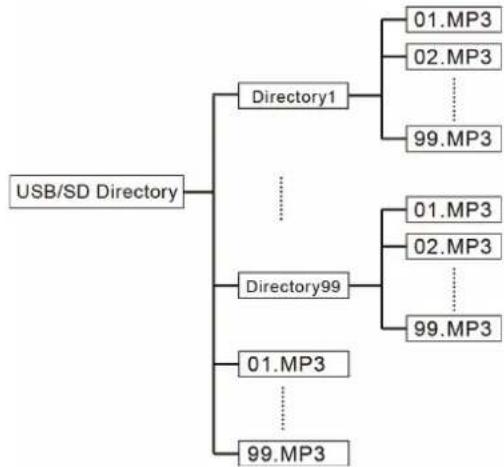
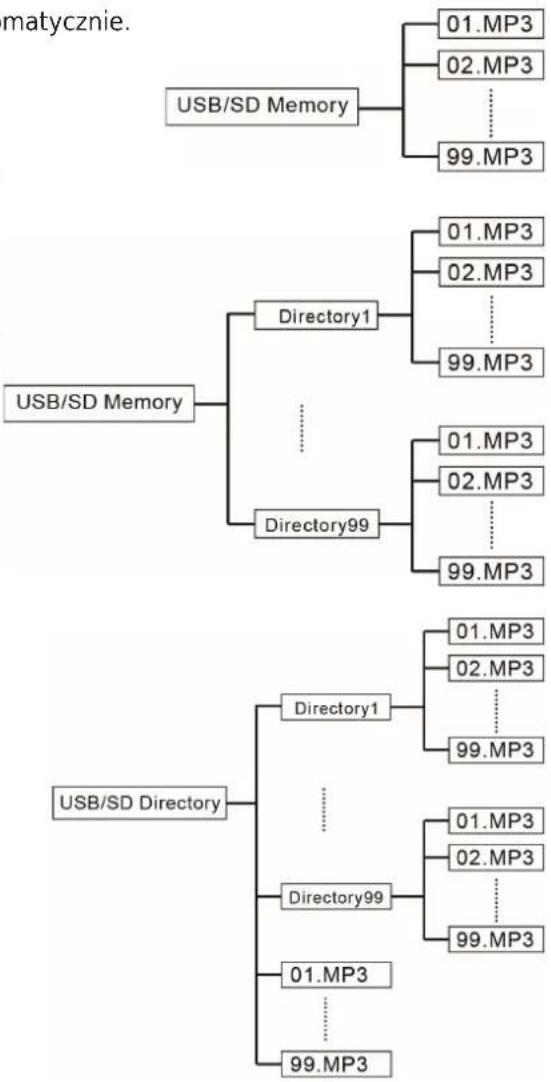
- This system only permits 99 files (directories) under root directory. Please don't create directories under 1st directories. The amplifier can't read files in second directories.
a. If you don't create directories and put all files under ROOT DIRECTORY, the advantage is easy selection of songs in the memory. The inconvenience is that the number of files is limited to 99.
b. If you create directories, the advantage is that you can group all songs. The maximum is 99 x 99 songs.
c. Put songs under root directory and create first directory so that you can store 99 x 99 x 99 songs.
flowchart
graph TD
    A["USB/SD Memory"] --> B["01.MP3"]
    A --> C["02.MP3"]
    A --> D["..."]
    A --> E["99.MP3"]
flowchart
graph TD
    A["USB/SD Memory"] --> B["Directory1"]
    A --> C["..."]
    A --> D["Directory99"]
    B --> E["01.MP3"]
    B --> F["02.MP3"]
    B --> G["..."]
    B --> H["99.MP3"]
    D --> I["01.MP3"]
    D --> J["02.MP3"]
    D --> K["..."]
    D --> L["99.MP3"]
flowchart
graph TD
    A["USB/SD Directory"] --> B["Directory1"]
    A --> C["..."]
    A --> D["Directory99"]
    A --> E["01.MP3"]
    A --> F["99.MP3"]
    B --> G["01.MP3"]
    B --> H["02.MP3"]
    B --> I["..."]
    B --> J["99.MP3"]
    D --> K["01.MP3"]
    D --> L["02.MP3"]
    D --> M["..."]
    D --> N["99.MP3"]
7. SPECIFICATIONS
Output power....80W
Input sensitivity ...... Mic: ≤7mV
.AUX: ≤400mV
S/N.....AUX: ≥65dB
Frequency response 80Hz - 12kHz (±3dB)
THD....≤2% (1kHz normal condition)
Audio output sensitivity ≥450mV
Tone control ....BASS: ±12dB (100Hz)
Tweeter: ±12dB (10kHz)
Override....MIC1 input
FM band 87.5-108MHz
BT band 2402-2480MHz
Maximum RF emission value of BT 0.39dBm
Power supply 220-240V\~50/60Hz
Power consumption....45W
Dimensions 244 x 66 x 218mm
Net weight 3.1kg
AMPLIFICATEUR PUBLIC ADDRESS
AVEC BLUETOOTH/USB/SD & TUNER FM
MANUEL D'INSTRUCTION
AVERTISSEMENTS

ATTENTION
NE PAS OUVRIR LE BOITIER RISQUE DE CHOC ELECTRIQUE
EXPLICATION DES SYMBOLES
2.2 ARRIERE (FIG. 2)
RECOMMANDATIONS POUR LES PILES

S/R Abstand ....AUX: ≥65dB
4. BLUETOOTH PAIRING
Supporta i file system FAT12, FAT16, FAT32.
Banda FM 87,5-108 MHz
Banda BT 2402-2480MHz
MANUAL DE INSTRUÇÕES
AVISO

ATENÇÃO
flowchart
graph TD
    A["USB/SD Memory"] --> B["01.MP3"]
    A --> C["02.MP3"]
    A --> D["..."]
    A --> E["99.MP3"]
    F["USB/SD Memory"] --> G["Directory1"]
    F --> H["..."]
    F --> I["Directory99"]
    I --> J["01.MP3"]
    I --> K["02.MP3"]
    I --> L["..."]
    I --> M["99.MP3"]
    N["USB/SD Directory"] --> O["Directory1"]
    N --> P["..."]
    N --> Q["Directory99"]
    Q --> R["01.MP3"]
    Q --> S["02.MP3"]
    Q --> T["..."]
    Q --> U["99.MP3"]
7. ESPECIFICACÕES
Banda FM 87,5-108 MHz
Banda BT 2402-2480 MHz
EQ: Puteti selecta dintre cele 7 seturi de EQ presetate
THD....≤2% (1kHz normal condition)
Sensibilitate audio iesire ≥450mV
Control ton....Bas : ±12dB (100Hz)
Inalte: ±12dB (10kHz)
Override....MIC1
Banda FM 87.5-108MHz
Banda BT 2402-2480MHz
REKOMMENDATIONER FÖR BATTERIER

flowchart
graph TD
    A["USB/SD Memory"] --> B["Directory1"]
    A --> C["..."]
    A --> D["Directory99"]
    B --> E["01.MP3"]
    B --> F["02.MP3"]
    B --> G["..."]
    B --> H["99.MP3"]
    I["USB/SD Memory"] --> J["Directory1"]
    I --> K["..."]
    I --> L["01.MP3"]
    I --> M["02.MP3"]
    I --> N["..."]
    I --> O["99.MP3"]
    P["USB/SD Directory"] --> Q["Directory1"]
    P --> R["..."]
    P --> S["01.MP3"]
    P --> T["02.MP3"]
    P --> U["..."]
    P --> V["99.MP3"]
    W["01.MP3"] --> X["..."]
    W --> Y["99.MP3"]
7. SPECYFIKACJE
UZAKTAN KUMANDADAKİ PİLLERİN TAKILMASI
THD ....≤2% (1kHz normal durum)
FM bandi 87.5-108MHz
BT bandi 2402-2480MHz


- PUBLIC ADDRESS AMPLIFIER
- WITH BLUETOOTH/USB/SD & FM TUNER
- MANUAL
- OPERATING INSTRUCTIONS
- WARNINGS
- CAUTION DO NOT OPEN THE HOUSING SHOCK HAZARD
- EXPLANATION OF SIGNS
- IMPORTANT SAFETY INSTRUCTIONS AND DANGER WARNINGS
- FEATURES
- AUX INPUT
- USB INPUT
- FRONT PANEL CONTROLS
- REAR PANEL
- WARNING! Impedance speakers and voltage speakers must be connected to the correspondent terminals or you will damage the amplifier!!!
- FM Antenna
- REMOTE CONTROL
- INSTALLING THE BATTERIES IN THE REMOTE CONTROL
- RECOMMENDATIONS FOR BATTERIES
- BLUETOOTH PAIRING
- INPUT SELECTION
- PLAYING FILES FROM THE USB STICK OR SD CARD
- SPECIFICATIONS
- AMPLIFICATEUR PUBLIC ADDRESS
- AVEC BLUETOOTH/USB/SD & TUNER FM
- MANUEL D'INSTRUCTION
- AVERTISSEMENTS
- ATTENTION
- NE PAS OUVRIR LE BOITIER RISQUE DE CHOC ELECTRIQUE
- EXPLICATION DES SYMBOLES
- ARRIERE (FIG. 2)
- RECOMMANDATIONS POUR LES PILES
- MANUAL DE INSTRUÇÕES
- AVISO
- ESPECIFICACÕES
- REKOMMENDATIONER FÖR BATTERIER
- SPECYFIKACJE
- UZAKTAN KUMANDADAKİ PİLLERİN TAKILMASI
Brand : LTC
Model : PAA80BT
Category : Receiver