
LED-2408 - Television LTC - Free user manual and instructions
Find the device manual for free LED-2408 LTC in PDF.


| Product Type | LED TV with built-in DVD player |
| Screen Size | 24 inches (diagonal) |
| Resolution | 1920 x 1080 pixels (Full HD) |
| Aspect Ratio | 16:9 |
| TV System | PAL BG/DK/I, SECAM BG/DK L/L' |
| Digital Tuner | DVB-T/T2, DVB-C, DVB-S2 |
| Power Supply | 12V DC, 3A (36W) |
| Audio Output Power | 2 x 3W |
| Input Ports | HDMI, VGA (D-Sub 15 pin), SCART, USB 2.0, RF (75 ohm), Satellite (DVB-S2), Mini AV/YPbPr, Common Interface (CI) |
| Output Ports | Coaxial digital audio (SPDIF), Headphone (3.5mm) |
| Remote Control | Infrared, range 5m, angle 30° horizontal, 20° vertical, uses 2 x AAA batteries |
| Multimedia Playback | Photo (JPEG), Music (MP3), Movie (MPEG, AVI, etc.), Text (TXT) |
| Recording Features | PVR via USB (TS/PS format), Timeshift, Timer recording, EPG support |
| DVD Player | Slot-load, supports DVD, CD, VCD; NTSC/PAL/MULTI |
| OSD Language | Multiple languages (including English, Swedish, etc.) |
| Cleaning Instructions | Use a soft dry cloth; for stubborn stains, damp cloth with diluted detergent; do not use solvents or petrol-based fluids |
| Safety Features | Overload protection, ventilation clearance 5cm, auto power-off timer, child lock |
| Accessories Included | Remote control, AAA batteries, power adapter, user manual |
| Repairability | No user-serviceable parts inside; qualified service personnel only |
| Environmental Compliance | WEEE, RoHS |
Frequently Asked Questions - LED-2408 LTC
User questions about LED-2408 LTC
0 question about this device. Answer the ones you know or ask your own.
Ask a new question about this device
Download the instructions for your Television in PDF format for free! Find your manual LED-2408 - LTC and take your electronic device back in hand. On this page are published all the documents necessary for the use of your device. LED-2408 by LTC.
USER MANUAL LED-2408 LTC
natural_image
Two computer monitors, one blank and one with blank display, shown against a plain background (no text or symbols)NICAM/A2: Välj TV Nicam/A2.
Beskrivning
Operations in Setting Menu are shown in the following table:
| Satellite System | |||||
| satellite | Transponder | Sitting | |||
| 0001 | HOTBIRD 6.7A,B | 0001 | 10723 H 29900 | HOTBRD 6.7A,B | |
| 0002 | ASTRA 1H,19K,L | 0002 | 10750 H 15000 | LNB Type | 9750/10000 |
| 0003 | ASTRA 2A,25,2D | 0003 | 10775 H 28000 | LNB Power | On |
| 0004 | ASTRA 1C,16,3A | 0004 | 10830 H 3303 | 22KBr | Auto |
| 0006 | NLESAT 101,10 | 0006 | 10853 H 27500 | DisEqCI.0 | Burst A |
| 0006 | EURELSAT WJA | 0006 | 10892 H 27500 | Motor | DisEqCI.3 |
| 0007 | EUTELSAT W1 | 0007 | 10938 H 27508 | ||
| 8006 | BADR-23-4EURO | 0006 | 10971 H 27506 | ||
USB-information
Notera:
Notera:
Nermixning
• V/H
natural_image
Two computer monitors displayed side by side, one blank and one with a blank screen (no text or symbols visible)Read all of the instructions before using this TV and keep the instruction manual in a safe place for future reference.
Contents
| Caution | 1 |
| Safety Information | 2 |
| Accessories | 3 |
| Product Introduction | 4 |
| Connections | 5 |
| Remote Control | 6-7 |
| Basic Operation | 8 |
| OSD Menu | 9-17 |
| 1. Picture menu | 9 |
| 2. Sound menu | 10 |
| 3. Channel menu | 11-14 |
| 4. Feature menu | 15-16 |
| 5. Setup menu | 17 |
| Multimedia Operation 18-20 | |
| Recording Operation 21-23 | |
| DVD Operation | 24-31 |
| Simple Troubleshooting | 32 |

The lightning flash with arrowhead symbol, within an equilateral triangle is intended to alert the user to the presence of un-insulated “dangerous voltage” within the products enclosure that may be of sufficient magnitude to constitute a risk of electric shock to the persons.

The exclamation point within an equilateral triangle is intend to alert the user to the presence of important operating and maintenance (servicing) instructions in the literature accompanying the appliance.

Correct disposal of this Product
(Waste Electrical & Electronic Equipment (WEEE)
Your product is designed and manufactured with high quality materials and components which can be recycled and reused.
This symbol means that electrical and electronic equipment, at their end-of-life should be disposed of separately from your household waste.
Please dispose of this equipment at your local community waste collection/recycling center.
In the USA there are separate collection systems for used electrical and electronic products. Please help us to conserve the environment we live in!

This unit complies with European safety and electrical interference directives.

This unit complies with The Restriction of the use of certain Hazardous substances in Electrical and Electronic Equipment
To ensure reliable and safe operation of this equipment, please read carefully all the instructions in this user guide, especially the safety information below.
Electrical safety
- To prevent overload, don't share the same mains supply socket with too many other items of equipment.
- Do not place any connecting wires where they may be stepped on or tripped over.
- Do not place heavy items on the leads, which may damage them.
- Hold the Mains plug, not the wires, when removing from a socket.
- During a thunderstorm or while leaving the TV for long periods, disconnect the aerial (if outdoor) and mains power from the supply.
- Do not allow water or moisture to enter the TV. Do NOT use in wet or moist areas such as Bathrooms, steamy kitchens or near swimming pools.
- Pull the plug out immediately, and seek professional help if:
- the mains plug or cable is damaged.
- liquid is spilt onto the set, or if it is accidentally exposed to water or moisture.
- anything accidentally penetrates the ventilation slots.
- the set does not work normally.
- Do NOT remove the safety covers. There are no user serviceable parts inside.
You may invalidate the warranty. Qualified personnel only are permitted to service this apparatus. - To avoid battery leakage, remove exhausted batteries from the remote control handset, or when not using for along period.
- Do NOT break open or throw exhausted batteries on a fire.
Physical safety
- Do NOT block ventilation slots in the back cover. You may place the TV in a cabinet, but ensure at least 5cm (2") clearance all around the unit.
- Do NOT tap or shake the TV screen, you may damage the internal circuitry. Take good care of the remote control, do not drop it or allow it to come into contact with liquids.
- To clean the TV use a soft dry cloth. Do NOT use solvents or petrol based fluids. For stubborn stains, you may use a damp soft cloth with diluted detergent.
Accessories

* Note: The configuration of the components may look different from the following illustration
Technical Specification
- TV System
PAL BG/DK/I SECAM BG/DK L/L' - Screen Size
19"/22"/24 "inch(diagonal) - Resolution
1366X768 / 1920x1080 - Aerial input
75 Ω (unbalanced) - Audio output power
2x3W - Power Consumption
12V = 3A 36W
Remote Control
| Type | infrared |
| Control distance | 5m |
| Control angle | 30° (horizontal) |
| Batteries | 2 x 1.5V, size AAA |
Product Introduction

(IR) Infrared Receiver: Receives IR signals from the remote control.
(Power on/Standby) LED indicator: Press ⬆ to turn on and standby.
Indicator on(Red)
Standby mode
Indicator on(Green)
Power on mode
The effective receiving range for the signal is 5-8 metres from the front of the remote control window, and 30^ to the left or right side and 20^ above or below the control window.
INPUT: Display the input source menu.
MENU: Display/exit the OSD menu.
CH+/-: Scan through channels.
VOL+/-: Adjust the volume.
PLAY: Play/pause the disc playing.
EJECT: Eject the disc
Tunisia: Turn on/standby the TV set.

POWER: Connect to the mains adaptor.
VGA: For PC display. Connect it to the D-Sub 15 pins analog output connector of the PC.
PC in: Connect it to the audio output terminal of PC.
SCART: Connect them to the SCART video output terminal of DVD.
DVB-S2: Connect a Satellite signal.
RF: Connect antenna or cable 75 Ohm coaxial to receive TV signal.
Coax: Digital output to AV receiver.
HDMI: Connect it to the HDMI of DVD or other equipment.
USB: Connect to USB device for multimedia and PVR.
Headphone: Connect it to your headphone or other audio equipment.
Common Interface: CI slot.
Mini YPbPr: Connect it to the YPbPr video output terminal of DVD with the Converter cable.
Mini AV: Connect it to the audio & video output terminal of DVD with the Converter cable. (Audio terminals are shared with YPbPr)
The remote control is using Infra-Red(IR). Point it towards the front of the LED TV. The remote control may not work correctly if it is operated out of range or out of angle.

: Turn the TV on/standby.
MUTE: Press to mute the sound, press again or press
VOL+ to unmute.
PICTURE: Select the picture mode.
ASPECT: Change the screen display mode.
SLEEP: Standby timer.
SOUND: Select the sound mode.
FAV: Display the favorite program list.
NUMBER BUTTONS
Press 0-9 to select a TV channel directly when you are watching TV.
Return to the previous channel viewed.
DISPLAY: Press to display the current mode's information.
INPUT: Press to display the input source menu.
MENU: System setup menu.
EXIT: Exit the OSD menu.
CURSOR KEYS (OK/◄/►/)
Allows you to navigate the on-screen menus and adjust the system settings to your preference.
VOL+/-: Adjust the volume.
CH▲/▼: Scan through channels.
EPG: To show the Electronic Program Guide during no-menu state only in DTV mode.
TV/RADIO: Switch to TV/RADIO.
▲: Load/eject DVD disc.
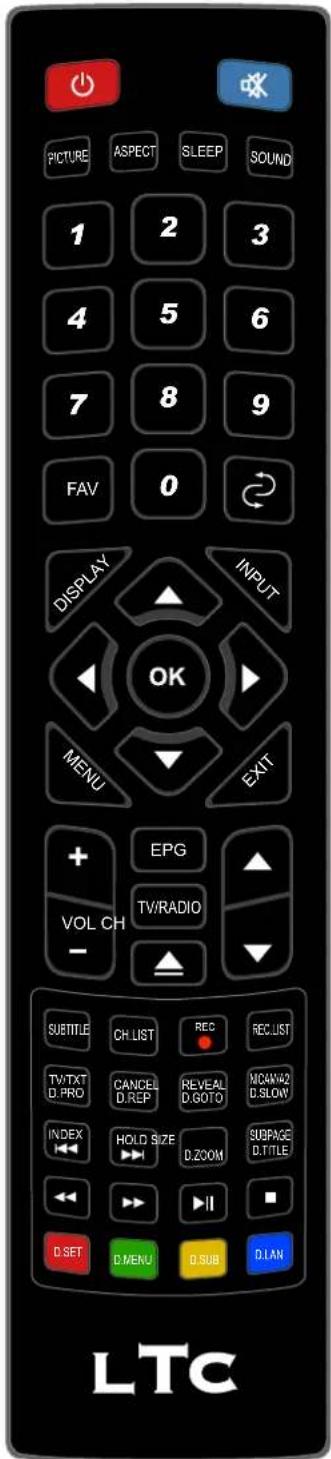
PVR/DVD
REC : Press to start record the program in DTV mode.
▶I: Play/Pause program.
◀: Previous chapter.
▶: Next chapter.
■ : Stop program.
◀: Fast reverse.
▶: Fast forward.
SUBTITLE: Turn on/off the subtitle display in DTV mode.
CH.LIST: Display the channel list.
REC.LIST:Record List.
TV.TXT:Turn off/on the Teletext display.
CANCEL: Cancel the Teletext display.
REVEAL: Reveal any hidden text.
NICAM/A2: TV Nicam/A2 select.
INDEX: Go to index.
HOLD: Hold or carry on the current subpage.
SIZE: Press to see top half of page double size, Press again to see the bottom half of page double size. Press again for normal size.
SUBPAGE: Press to enter subpages, pressagain to cancel.
D.PRO: Edit the program and play.
D.REP: Repeat playing the title or chapter.
D.GOTO:Play your favorite title/chapter/track.
D.SLOW:Play DVD programs at slow speed.
D.ZOOM: Adjust picture size in DVD mode.
D. TITLE: DVD title.
D.SET: DVD system setup.
D.MENU: DVD play list/Disc menu.
D.SUB: Turn on/off the subtitle display in DVD mode.
D.LAN: Select DVD disc language.
Basic Operation
Power on/off
- Connect to the power supply with the adaptor.
- -To turn on the TV
Press button on the TV or remote control.
-To turn off the TV
Press ⏻ button on the TV or remote control.
Input Source select
Press INPUT button on the TV set or remote control to display the input source menu, and use CH+/- button on the TV set or ∧/∨ button on remote control to select the input source, press OK button on the remote control to enter.
Note: Before you select the input source, make sure the connections are prepared.

Basic OSD Menu operation
Press MENU button to display the OSD menu as below:

Use ∧ ∨ button to select the main menu, and press >OK button to enter the submenu. In the submenu, use ∧/∨ button to select the function item, press >/ OK button to enter the setup menu, then press </> button to adjust, or press ∧/∨ to select and press OK / </> button to confirm.
* (Press MENU / <button to return to the upper menu.)
* (Press EXIT button to exit the menu display.)
Note1: Only when you input the suitable signal, the relevant items can be activated Note2: Please operating the OSD menu according to hint on the bottom of the banner.
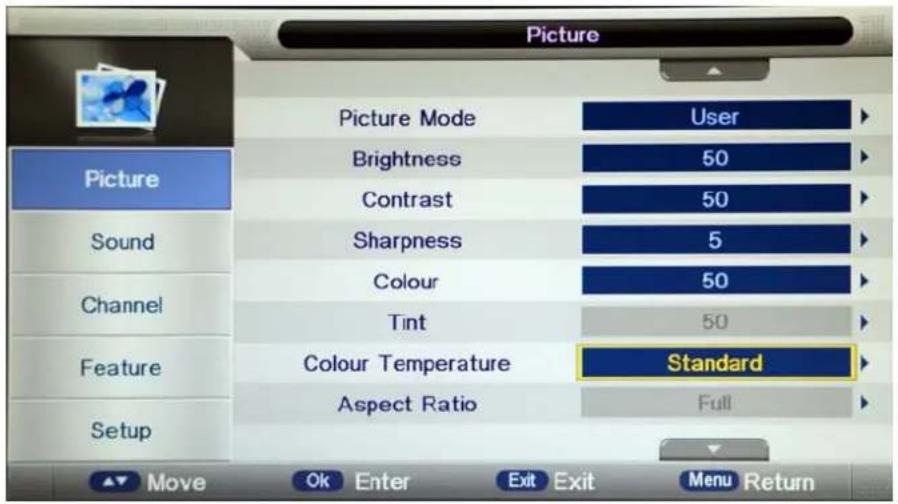
1. Picture menu
Description
Picture Mode: Select your desired picture mode from Dynamic, Standard, Mild and User.
Brightness: Adjust image black level.
Contrast: Adjust image contrast.
Sharpness: Adjust the sharpness(Gray and invalid in VGA/PC mode).
Colour: Adjust image colour from black and white.
Tint: Control the tint (NTSC mode only).
Colour Temp.: Select an optimum color temperature mode to suit your eyes for viewing from Warm, Cool, Standard.
Aspect Ratio: Change the aspect for the screen from 4:3,16:9,Zoom1,Zoom2 or Panorama etc....
Noise Reduction: If the broadcast signal received is weak, you can select the Noise Reduction option to reduce the video noise level between Off, Low, Middle and High.
2. Sound menu

Description
Sound Mode: Select your desired sound mode from Standard, Movie, Music, Speech and User.
Bass: Adjust the level of the lower-pitched sounds.
Treble: Adjust the level of the higherpitched sounds.
Balance: Adjust the audio output between left and right speakers.
Surround: Turn on/off the surround sound function.
Auto Volume Level (AVL): The volumes of all sources will be maintained when the function's on.
SPDIF: Select the spdif mode for the TV from off, PCM and Auto.
Audio Description: Enter the Audio Description menu to turn on / off the function and adjust the volume.
3. Channel menu(In ATV/DTV mode)

Description
Channel Management: Enter the Channel management menu to edit the channels.
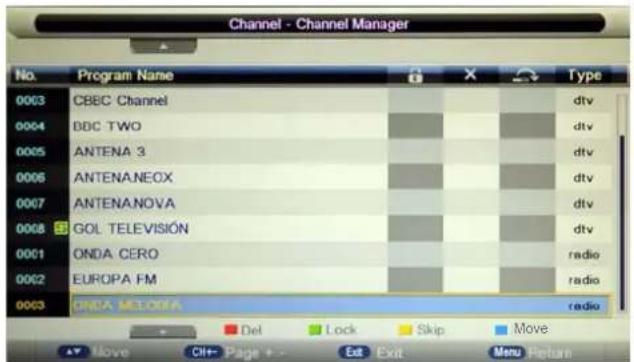
Press REDtoutton to sign the channels you want to delete, it will hint you when you exit.
Lock:User must set the "Lock enable"(Feature-Lock- Lock enable) at ON to active this function. Press GREEN button to sign(lock) or cancel(unlock) the channel. And you have to enter the password to view the program.
Skip: Press YELLOW button to skip the channel or cancel the setting, and the program will not be programmed by CH+/- button.
Swap: Press BLUE button to sign the channel, press ∧/∨ button to move, and press OK button to swap the position.
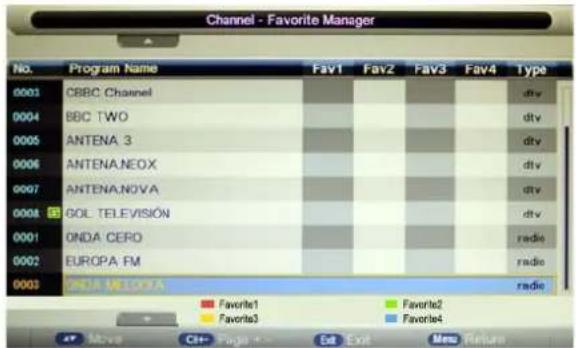
Favorite Management: Add or remove favourite channels by the colour buttons. Up to 4 favourite lists are available, RED-Fav1, GREEN-Fav2, YELLOW-Fav3, BLUE-Fav4.
Country: Select the country.
TV Connection: Select DTV type, you can choose Air(DVB-T), Cable(DVB-C), Satellite(DVB-S2), as you like.
When the Child Lock is on, please enter the Password (Lock Password in Feature menu) to start Auto and Manual Search.
Auto Search: Press OK button to enter the Auto Search menu, select search mode, and press OK button to start auto search.

Note:
-
ALL: Auto search channels for DTV, ATV and Radio. DTV: Auto search channels for DTV and radio. ATV: Auto search channels for ATV.
-
When the TV is auto tunning, you could press MENU button to stop auto tunning and return to preview menu.
DTV Manual Search: Enter the DTV Manual Search menu.
Press ∧/∨ button to select the "Channel" item, and press </ > button to select the channel, then press ∧/∨ button to select the "Start" item, and press </ > button to manual search.

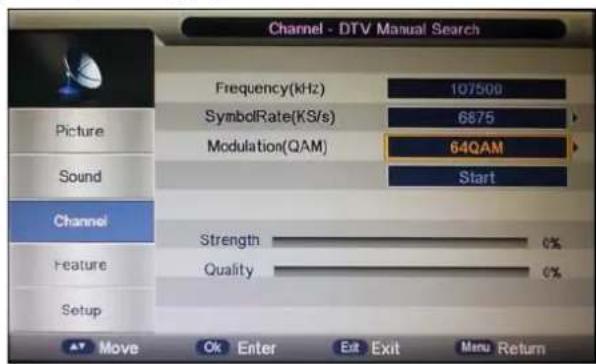
DVB-T DVB-C
ATV Manual Search : Enter the ATV Manual Search menu.

Current Channel: Select the current channel for manual searching.
Search: Press OK button to enter the search menu, and manual search the frequency by < / > button.
Fine Tune: Press OK button to enter the Fine tune menu, and fine tune the frequency by < / > button.
Color/Sound System: Select the Color/Sound system for the program.
Satellite System
Press ∧/∨ button to select the "TV Conection", and set it on "Satellite".

Select "Auto Search" as follow:


Operations in satellite Auto Search menu are shown in the following table
| Option | Value |
| Mode Default, Network Search, Full Search | |
| Satellite | 65 satellite for searching(3 user edit satellite) |
| Service Type All Services, Free Service | |
| Channel Type All, TV Only | |
Satellite System
Press ∧/∨ button to select the "TV Convection", and set it on "Satellite".

Press ∧/∨ button to select the "Satellite System", show as follow:
Operations in Satellite List Menu are shown in the following table:
| Satellite | Transponder | ASTRA 1E,1G3A | ||
| 0002 ASTRA 1H,1KR,L_ | 0001 | 11325 H 22000 | ||
| 0003 ASTRA 2A,2B,2D | 0002 | 11357 H 22000 | LNB Type | 9750/10600 |
| 0004 ASTRA 1E,1G3A | 0003 | 11798 H 27500 | LNB Power | On |
| 0005 NLESAT 101, 10 | 0004 | 11836 H 27500 | 22KHz | Auto |
| 0006 EUTELSAT W3A | 0005 | 11876 H 27500 | Toneburst | None |
| 0007 EUTELSAT W1 | 0006 | 11914 H 27500 | DisEqC1.0 | None |
| 0008 BADR-2.34EURO | 0007 | 11954 H 27500 | DisEqC1.1 | None |
| 0009 EUTELSAT SES_ | 0008 | 11992 H 27500 | ||
| Strength: 0% Edit Quality: 0% Scan | ||||
| noitcAekortSyeK | |
| KEY_UP use cursor to up | |
| KEY_DOWN | use cursor to down |
| KEY_LEFT | switch operation to satellite system parameters setting list |
| KEY_RIGHT | switch operation to Transponder list |
| KEY_MENU Back to Main Menu. | |
| KEY_EXIT | Exit Main Menu. |
| KEY_GREEN Enter satellite edit menu | |
Operations in Transponder List Menu are shown in the following table:

| Key Stroke | Action |
| KEY_UP | use cursor to up |
| KEY_DOWN | use cursor to down |
| KEY_LEFT | switch operation to Satellite list |
| KEY_RIGHT | switch operation to satellite system parameters setting list |
| KEY_ENTER | Select/unselect cursor item Transponder. |
| KEY_MENU | Back to Satellite list. |
| KEY_EXIT | Exit Main Menu. |
| KEY_RED | Enter Transponder Add menu |
| KEY_GREEN | Enter Transponder Edit menu |
| KEY_YELLOW | Enter Transponder Delete confirm menu |
| KEY_BLUE | Enter Transponder scan menu |
Operations in Setting Menu are shown in the following table:
| Satellite System | |||||
| Satellite | Transponder | Setting | |||
| 0001 | HOTBRD 6.7A,B | 0001 | 10723 H 29900 | HOTBRD 6.7A,B | |
| 0002 | ASTRA 1HL10K,L | 0002 | 10750 H 15000 | LNB Type | 9750/10900 |
| 0003 | ASTRA 2A.2B.2D | 0003 | 10775 H 28000 | LNB Power | On |
| 0004 | ASTRA 1E.1G.3A | 0004 | 10830 H 3333 | 22KBr | Auto |
| 0005 | NLESAT 10L.1D | 0005 | 10853 H 27500 | DisEqC1.0 | Burst A |
| 0006 | EUTELSAT WJA | 0006 | 10892 H 27500 | Motor | DisEqC1.3 |
| 0007 | EUTELSAT W1 | 0007 | 10938 H 27500 | ||
| 8008 | BADR-23.4EURO | 0008 | 10971 H 27500 | ||
| ekortSke | noiA | |
| KEY_UP | use cursor to up | |
| KEY_DOWN | use cursor to down | |
| KEY_MENU | Back to Transponder liat. | |
| KEY_EXIT | Exit Main Menu. | |
| Option | Value |
| LNB Type | 9750/10600,9750/10750,05150,05750,09750,10600,10750,11300,11475,User Single,User Dual |
| LNB Power | On,Off |
| 22KHz | Auto,off,on |
| DisEqC Mode | Off,LNB1,LNB2,LNB3,LNB4,Burst A,Burst B |
| Motor | None,DisEqC1.2,DisEqC1.3 |
5V antenna power
Turn on / off the 5V antenna power output.
4. Feature menu
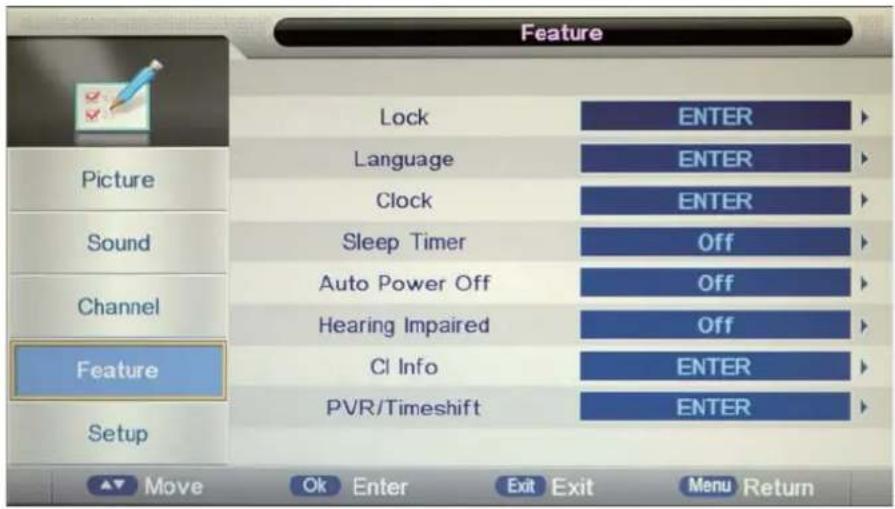
Description
Lock: This menu allows you to lock certain features of the television so that they can not be used or viewed. For example if you don't want certain channels viewed by children or if the television is to be used in a hotel and you want certain channels be locked.
When you enter the system lock menu you will be asked for a password. As default it is 0000.
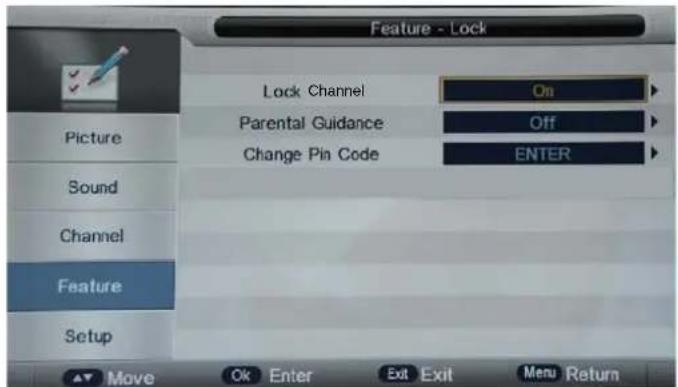
Lock Channel - Turn on/off the Lock functions.
Note: When it is be turned on, the functions of Parental Guidance and Change Pin code below will be locked, and the functions Lock(in Channel Management), Auto Search, DTV Manual Search, ATV manual Search in Channel menu will also be locked.
Parental Guidance - Select the Parental Guidance mode, or turn off the function.
Change Pin Code – Press OK button to enter, first enter the current code, then enter your new code and confirm your new code.
Language: Lets you adjust the different language options available.
Clock: Allows you to set the clock (as default the information is taken automatically from the digital signal).
Sleep Timer: Lets you set the sleep timer so the television automatically switches off after a certain amount of time.
Auto Power Off: The TV will switch off itself automatically if no change in status within the time you select. You can choose 1H, 2H, 4H or off.
Hearing Impaired: You can switch on the hearing impaired feature, this provides additional information and subtitles
CI Info: Pay per view services require a "smartcard" to be inserted into the TV.
If you subscribe to a pay per view service the provider will issue you with a 'CAM' and a "smartcard". The CAM can then be inserted into the COMMON INTERFACE PORT (CI Card In).
PVR/Timeshift: Setup menu for recording, please see the Recording Operation section.
5. Setup menu

Description
OSD Timer: Lets you adjust the amount of time the On Screen Menu stays on the screen before disappearing.
Auto SCART: The TV will be changed to SCART source automatically when you connect the TV to the SCART device.
PC Setup: Change the PC Settings in PC mode.

Auto Adjust: Setup the parameter of the screen automatically.
H/V-Position: Adjust the transverse/vertical position of the screen.
Phase: Adjust the phase of the ADC sampling clock relative to the sync signal, until a stable image is obtained.
Clock: Adjust the pixel clock frequency, until the image size is maximized for the screen.
Blue Screen: Changes the background when there is no input between clear and a blue background (Only available in some sources).
Home Mode: Press to select from the following home modes: Home, Dynamic.
Reset TV Setting - This clears all the TV settings for the television.
Software Upgrade: From time to time we may release new firmware to improve the running of the television (available to download). This menu lets you upgrade that software onto the television. Further details of how to do this will be issued with the firmware. Contact the helpline or refer to the 'product support' section of the website.
Load Default Database: Import the default satellites and channel, so that the user can watch programs directly.
Multimedia Operation
Basic Operation
1). Press the INPUT button on the remote control to display the input source menu, select Media source by the ▲ /▼ buttons, and press OK button to enter the Multimedia menu as shown below.

2). Insert USB device, and select the Media mode form Photo, Music, Movie and eBook, then you will find the name of the device display on the screen as shown below.

Hints for operation
3). Press ∧/∨ button to select the USB device and press OK button to enter the file list as shown below.

Press ∧/∨ buttons to move (press OK button to select the file or unfold the folder);
Press RED button to delete the file; Press GREEN button to sign or cancel all the files to playlist;
Press OK button to sign or cancel the selected file to playlist.
Press < button to previous menu, Press EXIT button to select the file view type list(< ) or thurnbnail( ).
Press Exit again to return to the root MENU.
Then press ▶ button to program the files (be signed) you select or the files in the fold you select.
Press ■ button to stop and exit the full screen program, please notes the hints on the bottom.
Multimedia Operation
1. Photo
Play the photo
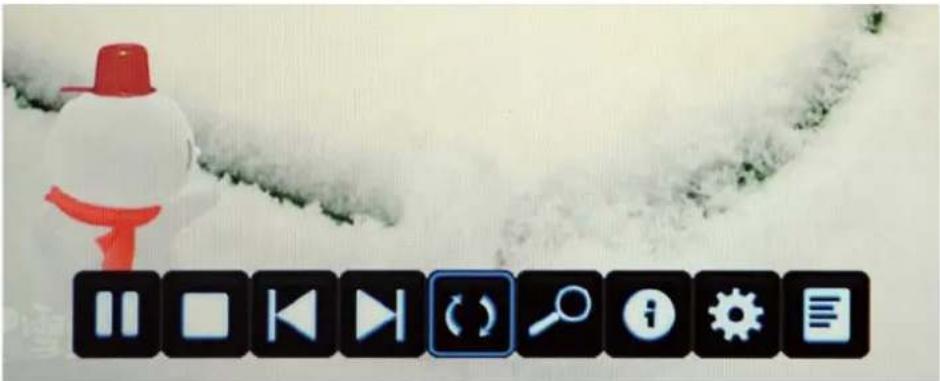
Press ◀/▶ button to select the option on the table, and press OK button to change.
Note: You could press OK button to display the option table when it disappears.
▶/II Play/Pause the photo playing.
■ Stop and exit the full screen program.
|◀▶| Play the previous or next file directly.
( ) Ratate the picture(0, 90, 180, 270).
Zoom in/out the picture, you could move the picture by Cursor left/right/up/down button in Zoom mode.
i Display the information of the current file.
Display the photo setup menu, and select the Repeat mode, Background Music, Slide Time, Effect.
■ Display the playing list.
2. Music
Play the music

Press ◀/▶ button to select the option on the table, and press OK button to change.
▶/II Play/Pause the music playing.
■ Stop and exit the music playing.
◀◀ ▶▶ Play fast backword or forward.
|◀▶ Play the previous or next file directly.
ALL Select the repeat mode for playing music.
Switch the window between "Information" and "Playlist".
Switch off the screen displaying (BLUE button as quick button), and it will be turned on by exepet power button)..
Multimedia Operation
3. Movie
Play the movie

Press ◀/▶ button to select the option on the table, and press OK button to change.
Note: You could press OK button to display the option table when it disappears.
▶/II Play/Pause the movie playing.
■ Stop and exit the full screen program.
◀◀ ▶▶ Play fast backword or forward.
▶ Play the movie in slow mode.
▶ Play the movie in step mode.
Set the A-B repeat playing mode.
|◀▶| Play the previous or next file directly.
■ Display the playing list.
i Display the information of the current file.
Display the movie setup menu, and setup the Program, Subtitle, Audio, Repeat mode.
Goto mode, Input the time and start playing directly.
4. eBook
Play the text
![8.12l have 35 match(es) for robin hobb in listfile: MAJECKI_MAIN . Type @majeckibiglist to obtain the whole list Imajecki Robin Hobb - [The Tawny Man 01] - Fool's Errand (v0.9) [rtf].rar ------------------------- 409.53 KB Imajecki Robin Hobb - [The Tawny Man 01] - Fool's Errand [covers & map].rar ------------------------- 255.8 KB](/content/2026/05/779787/images/357c770f82b550f63dcc6e9de140f8e6d150c30c2b8917725af31112a16d890c.jpg)
◀◀ ▶▶ Turn to previous/next page of the text.
RED button: Add or delete the bookmark.
GREEN button: Goto the appoint page.
YELLOW button: Display the bookmark list.
BLUE button: Display the playlist.
Recording Operation
PVR settings
Press the MENU button select Feature-PVR/Timeshift menu, press OK button to enter the menu as below.

1). Record File Format
Select Record File Format mode from TS and PS for storing in the USB device.
2). Partition Select

USB device informations
Format: Press RED button to format the selected USB device.
Set Default Partition: Press GREEN button to set the focus partition as the default partition. The recorders are stored in the default partition. It need to be reset if the default partition is full in recording progress.
Enter the Timer menu to setup the timer recording settings.
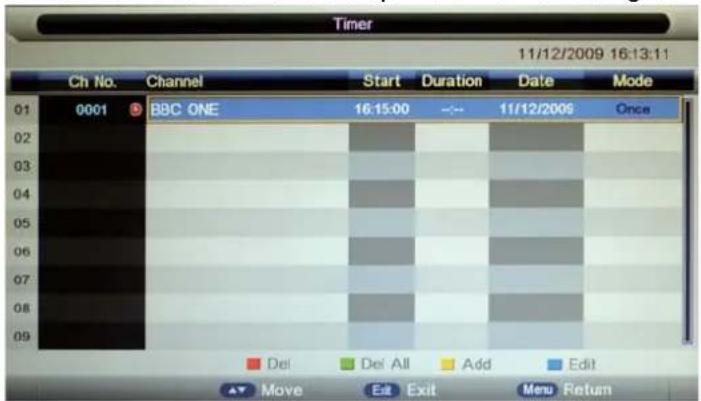
Press yellow button to add.

Recorder: Turn on/off the recorder function.
Type: Select the type of the program you want to recording.
Channel: Select the channel you want to recording.
Start Time: Setup the start time for recording the program.
Duration: Setup the duration time for recording.
Date: Select the date for recording.
Mode: Select the mode for recording.
Recording Operation
5). Record List
Display the Record list menu.

Delete: Press RED button to delete the selected record plan.
6). Recorder Start
Press OK button to start recording, as the function of the REC button on the remote control.
EPG and Timer Record
Press EPG button on the remote control to display the EPG menu.
![EPG Weekly Mode 0002 BBC NEWS 24 20/07/2005 12:09:53 20/07/2005 12:00-20/07/2005 13:00 BBC News News as it breaks, with live reports from Britain and around the world. [SL] Wed 20/07 Wed Thu Fri Sat Sun Mon Tue Wed BBC ONE 12:00-13:00 BBC News BBC NEWS 24 13:00-14:00 BBC News CBBC Channel 14:00-15:00 BBC News BBC TWO 15:00-16:00 BBC News ANTENA 3 16:00-17:00 BBC News ANTENA.NEOX 17:00-17:45 BBC News ANTENA.NOVA 17:45-18:00 Sportsday Daily Prev Day Next Day Move Exit Exit](/content/2026/05/779787/images/642db43e13ff82f6d1d9d2a60094d307fe3f52f0548a2273389cab588cc57d6d.jpg)
EPG mode: Press RED button to change the EPG display mode.
Daily mode: shows the information of the programs to be broadcasted in daily mode.
Weekly mode: shows the information of the programs to be broadcasted in weekly mode.
Reminder: Press GREEN button once to remind the program for watching, and press GREEN button again to remind the program for recording. You could check it in Timer menu, and the TV will record the program according to your settings automatically.
Previous/Next Day: Press YELLOW/BLUE button to display the programs on previous or next day.
Recording Operation
Recording
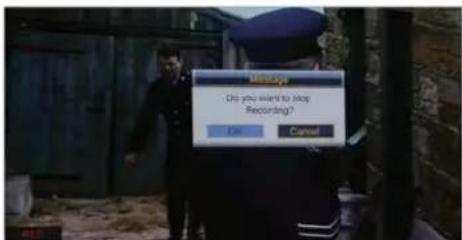
Press REC button on the remote control to start recording in DTV mode. Press ■ a message window appears. Select "OK" item, and press OK to exit recording
Note:
a. Please make sure the USB device is on the TV.
b. Please mke sure the speed and free space of the USB is enough.
c. Press Recording list button to display the Recorder list, and you can play the program you selected.
d. You can also play the Recorded program in Multimedia mode.
Timeshift
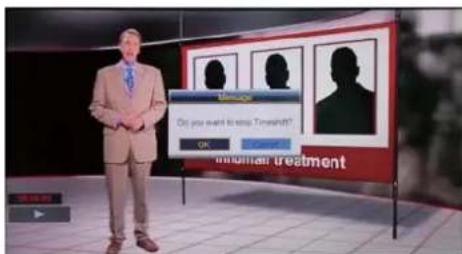
Press button on the remote control to start timeshift in DTV mode.
Press ■ to stop timeshift.
Note:
a. Please make sure the USB device is on the TV.
b. Please make sure the speed and free space of the USB is enough.
c. Press ▶ button to pause the program you are watching, and the timeshift will start.
d. Timeshift time menu on the corner shows the time between the current picture and the living broadcasting picture;
e. During the recoding progress, if the signal is missing, the recording process will take a pause until the signal is stable again.
Basic Operation
Press the ⏻ button on the TV or the remote control, then press the INPUT button to select DVD mode. If there is no disc in the DVD player the screen will show "NO DISC".
Insert Disc according to picture next to disc slot.
Do not touch the playing surface.
Hold the disc around the outside with your fingers and place the disc into the slot. The player will automatically draw the disc into the player.
To "Eject" the disc, press the EJECT button on the TV or the "▲" button on the remote control.
DVD Setup Mode
- Setup Mode provides the menu for the configuration of General Setup Page, Audio Setup Page, Dolby Digital, Setup, Preference Page.
- Item selection in the Setup Menu is done by using the Navigation Arrows, SETUP button and the OK button.
- Press the SETUP button first, enter into SETUP menu, then press the DIRECTION RIGHT button, you can enter into the next Sub-menu.
- Press the SETUP button again to exit the Setup Menu.
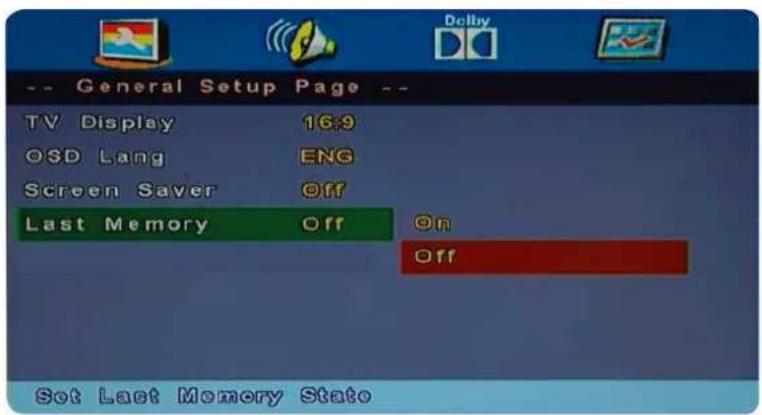
General Setup
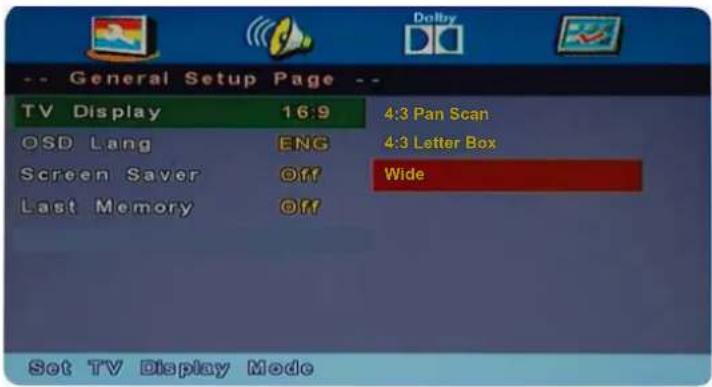
TV Display
• 4:3 Pan Scan
This is selected when the DVD player is connected to a normal TV. Wide-screen images are shown on the screen, but with some parts cut automatically.
• 4:3 Letter Box
This is selected when the player is connected to a normal TV. Wide-screen images are shown on the screen, with black belt on the top and bottom.
- Wide
This is selected when the player is connected to a wide-screen TV.
DVD Operation
OSD Language
This is used to select the OSD language.

Screen Saver
Start the screen saver, the screen saver image will appear when the player stops or the picture is frozen for a few minutes. This saver can keep the screen from being damaged.
- On (Start the screen saver)
- Off (Remove the screen saver).

Last Memory
Can set the items on the last memory, "on" and "off" option.
Select "On", the shutdown will shutdown the machine before the settings for memory, re-boot the machine settings. Set near the same time.
Select "Off", every time the machine automatically switched back to the default settings
- On (Start the memory)
- Off (Remove the memory).
DVD Operation
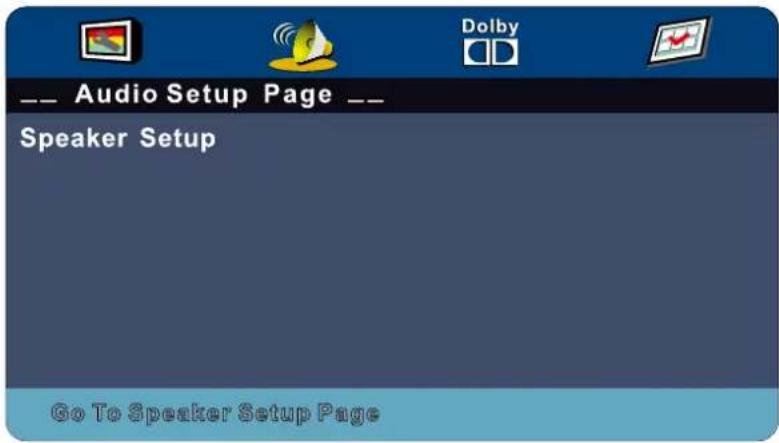
AUDIO Setup
- Speaker Setup
In the "Audio Setup page" press "▼" button to select "Speaker Setup" item, press the "OK ENTER" or "►" button (play) into the "Speaker Setup Page".
DVD Operation
Downmix
• LT/RT
A disc recorded multi channel soundtrack, the output signal will be incorporated to left and right channel.
- Stereo
A disc recorded multi channel soundtrack, The output signal will be incorporated to stereo.

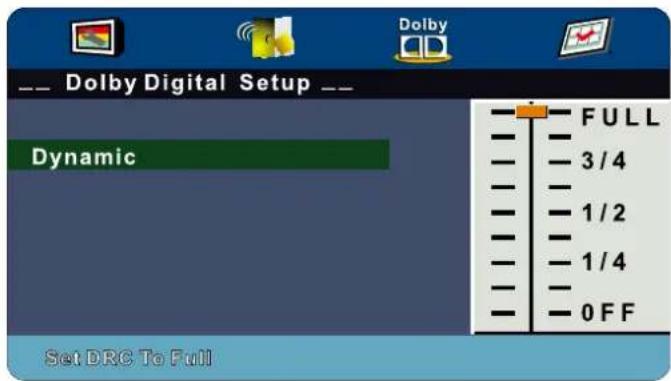
Dolby Digital Setup
Dynamic
This option is used to set the compression ratio in order to control the sound contrast.
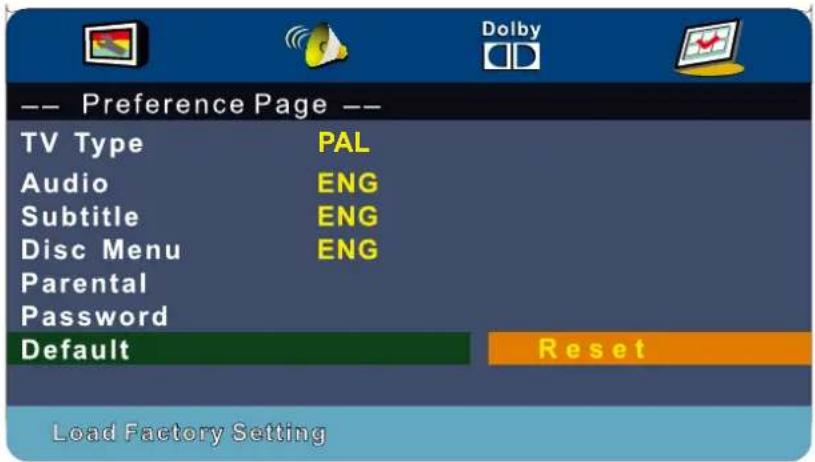
Preference Setup

You must press STOP twice to enter Preference Page or NO disc
TV Type
·PAL
This is selected when the player is connected to an PAL System TV.
• MULTI
The player will set the TV system according to the disc in the tray.
• NTSC
This is selected when the player is connected to a NTSC System TV.
Audio
If a language listed below is recorded on the disc, you can play the sound in such language. If not, the language recorded will be used.
DVD Operation

Subtitle
If a language listed below is recorded on the disc, you set the subtitle to be displayed in such language. If not, the language recorded will be used.

Disc Menu
If a language listed below is record on the disc, you can set the Menu to be displayed in such language. If not, the language recorded will be used.

DVD Operation
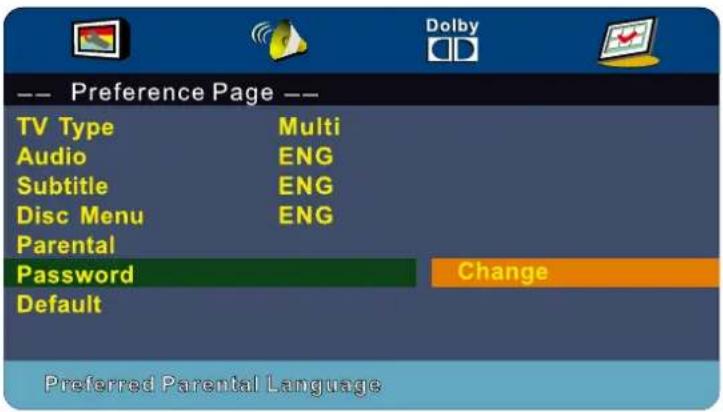
Parental
When playing disc with parental lock function, you may select an Age Control Grade according to grade of disc and your own preference. For example, if PG is selected, DVD Video disc rated higher than the PG grade cannot be played.
User can change the password that is required when the user wants to change the Age Control Grade in the Parental Lock function.
NOTE:(Default password is 123456)
DVD Operation

Default
User can load the original factory setting by choose RESET and press OK button.
Simple Troubleshooting
If the display fails or performance dramatically deteriorates check the Display in accordance with the following instructions. Remember to check the peripherals to pinpiont the source of the failure.
If the display still fails to perform as expected, connect your helpline for assistance.
No power
- Check all connections to the TV.
- Press either the power button or the Standby button on the Remote control.
No picture or sound
- Ensure that the TV is plugged in and the power is on.
- Ensure that the aerial is connected.
- Try a different program.
Poor picture quality
- Check the aerial connections.
- Check that the channel is tuned in properly.
- Adjust the picture settings:brightness,color,sharpness,contrast,hue.
- Make sure that the TV is not located close to electrical appliances that may emit radio frequency interference.
No colour
- Adjust the color setting.
- Check that the programme is broadcast in color.
- Check that the channel is tuned properly.
TV does not respond to remote control
- Check that there are no obstructions between the remote control and the unit.
- Check that the remote control is within range of the unit.
- Check that the batteries in the remote control and not weak or exhausted.
This TV is for household use and registered as harmless on electromagnetic waves.
Therefor,you can use it in every location as well as residential areas.

- Beskrivning
- USB-information
- Notera:
- Nermixning
- • V/H
- Contents
- Correct disposal of this Product
- Electrical safety
- Physical safety
- Accessories
- Technical Specification
- Product Introduction
- PVR/DVD
- Basic Operation
- Power on/off
- Input Source select
- Basic OSD Menu operation
- Picture menu
- Description
- Sound menu
- Channel menu(In ATV/DTV mode)
- Satellite System
- 5V antenna power
- Feature menu
- Setup menu
- Multimedia Operation
- Photo
- Music
- Movie
- eBook
- Recording Operation
- PVR settings
- 5). Record List
- 6). Recorder Start
- EPG and Timer Record
- Recording
- Note:
- Timeshift
- DVD Setup Mode
- General Setup
- TV Display
- DVD Operation
- OSD Language
- Screen Saver
- Last Memory
- AUDIO Setup
- - Speaker Setup
- Downmix
- Dolby Digital Setup
- Dynamic
- Preference Setup
- TV Type
- Audio
- Subtitle
- Disc Menu
- Parental
- Default
- Simple Troubleshooting
- No power
- No picture or sound
- Poor picture quality
- No colour
- TV does not respond to remote control
Brand : LTC
Model : LED-2408
Category : Television