
TLKR T81 Hunter - Radio MOTOROLA - Free user manual and instructions
Find the device manual for free TLKR T81 Hunter MOTOROLA in PDF.
| Product type | Bi-directional PMR (Private Mobile Radio) |
| Brand and model | Motorola TLKR T81 Hunter |
| Dimensions (approx.) | 160 x 55 x 30 mm |
| Weight (approx.) | 120 g (without batteries) |
| Power supply | Rechargeable NiMH battery (included) or 4 AAA alkaline batteries |
| Battery life | Up to 16 hours in normal conditions |
| Number of channels | 8 PMR channels (446.00625 - 446.09375 MHz) |
| Sub-codes | 121 (38 CTCSS codes and 83 DCS codes) |
| Maximum range | Up to 10 km (varies depending on environment) |
| Main features | VOX, LED lamp, 10 call tones, backlit LCD screen, channel scanning, dual watch, keypad lock, auto power off, energy saving, ambient monitoring, silent mode, timer |
| IP protection rating | IPX4 (splash resistant) |
| Included accessories | 2 radios, 2 belt clips, charging station, mains adapter, 2 battery holders, 2 NiMH batteries, 1 headset, 1 strap, user guide |
| Maintenance and cleaning | Charge batteries every 3 months; store between -20°C and 35°C in a dry place; use a soft, dry cloth for cleaning |
| Safety | Read the safety and RF exposure guide before use; do not expose to excessive moisture; use only approved accessories |
| Spare parts and repairability | NiMH batteries (ref. IXNN4002), headsets (NNTN8870_R, NNTN8868_R, IXTN4011), adapters (IXPN4016, IXPN4017) available; repair by authorized dealer |
| Warranty | Limited warranty by the dealer; not covered: damage due to misuse, modification, drop or exposure to liquids |
| General information | Complies with European standards; copyright Motorola Solutions; manufactured under license |
Frequently Asked Questions - TLKR T81 Hunter MOTOROLA
User questions about TLKR T81 Hunter MOTOROLA
0 question about this device. Answer the ones you know or ask your own.
Ask a new question about this device
Download the instructions for your Radio in PDF format for free! Find your manual TLKR T81 Hunter - MOTOROLA and take your electronic device back in hand. On this page are published all the documents necessary for the use of your device. TLKR T81 Hunter by MOTOROLA.
USER MANUAL TLKR T81 Hunter MOTOROLA
RF ENERGY EXPOSURE AND PRODUCT SAFETY GUIDE FOR PORTABLE TWOWAY RADIOS
ATTENTION!
Before using this product, read the RF Energy Exposure and Product Safety Guide that ships with the radio which contains instructions for safe usage and RF energy awareness and control for compliance with applicable standards and regulation.
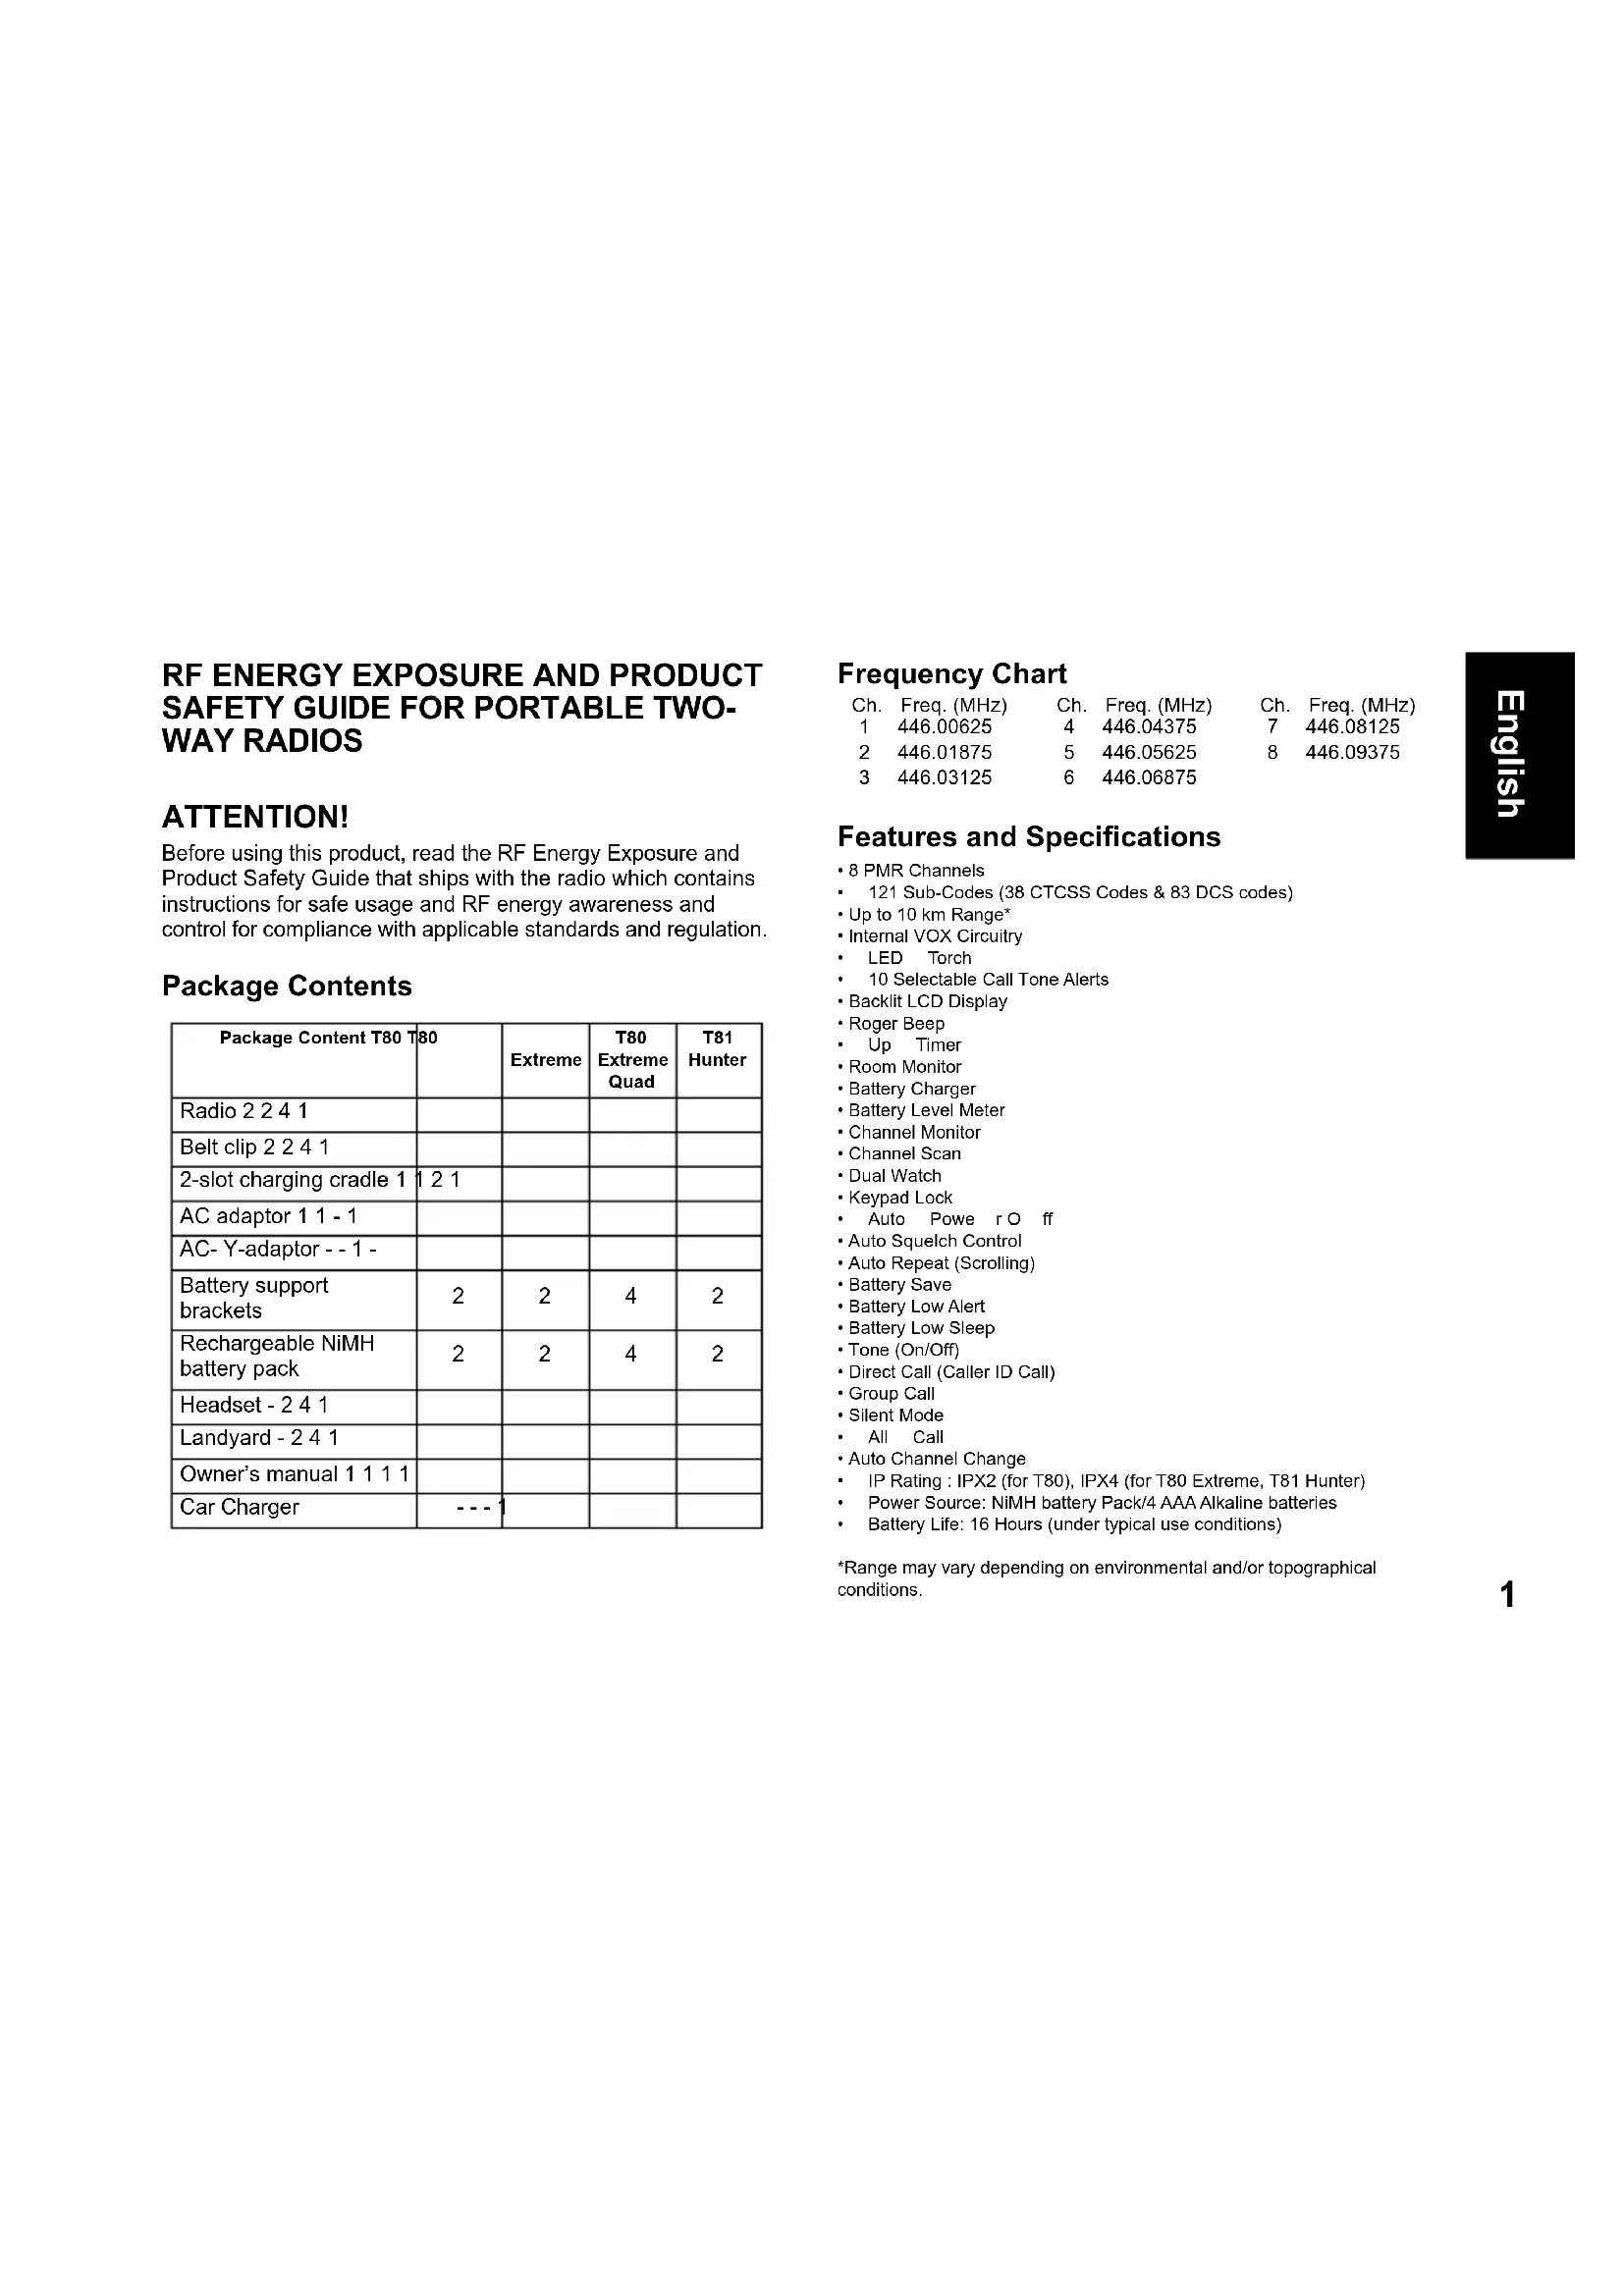
Package Contents
| Package Content T80 T80 | Extreme | T80 Extreme Quad | T81 Hunter | |
| Radio 2 2 4 1 | ||||
| Belt clip 2 2 4 1 | ||||
| 2-slot charging cradle 1 | 1 2 1 | |||
| AC adaptor 1 1 - 1 | ||||
| AC- Y-adaptor - - 1 - | ||||
| Battery support brackets | 2 | 2 | 4 | 2 |
| Rechargeable NiMH battery pack | 2 | 2 | 4 | 2 |
| Headset - 2 4 1 | ||||
| Landyard - 2 4 1 | ||||
| Owner's manual 1 1 1 1 | ||||
| Car Charger | --- 1 | |||
Frequency Chart
Ch. Freq. (MHz) Ch. Freq. (MHz) Ch. Freq. (MHz)
1 446.00625 4 446.04375 7 446.08125
2 446.01875 5 446.05625 8 446.09375
3 446.03125 6 446.06875
Features and Specifications
8 PMR Channels
121 Sub-Codes (38 CTCSS Codes & 83 DCS codes)
- Up to 10 km Range*
- Internal VOX Circuitry
LED Torch
10 Selectable Call Tone Alerts
- Backlit LCD Display
- Roger Beep
Up Timer
- Room Monitor
- Battery Charger
Battery Level Meter
- Channel Monitor
- Channel Scan
- Dual Watch
- Keypad Lock
Auto Powe r O ff
- Auto Squelch Control
- Auto Repeat (Scrolling)
Battery Save
- Battery Low Alert
Battery Low Sleep
- Tone (On/Off)
- Direct Call (Caller ID Call)
- Group Call
- Silent Mode
All Call
- Auto Channel Change
IP Rating: IPX2 (for T80), IPX4 (for T80 Extreme, T81 Hunter)
Power Source: NiMH battery Pack/4 AAA Alkaline batteries
Battery Life: 16 Hours (under typical use conditions)
*Range may vary depending on environmental and/or topographical conditions.

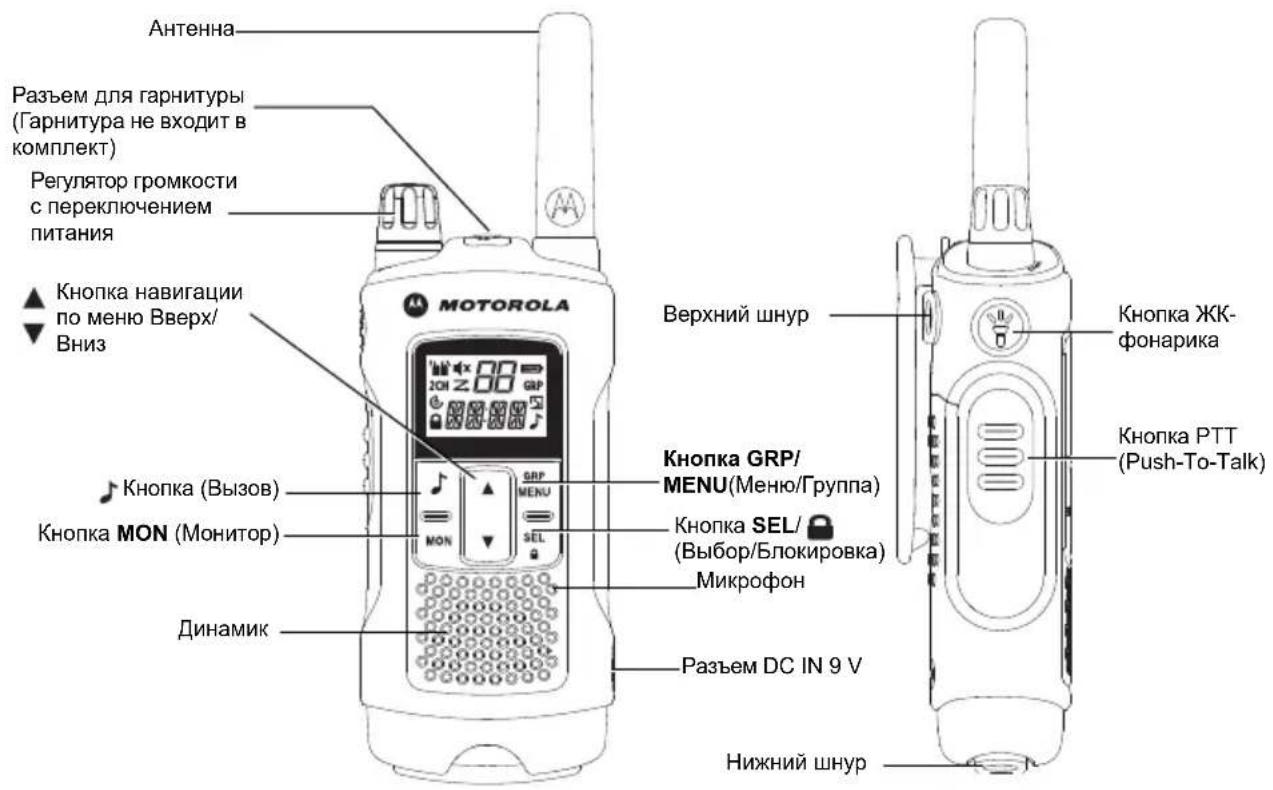
Control and Functions
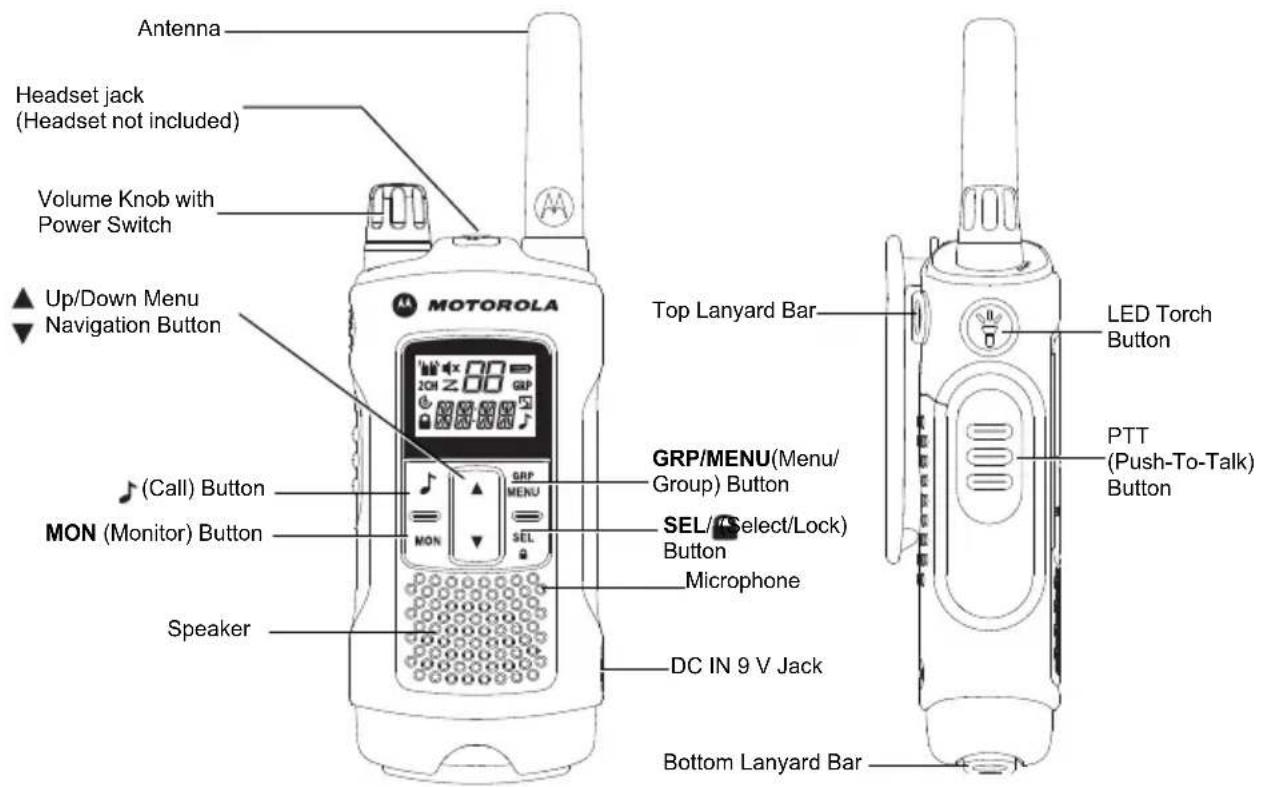
Note: Radio depicted is T80 Extreme. Also applicable for T80, T81 Hunter radios.

Display Installing the Battery
- Make sure your radio is turned OFF.
- For T80: To remove the battery compartment door, press the tab at the bottom of the compartment door.
For T80 Extreme and T81 Hunter : To remove the battery compartment door, use a coin to wedge the battery door open.
- Install the NiMH batteries into the battery compartment.
- Replace the battery compartment door.
Caution: Risk of explosion if battery is replaced by an incorrect type. Dispose used batteries according to the instructions.
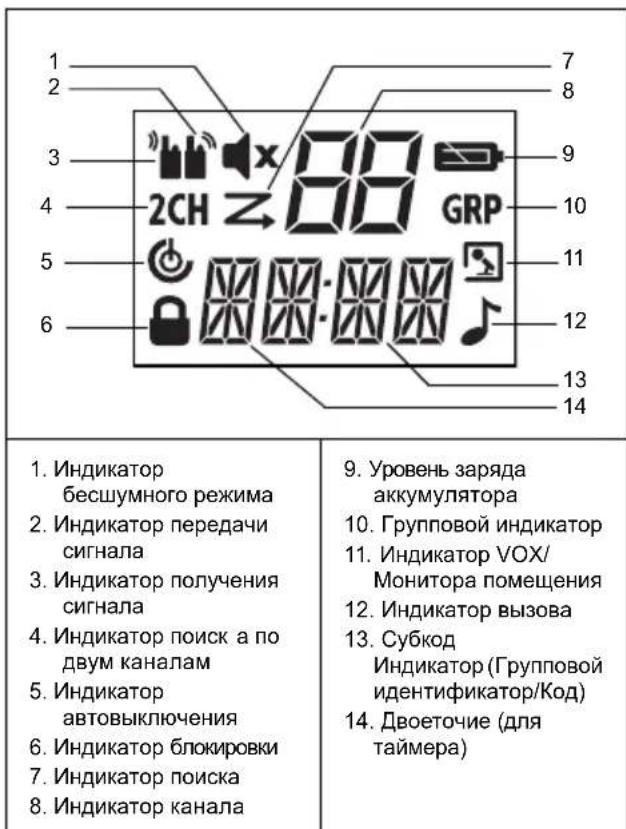
Battery Level and Low Battery Alert
| Indicates that the battery is fully charged. | |
| Blinks when battery is low; charge the radio or replace batteries immediately. (The alert tone sounds every 5 seconds for 30 seconds when the battery is low.) |
Battery Capacity Maintenance
- Charge the batteries at least once every 3 months when not in use.
- Remove the battery from the radio after using for storage purpose.
- Store the batteries in temperatures between -20^ to 35^ and in low humidity. Avoid damp conditions and corrosive materials.
Charging the Radio
Direct Charging :
-
Make sure your radio is turned OFF.
-
Connect the AC adapter to the radio's DC IN 9 V. Connect the other end of the AC adapter to a vehicle accessory power outlet.
-
Charge the battery pack for 14 hours.
Using the Charging Cradle:
- Make sure your radio is turned OFF.
- Connect the AC adapter to the DC IN 9 V of the charging cradle.
- Place the charging cradle on a stable surface.
- Place the radio in the charging cradle with the keypad facing forward.
- LED indicator will illuminate and remain illuminated as long as the radio is in the charger.
Note: Charge the battery pack for 14 hours.
Using the Battery Support Bracket :
- Remove the rechargeable NiMH battery pack from the radio.
- Place the battery support bracket into the charging cradle.
- Install the NiMH battery pack into the charging cradle. Ensure that the charging contacts are correctly aligned.
- LED indicator will illuminate and remain illuminated as long as the radio is in the charger.
Note: Charge the battery pack for 14 hours.
Basic Radio Operations
Read this reference guide completely before attempting to operate the unit.
Turning your Radio On/Off
To turn your radio ON, turn the rotary knob clockwise.
To turn your radio OFF, turn the rotary knob counterclockwise.
Adjusting the Volume
Increase volume by turning the rotary knob clockwise. To decrease volume, turn the rotary knob counterclockwise.
Adjusting the Sound (Key Beeps)
Your radio emits a beep each time one of the buttons is pressed (except the PTT and button).
Press and hold the button while turning the radio ON to switch the sound ON/OFF.
Navigating through the Menu
Your radios has two Menu functions: Select Menu and Common Menu.
- To enter the Select Menu, press the SEL/ button.
- To enter the Common Menu, press the MENU/GRP button.
- Additional presses of the SEL/ button or MENU/GRP button will advance you through the Menu.
- To exit the Menu function, do one of the following:
a. Press the MENU/GRP button,
b. Press the PTT button
c. Wait 10 seconds until the unit automatically returns to "Normal" mode.
Talking on Your Radio
- Hold your radio 5-8 cm from your mouth.
- Press and hold the PTT button while speaking. The icon appears on the display.
- Release the PTT button. You can now receive incoming calls. When you do, the icon appears on the display. To respond, repeat procedure from step 1.
Note: When you continue to transmit for 60 seconds, the radio emits TX Time Out tone and the icon flashes. The radio will stop transmitting.
In order to speak to someone, both your radios must be set to the same channel and Sub-Code. Refer to "Selecting a Channel and a Sub-Code".
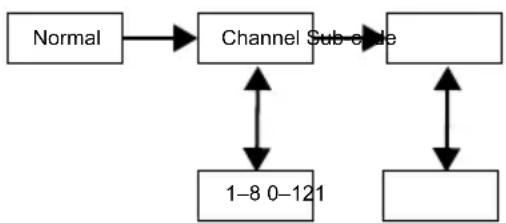
Selecting a Channel and a Sub-Code
To select a Channel:
- Press SEL/ button to enter Select Menu. Advance until the Channel indicator blinks.
- Press to the required channel.
To select a Sub-code :
- Press SEL/ button to enter Select Menu. Advance until the Sub-code indicator blinks.
- Press to the required Sub-code.
- Press Exit to exit the Select Menu.
Select Menu
Your radio navigates through the Select Menu as follows:
Voice Operated Transmission (VOX)
Transmission is initiated by speaking into the microphone of the radio instead of the pushing the PTT button.
To select the VOX level:
- MENU/GRP button to enter Common Menu. Advance and select "VOX".
- Press SEL/ select.
- Press to the desired VOX sensitivity level.
- Press Exit to exit the Select Menu.
Note: Level "N" (OFF) disables VOX. Levels 1-5 set the sensitivity of the VOX circuit. Use level 1 in quiet environments, and use level 5 in very noisy environments. You can find the appropriate sensitivity level by speaking into the microphone. If the radio flashes, your voice is accepted.
Transmitting a Call Tone
Your radio is equipped with 10 selectable call tones.
To select a call tone:
- Press MENU/GRP button to enter Common Menu. Advance to "TONE".
- Press SEL/ n select.
- Press to the desired call tone.
- Press Exit to exit the Common Menu.
To transmit the selected call tone :
- Press to transmit the selected call tone. The selected tone will automatically be transmitted for a fixed length of time.
- PTT to cancel Call Tone.
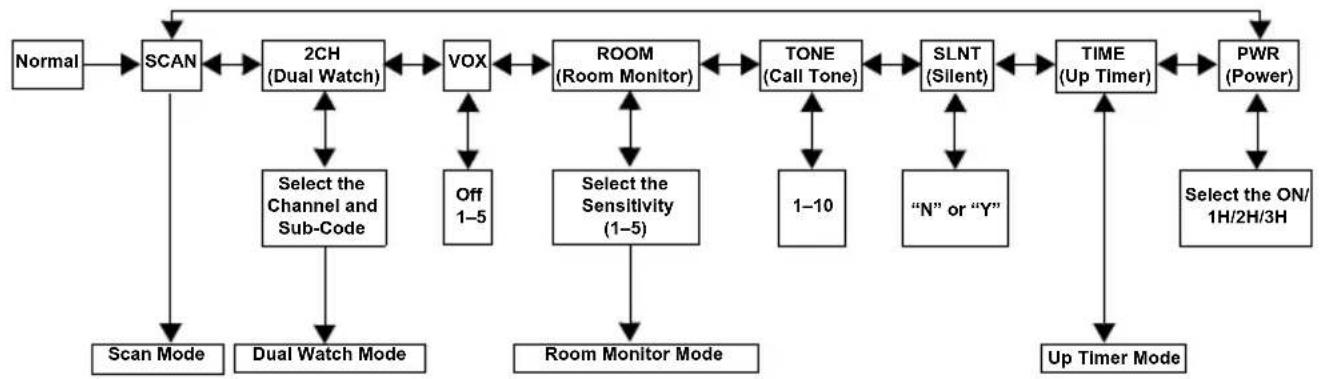
Auto Power Off
Auto Power Off feature allows you to set the time that the radio turns off automatically.
- Press MENU/GRP button to enter Common Menu. Advance until "PWR" and the current Auto Power Off time blinks.
- Press SEL/ n select.
- Press Ar to select the time from ON, 1H, 2H, and 3H.
- Press Exit to exit the Menu.

Common Menu
Your radio navigates through Common Menu as follows:
Group Menu
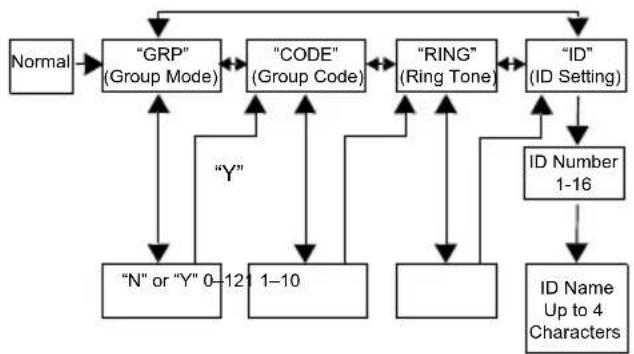
- Press and hold MENU/GRP to enter GROUP MENU.
- Press to proceed to each menu (GRP/CODE/RING/ ID).
- Press SEL/ select.
- Press to proceed to desired condition or number.
- Press SEL/ select.
- Press MENU/GRP to exit.
Set Group Mode
- Press and hold MENU/GRP to enter GROUP MENU.
- Press SEL/ control Group Mode.
- Press to Y". Press SEL/ to to Group Menu and Group Code Setting.
- Press to N". Press SEL/ to it from Group Menu.
Set Group Code
- Press to choose the Group Code.
- Press SEL/ complete Group Code setting.
- The radio enters "Ring Tone Setting Menu"
- Press MENU/GRP to go back to Group Menu.
Set Ring Tone
The user selects Ring Tone for a Direct Call. Ring Tones are the same as Call Tones.
- Press Ar to select a Ring Tone.
- The selected Ring Tone sounds.
Set ID
Each radio in the group needs to be set with an ID. The user can set an ID name of up to four (4) characters.
- Press to select an ID number.
- If the ID is already taken, USED is seen. If USED is not shown, then the ID is available.
- Press SEL/ advance to setting ID Name.
Set ID Name
The ID Name appears on the other radio's display when you make an All Call or a Direct Call. The ID Name also appears on the other radio's display when they are placing a Direct Call. When no ID name is set, the unit number appears.
- Press to select a character that blinks on the display.
- Press SEL/ select and move to the next character.
- Press SEL/ register the ID number and ID Name.
Note: The radio cancels selected ID Number and entered ID Name, then exits from Group Menu when MENU/GRP button is pressed.
Channel Setting in Group Mode
To set Auto Channel Change in Group Mode:
1. Press MENU/GRP to enter Group Mode.
2. Press SEL/ enter Channel Setting.
3. Press Auto Channel Change Setting".
4. Press SEL/ select.
A channel number blinks and "ALL" is seen.
- Press to select the channel.
- Press SEL/ or to transmit Auto Channel Change command.
- Press MENU/GRP to return to Channel Setting in Group Mode.
To set Manual Channel in Group Mode:
1. Press MENU/GRP to enter Group Mode.
2. Press SEL/ enter Channel Setting.
3. Press Ar to Manual Channel Setting".
4. Press SEL/ select. A channel number blinks and "MY" is seen.
5. Press Ar to select the channel manually.
6. Press SEL/ exit from Manual Channel setting.
7. Press MENU/GRP to return to Channel Setting in Group Mode.
Set All Call
- Press MENU/GRP to enter Group Mode.
- Press to enter All/ Direct Call Setting.
- Press to select All Call Transmission. "SYNC" is seen.
- Press SEL/ or to exit this setting and transmit All Call. All Call Tone sounds, and binks while transmitting.

- MENU/GRP to exit.
Set Direct Call

- Press MENU/GRP to enter Group Mode.
- Press to enter All/Direct Call Setting.
- Press Ar to select an ID Number.
- Press or SEL to transmit Direct Call Command. The selected Call Tone sounds. The display shows TX icon and CALL icon while transmitting.
- Press MENU/GRP to go back to All/Direct Call setting.
Features on Your Radio
Channel Scan Mode
Enables your radio to scan for active channels. When activity is detected, your radio lands (stays) on that channel for 2 seconds (5 seconds for VOX ON without headset). To transmit on that channel, press the PTT button. When activity on the landed channel ends, your radio continues scanning to other channels.
To turn the channel scan ON:
- Press MENU/GRP to enter Common Menu. Advance to "SCAN".
- Press SEL/ turn ON channel scan.
- Press MENU/GRP or PTT to turn OFF Scan mode.
Dual Watch Mode
Enables your radio to scan the current channel and another channel alternately.
To set another channel and start Dual Watch:
- Press MENU/GRP to enter Common Menu. Advance to "2CH".
- Press Ar to select the channel, then press SEL/
- Press or to select the Sub-code, then press SEL/
- The radio starts to Dual Watch.
Note: If you set the same channel and Sub-code as the current channel, Dual Watch doesn't work.
5. Press MENU/GRP to turn the Dual Watch mode OFF.
Room Monitor
Enables your radio to detect voice/noises (according to the sensitivity level set) and transmit back to the listening radio without pushing the PTT button. The monitoring radio is not able to receive any transmissions in this mode.
To turn Room Monitor ON:
- Press MENU/GRP to enter Common Menu. Advance to "ROOM".
- Press SEL/ to select.
- Press to the desired room monitor sensitivity level.
Note: Use level 1 in quiet environments. Use level 5 in very noisy environments.
- Press SEL/ turn ON room monitor.
Press MENU/GRP to turn OFF Room Monitor.
Note: When the voice/noise in the monitored room continues for more than 60 seconds, the monitoring radio stop monitoring for 5 seconds, and resumes.
Silent Mode
Silent mode mutes all incoming calls. The backlight of the radio blinks when there's an incoming call. If the call is not answered, the backlight turns off and the blinks until there is no signal. The T80/T80 Extreme radio will vibrate when there is a missed call.
The silent mode is disabled for 15 seconds when you transmit, receive, or press any other buttons.
To turn silent mode ON:
1. Press MENU/GRP to enter Common Menu
2. Select "SLNT".
3. Press SEL/ select.
4. Press turn Silent Mode ON. "Y" is displayed on the Channel Indicator. Appears.
5. Press to turn Silent Mode OFF. "N" is displayed on the Channel Indicator. disappears.
Up Timer
Enables your radio to time up to 59 minutes 59 seconds. You then received incoming calls in this mode.
To use up timer:
- Press MENU/GRP to enter Common Menu. Advance to "TIME".
- Press SEL/ select the Up Timer.
- Press SEL/ n start the Up Timer.
- Press SEL/ pause the Timer.
Press SEL/ Go ON/OFF the Timer.
- Press MENU/GRP or PTT to stop or reset up timer.
Note: If a call is received, the ID Name is indicated and then the radio returns to timer mode and the Call Icon blinks.
Key Lock
Press and hold SEL/ until "OCK" appears to lock the keypad.
Press and hold SEL/ until "NLK" disappears to unlock the keypad.
LCD Backlight
The LCD display will automatically illuminate for 10 seconds after any button is pressed (except for PTT).
Monitor Mode
Enables your radio to listen for weak signals on the current channel.
To turn the Monitor Mode ON:
- Press the MON button for brief listening. The icon blinks.
- Press and hold the MON button for 2 seconds for continuous listening. The icon continues to blink.
To turn the Monitor Mode OFF:
Press the MON, MENU/GRP, or SEL button to return to "Normal" mode. The icon stops blinking.
Roger Beep
Sounds to indicate the end of a PTT or VOX transmission. It can be heard through the speaker when Key Beep is on. It cannot be heard through the speaker if Key Beep is turned off.
Press and hold the button while turning the radio ON to turn the Roger Beep ON. Repeat the step to turn Roger Beep OFF.
LED Torch
Your radio has a built-in LED Torch. The LED Torch indicator remains on until the button is released.
Approved Accessories
| NNTN8870_R Consumer Earbud |
| NNTN8868_R Consumer Headset |
| IXTN4011_XTR Headset |

Approved Accessories
| IXPN4016_UK Adapter | |
| IXPN4017_EU Adapter | |
| IXNN4002_NiMH | Battery |
Warranty Information
The authorized Motorola Solutions dealer or retailer where you purchased your Motorola Solutions two-way radio and/or original accessories will honour a warranty claim and/or provide warranty service.
Please return your radio to your dealer or retailer to claim your warranty service. Do not return your radio to Motorola Solutions.
In order to be eligible to receive warranty service, you must present your receipt of purchase or a comparable substitute proof of purchase bearing the date of purchase. The two-way radio should also clearly display the serial number. The warranty will not apply if the type or serial numbers on the product have been altered, deleted, removed, or made illegible.
What Is Not Covered By The Warranty
- Defects or damage resulting from use of the Product in other than its normal and customary manner or by not following the instructions in this user manual.
Defects or damage from misuse, accident or neglect. - Defects of damage from improper testing, operation, maintenance, adjustment, or any alteration or modification of any kind.
-
Breakage or damage to aerials unless caused directly by defects in material or workmanship.
-
Products disassembled or repaired in such a manner as to adversely affect performance or prevent adequate inspection and testing to verify any warranty claim.
Defects or damage due to range. - Defects or damage due to moisture, liquid or spills.
- All plastic surfaces and all other externally exposed parts that are scratched or damaged due to normal use.
- Products rented on a temporary basis.
Periodic maintenance and repair or replacement of parts due to normal usage, wear and tear.
Copyright Information
The Motorola Solutions products described in this manual may include copyrighted Motorola Solutions programs, stored semiconductor memories or other media. Laws in the United States and other countries preserve for Motorola Solutions, certain exclusive rights for copyrighted computer programs, including the exclusive right to copy or reproduce in any form, the copyrighted Motorola Solutions programs.
Accordingly, any copyrighted Motorola Solutions computer programs contained in the Motorola Solutions products described in this manual may not be copied or reproduced in any manner without express written permission of Motorola Solutions. Furthermore, the purchase of Motorola Solutions products shall not be deemed to grant either directly or by implication, estoppel, or otherwise, any license under the copyrights, patents or patent applications of Motorola Solutions, except for the normal non-exclusive royalty free license to use that arises by operation of law in the sale of a products.
MOTOROLA, MOTO, MOTOROLA SOLUTIONS and the Stylized M logo are trademarks or registered trademarks of Motorola Trademark Holdings, LLC and are used under license. All other trademarks are the property of their respective owners. © 2012 and 2016 Motorola Solutions, Inc. All rights reserved.
HANDBUCH ZUR HF-ENERGIESTRAHLUNG UND PRODUKTSICHERHEIT FÜR TRAGBARE FUNKGERÄTE
ACHTUNG!
| Kan. | Freq. (MHz) | Kan. | Freq. (MHz) | Kan. | Freq. (MHz) |
| 1 | 446.00625 | 4 | 446.04375 | 7 | 446.08125 |
| 2 | 446.01875 | 5 | 446.05625 | 8 | 446.09375 |
| 3 | 446.03125 | 6 | 446.06875 |
Can. Freq. (MHz) Can. Freq. (MHz) Can. Freq. (MHz)
1 446,00625 4 446,04375 7 446,08125
2 446,01875 5 446,05625 8 446,09375
3 446,031256446,06875
Funzioni specifiche
1 446.006254 446.043757 446.08125
2 446.018755 446.056258 446.09375
3 446.031256 446.06875
\section*{Caracteristicas y specifications}
8 can ales PMR
Kan. freq. (MHz) Kan. freq. (MHz) Kan. freq. (MHz)
1 446.006254 446.043757 446.08125
2 446.018755 446.056258 446.09375
3 446.031256 446.06875
VOX (Voice Operated Transmission)
Transmission initieres ved at tale ind i radioens mikrofon i stedet for at trykke pa knappen PTT.
Sadan vaelger du VOX-niveau:
- MENU/GRP for at abne tilstanden Group.
- for at abne indstillingen All/Direct Call.
- aller forat vaelge All Call Transmission. Meddelelsen "SYNC" vises.

- MENU/GRP for at abne menuen Common. Fortsaet til "SCAN".
- SEL/ for at AKTIVERE kanalscanning.
- MENU/GRP erer PTT for at DEAKTIVERE scanningstildstanden.
Dobbeltoversgningstilstand
Lader dig scanne den aktuelle kanal og en,anden kanal skiftevis.
- SEL/ at AKTIVERE rumovergåning.
MENU/GRP for at DEAKTIVERE rumovergåning.
- at DEAKTIVERE lydls tilstand. "N" vises pa
kanalindikatoren. forsvinder.
Optimizer
Batarya Kapasite Bakimi
- PpmaoB Bb3OB (NO INeHTnФkaTopy Bb3Oba)
-урноьВы3OB
-6e33ByuHbipekkM
- 062mBb3OB
-AbTopeKeHNoeHHe KaHaNoB
- KnaCC IP-3aunTbI: IPX2 (T80), IPX4 (T8 T80 Extreme, T81 Hunter)
IcTouHnK NHTAHN: KOMPNeKT HIKKeJIb-MeTaJI-NrDpUHbIX aKKMyJrTopa/4 7eIoUHbix AAA-6aTapei
BpeMpa6oTbOaKMyyTATopa:16acOB(BcTaHapTHbIXycNoBmX NCNOJIb30BaHnIe
*MAnahanOHMOKETN3MEHHTCB 3BABNCIMOCTN OT OKpyKaIOUHX N/NII TONOPaFHNCKEX YCJOBNI

YnpaBHeHne nФункци
PpimueaHHe:Ha n3o6paKeHn npedctabHeHa moeIb T80 Extreme. TaIOke npimehmo dna MoedeN T80, T81 Hunter
Dncnne YcTaHObKa aKKMyJrTopa
- 16eHntecb, yTo paHnOmoynb BblKlIOUeH.
2.ДЯМоДелТ80:ЧTo6БI OTKpbIb KpbIshKу OTceKa aKKMyJITOpa,HaJaABITE Ha HIXHIOU Yactb KpbIshKу OTceKa.ДЯМоДелT80 Extreme n T81 Hunter:чTo6bI OTKpbIb KpbIshKу OTceKa aKKMyJITOpa,ПОДeHbTe ee C NOMOuBHO MOHeTbl. - Bctabte HnkeJIb-MeTaII-riIpyIhBie aKKymyIaTOpbI BOTCEK aKKymyIaTOPa.
- YcTaHOBnTe KpbIuKy OToCeKa AkkymyTOpa Ha MeCTo.
BHHMaHHe! Pn yctaHOBe aKMyJITopa HecOoTBcTCTByIOeTO TnNa BO3HnKaeT pCK B3pIbA. YtINn3NpyTe NcNOJIb3OBaHHbI aKKMyJITOp B COOTBetCTBn C INHCTpyKJNAIMN.
YpoBeH 3apJaN yBeOMnEHN O Hn3KOM 3apJe aKKymJrTopa
YcTaHOBKa Koda rpynnbI
- Haxmte A nn DnBb6opa Koda rpynnbl.
- HaxmTe SEL/ДдяЗавшенин HabtpoKи Кда рупь.
- PaIINOMOyIb IepExoIIT K MeHIO yCTaHOBKn MeIoDNIM 3BOHka
- HaxmTe MENU/GRP Дявьра В рупноье MeHIO.
YcTaHOBKaMeIOJIN3BOHka
IoiB3OBaTeInb MoKET Bb6paTb MeNoDIO 3BOHKa IINpIpyMOrO Bb3OBA. MeNoDIn 3BOHKA COBnAaOT C cnHaJAMN Bb3OBA.
- Haxmte nnn DnBb6opa MeNoDn 3BOHka.
- 3ByuHT BbIbpaHHa MeIoJa 3BOHka.
YcTaHOBKa IeHTnΦnKaTopa
IJaKaJIOrO paIINOMOyIaB rpyIne Tpe6yeTc yCTAHOBITb IeHTnФKAtOp. IoJIb3OBATeNb MoKeT yCTAHOBITb IMr IeHTnФKAtOpa MaKCMMyM 3eTbIpex (4) CIMBOIIOB.
- Haxmte A nIy DnBbOpa Homepa IeHTnKApota.
2.Пун уже 3анятOM Имени Идентификатор NOЯВлгетсуНдпь USED (NСПОЛьЗYETC).OTcYCTBNE HADПИСUSED O3Hauaet,чTO ИМЯ Идентификатор CB60dNo. - HaxmTe SEL/ДпяпepexoJa K yctaHOBKe IMeHn IeHTnФКaTopa.
YcTaHOBka MmEHN NDeHTnФKaTopa
IIMyIeHTnФKATopa noBbIaTcHa 3kpaHeppyrOraPAnOMOyIpyPi O6UeM IIN PpRmOM Bbl0Be.IMyIeHTnФKATopa Taokpe NoBtCra Ha 3kpaHe ppynxPaNOMOyJePi COBpeHm IMn PpRmOro Bbl0Ba.PnpOTcyTCTBm 3aDaHHOro IMeHN IeHTnФKATopa OTbpaXaETcHOMep yctpoiCTBa.
- HaxmTe A INI ▼nBb6opa CnmboJa, KOtOpbi 6ydet MItaTb Ha 3kpaHe.
-
HaxmTe SEL/ DnBb6opa npeepuNTe K CneDyIOUcEMy CmBOJy.
-
HaxMMTe SEL/Дпя ретистраци Homepa и Именин endHTnФКaTopa.
Пгимechаиме: Пи Нжати Кноги MENU/GRP радимodyь OCUшecTBляет OTмну ВьбранHorO HOMepa IeHTnФнКaTopа И BBeDEHHorO IMeH NdeHTnФнKaTopa, a 3aTeM BbIXODИЗ ГупноВО MEHIO.
HacTPOJa KaHaJIOB B rpynnOBom pexnme
PpmeHHe: NOnCK NO DByM KaHaanam He npOn3BODNTcA, cCn 3aJaTeTcTOT KKe KaHaI INN cy6KoD, UTo I TeKuIe KaHaI.
KaH Yact. Mf, KaH Yact. Mf, KaH Yact. Mf
1446,006254 446,043757 446,08125
2446,018755 446,056258 446,09375
3446,03125 6 446,06875
IpepiKyHkui TaTexHnX
XapaKTepeNCTNK
8 KaHaJIb PMR
121doataKOBn KOI (38KOiIBCTCSS Ta 83 KOIN DCS)
Paicdi 10 km*
Плдтримkaфункui VOX
CbitIOioHn nixTapNK
10 CnHaJIb ToHaJIbHOro BnKInky Ha Bn6ip
PK-dncnei3 niDcbiYBaHHrM
CunHan niiTBepeKHeHH npHOMy
Taimepi3BNTpMkoH
MoHiTopuHr HABKoJIuHIX 3ByKiB
3apnpiDnaymyntopa
- IIndkaTop piBHa 3aprA yakymyIaTopa
- MoHITOpINr nepepaB KaHaJI
- CkaHyBaHHaKaHaJIb
IHINKATop MOHITOpHry DBox KaHaJIb
BnokyBaHHKnaBiaTpy - ABTomatuHHe BIMKHeHHr
- ABTomatuHne KepyBaHHaФyHKueK 3aRnyuWeHHnpeuKoD
- ABTomTuHnNoBTop (npokpyyBaHHa)
- Pekim ekOHOMII 3apnya kymyntopa
CnoBiuueHH npo Hn3bKn pIBeHb 3apny akyMylTopa - PēpexiD B pēkIM OükiyBaHHa 3a Hn3bKOro piBHa 3apAу akymyIrTopa
ToHaJIbHn CnHAn (yBIMKH./BIMKH.)
Be3nocepEni BnKlnk (BnKlnk 3a iJeHTnphiAtopom) - FrpynOBm BVKnIK
Be33ByuHn peKIM
Buknik ycim yuachnkam rpynn - ABTomaTnUHe 3MiHeHHKaHaNy
CneuΦiakiaIP:IPX2 (T80), IPX4 (T80 Extreme, T81 Hunter)
-Джеретохиьменг:АкумлгтОп NiMH / 4 nyxhi 6atapei po3mipom AAA - Pecypc akymyIaTopa: 16 roINH (3a cTaNapTHNX ekCNIpyatauJHnx yMOB)
*Paiciy cii moKe 3miHOBaTnca 3anexKHO Bi yMOB HABKOINHbOro cepedobueta Ta/afo tonorpaicihx yMOB.
Функцт Ta eIeMeHTN KepyBaHHa
PnIMtKa: Bnue HabeJeHO 3o6paXeHHra padionpncToIO moDeni T80 Extreme. Nomy TaKox BiNoBiaHb MoDeni T80 Ta T81 Hunter.
Dncnne YcTaHOBHeHHaKymyIaTopa
- INDINKATOP 6e33ByuHOrOpexkMy
- IINikatop nepedni NOBIDOMJIeHb
- INdikaTop npinyomny NOBIDOMNeHb
- INdkaTOP MOHITOPNHy DBOX KaHaJIb
- IHINKaTOp fpyHKUJI aBTOMaTHUHOrO BIMKHeHHA
- IHHaKaTOp 6NoKyBaHnHa KnaBiaTpy
- INdkaTop cKaHyBaHHA
-
IzhkaTop KaHany
-
IuKaTOp pIBHa3pAkyaMyyTopa
- INdkatop rpynoBoro paioo6mHy
- INDINKATOP BKNOPCTAHHRAHITpy VOX/phiHKui MOHITOPINHRY HABKOJINWHIX3BYKIB
- INdNKaTOp BnKnky
-
INDINKATOP DOAeTkoBOro KOyI (IDeHTnIPiKATOPa/KOdy rpyIOBOrO paioooMHy)
14.Po3pndnIiBIObpaeHHaTMepe3BNTPNMkoHO -
Cnepuy BmKhitb padionpncpti.
2.ДЯ moJeni T80:ибЗнгИКИKу BiDcIky akymyIaTopa, HATNCHITb Ha φikcatop BnH3y KpUKN.
T80 Extme Ta T81 Hunter: 63nKpUky BiCicKy aKymyTopa, CKOpNCaNTecr MOHeTOO TaPiDuHITb Heo KpUky.
3.YctaHOBITbakymyIaTOpNiMHyBiDcIK.
4. NobephiB kpiu Ky BiDciKy Ha Micue.
3actepexehn. BkopncTahnaakymyIaTopa HeBIDNOBIDHO TnIy MOKe npN3BeCTn Do BN6bxy. YtNi13yTe BkOpncTaHi akymyIaTOpn 3riDHO 3 BiIDNOBIDHMn IHctpkyiMn.
PibeH 3apAky akymyIaTopa Ta cnobiueHH npo Hn3bKn pBeHb 3apAky
KoXHe HaTnCKaHH KHOHOK paIionpncToPO cynpOBOkYeTcB 3ByKObIM CnHaHOM (OKPIM BnnaKaIB HaTnCKaHH TaHReHTN
PTT Ta KHONKJ
Uo6 yBIMKHyTu YN BUMKHyTu BiTBopeHHA 3ByKObX CmHAniB, HATNCHTb i yTPMMyTe KONKy yBIMKHeHO rpaionpncTpOIO.
Habirua no MeHIO
PapionpncptiO ochaueHo dBOMa MeHIO yHKui: MeHIO HAIaHTyBaHH Ta 3aRaJIbHM MeHO.
- Ⅲo6 BiDkPnTm HeHn HanaWtYBaHb, HaTnCHITb KhoNky SEL/
- Ⅱб BiДКрИТи 3aRaJIbHe MeHIO, HATnCHITb KHOПКу MENU/GRP.
3.ДпЯпсху мінnapaMeTpamnцИХ MeHIO npOdoKуTeHaTnCKaTN KhoNkY SEL/ a6o MENU/GRP. - ⅡO6 BnITn 3 MeHIO ΦyHKui, BNUKHaIe OndHy 3 TaKnx Di: a. HatNCiTb KHONky MENU/GRP b. HatNCiTb KHONky PTT
c. 3aekaiTe 10 ckyH,doKn padionpntpi ABTOMaTHHO NOBepHeTbCn Do 3BnuAHHo pexmmy po60tn.
Padioo6min
- TpmaTe paionpiHn Ha BiDCTaHi 5-8 caHTmEtpiB BiD ry6.
- HatnchItb i ytpmmye KhoNky PTT niJ ac nepea hi nobiDommeHHa HdnCnei 3'ABtbc nikTorpaMa
- BiDnyctiB Khonky PTT. Tenep padionpncptri roTobn do npnMaHnRA NOBIDOMNeHB. Nid cac npniOny NOBIDOMNHe H a dinCnIe i BIO6paXaεTbC nIKtorpama 1. UoB BiINOBICTn Ha NOBIDOMNeHN, NOBTopit b iii KpOky 1.
IpiMItka. Iid yac nepeDaBaHnnoBIDOMnEHn BnpOdoX 60 cekyHn nyHaC cnHn o6MeKeHHa cacy nepeaTI X, a Ha nncnnei BiIObpaKaCTbcn nikTorpama . Npepauy nobIDomnEnn 6yde npinnHeHo.
Uo6 3iinCHnTpaioo6mH 3i cnIBpo3MOBnKOM,OBuBa paioipncTpoi Ma6ytn HajaTOBaHO Ha OHaKOBn KaHaI i3 OHaKOBIM DoaTKOBIM KOJOM. NIB. HabeHn HxKpeo3di "Bn6ip KaHany Ta doaTKOBORO KoJy".
Bn6ip KaHany Ta daOdaTkoBOr KoDy
UoB BbpaTn KaHaJI, BnKoHaIte Taki Dii:
- HaTnCHITb KONky SEL/, 06 yBiTu N Do MeHou HanaTuBaHb. PpOoBxUTe, DOKn Ha DnCnPeI He NoHHe 6NImaTu IHnKaTOp KaHany.
- ▲a6o▼, ξo6 o6paTn Heo6xidn KaHaJ.
Uo6 obaTn OdaTkoBm KoD, BvKoHaTe Taki dii:
- HaTnCHITb KHOJky SEL/ 0, uO6 yBIHTNo MeHIO HanaIaIyBaHb. IpoDObKnyTe, DOKN Ha dIcPneI He noUHe 6bnmati hdkaTOp doaTkoBOrO KoNy.
- a6o▼, o6o6paTdoJaTkoBm KoJ.
- BnDitb i3 MeHIO HanaaTuBaHb.
MeHIO HalaWtYBaHb
Ipeexid mix eIeMeHTamn MeHIO HanaU TyBaHb 3niCHIO6Tbcra B TaKOMy npAky:
YcTaHOBnEHn rpyNoBOrO KoDy
- a6o▼, Ⅲo6 o6paTn KoD rpynn.
- Hatncihb KhoNky SEL/ 063aBepuHTn HanaTByBaHHKaOdy dIra pynn.
3.ПсЯчOrHaДиCnIeipaIionpncTpO6ByeBIOobpaKeHo MEHNo HanaHTyBaHHcNrHany BxIDHO BKNKny. - HatncHt b KhoNky MENU/GRP, 06 BmTn 3 MeHIO rpynn.
Bn6ip cnHany BxIDHO BnKlnky
KopntyBaMKe Ha cBm CMAk 6oPn CnHnBxIHNOrO
6e3nocepeHbOro BnKnKy. H6ip CnHnIB BxINHX BnKnKiB
TAKN CAMN, kI CnHnIB ToHaJIbHO rBnKOy.
- a6o▼, 06b o6paTn Heo6xHn CnHaJ BxIhoro BnKJIky.
2.ПсягоюразиорпстийВьДТБОРИБобаннсган.
Pn3HaeHHIeHTnΦiKaTopa
KoXHOMy paioopncpoI rpynn Mae 6ytn npn3HaeHo iEHTNphiKatOp. KopcTByaB MOKe BBecTu IM'iEHTNphiKatOp DOBXHHOHe 6Inbue YoTnpbox (4) cunboinB.
- a5o▼, 606 o6paTn Heo6xIDHm HOMep-ideHTuΦikaTop.
- RaKIO TAKNI iDeHTnΦiKaTOP BKe 3apecCTpoBaHO, Ha DnCnIeI 3'ABNTbCe BiINOBiHne NOBIDOMnEHn. RaKIO TAKe NOBIDOMnEHn He 3'BnAETbcR, iDeHTnΦiKaTOp MOXHa BNKOpNCTOByBaTH.
- Hatncihb KhoNky SEL/ , 106 nepeTn Do npn3NaeHHa imehi-ideHTnΦikaTopa.
Pn3NaeHHImeHi-ideHTnΦiKaTopa
Im'i-ideHTnphiKATop BiOobpaKaetbca Ha dncnne iHworo paiaionpncTPOIO, KOIN KOpNCtBuBa 3iiinCHHe BnKNk ycim yuachNKam rpyn a6o 6e3nocepeHni BNKnIK. KoIN yUacNHK rpynn 3dInChHOe 6e3nocepeHni BNKnIK, IM'-i-IDEHTnphiKATop TAKOK BiOobpaKaetbca Ha dncnne iNoro paiaionpncTPOIO. RaIIO idHTnphiKATop He npnaHaeho, Ha dncnne iBiOobpaKaetbca Homep paiaionpncTPOIO.
- a6o▼, 06 o6paTn cMBOJ, 06 6nMaHa Da nCnJIeI.
- Hatncihb KhoNky SEL/ 06 niTbePnti nepenTdo Bn6opy HactynHOrO CmBOJy.
- HatnchItb KHONky SEL/ 06 3apeectpybatn ideHTnphiKauiH Hi Homep Ta im'ra.
Ipnmitka.ObpaHI ideHTnphiKauiHi Homep Ta im' 3HnkaHOb 3 dncnnei. Picna HATNCHeHH KhoNk MENU/GRP Ha dncnnei bye BiO6paXeHo MeHIO rpynn.
Bn6ip kaHaJy y rpynoBomy peKmI
Iio6 HanaityBaTn FyHKJIO ABOTMAHORO 3MiHeHHaKaHaIy y rpyOBOMy peKIMi, BIKOHaiTe Taki dii:
- Hatncihb KhoNky MENU/GRP, 06 nepeTn do rpynoBoro peKIMy.
- HatnCHtB KHONKY SEL/ 8, ybiTn Do MeHNO HanaWtyBaHH KaHaNoy.
- a6o▼, u06 akTbByBatn φyHKciio aBTOMaTHHOrO 3MiHeHHKaHaJy.
- Hatncihb KHONky SEL/ 106 niTBePunCbiBn6ip. Ha dncnnei noHe 6nMaHn Homep KaHany Ta 3'BAntbcn Hnnc "ALL" ("YCI").
- a6o ▼, uo6 o6paTn KaHaJ.
-
HatnCHt b KHONky SEL/ a6o J, 06 nepeaTn KOMaHdy ABToMaTHUHOrO 3MiHeHHKaHaNy.
-
Hatncitb KhoNky MENU/GRP, no6 noBepHytncra do Bn6opy kaHany y rpynoBomy peKmI.
UoB Bn6paTn Homep KaHaIy BpyHy y rpynoBOMy peKIMi, BnKOHaIte Taki Dii:
- Hatncihb KhoNky MENU/GRP, 06 nepeTn do rpynoBoro peXmMy.
- HATNCHTb KHONKY SEL/ 06 yBIITN DO MEHO HanaTByaHHaHaNoy.
- afo, 06 nepeTn do MeHIO Bn6opy Homepa KaHaIy BpyHy.
- Hatncihb KHONky SEL/,uO6 niTBPdntn CbiB Bu6ip. Ha dncPiEi Nohe 6nMaHn Homep KaHaNy Ta 3'ABNTbcn Hannc "MY" ("MI").
- afo, 06 opaTn KaHn BpyHy.
- HATNCiTB SEL/, 06 BnTn 3 MeHIO Bn6opy Homepa KaHaNy BpyHy.
- Hatncitb KhoNky MENU/GRP, no6 nobepHytncra do Bn6opy kaHaNy y rpynoBomy peKmI.
3diincheHHBnKlnky BcIM yachnkam rpynn
- HATNCHTb KhoNky MENU/GRP, 06 nepeTn do rpynoBoropexmy.
2.Дпя nepexody Do MeHIO Bn6Opy BnKInky BCIM yachHKam rpynn/6e3nocepEHNbOTo BNKInky. - a6o▼, 06 o6pTa napaMeTp 3iiCHeHHBnKlnky BcIM yachHKam rpyn. Ha dncnnei 3'BAuTBcH HAnc "SYNC" (CnHxp.)
-
Hatnchitb KhoNky SEL/ a6o J, 106 BnTu 3 zuoro MeHIO Ta noaTu paioooMih i3 ycima yachNKamr rpyu. Picra Yoro padionpncptpi BiD TBOPHTb CnHaI ToHaNBHO BRKnky BCIM yachNKam rpyu. Ta 6nMaTMMyt b Ha dnCnnei.
-
HatnciB KhoNkIy MENU/GRP, 06 BnTn 3 MeHIO.
3diencheHH6e3nocepEdhborBnKlnky

- Hatncihb KhoNky MENU/GRP, 06 nepeuTn do rpynoBoropexmy.
2.Дпя nepexOу Do MeHIO Bn6Opy BnKInky BCIM yachNKam rpyn/6e3nocepEHNbOTo BNKInky. - a5o▼, 106 o6paTn Heo6xIDHm HOpE-pIeHTnΦiKaTOp.
- a6o SEL/,uO6akTbByBaTHyHKcuio 6e3nocepEnboro BnKnky. Picra yoro paionpncpii BiTbOpntb opaHn CnHaToHaBHOro BnKnky.Ha dincnnei 6ye 3'ABnTbcniktorpama TX Ta nIKtorpama BnKnky,ka BiobpaXaTmEbC npotarom paioo6miHy.
- Hatncitb KhoNky MENU/GRP, 06 nepeiTu Ha3ad do napametpa Bn6opy BnKlNky Bcim yachnkaM rpyu/ 6e3nocepEHHoro BnKnky.
Функцл paДIONpuctpoH
Pekim cKaHyBaHHKaHaJIb
YcBOMy peKMI paIIOINpIcTI pI 3dIINCHIOe cKaHyBaHnKaHaNIB Ha HaeBHicTb paIOOmiHy B HIX. 3a BnBHeHHpaIOOmiHy Ba KaHani paIOINpcTI pI nePemnKaTeC hA aKTNBn KaHani I np3ynHReTcRa HbOMy Ha 2 CeKHyDn (Ha 5 ceKHyD 3a AKTNBOI FOHKUII VOX 6e3 BNkOpNCaHHrahpHtpyn). Uo6 3diCNHTn Nepeauy Ha cBOMy KaHani, HATNCihtb KONky PTT. KoJn paIOOOmin Ha aKTNBHom Ya KaHani 6yde 3abepSeHo, paIOINpcTI npODOBKIn TB cKaHyBaHn IHxN KaHAnIB.
IooakTnByBaTn cKaHyBaHHaHaJIb, BkHOHaTe Taki dii:
- Hatncitb KhoNky MENU/GRP, 06 ybiTn do 3araIbHoro MeHIO. IpeeiTb do npaMeTpcaKaHyBaHH.
- Hatncihb KhoNky SEL/ ,uO6 aKTHyBaTN cKaHyBaHH KaHaJIIB.
- Ⅲo6 3aBepuNTn cKaHyBaHHa KaHaJIb, HaTNCHTb KHOJky MENU/GRP afo PTT.
PekmMOHITOpHryDBoxKaHaJIb
LepeKMMD03BOJNEOHOCHAcHOCKaHyBaTN NOTOUHNI Ta neBHNI DODATKOBIKAHAI.
Ioo npn3haHTN DOaTkoBm KaHJI i BBIMKHyTN peKIM MOHITOPINHY DBOX KAHaIB, BIKOHaTe Taki ii:
- HatncHt b KhoNky MENU/GRP, 06 ybiTn do 3aRaIbHoro MeHIO. IpeeiTb do npametpa "2CH" (2 kaH.)
- a6o▼, 06 o6paTn KaHajn, nCnra Yoro HATNCHTb KHOJky SEL/
- a6oV, o6bO6paTn OdaTkoBn KoD, nicra Qoro HATNCHTb KONky SEL/
- Pekim MoHITOpnHy dBox KaHAniB 6yde aKTHBOBaHO.
PpIMITka.3a npn3HaueHH noTOHOro KaHaJy Ta KODY B RKOCTI DOATKOBnx MOHITOPnHr DBOX KaHaJIb 6yde HEMOXJINBn.
- Hatncitb KhoNky MENU/GRP, 0o6 BnTn 3 peXmMy MOHITOpNHry DBox KaHaIIB.
MoHITOpHr HABKOJIuNHX 3BykIB
Lc yHKciIO3BOJNEBIBTN OTOUHcI 3ByKn/ToNOC (3aENXHO BID o6paHoro pIBH YyTNUBOCTi) Ta nepeDaBaTI ix cnIBPO3MOBNky 6e3 Heo6XiHocI HATNCKAHNA KHOKN PTT. Y peKMMOHTOpHry HABKOINuHIX 3ByKb padionpncpii He npnMaE NOBIOMJeHHA.
Uo6akTbByBaTNpeKMMMOHITOpHryHABKOHNuHIX3BykIB, BkoHaHTe Taki dii:
- Hatncihb KhoNky MENU/GRP, u6yBtiNo 3aRaIbHoro MeHIO. IpeuDItb do napametpa"ROOM".
- Hatncihb kHonky SEL/ 8, nio6 niTbpntc bui Bn6ip.
- a6o▼, 106 HanaTByBAtn Heo6xHn pIBeHb yTJINBOCTi.
PpIMtKa.PiBeHyUytNIOBcTI 1 np3Haeyo dIy BnKOpNCaHHa 3a MinImaJIbHorO pIBHaBkoJINuHbOrO wMy.PiBeHyUytNIOBcTI 5 np3HaeyHO nIy BnKOpNCaHHa 3a DyKe BnCOKOro pIBHaBKOJINuHbOrO wMy.
- HatnchItb KhONky SEL/ 0, uo6 aKTHyBaTN MOHITOpHHABKOIMHIX 3BykIB.
HaTnCHITb KhoNky MENU/GRP, 0o6 DeakTNByBaTu MOHITOPINr HABKONMWHIX 3BykIB.
PpIMtKa. 3Bkyu/roJocn NoCTiHNo yTHo npOTaROM 6IbW HIX 60 cekyHd, padionpictpi npnnnnc MOHITOpHHr Ha 5 cekyHd, a notim npodobxye Ioro.
Be33ByuHn peXmN
Y6e33BvHOMy peKIMi CnHann BCix BxIDnHex BkNkIB He BiITBOPIOIbCra. Iid Yac BxIHoro BkNkKy 6nMaec nicBicyBaHHa paionpncTpoio. 3a BiIDcyTHOcTI BiINobidi Ha
BxIDHn BnKNiN iDcBiYBaHHBnMkaeTbca, a NIKTORpama 6bnMaTHme, DOKN BnKNK He 6yde 3aBepseHo. 3a HnBHOCTI npOnyuEHO BnKNky Moenb T80/T80 Extreme BiOpbyTaMe.
3a nepepaqi 60 npniomy nobidomnHna, a taKo3a HATNCHEHH6yIb-RAKOI KHONK6e33ByHn peKIM BmUKaTbcHa 15 cekyHd.
Uo6 yBIMKHTn 6e33ByHn pexHM, BIKOHaiTe Taki dii:
- Hatncihb KhoNky MENU/GRP, yBInn do 3aRaIbHoro MeHIO.
-
06epitb napametp "SLNT" (6e33B. pexum).
-
HatnchItb KHonky SEL/ 0, 0o6 niTBePdntu CbiB Bu6ip.
4.ДЯувIMKHeHH6e3BByHOropeXnMy.HaIHnKaToPi KaHaNy BiO6paXaTmEtbcra CnBMOn "Y".x 3'BAITbc Ha DnCnnei. - DnB BmKHeHH 6e33ByHOro peXmMy. Ha iHnKaToPi KaHaNy BiO6paXaTmEbCra CmBOn "N". x 3HnKHe 3 dncnna.
TaHmep i3 BHTpIMKoIO
MaKcMaJIbHn Yac BiDNIky TaIMepa - 59 XBUNH i 59 ceKyHd.
U ycbomy pekimi paionpncptpi npnMae NOBIDOMenneHra.
Uo6ckOpncTaTnca TaMepom,BuKohaiTe Taki II
- Hatncihb KNONy MENU/GRP, uo6 ybiTn do 3araIbHoro MeHIO. IpeeiNb do npaMeTp a "TIME" (vac).
- Hatnchitb KhoNky SEL/ , 06 o6paTn npaMeTp TaMepa.
- Hatncihb KhoNky SEL/ ,o6 noaTu BiDnik TaMepa.
- Hatncihb KhoNky SEL/ , 06 npn3yHHTB iDnik TaHmepa.
HaTnChiB KNONy SEL/ ,uO6 yBIMKHyTN/BIMKHyTN TaMep.
- Hatncitb KhoNky MENU/GRP a6o PTT, 063yHnHTB iDnik a6o noatu noTcnoaKy.
Pnmitka.3a HaBHOCTi BXIDHO BKNKNIky Ha DnCnJIeI 6yde BiIObpaKeHo IM'-ideHTNΦikaTOp, nicJr Yoro paIONpncTIpi NOBepHETbcB PexkM TaIMepa, a HA DnCnJIe I6NImATmE nIKTORpama BnKNIky.
BnokybaHHKnabiaIpy
HaTnCHi b i yTpmyIte KhoNky SEL/ ,doKn Ha dncnneI He 3'BAITbcn iKToPama /"LOCK"(6NoKyBaHHa).
HaTncHb i yTpmyte KhONky SEL/ ,doKn Ha dncnnei He 3'ABnTbc nIKTorpaMa /"UNLK"(po36nokyBaHH).
PK-dncnne i3 niicbiyuBaHHa
IicJn KOxHOro HaTNCHeHHa 6yDb-koKt KhoNKn PK-dncPiJe Bmkaetbca Ha 10 cekyHd (okpim BnnaAdkB HaTNCHeHH TaHreHTn PTT).
Pekim MOHITOPHry
D03BONJRE 3dINCHOBATM MOHITOPNHR Cna6kX CNHJIIB y NOTOCHOMY KAHANI.
IooakTbByBaTNpeKIMMOHITOpNHY,BNKoHaTe Taki II:
-
HATNCHTb KONky MON dIa Hetpmbano MOHITOpHry. POnHe 6JIIMaTn nIKTORpama
-
HaTnCHiB i yTpmyTe KhoNky MON npoTAROM 2 cekyHd nnoCTiHoro MOHITOpHry. PIKTORpama 6nMaTMHe Ha ducnnei.
UoB BmKHyTu peKIM MOHITOpHry, BuKOHaiTe Taki Dii:
HaTnCHiB KhONkY MON, MENU/GRP a6o SEL/, 0o6 noBepHyTncsA y 3BnuaHn pexm po6oTn. IikToPama npinnHtB 6nMAtn.
CnHanniTBepeKHeHHnpHmOy
BiodbopeHHa 0b0rO cnHany O3Haay 3akHneHH nepeaui NOBIOMNHe 3a DOnOMoTO KHOKN PTt a6o rapHITpyn VOX. CnHn BIDTBOPBOAtmEtbcyepe3 DNHAMIK paIONpncTpoIO, RkUc CNHAn NklaBiATyp He 6yIoo DeAKTNBOBaHO.CnHn H BIDTBOPBOAtmEtbcyepe3 DNHAMIK paIONpncTpoIO, RaIO CNHAn KNlbiAtyp 6yIoo DeAKTNBOBaHO.
IooB yBMkHyTN qn BmKHyTN BiTBopeHn CnHaJy
niTBePdKeHH npiOnMy, HATNCHTb iYtpMnyTe KONky A
yBMkHeHO rpaionpncPoIO. NOBtOpIb ii KpOky 3
iHcTpKuJIMn OoO BmKHeHH BiTBopeHH CnHaJy
NiTBePdKeHH npiOnOMy.
CbitnoioDn nixTapuk
Lei padionpntpi OchaueHO B6yOBOHIM CBITIOIDHM lixtapnKOM.
CbitnoioiDnH JixTapNK npaIOe 3a yMOBn HATNCHeHH Ta yTPMByBaHH BIDIOBIDHOI KHOKN.
Cxbaneni akcecyapn
Ha rapaTia He po3noBcOJxCyETbcA
- DepeKtn a6o NOwKOJxKeHn, 10o BnHKnB pe3yIbTaTI HeiNbOBOr BOkOpNCtAHn DaHOro BnPo6y a6o HeDToPMaHH HcTpyKu, HabeDeHnx y cMbmy NociHky KOpNCTyBa4.
- DepeKtn a6o noWkoJKeHH, 0o BNHKnI Yepe3 HnpaBnJIbHe BnKOpNCaHH, y pe3yIbTaTI HeuacHnx BnJaKIB a6o HeD6aNoRo NOBQKeHH.
- DepeKtn a6o NOWkoJKeHH, IO BUNHKnB pe3yIbTaTI HnPaBnBHoro TecTyBaHH, EKCnPyatai, 06cnyroByBaHH, HanaWtYBaHH, a TAKOX 6yDb-RAkNX 3MiHeh b a6o MoNΦiKaui.
ПОЛOMKa a60 noIkoJKeHHaHTeHb,3a BnHrTkOM Tnx BnIaKIB,KoJIc 6e63nocepeHbO NO'B'ra3aHO i3 DeΦeKTamMaTepiAIB a60 BnPo6hNtBA.
Bip06n, k6yno po3i6pao 160 BIDpeMOHBO H TaKIN cnoc6, knn np3BIB Do nOripeHHxHX ECKNpyaTuJHHX xapaKTEpcNTk A60 3aBAuIN npoBeEHIO HaNeKHOI OcIHKn Ta BNip06yBaHb npCtpoIO JnA NiTBePdKeHHn PpeH3i 3a rapaHTiHNMn 36OB'3aHHMn. - DepeKtn a6o nooKOJKeHHaYepe3 HeBiIOBjHy BiCTaHb BnKOpNCaHH.
- Depektn a6o noSKoJKeHHa, cnpuHHeHi nToPAnnHnM pinnH a6o BOJor No npictpoio.
Ioprrnnn a6o noikokHeHryb-kaNX nlaCTNKOBnx NOBepxohb Ta iHIXX 30BHihix KOMHOHTIB BnpOby,IO BNHKNIiD Yac HopMaJIbHoEckPnyataui.
Bipo6n, jki 3daabaHcB opeHy.
IpeioDnue O6cnyroByBaHHra, pEmoHT a60 3aMiHa KOMnoHeHtIB y 3B'ra3ky i3 HopMaJIbHOIO ekCnnyatauieTO Ta 3HOUyBaHHaM.
InΦopMaúi ΣoDo aBTopcbkIx npaB
Idocknady npedctabneHx y daHomy noci6Hky npodykTIB KOMnaii Motorola Solutions moKyTB BXoDHTN nporpamn, 10 36epiraotbcra y hainipnoBIDHHKOBi nAm'rti abo Ha iHnx Hocix. 3aKoHOaBCTBOM CUSA ta iHnx kpaHn neped6aehi neBHI BKNIOUHni npaba KOMnaii Motorola Solutions Ha 3axueneHi ABTOPcbKM npabOM KOMn'tOpTePHi nporpamn, y TOMy uCNCi BKNIOUHe npabo HA KOJIIOBAHNHa aO bITbOpeHHB 6yDb-aynn cNoci6 3axueneHX ABTopcbKM npabOM KOMn'tOpTePHX nporpam Motorola Solutions.
3BaKaHOnHa 1e, 3a6oPoHReTbC8 y 6yB-7Km CnOci6
KoJIIOBAtn abo BiITBOPHOBAtn 6yB-7Ki 3axuIeHi ABTOPCbKIMn npabAMn KOMN'ToEphPi nporpAmn KomnaHII Motorola Solutions,
IO BxOJaTB Do CKNaDy OINcAHnx YCbOMy NocIHbNKy PPOdyKTIB
KOMNaHI Motorola Solutions, 6e3 nonepeDhBoi NcBMOBoi
3rOaN KomnaHII Motorola Solutions. OkpIM TOrO, npd6BaHH
PPOdyKJI KomnaHII Motorola Solutions KOHNM YHOM He e
npraMMn abo HnpePMM HaADHNM 6yB-7Koi NiueHII Ha
06'kTN ABTOpcbKOro npaba, nateHTB abo 3a8B NaOTPMMaHH
NaTeHTB KomnaHII Motorola Solutions, 7u To Ha NiDCTabi
No36BaNHeHHn Praba 3anepeHyBaHH, 7u To 3 INHxN pInPHN,
OKpIM 3BvuaHoi HeBVKnIooHoi NiueH3II Ha BVKOpNCtAHHn 6e3
cnlAtn porJI, kA 3a 3aKOHom HaDaTbcN iD ac npdoaxy
npoDKyTIB.
MOTOROLA, MOTO, MOTOROLA SOLUTIONS i CTNIIOBAHNI NOROTIN M E TOPROBIMN Mapkamn a6o 3apeecTPOBAHIMN TOPROBIMN Mapkamn KOMNAHII Motorola Trademark Holdings, LLC i BnKOpNCTOBYOTbcra 3a Niueh3ieio.
Yci iHui Toprobi Mapkn HanexKaTb BiNobiDHM BnachHKaM.
© 2012 i 2016 Motorola Solutions, Inc. Yä npaba zaxnüeni.

MOTOROLA SOLUTIONS

68015000918-DA


- RF ENERGY EXPOSURE AND PRODUCT SAFETY GUIDE FOR PORTABLE TWOWAY RADIOS
- ATTENTION!
- Frequency Chart
- Features and Specifications
- Battery Capacity Maintenance
- Charging the Radio
- Note: Charge the battery pack for 14 hours.
- Basic Radio Operations
- Turning your Radio On/Off
- Adjusting the Volume
- Adjusting the Sound (Key Beeps)
- Navigating through the Menu
- Talking on Your Radio
- Selecting a Channel and a Sub-Code
- Select Menu
- Voice Operated Transmission (VOX)
- Transmitting a Call Tone
- Auto Power Off
- Common Menu
- Group Menu
- Set Group Mode
- Set Group Code
- Set Ring Tone
- Set ID
- Set ID Name
- Channel Setting in Group Mode
- Set All Call
- Features on Your Radio
- Channel Scan Mode
- Dual Watch Mode
- Room Monitor
- Silent Mode
- The silent mode is disabled for 15 seconds when you transmit, receive, or press any other buttons.
- Up Timer
- Key Lock
- LCD Backlight
- Monitor Mode
- Roger Beep
- LED Torch
- Approved Accessories
- Warranty Information
- What Is Not Covered By The Warranty
- Copyright Information
- HANDBUCH ZUR HF-ENERGIESTRAHLUNG UND PRODUKTSICHERHEIT FÜR TRAGBARE FUNKGERÄTE
- ACHTUNG!
- Funzioni specifiche
- \section*{Caracteristicas y specifications}
- VOX (Voice Operated Transmission)
- Dobbeltoversgningstilstand
- Optimizer
- Batarya Kapasite Bakimi
- Dncnne YcTaHObKa aKKMyJrTopa
- YpoBeH 3apJaN yBeOMnEHN O Hn3KOM 3apJe aKKymJrTopa
- YcTaHOBKa Koda rpynnbI
- YcTaHOBKaMeIOJIN3BOHka
- YcTaHOBKa IeHTnΦnKaTopa
- YcTaHOBka MmEHN NDeHTnФKaTopa
- HacTPOJa KaHaJIOB B rpynnOBom pexnme
- IpepiKyHkui TaTexHnX
- XapaKTepeNCTNK
- Dncnne YcTaHOBHeHHaKymyIaTopa
- PibeH 3apAky akymyIaTopa Ta cnobiueHH npo Hn3bKn pBeHb 3apAky
- Habirua no MeHIO
- Padioo6min
- Bn6ip KaHany Ta daOdaTkoBOr KoDy
- MeHIO HalaWtYBaHb
- YcTaHOBnEHn rpyNoBOrO KoDy
- Bn6ip cnHany BxIDHO BnKlnky
- Pn3HaeHHIeHTnΦiKaTopa
- Pn3NaeHHImeHi-ideHTnΦiKaTopa
- Bn6ip kaHaJy y rpynoBomy peKmI
- 3diincheHHBnKlnky BcIM yachnkam rpynn
- 3diencheHH6e3nocepEdhborBnKlnky
- Функцл paДIONpuctpoH
- Pekim cKaHyBaHHKaHaJIb
- PekmMOHITOpHryDBoxKaHaJIb
- PpIMITka.3a npn3HaueHH noTOHOro KaHaJy Ta KODY B RKOCTI DOATKOBnx MOHITOPnHr DBOX KaHaJIb 6yde HEMOXJINBn.
- MoHITOpHr HABKOJIuNHX 3BykIB
- PpIMtKa.PiBeHyUytNIOBcTI 1 np3Haeyo dIy BnKOpNCaHHa 3a MinImaJIbHorO pIBHaBkoJINuHbOrO wMy.PiBeHyUytNIOBcTI 5 np3HaeyHO nIy BnKOpNCaHHa 3a DyKe BnCOKOro pIBHaBKOJINuHbOrO wMy.
- PpIMtKa. 3Bkyu/roJocn NoCTiHNo yTHo npOTaROM 6IbW HIX 60 cekyHd, padionpictpi npnnnnc MOHITOpHHr Ha 5 cekyHd, a notim npodobxye Ioro.
- Be33ByuHn peXmN
- TaHmep i3 BHTpIMKoIO
- BnokybaHHKnabiaIpy
- PK-dncnne i3 niicbiyuBaHHa
- Pekim MOHITOPHry
- CnHanniTBepeKHeHHnpHmOy
- CbitnoioDn nixTapuk
- Cxbaneni akcecyapn
- Ha rapaTia He po3noBcOJxCyETbcA
- InΦopMaúi ΣoDo aBTopcbkIx npaB
Brand : MOTOROLA
Model : TLKR T81 Hunter
Category : Radio