Parcel LX - Stroller Joie - Free user manual and instructions
Find the device manual for free Parcel LX Joie in PDF.
User questions about Parcel LX Joie
0 question about this device. Answer the ones you know or ask your own.
Ask a new question about this device
Download the instructions for your Stroller in PDF format for free! Find your manual Parcel LX - Joie and take your electronic device back in hand. On this page are published all the documents necessary for the use of your device. Parcel LX by Joie.
USER MANUAL Parcel LX Joie
IMPORTANT - READ CAREFULLY AND KEEP FOR FUTURE REFERENCE.
Stroller Assembly

Stroller Operation

Accessories (May not be included in purchase) Accessories may be sold separately or may not be available depending on region.


Detach & Assemble Soft Goods


Care and Maintenance

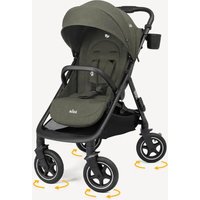
Welcome to Joie
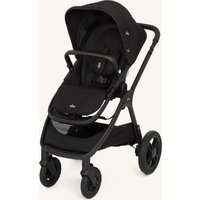
Congratulations on becoming part of the Joie family! We are so excited to be part of your journey with your little one. While traveling with the Joie parcel™ Ix, you are using a high quality, fully certified stroller, approved to European safety standards EN 1888-2:2018+A1:2022. This product is suitable for children up to 22kg or 4 years whichever comes first. Please carefully read this manual and follow each step to ensure a comfortable ride and best protection for your child.
IMPORTANT - READ CAREFULLY AND KEEP FOR FUTURE REFERENCE.
Visit us at joiebaby.com to download manuals and see more exciting Joie products!
For warranty information, please visit our website at jolbebaby.com
Emergency
In case of emergency or accident, it is most important to have your child taken care of with first aid and medical treatment immediately.
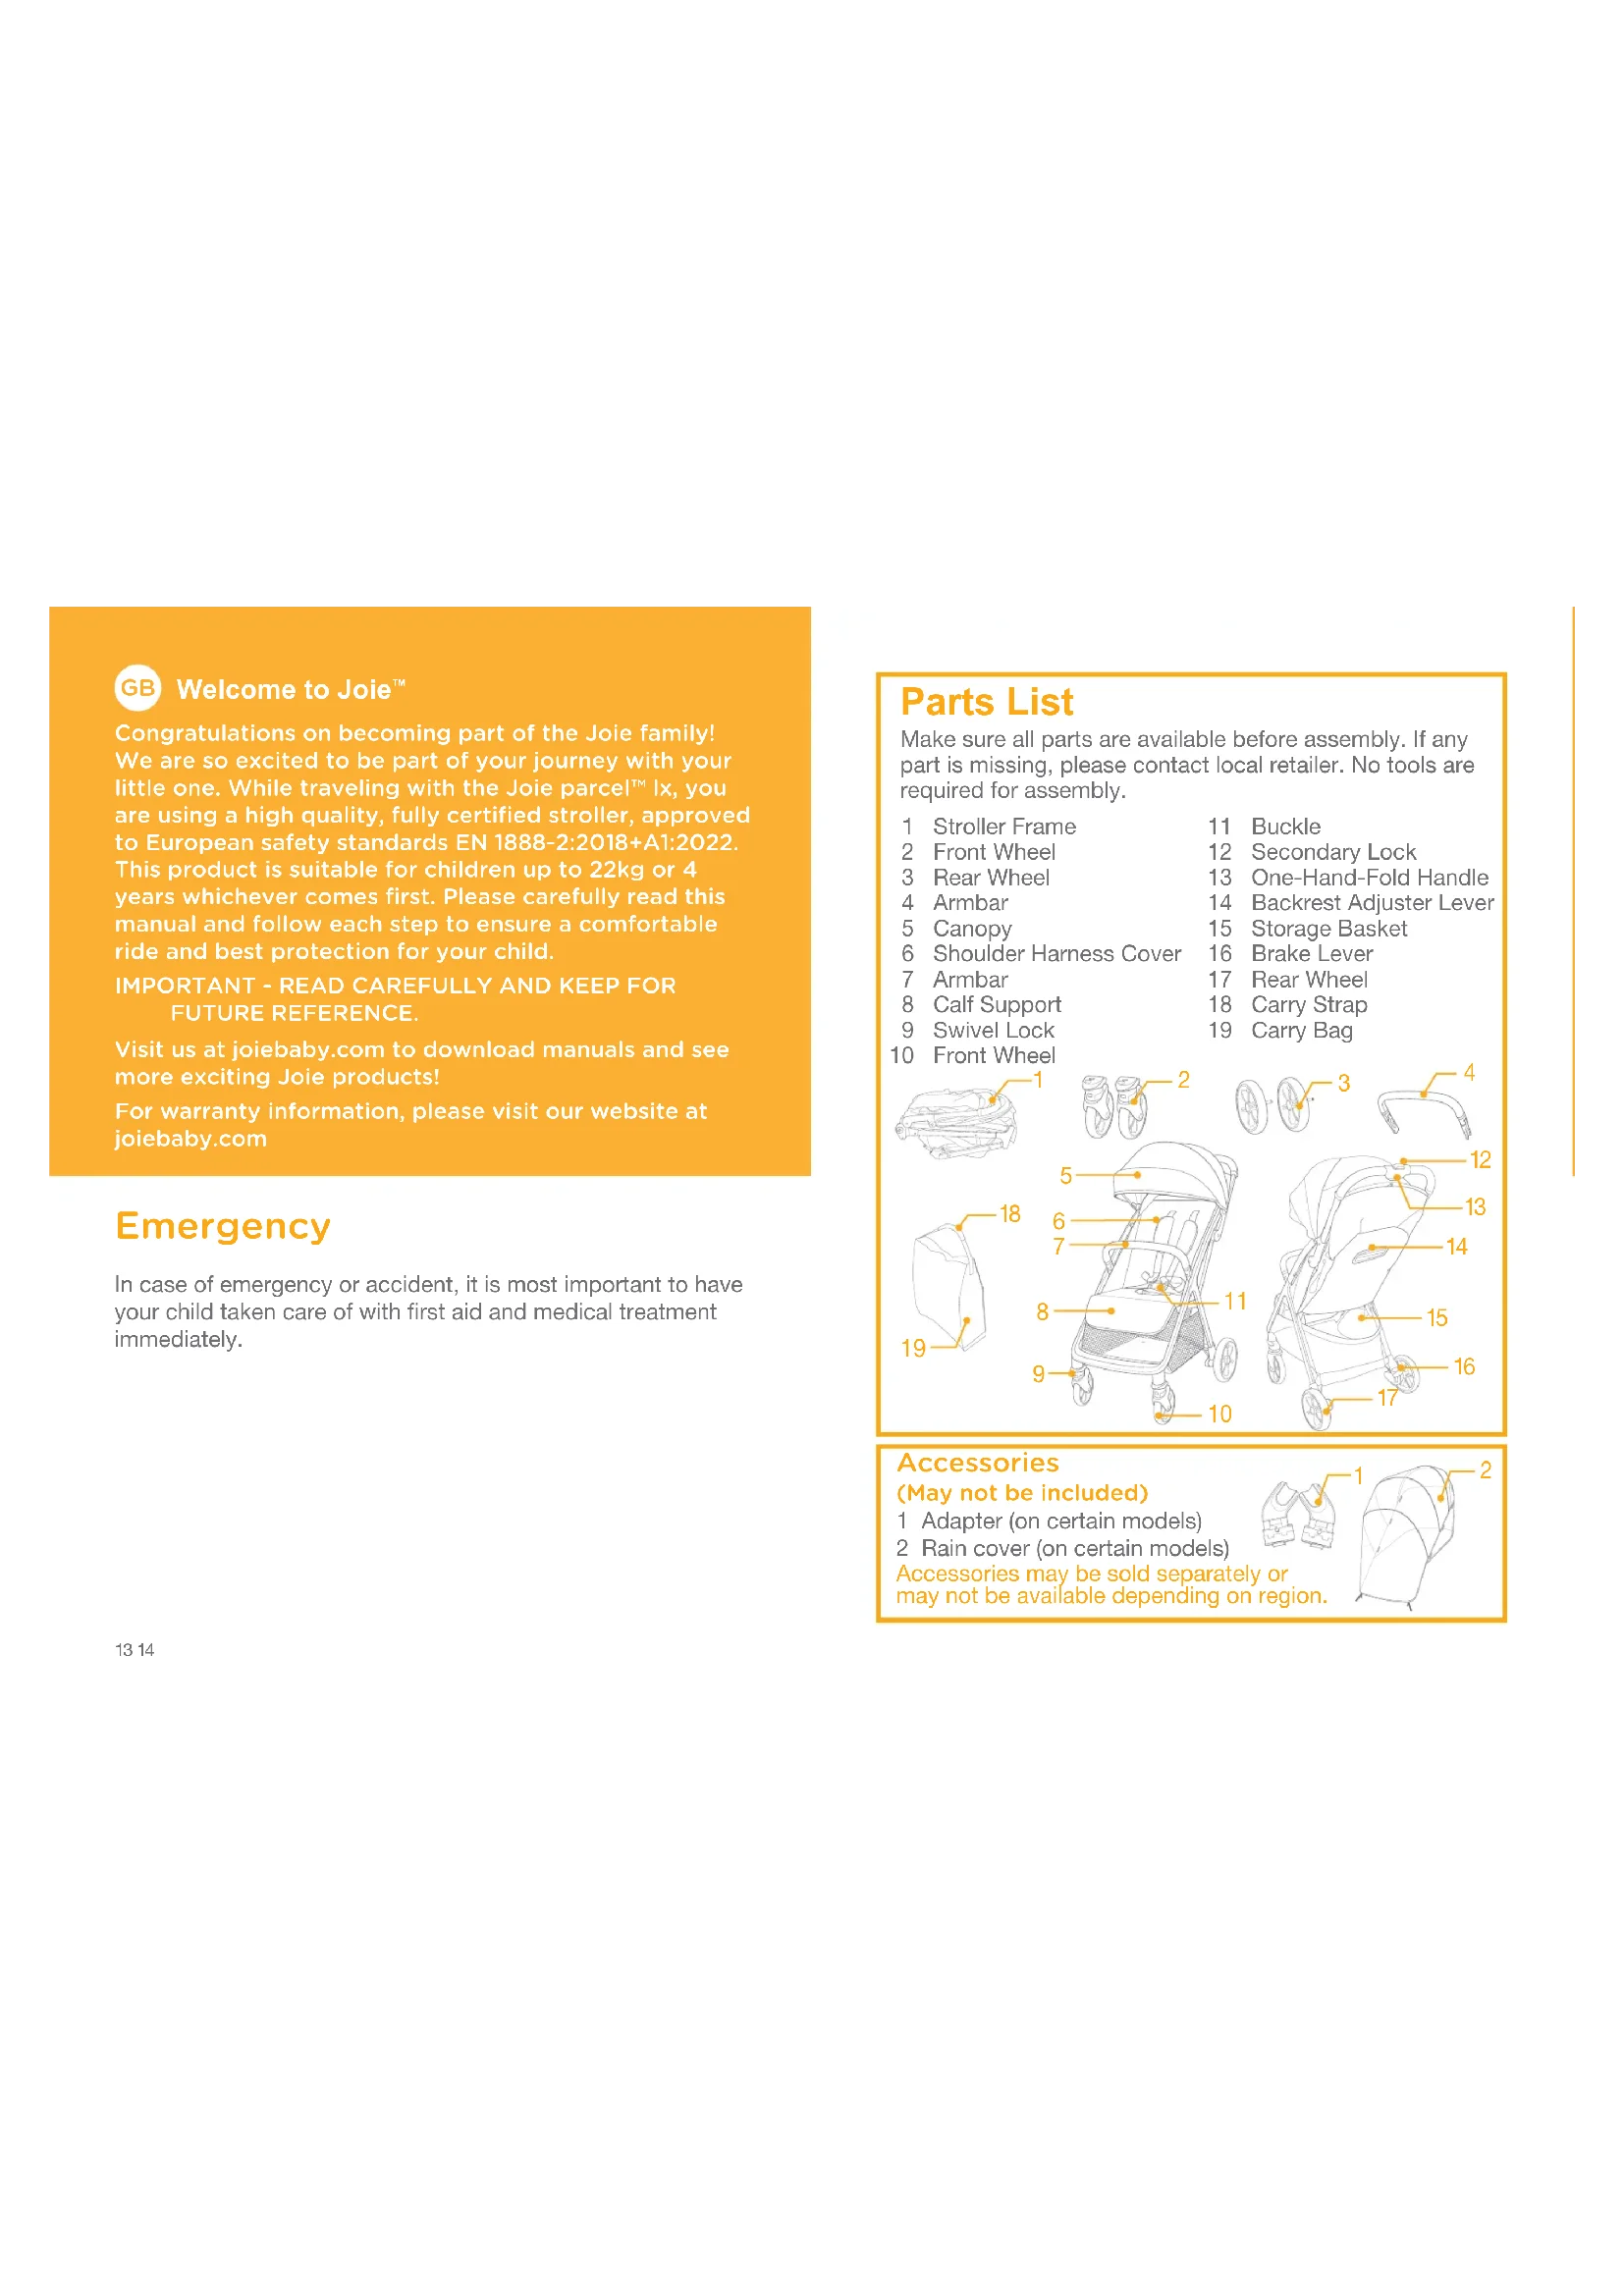
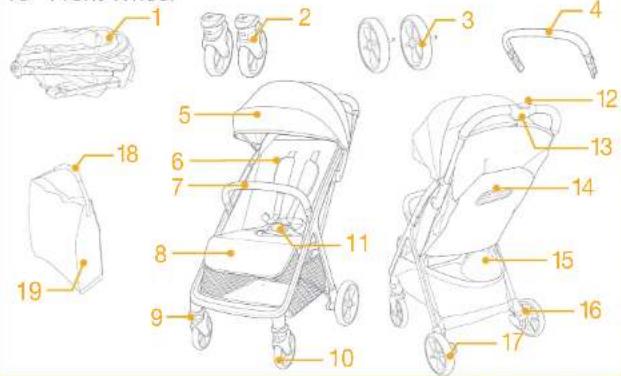
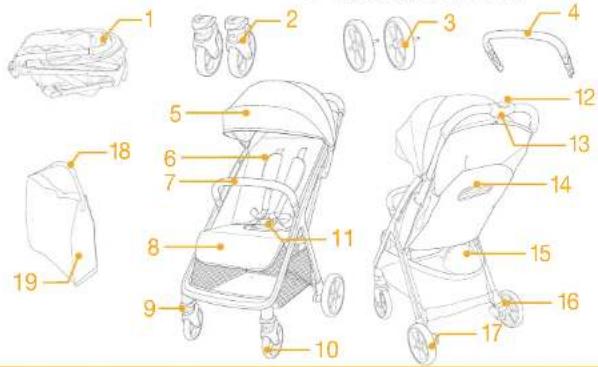
Parts List
Make sure all parts are available before assembly. If any part is missing, please contact local retailer. No tools are required for assembly.
1 Stroller Frame 11 Buckle
2 Front Wheel 12 Secondary Lock
3 Rear Wheel 13 One-Hand-Fold Handle
4 Armbar 14 Backrest Adjust
5 Canopy 15 Storage Basket
6 Shoulder Harness Cover
7 Armbar 17 Rear W
8 Calf Support 18 Carry Strap
9 Swivel Lock 19 Carry Bag
10 Front Wheel
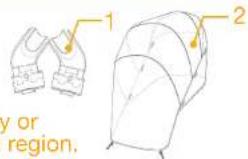
Accessories
(May not be included)
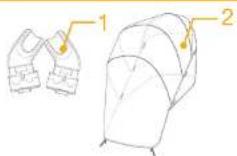
1 Adapter (on certain models)
2 Rain cover (on certain models)
Accessories may be sold separately or may not be available depending on region.
WARNING
! Always use the restraint system.
! Ensure that all the locking devices are engaged before use.
! Do not let the child play with this product.
! Check that the pram body or car seat attachment devices are correctly engaged before use.
! Adult assembly required.
! This product is suitable for children up to 22kg or 4 years whichever comes first.
! To prevent a hazardous, unstable condition, do not place more than 4.5kg in the storage basket.
! Never leave the child unattended.
! Use the stroller with only one child at a time. Never place purses, shopping bags, parcels or accessory items on the handle or canopy.
! Accessories which are not approved by the manufacturer shall not be used.
! Only replacement parts supplied or recommended by the manufacturer shall be used.
! To avoid injury ensure that the child is kept away when unfolding and folding this product.
! This product is not suitable for running or skating.
! Pushchair designed to be used from birth shall recommend the use of the most reclined position for new born babies.
! The parking device shall be engaged when placing and removing the children.
! For car seats used in conjunction with a chassis, this vehicle does not replace a cot or a bed. Should your child need to sleep, then it should be placed in a suitable pram body, cot or bed.
! Carry cot shall not be used, as soon as the child is able to sit by himself, roll over and can push itself up on its hands and knees. Maximum weight of the child: 9kg.
! No additional mattress shall be added unless recommended by the manufacturer.
! Any load attached to the handle and/or on the back of the backrest and/or on the sides of the vehicle will affect the stability of the vehicle.
Stroller Assembly
(Pleases refer to figures on page 1-11)
Please read all the instructions in this manual before assembling and using this product.
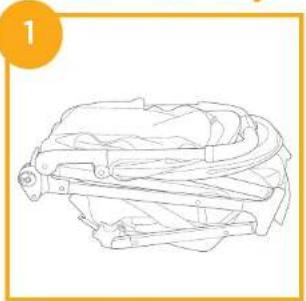
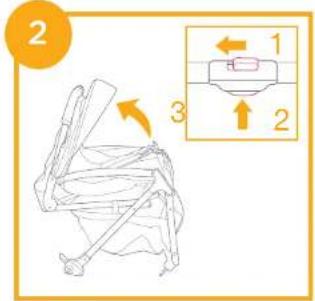
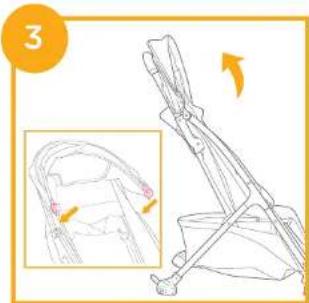
Open Stroller
see images 1-8
1 Check that the stroller is completely latched before continuing to use.
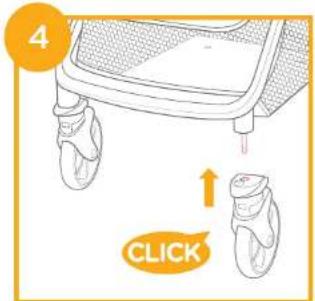
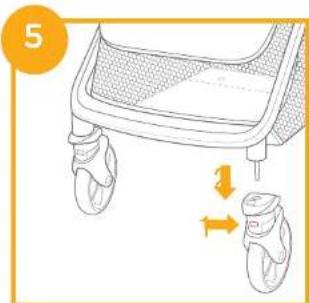
Assemble & Detach Front Wheel
see images 4 - 5
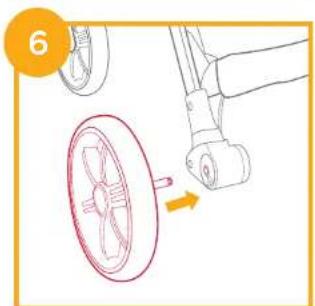
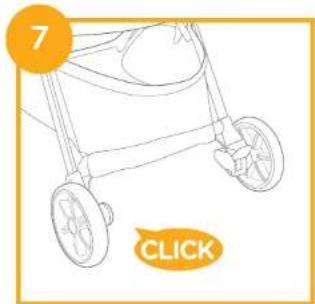
Assemble & Detach Rear Wheel
see images 6-8
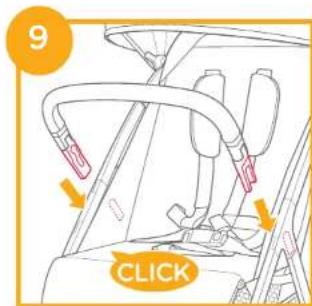
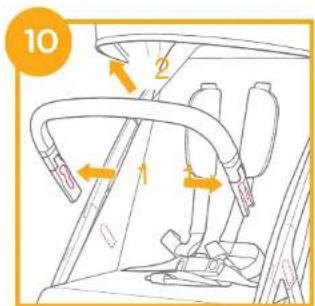
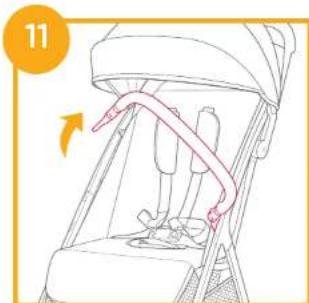
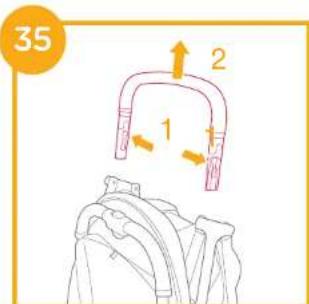
Assemble & Detach Armbar
see images 9 - 11
Armbar can be opened one side for easy seating and unseating of child.
! Always secure the child with the harness. The armbar is not a restraint device.
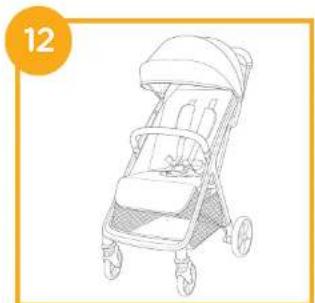
The completely assembled stroller is shown as
Stroller Operation
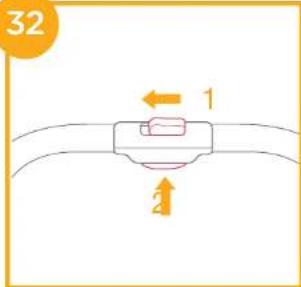
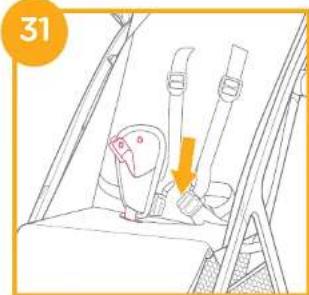
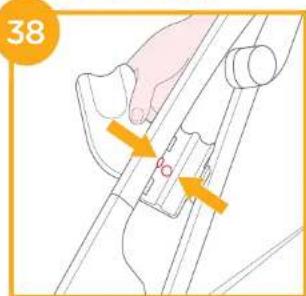
Use Buckle
see images -
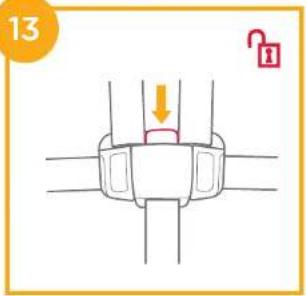
Release Buckle
Press the button, the buckle will release automatically.
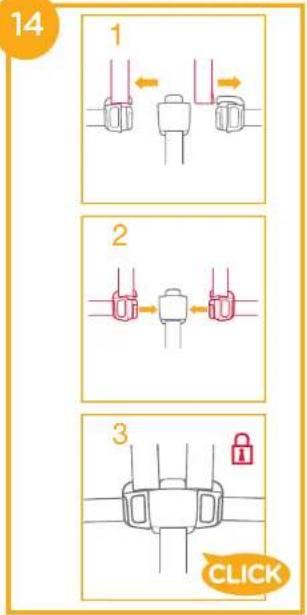
Lock Buckle
Match the waist belt buckle with the shoulder buckle 0-1, and align them with the center buckle, the buckle can lock automatically. 0-2 A "click" sound means the buckle is locked completely. 0-3
Always secure the child with the harness. The ambar is not a restraint device.
! Make sure your child is snugly secured. The space between the child and the shoulder harness is about the thickness of one hand.
Do not cross the shoulder belts. This will cause pressure on a child's neck.
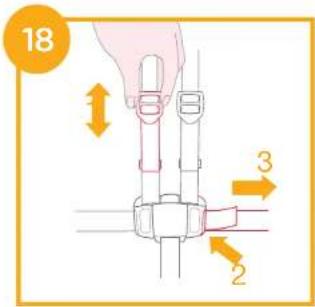
Use Shoulder & Waist Harnesses
see images -
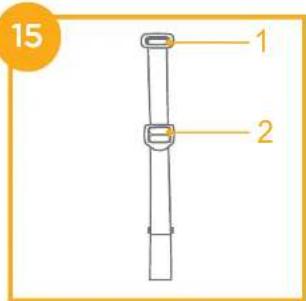
! In order to protect your child from falling out, after your child is placed into the seat, check whether the shoulder and waist harnesses are at proper height and length.
Shoulder harness anchor
-2 Slide adjuster
For larger child, use shoulder harness anchor and the highest shoulder slots. For smaller child, use shoulder harness anchor and the lowest shoulder slots.
To adjust the position of the shoulder harness anchor, turn the anchor to be level with the side facing forward. Thread it through the shoulder harness slot from back to front.
Rethread it through the slot that is closest to child's shoulder height.
Use slide adjuster to change the harness length.
Press the button -2, while pulling the waist harness to proper length. 13-3
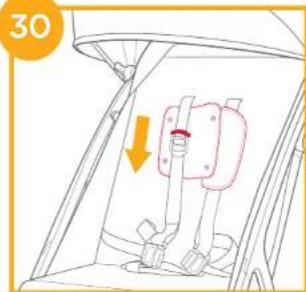
Adjust Backrest
see images
There are 4 recline angles for the backrest.
Recline Backrest
To recline the backrest, squeeze the recline handle on the back of the seat, pull down on the backrest.
Raise Backrest
To raise the backrest, push up.
Make sure the recline is set properly for use.
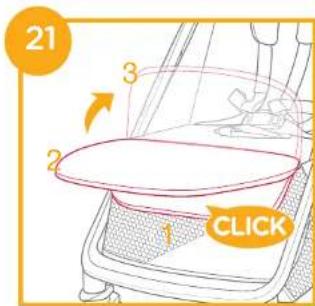
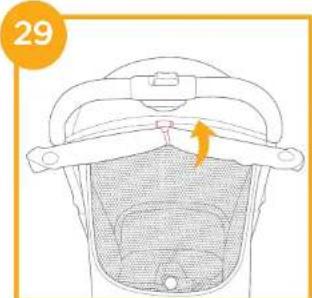
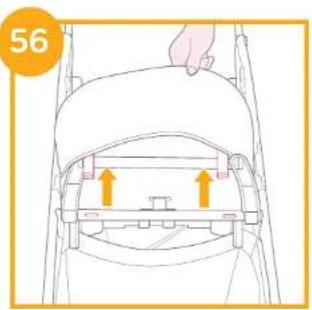
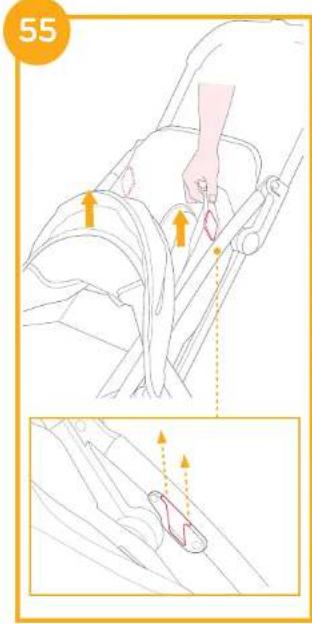
Adjust Calf Support
see images -
The calf support has 3 positions.
To raise the calf support, push it upwards. A "click" sound means the calf is locked completely.
To lower calf support, press the adjustment buttons on both sides of the calf support (1 - 1), and rotate the calf support downwards. (2 - 2)
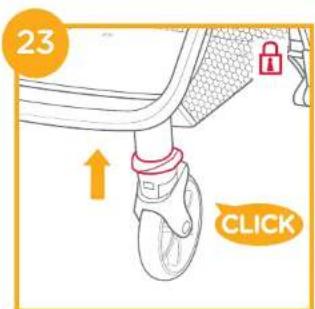
Use Front Swivel Lock
see image
Push up the front swivel locks to maintain the moving direction.
Tip It is recommended to use swivel locks on uneven surfaces.
Use Brake
see images
To lock the rear wheels, step down on the brake lever.
To unlock the rear wheels, just lift the brake lever upwards.
Always apply the brake when the stroller is stopped. Push the stroller slightly to ensure the brake is engaged.
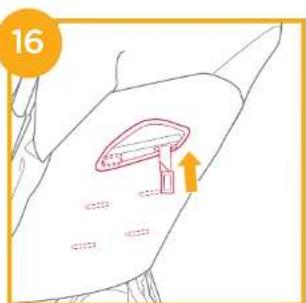
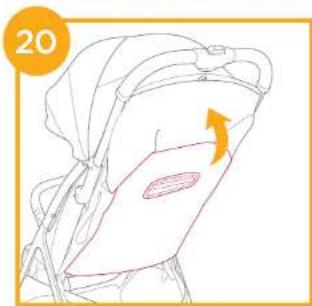
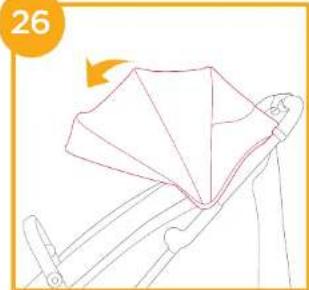
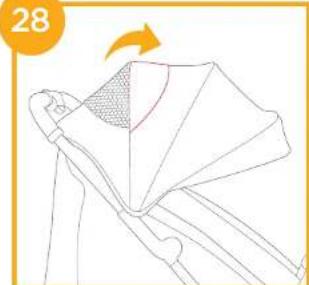
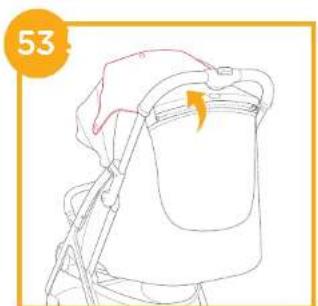
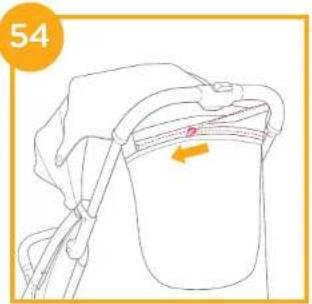
Use Canopy
see images
The canopy can be opened or folded, pull it toward front or back.
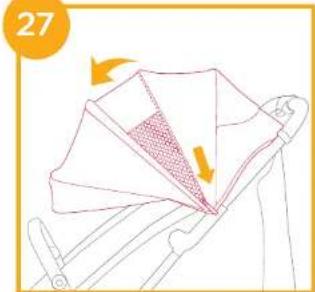
There is a window on the canopy, through which you can view your baby.
Roll up the canopy rear panel, and through the webbing out the fabric loop, then snap-fit the snaps on the webbing.
It is convenient to see the baby when rolling up the canopy near panel.
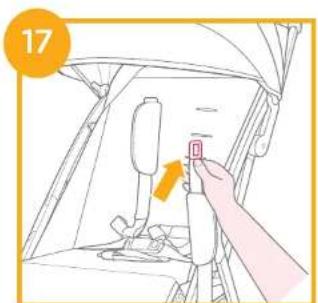
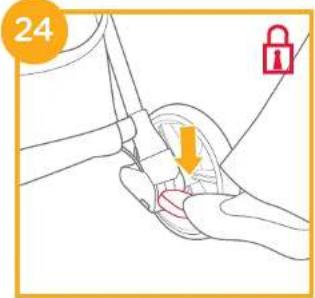
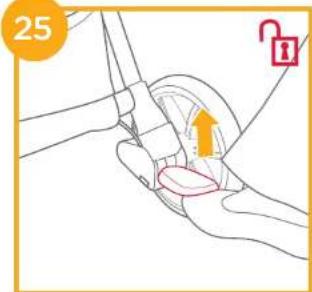
Use Shoulder Harness Cover and Crotch Harness Cover
see images -
The shoulder harness cover or crotch harness cover can be removed from the webbing. To assemble shoulder
harness cover and crotch harness cover in reverse steps
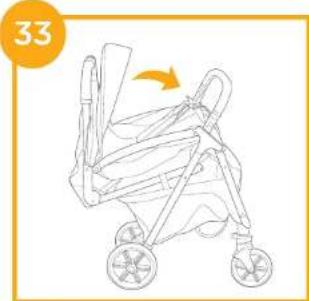
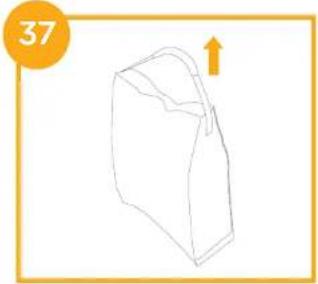
Fold Stroller
see images -
Please fold the canopy before folding the stroller.
Push secondary lock - 1 and squeeze one-hand-fold button - 2. Push the stroller forward to fold.
Grab the carry bag, the stroller will follow you.
Use Accessories
Accessories may be sold separately or may not be available depending on region.
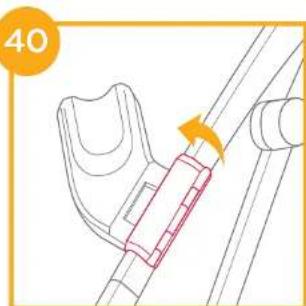
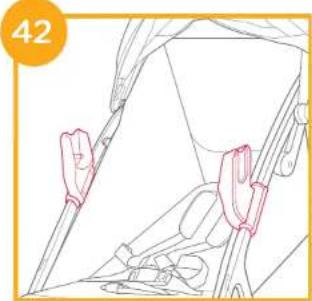
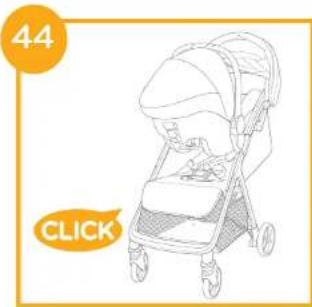
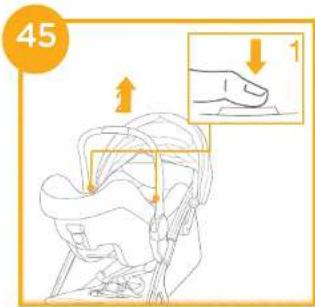
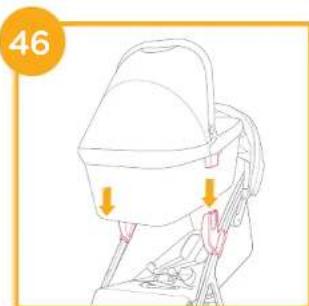
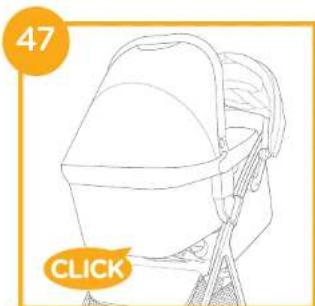
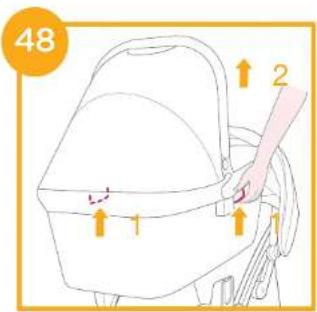
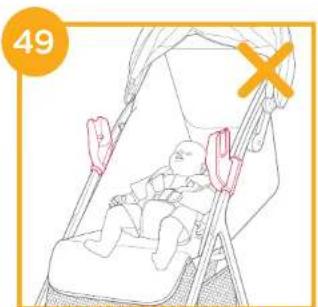
Use with Infant Child Restraint or Carry Cot
see images -
When using Joie child restraint I-Level Pro, i-Jamini, i-Snug 2, Sprint, gemm, i-Gemm 3, Ramble, please refer to the following instructions.
Adjust the backrest to the lowest position and fold the canopy.
1 Need to remove the ambar before using adaptes.
If you have any problems about using the infant child restraint or carry cot, please refer to their own instruction manuals.
Please do not fold the stroller when the infant child restraint or carry cot or adaptes are still attached.
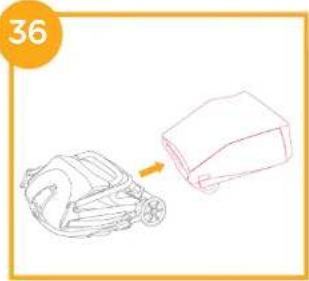
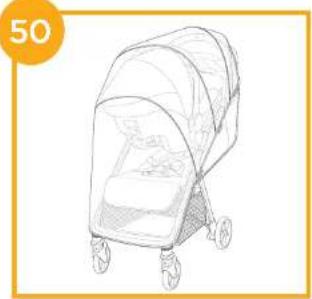
Use Rain Cover
see image 1
To assemble the rain cover, place it over the stroller, and then attach the seaps and hook and loop fasteners on the rain cover.
Before using the rain cover, please make sure the backrest has been adjusted to the lowest position and the infant child restraint has been fastened.
When using the rain cover, please always check its ventilation.
When not in use, please check that the rain cover has been cleaned and dried before folding.
Do not fold the stroller after assembling the rain cover.
Do not place your child into the stroller assembled with rain cover during hot weather.
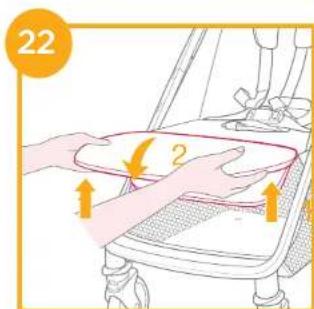
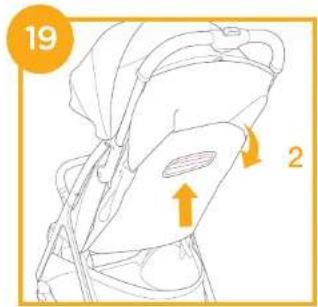
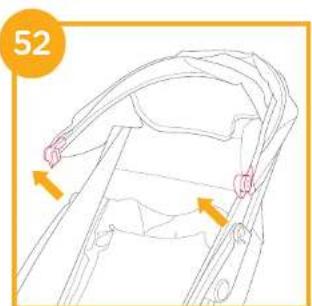
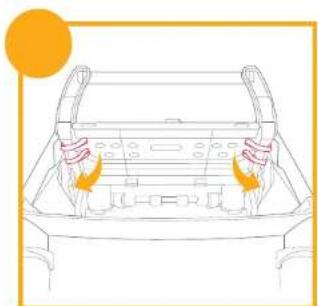
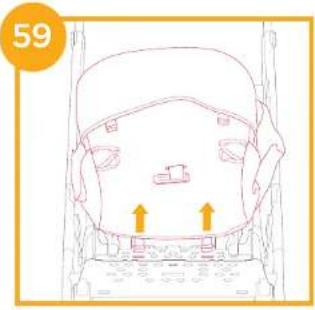
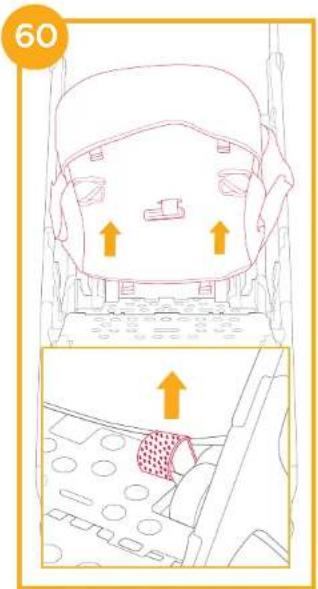
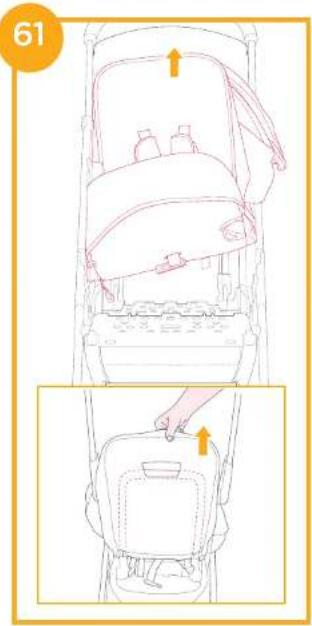
Detach & Assemble Soft Goods
seimages
Remove arm bar shown as
To re-assemble seat soft goods, follow the steps abovein reverse
Care and Maintenance
see image
Removable seat pad may be washed in cold water and drip-dried. No bleach. Please refer to the care label for instructions on cleaning the fabric parts of the stroller.
To clean stroller frame, use only household soap and warm water. No bleach or detergent. Periodically wipe clean plastic parts with a soft damp cloth. Always dry the metal parts to prevent the formation of rust if the stroller has come into contact with water.
From time to time, check your stroller for loose screws, worn parts, torn material or stitching. Replace or repair the parts as needed.
Excessive exposure to sun or heat could cause fading or warping of parts.
If stroller becomes wet, open hood and allow to dry thoroughly before storing.
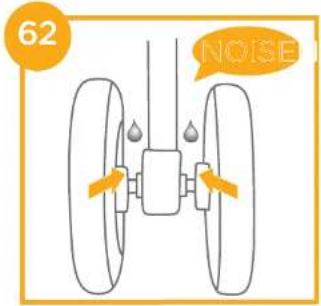
If wheels squeak, use a light oil (e.g., Silicon Spray, antirust oil, or sewing machine oil). It is important to get the oil into the axle and wheel assembly.
When using your stroller at the beach, completely clean your stroller after use to remove sand and salt from mechanisms and wheel assemblies.

Bem-vindo à Joie
-2 Posuvny regulator
Pro vsei dit ze poutje kotvu rarnenho projoare a neiyayai rarneni sloty. Pro menei dit aoujie kotvu rarnenho projoare a nejin25rarneni sloty.
CkaaTaB pyKOBOcTBa H O3HaKOMHTbC c Dpyro 3ameaTeNbHO npOdyKuH Neu Joie MoXHo Ha Be6-caIte joiebaby.com.
CBeHnO rapaHTnOny6JIHKOBaHbHa Be6-caTe joebaby.com
Upe3BbIaHbIe cHTyaIi
B cnyae ue3buaHoro npoCwecTBnI HecyactHoro cnya CneDyeT He3aMeIINTeNbHO OKa3aTb pe6eKy nepByIO NMOOuB IObpaNTbcR K BpaY.
Cneunfkaaiae Taale
Peped c6bpokn daHHoro n3dennnpoBpBeTbe Hauuue Bcex deTanei. B cnyae oCTyCTbna NIObIe Detanen OpaTuNTecb MaraaH, rge 6blno pnp6peTeHO daHHoe n3dennne. Dnra c6bpKn He Tpe6byOTc nHCTpymEnTbl.
1 Pama Kojrckn
2 PeredneKoIeCa
3 3aHne koneca
4 NopyuHb
5 Kozbipek
6 HaklaKa dnn nneyebix
PemHei
7IopyuHb
8 Onopa dny Hor
9ФнкатopпepdHeroKoneca
10 PpeHne koneca
11Pn
12 DononHnTeBHHbM KCaTOp
13 PykoTka nnn Cnoxhenny ODHn pykoi
14 PerynTOp HAKNoHa cnnHKn
15 BeueBaKOp3Ha
16 PdabT TopMo3a
17 3aHnne Koneca
18 PemeHdna nepeHoCKn
19 Cymka dny nepeHockn
PnHaJNeXHocTn
(MOYT H8 BXOINTB B KOMPNEKT NOCTAKN)
1AanTep(BHeKOTOpbIXMOeIaX)
2 DoxdeBnK (B HeKOTopbIX MoDenX)
PnHaNEXKHOCTMORYNPoDAaTbC
OTDeJIbHO HIN He IpeIpaIarTbcR B HEKOTOpBIX pEmoHax.
PPEyPExEHHa
!Bcerda nCnoIb3yIte yDepKnaIOuO cnCTemy.
!PexJeHcNtOBaTbKoIaCKy,y6eNTecb,HTO3aEICBOBaHb BCEΦnKCaTopbl.
He no3B0JrTe pe6eHky irpaTb c DaHHbIM n3dennm.
!PepedNcNoB3oBAHnEMKoJIaCKNy6eDnTeCb,YTO Bce KpeEnXbIe yctpoCTBa HA KOJIaCKe NIIABTOKpeCne 3aJeCTBOAbl HaNDJExaUIM o6paOm.
!C60pkydoJXHbIocUyecTBnTbB3pOcJIbe.
1 DAnHoe n3dene npedha3aueho dneTeBecm do 22 Kr uNBO3pactOMdo4NET(B3abNCIMOCTNOTTO,HTO HACTyNT paHbue).
1 Bo n36eKAnHe OAnCHO OnpOKnDbHnN KOnJcN He NOMEaITe BBeUeByo Kop3Iny npEmTb Becom 50nee 4,5 Kr.
!Kateropnueckn 3anpeaaetc octabnIbIpb6eHka 6e3 npncMToPa.
1 B konlae DonyckaetcpeBo3nToIbKO OJHO ropeHka. 3Anpeaetc pa3MeaTaHpaKoarTke I KO3bIpBe K0uEJIbKn, CymKn, CbePTKn andnaJeNKeHCTn.
!He pa3pewaaetc nCnONb3OBaTb npHaadNexKHOCTn, He oO6peHHbIe npOn3BOaNTeJIem.
!OnyckaetcNcNoB3ObaTbToJbKO3aNaChbYeactn,noCTabIeMbIe ININ peKomeHDoBaHHBe IPOIN3BOIDTeJIeMaHeJa.
!BoI36ekaHHe npuHHEnHnBpeJa 3dOpOBbIO pe6eHaKe HcKnadBaIte n He packlaDbIaBnte KOnrcky B6n3n pe6eHaKa.
!DahHoe n3dJIeN He npEHa3HaueHo dIg 6eRa IIN KaTAHn Ha pONkax.
IIOHOBOPOKDeHHbIX CnHKy KOJIaCKN peKOMeHnyETc ONyCTNb B CaMOE Hn3KOE NOJXKeHne.
I IpeTe TM KAK NOMeUaTb pe6eHka B KOJIaCKy uNn H3BNeKaTaB erO n3 KOJcKn, Heo6XoDmO 3aJeIeCTBOBaTb TopMo3a.
1 ABToIIObKa, yCTaHOBnEHHa Ha pAmy DaHHoN KOJIcKIn, He 3aMeHReT IIOJbKy IIN KPOBaTKy IIN HOBOpOxHeHHbIX. YTOb6I yIOXnTBpe6eHka CnTaB, eOro HeOxOxIMOn IpeHecTn B IOxOJaIyU IOxAHyO KOJIcKcy, IIOJbKy IIN KPOBaTb.
IpeHocHsAIOJIbKaHeIpeHa3aHaeHaIraTeTey,ymEIoUHXcAMoCTOaTeJbHoCmTeB,nepeBopauBaHTcbN BCTaTabbHa YeTEBepeHbKm.MakcImaIbHbBecpe6eHa:9Kr.
IcnoB3oBaHne DOnONHtEbHbIX MaTPacOB HeDOnyCTM0,ecn3TO HpeKOMeHDoBaHO pON3BOIDTeNEM.
I PnKpennneHne IIO6O rpy3a K pyKoTKe, CINHKe HIN 60KObIM YactrM KOJcNn npBedeT K hapuHHeHIO ee yCTOnHBOcTn.
C6opka KOJIAcKn
Juaa aagge gaaalbokgaiy
cuaaiaiiee aee 1000d joeibabycom
JaJoual Joie
As all 1000000000000000000000000000000000000000000000000
1
Jubby
a
-0
1
A
y 1
88 pall 120
j 1
1
yaiy
aed 1
i
3
y 1
()
p 1
1
y
T
y
aal 45
aaii 1
y
aaii iiaaa aiee
1
a a a a a a a a a a a a a a a a a a a a a
aalalalalallalalalalalalalal
Ji: yai aai ai jai iiae g dii g jai jai jai Jaa
Lai jie jiyue jibai yue liy jiaoli yibj jiaoi aoyi bui
#
A
Jnll 1 jdlal 5y yjg plu g
-
a
1
1
snll snn
y
a 1
1
Allison Baby UK Ltd,
Venture Point, Towers Business Park
Rugeley, Staffordshire, WS15 1UZ
NUNA International B.V.
Vander Valk Boumanweg 178 C,
2352 JD Leiderdorp, The Netherlands