VC 4 Cordless Premium myHome - Vacuum Cleaner Kärcher - Free user manual and instructions
Find the device manual for free VC 4 Cordless Premium myHome Kärcher in PDF.
Download the instructions for your Vacuum Cleaner in PDF format for free! Find your manual VC 4 Cordless Premium myHome - Kärcher and take your electronic device back in hand. On this page are published all the documents necessary for the use of your device. VC 4 Cordless Premium myHome by Kärcher.
USER MANUAL VC 4 Cordless Premium myHome Kärcher
- Frequenz Hz 50 - 60 Ladedauer bei vollständig entla- dener Batterie min 390 Schutzklasse II Leistungsdaten Gerät Behälterinhalt l 0,65 Betriebszeit bei voller Akkuladung im Normalbetrieb min 30 Betriebszeit bei voller Akkuladung im Maximalbetrieb min 18 Maße und Gewichte Gewicht (ohne Zubehör) kg 1,55 General notes p. 10
- Intended use p. 11
- Environmental protection p. 11
- Accessories and spare parts p. 11
- Warranty p. 11
- Scope of delivery p. 11
- Device description p. 11
- Installing the wall bracket p. 11
- Initial startup p. 11
- Operation p. 12
- How to use the Accessories p. 13
- Transportation p. 13
- Storage p. 13
- Care and service p. 13
- Troubleshooting guide p. 14
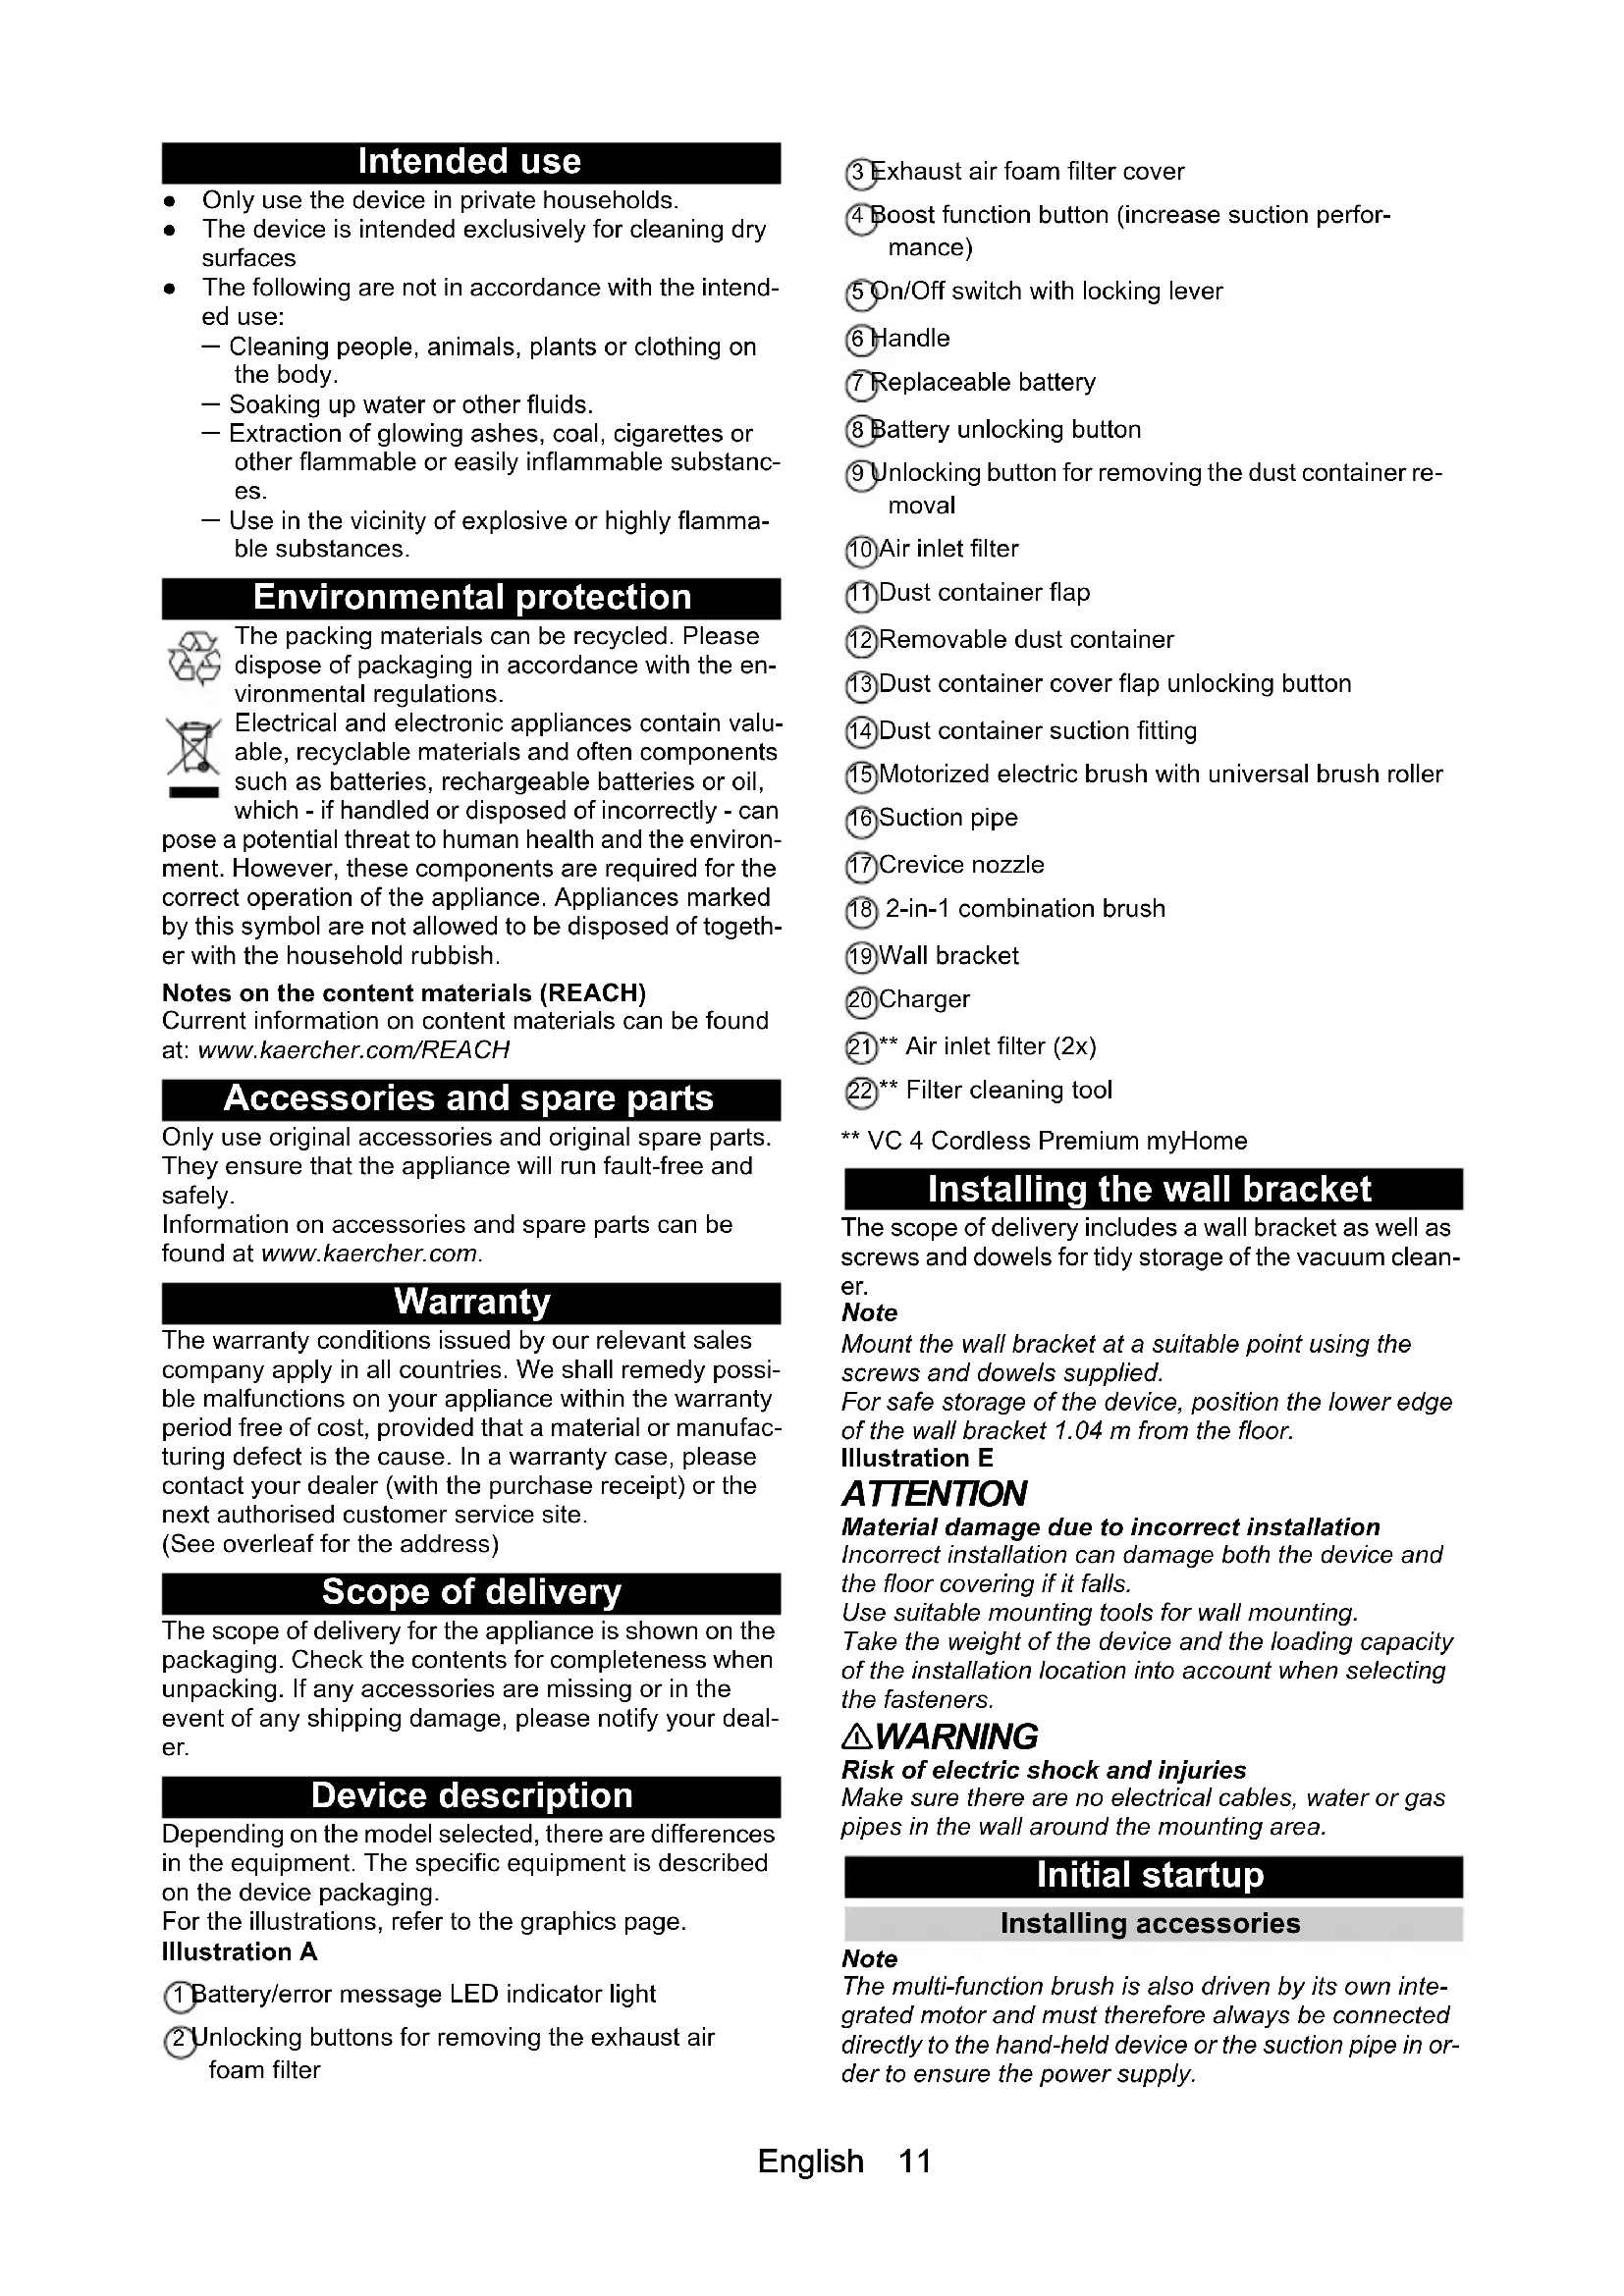
- Technical data English 11 Intended use ● Only use the device in private households. ● The device is intended exclusively for cleaning dry surfaces ● The following are not in accordance with the intend- ed use: – Cleaning people, animals, plants or clothing on the body. – Soaking up water or other fluids. – Extraction of glowing ashes, coal, cigarettes or other flammable or easily inflammable substanc- es. – Use in the vicinity of explosive or highly flamma- ble substances. Environmental protection The packing materials can be recycled. Please dispose of packaging in accordance with the en- vironmental regulations. Electrical and electronic appliances contain valu- able, recyclable materials and often components such as batteries, rechargeable batteries or oil, which - if handled or disposed of incorrectly - can pose a potential threat to human health and the environ- ment. However, these components are required for the correct operation of the appliance. Appliances marked by this symbol are not allowed to be disposed of togeth- er with the household rubbish. Notes on the content materials (REACH) Current information on content materials can be found at: www.kaercher.com/REACH Accessories and spare parts Only use original accessories and original spare parts. They ensure that the appliance will run fault-free and safely. Information on accessories and spare parts can be found at www.kaercher.com. Warranty The warranty conditions issued by our relevant sales company apply in all countries. We shall remedy possi- ble malfunctions on your appliance within the warranty period free of cost, provided that a material or manufac- turing defect is the cause. In a warranty case, please contact your dealer (with the purchase receipt) or the next authorised customer service site. (See overleaf for the address) Scope of delivery The scope of delivery for the appliance is shown on the packaging. Check the contents for completeness when unpacking. If any accessories are missing or in the event of any shipping damage, please notify your deal- er. Device description Depending on the model selected, there are differences in the equipment. The specific equipment is described on the device packaging. For the illustrations, refer to the graphics page. Illustration A 1 Battery/error message LED indicator light 2 Unlocking buttons for removing the exhaust air foam filter 3 Exhaust air foam filter cover 4 Boost function button (increase suction perfor- mance) 5 On/Off switch with locking lever 6 Handle 7 Replaceable battery 8 Battery unlocking button 9 Unlocking button for removing the dust container re- moval 10 Air inlet filter 11 Dust container flap 12 Removable dust container 13 Dust container cover flap unlocking button 14 Dust container suction fitting 15 Motorized electric brush with universal brush roller 16 Suction pipe 17 Crevice nozzle 18 2-in-1 combination brush 19 Wall bracket 20 Charger 21 ** Air inlet filter (2x) 22 ** Filter cleaning tool ** VC 4 Cordless Premium myHome Installing the wall bracket The scope of delivery includes a wall bracket as well as screws and dowels for tidy storage of the vacuum clean- er. Note Mount the wall bracket at a suitable point using the screws and dowels supplied. For safe storage of the device, position the lower edge of the wall bracket 1.04 m from the floor. Illustration E ATTENTION Material damage due to incorrect installation Incorrect installation can damage both the device and the floor covering if it falls. Use suitable mounting tools for wall mounting. Take the weight of the device and the loading capacity of the installation location into account when selecting the fasteners. 몇 WARNING Risk of electric shock and injuries Make sure there are no electrical cables, water or gas pipes in the wall around the mounting area. Initial startup Installing accessories Note The multi-function brush is also driven by its own inte- grated motor and must therefore always be connected directly to the hand-held device or the suction pipe in or- der to ensure the power supply.12 English All other accessor parts can also be used directly with the hand-held device or with the suction pipe to increase the reach. Push the suction pipe on to the suction fitting of the dust container until it audibly clicks into place. Press the unlocking button and remove the suction pipe from the suction fitting. Illustration B Push the floor nozzle on to the suction pipe until it audibly clicks into place. Press the unlocking button and remove the floor nozzle from the suction pipe. Illustration C Push the accessory, such as the crevice nozzle, on to the suction fitting of the dust container or suction pipe until it audibly clicks into place. Illustration D Battery charging Note The device is not supplied with a charged battery. Fully charge the battery before using it for the first time. Please observe the enclosed safety instructions for bat- tery powered vacuum cleaners. p. 15
1. To charge the device, attach it to the wall bracket in-
cluded in the scope of delivery. Illustration E
2. Plug the charger into a socket.
Insert the connecting plug into the charging socket of the device. The LED indicator light flashes green during the charging process. Illustration F
3. When the device is fully charged, the LED indicator
light lights up continuously green for 2 min. and then goes out. Remove the charger from the power socket and charging socket. Remove the device from the wall bracket. Illustration G The device is ready for use. Operation LED display The LED on the head of the device shows information on the charging state of the battery and error messages. The progress of charging the battery can be read from the green LED. The LED only lights up when the battery is correctly installed. Changing accessories To change accessories, see chapter Installing accesso- ries Vacuuming
1. Install the required accessories, see chapter Install-
2. Switch on the device, depending on cleaning re-
quirements: Press the On/Off switch and keep it pressed dur- ing operation.
Turn the locking lever to switch the device directly to continuous operation. Illustration H
3. If necessary, press the Boost button to increase the
dust intake. Illustration I Note When the device is switched off, the boost function is automatically disabled. The boost function can also be switched off by pressing the Boost button again. Ending operation
1. Switch off the device.
Release the On/Off switch or disable the locking le- ver. Note To ensure an optimum suction performance, empty the dust container and clean the air inlet filter after each use. Empty the dust container at the latest when the "MAX" marking is reached.
2. Remove the suction pipe or accessory.
3. Empty the dust container into a waste container.
a Press the unlocking button. The dust container flap opens. b Empty the dust container. Illustration J
4. To close the flap, push the dust container upwards
until it clicks into place.
5. Clean the air inlet filter, see chapter Cleaning the air
6. Attach the device to the wall bracket.
7. Charge the device, see chapter Battery charging.
Battery charging state LED Duration of lighting Meaning Lights up green continuously Battery charged Flashes green 1 s on / 1 s off 2 min remaining running time (-1 min/+2 min) Flashes green 125 ms on / 125 ms off Battery fault While charging LED Duration of lighting Meaning Flashes green
off / 1 s off Battery is charging Lights up green 2 min continu- ous lighting, then off Battery fully charged Error message LED Duration of lighting Meaning Flashes red 125 ms on / 125 ms off Floor nozzle blockedEnglish 13 How to use the Accessories General instructions for use Which accessories are included in the scope of de- livery is shown on the device packaging. Accessories not included in the packaging can be purchased in a KÄRCHER specialist shop or fr
www.kaercher.com. Test the accessory at an inconspicuous point before using it in a sensitive area. Follow the manufacturer's cleaning instructions. Connect the motor-driven electric nozzle to the suc- tion pipe or the hand-held device. Also connect the other accessory parts, such as crevice nozzle, to the hand-held device or push it di- rectly onto the suction pipe to increase the reach. Motor-driven multi-function brush Ideal for hard floors and carpets. The motor-driven multi-function brush removes dirt stuck between the carpet fibres particularly effectively. 2-in-1 dust brush The frame with the surrounding bristles can be taken off pressing the unlocking button. ● The soft brush is suitable for furniture with hard sur- faces ● The wide brush is used to clean upholstered furni- ture, curtains, etc. Crevice nozzle For edges, joints, heaters and areas that are difficult to reach. Soft brush The soft brush has particularly soft bristles for cleaning sensitive surfaces such as keyboards, lamps, etc. Flexible crevice nozzle The flexible crevice nozzle increases the reach. For cleaning hard-to-reach places, such as between the car seats. Flexible extension hose Due to the extension and flexibility, hard-to-reach areas such as in the car can be reached and cleaned. Large upholstery nozzle For cleaning textile surfaces such as sofas, armchairs, mattresses, car seats, etc. Soft motor-driven brush (Hardfloor nozzle) For hard floors and sensitive wooden floors. Extracts coarse and fine dirt simultaneously. Transportation The battery has been tested in accordance with the rel- evant rules for international transport, and can be transported / shipped. Storage ATTENTION Moisture and heat Risk of damage Store batteries only indoors in a dry place with low hu- midity and temperatures below 20°C. Care and service General care instructions Clean the device and plastic accessory parts with a commonly available plastic cleaner. Cleaning the air inlet filter Note The device can be cleaned manually or using a filter cleaning device.
1. Switch off the device.
2. Manually cleaning the air inlet filter.
a Pull the soiled air inlet filter down at the filter stick, carefully beat it and clean it with a damp cloth or running water. Illustration K b Reinsert the fully dried air inlet filter. c Check for correct seating.
3. Cleaning the air inlet filter with a filter cleaning
device. Note A new air inlet filter must be installed in the dust contain- er during filter cleaning. a Push the filter cleaning device on to the suction pipe branch and pull the air inlet filter out of the device using the filter stick. b Push the soiled air inlet filter into the filter clean- ing device. c Insert a new air inlet filter into the dust container. Illustration L d Switch on the device and let it run in boost mode while turning the side cover. Illustration M e Remove the cleaned air inlet filter from the filter cleaning tool and reinsert it in the dust container after removing the new air inlet filter. f Check that the air inlet filter is correctly seated. Cleaning the dust container and cyclone filter Note The dust container and cyclone filter can be cleaned with or without removing the dust container. We recommend removing the dust container from the device for easy cleaning. Note Before cleaning the dust container and cyclone filter, empty the dust container, see chapter Ending operation
1. Switch off the device.
2. Press the unlocking button for the dust container
and remove the dust container from the hand-held device. Illustration N a Remove the cyclone filter from the dust container by turning it anticlockwise. b Remove the cyclone filter from the dust container and take the air inlet filter out of the cyclone filter. Illustration O ATTENTION Short circuit hazard There are cables or contacts in the dust container and cyclone filter for the power supply. Make sure that the cables or contacts do not get wet when cleaning.
3. Clean the dust container and cyclone filter with a
soft brush or a slightly damp cloth. Illustration P
4. Clean the air inlet filter, see chapter Cleaning the air
inlet filter14 English
5. Re-insert the dry dust container and cyclone filter
with air inlet filter into the device and close the flap.
6. Attach the dust container to the handheld device.
a Hold the dust container at an angle against the handheld device while holding the top on the hook of the handheld device. b Push the dust container upwards until the hook on the handheld device engages in the slot in the dust container. c The dust container must audibly click into place. Illustration Q Clean the exhaust air foam filter/replace the exhaust air foam filter Note The exhaust air foam filter ensures pure exhaust air. ● Clean the exhaust air foam filter if it is visibly dirty. ● Replace the exhaust air foam filter if damage is vis- ible.
1. Switch off the device.
2. Clean the exhaust air foam filter.
a Press both side unlocking buttons at the same time and remove the cover with the exhaust air foam filter. Illustration R ATTENTION Short circuit hazard Power supply cables or contacts are located in the cov- er of the exhaust air foam filter. Before cleaning with water, remove the cover from the exhaust air foam filter so that the cables or contacts do not get wet.
3. Carefully tap off the exhaust air foam filter or if it is
heavily soiled: a Pull off the cover of the exhaust air foam filter. b Clean the exhaust air foam filter under running water. Do not rub or brush off. ATTENTION Health risk Exhaust air foam filters that are not completely dry when installed in the device can be a breeding ground for spores and mould. Make sure that the exhaust air foam filter is completely dry on installation. c Then allow the exhaust air foam filter to dry com- pletely. d Fasten the cover to the exhaust air foam filter. Illustration S e Insert the exhaust air foam filter into the device until it latches into place. f Press the cover down in the middle to ensure that the cover sits correctly on the device. Illustration U
4. Replace the exhaust air foam filter.
a Press both side unlocking buttons at the same time and remove the exhaust air foam filter. Illustration R b Remove the cover of the exhaust air foam filter and dispose of the used filter. c Fasten the new exhaust air foam filter to the cov- er. Illustration T d Insert the exhaust air foam filter into the device until it latches into place. e Press the cover down in the middle to ensure that the cover sits correctly on the device. Illustration U Cleaning the multi-function nozzle
1. Switch off the device.
2. Remove accessories.
ATTENTION Short circuit hazard The multi-function brush contains electrical compo- nents. You must not immerse the multi-function brush in water or clean it with a damp cloth.
3. Clean the multi-function brush.
a Unlock the brush roll cover / support with a coin or other object and remove it. Illustration V b Remove the brush roll from the brush opening in the direction of the arrow. Illustration W c Remove the dirt e.g. with a brush. If necessary, the brush roll can be cleaned under running wa- ter. The brush roll must be completely dry before re- installation. d Carefully clean the brush opening with a cloth or soft brush. Illustration X e Insert the brush roll into the brush opening. f Lock the brush roll with a coin or other object. Illustration Y Troubleshooting guide Malfunctions often have simple causes that you can remedy yourself using the following overview. When in doubt, or in the case of malfunctions not mentioned here, please contact your authorised Customer Service. The device does not start up Battery is empty. Charge the rechargeable battery. Battery is not inserted correctly. Push the battery into the mount until it locks into place. Battery is defective. Replace the battery. The battery is not charging The charging plug/mains plug is not connected correct- ly. Connect the charging plug/mains plug correctly. The socket is defective. Check that the socket is working. The wrong charger is being used Check that the correct charger is being used. The device stops during operation or the suction performance is poor The battery has overheated. Stop work and wait until the battery temperature is back in the normal range. The accessories, the suction opening on the dust con- tainer or the suction pipes are clogged. Remove the clog with a suitable aid. The dust container is full. Empty the dust container. The filters are soiled. Clean the filters, see chapter Care and service. Roller brush is blocked. Remove any blockage. Abnormal engine noise The accessories, the suction opening on the dust con- tainer or the suction pipes are clogged. Remove the clog with a suitable aid.Français 15 Removing / installing the battery ATTENTION Frequent removal of the battery Frequent removal can damage the battery. Only remove the battery for maintenance and mainte-nance work if the device is not used for a long period of time or if the device has to be sent for service purposes. Removing the battery
1. Press the unlocking button.2. Remove the battery from the device.Illustration Z
- Inserting the battery ATTENTION Dirty contactsDamage to the device and batteryCheck the battery mount and the contacts for soiling and clean them as necessary before inserting the bat-tery. Note Use only fully charged batteries.1. Push the battery into the mounting in the device until it audibly latches into place.Illustration AA Technical data Subject to technical modifications. Contenu Remarques générales Veuillez lire le présent le manuel d'ins-tructions original et les consignes de sé-curité jointes avant la première utilisation de l'appareil. Suivez ces instructions.Conservez les deux manuels pour une utilisation ulté-rieure ou pour le propriétaire suivant. Utilisation conforme ● Utiliser l'appareil uniquement pour un usage ména- ger privé.● L’appareil est exclusivement destiné au nettoyage de surfaces sèches.● L'utilisation suivante est considérée non conforme : – Aspiration sur des personnes, des animaux, des plantes ou des vêtements portés sur le corps. – Aspiration d’eau ou d’autres liquides. – Aspiration de cendres incandescentes, de char- bon, de cigarettes ou d’autres substances com-bustibles ou facilement inflammables. – Utilisation à proximité de substances explosives ou facilement inflammables. Protection de l'environnement Les matériaux d'emballage sont recyclables. Veuillez éliminer les emballages dans le respect de l’environnement.Les appareils électriques et électroniques contiennent des matériaux précieux recyclables et souvent des composants tels que des piles, batteries ou de l’huile représentant un danger po-tentiel pour la santé humaine et l'environnement, s'ils ne sont pas manipulés ou éliminés correctement. Ces composants sont cependant nécessaires pour le fonc-tionnement correct de l'appareil. Les appareils marqués par ce symbole ne doivent pas être jetés dans les or-dures ménagères.Remarques concernant les matières composantes (REACH)Les informations actuelles concernant les matières composantes sont disponibles sous : www.kaer-cher.com/REACH Accessoires et pièces de rechange Utiliser exclusivement des accessoires et pièces de re-change originaux. Ceux-ci garantissent le fonctionne-ment sûr et sans défaut de votre appareil.Des informations sur les accessoires et pièces de re-change sont disponibles sur le site Internet www.kaer-cher.com. Garantie Les conditions de garantie publiées par notre société commerciale compétente s'appliquent dans chaque pays. Nous remédions gratuitement aux défauts pos-sibles sur votre appareil dans la durée de garantie dans Electrical connectionVoltage of charger V 21,6Nominal power W 140Battery pack type Li-IONCharger 26 V TEK *EUModel YLJXA-E260040Part number 9.769-119.0Nominal voltage of charger V 100 - Frequency Hz 50 - 60Charging time when the battery is completely dischargedmin 390Protection class IIDevice performance dataTank content l 0,65Operating time when battery is ful-ly charged in normal operationmin 30Operating time in maximum mode when battery fully chargedmin 18Dimensions and weightsWeight (without accessories) kg 1,55 Remarques générales p. 15
- Utilisation conforme p. 15
- Protection de l'environnement p. 15
- Accessoires et pièces de rechange p. 15
- Garantie p. 15
- Etendue de livraison p. 16
- Description de l'appareil p. 16
- Montage du support mural p. 16
- Mise en service p. 16
- Utilisation p. 17
- Utilisation des accessoires p. 17
- Transport p. 18
- Stockage p. 18
- Entretien et maintenance p. 18
- Dépannage en cas de défaut p. 19
- Caractéristiques techniques Français la mesure où la cause du défaut est un vice de matériau ou de fabrication. En cas de garantie, veuillez vous adresser à votre distributeur ou au point de service après-vente autorisé le plus proche avec la facture d'achat. (Voir l'adresse au dos) Etendue de livraison L’étendue de livraison de l’appareil est illustrée sur l'em- ballage. Lors du déballage, vérifiez que le contenu de la livraison est complet. Si un accessoire manque ou en cas de dommage dû au transport, veuillez informer votre distributeur. Description de l'appareil Selon le modèle choisi, il existe des différences d’équi- pement. L’équipement spécifique est décrit sur l’embal- lage de l’appareil. Pour les figures, voir la page des graphiques. Illustration A 1 Témoin LED batterie/message d’erreur 2 Touches de déverrouillage pour le retrait du filtre à air vicié en mousse 3 Cache du filtre à air vicié en mousse 4 Touche fonction Boost (augmentation de la puis- sance d’aspiration) 5 Interrupteur Marche/Arrêt avec levier de verrouil- lage 6 Poignée 7 Batterie remplaçable 8 Touche de déverrouillage de l’accumulateur 9 Touche de déverrouillage pour le retrait du bac à poussière 10 Filtre d’entrée d’air 11 Clapet du bac à poussière 12 Bac à poussière amovible 13 Touche de déverrouillage du clapet de protection du bac à poussière 14 Embout d’aspiration du bac à poussière 15 Brosse électrique motorisée avec brosse-rouleau universelle 16 Tube d'aspiration 17 Suceur fentes 18 Brosse combinée 2 en 1 19 Support mural 20 Chargeur 21 ** Filtre d’entrée d’air (2x) 22 ** Outil de nettoyage de filtre ** VC 4 Cordless Premium myHome Montage du support mural La livraison comprend un support mural ainsi que des vis et des chevilles pour le rangement correct de l’aspi- rateur. Remarque Monter le support mural à un endroit approprié à l’aide des vis et des chevilles fournies. Pour ranger l’appareil en toute sécurité, placer le bord inférieur du support mural à 1,04 m du sol. Illustration E ATTENTION Dommages matériels dus à un montage incorrect Un montage incorrect peut endommager à la fois l’ap- pareil et le revêtement de sol en cas de chute. Utilisez des outils de montage appropriés pour le mon- tage mural. Lors de la sélection des éléments de fixation, tenez compte du poids de l’appareil et de la portance du lieu de pose. 몇 AVERTISSEMENT Risque d’électrocution et de blessure Assurez-vous qu’il n’y a pas de câbles électriques, de conduites d’eau ou de gaz dans le mur autour de la zone de montage. Mise en service Montage des accessoires Remarque La brosse multifonction est également entraînée par son propre moteur intégré et doit donc toujours être di- rectement raccordée à l’appareil portatif ou au tube d’aspiration pour que l’alimentation électrique soit assu- rée. Tous les autres accessoires peuvent également être uti- lisés directement avec l’appareil portatif ou avec le tube d’aspiration pour augmenter la portée. Pousser le tube d’aspiration sur l’embout d’aspira- tion du bac à poussière jusqu’à ce qu’il s’enclenche de manière audible. Appuyer sur la touche de déverrouillage et retirer le tube d’aspiration de l’embout d’aspiration. Illustration B Pousser la buse pour sol sur le tube d’aspiration jusqu’à ce qu’elle s’enclenche de manière audible. Appuyer sur la touche de déverrouillage et retirer la buse pour sol du tube d’aspiration. Illustration C Pousser l’accessoire, p. ex. le suceur fentes, sur l’embout d’aspiration du bac à poussière ou sur le tube d’aspiration jusqu’à ce qu’il s’enclenche de ma- nière audible. Illustration D Charger la batterie Remarque L’appareil est livré sans batterie chargée. Chargez en- tièrement la batterie avant la première mise en service. Veuillez respecter les consignes de sécurité jointes re- latives aux aspirateurs sans fil. p. 2016