
P5735SS - Doorbells Emos - Free user manual and instructions
Find the device manual for free P5735SS Emos in PDF.
| Product type | Wireless doorbell |
| Brand | Emos |
| Model | P5735SS |
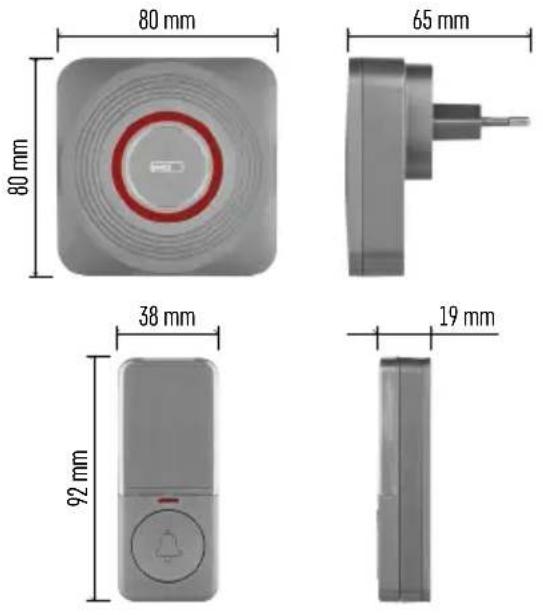
| Maximum range | 150 m outdoors (about 30 m indoors) |
| Button protection rating | IP44 (weatherproof) |
| Chime power supply | 230 V AC / 50 Hz |
| Button power supply | 1 CR2032 lithium battery (3 V) included |
| Transmission frequency | 433.92 MHz, 10 mW e.r.p. max |
| Number of melodies | 52 built-in melodies |
| Number of pairable buttons | Up to 8 buttons (2 via app) |
| Adjustable volume levels | 5 levels (100% to 0%) |
| Pairing method | Self-learning or via app |
| Compatible mobile app | EMOS GoSmart (iOS and Android) |
| App features | Ringing history, individual button settings, notifications, sound/light modes |
| Ringing modes per button | Sound only, light only, light + fixed LED, sound + light, sound + light + fixed LED |
| Memory in case of power failure | Yes, paired button codes are saved |
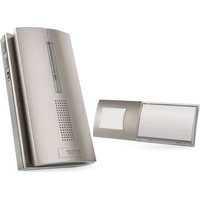
| Package contents | Chime, button, CR2032 battery, double-sided adhesive tape, manual |
| Maintenance and cleaning | Unplug the chime, clean with a soft damp cloth and a little soap. Do not use harsh solvents. |
| Safety instructions | The chime is intended for indoor use only. Do not expose to shocks, high temperatures, or humidity. Keep batteries out of reach of children. |
| Used batteries | Do not throw into fire, disassemble, or short-circuit. Follow local regulations. |
Frequently Asked Questions - P5735SS Emos
User questions about P5735SS Emos
0 question about this device. Answer the ones you know or ask your own.
Ask a new question about this device
Download the instructions for your Doorbells in PDF format for free! Find your manual P5735SS - Emos and take your electronic device back in hand. On this page are published all the documents necessary for the use of your device. P5735SS by Emos.
USER MANUAL P5735SS Emos
GB Wireless doorbell
natural_image
Four different electronic devices with red circular indicators and a bell icon, shown from different angles (no text or symbols visible)
Contents
Safety Instructions and Warnings 2
Technical Specifications....3
Description 4
Installation and Assembly 6
Mobile App....8
Controls and Functions ....10
Troubleshooting FAQ....13
Safety Instructions and Warnings
Read the user manual before using the device.
Follow the safety instructions in the manual.
- The chime (receiver) is designed for indoor use in dry environments only.
- The chime must be placed in an easily accessible location for ease of handling and unplugging.
- Occasionally check the functioning of the doorbell button and replace the battery in a timely manner. Use only high-quality lithium batteries with the prescribed parameters.
- When the doorchime is not used for a long time, remove the battery from the doorbell button.
- Do not subject the button or chime to excessive vibrations and shocks.
- Do not subject the button or chime to excessive heat and direct sunlight or moisture.
- When cleaning the chime, unplug it from the socket.
- To clean the device, use a slightly moistened cloth with a small amount of detergent; do not use aggressive cleaning agents or solvents.
- The manufacturer is not liable for damage caused by improper use of the device.
- Do not throw batteries into a fire and do not disassemble or short-circuit them.
- Keep the batteries out of reach of children. Ingestion may result in poisoning by chemicals, perforation of soft tissues and death.
- Severe poisoning may occur within two hours of first issues appearing. Seek medical attention immediately.
- The appliance is not intended for use by persons (including children) whose physical, sensory or mental disability, or lack of experience and expertise prevents safe use, unless they are supervised or instructed in the use of the appliance by a person responsible for their safety. Children must always be supervised to ensure they do not play with the appliance.
EMOS spol. s r.o. hereby declares that radio device type P5735SS and P5735WS complies with directive 2014/53/EU.
The full wording of the EU declaration of conformity is available at http://www.emos.eu/download.

Technical Specifications
Transmission range: up to 150 m in an open area (can drop down to one fifth in a busy area)
Button: water resistant; IP44 enclosure rating
Pairing the chime with buttons: self-learning function
Pairing capacity: maximum of 8 buttons per 1 chime, maximum of 2 buttons per 1 chime in the EMOS GoSmart app
Number of ringtones: 52
Transmission frequency: 433.92 MHz, 10 mW e.r.p. max.
Chime power supply: 230 V AC/50 Hz
Button power supply: 1×3 V battery (type CR2032, included)
Includes: double-sided adhesive tape

Description
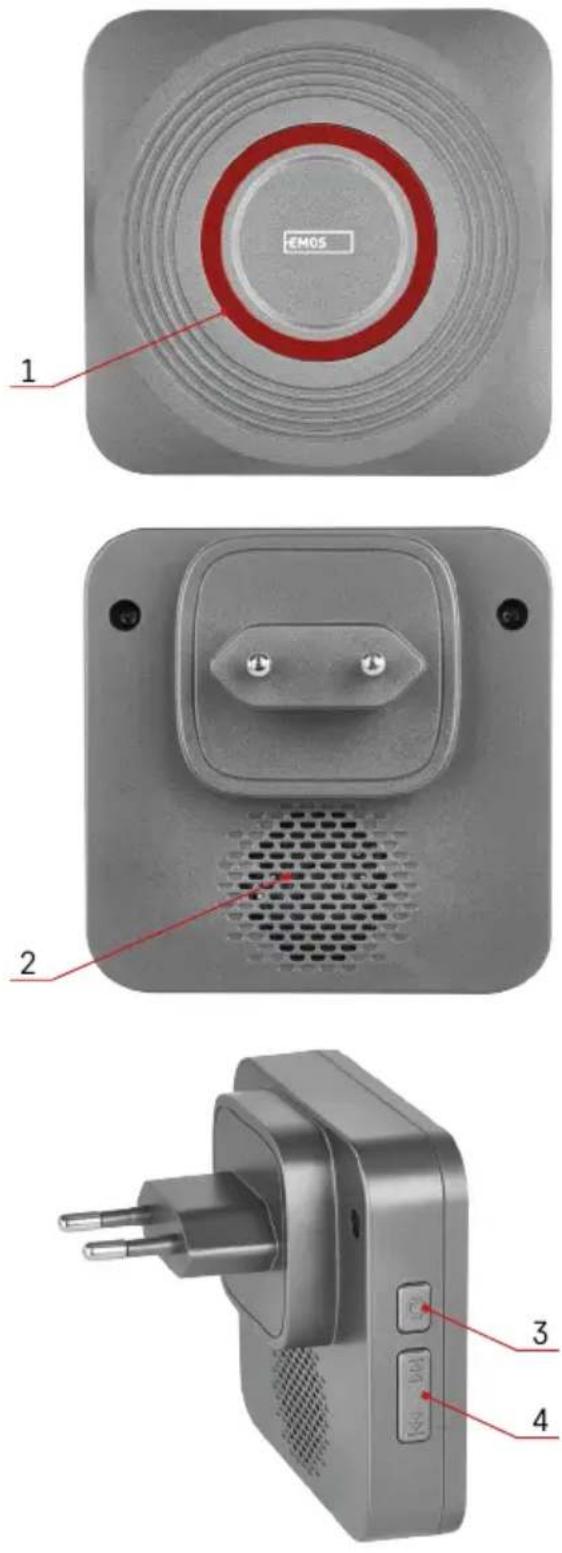
Chime Description
1 - bell LED
2-speaker
3 - volume setting button
4 - ringtone setting button
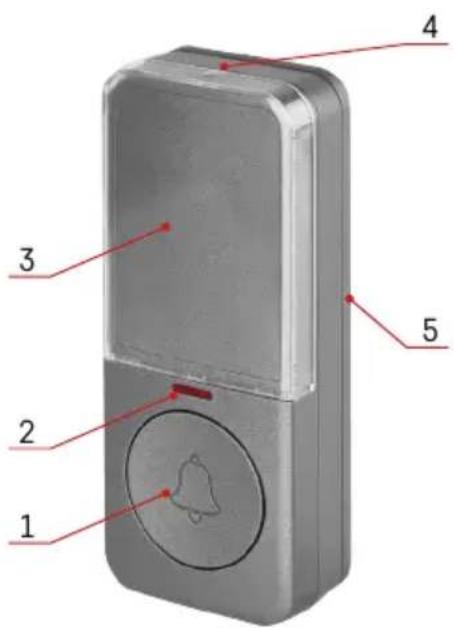
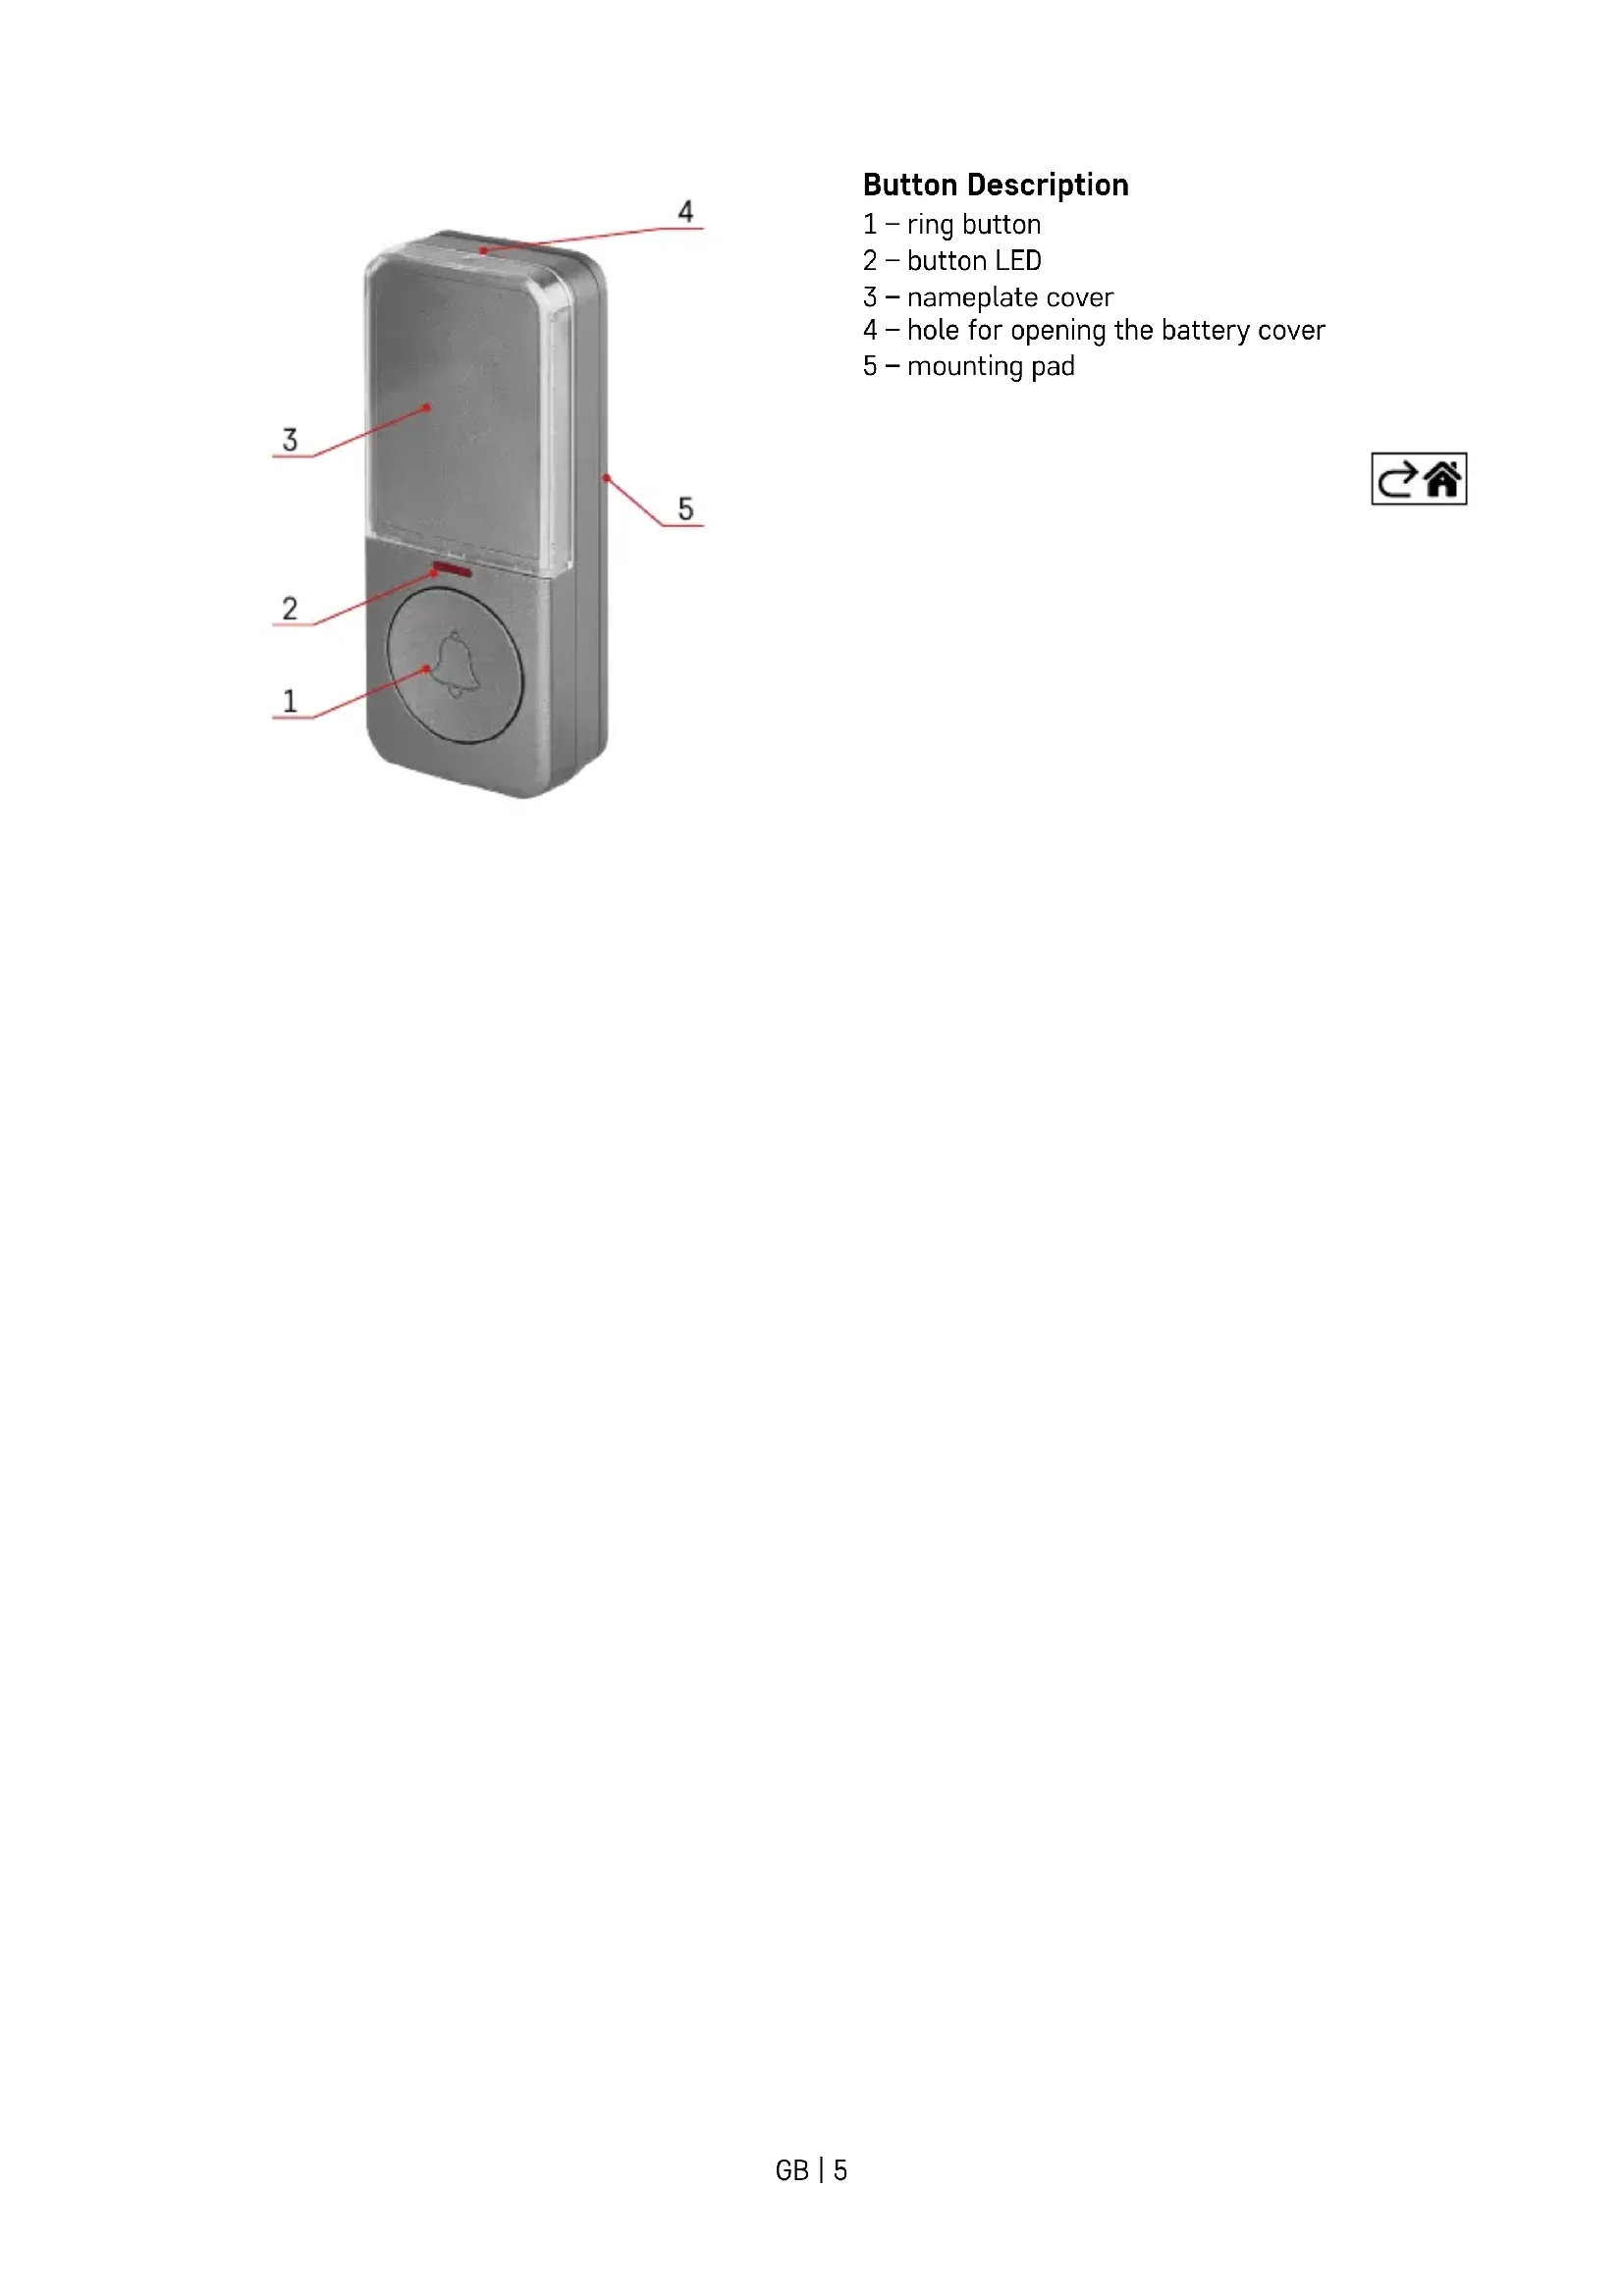
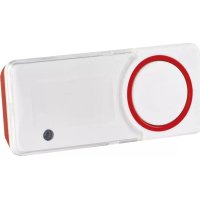
Button Description
1 - ring button
2 - button LED
3 - nameplate cover
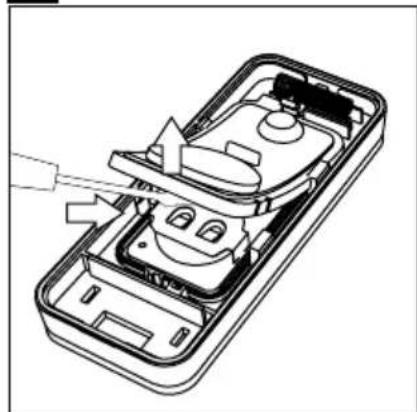
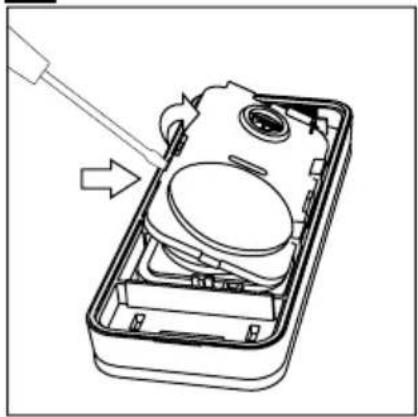
4 - hole for opening the battery cover
5 - mounting pad

Installation and Assembly
Pairing the Button with the Chime
- Plug the doorbell into a 230 V AC/50 Hz socket.
- Then, long-press the pairing button on the chime for ca. 5 seconds.
- The chime LED will light up; release the ⏻ button. The chime will switch to self-learning pairing mode which lasts for 25 seconds.
During this time, press the ring button. The chime will ring and the button is now paired with the chime.
This automatically ends self-learning mode.
4. To pair multiple buttons, repeat the process for each button from step 1.
Note: The chime has an internal memory where it stores the codes of the currently paired buttons for the event of a power failure. There is thus no need to pair buttons again after a power cut.
Erasing the Memory of Paired Buttons
Press and hold the pairing button 📋 on the chime.
Plug the chime into a socket.
The LED of the chime will light up after ca. 5 seconds. Release the button. The LED will turn off.
The memory of all paired buttons will be erased including the buttons in the app.
Installing the Doorbell Button (Transmitter)
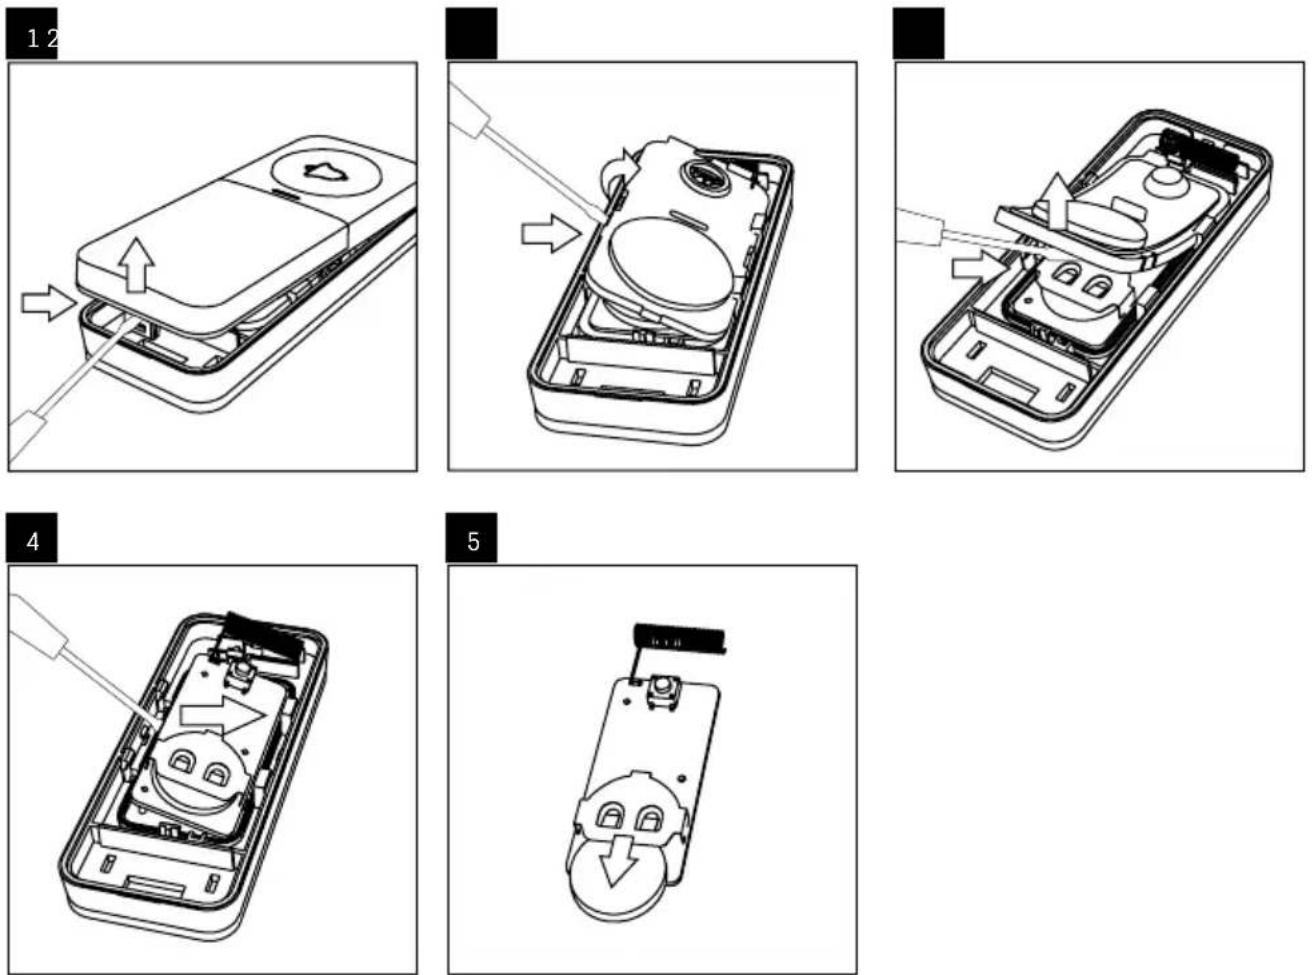
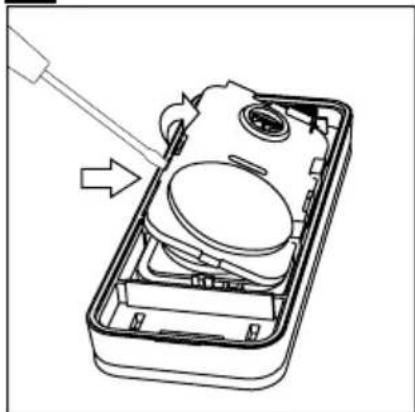
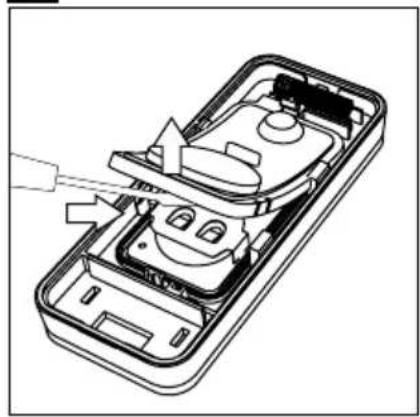
- Insert a battery into the button, see "Changing the Button's Battery" below.
- Begin by pairing the button with the chime.
- Before installation, verify the reliable function of the kit at the selected place.
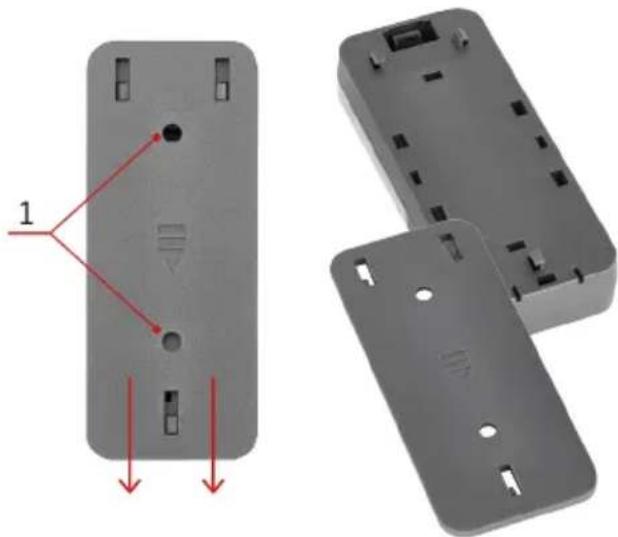
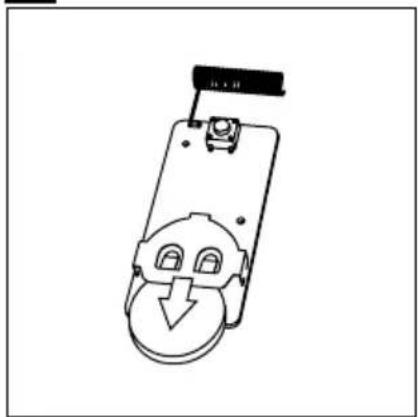
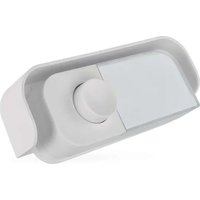
- Remove the mounting pad from the battery cover, see the fig. 3.
natural_image
3D CAD model of a gray plastic enclosure with internal components and red arrows indicating features (no text or symbols)1 - holes for screws
- Use the double-sided adhesive tape (included) or two screws (not included) to fix the back of the mounting pad to the wall. Although the button is weather resistant, choose a location where it is protected, e.g. in a wall recess.
- Fit the mounting pad back onto the button.
- Press the button to ring the chime. Pressing is accompanied the button's LED lighting up, indicating the button has sent a radio signal. The chime plays the selected ringtone.
Note: The doorbell button (transmitter) can be placed on wood or brick walls without issue. However, never place the button directly onto metal objects or materials containing metal, such as plastic windows or doors that have a metal frame. In such cases, the transmitter will not work properly.
Installing the Chime (Receiver)
- The chime is designed for indoor use only. When running, it must be plugged in a 230 V AC/50 Hz socket and with free space around it so that it is always accessible.
- The transmission range (max. 150 m) is influenced by local conditions, such as the number of walls through which the signal passes, metal door frames and other elements which affect the transmission of radio signals (presence of other radio devices operating at a similar frequency, such as wireless thermometers, gate controls etc.). Transmission range can decrease drastically due to these factors.
Selecting a Ringtone
- Repeatedly press the ringtone change button or located on the chime.
- Each press of the button will play a different ringtone. The last ringtone played is the one that will be used.
Setting the Bell Volume
You can set 5 volume levels.
Repeatedly press the button on the chime. Each press changes the volume level (100 % - 75 % - 50 % - 25 % - 0 %). At 0 %, ringing is indicated only by the bell LED flashing.
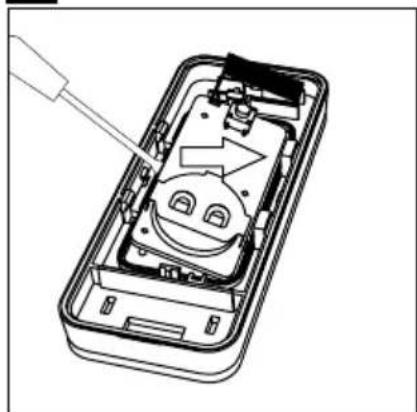
Changing the Button's Battery

Mobile App


The chime can be controlled using a mobile app for iOS or Android.
Download the EMOS GoSmart app for your device.
Tap the Log In button if you've used the app before.
Otherwise, tap the Sign Up button and register.
Pairing with the App

Plug the chime into a 230 V AC/50 Hz socket; the chime's LED will start flashing.
The LED is not flashing, long-press the or button for approx. 5 seconds.
Tap Add Device in the app.
Tap the GoSmart list on the left and tap the Doorchime silver P5735SS / Doorchime white P5735WS icon Follow the instructions in the app and enter the name and password for your 2.4 GHz Wi-Fi network. The pairing with the app will be completed within 2 minutes; the LED light will stop flashing.
Note: If the device fails to pair, repeat the process. 5 GHz Wi-Fi networks are not supported.

Controls and Functions
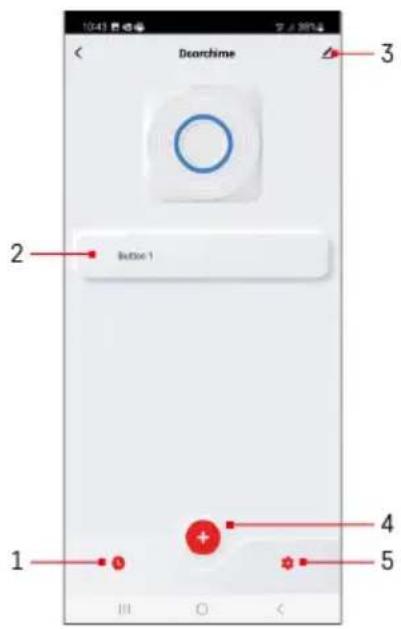
App Menu
1 - ring history
2 - button settings
3 - advanced settings
4 - pairing of the button with the app
5 - ring notification settings
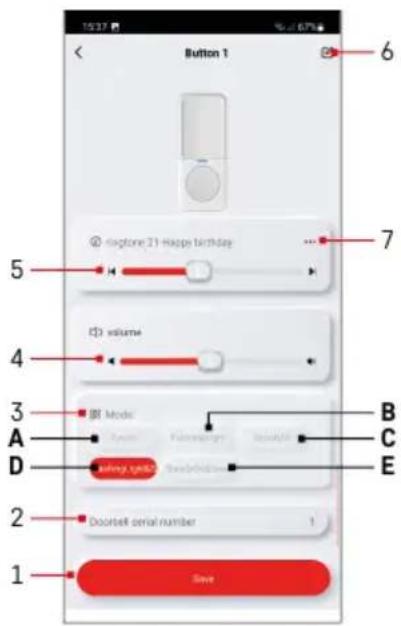
Button Settings
1 - save settings
2 - ordinal number of the button
3 - ring mode settings (this setting only applies to buttons paired in the app)
4 – volume settings (this setting only applies to buttons paired in the app)
5 - ringtone settings (this setting only applies to buttons paired in the app)
6 - rename the button
7 – display list of ringtones
Ring Mode Settings
You can set a different ring mode for each button paired with the app:
A - acoustic signalisation only
B – optical signalisation only
C - optical signalisation only + LED constantly lit
D - acoustic + optical signalisation
E - acoustic and optical signalisation + LED constantly lit
Save the setting using the button at the bottom.
Volume Settings
You can set a different volume for each button paired with the app.
You can set 5 volume levels.
Adjust volume using the slider or the left/right speaker icon (100 % - 75 % - 50 % - 25 % - 0 %). At 0 %, ringing is indicated only by the bell LED flashing.
Save the setting using the button at the bottom.
Ringtone Settings
You can set a different ringtone for each button paired with the app to better identify which button was pressed to ring the chime.
Set the ringtone using the slider or the left/right arrow icon.
Save the setting using the button at the bottom.
Pairing the Button with the Chime in the App
Tap the icon; the button will switch to self-learning pairing mode, which lasts for 30 seconds.
During this time, press the ring button. The chime will ring and the button is now paired with the chime in the app.
This automatically ends self-learning mode.
To pair another button, repeat the process.
A maximum of 2 buttons can be paired in the app.
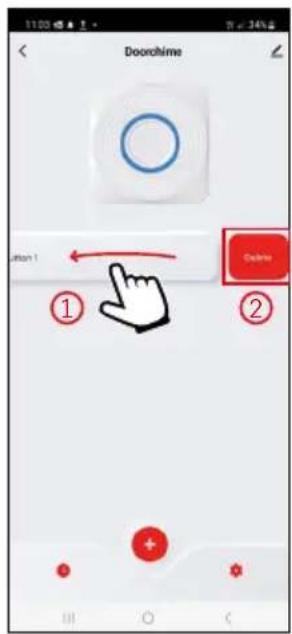
Erasing the Memory of Paired Buttons
Slide the chosen button to the left ① and confirm deletion. ②
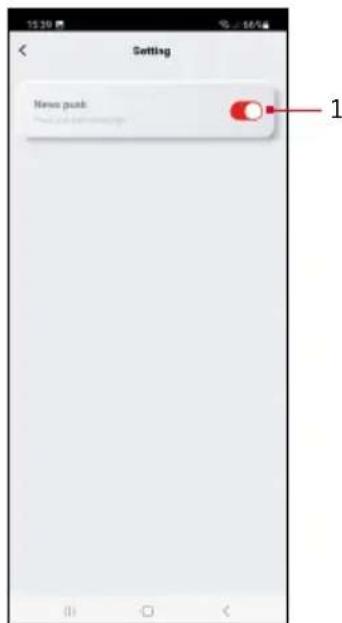
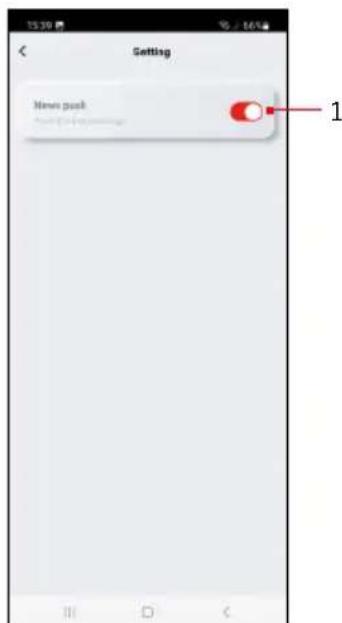
Ring Notification Settings
1 - activate displaying of notifications of button presses
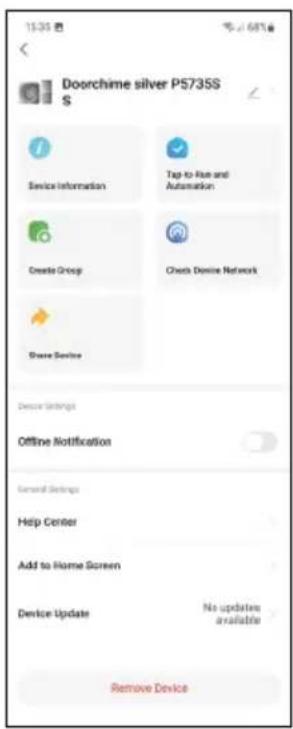
Advanced Settings
- Device Information – basic information about the device
- Tap-To-Run and Automation – scenes and automations assigned to the device
- Create Group – creates a group of similar devices
- Check Device Network – Wi-Fi network test
- Share Device – shares control of the device with another person
- Offline Notification – notifies when the device is offline for over 8 hours (e.g. power outage)
- Help Center – displays frequently asked questions and their solutions and provides the option to send us a question/suggestion/feedback directly
- Add to Home Screen – adds an icon for the device on the phone's home screen
- Device Update – updates the device
- Remove Device – unpairs the device

Troubleshooting FAQ
The chime does not ring
• The chime may be out of range.
- Change the distance between the button and the chime; the range may be affected by local conditions.
- The button's battery may be low.
- Replace the battery. Make sure it has the correct polarity with the + side up.
- Pair the button with the chime again.
• The chime is not powered.
- Make sure the chime is properly plugged into the socket and that power is on or the fuse/circuit breaker for the branch is on.

P5735SS | P5735WS
natural_image
Four different electronic devices with red circular indicators and a bell icon, shown from different angles (no text or symbols visible)
Obsah
natural_image
3D CAD model of a gray plastic enclosure with internal components and red arrows indicating features (no text or symbols)1 – otvory na šroubek

natural_image
Four different electronic devices with red circular indicators and a bell icon, shown from different angles (no text or symbols visible)
Obsah
natural_image
3D model of a gray plastic enclosure with internal components and red arrows indicating features (no text or symbols)1 - otvory na skrutku

natural_image
Four different electronic devices with red circular indicators and a bell icon, shown from different angles (no text or symbols visible)
Spis treści
natural_image
3D CAD model of a gray plastic enclosure with internal components and red arrows indicating features (no text or symbols)
natural_image
Four different electronic devices with red circular indicators and a bell icon, shown from different angles (no text or symbols visible)
Tartalom
natural_image
3D CAD model of a gray plastic enclosure with internal components and red arrows indicating features (no text or symbols)1 – rögzítőfuratok

natural_image
Four different electronic devices with red circular indicators and a bell icon, shown from different angles (no text or symbols visible)
Kazalo
Varnostna navodila in opozorila 2
Tehnična specifikacija ....3
Opis....4
Opis tipke
natural_image
3D CAD model of a gray plastic enclosure with internal components and red arrows indicating features (no text or symbols)
Napredne nastavitve
natural_image
Four different electronic devices with red circular indicators and a bell icon, shown from different angles (no text or symbols visible)
Obsah
Sigurnosne upute i upozorenja ....2
natural_image
3D CAD model of a gray plastic enclosure with red annotations indicating features (no text or symbols present)1 - 0tvori za vijke

Brisanje memorije uparenih gumba
Pomaknite odabrani gumb u lijevo ① potvrdite brisanje . ②
Napredne postavke
- Informacije o uređaju – Osnovne informacije o uređaju
- Pokretanje na dodir i automatizacija – Prizori i automatizacije dodijeljene uređaju
- Stvaranje grupe – Stvara grupu sličnih uređaja
- Provjera mreže uređaja – Testiranje Wi-Fi mreže
- Dijeljenje uređaja – Dijeli kontrolu nad uređajem s drugom osobom
- Izvanmrežna obavijest – Obavještava kada je uređaj izvan mreže više od 8 sati (npr. nestanak struje)
- Centar za pomoć – Prikazuje česta pitanja i njihova rješenja te nudi opciju za izravno slanje upita/prijedloga/povratne informacije
- Dodavanje na početni zaslon – Dodaje ikonu za uređaj na početni zaslon telefona
- Ažuriranje uređaja – Ažurira uređaj
- Uklanjanje uređaja – Poništava uparivanje uređaja

natural_image
Four different electronic devices with red circular indicators and a bell icon, shown from different angles (no text or symbols visible)
Inhalt
natural_image
3D CAD model of a gray plastic enclosure with internal components and red arrows indicating features (no text or symbols)
natural_image
Four different electronic devices with red circular indicators and a bell icon, shown from different angles (no text or symbols visible)
Зміст
natural_image
3D model of a gray plastic enclosure with internal components and red arrows indicating features (no text or symbols)1 – отвір на гвинти

natural_image
Four different electronic devices with red circular indicators and a bell icon, shown from different angles (no text or symbols visible)
Cuprins
natural_image
3D CAD model of a gray plastic enclosure with internal components and red arrows indicating features (no text or symbols)
Ştergerea memoriei butoanelor asociate
Setări avansate
natural_image
Four different electronic devices with red circular indicators and a bell icon, shown from different angles (no text or symbols visible)
Turinys
natural_image
3D CAD model of a gray plastic enclosure with internal components and red arrows indicating features (no text or symbols)
natural_image
Four different electronic devices with red circular indicators and a bell icon, shown from different angles (no text or symbols visible)
Saturs
natural_image
Two views of a gray plastic enclosure with internal components and red arrows indicating features (no text or symbols present)1 – caurumi skrūvēm

Zvanu var vadīt ar iOS vai Android mobilo lietotni.
natural_image
Four different electronic devices with red circular indicators and a bell icon, shown from different angles (no text or symbols visible)
Sisukord
Nuppude kirjeldus
1 - helinanupp
2 - nupu LED
3 - nimeplaadi kate
4 - avaus patareipesa kaane avamiseks
5 – paigaldusalus

natural_image
Diagram of a device with an open lid and internal components, showing directional arrows (no text or symbols)m = 311
natural_image
Diagram of a device inside a rectangular housing with internal components and an arrow indicating direction (no text or symbols)The image is too blurry to recognize any text content.
natural_image
Technical line drawing of an open mobile phone casing with internal components and a tool inserted (no text or symbols)4
natural_image
Technical line drawing of an open electronic device with internal components and a tool inserted (no text or symbols)5

natural_image
Simple line drawing of a mechanical device with a circular component and a downward arrow, no text or symbols present.
Mobiilirakendus


Helinatoonide seaded
Helinateadete seaded
Täpsemad seaded
natural_image
Four different electronic devices with red circular indicators and a bell icon, shown from different angles (no text or symbols visible)
Съдържание
Описание на бутона
natural_image
3D model of a gray plastic enclosure with internal components and red arrows indicating features (no text or symbols)
Разширени настройки
natural_image
Four different electronic devices with red circular indicators and a bell icon, shown from different angles (no text or symbols visible)
Sommaire
Application mobile....8
natural_image
3D model of a gray plastic enclosure with internal components and red arrows indicating features (no text or symbols)1 – Orifices destinés aux vis

Options avancées
natural_image
Four different electronic devices with red circular indicators and a bell icon, shown from different angles (no text or symbols visible)
Indice
natural_image
3D CAD model of a gray plastic enclosure with internal components and red arrows indicating features (no text or symbols)
natural_image
Four different electronic devices with red circular indicators and a bell icon, shown from different angles (no text or symbols visible)
Inhoud
natural_image
3D model of a gray plastic enclosure with internal components and red arrows indicating features (no text or symbols)1 - schroefgaten

Instellingen belmelding
natural_image
Four different electronic devices with red circular indicators and a bell icon, shown from different angles (no text or symbols visible)
Contenido
natural_image
3D CAD model of a gray plastic enclosure with internal components and red arrows indicating features (no text or symbols)
natural_image
Four different electronic devices with red circular indicators and a bell icon, shown from different angles (no text or symbols visible)
Conteúdo
natural_image
3D model of a gray plastic enclosure with internal components and red arrows indicating features (no text or symbols)Instalar a campainha (recetor)

natural_image
Four different electronic devices with red circular indicators and a bell icon, shown from different angles (no text or symbols visible)
Περιεχόμενα
natural_image
3D model of a gray plastic enclosure with internal components and red arrows indicating features (no text or symbols)1 - Οπές για βίδες
natural_image
Diagram of a device's internal structure showing a handle and lock mechanism (no text or symbols)The image is too blurry to recognize any text content.
natural_image
Diagram of a device inside a rectangular housing with internal components and an arrow indicating rotation (no text or symbols)The Ground Truth image displays a single, solid horizontal line. According to Rule 2 (UNDERSCORE & LINE RULES), this is a stylistic or background line, not a placeholder underscore. Therefore, the OCR result must ignore it. The provided OCR content is "____", which consists of four underscores. This is an incorrect interpretation of the line as a placeholder, violating the rule that stylistic lines must be ignored. The OCR has hallucinated text (underscores) where none should exist. Hence, the result is inconsistent with the Ground Truth.
natural_image
Technical line drawing of a device's internal components, showing a handle and wiring (no text or symbols)4

natural_image
Diagram of a device interior with a tool inserted, showing internal components and a smiley face (no text or symbols)5
natural_image
Simple line drawing of a mechanical device with a circular component and a downward arrow, no text or symbols present.

Σύνθετες ρυθμίσεις
natural_image
Four different electronic devices with red circular indicators and a bell icon, shown from different angles (no text or symbols visible)
Innehåll

natural_image
Four different electronic devices with red circular indicators and a bell icon, shown from different angles (no text or symbols visible)
Sisällys
natural_image
3D CAD model of a remote control casing with red arrows indicating component alignment (no text or symbols)1 - ruuvinreiät

natural_image
Four different electronic devices with red circular indicators and a bell icon, shown from different angles (no text or symbols visible)
Indhold
natural_image
3D model of a gray plastic enclosure with internal components and red arrows indicating features (no text or symbols)
Avancerede indstillinger


- Contents
- Safety Instructions and Warnings
- Technical Specifications
- Description
- Chime Description
- Button Description
- Installation and Assembly
- Pairing the Button with the Chime
- Erasing the Memory of Paired Buttons
- Installing the Doorbell Button (Transmitter)
- Installing the Chime (Receiver)
- Selecting a Ringtone
- Setting the Bell Volume
- Changing the Button's Battery
- Mobile App
- Pairing with the App
- Controls and Functions
- App Menu
- Button Settings
- Ring Mode Settings
- Volume Settings
- Ringtone Settings
- Pairing the Button with the Chime in the App
- Ring Notification Settings
- Advanced Settings
- Troubleshooting FAQ
- The chime does not ring
- P5735SS | P5735WS
- Obsah
- Spis treści
- Tartalom
- Kazalo
- Opis tipke
- Napredne nastavitve
- Brisanje memorije uparenih gumba
- Napredne postavke
- Inhalt
- Зміст
- Cuprins
- Ştergerea memoriei butoanelor asociate
- Setări avansate
- Turinys
- Saturs
- Sisukord
- Nuppude kirjeldus
- Mobiilirakendus
- Helinatoonide seaded
- Helinateadete seaded
- Täpsemad seaded
- Съдържание
- Описание на бутона
- Разширени настройки
- Sommaire
- Options avancées
- Indice
- Inhoud
- Instellingen belmelding
- Contenido
- Conteúdo
- Instalar a campainha (recetor)
- Περιεχόμενα
- Σύνθετες ρυθμίσεις
- Innehåll
- Sisällys
- Indhold
- Avancerede indstillinger
Brand : Emos
Model : P5735SS
Category : Doorbells