
SBSLAB150 - Dry bath STEINBERG - Free user manual and instructions
Find the device manual for free SBSLAB150 STEINBERG in PDF.
| Product type | Dry bath |
| Brand | Steinberg |
| Model | SBSLAB150 |
| Rated voltage | 100-240 V~ |
| Frequency | 50-60 Hz |
| Input power | 50 W |
| Protection class | II |
| Temperature control range | Ambient temperature +5 to 100 °C |
| Time range | 1 minute to 99 hours 59 minutes |
| Standard block | 15 holes × 1.5 ml |
| Dimensions (W × D × H) | 110 × 185 × 136 mm |
| Weight | 1.05 kg |
| Display | Digital with temperature and time |
| Programming | Up to 5 segments (S1 to S5) with multipoint linking |
| Operation | Microcomputer control |
| Cleaning | Soft cloth moistened with anhydrous alcohol for holes; mild cleaning paste for surface |
| Safety | Protection class II; disconnect power before cleaning |
| Disposal | Do not dispose of with household waste; recycle via WEEE collection points |
Frequently Asked Questions - SBSLAB150 STEINBERG
User questions about SBSLAB150 STEINBERG
0 question about this device. Answer the ones you know or ask your own.
Ask a new question about this device
Download the instructions for your Dry bath in PDF format for free! Find your manual SBSLAB150 - STEINBERG and take your electronic device back in hand. On this page are published all the documents necessary for the use of your device. SBSLAB150 by STEINBERG.
USER MANUAL SBSLAB150 STEINBERG
| S2 | 30.0 | 00:00 |
| S2 | 60.0 | 01:00 |
This User Manual has been translated using machine translation. We have made every effort to ensure the translation is accurate, but please note that automated translations are not perfect and are not meant to replace human translators. The official version of the User Manual is in English. Any differences between the translated version and the original English are not legally binding. If you have any questions about the accuracy of the translation, please refer to the English version, which is the official reference. More language versions are available upon request via info@expondo.com.
Technical data
| Parameter description Parameter value | |
| Product name Dry Bath | |
| Model | SBS-LAB-150 |
| Rated voltage [V~] / frequency [Hz] 100-240 / 50-60 | |
| Input power [W] 50 | |
| Protection class | II |
| Temperature control range [°C] | R.T + 5-100 |
| Timing range 1min-99h59min | |
| Standard block [holes*ml] 15*1.5 | |
| Dimensions [width * length * height; mm] 110*185*136 | |
| Weight [kg] 1.05 | |
Description
The product is a microcomputer-controlled device designed for a variety of laboratory applications. It is widely used for sample incubation, DNA amplification, electrophoresis pre-denaturation, and serum solidification, among other procedures.
The user is liable for any damage resulting from unintended use of the device.
Operation
Operation interface and buttons
- Operation panel and display view
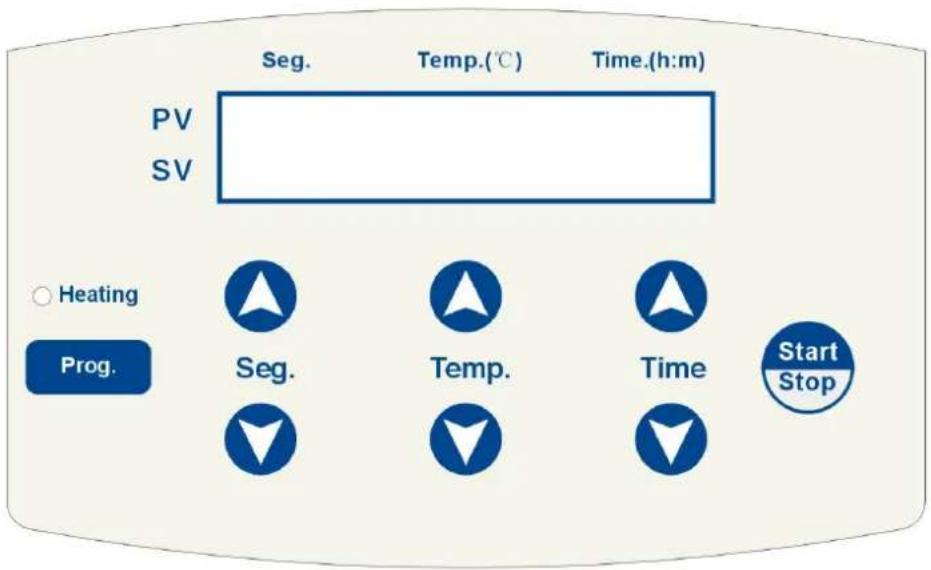
- Display screen
other
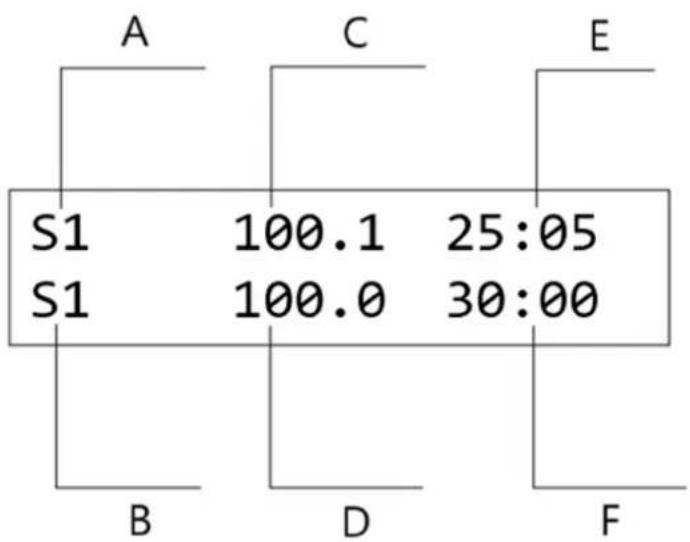
| Section | Value | | :--- | :--- | | S1 | 100.1 | | S1 | 100.0 | | 25:05 | 25:05 | | 30:00 | 30:00 |A- Current temperature node
B- Setting temperature node
C- Current temperature
D- Setting temperature
E- Remaining time
F- Setting time
- Button instructions
| Button | Instruction |
 | Program Selection: Select the desired program node, supporting up to five nodes: S1, S2, S3, S4, and S5. |
 | Temperature Setting: Use the temperature setting button to adjust the operating temperature. Press “▲ and ”▼ to modify the temperaturevalue. For faster adjustments, long press “▲and ” to change the digit position. |
| Time ▲▼ | Timing Setting: Use the timing setting button to set the duration. Press “▲ and “▼” to set the desired time. For quicker adjustments, long press “▲” and “”to change the digit position. |
| Prog. | Prog.Program Setting: Press the button to select the endpoint node. The start node defaults to S1. The following program sequences can be configured: S1-S2, S1-S2-S3, S1-S2-S3-S4, and S1-S2-S3-S4-S5. |
| Start/Stop | Start/Stop: Press the button to begin the program operation. Press again to stop the program. |
Operation instructions
1. Single-point program setting
a) Turn on the power switch, the display is shown in the figure below.
System-Testing
...
The instrument will initialize, accompanied by a "Beep" sound.
b) After 6 seconds, the display will show: "S1" as the last operating node, "30.0" as the current temperature of the blocks, "37.0" as the previously set temperature, and "10:00" as the previously set time. The temperature is displayed in "℃", and the time is shown in "hours: minutes". The display is shown in the figure below.
S1 30.0 00:00
S1 37.0 10:00
c) Press the Temp button to adjust the temperature value by increasing or decreasing the decimal place. If you long press the button for more than 3 seconds, the adjustment will quickly move from the unit to the tens place, allowing for faster changes.
Press the Time button to adjust the time value by increasing or decreasing it. Holding the button for more than 3 seconds will cause the adjustment to move quickly from the unit to the tens place, allowing for faster modifications.
e.g. To set the temperature to 40^ C and the time to 2 hours from 37^ C and 10 hours: Press the Temp button until it increases to 40^ C, then release the button. The instrument will automatically confirm and save the setting. Next, press the button until the setting decreases to 02:00, then release the button. The instrument will confirm and save the time. The temperature and time settings for the S1 node are now successfully configured. Press the Start/Stop button to run the program. The display is shown in the figure below.

flowchart
graph TD
    A["S1 30.0 00:00\nS1 37.0 10:00"] --> B["S1 30.0 00:00\nS1 40.0 02:00"]
    B --> C[""Start/Stop" button"]
Operate the single-point program
d) Press the Seg button to select and set the 5 temperature points for S1, S2, S3, S4, and S5. For example, press the button to select S2, then follow the previous step (c) to set the temperature and time for S2. The display is shown in the figure below.
Follow the same steps to set the temperature and time values for nodes S1 to S5. These five temperature points can be saved as commonly used settings, allowing the user to quickly select them when needed.
| S2 | 30.0 | 00:00 |
| S2 | 60.0 | 01:00 |
2. Multi-point program setting
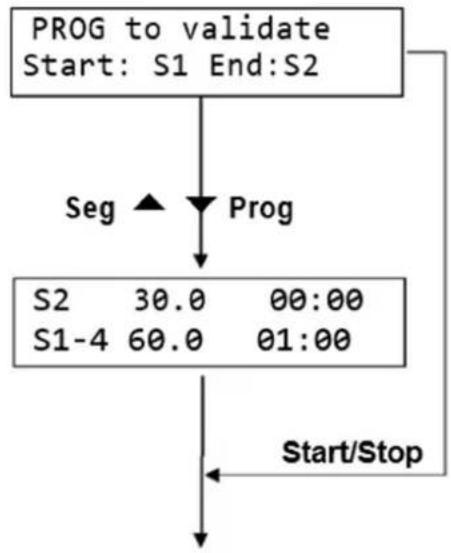
a) Press the Prog. button to combine the temperature points of S1, S2, S3, S4, and S5 into multi-point connection programs, such as S1-S2, S1-S2-S3, S1-S2-S3-S4, or S1-S2-S3-S4-S5.

NOTICE! The temperature point of the multi-point program can only start from S1.
b) E.g. To set a connection program for S1-S2-S3-S4, press the Prog. button. The display will show the current configuration, where S1 is the starting node (which cannot be changed) and S2 is the end node (which can be modified). Press the button to change S2 to S4. Then press Start/Stop button to confirm the setting. The node configuration will be displayed as S1-4, and the program will run through the S1-S2-S3-S4 sequence.
c) Press Start/Stop button again to run S1-S2-S3-S4 four-point connection program.
flowchart
graph TD
    A["PROG to validate\nStart: S1 End:S2"] --> B["Seg"]
    B --> C["Prog"]
    C --> D["S2 30.0 00:00\nS1-4 60.0 01:00"]
    D --> E["Start/Stop"]
Operate the multi-point program

NOTICE! After selecting the end node, you can press Start/Stop button to run the multi-point m directly.
Cleaning and maintenance
Use a clean, soft cloth moistened with a small amount of anhydrous alcohol to clean the taper holes in the instrument's blocks. This ensures full contact and efficient heat conduction between the test tube and the taper holes, while preventing contamination.
If stains appear on the instrument's surface, clean it with a soft cloth and a mild cleaning paste.

CAUTION
• Ensure the power supply is turned off before cleaning the instrument.
• DO NOT allow cleaning agents to enter the taper holes during cleaning.
- Avoid using corrosive cleaning agents on the instrument's surface.
Disposing of used devices
Do not dispose of this device in municipal waste systems. Hand it over to an electric and electrical device recycling and collection point. Check the symbol on the product, instruction manual, and packaging. The plastics used to construct the device can be recycled following their markings. By choosing to recycle you are making a significant contribution to the protection of our environment.
Contact local authorities for information on your local recycling facility.

| S2 | 30.0 | 00:00 |
| S2 | 60.0 | 01:00 |
| S2 | 30.0 | 00:00 |
| S2 | 60.0 | 01:00 |
| S2 | 30.0 | 00:00 |
| S2 | 60.0 | 01:00 |
| S2 | 30.0 | 00:00 |
| S2 | 60.0 | 01:00 |
| S2 | 30.0 | 00:00 |
| S2 | 60.0 | 01:00 |
| S2 | 30.0 | 00:00 |
| S2 | 60.0 | 01:00 |
| S2 | 30.0 | 00:00 |
| S2 | 60.0 | 01:00 |
| S2 | 30.0 | 00:00 |
| S2 | 60.0 | 01:00 |
| S2 | 30.0 | 00:00 |
| S2 | 60.0 | 01:00 |
| S2 | 30.0 | 00:00 |
| S2 | 60.0 | 01:00 |
2. Flerpunktsprograminnstilling
a) Trykk på Prog. for å kombinere temperaturpunktene til S1, S2, S3, S4 og S5 til flerpunkts tilkoblingsprogrammer, for eksempel S1-S2, S1-S2-S3, S1-S2-S3-S4 eller S1-S2-S3 -S4-S5.

| S2 | 30.0 | 00:00 |
| S2 | 60.0 | 01:00 |
| S2 | 30.0 | 00:00 |
| S2 | 60.0 | 01:00 |
| S2 | 30.0 | 00:00 |
| S2 | 60.0 | 01:00 |
2. Viacbodové nastavenie programu
| S2 | 30.0 | 00:00 |
| S2 | 60.0 | 01:00 |
| S2 | 30.0 | 00:00 |
| S2 | 60.0 | 01:00 |
| S2 | 30.0 | 00:00 |
| S2 | 60.0 | 01:00 |
| S2 | 30.0 | 00:00 |
| S2 | 60.0 | 01:00 |
| S2 | 30.0 | 00:00 |
| S2 | 60.0 | 01:00 |
| S2 | 30.0 | 00:00 |
| S2 | 60.0 | 01:00 |
For the disposal of the device please consider and act according to the national and local rules and regulations.
CONTACT
expondo Polska sp. z o.o. sp. k.
Brand : STEINBERG
Model : SBSLAB150
Category : Dry bath