USER MANUAL KIM 91221 B Koenic
natural_image
Black and white photo of a kitchen appliance with a circular top and control knob (no visible text or symbols)
(2) 1+1
E-mail: 123-78
1. 2017年1月1日
quale (2-3)
(1-40, 2) = 75
(1) AD = BD = 1
2014年
Mg · 41.52
(4) _1 (1)
(1) = 12( 1 + u1 - 1) + ·s + 1 = ( 1 + u) u1 < 1 = u
(1) 2016年7月
-
1.0000
(一)独立董事意见
9.64:5.3
1.4(1.6)
M. GONZEN ZHIYAN HONG
Innov. 24t+
[SIGNATURE]
E-17 In-3b4
L. "TIME"
5.6% FIBAO
8.651(元)
表决意见:同意9票反对0票弃权0票。
(1) K40121 B 30121 G 408
CE
761053 1CM
Sicherheitshinweise

Caution! Risk of fire! Flammable materials.
- Warning! During using, service and disposal of the appliance, please pay attention to the symbol which is located on rear of appliance (rear panel or compressor). It is the risk of fire warning symbol. There are flammable materials in refrigerant pipes and compressor. Please keep sources of fire / open flames away during using, service and disposal.
- Do not operate the product by means of an external timer or separate remote control system.
- This product can be used by children aged from 8 years and above and persons with reduced physical, sensory or mental capabilities or lack of experience and knowledge if they are being supervised or have been given instructions concerning the use of the product in a safe way and understand the hazards involved.
- Children shall not play with the product and must therefore be supervised.
- Cleaning and user maintenance shall not be carried out by children unless they are older than 8 years and supervised.
- Keep this product and its power cord out of reach of children under the age of 8 years.
- Children aged from 3 to 8 years are allowed to load and unload refrigerating appliances.
- The product is to be connected to a socket-outlet having an earthing contact.
- The supply cord should be regularly examined for signs of damage, and if the cord is damaged, the product must not be used.
English
Safety Instructions
- The product is designed for the preparation of normal household quantities in the home, or in household-like, non-commercial environments. Household-like environments include staff kitchens in shops, offices, agricultural and other small businesses or for use by guests at bed and breakfast establishments, small hotels and similar residential facilities.
- A damaged power cord may only be replaced by the authorised service agent in order to avoid hazards.
- Warning! Keep ventilation openings in the appliance enclosure clear of obstructions.
- Warning! Do not use mechanical devices or other means to accelerate the defrosting process, other than those recommend by the manufacturer.
- Warning! Do not damage the refrigerant circuit.
- Warning! Do not use electrical appliances inside the food storage compartments of the appliance, unless they are of the type recommended by manufacturer.
- Do not store explosive substances such as aerosol cans with a flammable propellant in this appliance.
- The device contains flammable insulation blowing gas and must therefore be disposed of by special facilities.
- Clean the product and all other accessories after each use.
- Clean regularly surfaces that can come in contact with food and accessible drainage systems.
- Follow the instructions in the chapter Cleaning and care.
Safety Instructions
- Read this manual thoroughly before first use. It contains important information for your safety as well as for the use and maintenance of the equipment.
- Keep this manual for future reference and pass it on with the product.
- Pay particular attention to the warnings on the product and in this manual.
- Use the product only for its intended purpose. Improper use may lead to hazards.
- In the event of improper use or wrong operation, we do not accept any liability for resulting damages.
- The use of accessories and components not expressly recommended by the manufacturer may result in injuries or damages and voids the warranty.
- Never leave the product unsupervised while it is switched on.
- Do not place any objects on top of the product.
- Never immerse electrical parts of the product in water or any other fluid during cleaning or operation. Never hold the product under running water.
- Do not under any circumstances attempt to repair the product yourself. For servicing and repairs, please consult an authorised service agent.
- The mains voltage must match the information on the rating label of the product.
- The power plug is used as the disconnect device. Please be sure that the power plug is in operable condition.
- Only unplugging from the power socket can separate the product completely from the mains.
- Avoid damages to the power cord that may be caused by kinks or contact with sharp corners.
-
Keep this product including its power cord and power plug away from all heat sources such as ovens, hot plates and other heat-producing devices/objects.
-
Only unplug from the power socket by the plug itself. Do not pull on the cord.
-
Unplug the product ...
- when the product is not being used,
- in case of malfunctions,
- before attaching / detaching,
- accessories and
- before cleaning the product.
-
If the power cord or the casing of the product have been damaged or if the product has been dropped, the product may not be used before it has been examined by an authorised service agent.
-
Use this product in dry indoor areas only and never outdoors.
English
Congratulations!
Thank you for your purchase of a KOENIC product. Please read this manual carefully and keep it for future reference.
Intended use
This product is suitable for preparing ice cream only. Any other use can lead to damage to the device or injuries.
The Imtron GmbH assumes no liability for damage to the product, for property damage or for personal injury due to careless or improper usage of the product, or usage of the product which does not meet the manufacturer's specified purpose.
Before first use
Carefully take the product and its accessories out of the original packaging. Retain the original packaging in case you would like to store the product away or transport it at a later date. If you choose to dispose of the original packaging, then do so according to the applicable legal regulations.
Check the packaging contents for completeness and damages. Should the contents in the packaging not be complete or damaged, do not use the product. Return it to your retail outlet immediately.
After unpacking, please refer to chapter
Cleaning and care.
Disposal
Do not dispose of this appliance as unsorted municipal waste. Return it to a designated collection point for the
recycling of WEEE. By doing so, you will help to conserve resources and protect the environment. Contact your retailer or local authorities for more information.
Content
1 x ice cream maker
1 x Measuring cup
1 x Instruction manual
1 x Warranty card
Technical data
Rated voltage : 220 - 240 V\~
Rated input power : 135 W
Rated frequency : 50 Hz
Protection class : I
Refrigerant : R600a (18 g)
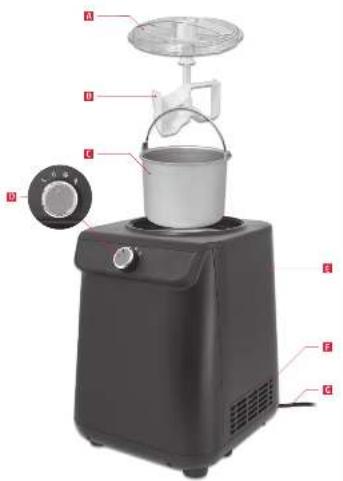
Controls and components
A Lid with fill opening
B Mixer insert
c Ice cream container
D Mode selection dial / off
E Housing
F Ventilation slots
G Power cord with plug
Operation
Note:
Place the device on a flat and non-slip surface, near a suitable socket. The device is equipped with non-slip feet.
Using the ice cream maker
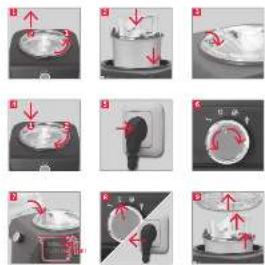
Fig. 1 Turn the lid slightly counter-clockwise so that it loosens and remove it.
Fig. 2 Make sure that the ice cream bucket is inserted correctly and the mixer insert is properly installed.
Preparation
Note:
The ice bucket does not need to be frozen in the freezer beforehand. The machine's built-in compressor cools down the ingredients.
Making ice cream
Fig. 3 Fill the ice cream mixture in the ice cream container.
Note:
The ice cream container can hold a maximum of 1.2 liters, but note that the ingredients expand when preparing ice cream and you can therefore only fill the ice cream container up to 60% (720 ml).
Fig. 4 Place the lid on the outer container so that the lugs on the lid engage in the recesses on the enclosure. The filling opening is at the front. Turn the cover slightly clockwise until it clicks into place.
Fig. 5 Insert the power plug into the socket.

Warning
Never stop the appliance while the ice cream is being prepared! The ice cream immediately freezes on the walls of the ice cream container and the mixer is blocked when switching it on (again), which can damage the motor and gearbox!
Fig. 6 Switch on the mixer with the mode dial. For preparing ice cream set the dial to For cooling only set the dial to for mixing only set the dial to
Fig. 7 If necessary fill further ingredients into the ice cream container through the fill opening.
Let the appliance run until you are satisfied with the consistency of the ice cream. The ice cream can be ready within 60 minutes.
Note:
- If the ice gets harder, the motor can be overloaded. If the motor gets too hot, it is switched off to prevent damage to the device.
- In this case, switch off the device, pull out the power plug and let the device cool down. After cooling down and plugging in the power plug, the device is ready for use again.
English
Fig. 8 Switch off the device with the mode selection dial (0) and pull out the mains plug.
Turn the lid slightly until you can remove it. Pull the mixer out of the ice. Scrape off any stuck ice from the mixer insert with a plastic spoon or something similar. Take out the ice cream container and remove the ice cream. Use only plastic or wooden cutlery for this.

Do not use metal cutlery to remove the ice from the ice cream container, as this could lead to scratches!
Tips and recommendations
- Always prepare the ice cream mixture in advance and refrigerate it, before further preparation in the ice cream maker. It will freeze faster this way.
- Blend or chop all ingredients evenly, to ensure even blending.
- Add bigger ingredients, e.g. pieces of chocolate or fruits, only after the ice cream mixture is slightly frozen, as otherwise they might not be blended in evenly.
- When adding alcohol, do so sparsely and towards the end of the freezing, as alcohol delays the freezing process.
- Use cream or whipped cream for creamier ice cream. The higher the fat content of the cream, the creamier the ice cream.
- Ice cream is usually of softer consistency. If you wish to further freeze the ice cream, place it in a separate, sealable, box.
- Do not store ice cream in open containers, as ice crystals might form.
Ice cream recipes
Vanilla ice cream
250 ml of whole milk
100 g granulated sugar
375 ml heavy cream, well chilled
1-2 teaspoons of pure vanilla extract, depending on your taste
In a medium-sized bowl, use a hand mixer or whisk on low speed for about 1-2 minutes to mix the milk and granulated sugar until the sugar has dissolved. Stir in the heavy cream and vanilla as desired.
Turn on the machine, pour the mixture into the ice cream container through the fill opening and let it thicken for 30-40 minutes until the ice cream has the right consistency.
Variations:
- Mint Chip: Omit the vanilla and replace it with 1 to 1.5 teaspoons of pure peppermint extract (to taste). Cut 120 g of dark or semi-dark chocolate into tiny, uneven pieces. Add the chopped chocolate during the last 5 minutes of mixing.
- Butter Pecan: Melt 100 g of unsalted butter in a pan. Add 100 g of coarsely chopped pecans and a pinch of salt. Roast over medium-low heat, stirring frequently, until the pecans are lightly browned. Remove from heat, strain (the butter will have a pecan flavor and can be used elsewhere) and let the pecans cool completely. Add the toasted, buttered pecans during the last 5 minutes of mixing.
- Cookies and Cream: During the last 5 minutes of mixing, add 75 g of coarsely chopped cookies or your favorite candy (chocolate chips, etc).
Chocolate ice cream
250 ml of whole milk
100 g granulated sugar
240 grams of dark or semi-dark chocolate broken into 1/2-inch pieces
250 ml cream, well chilled
1 teaspoon of pure vanilla extract
Heat the whole milk until it is just bubbly at the edges (on the stove or in the microwave). Pour the chocolate and sugar in a bowl and use a hand mixer or food processor to blend them, until the chocolate is very finely chopped. Add the hot milk and process until it is well mixed and smooth. Transfer to a medium bowl and let the chocolate mixture cool down completely. Stir in the heavy cream and vanilla to taste. Turn on the machine, pour the mixture into the ice cream container through the fill opening and let it thicken for 30-40 minutes until the ice cream has the right consistency.
Variations:
- Chocolate Almond: Add 1/2 teaspoon of pure almond extract along with the vanilla. Add 60-100 g of chopped toasted almonds or chopped chocolate-coated almonds during the last 5-10 minutes of preparation.
- Chocolate Biscuit: During the last 5 minutes of preparation, add 50-100 g of chopped biscuits.
• Chocolate Caramel Brownie: Add 50-100 g of chopped day-old brownies with caramel during the last 5 minutes of preparation.
- Chocolate Marshmallow Swirl: When you put the ice cream in a container to freeze, cover it with some of your favorite chocolate sauce and balls of marshmallow cream.
Fresh strawberry ice cream
250 g of fresh, ripe strawberries, stemmed and sliced
1.5 tablespoons of freshly squeezed lemon juice
100 g sugar, divided
100 ml of whole milk
100 ml of whipped cream
1 teaspoon of pure vanilla extract
In a small bowl, mix the strawberries with the lemon juice and 100 g of sugar; stir gently and let the strawberries soak in the juice for 2 hours.
In a medium-sized bowl, mix the milk and granulated sugar with a hand mixer or whisk until the sugar has dissolved. Stir in the heavy cream and any accumulated juice from the strawberries and vanilla.
Turn on the machine, pour the mixture into the ice cream container through the fill opening and let it thicken for 30-40 minutes until the ice cream has the desired consistency. Add the sliced strawberries during the last 5 minutes of preparation.
Note: this ice cream will have a "natural" look of very pale pink; if a deeper pink is desired, sparingly add drops of red food coloring until the desired color is achieved.
English
Fresh lemon sorbet
320 ml of sugar
320 ml of water
210 ml of freshly squeezed lemon juice
1 tablespoon of finely chopped lemon peel *
Mix the sugar and water in a medium sized saucepan and shortly boil it over medium to high heat. Reduce the heat to low heat and simmer about 3-5 minutes without stirring until the sugar has dissolved. Let cool down completely.
After cooling, add the lemon juice and lemon zest and stir well.
Turn on the machine, pour the mixture into the ice cream container through the fill opening and let it thicken for 30-40 minutes until the sorbet has the right consistency.
* If you're peeling a lemon or lime, use a vegetable peeler to remove the colored part of the citrus peel.
Variations:
Fresh Pink Grapefruit Sorbet: Replace the lemon juice with 375 ml of freshly squeezed pink grapefruit juice and the lemon peel with 1 tablespoon of finely chopped grapefruit peel. Add 60 ml of orgeat syrup (orgeat syrup is used in cocktails like Mai Tai or Scorpion and can be found in most grocery stores).
Frozen chocolate yogurt
220 ml of whole milk
160 g of dark or semi-sweet chocolate, chopped
400 ml of low-fat vanilla yogurt
45 g sugar
Put the milk and chocolate in a blender or a metal-bladed food processor and process the ingredients for 20-30 seconds until well blended and smooth. Add yogurt and sugar and process for about 15 seconds until smooth. Turn on the machine, pour the mixture into the ice cream container through the fill opening and let it thicken for 50-60 minutes until the ice cream has the right consistency.
English
Cleaning and care

Caution
Never immerse electrical parts of the device in water or any other fluids during cleaning or operation. Never hold the device under running water. Never use solvents and abrasives, hard brushes, metallic or sharp objects for cleaning. Solvents are harmful to your health and attack the plastic parts. Abrasive cleaners and tools do scratch the surface.
Fig. 9 Remove lid and ice cream container and pull out the mixer insert.
- Wash all components except the motor housing with warm water and washing-up liquid, and then rinse them thoroughly with clean water. Clean the motor housing with a slightly damp cloth and dry it thoroughly afterwards.
- Carefully dry all components after each cleaning.
- Put all the previously cleaned and dried parts back together. Please note the relevant points in the Using the ice cream maker section.
- Never use solvents, abrasives, hard brushes, metallic or sharp objects for cleaning. Solvents are harmful to health and attack plastic parts; abrasive cleaners and auxiliaries scratch the surface.
Troubleshooting
If there are any problems during operation, please refer to the following table. If problems cannot be solved as indicated under Solution, please contact your manufacturer.
| Problem Possible causes Solution | |
| Product does not work Interrupted power supply Check the power supply | |
| After the ice cream is finished, the ice cream container is not easy to take out. | There are some frozen water droplets between the ice cream container and cooling barrel. | Wait for 1-2 minutes before removing the ice cream container. When inserting the ice cream container, make sure it's dry. |
| Ice cream production time is not completed, but the stirring has stopped | Normal phenomenon, as the ice cream hardens, the stirring blade may be stuck, and when temperature increases the motor is stopped to avoid damages. | Take out the ice cream container. Turn of the device and wait a while to restart. |
| The lid is lifted and the mixer insert is not fix in place. | The mixing insert is not correctly in place, pay attention to the alignment of the hexagon socket. | Place the mixing insert correctly in place. |
| The ice cream container cannot be placed into the cooling barrel | Improper use of the ice cream container causes deformation. | Contact your service center. |
| When the ice cream was first made, the mixing insert was severely scratched or stuck. | Improper use of the ice cream container causes deformation. | Contact your service center. |
Español