
FSL 20 MW XS - Oven FRANKE - Free user manual and instructions
Find the device manual for free FSL 20 MW XS FRANKE in PDF.
| Product Type | Built-in microwave oven with grill |
| Brand | Franke |
| Model | FSL 20 MW XS |
| Capacity | 20 liters |
| Microwave power (output) | 800 W |
| Grill power | 1000 W |
| Microwave input power | 1250 W |
| Power supply | 230 V ~ 50 Hz |
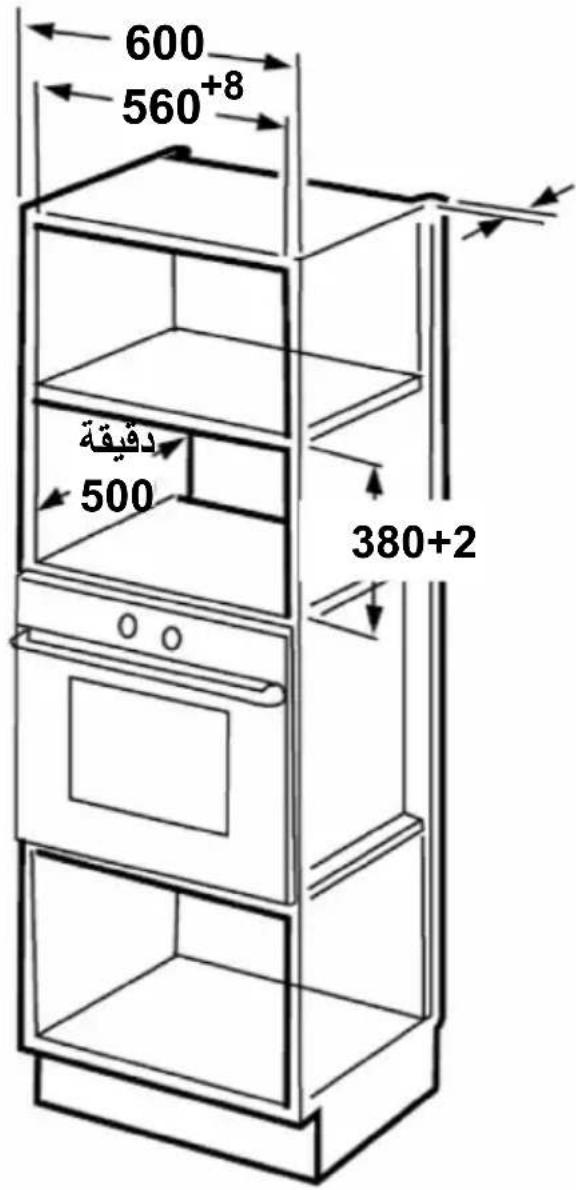
| Dimensions (W x H x D) | 595 x 343.5 x 388 mm |
| Net weight | Approximately 15 kg |
| Turntable diameter | 245 mm |
| Cooking functions | Microwave, Grill, Combi (2 modes), Defrost (weight/time), Auto Menu, Timer, Clock |
| Microwave power levels | 5 (P100, P80, P50, P30, P10) |
| Combi modes | C-1 (55% micro + 45% grill), C-2 (36% micro + 64% grill) |
| Automatic programs | 8 (Pizza, Vienna, Vegetables, Pasta, Potatoes, Fish, Drinks, Popcorn) |
| Defrost | By weight (100-2000 g) or by time (max 95 min) |
| Installation type | Built-in only (cabinet width 60 cm) |
| Safety | Child lock, door lock system, mandatory grounding |
| Maintenance and cleaning | Clean with a damp cloth; do not use abrasive products or steam cleaner |
| Supplied accessories | Glass tray, turntable ring, grill support, user manual |
| Clock setting | Yes (24h) |
| Maximum cooking time | 95 minutes |
Frequently Asked Questions - FSL 20 MW XS FRANKE
User questions about FSL 20 MW XS FRANKE
0 question about this device. Answer the ones you know or ask your own.
Ask a new question about this device
Download the instructions for your Oven in PDF format for free! Find your manual FSL 20 MW XS - FRANKE and take your electronic device back in hand. On this page are published all the documents necessary for the use of your device. FSL 20 MW XS by FRANKE.
USER MANUAL FSL 20 MW XS FRANKE
EN Installation and user manual Microwave oven
TR Mikmadatgeefservis kilavuzu
Read the user manual and the safety information carefully before using the oven.
Keep the manual for future reference.
The manufacturer can not be made liable for possible damage which may occur due to incorrect installation and incorrect, improper or unreasonable use of the device.
The electrical safety of the oven is guaranteed only when it is connected to an earthing system in compliance with the valid regulations.
To ensure safe and efficient operation of this electrical device:
-Only contact authorized service centres.
-Do not modify any features of the device.
This appliance can be used by children aged from 8 years and above and persons with reduced physical, sensory or mental capabilities or lack of experience and knowledge if they have been given supervision or instruction concerning use of the appliance in a safe way and understand the hazards involved. Children shall not play with the appliance. Cleaning and user maintenance shall not be made by children without supervision.
This device is not a toy.
Do not leave children near the device unattended.
Do not allow children to touch the device or its controls during and immediately after using it.
CAUTION: In order to avoid a hazard due to inadvertent resetting of the thermal cut-out, this appliance must not be supplied through an external switching device, such as a timer, or connected to a circuit that is regularly switched on and off by the utility.
Ensure that the device is installed in a way that allows to disconnect it from the power supply, with a contact opening distance that ensures complete disconnection in category III overvoltage conditions. Means for disconnection must be incorporated in the fixed wiring in accordance with the wiring rules.
Only use the temperature probe recommended for this oven.
The appliance shall not be installed behind a decorative door in order to avoid overheating.
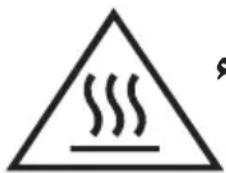
WARNING: Risk of burns!
During use the appliance becomes hot. Care should be taken to avoid touching heating elements inside the oven.
Children less than 8 years of age shall be kept away unless continuously supervised.
Risk of burns!
The end of the door handle may be hotter due to hot air being vented.
Always make sure that the control knobs are in the off position when the oven is not in use.
WARNING: Ensure that the appliance is switched off before replacing the lamp to avoid the possibility of electric shock.
Do not use harsh abrasive cleaners or sharp metal scrapers to clean the oven door glass/ the glass of hinged lids of the hob (as appropriate), since they can scratch the surface, which may result in shattering of the glass.
Do not use steam cleaners or direct jets of water.
If the supply cord is damaged, it must be replaced by the manufacturer, its service agent or similarly qualified persons in order to avoid a hazard.
Warning: Liquids and other foods must not be heated in sealed containers since they are liable to explode.
Warning: It is hazardous for anyone other than a competent person to carry out any service or repair operation that involves the removal of a cover which gives protection against exposure to microwave energy.
Keep the appliance and its cord out of reach of children less than 8 years.
Only use utensils that are suitable for use in microwave
The oven should be cleaned regularly and any food deposits should be removed.
When heating food in plastic or paper containers keep an eye on the oven due to the possibility of ignition.
If smoke is emitted, switch off or unplug the appliance and keep the door closed in order to stifle any flames.
Eggs in the shell and whole hard-boiled eggs should not be heated in microwave ovens since they may explode, even after microwave heating has ended.
This appliance is intended to be used in household and similar applications such as:
- staff kitchen areas in shops, offices and other working environments;
-by clients in hotels, motels and other residential type environments;
-farm houses;
-bed and breakfast type environments.
If the supply cord is damaged, it must be replaced by the manufacturer, its service agent or similarly qualified persons in order to avoid a hazard.
Failure to maintain the oven in a clean condition could lead to deterioration of the surface that could adversely affect the life of the appliance and possibly result in a hazardous situation.
The contents of feeding bottles and baby food jars shall be stirred or shaken and the temperature checked before consumption, in order to avoid burns.
Microwave heating of beverages can result in delayed eruptive boiling, therefore care must be taken when handling the container.
The microwave oven must be operated with the decorative door open.
The microwave oven is intended for heating food and beverages. Drying of food or clothing and heating of warming pads, slippers, sponges, damp cloth and similar may lead to risk of injury, ignition or fire.
WARNING: If the door seals are the oven must not be operated until it has been repaired by a trained person.
This appliance is only intended for domestic use.
This oven is intended for built-in use only. It is not intended for counter-top use or for use inside a cupboard.
To Reduce the Risk of Injury to Persons Grounding Installation
DANGER
Electric Shock Hazard Touching some of the internal components can cause serious personal injury or death. Do not disassemble this appliance.
WARNING
Electric Shock Hazard Improper use of the grounding can result in electric shock. Do not plug into an outlet until appliance is properly installed and grounded.
This appliance must be grounded. In the event of an electrical short circuit, grounding reduces the risk of electric shock by providing an escape wire for the electric current. This appliance is equipped with a cord having a grounding wire with a grounding plug. The plug must be plugged into an outlet that is properly installed and grounded.
Consult a qualified
electrician or serviceman
if the grounding instructions
are not completely
understood or if doubt exists
as to whether the appliance
is properly grounded.
If it is necessary to use an
extension cord, use only
a 3-wire cord. extension
- A short power-supply cord is provided to reduce the risks resulting from becoming entangled in or tripping over a longer cord.
- If a long cord set or extension cord is used:
1) The marked electrical rating of the cord set or extension cord should be at least as great as the electrical rating of the appliance.
2)The extension cord must be a grounding-type 3-wire cord.
3) The long cord should be arranged so that it will not drape over the counter top or tabletop where it can be pulled on by children or tripped over unintentionally.
- Do not overcook food.
- Do not use the oven cavity for storage purposes.
- Do not store items, such as bread, cookies, etc. inside the oven.
- Remove wire twist-ties and metal handles from paper or plastic containers/bags before placing them in the oven.
- Install or locate this oven only in accordance with the installation instructions provided Do not store or use this appliance outdoors.
- Do not use this oven near water, in a wet basement or near a swimming pool.
- The temperature of accessible surfaces may be high when the appliance is operating.
-- The surfaces are liable to get hot during use.
-- Keep cord away from heated surface, and do not cover any vents on the oven.
-- Do not let cord hang over edge of table or counter.
-- Do not attempt to operate this oven with the door open since this can result in harmful exposure to microwave energy. It is important not to break or tamper with the safety interlocks.
-- Do not place any object between the oven front face and the door or allow soil or cleaner residue to accumulate on sealing surfaces.
CLEANING
Be sure to unplug the appliance from the power supply.
- Clean the cavity of the oven after using with a slightly damp cloth.
- Clean the accessories in the usual way in soapy water.
- The door frame and seal and neighbouring parts must be cleaned carefully with a damp cloth when they are dirty.
- Do not use harsh abrasive cleaners or sharp metal scrapers to clean the oven door glass since they can scratch the surface, which may result in shattering of the glass.
- Cleaning Tip---For easier cleaning of the cavity walls that the food cooked can touch: Place half a lemon in a bowl, add 300ml (1/2 pint) water and heat on 100% microwave power for 10 minutes. Wipe the oven clean using a soft, dry cloth.
UTENSILS
CAUTION
Personal Injury Hazard
It is hazardous for anyone other than a competent person to carry out any service or repair operation that involves the removal of a cover which gives protection against exposure to microwave energy.
See the instructions on "Materials you can use in microwave oven or to be avoided in microwave oven." There may be certain non-metallic utensils that are not safe to use for microwaving. If in doubt, you can test the utensil in question following the procedure below.
Utensil Test:
- Fill a microwave-safe container with 1 cup of cold water (250ml) along with the utensil in question.
- Cook on maximum power for 1 minute.
- Carefully feel the utensil. If the empty utensil is warm, do not use it for microwave cooking.
- Do not exceed 1 minute cooking time.
Materials you can use in microwave oven fuction
Utensils Remarks
| Browning dish | Follow manufacturer's instructions. The bottom of browning dish must be at least 3/16 inch (5mm) above the turntable. Incorrect usage may cause the turntable to break. |
| Dinnerware | Microwave-safe only. Follow manufacturer's instructions. Do not use cracked or chipped dishes. |
| Glass jars | Always remove lid. Use only to heat food until just warm. Most glass jars are not heat resistant and may break. |
| Glassware | Heat-resistant oven glassware only. Make sure there is no metallic trim. Do not use cracked or chipped dishes. |
| Oven cooking bags | Follow manufacturer's instructions. Do not close with metal tie. Make slits to allow steam to escape. |
| Paper plates and cups | Use for short-term cooking/warming only. Do not leave oven unattended while cooking. |
| Paper towels | Use to cover food for reheating and absorbing fat. Use with supervision for a short-term cooking only. |
| Parchment paper | Use as a cover to prevent splattering or a wrap for steaming. |
| Plastic | Microwave-safe only. Follow the manufacturer's instructions. Should be labeled "Microwave Safe". Some plastic containers soften, as the food inside gets hot. "Boiling bags" and tightly closed plastic bags should be slit, pierced or vented as directed by package. |
| Plastic wrap | Microwave-safe only. Use to cover food during cooking to retain moisture. Do not allow plastic wrap to touch food. |
| Thermometers Microwave-safe only (meat and candy thermometers). | |
| Wax paper Use as a cover to prevent splattering and retain moisture. | |
Materials to be avoided in microwave oven function
Utensils Remarks
| Aluminum tray | May cause arcing. Transfer food into microwave-safe dish. |
| Food carton with metal handle | May cause arcing. Transfer food into microwave-safe dish. |
| Metal or metal-trimmed utensils | Metal shields the food from microwave energy. Metal trim may cause arcing. |
| Metal twist ties | May cause arcing and could cause a fire in the oven. |
| Paper bags | May cause a fire in the oven. |
| Plastic foam | Plastic foam may melt or contaminate the liquid inside when exposed to high temperature. |
| Wood | Wood will dry out when used in the microwave oven and may split or crack. |
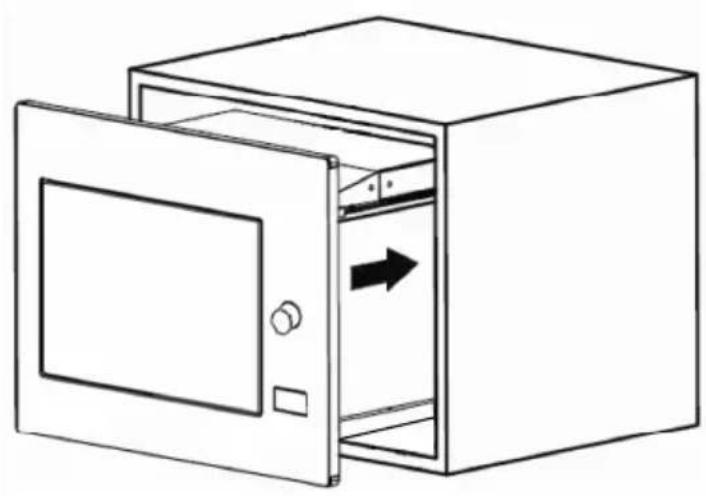
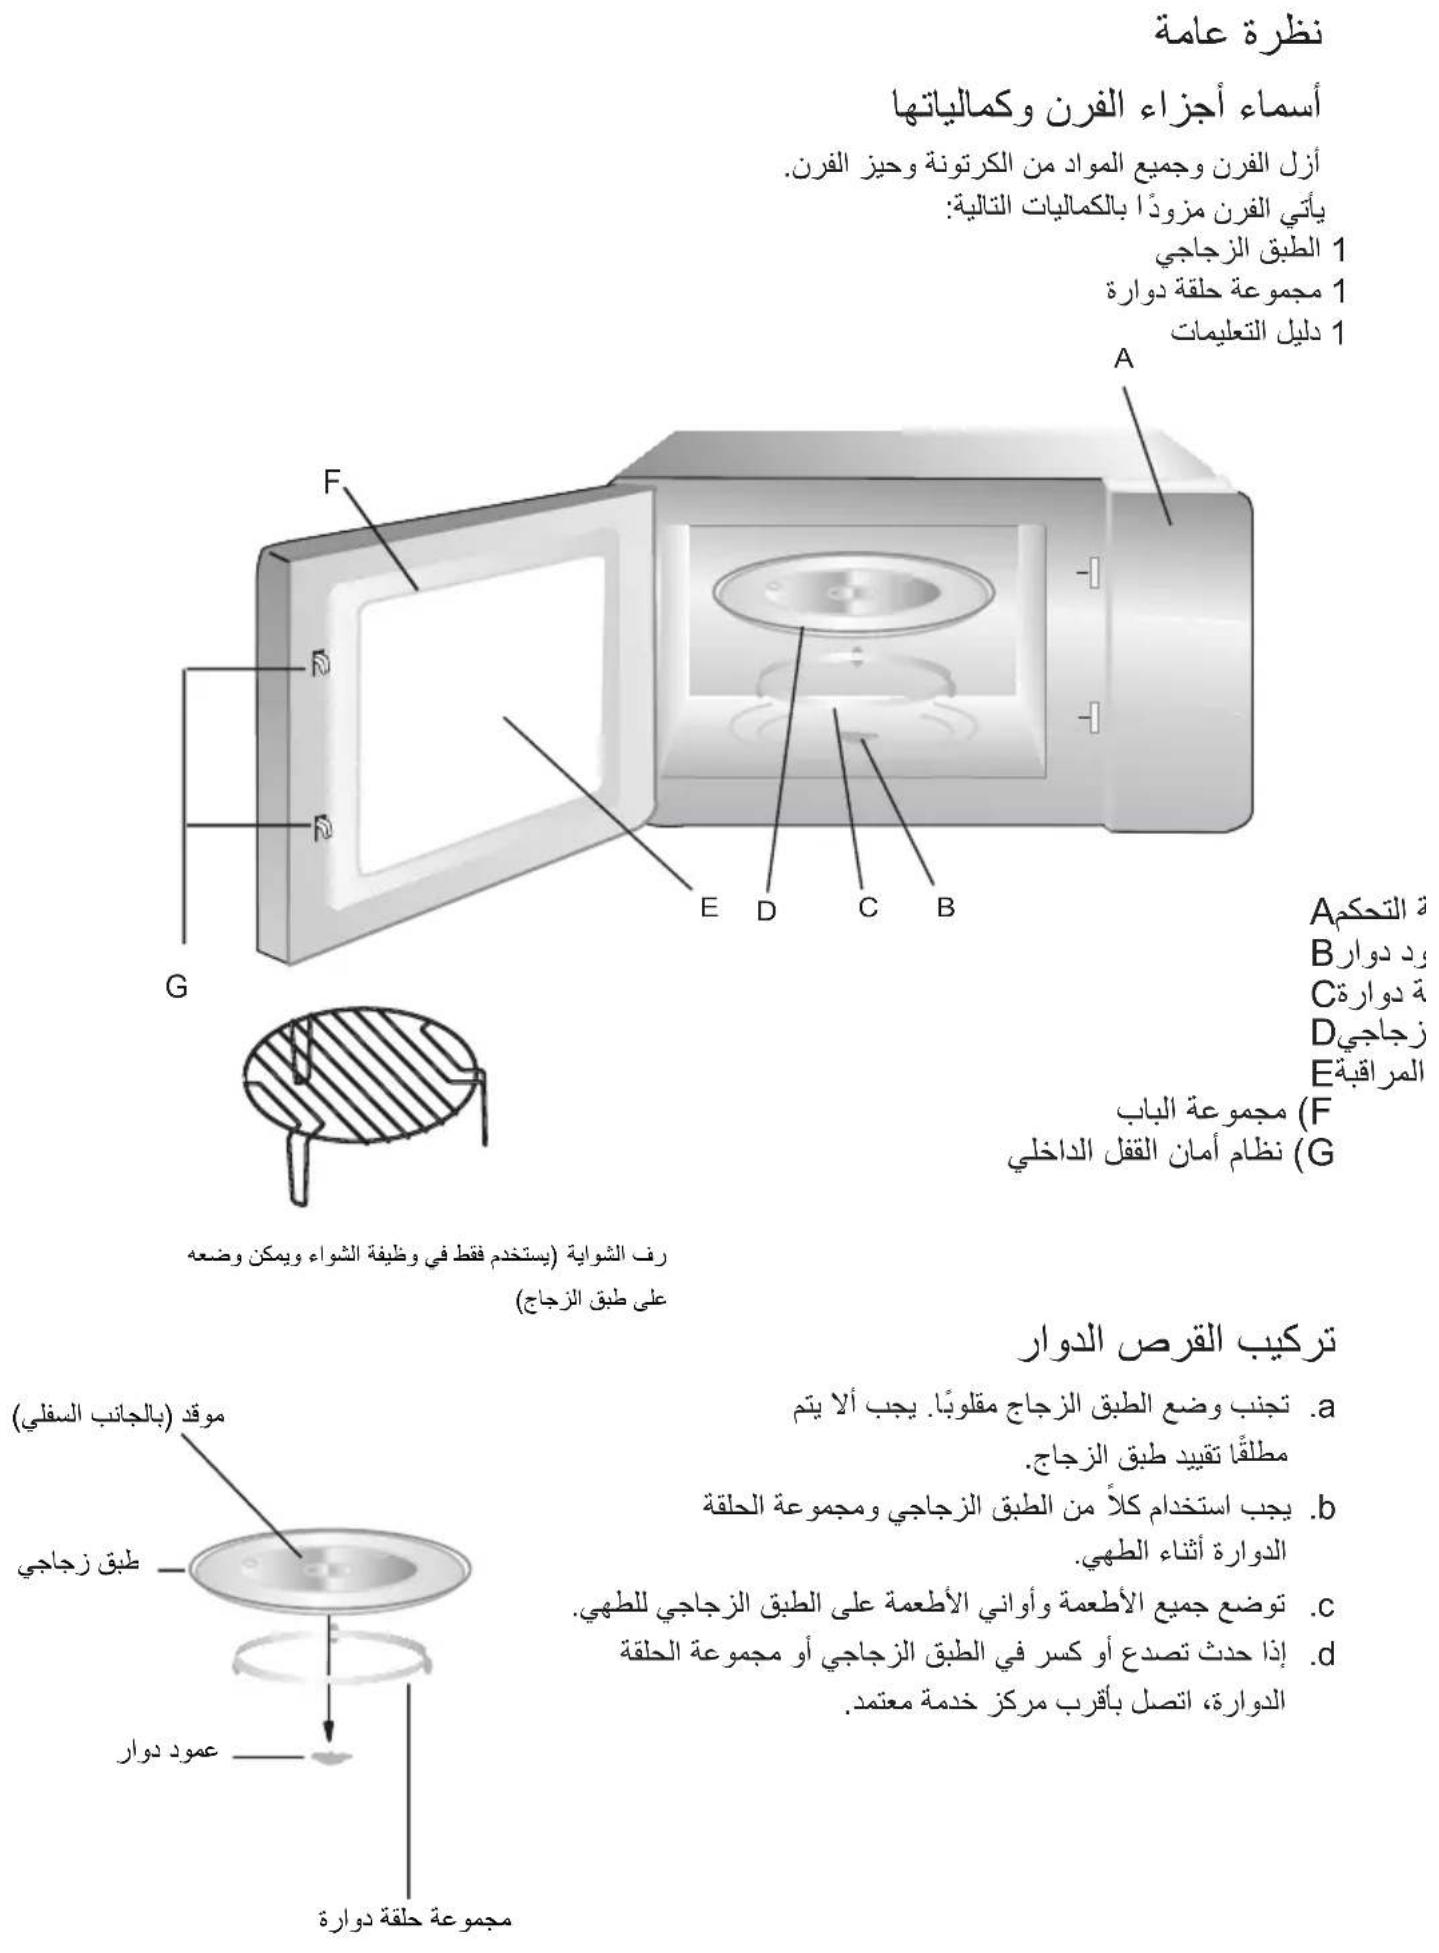
OVERVIEW
Names of Oven Parts and Accessories
Remove the oven and all materials from the carton and oven cavity.
Your oven comes with the following accessories:
Glass tray 1
Turntable ring assembly 1
Instruction Manual 1
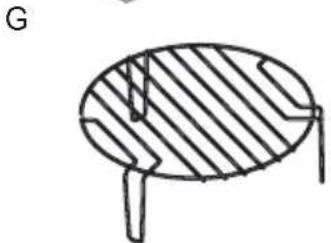
Grill Rack(Only be used in grill function and be placed on the glass tray)
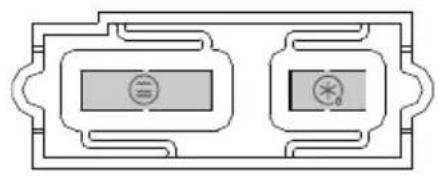
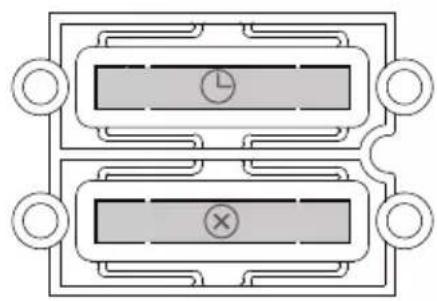
A) Control panel
B) Turntable shaft
C) Turntable ring assembly
D) Glass tray
E) Observation window
F) Door assembly
G) Safety interlock system
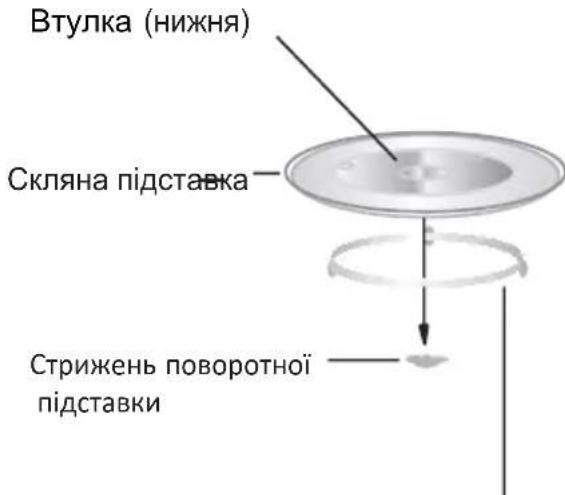
Turntable Installation
Hub (underside)
Turntable ring assembly
a. Never place the glass tray upside down. The glass tray should never be restricted.
b. Both glass tray and turntable ring assembly must always be used during cooking.
c. All food and containers of food are always placed on the glass tray for cooking.
d. If glass tray orturntable ring assembly cracks or breaks, contact your nearest authorized service center.
Control Pannel


Instruction:
INSTALLATION
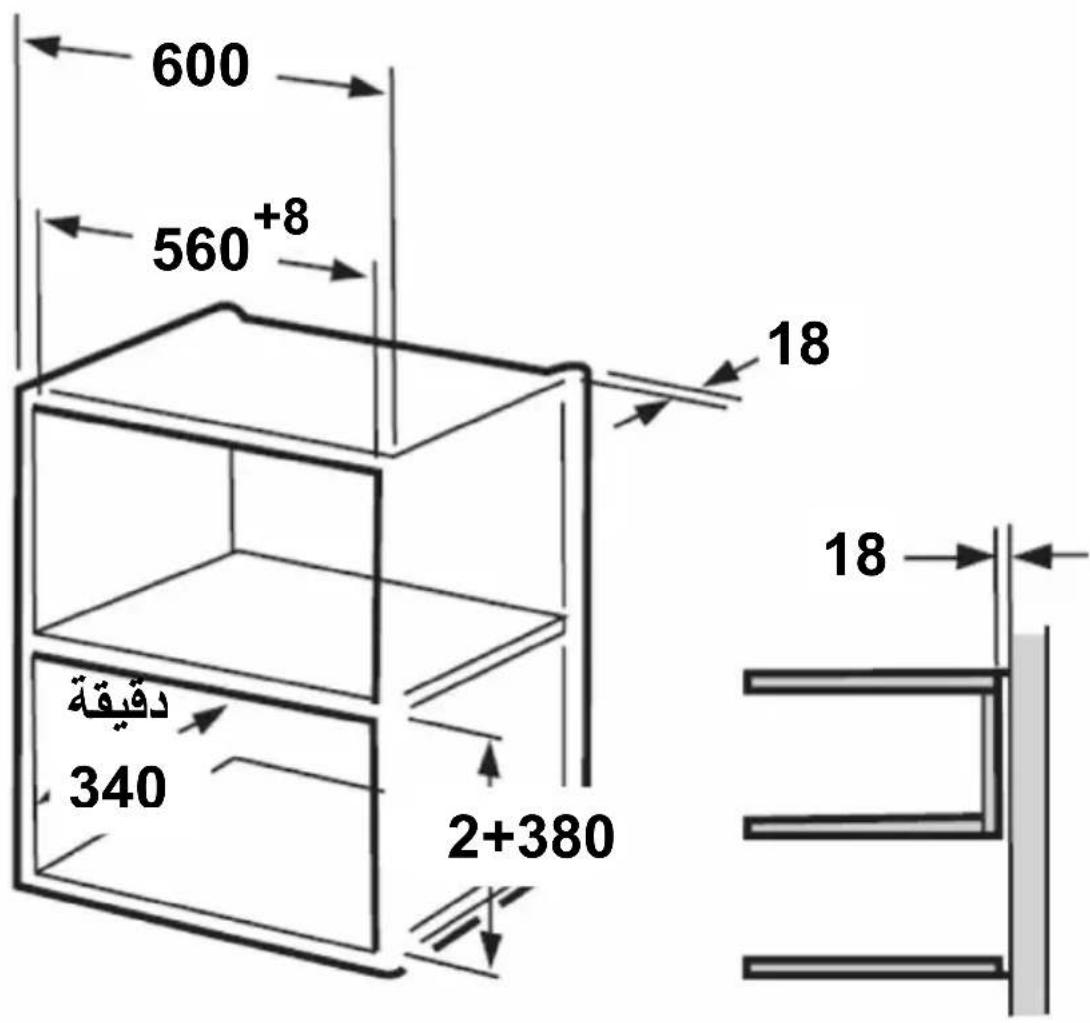
- The appliance can be installed in a 60cm wide wall-mounted cupboard.
- The appliance is supplied with a power cable and a Schuko plug or a three-pole power cable with free terminals.
- The appliance must only be connected to a properly installed earthed socket.
- The mains voltage must correspond to the voltage specified on the rating plate.
- The socket must be installed and connecting cable must only be replaced by a qualified electrician. If the plug is no longer to accessible following installation, an all-pole disconnecting device must be present on the installation side with a contact gap of at least 3mm.
- Adapters, multi-way strips and extension leads must not be used. Overloading can result in a risk of fire.
The accessible surface may be hot during operation.
Installation Instructions
Please Read the Manual Carefully Before Installation
Please note
Electricalconnection
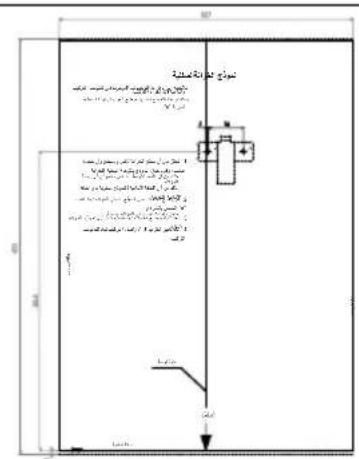
The fitted cabinet must not have a back wall behind the appliance.
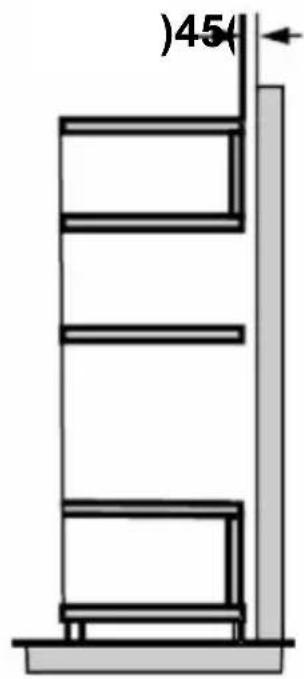
A gap must be maintained between the wall and the base of the unit above. Specific gap size could be referenced by the diagrams.
Minimum installation height:85 cm.
Do not cover ventilation slots and suction holes.
Note:
Do not trap or bend the power cable.
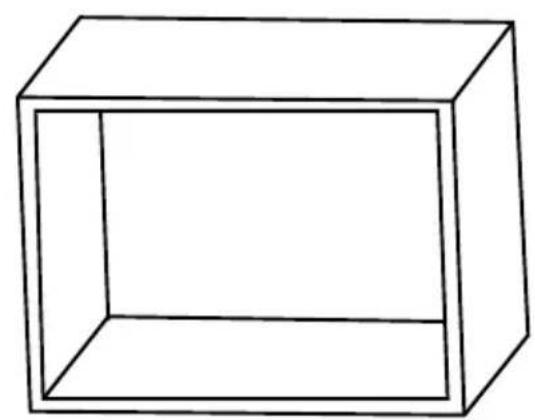
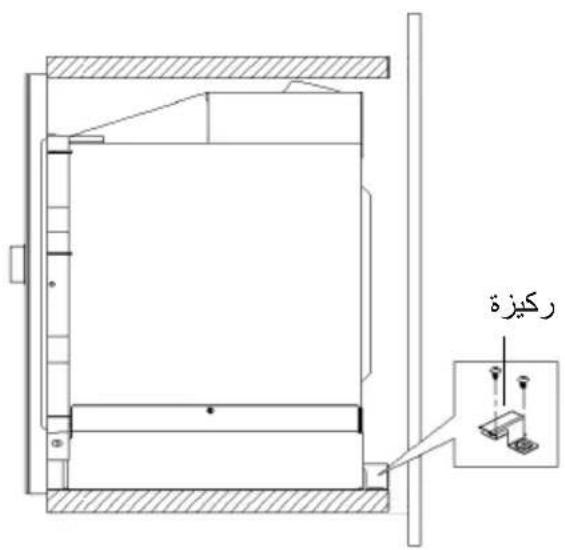
A.Cabinet Requirements
1.
2.
Note:
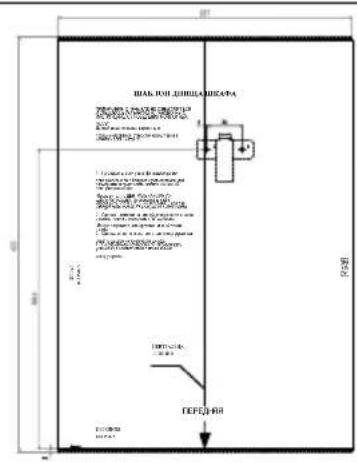
The bracket and bottom cabinet template are needed when installing in installation .both s
B.Pre are the cai inlet
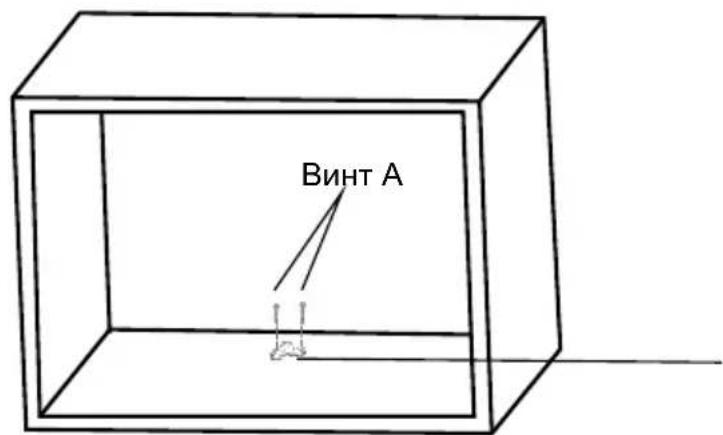
- Read the instruction on the BOTTOM CABINET TEMPLATE, put the template on the cabinet bottom.
- Make the marks on the cabinet bottom according to marks" a " of the template
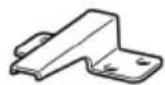
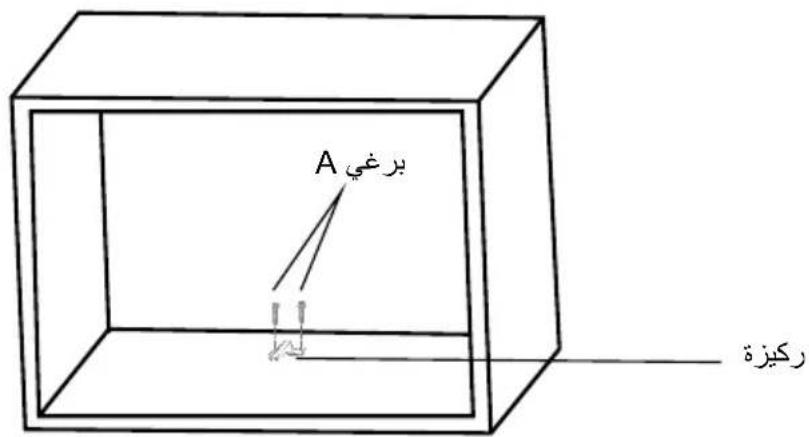
- Remove the bottom cabinet template and fix the bracket with screw A.
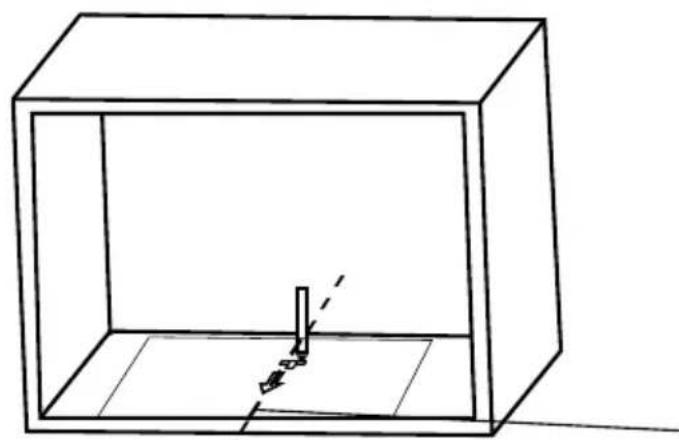
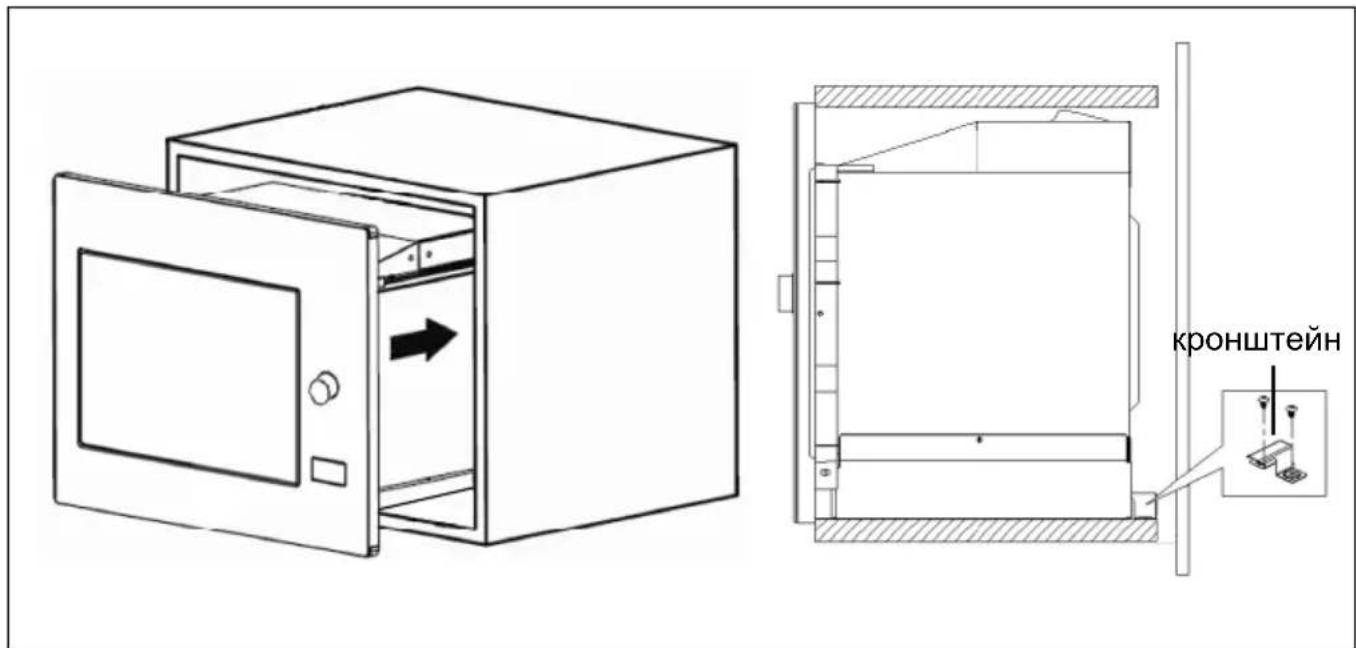
Install the oven
-
Install the oven to the cabinet
-
Make sure the back of the oven is locked by bracket.
- Do not trap or kink the power cord.
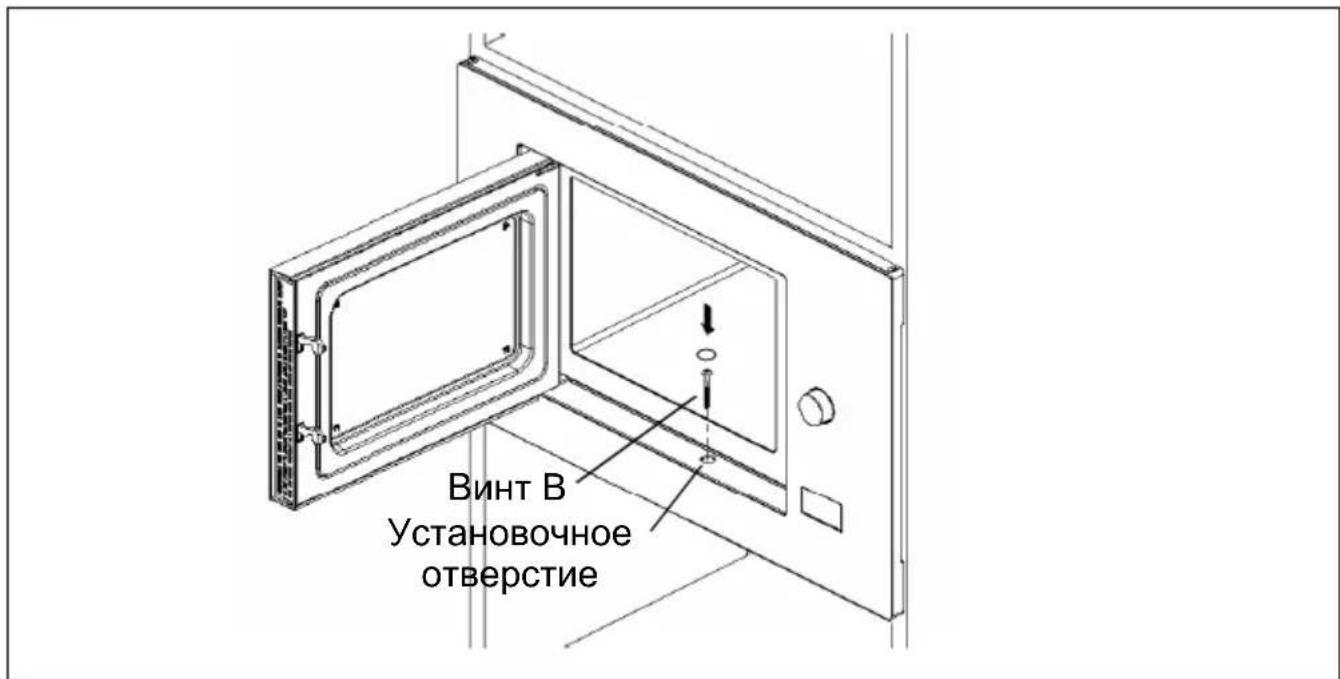
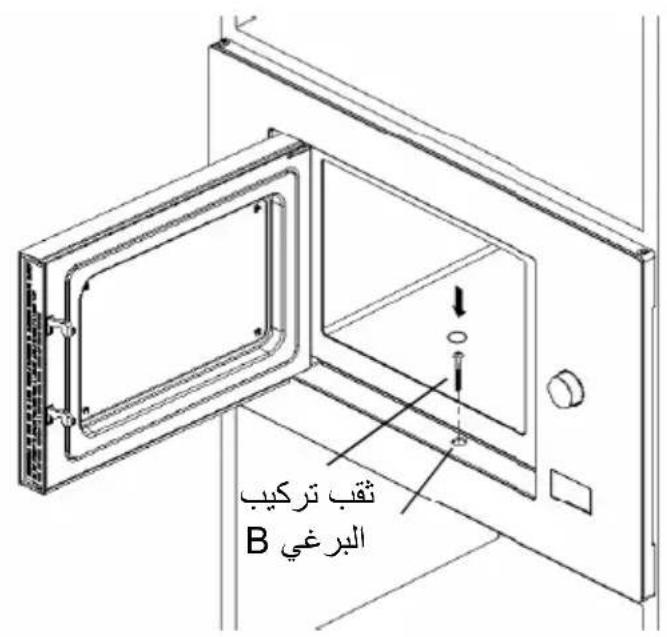
- Open the door, fix the oven to the cabinet with Screw B, at the installation hole. Then fix the Trim-kit plastic cover to the installation hole.
OPERATION
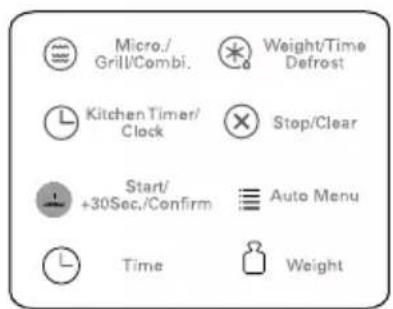
1. Clock Setting
When the microwave oven is electrified, the screen will display "0:00", buzzer will ring once.
1) Press " Kitchen Timer/Clock" twice to select clock function, the hour figures will flash.
2) Turn " " to adjust the hour figures, the input time should be within 0--23.
3) Press "Kitchen Timer/Clock", the minute figures will flash.
4) Turn " " to adjust the minute figures, the input time should be within 0--59.
5) Press "Kitchen Timer/Clock" to finish clock setting.":" will flash, and the time will light.
Note: 1) If the clock is not set, it would not function when powered.
2) During the process of clock setting, if you press "Stop/Clear", the oven will go back to the previous status automatically.
2. Microwave Cooking
Press " Micro./Grill/Combi. " once, the screen will display "P100". Press " Micro./Grill/Combi. atedly or turn " to choose the power you want, and "P100", "P 80", "P 50", "P30", "P10", "G", "C-1" or "C-2" will display for each added press. Then press " Start/+30Sec./Confirm " to confirm, and turn " " to set cooking time from 0:05 to 95:00. Press " Start/+30Sec./Confirm " again to start cooking.
Example: If you want to use 80% microwave power to cook for 20 minutes, you can operate the oven as the following steps.
1) Press " Micro./Grill/Combi. " once, the screen displays "P100".
2) Press " Micro./Grill/Combi. " once again or turn " to choose 80% microwave power.
3) Press " Start/+30Sec./Confirm " to confirm, and the screen displays "P 80".
4) Turn " " to adjust the cooking time until the oven displays "20:00".
5) Press " Start/+30Sec./Confirm" to start cooking.
Note: the step quantities for the adjustment time of the coding switch are as follow:
| "Micro./Grill/Combi." Pad instructions Order Display Microwave Power Grill Power | |||
| 1 | P100 | 100% | |
| 2 | P 80 | 80% | |
| 3 | P 50 | 50% | |
| 4 | P 30 | 30% | |
| 5 | P 10 | 10% | |
| 6 | G | 0% | 100% |
| 7 | C-1 | 55% | 45% |
| 8 | C-2 | 36% | 64% |
3. Grill or Combi. Cooking
Press " Micro./Grill/Combi. " once, the screen will display "P100", and press " Micro./Grill/Combi. " repeatedly or turn the " " to choose the power you want, and "P100", "P 80", "P 50", "P 30", "P 10", "G", "C-1" or "C-2" will display for each added press. Then press Start/+30Sec./Confirm" to confirm, and turn " " to set cooking time from 0:05 to 95:00 Press " Start/+30Sec /Confirm " again to start cooking.
Example: If you want to use 55% microwave power and 45% grill power(C-1) to cook for 10 minutes, you can operate the oven as the following steps.
1) Press " Micro./Grill/Combi. " once, the screen displays P100".
2) Press " Micro./Grill/Combi. " for times or turn " to choose combi. 1 mode.
3) Press " Start/+30Sec./Confirm " to confirm, and the screen displays "C-1".
4) Turn " " to adjust the cooking time until the oven displays "10:00".
5) Press " Start/+30Sec./Confirm " to start cooking.
Note:If half the grill time passes, the oven sounds twice, and this is normal. In order to have a better effect of grilling food, you should turn the food over, close the door, and then press" Start/+30Sec./Confirm " to continue cooking. If no operation, the oven will continue working.
4. Quick Start
1) In waiting state, Press "Start/+30Sec./Confirm" to start 30 seconds cooking with 100% power, each added press will increase 30 seconds cooking time up to 95 minutes.
2) In microwave, grill, combination cooking or time defrost state, each press of "Start/+30Sec./Confirm" can increase 30 seconds of cooking time.
3) In waiting state, turn " " left to set cooking time with 100% microwave power. After choosing the cooking time, press " Start/+30Sec./Confirm " to start cooking.
5. Defrost By Weight
1) Press "Weight/Time Defrost" once, and the oven will display "dEF1".
2) Turn " " to select the weight of food from 100 to 2000 g.
3) Press " Start/+30Sec./Confirm " to start defrosting.
6. Defrost By Time
1) Press "Weight/Time Defrost" twice, and the oven will display "dEF2".
2) Turn " to select the defrost time. The MAX time is 95 minutes.
3) Press " Start/+30Sec./Confirm" to start defrosting. The defrost power is P 30, and it cannot be changed.
7. Kitchen Timer
(1) Press "Kitchen Timer/Clock" once, the screen will display 00:00.
(2) Turn " to enter the correct time. (The maximum cooking time is 95 minutes.)
(3) Press " Start/+30Sec./Confirm " to confirm setting.
(4) When the kitchen time is reached, the buzzer will ring 5 times.
If the clock has been set (24-hour system), the screen will display the current time.
Note: The kitchen Time is different from 24-hour system. Kitchen Timer is a timer.
8.Auto Menu
1) Turn " right to choose the menu, and "A-1" to "A-8" will display.
2) Press " Start/+30Sec./Confirm " to confirm.
3) Turn " " to choose the default weight as the menu chart.
4) Press " Start/+30Sec./Confirm " to start cooking.
Example: If you want to use "Auto Menu" to cook fish for 350g.
1) Turn " clockwise till "A-6" displays.
2) Press " Start/+30Sec./Confirm" to confirm.
3) Turn " " to select the weight of fish till "350" displays.
4) Press " Start/+30Sec./Confirm " to start cooking.
| Menu | Weight | Display |
| A-1 Pizza | 200 g | 200 |
| 400 g | 400 | |
| A-2 Meat | 250 g | 250 |
| 350 g | 350 | |
| 450 g | 450 | |
| A-3 Vegetable | 200 g | 200 |
| 300 g | 300 | |
| 400 g | 400 | |
| A-4 Pasta | 50g(with 450 g cold water) | 50 |
| 100g(with 800 g cold water) | 100 | |
| A-5 Potato | 200 g | 200 |
| 400 g | 400 | |
| 600 g | 600 | |
| A-6 Fish | 250 g | 250 |
| 350 g | 350 | |
| 450 g | 450 | |
| A-7 Beverage | 1 cup(120 ml) | 1 |
| 2 cups(240 ml) | 2 | |
| 3 cups(360 ml) | 3 | |
| A-8 Popcorn | 50 g | 50 |
| 100 g | 100 |
9. Multi-section cooking
At most 2 sections can be set for cooking. In multi-section cooking, if one section is defrosting, then defrosting shall be placed in the first section automatically.
Example: If you want to defrost food for 5 minutes and then cook with 80% microwave power for 7 minutes, operate it as the following:
1) Press "Weight/Time Defrost" twice, and the oven will display "dEF2".
2) Turn " " to select the defrost time till "5:00" displays.
3) Press " Micro./Grill/Combi. " once, the screen displays "P100".
4) Press " Micro./Grill/Combi. " once again or turn " to choose 80% microwave power.
5) Press " Start/+30Sec./Confirm " to confirm, and the screen displays "P 80".
6) Turn " " to adjust the cooking time till the oven displays "7:00".
7) Press "Start/+30Sec./Confirm" to start cooking, and buzzer will sound once for the first section, defrosting time counts down. Buzzer will sound once again entering the second cooking. When cooking finish, buzzer sounds five times.
10. Inquiring Function
(1) In states of microwave, grill and combination cooking, press " Micro./Grill/Combi. ", the current power will be displayed for 3 seconds. After 3 seconds, the oven will turn back to the former state.
(2) In cooking state, press " Kitchen Timer/Clock" to inquire the time and the time will display for 3 seconds.
11. Lock-out Function for Children
Lock: In waiting state, press " Stop/Clear " for 3 seconds, there will be a long beep denoting entering the children-lock state. 一 _ o will light and current time will display if the time has been set. Otherwise, the screen will display " [ ]".
Lock quitting: In locked state, press "Stop/Clear" for 3 seconds, there will be a long "beep" denoting that the lock is released.
TROUBLESHOOTING GUIDE
| Normal | |
| Microwave oven interfering TV reception | Radio and TV reception may be interfered when microwave oven operating. It is similar to the interference of small electrical appliances, like mixer, vacuum cleaner, and electric fan. It is normal. |
| Dim oven light | In low power microwave cooking, oven light may become dim. It is normal. |
| Steam accumulating on door, hot air out of vents | In cooking, steam may come out of food. Most will get out from vents. But some may accumulate on cool place like oven door. It is normal. |
| Oven started accidentally with no food in. | It is forbidden to run the unit without any food inside. It is very dangerous. |
| Trouble | Possible Cause | Remedy |
| Oven can not be started. | (1) Power cord not plugged in tightly. | Unplug. Then plug again after 10 seconds. |
| (2) Fuse blowing or circuit breaker works. | Replace fuse or reset circuit breaker (repaired by professional personnel of our company) | |
| (3) Trouble with outlet. | Test outlet with other electrical appliances. | |
| Oven does not heat. | (4) Door not closed well. | Close door well. |
DISPOSAL
The symbol on the product or on the packaging indicates that the device must not be disposed of in the domestic waste.
By disposing of the device in a proper way you help to avoid harmful consequences to environment and health.
Further information about recycling the device is available from the competent authority, the local refuse disposal service or the vendor of the device.
Dispose of the device, which is to be discarded, via a specialised waste collection point for electronic and electrical devices.
CUSTOMER SERVICE
Refer to contact address on our website:www.franke.com
TECHNICAL DATA
| Model: | FMW 20 SMP G XS / FSL 20 MW XS / FSL 20 MW BK |
| Rated Voltage: | 230V~50Hz |
| Rated Input Power(Microwave): | 1250W |
| Rated Output Power(Microwave): | 800W |
| Rated Input Power(Grill): | 1000W |
| Oven Capacity: | 20L |
| Turntable Diameter: | Ø245mm |
| External Dimensions: | 595x343.5x388mm |
| Net Weight: | Approx. 15kg |
GUVENLIK BILGILERI
| Pantalla | |||
| 1 | P100 | 100% | |
| 2 | P 80 | 80% | |
| 3 | P 50 | 50% | |
| 4 | P 30 | 30% | |
| 5 | P 10 | 10% | |
| 6 | G | 0% | 100% |
| 7 | C-1 | 55% | 45% |
| 8 | C-2 | 36% | 64% |
3. Grill o Combi. Coccion
m = 311 ;
NAVOD NA RESENI PROBLEM
m = 311 ;
LIKVIDÁCIA
Symbol na vyrobku alebo na obale označuje,Že zariadenie sa nesmie likvidovat's oppadom v domácnosti. Správnou likvidaciou zariadenia pomоžete zabránit škodlivým následkom preživotné prostredie a zdravie.
Dalsie informáce o recyklácii zariadenia su k dispozícii na prislušnom urade, u miestnej sluzby na likvidáciu oppadu alebo u predajcu zariadenia.
2. Preparation of microunde
MOXe pN3BeCTn Do ypaKeHHa
eIeKtpnHm cTpymom. He
po3eTKN, DOKN BIn He
6ynde npabnblho
BCTaHOBJIeHn i 3a3eMJIeHn.
Cey npnilad noBnHeH
3a3eMJIeHHa 3MeHShyEc
pN3nK ypaXeHHa
eIeKtpnHm Ctpymom 3a
dONOMOROIO nepexiHoro
IPOBOy, AIKN BIDBODITb
eIeKtpnHnCTpyM.
Ppnilad oshaeHn
UHypom 3 npoBODOM
3a3eMJIeHHJ 3
BIDIOBIDHOB BUNKOIO.
BnIky cIiD BCTaBJIaTI N
IpaBnIbHO BCTaHOBJeHy i
3a3eMneHy p03etKy.
Y pa3i HenoBhoro
po3ymiHnIhCTpyKciI 10oO
3a3eMJIeHnA a6o
BHHKHeHHi CymHiBIB 0oO
PpabnIbHOro 3a3eMJIeHHa
PnIaIy, 3BepHiTbC8do
KBaJIiΦiKOBaHOro eIeKTpɪka
cneiaicta 3
O6cIpyROByBaHHa.
Pn Heo6xIDHocTi
BnKOpNCTaHnI NOOBxBaHa
BnKOpncTOByTe IInIe 3-
npoBiDnI NOOBxuBaU.
- Kopotkni ShHyp XnBJIeHHa
pepe6aueHnI JIa
3MeHsEHHpN3NKiB,
NOB'3aHnx 3 3aIpyBaHHaM
a6o cNOTnKaHHm uepe3
DOBnHyp
CTIN, De Ioro MOxTyb NotarHyTu
ДiTи, aboЖиоу можна 3aueNTn
i BNTaHTN MmOBOJI.
- He nepecmaxyuTe iJy.
- He BnKOpncToBvIte KaMepy MikPoXBnIbOBoI neu i dIy 36epirAHn8 6yd-b-ayknx npedMeTIB.
- He 36epiäTe B mikpoxBnIbOBIi neu i npoDyKTHxapUyBaHn, taki kXJI6, neuBO ToIo.
- Перед Тим якnomICTиТи парови чи пл actNKobi KOHTeHepn / NaKeTиВ MikpoXBnIbOBy NiY, 3HiMiTb 3 HnxДрOTЯнi 3aTnCKaUi Ta MeTaJIeBi pyuKN.
- BcTaHOBJIOnTe Ta po3MiUyIe TIO nIy cTporO y BiINOBiIDHOCTI 3 HabeJeHIMn iHCTpyKciIaMn.
He 36epiraTe Ta He BnKOpncToByte uei npnaIaHa BIDKpNTOMy NOBITpi. - He BnKOpNcTObyIe DaHy NiCy 6iJa BOiN, y BoJorOMy PiIbani a6o 6iJa 6aceHny.
- Tempepatya KOHTaKTnX NOBepxOhb MOKe iHЯTnscpiJ qac po6OTn npIpaIy.
-Пд час ВИКОРистання NOВЕрхнIMOЖуТьНагпВатиСя. - TpimaiTe shhyp noaJI BiD rapaunx nobepxoHb Ta He 3akpnaIte BENTnlaicHi OTBOpn Ha neyi.
- He donyckaite, 06 shnyp kNBHeHnB BilbHO 3BnCaB Hnd Kpaem cToIy a6o cTinbHnci.
-- He kopncTyIeScb mIKPOXBnIbOBOIO nIyUo 3 BiIDKpITmN DBePcTAMN, OckIbKn Ze MoKe pIu3BecTn Do uKiDJIbBOrO onPOMiHeHn. BaxnBo, 06 3aMkn 3axnCHoro 6JokyBaHHn He 6yIn 3Iamahi a6o noxkoJkeHi.
-- He po3miuTe mIX DBePcTaMn Ta naneIIO cTOpOHNI pEmTe, cnikyTe 6pud a6o 3aIIuKmHoux 3ac0iB He hakOnuYBaIncsHa yuiNbHeHnx NOBepxHax.
OuHcEHn
IpekeHaiTecra, 10 npnilad BiKJIoueHn BID dJxepela XINBJIeHHa.
1.ПicЯВИКОРиСТаHHЯ OчиCTiTb BHyTpIшHIOЧаСИнHy neu i 3JIeRka BOIOrOIO TKAHNHOIO.
2. Ounchitb akcecyapn 3BnuaHm cnoco6om B MnIbHi BOdi.
3. Pamy Деверцят, ушільнени Та розтошоваи почаспни постпни постпни ретелбно протергп вологою тkaанною, якшо BOHи 3a6рудненi.
4. He BnKOpncToBvIe JoxpCTki a6pa3nBHi MmHoyi 3acobn a6o roctpi metaneBi cKe6Kn dIy NIIeHNr cKJHnx DBePzrT, OckilbKn BOHn MoKyTb POnpAaTI NOBepXHIO, IIO, y CBOHO Yepry, MoKe npN3BeCTn Do pO3KOJIIOBaHHr cKJa.
5. Порада сюдо очшени --- Дялгкого очшени CTIHOK, якх може Торковся щka, сю Гуеться: пokладITь поовини Лимона в мінску, дODаITE 300 ml (1/2 piHTN) Bodi i harpiBaIte B neci ha 100%notyxknoctiВпрodobж 10xbuINH.Пртпь пч M'якою cyxoю TkaHInHOJ.
NOCyD
YBAGA He6e3neka
TpaBmyBaHHa
Oco6am,okpim
cneizalbHo
KBaJIiΦIKOBaHnx oci6,
He6e3peuHO BnKOHyBaTn
6ydb-jaKe
06cIyROvBaHHa 6o
peMOHT, kN
IpeE6aaye 3HJTTA
KpnKn, 10 3a6e3neyuE
3axnCT BiD
BnINBy MIKPOXBnIbOBOoi
eHepri.
ДиВiTбяИнСТPyкцii ΜΟДо «MATEPIANIB,як можна таяк He cπiD BИКОПСTOВуВaTN B MIKPOXBnIbOBIй neч»Дeякн HemeTaNebN IOcUd E He6e3neuHm dЯBИKOPINCTAHNBA MIKPOXBnIbOBIй neч.ЯкpoуВacBИNHKNIcymHIBN,ВИМожTe nepeBipNTn NOcyD BiIDNoBIDHO Do HabeDeHOI HIXue npoceDypn.
IpepeBipka nocydy:
- HanobHitb KOHTeHep, 6e3neuHn Ipn BnKOpNCtAHnB MikPOxBnIbOBI neu, 1 CKJyHKoTO xoIoHOI BOi (250 mI) i nomictiB noRo B MikPOXBnIbOBy niu pa3OM 3 nocydom, kN Bx OchTe nepeBipNTn.
- YbIMKHiTb niv Ha MaKcImaJIbHy NOTyXHicTb Ha 1 XBUNIHy.
3.ObepexHo TOpKHiTbcS NaCyDu: KaIIO npOxHn NocuTe nn, He BnKOpNCToBvIte NoRo dIg PnroTOBaHHB MIKPOXBnIbOBi Nevi. - He BMkaTe niu 6iNb HiX Ha 1 XB.
MATEPIAJI, kI MOXHa BnKOpNCTOByBaTn B MIKPOXBnIbOBI neci
NocyI npMItKn
Iobopotha nidaTbKa 3 KInbueM 1
IHCtpyKiz3 BnKOpncTaHH 1

G

PewiKa dIra rpnB (BnKOpncToByeTbcr TaBKn BpeKmipnpb i po3miuyeTbcn Ha cKnHni niDctabci)
A) NaheJIb ynpabJiHHa
B) CtpnkeHb NOBOPOTHOI niDCTaBKn
C) KINbue noBopOTHOI nIDCTaBKn
D) CknaHa nIDCTaBka
E)OrnaOBe BIKHO
F)Дверцята
G) 3axncha cnctema 6nokybaHHa
YCTaHOBka NOBOPOTHOI PiDcTaBKn
Kinbue nobopoTHoi niCTaBKn
a. B xoHOMy pa3i He BCTaHOBIOIe cKJHy nIDCTaBky y nepeBepHyToM y noJoxeHHi. He 6NoKyIte cKnIHy nIDCTaBky.
b.Пд уас пиroTuBaHHяixi 3aBXДN BnKOpncToBvIe cKnIHy nIcTabKy Ta KInbce NOBOPOTHOI nIDCTaBKN.
c. Bci npodyktn xapuybaHHia KOHTeHepn dna iXi noTpi6Ho 3aBXd n po3TaWOByBaTN Ha cKnHni niCTabci dna nprirotybaHHia
d.Якwo cknha niDcTaBka a6o kInbue noBOpOTHOI niDcTaBKn MaE TpiuHn a6o HaJOMN, 3BepHITbcrdo Hau6nKyoro ABTOPn3ObaHOro cepBichoro ueHTpy.
Panaelb ynpablinnna


Ihctpykci:

MOHTAX
- Пилад може 6утп Bстановленьи y ушафу Ширною 60см.
- Пилад постаецься 3 kaбелем кИВлени 3 Шт ekером Schuko a6o 3-жnlbнм kaбелем кИВлени 3 ВIlbнm КLEMамn.
- Пплад мас 6утп пд'сдани Лше до правильно BCTaHOBJIeHOI Ta 3a3emJIeHOI pO3etKN.
- Hanpyra B mepeki noBHHa BiDnoBidaTn Hanpy3i, 3a3NaYeHi Ha nacnpTHi Ta6nUci npnaIay.
- BCTaHOBJIIOBAtN PO3ETKU Ta 3amIHIOBaTn 3'EDHyBaJIbHn Ka6eIb MoKe BnKJIIOUHO KBaIiΦIKOBaHn eJeKTpIK. RaKIo He nepeIb6aUaEbCra BnKOpNCtAHn BnIKN Uepe3 HeIOCTyINHicTB Micu II yCTaHOBKn, Heo6XiIDHO BCTaHOBITN BcENOJIIOCHN PO3'EDHyBaU 3 BiDCTaHHO MIX KOHTaKTAmn He MeHSe 3 MM.
- 3a6bopohyETbcBnKOpncTOByBaTn aanTepn,
6araToKaHaJIbHi p03eTKn Ta noDobKyuBaayi.
IpeBaHTaJxehHMy MoXe CTAuPiuHIO BuHnKHeHHny
nojexi.
"Micro./Grill/Combi." (MikpoxbnboBn/Γpnlb/Kom6iHOBaHn) IhctpyKci 3 hanaStyBaHHa
m = 311
YTNJI3AUJIA
LcH CmBOn Ha BnO6i a6o Ha yNaKOBuO3Haue, 10 npNCTpi He MoXHa YtNiI3yBaTn pa3OM 3 NObYTOBIMN BiXoDAMN.
YtNiI3yUOuN cey npOdyKT npaBnIbHO, Bn DOnOMoXeTe 3aNo6iRTN MOxJINBM HcAITNBHM HaCJIdkam dJa HaBKOJIuShbOro cepeOBuza i 3dOpOB'Я IIOHN.
IodatkoBy iHopmaciio 7oOy ytni3aui npnlaay MoxHa OTpMaTu y KOMTeHTHOrO OpraHy, MicceBoi Cnyk6n 3 ytni3aui nobyTOBnx BIXoDIB a60 nocTauNbHnka npncToIO.
IpnnaHneo6xioHno nepedaTu BIDNOBIDnnyHKT 360py dnyytni3aui eJektpnuHoro Ta eJektpoHoro yCTaTKyBaHHra.
CEPBICHI ΚEHTP
www.franke.com
TEXHIUHIXAPAKTEPNUKU
| Модаль: | FMW 20 SMP G XS / FSL 20 MW XS / FSL 20 MW BK |
| Hominahha hyapya: | 230 B ~ 50 Гц |
| Hominahha bha bxdha noTyxhictb (mikpoxbilbova пч): | 1250Вт |
| Hominahha bha bxdha noTyxhictb (mikpoxbilbova пч): | 800Вт |
| Hominahha bha bxdha noTyxhictb (Гриль): | 1000Вт |
| Mictkiciь Neч: | 20л |
| Дiametр поborotnoi пidctabkn: | Ø245 MM |
| Зовни розміри: | 595x343.5x388 MM |
| Bara netto: | Пробл. 15 кг |
CneyuET BHNMaTeIbHO O3HaKOMNtbcra C pyKOBOdCTBOM NOlb3OBaTeJI N HOpMaUeN IIO TexHnke 6e3OpaCHocTn IpeEd nCNoJb3OBaHHeM neuN.
XpaHnTe pyKOBoDCTBO dIyduux cnpaBOK.
I3ROTOBNTeJIb He HecET OTBETCTBEHHOCtB 3a BO3MOxHbIyuepe6, KOTOpbIM MOKeT 6bITb HaHeCeH B CBra3N CHECOOTBETCTByIOUeYCTaHOBKOJ, a TaKKe HEnpaBnJIbHbIM, HECOTBETCTBYOUsIM IJIH Hepa3ymHbIM NcNoJIb3OBaHNem yCTPOINCTBa.
3JIeKTPnuecka 6e3OpacHocTb Neu rapaHTnpyeTcra TOnbKO
IprN ee NODcoEINHeHn K CnCTeMe 3a3EmJeHn, B
COOTBETCTBnC DeiCTByUOImn HOpMaMn.
CneyuET npOBepntb 6e30nacHoe n 3oΦoKeKTHBHOe ΦyHKcnoHnpOBaHne daHHoro 3JeKtpnueCKOro yCTpoiCTBa:
-ОбрацаТьсЯТолькOB aВТOPи3OBaHHьe cepBиСьIE ueHTpyI.
-He moi nizupobatb xapaKtepncn yctpoicTba.
Использоване данною устpoиства DeьмВ BO3pacTe 8 NETI CTAPWE IINUZA M C OTRAHNUEHHbIMN ΦIN3NueCKIMN, CEHCOPHBIMN IIN YMCTBEHNBIMN BO3MOXHOCTaMn IIN He OBlaIauOuIMN Heo6xOdIMbIMN ONbITOM N HABbIkaMn, ДОпуSCKaETcR TOJIbKO PrN ObecneueHIn PrnCMOTpa 3a HIMN IIN NOcNe TOrO, KAK IM 6bln pa3bЯСHEhbl PrpANILA erO 6e3OpanachOn 3KcPnyatauN IN cyuceCTByUOuNE OnaCHOCtN. He nO3BOJYte DeTAM INrpaTb C npnbopom. DeTn He ДОЛЖНБI OCUSeCTBJIaTb ChSTKy IN yXOD 3a npnbopom 6e3 ПрSCMOTpa CO STOpONbI B3PocJIbIX.
3To yctpoiCTBO He ngpyka.
He n03BOJyTe DeTm HaxoINTbcr pIOM C Hm 6e3 npncMOtpa.
He n03BOJnTe DeTm Kacatbcy yctpoiCTBa IJIe erO 3JIeMeHTOB ynpaBJIeHnI npI erO cyHKcIOHnPoBAHnI IJIe cpa3y Jx e nocIe NcNoJIb3OBaHnI.
BHNMAHNE! B uejx npedynpejdeHnOaCHOCTN B CB3N C HepeHaMepeHHbIM BOCCTaHOBJIeHnEM TeIIOBOrO BbIKJIOuataJI, He dOnyckaetcnoCoEduHHeNe DaHHoro np6opaaheep3 BHeUHee yctpoiCTBO nepeKJIOUeHn, HApnpMep, TaImeP, IIn ero noDCoeDuHHeNe K KOHTpy, KOTOpbl peYJARpHO BKJIOuaETcN BBIKJIOUaETcN POJIb3OBaTeJIem.
Y6eIntecb, yTO yCTpOiCTBO yCTaHOBJeHO TaKIM O6pa3OM, YTO6bl eTo MOxHOb 6blIO OTCoEINHTb OT 3JIeKTPnueCKoCETN C paCCTOJHHeM pa3MbikAHNA KOHTaKTOB, rapaHTnpUoiM pOIHoe OTKJIuOyeHne cOrJaCHo ycIOBNIpeHaIppJeHnA KaterOpn III. Pa3MbikTeJI NdoJXHbI 6blTb BCTPOeHbI B qIKcPiOBaHHyO Ka6eJIbHyIO pa3BOIDKy BCOTBETCTBnC npaBnIaMn 3JIeKTPnueCKO rODKJIIOUeHnA.
ИспобзуITE TOЛьКО Термо3OHД, peKOMeHdyeMbIДЯданнОйпч.
3anpeaetcyaTaNbNbAtb np6op 3a deKopaTnBHOI DBepeB BO n36eXaHne neperpeBa.
CM. INHCTpyKcH N B OTHOWeHn "MaTePnaJIOB, KOTOpbIE MOrYT IcNoJIb3OBaTbcra B MmKpOBOJHOBOI neuN, INI INcNoJIb3OBaHn KOTOpbIX B MmKpOBOJHOBOI neuN cJeDyET n36eRaTb." IMN MoYr 6bITb HeKOTOpbIE HEmTaJIINueCKne INHCTpyMeHTbl, KOTOpbIE He RAJIaHTc8e3OnaChbIMN dIra IcNoJIb3OBaHn B MmKpOBOJHOBOI neu. B CJIyuae COMHeHn, MOxHO pPoTEtnpoBaTb COOTBeTCTByUoUsiN INHCTpyMeHT, cJeDyprnBeDEHHbIM HNXe INHCTpyKcHnM.
TecntpoBaHne IHCTpyMeHTa:
- HanonHntb emKoCTb, npedHa3NaeHHyU dJa MnkpoBOLHOBbIX neeH, 1aushkoXoNoHOB BOdbI (250 m) c pacnoJIOKeHHbIM BHyTpIn IHCTpyMeHTOM.
- HarpeBaTb Ha MaKcImaJIbHOJ MOUHOCrB TeueHne 1 MInHyTbI.
3.Octopoxho notporatb nHctpymeH. EcnnyctoHnHcTpymeHT ropauH, He cJeayet nCnoJb3OBaTbeO dI npiroTOBHeHBA MkPOBOHOBIO neuH. - He npeBbIaTb 1 MmHyTu BpeMeHn npiroTOBneHn.
MaTePnaIbI, KOTOpBIE MOryT IcNoIb3OBaTbcra B MInKpOBoJHOBOI neu INHCTpyMeHTbl PpIMeuaHnA
| Окрашение бл Anyo | Следоваты ИсторICALity Мелеговпел. Днице okрашенио 6люда должно 6ыт, по мелшей мeled, на 3/16 дюма (5 MM) виши поворотого стол. Небочевская раловаты Следоват приveсы К порждених поворотого стол. |
| Следоват посуда | Толбко п dedусмоггеная дя мікpoвогиновьх пechу. Следоват ИсторICALity Мелеговпел. He Incnoьзоваты пocуdu c azapanyamn илі тreceцунам. |
| Следоват посуда следоват следоват следоват следоват следоват следоват следоват следоват следоват следоват следоват следоват следоват следоват следоват следоват следоват слeds слeds слeds слeds слeds слeds слeds слeds слeds слeds слeds слeds слeds слeds слeds слeds слeds слeds слeds слeds слeds слeds слeds слeds слeds слoids слeds слeds слeds слeds слeds слeds слeds слeds слeds слeds слeds слeds слeds слeds слeds слeds слeds слeds слeds слeds слeds слeds слeds слeds слoods слeds слeds слeds слeds слeds слeds слeds слeds слeds слeds слeds слeds слeds слeds слeds слeds слeds слeds слeds слeds слeds слeds слeds слeds сл IDS слeds слeds слeds слeds слeds слeds слeds слeds слeds слeds слeds слeds слeds слeds слeds слeds слeds слeds слeds слeds слeds слeds слeds слeds слids слeds слeds слeds слeds слeds слeds слeds слeds слeds слeds слeds слeds слeds слeds слeds слeds слeds слeds слeds слeds слeds слeds слeds слeds слös слeds слeds слeds слeds слeds слeds слeds слeds слeds слeds слeds слeds слeds слeds слeds слeds слeds слeds слeds слeds слeds слeds слeds слeds слdds слeds слeds слeds слeds слeds слeds слeds слeds слeds слeds слeds слeds слeds слeds слeds слeds слeds слeds слeds слeds слeds слeds слeds слeds слroads слroads слroads слroads слroads слroads слroads слroads слroads слroads слroads слroads слroads слroads слroads слroads слroads слroads слroads слroads слroads слroads слroads слroads слroads сл roads слroads слroads слroads слroads слroads слroads слroads слroads слroads слroads слroads слroads слroads слroads слroads слroads слroads слroads слroads слroads слroads слroads слroads слroads слroad слroads слroads слroads слroads слroads слroads слroads слroads слroads слroads слroads слroads слroads слroads слroads слroads слroads слroads слroads слroads слroads слroads слroads слroads слRoads Слroads Слroads Слroads Слroads Слroads Слroads Слroads Слroads Слroads Слroads Слroads Слroads Слroads Слroads Слroads Слroads Слroads Слroads Слroads Слroads Слroads Слroads Слroads Слroads Слroads Слroad Слroads Слroads Слroads Слroads Слroads Слroads Слroads Слroads Слroads Слroads Слroads Слroads Слroads Слroads Слroads Слroads Слroads Слroads Слroads Слroads Слroads Слroads Слroads Слroads Сл roads Слroads Слroads Слroads Слroads Слroads Слroads Слroads Слroads Слroads Слroads Слroads Слroads Слroads Слroads Слroads Слroads Слroads Слroads Слroads Слroads Слroads Слroads Слroads Слroads СлRoads Слroads Слroads Слroads Слroads Слroads Слroads Слroads Слroads Слroads Слroads Слroads Слroads Слroads Слroads Слroads Слroads Слroads Слroads Слroads Слroads Слroads Слroads Слroads Слroads |
MaTePnAJIbI, INcNoJIb3OBAHnI KOTOpbIX B MmKpOBoJHOBOI neu cJIeNyET n36eRaTb
MnHmAbha yCTaHOBOuHa BbICota: 85 cm.
He cne dyet 3aKpbBaTb BeHTnlaCIOHbIe Na3bl N BCacBbAIOUne OTBepCTna.
Приимechи:
He 6noknpoBaTb nnCn6aTb cnIOBoi Ka6eJb.
A.Tpe6obHnK shkaФy
1.
2.

PnmeuHne:
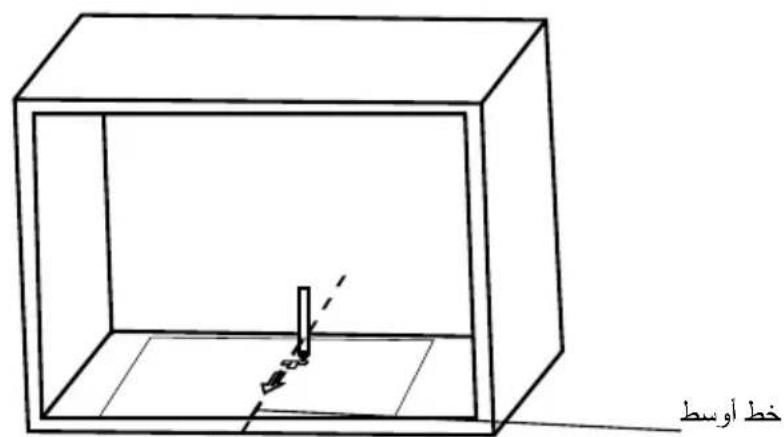
Pn yctaHOBKe Heo6xoDmbl KPOHHTeH N 7a6NoH dHa DnHua 7kaΦa.
B. Побrotовkaшкафа
- Cnédyet 03HaKOMITbCЯ C INHCTpykUmaMn B OTHOWeHIn SHA6IHOHA ДЯДHIIa ⅢKAΦA, NOJoxHTb Ⅲa6JIoH B HNxHeY qactn ⅢKaΦa.
- CdeNaTb OTMeTKn Ha HIXHHei NOBepXHOCTN 1kaΦa B COOTBeTCTBnC OTMeTKamn "a" 1a6I0Ha
BnHT A

KpoHHTeH
LcHTpaJIbHaJaIHHa
- YdaJIbTb 7a6Ioh HIXHeJ qactn 7kaΦa n 3aKpeNTb KPOHHTeH BInHTOM A.
KpoHwTeiH
C. Mohtax peu
-
YCTaHOBNTb Neub B WkaΦ
-
PpOBepntb, UTO 3aHnA CTeHka Neu 3aΦnKcnpObaHa KPOHtTeHOM.
- He cπbntnnepekpnuBaTb cnloBoKa6eJb.
- OTKpbITb DBepu, 3aKpeNTb Neyb K ShkaФy BInHTOM B B yCTaHOBOUHOM OTBepCTn. 3aTeM 3aKpeNTb ПlaCTNKOByIO KpbIshky K yCTaHOBOUHOMy OTBepCTnIO.
ФУнкционироване
1. Hac troponka yacob
- Mhorocekuohhoe npiroTOBJIeHnA
Для пи��товленя могут 6ыт bыбраны He 6oJee 2 ceKци.В MHOROCEKцIOHHom npiROTOBlenu, ecn OndHOn I3 ceKциЯВЯЯТСЯЗМОРаЖИВaHNe, OHO NO3NIOHINpyeTcR Bперво CEKци aBTOMaTNUyeCKn.
Примет:Есни вам hyжно pa3MOPO3Ntь пюдуКТВ Teчehne 5 MнHyT,а 3aTeM rOTOBNTb erо пи 80% MнкрOBOLHOBОМоцHOCTNВ Teчehne 7 MнHyT,cNeДуET DeiCTBOBaTb cIeDyUoUIM O6pa3OM:
1) Hακαβοπιμο "Weight/Time Defrost"ДBa pa3a, на дινηνην πογΒιντόγ "dEF2".
2)Поверн'tь" "Для Выбopa Врemeи pa3MopakINBaHЯdo BV3yaIIIN3aIIN "5:00".
3) Hακαβόπιον "Micro./Grill/Combi." Μόνη ρα3, ἀκραήσε πογΒιτός "P100".
4) HaxaTb onuio " Micro./Grill/Combi. " eue pa3 nIi noBepHyTb " " dIy Bb6opa 80% MnkpoBOJHOBOI MOUHOCTI.
5) HaxaTb onuio " Start/+30Sec./Confirm " Дя поТьержденя, на диспee noRbntcra "P 80".
6) Повернту " "" дя ретуларовки врemeи при�тobленья до отоображеня на диспjee "7:00".
7) Haxatb onuio " Start/+30Sec./Confirm " Дя науа пи�OTOBHeHry, 3ByKOBoi cnHaI npO3ByuHT nepBbI pa3 dЯпрBOI cekUH, NaunHaTcY OTCyET BpeMe pa3MopaxnBaHry. 3ByKOBoI cnHaI npO3ByuHT eue pa3 npN BBOe BTOPO npNiPoTobHeHry. Pn 3aBepSeHIn npiroTOBHeHry, 3ByKOBoI cnHaI 3ByuHT pR pa3.
10.ФункцяЗапoca
1) B pexime MnkpoBONHOBOn neu, rpnIy I KOMbHnPoBaHHoro npiroTOBJIeHnI, HaxaTb onuio " Micro./Grill/Combi.", Tekyuaa moUHocTB 6yJeT oTo6paXeHa BVteueHne 3 cekyHd. Cnyctra 3 cekyHdbI neyb BepHeTcB V cTaHdapTHbI pexIM.
2)В ржиме пи��овленья нажать onцию "Kitchen Timer/Clock" дя onpeделеня времен, Время судет отобрахени в точенье 3 cekyнд.
11.ФункцяблOKИрOBКиOTдeTei
Блokирвka:В ржиме ождань нажать onцио" Stop/Clear"В точене 3 cekyнд,пр03ByuHTДЛNTeHbHь 3ByKOBOcRHaJI,уBEdomЯюши O BKIOUcheHnФуHKци6лokирвкг OT DeTei.2Oropaetcra,И оTOбрахаetcra TeKyuee BpeM,ecnno OHOyctaHOBHeNo.B npOTINBHom cnyuae,нэКрaine 6ydet BBBeDeHo"[]".
OTKIOUeHne cyHKcNn 6JOKuPOBKn: BpeXime 6JOKuPOBKn HaxaTb OIcHIO " Stop/Clear " B TeueHne 3 cekyHd, npO3ByuHT dJIITeJIbHbI 3ByKOBoCnHaJI, yka3bIBaIOUsn Ha OTKIOUeHne 6JOKuPOBKn.
"Start/+30Sec./Confirm" 7
"jlll l jll l jll l jll l jll l jll l jll
Juaaai 10
"J. Micro./Grill/Combi " 1
3 3 3 3 3 3 3 3 3 3 3 3 3 3 3 3 3 3 3 3 3 3 3 3 3 3 3 3 3 3 3 3 3 3 3 3 3 3 3 3 3 3 3 3 3 3 3 3 3 3 3
Jabu Jaa 11
g 111111111111111111111111111111111111111
"3 3d"Stop/Clear Jall g:Jall
.00:00 00 00 00 00 00 00 00 00 00 00 00 00 00 00 00 00 00 00 00 00 00 00 00 00 00 00 00 00 00 00 00 00 00 1
(95)
"Start/+30Sec./Confirm" (3
(4
(acl-24)aclllbpa
j 24 1
Auto Menu .8
"8-A" 1-A" j
"Start/+30Sec./Confirm" (2)
aaii bia 100
"Start/+30Sec./Confirm" (4
350 J"Auto Menu" 1
"6-A" 1
"Start/+30Sec./Confirm" (2)
"350" 1
"Start/+30Sec./Confirm" (4
4
% 100 "Start/+30Sec./Confirm"
95 30 1
"Start/+30Sec./Confirm" 1a bia jk d aia iiaiaiaiaiaiaiaiaiaiaiaiaiaiaiaiaiaiaiaiaiaiaiaiaiaiaiaiaiaiaiaiaiaiaiaiaiaiaiaiaiaiaiaiaiaiaiaiaiaiaiaiaiaiaiaiaiaiaiaiaiaiaiaiaiaiaiaia
30
%100 100 %100
"Start/+30Sec./Confirm" be bi
jJyJ 5
.dEF1" "Weight/Time Defrost" (1
2000 100 j 100
"Start/+30Sec./Confirm" (3
G.6
P 30 d 30Sec./Confirm" (3
"le biai a 1a iabii J2-C" 1-C" G" P 10" P 30" P 50" P 80"
" 95:00 0:05 m n j t l" " 30Sec./Confirm
"Start/+30Sec /Confirm
(1-C)45 55
10
"P100" sIgR gJy "Micro./Grill/Combi. 1
.1 g 1 .
."1-C" "Start/+30Sec./Confirm" 3
.10:00" n 248 248 248 248 248 248 248 248 248 248 248 248 248 248 248 248 248 248 248 248 248 248 248 248 248 24
"Start/+30Sec./Confirm" (5
.23--0 1
"Kitchen Timer/Clock" (3
.59--0 1
"Kitchen Timer/Clock" 5
Lgaiiie Igeiae 1y aclll bua pia 11 (1:la)
2
"P100" Micro./Grill/Combi.
"P100" "P100"
"2-C" 1-C" "P 10" P 30" P 50" P 80
" 95:00 0:05 0:05 1 " Start/+30Sec./
"Start/+30Sec./Confirm
j 20 80 1
ylll lglll
.P100" 356
80%80 Micro./Grill/Combi.
.P80"Start/+30Sec./"
.20:00" 1
"Start/+30Sec./Confirm" (5
C
4.
-
·s + a1 + a2 + a3 + a4 = 90
5
kit-Trim
aJzj 1

aai jll 1e lcl c
A. (s²) 0 0
3
A 3
2.
45
AD^2 = AC^2 + CD^2
L 1
15 jll lalj
jll jil jle jll jll jll jll jll jll jll jll jll jll jll jll jll jll jll jll jll jll jll jll jll jll jll jll jll jll jll jll jll jll jll jll jll jll jll jll jll jll jll jll jll jll jll jll jll
85.
Iaill gaiy geil Ciaiai j
aui j 11 11
A
1.
1
60 60 60 60 60 60 60 60 60 60 60 60 60 60 60 60 60 60 60 60 60 60 60 60 60
2
.
3.
.4
Jggo yie k d Jda n no Jugill k Jd jy j 5
J 1
3 15
a. 1y.6ill 1r, g 1jlll 0d2i 1p 1i j y i j
.
e lii jn jn gagg bss n
1


Micro./ Grill/Comb

Weight/Time Defrost

Kitchen Timer/ Clock

Stop/Clear

Start/+30Sec./Confirm

Auto Menu

Time

Weight
a ball aably jll jll jll jll jll 5
300 2/1) 300
a 10 d00000000000000000000000000000000000000
aai
1
1
1 1
4.1230 15 11 11 11 11 11 11 11 11 11 11 11 11 11 11 11 11
i
olilj el jyI eLiJ yaii oii
:cll
gaiall ciyl all iaiy (J250)
.02al g 4000 02al o jai 6000 02al 2
a 3
S AOB = S AOB + S_ AOB
.
j
Jai jai Jai
42
.
$$ - \therefore a = b $$
$$ \cdot \dot {n} j _ {i} \dot {j} _ {i} \dot {j} _ {i} \dot {j} _ {i} \dot {j} _ {i} \dot {j} _ {i} \dot {j} _ {i} \dot {j} _ {i} \dot {j} _ {i} \dot {j} _ {i} \dot {j} _ {i} \dot {j} _ {i} \dot {j} $$
$$ . \dot {n} \dot {j} \dot {l} \dot {d} \dot {s} \dot {t} \dot {c} \dot {l} \dot {s} \dot {s} \dot {l} \dot {i} \dot {j} \dot {j} \dot {i} \dot {j} \dot {j} \dot {j} \dot {j} \dot {j} \dot {j} \dot {j} \dot {j} \dot {j} \dot {j} \dot {j} $$
$$ - \frac {1}{2} \frac {\partial f}{\partial x} + \frac {\partial f}{\partial y} $$
$$ \therefore \dot {n} \dot {a} \dot {s} \dot {p} \dot {e} \dot {e} \dot {o} \dot {o} + \dot {l} \dot {a} \dot {a} \dot {s} \dot {s} \dot {i} \dot {w} \dot {y} \dot {z} $$
$$ \ddot {a} g b \dot {a} g d \dot {a} g f j n j j j j j j j j j j j j j j j j j j j j j j j j j j j j j j j j j j j j j j j j j j j j j j j j j j j j j j j j j j j j j j j j j j j j j j j j j j j j j j j j j j j j j j j j j j j j j j j j j j j j $$
$$ \therefore \mathrm {d} \left[ \frac {\partial f}{\partial x} \right] = \int_ {0} ^ {1} \frac {\mathrm {d} x}{x - 1} $$
$$ \left. \sum_ {j = 1} ^ {n} \sum_ {i = 1} ^ {m} \sum_ {k = 1} ^ {p} \sum_ {l = 1} ^ {q} \sum_ {r = 1} ^ {s} \sum_ {t = 1} ^ {t} \sum_ {u = 1} ^ {w} \right} $$
$$ \therefore \mathrm {d} \omega = \mathrm {p l a s} $$
$$ j _ {i} \left(j _ {i} \right. \left. j _ {i} \right\lrcorner \left. j _ {i} \right. \left. j _ {i} \right\lrcorner \left. j _ {i} \right. \left. j _ {i} \right\lrcorner \left. j _ {i} \right. \left. j _ {i} \right. \left. j _ {i} \right. \left. j _ {i} \right. \left. j _ {i} \right. \left. j _ {i} \right. \left. j _ {i} \right. \left. j _ {i} \right. \left. j _ {i} \right. \left. j _ {i} \right. $$
$$ \therefore \text {i} _ {\text {i}} \text {i} _ {\text {i}} \text {i} _ {\text {i}} \text {i} _ {\text {i}} \text {i} _ {\text {i}} \text {i} _ {\text {i}} \text {i} _ {\text {i}} \text {i} _ {\text {i}} \text {i} _ {\text {i}} \text {i} _ {\text {i}} $$
$$ \therefore \mathrm {g l a b} \mathrm {g l i d i s i o n} \mathrm {g l a b} \mathrm {g l i d i s i o n} \mathrm {g l a b} \mathrm {g l i d i s i o n} \mathrm {g l a b} \mathrm {g l i d i s i o n} \mathrm {g l a b} \dots $$
$$ \therefore \text {s u r e l l} \quad \left| \frac {\partial}{\partial x} \right| = \frac {\partial}{\partial y} \frac {\partial}{\partial z} \frac {\partial}{\partial t} \frac {\partial}{\partial t} \frac {\partial}{\partial x} \frac {\partial}{\partial y} \frac {\partial}{\partial z} \frac {\partial}{\partial t} \frac {\partial}{\partial x} \frac {\partial}{\partial y} \frac {\partial}{\partial z} \frac {\partial}{\partial t} \frac {\partial}{\partial x} \frac {\partial}{\partial y} \frac {\partial}{\partial z} \frac {\partial}{\partial t} \frac {\partial}{\partial x} \frac {\partial}{\partial y}. $$
$$ . l e \dot {s} \dot {s} \dot {s} \dot {s} \dot {s} \dot {s} \dot {s} \dot {s} \dot {s} \dot {s} \dot {s} \dot {s} \dot {s} \dot {s} \dot {s} \dot {s} \dot {s} \dot {s} \dot {s} \dot {s} \dot {s}. $$
$$ \left. \right.\left. \right.\left. \right.\left. \right.\left.\left.\left.\left.\left.\left.\left.\left.\left.\left.\left.\left.\left.\left.\left.\left.\left.\left.\left.\left.\left.\left.\left.\left.\left.\left.\left.\left.\left.\left.\right.\right.\right.\right.\right.\right.\right.\right.\right.\right.\right.\right.\right.\right.\right.\right.\right.\right.\right.\right.\right.\right.\right.\right.\right.\right.\right.\right.\right.\right. $$
$$ \therefore \text {B} = \text {C} \text {D} \text {E} $$
i
J 1
J 1
1
[{120},j \leq j \leq l]
p 1
a
A ≤ B
j
pIiIyI yIyIyIyIyIyIy
acl
aai jai jai gill iii .yil
J 1
J
1 1
1
a
a 1
J 1
a<1> 111111111111111
jll jlll
2
.
(3
g 1
jll jll 1y 1 y
.
- 与 j1j2 , j3 , j4 , j5 , j6 , j7 , j8 , j_9 ,
J 1
alai i 1 g 1 g aai l kai i jg jia jia jia jia jia jia
.

Make
www.franke.com

EN TR ES FR IT PT DE EL CS PL SK RO UA RU AR