Power Output Sensor - Ergotrainer accessory POLAR - Free user manual and instructions
Find the device manual for free Power Output Sensor POLAR in PDF.

User questions about Power Output Sensor POLAR
0 question about this device. Answer the ones you know or ask your own.
Ask a new question about this device
Download the instructions for your Ergotrainer accessory in PDF format for free! Find your manual Power Output Sensor - POLAR and take your electronic device back in hand. On this page are published all the documents necessary for the use of your device. Power Output Sensor by POLAR.
USER MANUAL Power Output Sensor POLAR
Power output kamei CK 19/10/01 9:39 Page 1
Product of Polar Electro Gy
Professorintie 5
FIN-90440 KEMPELE
WVW
Distributed in the USA by Polar Electro Inc.
370 Crossways Park Drive
Wilmington, DE 19117-2850
Wubbudy, NY 11797-2080
U.S.A.
www.polarusa.com
187065GENA


English Pages 2-11
INSTALLATION 3
Installing the power sensor 4
Installing the chain speed sensor 5
Installing the speed sensor 6
Installing the bike mount 7
Battery replacement. 7
HOW TO USE 8
Your Polar Power Output Sensor 8
Precautions. 10
Troubleshooting 10
Technical specification 11
Warranty 11
The Polar Power Output Sensor measures pedalling power, left/right balance (LRB) describes the share of power output of left and right as a percentage), pedalling Index (PI) describes how evenly power output was produced during a cycle round), speed, cadence and distance when cycling. No other use is intended or implied.
The Polar Power Output Sensor is compatible with the Polar S710™ heart rate monitor and with bikes with a rear deraillur. It is designed especially for road cycling but it is also suitable for most mountain bike types. However, the wires can not take strong external stress. Also, installation may be more difficult on mountain bikes than on road bikes.
Before attaching the rubber pads for the sensors or the magnets to the bicycle, the area in question should be cleaned and dried thoroughly.
If the cable ties are too short for your bicycle, join two of them together to make them longer.
For more instructions on how to use the Polar Power Output Sensor, please refer to the user's manual of the Polar S710 heart rate monitor.
华


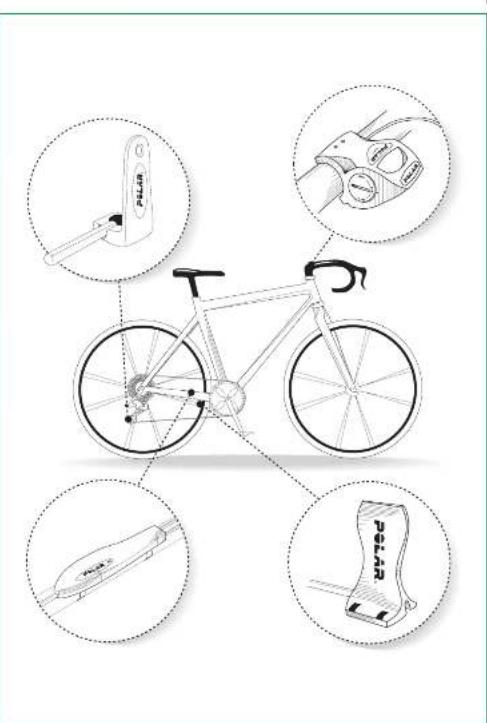
Installing the power sensor
Note: There are two types of cable ties included in the package. Use the wider cable ties for the installation of the power sensor.
- Check the top of the right chain stay to find a suitable place for the power sensor. The sensor should be installed in the middle of the chain stay.
- Place two rubber pads on the chain stay and then put the sensor on the pads. You should be able to read the Polar logo from left to right, when you are on the right hand side of your bicycle. Place the "middle" notch in the middle of the chain stay. Pass the cable ties through the sensor holes and around the chain stay. Do not wind them around the gear cables. Adjust the ties loosely.

Note: Do not tighten the cable ties of the sensor fully before installing the crank magnet!
- Install the crank magnet on the upper side of the crank when the crank is pointing backwards. To ensure the successful transmission of the cadence signals, the crank magnet should pass the "cadence" notch of the power sensor. Attach the magnet to the crank. Secure with a cable tie. Make sure that the crank magnet does not touch the chain when the chain is in the position that is closest to the crank.
- Fine-tune the position of both the crank magnet and the power sensor so that the magnet passes the sensor closely but does not touch it. The maximum distance between the power sensor and the crank magnet should be 7mm / 0.3^ . Cut off any excess cable tie ends.
Installing the chain speed sensor
- Wind the wire from the power sensor to the chain speed sensor securely around the rear derailleur cable so that the wire is not hanging loosely. However, the normal operation of the rear derailleur must be possible. If you are installing the sensor on a mountain bike, it is not always necessary to wind the wire around the rear derailleur cable, as the wire may not be long enough for that. Avoid extreme tightening of the wire
- There are three pulley bolt options included in the package. Choose from the following table the most suitable pulley bolt to be installed on your bicycle. Please note that only some commonly used rear deraillaur types are included in the table. The bolts are suitable for many other types, as well.
| Rear derailleur Pulley bolt Rear derailleur Pulley bolt | |||
| Shimano | Bolt Shimano | Campagnolo | Bolt Campagnolo |
| • Dura-Aco RD-7700 Road #501030 • Record 9-speed RD00-RE200 Road #501032 • Ultregra RD-6500 • Chorus 9-speed RD00-VL209 | |||
| • Shimano 105 RD-5500 • Record 10-speed RD00-RE210, RD00-RE2101 • Chorus 10-speed RD00-CH210, RD00-CH2101 • Rading Triple 9-speed RD00-RA309 • Daytona 9-speed RD00-DA209 • Daytons Triple 9-speed RD00-DA309 • Velocare 9-speed RD99-VL209 | |||
| Shimano | • Velocare Triple 9-speed RD99-VL309 | ||
| • Deere RD-M510 | Bolt Shimano | • Mirage RD99-M1209 | |
| • Tiagra RD-4400 | MTB #501031 | • Mirago Triple RD99-M1309r | |
- Detach the original bolt from the rear derailleur. Install the chain speed sensor on the rear derailleur and fasten it with one of the bolts delivered in the package. Do not tighten fully yet.
- Check that all gears function properly and the chain speed sensor does not touch the spokes when the chain is on the biggest sprocket.
- Once positioned correctly, lighten the bolt securely.

Note: To ensure your safely, attach the wires of the power output sensor firmly to the frame of the bicycle using the cable ties. Surplus wires can be folded around the frame.
G
Installing the speed sensor
Note: There are two spoke magnet options included in the package (see illustration III/4). You only need to install one of them.
- Check the inner part of the left chain stay opposite the power sensor to find a suitable place for the speed sensor.
- Place the rubber pad on the chain stay in a suitable place.
- Place the speed sensor on the rubber pad, downwards from the chain stay. Check that the sensor does not touch the spokes. Pass the cable ties through the sensor holes and loosely adjust the ties. Do not tighten fully yet.
- Attach one of the two speed magnets to a spoke of the rear wheel. Choose the one that fits better on your spoke diameter. A) Attach the magnet by rotating it around the spoke before putting the metal cover on the magnet. Position the magnet towards the sensor. B) Attach the screw magnet to a spoke. The magnet must be facing the speed sensor.
- Fine-tune the positioning of both the spoke magnet and the speed sensor so that the magnet passes the sensor closely but does not touch it. The maximum distance between the speed sensor and the spoke magnet should be 5 mm / 0.2^ .
- Once positioned correctly, tighten the cable ties securely and cut off any excess cable tie ends.

Power.cuipL.GBR A19101.9366-7


Installing the bike mount
- Paas the bike mount cable along the bicycle frame towards the handlebar and attach it with cable ties.
- Attach the cable to the bike mount. Surplus wires can be folded next to the bike mount.
- Place the rubber pad on the handlebar.
- Position the bike mount on the rubber pad. Power text needs to be right way up to allow it to be read.
- Pass the cable ties through the grooves on both sides of the bike mount. Secure the bike mount snugly. Cut off any excess cable tie ends.
- Place the S710 wrist receiver on the bike mount. Pass the wrist strap through hole in the bike mount and around the handlebar. Attach by securing the wrist strap.
V
Battery replacement
The estimated average battery life of the Polar Power Output Sensor is 300 riding hours. To change the battery, please follow these instructions carefully and see picture V on the cover.
- The battery for the power output sensor is in the bike mount unit.
- Open the battery cover on the right side of the bike mount with the aid of a coin. Push the battery cover gently and turn it counterclockwise.
- Remove the old battery and insert a new one, minus side up (battery type CR 123A). A flashing light in the power sensor indicates a correct replacement of the battery.
- Put the cover back into place. Push the battery cover gently and turn it clockwise until the arrow points to the arrow next to the "close" tex
- Test the sensor by checking that a red indicator light flashes in the power sensor when the spoke magnet passes the speed sensor.
- Do not throw the old battery away with normal waste; take it to a place where problem waste is handled.

品


G
Your Polar Power Output Sensor
- To be able to use the Polar Power output sensor you need to have the following settings on your Polar S710 wrist receiver:
Options
Bike Set
BIR120
Bower On
Power.
- Chain weight in grams
- Chain length in millimetres
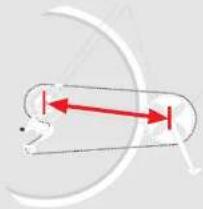
- Span length from the centre of the rear hub to the centre of the bottom bracket in millimetres.
If you know the factory default weight and length of the chain, set those values in the receiver.
If you do not know the values, release the chain and weigh it. For the length, count the number of loops and multiply the amount by 12.7mm .
Number of loops x12,7 mm - Chain length mm
Examples of the chain weights and lengths:
Shimano Dura-ace CN-7700
Super narrow HG
weight:304g
length:1473mm
Campagnolo Record 2000
10 Speed Chain
weight:279g
length:1448mm
How to measure span length:
- To ensure the successful connection between the power output sensor and the wrist receiver make sure that the metallic pins on the bike mount make contact with the bottom of the receiver.
- Verification of the sensor installations:
- Test the power sensor installation by checking that the green indicator light flashes in the power sensor when the crank magnet passes the sensor.
- Test the speed sensor installation by checking that the red indicator light flashes in the power sensor when the spoke magnet passes the speed sensor.
- Test the chain speed sensor installation by checking that the yellow indicator light flashes in the power sensor when the chain is rotated.
This is only a testing procedure. The flashing will not continue after 50 flashes when cycling. If you want to check this procedure again, you must pause for one minute during which time the magnets must not pass the sensors and the chain must not move. - If you want the exercise file to include heart rate data from the beginning, you should wait for the heart rate code to be recognised by wrist watch receiver before you start cycling. The heart rate code search takes max. 15 seconds.
- For moro instructions on how to use the Polar Power Output sensord, please refer to the user's manual of the Polar S710.
品

Power.cputcGBA19010.9388-9


Precautions

- Before you start cycling, check that no wires affect your safety when cycling and that your handlebars turn normally, brakes and gears function properly etc. Also, carefully ensure that all sensors are installed securely and no surplus wires are hanging loosely.
- Please note that installation and maintenance not carried out according to this manual may result in a serious accident.
- The sensors contain strong magnots which may damage diskettes, magnetic cards such as credit cards, or other electromagnetic equipment.
- Do not immerse the power output sensor in water.
- Avoid hard knocks as these may damage the sensor.
- Do not wash the device with a pressure washer.
Troubleshooting
- Check that the wristwatch receiver is correctly installed on the bike mount and the metal pins on the bike mount make solid contact with the back cover of the wristwatch receiver.
- Check that you have set the correct cycling settings in your wristwatch receiver.
- Iron spokes and bicycle parts may cause irregular readings.
- If the 00 reading is constant, you may have exceeded 300 riding hours and the battery in the power output sensor needs to be replaced.
- If there is no speed reading, check the correct position of the speed sensor with the spoke magnet.
- If there is no cadence reading, check the correct position of the power sensor with the crank magnet.
Technical specification
- Operating temperature 0 °C to +60 °C / 32 °F to 140 °F
Battery type: CR 123A (1200 mAh)
Battery life: average 300 riding hours
Accuracy of power output measurement: ±5% (range 75-2000W)
Weight of the sensors and the bike mount: 197 g (including battery)
Splash-proof
Measurement ranges
Average power: 0 - 2000 W
LR balance:1-99%
Pedalling index: 0 - 100%
Speed:0-120 km/h (75 mph)
Cadence: 0 - 255 rpm
Warranty
- Polar Electro Oy warrants to the original consumer/purchaser of this Polar Power Output Sensor that the product will be free from defects in material or workmanship for one year from the date of purchase. Please keep the receipt, which is your proof of purchase!
- Warranty does not cover sensor battery, damage due to misuse, abuse, accidents or negligence of the precautions; improper maintenance, commercial use, cracked or broken cases.
- Warranty does not cover damage or consequential damage caused by service not authorised by Polar Electro Oy.
- During the warranty period the product will be either repaired or replaced at an authorised service centre free of charge.
This warranty does not affect the consumer's statutory rights under applicable national or state laws in force, or the consumer's rights against the dealer arising from their sales/purchase contract.
Copyright © 2001 Polar Electro Oy, FIN-90440 KEMPELE, Finland.
All rights reserved. No part of this manual may be used or reproduced in any form or by any means without prior written permission of Polar Electro Oy.
Polar logotype is a registered trademark and Polar Power Output Sensor is a trademark of Polar Electro Gy.
Patents pending.

Power.culpUGBA1810193510-11


Polar Power Output Set
Copyright © 2001 Polar Electro Oy, FIN-90440 KEMPELE, Finland
Copyright © 2001 Polar Electro Oy, FIN-90440 KEMPELE, Finland.
Polar Power Output Sensor
Copyright © 2001 Polar Electro Oy, Polar Electro Oy, FIN-90440 KEMPELE, Finland
Polar Power Output Sensor
- Hvis du skal kinne bruke Polar Power Output-sensoren, mA du ha folgende ininstillinger på Polar S710-mottakeren:
Options
Bike Sel
Bike 1/2 On
Power On
Kjedevekt i gram
Copyright © 2001 Polar Electro Gy, FIN-90440 KEMPELE, Finland.
Patenter under handling.
VON
Power.output.NOR A 18/101,14:0096-91


NOF
MONTERING 93
Montera effektensorn 94
Montera kedjehastighetssensorn 95
Montera hastighetssensorn 96
Montera mottagarfastet 97
Batteribyte 97
HUR DU ANVANDER 98
Polar Power Output Sensor 98
Att tanka pa. 100
Felsökning 100
Tekniska data 101
Garantivillkor 101
mss
MONTERING
Polar Power Output Sensor
- For att du sakka kunna anvanda Polar Power Output Sensor behover du programmera In foljande Installningar I Polar S710:
Options
Bike Set
Bike 1/2 On
Power On
Kedjansvikt i gram
Kedjans langd imillimeter
Avstandi millimeter fran mitten pa bakhjulets nav till mitten pa navet for vevarmen.
Copyright © 2001 Polar Electro Oy, FIN-90440 KEMPELE, Finland.
Med ensamrtt. Ingen del avenna bruksanvisning far anvandas oeler kopieras utan skriftig tilstand fran Polar Electro Oy.