MX6 - Speaker Mirage - Free user manual and instructions
Find the device manual for free MX6 Mirage in PDF.

| Product type | Acoustic speaker (satellite speaker) |
| Brand | Mirage |
| Model | MX6 |
| Technology | Omnipolar (direct and reflected sound) |
| Connectivity | Spring clip terminals for bare wires (max. 14 AWG) |
| Wall mounting | Yes, via keyhole mount (screw #8) |
| Stand mounting | Yes, compatible with universal stand (minimum weight 1.5 kg) |
| Recommended use | Home theater (center, surround, front) |
| Recommended positioning | At ear height when seated; listening distance = 1.5 times speaker spacing |
| Dolby Digital/DTS compatibility | Yes, recommended setting 'Small speakers' and crossover frequency at 120 Hz |
| Maintenance | Clean with a soft dry cloth |
| Warranty (Canada/USA) | 5 years for speaker, 3 years for amplifier |
| Country of manufacture | China |
| Included accessories | Isolation pads |
Frequently Asked Questions - MX6 Mirage
User questions about MX6 Mirage
0 question about this device. Answer the ones you know or ask your own.
Ask a new question about this device
Download the instructions for your Speaker in PDF format for free! Find your manual MX6 - Mirage and take your electronic device back in hand. On this page are published all the documents necessary for the use of your device. MX6 by Mirage.
USER MANUAL MX6 Mirage
Mirage MX Home Theater System
natural_image
Black studio setup with six speaker units and a central cube, no visible text or symbols on the devices themselves.IMPORTANT SAFETY INSTRUCTIONS - READ CAREFULLY!
Caution: To prevent the risk of electrical shock, match wide blades of plug to wide slot, fully insert.
Read Instructions: All safety and operating instructions should be read before the product is operated.
Retain instructions: Safety and operating instructions should be retained for future reference.
Heed Warnings: All warnings on the product & operation instructions should be adhered to.
Follow Instructions: All operating and use instructions should be followed.
Cleaning: Unplug the product from the wall before cleaning. Do not use aerosol or liquid cleaners, just a damp cloth.
Attachments: Do not use attachments not recommended by the product manufacturer as they may cause hazards.
Water and moisture: Do not use this product near water.
Power Sources: This product should be operated only from the type of power source indicated on the marking label. If you are not sure of the type of power supply in your home, call your local power company.
Grounding or Polarization: This product may be equipped with a polarized alternating current line plug. This plug will fit the power outlet in only one way as a safety feature. If you are unable to insert the plug, try reversing it. If the plug should still fail to fit, contact your electrician to replace your outlet. Do not defeat the safety purpose of the plug.
Power Cord Protection: Power supply cords should be routed so that they are not likely to be walked on or pinched by items placed upon or against them, paying particular attention to cords at plugs, convenience receptacles and the point where they exit from the product.
Overloading: Do not overload wall outlets or extension cords, as this can result in a risk of electrical shock.
Object and Liquid Entry: Never push objects of any kind into this product through openings as they may touch dangerous voltage points or short out parts that can result in a fire or electrical shock. Never spill liquid of any kind on the product.
Servicing: Do not attempt to service this product yourself as openings or removing covers may expose you to dangerous voltage or other hazards. Refer all servicing to qualified personnel.
Heat: This product should be situated away from heat sources such as radiators, heat registers, stoves, or other appliances (including amplifiers) that produce heat.
Non-Use Periods: The power cord of the product should be unplugged from the outlet when left unused for a long period of time.
Damage Requiring Service: The product should be serviced by qualified personnel when:
A. The power supply cord or the plug has been damaged; or
B. Objects have fallen, or liquid has been spilled into the appliance; or
C. The product has been exposed to rain; or
D. The appliance does not appear to operate normally or exhibits a marked change in performance; or
E. Product has been dropped, or the enclosure damaged.
F. If the product does not operate normally by following the operating instructions.
The lightning flash with arrowhead symbol. Within an equilateral triangle is intended to alert the user to the presence of uninsulated "dangerous voltage" within the products enclosure that may be of sufficient magnitude to constitute a risk of electric shock to persons.

The exclamation point within an equilateral triangle is intended to alert the user to the presence of important operating and maintenance (servicing) instructions in the literature accompanying the appliance.
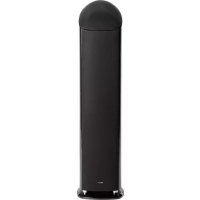
MIRAGE MX SERIES
Please take the time to read all of the instructions contained in this manual to make certain your system is properly installed and functioning correctly.
Please retain the carton and packing materials for this MIRAGE® product to protect it in the event it ever has to be shipped to a service center for repairs. Product received damaged by a service center that has been shipped by an end user in anything other than the original packaging will be repaired, refurbished, and properly packaged for return shipment at the end user's expense.
INTRODUCTION
We are proud to welcome you as a new owner of a MIRAGE speaker. The finest components and materials are manufactured to exacting standards and tested with sophisticated manufacturing and quality control techniques to ensure exceptional performance that is superior to systems costing several times their price. This approach to the development of the MIRAGE system has resulted in a significant improvement over other system designs in terms of performance and aesthetics.
THE MIRAGE MX SERIES
The main goal of this series was to provide a product with the most natural, accurate performance and seamless, home theater blending. This was accomplished by using MIRAGE'S proprietary OMNIPOLARTM technology. OMNIPOLARTM technology produces the same amount of direct and reflected sound as live events for the most realistic experience of either music or home theater.
WHAT EXACTLY IS OMNIPOLAR™?
OMNIPOLAR™ technology uses natural room reflections to create a greater sense of realism. This realism is accomplished by recreating the same ratio of direct to reflected sound found in nature, 70% reflected and 30% direct. A traditional speaker can only produce 30% reflected sound. It is the required additional reflected sound provided by an OMNIPOLAR™ speaker that creates the OMNIPOLAR™ three-dimensional sound experience.
QUICK SET-UP GUIDE RECOMMENDED CONNECTION FOR DOLBY DIGITAL/DTS/DOLBY PROLOGIC II SYSTEMS
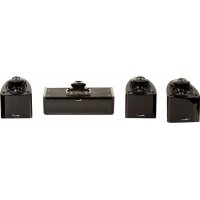
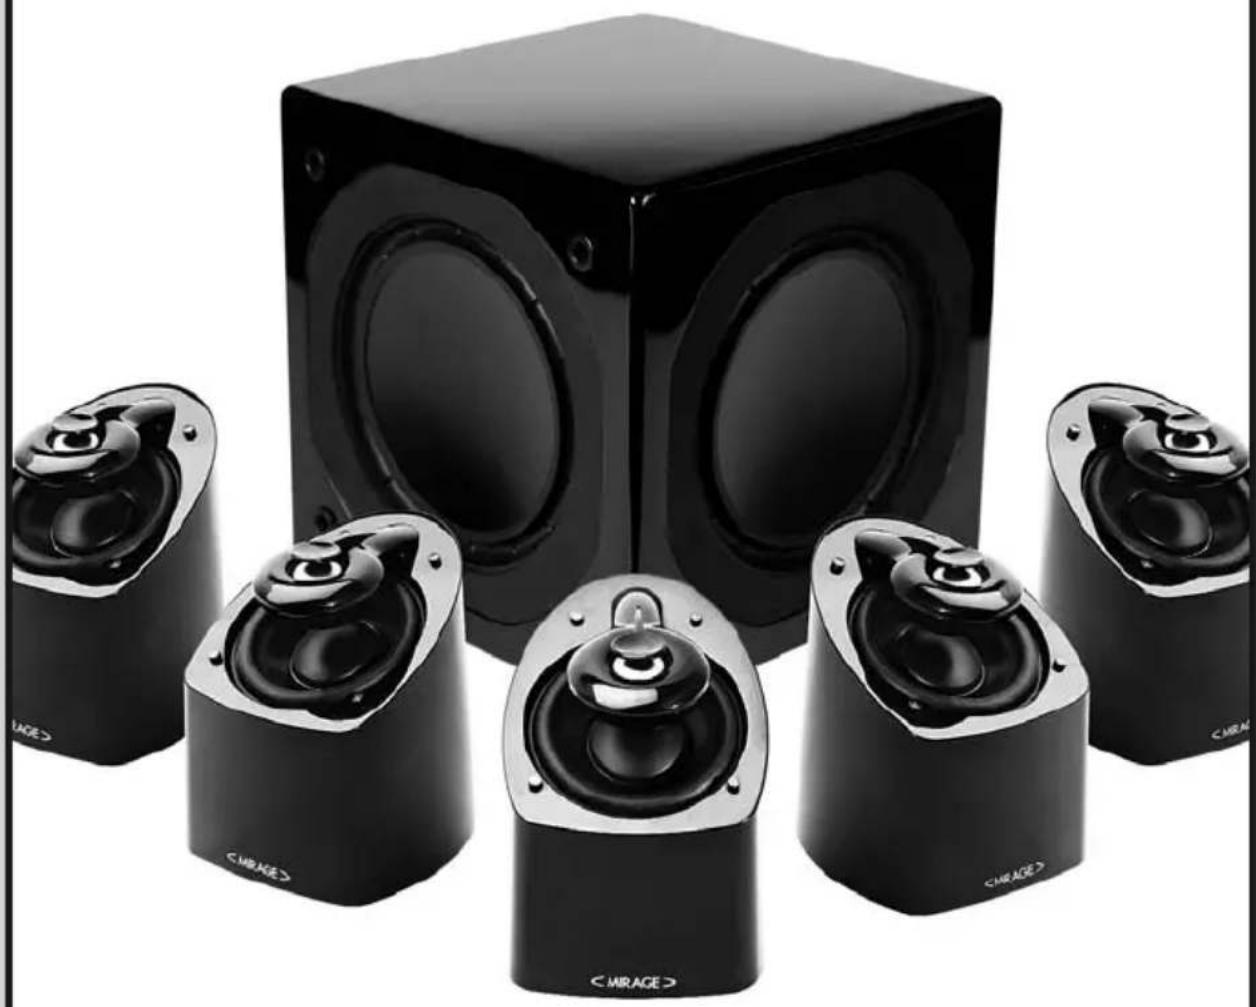
- Arrange the MIRAGE MX satellites and subwoofer in a Home Theater configuration. See Diagrams G and H.
-
Connect all five speakers with speaker wire to their respective speaker outputs on the back of the amplifier/receiver. Be sure to respect the polarity of the wire. Connect the speaker wire from the positive (RED +) terminal on the receiver/amplifier to the positive (RED+) terminal on the satellite. Connect the negative (BLACK-) terminal on the receiver/amplifier to the negative (BLACK-) terminal on the satellite. See Diagram B.
-
Connect the subwoofer from the Subwoofer Output on the back of the A/V Receiver or processor to the input on the subwoofer.
- MIRAGE suggests using the Small setting in the bass management set-up of your Dolby Digital system for all speakers.
- MIRAGE suggests setting the bass management crossover of your A/V Receiver or processor to 120Hz. (Or as close to 120Hz as possible). If your A/V Receiver or processor does not have a variable crossover, please proceed to the next step.
NOTE: When using the receiver for bass management, the internal filter of the subwoofer should be bypassed by turning the Low Pass Filter ④ completely to the right.
- Balance the sound output of the speakers by using the pink noise test pattern generated by your A/V Receiver or processor, adjusting the system so all speakers produce the same output level.
- When setting your subwoofer level, be sure that the setting on your A/V Receiver or processor remains as close to flat as possible. Boosting or cutting the subwoofer output on your A/V Receiver or processor may produce poor sound quality. Instead, use volume control on the back of the MIRAGE MX Subwoofer for fine tuning.
You are now ready to enjoy your MIRAGE MX System.
MIRAGE MX IN-DEPTH INSTRUCTIONS
CONNECTIONS
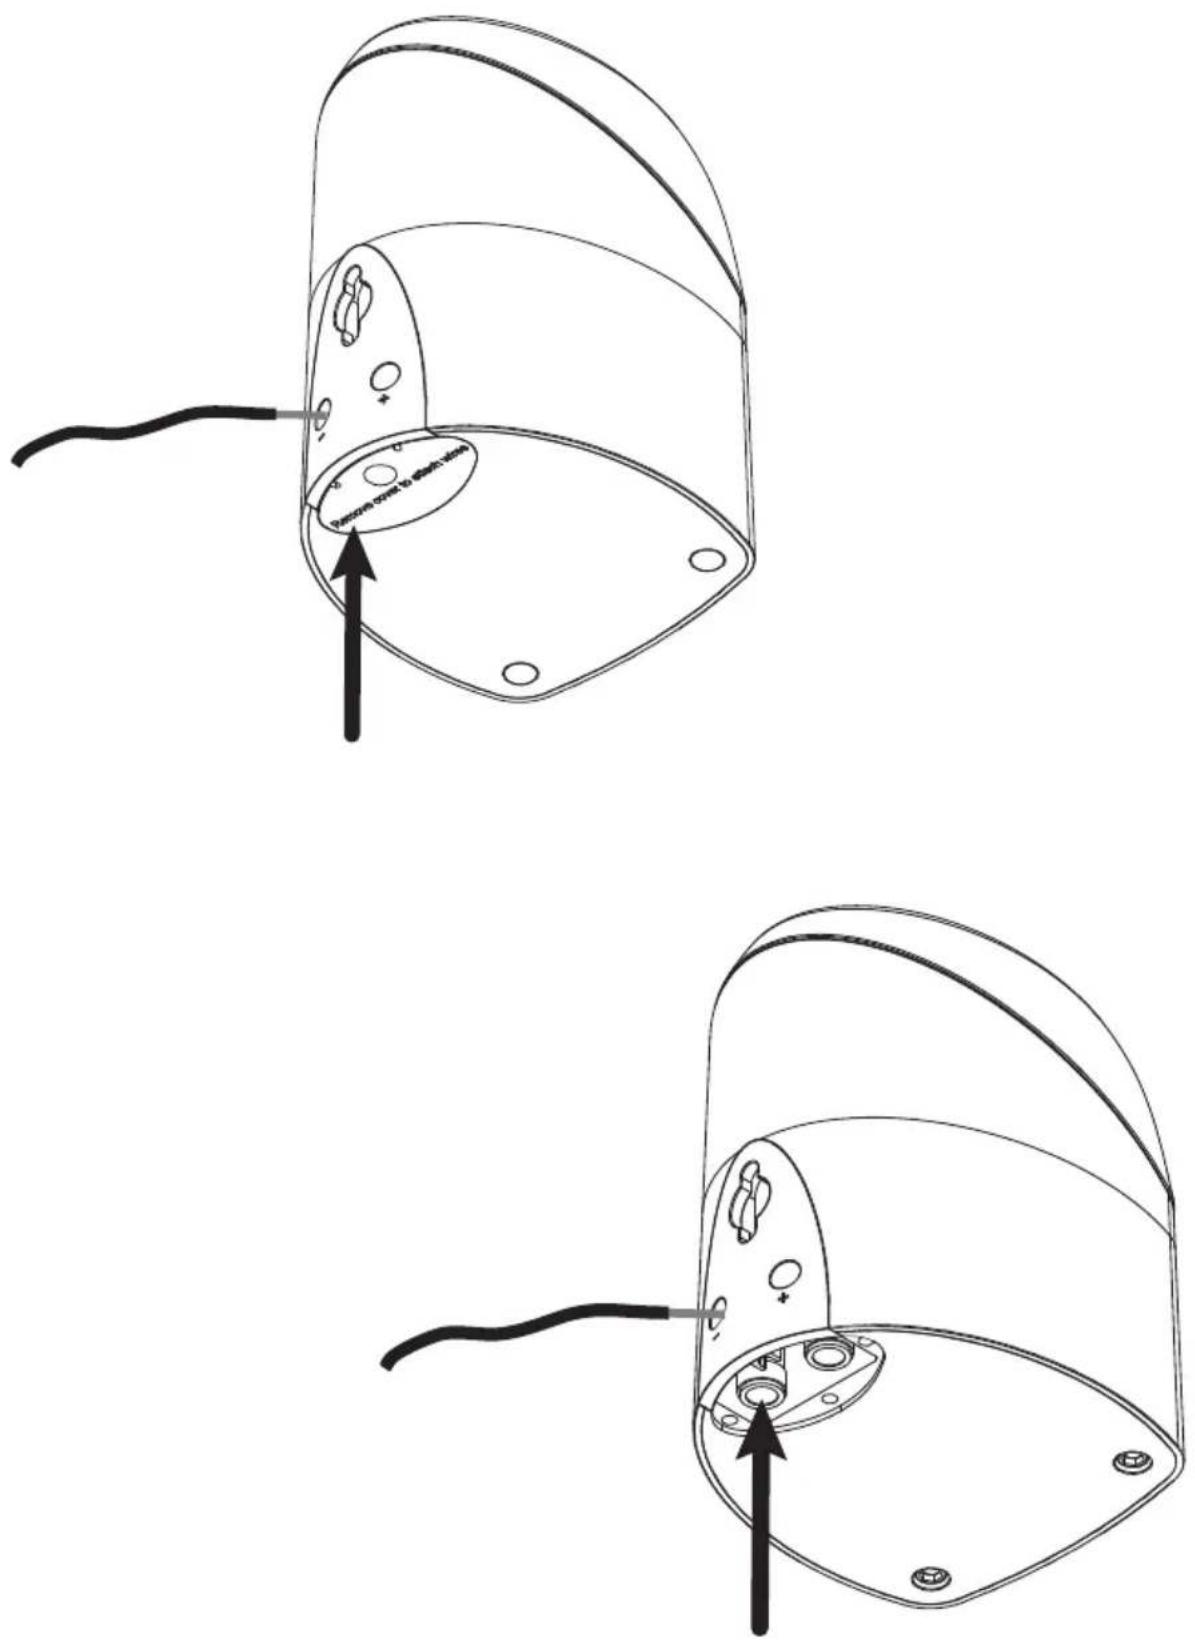
The MIRAGE MX Series is equipped with high quality binding posts ideally suited for bare wire connections.
In order to connect the wires, push down on the rubber insert located on the underside of the cabinet. Pushing down on this insert will activate the spring loaded terminals hidden below it and will line up the terminals with the small holes in the back of the cabinet. Carefully insert bare wire (maximum of 14 gauge) into the openings. Alternatively, the rubber insert at the bottom of the cabinet can easily be removed with a paper clip. Once the insert is removed, simply follow the steps indicated above. Diagram E.
Connect all five speakers with speaker wire to their respective speaker outputs on the back of the amplifier/receiver. Be sure to respect the polarity of the wire. Connect the speaker wire from the positive (RED +) terminal on the receiver/amplifier to the positive (RED+) terminal on the satellite. Connect the negative (BLACK-) terminal on the receiver/amplifier to the negative (BLACK-) terminal on the satellite. See Diagram B.
STAND MOUNT OPTIONS
A variety of universal stands are suitable for the MIRAGE MX speaker system. One of the recommended stands is the Sanus Home Theater HTB7 (www.sanus.com). Diagram F illustrates how the MIRAGE MX attaches to the Sanus HTB7 stand. The illustration can also be used as a guide for attaching the MIRAGE MX satellite to other universal stands. Please note that a universal stand must have a minimum weight allowance of at least 4 pounds or 1.5Kg.
NOTE: When attaching the speaker to the stand, the mounting screw needs to slide all the way into the key-way hole. While tightening the thumbscrew, ensure that there is a solid fit between the MIRAGE MX enclosure and the stand bracket to avoid the speaker falling off the bracket.
WALL MOUNT OPTIONS
For wall mount installations, the MIRAGE MX is equipped with a simple key-way insert that can be used to mount the speaker securely to a vertical surface.
Carefully drive a #8 screw into a stud in the wall, leaving approximately 1/4 inch of the screw exposed, then mount the MIRAGE MX like you would a picture.
Note: Failure to attach the screw safely to a secure spot on the wall can result in damage or injury. See Diagram C.
When mounting the speaker at a height of under six feet, orient the MIRAGE MX in an upright position. Slide the head of the screw into the wide portion of the channel opening and slide the MIRAGE MX downward until it sits in position. See Diagrams C and D.
When mounting the speaker at a height of over six feet, orient the MIRAGE MX in an upside down position so the grille is facing the floor and use the bottom key-way channel. Slide the head of the screw into the wide portion of the channel opening and slide the MIRAGE MX downward until it sits in position. See Diagrams C and D.
SPEAKER PLACEMENT
The MIRAGE MX System has been designed for high performance in a wide variety of settings, but here are a few helpful hints that will help to maximize performance and your enjoyment.
LEFT AND RIGHT CHANNELS
A general guideline for speaker placement is to set up the space between speaker and listener at approximately 1.5 times the distance between the speakers. For example, if the speakers were ideally placed a minimum of 6 feet apart, the best seating position would be 9 feet away.
Ideal height would position the speaker at approximately ear level when the listener is in a seated position.
CENTER CHANNEL
A center channel can be expected to reproduce as much as 60% of a movie's soundtrack, most of which is dialogue. In order to maintain the effect of voices emanating from the actor's mouth, the center channel should be centrally located between the left and right MIRAGE MX and be placed above or below the television.
SURROUND CHANNEL
When using the MIRAGE MX as a surround speaker it should be positioned adjacent to and slightly in front or behind the primary listening area. A general guideline for the recommended height would be approximately 6 feet.
BOOKSHELF/ENTERTAINMENT UNIT PLACEMENT
The small size and OMNIPOLAR ^™ dispersion of the versatile MIRAGE MX permits them to be easily placed, among other places, in a bookshelf. To maximize the OMNIPOLAR ^™ dispersion potential, bring the speaker as close to the front of the cabinet as possible.
CABINET CARE
Great care and craftsmanship has gone into the construction and finish of the cabinet. Periodically use a soft, dry cloth to remove dust or fingerprints. Do not use paper towels or other abrasive materials as it may damage the finish.
NOTE: Please retain the carton and packing material for your MIRAGE products, to protect them in the event of a move or if they need to be shipped to a service center. Product received damaged by a service center that has been shipped by the end user in other than the original packaging will be repaired, refurbished and properly packaged for return shipment, at the end user's expense.
SUBWOOFER PLACEMENT
The placement of your new MIRAGE MX subwoofer is critical to its performance. The three most common locations include: in the corner of the room (which can result in a boomy or exaggerated low frequency response), placement along one wall but out of the corner (moderate bass performance with increased fidelity over corner placement), or alongside a front speaker (creating a better blend with the front speaker, but sacrificing overall volume). Experimentation with subwoofer placement is highly encouraged, as slight adjustments can create large benefits in sound reproduction. To further test subwoofer placement, install the subwoofer temporarily in your main listening position and while playing a familiar piece of music, walk around the listening room until you find the best sounding position. This is a possible location for the subwoofer to be placed.
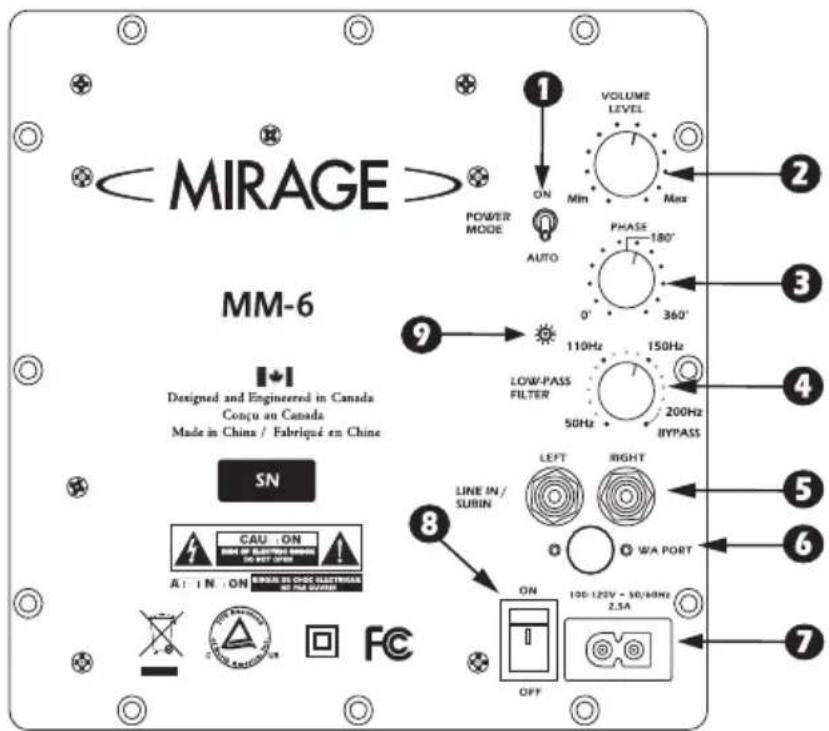
TERMINOLOGY AND CONTROLS
1 POWER MODE – This switch can be set to either On or Auto. If the switch is in the On position, it will constantly remain on. If the switch is set to the Auto position, when a signal is present the subwoofer will turn on and will automatically turn off several minutes after a signal is no longer present.
② VOLUME LEVEL – This knob can be adjusted to control the level of output from your subwoofer. The level chosen should allow the subwoofer to blend its output with that of the rest of your audio system.
3 PHASE – This switch allows for the adjustment of the phase of the subwoofer, in relation to the speakers used in your system, from 0 to +360 degrees.
4 LOW-PASS FILTER – This control allows for the adjustment of the low-pass filter. Adjustments can infinitely be made from 50HZ to 200Hz. This will determine the highest frequency that the subwoofer will reproduce. When using an external filter (in your home theater receiver) the internal filter can be bypassed by turning the knob completely to the right.
5 LINE IN/SUB IN – These inputs are an RCA type LFE/stereo/mono input. If you are connecting your subwoofer to a pre-amp/processor with a LFE or Subwoofer pre-amp output, connect a single RCA cable to the LFE/Left input.
⑥ WA PORT – For future use.
7 POWER CORD CONNECTOR – Connect the power cord from your AC outlet to this input. Connecting your subwoofer to a surge protector or line conditioner is always recommended. Do not connect the power cord to the switched or unswitched outlet of your receiver as this could damage your subwoofer and receiver.
⑧ AC MAINS – Turn the main power on/off with the AC MAINS switch.
9 STATUS INDICATOR – The LED found on the amplifier panel will illuminate in blue when the subwoofer is functioning. If the unit is in Auto mode and is not receiving a signal, the light will remain off.
CONNECTING YOUR MIRAGE MX SUBWOOFER
CAUTION: All power should be turned off to your system before any connections are made. Careful attention should be taken to ensure that all electronic components are not connected to an AC source. Not doing so could result in potential damage to the system.
METHOD 1 – RCA – SUB IN FOR HOME THEATER OR LFE APPLICATIONS
1 On the rear of the receiver/pre-amp there should be a single RCA type jack marked "Subwoofer/Pre-Amp Out". Connect a single RCA cable from that jack to the ⑤ LINE IN/SUB IN on the rear of the subwoofer. A standard male to male RCA cable is needed.
2 After connecting the single 5 LINE IN/SUB IN connection, plug your MIRAGE subwoofer into an AC outlet. Do not use the AC outlet on the rear of your receiver. After plugging in the unit, switch the Main Power to On.
3 See Final System Adjustments, below.
FINAL SYSTEM ADJUSTMENTS
1 After having turned on the main power switch and having broken-in the speaker, select the correct position for the POWER MODE, either On or Auto depending on your system. The Auto selection will leave the unit in a self-sensing mode, such that should the unit sense an audio signal it will turn itself on and then shut down after several minutes without signal, while in the On position the subwoofer always remains on. Should the system not be used for an extensive period of time, it is recommended that the subwoofer be unplugged from the AC.
2 Adjust the ② VOLUME LEVEL of your MIRAGE MX subwoofer so that the volume of your subwoofer matches the overall system volume. This ensures a smooth transition between the low and high frequencies of your system.
3 Adjust the 4 LOW-PASS FILTER on your MIRAGE MX subwoofer so that the frequency range of the subwoofer blends well with that of the front speakers. Setting the crossover too low will create a gap between the frequency response of the front speakers and that of the subwoofer, while setting the crossover frequency too high will create a doubling of certain frequencies, making the music sound boomy. When using small satellite speakers, the appropriate crossover frequency should be from 90Hz to 120Hz, for the bookshelf speakers 70Hz to 90Hz and for the large floorstanding speakers 40Hz to 70Hz. The Bypass position should be used when connecting to a receiver with bass management (such as in a digital surround sound movie system). This connection defeats the crossover feature on the MIRAGE MX subwoofer, allowing this control to be handled by the receiver.
4 Adjust the ③ PHASE CONTROL so that the subwoofer integrates fully with the rest of your audio system. This control ensures that the subwoofer operates in phase with the rest of the system, as an out of phase subwoofer will either sound like it is lacking in bass performance or that its timing is off. This setting will be determined by your listening position, the characteristics of your listening room and its interaction with your MIRAGE MX subwoofer. An out of phase speaker means that the speaker cone is moving inwards when it should be moving outwards, like the other speakers in your system, causing cancellations of certain frequencies. By adjusting the phase control, one can ensure that all speakers move in the proper direction, at the same time.
5 Steps 2, 3 and 4 might require repeating in order to fine tune your system. Ensuring the proper blending between the speakers and the subwoofer is critical to the performance of your system, as a whole.
WARRANTY OUTSIDE OF THE UNITED STATES
Outside of North America, the warranty may be changed to comply with local regulations. Ask your local MIRAGE dealer for details of the LIMITED WARRANTY applicable in your country.
WARRANTY FOR THE UNITED STATES AND CANADA
Please see the warranty document on the back cover
IMPORTANTES CONSIGNES DE SÉCURITÉ – LIRE ATTENTIVEMENT!
The MIRAGE MX Series is equipped with high quality binding posts ideally suited for bare wire connections.
HVAD ER OMNIPOLAR HELT N∅JAGTIGT?
PLACERING AF SUBWOOFEREN
INSTRUÇÕES DETALHÁDAS CONEXÕES
Diagram B
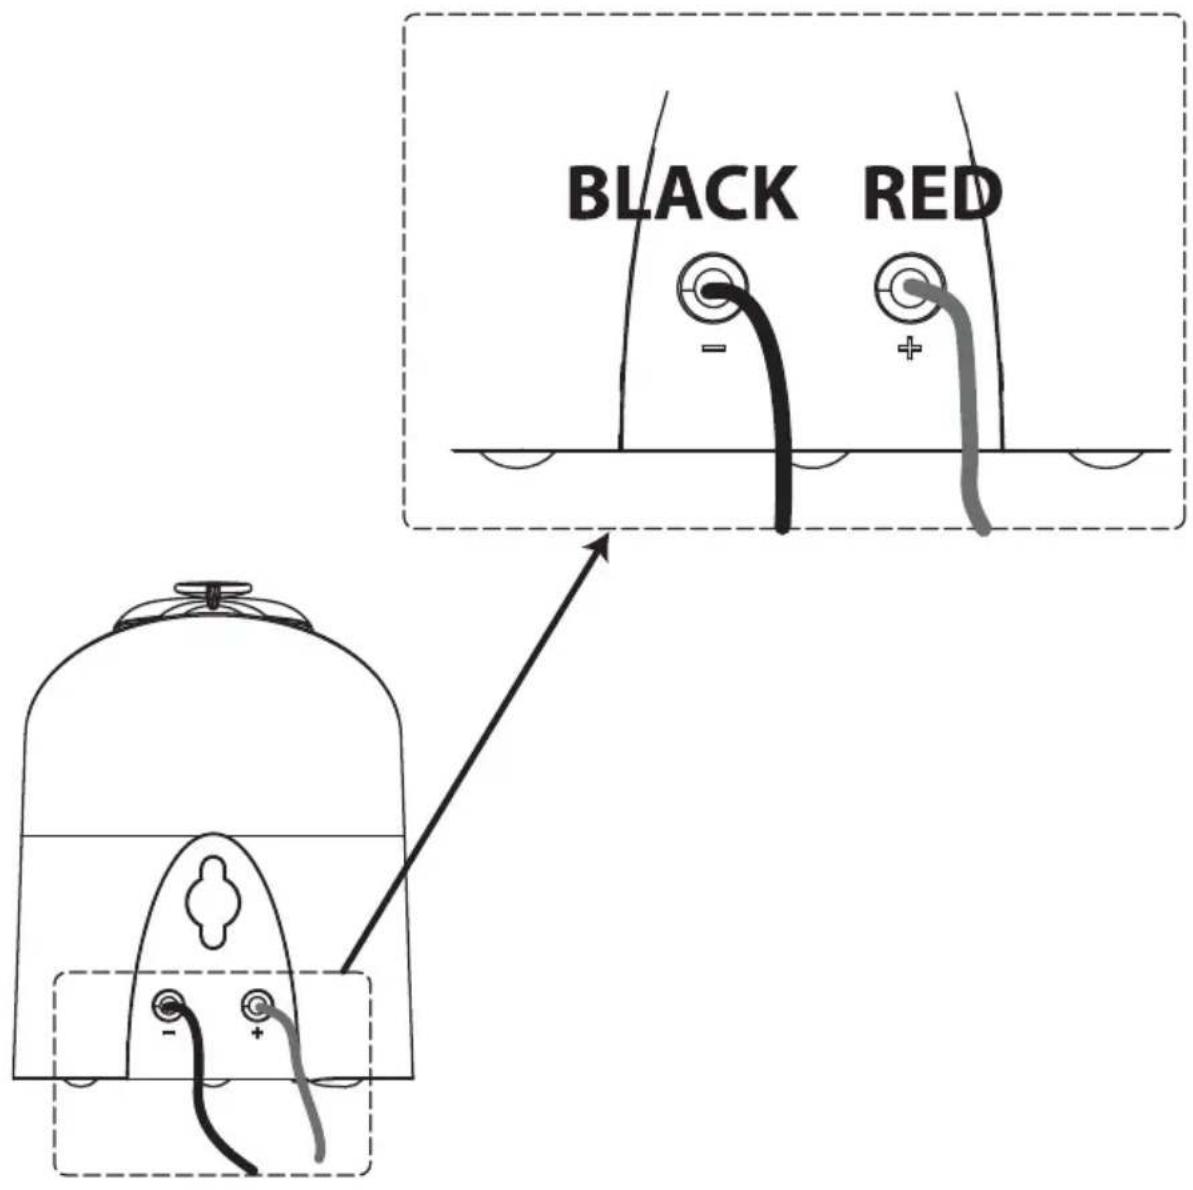
Diagram C
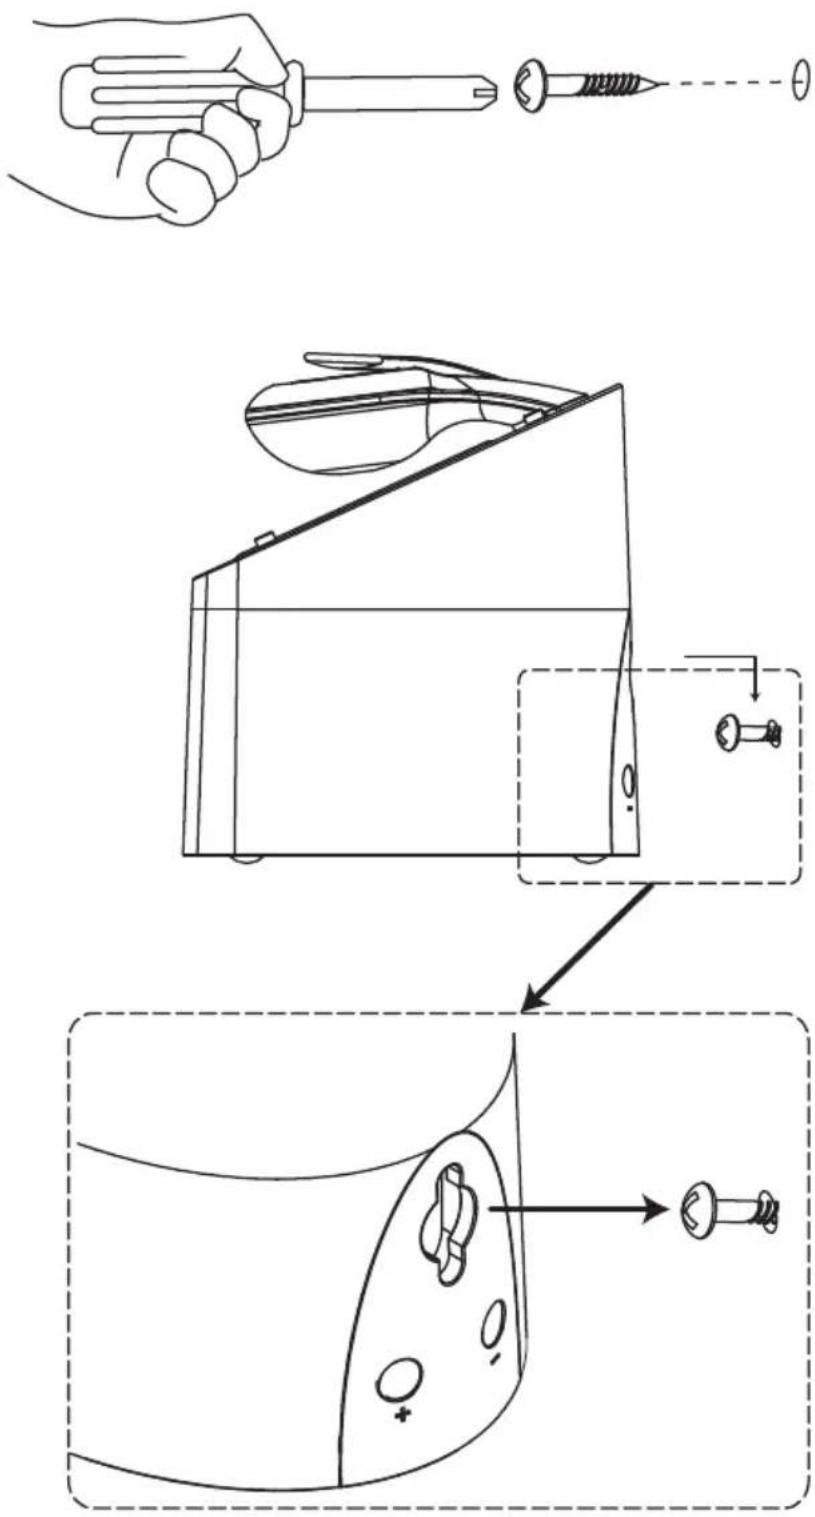
Diagram D
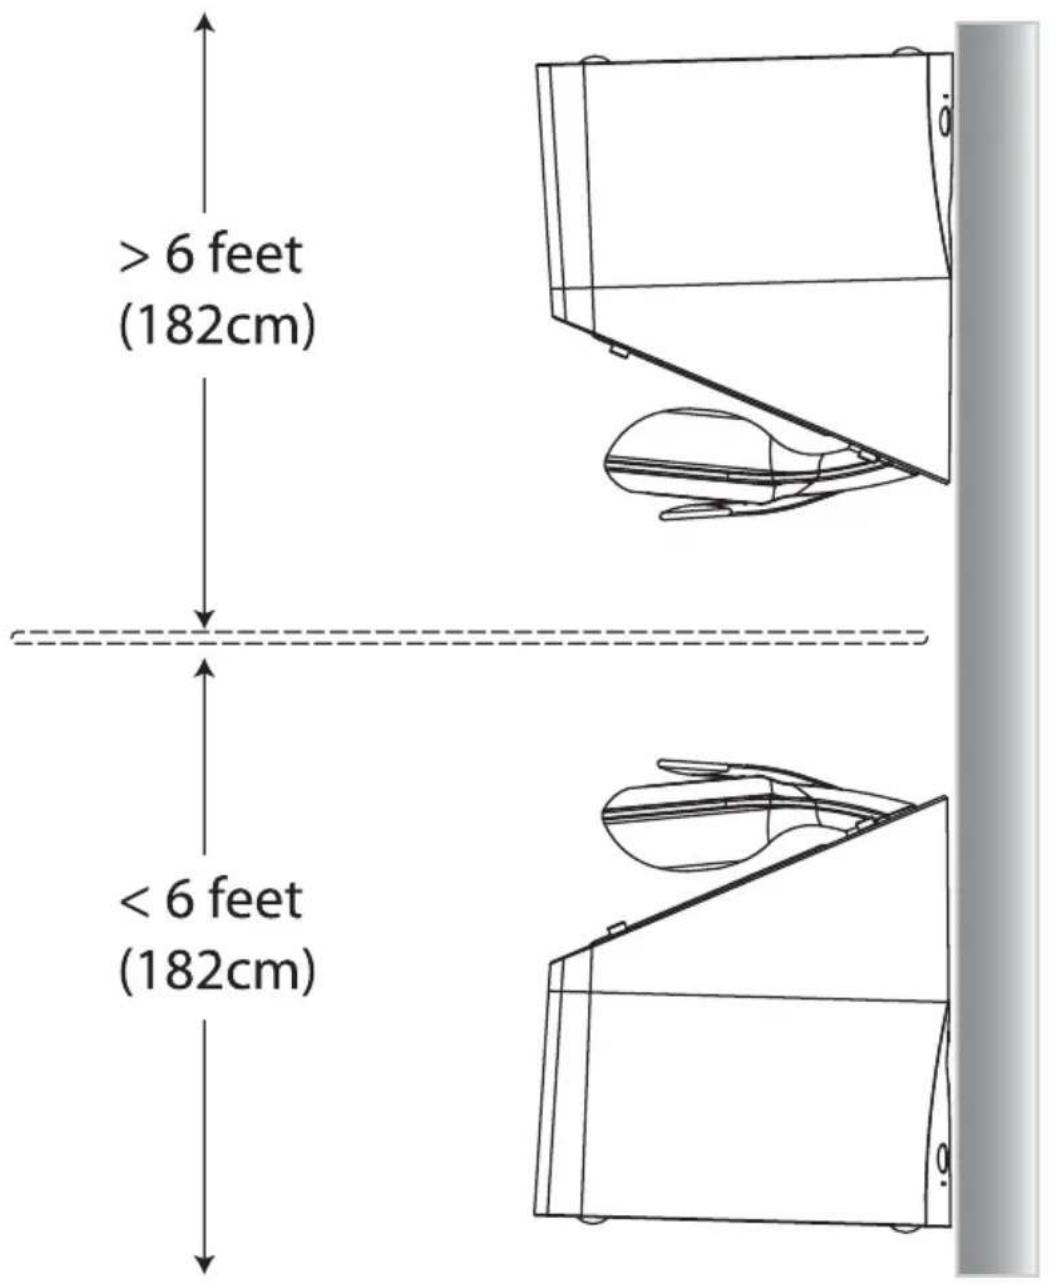
Diagram E
Optional stand mount (example Sanus HTB-7 Black)
![[07] [09] [02] [10] [07] [08]](/content/2026/03/517845/images/96cf998b2268fffdda83f8afd509b885313e3a0948c7cf9a906a1abcfb6e8aaf.jpg)
NOTE: For additional information on stand compatibility please visit www.miragespeakers.com
Diagram G
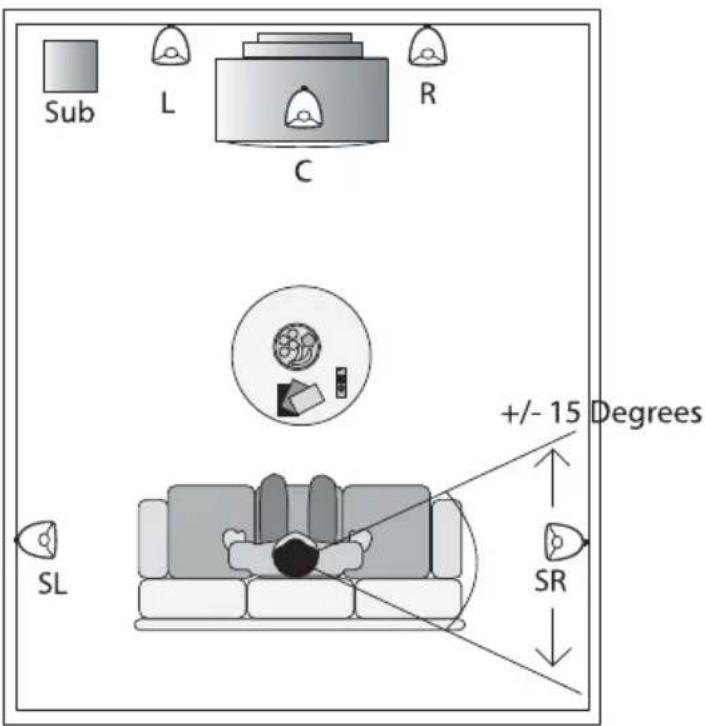
Diagram H
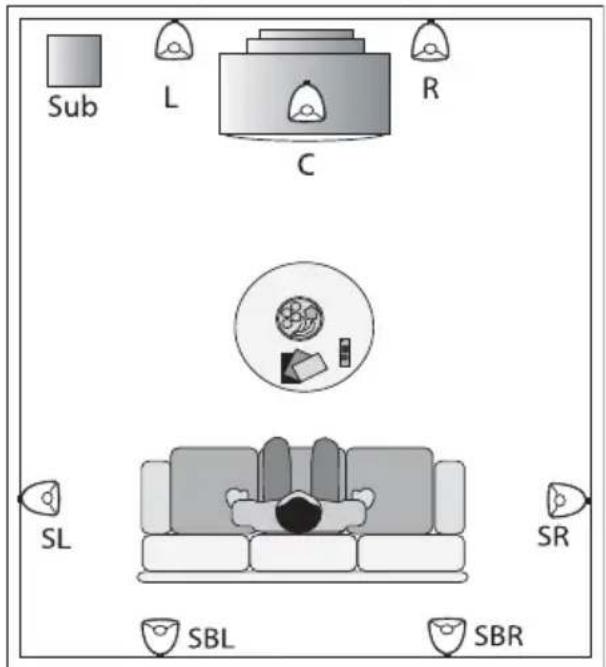
Optional 7.1 Setup
LIMITED WARRANTY POLICY IN THE UNITED STATES AND CANADA
MIRAGE® warrants this product to the retail purchaser against any failure resulting from original manufacturing defects in workmanship or materials. The warranty is in effect for a period of: Speaker Section-five (5) years, Amplifier Section-three (3) years from date of purchase from an authorized MIRAGE® dealer and is valid only if the original dated bill of sale is presented when service is required.
The warranty does not cover damage caused during shipment, by accident, misuse, abuse, neglect, unauthorized product modification, failure to follow the instructions outlined in the owner's manual, failure to perform routine maintenance, damage resulting from unauthorized repairs or claims based upon misrepresentations of the warranty by the seller.
WARRANTY SERVICE
If you require service for your MIRAGE® Speaker Systems speaker(s) at any time during the warranty period, please contact:
1) the dealer from whom you purchased the product(s), or
2) MIRAGE ^® Speaker Systems SERVICE — Tel: 1 (866) 441-8208.
3) Additional service centers can be found by checking the MIRAGE® Speaker Systems website: www.miragespeakers.com.
You will be responsible for transporting the speakers in adequate packaging to protect them from damage in transit and for the shipping costs to an authorized MIRAGE® Speaker Systems service center or to MIRAGE® Speaker Systems. If the product is returned for repair to MIRAGE® Speaker Systems the costs of the return shipment to you will be paid by MIRAGE® Speaker Systems, provided the repairs concerned fall within the Limited Warranty. The MIRAGE® Speaker Systems Warranty is limited to repair or replacement of MIRAGE® Speaker Systems products. It does not cover any incidental or consequential damage of any kind. If the provisions in any advertisement, packing cartons or literature differ from those specified in this warranty, the terms of the Limited Warranty prevail.