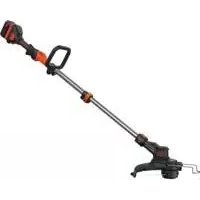
STB3620L - Brush cutter BLACK & DECKER - Free user manual and instructions
Find the device manual for free STB3620L BLACK & DECKER in PDF.


| Product type | Cordless string trimmer |
| Brand | Black & Decker |
| Model | STB3620L |
| Power source | 36 V Li-ion battery |
| Battery type | BL2036, 2.0 Ah |
| No-load speed | 0 - 7,200 min⁻¹ |
| Weight | 3.4 kg |
| Line diameter | 2.0 mm (round) |
| Line feed system | AFS (automatic feed) |
| Cutting modes | Trimming and edging (pivoting head) |
| Height adjustment | Telescopic with locking clamp |
| Auxiliary handle | Adjustable |
| Edging guide | Yes, retractable |
| Sound pressure level | 75 dB(A) (uncertainty K=1.5 dB) |
| Guaranteed sound power level | 96 dB(A) |
| Vibration (hand/arm) | 2.5 m/s² (uncertainty K=1.5 m/s²) |
| Charger | LCS36 Type 1, input 220-240 V, output 36 V / 1.3 A |
| Guard | Yes, included |
| Replacement spool | A6482-XJ (1 piece) or A6486-XJ (3 pieces) |
| Maintenance | Clean the ventilation slots and the underside of the guard regularly |
| Warranty | 24 months (domestic use) |
Frequently Asked Questions - STB3620L BLACK & DECKER
User questions about STB3620L BLACK & DECKER
0 question about this device. Answer the ones you know or ask your own.
Ask a new question about this device
Download the instructions for your Brush cutter in PDF format for free! Find your manual STB3620L - BLACK & DECKER and take your electronic device back in hand. On this page are published all the documents necessary for the use of your device. STB3620L by BLACK & DECKER.
USER MANUAL STB3620L BLACK & DECKER
Your BLACK+DECKER STB3620L trimmer has been designed for trimming and finishing lawn edges and to cut grass in confined spaces. This appliance is intended for consumer use only.
Safety instructions
Warning! When using mains-powered appliances, basic safety precautions, including the following, should always be followed to reduce the risk of fire, electric shock, personal injury and material damage.
Warning! When using the machine the safety rules must be followed. For your own safety and bystanders please read these instructions before operating the machine. Please keep the instructions safe for later use.
- Read all of this manual carefully before operating the appliance.
The intended use is described in this manual. The use of any accessory or attachment or the performance of any operation with this appliance other than those recommended in this instruction manual may present a risk of personal injury.
Retain this manual for future reference.
Using your appliance
Always take care when using the appliance.
Always use safety glasses or goggles.
- Never allow children or people unfamiliar with the instructions to use the appliance.
Do not allow children or animals to come near the work area or to touch the appliance or power supply cord.
- Close supervision is necessary when the appliance is used near children.
- This appliance is not intended for use by young or infirm persons without supervision.
This appliance is not to be used as a toy.
- Only use the appliance in daylight or good artificial light.
Use in a dry location only. Do not allow the appliance to become wet.
- Avoid using the appliance in bad weather conditions, especially when there is a risk of lightning.
- Do not immerse the appliance in water.
Do not open the body casing. There are not user-serviceable parts inside.
- Do not operate the appliance in explosive atmospheres, such as in the presence of flammable liquids, gases or dust.
To reduce the risk of damage to plugs or cords, never pull the cable to remove the plug from a socket.
- The appliance is only to be used with the power supply unit provided with the appliance.
Safety of others
This appliance can be used by children aged from 8 years and above and persons with reduced physical, sensory or mental capabilities or lack of experience and knowledge if they have been given supervision or instruction concerning use of the appliance in a safe way and understand the hazards involved. Children shall not play with the appliance. Cleaning and user maintenance shall not be made by children without supervision.
Children must be supervised to ensure that they do not play with the appliance.
Residual risks.
Additional residual risks may arise when using the tool which may not be included in the enclosed safety warnings.
These risks can arise from misuse, prolonged use etc.
Even with the application of the relevant safety regulations and the implementation of safety devices, certain residual risks can not be avoided. These include:
Injuries caused by touching any rotating/moving parts.
Injuries caused when changing any parts, blades or accessories.
Injuries caused by prolonged use of a tool. When using any tool for prolonged periods ensure you take regular breaks.
Impairment of hearing.
Health hazards caused by breathing dust developed when using your tool (example:- working with wood, especially oak, beech and MDF.)
After use
- When not in use, the appliance should be stored in a dry, well ventilated place out of reach of children.
Children should not have access to stored appliances. - When the appliance is stored or transported in a vehicle it should be placed in the boot or restrained to prevent movement following sudden changes in speed or direction.
Inspection and repairs
- Before use, check the appliance for damaged or defective parts. Check for breakage of parts and any other conditions that may affect its operation.
- Do not use the appliance if any part is damaged or defective.
-
Have any damaged or defective parts repaired or replaced by an authorised repair agent.
-
Never attempt to remove or replace any parts other than those specified in this manual.
Additional safety instructions for grass trimmers
Warning! Cutting elements continue to rotate after the motor is switched off.
Be familiar with the controls and the proper use of the appliance.
Before use, check the power supply cord and extension cord for signs of damage, ageing and wear. If a cord becomes damaged during use, disconnect the cord from the mains supply immediately. DO NOT TOUCH THE CORD BEFORE DISCONNECTING THE SUPPLY.
Always remove the battery from the appliance whenever the appliance is unattended, before clearing a blockage, before cleaning and maintenance, after striking a foreign object or whenever the appliance starts vibrating abnormally.
Do not use the appliance if the cords are damaged or worn.
- Wear stout shoes or boots to protect your feet.
Wear long trousers to protect your legs.
Before using the appliance, check that your cutting path is free from sticks, stones, wire and any other obstacles.
- Only use the appliance in the upright position, with the cutting line near the ground. Never switch the appliance on in any other position.
Move slowly when using the appliance. Be aware that freshly cut grass is damp and slippery.
Do not work on steep slopes. Work across the face of slopes, not up and down.
- Never cross gravel paths or roads while the appliance is running.
- Never touch the cutting line while the appliance is running.
- Do not put the appliance down until the cutting line has come to a complete standstill.
- Use only the appropriate type of cutting line. Never use metal cutting line or fishing line.
Be careful not to touch the line trimming blade.
Take care to keep the mains cable away from the cutting line. Always be aware of the position of the cable.
- Keep hands and feet away from the cutting line at all times, especially when switching on the motor.
Before using the appliance and after any impact, check for signs of wear or damage and repair as necessary.
Never operate the appliance with damaged guards or without guards in place.
- Take care against injury from any device fitted for trimming the filament line length. After extending new cutter line always return the machine to its normal operating position before switching on.
Always ensure that the ventilation slots are kept clear of debris.
- Do not use the lawn trimmer (edge trimmer), if the cords are damaged or worn.
- Keep extension cords away from cutting elements.
Additional safety instructions for batteries and chargers
Batteries
- Never attempt to open for any reason.
Do not expose the battery to water. - Do not store in locations where the temperature may exceed 40^ .
Charge only at ambient temperatures between 10^ and 40^ .
Charge only using the charger provided with the tool. - When disposing of batteries, follow the instructions given in the section "Protecting the environment".
Chargers
Use your BLACK+DECKER charger only to charge the battery in the tool with which it was supplied. Other batteries could burst, causing personal injury and damage.
- Never attempt to charge non-rechargeable batteries.
- Have defective cords replaced immediately.
Do not expose the charger to water.
Do not open the charger.
Do not probe the charger.

The charger is intended for indoor use only.

Read the instruction manual before use.
Electrical safety

Your charger is double insulated; therefore no earth wire is required. Always check that the mains voltage corresponds to the voltage on the rating plate. Never attempt to replace the charger unit with a regular mains plug.
- If the supply cord is damaged, it must be replaced by the manufacturer or an authorised BLACK+DECKER Service Centre in order to avoid a hazard.
Labels on appliance
The following warning symbols are found on the appliance along with the date code:

Read the manual prior to operation.

Wear safety glasses or goggles when operating this appliance.

Wear suitable ear protectors when operating this appliance.

Always remove the battery from the appliance before performing any cleaning or maintenance.
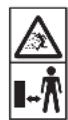
Beware of flying objects. Keep bystanders away from the cutting area.

Do not expose the appliance to rain or high humidity.
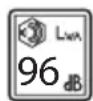
Directive 2000/14/EC guaranteed sound power.
Features
This appliance includes some or all of the following features.
- Variable speed trigger
- Handle
- Lock off button
- Battery
- Charge indicator
- Auxiliary handle
- Height adjust locking clamp
- Trimmer head
- Head rotate button
- Edge guide
- Guard
- Spool housing
- Spool cap
Assembly
Warning! Before assembly, make sure that the tool is switched off and the battery has been removed.
Fitting the guard (Fig. D & E)
Remove the screw (E1) from the Guard
Keeping the Guard square to the trimmer head slide it fully into place until the retaining tab clicks. Ensure that the guide rails (D1) on the Guard (11) are correctly aligned with the guide rails (D2) on the trimmer head (D3) (Figure D). The locking tab (D4) should be snapped into the housing slot (D5).
Secure the guard with the screw (E1) (Figure E).
Warning! Never use the tool unless the guard is properly fitted.
Attaching the auxiliary handle (Fig. F&G)
Push the Auxiliary handle (F1) onto the tube (F2).
Slide the bolt (G1) into the hex-shaped hole in the handle and through to the opposite side.
- Tighten the knob (G2) onto the bolt by turning it clockwise.
Warning! Ensure that central rib is located into slot in tube.
Adjusting the position of the auxiliary handle (Fig.G)
The auxiliary handle (6) can be adjusted to provide optimum balance and comfort.
Loosen the knob (G2) on the bolt (G1) by turning it counter-clockwise.
Gently slide the auxiliary handle up or down the tube (F2) to the desired height for comfort.
Tighten the knob (G2) onto the bolt by (G1) turning it clockwise.
Adjusting the height of the tool (Fig.H)
Adjust the length of the trimmer to obtain proper working position as shown in Figure M.
This tool has a telescopic mechanism, allowing you to set it to a comfortable height.
To adjust the height setting, proceed as follows:
Release the height adjust locking clamp (7).
Gently pull the tube (H1) up or down to the desired height.
Close the height adjust locking clamp (7).
Releasing the cutting line
In transit, the cutting line is taped to the spool housing.
Warning! Before assembly, remove the battery from the tool.
Remove the tape holding the cutting line to the spool housing (12).
Fitting and removing the battery (Fig.B,C)
To fit the battery (4), line it up with the receptacle on the tool. Slide the battery into the receptacle and push until the battery snaps into place.
To remove the battery, push the release button while at the same time pulling the battery out of the receptacle.
Use
Warning! Let the tool work at its own pace. Do not overload.
Charging the battery
The battery needs to be charged before first use and whenever it fails to produce sufficient power on jobs that were easily done before. The battery may become warm while charging; this is normal and does not indicate a problem.
Warning! Do not charge the battery at ambient temperatures below 10^ or above 40^ . Recommended charging temperature: approx. 24^ .
Note: The charger will not charge a battery if the cell temperature is below approximately 10^ or above 40^ . The battery should be left in the charger and the charger will begin to charge automatically when the cell temperature warms up or cools down.
Plug the charger into an appropriate outlet before inserting the battery pack.
Insert the battery pack into the charger.
The green LED will flash indicating that the battery is being charged.
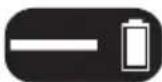
The completion of charge is indicated by the green LED remaining on continuously. The pack is fully charged and may be used at this time or left in the charger
Warning! Recharge discharged batteries as soon as possible after use or battery life may be greatly diminished.
Charger diagnostics
This charger is designed to detect certain problems that can arise with the battery packs or the power source. Problems are indicated by one LED flashing in different patterns.
Bad Battery
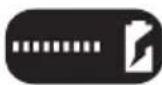
The charger can detect a weak or damaged battery. The red LED flashes in the pattern indicated on the label. If you see this bad battery blink pattern, do not continue to charge the battery. Return it to a service centre or a collection site for recycling
Hot/Cold Pack Delay
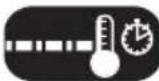
When the charger detects a battery that is excessively hot or excessively cold, it automatically starts a Hot/Cold Pack delay, suspending charging until the battery has normalised. After this happens, the charger automatically switches to the Pack Charging mode. This feature ensures maximum battery life. The red LED flashes in the pattern indicated on the label when the Hot/Cold pack delay is detected.
Leaving the battery in the charger
The charger and battery pack can be left connected with the LED glowing indefinitely. The charger will keep the battery pack fresh and fully charged.
State of Charge Indicator
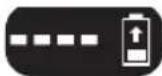
The battery is equipped with a state of charge indicator. This can be used to display the current level of charge in the battery while in the trimmer and during charging. It does not indicate appliance functionality and is subject to variation based on product components, temperature and end user application.
Checking State of Charge during use
Press the state of charge indicator (A1).
The four LEDs (A2) will illuminate indicating the percent of charge in the battery (Fig.A.)
If LED light does not illuminate, charge battery.
Switching on and off
To switch the trimmer on, press in and hold the lock off button (3).
Depress the variable speed trigger (1). The trimmer's speed, power and runtime depend on how far you press the trigger. Lightly depressing the trigger will result in lower speed and power, but longer runtime. Fully depressing the trigger will result in maximum speed and power, but shorter runtime.
To switch the trimmer off, release both the trigger and the lock off button.
Warning! Never attempt to lock the on/off button in the on position.
Operating the trimmer
With the unit on, angle unit and slowly swing the trimmer side to side as shown in (Fig.M).
Maintain a cutting angle of 5^ to 10^ as shown in figure M1. Do not exceed 10^ (Fig.M2). Cut with the tip of the line. To keep distance from hard surfaces use edge guide (10). Pull the guide out until it snaps securely into place
Maintain a minimum distance of 60cm between the guard and your feet as shown in (Fig.M3). To achieve this distance adjust the overall height of the trimmer as shown in (Fig.H).
Setting Trimming or Edging Mode (Fig.I, J and K)
The trimmer can be used in trimming mode as shown in (Fig.1) or in edging mode to trim overhanging grass along lawn edges and flower beds as shown in (Fig.K).
Trimming Mode (Fig.I and J)
For trimming mode, the trimmer head should be in the position shown in figure 1. If it is not:
Remove the battery from the trimmer.
Press and hold the head release button (9).
While holding the auxiliary handle (6), rotate the head (8) clockwise.
Release the head release button.
Lift the edge guide (10) into the closed position.
Edging Mode (Fig.K)
Warning! When being used as an edger, stones, pieces of metal and other objects can be thrown out at high speed by the line. The trimmer and guard are designed to reduce the danger, however make sure that other persons and pets are at least 30 metres away. For edging, the trimmer head should be in the position shown in (Fig.K). If it is not:
Remove the battery from the trimmer.
Press and hold the head-release button (9) as shown in (Fig. K).
While holding the auxiliary handle (6), rotate the head (8) counterclockwise.
Release the head-release button.
- Drop the edge guide (10) in to the open position. Ensure that the guide is all the way down, an audible click will be heard.
Note: The head will only rotate in one direction.
Warning! Do not use the trimmer to create edges or trenches.
Guide the trimmer as shown in (Fig.N).
To make a closer cut, slightly tilt the trimmer.
Hints for optimum use
Use the tip of the string to do the cutting; do not force string head into uncut grass.
Wire and wooden fences cause extra string wear, even breakage. Stone and brick walls, kerbs and wood will wear string rapidly. Take care to reduce contact with hard surfaces.
Do not allow spool cap to drag on ground or other surfaces.
In long growth cut from the top down and do not exceed 30cm in height.
Keep trimmer tilted toward the area being cut; this is the best cutting angle
The trimmer cuts when passing the unit from the right to the left. This will avoid throwing debris at the operator.
Avoid trees and shrubs. Tree bark, wood mouldings, siding and fence posts can easily be damaged by the string.
Clearing Jams and Tangled Line Fig.O, P, Q
Warning! Remove the battery from the trimmer before making any assembly adjustments or changing accessories. Such preventive safety measurements reduce the risk of starting the appliance accidentally. From time to time, especially when cutting thick or stalky weeds, the line feeding hub may become clogged with sap or other material and the line will become jammed as a result. To clear the jam follow the steps below.
Press the release tabs on the line spool cap as shown in (Fig.O) and remove the cap by pulling it straight off.
Pull the nylon line spool out and clear any broken line or debris from the spool area.
Place spool and line into spool cap with line "parked" in slots provided as shown in (Fig.P1).
Insert the line end through the appropriate hole in the spool cap. Pull slack line through until it pulls out of the holding slots as shown in (Fig.P2).
Press the spool down gently and rotate it until you feel it drop into place. When in place the spool will turn a few degrees left and right freely.
Take care to keep the line from becoming trapped under the spool
Align the spool caps tabs with the slots on the spool housing (Fig.P).
Snap the spool cap back on ensuring the lugs snap into spool housing.
Note: The line should protrude approximately 122mm from the housing.
Replacing the Spool Fig.O, P, Q and R
Remove battery from trimmer.
Depress the tabs and remove the spool cap from the spool housing on the trimmer head (Fig.0).
Grasp empty spool with one hand and spool cap with other hand and pull spool out.
Replace spool with BLACK+DECKER model A6482-XJ.
Remove any dirt and grass from the spool and spool cap.
If lever (R1) in base of spool cap becomes dislodged, replace in correct position before inserting a new spool as shown in (Fig.R).
Unfasten the end of the cutting line and guide the line into the eyelet (P2).
Press the spool gently into the spool cap and rotate it until you feel it drop into place. Then push to snap into place. When in place the spool will turn a few degrees left and right freely.
Take care to ensure that the line does not become trapped under the spool.
Align the spool cap tabs with the slots on the spool housing (fig Q).
Snap the spool cap back on ensuring the lugs snap into spool housing.
Note: The line should protrude approximately 122mm from the housing.
Rewinding spool from bulk line (use only 2.0mm ROUND diameter line) (Fig.S)
Bulk line is also available for purchase from your local retailer. To install bulk line, follow the steps below:
Remove battery from trimmer.
ENGLISH
(Original instructions)
Remove the empty spool from the trimmer as described in "Replacing the spool".
Remove any remaining cutting line from the spool.
Make a fold at the end of the cutting line at about 19mm (S1). Feed the cutting line into one of the line anchoring slots (S3).
Make sure the line is pulled tight against the spool and begin to wind the cutting line onto the spool in the direction of the arrow on the spool
Make sure to wind the line on neatly and in layers. Do not crisscross (Fig.T).
- When the wound cutting line reaches the recesses (S4), the spool is full.
Locate line into 'parked' slot provided (Fig.P1). Cut line from bulk reel.
Fit the spool onto the trimmer as described in "Replacing the spool" figures O,P,Q and R.
NOTE: Hand wound spools from bulk line are likely to become tangled more frequently than BLACK+DECKER factory wound spools. For best results, factory wound spools are recommended.
Replacement spools:
A6486-XJ (3pcs SA spool and line)
A6482-XJ (1pcs SA spool and line)
Auto Feed System (AFS)
The string trimmer is fitted with AFS spool, which will detect when the string breaks and re-feed automatically. Do not bump or pull the string. If the AFS is not feeding properly, remove spool and check the wire is wound correctly and re-insert into tool.
Maintenance
Your BLACK+DECKER corded/cordless appliance/tool has been designed to operate over a long period of time with a minimum of maintenance. Continuous satisfactory operation depends upon proper tool/appliance care and regular cleaning.
Your charger does not require any maintenance apart from regular cleaning.
Warning! Before performing any maintenance on corded/ cordless power tools:
Switch off and unplug the appliance/tool.
Or switch off and remove the battery from the appliance/ tool if the appliance/tool has a separate battery pack.
Or run the battery down completely if it is integral and then switch off.
Unplug the charger before cleaning it. Your charger does not require any maintenance apart from regular cleaning.
Regularly clean the ventilation slots in your tool/appliance and charger using a soft brush or dry cloth.
Regularly clean the motor housing using a damp cloth. Do not use any abrasive or solvent-based cleaner.
Regularly clean the cutting line and spool using a soft brush or dry cloth.
Regularly use a blunt scraper to remove grass and dirt from the underneath of the guard.
Troubleshooting
| Problem | Solution |
| Appliance runs slowly. | Fully depress the variable speed trigger. The level of trigger depression affects speed. Remove battery from trimmer Check that the spool housing can rotate freely. Carefully clean it if necessary. Check that the cutting line does not protrude more than approximately 122mm from the spool. If it does, trim it so that it just reaches the line trimming blade. |
| Automatic line feed does not feed line. | More line is fed when the line shortens to approximately 76mm. To determine if the line is not feeding, let line wear past this point. Keep the tabs depressed and remove the spoolcap with the spool from the spool housing in the trimmer head. Ensure that the line is not crisscrossed on the spool as detailed in (Fig.T). If it is unwind the cutting line and rewind it neatly. Inspect tracks at the bottom of spool for damage. If damaged, replace spool. Pull the cutting line until it protrudes approximately 122mm from the spool. If insufficient cutting line is left on the spool, install a new spool of cutting line. Align the tabs on the spool cap with the cut outs in the housing. Push the spool cap onto the housing until it snaps securely into place. If the cutting line protrudes beyond the trimming blade, cut it off so that it just reaches the blade. If the automatic line feed still does not work or the spool is jammed, try the following suggestions: Carefully clean the spool and housing. Make sure you are using correct line size and diameter (2.00 mm) - smaller and larger line sizes will affect the functionality of the auto feed system. Remove the spool and check if the lever in the spool housing can move freely. Remove the spool and unwind the cutting line, then wind it on neatly again. Replace the spool into the housing. |
| Overfeeding | Ensure you are cutting with the tip of the line 177mm from the spool. Use the edge guide if needed to ensure proper space is maintained. Ensure you are not exceeding a 10° angle as shown in (Fig.M). Avoid contact of the line with hard surfaces such as brick, concrete, wood etc. This will prevent excessive wear and/or overfeed of line. Cut with the tip of the line |
| Line unravels when cap or spool is removed | Make sure to park the lines in holding slots (figure P) before removing. |
Protecting the environment

Separate collection. This product must not be disposed of with normal household waste.
Should you find one day that your BLACK+DECKER product needs replacement, or if it is of no further use to you, do not dispose of it with household waste. Make this product available for separate collection.

Separate collection of used products and packaging allows materials to be recycled and used again. Re-use of recycled materials helps prevent environmental pollution and reduces the demand for raw materials.
Local regulations may provide for separate collection of electrical products from the household, at municipal waste sites or by the retailer when you purchase a new product.
BLACK+DECKER provides a facility for the collection and recycling of BLACK+DECKER products once they have reached the end of their working life. To take advantage of this service please return your product to any authorised repair agent who will collect them on our behalf.
You can check the location of your nearest authorised repair agent by contacting your local BLACK+DECKER office at the address indicated in this manual. Alternatively, a list of authorised BLACK+DECKER repair agents and full details of our after-sales service and contacts are available on the Internet at: www.2helpU.com
Batteries

At the end of their useful life, discard batteries with due care for our environment:
Run the battery down completely, then remove it from the tool.
NiCd, NiMH and Li-ion batteries are recyclable. Place the battery(s) in a suitable packaging to ensure that the terminals cannot be short-circuited. Take them to any authorised repair agent or a local recycling station.
Do not short-circuit the battery terminals.
- Do not dispose of the battery(s) in a fire as this may result in a risk of personal injury or an Explosion.
Technical data
| STB3620L H 1 | ||
| Input Voltage | Voc | 36V |
| No-Load Speed | min- | 0 - 7200/min |
| Weight | kg | 3.4kg |
| Battery BL2036 | ||
| Voltage | V1. | 36V |
| Capacity | Ah | 2.0Ah |
| Type | Li-Ion |
| Charger LCS36 Type 1 | ||
| Input Voltage | Voc | 220 - 240V |
| Output Voltage | Voc | 36V |
| Current | mA | Input: 600mA |
| A | Output: 1,3A |
Hand/arm weighted vibration value according to EN 50636-2-91:
$$ = < 2, 5 \mathrm {m} / \mathrm {s}, \text {u n c e r t a i n t y} (\mathrm {K}) = 1, 5 \mathrm {m} / \mathrm {s}. $$
L_* (sound pressure) 75 dB(A)
$$ \text {u n c e r t a i n t y} (K) = 1. 5 \mathrm {d B} (\mathrm {A}) $$
EC declaration of conformity
MACHINERY DIRECTIVE OUTDOOR NOISE DIRECTIVE

STB3620L Cordless String Trimmer
Black & Decker declares that these products described under "technical data" are in compliance with: 2006/42/EC, EN 60335-1:2012 + A11:2014 EN 50636-2-91:2014
2000/14/EC, Lawn Trimmer, L ≤ 50 cm, Annex VIII
DEKRA Certification B.V., Utrechtseweg 310, 6802 ED Arnhem, The Netherlands
Notified Body ID No.: 0344
Level of acoustic power according to 2000/14/EC
ENGLISH
(Original instructions)
(Article 12, Annex III, L ≤ 50 cm):
L_ (measured sound power) 95 dB(A)
uncertainty (K) = 1.5 dB(A)
L_xx (guaranteed sound power) 96 dB(A)
These products also comply with Directive 2014/108/EC (until 19.04.2016), 2014/30/EU (from 20.04.2016) and 2011/65/EU.
For more information, please contact Black & Decker at the following address or refer to the back of the manual.
The undersigned is responsible for compilation of the technical file and makes this declaration on behalf of Black & Decker.
R. Laverick
Engineering Manager
Black & Decker Europe, 210 Bath Road, Slough,
Berkshire, SL1 3YD
United Kingdom
06/08/2015
Guarantee
Black & Decker is confident of the quality of its products and offers an outstanding guarantee. This guarantee statement is in addition to and in no way prejudices your statutory rights. The guarantee is valid within the territories of the Member States of the European Union and the European Free Trade Area.
If a Black & Decker product becomes defective due to faulty materials, workmanship or lack of conformity, within 24 months from the date of purchase, Black & Decker guarantees to replace defective parts, repair products subjected to fair wear and tear or replace such products to ensure minimum inconvenience to the customer unless:
The product has been used for trade, professional or hire purposes;
The product has been subjected to misuse or neglect;
The product has sustained damage through foreign objects, substances or accidents;
Repairs have been attempted by persons other than authorised repair agents or Black & Decker service staff.
To claim on the guarantee, you will need to submit proof of purchase to the seller or an authorised repair agent. You can check the location of your nearest authorised repair agent by contacting your local Black & Decker office at the address indicated in this manual. Alternatively, a list of authorised Black & Decker repair agents and full details of our after-sales service and contacts are available on the Internet at: www.2helpU.com
Please visit our website www.blackanddecker.co.uk to register your new BLACK+DECKER product and to be kept up to date on new products and special offers. Further information on the BLACK+DECKER brand and our range of products is available at www.blackanddecker.co.uk
Black & Decker Europa, 210 Bath Road, Slough,
Berkshire, SL1 3YD
Großbritannien
06/08/2015
Garantie
Responsible technique
Black & Decker Europe, 210 Bath Road, Slough,
Berkshire, SL1 3YD
Royaume-Uni
06/08/2015
Garantie
Engineering Manager
10 Bath Road, Slough, Berkshire, SL1 3YD
Black & Decker Europe, 210 Bath Road, Slough,
Berkshire, SL1 3YD
Verenigd Koninkrijk
06/08/2015
Garantie
Black & Decker Europa, 210 Bath Road, Slough,
Berkshire, SL1 3YD
Reino Unido
06/08/2015
Garantía
Director de Engenharia
Black & Decker Europe, 210 Bath Road, Slough,
Berkshire, SL1 3YD
Reino Unido
06/08/2015
Garantia
Black & Decker Europe, 210 Bath Road, Slough,
Berkshire, SL1 3YD
Storbritannien
06/08/2015
Garanti
Black & Decker Europe, 210 Bath Road, Slough,
Berkshire, SL1 3YD
Storbritannia
06/08/2015
Garanti
Black & Decker er trygg pa kvaliteten av produitene sine og tilbyr en enestaende garanti. Denne garantierklaringen kommer i tillegg til dine lovbestemte rettigheter og er ici konflikt med disse. Garantien er gyldig i EU- og EFTA-medlemsstatene.
Black & Decker Europe, 210 Bath Road, Slough,
Berkshire, SL1 3YD
Storbritannien
06/08/2015
Garanti
Black & Decker Europe, 210 Bath Road, Slough,
Berkshire, SL1 3YD
Opate Tavta TPOOTATEUká yuaia aOgaaIac.
Mny aqnvTe TOTe Mkpa TaaDi a n atoua Tou dEv yywipizouv Tc odnyie vXpnoTPOINsouv Tn OoKEun.
Mny aqnvTe TnaiDi n Zwa va nnoiadoov oTo xwpo epyaogiaç n va ayizouv Tn oukeun n To Kaawdo tpofooiaac.
- AnaiTeiai otEvn Eπiβλεψη kata tη xροσιη tcns ouokεuç πλησiov πaiδiωv.
Autn n ouokcun dev ppoopizetai yia xpnoan aTIO vapa n aovama atoua xwpic EpiIbIeyn.
H ouokean autn dEv pPEni va xpnoioioietai wC TaiyviDl.
Xpnoiopoioinote noukeun mov o e wc npapkn texvnto
Na xpnoiopoioieitai movo oXwpoucs wpiuc uypaia. Mny aqnvTe va paexi n ouokuun.
AIOPOEUYETXpHON TNG OUOKEUNCS UTO KAKEC KAIPKEC OUVHKeS, EIDIKAOTAV UTTAPXKIVDuvoc TTWONCS KepauvWv.
Mny emutheta t n ouokun ovepO.
Mnv avoiyTe To TEPiBAnma Tou KOpou. Ev UInapxouv EApntna OTO EOWTEPIKO TOU VA EITIDEXOVTAI EITIOKEUN aTTo XpnoTn.
Mn ete OE Aitoupyia tn ouokun oE EKpNKTIKo TEPiAALov,OTWc TAPouoia EUΦAekTow Uypw, aepiw n OKovns.
Ia va y TO i aTIO TnV Tpica, mnv TpaBATE TOTe TO KAwOio. EToI 0a aTTOpuyETe Tov KIVduvo Oopac Tou i kai Tou Kaawoiou.
H ouokun npetie va xpnoiopoioietai movo u Tn mova tpoopodocac Tou TapexTai uoukun.

Black & Decker Europe, 210 Bath Road, Slough,
Berkshire, SL1 3YD
Hvwévo BaoiAio
06/08/2015
Eyyunon
H Black & Decker éivai oiyoupn yia tv nioiota twv
Tpoiovtwv tnc kai napexei egaipetikn evyunon. H napouoa
ypaattn eyyunon aotalei tpoaeeto biakiwma ockaiev
Zniwvei ta vopima diikawata oc. H evynon ioxuei evtoc
tnc ettikpateiaac twv Kpatwv Meawv tnc Eupwntaikns Evwo
kai tnc Eupwntaiknc Zwns Eaeuhepwv suvaalayw.
service.austria@sbdinc.com
Portugal Black & Decker Limited SARL Tel. 214667500
www.blackanddecker.pt Quinta da Fonte - Edificio Q55 D. Diniz Fax 214667580
resposta.resvenda@sbdinc.com Rua dos Malhoes, 2 e 2A - Piso 2 Esquerdo
2770 - 071 Paço de Arcos
emeaservice@sbdinc.com
Middle East & Africa Black & Decker Tel. +971 4 8863030
www.blackanddecker.ae P.O.Box-17164 Fax +971 48863333
service.mea@sbdinc.com Jebel Ali Free Zone (South),Dubai,
UAE


- Safety instructions
- Using your appliance
- Safety of others
- Residual risks.
- After use
- Inspection and repairs
- Additional safety instructions for grass trimmers
- Additional safety instructions for batteries and chargers
- Batteries
- Chargers
- Electrical safety
- Labels on appliance
- Features
- Assembly
- Fitting the guard (Fig. D & E)
- Attaching the auxiliary handle (Fig. F&G)
- Adjusting the position of the auxiliary handle (Fig.G)
- Adjusting the height of the tool (Fig.H)
- Releasing the cutting line
- Fitting and removing the battery (Fig.B,C)
- Use
- Warning! Let the tool work at its own pace. Do not overload.
- Charging the battery
- Charger diagnostics
- Bad Battery
- Hot/Cold Pack Delay
- Leaving the battery in the charger
- State of Charge Indicator
- Checking State of Charge during use
- Switching on and off
- Operating the trimmer
- Setting Trimming or Edging Mode (Fig.I, J and K)
- Trimming Mode (Fig.I and J)
- Edging Mode (Fig.K)
- Warning! Do not use the trimmer to create edges or trenches.
- Hints for optimum use
- Clearing Jams and Tangled Line Fig.O, P, Q
- Replacing the Spool Fig.O, P, Q and R
- Rewinding spool from bulk line (use only 2.0mm ROUND diameter line) (Fig.S)
- ENGLISH
- (Original instructions)
- Auto Feed System (AFS)
- Maintenance
- Protecting the environment
- EC declaration of conformity
- MACHINERY DIRECTIVE OUTDOOR NOISE DIRECTIVE
- Guarantee
- Garantie
- Garantía
- Garantia
- Garanti
- Eyyunon
Brand : BLACK & DECKER
Model : STB3620L
Category : Brush cutter