
GL5028 - Brush cutter BLACK & DECKER - Free user manual and instructions
Find the device manual for free GL5028 BLACK & DECKER in PDF.


| Product Type | Brush Cutter |
| Brand | Black & Decker |
| Model | GL5028 |
| Power Source | Electric (corded) |
| Motor Power | 500 W |
| Cutting Width | 30 cm |
| Cutting System | Dual line with automatic feed |
| Shaft Type | Telescopic, adjustable |
| Handle | Adjustable auxiliary handle |
| Safety Guard | Edge guard for debris protection |
| Weight | 4.2 kg |
| Overall Length | 120 cm |
| Cable Length | 10 m |
| Noise Level | 96 dB(A) |
| Vibration Level | 4.5 m/s² |
| Maintenance | Clean after use, check line feed, lubricate moving parts |
| Safety Features | Double switch activation, safety guard |
| Spare Parts | Replacement spool, line, guard available |
| Repairability | Consumer-replaceable line spool; motor service by professional |
Frequently Asked Questions - GL5028 BLACK & DECKER
User questions about GL5028 BLACK & DECKER
0 question about this device. Answer the ones you know or ask your own.
Ask a new question about this device
Download the instructions for your Brush cutter in PDF format for free! Find your manual GL5028 - BLACK & DECKER and take your electronic device back in hand. On this page are published all the documents necessary for the use of your device. GL5028 by BLACK & DECKER.
USER MANUAL GL5028 BLACK & DECKER
GL4525
GL5028
GL5530
natural_image
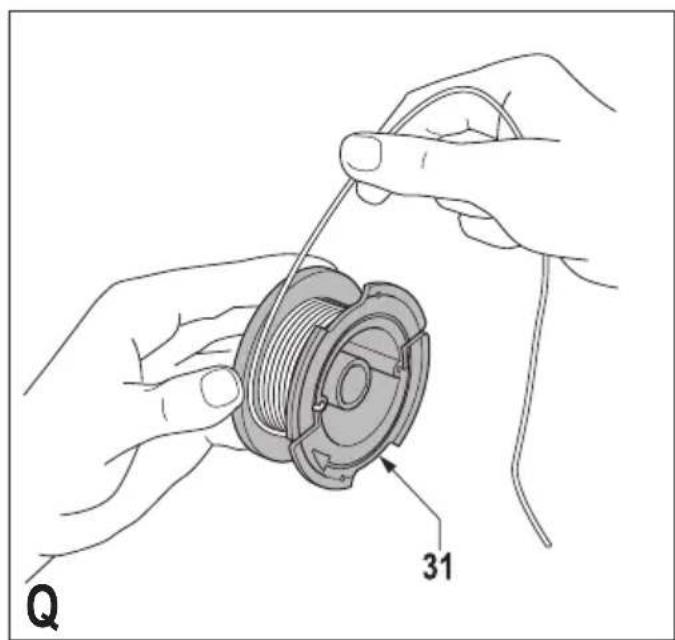
Illustration of hands connecting a mechanical component to a coiled spring, labeled with number 31 (no text or symbols beyond label)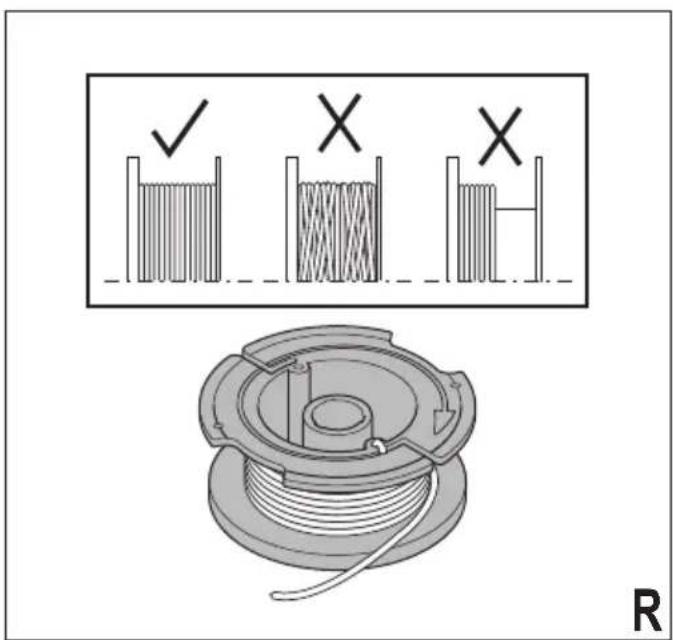
S
natural_image
Simple line drawing of a curved object with arrows indicating motion (no text or symbols)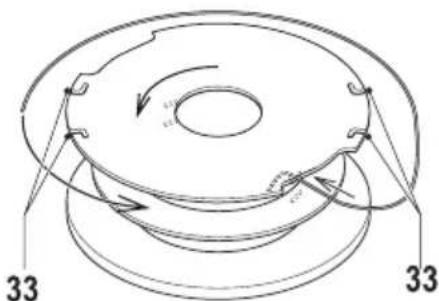
natural_image
Simple line drawing of a mechanical component or tool with curved arrows indicating motion (no text or symbols)T
U
Intended use
Your Black & Decker trimmer has been designed for trimming and finishing lawn edges and to cut grass in confined spaces. This appliance is intended for consumer use only.
Safety instructions
Warning! When using mains-powered appliances, basic safety precautions, including the following, should always be followed to reduce the risk of fire, electric shock, personal injury and material damage.
Warning! When using the machine the safety rules must be followed. For your own safety and bystanders please read these instructions before operating the machine. Please keep the instructions safe for later use.
- Read all of this manual carefully before operating the appliance.
- The intended use is described in this manual. The use of any accessory or attachment or the performance of any operation with this appliance other than those recommended in this instruction manual may present a risk of personal injury.
◆ Retain this manual for future reference.
Using your appliance
Always take care when using the appliance.
◆ Always use safety glasses or goggles.
- Never allow children or people unfamiliar with the instructions to use the appliance.
- Do not allow children or animals to come near the work area or to touch the appliance or power supply cord.
◆ Close supervision is necessary when the appliance is used near children.
- This appliance is not intended for use by young or infirm persons without supervision.
◆ This appliance is not to be used as a toy.
- Only use the appliance in daylight or good artificial light.
◆ Use in a dry location only. Do not allow the appliance to become wet.
◆ Do not immerse the appliance in water.
- Do not open the body casing. There are not user-serviceable parts inside.
- Do not operate the appliance in explosive atmospheres, such as in the presence of flammable liquids, gases or dust.
- To reduce the risk of damage to plugs or cords, never pull the cable to remove the plug from a socket.
Safety of others
- This appliance is not intended for use by persons (including children) with reduced physical, sensory or mental capabilities, or lack of experience and knowledge, unless they have been given supervision or instruction concerning use of the appliance by a person responsible for their safety.
◆ Children must be supervised to ensure that they do not play with the appliance.
Residual risks.
Additional residual risks may arise when using the tool which may not be included in the enclosed safety warnings. These risks can arise from misuse, prolonged use etc.
Even with the application of the relevant safety regulations and the implementation of safety devices, certain residual risks can not be avoided. These include:
- Injuries caused by touching any rotating/moving parts.
◆ Injuries caused when changing any parts, blades or accessories. - Injuries caused by prolonged use of a tool. When using any tool for prolonged periods ensure you take regular breaks.
◆ Impairment of hearing. - Health hazards caused by breathing dust developed when using your tool (example:- working with wood, especially oak, beech and MDF.)
After use
- When not in use, the appliance should be stored in a dry, well ventilated place out of reach of children.
◆ Children should not have access to stored appliances. - When the appliance is stored or transported in a vehicle it should be placed in the boot or restrained to prevent movement following sudden changes in speed or direction.
Inspection and repairs
- Before use, check the appliance for damaged or defective parts. Check for breakage of parts and any other conditions that may affect its operation.
- Do not use the appliance if any part is damaged or defective.
- Have any damaged or defective parts repaired or replaced by an authorised repair agent.
- Never attempt to remove or replace any parts other than those specified in this manual.
Using an extension cable
Always use an approved extension cable suitable for the power input of this appliance (see technical data). The extension cable must be suitable for outdoor use and marked accordingly. Up to 30 m of 1.5 mm2 HO5VV-F extension cable can be used without loss of product performance. Before use, inspect the extension cable for signs of damage, wear and ageing. Replace the extension cable if damaged or defective. When using a cable reel, always unwind the cable completely.
Additional safety instructions for grass trimmers
Warning! Cutting elements continue to rotate after the motor is switched off.
- Be familiar with the controls and the proper use of the appliance.
Before use, check the power supply cord and extension cord for signs of damage, ageing and wear. If a cord becomes damaged during use, disconnect the cord from the mains supply immediately. DO NOT TOUCH THE CORD BEFORE DISCONNECTING THE SUPPLY. - Do not use the appliance if the cords are damaged or worn.
◆ Wear stout shoes or boots to protect your feet.
◆ Wear long trousers to protect your legs.
Before using the appliance, check that your cutting path is free from sticks, stones, wire and any other obstacles. - Only use the appliance in the upright position, with the cutting line near the ground. Never switch the appliance on in any other position.
- Move slowly when using the appliance. Be aware that freshly cut grass is damp and slippery.
- Do not work on steep slopes. Work across the face of slopes, not up and down.
- Never cross gravel paths or roads while the appliance is running.
◆ Never touch the cutting line while the appliance is running. - Do not put the appliance down until the cutting line has come to a complete standstill.
◆ Use only the appropriate type of cutting line. Never use metal cutting line or fishing line. - Be careful not to touch the line trimming blade.
◆ Take care to keep the mains cable away from the cutting line. Always be aware of the position of the cable. - Keep hands and feet away from the cutting line at all times, especially when switching on the motor.
Before using the appliance and after any impact, check for signs of wear or damage and repair as necessary. - Never operate the appliance with damaged guards or without guards in place.
Take care against injury from any device fitted for trimming the filament line length. After extending new cutter line always return the machine to its normal operating position before switching on.
◆ Always ensure that the ventilation slots are kept clear of debris.
- Do not use the lawn trimmer (edge trimmer), if the cords are damaged or worn.
◆ Keep extension cords away from cutting elements.
Labels on appliance
The following warning symbols are found on the appliance:

Read the manual prior to operation.

Wear safety glasses or goggles when operating this appliance.

Wear suitable ear protectors when operating this appliance.

Always remove the plug from the socket before inspecting a damaged cable. Be careful not to use your strimmer if the cable is damaged.
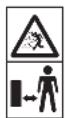
Beware of flying objects. Keep bystanders away from the cutting area.

Do not expose the appliance to rain or high humidity.

Directive 2000/14/EC guaranteed sound power.
Electrical safety

This appliance is double insulated; therefore no earth wire is required. Always check that the power supply corresponds to the voltage on the rating plate.
ENGLISH
(Original instructions)
If the supply cord is damaged, it must be replaced by the manufacturer or an authorised Black & Decker Service Centre in order to avoid a hazard.
◆ Electric safety can be further improved by using a high sensitivity 30 mA Residual Current Device (RCD).
Features
This appliance includes some or all of the following features.
- On/off switch
- Handle
- Cable restraint
- Power inlet
- Second handle
- Guard
- Spool housing
- Head
- Edge guide
Assembly
Warning! Before assembly, make sure that the tool is switched off and unplugged.
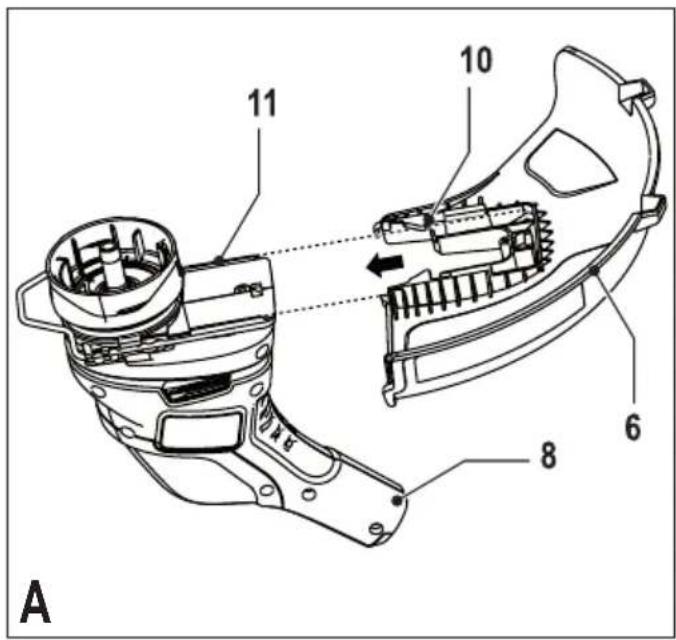
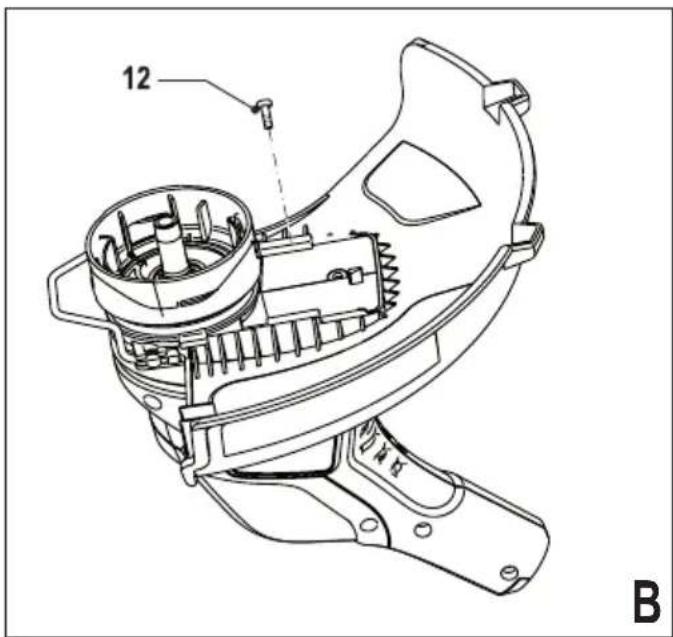
Fitting the guard (fig. A-B)
◆ Remove the screw from the guard.
- Keeping the guard (6) square to the strimmer head (8) slide it into place until the retaining tab clicks into place (Ensure that the guide rails (10) on the guard (6) are correctly aligned with the guide rails (11) on the strimmer head (8). fig. A).
◆ Secure the guard (6) with the screw (12).
Warning! Never use the tool unless the guard is properly fitted.
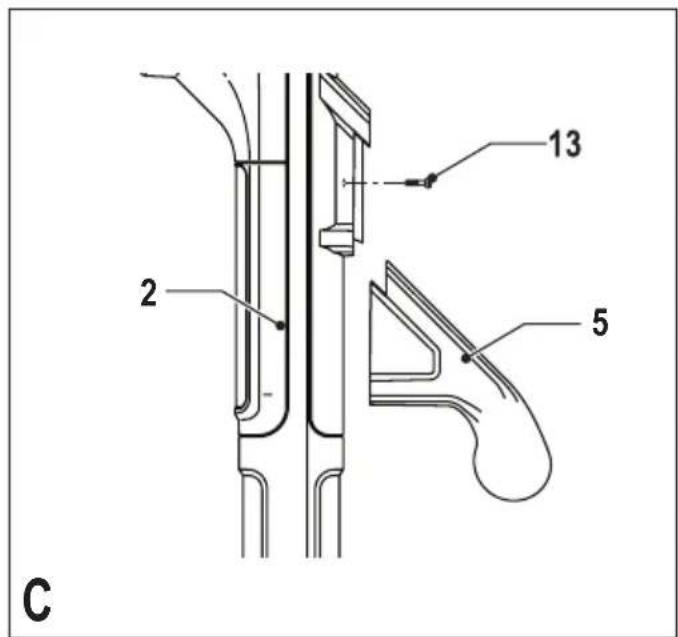
Attaching the second handle (fig. C) (GL4525 & GL5028 only)
◆ Slide the second handle (5) on to the main handle (2) in an upwards direction.
- Secure the second handle in place with the screw (13) provided.
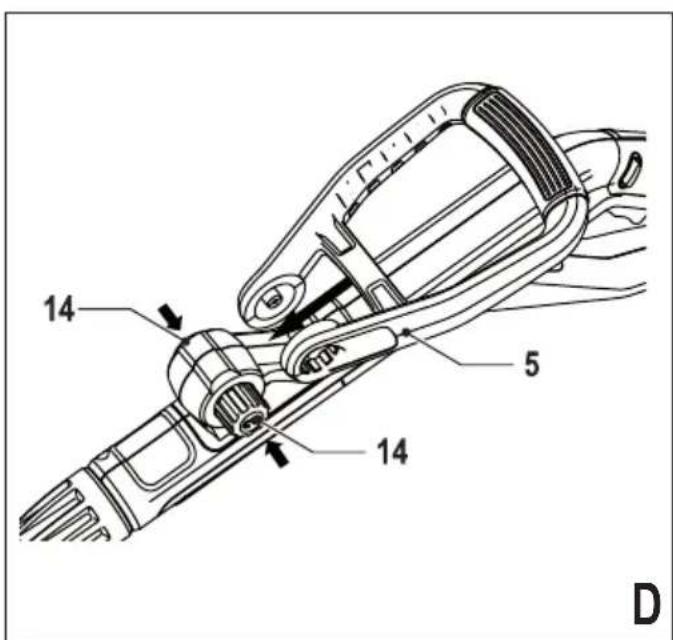
Attaching the second handle (fig. D) (GL5530 only)
- Press in and hold both of the buttons (14) on the side of the handle.
◆ Slide the second handle (5) in place over the buttons (14).
Warning! Ensure that the teeth on the button are correctly aligned in slots in the handle and that the handle is secure.
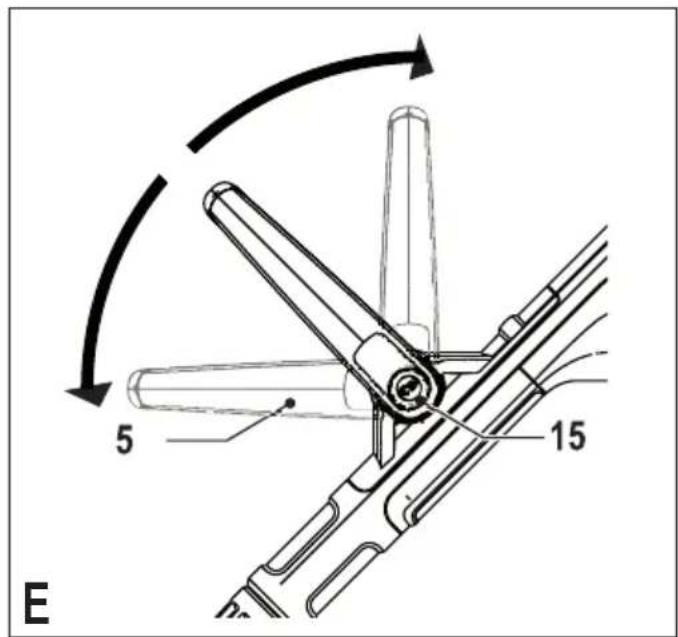
Adjusting the position of the secondary handle (fig. E) (GL5530 only)
The second handle (5) can be adjusted to provide optimum balance and comfort.
◆ Press in the button (15) on the left side of the handle.
◆ Rotate the second handle (5) into the required position.
◆ Release the button (15).
Warning! Ensure that the teeth on the button are correctly aligned in slots in the handle and that the handle is secure.
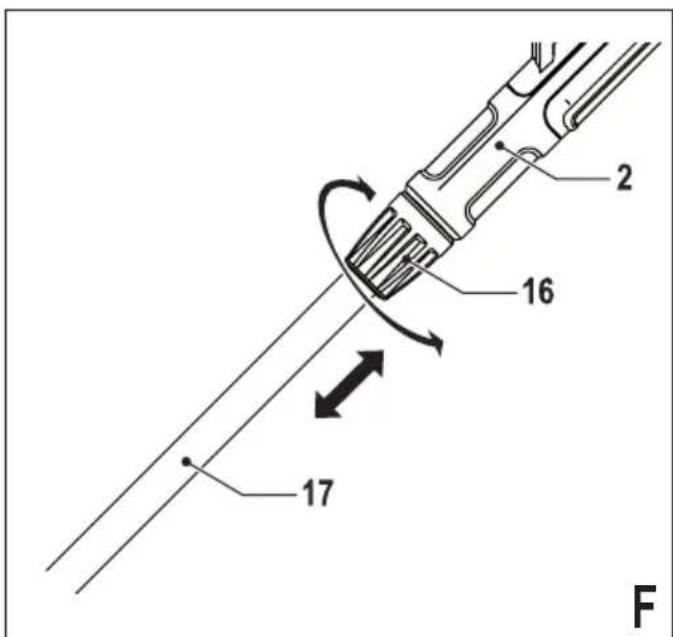
Adjusting the height of the tool (fig. F)
This tool has a telescopic mechanism, allowing you to set it to a comfortable height. There are multiple height settings.
To adjust the height setting, proceed as follows:
◆ Disconnect the tool from the supply.
◆ Loosen the adjustment collar (16) by turning it clockwise.
◆ Gently pull the tube (17) in or out of the handle (2) to the desired height.
◆ Tighten the adjustment collar (16) by turning anticlockwise.
Releasing the cutting line
In transit, the cutting line is taped to the spool housing.
- Remove the tape holding the cutting line to the spool housing (7).
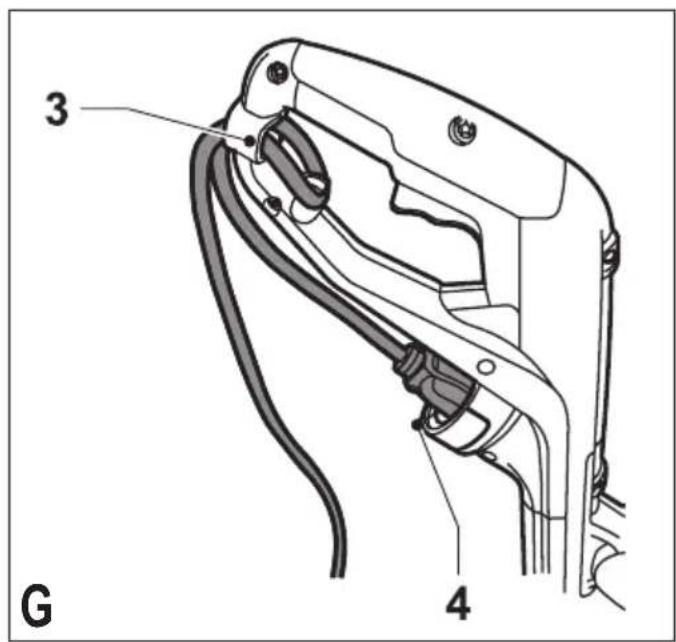
Connecting the tool to the mains (fig. G)
- Connect the female plug of a suitable extension cable to the power inlet (4).
◆ Loop the cable through the cable restraint (3).
◆ Insert the mains plug into a mains outlet.
For wired in cable units: Make sure the cable is looped through the cable restraint prior to connecting the plug to the mains outlet.
Warning! The extension cable must be suitable for outdoor use.
Use
Warning! Let the tool work at its own pace. Do not overload.
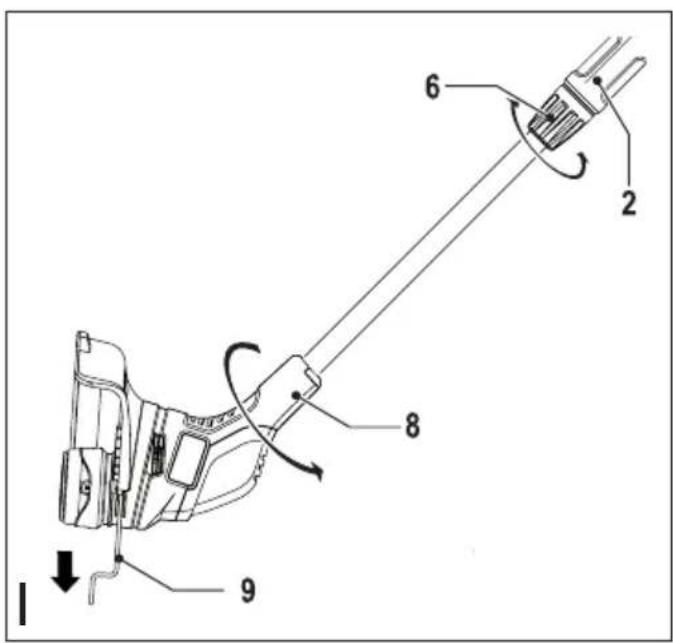
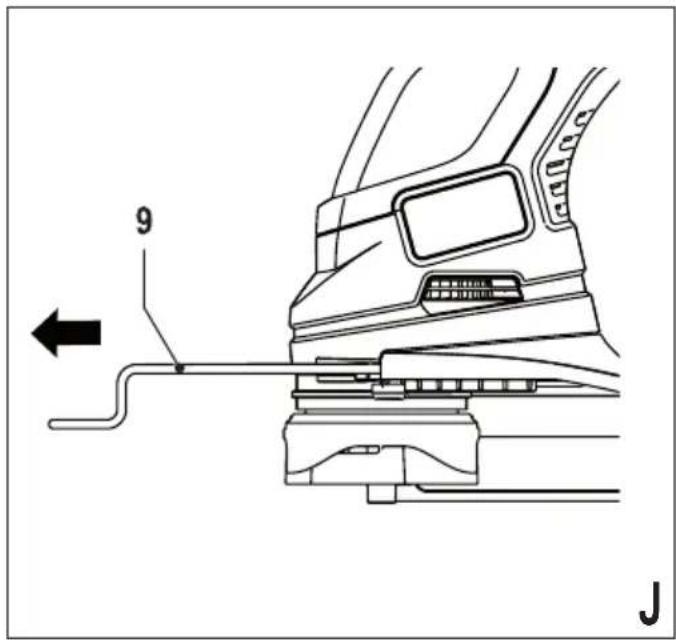
Setting the tool to trimming or edging mode (fig. H, I & J)
The tool can be used in trimming mode as shown in fig. E or in edging mode to trim overhanging grass along lawn edges and flower beds as shown in fig. F.
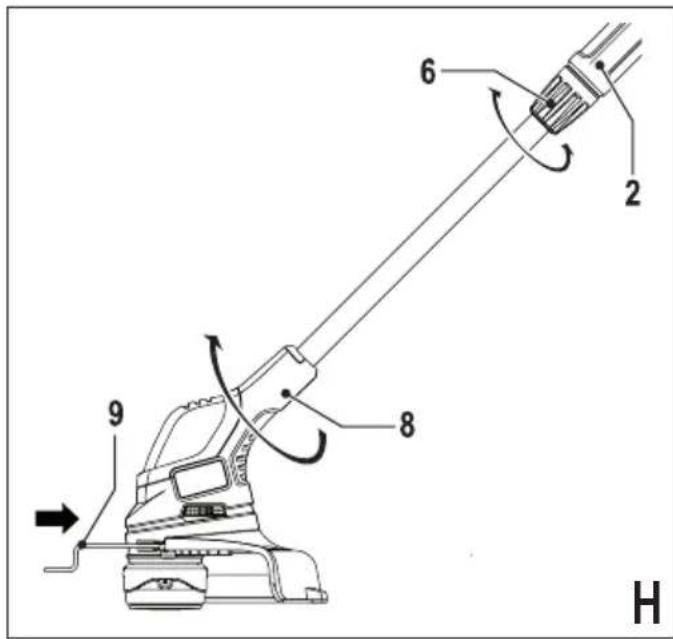
Trimming mode (fig. H)
For trimming, the trimmer head should be in the position shown in fig. H. If it is not:
◆ Disconnect the tool from the supply.
◆ Loosen the adjustment collar (6) by turning it clockwise.
- Whilst holding the handle (2), rotate the head (8) clockwise.
◆ Tighten the collar (6) by turning it anti-clockwise.
◆ Slide the edge guide (9) into the motor housing.
Note: Note: The head will only rotate in one direction.
Edging mode (fig. I & J)
For edging, the trimmer head should be in the position shown in fig. 1. If it is not:
◆ Disconnect the tool from the supply.
◆ Loosen the adjustment collar (6) by turning it clockwise.
- Whilst holding the handle (2), rotate the head (8) anti-clockwise.
◆ Tighten the collar (6) by turning it anti-clockwise.
- Slide the edge guide out of the motor housing. Ensure that the edging guide (9) is fully extended, an audible click will be heard.
Note: The head will only rotate in one direction.
Switching on and off
◆ To switch the tool on, squeeze the trigger lever (1).
◆ To switch the tool off, release the trigger lever.
Warning! Never attempt to lock the trigger lever in the on position.
Hints for optimum use
General
- In order to achieve optimum cutting results, only cut dry grass.
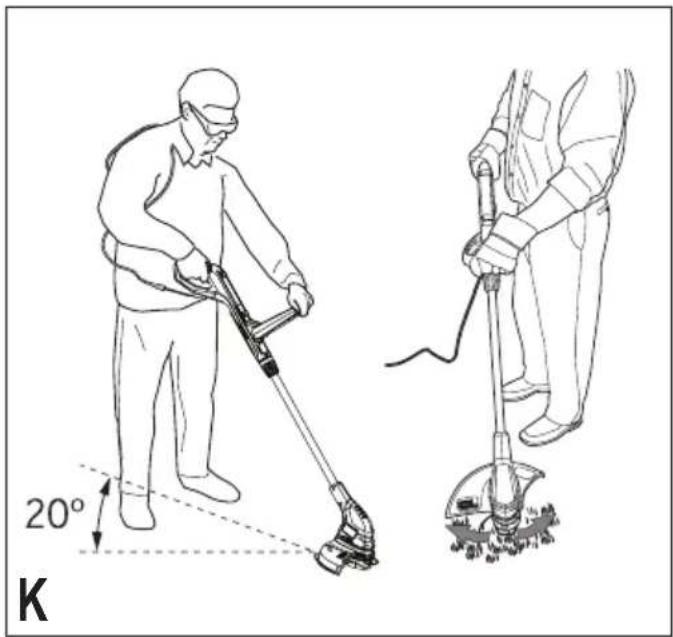
Trimming
◆ Hold the tool as shown in fig. K.
◆ Gently swing the trimmer from side to side.
- When cutting long grass, work in stages from the top. Take small cuts.
◆ Keep the tool away from hard objects and delicate plants.
◆ Cutting line will wear faster and require more feeding if the cutting is done along pavements or other abrasive surfaces or heavier weeds are being cut.
◆ If the tool starts running slowly, reduce the load.
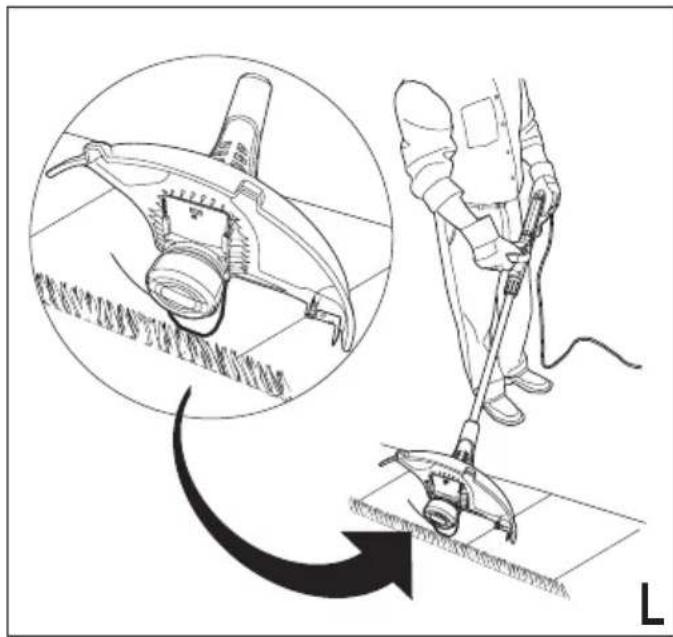
Edging
Optimum cutting results are achieved on edges deeper than 50 mm.
- Do not use the tool to create edges. To create edges, use an edging spade.
◆ Guide the tool as shown in fig. L.
◆ To make a closer cut, slightly tilt the tool.
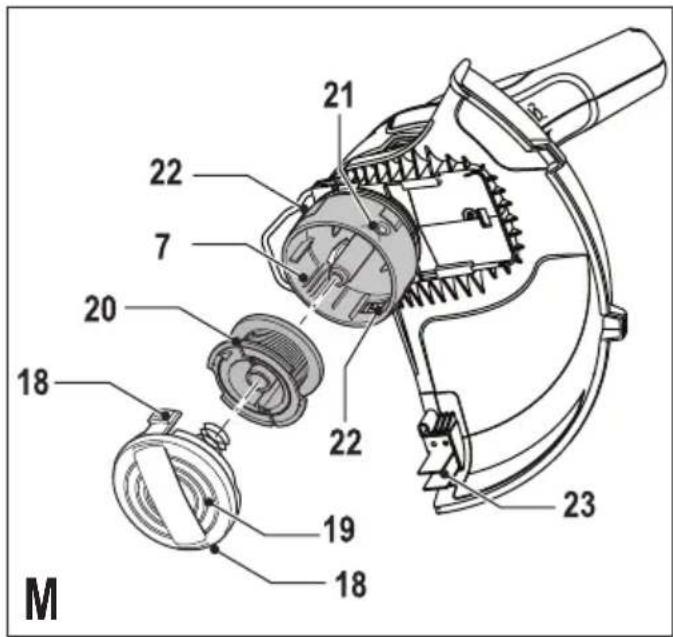
Fitting a new spool of cutting line (fig. M) (GL4525 & GL5028 only)
Replacement spools of cutting line are available from your Black & Decker dealer (cat. no. A6481).
◆ Unplug the tool.
- Keep the tabs (18) depressed and remove the spool cover (19) from the housing (7).
◆ Remove the empty spool (20) from the housing.
- Remove any dirt and grass from the spool cover and housing.
◆ Take the new spool and push it onto the boss in the housing. Rotate the spool slightly until it is seated.
◆ Unclip the end of one of the cutting lines and guide the line into the eyelets(21). The line should protrude approx. 11 cm from the spool cover.
♦ Align the tabs (18) on the spool cover with the cut outs (22) in the housing.
◆ Push the cover onto the housing until it snaps securely into place.
Warning! If the cutting lines protrude beyond the trimming blade (23), cut them off so that they just reach the blade.
Fitting a new spool of cutting line (fig. N & O) (GL5530 only)
Replacement spools of cutting line are available from your Black & Decker dealer (cat. no. A6441). Complete cassettes containing a spool of cutting line are also available (cat. no. A6442).
◆ Unplug the tool.
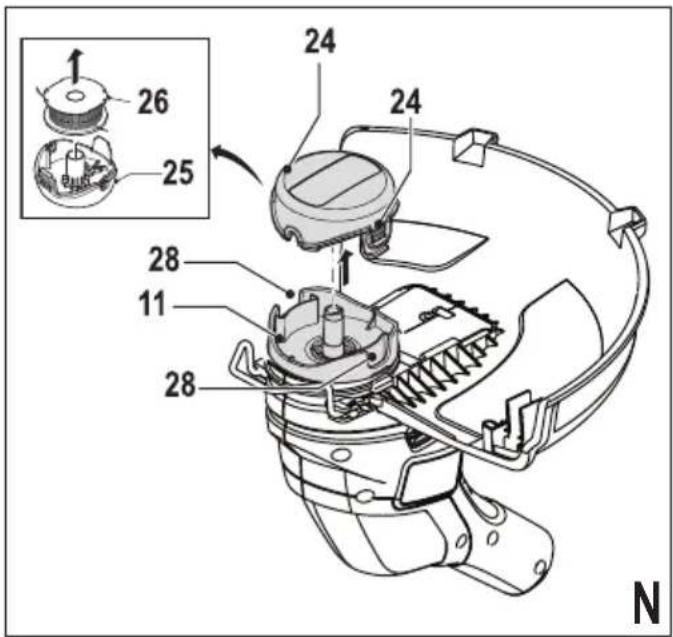
◆ Keep the tabs (24) depressed and remove the spool cover (25) from the housing (11) (fig. N).
◆ Remove the empty spool (26) from the spool cover.
- Remove any dirt and grass from the spool cover and housing.
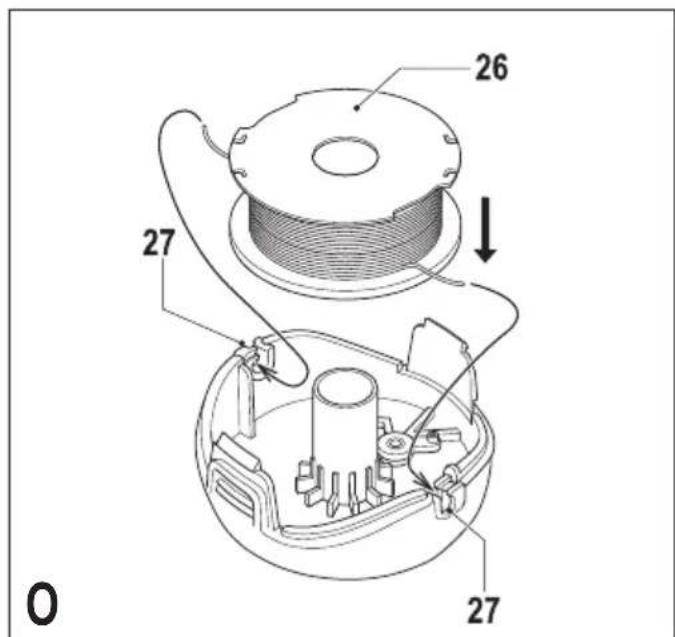
◆ Take the new spool and push it onto the boss in the spool cover. Rotate the spool slightly until it is seated.
◆ Unclip the end of one of the cutting lines and guide the line into one of the eyelets (27) (fig. O). The line should protrude approx. 11 cm from the spool cover.
◆ Unclip the end of the other cutting line and guide the line into the other eyelet. The line should protrude approx. 11 cm from the spool cover.
♦ Align the tabs (24) on the spool cover with the cut outs (28) in the housing (fig. N).
- Push the cover onto the housing until it snaps securely into place.
Warning! If the cutting lines protrude beyond the trimming blade (10), cut them off so that they just reach the blade.
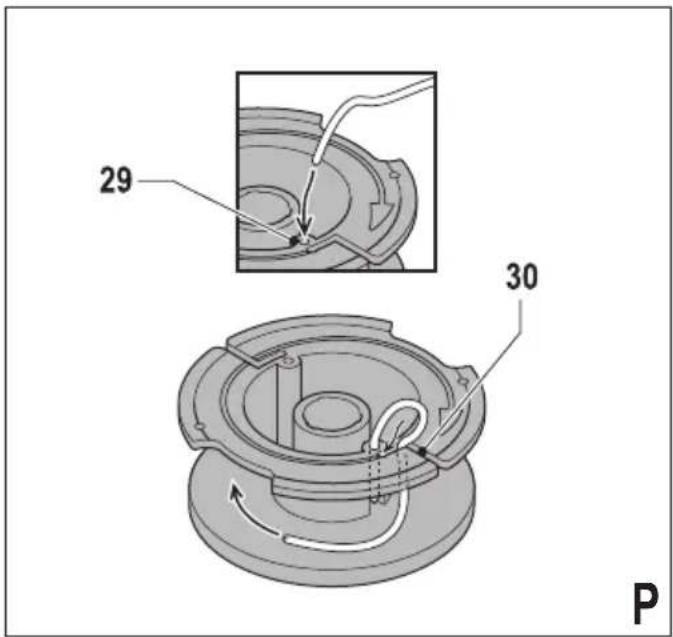
Winding new line onto an empty spool (fig. P - R) (GL4525 & GL5028 only)
You may wind new cutting line onto an empty spool. Replacement packs of cutting line are available from your Black & Decker dealer (cat. no. A6170 (31 m), A6171 (50 m)).
- Remove the empty spool from the tool as described above.
◆ Remove any remaining cutting line from the spool.
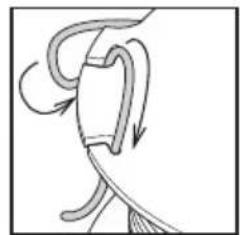
◆ Feed 2 cm of cutting line into one of the holes (29) in the spool as shown (fig. P).
◆ Bend the cutting line and anchor it in the L-shaped slot (30).
ENGLISH
(Original instructions)
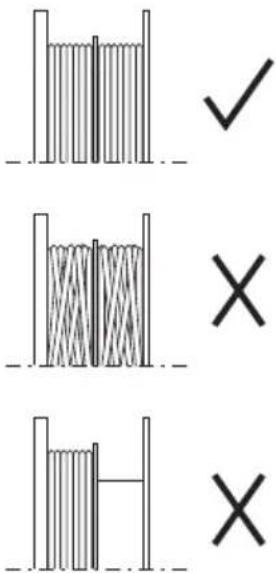
- Wind the cutting line onto the spool in the direction of the arrow. Make sure to wind the line on neatly and in layers. Do not criss-cross (fig. R).
- When the wound cutting line reaches the recesses (31), cut the line. Let the line protrude approx. 12 cm from the spool and hold a finger on the line to keep it in place (fig. Q).
◆ Proceed as described above to fit the spool on the tool.
Warning! Only use the appropriate type of Black & Decker cutting line.
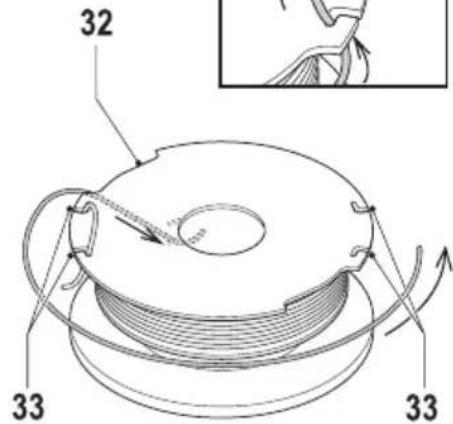
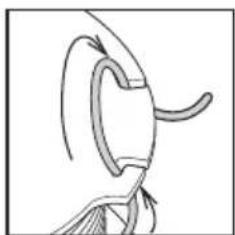
Winding new line onto an empty spool (fig. S - U) (GL5530 only)
You may wind new cutting line onto an empty spool. Replacement packs of cutting line are available from your Black & Decker dealer (cat. no. A6440).
- Remove the empty spool from the tool as described above.
◆ Remove any remaining cutting line from the spool. - First wind new line onto the uppermost part of the spool:
◆ Feed 2 cm of cutting line into one of the slots in the upper section of the spool as shown. - Wind the cutting line onto the spool in the direction of the arrow. Make sure to wind the line on neatly and in layers. Do not criss-cross.
- When the wound cutting line reaches the recesses (32), cut the line.
◆ Temporarily park the line in the slots (33) on one side of the spool as shown. - Repeat the above procedure for the second cutting line on the lower section of the spool. Park the line in the unused slots (33).
- Proceed as described above to fit the spool on the tool. Do not forget to release the cutting line from the parking slots (33).
Warning! Only use the appropriate type of Black & Decker cutting line.
Mains plug replacement (U.K. & Ireland only)
If a new mains plug needs to be fitted:
◆ Safely dispose of the old plug.
- Connect the brown lead to the live terminal in the new plug.
◆ Connect the blue lead to the neutral terminal.
Warning! No connection is to be made to the earth terminal. Follow the fitting instructions supplied with good quality plugs. Recommended fuse: 5 A.
Troubleshooting
If your tool seems not to operate properly, follow the instructions below. If this does not solve the problem, please contact your local Black & Decker repair agent.
Warning! Before proceeding, unplug the tool.
Appliance runs slowly
- Check that the spool housing can rotate freely. Carefully clean it if necessary.
- Check that the cutting line does not protrude more than 11 cm from the spool housing. If it does, cut it off so that it just reaches the line trimming blade.
Automatic line feed does not work
- Keep the tabs depressed and remove the spool cover from the housing.
◆ Pull the cutting line until it protrudes 11 cm from the housing. If insufficient cutting line is left on the spool, install a new spool of cutting line as instructed above. - Align the tabs on the spool cover with the cut outs in the housing.
- Push the cover onto the housing until it snaps securely into place.
- If the cutting line protrudes beyond the trimming blade, cut it off so that it just reaches the blade.
If the automatic line feed still does not work or the spool is jammed, try the following suggestions:
◆ Carefully clean the spool cover and housing.
◆ Remove the spool and check if the lever can move freely.
- Remove the spool and unwind the cutting line, then wind it on neatly again as described above. Replace the spool as instructed.
Maintenance
Your Black & Decker corded/cordless appliance/tool has been designed to operate over a long period of time with a minimum of maintenance. Continuous satisfactory operation depends upon proper tool/appliance care and regular cleaning.
Warning! Before performing any maintenance on corded/cordless power tools:
◆ Switch off and unplug the appliance/tool.
- Or switch off and remove the battery from the appliance/tool if the appliance/tool has a separate battery pack.
- Or run the battery down completely if it is integral and then switch off.
◆ Unplug the charger before cleaning it. Your charger does not require any maintenance apart from regular cleaning.
- Regularly clean the ventilation slots in your tool/appliance and charger using a soft brush or dry cloth.
◆ Regularly clean the motor housing using a damp cloth. Do not use any abrasive or solvent-based cleaner.
- Regularly clean the cutting line and spool using a soft brush or dry cloth.
- Regularly use a blunt scraper to remove grass and dirt from the underneath of the guard.
Protecting the environment

Separate collection. This product must not be disposed of with normal household waste.
Should you find one day that your Black & Decker product needs replacement, or if it is of no further use to you, do not dispose of it with household waste. Make this product available for separate collection.

Separate collection of used products and packaging allows materials to be recycled and used again. Re-use of recycled materials helps prevent environmental pollution and reduces the demand for raw materials.
Local regulations may provide for separate collection of electrical products from the household, at municipal waste sites or by the retailer when you purchase a new product.
Black & Decker provides a facility for the collection and recycling of Black & Decker products once they have reached the end of their working life. To take advantage of this service please return your product to any authorised repair agent who will collect them on our behalf.
You can check the location of your nearest authorised repair agent by contacting your local Black & Decker office at the address indicated in this manual. Alternatively, a list of authorised Black & Decker repair agents and full details of our after-sales service and contacts are available on the Internet at: www.2helpU.com
Technical data
| GL4525Type 1 | GL5028Type 1 | GL5530Type 1 | ||
| Input Voltage | V_ | 230 230 230 | ||
| Power Input | W | 450 | 500 550 | |
| No-Load Speed | min | 7300 7200 | 7300 | |
| Weight | kg | 1.3 1.5 1.5 |
Hand/arm weighted vibration value according to EN 786: = 2.5 m/s, uncertainty (K) = 1.5 m/s.
L_FA (sound pressure) 81 dB(A) uncertainty (K) = 1 (A)
EC declaration of conformity
MACHINERY DIRECTIVE
OUTDOOR NOISE DIRECTIVE

GL4525/GL5028/GL5530
Black & Decker declares that these products described under
"technical data" are in compliance with:
2006/42/EC, EN 60335-1, EN 60335-2-91
2000/14/EC, Lawn Trimmer, L ≤ 50 cm, Annex VIII
KEMA Quality B.V., Utrechtseweg 310, 6802 ED Arnhem, The Netherlands
Notified Body ID No.: 0344
Level of acoustic power according to 2000/14/EC
(Article 12, Annex III, L ≤ 50 cm):
L_NA (measured sound power) 95 dB(A)
uncertainty (K) = 1 dB(A)
L_ss (guaranteed sound power) 96 dB(A)
uncertainty (K) = 1 dB(A)
These products also comply with directive 2004/108/EC.
For more information, please contact Black & Decker at the following address or refer to the back of the manual.
The undersigned is responsible for compilation of the technical file and makes this declaration on behalf of Black & Decker.
Kevin Hewitt
Vice-President Global Engineering
Black & Decker Europe, 210 Bath Road, Slough,
Berkshire, SL1 3YD
United Kingdom
20/04/2012
Guarantee
Black & Decker is confident of the quality of its products and offers an outstanding guarantee. This guarantee statement is in addition to and in no way prejudices your statutory rights. The guarantee is valid within the territories of the Member States of the European Union and the European Free Trade Area.
If a Black & Decker product becomes defective due to faulty materials, workmanship or lack of conformity, within 24 months from the date of purchase, Black & Decker guarantees to replace defective parts, repair products subjected to fair wear and tear or replace such products to ensure minimum inconvenience to the customer unless:
- The product has been used for trade, professional or hire purposes;
◆ The product has been subjected to misuse or neglect; - The product has sustained damage through foreign objects, substances or accidents;
◆ Repairs have been attempted by persons other than authorised repair agents or Black & Decker service staff.
To claim on the guarantee, you will need to submit proof of purchase to the seller or an authorised repair agent. You can check the location of your nearest authorised repair agent by contacting your local Black & Decker office at the address indicated in this manual. Alternatively, a list of authorised Black & Decker repair agents and full details of our after-sales service and contacts are available on the Internet at:
www.2helpU.com
Please visit our website www.blackanddecker.co.uk to register your new Black & Decker product and to be kept up to date on new products and special offers. Further information on the Black & Decker brand and our range of products is available at www.blackanddecker.co.uk
Partial support - Only parts shown available
Partial support - Only parts shown available
Do not forget to register your product!
www.blackanddecker.co.uk/productregistration
Register your product online at www.blackanddecker.co.uk/productregistration or send your name, surname and product code to Black & Decker in your country.
Australia
Black & Decker (Australia) Pty. Ltd. Tel. 03-8720 5100
20 Fletcher Road, Mooroolbark, Fax 03-9727 5940
Victoria, 3138
New Zealand
Black & Decker Tel. +64 9 259 1133
5 Te Apunga Place Fax +64 9 259 1122
Mt Wellington
Auckland 1060
United Kingdom
Black & Decker Tel. 01753 511234
210 Bath Road Fax 01753 551155
Slough, Berkshire SL1 3YD Helpline 01753 574277


- Intended use
- Safety instructions
- Using your appliance
- Safety of others
- Residual risks.
- After use
- Inspection and repairs
- Using an extension cable
- Additional safety instructions for grass trimmers
- Labels on appliance
- Electrical safety
- ENGLISH
- (Original instructions)
- Features
- Assembly
- Fitting the guard (fig. A-B)
- Attaching the second handle (fig. C) (GL4525 & GL5028 only)
- Attaching the second handle (fig. D) (GL5530 only)
- Adjusting the position of the secondary handle (fig. E) (GL5530 only)
- Adjusting the height of the tool (fig. F)
- Releasing the cutting line
- Connecting the tool to the mains (fig. G)
- Use
- Setting the tool to trimming or edging mode (fig. H, I & J)
- Trimming mode (fig. H)
- Edging mode (fig. I & J)
- Switching on and off
- Hints for optimum use
- General
- Trimming
- Edging
- Fitting a new spool of cutting line (fig. M) (GL4525 & GL5028 only)
- Fitting a new spool of cutting line (fig. N & O) (GL5530 only)
- Winding new line onto an empty spool (fig. P - R) (GL4525 & GL5028 only)
- Winding new line onto an empty spool (fig. S - U) (GL5530 only)
- Mains plug replacement (U.K. & Ireland only)
- Troubleshooting
- Appliance runs slowly
- Automatic line feed does not work
- If the automatic line feed still does not work or the spool is jammed, try the following suggestions:
- Maintenance
- Warning! Before performing any maintenance on corded/cordless power tools:
- Protecting the environment
- EC declaration of conformity
- Guarantee
- Do not forget to register your product!
- Australia
- New Zealand
- United Kingdom
Brand : BLACK & DECKER
Model : GL5028
Category : Brush cutter