
BGA 100 - Blower STIHL - Free user manual and instructions
Find the device manual for free BGA 100 STIHL in PDF.
| Product type | Cordless blower |
| Brand | STIHL |
| Model | BGA 100 |
| Maximum air speed (with nozzle) | 63 m/s |
| Weight | 2.5 kg |
| Sound pressure level (LpA) | 80 dB(A) |
| Sound power level (LwA) | 90 dB(A) |
| Vibration level (handle) | < 2.5 m/s² |
| Compatible batteries | STIHL AR or STIHL AP with AP pouch |
| Adjustable power levels | 3 levels + boost function |
| Boost function | Maximum temporary power |
| Use in rain | Yes |
| Recommended safety distance | 5 m around work area |
| Recommended hearing protection | Yes (high sound level) |
| Routine maintenance | Clean with damp cloth and soft brush |
| Annual maintenance | Have checked by a STIHL specialist dealer |
| Spare parts | STIHL original parts only |
| Repairability | Entrust to an authorized dealer (do not repair yourself) |
Frequently Asked Questions - BGA 100 STIHL
User questions about BGA 100 STIHL
0 question about this device. Answer the ones you know or ask your own.
Ask a new question about this device
Download the instructions for your Blower in PDF format for free! Find your manual BGA 100 - STIHL and take your electronic device back in hand. On this page are published all the documents necessary for the use of your device. BGA 100 by STIHL.
USER MANUAL BGA 100 STIHL
natural_image
White and black STIHL BGA 100 handheld hair dryer (no visible text or symbols on body)Skötselanvisning
Käyttöohje
Istruzioni d'uso
1 Akku STIHL AR
natural_image
Line drawing of a person's lower back wearing a safety harness, showing two views (no text or symbols)natural_image
Line drawing of a person sweeping pavement with a tool, no text or symbols present2.1 Applicable Documentation....24
2.2 Symbols used with warnings in the text .....24
2.3 Symbols in Text 24
3 Overview 24
3.1 Blower 24
3.2 Carrying Systems 25
3.3 Symbols 26
4 Safety Precautions 26
4.1 Warning Signs 26
4.2 Intended Use 26
4.3 The Operator 27
4.4 Clothing and Equipment 27
4.5 Blower 28
4.6 Blower 28
4.7 Operation 28
4.8 Transporting 29
4.9 Storing 29
4.10 Cleaning, Maintenance and Repairs....29
5 Preparing the Blower for Operation 30
5.1 Preparing the Blower for Operation .....30
6 Assembling the Blower 30
6.1 Mounting, Adjusting and Removing the Nozzle .....30
7 Adjusting Blower for User 30
7.1 Using with STIHL AR Battery 30
7.2 Using with Carrying System 32
7.3 Using with AP Belt Bag with Connecting Cable .....33
8 Inserting and Removing Connecting Cable Plug ....34
8.1 Inserting the Connecting Cable Plug....34
8.2 Removing the Connecting Cable Plug ....34
9 Switching the Blower On/Off 35
9.1 Switching On 35
9.2 Switching Off 35
10 Checking the Blower 35
10.1 Checking the Controls 35
11 Operating the Blower 36
11.1 Holding and Controlling the Blower.... 36
11.2 Selecting Power Level 36
11.3 Activating the Boost Function 36
11.4 Blow-Sweeping 37
12 After Finishing Work 37
12.1 After Finishing Work 37
13 Transporting 37
13.1 Transporting the Blower 37
14 Storing 37
14.1 Storing the Blower 37
15 Cleaning 37
15.1 Cleaning the Blower 37
16 Maintenance and Repairs 38
16.1 Maintenance Intervals 38
16.2 Servicing and Repairing the Blower 38
17 Troubleshooting 39
17.1 Troubleshooting the Blower and Battery 39
18 Specifications 41
18.1 STIHL BGA 100 Blower 41
18.2 Noise and Vibration Data 41
18.3 REACH 41
19 Spare Parts and Accessories 41
19.1 Spare Parts and Accessories 41
20 Disposal 41
20.1 Disposing of Blower 41
21 EC Declaration of Conformity 41
21.1 STIHL BGA 100 Blower 41
STIHL®
0458-711-9621-A
This instruction manual is protected by copyright. All rights reserved, especially the rights to reproduce, translate and process with electronic systems.
1 Introduction
Dear Customer,
Thank you for choosing STIHL. We develop and manufacture our quality products to meet our customers' requirements. The products are designed for reliability even under extreme conditions.
STIHL also stands for premium service quality. Our specialist dealers guarantee competent advice and instruction as well as comprehensive service support.
We thank you for your confidence in us and hope you will enjoy working with your STIHL product.

Dr. Nikolas Stihl
IMPORTANT: READ BEFORE USE AND KEEP IN A SAFE PLACE.
2 Guide to Using this Manual
2.1 Applicable Documentation
Local safety regulations apply.
- Read, understand and save the following documents in addition to this instruction manual:
- User instructions for STIHL AR battery
– Instruction manual for AP belt bag with connecting cable
– Safety notes and precautions for STIHL AP battery
– Instruction manual for STIHL AL 101, 300, 500 chargers - Safety information for STIHL batteries and products with built-in batteries: www.stihl.com/safety-data-sheets
2.2 Symbols used with warnings in the text

WARNING
This symbol indicates dangers that can cause serious injuries or death.
- The measures indicated can avoid serious injuries or death.
NOTICE
This symbol indicates dangers that can cause damage to property.
▶ The measures indicated can avoid damage to property.
2.3 Symbols in Text

This symbol refers to a chapter in this instruction manual.
3 Overview
3.1 Blower
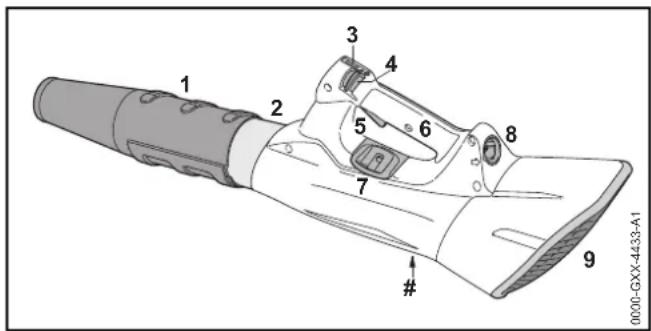
1 Nozzle
Directs and concentrates the airstream.
3 Overview
English
2 Blower Tube
Directs the airstream.
3 Retaining Latch
Unlocks the trigger. It is also used to select the power level.
4 LEDs
The LEDs indicate the selected power level.
5 Trigger
The trigger switches the blower on and off.
6 Control Handle
For operating, controlling and carrying the blower.
7 Carrying Ring
For attaching carrying system.
8 Socket
Receptacle for connecting cable plug.
9 Intake Screen
Protects the operator from moving parts inside the blower.
# Rating Label with Serial Number
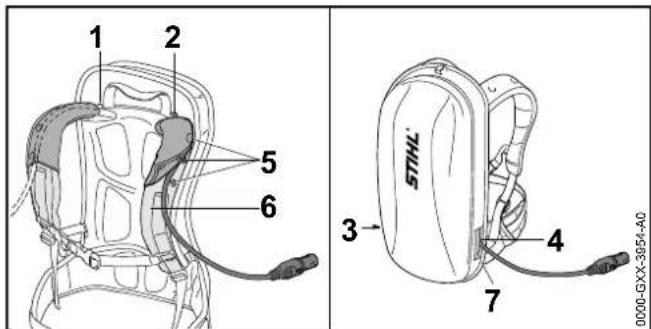
3.2 Carrying Systems
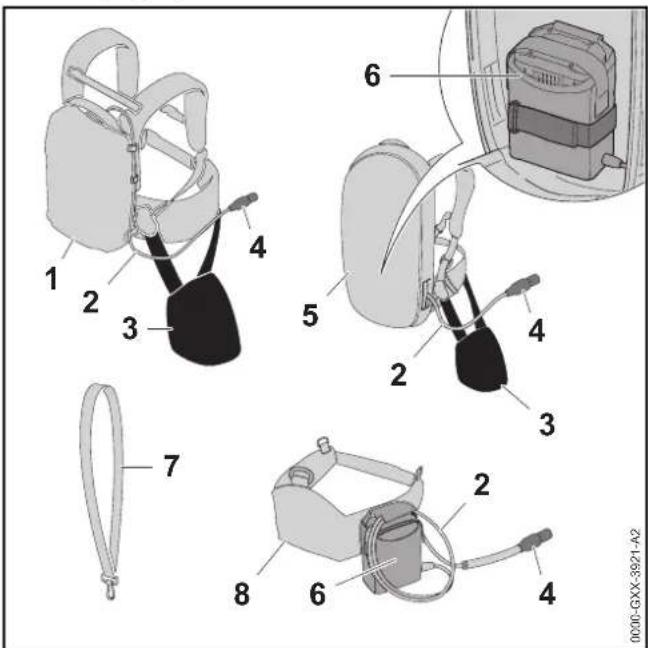
1 STIHL AR Battery
Supplies power to the blower.
2 Connecting Cable
Connects blower to the battery or "AP belt bag with connecting cable".
3 Hip Padding
Serves to secure blower to STIHL AR battery or the carrying system with built-in "AP belt bag with connecting cable".
4 Connecting Cable Plug
Connects blower to "AP belt bag with connecting cable" or an STIHL AR battery.
5 Carrying System with Built-In "AP Belt Bag with Connecting Cable"
Supplies power to the blower.
English
4 Safety Precautions
6 "AP Belt Bag with Connecting Cable" Supplies power to the blower.
7 Shoulder Strap
Serves to carry the blower.
8 Battery Belt with "AP Belt Bag with Connecting Cable" Supplies power to the blower.
3.3 Symbols
Meanings of symbols that may be on the blower:

Retaining latch unlocks the trigger in this position.

Retaining latch locks the trigger in this position.

LWA
Guaranteed sound power level according to directive 2000/14/EC in dB(A) in order to make sound emissions of products comparable.

Do not dispose of the product with your household waste.
4 Safety Precautions
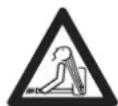
4.1 Warning Signs
Meanings of warning signs on the blower:

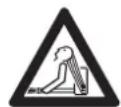
Observe safety notices and take the necessary precautions.

Read, understand and save the instruction manual.

Wear safety glasses.
Confine long hair so that it cannot be sucked into the blower.
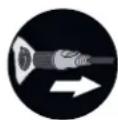
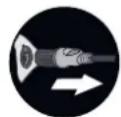
Disconnect connecting cable plug from socket during work breaks, transport, storage, maintenance and repairs.
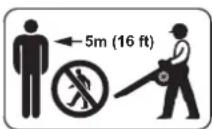
Maintain safe distance.
4.2 Intended Use
The STIHL BGA 100 blower is designed for blow-sweeping leaves, grass, paper and similar matter.
The blower may be used in the rain.
Power to this blower is supplied by a STIHL AP battery in combination with the "AP belt bag with connecting cable" or a STIHL AR battery.
▲ WARNING
■ Batteries not explicitly approved for the blower by STIHL may cause a fire or explosion. This can result in serious or fatal injuries and damage to property.
▶ Use the blower with a STIHL AP battery in combination with the "AP belt bag with connecting cable" or an STIHL AR battery.
■ Using the blower or the battery for purposes for which they were not designed may result in serious or fatal injuries and damage to property.
▶ Use the blower as described in this instruction manual.
▶ Use the battery as described in the instruction manual for the "AP belt bag with connecting cable" or the STIHL AR battery.
4.3 The Operator
▲ WARNING
■ Users who have had no instruction cannot recognize or assess the risks involved in using the blower. The user or other persons may sustain serious or fatal injuries.

- Read, understand and save the instruction manual.
▶ If you pass the blower on to another person: Always give them the instruction manual.
▶ Make sure the user meets the following requirements:
- The user must be rested.
- The user must be in good physical condition and mental health to operate and work with the machine. If the user's physical, sensory or mental ability is
restricted, he or she may work only under the supervision of or as instructed by a responsible person.
- The user must be legally recognized as an adult.
- The user has received instruction from a STIHL servicing dealer or other experienced user before working with the blower for the first time.
- The user must not be under the influence of alcohol, medication or drugs.
▶ If you have any queries: Contact your STIHL servicing dealer for assistance.
4.4 Clothing and Equipment
▲ WARNING
■ Long hair can be sucked into the blower during operation. This can result in serious injuries.
▶ Tie up and confine long hair so that it cannot be sucked into the blower.
■ Objects can be thrown through the air at high speed during operation. This can result in personal injury.

▶ Wear close-fitting safety glasses. Suitable glasses that have been tested and labeled in accordance with EN 166 or national standards are available from retailers.
▶ Wear long trousers.
■ Dust can be whipped up during operation: Whipped up dust can damage the respiratory passages and cause allergic reactions.
▶ Wear a respirator.
■ Unsuitable clothing can snag on wood, brush or the blower. Not wearing personal protective equipment may result in serious injury.
▶ Wear snug-fitting clothing.
▶ Do not wear a scarf or jewelry.
English
4 Safety Precautions
■ Dust can be whipped up during operation: The dust generated may cause the blower to be electrostatically charged. If the blower is touched, there may be a static electricity discharge which can produce a mild electric shock. This can result in personal injury.
- Wear work gloves made of durable material.
■ Wearing unsuitable footwear may cause you to slip or stumble. This can result in personal injury.
- Wear sturdy enclosed footwear with non-slip soles.
4.5 Blower
▲ WARNING
■ Innocent bystanders, children and animals are not aware of the dangers of the blower or flying debris. Innocent bystanders, children and animals may be seriously injured and damage to property may occur.

- Do not allow bystanders, children or animals within 5 meters of the work area.
- Maintain a clearance of 5 meters from objects.
▶ Do not leave the blower unattended.
▶ Make sure that children cannot play with the blower.
■ Electrical components of the blower can produce sparks. Sparks may cause a fire or an explosion in an easily combustible or explosive environment. This can result in serious or fatal injuries and damage to property.
- Do not work in an easily combustible or explosive environment.
4.6 Blower
The blower is in a safe condition if the following points are observed:
- Blower is undamaged.
- Blower is clean.
-
The controls function properly and have not been modified.
-
Only original STIHL accessories are fitted.
– Accessories are properly mounted.
▲ WARNING
■ If components do not comply with safety requirements, they will no longer function properly and safety devices may be rendered inoperative. This can result in serious or fatal injuries.
▶ Work only with an undamaged blower.
▶ If the blower is dirty: Clean the blower.
- Never modify your blower. Exception: Mounting a nozzle approved for this blower model.
- If the controls do not function properly: Do not work with the blower.
- Only fit original STIHL accessories designed for this blower model.
- Mount accessories as described in this instruction manual or the instructions supplied with the accessory.
▶ Never insert objects in the blower's openings.
▶ If you have any queries: Contact your STIHL servicing dealer for assistance.
4.7 Operation
▲ WARNING
■ The user cannot concentrate on the work in certain situations. The user may stumble, fall and be seriously injured.
▶ Work calmly and carefully.
- If light and visibility are poor: Do not work with the blower.
▶ Operate the blower alone.
- Do not work above shoulder height.
▶ Watch out for obstacles.
4 Safety Precautions
- Stand on the ground while working and keep a good balance. If it is necessary to work at heights: Use a lift bucket or a safe platform.
▶ If you begin to feel tired: Take a break.
▶ Blow sweep with the wind.
■ Objects can be thrown through the air at high speed during operation. Bystanders and animals may be injured and damage to property may occur.
- Do not direct the air blast towards bystanders, animals or objects.
■ If the behavior of the blower changes during operation or feels unusual, it may no longer be in a safe condition. This can result in serious injuries and damage to property.
- Stop work, remove the battery and contact your STIHL servicing dealer for assistance.
■ Blower vibrations may occur during operation.
▶ Wear gloves.
▶ Take regular breaks.
▶ If signs of circulation problems occur: Seek medical advice.
4.8 Transporting
WARNING
■ The blower can turn over or move while being transported. This may result in personal injuries and damage to property.
▶ Push the retaining latch into position 🔒

▶ Pull the connecting cable plug out of the socket.
- Secure the blower with lashing straps or a net to prevent it turning over and moving.
4.9 Storing
▲ WARNING
■ Children are not aware of and cannot assess the dangers of a blower and can be seriously injured.
▶ Push the retaining latch into position

▶ Pull the connecting cable plug out of the socket.
- Store the blower out of the reach of children.
■ Dampness can corrode the electrical contacts on the blower and metal components. The blower may be damaged.
▶ Push the retaining latch into position 🔒
▶ Pull the connecting cable plug out of the socket.
- Store the blower in a clean and dry condition.
4.10 Cleaning, Maintenance and Repairs
▲ WARNING
■ The blower may start unintentionally if the connecting cable plug remains inserted during cleaning, maintenance or repair operations. This can result in serious injuries and damage to property.
▶ Push the retaining latch into position 🔒
- Pull the connecting cable plug out of the socket.
■ Aggressive cleaning agents, cleaning with a jet of water or pointed objects can damage the blower. If the blower is not cleaned as described in this instruction manual,
English
5 Preparing the Blower for Operation
components may no longer function properly or safety devices may be rendered inoperative. This can result in serious injuries.
- Clean the blower as described in this instruction manual.
■ If the blower is not serviced or repaired correctly, components may no longer function properly or safety devices may be rendered inoperative. This can result in serious or fatal injuries.
- Do not attempt to service or repair the blower.
- If the blower needs to be serviced or repaired: Contact your STIHL servicing dealer for assistance.
5 Preparing the Blower for Operation
5.1 Preparing the Blower for Operation
Perform the following steps before starting work:
- Make sure the following components are in a safe condition:
- Blower, 4.6.
- Battery as described in the STIHL AR battery's instruction manual or in the user instructions for the "AP belt bag with connecting cable".
- Check the battery as described in the STIHL AR battery's instruction manual or in the user instructions for the "AP belt bag with connecting cable".
▶ Recharge the battery fully as described in the instruction manual for the STIHL AL 101, 300, 500 chargers.
▶ Clean the blower, 15.
▶ Mount the nozzle, 6.1. - Put on and adjust the STIHL AR battery, carrying system or "AP belt bag with connecting cable", 7.
▶ Check the controls, ☐10.1.
▶ If 3 LEDs on the battery flash red while you are checking the controls: Pull connecting cable plug out of the socket and contact your STIHL dealer for assistance. Malfunction in blower.
- If you cannot carry out this work: Do not use the blower and contact your STIHL servicing dealer.
6 Assembling the Blower
6.1 Mounting, Adjusting and Removing the Nozzle The nozzle can be mounted to the blower tube in three positions to suit the height and reach of the user. The positions are marked on the blower tube.
- Switch off the blower and pull out the connecting cable plug.
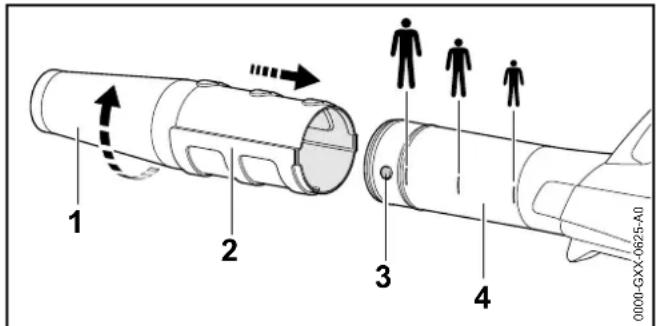
▶ Line up the lug (3) and the slot (2).
▶ Push nozzle (1) into required position on blower tube (4).
▶ Rotate nozzle (1) until it engages.
7 Adjusting Blower for User
7.1 Using with STIHL AR Battery
7.1.1 Fitting and Adjusting the Connecting Cable
The connecting cable can be fitted and adjusted to suit the user's size and the application.
7 Adjusting Blower for User
English
The connecting cable can be secured in position by the guide (1) on the harness and the fasteners (2), or on the side of the backplate with the fasteners (2).
▶ Close buckle (2) on the waist belt.
▶ Close buckle (1) on the chest strap.
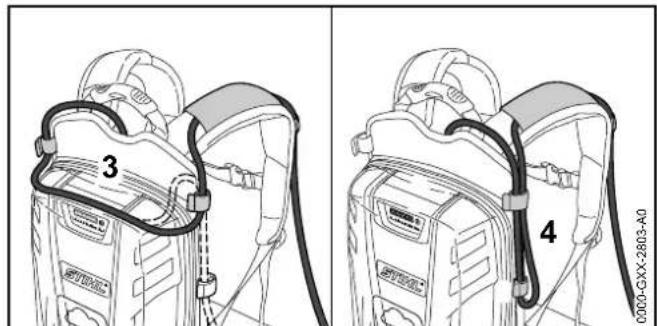
The length of the connecting cable can be adjusted by making a loop on the backplate (3) or at one side (4).
- Arrange the connecting cable so that it is as short as possible without hindering your work.
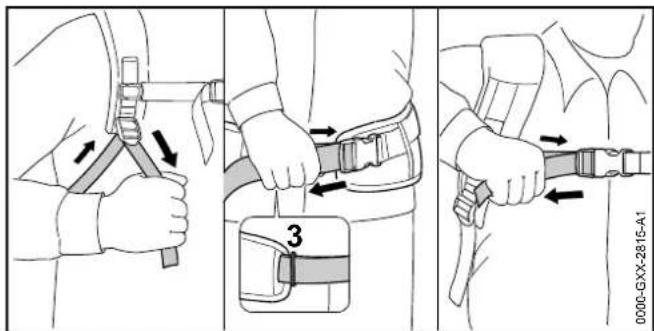
- Tighten the straps until the waist belt fits snugly on your hips and the back padding is against your back.
▶ Thread the end of the waist belt through the loop (3). - Fit the hip pad as described in the instructions supplied with the hip pad.
7.1.2 Fitting and Adjusting the Carrying System
▶ Put the battery on your back.
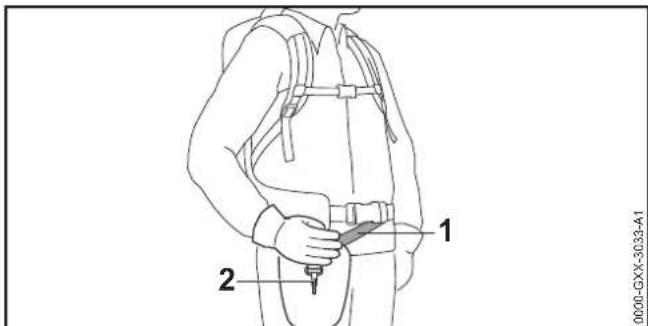
- Adjust the strap (1) so that the carabiner (2) is about a hand's width below your right hip.
7.2 Using with Carrying System
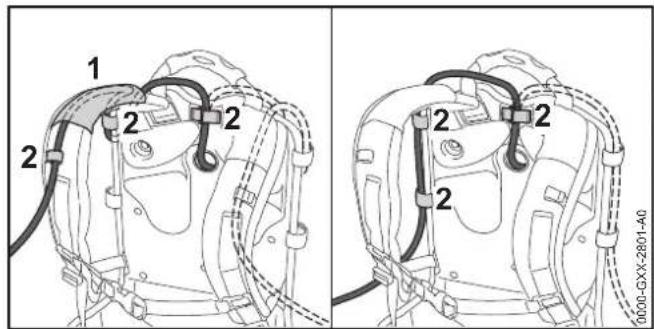
7.2.1 Fitting and Adjusting the Connecting Cable The connecting cable can be fitted and adjusted to suit the user's size and the application.
The connecting cable can be fitted through the following openings:
- the upper left opening (1)
– the upper right opening (2) - the lower left opening (3)
– the lower right opening (4)
▶ If the connecting cable is fitted through the upper left opening (1) or the upper right opening (2):
▶ Open the press studs (5).
▶ Lay the connecting cable over the shoulder strap (6).
▶ Close the press studs (5).
▶ If the connecting cable is fitted through the lower left opening (3) or the lower right opening (4): Seal the opening you use (3 or 4) with the hook and loop fastener (7).
- Arrange the connecting cable so that it is as short as possible without hindering your work.
7.2.2 Fitting and Adjusting the Carrying System
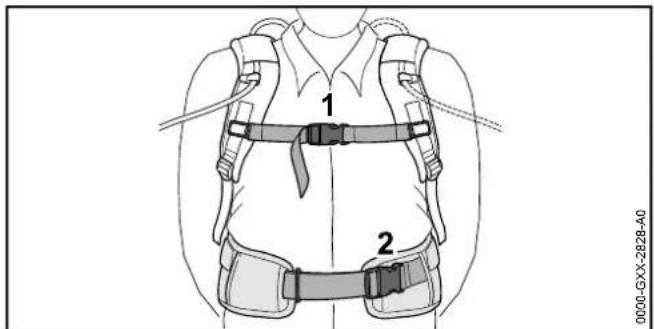
▶ Put the battery on your back.
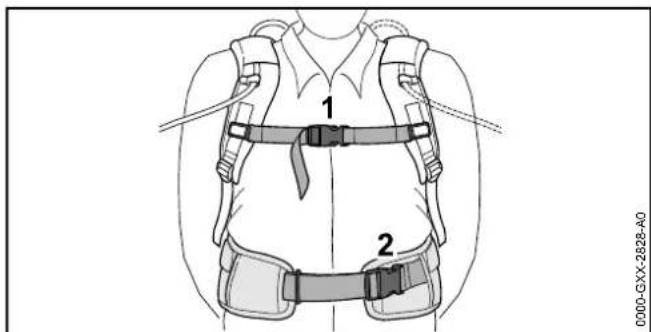
▶ Close buckle (2) on the waist belt.
▶ Close buckle (1) on the chest strap.
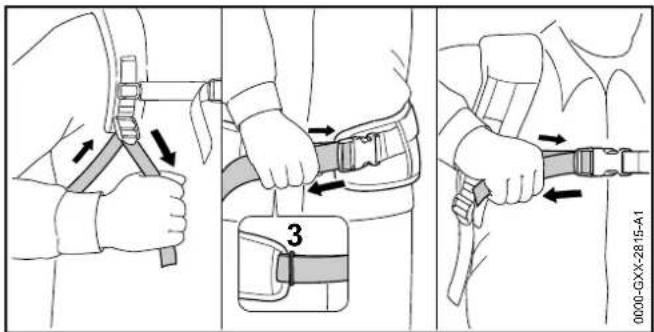
▶ Tighten the straps until the waist belt fits snugly on your hips and the back padding is against your back.
- Thread the end of the waist belt through the loop (3).
- Fit the hip pad as described in the instructions supplied with the hip pad.
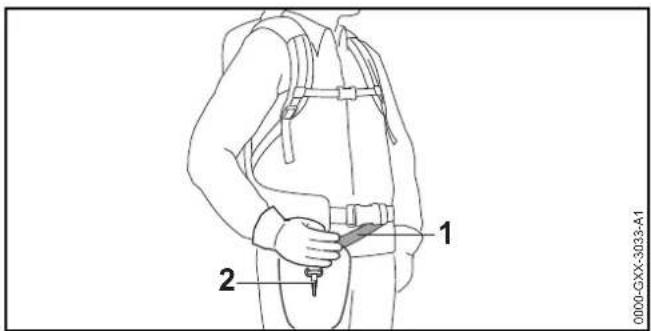
- Adjust the strap (1) so that the carabiner (2) is about a hand's width below your right hip.
7.3 Using with AP Belt Bag with Connecting Cable
7.3.1 Attaching the "Belt bag AP with connecting cord"
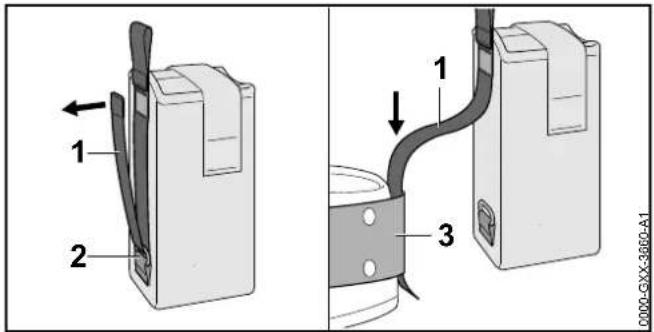
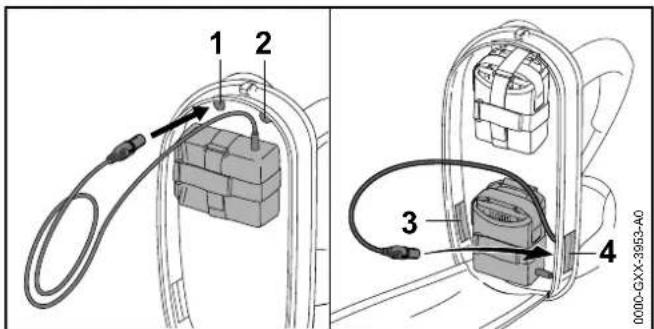
- Open the Velcro® fastening on the strap (1) and pull the strap (1) out of the ring (2).
▶ Feed strap (1) through belt (3).
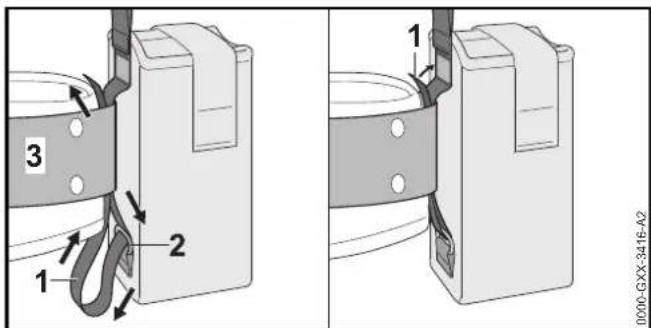
▶ Feed strap (1) back through the ring (2) and the belt (3).
- Close the Velcro® fastening on the strap (1).
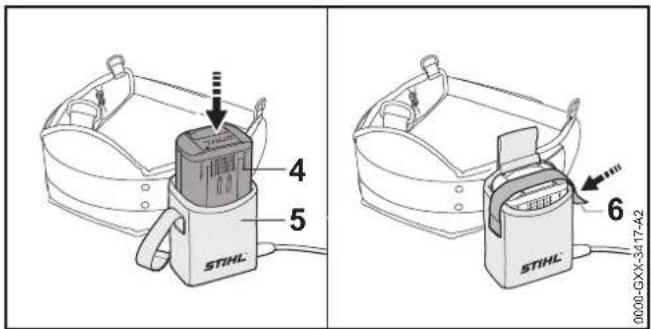
▶ Push battery (4) as far as it will go into the belt bag (5). A short beep will sound.
- Secure battery (4) with the Velcro® fastening (6).
7.3.2 Adjusting the Connecting Cable
The connecting cable can be fitted and adjusted to suit the user's size and the application.
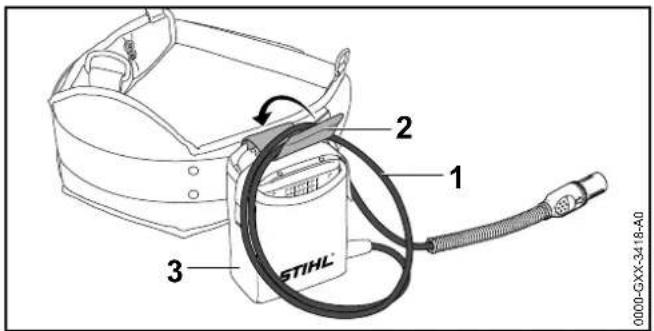
The length of the connecting cable can be adjusted by making a loop (1) and securing it to the belt bag (3) with the fastener (2).
- Arrange the connecting cable so that it is as short as possible without hindering your work.
8 Inserting and Removing Connecting Cable Plug
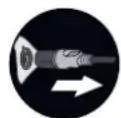
8.1 Inserting the Connecting Cable Plug
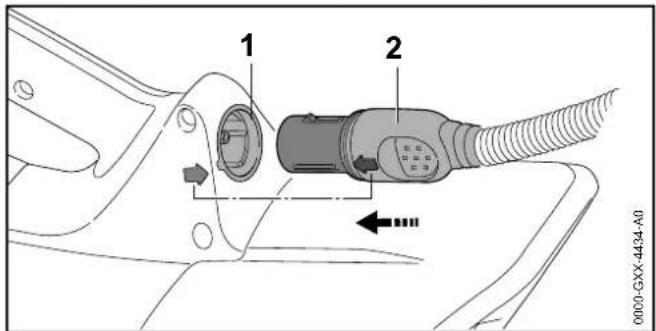
- Hold connecting cable plug (2) so that the arrow on its side lines up with the arrow on the socket (1).
- Insert the connecting cable plug (2) in the socket (1). The plug (2) engages in position.
8.2 Removing the Connecting Cable Plug
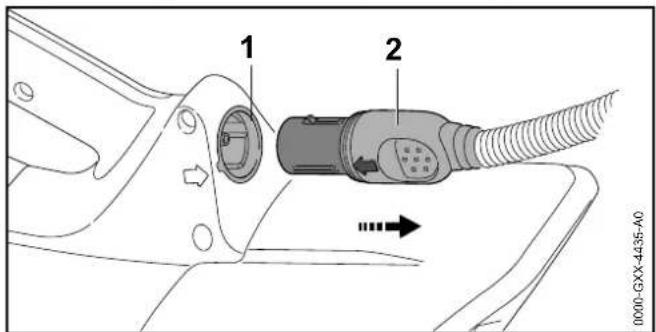
▶ Grip the connecting cable plug (2) with your hand.
▶ Pull the plug (2) out of the socket (1).
9 Switching the Blower On/Off
9.1 Switching On
- Hold the blower with one hand on the control handle - wrap your thumb around the handle.
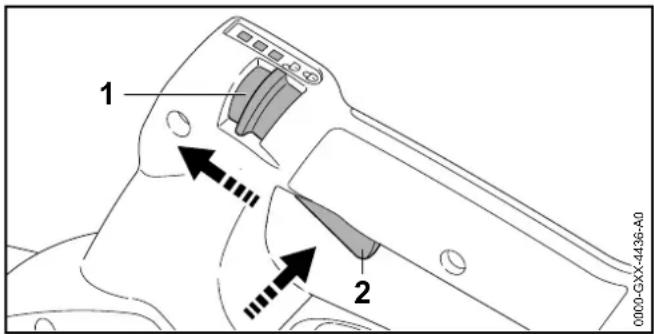
- Push the retaining latch (1) with your thumb to position
▶ Pull the trigger (2) with your index finger and hold it there. The blower accelerates and air flows from the nozzle.
The air flow rate is controlled by the trigger (2).
9.2 Switching Off
▶ Release the trigger.
No air flows from the nozzle.
▶ If air continues to flow from nozzle: Remove the battery and contact your STIHL dealer for assistance. Blower has a malfunction.
▶ Push the retaining latch into position 🔒
10 Checking the Blower
10.1 Checking the Controls
Trigger
▶ Pull the connecting cable plug out of the socket.
▶ Push the retaining latch into position 🔒
▶ Try to pull the trigger.
▶ If the trigger can be pulled: Do not use the blower and contact your STIHL servicing dealer for assistance. The retaining latch is faulty.
▶ Push the retaining latch into position
▶ Pull the trigger and then let it go.
▶ If the trigger is stiff or does not spring back to its idle position: Do not use the blower and contact your STIHL servicing dealer for assistance.
The trigger has a malfunction.
Switching on the blower
- Insert the connecting cable plug.
▶ Push the retaining latch into position 📋
▶ Pull the trigger and hold it there. Air flows from the nozzle.
▶ If 3 LEDs on the battery flash red: Pull connecting cable plug out of the socket and contact your STIHL dealer for assistance. There is a malfunction in the blower.
▶ Release the trigger. No air flows from the nozzle.
▶ If air continues to flow from nozzle: Pull connecting cable plug out of the socket and contact your STIHL dealer for assistance. Blower has a malfunction.
11 Operating the Blower
11.1 Holding and Controlling the Blower
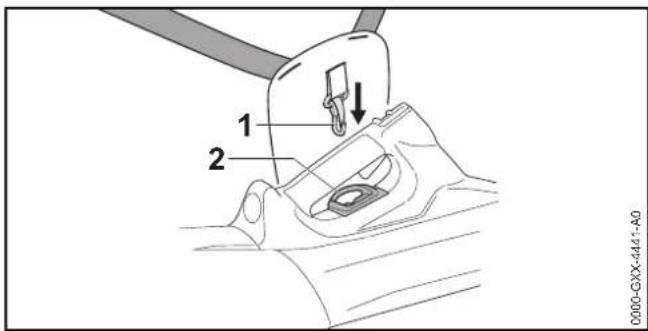
▶ If you use the STIHL AR battery or the carrying system with hip padding: Connect the carrying ring (2) to the carabiner (1).
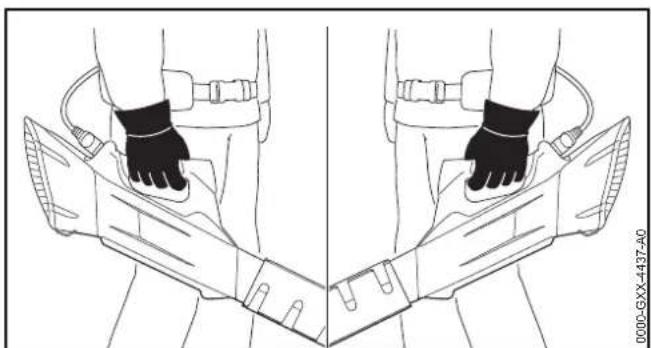
natural_image
Line drawing of a person's lower back wearing a safety harness, showing two views (front and side) with no text or symbols.- Hold and control the blower with one hand on the control handle - wrap your thumb around the handle.
11.2 Selecting Power Level
One of three power levels can be selected to suit the application. The LEDs indicate the selected power level. The higher the power lever, the higher the volume of air that flows from the nozzle.
The selected power level affects the battery's runtime. The lower the power level, the longer the runtime.
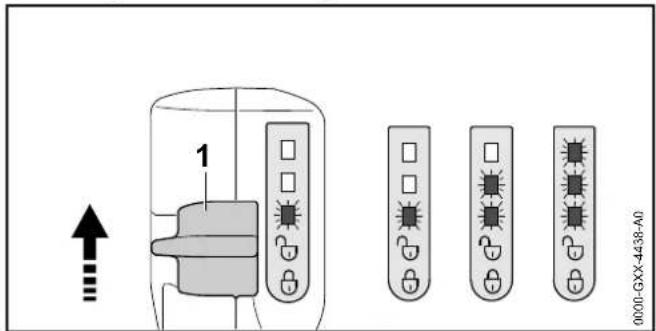
- Push the retaining latch (1) with your thumb to position 🌐 The LEDs indicate the selected power level.
- Push the retaining latch (1) forwards and allow it to spring back.
This selects the next power level. Power level 3 is followed by power level 1, then 2, 3, etc. - Push the retaining latch (1) forwards and allow it to spring back as many times as necessary to select the required power level.
11.3 Activating the Boost Function
The boost function can be activated independent of the selected power level. The blower operates at maximum power when the boost function is activated.
The boost function affects the battery's runtime. The longer the boost function is activated, the shorter the battery runtime.
12 After Finishing Work
English
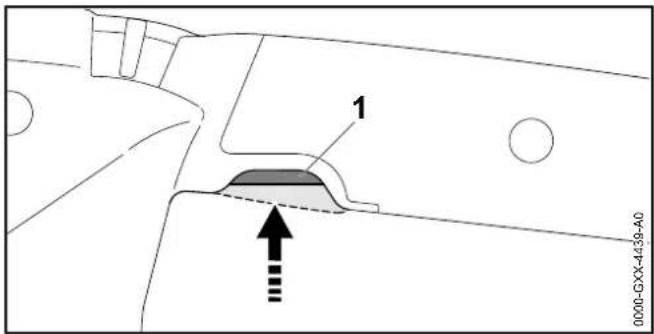
▶ Override the trigger's (1) end position and hold it there. The LEDs flash in sequence. The boost function is activated.
The boost function is deactivated when you release the trigger (1). The previously selected power level is restored.
11.4 Blow-Sweeping
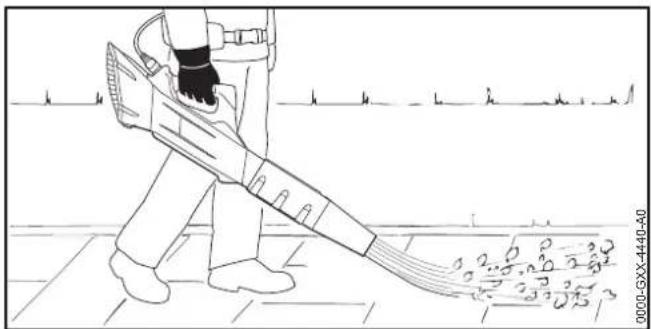
natural_image
Line drawing of a person sweeping floor with a broom, no text or symbols present▶ Point the nozzle at the ground.
▶ Walk slowly and steadily forwards.
12 After Finishing Work
12.1 After Finishing Work
- Switch off the blower, move retaining latch to position and pull the connecting cable plug out of the socket.
▶ If the blower is wet: Allow the blower to dry.
▶ Clean the blower.
13 Transporting
13.1 Transporting the Blower
- Switch off the blower, move retaining latch to position and pull the connecting cable plug out of the socket.
- Carry the blower by the control handle.
- Transporting the blower in a vehicle: Secure the blower to prevent turnover and movement.
14 Storing
14.1 Storing the Blower
- Switch off the blower, move retaining latch to position and pull the connecting cable plug out of the socket.
▶ Observe the following points when storing the blower: - Blower is out of the reach of children.
- Blower is clean and dry.
15 Cleaning
15.1 Cleaning the Blower
- Switch off the blower, move retaining latch to position and pull the connecting cable plug out of the socket.
- Clean the blower with a damp cloth.
▶ Clean the intake screen with a soft brush.
16 Maintenance and Repairs
16.1 Maintenance Intervals
The maintenance intervals are dependent on the environmental and operating conditions. STIHL recommends the following maintenance intervals:
Every 12 months
▶ Have the blower checked by a STIHL servicing dealer.
16.2 Servicing and Repairing the Blower
The blower cannot be serviced or repaired by the user.
▶ If your blower has a malfunction or is damaged or requires servicing: Contact your STIHL servicing dealer.
17 Troubleshooting
17.1 Troubleshooting the Blower and Battery
| Condition LEDs on Battery Cause Remedy | |||
| Blower does not start when switched on | 1 LED flashes green. | Battery has low charge. ▶ Recharge the battery fully as described in the instruction manual for the STIHL AL 101, 300, 500 chargers. | |
| 1 LED glows red. | Battery too hot or too cold. | ▸ Pull the connecting cable plug out of the socket.▸ Allow battery to cool down / warm up. | |
| 3 LEDs flash red. There is a malfunction in the blower. | ▸ Pull connecting cable plug out of the socket and then refit it.▸ Switch on the blower.▸ If 3 LEDs continue to flash red: Do not use the blower and contact your STIHL servicing dealer for assistance. | ||
| 3 LEDs glow red. Blower too hot. ▶ Pull the connecting cable plug out of the socket.▸ Allow blower to cool down. | |||
| 4 LEDs flash red There is a malfunction in the battery. | ▸ Pull connecting cable plug out of the socket and then refit it.▸ Switch on the blower.▸ If 4 LEDs continue to flash red: Do not use the battery and contact your STIHL dealer for assistance. | ||
| No electrical contact between blower and battery. | ▸ Pull connecting cable plug out of the socket and then refit it.▸ If blower still does not start when switched on: Check the battery as described in the STIHL AR battery's instruction manual or in the user instructions for the “AP belt bag with connecting cable”. | ||
| Blower or battery damp. | ▸ Allow blower or battery to dry. | ||
| Blower cuts out during operation | 3 LEDs glow red. Blower too hot. ▶ Pull the connecting cable plug out of the socket.▸ Allow blower to cool down. | ||
| There is a electrical malfunction. | ▸ Pull connecting cable plug out of the socket and then refit it.▸ If blower continues to cut out during operation: Clean contacts of connecting cable as described in the STIHL AR battery's instruction manual or in the user instructions for the “AP belt bag with connecting cable”.▸ Switch on the blower. | ||
| Blower runtime is too short | Battery not fully charged. | ▸ Recharge the battery fully as described in the instruction manual for the STIHL AL 101, 300, 500 chargers. | |
| Normal battery life has been exceeded. | ▸ Replace the battery. | ||
18 Specifications
18.1 STIHL BGA 100 Blower
- Approved batteries:
- STIHL AR
- STIHL AP together with "AP belt bag with connecting cable"
– Air speed with nozzle mounted: 63 m/s
- Weight: 2.5 kg
For battery life see www.stihl.com/battery-life.
18.2 Noise and Vibration Data
K-value for sound pressure level is 2 dB(A). K-value for sound power level is 2 dB(A). K-value for vibration level is 2 m/s ^4 .
STIHL recommends that you wear hearing protection.
- Sound pressure level L_pA measured according to EN 50636-2-100: 80 dB(A)
- Sound power level L_wA measured according to EN 50636-2-100: 90 dB(A)
- Vibration level a_hv measured according to EN 50636-2-100, control handle: < 2.5 m/s ^2 .
The vibration values quoted above have been measured according to a standardized test procedure and may be used to compare electric power tools. Depending on the type of usage, the vibrations that actually occur may differ from the values quoted. The vibration values quoted may be used for an initial assessment of the user's exposure to vibrations. The actual exposure to vibrations has to be estimated. This process may also take into account times during which the electric power tool is switched off and times during which it is switched on but running off load.
Information on compliance with Vibration Directive 2002/44/EC is available at www.stihl.com/vib.
18.3 REACH
REACH is an EC regulation and stands for the Registration, Evaluation, Authorisation and Restriction of Chemical substances.
For information on compliance with the REACH regulation see www.stihl.com/reach.
19 Spare Parts and Accessories
19.1 Spare Parts and Accessories
STIHL® These symbols identify original STIHL replacement parts and original STIHL accessories.
STIHL recommends the use of original STIHL replacement parts and accessories.
Original STIHL replacement parts and original STIHL accessories are available from STIHL servicing dealers.
20 Disposal
20.1 Disposing of Blower
Information on disposal is available from STIHL servicing dealers.
- Dispose of the blower, accessories and packaging in accordance with local regulations and environmental requirements.
21 EC Declaration of Conformity
21.1 STIHL BGA 100 Blower
21 EC Declaration of Conformity
declare in exclusive responsibility that
– Category: Cordless electric blower
- Make: STIHL
- Model: BGA 100
– Serial identification: 4866
conforms to the relevant provisions of Directives 2011/65/EU, 2006/42/EC, 2014/30/EU and 2000/14/EC and has been developed and manufactured in compliance with the following standards in the versions valid on the date of production: EN 55014-1, EN 55014-2, EN 60335-1 and EN 50636-2-100.
The measured and guaranteed sound power levels were determined according to Directive 2000/14/EC, Annex V.
- Measured sound power level: 88 dB(A)
– Guaranteed sound power level: 90 dB(A)
Technical documents are deposited at ANDREAS STIHL AG & Co. KG Produktzulassung (Product Licensing).
The year of manufacture, country of manufacture and serial number are applied to the product.
Done at Waiblingen, 01.03.2017
Thomas Elsner, Director Product Management and Services
Table des matières
1 Préface 44
1 Batterie STIHL AR
natural_image
Line drawing of two identical foot positions wearing safety harnesses, viewed from front and side (no text or symbols)natural_image
Line drawing of a person sweeping the ground with a broom and sound waves (no text or symbols)1 Acumulador STIHL AR
natural_image
Line drawing of two identical foot positions wearing safety harnesses, viewed from front and side (no text or symbols)natural_image
Line drawing of a person sweeping floor with a broom and sound waves (no text or symbols)1 Batteri STIHL AR
natural_image
Line drawing of a person wearing a safety harness and belt, viewed from front and side views (no text or symbols)natural_image
Line drawing of a person sweeping floor with a broom and sound waves (no text or symbols)1 Akku STIHL AR
natural_image
Line drawing of two identical hands wearing safety harnesses, viewed from side to front (no text or symbols)natural_image
Line drawing of a person sweeping pavement with a tool, no text or symbols present1 Batteria STIHL AR
natural_image
Line drawing of a person wearing a full-body safety harness and belt, viewed from front and side views (no text or symbols)natural_image
Line drawing of a person sweeping the ground with a tool, no text or symbols present1 Batteri STIHL AR
natural_image
Line drawing of two identical foot positions wearing safety harnesses, viewed from the side (no text or symbols)natural_image
Line drawing of a person sweeping or cleaning a surface with a tool, no text or symbols present1 Batteri STIHL AR
Batteriet STIHL AR kan forsyne løvblåseren med strøm.
natural_image
Line drawing of two identical foot positions wearing safety harnesses, viewed from front and side (no text or symbols)natural_image
Line drawing of a person sweeping floor with a broom, no text or symbols presenttar alene ansvar for at
Thomas Elsner, Leder produktledelse og service
Tartalomjegyzék
1 Előszó 187
natural_image
Line drawing of two identical foot positions wearing harnesses and gloves, viewed from the side (no text or symbols)natural_image
Line drawing of a person sweeping or cleaning a surface with a tool, no text or symbols present1 Bateria STIHL AR
A bateria STIHL AR fornece energia ao soprador.
2 Linha de conexão
natural_image
Line drawing of two identical foot positions wearing safety harnesses, viewed from front and side (no text or symbols)natural_image
Line drawing of a person sweeping floor with a broom and sound waves (no text or symbols)1 Accu STIHL AR
natural_image
Line drawing of two identical foot positions wearing harnesses and straps, viewed from the side (no text or symbols)natural_image
Line drawing of a person sweeping or cleaning a tiled floor with a brush (no text or symbols)Thomas Elsner, Hoofd productmanagement en services
Nederlands
D GB F E S FIN I DK N H P NL
www.stihl.com

0458-711-9621-A

- STIHL®
- Introduction
- Guide to Using this Manual
- Applicable Documentation
- Symbols used with warnings in the text
- WARNING
- NOTICE
- Symbols in Text
- Overview
- Blower
- English
- Safety Precautions
- Symbols
- Warning Signs
- Intended Use
- ▲ WARNING
- The Operator
- Clothing and Equipment
- Blower
- Blower
- Operation
- Transporting
- Storing
- Cleaning, Maintenance and Repairs
- Preparing the Blower for Operation
- Preparing the Blower for Operation
- Assembling the Blower
- Mounting, Adjusting and Removing the Nozzle The nozzle can be mounted to the blower tube in three positions to suit the height and reach of the user. The positions are marked on the blower tube.
- Adjusting Blower for User
- Using with STIHL AR Battery
- Fitting and Adjusting the Connecting Cable
- Fitting and Adjusting the Carrying System
- Using with Carrying System
- Fitting and Adjusting the Carrying System
- Using with AP Belt Bag with Connecting Cable
- Attaching the "Belt bag AP with connecting cord"
- Adjusting the Connecting Cable
- Inserting and Removing Connecting Cable Plug
- Inserting the Connecting Cable Plug
- Removing the Connecting Cable Plug
- Switching the Blower On/Off
- Switching On
- Switching Off
- Checking the Blower
- Checking the Controls
- Trigger
- Switching on the blower
- Operating the Blower
- Holding and Controlling the Blower
- Selecting Power Level
- Activating the Boost Function
- After Finishing Work
- Blow-Sweeping
- After Finishing Work
- Transporting
- Transporting the Blower
- Storing
- Storing the Blower
- Cleaning
- Cleaning the Blower
- Maintenance and Repairs
- Maintenance Intervals
- Every 12 months
- Servicing and Repairing the Blower
- Troubleshooting
- Specifications
- STIHL BGA 100 Blower
- Noise and Vibration Data
- REACH
- Spare Parts and Accessories
- Spare Parts and Accessories
- Disposal
- Disposing of Blower
- EC Declaration of Conformity
- STIHL BGA 100 Blower
- Table des matières
- Batterie STIHL AR
- Acumulador STIHL AR
- Tartalomjegyzék
- Bateria STIHL AR
- Linha de conexão
Brand : STIHL
Model : BGA 100
Category : Blower