QLT35 - TV wall mount Secura - Free user manual and instructions
Find the device manual for free QLT35 Secura in PDF.

User questions about QLT35 Secura
0 question about this device. Answer the ones you know or ask your own.
Ask a new question about this device
Download the instructions for your TV wall mount in PDF format for free! Find your manual QLT35 - Secura and take your electronic device back in hand. On this page are published all the documents necessary for the use of your device. QLT35 by Secura.
USER MANUAL QLT35 Secura
We'll Make It Stress-Free
If you have any questions along the way, just give us a call. We're ready to help!
US: 800-359-5520 • EMEA: +31 (0) 495 580 852 • UK: 0800 056 2853
IMPORTANT SAFETY INSTRUCTIONS – SAVE THESE INSTRUCTIONS – PLEASE READ ENTIRE MANUAL PRIOR TO USE
Before getting started, let's make sure this mount is perfect for you!
| 1 Does your TV (including accessories) weigh more than 110 lbs. (49.8 kg)? | 110 lbs. (49.8 kg) No - Perfect! Yes - This mount is NOT compatible. Visit secura-av.com or call to find a compatible mount. US: 800-359-5520 • EMEA: +31 (0) 495 580 852 • UK: 0800 056 2853 | ||||||
| 2 What is your wall made of? | Perfect! | Drywall with wood studs? | Perfect! | Solid concrete or concrete block? | ? | Unsure? | |
| CAUTION: DO NOT install into drywall alone | Call Customer Service: 800-359-5520 P; +31 (0) 495 580 852 UK: 0800 056 2853 | ||||||
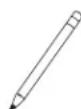
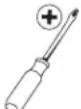
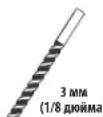
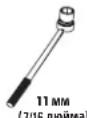
| 3 Do you have all the tools needed? | Tape Measure | Pencil Level | Screwdriver | Electric Drill | Wood Stud Install Stud Finder | Awl | 1/8 in. (3 mm) Wood Drill Bit |
| Ready to begin? | Please read through these instructions completely to be sure you're comfortable with this easy install process. Also check your TV owner's manual to see if there are any special requirements for mounting your TV. If you do not understand these instructions or have doubts about the safety of the installation, assembly or use of this product, contact Customer Service. | ||||||
| CAUTION: Avoid potential personal injury or property damage! | |||||||
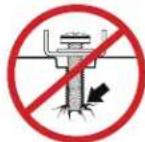
| · This product is designed for use in wood stud, solid concrete, and concrete block walls - DO NOT install into drywall alone · The wall must be capable of supporting five times the weight of the TV and mount combined · Do not use this product for any purpose not explicitly specified by manufacturer · Manufacturer is not responsible for damage or injury caused by incorrect assembly or use | |||||||
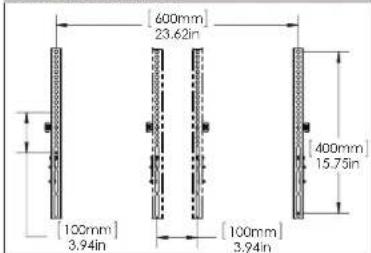
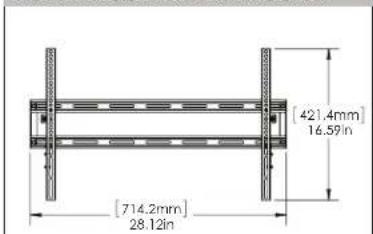
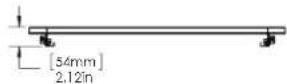
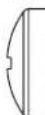
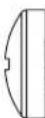
Dimensions
TV INTERFACE
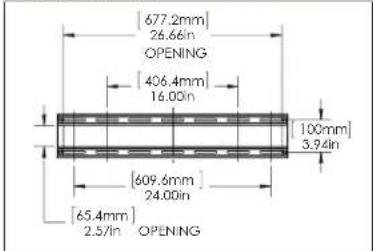
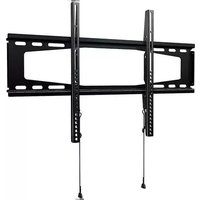
WALLPLATE
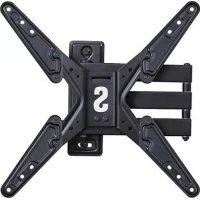
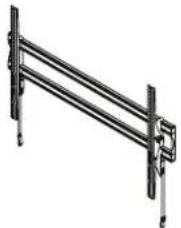
FULLY ASSEMBLED MOUNT
TOP VIEW - RETRACTED
3-D
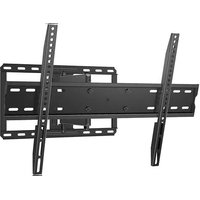
SIDE VIEW - TILT RANGE

Parts and Hardware
WARNING: This product contains small items that could be a choking hazard if swallowed. Before starting assembly, verify all parts are included and undamaged. If any parts are missing or damaged, do not return the damaged item to your dealer; contact Customer Service. Never use damaged parts!
NOTE: Not all hardware included will be used.

Parts and Hardware for STEP 1
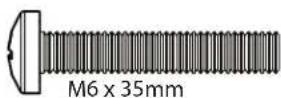
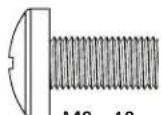
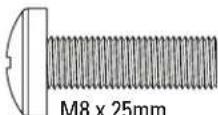
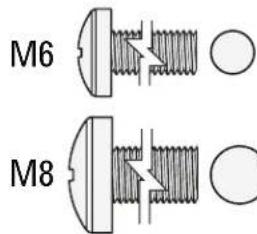
TV Screws (qty. 4 each)
[Only one size fits your TV]
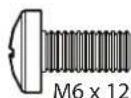
M6
M8

Washer
(qty. 4 each)

M6/M8
Spacers
[If necessary] (qty. 4 each)

2.5mm
22mm
TV Bracket

(qty. 1)
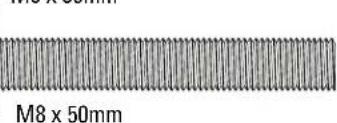
Parts and Hardware for STEP 2

Lag Bolts
07 (qty.4)
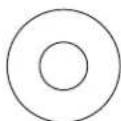
Washers
08 (qty. 4)
1/4 in.
For concrete installations ONLY
CAI
JTION: Do not use in drywall or wood

Concrete Anchors
(qty.4)
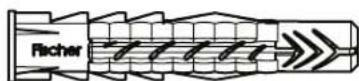
UX10 x 60R Fischer UX10 x 60R
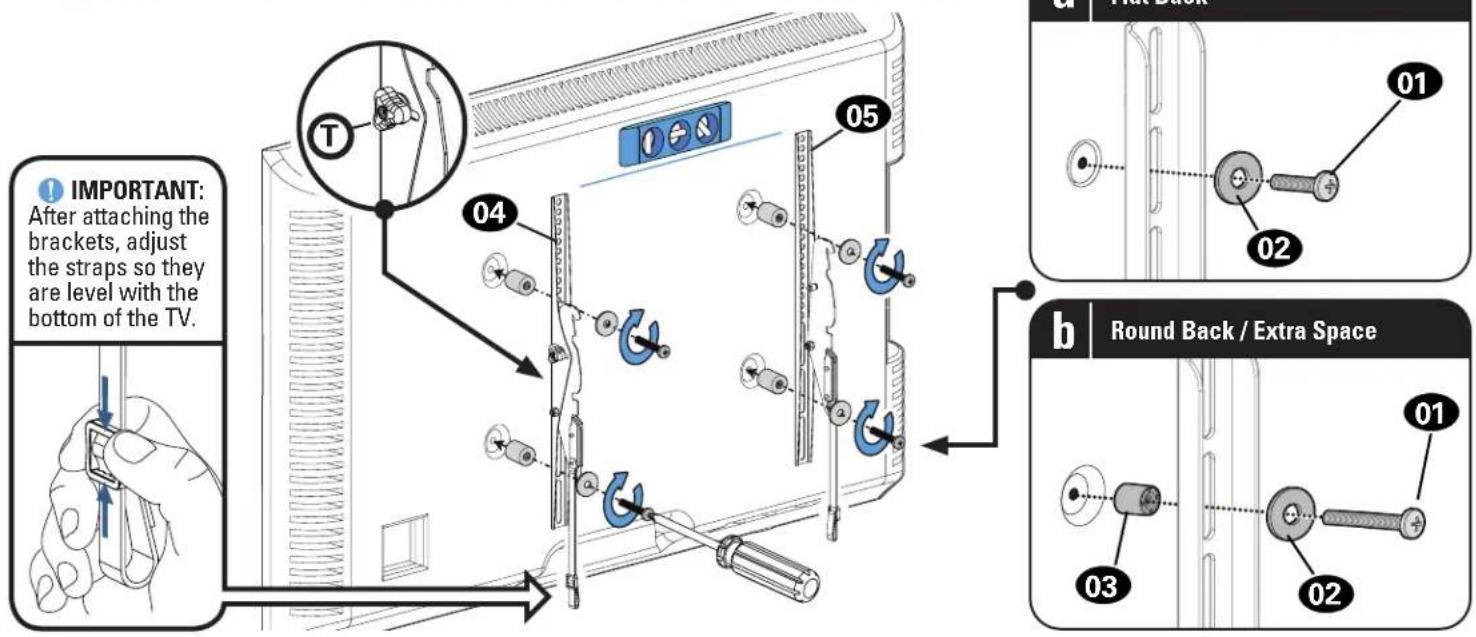
STEP 1: Attach Brackets to TV
1.1 Select TV Screw Diameter
Test the two screw diameters (M6 and M8) in the threaded inserts on the back of your TV to determine which screw diameter fits your TV.
1.2 Select TV Screw Length
a:For flat-back TVs, no spacers 03 required.
b: Spacers 03 supplied for:
- Round (irregular) back TVs
- Extra space needed (for cables or inset mounting holes)
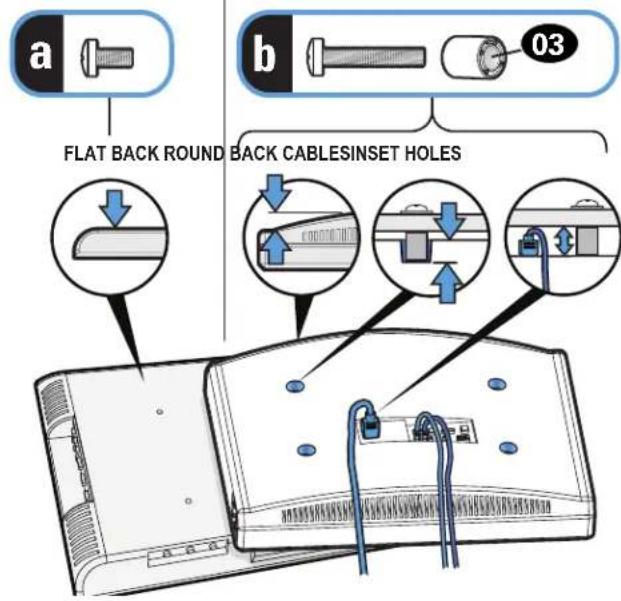
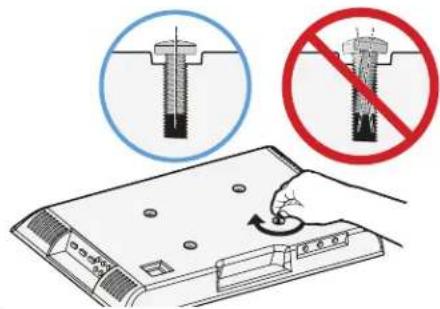
Standard configurations are shown. For special applications, or if you are uncertain about your hardware selection, contact Customer Service.
CAUTION:
Verify adequate thread engagement with your screw/ washer/spacer combination AND TV bracket (STEP 1.3).
- Too short will not hold the TV.
- Too long will damage the TV.
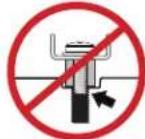
Too Short
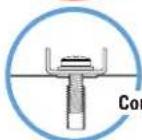
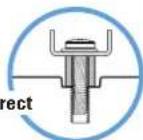
Too Long
1.3 Attach TV Brackets
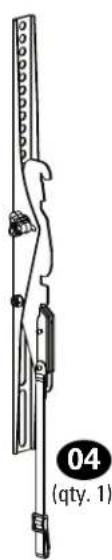
Center the TV brackets 04 and 05 over your TV hole pattern as shown - making sure the brackets are level.
NOTE: The tilt tension knobs on TV brackets 04 and 05 should be oriented to the outside edges.
Install using the screw/washer/spacer combination (a) or (b) you selected for your TV.
CAUTION: Avoid potential personal injuries and property damage! DO NOT use power tools for this step. Tighten the screws only enough to secure the TV bracket to the TV. DO NOT overtighten the screws.
1 important: Ensure TV bracket is securely fastened before moving on to the next step.
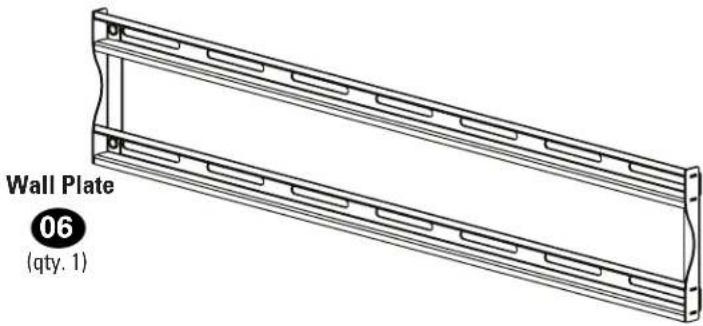
STEP 2A: Attach Wall Plate [Wood Stud Installation]
CAUTION: Avoid potential personal injury or property damage!
- Drywall covering the wall must not exceed 5/8 in. (16 mm)
- Minimum wood stud size: nominal 2 × 4 in. (51 × 102 mm) actual 112 × 312 in. (38 × 89 mm)
- Minimum horizontal space between fasteners: 16 in. (406 mm)
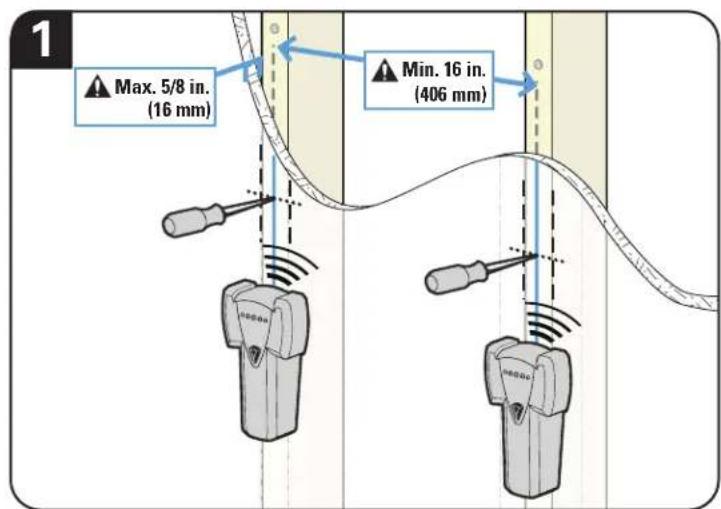
Verify and mark the CENTER of the stud by finding the stud edges using an awl, a thin nail, or an edge to edge stud finder.

Position the wall plate 06 at your desired height and line up the holes with your stud center line. Level and mark the four hole locations.
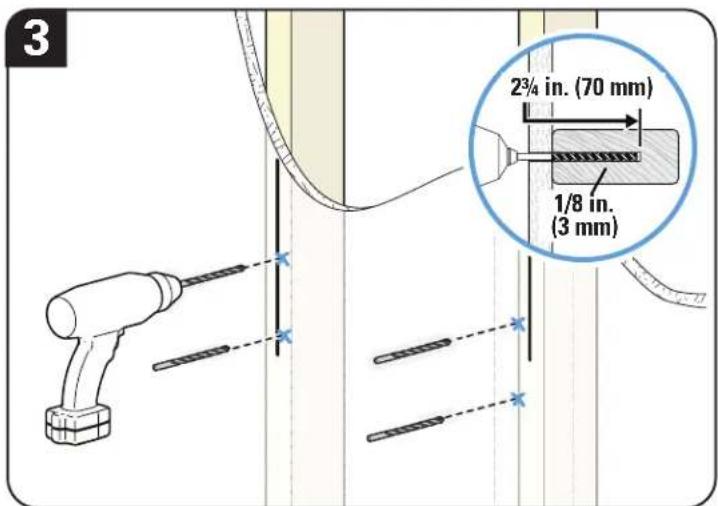
Drill four pilot holes using a 1/8 in. (3 mm) diameter drill bit.
1 Important: Pilot holes must be drilled to a depth of 234 in. (70mm)
Be sure to drill into the center of the studs.
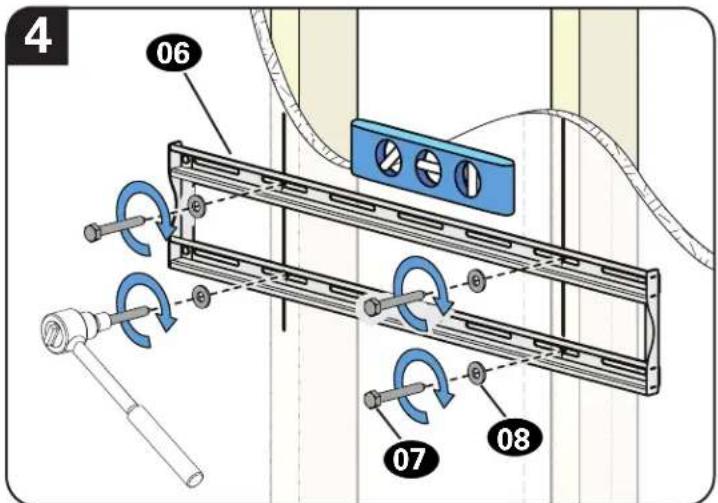
Install wall plate 06 using four lag bolts 07 and four washers 08 Tighten the lag bolts only until they are pulled firmly against the wall plate.
CAUTION: Avoid potential personal injury or property damage! All four lag bolts 07 MUST BE firmly tightened to prevent unwanted movement of the wall plate 06. Ensure the wall plate is securely fastened to the wall before continuing on to the next step.
Go to STEP 3 on PAGE 12.
STEP 2B: Attach Wall Plate [Solid Concrete or Concrete Block Installation]
CAUTION: Avoid potential personal injury or property damage!
- Mount the wall plate 06 directly onto the concrete surface
- Minimum solid concrete thickness: 8 in. (203 mm)
- Minimum concrete block size: 8 × 8 × 16 in. (203 × 203 × 406 ~mm)
- Minimum horizontal space between fasteners: 16 in. (406 mm)
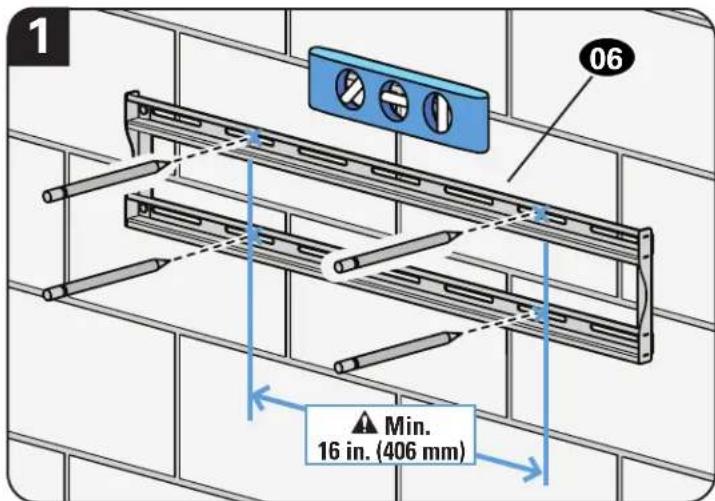
Position the wall plate 06 on the wall at your desired height. Level the wall plate and mark the four hole locations.
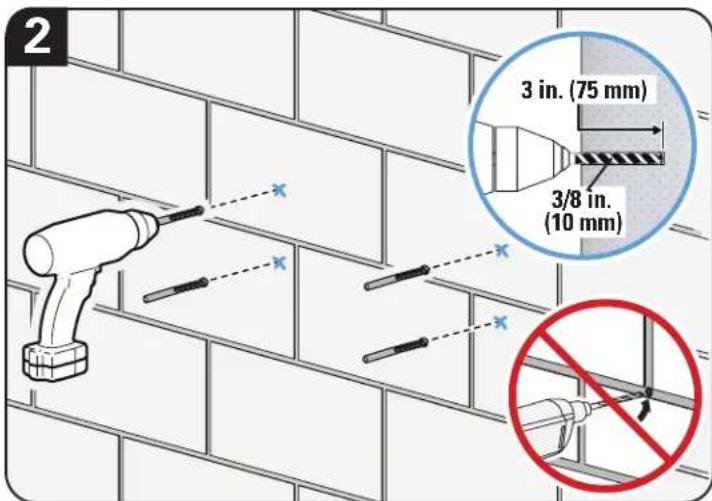
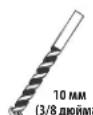
Drill four pilot holes using a 3/8 in. (10 mm) diameter masonry drill bit.
IMPORTANT: Pilot holes must be drilled to a depth of 3 in. (75 mm). Never drill into the mortar between blocks.
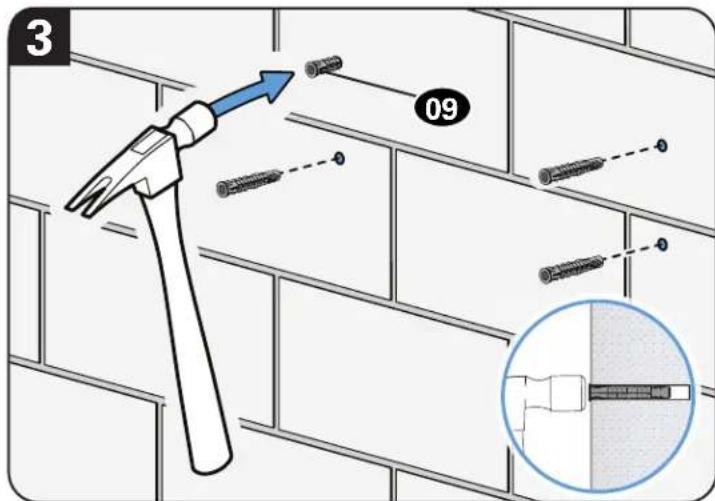
Insert four anchors 09
CAUTION: Be sure the anchors are seated flush with the concrete surface.
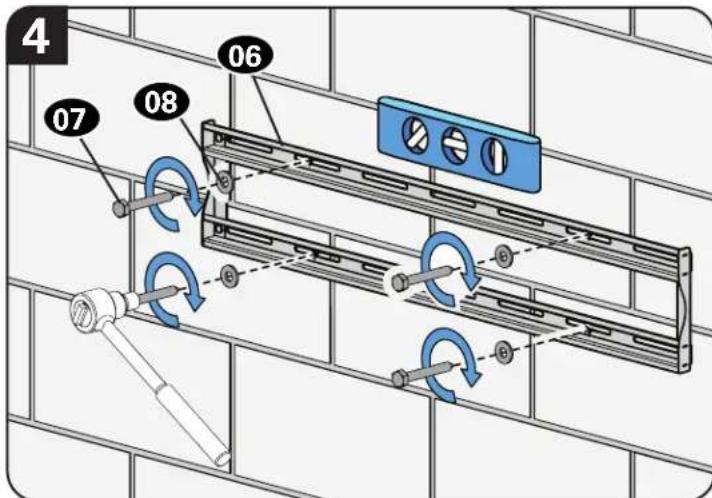
Install wall plate 06 using four lag bolts 07 and four washers 08
Tighten the lag bolts only until they are pulled firmly against the wall plate.
CAUTION: Avoid potential personal injury or property damage! All four lag bolts 07 MUST BE firmly tightened to prevent unwanted movement of the wall plate 06. Ensure the wall plate 06 is securely fastened to the wall before continuing on to the next step.
STEP 3: Attach TV to Wall Plate

HEAVY! You may need assistance with this step.
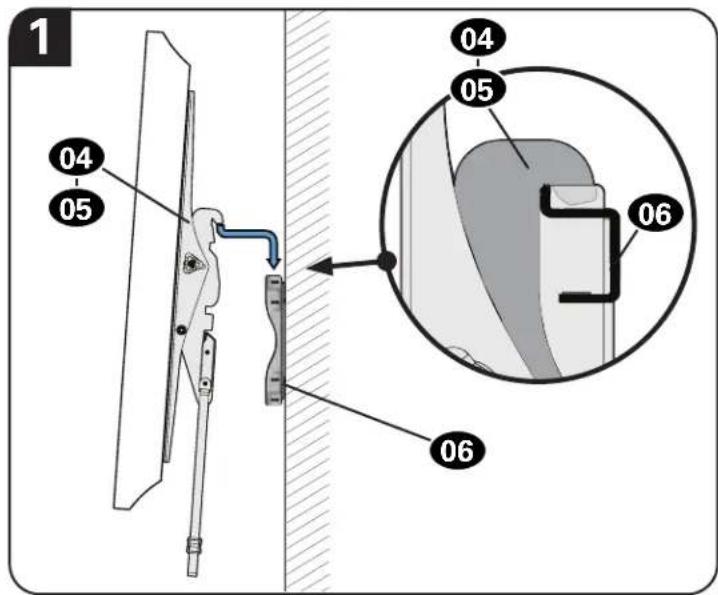
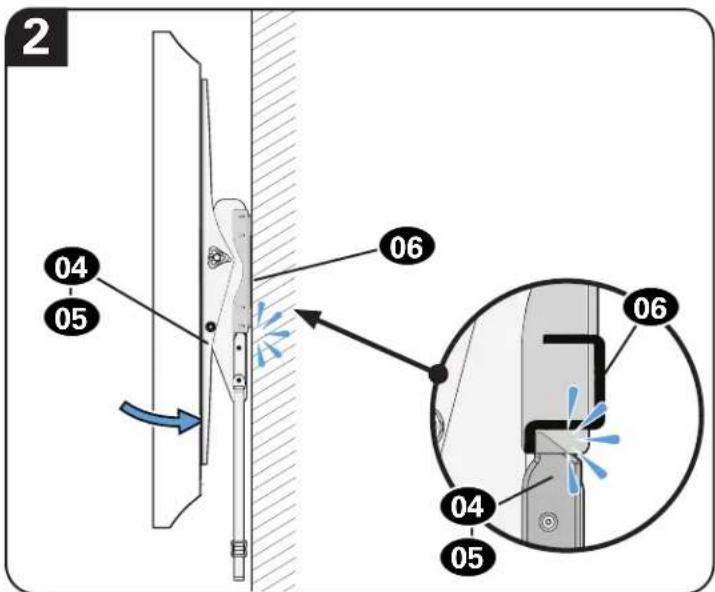
Hook TV brackets 04 and 05 onto wall plate 06
1 IMPORTANT: You will hear an audible click when the TV brackets 04 and 05 are securely fastened to the wall plate 06.
Adjustments
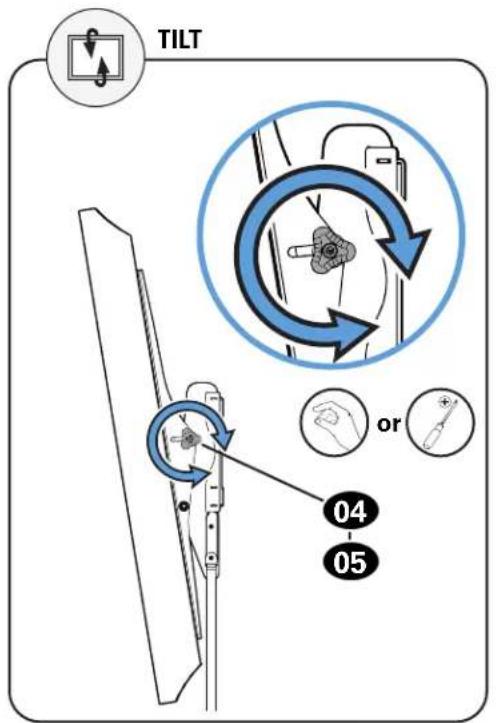
Loosen the knob on TV brackets 04 and 05 to adjust the tilt of your TV. Tighten the knob when your TV is set to the desired tilt.
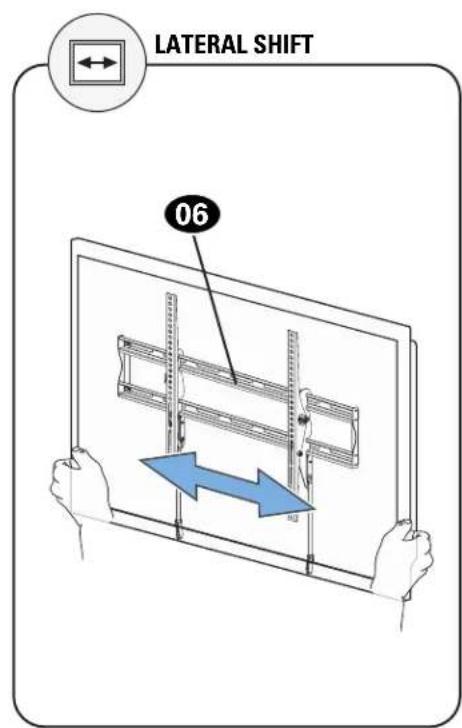
Slowly slide the TV along wall plate 06
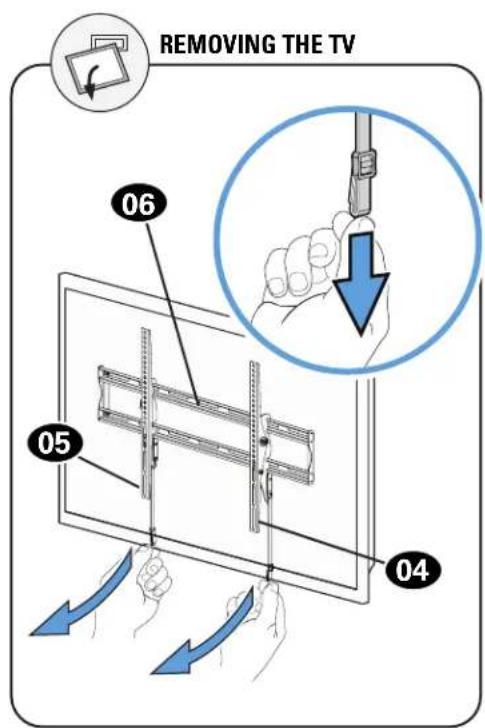
Pull down on the straps on TV brackets 04 and 05 and lift the TV up and out away from the wall plate 06.
ESPANOL
Betong ells betongblock?

Osaker?
Ringkundtjan:1-800-359-5520 P:+31(0)495580852
Y Bac eTb BCE Heo6xOaMbIe INHCTpyMeHTbl?
NcKaTeNb KpaeB
Kapamau Ypobenb OTBepTKa Mepna

pyntka


TOTOBbHaayatb?
PcHTte DaHnHCTpyKnnIO NIOHctbIO, YTObIy BVEpeHHO I C nERKocTbIO BblONHtB yCTaHOBky. Cm. cneuaIbHble Tpe6oBaHN K yCTaHOBKe TeneBn3Opa B INCHPTK K TEJIeBUNOpY
EcnBbHe NoHmaeTe npBeDHe HCTpyKunn He yBepHe, Yo DaHHe u3JeHne yCTaHOBHeo, Co6paHO nn EKnnyaTupyetc 6e3OnacHbIM o6pa3OM, o6paTntecb U cHTp OcbNyKunBaHn KInentob no TelefoHy 1-800-359-5520 P: +31 (O) 495 580 852 BeNko6puTaHn: 0800-056-2853.
BHIMAHNE! Co6IIOaIte octopokHOCTb IIN PneotBpaueHn BO3MOXhIX TpABM INI NOBpeKDeHn IMUeCTBa!
- ⅢДелпгдзанчснг ДИ синрьшьогин на Depeвгньх CTOнКА, CTeHAn 3бETOHа bETOHbX 6NOKOB. 3AПЕШАТСТ YcaTahOBKA TOnько И raNcOKaKToHе.
CTeHa DoJxHbBdEpxNtBaTb Harpy3ky, BnTb pa3 npeBbIaOuIyU 06uN BeC TeNeBn3opa N KpOHTeHa.
He nCnoB3yIe NTdEJIne dJa KaKo-Ni6o cenn, ABO He OROBOpEHNO Ipon3BOUITeJEM. - PpOIN3BODIeH He Hecet OTBETCTBEHHOCTH 3a NOBpeXeHHe O6OpyDObAHn IIN NIOYueHHe NOnb3OBaTeHem TpaBMbl No pNpHHe HEnpaBnHbHOc6OpKn IIN EKcnNyataun N3denn.
PYCCKM
Pa3Mepbl CM. ctp. 3
NocTabnemble KOMnEeKtyuue n KpeNXhbe 3neMeHtbl
CM. ctp. 4
PNEpynpexkdeHne! B coCTabe n3dienecb MeKne deTaNN, KOtOpbe MOry T bB3BaT yDyWbe npn pOrnaTbHaNN. Peped c6bpokoy6eJeTceB, tOc Bte TaNl NmeoTcB H aNCHN He NOpeXdeHb. Ecn KaaJ-ni6o TeTaNb OTCyTcByet nIN NobpeXdeHa, He Bo3BpaauTe n3diene dInepy; o6paTntecb B cHTp noCennpodaxHoro 0cbnyKbAHNA. He nCnonb3yIte NOpeXdeHbIe deTaN!

UAR 1 KpenneHne KpOnuTeHOB Ha TeBeBn3Op
CM. ctp. 6
1.1 BbI6op dIaMepTa BnHTOB nTeIeBn3Opa
1.2 Bb6op dnnHb BNHTOB nra teneBu30pa
BHIMAHHEI
Y6eHNTecb B HAdnEkaem 3aCenneHnn pe3b6bl Ha6opa BHTOB, Wai6 n Btynok I TeNEBn3NOHHO KPOHTeHa.
-CnnuKOM KOpOTKape3b6aHe ydeprnTeIeBn3Op.
-CnIshKOM dnnHHa pe3b6a nobpeMNT TeJeBn3Op.
1.3 KpenJIeHne TeJIeBn3NoHHbIX KPOHwTeHOB
BHIMAHHE! Co6nOaIte OTOPOXHOCTb IIN PNEoTbPAUeHNA BO3MOxHBIX TpAM INN NOBpeXeHNA IMyueCTBa! HE ICNOJb3yIe 3NeKTPoHNCTpyMEnTb IIN DAHHO ONepaum. 3aTnBAite BnHTbI C yCNiMe H 60lbuM, YcM DoCTaTOHIO IIN KpeJIeHNA TeENBUNOHOR KOHUIeHa K TeneBu3OpY. HE 3aTARnBAite BnHTbI CNUkOM CNlBHO.
BAKHO! Npeed nepexodom K cneyioeMy uary y6eItecb, yTO TeeneBnIOHbIe KoPOHTeHbI HaJeXHO 3aKepeNJIeHbI.
UAR 2A KpenneHn HacteHHo NnactmhbK CTHe - KpenneHn Ha depeBnHbIe cToiKN
CM.ctp.18
BHIMAHNE! Co6nloaite octopoxhoctb Iy npedotBpaueHn BO3MOxHbIX TpABM INI NOBpeXeHn IMUeCTBa!
ToIunHa rncokaptoHa, noKpbBaIoUero cTeHy, He dOnXHa npeBbIaTb 16 MM (5/8 dIOIma)
MnHMaJIbHbI pa3MeP DepeBHHoI cToKn: o6uN 51 x 102 MM (2 x 4 JIOHa); HOMHaJIbHbI 38 x 89 MM (1 1/2 x 3 1/2 dIOHa)
MHHMaIbHoe ropU3oHTaIbHoe npocTpaHCTBO MeKdy KpeNneHnM: 406 MM (16 JIOuMOB)
Heo6xoJIMO npOBepnTb paCtOHHme MeKdy ceHTpAMN cToeK
BAXHO! Hapabnnoe OTBepTna CBepTcna HrnybHry 70 MM (2 3/4 duHma).OTBepTna Heo6xOIMn PocBepInb no cHTpy cToKn.
PYCCKM
BHIMAHVE!Co6noaTe OCTopoxHOCTbIpypeoTbpaeHn BO3MOxHBx TpABM IIOBpeKdHn IMyueCTBa!
Bce BnTbI C WeCTnPaHHbIMrTOJOBKaMm HEO5XODIMO HaJeKHO 3aTHyb, YTo6bI He Donyctntb HexeJaTeHbORo CMeueHna HAcTeHNO nlaactnHb.
Ipeep nepexoom K cneuoyemy y8eHntecb, YTO hactehnoe kpenenhe naedjno npikpenlho K cteHe.
BHIMAHHE! HenpaBnblHoe nCIOJIb3OBAHHe MOKET yMeHbWntb ycINNE KpeNIIeHnB HHTOB CJeCTrPaHHbIMI rJIOBkAM.
HE npunarai Te ype3MepHbIe ycHnI npu 3aTARnBaHN BHTOB C wecTHrpaHHbIMN rOJOBKaMn.
UAR 2B KpenneHHe HaCTeHHoN PnactuHbI KCTeHe - KpenneHHe Ha CTehy N3 6eToHa UIN 6eTOHHbIX 6NOKOB CM. ctp.10
BHIMAHHE! Co6nOaTe octopoXHOCTb Iy npEOOTBpaueHn BO3MOxHbIX TpaBM INI NOBpeXeHn IMUeCTBa!
- UctahOBHTe HAcTeHHyIO nIaCTHy B Cope 06 HenocpeDCTBeHHo Ha beOHyIO NOBepxHOCTb
MHHMaJIbHaTOnIuHn6eToHHoNCTeHbI:203MM(8JIOMOB)
MHHMaJIbHbI pa3Mep 6eToHHoro 6noka:203x203x406 MM (8x8x16IOHMOB)
MIMMaJIbHoe rOpI3OHTaJIbHoe nPoCTpaHCTBO MeJy KpeJIeHnAMy: 406 MM (16 JIOHMOB)
BAXHO! HapablaIOune OTbepCTnBa CBEPaTcH RaIy6mHy 75 MM (3 duMa). He donyckaetcCBepInb OTbepCTnB Wbax MeJxdy 6NOKaMn.
BHIMAHNE!y6eHNTecb,yTOIIO6eINyCTaHOBHeNb3aONIOc 6eToHHoNOBepxHOCTbIO.
BHIMAHHE! Co6nIOaIte OCTOPOXHOCbIg InpoTbpaueHn BO3MOXHbIX TpaBM INI NOBpeXeHn IMyueCTBa!
Bce BnHbI c WeCTNRpaHHbIMn HEO5XODIMNO HaedKHO 3aTHyb, TTo6bHe Donyctntb HexeNaTehBOrO CMeueHna HAcTeHHo nlaactnHbI.
Ipeep nepexoom K cneyuouemy aary y6eunitecb, tO hactehnoe kpenenhe Naedxho npikpennoK cTeHe.
BHIMAHHE! HenpaBnIbHoe IcNoJIb3OBAHHe MOKeT UMeHbUHTb YcUNIE KpeNJIeHnBAHTOB C WeCTrPaHHbIMI rOIOBkAM.
HE npuIaraiTe 4pe3MepHbIe ycIIIN npn 3aTARIBAHIN BHTOB C sECTrpaHHbIM rOIOBkAM.
UAR3KpenneHnTeLeBn3opa KHaCTeHHoN nlaTHe
CM. ctp. 12
60JbOJBEC!Ha3tOMwareBAMMOXeTnoHaonobuTBcraNOMoUsb.
BAXHO! PnnaHaeKHOH KPOHHTeHa TeteBUN3Opa Ha HacteHHo nlaCTHe pa3daeTcIeH.
PerynupOBKn TeneBn3opa CM. ctp.13
6OJIbIOW BEC! Ha 3TOM ware Bam MoXeT NOHaO6Ntbcn NOMOuB.
SECURA
Thank you for choosing Secura! Please take a moment to let us know how we did:
Legrand AV
Global Headquarters
6436 City West Parkway
Eden Prairie, MN 55344, USA
Legrand AV
EMEA Headquarters
Legrand AV Inc. and its affiliated corporations and subsidiaries (collectively, "Legrand"), intend to make this manual accurate and complete. However, Legrand makes no claim that the information contained herein covers all details, conditions, or variations. Nor does it provide for every possible contingency in connection with the installation or use of this product. The information contained in this document is subject to change without notice or obligation of any kind. Legrand makes no representation of warranty, expressed or implied, regarding the information contained herein. Legrand assumes no responsibility for accuracy, completeness or sufficiency of the information contained in this document.
Designed and engineered in the US. Made in China. US and foreign patents and patents pending.
©2020 Legrand AV Inc. All rights reserved. Secura is a brand of Legrand.
All other brand names or marks are used for identification purposes and are trademarks of their respective owners.