
SUWTS1 - Wall mount SONY - Free user manual and instructions
Find the device manual for free SUWTS1 SONY in PDF.

| Product Type | Wall mount for TV |
| Brand | Sony |
| Model | SUWTS1 |
| Compatibility | Sony KZ-32TS1E (32 in) and KZ-42TS1E (42 in) |
| Maximum Supported Weight | 102 kg for KZ-32TS1E (25.5 kg × 4), 148 kg for KZ-42TS1E (37 kg × 4) |
| Material | Steel |
| Color | Black |
| Tilt Angle | Tiltable (adjustable with screws on both sides) |
| Distance between wall brackets | 230 mm (using the included cardboard ruler) |
| Wall mounting | Screws not included, suitable for wall material |
| Installation | By an authorized dealer or personnel, at least two people |
| Safety | Security bolts included (4 × 6 mm) for locking |
| Parts provided | Left/right mounting brackets (A), wall brackets (B), cardboard ruler (C), security bolts (D), nylon spacers (E), protective sheet (F), Phillips screws (G), protectors (H) |
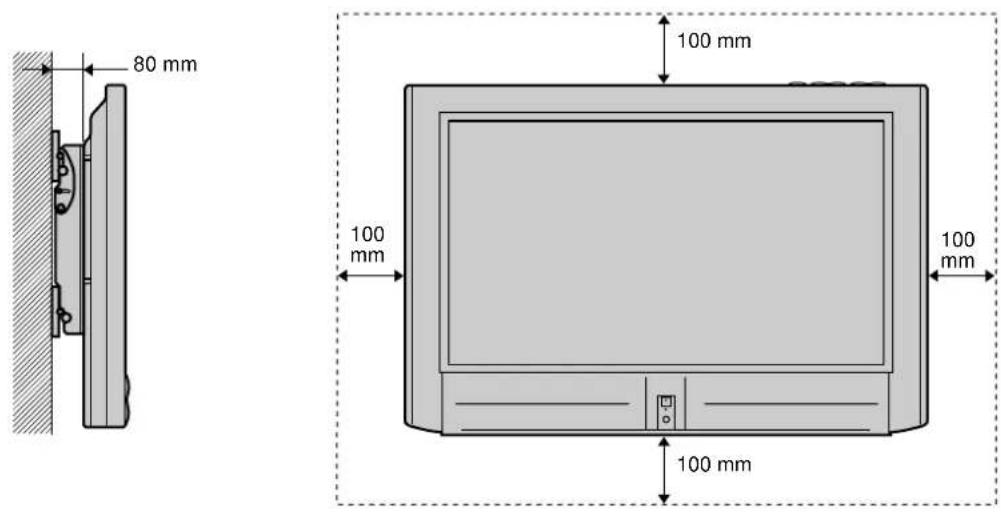
| Required ventilation | At least 100 mm space around the TV |
| Maintenance | Clean with a soft, dry cloth. Do not use abrasive products. |
| Repairability | Spare parts available through authorized after-sales service |
| Warranty | Refer to Sony general terms and conditions |
Frequently Asked Questions - SUWTS1 SONY
User questions about SUWTS1 SONY
0 question about this device. Answer the ones you know or ask your own.
Ask a new question about this device
Download the instructions for your Wall mount in PDF format for free! Find your manual SUWTS1 - SONY and take your electronic device back in hand. On this page are published all the documents necessary for the use of your device. SUWTS1 by SONY.
USER MANUAL SUWTS1 SONY
This installation manual is for dealers or authorized service personnel. Never install the unit by yourself, otherwise it may result in serious bodily injury.
Consult dealers or authorized service personnel for the installation of this unit. We are not liable for any damage or injury caused by mishandling or improper installation. Your Statutory Rights (if any) are not affected.
For dealers or authorized service personnel
For safety installation of the unit, be sure to read this manual thoroughly.
We are not liable for any damage or injury caused by mishandling or improper installation. Your Statutory Rights (if any) are not affected.
Safety Precautions
Wall Mounting Bracket for KZ-32TS1E/ KZ-42TS1E
Read the following safety information prior to installation.

Danger Failure to follow directions may result in serious bodily injury or damage to the unit.
Installation
- Before installing the unit, read this manual and the TV's operating instructions thoroughly, and install the unit properly.
- Instructions must be followed precisely for safe and stable installation.
- Install the Wall-Mount Bracket by the proper installation procedure for the wall material and structure. Improper installation procedure may result in the TV dropping, and causing bodily injury or damage to the TV.
- The wall should be capable of supporting a weight of at least four (4) times the TV weight (KZ-32TS1E 25.5kg× 4 = 102kg , KZ-42TS1E 37kg× 4 = 148kg ).
- Always have at least two persons install the Wall-Mount Bracket. If the work is done by a single person, the TV may be dropped and may cause an injury, or damage the TV.
- Do not alter the parts of Wall-Mount Bracket. Do not make improper use of the Wall-Mount Bracket.
- Before installation of the TV, pull the equipment power plug from the wall receptacle. Installing the TV with the power cable plug inserted in an outlet may result in fire or electric shock.
- Do not use screws and attachment parts other than items supplied.
- The screws securing the Wall-Mount Bracket to the wall are not supplied. Use the proper screws for the wall material and structure.
- Assemble properly in the instructed order.
- Tighten the bolts and screws to the designated position securely.
-
Do not subject the TV to shock during installation.
-
Observe the following to guarantee correct performance of the TV and prevent any trouble.
-
Do not install the TV to any wall other than a vertical plain.
- To prevent fire or shock hazard, do not expose the TV to rain or moisture.
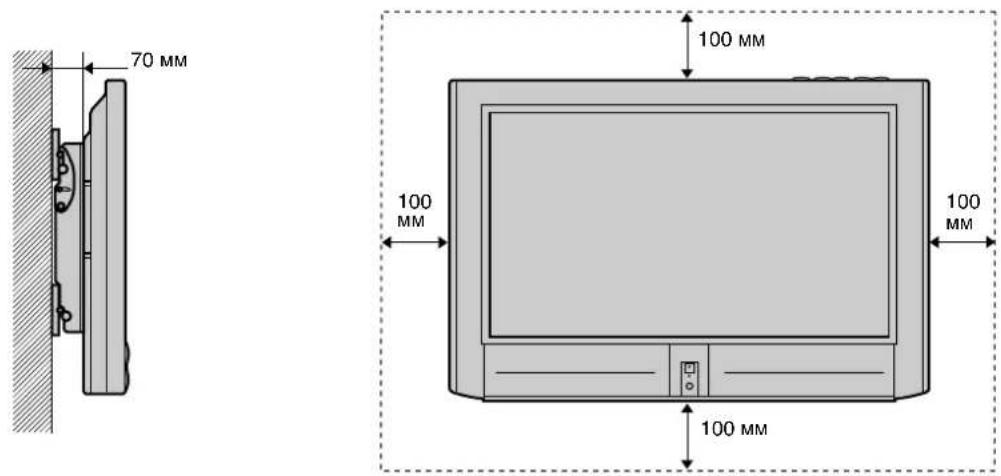
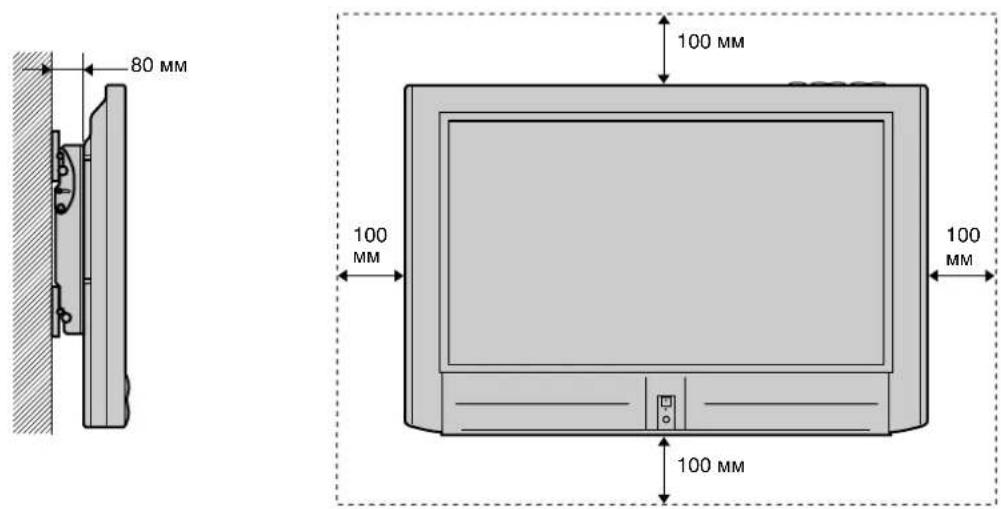
- Do not cover the ventilation openings of the TV. For ventilation, leave a space of at least 10cm (100mm) all around the set.
- Never place the TV in hot, humid or excessively dusty places. Do not install the TV where it may be exposed to mechanical vibrations.
- To prevent fire, keep inflammable objects or naked lights (e.g. candles) away from the TV.
- Do not cover the ventilation openings of the TV with items such as curtains or newspapers etc.
- Do not install the TV over or under the air-conditioner.
- Never spill liquid of any kind on the TV.
After installation
- Do not remove backing or bolts after mounting the TV.
- Consult dealers or authorized service personnel when moving or shifting unit, or adjusting the angle of unit, after installation.
- Do not climb on the unit once assembled and installed.
- After proper installation, secure the cables so that people or objects do not get tangled in them.
- If the Wall-Mount Bracket is removed after installing them on the wall, the screw holes are left.
- Using the TV for a long period may discolour the wall due to heat generated by the TV.
- After installation, please hand this installation manual to the users so that they read it thoroughly and retain it for future reference (This may need for moving the TV or maintenance of TV).
We recommend that you first thoroughly read this manual to familiarize yourself with the use of this unit as well as proper installation and safety precautions. Retain this manual in an easily accessible location for future reference.
NOTE
During installation, the cardboard template (Item ) in the parts list is required for proper separation of the wall plates. Do not discard the cardboard template before using.
MOUNTING POINTS FOR PLASMA MODELS KZ-32TS1E / KZ-42TS1E
Step 1: Check the Parts
Check for missing parts after opening.
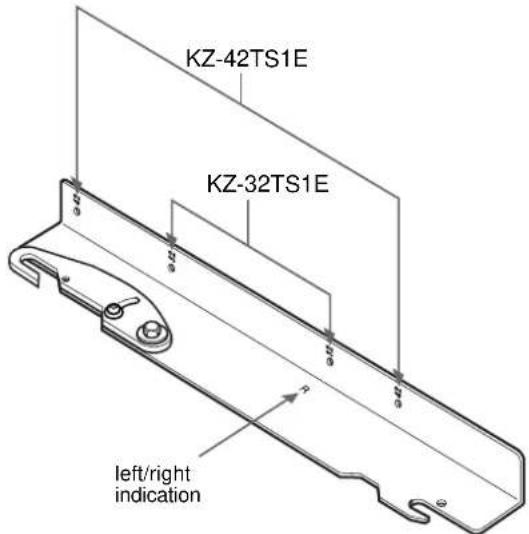
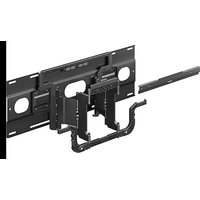
| A | (R) 4-091-921-01 (L) 4-091-922-01 | Left and right mounting arms for the (KZ-32TS1E) (KZ-42TS1E) TV 1pc. (left), 1pc. (right) Note: Mounting points for the TVs differ. Please see diagram for mounting point specifications. |
| B | 4-091-923-01 | Mount wall brackets...... 2 pcs. |
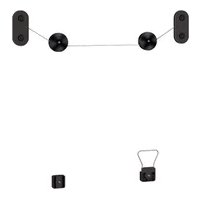
| C | 4-091-924-01 | Cardboard template for 230 mm accurate separation of the wall brackets...... 1 pc. |
| D | 4-091-925-01 | 6 mm × 12 mm Safety knobs...... 4 pcs. |
| E | 4-091-926-01 | 15 mm Nylon spacers .... 4 pcs. |
For KZ-32TS1E only
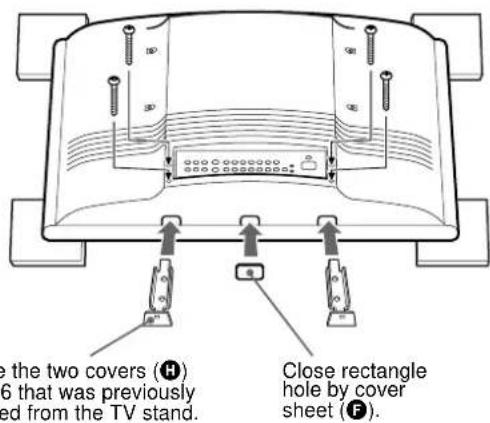
| F | 4-091-927-01 | Cover Sheet............1 pc. |
| G | 4-957-517-01 | 5 mm × 40 mm Phillips screws..........4 pcs. |
| H | 4-089-347-01 | Covers..............2 pcs. |
For KZ-42TS1E only
| 1 | 7-682-969-09 | 4 mm × 35 mm Phillips screws............4 pcs. |
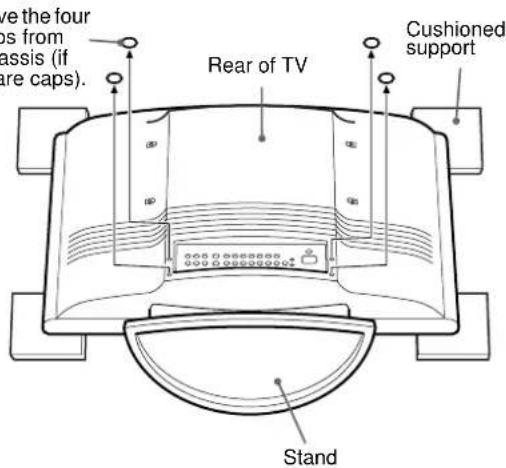
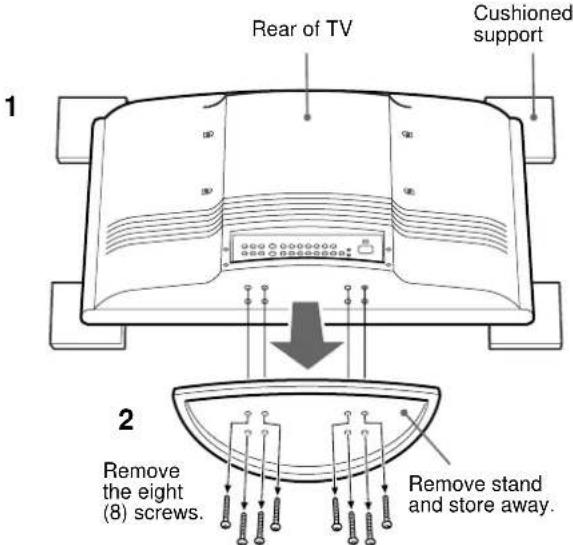
Step 2: Remove Stands from the TV
1 Place the 32" model (KZ-32TS1E) or 42" model (KZ-42TS1E) on 4 cushioned supports (not supplied). The TV screen should face down, parallel to the floor and the base/stand should not touch the floor.
2 Pull the base/stand out from the TV.
For KZ-32TS1E
At the bottom of the rear panel of the TV, cut out the 4 rear panel caps (if there are any) with clippers and scrape the plastic clean with reamers, so each opening is round and smooth enough to allow a screw to be removed.
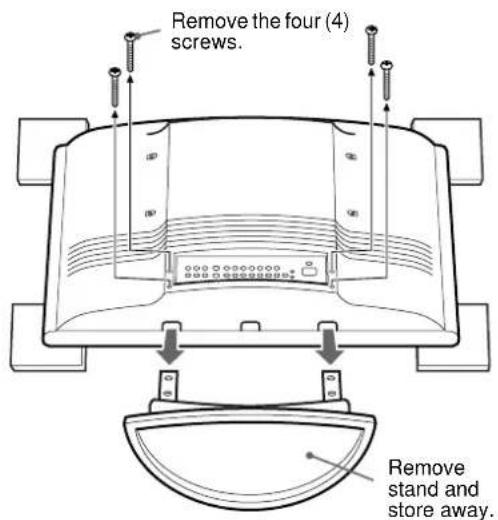
For KZ-42TS1E
At the bottom of the stand of the TV, you will see the screws securing the stand. With a (Philips) magnetic screwdriver, remove all the screws that secure the base to the TV.
3 For KZ-32TS1E only
Attach the covers (F,H) on the bottom of the TV.
KZ-32TS1E
How to remove the stand and assemble the covers
1
3
2
KZ-42TS1E
How to remove the stand
Caution
Installation of units is to be carried out by dealers or authorized service personnel only. Install in appropriate location by checking the wall structure and durability for safety and accident prevention.
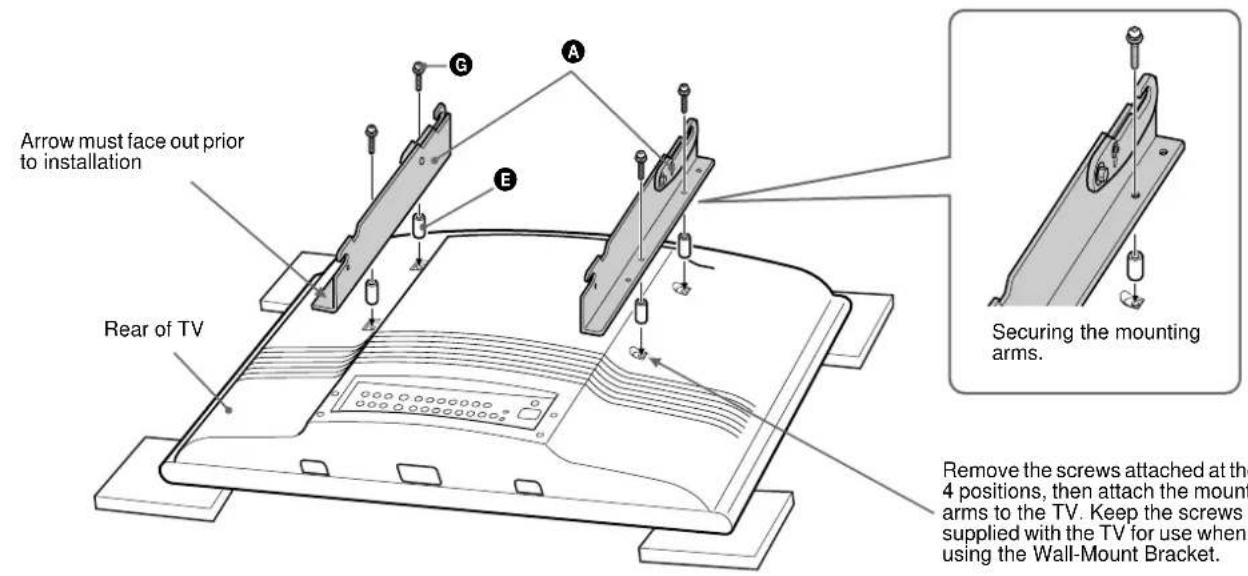
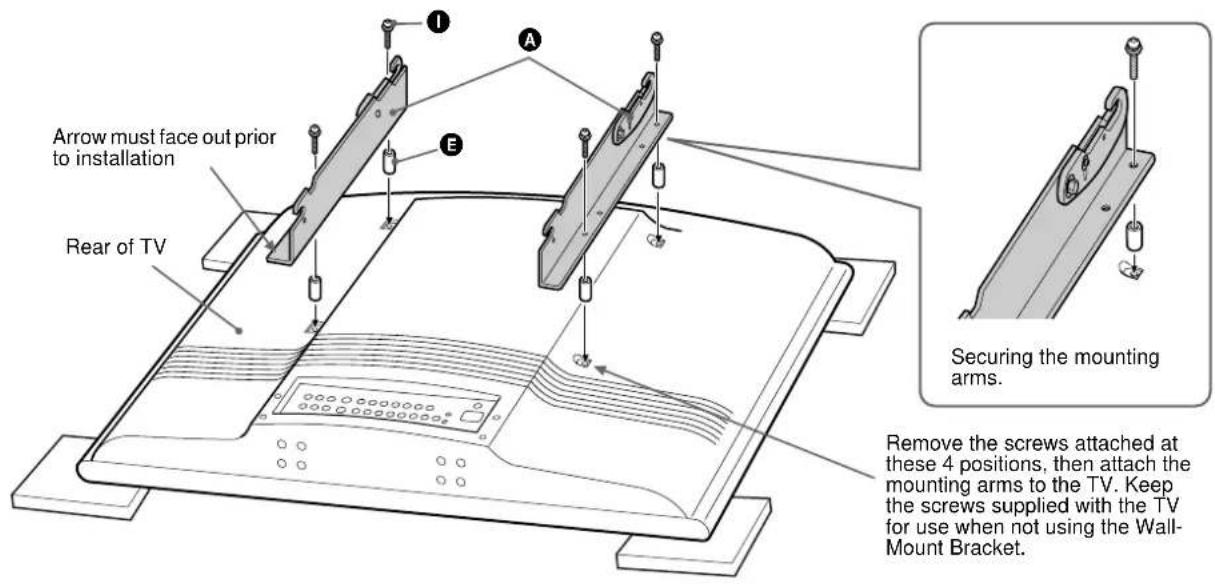
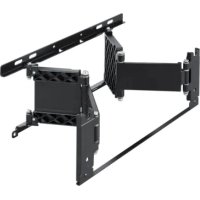
Step 3: Attach the Mounting Arms to the TV
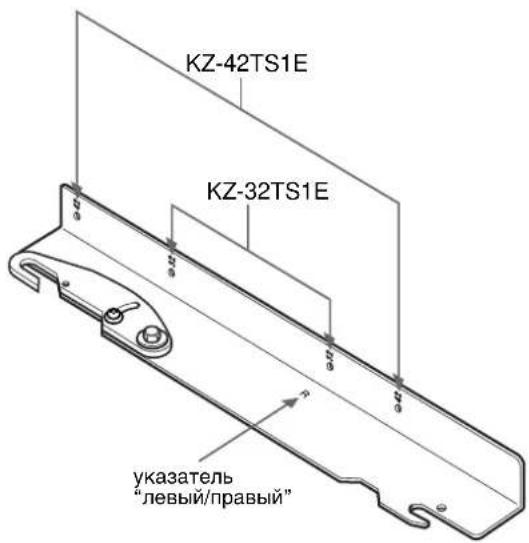
Use the hardware chart in "Step1: Check the Parts" on page 3 of this manual to identify the appropriate hardware. Mounting points on the mounting arms (A) differ depending on TV size. See "MOUNTING POINTS FOR PLASMA MODELS KZ-32TS1E / KZ-42TS1E" on page 3 of this manual.
Invert the TV on a soft, flat surface and locate the mounting points on the back of the TV. Secure the left and right mounting arms (A) to the TV with the screws (G, D), making sure that the upper hook screw, nut and reference arrow are facing the outside edges of the TV.
Note
Do not overtighten the bracket mounting screws as damage to the TV internal mounting threads could occur.
KZ-32TS1E
KZ-42TS1E
Caution
Install the unit by the proper installation procedure for the wall material and structure.
Step 4: Fasten Lower Mount Wall Brackets (Example for securing to a wood wall)
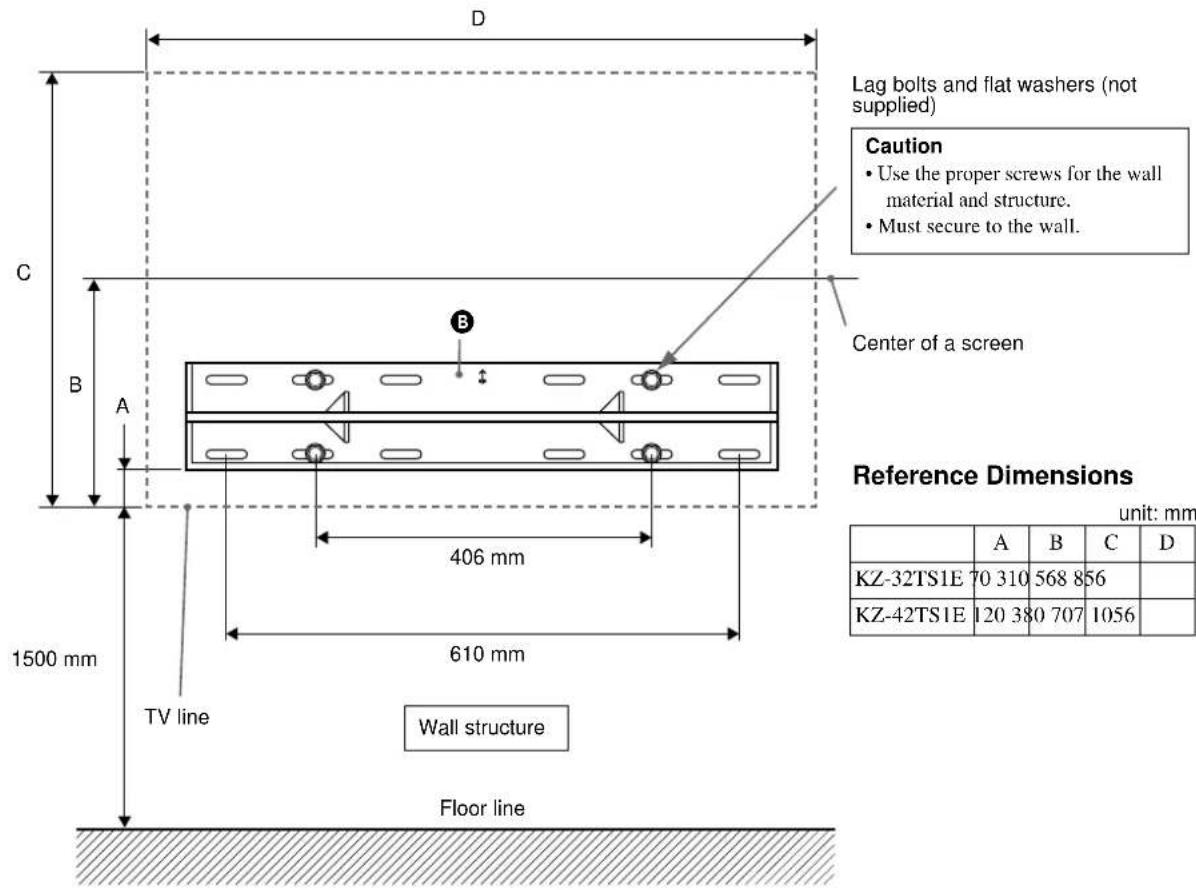
The mount wall brackets (B) must be secured to the wall capable of supporting at least four (4) times the weight of the unit (KZ-32TS1E 25.5kg× 4 = 102kg , KZ-42TS1E 37kg× 4 = 148kg ). To determine the centre viewing height of the TV:
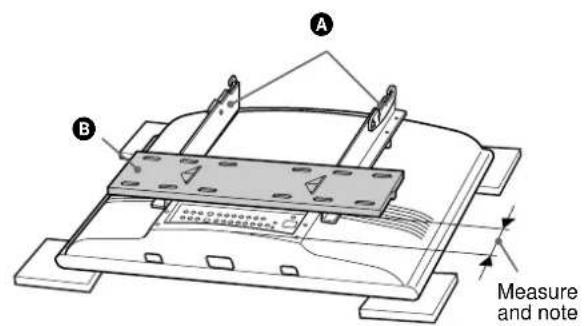
1 Temporarily position the rod of the lower mount wall bracket (B) to the bottom hook of the secured mounting arms (A) and determine and note the distance between the bottom of the TV to the bottom of the mount wall bracket (A).
2 Measure the distance from the floor to where the bottom of the TV will be (Example 1500mm ). Add the noted distance to the 1500mm mark and mark your first securing points (Example 1500mm + 70mm = 1570mm ). Level and secure the bottom mount wall bracket (B) with four (4) lag bolts and flat washers (not supplied).
Step 5: Secure Upper Mount Wall Brackets
1 With the lower mount wall bracket secured to the wall structure, place the supplied cardboard template (C) over the top outside edges of the lower mount wall bracket. Place the bottom and outside edges of the upper mount wall bracket (D) into the top portion of the cardboard template (G) and mark the second set of securing points for the upper mount wall bracket (B).
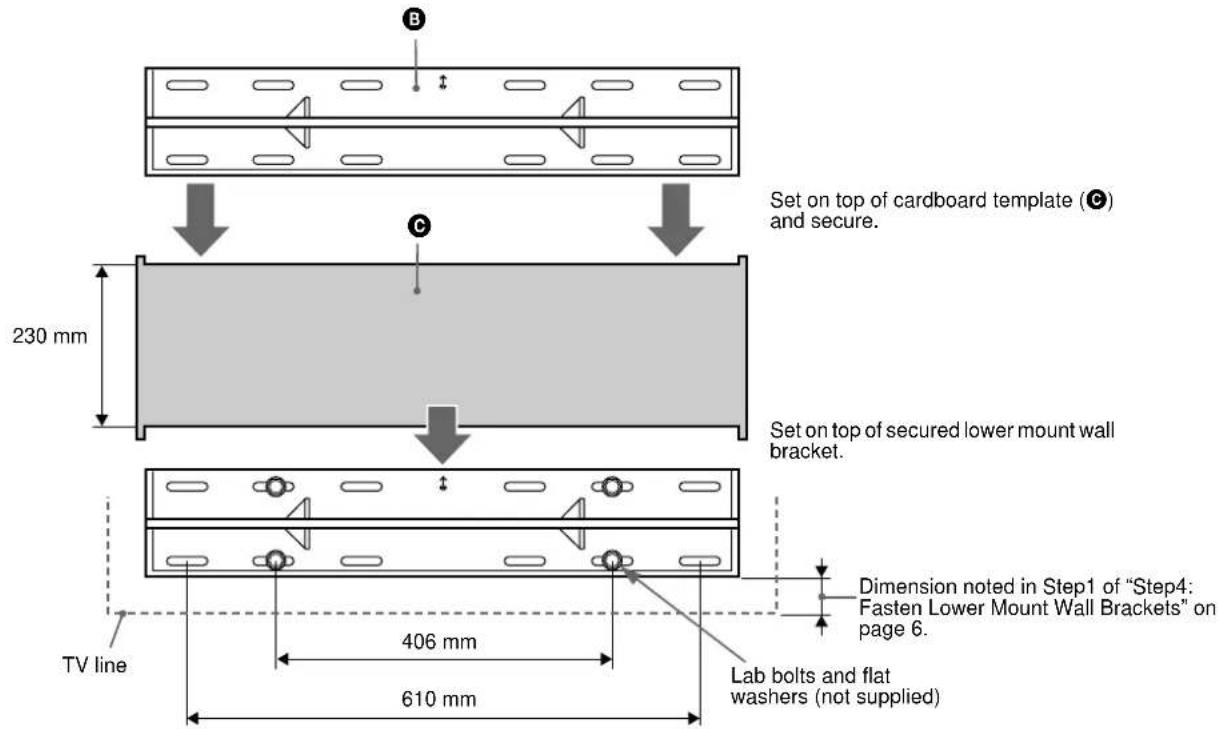
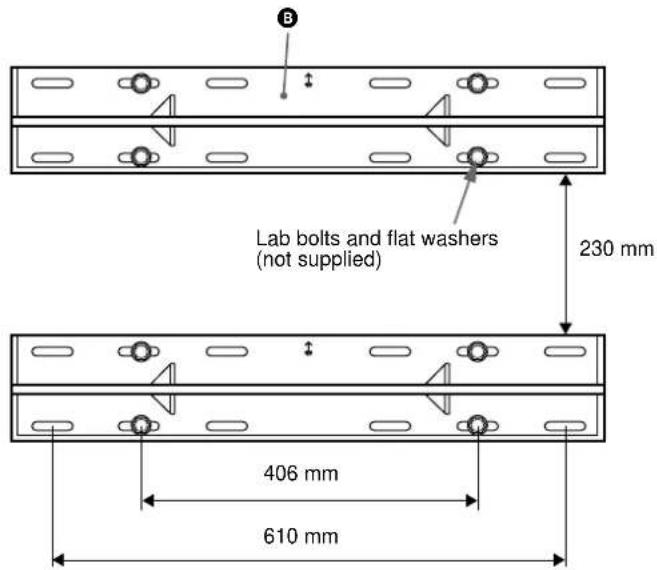
2 Secure the upper mount wall bracket (B) with the four (4) lag bolts and flat washers (not supplied). The mount wall bracket must be secured to wall capable of supporting at least four (4) times the weight of the unit. The distance between the two mount wall brackets should end up at 230mm .
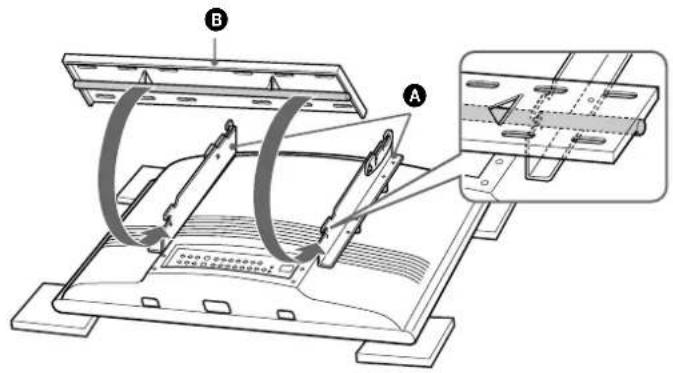
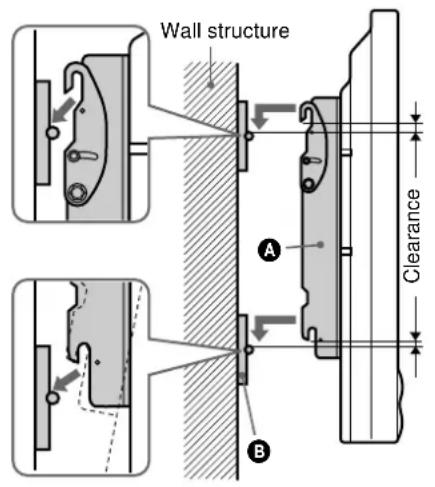
Step 6: Mount the TV to the Mount Wall Brackets
1 With the upper tilt hooks on the mounting arms (A) in the flat position, raise the TV with mounting arms (A) attached (2 people minimum recommended) and place the TV flat against wall with the upper and lower mounting arms (A) attaching slots slightly higher than the steel receiving rods of the upper and lower mount wall brackets (B).
2 With the TV reasonably level, lower the TV until the mounting arms (A) receiving slots are fully installed into the upper and lower mount wall brackets (B) steel rods. Gently pull the left and right upper edges of the TV to extend the mount to its maximum 10^ tilt and install the four 6 mm safety knobs (D) on each mounting arm (A) for security.
Note
To remove the TV from the wall, simply extend the TV to its maximum tilt range, remove the four 6 mm safety knobs (D) push the TV back to its flat wall position and lift the unit up and out from the wall.
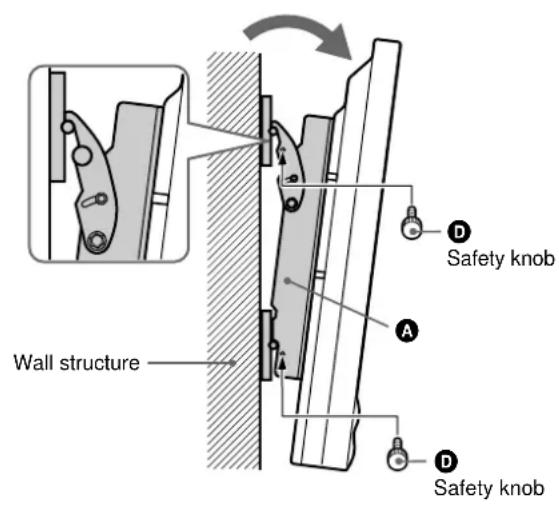
Caution
Be sure to install the four safety knobs (D) to prevent the TV from falling down.
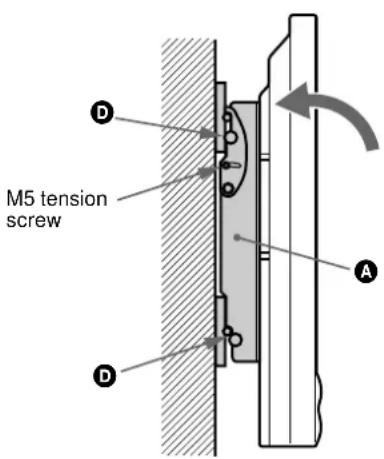
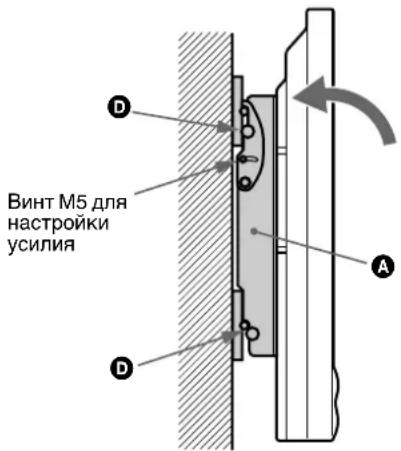
Step 7: Adjust Tension
Tension:
To adjust the tilting tension, tighten the 5mm screws on both sides of the brackets.
Proper Ventilation
CAUTION
When installing the TV, space should be maintained for proper ventilation of the TV unit.

KZ-32TS1E
KZ-42TS1E
Passo 7: Regular a tension
Tensão:
Para regular a tensao do angulo de inclinacao, aperte os parafusos de 5mm colocados de ambos os lados dos suportes.

Ventilação adequada
ATENÇAO
He Bb6paBbIaTe KAPTOHbI Ia6IOH, He HcHIOJIb3OBaB erO.
TOUKN KPERJIENNAДЯ MODELEI
ПЛАЗMEHHbIX TEJIEBN3OPOB
KZ-32TS1E / KZ-42TS1E
Uar 1: PpOBepka Hauuynja Detalne
BckpbYyIaKOBky,IIPOBcpeHaIINHc Bccx DeTaeJe.
War 7: HacrtpoiKa yCnIy
Ycunne:
IIaHactpoKHycHHI,IHPKJIaIbIbAcMOrO IIpH HAKIOHe,3aBepHIte 5-MM BnHTbHa O6cx CTOpOHAX KpOHITeHOB.
HaJIeKaaJABeHTnJIaCnJ
BHIMAHME
Pn yctahOBKe TeIeBH3Opa Heo6xoHMO OCTaBHT BoCTaTOHoe IPOCTpAChTBO JIN OBeCHeHH HaJIeKaIe BeHTHJIAHN TeIEBH3Opa.
KZ-32TS1E
KZ-42TS1E

- For dealers or authorized service personnel
- Safety Precautions
- Wall Mounting Bracket for KZ-32TS1E/ KZ-42TS1E
- Installation
- After installation
- NOTE
- MOUNTING POINTS FOR PLASMA MODELS KZ-32TS1E / KZ-42TS1E
- Step 1: Check the Parts
- Step 2: Remove Stands from the TV
- Caution
- Step 3: Attach the Mounting Arms to the TV
- KZ-32TS1E
- KZ-42TS1E
- Step 4: Fasten Lower Mount Wall Brackets (Example for securing to a wood wall)
- Step 5: Secure Upper Mount Wall Brackets
- Step 6: Mount the TV to the Mount Wall Brackets
- Step 7: Adjust Tension
- Tension:
- Proper Ventilation
- Passo 7: Regular a tension
- Tensão:
- Ventilação adequada
- Uar 1: PpOBepka Hauuynja Detalne
- War 7: HacrtpoiKa yCnIy
- Ycunne:
- HaJIeKaaJABeHTnJIaCnJ
- BHIMAHME
Brand : SONY
Model : SUWTS1
Category : Wall mount