USER MANUAL SUB551S SONY
© 2011 Sory Corporation
NOTICE FOR CUSTOMERS IN THE UNITED KINGDOM
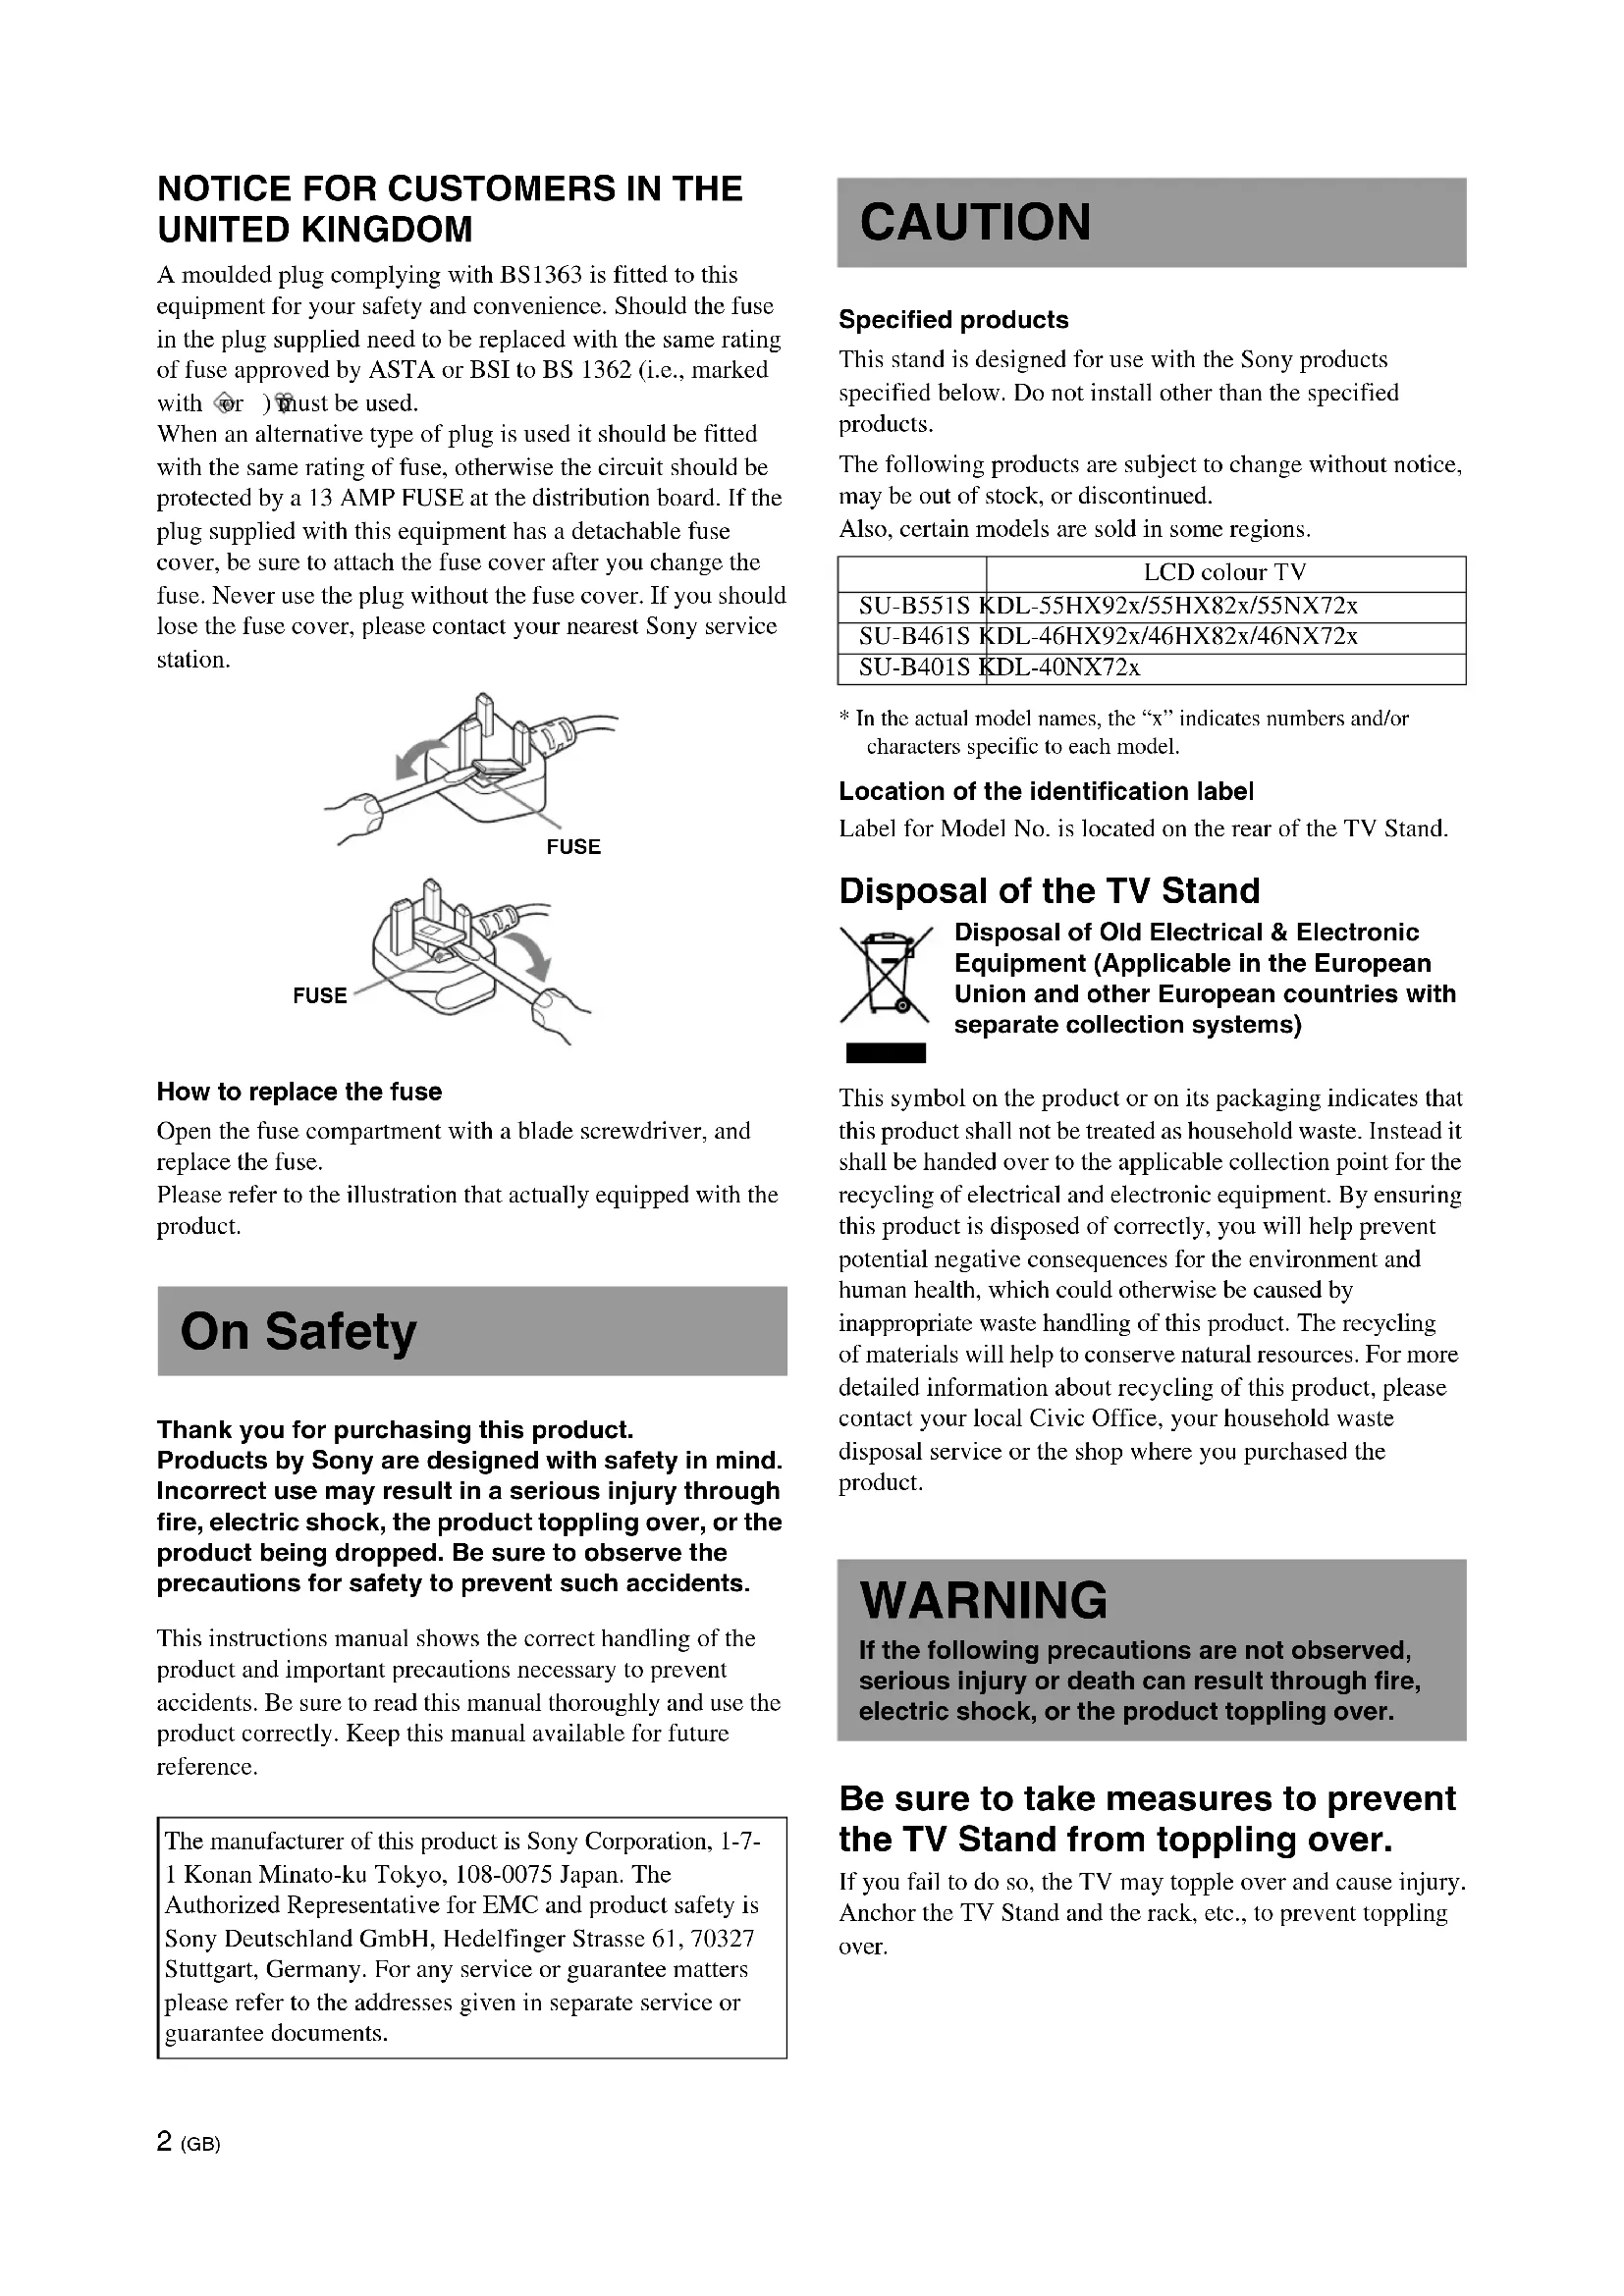
A moulded plug complying with BS1363 is fitted to this equipment for your safety and convenience. Should the fuse in the plug supplied need to be replaced with the same rating of fuse approved by ASTA or BSI to BS 1362 (i.e., marked with or) must be used.
When an alternative type of plug is used it should be fitted with the same rating of fuse, otherwise the circuit should be protected by a 13 AMP FUSE at the distribution board. If the plug supplied with this equipment has a detachable fuse cover, be sure to attach the fuse cover after you change the fuse. Never use the plug without the fuse cover. If you should lose the fuse cover, please contact your nearest Sony service station.
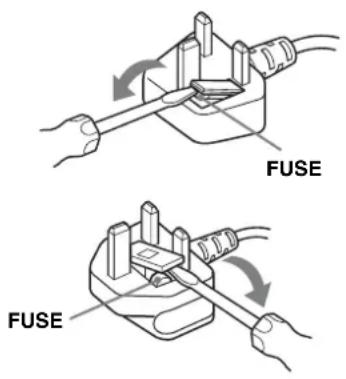
How to replace the fuse
Open the fuse compartment with a blade screwdriver, and replace the fuse.
Please refer to the illustration that actually equipped with the product.
On Safety
Thank you for purchasing this product.
Products by Sony are designed with safety in mind. Incorrect use may result in a serious injury through fire, electric shock, the product toppling over, or the product being dropped. Be sure to observe the precautions for safety to prevent such accidents.
This instructions manual shows the correct handling of the product and important precautions necessary to prevent accidents. Be sure to read this manual thoroughly and use the product correctly. Keep this manual available for future reference.
The manufacturer of this product is Sony Corporation, 1-7-1 Konan Minato-ku Tokyo, 108-0075 Japan. The Authorized Representative for EMC and product safety is Sony Deutschland GmbH, Hedelfinger Strasse 61, 70327 Stuttgart, Germany. For any service or guarantee matters please refer to the addresses given in separate service or guarantee documents.
CAUTION
Specified products
This stand is designed for use with the Sony products specified below. Do not install other than the specified products.
The following products are subject to change without notice, may be out of stock, or discontinued.
Also, certain models are sold in some regions.
| LCD colour TV |
| SU-B551S KDL-55HX92x/55HX82x/55NX72x |
| SU-B461S KDL-46HX92x/46HX82x/46NX72x |
| SU-B401S KDL-40NX72x |
* In the actual model names, the “x” indicates numbers and/or characters specific to each model.
Location of the identification label
Label for Model No. is located on the rear of the TV Stand.
Disposal of the TV Stand
Disposal of Old Electrical & Electronic Equipment (Applicable in the European Union and other European countries with separate collection systems)
This symbol on the product or on its packaging indicates that this product shall not be treated as household waste. Instead it shall be handed over to the applicable collection point for the recycling of electrical and electronic equipment. By ensuring this product is disposed of correctly, you will help prevent potential negative consequences for the environment and human health, which could otherwise be caused by inappropriate waste handling of this product. The recycling of materials will help to conserve natural resources. For more detailed information about recycling of this product, please contact your local Civic Office, your household waste disposal service or the shop where you purchased the product.
WARNING
If the following precautions are not observed, serious injury or death can result through fire, electric shock, or the product toppling over.
Be sure to take measures to prevent the TV Stand from toppling over.
If you fail to do so, the TV may topple over and cause injury. Anchor the TV Stand and the rack, etc., to prevent toppling over.
Be sure to install the TV Stand on a stable surface.
If you install the TV Stand on an unstable surface, it may lose its balance and topple over or fall off. This may cause injury or property damage.

Do not lean on or hang from the TV with the TV installed on the TV Stand.
The TV Stand may topple over, or the TV may fall and cause serious injury or death.
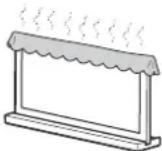
Do not cover the ventilation holes of the TV.
The ventilation openings in the TV are necessary to ensure reliable operation of the TV and to protect it from overheating.
- Do not block or cover the ventilation openings with cloth or other materials.
- Never allow liquid or solid objects to fall into the ventilation openings.
Do not place liquid filled objects such as a vase or potted plant on the TV.
Do not use a power line operated TV set near water; for example, near a bathtub, washbowl, kitchen sink, laundry tub, wet basement or near a swimming pool, etc.
Do not install the TV in places subject to extreme temperature, such as in direct sunlight, near a radiator or a heating vent.
The TV may overheat in such conditions which can cause deformation of the enclosure and/or TV malfunction.
Do not install the TV in a place exposed to direct air conditioning.
Moisture may condense inside and may cause TV malfunction.
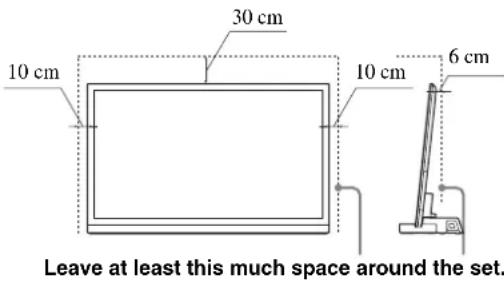
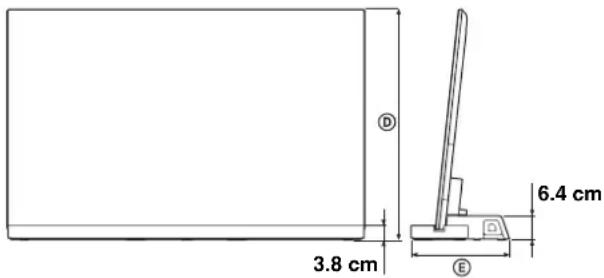
Allow adequate space around the TV set to ensure proper air circulation.
Allow enough space around the TV as shown below.
AC power cord (mains lead)
- Connect the TV set using a three-wire grounding type mains plug to a mains socket with a protective earthing connection.
- Use only Sony supplied AC power cords (mains lead), not those of other brands.
- Do not allow the AC power cord (mains lead) or the connecting cable to be pinched when you install the TV on the TV Stand. If the AC power cord (mains lead) or the connecting cable is damaged, this may result in fire or electric shock.
- Do not step on the AC power cord (mains lead) or the connecting cable when you carry the TV Stand. The AC power cord (mains lead) or the connecting cable may be damaged, and this may result in fire or electric shock.
- If you stumble over the AC power cord (mains lead) or the connecting cable, the TV Stand may topple over and cause injury.
- Unplugging the AC power cord (mains lead) from the wall outlet (mains) will completely remove power from the TV Stand.
NOTE ON AC adapter (mains adaptor)
Warning
To reduce the risk of fire or electric shock, do not expose this apparatus to rain or moisture.
To prevent fire or shock hazard, do not place objects filled with liquids, such as vases, on the apparatus.
Do not install this equipment in a confined space, such as a bookshelf or similar unit.
- Please ensure that the AC power outlet (mains socket) is installed near the equipment and shall be easily accessible.
- Be sure to use the supplied AC adapter (mains adaptor) and AC power cords (mains lead).
- Do not use any other AC adapter (mains adaptor). It may cause a malfunction.
- Connect the AC adapter (mains adaptor) to an easily accessible AC power outlet (mains socket).
(Continued)
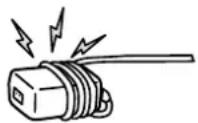
- Do not coil the AC power cord (mains lead) around the AC adapter (mains adaptor). The core wire may be cut and/or it may cause a malfunction of the TV.
- Do not touch the AC adapter (mains adaptor) with wet hands.
- If you notice an abnormality in the AC adapter (mains adaptor), disconnect it from the AC power outlet (mains socket) immediately.
- The set is not disconnected from the AC (mains) source as long as it is connected to the AC power outlet (mains socket), even if the set itself has been turned off.
CAUTION
If the following precautions are not observed, injury or property damage may occur.
Do not install any equipment other than the specified product.
This TV Stand is designed for use with the specified product only. If you install equipment other than specified, it may fall or break, and cause injury. Illustrations used in this manual show of the KDL-40NX72x, unless otherwise stated.
Be sure to secure the TV.
Secure the TV to the TV Stand using the supplied screws. If the TV is not installed securely, it may fall, or the TV Stand may topple over, and cause injury.
Notes on installation
Do not allow the TV Stand to be installed at an angle or incline. To avoid this, observe the following precautions.
- If you install the TV Stand on a soft surface such as a mat or a carpet, lay a board over the designated location beforehand.
- Do not install the TV Stand in a place subject to direct sunlight or near a heater.
- Do not install the TV Stand in a hot or humid place, or outdoors.
Note on use
Cleaning
To keep the TV Stand clean, occasionally wipe it with a dry soft cloth. Stubborn stains may be removed by wiping with a cloth slightly dampened with mild soap. Be sure to dry the area afterwards with a dry soft cloth. Do not use chemicals, such as thinner or benzine, as they damage the finish of the TV Stand.
Be sure that two or more persons do the installation work.
Be sure that two or more persons install the TV on the TV Stand. If one person does the installation work alone, this may result in an accident or injury.
Do not modify the TV Stand.
It may fall and cause injury.
Be sure to install the TV securely following the instructions.
Tighten the screws securely. If the TV is not installed securely, it may fall and cause injury.
Be careful not to injure your hands or fingers while assembling.
- Do not move the TV Stand with holding the Neck section.
- Be careful not to hurt your fingers or hands when installing the TV.
PRECAUTIONS
On power sources
- If you are not going to use the TV Stand for a long time, be sure to disconnect the TV Stand from the wall outlet (mains). To disconnect the AC power cord (mains lead), grasp the plug itself; never pull the cord.
- AC power cord (mains lead) must be changed only at the qualified service shop.
On operation
Before connecting other components, be sure to turn off and unplug the TV Stand.
Copyrights
This TV Stand incorporates Dolby* Digital and Pro Logic Surround and the DTS** Digital Surround System.
* Manufactured under license from Dolby Laboratories.
Dolby, Pro Logic, and the double-D symbol are trademarks of Dolby Laboratories.
** Manufactured under license under U.S. Patent #'s: 5,451,942; 5,956,674; 5,974,380; 5,978,762; 6,487,535 & other U.S. and worldwide patents issued & pending. DTS and the Symbol are registered trademarks & DTS Digital Surround and the DTS logos are trademarks of DTS, Inc. Product includes software. © DTS, Inc. All Rights Reserved.
This TV Stand incorporates High-Definition Multimedia Interface (HDMI ^™ ) technology.
HDMI, the HDMI Logo, and High-Definition Multimedia Interface are trademarks or registered trademarks of HDMI Licensing LLC in the United States and other countries.
"BRAVIA" is a trademark of Sony Corporation.


Note on taking the TV Stand out from the carton
Be sure to hold the TV Stand and handle it carefully.
Step 1: Checking the parts
| Name Quantity | |
Stand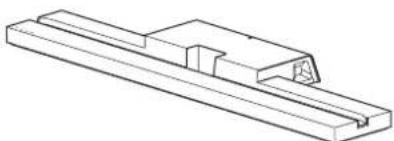 | 1 |
Rear Cover L*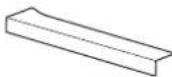 | 1 |
Rear Cover R*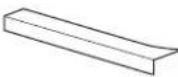 | 1 |
Joint | 1 |
Neck | 1 |
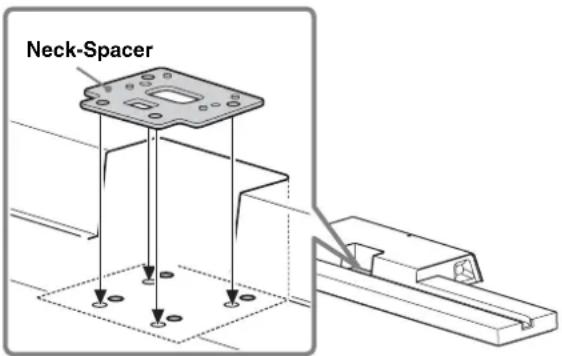
Neck-Spacer**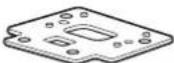 | 1 |
TV Stand Neck Attachment Screw(PSW5 × 16) (× 3) Joint Screw(PSW5 × 16) (× 3) Joint Screw(PSW5 × 16) (× 3) | 6 |
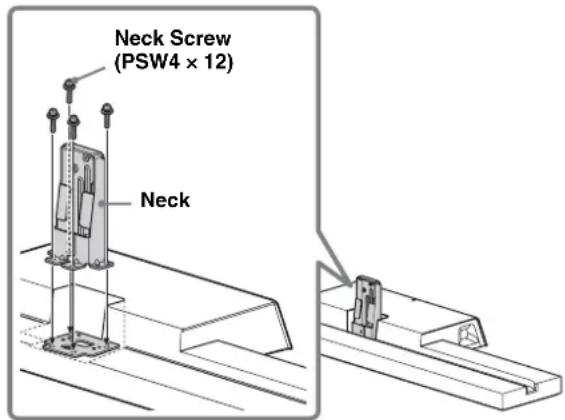
Neck Screw(PSW4 × 12) | 4 |
| AC adapter (mains adapter) (ACDP-001) 1 | |
| AC power cord (mains lead) |
| High Speed HDMI cable 1 | |
| Instructions manual 1 | |
| Warranty card |
* For SU-B551S model only.
** For SU-B551S/461S models only.
WARNING
If you allow the AC power cord (mains lead) to be pinched under or between pieces of equipment, this may result in a short circuit or an electric shock. If you stumble over the AC power cord (mains lead) or the connecting cable, the TV Stand may topple over and cause injury.
Decide on the installation location and lay the TV Stand down before installing the TV.
Since the TV is heavy, it is recommended that you decide on the installation location beforehand, and assemble the TV Stand on site.
Refer to the operating instructions supplied with your TV for information on how to remove the Table-Top Stand from the TV.
Step 2: Installing the TV
Before assembling
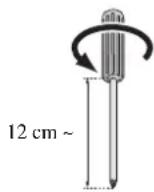
- Be sure to have a Phillips screwdriver that fits the screws prior to the assembly.
- When using an electric screwdriver, set the torque setting to approximately 1.5 ~N · m {15 kgf·cm}.
1 Position the Neck-Spacer on the TV Stand.
The Neck-Spacer is used for adjusting the height of the Neck and TV.
Be sure to attach the Neck-Spacer.
For KDL-55HX82x/46HX82x/55NX72x/46NX72x only:
2 Attach the Neck and the Neck-Spacer (for KDL-55HX82x/46HX82x/55NX72x/46NX72x only) to the TV Stand with the four Neck Screws (PSW4 × 12) (supplied).
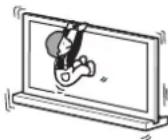
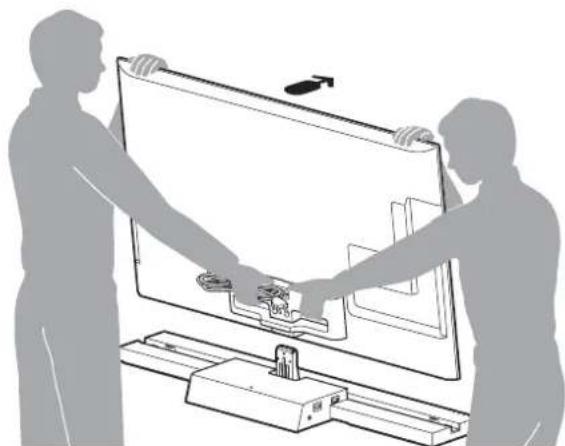
3 When moving the TV, hold the TV as shown below.

natural_image
Silhouettes of two people carrying a large rectangular object with abstract geometric shapes inside (no text or symbols)
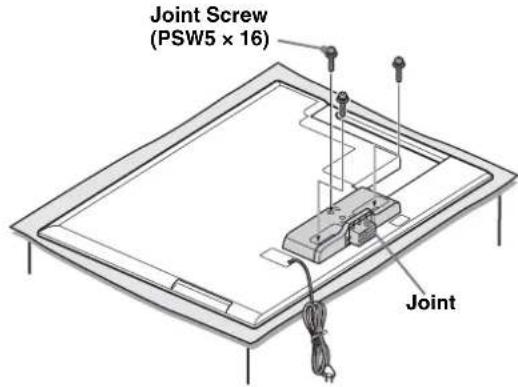
4 Attach the supplied Joint to the rear of the TV with the three screws (PSW5 × 16) (supplied).
Slide the supplied Joint up to attach.
[NO TEXT]
• Make sure to keep the removed screws.
- When removing the Table-Top Stand from the Display, lay the display face down on a stable work surface that is larger than the Display.
- To prevent damaging the surface of the LCD display, make sure to place a soft cloth on the work surface.
CAUTION
- If pressure or shock is applied to the surface of the Display, the LCD display may break or become damaged.
- Lay the display face down on a stable and level surface with the Table-Top Stand hanging over the edge of the surface.
Having the display face and the base of the Table-Top Stand on the same level surface will create an unstable working condition and can damage the Display.
5 Install the TV onto the TV Stand.
The TV is installed by placing it in the groove of the TV Stand.
natural_image
Illustration of two people interacting with a large screen displaying a device, no text or symbols present

Arrow direction shows front of the TV Stand.
6 Secure the TV and the TV Stand with the three TV Stand Neck Attachment Screws (PSW5 × 16) (supplied).
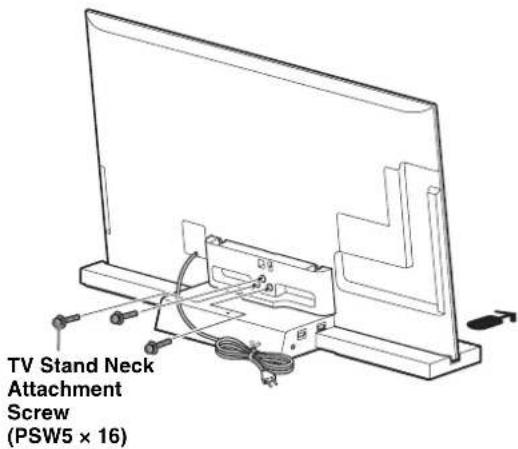
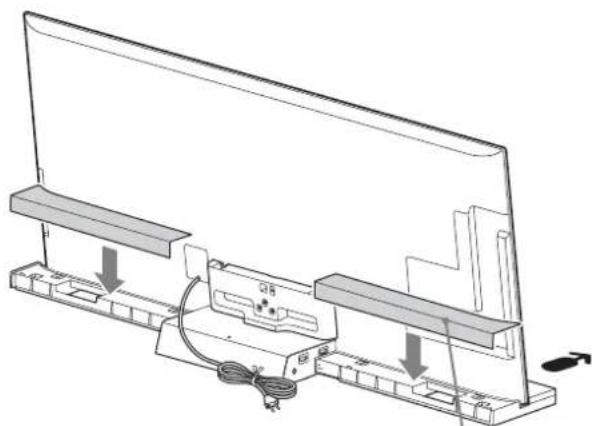
7 Attach the Rear Cover to the TV Stand. (For SU-B551S model only)
natural_image
Technical line drawing of a monitor mounted on a base with cables and connectors (no text or symbols)
Rear Cover
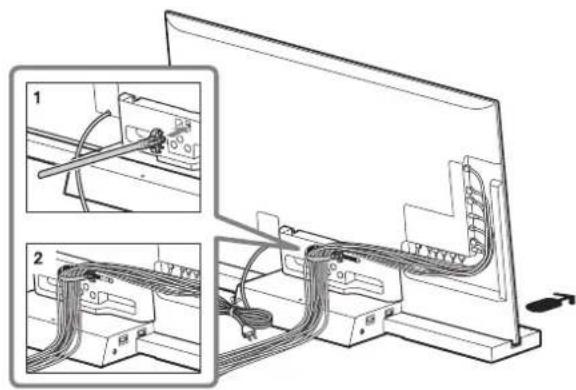
8
Bundling the cables.
Use the cable clamper supplied with the TV.
[NO TEXT]
- Do not bundle the AC power cord together with other cables.
Step 3: Safety measures to prevent toppling over
WARNING
Be sure to take measures to prevent the TV Stand from toppling over, and causing possible injury and damage.
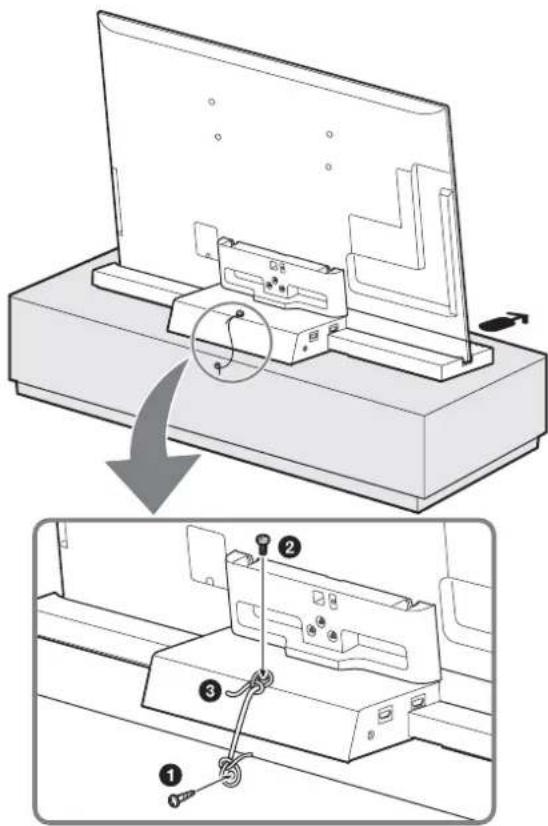
① Install a wood screw (4 mm in diameter, not supplied) in the board.
② Install a machine screw (M4 × 16, not supplied) into the screw hole of the TV Stand.
③Tie the wood screw and the machine screw with a strong cord (not supplied).
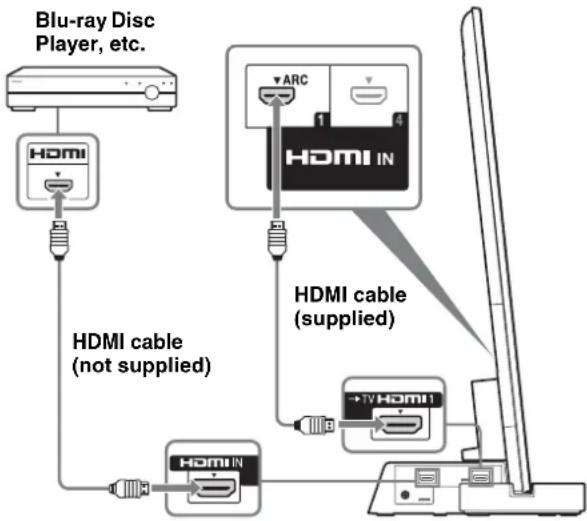
Step 4: Connecting the TV and Player
Connect the TV with an HDMI IN 1 to the TV Stand using an HDMI cable.
By connecting Sony “BRAVIA” Sync-compatible components using HDMI cables, operation can be simplified when you set the Control for HDMI function for the TV.
flowchart
graph TD
    A["Blu-ray Disc Player, etc."] --> B["HDMI"]
    B --> C["HDMS"]
    C --> D["HDMS IN"]
    D --> E["HDMS cable (supplied)"]
    E --> F["HDMS cable (not supplied)"]
    F --> G["HDMS IN"]
    G --> H["HDMS cable (supplied)"]
    H --> I["HDMS cable (not supplied)"]
    I --> J["HDMS cable (supplied)"]
[NO TEXT]
- Please do not connect PC with HDMI.
- The TV Stand is compatible with the Audio Return Channel (ARC) function. If you connect the TV Stand to the ARC compatible TV's HDMI IN 1 via an HDMI cable, you do not need to connect the TV to the TV Stand with the digital optical cord.
- You can see the letters “ARC” beside the TV’s HDMI jack (socket) if it is compatible with the ARC function. Even if you connect an HDMI cable to the socket, if the HDMI input jack (socket) is not compatible with the ARC function, you cannot use the ARC function.
- The ARC function is available only when Control for HDMI is set to on.
- Even if the TV Stand is turned off (active standby mode), the HDMI signal will be sent from the connected component to the TV via the HDMI connection. You can enjoy image and sound from the component on the TV.
Notes on HDMI connections
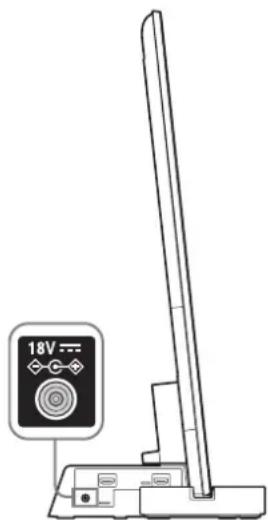
Step 5: Connecting the AC power cord (mains lead)
Connect all components and TV to the TV Stand before connecting the AC power cord (mains lead) of the TV Stand's AC Adapter (mains adapter) to a wall outlet.
natural_image
Line drawing of a vertical electronic device with a 18V power indicator and control panel (no text or symbols on the device itself)
[NO TEXT]
- Connect the TV Stand to an easily accessible AC outlet (mains). Should you notice an abnormality in the TV Stand, disconnect the main plug from the AC outlet (mains) immediately.
①Set to "On" in the "Control for HDMI" function.
Press the HOME button of the remote of the TV and select the menu as follows;
Settings > External Inputs > HDMI Set-up > Control for HDMI > On
Press the SYNC MENU button of the remote of the TV and select the menu as follows;
Speakers > Audio System
23
- After completing the settings for procedure ① and ②, the I (power) indicator lights up in green.
[Non-Text]
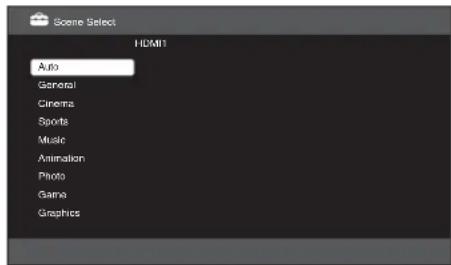
- Scene Select mode
This TV Stand is synchronized with the TV sound settings automatically, and works together with the Scene Select function, for you to choose your preferred sound for the selected scene.
To change the sound, change the TV sound settings.
- Position Control
If you set “External Device Control” to “On” of the TV, this TV Stand adjusts the volume balance between the left and right speakers according to viewing position. (Setting of the TV)
To set "Position Control", press the HOME button, then select System Settings > Position Control > the desired option.
Troubleshooting
Sound
No sound:
- Check the HDMI cable connection.
- Check the settings for “Control for HDMI” and “Audio System” in Step 6 (page 11).
Using with headphones:
- Switch “Audio System” to “TV Speakers” in the “Speakers” setting.
Using with dual sound of the TV digital transmission:
- Depending on the transmission, the sound cannot switch. Switch the “Optical Out” setting of the TV from “Auto” to “PCM”.
Using with external equipment for dual sound:
- If the sound cannot be switched, switch the audio output setting of the external equipment to activate PCM.
Indicator
Although the TV power is turned on, the I (power) indicator of the TV Stand does not light up:
- Check whether the AC adapter (mains adapter)'s AC power cord (mains lead) is plugged into a wall outlet.
- Consult customer support services.
Flash I (power) indicator red:
- A malfunction may have occurred with this product. Check how many times the LED flashes, and consult Sony service center.
Indicator
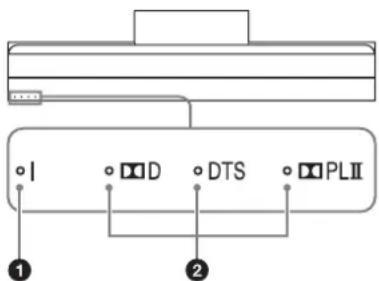
① (power) indicator
Lights as follows:
Green: The TV Stand is power on. (“Audio System” is set for “Speakers.”)
Off: The TV Stand is standby or power off.
Light up according to the audio format that is being input to the TV Stand.
D: Dolby Digital
DTS
PLII: Dolby Pro Logic II
Specifications

| | SU-B551S SU | B461S SU-B401S |
| Dimensions:cm | A1 | 0.2 11.8 11.0 | | |
| B1 | 9.0 15.9 15.1 | | |
| C1 | 27.6 | 107.9 | 94.4 |
| D | 55HX92x:79.6 | 46HX92x:68.6 | - |
| 55HX82x:79.8 | 46HX82x:68.7 | - |
| 55NX72x:79.7 | 46NX72x:68.7 | 40NX72x:61.2 |
| E2 | 9.2 27.7 26.1 | | |
| Stand Weight: | 6.3 kg | 5.6 kg | 4.9 kg |
Amplifier section
Rated Output Power Front: 10 W + 10 W, (per channel)
8 ohms, 1 kHz, THD less than 1%
Subwoofer: 20 W, 6 ohms, 100 Hz,
THD less than 1%
HDMI section
| Connector | HDMI ^TM | Connector |
| Video inputs/outputs | 720 × 480p (60Hz) 16:9 |
| 1280 × 720p (60Hz) 16:9 |
| 1920 × 1080i (60Hz) 16:9 |
| 1280 × 720p (50Hz) 16:9 |
| 720 (1440) × 480i (60Hz) 4:3 |
| 720 (1440) × 480i (60Hz) 16:9 |
| 720 (1440) × 576i (50Hz) 4:3 |
| 720 (1440) × 576i (50Hz) 16:9 |
| 1920 × 1080p (60Hz) 16:9 |
| 720 × 576p (50Hz) 16:9 |
| 1920 × 1080i (50Hz) 16:9 |
| 1920 × 1080p (50Hz) 16:9 |
| 1920 × 1080p (24Hz) 16:9 |
| 1920 × 1080p (30Hz) 16:9 |
| 1280 × 720p (24Hz) 16:9 |
| 1280 × 720p (30Hz) 16:9 |
| Deep Colour: 30bit/36bit |
| Video inputs/ 1280 × 720p@59.94/60 Hz |
| outputs (3D) Frame packing |
| 1920 × 1080i@59.94/60 Hz |
| Frame packing |
| 1920 × 1080i@59.94/60 Hz |
| Side-by-Side (Half) |
| 1920 × 1080p@59.94/60 Hz |
| Side-by-Side (Half) |
| 1280 × 720p@50 Hz |
| Frame packing |
| 1920 × 1080i@50 Hz |
| Frame packing |
| 1920 × 1080i@50 Hz |
| Side-by-Side (Half) |
| 1920 × 1080p@50 Hz |
| Side-by-Side (Half) |
| 1920 × 1080p@24 Hz |
| Frame packing |
| Deep Colour: 30bit/36bit |
| Audio inputs Linear PCM 2ch/5.1ch/7.1ch |
| Dolby Digital |
| DTS |
| Each signal is compliant with 32, 44. |
| 48 kHz. |
Speakers
Front speaker unit
Speaker system 2-way 2-driver, Bass reflex type
Speaker unit Woofer: 30 × 100 mm cone type ×1
Tweeter: 30 mm cone type
Subwoofer unit
Speaker system Subwoofer, Bass reflex type
Speaker unit 70 mm cone type
General
Power requirements 100 - 240 V, 50/60 Hz
Power consumption
On: 12 W
Standby: 0.7 W
- Standby power consumption: 0.7 W
- Halogenated flame retardants are not used in the certain printed wiring boards.
• Over 85% power efficiency of amplifier block is achieved with the full digital amplifier, S-Master.
Design and specifications are subject to change without notice.
natural_image
Silhouettes of two people carrying a large rectangular object with abstract geometric shapes inside (no text or symbols)
natural_image
Silhouettes of two people interacting with a large screen device (no text or symbols visible)
natural_image
Line drawing of a vertical electronic device with a 18V power indicator and control panel (no text or symbols on the device itself)
① Voyant I (alimentation)
natural_image
Silhouettes of two human figures holding a rectangular frame with abstract geometric shapes inside (no text or symbols)
natural_image
Silhouettes of two people interacting with a computer monitor (no text or symbols visible)
natural_image
Line drawing of a handheld electronic device with a 18V power indicator and control panel (no text or symbols on the device itself)
natural_image
Silhouettes of two human figures holding a rectangular frame with abstract geometric shapes inside (no text or symbols)
natural_image
Two silhouettes of people interacting with a large screen displaying a device (no text or symbols visible)
① Anzeige I (Ein)
natural_image
Silhouettes of two people carrying a rectangular frame with abstract geometric shapes inside (no text or symbols)
natural_image
Silhouettes of two people interacting with a large screen displaying a device (no text or symbols visible)
natural_image
Technical diagram showing two views of cable routing on a computer monitor, with no visible text or symbols.
natural_image
Line drawing of a handheld electronic device with a 18V power indicator and control panel (no text or symbols on the device itself)
① (aan)-lampje
licht als volgt op:
Deep Colour: 30bit/36bit
Audio-ingangen Lineaire PCM 2/5.1/7.1-kanaals
Dolby Digital
DTS
Speakersysteem Subwoofer, bass reflex-type
Speaker 70 mm, conustype
Algemeen
Voeding 100 - 240 V, 50/60 Hz
Stroomverbruik
Aan: 12 W
Stand-by: 0,7 W
natural_image
Silhouettes of two people carrying a rectangular frame with abstract geometric shapes inside (no text or symbols)
4
natural_image
Illustration of two people interacting with a large screen displaying cable and a device (no text or symbols visible)
natural_image
Silhouettes of two people carrying a large rectangular object with abstract geometric shapes inside (no text or symbols)
4
natural_image
Silhouettes of two people interacting with a large screen displaying a device (no text or symbols visible)
natural_image
Line drawing of a handheld electronic device with a 18V power indicator and control panel (no text or symbols on the device itself)

① (power)-indikering
natural_image
Silhouettes of two human figures holding a rectangular frame with abstract geometric shapes inside (no text or symbols)
4
natural_image
Silhouettes of two people interacting with a large screen displaying a 3D object (no text or symbols visible)

natural_image
Line drawing of a handheld electronic device with a 18V power indicator and control panel (no text or symbols on the device itself)
natural_image
Silhouettes of two people carrying a large rectangular object with abstract geometric shapes inside (no text or symbols)
natural_image
Silhouettes of two people interacting with a large screen or monitor device (no text or symbols visible)
8
Juntar os cabos.
Utilize a braçadeira de cabos fornecida com o televisor.

natural_image
Silhouettes of two people carrying a large rectangular object with abstract geometric shapes inside (no text or symbols)
natural_image
Silhouettes of two people interacting with a large screen displaying a device (no text or symbols visible)

Pilens retning angiver fronten på tv-bordet.
natural_image
Technical diagram showing cable installation on a computer monitor, with two views (1 and 2) highlighting cable routing and cable connection details (no text or symbols present)
natural_image
Line drawing of a handheld electronic device with a 18V power indicator and control panel (no text or symbols on the device itself)
- Kontakt kundesupportservice.
Indikatoren I (power) blinker rødt:
① Indikator I (power)
Lyser som følger:
8 ohm, 1 kHz, THD under; 1%
Subwoofer: 20 W, 6 ohm, 100 Hz,
THD under; 1%
HDMI
Stik HDMI ^TM -stik
Videoindgange/ 720 × 480p (60 Hz) 16:9
-udgange 1280 × 720p (60 Hz) 16:9
1920 × 1080i (60 Hz) 16:9
1280 × 720p (50 Hz) 16:9
720 (1440) × 480i (60 Hz) 4:3
720 (1440) × 480i (60 Hz) 16:9
720 (1440) × 576i (50 Hz) 4:3
720 (1440) × 576i (50 Hz) 16:9
1920 × 1080p (60 Hz) 16:9
720 × 576p (50 Hz) 16:9
1920 × 1080i (50 Hz) 16:9
1920 × 1080p (50 Hz) 16:9
1920 × 1080p (24 Hz) 16:9
1920 × 1080p (30 Hz) 16:9
1280 × 720p (24 Hz) 16:9
1280 × 720p (30 Hz) 16:9
Deep Colour: 30 bit/36 bit
Videoindgange/ 1280 × 720p@59,94/60 Hz
Deep Colour: 30 bit/36 bit
Lydindgange Linear PCM 2-kanals/5.1-kanals/
7.1-kanals
Dolby Digital
DTS
natural_image
Silhouettes of two people carrying a large rectangular object with abstract geometric shapes inside (no text or symbols)
natural_image
Two silhouettes of people interacting with a large screen displaying a mechanical component (no text or symbols visible)
natural_image
Technical diagram showing cable installation on a computer monitor, with two views (1 and 2) highlighting cable routing and cable connection details (no text or symbols present)
natural_image
Line drawing of a handheld electronic device with a 18V power indicator and control panel (no text or symbols on the device itself)

natural_image
Silhouettes of two people carrying a large rectangular object with abstract geometric shapes inside (no text or symbols)
4
Fest den medfølgende festebraketten bak på TV-en med de tre skruene (PSW5 × 16) (medfølger).
natural_image
Silhouettes of two people interacting with a large screen displaying a device (no text or symbols visible)
natural_image
Line drawing of a handheld electronic device with a 18V power indicator and control panel (no text or symbols on the device itself)

① (strøm)-indikator
Lyser som følger:
8 ohms, 1 kHz, THD mindre enn 1 %
Subwoofer: 20 W, 6 ohms, 100 Hz,
THD mindre enn 1 %
HDMI-del
Kontakt HDMITM-kontakt
Videoinnganger/ 720 × 480p (60 Hz) 16:9
-utganger 1280 × 720p (60 Hz) 16:9
1920 × 1080i (60 Hz) 16:9
1280 × 720p (50 Hz) 16:9
720 (1440) × 480i (60 Hz) 4:3
720 (1440) × 480i (60 Hz) 16:9
720 (1440) × 576i (50 Hz) 4:3
720 (1440) × 576i (50 Hz) 16:9
1920 × 1080p (60 Hz) 16:9
720 × 576p (50 Hz) 16:9
1920 × 1080i (50 Hz) 16:9
1920 × 1080p (50 Hz) 16:9
1920 × 1080p (24 Hz) 16:9
1920 × 1080p (30 Hz) 16:9
1280 × 720p (24 Hz) 16:9
1280 × 720p (30 Hz) 16:9
Deep Colour: 30bit/36bit
Videoinnganger/ 1280 × 720p@59,94/60 Hz
-utganger (3D) Frame packing
1920 × 1080i@59,94/60 Hz
Frame packing
1920 × 1080i@59,94/60 Hz
side-ved-side (halv)
1920 × 1080p@59,94/60 Hz
side-ved-side (halv)
1280 × 720p@50 Hz
Frame packing
1920×1080i@50 Hz
Frame packing
1920×1080i@50 Hz
side-ved-side (halv)
1920 × 1080p@50 Hz
side-ved-side (halv)
1920 × 1080p@24 Hz
Frame packing
Deep Colour: 30bit/36bit
Lydinnganger Linear PCM 2k/5.1k/7.1k
Dolby Digital
DTS
Hvert signal er kompatibelt med 32,
44,1, 48 kHz.
Høyttalere
Fronthøyttaler
Høytalersystem 2-veis 2-driver, bassreflekstype
natural_image
Silhouettes of two human figures holding a rectangular frame with abstract geometric shapes inside (no text or symbols)
natural_image
Two silhouettes of people interacting with a large screen displaying a device (no text or symbols visible)
natural_image
Line drawing of a vertical electronic device with a 18V power indicator and control panel (no text or symbols on the device itself)
429
Deep Colour: 30bit/36bit
Deep Colour: 30bit/36bit
Product Compliance Europe (PCE),
natural_image
Silhouettes of two human figures holding a rectangular frame with abstract geometric shapes inside (no text or symbols)
natural_image
Two silhouettes of people interacting with a large screen displaying a device (no text or symbols visible)

natural_image
Technical diagram showing cable installation on a computer monitor, with two views (1 and 2) highlighting cable routing and cable connection details (no text or symbols present)

natural_image
Line drawing of a handheld electronic device with a 18V power indicator and control panel (no text or symbols on the device itself)
①l (güç) göstergesi
8 ohm, 1 kHz, Toplam Armonik
Bozulma %1'den az
Subwoofer: 20 W, 6 ohm, 100 Hz,
Deep Colour: 30 bit/36 bit
Deep Colour: 30 bit/36 bit
natural_image
Silhouettes of two people carrying a rectangular object with abstract geometric shapes inside (no text or symbols)
4
natural_image
Two silhouettes of people interacting with a large screen displaying a device (no text or symbols visible)

natural_image
Technical diagram showing cable installation on a computer monitor, with two views (1 and 2) highlighting cable routing and cable connection details (no text or symbols present)
natural_image
Line drawing of a vertical electronic device with a 18V power indicator and control panel (no text or symbols on the device itself)
Deep Colour: 30 bit/36 bit
Videobemenetek/ 1280 × 720p@59,94/60 Hz
kimenetek (3D) Frame packing
1920 × 1080i@59,94/60 Hz
Frame packing
1920 × 1080i@59,94/60 Hz
Side-by-side horizontally (half)
1920 × 1080p@59,94/60 Hz
Side-by-side horizontally (half)
1280 × 720p@50 Hz
Frame packing
1920 × 1080i@50 Hz
Frame packing
1920 × 1080i@50 Hz
Side-by-side horizontally (half)
1920 × 1080p@50 Hz
Side-by-side horizontally (half)
1920 × 1080p@24 Hz
Frame packing
Deep Colour: 30 bit/36 bit
natural_image
Silhouettes of two people carrying a large rectangular object with abstract geometric shapes inside (no text or symbols)
natural_image
Silhouettes of two people interacting with a computer monitor (no text or symbols visible)

natural_image
Line drawing of a handheld electronic device with a 18V power indicator and control panel (no text or symbols on the device itself)
① Kontrolka I (zapnuto)
* Len pre model SU-B551S.
** Len pre modely SU-B551S/461S.
VAROVANIE
natural_image
Silhouettes of two people holding a rectangular frame with abstract geometric shapes inside (no text or symbols)
natural_image
Two silhouettes of people interacting with a large screen displaying a device (no text or symbols visible)
①Zaskrutkujte do dosky skrutku do dreva (s priemerom 4 mm, nedodáva sa).
② Zaskrutkujte skrutku do kovu (M4 × 16, nedodáva sa) do otvoru pre skrutku v stojane na televízor.
natural_image
Line drawing of a handheld electronic device with a 18V power indicator and control panel (no text or symbols on the device itself)
Pasul 1: Verificarea pieselor
natural_image
Silhouettes of two people carrying a large rectangular object with abstract geometric shapes inside (no text or symbols)
natural_image
Two silhouettes of people interacting with a large screen displaying a device (no text or symbols visible)
natural_image
Technical diagram showing cable installation on a computer monitor, with two views of cable routing (no text or symbols present)
① indicator (alimentare)
Putere consumată Frontal: 10 W + 10 W, (pc canal)
8 ohmi, 1 kHz, THD sub 1%
Subwoofer: 20 W, 6 ohmi, 100 Hz,
THD sub 1%
Sectiune HDMI
Conector Conector HDMI ^TM
natural_image
Silhouettes of two people carrying a rectangular object with internal geometric shapes (no text or symbols)
4
natural_image
Two silhouettes of people interacting with a large screen displaying a device (no text or symbols visible)
Sony Corporation, 1-7-1 Konan,
Minato-ku, Tokyo Japan
Assembled in Malaysia

natural_image
Silhouettes of two people carrying a large rectangular object with abstract geometric shapes inside (no text or symbols)
4
natural_image
Silhouettes of two people interacting with a large screen displaying a device (no text or symbols visible)
natural_image
Silhouettes of two human figures holding a rectangular object with abstract geometric shapes inside (no text or symbols)
4
natural_image
Two silhouettes of people interacting with a large screen or monitor device (no text or symbols visible)
natural_image
Line drawing of a handheld electronic device with a 18V power indicator and control panel (no text or symbols on the device itself)
Deep Colour: 30 bit/36 bit