CT500BT - Alarm clock radio THOMSON - Free user manual and instructions
Find the device manual for free CT500BT THOMSON in PDF.
User questions about CT500BT THOMSON
0 question about this device. Answer the ones you know or ask your own.
Ask a new question about this device
Download the instructions for your Alarm clock radio in PDF format for free! Find your manual CT500BT - THOMSON and take your electronic device back in hand. On this page are published all the documents necessary for the use of your device. CT500BT by THOMSON.
USER MANUAL CT500BT THOMSON
Waterloo Office Park/Batiment H
Dreve Richelle 161 bte 15 1410 Waterloo, Belgium
Bigben Interactive NEDERLAND b.v.
BELGIQUE, customerservice@bigben-interactive.be
NEDERLAND, customerservice@bigben-interactive.nl
ESPANA, sat@bigbeninteractive.es
ITALIA, support@bigbeninteractive.it
www/bigben.eu
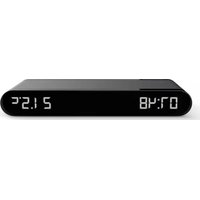
THOMSON
CT500BT
Weather Station
OPERATING INSTRUCTIONS
PLEASE READ THIS USER MANUAL CAREFULLY BEFORE OPERATING THIS UNIT AND RETAIN FOR FUTURE REFERENCE
Contents
Getting Started 1
Safety and Notice 1
Care for your product 2
What's in the box? 3
Description of Parts 4
Adaptor specification 8
Product Specification 8
Care of the environment
9
Getting Started
- Remove the appliance from the box.
- Remove any packaging from the product.
- Place the packaging inside the box and either or dispose of safely.
Safety and Notice
- Read and understand all instructions before you use this product. If damage is caused by failure to follow the instructions, the warranty does not apply.

- Never remove the casing of this device.
- Never place this device on other electrical equipment.
- Protect the power cord from being walked on or pinched, particularly at plugs, convenience receptacles, and the point where they exit from the device. Make sure that the power voltage corresponds to the voltage printed on the back label. When you unplug the AC power cord always pull the plug from the socket. Never pull the cord. Before connecting the AC power cord, ensure you have completed all other connections
- Only use attachments/accessories specified by the manufacturer.
-
Refer all servicing to qualified service personnel. Servicing is required when the device has been damaged in any way, such as:
-
damaged power-supply cord,
- spilled liquid or objects have inserted into the device,
- the device has been exposed to rain or moisture,
- the device does not operate normally,
-
or the device has been dropped.
-
The rating label is placed on the bottom side of apparatus.
- Make sure there is enough space around the product for ventilation.
- The use of this device must be done in moderate climates, away from direct sunlight, naked flames or heat. Do not install near any heat sources.
- Batteries (battery pack or batteries installed) shall not be exposed to excessive heat such as sunshine, fire, etc.
-
Unplug before cleaning. Never lubricate any part of this device. Clean the appliance with a soft cloth. Do not use abrasives or harsh cleaners.
-
Ensure that you always have easy access to the power cord, plug or adaptor to disconnect this device from the power if necessary.
- Do not use this apparatus near water. It must not be in contact with dripping or splashing. Do not use this unit in wet or damp conditions.
- Unplug this device during lightning storms or when unused for long periods of time.
Care for your product
1) Always unplug the appliance when not in use and before cleaning.
2) Do not play music at excessive volume levels as damage to hearing and or the equipment may occur.
3) Do not use this unit in wet or damp conditions.
4) Always disconnect the unit from the mains power supply before cleaning. Clean the appliance with a soft, damp, lint free cloth. Do not use abrasives or harsh cleaners.


The lightning symbol inside an equilateral triangle warns the user of the presence inside the product of uninsulated hazardous electric voltages powerful enough to represent an electrocution risk.

The exclamation point within a triangle indicates the presence of important operating and maintenance (servicing) instructions in the literature accompanying the unit.
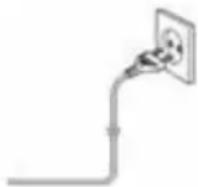
Place the unit in the desired position and unravel the mains cable. Insert the cable into the supply socket and switch on if applicable.
| CLASS II MATERIAL | |
| DC POWER SUPPLY | = = = |
| ALTERNATING CURRENT | ~ |
| FOR INDOOR USE ONLY |
Note the following information: Only use the power supplies listed below.

This product is intended for use only with the adaptor provided:
Manufacturer: OBELIEVE
Model: OBL-0501000E
Battery power:
Be sure that the batteries are inserted correctly to avoid damage to the appliance. Always remove the batteries when appliance will not be used for a long period of time, as this will cause leakage to the batteries and subsequently damage to your set.
Use batteries of the same type. Never use different types of batteries together.
Do not throw the battery into the fire, or exposed to sunshine or the like.
If the liquid contained in the batteries comes in contact with eyes or skin, wash the area immediately and carefully with clear water and consult a doctor.
Lithium battery:
CAUTION
Risk of explosion of the battery is replaced by an incorrect type.
- High or low extreme temperatures that a battery can be subjected to during use, storage or transportation; and
- Low air pressure at high altitude.
- Replacement of a battery with an incorrect type that can defeat a safeguard (for example, in the case of some lithium battery types);
- Disposal of a battery into fire or a hot over, or mechanically crushing or cutting of a battery, that can result in an explosion;
- Leaving a battery in an extremely high temperature surrounding environment that can result in an explosion or the leakage of flammable liquid or gas;
- a battery subjected to extremely low air pressure that may result in an explosion or the leakage of flammable liquid or gas.
The following safeguard for coin/button cell batteries:
Do not ingest battery, Chemical Burn Hazard
This product contains a coin / button cell battery. If the coin / button cell battery is swallowed, it can cause severe internal burns in just 2 hours and can lead to death.
Keep new and used batteries away from children.
If the battery compartment does not close securely, stop using the product and keep it away from children.
If you think batteries might have been swallowed or placed inside any part of the body, seek immediate medical attention.
WARNING! Risk of hearing damage

- Set a low volume on the playback device before connecting the headphones to the sound source.
- Avoid excessive volume, particularly over extended periods or frequent use. Excessive volume can result in permanent hearing damage.
What's in the box?
Check and identify the contents of your package:
- Main unit
Transmitter - User manual
- AC adaptor
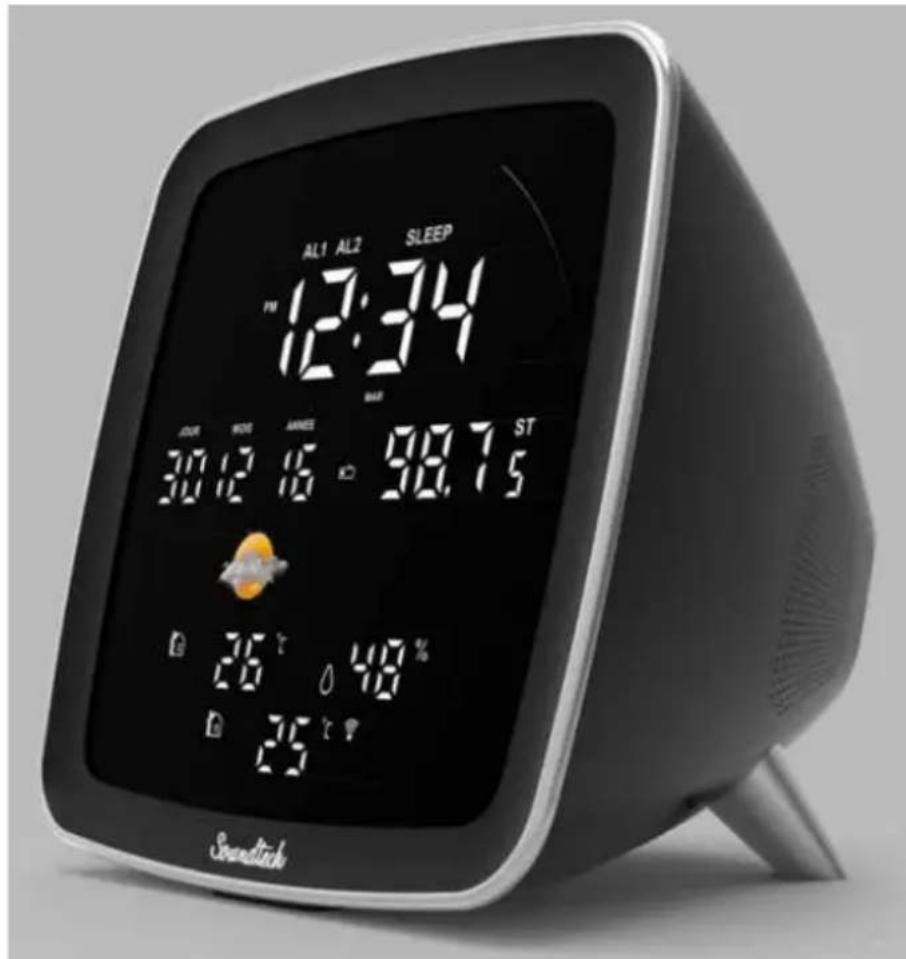
Description of Parts
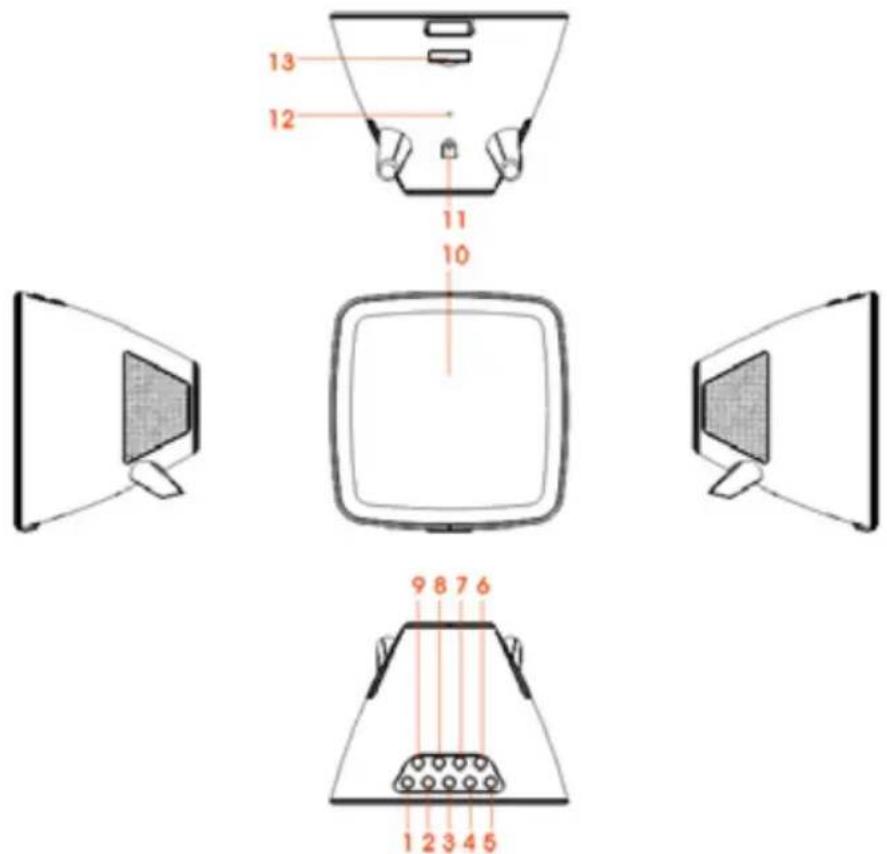
1)SKIP-BUTTONG
8) STOP BUTTON / CELSIUS-FAHRENHEIT
2)SKIP+ BUTTON
9) PLAY/PAUSE/SNOOZE BUTTON
3) VOL-B BUTTON
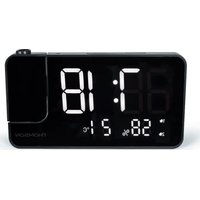
10) LED DISPLAY
4)VOL+ BUTTON
11) DC JACK
5) STANDBY/TIME SET BUTTON
12) FM WIRE ANTENNA
6) DIMMER BUTTON
13) BATTERY DOOR
7) ALARM SET/FUNCTION BUTTON
UNIT POWER SUPPLY
This unit is designed to operate with a DC 5V/1A adaptor.
Insert the small plug of the adaptor into the DC Jack.
Insert the AC/DC adaptor into any convenient 230V~AC, 50Hz household outlet in either the vertical or horizontal position.
CLOCK BACK-UP
Prior to first use, remove the transparent tab (which prevents battery contact) located under the battery compartment to activate the battery.
Replacing the battery
To replace the battery, please proceed as follows:
1) Take out the battery compartment and open the drawer fully.
2) Insert the CR2025 type battery in accordance with the correct polarity (+/-) .
3) Return the battery compartment to the inside of the weather station.
Note:
Only use the battery type stipulated in this manual.
OUTDOOR TEMPERATURE & HUMIDITY TRANSMITTER
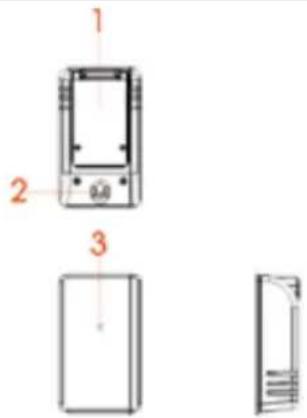
1) battery door
2) wall mount opening
3) LED indicator
CELSIUS-FAHRENHEIT: Press the stop button on "stand by" mode to choose between Celsius or Fahrenheit.
Operation:
Open the battery door located behind the transmitter using a screwdriver.
Insert 2 × 1.5 ~V "AAA" batteries according to the polarity indicated.
Close the battery compartment cover.
The transmitter may be installed:
- either on the wall using a screw (not provided). Hang the transmitter by the opening located on the back;
-or horizontally,
For better results:
- Do not expose the sensor to direct sunlight or humidity.
- Do not place the sensor more than 10 meters from the weather station.
- Minimize obstacles (doors, walls and furniture) between the sensor and the clock radio.
- Keep the transmitter away from metal or electronic objects.
TO SET THE CLOCK TIME &CALENDAR
1) In standby mode, press and hold the STANDBY/TIME SET BUTTON; the digital will blink on the display.
2) Press the SKIP+ or SKIP- button to set the 12/24H format, then press STANDBY/TIME SET BUTTON to confirm.
3) Press the SKIP+ or SKIP- button to set the DESIRED HOUR, then press the STANDBY/TIME SET BUTTON to confirm.
4) Press the SKIP+ or SKIP- button to set the DESIRED MINUTE, then press the STANDBY/TIME SET BUTTON to confirm.
5) Press the SKIP+ or SKIP- Button to set the DESIRED YEAR. Then press the STANDBY/TIME SET BUTTON to confirm.
6) Press the SKIP+ or SKIP- button to set the DESIRED MONTH. Then press the STANDBY/TIME SET BUTTON to confirm.
7) Press the SKIP+ or SKIP- button to set the DESIRED DAY. Then press the STANDBY/TIME SET BUTTON to confirm.
TO SET THE ALARM TIME
1) In standby mode, press and hold the ALARM SET/FUNCTION button, the numbers will blink on the display.
2) Press the SKIP+ or SKIP- button to set the DESIRED ALARM1 HOUR, then press the ALARM SET/FUNCTION button again.
3) Press the SKIP+ or SKIP-button to set the DESIRED ALARM1 MINUTE, then press the ALARM SET/FUNCTION button to confirm.
4) Press the SKIP+ or SKIP-button to set the DESIRED ALARM1 SOURCE (buzz or radio), then press the ALARM SET/FUNCTION button to confirm.
5) Press the SKIP+or SKIP- button to set the DESIRED ALARM2 HOUR, then press the ALARM SET/FUNCTION Button again.
6) Press the SKIP+ or SKIP-button to set the DESIRED ALARM2 MINUTE, then press the ALARM SET/FUNCTION button to confirm.
7) Press the SKIP+ or SKIP-button to set the DESIRED ALARM2 SOURCE (buzz or radio), then press the ALARM SET/FUNCTION button to confirm.
NOTE: In standby mode, press the ALARM SET/FUNCTION button to turn the alarm1 & alarm2 function on/off. The "Alarm 1" & "Alarm 2" icon will show on the LED display once the alarm function is active.
SHUT OFF THE ALARM
1) When the alarm goes off, press the STANDBY/TIME SET BUTTON to turn off the alarm. The alarm will reset for the next day.
2) To turn off the alarm completely (not reset for the next day), press the ALARM SET/FUNCTION button repeatedly until "Alarm 1" & "Alarm 2" icon are off.
SNOOZE FUNCTION
When the alarm activates, press the PLAY/PAUSE/SNOOZE BUTTON. The alarm will turn off and will ring again 9 minutes later.
DIMMER FUNCTION
Press the DIMMER button to select your desired display brightness.
VOLUME CONTROL
a) Press the VOL+ button to increase the volume
b) Press the VOL- button to decrease the volume.
RADIO OPERATION
1) Press the STANDBY/TIME SET BUTTON to turn on the unit first
2) Press the ALARM SET/FUNCTION BUTTON repeatedly until the frequency is shown on the display. How to use the buttons for radio
i. Manual Tuning
Press the SKIP- or SKIP+ button to search for the desired frequency.
ii Automatic Tuning
a) Press & hold the SKIP-or SKIP+ button until the display frequency starts running
b) When a station of sufficient strength is found Tuning will stop or you can stop automatic tuning by pressing the SKIP- or SKIP+ button.
3) To turn off the radio, press the STANDBY/TIME SET BUTTON.
Note:
The FM wire antenna should be fully extended for better FM reception.
MANUAL PRESETTING
1) Tune into the desired radio station as shown above.
2) Press and hold the STOP button for 3 seconds; "P 01" will blink on the display. Press the SKIP- or SKIP+ button to select the program number (01-10) you want it stored to. Then press the STOP button again to store it.
3) Repeat the same procedure until all the desired radio stations are stored into the program list.
MEMORY RECALL
Recall the stored frequencies by pressing the STOP button first, then press the SKIP- or SKIP+ button to select station 1 to 10 as desired.
Play from Bluetooth-enabled devices
With this product, you can listen to audio from Bluetooth-enabled devices.
Connect a device
1) Turn on the unit first by pressing the STANDBY/TIME SET BUTTON.
2) Press the ALARM SET/FUNCTION BUTTON repeatedly until the "bt" indicator is shown on the display
3) The BLUETOOTH icon flashes blue quickly.
4) On your Bluetooth device, enable Bluetooth and search for Bluetooth devices (refer to the device user manual).
5) When [CT500BT] is displayed on your device, select it to start pairing and connect. If necessary, enter the default password "0000". After successful pairing and connection, the product beeps and the Bluetooth icon will appear as a steady light.
Note:
- Make sure that your Bluetooth device is compatible with this product.
- Before pairing a device with this product, read its user manual for Bluetooth compatibility.
- Make sure that the Bluetooth function is enabled on your device, and your device is set as visible to all other Bluetooth devices.
- Any obstacle between this product and a Bluetooth device can reduce the operational range.
- Keep away from any other electronic device that may cause interference.
- The operational range between this product and a Bluetooth device is approximately 10 meters.
To disconnect the Bluetooth-enabled device:
- Press and hold the Play/Pause/Snoopze button for three seconds;
- Disable Bluetooth on your device; or
- Move the device beyond the communication range. The product beeps and the Bluetooth icon flashes quickly.
To reconnect the Bluetooth-enabled device:
- Next time this product enters Bluetooth mode, it will reconnect to the last connected device automatically; or
- On your Bluetooth device, select [i-box Glow] on your Bluetooth menu to start the connection.
Play from a Bluetooth device
After successful Bluetooth connection, press the Play/Pause/Snoopze button to play audio on the Bluetooth device.
Press the SKIP+ or SKIP- button to choose a track.
To pause or resume play, press the Play/Pause/Snoopze button.
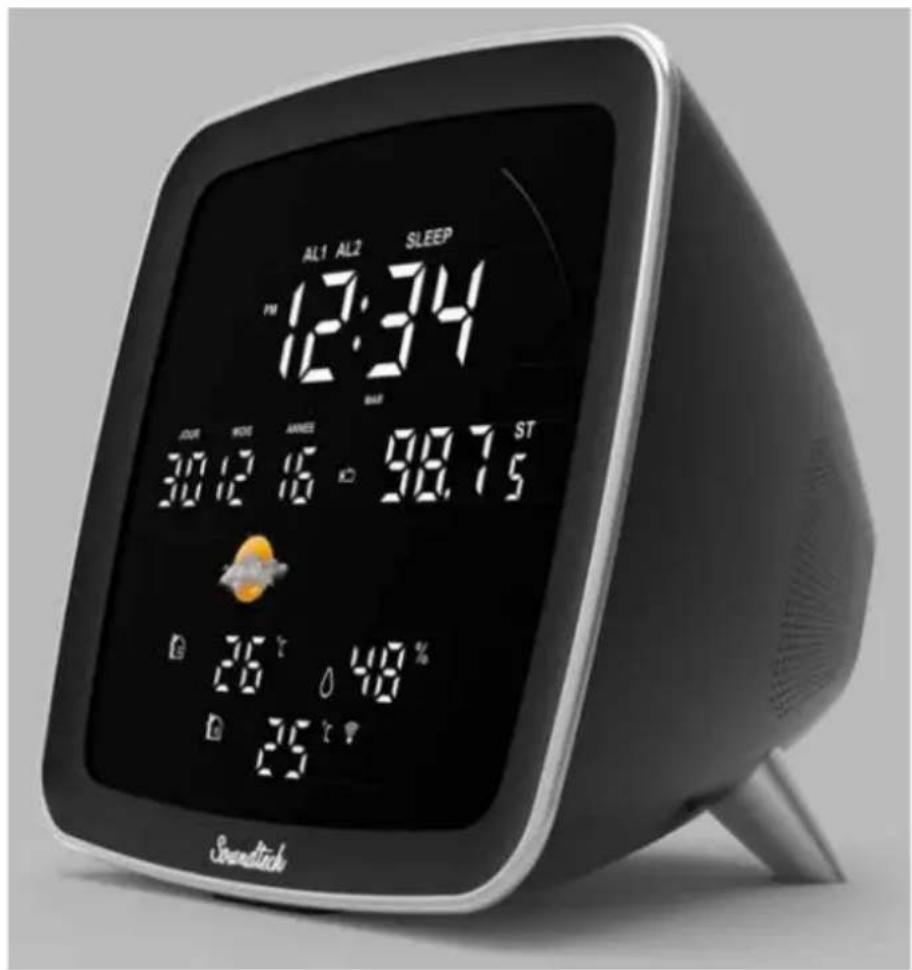
By default, the weather station's screen is set to a bright display.
To adjust the brightness, press the DIMMER button repeatedly.
WIRELESS TEMPERATURE
This unit is equipped with a wireless temperature transmitter. Just put it outdoors and turn on the power. The outdoor transmitter automatically connects itself after 1 minute. Otherwise, connect the devices manually:
- In standby mode, press the Play/Pause/Snoopze button for 3 seconds. Once the weather station detects the sensor, the outdoor temperature and humidity is displayed. The sensor data is automatically sent approximately every 3 minutes.
- Choice of temperature unit:
- In standby mode, Press the STOP button to select the temperature unit: Celsius or Fahrenheit.
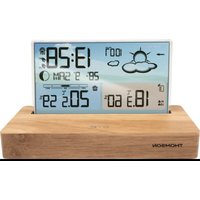
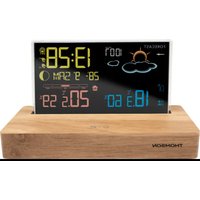
WEATHERSTATION
The outdoor/indoor temperature & humidity are shown on the bottom left of the LED screen and the weather symbol is shown on the middle left of the LED display.

Sunny

Sunny intervals

Cloudy

Rainy
Please connect to Bluetooth. Refer to your phone instructions on how to connect to Bluetooth devices.
Adaptor specification
Adaptor Input: 100-240V~50/60Hz 0.3A MAX.
Output: DC 5V-1A
Product Specification
Frequency ranges: FM: 88.8 - 108 Mhz
Clock back up: 1 x CR2025 (3V)
Pairing name: CT500BT
Remark: The maximum connection distance is around 10 meters. Please place your Bluetooth speaker as close as possible to this device to avoid connection getting disturbed.
Under the environment with electrostatic discharge, the device may be power off. (EUT could not operate properly). It requires user reset the device by turn on the device to choose the appropriate mode & set time again.
Care of the environment
Auto standby
When no music play from a connected device, the product automatically switches to standby if:
- No button is pressed for 10 minutes,
- No audio from a connected device for 10 minutes.

Your product is designed and manufactured with high quality materials and components, which can be recycled and reused.
Attention should be drawn to environmental aspects of battery disposal.

When this crossed-out wheeled bin symbol is attached to a product it means that the product is covered by the European Directive 2002/96/EC. Please inform yourself about the local separate collection system for electrical and electronic products. Please act according to your local rules and do not dispose of your old products with your normal household waste. Correct disposal of your old product helps to prevent potential negative consequences for the environment and human health.
- If there is an incoming call while CT500BT is connected to your cell phone for music playback, it will pause at once when you answer the call and resume after the call ended. (Sometimes it will pause after end the call, it depend on your cell phone.)
- The Bluetooth® word, mark and logo are registered trademarks owned by Bluetooth SIG, Inc. and any use of such marks by Bigben Interactive is under license. Other trademarks and trade names are those of their respective owners.
- THOMSON is a trademark of TECHNICOLOR SA or its affiliates used under license to Bigben Interactive.
- You can find the information on the plate located at the back of the unit.
DECLARATION OF CONFORMITY
The undersigned, Bigben Interactive declares that the radio equipment of the CT500BT complies with the 2014/53/EU directive.
The complete text is available at https://www/bigben-interactive.co.uk/support/
Made in China
Manufactured by BIGBEN INTERACTIVE SA
396, Rue de la Voyette
CRT2-FRETIN
CS 90414
59814 LESQUIN Cedex - France
www/bigben.eu
Email: support.thomson@bigben.fr


Fabricant: Bigben Interactive FRANCE
- Rue de la Voyette, C.R.T. 2, Fretin, CS90414 - 59814 Lesquin Cedex, France
Waterloo Office Park/Batiment H
Dreme Richelle 161 bte 15 1410 Waterloo, Belgium
Bigben Interactive NEDERLAND b.v.
BELGIQUE, customerservice@bigben-interactive.be
NEDERLAND, customerservice@bigben-interactive.nl
ESPANA, sat@bigbeninteractive.es
ITALIA, support@bigbeninteractive.it
www/bigben.eu
THOMSON
CT500BT
Waterloo Office Park/Batiment H
Dreve Richelle 161 bte 15 1410 Waterloo, Belgium
Bigben Interactive NEDERLAND b.v.
BELGIQUE, customerservice@bigben-interactive.be
NEDERLAND, customerservice@bigben-interactive.nl
ESPANA, sat@bigbeninteractive.es
ITALIA, support@bigbeninteractive.it
THOMSON
CT500BT
Waterloo Office Park/Batiment H
Drive Richelle 161 bte 15 1410 Waterloo, Belgium
Bigben Interactive NEDERLAND b.v.
BELGIQUE, customerservice@bigben-interactive.be
NEDERLAND, customerservice@bigben-interactive.nl
ESPANA, sat@bigbeninteractive.es
ITALIA, support@bigbeninteractive.it
www/bigben.eu
THOMSON
PT
CT500BT
Waterloo Office Park/Batiment H
Dreve Richelle 161 bte 15 1410 Waterloo, Belgium
Bigben Interactive NEDERLAND b.v.
BELGIQUE, customerservice@bigben-interactive.be
NEDERLAND, customerservice@bigben-interactive.nl
ESPANA, sat@bigbeninteractive.es
ITALIA, support@bigbeninteractive.it
www/bigben.eu
THOMSON
CT500BT
Wetterstation

7) TASTE ALARM SET/FUNCTION
ENERGIEVERSORGUNG
Kopplungsname:CT500BT
Waterloo Office Park/Batiment H
Drive Richelle 161 bte 15 1410 Waterloo, Belgium
Bigben Interactive NEDERLAND b.v.
BELGIQUE, customerservice@bigben-interactive.be
NEDERLAND, customerservice@bigben-interactive.nl
ESPANA, sat@bigbeninteractive.es
ITALIA, support@bigbeninteractive.it
www/bigben.eu
THOMSON
CT500BT
Weerstation
HANDLEIDING
GELIEVE DEZE GEBRUKSAANWIJZING GOED DOOR TENEMEN VOOR U HET TOESTEL IN GEBRUK NEEMT EN BEWAAR HET ZODAT U HET LATER NOG KAN RAADPLEGEN.
Inhoud
Eerste stap 1
Waterloo Office Park/Batiment H
Dreve Richelle 161 bte 15 1410 Waterloo, Belgium
Bigben Interactive NEDERLAND b.v.
BELGIQUE, customerservice@bigben-interactive.be
NEDERLAND, customerservice@bigben-interactive.nl
ESPANA, sat@bigbeninteractive.es
ITALIA, support@bigbeninteractive.it
www/bigben.eu
THOMSON
CT500BT
Stacja pogodowa

INSTRUKCJA OBSŁUGI
PRZED ROZPOCZECIEM UZYWANIA URZADZENIA NALEZY UWAZNIE PRZECZYTAC NINIEJSZA INSTRUKCJE OBSLUGI. INSTRUKCJE NALEZY ZACHOWAÇ NA PRZYSZŁOSC
Spistresci
Spis tresci 1
Pierwsze kroki 1
Waterloo Office Park/Batiment H
Drive Richelle 161 bte 15 1410 Waterloo, Belgium
Bigben Interactive NEDERLAND b.v.
BELGIQUE, customerservice@bigben-interactive.be
NEDERLAND, customerservice@bigben-interactive.nl
ESPANA, sat@bigbeninteractive.es
ITALIA, support@bigbeninteractive.it
www/bigben.eu