
CBWM 30 DS - Microwaves CANDY - Free user manual and instructions
Find the device manual for free CBWM 30 DS CANDY in PDF.
User questions about CBWM 30 DS CANDY
0 question about this device. Answer the ones you know or ask your own.
Ask a new question about this device
Download the instructions for your Microwaves in PDF format for free! Find your manual CBWM 30 DS - CANDY and take your electronic device back in hand. On this page are published all the documents necessary for the use of your device. CBWM 30 DS by CANDY.
USER MANUAL CBWM 30 DS CANDY
Read these instructions carefully before using your microwave oven, and keep it carefully.
If you follow the instructions, your oven will provide you with many years of good service.
SAVE THESE INSTRUCTIONS CAREFULLY
By placing the CE ( C € ) marking on this product , we declare ,on our own responsibility, compliance to all of European safety ,health and environmental requirements stated in the legislation for this product
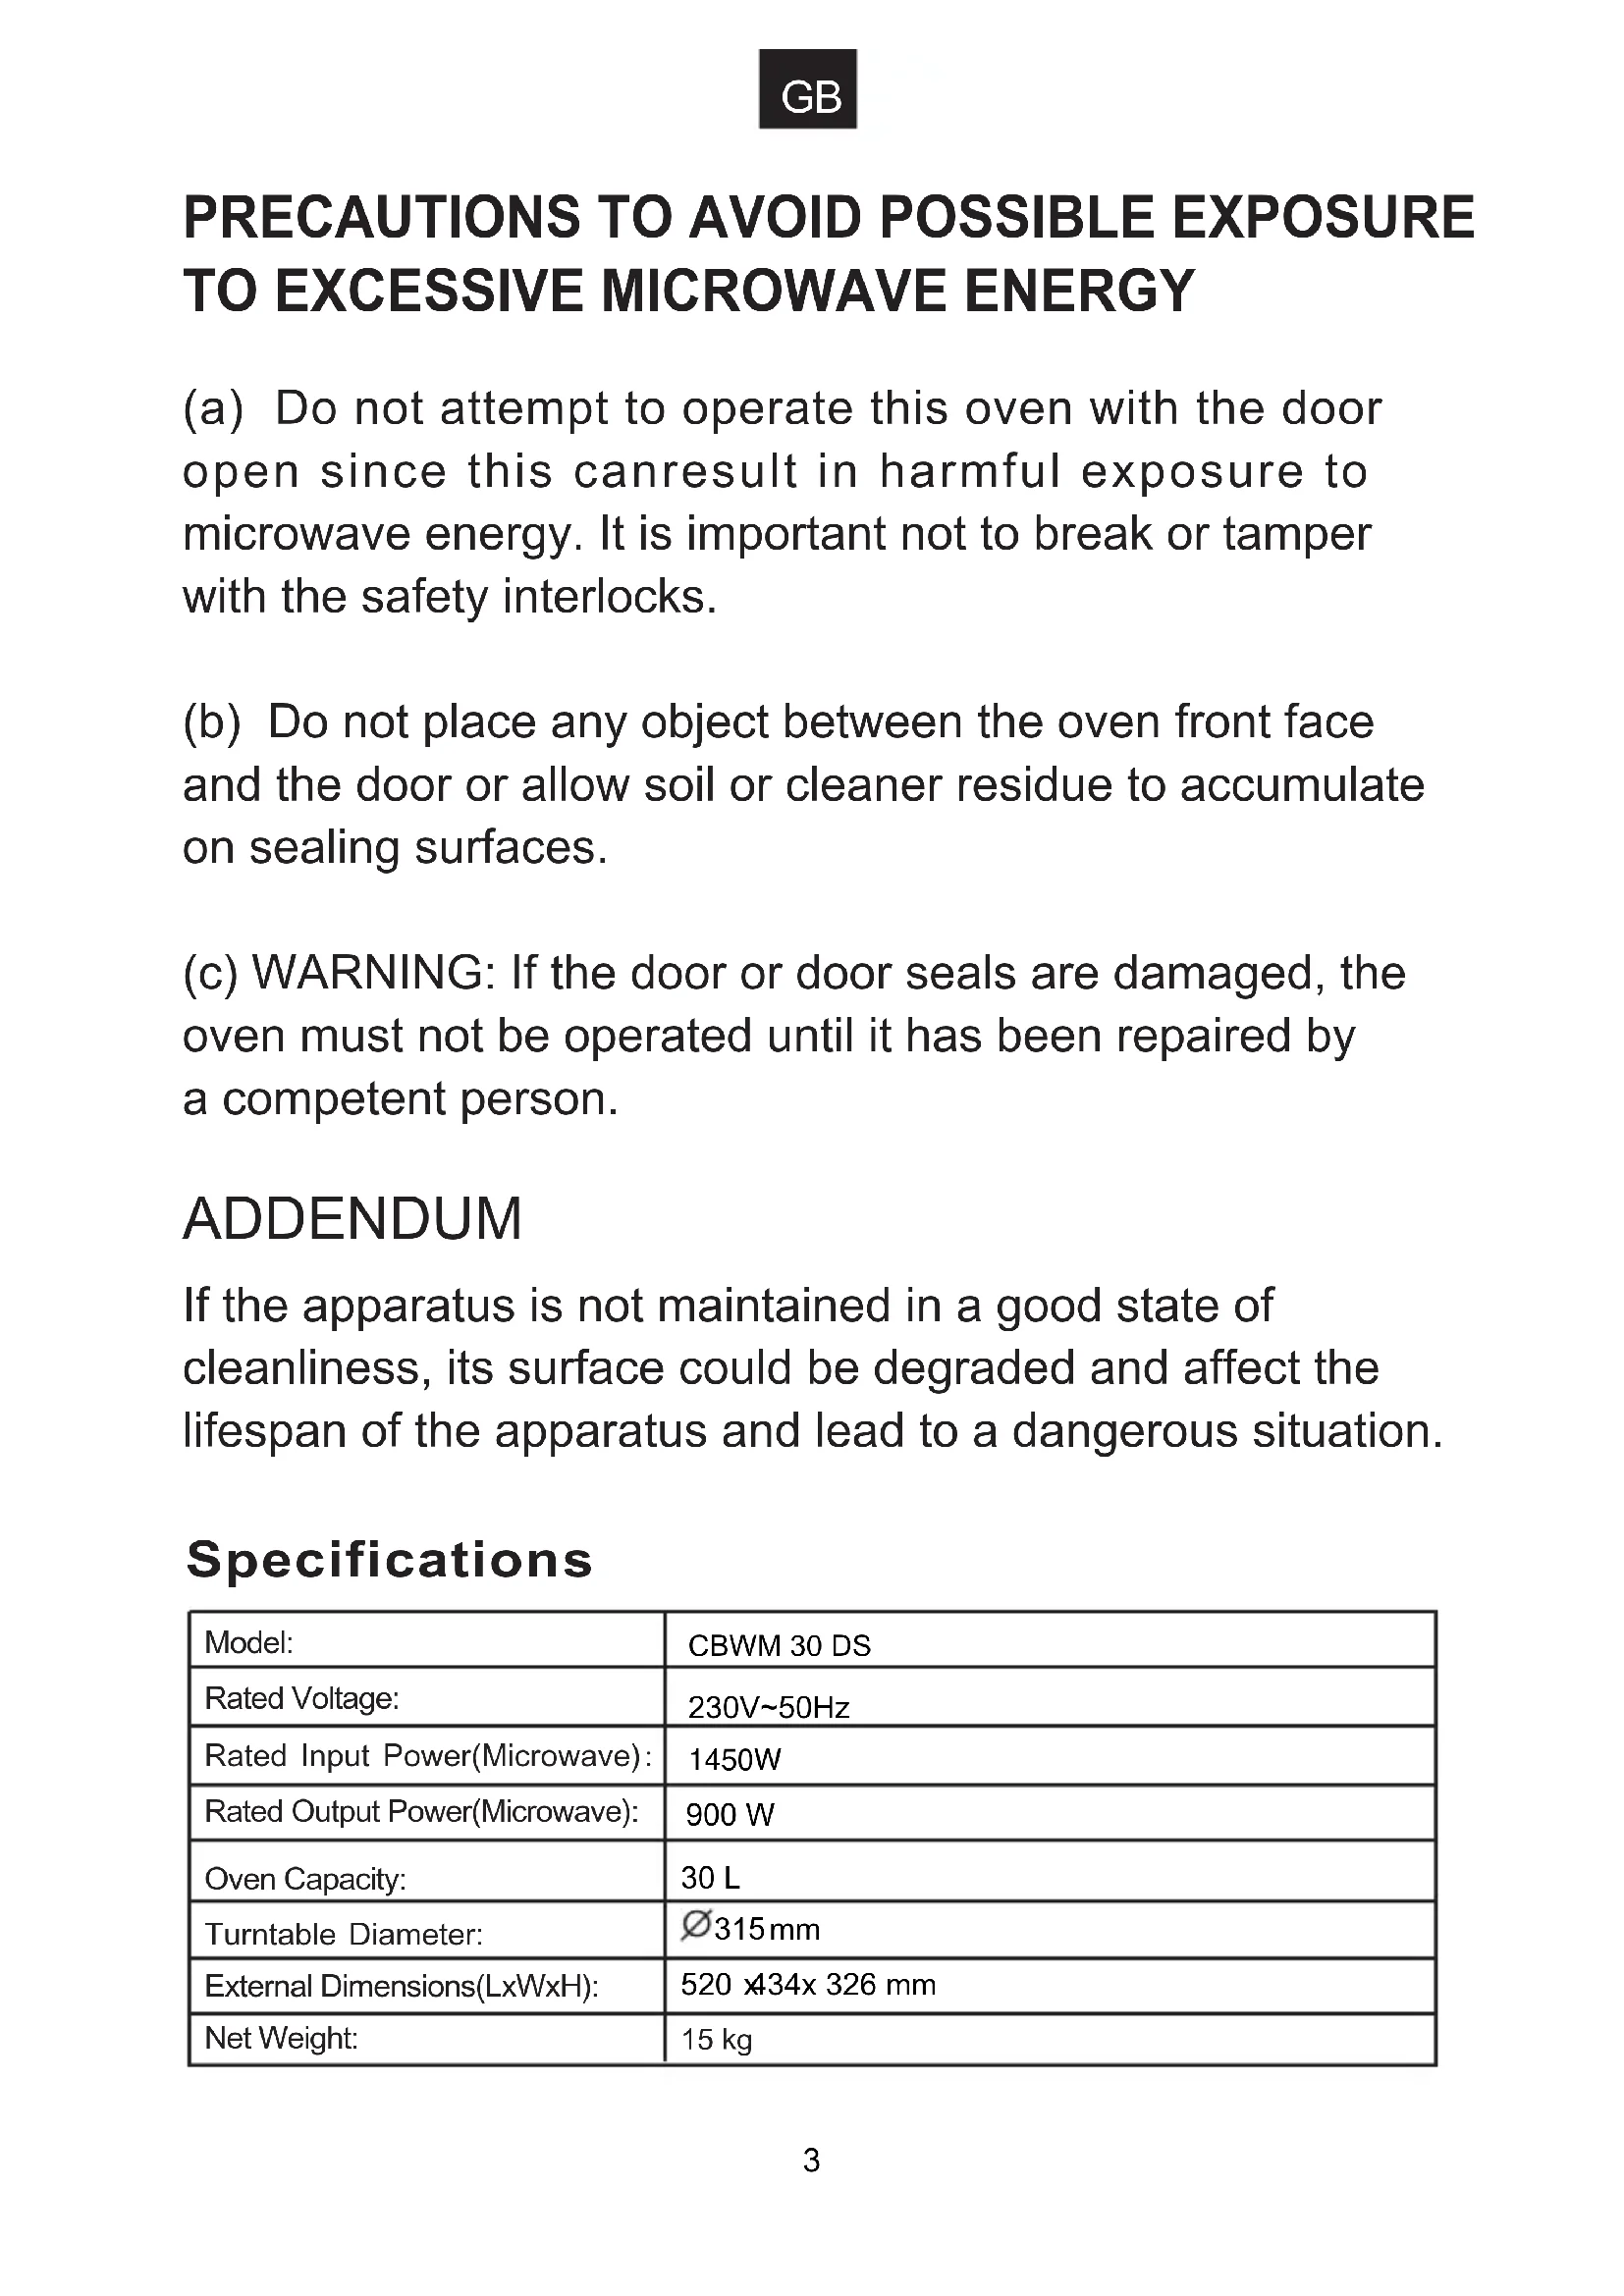
PRECAUTIONS TO AVOID POSSIBLE EXPOSURE TO EXCESSIVE MICROWAVE ENERGY
(a) Do not attempt to operate this oven with the door open since this can result in harmful exposure to microwave energy. It is important not to break or tamper with the safety interlocks.
(b) Do not place any object between the oven front face and the door or allow soil or cleaner residue to accumulate on sealing surfaces.
(c) WARNING: If the door or door seals are damaged, the oven must not be operated until it has been repaired by a competent person.
ADDENDUM
If the apparatus is not maintained in a good state of cleanliness, its surface could be degraded and affect the lifespan of the apparatus and lead to a dangerous situation.
Specifications
| Model: | CBWM 30 DS |
| Rated Voltage: | 230V~50Hz |
| Rated Input Power(Microwave): | 1450W |
| Rated Output Power(Microwave): | 900 W |
| Oven Capacity: | 30 L |
| Turntable Diameter: | Ø315mm |
| External Dimensions(LxWxH): | 520 x434x 326 mm |
| Net Weight: | 15 kg |
IMPORTANT SAFETY INSTRUCTIONS WARNING
To reduce the risk of fire, electric shock, injury to personor exposure to excessive microwave oven energy when using your appliance, follow basic precautions, including he following:
- Warning: Liquids and other foods must not be heated in sealed containers since they are liable to explode.
- Warning: It is hazardous for anyone other than a competent person to carry out any service or repair operation that involves the removal of a cover which gives protection against exposure to microwave energy.
- This appliance can be used by children aged from 8 years and above and persons with reduced physical, sensory or mental capabilities or lack of experience and knowledge if they have been givensupervision or instruction concerning useof the appliance in a safe way andunderstand the hazards involved. Children shall not play with the appliance.Cleaning and user maintenance shallnot be made by children unless they are older than 8 and supervised.
- Keep the appliance and its cord out of reach of children less than 8 years.
- Only use utensils suitable for use in microwave ovens.
- The oven should be cleaned regularly and any food deposits should be removed.
- Read and follow the specific:"PRECAU-TIONS TO AVOID POSSIBLE EXPOSURE TO EXCESSIVE MICROWAVE ENERGY".
- When heating food in plastic or paper containers, keep an eye on the oven due to the possibility of ignition.
GB
- If smoke is emitted, switch off or unplug the appliance and keep the door closed in order to stifle any flames.
- Do not overcook food.
- Do not use the oven cavity for storage purposes. Do not store items, such as bread, cookies, etc. inside the oven.
- Remove wire twist-ties and metal handles from paper or plastic containers/bags before placing them in the oven.
- Install or locate this oven only in accordance with the installation instructions provided.
- Eggs in the shell and whole hard-boiled eggs should not be heated in microwave ovens since they may explode, even after microwave heating has ended.
- This appliance is intended to be used in household and similar applications such as:
- staff kitchen areas in shops, offices and other working environments;
-by clients in hotels, motels and other residential type environments;
-farm houses;
-bed and breakfast type environments. - If the supply cord is damaged, it must be replaced by the manufacturer, its service agent or similarly qualified persons in order to avoid a hazard.
- Do not store or use this appliance outdoors.
- Do not use this oven near water, in a wet basement or near a swimming pool.
- The temperature of accessible surfaces may be high when the appliance is operating. The surfaces are liable to get hot during use. Keep cord away from heated surface, and do not cover any vents on the oven.
GB
- Do not let cord hang over edge of table or counter.
- Failure to maintain the oven in a clean condition could lead to deterioration of the surface that could adversely affect the life of the appliance and possibly result in a hazardous situation.
- The contents of feeding bottles and baby food jars shall be stirred or shaken and the temperature checked before consumption, in order to avoid burns.
- Microwave heating of beverages can result in delayed eruptive boiling, therefore care must be taken when handling the container.
- The appliance is not intended for use by persons (including children) with reduced physical, sensory or mental capabilities, or lack of experience and knowledge, unless they have been given supervision or instruction concerning use of the appliance by a person responsible for their safety.
- Children should be supervised to ensure that they do not play with the appliance.
- The appliances are not intended to be operated by means of an external timer or separate remote-control system.
- Accessible parts may become hot during use. Young children should be kept away.
- Steam cleaner is not to be used.
- During use the appliance becomes hot. Care should be taken to avoid touching heating elements inside the oven.
- Only use the temperature probe recommended for this oven.(for ovens provided with a facility to use a temperature-sensing probe.)
GB
- WARNING: The appliance and its accessible parts become hot during use. Care should be taken to avoid touching heating elements. Children less than 8 years of age shall be kept away unless continuously supervised.
- The microwave oven must be operated with the decorative door open.(for ovens with a decorative door.)
- The rear surface of appliance shall be placed against a wall.
- The microwave oven shall not be placed in a cabinet unless it has been tested in a cabinet.
READ CAREFULLY AND KEEP FOR FUTURE REFERENCE
To Reduce the Risk of Injury to Persons Grounding Installation
DANGER
Electric Shock Hazard Touching some of the internal componentscan cause serious personal injury or death.Do not disassemble this appliance.
WARNING
Electric Shock Hazard Improper use of the grounding can result inelectric shock. Do not plug into an outlet untilappliance is properly installed and grounded.
This appliance must be grounded. In the event of an electrical short circuit, grounding reduces the risk of electricshock by providing an escape wire forthe electric current.
This appliance isequipped with a cord having a groundingwire with a grounding plug. The plug must be plugged into an outlet that is properly installed and grounded.
Consult a qualified electrician orserviceman if the grounding instruction sare not completely understood or if doubtexists as to whether the appliance isproperly grounded. If it is necessary touse an extension cord, use only a 3-wire
- A short power-supply cord is provided to reduce the risks resulting from becoming entangled in or tripping over a longer cord.2. If a long cord set or extension cord is used:
1) The marked electrical rating of the cordset or extension cord should be at least as great as the electrical rating of the appliance.
2)The extension cord must be a grounding-type 3-wire cord.
3) The long cord should be arranged so that it will not drape over the counter top ortabletop where it can be pulled on bychildren or tripped over unintentionally.
CLEANING
Be sure to unplug the appliance from the power supply.
- Clean the cavity of the oven after using with a slightly damp cloth.
- Clean the accessories in the usual way in soapy water.
- The door frame and seal and neighbouring parts must be cleaned carefully with a damp cloth when they are dirty.
- Do not use harsh abrasive cleaners or sharp metal scrapers to clean the oven door glass since they can scratch the surface, which may result in shattering of the glass.
- Cleaning Tip---For easier cleaning of the cavity walls that the food cooked can touch: Place half a lemon in a bowl, add 300ml (1/2 pint) water and heat on 100% microwave power for 10 minutes. Wipe the oven clean using a soft, dry cloth.
UTENSILS
CAUTION Personal Injury Hazard It is hazardous for anyone other than a competent person to carry out any service or repairo peration that involves the removal of a cover which gives protection against exposure to microwave energy.
See the instructions on "Materials you can use in microwave oven or to be avoided in microwave oven." There may be certain non-metallic utensils that are not safe to use for microwaving. If in doubt, you can test the utensil in question following the procedure below.
Utensil Test:
- Fill a microwave-safe container with 1 cup of cold water (250ml) along with the utensil in question.
- Cook on maximum power for 1 minute.
- Carefully feel the utensil. If the empty utensil is warm, do not use it for microwave cooking.
- Do not exceed 1 minute cooking time.
Materials you can use in microwave oven
Utensils Remarks
| Browning dish | Follow manufacturer's instructions. The bottom of browning dish must be at least 3/16 inch (5mm) above the turntable. Incorrect usage may cause the turntable to break. |
| Dinnerware | Microwave-safe only. Follow manufacturer's instructions. Do not use cracked or chipped dishes. |
| Glass jars | Always remove lid. Use only to heat food until just warm. Most glass jars are not heat resistant and may break. |
| Glassware | Heat-resistant oven glassware only. Make sure there is no metallic trim. Do not use cracked or chipped dishes. |
| Oven cooking bags | Follow manufacturer's instructions. Do not close with metal tie. Make slits to allow steam to escape. |
| Paper plates and cups | Use for short-term cooking/warming only. Do not leave oven unattended while cooking. |
| Paper towels | Use to cover food for reheating and absorbing fat. Use with supervision for a short-term cooking only. |
| Parchment paper | Use as a cover to prevent splattering or a wrap for steaming. |
| Plastic | Microwave-safe only. Follow the manufacturer's instructions. Should be labeled "Microwave Safe". Some plastic containers soften, as the food inside gets hot. "Boiling bags" and tightly closed plastic bags should be slit, pierced or vented as directed by package. |
| Plastic wrap | Microwave-safe only. Use to cover food during cooking to retain moisture. Do not allow plastic wrap to touch food. |
| Thermometers Microwave-safe only (meat and candy thermometers). | |
| Wax paper Use as a cover to prevent splattering and retain moisture. | |
Materials to be avoided in microwave oven
Utensils Remarks
| Aluminum tray | May cause arcing. Transfer food into microwave-safe dish. |
| Food carton with metal handle | May cause arcing. Transfer food into microwave-safe dish. |
| Metal or metal-trimmed utensils | Metal shields the food from microwave energy. Metal trim may cause arcing. |
| Metal twist ties | May cause arcing and could cause a fire in the oven. |
| Paper bags | May cause a fire in the oven. |
| Plastic foam | Plastic foam may melt or contaminate the liquid inside when exposed to high temperature. |
| Wood | Wood will dry out when used in the microwave oven and may split or crack. |
SETTING UP YOUR OVEN
Names of Oven Parts and Accessories
Remove the oven and all materials from the carton and oven cavity.
Your oven comes with the following accessories:
Glass tray 1
Turntable ring assembly 1
Instruction Manual 1
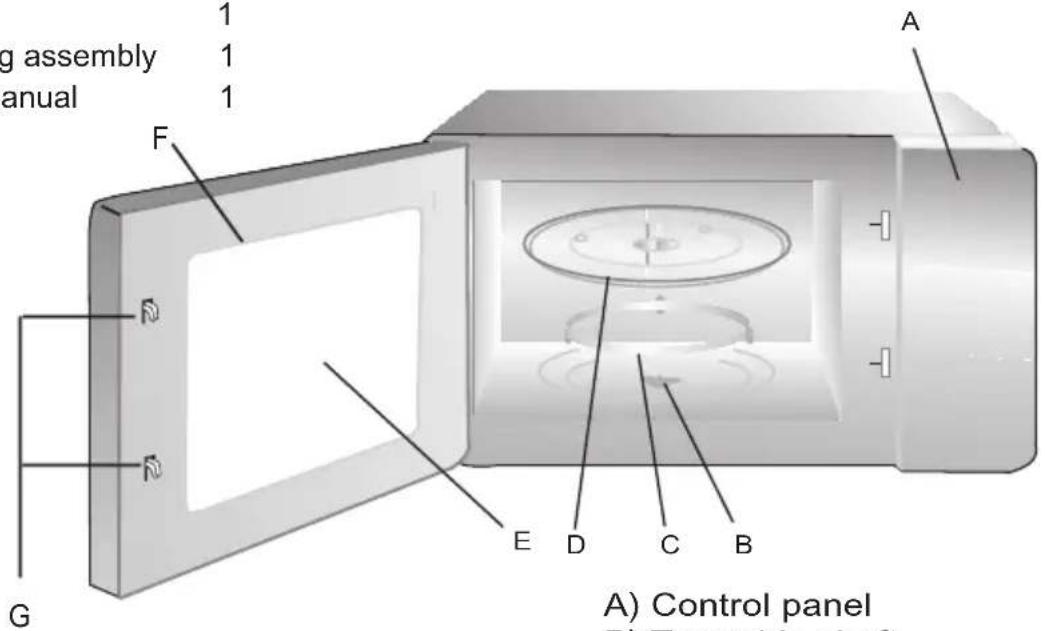
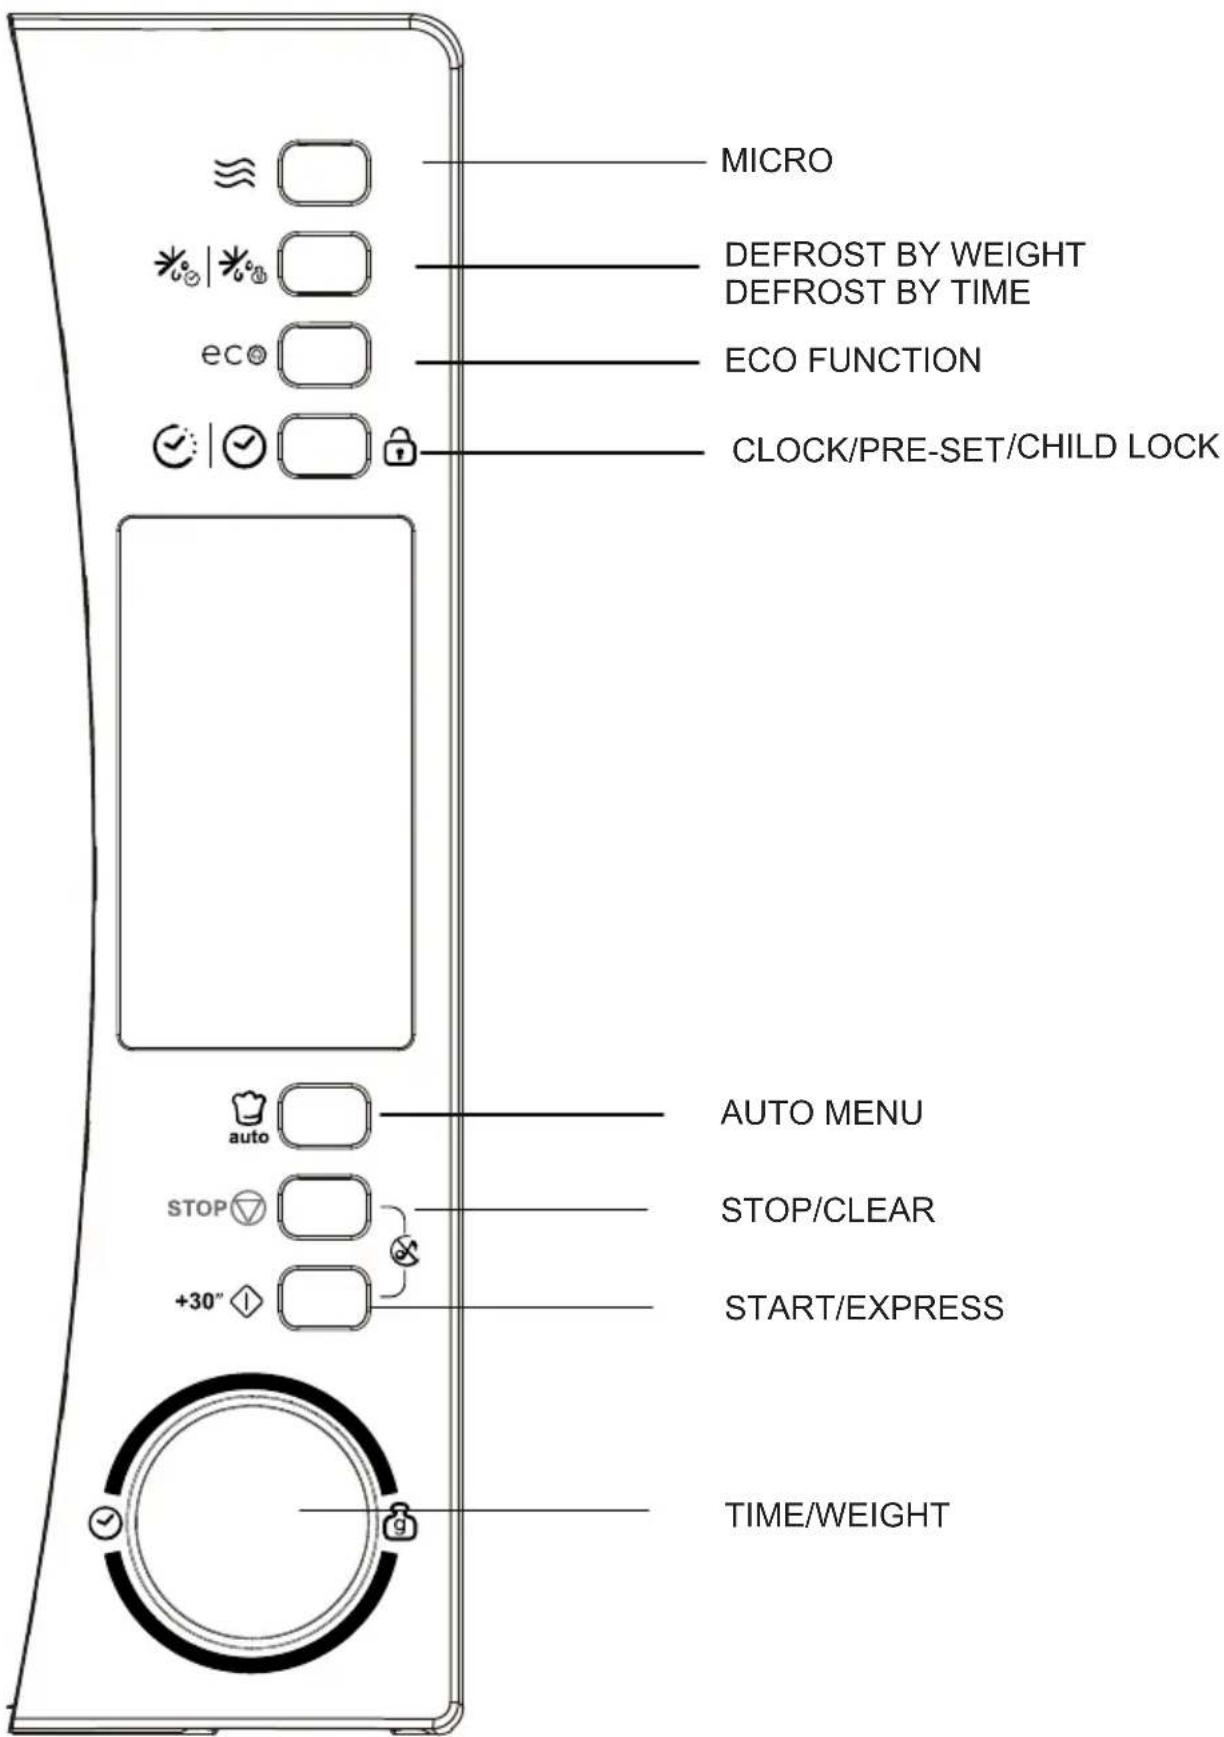
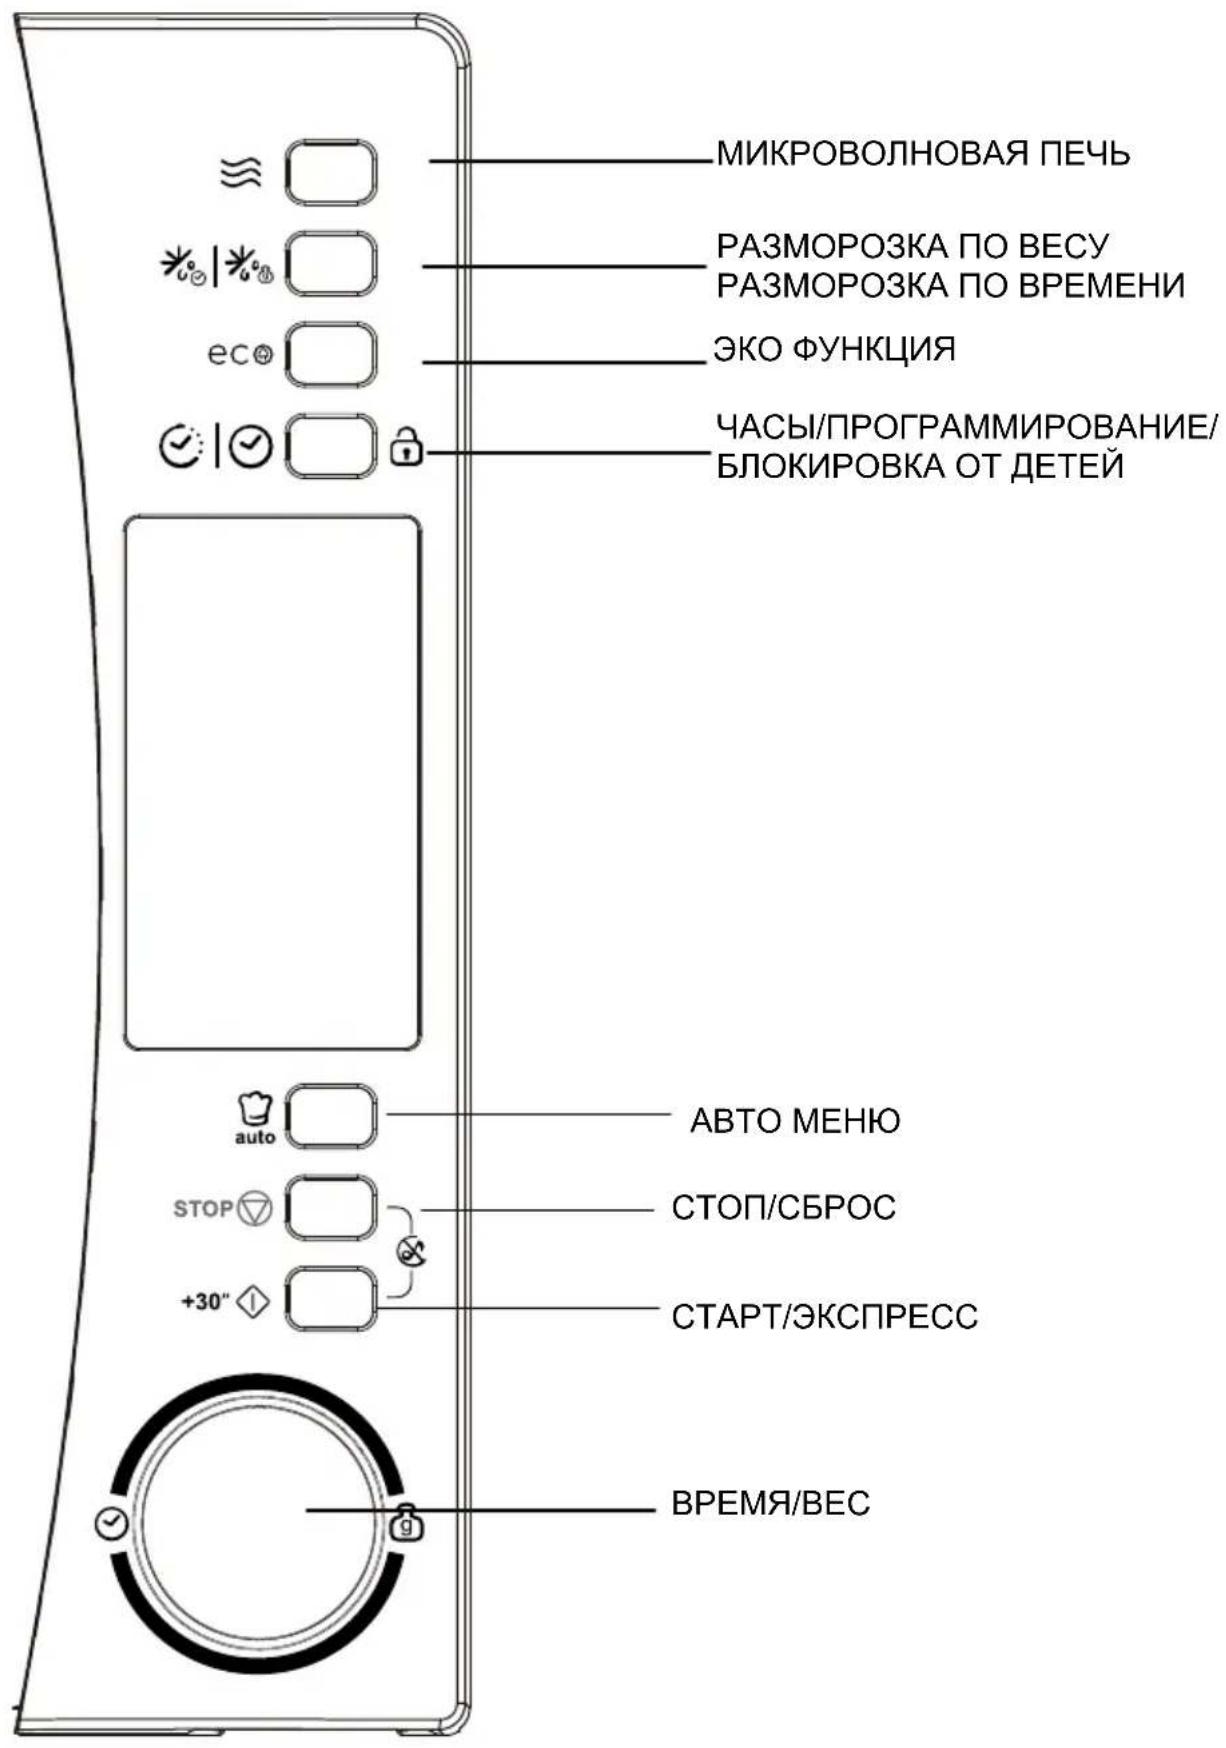
A) Control panel
B) Turntable shaft
C) Turntable ring assembly
D) Glass tray
E) Observation window
F) Door assembly
G) Safety interlock system
Turntable Installation
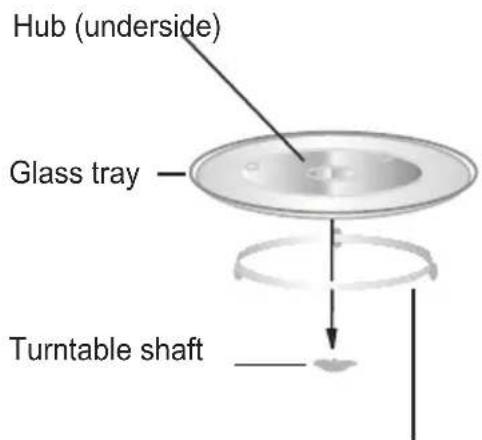
Turntable ring assembly
a. Never place the glass tray upside down. The glass tray should never be restricted.
b. Both glass tray and turntable ring assembly must always be used during cooking.
c. All food and containers of food are always placed on the glass tray for cooking.
d. If glass tray or turntable ring assembly cracks or breaks, contact your nearest authorized service center.
Countertop Installation
Remove all packing material and accessories. Examine the oven for any damage such as dents or broken door. Do not install if oven is damaged.
Cabinet: Remove any protective film found on the microwave oven cabinet surface. Do not remove the light brown Mica cover that is attached to the oven cavity to protect the magnetron.
Installation
- Select a level surface that provideenough open space for the intake and/or outlet vents.
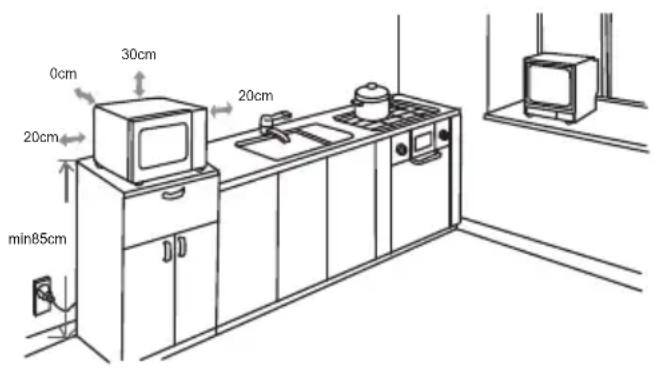
(1) The minimum installation height is 85cm .
(2) The rear surface of appliance shall be placed against a wall.
Leave a minimum clearance of 30cm above the oven, a minimum clearance of 20cm is required between the oven and any adjacent walls.
(3) Do not remove the legs from the bottom of the oven.
(4) Blocking the intake and/or outlet openings can damage the oven.
(5) Place the oven as far away from radios and TV as possible. Operation of microwave oven may cause interference to your radio or TV reception.
2. Plug your oven into a standard household outlet. Be sure the voltage and the frequency is the same as the voltage and the frequency on the rating label.
WARNING: Do not install oven over arange cooktop or other heat-producing appliance. If installed near or over a heatsource, the oven could be damaged andthe warranty would be
void.
The accessible surfacemay be hot duringopera
This microwave oven uses modern electronic control to adjust cooking parameters to meet your needs better for cooking.
1.Clock Setting
When the microwave oven is electrified, the oven will display "0:00", buzzer will ring once.
1) Press " ", the hour figures will flah.
2) Turn " " to adjust the hour figures, the input time should be within 0--23.
3) Press "the minute figures will flash. 89:88:
4) Turn " to adjust the minute figures, the input time should be within 0--59.
5) Press " " to finish clock setting. ":" will flash. Note: 1) If the clock is not set, it would not function when powered.
2) During the process of clock setting, if you press " stop operation in one minute, the oven will exit the setting.
2. Microwave Cooking
Press " ≈ "once, "P100" displays. Then turn " "to select the function you want. Press "+"30" to confirm the Tpower" to adjust the cooking time. Press "+"30" to start cooking.
Example: If you want to use 80% power to cook for 20 minutes, you can operate the oven as the following steps.
1) Press " once, the LED will display "P100",
" ≡" indicator will be lighted.
2) Turn " " to choose 80% power, the LED will display "P80". Press "+"30" "to confirm power.
3) Turn " " to adjust the cooking time until the oven display"20:00" (The maximum cooking time is 95 minutes.)
4) Press "+" to start cooking, ":" will light and the
" ≈ " indicator will flash (Buzzer will sound five times after finishing).
NOTE: the step quantities for the adjustment time of the coding switch are as follow:
Microwave Power Chart
| Microwave Power | 80% 50% | 30% | 10% |
GB
3. Speedy Cooking
1). When the oven is in the waiting states, press "+30" key to start cooking with full microwave power for 30 seconds. The cooking time will add 30 seconds by every press on " ¥ 89, and the maximum setting time is 95 minutes.
Note: Time can be increased by press "+" button except weight defrost and auto menu program.
2). In waiting state, turn " left to choose cooking time directly then press +30 " key to cook with 100% microwave power.
This program can be set as the first one of multi-stage.
4. Defrost By Time
1) Press "keyonce, the LED will display "dEF1".
8EE8
2) Turn " to select the cooking time. At the same time, " ≡ " and " * " will be lighted. The time setting is from 00:05 to 95:00.
888
The default power level is P30. It is not adjustable.
3) Press " + " key to start defrosting.
" ≡ " and " % " indicators will flash .
5. Defrost by Weight
1) Press " "pad twice, the LED will display "dEF2".
8888
2) Turn "Q" to select the weight of food. At the same time, "g" will light.
8888
The weight should be 100-2000g.
3) Press " " key" to start defrosting.
" ≡ " and " % " indicators will flash and "g" indicator will go out.
6. Auto Menu
1). In waiting states, press "auto" or turn "right to choose the menu you need. "A-01","A-02"... "A-10" will display in order.
2) Press " + 30" to confirm the selected main menu.
2). Turn " to select the menu from b-1 to b-4.
3) Press " + to start cooking.
When cooking finish, buzzer will sound five times. If the clock has been set before, the current time will be displayed, otherwise, 0:00 will be displayed.
For example: to cook the pasta.
1) Press " " for seven times, "A-07" displays and pasta menu is selected.
" ≈ " and " [ indicator will light.
2) Press " + 30" to confirm the selected main menu.
3). Stop turning " when "b-4" displays.
3) Press " + 30" to start cooking.
When cooking finish, buzzer will sound five times. Then turn back to waiting states.
7. Multi-Stage Cooking
Two stages of cooking can be maximumly set. If one stages is defrosting, it will be put in the first stage automatically. The buzzer will ring once after each stage and the next stage will begin.
Note: Auto menu cannot be set as one of the multi-stage.
Example: if you want to defrost the food of 500g + 80% microwave power for 5 minutes.
The steps are as following:
1) Press "Wice" dEF2" displays;
2) Turn " " to adjust the weight of the food. Stop turning when "500" displays;
3) Press" once, turn " "o choose 80% microwave power;
Press ^ 串 +30" 1 to confirm the power;
4) Turn " to adjust the cooking time of 5 minutes;
5) Press "+"30'st cooking.
Note: When the first stage finish, buzzer sounds once then the second stage begins. When all of them finish, buzzer sounds five times and the unit turn back to the waiting states.
8. Pre-set Function
1) Set the clock first. (Consult the instruction of clock setting.)
2) Input the cooking program. Two stages can be set at most. Defrosting should not be set here.
3) Press "The current clock is displayed. The hour figure flash;
4) Turn " " to adjust the hour figures, the input time should be within 0--23.
5) Press " minute figurethwill flash.
6) Turn " " to adjust the minute figures, the input time should be within 0--59.
7) Press " + 30" to finish setting.": will light, buzzer will ring twice when the time arrives, then cooking will start automatically.
Note: 1) Clock must be set first. Otherwise, pre-set function will not work.
2) If the pre-set program has been set without the cooking program, the whole setting will be used as an alarm clock. That means when pre-set time arrives, buzzer will sound five times only.
9. ECO Function
In waiting state, Press "E C O" or if no operation in 1 minute, the screen will be off. At this time, press any button to turn the screen on.
Note: 1). The oven cannot enter ECO mode if the door is open.
2). Press any button or open the door to turn the screen on under ECO mode.
3). If enter ECO mode under child lock state, recover to still child lock state.
10. Inquiring Function
(1) In cooking state, press "the current microwave power will be displayed for 3 seconds.
(2) In pre-set state, press " to inquire the time for delay start cooking.
The pre-set time will flash for 3 seconds, then the oven will turn back to the clock display.
(3) During cooking state, press "check the current time. It will be displayed for 3 seconds.
11. Lock-out Function for Children
Lock: In waiting state, press "for seconds, there will be a long "beep" denoting entering into the children-lock state and LED will display "8888:" and " l " will light.
Lock quitting: In locked state, press "for 3 seconds, there will be a long "beep" denoting that the lock is released, and LED will turn back to the clock stae, "will go out.
12. Silent Mode
In waiting states, press "STOP", and then press +30 simotaneously in 3 seconds to enter silent mode. All the buttons and buzzers will stop ringing under silent mode.
To active the sound: in waiting state, press "STOP", and then press "+" simotaneously in 3 seconds to exit the silent mode.
13. Protection of Fan
When the microwave or combination cooking works over 5 minutes, it stops working at the last 15 seconds, only fan runs.
14. Protection Function of Magnetron Control Pipe
When the unit runs for 30 minutes with high power level, it will adjust to 80% microwave power to protect the magnetron control pipe.
This function works under multi-stage and other states.
15. Automatic Going Out Function
When the door is kept open for 10 minutes, the oven light will be off. Press any key after opening the door, time will count down again. The oven lamp will light.
16. Specification
(1) The buzzer will sound once when turning the knob at the beginning;
(2) " + 30" must be pressed to continue cooking if the door is opened during cooking;
(3) Once the cooking programme has been set, " + 30" 1 " is not pressed in 1 minute. The current time will be displayed. The setting will be cancelled.
(4) The buzzer sounds once by efficient press, inefficient press will be no response.
Auto menu Chart
| Menu | Display | Weight(g) | Power |
| A-01 BAKERY | b-1 Pizza reheat | 200 | P100 |
| b-2 Bread reheat | 200 | P100 | |
| b-3 Savoury pie | 400 | P80+P0+P80 | |
| b-4 Dough | 500 | P30 | |
| A-02 POTATOES | b-1 Steam | 400 | P100 |
| b-2 Potato croquettes | 250 | P80+turn over+P0 | |
| b-3 Potato bake | 1 | P80+P0 | |
| b-4 French fries | 200 | P100 | |
| A-03 MEAT | b-1 Chicken | 800 | P100 |
| b-2 Turkey | 800 | P100 | |
| b-3 Pork | 450 | P100 | |
| b-4 Red meat | 800 | P100 | |
| A-04 FISH | b-1 Mussels | 200 | P80 |
| b-2 Salmon (Fish) | 350 | P80 | |
| b-3 Tuna | 350 | P80 | |
| b-4 Sea bass | 350 | P80 | |
| A-05 VEGETABLES | b-1 Broccoli | 400 | P100 |
| b-2 Spinach | 400 | P100 | |
| b-3 Carrots | 400 | P100 | |
| b-4 Fennel | 200-400 | P80+P0 | |
| A-06 HOT BEVERAGE | b-1 Milk(1 cup/240ml) | 1 cup | P100 |
| b-2 Coffee(1 cup/120ml) | 1 cup | P100 | |
| b-3 Tea | 1 cup | P100 | |
| b-4 Hot chocolate | 200 | P70 | |
| A-07 PASTA-RICE | b-1 Pasta parcels | 450 | P80 |
| b-2 Rice | 1 cup | P100+P50 | |
| b-3 Soup (reheat vegetable soup) | 250 | P100 | |
| b-4 Pasta | 50(add water 500ml) | P80 |
Auto menu Chart
| Menu | Weight(g) | Display | Power |
| A-08 PATISSERIE | b-1 Biscuits | 200 | P80+P0+P80 |
| b-2 Cake | 1 cup | P80 | |
| b-3 Jam | 400 | P100+P0 | |
| b-4 Muffins | 400 | P100 | |
| A-09 HEALTHY | b-1 Dried food | 100 | P80+P0 |
| b-2 Homemade yogurt | 1 liter | P30 | |
| b-3 Wholemeal pasta | 150(add water 500l) | P100 | |
| b-4 Legumes | 500 | P100 | |
| A-10 BABY | b-1 Pureed Baby Food | 150 | P80+P0 |
| b-2 Broth | 200 | P100+P0 | |
| b-3 Sterilization | 1 bottom | P100 | |
| b-4 Baby milk | 100 ml | P30 |
Trouble shooting
| Normal | |
| Microwave oven interfering TV reception | Radio and TV reception may be interfered when microwave oven operating. It is similar to the interference of small electrical appliances, like mixer, vacuum cleaner, and electric fan. It is normal. |
| Dim oven light | In low power microwave cooking, oven light may become dim. It is normal. |
| Steam accumulating on door, hot air out of vents | In cooking, steam may come out of food. Most will get out from vents. But some may accumulate on cool place like oven door. It is normal. |
| Oven started accidentally with no food in. | It is forbidden to run the unit without any food inside. It is very dangerous. |
| Trouble | Possible Cause | Remedy |
| Oven can not be started. | (1) Power cord not plugged in tightly. | Unplug. Then plug again after 10 seconds. |
| (2) Fuse blowing or circuit breaker works. | Replace fuse or reset circuit breaker (repaired by professional personnel of our company) | |
| (3) Trouble with outlet. | Test outlet with other electrical appliances. | |
| Oven does not heat. | (4) Door not closed well. | Close door well. |
CUSTOMER ASSISTANCE SERVICE
If you cannot identify the cause of the operating anomaly: switch off the appliance (do not subject it to rought treatment) and contact the Assistance Service.
PRODUCT SERIAL NUMBER. Where can I find it?
It is important that you to inform the Assistance Service of your product code and its serial number (a 16 character code which begins with the number 3); this can be found on the guarantee certificate or on the data plate located on the appliance.
It will help to avoid wasted journeys to technicians, thereby (and most significantly) saving the corresponding callout charges.

This appliance is marked according to the European directive 2012/19/EU on Waste Electrical and Electronic Equipment (WEEE). By ensuring this product is disposed of correctly, you will help prevent potential negative consequences for the environment and human health, which could otherwise be caused by inappropriate waste handling of this product.
The symbol on the product indicates that this product may not be treated as household waste. Instead it shall be handed over to the
applicable collection point for the recycling of electrical and electronic equipment Disposal must be carried out in accordance with local environmental regulations for waste disposal.
For more detailed information about treatment, recovery and recycling of this product, please contact your local city office, your household waste disposal service or the shop where you purchased the product.
CookingGuide
MICROWAVES
Microwaveenergyactuallypenetratesfood, attractedandabsorbedbyitswater, fatandsugarcontent.
Themicrowavescausethemoleculesinthefoodtomoverapidly.Therapid movementofthesemoleculescreatesfrictionandtheresultingheatcooksthe food.
COOKING
Cookwareformmicrowavecooking:
Cookware must allow microwave energy to pass through it for maximum efficiency. Microwaves can penetrate through ceramic, glass, porcelain and plastic as well as paper and wood, but they are reflected by metal, such as stainless steel, aluminium and copper. So food must never be cooked in metal containers.
Foodssuitableformicrowavecooking:
Manykindsofffoodaresuitablemicrowavecooking,includingfreshorfozen vegetables,fruit,pasta,rice,grains,beans,fish,andmeat.Saues,custard, soups,steamedpuddings,preserves,andchutneyscanalsobecookedina microwaveoven.Generallyspeaking,microwavecookingisidealforanyfood thatwouldnormallybepreparedonahob.
Coveringduringcooking
Tocoverthefoodduringcookingisveryimportant,astheevaporatedwaterrises assteamandcontributestocookingprocess.Foodcanbecoversindifferent ways:e.g.withaceramicplate,plasticcoverormicrowavesuitableclingfilm.
Standingtimes
Aftercookingisoverfoodthestandingtimeisimportanttoallowthetemperature toevenoutwithinthefood.
CookingGuide
CookingGuideforfrozenvegetables
Useasuitableglasspyrexbowlwithlid.Cookcoveredfortheminimumtime-seetable.Continuecookingtogetheresultyouprefer.
Sirtwiceduringcookingandonceaftercooking.Addsalt,herbsorbutterafter cooking.Coverduringstandingtime..
| FoodPortion | Power | Time (min.) | Standing Time(min.) | Instructions | |
| Spinach | 150gP | 805-62-3 | Add15ml(1tablespoon) coldwater. | ||
| Broccoli | 300gP | 808-92-3 | A d d 30 ml (2t b sp.) water. | ||
| Peas | 300gP | 807-82-3 | A d d 15 ml (1t b sp.) water. | ||
| GreenBeans | 300gP | 807½-8½2-3 | A d d 30 ml (2t b sp.) water. | ||
| Mixed Vegetables (carrots/peas/ corn) | 300gP | 807-82-3 | A d d 15 ml (1t b sp.) water. | ||
| Mixed Vegetables (Chinesestyle) | 300gP | 807½-8½2-3 | A d d 15 ml (1t b sp.) water. |
CookingGuide
CookingGuideforfreshvegetables
Useasuitableglasspyrexbowlwithlid.Add30-45mlcoldwater(2-3tbsp.)for every250gunlessanotherwaterquantityisrecommended-seetable.Cook coveredfortheminimumtime-seetable.Continuecookingtogettheresultyou prefer.Stironceduringandonceaftercooking.Addsalt,herbsorbutterafter cooking.Coverduringastandingtimeof3minutes.
Hint: Cuttreshvegetablesintoevensizedpieces. Thessmallerthey arecut, the quicker they will cook.
All fresh vegetables should be cooked using full microwave power (P100).
| Food | Portion | Time (min.) | Standing Time(min.) | Instructions |
| Broccoli | 250g | 31/2-4 | 3 | Prepareevensizedflorets Arrange thestemstothecentre. |
| 500g | 6-7 | |||
| Brussels Sprouts | 250g5 | 51/3 | Add60-75ml(5-6tbsp.)water. | |
| Carrots | 250g3 | 1/2-43 | Cutcarrotsintoevensizedslices. | |
| Cauliflower | 250g | 4-41/2 | 3 | Prepareevensizedflorets.Cutbig floretsintohalves.Arrangestemsthecentre. |
| 500g | 61/2-71/2 | |||
| Courgettes | 250g3 | 31/23 | Cutcourgettesintoslices.Add30ml (2tbsp.)wateroraknobofbutter. Cookuntiljusttender. | |
| EggPlants | 250g2 | 1/2-33 | Cuteggplantsintosmallslicesand sprinklewith1tablespoonlemon juice. | |
| Leeks | 250g3 | 31/23 | Cutleeksintothickslimes. | |
| Mushrooms | 125g | 1-11/2 | 3 | Prepaesmallwholeorsliced mushrooms.Donotaddanywater. |
| 250g | 2-21/2 | Sprinklewithlemonjuice.Spicewith saltandpepper.Drainbefore serving. | ||
| Onions | 250g4 | 41/23 | Cutonionsintoslicesorhalves.Add only15ml(1tbsp.)water. | |
| Pepper | 250g3 | 1/2-43 | Cutpepperintosmallslimes. | |
| Potatoes | 250g | 3-4 | 3 | Weighthepeeledpotatoesandcut themintosimilarsizedhalvesor quarters. |
| 500g | 6-7 | |||
| Turnip Cabbage | 250g | 41/2-5 | 3 | Cutturnipcabbageintosmallcubes. |
CookingGuide
CookingGuideforriceandpasta
Rice:Usealargeglasspyrexbowlwithlid-ricedoublesinvolumeduring cooking.Cookcovered. Afterthecookingtimeisover,stirbeforestandingtimeandsalt addherbsandbutter. Remark:thericemaynothaveabsorbedallwaterafterthecoc timeisfinished.
Pasta:Usealargeglasspyrexbowl.Addboilingwater,apinchofsaltand stirwell.Cookuncovered. Stiroccasonallyduringandaftercooking.Coverduringstanding timeanddrainthoroughlyafterwards.
| FoodPortion | onPower | Time (min.) | Standing Time(min.) | Instructions | |
| WhiteRice (parboiled) | 250g | P100 | 15-16 | 5 | Add500mlcoldwater. |
| 375g | 17½- 18½ | Add750mlcoldwater. | |||
| BrownRice (parboiled) | 250g | P100 | 20-21 | 5 | Add500mlcoldwater. |
| 375g | 22-23 | Add750mlcoldwater. | |||
| MixedRice (rice+wild rice) | 250g | 10016-1 | 75 | Add500mlcoldwater. | |
| MixedCorn (rice+grain) | 250g | 10017-1 | 85 | Add400mlcoldwater. | |
| Pasta | 250g | 10010-1 | 15 | Add1000mlhotwater. |
REHEATING
Yourmicrowaveovenwillreheatfoodinafractionofthetimethatconventional ovenshobsnormallytake.
Usethepowerlevelsandereatingtimesinthefollowingchartasaguide. The timesinthechartconsiderliquidswitharoomtemperatureofabout +18to + 20^ orachilledfoodwithatemperatureofabout +5to + 7^ .
Arrangingandcovering
Avoidreheatinglargeitemsssuchasjointofmeat-theytendtoovercookanddry outbeforethecentreispiinghot.Reheatingsmallpieceswillbemore successful.
Powerlevelsandstirring
Somefoodscanbereatedusing maximum powerwhileothersshouldbe reheated using lower power.
Checkthetablesforguidance. Ingeneral, itisbettertoheatfoodusingalower powerlevel, ifthefoodisdelicate, inlargequantities, orifitislikelytoheatup veryquickly(mincepies,forexample).
Stirwellorturnfoodoverduringreheatingforbestresults. When possible, stir againbeforeserving.
CookingGuide
Takeparticularcarewhenheatingliquidsandbabyfoods. Topreventeruptive boilingofliquidsandpossiblescalding,stirbefore,duringandafterheating.
Keeptheminthenemicrowaveovenduringstandingtime.Werecommendputtinga plasticspoonorglasssticktotheliquids.Avoidoverheating(andtherefore spoiling)thefood.
Itispreferabletounderestimatecookingtimeandaddextraheatingtime,if necessary.
Heatingstandstandingtimes
Whenreheatingfoodforthefirsttime, itishelpfultomakeanoteofthetime taken-forfuturereference.
Always makes sure that thereheated food dispiping hot throughout.
Allowfoodtostandforashorttimeafterreheating-tolethetemperatureeven out.Therecommendedstandingtimeafterreheatingis2-4minutes,unless anothertimeisrecommendedinthechart..
Takeparticularcarewhenheatingliquidsandbabyfood.Seealsothechapter withthesafetyprecautions.
REHEATINGLIQUIDS
Alwaysallowstandingtimeofatleast20secondsaftertheovenhasbeenswitchedofftoallowthetemperaturetoevenout.Stirduringheating,ifnecessary,andALWAYSstirafterheating.Topreventeruptiveboilingandpossiblescalding,youshouldputaspoonorglassstickintothebeveragesandsibirbefore,duringandafterheating.
REHEATINGBABYFOOD
BABYFOOD:
Emptyintoadeepceramicplate.Coverwithplasticid.Stirwellafterreheating! Letstandfor2-3minutesbeforeserving.Stiragainandcheckthetemperature. Recommended servingtemperature:between 30 - 40^
BABYMILK:
Pourmilkintoasterilisedglassbottle.Reheatuncovered.Neverheatababy's bottlewithteaton,asthebottlemayexplodeifoverheated.Shakewellbefore standingtimeandagainbeforeserving!Alwayscarefullycheckthetemperature ofbabymilkorfoodbeforegivingittothebaby.Recommended serving temperature:ca.37°C.
REMARK:
Babyfoodparticularlyneedstobebecheckedcarefullybeforeservingtoprevent burns.
Usethepowerlevelsandtimesinthenthenameasaguidelinesforreheating.
CookingGuide
ReheatingLiquidsandFood
Usethepowerlevelsandtimesinthistableasaguidelinesforreheating.
| FoodPortion | Power | Time(min.) | Standing Time(min.) | Instructions | |
| Drinks(coffee,milk,tea,waterwithroomtemperature) | 150ml(1cup)300ml(2cups)450ml(3cups)600ml(4cups) | P100 | 1-1½1½-22½-33-3½ | 1-2 | Pourintoaceramiccupandreheatuncovered.Clay1cup in the centre,2oppositesefeachotherand3or4inacircle.Stircarefullybeforeandafterstandingtime,becarefulwhiletakingthemoutofoven. |
| Soup(chilled) | 250g350g450g550g | P100 | 2-2½2½-33-3½3½-4 | 2-3 | PourintoadeepceramicplateordeepceramicbowlCOVERwithplasticlid.Stirwellafterreheating.Stiragainbeforeserving. |
| Stew(chilled) | 350gP80 | 4½-5½2-3 | Putstewinadeepceramicplate.Coverwithplasticlid.Stroccasonallyduring reheatingandagainbeforestandingandserving. | ||
| Pastawithsauce(chilled) | 350gP80 | 03½-4½3 | Putpasta(e.g.spaghettieggnoodles)onaflatceramicplate.Coverwithmicrowaveclinging.M.Stirbeforeserving. | ||
| Filledpastawithsauce(chilled) | 350gP80 | 4-53 | Putfilledpasta(e.g.ravioli,tortellini)inadeepceramicplate.Coverwithplasticlid.Stiroccasonallyduring reheatingandagainbeforestandingandserving. | ||
| PlatedMeal(chilled) | 350g450g550g | P80 | 4½-5½5-65½-6½ | 3 | Plateamealof2-3chilledcomponentsonaceramicdish.Coverwithmicrowavecling-film. |
CookingGuide
ReheatingBabyFoodandMilk
Usethepowerlevelsandtimesinthistableasguidelinesforreheating.
| FoodPortonPower | Time | Standing Time (min.) | Instructions | |
| Babyfood (vegetables +meat) | 190gP8030sec | 2-3 | Emptyintoceramicdeepplate. Cookcovered.Stiraftercooking time.Standfor2-3minutes. Beforeserving,stirwelland checkthetem-peraturecarefully. | |
| Baby porridge (grain+ milk+fruit) | 190gP8020sec | 2-3 | Emptyintoceramicdeepplate. Cookcovered.Stiraftercooking time.Standfor2-3minutes. Beforeserving,stirwelland checkthetem-peraturecarefully. | |
| Babymilk | 100ml 200ml | P30 | 30-40 sec. 1 min to 1 min 10sec. | 2-3 Stirorshakewellandpourintoa sterilisedglassbottle. Place into thecentreofturntable.Cook uncovered.Shakewellstand foratleast3minutes.Before serving,shakewellandcheckthe tempera-turecarefully. |
CookingGuide
GRILL
Thegrill-heatingelementislocatedunderneaththeceilingofthecavity.It operateswhilethedoorisclosedandtheturntableisrotating. Theturntable's rotationmakesthefoodbrownmoreevenly.Preheatingthegrillfor4minuteswill makethefoodbrownmorequickly.
Cookwareforgrilling:
Shouldbeflameproofandmayincludemetal.Donotuseanytypeofplastic cookware,asitcanmelt.
Foodsuitable forgrilling:
Chops, sausages, steaks, hamburgers, bacon and gammonrashers, thinfish portions, sandwiches and all kinds of toast with toppings.
IMPORTANTREMARK:
Please remember that food must be placed on the high rack, unless another instruction is recommended.
MICROWAVE+GRILL
Thiscookingmodecombinestheradiantheatthatiscomingfromthegrillwiththe speedofmicrowavecooking.Itoperatesonlywhilehedoorisclosedandthe turntableisrotating.Duetotherotationoftheturntable,thefoodbrownsevenly.
Cookwareforcookingwithmicrowave+grill
Please use the cookware that microwaves can pass through. Cookware should be flameproof. Donotuse metal cookware with combination mode. Donotuse any type of plastic cookware, as it can melt.
Foodsuitable microwave+grillcooking:
Foodsuitableforcombinationmodecookingincludeallkindsofcookedfood whichneedreheatingandbrowning(e.g.bakedpasta),aswellasfoodswich requireashortcookingtimetobrownthetopofthefood. Also, thismodecanbe usedforthickfoodportionsthatbenefitfromabrownedandcrispytop(e.g. chickenpieces, turningthemoverhalfwaythroughcooking). Pleasefertothe grilltableforfurtherdetails.
The food must be turned over, if it is to be browned on both sides.
CookingGuide
GrillGuideforfreshfood
Preheatthegrillwiththegrill-functionfor4minutes.
Usethepowerlevelsandtimesinthistableasguidelinesforgrilling.
| FreshFoodPortionPower | 1.Side Time (min) | 2.Side Time (min) | Instructions | ||
| ToastSlices | 4pcs(each25g ) | Grill only | 3½-4½3 | -4 | Putthetoastslicesidebyside ontherack. |
| BreadRolls(already baked) | 2-4 pieces | Grill only | 2½-3½1 | ½-2½ | Putbreadrollsfirstwiththe b o t to m s i d e u p i n a c i r c l e directlyontheturntable. |
| Grilled Tomatoes | 200g(2pcs)400g(4pcs) | C2 | 3½-4½5-6 | - | Cuttomatoesintohalves.Put somecheeseontop Arrange inacircleinaflatglasspyrex dish.Placeitontherack. |
| Tomato-Cheese Toast | 4 pcs(300g) | C24-5- | Toastthebreasslicesfirst.Put thetoastwithtoppingonthec rack.Standfor2-3minutes. | ||
| Toast Hawaii(pineapple, ham,cheese slices) | 2 pcs(300g)4 pcs(600g) | C1 | 3½-4½6-7 | - | Toastthebread slicesfirst.Put thetoastwithtoppingonthec rack.Put2toastsopposite directlyontherack.Standfor 2-3minutes. |
| Baked Potatoes | 250g500g | C1 | 4½-5½6½-7½ | - | Cutpotatosintohalves.Put themin acircleontherack thecutsidetohegrill. |
| Gratin Potatoes/vegetables(chilled) | 500g | C1 | 9-11- | Put the fresh gratin into glass Grillpyrexdish.Putthe dishontherack. Aftercooking standfor2-3minutes. | |
| Chicken Pieces | 450g(2pcs)650g(2-3pcs)850g(4pcs) | C2 | 7-89-1011-12 | 7-88-99-10 | Brushchickenpieceswithoil andspices.Putthemincircle withthebonestothemiddle.Putonechickenpiecenotinto thecentreoftherack.Standfor 2-3minutes. |
| Roast Chicken | 900g1100g | C1 | 10-1212-14 | 9-1111-13 | Brushchickenwithoiland spices.Putchickenfirstbreast sidedown,secondsidebreast sideupdirectlyontturntable. Standfor5minutesafter grilling. |
CookingGuide
GrillGuideforfreshfood
| FreshFoodPortionPower | 1.Side Time (min) | 2.Side Time (min) | Instructions | ||
| LambChops (medium) | 400g (4pcs) | Grill only | 10-128 | 9 | Brushthelambchopswithoil andspices.Laythemina circleontherack.After grillingstandfor2-3minutes. |
| PorkSteaks | 250g (2pcs) 500g (4pcs) | MW + Grill | C2 6-7 8-10 | (Grill only) 5-6 7-8 | Brushtheporksteakswithoil andspices.Laythemina circleontherack.After grillingstandfor2-3minutes. |
| RoastFish | 450g 650g | C2 | 6-7 7-8 | 7-8 8-9 | Brushskinofwholefishwith oilandherbsandspices.Put fishsidebyside(headtotail) onrack. |
| Baked Apples | 2apple (ca.400g) 4apples (ca.800g) | C2 | 6-7 10-12 | - | Coretheapplesandfillthem withraisinsandjam.Put somealmondslicesontop. Putapplesonaflatglass pyrexdish.Placethedish directlyontheturntable. |
CookingGuide
GrillGuideforfrozenfood
Usethepowerlevelsandtimesinthistableasguidelinesforgrilling.
| FreshFoodPortionPower | 1.Side Time (min) | 2.Side Time (min) | Instructions | ||
| BreadRolls (eachca.50g) | 2 pcs 4 pcs | MW+ Grill | C2 1½-2 2½-3 | Grill only 2-3 2-3 | Arrangerollsinacircle withthebottomsideup directlyontheturntable. Grillthesecondasideof therollsuptothecrisp youprefer.Standfor2-5 minutes. |
| Baguettes/ GarlicBread | 200-250g (1pc) | MW+ Grill | C1 3½-4 | Grill only 2-3 | Putfrozenbaguette diagonallyonbaking paperontherack.After grillingstandfor2-3 minutes. |
| Gratin (vegetablesor potatoes) | 400gC1 | 13-15- | Putfrozensgratinintoa smallglasspyrexdish. Putthedishontherack. Aftercookingstandfor2-3minutes. | ||
| Pasta (Cannelloni, Macaroni, Lasagne) | 400gC1 | 14-16- | Putfrozenpastaintoa smallflatrectangular glasspyrexdish.Putthe dishdirectlyonthe turntable. Aftercooking standfor2-3minutes. | ||
| FishGratin400g | C1 | 16-18- | Putfrozenfishgratinto asmallflatrectangular glasspyrexdish.Putthe dishdirectlyonthe turntable. Aftercooking standfor2-3minutes. | ||
CANDY
Forno a microonde
MANUALE DI ISTRUZIONI MODELLI: CBWM 30 DS
7. Cotture in sequenza
MINKPOBOJHOBbie Pecn
PYKOBODCTBO NOJIb3OBATEJIa
CANDY
PYKOBODCTBO NO 3KcPlyATAUIN
Mнкроволноьпechи MODEЛь: CBWM 30 DS
BHHMaTeIbHo npOHTaIe DaHHyU nHcTpyKcNIO nepei NCpOJIb3OBaHHeM MKNPOBOJHOBoI neu I 6epeXHo xpaHnte ee.
Co6IIOHeHne Coepkauxx83e8b HnCtpyKuIn rapaHTnpyeT OTNIuHyO pa6Ot y BaWei neu Ha DoJIrne rOdbI.
БЕPEХНО XPAHNTE HACTORIQUEE PYKOBODCTBO.
3нak CE (Ha daHOM TOBape NOdTBePkaeT erO COOTBeTCTBne
Ebponeckm Tpe6oBaHnM no oxpaHe Tpyda, OkpykaUoIeN CpeIbI npomblNeHHo 6e3OnaChOCTN, KOtOpbI nepeDyCMOTpeHbI 3aKOHODaTeJIbCTBOM dJaDaHHOrO pOdoYkTa.
MEPbI INPEIOCTOPOXHOCTN IJIY NCKJIIOUeyHNA BO3MOJHO BO3DEIeCTBnY N36bIToUHOIMNKPOBOJHOBOI 3HEPRIN
(a) He nbitaTeCb nCNoJIb3OBaTb daHHyIO neyb C OTKpbIToi DBepcei, TAK KcK pa6Ota C OTKpbIToi DBepcei cnocobHa CO3DaTb BpeDHOe BO3DeIcTBnE MmKPOBOJHOBOI 3Heprn. BaxHo NCKIouHTb NOBpeJdEHNe I He MeMaTb pa6oTe 3aUeJOK DBepzbl.
(6) He donyckaetcnaomeeHne IIObIX oBbeKTOB MeKdyJIuCeBOJ YacTbI O neu N DBepceN nn HaKOpJIeHne3aRpy3HeHn nn OCTaTKOB YnCTaIeTo CpeDCTBa HaYnloTHHTeJIbHbIX NOBepxHOCTaX.
(B) BHIMAHNE: Ecni DBePca nIyNpNOTHnTeJIb NOBpeJxdeHbl, neYb He DoJxHa IcNoJb3OBaTbcra, Noka He 6ydet NouHHeHa KOMPeTeHThblm CneuaJIInCTOM.
ПРИJOЖЕΗΝΕ
Ecπn πριδορ He ποДeρχиВaetcB B Xopoшem COCTOHyN CHCTOTbI, eRo ΠOBeρXHOCtB MOxet 6bITb ΠOBpeKdEHa, I ΘTO MOxET COKpaTHTb CpOK cIyK6bI πριδopa N πρινEcTn K BO3HnKHOBEHnIO ONaCHbIX CNTyaцn.
TexHnueckne xapaKTepeNCTnKN
BAKHbIE YKA3AHnI NO BE3OpACHOCTN
UTo6bI CHN3NTb PnCK IOnKapa, 3JIeKTPnueckoro ydapa, yUep6a IIOJAM nII N OblyueHnA 3HeprnE MmKpOBoH BO BpeMnOJIb3OBaHnA 3JIeKTPo6bITOBbIM npIbOpOM, Mbl peKOMeHnyem CJIeIOBaTb OCHOBhBIM MepaM IIpeDIOCTOPOXHOCTN, BKJIouaR cJIeDyIOUne:
MaTePnaJIbI, KOToPbIe He peKOMeHIOBaHO IcNoJIb3OBArB MmKpOBoJHOBOI neu
INHCTPYKlIy IIO NcPOnb3OBAHnIO
Данная мИкpoBOЛHOBа пechи NCПОЛь3уET COВрЕмEHу OЗЕКТpoHHy O CnCTeMy ynpaBJIeHЯ Дя рergулрOBК napaMeTpOB npriROTOBJIeHЯ ПИш,чTo6bl HAn6OJIe NOJHO ydoBJIeTB BaIи NOTpe6HocTи.
1. YctaHOBka YacOB
Ipnnoaue nntaan Ha MnkpoBOHOByIO neyb,Ha dncnnee neyn oTo6paXaetcra 0:00》,n3ByuHT 3ByKOBoCnHaJ.
3. Pexim 6bICTporo npiroTOBHeHnA
1).Korda neyb haxoNTcBpeXIME OxndaHnA,MOXHO hXaTb KONky "+30" 7TO6bl BKNIOHTb neyb Ha MaKcMaIbHyIO MOUHocTb Ha 30 ceKyHd. KaJdoe NocJeDyUoOee HXKaTne KONKn "DobABPET KO BpeMeHn
PnroToBneHna noHou MouHocTne 30 ckyH; MaKcImaJIbHO BO3MOxHoe Bpem npn 3tOM coCTabJrae 95 MNHyT.
PpmeHHe:BpeMa npiroToBnHm MOxHO yBeJIuHTb,HaXaB KOnKy
+30^ 1",3a NCKIIOUeHHeM npoRpaMM pa3MOpO3KN n aBTOMaTnueCKOrO MeHIO npiroTOBJIeHn.
I nporpaMMbl aBTOMaTnueckoro MeHIO.
2) B coctoHn OxuHaHn, noBepHnte pyuKy "BHeBO dIy npraMOrO bbl6opa BpeMeHn npiroTOBneHn, nocJe yero HaxMITE KHOKky " + 30" " dIy HaaJa npiroTOBneHn Ha 100% MoUHocTn. DaHHyIO nporpaMMy MOXHO yCTaHOBTb nepBoB MHOROCTyNeHuaTOM MeHIO.
4. Pa3MopaxKbAHne no BpeMeHn
1)ОднокраТно habKMITE KHONKY"HaIcMnee oTo6pa3ntc< dEF1>.
8880
CJYKBAIPOIDEPKKKNKINEMTOB
EcBHe B COCTOHN ONpeJeINb npuHnHy HApUWeHnB pa6oTe: OTKnIOUHTe yCTPOIcTBO (He noDBepraer oero pe3KOMy BO3dEInCTBnIO) n O6paTntecb B Cnyk6y NODepxKn KIneHTOB. CEPNIHBiHOMEP I3DEJNIA. TDe OH HaxoDNTca?
CneuJaNCTam ueHpa o6cIyKunBaHnna Heo6xOJIMo COo6UHTb KO npno6peTeHHoro n3deJIINa Iero cepnHbH HOMep (kOd n3 16 CmMBOIOB, KOTOpBHaUNHaeTcra C uΦpbl 3); erO MOXHO HAHTNa HapantHOM cepTuΦnKaTe nII Ha 3aBOIDCKo Ta6JNUKe, paCNOLOKeHHo Ha yCTpoiCTBe. 3TO NOMOKeT n36ExKaTb HApacbIX Bbl3OBOB TexHueCKo cLyKbI, CNeDObaTeJIbHO (YTO camoe BaJHXe), IO3BOJNT n36ExKaTb COOTBEcTBByOuix pAcXODOB Ha Bbl3OB.
RU
HacToaee yCtpoNCTBO NMeET MapKnipOBky COOTBeTCTBnY Tpe6oBaHnA M Ebponecko DnpeKTHBbI 2012/19/EC no yTnIn3aunn 3JeKtpOnHoro n 3JeKtpnueckoro obOpyDobAHn (WEEE). Co6IIOda npabnla yTnIn3aunn np6bopa, Bbl nomoxete npedotbpaNTb BO3MOXHOe OTPucaTeNbHOe BO3dienCTBne Ha OKpykaUOyU Ocreny n 3doPObbe yeJIOBEka, Bbl3BaHHoe HenpaBnHoh nepepa6OTko n3DeJIIN.
CnMBoN Ha n3dJIyUka3bIbAeT, yTo daHbI np6Op 3anpeSeHO yTuIN3InPoBaTb B kaueCTBe 6bITOBbIX OTXoIDOB. BMeCTO 3TOrO np6Op cNe dyET cDaTb B cneuaJIbHbI pyHKT nepepa6OTKn 3JeKtpuYeCKOrO n 3JeKTPoHHoro
obopydOBaHn. YtIN3aUgI DOJXHa IPOUN3BOuNTbC B COOTBETCTBn C MeCTbIMN HOpMaMn 3aUHTbI OKpyKaOuSe CpeDbI, KacaIOUIMMCr YtIN3aUgN N3DeJIIn.
Дя поуеня 6оjee DeТаьнов Ифорmaци no Oбсnyквани, yTил3aци n nepepa6OTke 3TOrO n3delenЯ obpatntecb B MeCTHbie MyHUnIaJIbHbIe opraHbl, MeCTHyO cIyK6y yTиЛIN3aци 6bITOBbIX OTXODOB IIN MaRa3Hn, B KOTOpOM n3delenie 6blNo npno6peTeHo.

Pekomehdauu no npuzomoblehuo nuuu
MVKPOBOJHbI
Boda, xnpb i caxap, 6pa3yUoIe nIu, npBJIeKaIoT I NOrIooaIOT 3HeprnIO MmKpoBOH. MmKPOBONHb 3acTabJrO T MoJeKyIb B nIue 6bICTpO dBNraTbcr. BbICTpoe DnIXeHne 3TNX MOJEKIp CO3daet TpeHne, KOTOpoe npIBODIT K BO3HnKHOBeHnIO TeIIa, yuaCTByIOeR O B npriTOBJIeHn IIu.
FOTOBKA
Nocya dIy npnroTOBJeHn Iu n B MmKpOBoHOBo neu:
Iocya doJxHa no3BOJrB 3Heprn MmKpOBoH npoxoHTb yepe3 Hee, YTObI NMeTb MaKcMaJIbHyIO 3ΦΦeKTnBHOCTb. MmKpOBoHbI MOyT npoxoHTb yepe3 KepaMky, CTeKNo, φapφop i nlaTmaccy, a TaKke 6ymary u DepeBO, Ondako OHN OTPaKaOTcR OT MeTaIINa, HepXaBeUoSei CTaII, anOMMHnI y MedI. ITo TOn npuHne NiueBbI npOdyKtBi HNKOrda He rTOBByTCB KOHTeHepax DaHHoro TUna.
NiuueBbI npOdykTbI, npiroDhbI dI npiroTOBHeHnB B MmKpOBoJHOBOI neu:
MHorne BnIbI NIIeBbIX npOdyKTOB NOxOJrT dJI npNroTOBHeHNA B MInKpOBOHOBoNeu, TAKHe KAK OBOUcN CBExKe I 3aMOpOxKeHHbIe, PpyKtbl, MaKapOHHbIe N3deJIyra, PNC, 3epHOBbIe, 606OBbIe, PbIbIa N MraCo. POnIINBKn, 3aBapHbIe KpeMbI, cyNbI, NyDINHn, JxKembl N aTHN TaKKe MOryT 6bITb npNROToBJeHbIB MInKpOBOHOBo Neu. B o6IeM, MoXHo cKa3aTb, YTO npNROTOBLeHne B MInKpOBOHOBo Neu NIDEaIbHo dJIa NIObOro NIISeBOro pOdyKTa, KOtOpbl O6bIuHO rOTOBNTcHa O6bUHoi KxOHHO Pnnte.
3aKpbBaHne BO BpeMa npnroTOBNeHna
Ouehb Baxho 3aKpbIbTaB NIIeBBe IpoDyKTb BO BpeM npiroTOBHeHn, Notomy To
NcnapraUozaCByBna r CTAHOBITcR napOM n CoJeCTByET npoceCy npiroTOBHeHn. NIOeBbIE
IPOdyKTb MOryT 3aKpbIBaTcR No-pa3HOMy: HApPIMep, KepAMuYeCKoTapeJIkoi,
PiactMaCCOB0k PblIKo INI INeHKo, npiroHOJ DIA MMKPOBOH.
Bpemr OTeTaunBaHn
Послne пи��OTOBненяВпechи ВаЖно ДaТь поДуКТам OTСТОТбСЯ HeKOTOpoe BpeMЯДЯТOrO,чTOБы ПОЗВОЛNTь ИХ TemпepаType урвНовecNTбСЯ.
Pekomendaauu no npuzomoblehuo nuuu
HcTpyKzna no npuroTOBHeHIO 3aMopOKeHHbIX OBOUe
IcnoIb3yIte IooXoJMyIO nocUy I3 JapocToKoro CTeKJa C KpbIshKo. IOTOBtpe NnueBbie npOdykTb 3akpbItbIMn Ha MInHmAlbHoe Bpem, corlacho npnbdeHHo danee TabJIne.
PpOdoJkaTe npiroToBneHne, noka He noIyUte JeklaeMbI pe3yIbTaT.
Hnctpykunno npnroTOBJeHHo CBexnx OBOeJ
IcnoIb3yIte nOxOJaUIOncuIy I3 JapocToKoro cTeKna C KpbIkwOJ. Do6aBbTe 30-45 Mn XoIoHOH BObl (2-3 cTOnOBbIX loXKn) Ha KaJdbie 250 r npOdykTa, ecH He peKOMeHDoBaHO HHOE KOINueCTBO BODbl-CM. Ta6NtCy. TOTOBbTe NIIeBbIe PpOdyKbTI 3aKpbITbIMn Ha MNHMaJIbHOe BpeM, corIacHO pnpBeDEHHo JaIee Ta6Ntce. PpOdoJkaTe npriTOBJIeHne, Noka He NpOyuTe JeIaEMbI pe3yIbTaT. IepemeMaIte NIIuY Odn H pa3 B npOceCe npriTOBJIeHn I oDNH pa3 NocIe. NocIe npriTOBJIeHn Do6aBbTe coJIb, cNeuN IIIN MaCNo. 3akpoIte Ha 3 MnHyMbI dIra OTcTaIBaHn.
ПодсkaЗкa: HapeжьTe CBexKne OBOUи Ha OOnHaKOBbIe KycKn. Yem MeJIbYe OHN 6ydyT Hape3aHbI, Tem 6bIcTpee npriroTOBraTcR.
Bce Bnbl CBexnx OBOUeN CJIeDyeT rOToBNTb B Neu Ha MaKcMmaHbHOJ MOUHOCTH (P100).
| Пишиевскиеpropondуксы | Порци | Время(Mин.) | ВремяOTстанва-ная(Mин.) | Инструкции |
| Броколи | 250 r | 3'1/2-4 | 3 | Проботовы сочьетияODинаковых размеров. Ножкипомостите по центу. |
| 500 r | 6-7 | |||
| БрюccьскаяКалUCTа | 250 r | 5-5'1/2 | 3 | Добавытб 60-75 мл (5-6 сг. ложек)Воны. |
| Морковь | 250 r | 3'1/2-4 | 3 | Прожьт Морковь на обинаковыдочьи. |
| Цвettingая калUCTа | 250 r | 4-4'1/2 | 3 | Проботовы сочьетияODинаковых размеров. РаджытбБалшке сочьетия поочу. |
| 500 r | 6'1/2-7'1/2 | |||
| Кабачки | 250 r | 3-3'1/2 | 3 | Наржыт Кабачки на дочьи.Добавытб 30 мл (2 сг. ложки)Воныи пи Кужесенite 1 сгочьи, пokaОни He STANHT HeKньIMN. |
| Бakлajханы | 250 r | 2'1/2-3 | 3 | Прожьт Баклajханы на ЛомтукиСпрысение 1 сгочьи Ломоно Horo сoka. |
| Лун-Kлорей | 250 r | 3-3'1/2 | 3 | Прожьт Лун-Kлорей на толстylesДочьи. |
| Грибы | 125 r | 1-1'1/2 | 3 | Проботовы маленьке грибыцелковлпб.Есяковам лобовы. Есяковам лобовы. Есяковам лобовы. Есяковам лобовы. Есяковам лobов. Есяковам лobов. Есяковам лobов. Есяковам лobов. Есяковам лobов. Есяковам лobов. Есяковам лobов. Есяковам лobов. Есяковам лobов. Есяковам лobов. Есяковам лobов. Есяковам лobов. Есяковам лobов. Еся Kov. Есяковам лobов. Есяковам лobов. Есяковам лobов. Есяковам лobов. Есяковам лobов. Есяковам лobов. Есяковам лobов. Есяковам лobов. Есяковам лobов. Есяковам лobов. Есяковам лobов. Есяковам лobов. Есяkovам лobов. Есяковам лobов. Есяковам лobов. Есяковам лobов. Есяковам лobов. Есяковам лobов. Есяковам лobов. Есяковам лobов. Есяковам лobов. Есяковам лobов. Есяковам лobов. Есяковам лobов. Есяковам лobow. Есяковам лobow. Есяковам лobow. Есяковам лobow. Есяковам лobow. Есяковам лobow. Есяковам лobow. Есяковам лobow. Есяковам лobow. Есяковам лobow. Есяковам лobow. Есяковам лobow. Есяковам лobow. Еся Kov. Есяковам лobov. Есяковам лobov. Есяковам лobov. Есяковам лobov. Есяковам лobov. Есяковам лobov. Есяковам лobov. Есяковам лobov. Есяковам лobov. Есяковам лobov. Есяковам лobov. Есяковам лobov. Есяковам лobov. Еся Kov. Есяковам лobov. Есяковам лobov. Есяковам лobov. Есяковам лobov. Есяковам лobov. Есяковам лobov. Есяковам лobov. Есяковам лobov. Есяковам лobov. Есяковам лobov. Есяковам лobov. Есяковам лobов. Есяковам лobов. Есяковам лobов. Есяковам лobov. Есяковам лobov. Есяковам лobov. Есяковам лobov. Есяковам лobov. Есяковам лobov. Есяковам лobov. Есяковам лobov. Есяковам лobov. Есяковам лobov. Есяковам лobov. Есяковам лobov. Есяkovам лobov. Есяковам лobov. Есяковам лobov. Есяковам лobov. Есяковам лobov. Есяковам лobov. Есяковам лobov. Есяковам лobov. Есяковам лobov. Есяковам лobov. Есяковам лobov. Есяковам лobov. Есяковам лobов. Еся Kov. Есяковам лobov. Есяковам лobov. Есяковам лobov. Есяковам лobov. Есяковам лobov. Есяковам лobov. Есяковам лobov. Есяковам лobov. Есяковам лobov. Есяковам лobov. Есяковам лobov. Есяковам лobу; Есяковам лobу. Есяковам лobу. Есяковам лobу. Есяковам лobу. Есяковам лobу. Есяковам лobу. Есяковам лobу. Есяковам лobу. Есяковам лobу. Есяковам лobу. Есяковам лobу. Есяковам лobу. Есяковам лobу. Есяковam. Есяковам лobу. Есяковам лobу. Есяковам лobу. Есяковам лobу. Есяковам лobу. Есяковам лobу. Есяковам лobу. Есяковам лobу. Есяковам лobу. Есяковам лobу. Есяковам лobу. Есяковам лobу. Еся Kov. Еся Kov. Еся Kov. Еся Kov. Еся Kov. Еся Kov. Еся Kov. Еся Kov. Еся Kov. Еся Kov. Еся Kov. Еся Kov. Еся Kov. Еся Kov. Еся Kov. Еся Kov. Еся Kov. Еся Kov. Еся Kov. Еся Kov. Еся Kov. Еся Kov. Еся Kov. Еся Kov. Еся Kov. Есяov. Еся Kov. Еся Kov. Еся Kov. Еся Kov. Еся Kov. Еся Kov. Еся Kov. Еся Kov. Еся Kov. Еся Kov. Еся Kov. Еся Kov. Еся Kov. Еся Kov. Еся Kov. Еся Kov. Еся Kov. Еся Kov. Еся Kov. Еся Kov. Еся Kov. Еся Kov. Еся Kov. Еся Kov. Есяkov. Еся Kov. Еся Kov. Еся Kov. Еся Kov. Еся Kov. Еся Kov. Еся Kov. Еся Kov. Еся Kov. Еся Kov. Еся Kov. Еся Kov. Еся Kov. Еся Kov. Еся Kov. Еся Kov. Еся Kov. Еся Kov. Еся Kov. Еся Kov. Еся Kov. Еся Kov. Еся Kov. Еся Kov. Еся�; Еся Kov. Еся Kov. Еся Kov. Еся Kov. Еся Kov. Еся Kov. Еся Kov. Еся Kov. Еся Kov. Еся Kov. Еся Kov. Еся Kov. Еся Kov. Еся Kov. Еся Kov. Еся Kov. Еся Kov. Еся Kov. Еся Kov. Еся Kov. Еся Kov. Еся Kov. Еся Kov. Еся Kov. Еся Kov Еся Kov. Еся Kov Еся Kov Еся Kov Еся Kov Еся Kov Еся Kov Еся Kov Еся Kov Еся Kov Еся Kov Еся Kov Еся Kov Еся Kov Еся Kov Еся Kov Еся Kov Еся Kov Еся Kov Еся Kov Еся Kov Еся Kov Еся Kov Еся Kov Еся Kov Еся Kov Еся Kov. Еся Kov Еся Kov Еся Kov Еся Kov Еся Kov Еся Kov Еся Kov Еся Kov Еся Kov Еся Kov Еся Kov Еся Kov Еся Kov Еся Kov Еся Kov Еся Kov Еся Kov Еся Kov Еся Kov Еся Kov Еся Kov Еся Kov Еся Kov. Еся Kov Еся Kov. Еся Kov Еся Kov Еся Kov Еся Kov Еся Kov Еся Kov Еся Kov Еся Kov Еся Kov Еся Kov Еся Kov Еся Kov Еся Kov Еся Kov Еся Kov Еся Kov Еся Kov Еся Kov Еся Kov Еся Kov Еся Kov Еся Kov. Еся Kov Еся Kov Еся Kov. Еся Kov Еся Kov Еся Kov Еся Kov Еся Kov Еся Kov Еся Kov Еся Kov Еся Kov Еся Kov Еся Kov Еся Kov Еся Kov Еся Kov Еся Kov Еся Kov Еся Kov Еся Kov Еся Kov Еся Kov Еся Kov Еся Kov. Еся Kov. Еся Kov Еся Kov Еся Kov Еся Kov Еся Kov Еся Kov Еся Kov Еся Kov Еся Kov Еся Kov Еся Kov Еся Kov Еся Kov Еся Kov Еся Kov Еся Kov Еся Kov Еся Kov Еся Kov Еся Kov Еся Kov Еся Kov Еся Kov Еся Kov. Еся Kov. Еся Kov Еся Kov. Еся Kov Еся Kov Еся Kov Еся Kov Еся Kov Еся Kov Еся Kov Еся Kov Еся Kov Еся Kov Еся Kov Еся Kov Еся Kov Еся Kov Еся Kov Еся Kov Еся Kov Еся Kov Еся Kov Еся Kov Еся Kov. Еся Kov Еся Kov Еся Kov Еся Kov. Еся Kov Еся Kov Еся Kov Еся Kov Еся Kov Еся Kov Еся Kov Еся Kov Еся Kov Еся Kov Еся Kov Еся Kov Еся Kov Еся Kov Еся Kov Еся Kov Еся Kov Еся Kov Еся Kov Еся Kov Еся Kov. Еся Kov Еся Kov. Еся Kov Еся Kov. Еся Kov Еся Kov Еся Kov Еся Kov Еся Kov Еся Kov Еся Kov Еся Kov Еся Kov Еся Kov Еся Kov Еся Kov Еся Kov Еся Kov Еся Kov Еся Kov Еся Kov Еся Kov Еся Kov Еся Kov Еся Kov. Еся Kov. Еся Kov Еся Kov Еся Kov. Еся Kov Еся Kov Еся Kov Еся Kov Еся Kov Еся Kov Еся Kov Еся Kov Еся Kov Еся Kov Еся Kov Еся Kov Еся Kov Еся Kov Еся Kov Еся Kov Еся Kov Еся Kov Еся Kov Еся Kov Еся Kov. Еся Kov. Е的标准 Е的标准 Е的标准 Е的标准 Е的标准 Е的标准 Е的标准 Е的标准 Е的标准 Е的标准 Е的标准 Е的标准 Е的标准 Е的标准 Е的标准 Е的标准 Е的标准 Е的标准 Е的标准 Е的标准 Е的标准 Е的标准 Е的标准 Е的标准 Е的标准 Е的标准 Е的标准 Е的标准 Е的标准 Е的标准 Е的标准 Е的标准 Е的标准 Е的标准 E标准 E标准 E标准 E标准 E标准 E标准 E标准 E标准 E标准 E标准 E标准 E标准 E标准 E标准 E标准 E标准 E标准 E标准 E标准 E标准 E标准 E标准 E标准 E标准 E标准 E标准 E标准 E标准 E标准 E标准 E标准 E标准 E标准 E标准 |
Pekomehdaa uu no npuzomoblehuo nuu
PykoBoDcTBO no npuroToBneHnO pnca nIIM MakapoHHbIX n3deJIi
Pnc:
IcnoJb3yIte Iny60kyU cTeKJIHHyU KAcTpIOJI U C NOxOJaUe KpbIJKoI, NocKoJIbKy pnc yDbaUNBaET OBeM BO BpeM npriTOOBJeHnHa INdYkuOHbIX BapouHbIX NOBepXHOCTaX. TOTOBt Pe ND KpbIJKoI.
No nCTeHn BpeMeH npiroTOBHeHn nepeMaTe nepeD OTCaUNBaHNem, nocOJIte nn Do6abTe CneuN mACJIO.
PpmeHHe: pnc MOKeT He BnntaTb BCIO BDOy nO OKOHnBpeMeHH npiroTOBJIeHn.
MaKapOHbIe n3dJIy:
IcnoJb3yIte Iny60kyIO CTeknHHyIO KAcTpOJIHO. 3aJeTe KInJaUeB ODoI, Do6aBbTe UenOTKy CoIN N TuaTeJIbHO nepemeuAHTe. FToOBtB HxKHO 6e3 KpbIshKNI.
NepnoDnueckn NomeuBaIte BO BpeM n noCne npnroTOBJeHn. Ha BpeM OTCTaNBHaHn 3akpoTe KpbIshKoN, 3aTEM TuaTeJbHo CneiTe.
HeKOTOpBie NIIeBbI npOdykTbI MoryT pa3OrpeBaTbCra Ha MaKcMmaJIbHOH MOUHOCTN, B TO BpEmKaK dpyrIe DOJXHbI pa3OrpeBaTbCra Ha MeHbWe HMOUHOCTN.
IINHOpMaunno yPOBnMMoHCTN CBepbTecb TcAbnue. KaNPaBnIO,JeNkAThBie IIN6bICTPO HArpeBaIOUncEe npOdyKTbI (HaNPmep, n3DeJnna n3 MChORo fapwa), a TaKke npOdyKTbIB 60JIbWOM KOJNUeCtBe, JyUWe pa3OrpeBaTb Ha MaIO MOUHOCTN.
IpyuyeHn lyuwepe3ynbTaTtataeNbHO nepemeunBaHTe NJI nepeBopauBaTe npdykTB. Ecn BO3MOxHo, nepemeaHTe eue pa3 neped noaeh Ha cToJ.
Pekomehdaa uu no npuzomoblehuo nuu
O6paaaiTe oc06oe BHMaHne, KOrda pa3oRpeBaete xuKocTn IIN DeTCKe nITaHne. Bo 36exaHne BO3MOxHBIX OXoROB N nepeJIbAHnja XuKOCTeYpe3 KpaI NOcyDbI BO BpeMa KNHeNna nepeMeunBaIte IN Do NaHa, BO BpeMn IocNe pa3oRpeBaHnA. DePKeTne IN B MmKPOBOJHOBo N neu Ha BpeM OTCaUNBaHnA. Cobetyem Bam INoJoxMbI pIaCTMaCCOByIO JoxKy INI CTekJHHyI NaOnky B xuKocTn. CtapaiTeCb N36eRaTB neperpeBa (N, cIeDoBaTeNbHO, npCu) npOdykTa.
Iyuwe HeooeHTb Bpem npiroTOBHeHn I doabntb DOnoHnTeHbHOe Bpem Ha pa3OrpeB npn Heo6xoDmOCTn.
Bpempa3oRpeBa n oTcTaBaan
Korda Bbl pa30rpeBaete npOdykTbI BnepBbIe, NOJIe3HO 3aNcTaB BpeM JaNCNoJb3OBaHnB 6bydUeM.
Y6eDNTecb B TOM, YTO pa3OrpeBaemar NIIa OOnHaKOBO Ropya BO BCex yAcTkax.
Pocne pa3orpeBa daIte nIe OTCTOaTbCra, YTO6bl N03BOJNTb Tempeatype c6aJahcnpoBaTbcra.
Bpemr OTCaHbHn, peKOMeHdyEmoe nocne pa3OrpeBa, coCTabJraT 2-4 MmHyTbI, 3a NCKJIIOUeHNEM OTdJIbHO yKa3aHHbIX B Ta6JInce CnyuaeB.
O6paaIte oco6oe BnHMaHne, KOrda pa3oRpeBaeTe KnDkoCTn IIN DeTCKoe nITaHne. TaKKe O3HaKOMbTEcB C pa3JeIOM IO MEPam 6e3OnacHOCTN.
PA30IPEB KNUKOCTE
Bcerda daTe xuDKoCTn OTCOTbC XOTb 6bl 20 ckyHn nocLe TOrO, KaK BvIKIIOUHnlaCb neyb, YTO6bl N03BOJNTb TempepaType ypaBHOBeCnTbcra. IOp Mepe Heo6xOIMOCtN, nepemeunBaIte XuDKoCTb BO Bpem pa3orpeBaHn u BCErA nepemeunBaIte nocLe pa3orpeBaHn. Bo N36exaHne BCIIeCKOB BO Bpem 3aKnHaHn, BO3MOXhBX OXOROB INpeJIUNBaHn JxIDKOCTe Upe3 Kpaar nocydbI BO Bpem KInHeHn, nepemeunBaIte INdo Haayana, BO Bpem INocLe pa3orpeBaHn.
PA30FPEB JETCKOFO HHTAHH
DETCKOE NITAHNE:
IonoKHe erO B rny60kyo KepaMueckyo TapeNky. 3akpoTe PnactMaCCOBO KpbIko. Iocne pa3orpeBa TsaTeNbHO nepemeaaTe! NpeD cepBupOBKO daTe OTcToTbCBA TeueHne 2-3 MNHT. IOBtOPHO nepemeaaTe n npOBepbTe Tempeatpy. PeKOMeHyemar TemnepaTpa dna cepBupOBKn:OT 30do 40^
DETCKOE MOJOKO:
IpepeeTe MOKOBCTepnHn3OBaHHyO CTekJHHyO 6ytbIOUcy. Pa3orpeBaIte 6e3 KpbIiKN. HkOrda He pa3oRpeBaIte 6ytbIOUcy C COCKO, NOTOMy UTO 6ytbIOUka MoKeT B3OpBaTbcra, ecnnepepeetc. Xopoio nepeMeuAte nepeD OTcAnBaHNm Eepe pa3 nepeD nOaueHa cToI. Bcerda BnMaTeJIbHO npOBepaIte TempepaTyPO MOnoka nnN Detckoro NITAHnpeTd TEM, KaK daBaTb INx pe6eHky. PekomeHdyEma TEmpepaTypa dIy IOnaun Ha cToI coCTabJIaET OKONO 37^
ПРИМЕЧАНЕ:
Bo n36eXaHHe oXoROB DeTCKoe NITaHHe DOJXHO OCO6eHHbIM 06pa3OM I BHIMaTeIbHO npOBepaTbcnpeed noDaueH Ha cToJ.
B kaueCTBe pyKOBoDcTBa dIra pa3OrpeBa NIIeBbIX npOdyKToB IcNoIb3yIte npINBeDeHHyU Hxke Ta6nucy.
Pekomehdaquu no npuzomoblenu nuu
Pa30rpeB XnIDKoCTe N nIeBbIX npOdyKTOB
IcnoJIb3yIte npUBeDEHHBIE B daHHoT Ta6nue ypoBHN MOuHOCTN IN BpeM pa3OrpeBa BA KaueCTBe pyKOBOdCTBa npi pa3OrpeBAHN pOdyKTOB.
BELANGRIJKE VEILIGHEIDSINSTRUCTIES WAARSCHUWING
MANUEL D'INSTRUCTIONS
FR
MIKROWELLENHERD
MANUEL D'INSTRUCTIONS MODELES: CBWM 30 DS
CbueCTByBa onaCHOCT 3a BCEKN,OCBEH
OTOPIN3npaHNTe
KOMnTeHTHn Iuca, Da n3BbPwBaT cepBn3n i
Pa30nakobaiTe BHMateJIHOnΦypHaTa,KaTO n3BaJNTe BCNUKu Yactu OT KaUOHa .
Baata dvpna nDbBa cbc cJeHnTe akcecoapn:
CTbKJHeHa Ta6na 1
BbptTaepeonKOBkpbr1
Hnctpykun3a ynoTpe6a 1
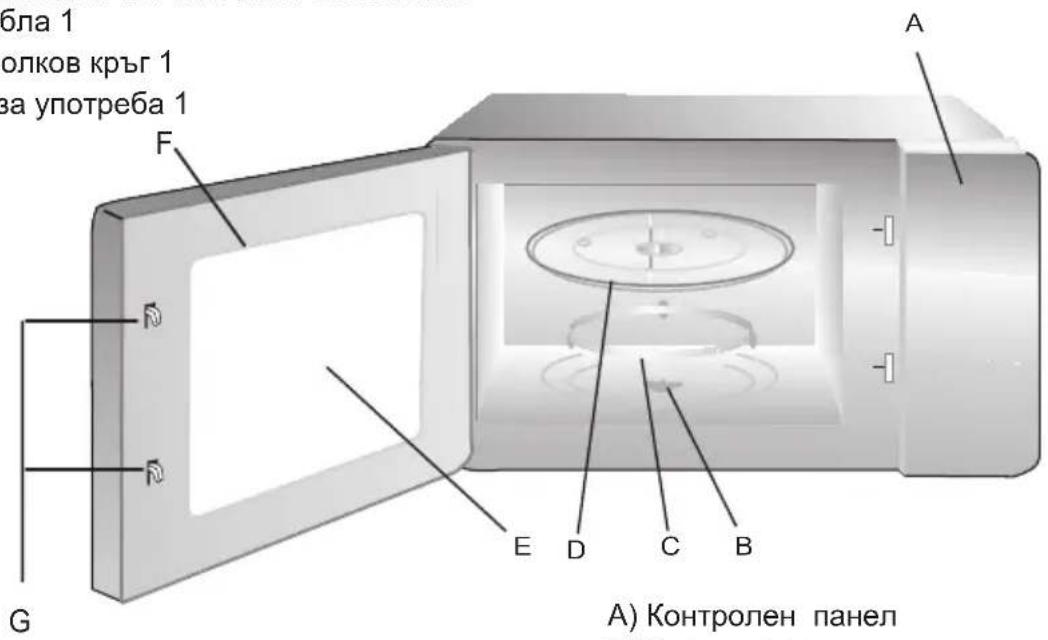
A)KoHTpOJen naHEn
B) BbptTaa oc
C) Bbptra ce poNKOB kpb
D) CtbKneHa Ta6Ja
E) Ipo3 opeu Ha neukata
F) MoHTnpaHe Ha BpaTaTa
G)Ппдзнстema 3a3akluybaHe Ha BpaTaTa
2)Пин acToPoiKa Ha yacOBnka,akOHaTncHe6yToH ec He nIi He nIi He n3BbPwnte HnKaKBa onepaun 3a nepnoD ot 1 MNHyta ue n3Je3eTe ot peXIMa.
2.МнкpoьЛноBO rotBeHe
HaTnCHeTe BeHbJx" ≈ ", nOyBraCe"P100". CJeI TOBa " ", 3a Da u36peTe
ФункцЯТа, KoYTo JKeJaTe. HaTnCHeTe +30", 3a Da NotBbPdNte MoUHocTTa. 3aBbPTeTe
"" ", 3a Da 3aJaTe BpeMeTo 3a rotBeHe. HaTnCHeTe +30", 3a Da cTapTnpaTe
rotBeHTo.
Hapnmep: Ako nckate da n3no13BaTe 80% ot mouhoctTa Ha cyphata 3a rotBeHe Ha MInKpoBbHN 3a 20 MNHyTu, n3NbIHeTe cneDNITE CTbKN.
1)HaTncheTe BEdHbX,HaDnCnIeJe ce ce noBn ,P100 ≈ " HndNKaTOpBT 3aNoUHe Da CBETN.
2) 3aBbptete6yToH OuIe BeDnBx 3a da n36peTe 80% MmKpOBbHOBa MOUHOCT, Ha LED dncnpeJe ce neoBN ,P80". HATNCHeTe +30"
3) 3aBbptTe 6yToH , 3a Da HacTpOnTe BpeMeTo 3a rotBeHe Ha 20 MNHTN, DOKATO Ha dncnpeer ce nOBu INHdkatopa "20:00" (MoxTe da n36epTe rotBeHe Do 95 MNHTN).
4)HaTnCHeTe +30^ 1,3a da cTaptnpate roTbeHTo,Ha nCnIe Ie CBeTHe HNdkaTopbT ,: a INdkaTopbT uE Mna (CneI Kpa Ha rotBeHTo Ie yyeTe 5 nbTN 3ByKOB cnHaI).
3a6eJekka:CTbNkTe no HAcTpoJa Ha BpeMeTo NO KOD ca, KaKTO CJIeDba:
0---1 MUN:5 cekyHn
10—30 MInH: 1 MNHyTa
1---5MnH:10ceKyHdN
30---95 MNH: 5 MNHyTN
5---10 mH:30 ckyHn
MnKpoBbIHOBa MoUHOCT
| М��ковая мошноct | 100% | 80% | 50% | 30% | 10% |
3.БьрзотВеHe
Korato cyphatae B pexnHa Ha 3aKaBaHe, HATNCHEte 6yToHa, 3a 3a" cTaptnpate roTBHeTo Ha XpaHa npi PbHa MOHcT Ha MKNPOBbHNITE n PPODbJXHTENHOCT ot 30 cekyn. KbM BpeMeTo 3a roTBHe ue ce npnbAByT no 30 cek. BCEkn nbT, KaTO HA TNCHeTe 6yToHa +30", KaTO MaKcImaJIHOTo BpeMe, KOeTO MoKe Da ce 3aJaDe, e 95 MNHyTN.
BpeKIM Ha n3aKaBaHe, 3aBbptete" "HaJIaBO, 3a Da n36epeTe dIpuKeTHO BpeMeTo 3a RotBeHe, CJeI TOBa HATnCHete 6yToHa, +30" 3a Da rotBnTe npi PbIHa MoUHocT Ha MmKpOBbIHNte. Ta3n nporpaMa MoKe Da 6bDe 3aJaDeHa KaTO PbPbATA OT HЯKOJIKOTo etana.
4. Pa3mpa3BaHe no BpeMe
1)HaTnchTe 6yToHa EINH nT. Ha dncnpe ue ce noaBn dEF1".
2) 3aBbptete6ytoHa , 3a Da n36epTe BpeMeTo 3a rotBeHe. EINHOpeMeHHo Ha IncnIe HndkaTopuTe n He CBetT. MoKeTe Da n36epTe BpeMe MeKdy 00:05 u 95:00. FapHNO 3aJaDeHOTO HNBO Ha MOUHOCT e P30. To He MoKe Da ce perynipa.
3) HatncheTe, 8a30a cTaptnpate pa3Mpa3raBaHeTo. HndnkaTopnte 1ue CBetHaT.
5. Pa3Mpa3BaHe no TerNo
1)HaTnCHHe 6yToHa 12 IBa nBn. HaLED nCnpeJe ce neoRb "dEF2".
2) 3aBbptTe 6yToH, 3a Ha 36epeTe TergIo To Ha xpaHaTa. B cbIoTo BpeMe Ha dncnner ige CBetHe "g". TerIto Tpr6Ba Da 6bDe 100-2000 rp.
3)HaTnCHHe 6yToHa,aTaPtpaTe pa3Mpa3YBaHeto. Ha nCnpe Ⅲe 3aNochat da MNaHT mNdkaTopuTe ≌ n %, a HnDnKaTOpbT "g" Ie n3rache.
6. ABTomatmyHO MeHIO
1).прп ржIMITEHa n3aKBaHe,HaTnCHete /3aBbptete" "HaIaCHO,3a Da n36epeTe MeHIOTo,KoETo NCKaTe. HaДиСПЯЯcle ce peKaJAT BpeД"A-01","A-02"..."A-10".
2)HaTnCHeTe +30" 3a Da NOTBbPdNte H36paHOTo rnaBHO MeHIO.
3). 3aBbptete " ", 3aДаи36epeTe MeHTo OT b-1 Do b-4.
4) HATINCHTe " 430"da3anoyHeTe roTBeHe.
Korato roTBeHTo npNKIOUHy, ige cyyeTe NO3BbHraBaHe 5 nbTu. Ako yacbTe e 6n 3aAden no-paHO, YacbT B MOMeHTa ige ce nOBu Ha ducnpeA A aKO He e 6n 3aAden , Ha ducnpeA ue ce nOABu 0:00.
HannmuMp: npn rotBeHe Ha nacta
1)3aBbptete" "HaJaCHO dOKaTO Ha DnCpIe Ce IOnBn "A-07" n MeHHTO 3a NaCTa e H36paHO. " u HnDnKAtopa "E" ue CBeTHe.
2)HaTnchHeTe " + 30" 1 ", 3a Da NOTBbPdnte N36paHOTo rnaBHO MeHIO.
3) 3aDpBxTe " ", koraTo Ha dncnpe ce nokaxe "b-4".
4)HaTnCHete " + 30"1 ,3a da 3anOHTe rOTBeHTo. Korato rotBeHTo npNKIOUHy,ue yyeTe nO3BbHRAHe 5 nBTN.CJeT TOBa BbpHeTe do peKIMITE Ha N3uKaBAhe..
7. TOrBeHe Ha HrKoNko etana
Morat da 6bdat 3aadaeHn MaKcMym Dba etana Ha rotBeHe.AKO eHN OT etannte e
pa3mpa3raBaHe,TO Tp86Ba Da ro nocTabte KaTo PbBn.CneJ KpaHa BceKn etan cyphata u
n3daTe 3ByKOB CNrHaN U ze 3anoHc CneDbauNt Etan.
3a6enkka:ABTomauHOTo rotBeHe He MOKe Da 6bde BKIOUeHO B TO3n peXmHa pa6ota. HanpImep:Ako
XeNaTe da pa3mpa3raBaTe 500 rp. XpaHa, cneJ KOeTO Da J ra rotBnte 5 MInHyTn npn 80% MoUHocT Ha cyphata,
CneDbaiTe cneDnIte CTbKN.
CTbKnITE ca cneDnIte:
1)HaTncheTe 1Ba nBtN.HaLEDnncnpeIe ce noBn "dEF2".
2)3aBbptete 3a TernlTo Ha xpaHata.CnpTe Da Bbptnte, KOraTo ce noaBn "500";
3)HaTnCHHeTe BEdHbX, 3aBbPTeTe 6yToH 3a Da n36epeTe 80% MInKPOB. MoIHOCT; HaTnCHHeTe +30"
4) 3aBbptete, 3a da 3a daTe BpeMeTo 3a rotBeHe ot 5 MnHyTu;
5)HaTnchete+30" 3aJa cTaptnpate roTBeHTo. 3a6eJekKa:CpeKpaHa BceKn eTan ige CyBaTe 3ByKOB cnHAn, CpeI KoETo ige 3aNoUHe cPeBauNt. Korato BCuKn 3aBbPWBaT, 3ByKOBnT CNHAn ige npO3Byu nT PbTu, DOKaTO He ce BbPHe Ha cbCToRnraTa Ha n3yakBaHe.
OBCJNYKBAHE HA KJINEHTNTE
Ako He MoKeTe Da OTkPneTe npUHHaTa 3a NOBpeJaTa:N3KlHouTe ypeJa n Ce CbbpXeTe C OToPn3nPaHn cepBn3 3a o6cIyKbaHe.
CEPNHHT HOMEP HA IPOyKTA: Kbde mora da ro otkpna?
MHoroeBaXHO Da yBeIDOMTe OToPn3npAHncrepBn3 3a npOdyKTOBnKoN CepHnHn Homep Ha Baunyypei (KoD OT 16 CmBOna, 3anOvBaUc c nOcpPaTa 3); ToI MoKe Da 6bJe HamepeH Ha rapaHOnHaTa KapTa nnHa INOpMaUNOHnHa Ta6eJa, HamnPaua ce Ha ypeJa.
Toba nOMorHe da n36berHeTe n3nHHTe XoDeHna Do TexHnCTte, a No To3n Haun (u B Hau-3HaHTeHa CTeneH) u da CnecTHe CbOTBeTHHe pa3XODn 3a u3XODn IOBnKBaHn.
To3n ypei e MapKnpaH cbo6pa3Ho eBpOneiCKaTa dIpuKeTnBa 2002/96/EC 3a DeNoHnpaHe Ha eJekTpUHn I eJekTpOHHu ypei (W EEE).
C npabnHTo DeNoHnpaHe Ha To3n npOdyKT, Bne nomarate B 3aunTata OT nOTeHuaJIHn HeratNBn NocJeIu3a OKoJHaTa CpeDa N YoBeWKOTO 3dpaBe.
CnmbolbT Ha To3n npoodyk T noka3Ba ye He Tp86Ba da ce TpeTnpa KaTO DOMAKINHCKN OTnaDbK.3a TOBA Tp86Ba da ce npede B
naKTObTe 3a c6bnpaHe Ha domaKnHcN ypeiHa peuKnnpaHe Ha eJeKtpnuecko I eNeKTPoHNo obOpyDbAhe.
I3XBpIHeTo u yHnOxKaBaHeTo Ha ypeDa Tp8Ba Da ce I3BbPmB CbOTBeTCTBHe C MeCTHnte pa3Nope6n 3a yHnOxKaBaHe Ha OTpaDbu 3a NOBeue IHΦOpMaζη 3a I3XBpIe He n peuzKnipaHe Ha To3n IpOdyKT MoJr OsbPheTe Ce KbM MeCTHnte BlaCTn, CbOTBeTHnte pyHKTOBe 3a Cb6IpaHe Ha OTpaDbu NIM MaRa3Ha O T KbIeTO CTe 3akynnn npOdykTa.

YnbTbaHe npn rotBeHe
MnKpoBbJIHn
MnKpOBbJIHOBaTa eHeprrna npOHnKBa B xpaHaT, KaTO ce KaTO ce npNBnua n a6copbnpa OT BoDaTa, Ma3HHHTe N CbIbPkaHneTo Ha 3axap B He.
MnKpOBbJIHInTe Kapat MOnEkyJIInTe B xpaHaTа Da ce DmNkaT 6bp30. TOba 6bp30 DmNkeHne Ha MoJekyJIInTe Cb3dAba TbpKaHe, KOeTo HapraBa XpaHaTa.
TOTBeHe
CbdoBe 3a MmKpoBbJHOBO rOTBeHe
3a MaKcHMaJIHa epeKTbHOCCT cbIOBte KOtO nI3NOJ3BaTe Tp6Ba Da nO3BOJBAr Ha eHepnra Ta da MNHaba ppe3 T'AX. MInkpOBbIhNte IecHO npOHKBaT ppe3 KepAMuHN, CTbKJIeHN, NOpceIaNOBu INlactMacOBn CbIOBe, KaKTo n Ipe3 XapTna N IbPBO, HO Te ce peFNeKTIpaT OT MeTaI, KaTO HEPBXJaema CTOMaHa, anyMHH u Mei. 3aTOBa HIKORA He nI3NOJ3BaIte MeTaJIHN CbIOBE 3a ROTBeHe B MInkpOBbIhOba FypHa.
XpaHn NOxOJaun 3a MKNpOBbJHOBO rOTBeHe
MHoro BnOBe XpaHn ca NOxOJaIz 3a npriOTBHe B MKNPOBbJHOBN cyPHN, BKJIIOHTeJIHO npeCHn 3aMpa3EH N3eJeUyI, MaKapOHeHn I3dEJIa, opu3, 3bpHeHn 6o6OBx paAHn, Meco n pnb.
Cocobe, ropuca, cynn, nydnhrn, cnaDKa, KOHcHTOpN IIOTeHNUca CbIoo MoRat da 6bDaT npiroTBaH B MmKpOBbJHOBn OpyH. Hau-06Ioo Ka3aHO MmKpOBbJHOBOTo rOTBeHe e NODxOJaIo 3a BCaKaBn BuIOBE xpaHa.
PokpmbaHe Ha xpaHaTa NO BpeMe Ha rotBeHe
POKPBAneto Ha XpaHaTa No BpeMe Ha rotBeHe e N3KJIIOHTeHBO BaxHO, TbN KaTO n3napeHaTa Boda Ce npBpbUa B npa N NOIOMara rotBeHTo. MoKeTe da NOKpNeTe XpaHaTa no pa3NJuHN HaUNH: C KepaMnHn, PIACTMacOBn CbDoBE N KanaC N C FOJNO N PIIKOBe POxOJaU 3a yNoTpe6a B MmKPOBbLHOBn FyprHn.
N3paBnBaHe Ha TemnepaTpTa
CJIeI KpaI Ha rotBeHeTo OCTaBete XpaHaTa BbB 0yPHaTa HraKoNko MInHyTu 3a Da MoKe TEMpePaTypaHa Ha XpaHaTa Da ce N3paBHn.
YnbTbaHe npn rotBeHe
PniroTbHe Ha 3aMpa3eHn 3eJeHcyu
I3non3BaIte cTBkIeHa Kya c KaIak. IOKPnIe C Kanak N 36peTe MHNMaHHTO BpeMe 3a rotBeHe (BIXTe TaBnIcata). PpOdbJIxEte rOTBeHTo DOKaTO NOCTINHete JKeJAHrT pe3yIITat. Pa36bPKaIte XpaHATA DBA NbTN NO BpeMe Ha rOTBeHTo N BeDhBX CneI TOBa. Do6aBeTe coJ, NOdnpabKn INN MaCNo CneI KpaI Ha rOTBeHTo. IOKPnIe XpaHATA N a OCTaBete 3a HraKOJIko MNHyTN BB FypHaTa.
| Храна | Колиесстvo гравma | Мошиост | Вре'me | Вре'me за иизразв�新аhe на Темп. (Мин) | Инстукуни |
| Спанak | 150 rp | P80 | 5-6 | 2-3 | ДобавеTe 15 мп. (1 сунега лъжица) сухда на Ворda |
| Броколи | 300 rp | P80 | 8-9 | 2-3 | ДобавеTe 30 мп. (2 сунеги лъжици) сухда на Ворda |
| Грах | 300 rp | P80 | 7-8 | 2-3 | ДобавеTe 15 мп. (1 сунега лъжица) сухда на Ворda |
| Зелен phасул | 300 rp | P80 | 7½-8½ | 2-3 | ДобавеTe 30 мп. (2 сунеги лъжици) сухда на Ворda |
| Смec ot различни зеленчуши (моркови, грах, царевица) | 300 rp | P80 | 7-8 | 2-3 | ДобавеTe 15 мп. (1 сунега лъжица) сухда на Ворda |
| Смec ot Китайски зеленчуши | 300 rp | P80 | 7½-8½ | 2-3 | ДобавеTe 15 мп. (1 сунега лъжица) сухда на Ворda |
YnbTbaHe npn rotBeHe
PnroTbHe Ha npeChn 3eJIeHcyu
I3no3BaIte CTbKJIeHa Kyna c Kanak. Do6aBeTe 30-45 MЛ. CtydeHa BODa (2-3 cyneHn JbXnCn) Ha BCEKN 250 rp. 3eJenHcyuO nOBeH aKO He e NocOyeHO dpyro BIXkTe TaBnUcaTata. POKPnIe C Kanak n I36peTe MNHmAlHOTo BpeMe 3a rotBeHe (BVkTe TaBnUcaTata). PpOdbJnxTe rotBeHeTo DOKaTO NOCTnHHeTe JeHAnr pe3yIrtat. Pa3bPkainTe xpaHATA BeHNbX No BpeMe Ha rotBeHeTo IN BeHNbX CNeI TOBA. Do6aBeTe coN, noDnpabKn IIn MacNo CLeD KpaH a RotBeHeTo. POKPnIe XpaHATA n Y OCTaBeTe 3a 3 MInHyTN BB BpyHata.
CbBET: Hapejete 3eHcyuTe ha paBn napyeTa. KOnkoto no-MoKn ca napYeTaToJkoBa no-6bp30 ue ce npuroTBaT.
BcnyKn npecn 3eJeHcyuT Tp6Ba Da 6bDaT npiroTBaHn npMaKcMaJHa MoUHocT (P100)
| Храна | Колочевограма | Вреем Мин. | Вреем за иизразова- набел. (Min) | ИсторICAL |
| Броколи | 250 rp | 3½-4 | 3 | Наржete на равни парчета. Пор dedete стеблata в среда. пс.) Добavenе 60-75 мл (5-6 сухени льжши) Вoda. |
| 500 rp | 6-7 | |||
| БрукSELSCO зеле | 250 rp | 5-5½ | 3 | |
| Моркови | 250 rp | 3½-4 | 3 | Наржete на равни парчета. Пор dedete стеблata в среда. пс. Достато омекhal. Hа对接е на равни парчета. Добavenе 30мл (2 сухени льжши) Вoda по малко масло. Готва- докато омекhal. |
| Карфюл | 250 rp | 4-4½ | 3 | |
| 500 rp | 6½-7½ | |||
| Тikвинки | 250 rp | 3-3½ | 3 | |
| Патладжанi | 250 rp | 2½-3 | 3 | Наржete на равни парчета и посысану с1 сухни льжши лимонов сok. |
| Праз лук | 250 rp | 3-3½ | 3 | Наржete на равни парчета. |
| Гьби | 125 rp | 1-1½ | 3 | Наржete по малки парчета по по-mалки льбиные по оставе тцени. Н doбавайе вoda. Нарьскайные по с лимонов сok. Рырравete сьс соли пимер. Издete по понасяп. Hа对接е на парчета по повинки. Добavenе само 15 мл (1 сухени льжши) Вoda. |
| 250 rp | 2-2½ | |||
| 4-4½ | ||||
| Лук | 250 rp | 3 | ||
| Пинер | 250 rp | 3½-4 | 3 | Наржete на равни парчета. Пор dedete картофігіte, обетete по и по паржete на пособни парчета повинки по ТВьртунkin. |
| Картофи | 250 rp | 3-4 | 3 | |
| 500 rp | 6-7 | |||
| Рая/Зелe | 250 rp | 4½-5 | 3 | Наржete на малки кубчета. |
YnbTbaHe npn rotBeHe
TOrTbeHe HaOpn3 N MaKapOHN
Op3: 13noJ3BaIte roJMa cTbKHeHa Kya c KaNak opn3bT yDBoYBa o6ema cn npn rotBeHe. POKPInTe c Kanak.
CneI KpaHa BpeMeTo 3a roTBeHe, pa36bPKaIte N OCTaBeTe 3a HRAKO MHyTu BB cyphata. Iopnpabete cbc coN IO6aBeTe NOINPABKn MACNo.
3a6eJekKa:Opn3bT MoKe Da He NoEme cIaNoTo KOnuYeCTBO BODa.
MaKapOnH: I3noJ3BaIte roJMa CTbKNeHa Kyna. Do6aBeTe ropeu a Boda, MaJko coN pa36bpKaIte do6pe. FroBete 6e3 Kanak.
Pa36bpbBaiTe no BpeMe Ha rotBeHeTo n Cnei ToBa. Cnei KpaHa rotBeHeTo nOKpHte Kynata c Kaapan N octaBeTe 3a HAKOJIKO MInHyTN BB BpyHaTa, Cnei KOeTo n3ueDeTe MaKapOHnte.
| Хранa | Колиесстvo грзma | Мошноct | Вреем Мин. | Вреем за иизразваянe на Temп. (Min) | Инструкции |
| Бал ориз | 250 rp 375 rp | P100 | 15-16 17 1/2 -18½ | 5 | Добаве тудени вoda Добаве тудени вoda |
| Кафяв ориз | 250 rp 375 rp | P100 | 20-21 22-23 | 5 | Добаве тудени вoda Добаве тудени вoda |
| Смеше ориз (ориз + Дов ориз) | 250 rp | P100 | 16-17 | 5 | Добаве тудени вoda |
| Смес орис + зырно | 250 rp | P100 | 17-18 | 5 | Добаве тудени вoda |
| Мakаронi | 250 rp | P100 | 10-11 | 5 | Добаве тудени вoda |
IIOdprBaHe
MnKpOBJIHOBNTe FyprH NIOIrpBaT XpaHNTe HAnHTKNTe MHOrO No-6bp30 OT O6NKHOBeHInTe FyprH.
Obphe TBNMaHHe Ha MoUHocTt N BpeMeTo 3a NoIrpabRHe B Ta6nucTa. BpeMeTo, nocoeyo B Ta6nucTa, e onpeDeNeHO Bb3 OCHOBa Ha HAnITKn Cbc CtaHa TemnepaTypo o+18 do +20°C nIn oxlaedHxpaHc TemnepaTypo +5 do +7°C.
Iopdxane HnokpmbaHe Ha xpaHnte npnOidprbahe
I36BaIe NOIrpBAnHe Ha IOnEMN KOINueCTBa XpHa, KaTo HApPImep 6yt MeCo, TbKATO No IOBbPHOCTTa MecOTO Uc Ce NODrpeE IN 3CsuN, DOKaTO BbTpeuHata Yact e CtUdeHa. POnIrpBAneto Ha IIO-MaIKN KOINueCTBa XpHa e NO-NOxOJaIo.
MoUHocT npa36bpkBaHe
HЯкохранMoRatДабБдТпОдграВи npMakcmaJHa MoUHOCT,DOKaTO 3aДугДа e Heo6xOДIMO HnCKO HnBO Ha MOuHOCT.ObbPheTe BnHMaHne Ha Ta6NtAta 3a NOBeYe INΦopMaZyra.
Pa3b6pkai Te do6pe nnn o6bpHeTe xpaHaTa no BpeMe Ha noDprBaHeTo. Pa36bkai Te xpaHaTa n
Ppei noDhaCnHe.
YnbTbaHe npn rotBeHe
m = 311 ;
H ouakeun autn avnkei otnv katnyopia twv ouakeuwv twv onoiw n anoupon npette va o uwpwa Te Tnpi2002/96/ odnyia ts EE yia tnv anoupon twv nektpikw kai nAeKtpovikw ouakeuwv (WEEE). Me auto To atouakpuvetai o kivduvo s pokanons eTtapuvong tsoutepiaalovtos kai bAsns otnv uyia twv aeeTTuV havaaouevn antoupan autow twv ouakeuwv. To oujboLo Tnou piokeeta tndaw otnv ouakeun utodnaewei ot dev mtpevi va atiuetwiicetai wc oikiako atoBAnto. H ouakeun npette va napadidetai ota EIOkα onneiauykvetpwongyia tn v atoupon autow twv ouakeuwv yia TTnpopopiecs oxetika μe To Kevtpo avakukwong mipoxnc oac kaalete tnv etaipelia ANAKYKAΩsH AE tnavo 2105319762-66

O△HΓΟ ΜΑΓΕΙΡΕΜΑΤΟ
MIKPOKYMATA
Ta trophi a anoteaovtai ano vpo, AIOc kai uatavbpaceocouie Tnou atoppopov tv evpeia twv mikpokuatwv ia diaikaciaiou npokaei nvynpoyon dovnTow npoiw.
Autn ynpnyopn kivnon napaye1 tpiBn kai paalagn pokoalwvtac tyn auGnon nC thepuokpaaickai kat'ETtkeTaoon to
payeipepa Touc