
WV1510 W 1 - Freezer WHIRLPOOL - Free user manual and instructions
Find the device manual for free WV1510 W 1 WHIRLPOOL in PDF.
User questions about WV1510 W 1 WHIRLPOOL
0 question about this device. Answer the ones you know or ask your own.
Ask a new question about this device
Download the instructions for your Freezer in PDF format for free! Find your manual WV1510 W 1 - WHIRLPOOL and take your electronic device back in hand. On this page are published all the documents necessary for the use of your device. WV1510 W 1 by WHIRLPOOL.
USER MANUAL WV1510 W 1 WHIRLPOOL
Instructions for use
Mode d'emploi
Gebruiksaanwijzing
-
This appliance is intended to be used in household and similar applications such as
-
staff kitchen areas in shops, offices and other working environments;
-
farm houses and by clients in hotels, motels and other residential type environments;
-
bed and breakfast type environments.
To ensure best use of your appliance, carefully read the operating instructions which contain a description of the product and useful advice. Keep these instructions for future reference.
- After unpacking the appliance, make sure it is not damaged and that the door closes properly. Any damage must be reported to the dealer within 24 hours of delivery of the appliance.
- Wait at least two hours before switching the appliance on, to ensure that the refrigerant circuit is fully efficient.
- Installation and the electrical connection must be carried out by a qualified technician according to the manufacturer's instructions and in compliance with the local safety regulations.
- Clean the inside of the appliance before using it.
SAFEGUARDING THE ENVIRONMENT
I. Packing
The packing material is 100% recyclable and bears the recycling symbol or disposal, comply with the local regulations. Keep the packing materials (plastic bags, polystyrene parts, etc.) out of the reach of children, as they are a potential source of danger.
2. Scrapping/Disposal
The appliance is manufactured using recyclable material.
This appliance is marked in compliance with European Directive 2002/96/EC on Waste Electrical and Electronic Equipment (WEEE). By ensuring the correct disposal of this appliance, you can help prevent potentially negative consequences for the environment and the health of persons.
The symbol on the appliance, or on the accompanying documents, indicates that this appliance should not be treated as domestic waste but must be taken to a special collection centre for the recycling of electrical and electronic equipment. When scrapping the appliance, make it unusable by cutting off the power cable and removing the doors and shelves so that children cannot easily climb inside and become trapped.
Scrap the appliance in compliance with local regulations on waste disposal, taking it to a special collection centre; do not leave the appliance unattended even for a few days, since it is a potential source of danger for children. For further information on the treatment, recovery and recycling of this product, contact your competent local office, the household waste collection service or the shop where you purchased the appliance.
Information:
This appliance does not contain CFCs. The refrigerant circuit contains R134a (HFC) or R600a (HC) (see the rating plate inside the appliance).
Appliances with Isobutane (R600a): isobutane is a natural gas without environmental impact, but is flammable. Therefore, make sure the refrigerant circuit pipes are not damaged.
This product may contain Fluorinated Greenhouse Gases covered by the Kyoto Protocol; the refrigerant gas is inside a hermetically sealed system.
Refrigerant gas: R134a has a Global Warming Potential of (GWP) 1300.
Declaration of conformity C
- This appliance has been designed for preserving food and is manufactured in compliance with Regulation (CE) No. 1935/2004.
-
This appliance has been designed, manufactured and marketed in compliance with:
-
safety objectives of the "Low Voltage" Directive 2006/95/CE (which replaces 73/23/CEE and subsequent amendments);
-
the protection requirements of Directive "EMC" 2004/108/EC.
Electrical safety of the appliance can only be guaranteed if it is correctly connected to an approved earthing system.
PRECAUTIONS AND GENERAL RECOMMENDATIONS
INSTALLATION
- The appliance must be handled and installed by two or more persons.
- Be careful not to damage the floors (e.g. parquet) when moving the appliance.
- During installation, make sure the appliance does not damage the power cable.
- Make sure the appliance is not near a heat source.
- To guarantee adequate ventilation, leave a space on both sides and above the appliance and follow the installation instructions.
- Keep the appliance ventilation openings free.
- Do not damage the appliance refrigerant circuit pipes.
- Install and level the appliance on a floor strong enough to take its weight and in a place suitable for its size and use.
- Install the appliance in a dry and well-ventilated place. The appliance is arranged for operation in places where the temperature comes within the following ranges, according to the climatic class given on the rating plate. The appliance may not work properly if it is left for a long time at a temperature outside the specified range.
| Climatic Class Amb. T. (°C) Amb. T. (°F) | |
| SN From 10 to 32 From 50 to 90 | |
| N From 16 to 32 From 61 to 90 | |
| ST From 16 to 38 From 61 to 100 | |
| T From 16 to 43 From 61 to 110 |
- Make sure the voltage specified on the rating plate corresponds to that of your home.
- Do not use single/multi adapters or extension cords.
- For the water connection, use the pipe supplied with the new appliance; do not reuse that of the previous appliance.
- Power cable modification or replacement must only be carried out by qualified personnel or by After-sales Service.
- It must be possible to disconnect the appliance from the power supply by unplugging it or by means of a mains two-pole switch installed upstream of the socket.
SAFETY
- Do not store explosive substances such as aerosol cans with a flammable propellant in this appliance.
- Do not store or use petrol, flammable liquids or gas in the vicinity of this or other electrical appliances. The fumes can cause fires or explosions.
- Do not use mechanical, electric or chemical means other than those recommended by the Manufacturer to speed up the defrost process.
- Do not use or place electrical devices inside the appliance compartments if they are not of the type expressly authorised by the Manufacturer.
- This appliance is not intended for use by persons (including children) with reduced physical, sensory or mental capabilities, or lack of experience and knowledge, unless they have been given supervision or instruction concerning use of the appliance by a person responsible for their safety.
- To avoid the risk of children becoming trapped and suffocating, do not allow them to play or hide inside the appliance.
- Do not swallow the contents (non-toxic) of the ice packs (in some models).
- Do not eat ice cubes or ice lollies immediately after taking them out of the freezer since they may cause cold burns.
USE
- Before carrying out any maintenance or cleaning operation, unplug the appliance or disconnect it from the power supply.
- All appliances equipped with an automatic icemaker and water dispenser must be connected to a water supply that only delivers drinking water (with mains water pressure of between 0.17 and 0.81 Mpa (1.7 and 8.1 bar)). Automatic ice-makers and/or water dispensers not directly connected to the water supply must be filled with drinking water only.
- Use the refrigerator compartment only for storing fresh food and the freezer compartment only for storing frozen food, freezing fresh food and making ice cubes.
- Do not store glass containers with liquids in the freezer compartment since they may break.
- Avoid storing unwrapped food in direct contact with internal surfaces of the refrigerator or freezer compartments.
- "The bulb used inside the appliance is specifically designed for domestic appliances and is not suitable for general room lighting within the home (EC Regulation 244/2009)".
The Manufacturer declines any liability if the above advice and precautions are not respected.
HOW TO USE THE FREEZER
The freezer can be used for storing already frozen food and for freezing fresh food.
Switching on the freezer for the first time
- There is no need to set the freezer temperature on the thermostat because the appliance is already factory set.
- Plug in the appliance.
- Only place food in the freezer 2 hours after switching on.
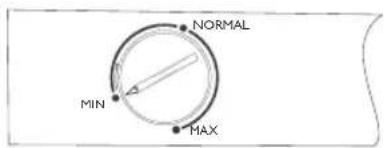
Adjusting temperature
From MIN to MAX: make the internal temperature colder.
- Thermostat setting indicator:
MIN - for storing food for short periods;
NORMAL - for storing food for longer periods;
MAX - for storing food for long periods.
Note:
Ambient air temperature, the frequency of door opening and the position of the appliance can affect the freezer internal temperature.
Take these factors into consideration when setting the thermostat knob.
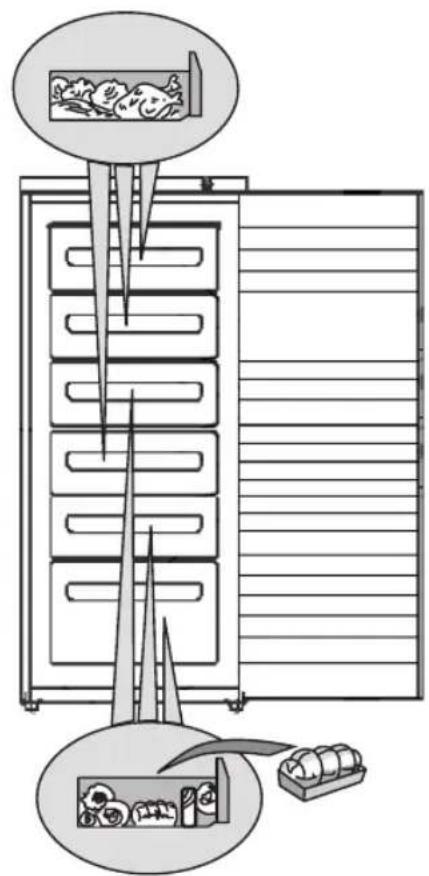
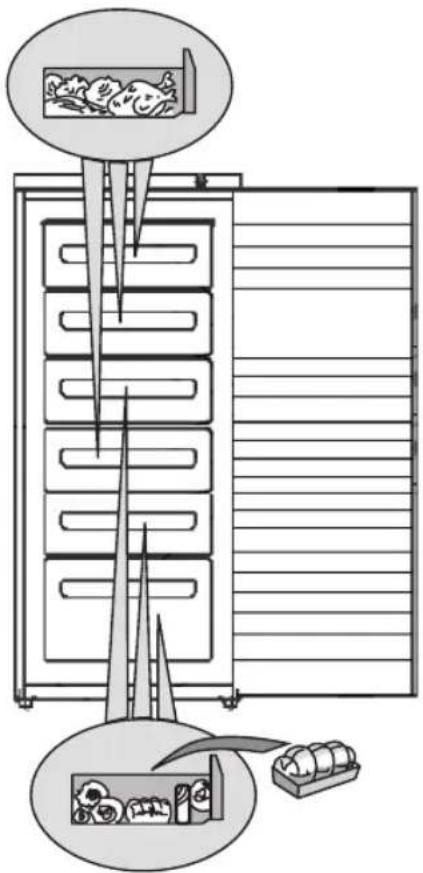
Freezing
Place the amount of fresh food indicated on the rating plate in the middle compartment. Take care not to place the food directly in contact with food already frozen.
It is advisable to maintain the thermostat position used in normal operation.
Important:
When freezing only small amounts of food, the food can be placed in any compartment, with the exception of the bottom drawer.

Control unit
Tips for freezing and storing fresh food.
- Before freezing, wrap and seal fresh food in: aluminium foil, cling film, air and water-tight plastic bags, polythene containers with lids or freezer containers suitable for freezing fresh food.
- Food must be fresh and of prime quality.
- Fresh vegetables and fruit should preferably be frozen as soon as they are picked to maintain the full original nutritional value, consistency, colour and flavour.
Note:
- Always leave hot food to cool before placing in the freezer.
- Eat fully or partially defrosted foods immediately. Do not refreeze unless the food is cooked after it has thawed. Once cooked, the thawed food can be refrozen.
Important:
The table alongside shows the recommended maximum storage time for frozen fresh foods.
Classification of frozen foods
Put the frozen products into the freezer and classify them. The storage date should be indicated on the packs, to allow use within expiry dates.
Advice for storing frozen food
When purchasing frozen food products:
- Ensure that the packaging is not damaged (frozen food in damaged packaging may have deteriorated). If the package is swollen or has damp patches, it may not have been stored under optimal conditions and defrosting may have already begun.
- When shopping, leave frozen food purchases until last and transport the products in a thermally insulated cool bag.
- Once at home, place the frozen foods immediately in the freezer.
- If food has defrosted even partially, do not re-freeze it. Consume within 24 hours.
- Avoid, or reduce temperature variations to the minimum. Respect the best-before date on the package.
- Always observe the storage guidelines on the frozen food packages.
MONTHS FOOD
| 1-3 | ||
| 4-7 | ||
| 8-12 |
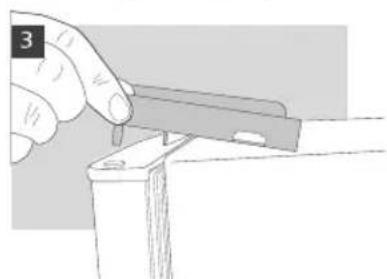
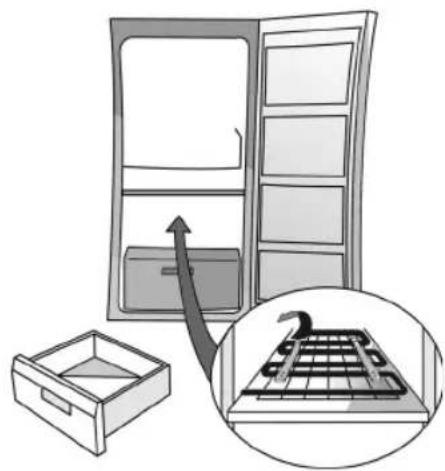
Removing the baskets
- Pull the baskets out fully, then lift them up slightly in order to remove.
Note:
Drawers may be removed in order to obtain increased storage space.
Ensure that the load does not exceed the limit (if present) indicated on the side walls of the appliance.
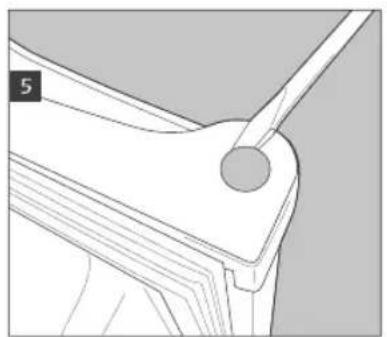
Making ice cubes
- Fill the ice cube tray 2/3 full and place it in the special freezer compartment.
- Do not use sharp or pointed instruments to detach the tray if it is stuck to the bottom of the freezer.
- Bend the ice tray slightly to remove the cubes.
Note:
The freezer door will not re-open easily immediately after closing. Wait a few minutes before opening again in order to allow for compensation of the vacuum created.

Fig.1
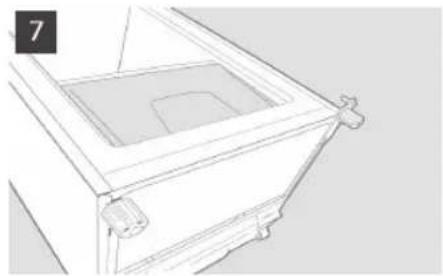
HOW TO DEFROST AND CLEAN THE FREEZER
Before any cleaning or maintenance operation, always unplug the appliance or disconnect it from the power supply.
Defrost the freezer once or twice a year, or when the formation of ice on the refrigeration grilles is excessive. It is perfectly normal for ice to form on the grilles. The amount of ice which forms and the rate at which it accumulates will depends on room temperature and humidity, and on the frequency with which the door is opened.
If possible, defrost the freezer when it is nearly empty.
- Remove the food from the freezer, wrap in newspaper and group together in a cool place or in a portable cooler.
- Leave the freezer door open to allow the frost to melt.
- Clean the interior of the freezer with a sponge and warm water and/or neutral detergent. Do not use abrasive substances.
- Rinse the interior and dry thoroughly.
- Put the food back into the freezer.
- Close the freezer door.
- Plug in the appliance once again.
- Switch on the freezer.
CLEANING AND MAINTENANCE
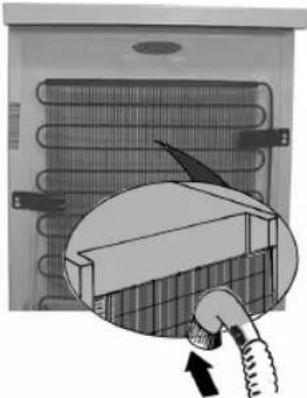
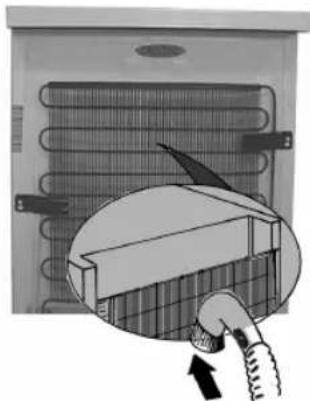
Periodically clean the condenser at the rear of the appliance with a vacuum cleaner or brush.
Prolonged disuse
- Empty the freezer.
- Disconnect the freezer from the mains power supply.
- Defrost and clean.
- Leave the door open to prevent formation of unpleasant odours and to eliminate any dampness.
TROUBLESHOOTING GUIDE
I. The appliance is not working.
- Is there a power failure?
Is the main power switch on? -
Do the household electrical system protection devices work correctly?
Is the thermostat setting correct?
Was the appliance switched on correctly? -
Excessive frost build-up.
-
Has the defrost water drain been positioned correctly?
Is the door shut properly?
AFTER-SALES SERVICE
Before contacting the After-Sales Service:
I. See if you can solve the problem yourself (see "Troubleshooting guide").
2. Switch the appliance off and then on again to see if the problem has been solved. If it has not, switch off the appliance again and repeat the operation after one hour.
3. If the problem persists after this course of action, contact After-sales Service.
Specify:
the nature of the fault,
the model,
Attention:
- The front edge of the appliance may be hot. This prevents the formation of condensation and is not a defect.
Gurgling and hissing noises due to expansion in the refrigerant circuit are normal.
The Service number (the number after the word SERVICE on the rating plate inside the appliance),
- Your full address,
- Your telephone number and area code.
SERVICE 00000000000
Note:
The direction of door opening can be changed. If this operation is performed by After-sales Service it is not covered by the warranty. The door cannot be reversed on models with front handle.
INSTALLATION
- Install the appliance away from heat sources. Installation in a hot environment, direct exposure to the sun or installation near heat sources (heaters, radiators, cookers) will increase power consumption and should therefore be avoided.
-
If this is not possible, the following minimum distances must be respected:
-
30~cm from coal or paraffin stoves;
-
3cm from electric and/or gas stoves.
-
To optimize appliance efficiency, leave a 5cm gap above the appliance and make sure that adjacent kitchen units are sufficiently distanced to allow air circulation.
- Install the appliance in a dry, well-ventilated place, and ensure it is level, using the front adjustment feet if necessary.
Clean the interior. - Fit the accessories.
Electrical connection
- Electrical connections must be made in accordance with local regulations.
- Voltage and power consumption are indicated on the rating plate inside the appliance.
- Regulations require that the appliance be earthed. The manufacturer declines all liability for injury to persons or animals and for damage to property resulting from failure to observe the above procedures and reminders.
- If the plug and socket are not of the same type, have the socket replaced by a qualified electrician.
- Do not use extension leads or adapters.
Disconnecting the appliance
It must be possible to disconnect the appliance by unplugging it or by means of a two-pole switch fitted upline of the socket.
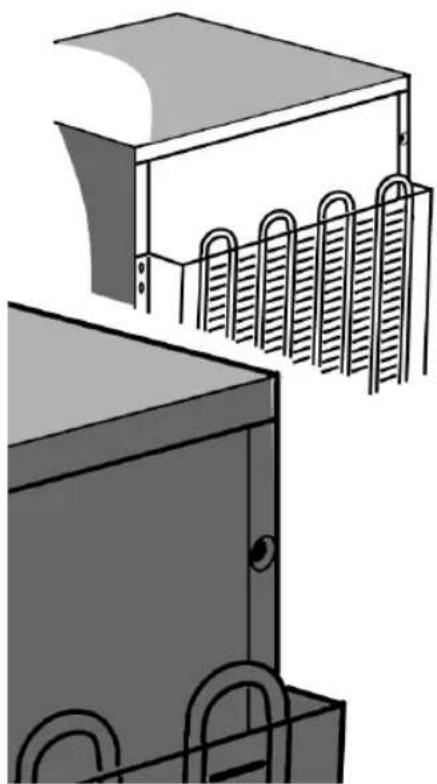
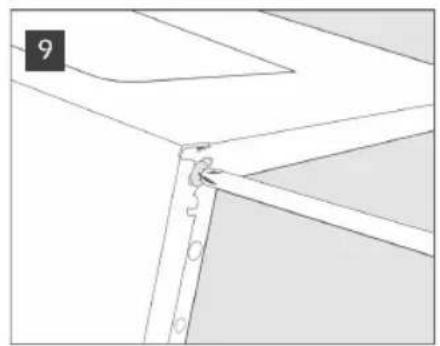
DOOR REVERSIBILITY
The direction of door opening of your freezer can be changed.
- Make sure that the freezer is not connected to the power supply and that it is empty.
- Reversing the direction of door opening is a task which requires two people.
Tools required
- Phillips style screwdriver
- Flat bladed screwdriver
- 8 mm and 10 mm socket or spanner.
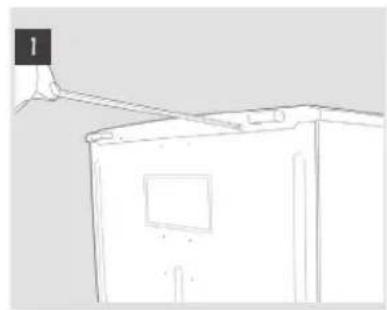
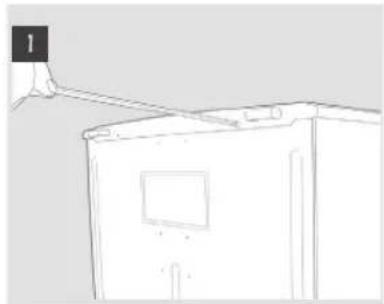
Lay the fridge/freezer on its back in order to gain access to the base, being careful not to tip it back by more than 45^ . Rest it on the soft foam packaging or similar material to avoid damaging the cooling pipes at the rear of the appliance.
Remove the two screws on the rear of the fridge/freezer. Lift the top off the fridge/freezer.
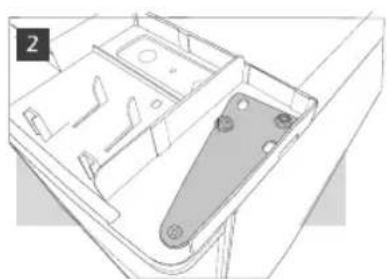
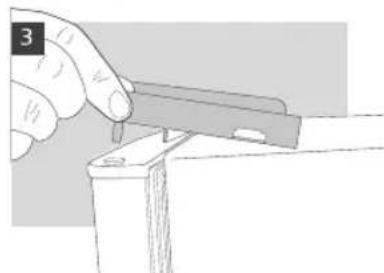
Use the 8 mm socket or spanner to remove the 2 hinge bolts. Remove the 2 bolts from the opposite side.
Remove the bracket and plastic surround.
Remove and replace the pin in the bracket.
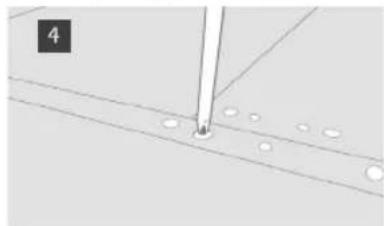
Refit on the opposite side of the fridge/freezer cabinet.
Remove the blanking plug from the new hinge side and refit it on the opposite side.

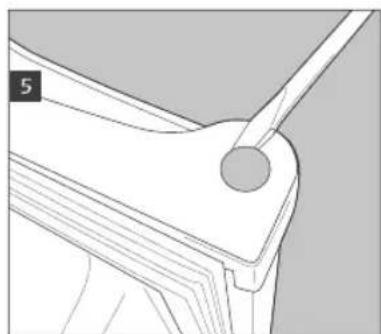
Remove the levelling feet by unscrewing.
Remove the bottom bracket using an 8 mm socket or spanner. Remove and replace the pin, using a 10 mm socket to unscrew the nut and a flat bladed screwdriver to remove the pin. You may need to push the pin through from the underside to remove fully.
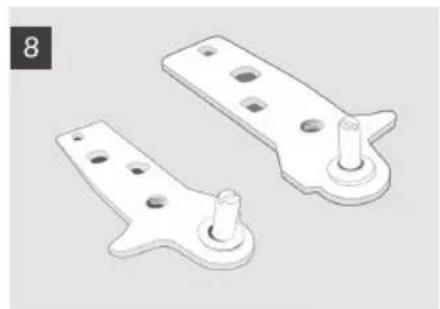
Remove the screw on the base and refit it on the other side. Remove the blanking plates from the unused side of the fridge/ freezer and refit them in the holes left by the brackets. Replace the door and brackets in reverse order. When replacing the feet take care to ensure the larger foot is on the side without the bracket. Check the door is aligned horizontally and vertically and that the seal fits properly all around before tightening the bottom hinge.
Note:
The direction of door opening can be changed. If this operation is performed by After-sales Service it is not covered by the warranty.


ELECTRICAL CONNECTION
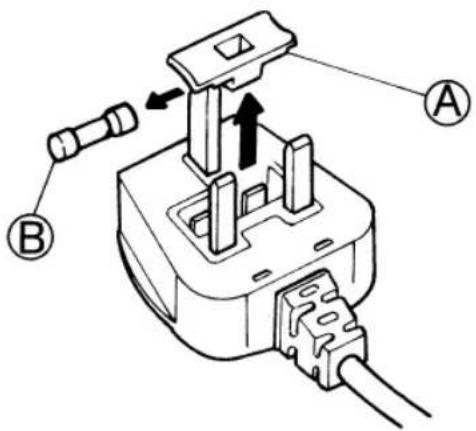
I) For Great Britain only
Warning - this appliance must be earthed
Fuse replacement
If the mains lead of this appliance is fitted with a BS I363A I3amp fused plug, to change a fuse in this type of plug use an A.S.T.A. approved fuse to BS I362 type and proceed as follows:
- Remove the fuse cover (A) and fuse (B).
2.Fit replacement I3A fuse into fuse cover.
3.Refit both into plug.
Important:
The fuse cover must be refitted when changing a fuse and if the fuse cover is lost the plug must not be used until a correct replacement is fitted.
Correct replacement are identified by the colour insert or the colour embossed in words on the base of the plug.
Replacement fuse covers are available from your local electrical store.
2) For the Republic of Ireland only
The information given in respect of Great Britain will frequently apply, but a third type of plug and socket is also used, the 2-pin, side earth type.
3) Socket outlet / plug (valid for both countries)
If the fitted plug is not suitable for your socket outlet, please contact Whirlpool Service for further instruction. Please do not attempt to change plug yourself. This procedure needs to be carried out by a qualified Whirlpool technician in compliance with the manufactures instructions and current standard safety regulations.
AVANT D'UTILISER L'APPAREIL
GUIDA RICERCA GUASTI
IPIN XPHSIMOIOIHSETE TO IPOION
H ouokeu nou ayopaoate avantuxkveia va xpnooponoihei oikaioknaiio kaowc kai:
-OTICNEPIOXKOUZIVACXwPwVEPyaoiaKATAOTnmuTswKaHypaPeiwv
-otaaypoktnmuata
- σε hotels, motels, residences, bed & breakfast
προς χρήση του καθε πελάτη.
Tia va xpoiiponoioeTe eToV kalutepe duvaro TpnoTn ouakeun oac, oac npapaakoume va diaaote npoektikac Tc odnyie cxnnc otic onoe c Ta pte Te nTv peiypaon Tou npoiovtoc kai xpniues ouuboue.
ΦuáéTe to napov εyεipidio yia Kaθε μελλovtikn xρηση.
Taigovon Twv KATEVUeyevwv TpoipuWv
BáIe kai taigovnoTe Ta kateyuyeva TpoioVt aTov katauuktn.
Suviotatai va avaypapete Tnv nepounvia ouvtnpnnc Tavw otouakeuaia,vi Tnv Egaopalion Tc katavawonC PPiv Tnv nepounvia anxng.
Sigmaoules yia tn diatnpnntwv katepsiuyevwv Tpoipimwv
Kata nV ayopa twv kateyuuyevwv tropiuwo, a i w e i t e o t i
H oukeuaia n to taketo eivai atheta, yiata popipaa evexetai va aaloiwouv. Av eva taketo eivai qoukwevo n napouiae i anuia uypaaic, dev exi diatnpne ootic idavikc suvthnkec kai evexetai va exapxoei va anouyctai.
Ayopacete ta kateyuymeva trophiia teleutalia kai xpnoiopoioite thepikcsg toavtc yia tn metaopopa.
Molc fatoe oTo oTNI Oac, bale aoeow ta kateyuyuva TpOPIa oTOv katauKtn.
Mny katauxete xava ta Tpofipma Tnou exouv ev hepei Eeaywoei, aaaa katavaawote Ta eoa 24 wpc.
AIOPEUYET E MIEWETE OTO EALAXIO TO TIG DIAKUAVOEC TCS 0EPUKPAGIAC. TnpTE TNV NEPounvia ANENC TOU AVPEpTaI OTN OOKEuOIA.
- Ak oλouθειτηντα τις Μβγίες συακευασίας για τη διαπήροι των κατεψύμένων τροφίμων.

MHNE TPOΦIMA
| 1-3 | ||
| 4-7 | ||
| 8-12 |
INNAN APPARATEN ANVÄNDS
- Termostatinnstilling:
RENGJØRING OG VEDLIKEHOLD
Temperaturregulating
Positionerne fra MIN til MAX: Stigende aflkølingstemperatur.
- Termostatindstilling:
MIN - opbevaring af madvarer i korte perioder.
NORMAL - opbevaring af madvarer i laengere tid.
CoBeTbI NO 3aMopaxnBaHnIO XpaHeHIO CBexKx npOdyKTOB.
3aBepHnTe n 3aIeHaTaIte CBexne npOdyKtbl, npEHa3HaueHHbIe DJIa 3aMopaxNBAHnR: B OJbry, npO3paHyIO PJIeHKy, HEPOMOKaEMbIe UeJIIOphiHOBBie NaKeTbI, POIN3TNIEHOBBle EMKOCTN C KpbIIuKo, CNEUInHbIe EMKOCTN, pNIroHbIe DJIa 3aMopaxNBAHnnpOdyKTOB.
- PpOdyKtBIOJXHbI 6bITb CBEXIMN BBICOKOKaueCTBEHHbIM.
- CBexne OBOUH N φpyKtbl, NO BO3MOXHOCTN, CJIeIyET 3aMopaxNBaTb cpa3y NOCLe TOrO, KAK OHN bbln CO6paHbl, B CEJx OXPaHEHNA INTaTeJIbHbIX CBOINCTB, CTpyKTypbl, KOHCNCTeHcUN, Ubeta N BKyca.
Приимechаиме:
Bcerda daTe ropynIM npOdyKTam OCTbITb, npexJe cem KlaCTb INX B MOp03NJbHNK.
- HeMeIeHNO IcNoB3yIte B NnUy pa3MOpOKeHHbIe NnN aCTuHPO pa3MOpOKeHHbIe npOyKtbl. He NoDBepraTe nx NOBTOHO 3aMOpO3Ke, KpOME ClyuaeB, KOrda pa3MOpOKeHHbI npOyKT nCNoB3yETcIg InproTOBJIeHHr roTOBOrO 6JIoJa. PocIe nprirotOBJIeHHra, pa3MOpOKeHHbI npOyKT MoKet 6bITb CHOBA 3aMOpOKeH.
Baxho!
Дя onpeendeHЯ donyctmblx cpoKOB xpaHeHn CBexKe3amOpoxeHHbIX npOdyKTOB nCNoIb3yTe npBBeDEHHyIO 3deCb Ta6nUy.
KlaccnΦnkaun3amopoxeHHbIX npOdykTOB
NoJoxTe 3amOpOKeHHbIe npOyKtbl B MOpO3nJIbHnK n HaDnWnte nx Ha3BaHne Ha yNaKOBke.
PekomeHnyetc TaKke yKa3aTb Ha yNaKOBKe DaTy 3aKJaKnHa XpaHeHne IJr OeCneHEn CBOEbpemEHOrONCNoJIb3OBAHHn PpOdyKTa B NnUy.
CobetbI NO xpaHeHIO 3aMOpOKeHHbIX npOdyKTOB
Pnpnpno6peTeHn 3amopoxeHHbIX npOyKTOB cneNyET npndepxNBatbcr CNeDyUOnx npaBnI:
- PpOBepaTe CEIOCTHOb yNaKOBn nn NaKeTa, B
- PpOTNBOM CnyHae npOyKT MoXeT OKa3aTbCn NCNOpHeHHbIM.
- EcIn aKeT B3DyT nn Ha HEM BnHbI BnXhBie nTHa, TO 3TO
- O3HaAeT, YTO OH XpaHnLCr He B ONTMaJIbHbIX YCNoBnX, IN
- YTO YKe MOR HauTbcn pOnCeC pa3MopaxKnBaHn.
- Pokynaite 3amopoxeHHbIe npOdykTbIB NOcJIeHIOU OpeBn IINx NpeBO3Kn INCNOJb3yIte CymKn C TepMOUN3OJIaune.
Cpa3y Je NO B03BpaueHn IOMO NIOXHTe 3aMOPoKeHHbI IpOdykTb IB MOpO3NJIbHNK.
He noDBepraIte yacnHHO pa3MOpOKeHHbIe npOyKtbl NOBTOPHOMY 3aMOPaXINBaHNIO; TaKne npOyKTbl DOJXHbI 6bITb NCNoJIb3OBAHbIB TeueHne 24 acOB. - N36eraIte nII CBeInte K MUNHMy nepenaiTe TMnepaIpybl. Co6IIOaIte DaTy 3aBepWeHnCpoka xpaHeHry, yka3aHHyIO Ha yNaKOBKe.
Bcerda npnepknaBntecb yka3aHn no xpaHeHHo 3amopoxeHHbIX npOdyKTOB, npNBedeHHbIX Ha nx ynaKOBKe.
YNCLO MECRAUEB NPOyKtbl
| 1-3 | ||
| 4-7 | ||
| 8-12 |
N3BLeueHne KOp3IN
-NotraHnTe Raunn HapyJy Do ynpa, CJIeKApIINIOHNMTe N BbIHbTe INX.
Приимechаиме:
IJIa CO3dHn8 60JIbSeero OObema BHyTpN IprNoBa n3 HeRo MOxHO BblHTb RIIKN.
CleIte 3a TeM, YTo6bHaHarpy3Ka Ha 6OKOBbie CTeHK npnbopa He npeBbIwala yka3aHHbIe npeJeJIbI (ecIn TAKOBbie IMeIOc).
PonyuHne Ky6nKOB Ibda
- HanoHnTe BaHHouky JIJIbJa Ha 2/3 eMKoCTn BOOJ INocTaBbTe ee B COOTBeTCTByIOUe OE TDeJeHne dJIa 3aMopaxNBAHn.
B cIyueae ecn BaHHoUka npMep3aET KO dHy MOpO3nJIbHnKa, He nOJIb3yITeCb IJRA ee OTdJeHnA 3aoCTpeHHbIMN nn peKyuIMN ppeDmetamn. - TTo6bI O6JIeRcHTb OTdJIeHHe Ky6NKOB JbDa O T BaHHOuKN, CJerKa cOrHInTe ee.
Приимechаиме:
IOBTOHOE packpbITne DBepuMOP03NbHnka cpa3y NocTe TOrO, Ka OHa 6bJa 3aKpIta, OKa3bBaETcra 3aTpduHNTeJbHbIM. CJeNyET NOOXdaTb DBe HIN TPN MNHyTb, YTO6bl PON3oJNA KOMNEHCAUHAO3DAHHORO NOHNKeHHORO DAABHeHr.
Puc. 1
PA3MOPAXKIBAHNEИЧNTKA MOpO3nJIbHnKA
Ipeed BbINOJIHeHem KaKx-JIn6o Oepaun no YnCTKe np6opa nn yXOdy 3a Hm BbIHbTe BNkky n3 po3eTKn Nn BBIKJIOUHTe 3JeKTpNUeCKoe nNTahne.
PekomeHdyetc pa3MopaxKbAtb MOp03nIbHnK 1 nn2 pa3a B roD nJn B cIyue o6pa3ObaHna OxJaIOuX PeWETKa N36bIToUHO KOJInuEcTBA HHe.
06pa3OBaHne Ibda Ha peWetkax CnCTembl oxJaXDeHnRABJeTcH HopMaJIbHbIM RAJIeHnEM. KoJInueCTBO N cKOpOCTb erO HaKoJIpeHn 3aBNCrT OT ycIobN OkpykaIOUeI cpebl n OT KOJIInueCTBa packKpbIbAHn DBepciI.
PekomeHdyetc BbINOLHrTa pa3MopaxNBAHne pnn MInHMaIbHOM 3anace npOdyKTOB.
- OtkpoTe DBepy N BblbTe BCE npOdyKtbl, 3aBepHnte INB rA3eTHyIO Bymary IN NOLOXnTE NlOTHO pyr K dpIry B nPOxaHOM MeCTe nnB TepMocymky.
OctaBbTe DBepy MOpO3nIbHnKa OTKpbITOn IJRA o6ecneHn TaHn JbDa.
BbIMOnTe BHTpeHHIOU qactb MOpO3nIbHnka r6koi, CMOeHHoB TEnNoB OBe N/INB pAcTBope HeITpaJIbHOr MOIOSeO CpeDCTBa. He IOnb3yItec b a6pa3NBbIMN BEECECTBAm. - Nocne 3Toro cnoJIOCHnTe BODoN n TuaTeJIbHO npOtpnTe.
Pa3JIOXHTe npOdyKtbl.
3akponTe DBepu MOpO3nIbHnka.
BHOBB BCTaBbTe BUNKy B p03eTKy.
BkIIOUHTe MOpO3NJIbHNK.
ЧИСТКА И YXOD
IepnoDnueckn OunuTe NblIEcOCOM NIN UeTKoN KOHdeHCAToP, paCNOIOXeHHbI C 3aJHeN CTOpObI np6opa.
Mepbl npedoctopoxhoctn B clyuae BaWero npoJXHTeHbHOrO OTCyTCTBnA
BbHbTe Bce npOdyKtBu n3 MOp03nJIbHnKa.
- OTKJIIOHTe np6Op OT 3JNEKTPocTeN.
- BbINOJIHnTe pa3MopaxKnBaHne n BbIMOnTe npn6Op n3HyTpN.
OctabTe DBepuy OTKpItoI dI npedeOTBpaueHn8 O6pa3OBaHn8 HenpyTHbIX 3anaxOB IN BnaXHOCTN BHyTp npi6opa.
PYKOBODCTBO NO NONCKY HENCPABHOCTei
1. Пибор He pa6oTaT.
- Ectb Jn HanpjaeHne B cetu?
BknIOueHnnrnaHBn py6nJIbHNK?
-NCnpaBbI JIN ppeOxpaHHTeJIbHbIe yCTPOIcTBA CnCTEmbl 3JIeKTPoCHa6XeHnY BAC Doma? - YCTaHOBJIeHa JIN pyUka TepMOCTaTb B npaBnIbHoe NOJIOKeHne?
-Праиьно Л NCуцEcTBЛeн BВОДпбораВЗКслУаТaцИю?
Heo6xoIaMbIe HNCTpyMeHTbI
KpectOBa OTBepTKa
- Плоская OTвертka
- RaeyHbI KJIIOU C OTKpbITbIM 3EBOM NIN TOPOBBIraeHbI KJIIOU Ha 8 mm n Ha 10 mm.
HaKIOHIne XOLOINbHK/MOp03INbHK Ha3a, YTO6bl
NoIyHTb DOCTyn K erO dHy. He HAKIOHNrTe
XoIOINbHK NOd yrIOM CbbIwe 45 rpaIycOB IN
NOIOXIne NOd Hero NcHONlNaCT n3 ynaKOBKn IIN
DpyroN IOIO6HbM MaTePnA B O N36ExKaHne
OBpeXDeHn Tpy6ok XOLOINbHOrO KOHTypa,
pacnoIOXeHHbIX c erO 3aIHei CTopoHbI.
CHIMITE IBa BNHTa C 3aHHei CTOpOHbI XOIOJNbHnKa/ MOp03NlbHnKa.
IopHnMnte BepxHIOU KpbIuKy XoIoNJIbHnKa/MOpO3NJIbHnKa.
C nOMOuIraeHoro KIOHa Ha 8 mm CHIMnTe 2 6oNTa
KpeJIeHnI neTNI. ChIMnTe Dba 6oNTa C
IpoTIBONIOJXHO CTOpOHbl.
CHIMnTe epKaTeIb n IJIaCTnKObyIO HaKlaDky.
ChnMTe naJeu depKataTJI.
YCTaHOBnTe erO Ha npOTnBOONIOJXHyIO CTOpOH YONOJIbHnKa/MOP03NJbHnKa.
BbHbTe 3aIyUky CO CTOpOHbI, Ie 6yIeT yCTaHOJIeHa neTJI, n BCTaBBTe ee C npOTnBONIOJXHOI CTOpOHbI.

BbikpyTne n CHIMnTe BbipabHnBaIOuIe HOKKn.
C nOMOuIbIraeHOrO KJIouHa 8 mm CHIMITE HIXHN depKaTeIb. CHIMITE naIeU; nCnOJb3yIte KJIou Ha 10 mm, yTO6bl OTnHTnTb raIKy, nNLOCKyIO OTBepTKy, yTO6bl ChrTb naIeU. JIra TOrO YTO6bl NOJHOCTbIO CHrTb naIeU, MOKET NOTpe6oBaTbCnDTOnkHyTb erO CHN3Y.
CHIMITE BINT C OCHOBAHIN N YCTAHOBNTe eRO Ha npOTIBOIOLOXHYIO CTOPOHY.
CHIMITE HaKnaIcN C HeucnOJb3yEmoC CTOpOHbIXOIOJIbHnKa/MOpO3NJbHnKa N yCTaHOBnTe INx HAOTBepCTnR, B KOToPbIX paHee cTOrnn DEpKaTeIN.
DcBBy B o6paTHOM nopAKe, yCTaHOBNTe DBepuI INepKaTeJI.
Pn yctahOBKe HOxEK npocJIeIte, YTObI 6OJIbwaH OXKa 6bla yCTAHOBHeHa Toi CTOpOHe, Ha KOToPOHET DePKaTJ.
IpeTeM, KaK OKOHaTeJIbHO 3aTgINBaTb HIXHIOIO neTIO, y6eINTecb B TOM, YTO DBepca BblPOBHeHa NO TOpN3OHTaII IN BEPTkAI N YTO npOKJaIK NlOTHO npNJERaIOT K CTehKaM CO BCEx CToPOH.
Приимechаиме:
CTopoHa Habeckn DBepei np60pa MoKeT 6bITb
H3MeHeHa, 3Ta Oepaun BblNOJIHReTCePBNCbIM
UeHTPOM I He BKIOUeTCB R rapaHTnHbIe
O6ra3aTeJbCTBa.

Pon3BOIDTEJIAT He HOCN HNKaKBA OTROBOPHOCT, aKO He 6bDaT cna3BaHn Ipedna3Hnte MEPKN, yKa3aHn norope.