O!Play Mini V2 - Media player ASUS - Free user manual and instructions
Find the device manual for free O!Play Mini V2 ASUS in PDF.

| Product Type | HD Media Player |
| Brand | ASUS |
| Model | O!Play Mini V2 |
| Dimensions (W x D x H) | Approximately 150 x 100 x 30 mm |
| Weight | Approximately 300 g |
| Power Supply | External power adapter 5V / 2A |
| Input Interfaces | 1 x USB 2.0, 1 x SD/MMC/MS/xD card reader |
| Video Output Interfaces | 1 x HDMI, 1 x composite (RCA) |
| Audio Output Interfaces | 1 x analog audio (RCA), 1 x optical S/PDIF |
| Supported Video Formats | MKV, AVI, MP4, MOV, VOB, etc. |
| Supported Audio Formats | MP3, WMA, AAC, OGG, FLAC, etc. |
| Supported Image Formats | JPEG, BMP, PNG, GIF |
| Maximum Video Resolution | 1080p (1920x1080) |
| Network Connectivity | None |
| Internal Storage | None (plays from USB devices/cards) |
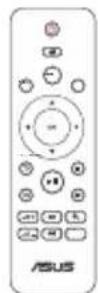
| Remote Control | Included (batteries supplied) |
| Main Features | Play video, music and photos; folder navigation; slideshow |
| Available Settings | HDMI resolution, audio output, automatic device scan, firmware update |
| Included Accessories | Power adapter, composite AV cable, remote control, batteries, quick start guide |
| Firmware Update | Via USB (download from support.asus.com) |
| Reset | Reset button on the back |
Frequently Asked Questions - O!Play Mini V2 ASUS
User questions about O!Play Mini V2 ASUS
0 question about this device. Answer the ones you know or ask your own.
Ask a new question about this device
Download the instructions for your Media player in PDF format for free! Find your manual O!Play Mini V2 - ASUS and take your electronic device back in hand. On this page are published all the documents necessary for the use of your device. O!Play Mini V2 by ASUS.
USER MANUAL O!Play Mini V2 ASUS
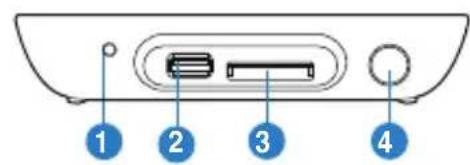
| 1. | Power LED |
| 2. | USB 2.0 port |
| 3. | SD/MMC/MS/xD combo card slot |
| 4. | IR (Infra-red) Receiver |
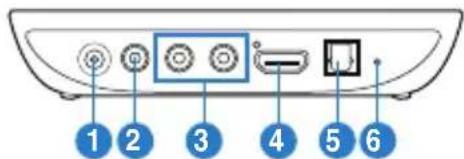
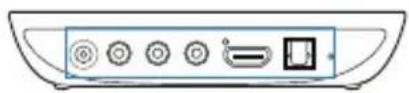
Rear view
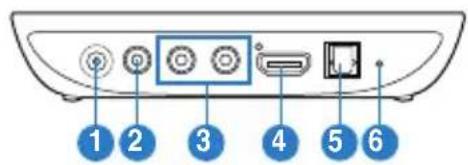

| 1. | Power (DC-In) input |
| 2. | Video Out port |
| 3. | Audio Out port |
| 4. | HDMI port |
| 5. | Optical S/PDIF Out port |
| 6. | Reset button |
Quick Start Guide - 3


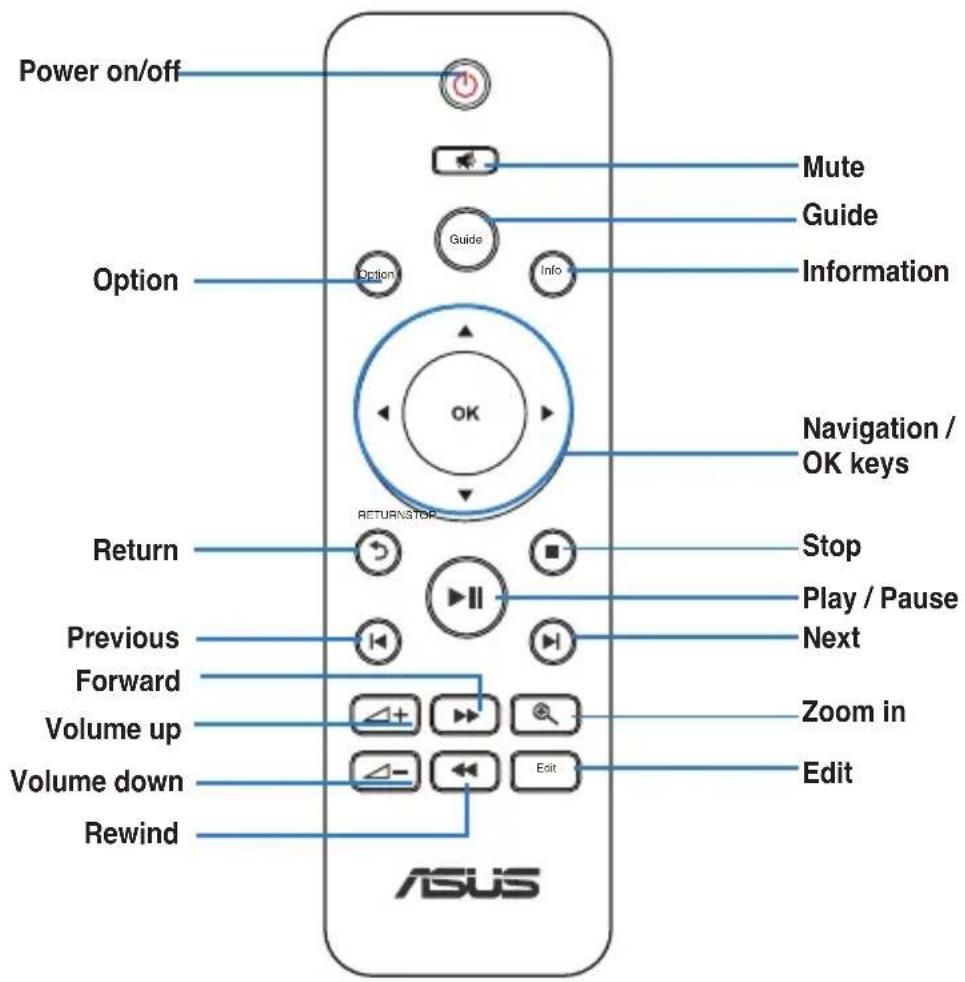
Remote control
Quick Start Guide - 4

Using your HD media player
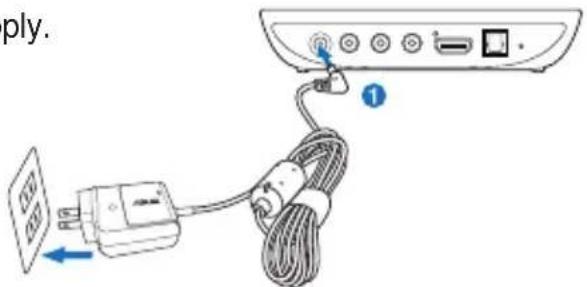
- Connect the power supply.
- Connect the multimedia devices.

The O!Play Mini V2 media player is for use with media legally owned or licensed by the user only. Violation of copyright or other intellectual property rights is not allowed.


AV cable
OR
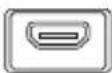


HDMI cable


Optical cable
TV or HDMI monitor
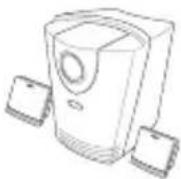
Home theater system AV receiver
Quick Start Guide - 5


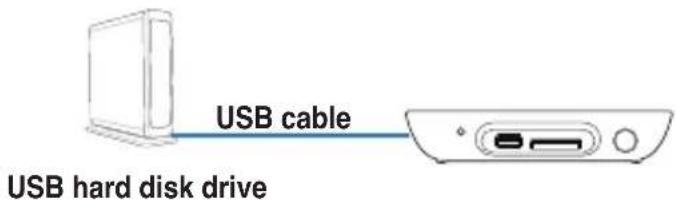
- Plug storage devices and use the remote control to play media.


Quick Start Guide - 6

Troubleshooting
The media player does not work. You think that the problem might be with the media player's power adapter.
- The media player's power adapter may have performed overload protection feature — automatic shutdown during improper working conditions, such as too much current and voltage, or exposure to extreme temperatures.
- Disconnect the media player's power adapter and wait a few minutes before you reinsert the player's power adapter directly into an outlet. Power on the media player again.
- If the problem still exists, contact your retailer.
The TV screen is blank and the media player power LED remains off.
- Ensure that the TV is turned on.
- Ensure that the media player's power adapter and power outlet are functional.
- Ensure that the media player's power adapter plug is firmly attached to the rear panel of the player and to the power outlet.
I cannot see the Setup Wizard when I power on the player for the first time. The TV screen is blank and the media player power LED is on.
- Ensure that the TV is turned on.
- Ensure that the AV/HDMI cable is properly connected to the correct terminals on both the TV and the media player.
- Ensure that your TV is set to the appropriate video source (AV IN or HDMI). You may need to use your TV Remote control to change video sources.
- Turn off your media player and wait for a few minutes before turning it on again or press the reset button at the back panel.
Quick Start Guide - 7
usu6u3
- Check that the HDMI resolution of your TV supports 720p, 1080i, or 1080p.
The TV screen is blinking and fuzzy.
- Ensure that the AV/HDMI cable is properly connected to the correct terminals on both the TV and the media player.
- Ensure that the media player power LED is on.
- Ensure that the TV system setting matches the system used in your country.
- Ensure that the correct video resolution option is selected.
I cannot find any of my music, movie, or photo files.
- Ensure that your Media Server (such as a USB storage device) or your computer is switched on and that the device is not in standby mode.
- Ensure that the files are supported file formats and are not damaged.
Certain files cannot be played on the Media Player.
The Media Player does not support all types of audio and video file formats. For information on file format support, refer to the Specifications summary in the user manual.
Only one video/music/photo is played when I selected it. How do I play the entire list?
Select a video/music/photo and press the OK button on the remote control to play only the selected file. Press the PLAY/PAUSE button to play the entire list of files.
There is no sound.
- Check that the media player is not on mute.
- Go to Setup > Audio and ensure that you have enabled the correct Digital Output setting.

For more details, refer to the section Configuring audio playback settings in the user manual.
- If you are watching a video that supports multiple audio channels, press the Option key on the remote control and select Audio to check which audio channel is being played.
I cannot hear any sound when I am playing music files.
- Ensure that the audio cables are properly connected.
- If the audio cables are connected to your TV, the TV must be turned on to play any music files.
- If the audio cables are connected to your stereo, ensure that the stereo is on and you have the correct stereo input selected. If you are having trouble selecting the correct audio source, refer to the instructions that came with your stereo.
A few of my Music files do not appear.
The media player supports the most common music file formats. However, there are many available bit rates and sample rates. If a file is not displayed on the screen, it most likely uses an unsupported bit rate or sample rate. Only use files with supported formats, bit rates and sample rates.
I cannot find any of my music, movie, or photo files.
- Ensure that your USB storage device (USB Flash/USB HDD) is not on standby mode.
Quick Start Guide - 9
- Ensure that the files are supported file formats and are not damaged.
The Media Player does not recognize my USB storage device.
Problems with USB storage devices are caused by the USB driver or USB cable. The media player may also need more time to detect the USB storage device. Disconnect and reconnect the USB storage device, replace a new USB cable, or use another USB storage device.
The media player remote control is not working.
- Ensure that the batteries are properly inserted.
- The batteries may already be drained. Replace them with new batteries.
- Ensure that the path between the remote control and the media player is not blocked.
What is my HD media player's firmware version? How do I upgrade it?
- Check the firmware version before the upgrade process. If the firmware is the latest version, you will not need to update the firmware.
- Go to Setup > MISC > USB upgrade to perform the firmware upgrade process.
- Go to Setup > MISC > Version Info to find the firmware version.

If you are still unable to update the firmware, reset the system and perform the update again.
- The firmware update manual is available as a PDF file (included in the updated firmware folder). Visit the ASUS support site at http://support.asus.com/ for more details.

If the O!Play Mini V2 media player is shut down or powered off during the software installation, the update will fail. If the device will not power on, you will need to reset the device. This will restore the device back to its default settings. Perform the update again.
An operation/function failed on my media player. What can I do?
- Disconnect the AC adapter from the power source, then plug it in again.
- Use a ballpoint pen or paper clip to press the reset button located at the rear panel for three seconds.
- If you still encounter the same problem, contact ASUS Technical Support.
Why is it that it takes awhile to enter the Movies, Music, or Photo screen from the Home screen?
When you connect a new USB storage device, hard disk drive, or memory card, your media player automatically scans and indexes the files stored on the device. To disable the indexing function and quickly enter the Movies, Music, or Photo screen, press the Stop key and navigate to File Manager to browse all the media files in your devices.
To disable the auto-scan function, go to Setup > System > Scan Storage > Auto Scan Off.
Where can I find more information about the HD media player?
- User Manual in the support CD
For more details about using the features of your HD media player, refer to its user manual included in the support CD.
ASUS Support site
Download the latest firmwares, drivers, and utilities from the ASUS Support site at http://support.asus.com
Quick Start Guide - 11
KpaTKoe pyKOBOCTBO -


3.ПоdkлioчiteHaKoJIteIbИNcNoJIb3yIeIyIbTДЯВOCIpOu3BeDEHnA.

KecTkni Dnck USB

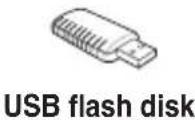
USBΦnəu-dnck
mnnnnd
KpaTKoe pyKOBoCTBO -
wnckoeA
YcTpaHHe HEnCnPaBHOCTeI
MeHnep He pa6oTaT. Bbl noO3peBaTe, YTo npo6Iema c 6NOKOM nHTAHJ.
- PpOBepbTe, He cpa6oTana JI 3aunTa OT nepeRpy3Kn 6noka nITaHnMeMaanJeepa - aBtOMaTHueCKoe OTKJIIOUeHne npn peRpy3Ke (PpeBbIeHne dOnyCTMOrO TOKa, HAprrXeHn, TeMpePaTypbI).
- OTKJIOHHTe 6IOK IITaHnO T MeINaJIpeepa, NOIOXJNTe HeCKOJIbKO MInHYT N IOKJIIOHHTe 6OpaTHo. CHOba BKIOHHTe MeINaJIneep.
- Ecnn npo6nema ocTanaocb, o6paTnTeCb K npOaBcy.
3KpaH TB nyct n HndnKaTOp nHTaHnMa nnpeepa BbIKIOueH.
- Y6eIHTecb, yTO TB BKJIIOueH.
- Y6eIITecb B nCnpaBHOCTn po3ETKn 6Ioka nItaHnaMeiAnJIeepa.
- Y6eIITecb B HaNEXKHOCTN NOKNIQUeHn 6LOKa NITaHnMeDnAnPeepa K p03eTKe mEtnanPeepy.
KpaTKoe pyKOBOCTBO -
- Y6eIntecb, yTO INHdkaTOp nHTaHnMaMeHaIeHTpa RopNT.
- Y6eHNTecb, yTO HAcTpoKn TB CnCTembl COBnaIaOT C CnCTEmo, nCnoJIb3yEmoB BaWeI CTpaHe.
- Y6eHITecb, yTO BbIbpaHO npaBnIbHoe pa3peWeHne.
KpaTKoe pyKOBoDCTBO -
nnnna

IJIyueHnIOnJHnTeJIbHOINHOpMaun CMOtpnte pa3Je HAcTPOkaaynoBpyKOBOCTBENoJIb3OBaTeJI.
- Пи посмOTpe Bndeo, noДeрхиBaIOоero HeCKOЛьКо aydNOKaHANOB, HaxMnte KhoNkY Option n Bbl6epNTe HyxHbI aydNOKaHaI.
Het 3Byka npn Bocnpon3BeDeHnn 3BykoBbIX paJnoB.
- y6eHntecb, yTo aydnoka6eIb npabnIbHo nOdknIOueH.
- Ecnn aydnokabeNb noKnHueH K BaewMy TB, TB doJxeh 6bTb BkHoueH DnBocnpOn3BeJeHn My3bIkaJIbHbIX paaiNoB.
- Ecnn aydno-kabenn nocknuehki Baeey aynocnteme, y6eNTecb, uTO aydnoocntema BkNoyeHa n Bb6paH npaBnIbHbY aynOBXoD. Ecnn Bbl He 3naete kak BblpaTbp naBnIbHbY aynOBxO, o6paTNTecb K pyKOBOCTBy, NOCTaBnIeMOMy B KOMnJIeKTe C aydnoocntemoi.
HeKoTOpbIe n3 MoNX My3bIkaJIbHbIX paJIOB He OTo6paXaIOTcR.
MeHnAJIeep IODIePbXnBaET 6OJIbUHHCTBO φOpMaTOB My3bIKAJIbHbIX φaJIIOB. OHaKo IMeETc8 6OJIbUOE KOJIuYeCTBO 6bITpeTob U cAcTOT dNcKpeTn3aun. Ecn ΦaII He oTo6paXaETc8 Ha 3KpaHe, BepoTHO, OH NcNoJIb3yET He IODIePbXnBaEMbI 6bITpeT INIu YacTOy dNcKpeTn3aun. NcNoJIb3yInTe faiJIb IODIePbXnBaEmbIX φOpMaTOB, 6bITpeTob U yAcTOT dNcKpeTn3aun.
Ye Mory haTm Moaayno-BndeofoaIbI n foToRafo.
- Y6eIITecb, yTo BaU USB-HaKoINTeIb (USB Flash/USB HDD) He HaxOuNTcB B XdUyIeM peXnme.
- y6eHntecb, yTO faiJIbI NOIDepKINBaEMO foOpMaTa n He NOBpeXKeHbI.
KpaTKoe pyKOBoCTBO -
IyIbT Meiannneepa He pa6oTaet.
- Y6eIITecb B IpaBnJbHOn yCTaHOBKe əJIemEHTOB NITaHnI.
Bo3MOxHO y Bac "ceIN" 3IeMeHTbI NITaHn. 3aMeHInTe 3IeMeHTbI NITaHn Ha HOBbie. - Y6eIITecb, yTO MEXKdy NylbTOM mMeiHaJIeepom HET IpePnTCTBm.
Kakay meha Bepn npoWbKn? Kac o6HOBntb ee?
- Ipeed o6HOBHeHem npOBepbTe Bepcno npOuBKn. Ecn y Bac nocJeHra Bepcna npOuBKn - 6HOBHeHne He Tpe6yeTc.
- Дя обновленя пошимьни поеди в Насторда > MISC> 06новлене черз USB.
-
IpeenIte HacTroka > MISC > NHΦopMaζη o Bεrcn ένροσmOTpa Bεrcn ένροùNBκι.
-
EcnBbI He moXeTe 6HOBtB npOuINBky, BblIOJIHnTe c6poc cnCTEmbl N NOBTOPIE pOUECC CHOBA.
-PykoBOdCTBO NO 06HOBJIeHIO npoUWBKn DOcTyHNO B PDF paJne (B nAnKe 06HOBJIeHn IpoUWBKn).IJa IOnyueHn IOnpObHn INΦopMaun Nocetnte caT ASUS http://support.asus.com/.

Bo n36eXaHne oUmbok, He OTKIIOuHaTe yCTpoiCTBO npn yCTaHOBKe nporpaMMHOrO oEecneueHn. EcIn BbI He MOxTe BKJIIOHTb yCTpoiCTBO, Bam HuxHo BbINOHNt b c6poc yCTpoiCTBa. 3TO N03BOJNT BOCCTaHOBtB yCTpoiCTBO K HAcTPOiKaM No yMOJIuaHnO. BblONHITe 6HOBJIeHne eIe pa3.
KpaTKoe pyKOBoDCTBO -
wncoA
Owmbka onepaun/phiHKmmeHaanpeepa. Yto deIatb?
OTKJIIOHTe 6JIOK NITaHnO T NCTOCHNkA NITaHn, 3aTeM NOIKJIOHTe CHOBa.
CnmooupuyknnnckpeKnHaXmTe KHOKNy c6poca Ha 3aHne HaeJI.
- Ecnn Bbl BCE JKe CToJKNHyNcB C3ToI JKe Ipo6JeMo, o6paTITecb TExnOndepKky ASUS.
KpaTKoe pyKOBoCTBO -
Ukstad spreztowy
Widok z przyodu
!Xs|Od
Sistem home theater / receptor AV
Ghid rapid de pornire - 164


UcyHeHHa HeCnpaBHOCTeH
MediHnPiep He npaioe. Bn BBaxaTe, 0o cy npobme MoKe 6yTN Nob'3aHa 3 aanTepom KMBHeHHa MediHoro Pneepa.
MokJIMBO, aanTep kNBLeHH BnKOHy e cyHKcIO 3axncty Bi nepeHabaHTaXeHH: aBTOMaTnUHe BmKHeHH CnCTemnPi d ac nepeHabaHTaXeHH, TAKO rK BnKnHa npYr, ekCTpactpym a6o nepeBnIeHH npInyCTmOI TemnepaTyPI.
BIMKHiTb aadTep xNIBeHHa MeiHoro nIeepa i noyeKaTe deKiIbKa XBNIH, nepu Hix Bn nobTopHO yBIMKHeTe aadTep xNIBeHHa nIeepa Do po3ETKn eJIeKTpOmepekxi. 3HOBy yBIMKHiTb MeiHnPiIeep.
- JaKuo npo6JIema He 3HnKJna, 3BepHiTbcra Do po3IOBcOJkyBaHa.
Ekpan Tenebi3opa npoXn, a cBITIOIOJ XNBHeHNe MeiHoro npepa IINsactbCBy BmKHeHn.
- IpekeoHaITeCra, 10 TeIeBi3Op yBIMKHeHO.
- IpekoHaTec, 10 aanTep XnBHeHn MeiHoro nneepa Ta po3eTKa eNktpomepki npauoIOb.
CTnCne kepiBnTBO nna noaTKy eKcnnyataa -
EeHedx
- IpekeohaiTeC8, 0o aadanTep KnBHeHna MeiHoro nIeepa HAIHO npKpInJIeHi Do 3aHbOII naHeJI nIeepa Ta po3eTKn eJekTpomepeXi.
Ipn nepwomy yBIMKHeHHi npeepa he 6auy nporpaMy-nomiuHnka. Ekpan Telebi3opa nopoxhni, a cBITIOIOJXMBLeHHa MediHoro npeepa yBIMKHeHH.
- IpekehauTeCra, 10 TeJIeBi3Op yBIMKHeHO.
- PepekoHaTeC8, 00 Ka6eJIb ayio-BiJeO/HDMI npabNlBHO nIKNoueHn DO BiIOBIDHNX KOHTaKTIB Ha TeJIeBI3opi Ta MedInHomy PIIeepi.
- IpekehaiTecra, 10 TeJIeBI3Op nepeKJIIOHeHn Ha npaBnIbHe dJKepeBIO Bideo (BXiAayIO-Bideo a6o HDMI). MoKe 3HaIo6ntncr nylbTom DInCTaHcHOrO ynpabLiHHa TeteBI3opa 3MiHTn dJKepeNa BiDeo.
BIMKHTb MeiHn nIeep i noeKaTe deKiIbka XBNIH nepu HIX 3HOBy yBIMKHyTN Ioro i HaTNCHTb KONky «CkNHyTN» Ha 3aDiH nnHeJI. - Пеконайся, до уткICTь HDMI Baшоу телевизopa пдтумуе 720p, 1080i a6o 1080p.
TeJIeBI3iHm eKpaH MepexTb, 306paXeHH HeYiTke.
- PepekoHaTeCra, 0o Ka6eJIb ayio-BiJeO/HDMI npaBnIbHO nIKNoueHn IIO BiNObiHNx KOHTaKTIB Ha TeJIeBi3opi Ta MeiINHomy PJIeepi.
- PepekoHaTec, 10 Cbitnoioj XnBHeHn MeiHoro Pneepa yBIMKHeHn.
- PepekoHaTeC, 10 HanaWtYBaHHa CnCTeMn TeneBisop a BIDNobiaHOCTeMi, kA BnKOpNCTOByetbcy y Baui KpaiHi.
- IpekehauTeC, 10 Bn6paHa npaBnBHa yITKicTb BiJeO.
He 3haxoJky KODHnx faJIiB My3nKn, fInbMiB a6o foToIpaqi.
- IpekoHaTecr, 0 MeiHn cepBep (HaPnKnaI, npucpi nam'RTI USB) Ha KOMTIopei yBIMKHeHn, a npucpi He 3haxOHTbcB peXMI OikyBaHH.
CTnCne KepiBnTBo DnI noaTky ekcnnyatau-186
- Ipebeipte, n iDtpmyetbcra fopmat faaiib, kmmn Bn diHntecra.
Deaiki fainn Hmoxnbo nporpatn Ha medinHomy nneepi.
MeiHnPiEe MoKe He nIITpMByBaTn FopMaTu BiDeo a6o ayio, kBi BIKOPNCTOByOTbcra IJIaJy. FOpMaTu Meia, kI NiITpMMye MeiHnPiEep, Bka3aHI BTEXHiHX XapaKTePNCtNKax.
BiTbOpIOeTbc8I MHe OIN PhaIN BiDeo/My3nKn/foTo, KOJIa Bn6npaIO NOrO. Jk nporpaTN NOBHN cIncOK?
Bn6npaOnu BiJeO/My3Nky/foTo IJRA BiITBOpEHnHaTncHtB KHOkny OK (OK) Ha NylbTi DnCTaHcuiHOro ynpabInHH, 0o6 nporpaTN Bn6paHnФaH. JaKuo HATNCHTN KHOkny PLAY/PAUSE (PporpaTu/Play3a), 6yde BiITBOpEHn NOBnCncoK faiJIIB.
Hema 3Byky.
- IpekeohaiTeC, 10 He BIMKHeHO 3Byk pO3BaXaJIbHOro ueHTpy.
- IpeenDiTb Do Setup (HaIauTyBaHH) > Audio (Aydio) i nepekoHaiTeC, 10 Bu aKTHByBaJI npaBnJIbHe HaIauTyBaHHu LcfoPoBOro BxOdy.

TeTalbHie npo ue po3ka3aHo B po3di KoHphiIpyBaTu HanaTuBaHHB iD TBOpEHn ayio.
- RaKuo Bn dNbntecb BiJeO, IKe NiItpmYe 6BarToKaHaJIbHe ayIO, HATncHtB KnaBiUy Option (Oni) Ha nyIbTi NcStaHciHOro ynpabInHH i Bn6epiB Audio (Ayio), 06 nepekoHaTscra, 10 noka3aHo Notpi6Hni KaHaJ.
He cyio 3Byky niD yac nporpaBaHHMy3nHnx faJIiB.
- IpekeohaiTeCra, 0 KoabeJI ayio npabnIbHO iKIOueHi.
Ka6e iayio nkiKnohei do BaWoro teBisopa, TeBis3Op Mycntb 6yTu yBIMKHeHn, 0o6 nporpaBatu 6yDb-aki My3NHi paai.
CTNCNE KepiBHTBO Dnno noatky ekcnnyataa - 187
EeHedx
- RaKo Do BaOoi CTpeocnCTem NiKlHoyeni KaBeli ayio, nepeKoHaItec, 10 CTpeocnCTema yBIMKHeHa, i Bn Bn6paII npaBnIbHn BxID CTpeo. Kso y Bac BNHKn cKnadHocTi i3 Bn6opom npaBnIbHoro DxepeNa ayIO, INB. IHCTpykui do CTpeocnCTem.
He noka3yIOb8eKJIbKa My3uHnx paaiB.
MeiHnPiep NiItpmye Hai6ilbpo3IOBcOJxehi fOpMaTH My3NHyHX paHIB.PoTe icHy e MaXe He3niueHHa KInbKICTb WbNDKOCTe NpepaH i DaHnx Ta iHTepBaIIB Bn6ipKn. JaKuo fAin He noka3yctbcra Ha ekpaH, HauBiporidHie, 0o Bin BnKOpNCTOBye WbNDKICTb NpepaH daHnx abo iHTepBaN Bn6ipKn, kH i NIDTPMyOTbcR. BnKOpNCTOByte IuWe fAin, fOpMaTH, WbNDKICTb NpepaH daHnx Ta iHTepBaN Bn6ipKn JIKX NiITpmyOTbcR.
He 3haxoJx JoxdHnx faiJIb My3nKn, fIbMiB a6o foToIpaqi.
- IpekeohaTeCra, 10 npicpti nam'rti USB (pIeew-namrUSB/ JopctKn DnCK USB) He 3haxoJrTcB B pexmioqikyBaHH.
- IpeekohaiTeec, 10 niItpmUyEbCg fopMaT Bcix faaiB.
MeiHn nneep He Bni3Hae Mi npncptpi Na'rti USB.
Bau npicpii nam'ati USB mir 6yTu He Bn3NaueHm Upe3 npo6JIeM 3 IpaBepom anapathoro 3a6e3neuHn USB, ka6eJem USB a6o DoBwIM nepioDom Biinobidi cnCTem. Cnpo6yTe nepenikKluOHTn npicpti i am'ati USB do npTy USB i 3amInTu Ka6eJb USB.
IyIbT dIcTaHciHoro ynpabInnHa MeiHoro nneepa He npauoe.
- PepekoHaTeCra, 60 6aTapei npabnIbHO BCTaBHeHi.
3ap4d 6atapeMir Bnueepnatncs.3amHtB 6atapei. - PepekoHaTeC, 10 MIX nybTom ductaHioro ynpabnHHa Ta MediHm Pneepom Hema NpewKoJ.
Rky Bepciio anapathoro 3abe3neueHHra MaIO? Ra II BdoCKoHaHTn?
- Ipebeipte Bepciio anapathoro 3a6e3neuHn, nepH nIX nounatni npouec BdockoHaenHH. KIOBepci anapathoro 3a6e3neuHn - HauHOiHa, Bam He Notpi6He BdockoHaenHH anapathoro 3a6e3neuHn.
-
Перейдіт bdo Setting (Hалайтування) > MISC (PI3HE) > USB upgrade (В diockоналенny USB), 06 3dINCHNTBDOCKOHAJIENH anapathoro 3a6e3neueHH.
-
Ipeeniditb do Setup (HanauTyBaHHa) > MISC (PI3HE) > Version Info (InΦopmaia Bepci), 306 3HaHTn BepciO «PpOuNBKN».
-
YKso Bn doci He moKeTe noHOBHTn anapatHe 3a6e3neueHH, CKHbTe HaJaTuBaHHcNCTeMn i 3HOBy BkOHaIte npocec BDOCKOHaleHH.
KepiBnTBO 3 BDOCKOHaJIeHHa anapaTHoro 3a6e3neueHH eB paJIi PDF (y napani BDOCKOHaJIeHoro anapaTHoro 3a6e3neueHH).Lio6 i3HaTncs6IbSe, BiDbIaIte caNT niITpIMKn ASUS: http://support.asus.com/
-Якшо пд уас incталяцл ПЗ ВIMKHyTN cnCTemy O!PLAY MINI V2 a60 BIMKHyTN noTo XnBJIeHH, BDOCKOHaJIeHH He Bdactbca.Яшо xnBJIeHH O!PLAY MINI V2 He yBIMKHeTbcra, Heo6xIDNo cKNHyTN npncTpii. Ze nobephe npncTpii Ha HalaStyBaHHa 3a 3amOBuAHH. Ha zbomy etani moXha CnpobyBatn NOBtOpHTN BDOCKOHaJIeHH anapathoro 3a6e3neueHH.
EeHn
MIMmedHnPiep Bucokoi itkocti He npaoc. 1o moxHa 3po6nt?
BidknHcytbaanTep 3miHHoro cTpymy 3dxpepaXnBneHH,notim yBIMKHiTb NOrO 3HOBy.
ToHKIM 3aOCTpeHIM IpeDMETOM HaTNCiTB KHOKNy «CknHyTN» Ha 3aDiHn NaHeni.
- RaKuo npo6nema He 3HnKna, 3BepHiTbCra Do cnyXbN TexHiuHOi NiTpMKN ASUS.
- PowerLED
- USB 2.0 port
- SD/MMC/MS/xD combo card slot
- IR (Infra-red) Receiver
Vista posterior