
Delta - Stroller Teutonia - Free user manual and instructions
Find the device manual for free Delta Teutonia in PDF.
| Brand | Teutonia |
| Model | Delta |
| Product type | Stroller (usable as carrycot up to 6 months, then pushchair seat up to 3 years) |
| Recommended age | From birth (with carrycot) to approx. 3 years (15 kg) |
| Maximum child weight | 15 kg |
| Main functions | Foldable chassis, swivel and height-adjustable handle, 5-point harness, adjustable canopy with ventilation, reclining backrest, adjustable footrest, locking brake, removable safety bar, removable carrycot |
| Care and cleaning | Machine wash at 30°C delicate cycle for removable fabric parts, spot clean with damp cloth, oil axle ends every 4 weeks |
| Safety | Parking brake with pedal, 5-point harness, check locks before each use, never leave child unattended |
| Spare parts and repairability | Available at authorized dealer (repair kits for paint, wheels, etc.) |
| General information | Operating temperature from -20°C to +60°C, avoid prolonged sun exposure, TÜV tested |
| Maximum basket load | 5 kg |
| Inflatable wheel pressure | 1.5 to 2 bars (respect the maximum pressure indicated on the tire) |
| Compatible accessories | Rain cover, sleeping bag extension, safety bar, carrycot |
| Power supply | None (manual product) |
Frequently Asked Questions - Delta Teutonia
User questions about Delta Teutonia
0 question about this device. Answer the ones you know or ask your own.
Ask a new question about this device
Download the instructions for your Stroller in PDF format for free! Find your manual Delta - Teutonia and take your electronic device back in hand. On this page are published all the documents necessary for the use of your device. Delta by Teutonia.
USER MANUAL Delta Teutonia
natural_image
Black and white photo of a children's stroller with a hooded canopy, no visible text or symbolsBabys first friend
teutonia

text_image
20300401710400Deutsch 3-6
English 7-10
Français 11 - 14
Español 15 - 18
- tested for harmful substances
- tested for safety
- tested and certified production

text_image
JEVENTILE PRODUCTS MANUFACTURERS ASSOCIATION CERTIFIED AN INDIVIDENT TESTING LABORATORY VALIDATES THE MANUFACTURER'S CERTIFICATION OF THIS CARRAGE STRONG TO ITEM 7-800only for USA
text_image
TÜV Rheinland SCH-3640FF5FPP.17 TO PROOF P11(### 520 7)409 22teutonia is the only pram manufacturer awarded the TÜV Rhineland TOXPROOF seal. For you it certifies that for your child all used materials are harmless. Not for GB!

BS 7409:1996 only for GB

DIN EN ISO 1888
DIN 66068

text_image
TÜV CERT DIN EN ISO 9001 Zertifikat: 09 100 70249Production facilities certified according to the DIN EN ISO 9001 quality management system

NF S 54-001
BS 7409:1996

Production facilities certified according to the DIN EN ISO 14001 environment management system For further information log onto: www.tuv.com, ID:5211890561
natural_image
Close-up of a sewing machine needle with a black arrow pointing to the needle (no visible text or symbols)text_image
Technical diagram of a mechanical component with numbered parts for identificationtext_image
Diagram of a mechanical device with labeled parts 1, 2, and 3, showing directional arrows indicating movement or force.natural_image
Close-up of a mechanical component with two black brackets and directional arrows indicating measurement or alignment (no text or symbols)natural_image
Technical line drawing of a mechanical component with directional arrows indicating motion (no text or symbols)text_image
Technical diagram showing mechanical assembly with labeled parts 1 and 2, likely illustrating a gear or cam mechanism.natural_image
Illustration of a hand holding a tool with a ruler, no text or symbols presentnatural_image
Diagram of a hand gripping a device with directional arrows indicating movement (no text or symbols)Our slogan “Babys first friend” is our philosophy. teutonia products combine traditional workmanship and technical innovations with fashionable design. teutonia stands for quality that meets most stringent requirements. The teutonia logo with the rainbow is your guarantee that this is a genuine teutonia model. Read the instructions carefully before use (especially our safety notes) and keep them handy for future reference. Instructions on what to do in the event of a complaint are given starting on page 54.
General
The product has been tested in a temperature range of -20^ C to +60^ C (-4 °F to +140 °F). Besides the many positive properties of our materials such as air permeability, etc., many fabrics are very sensitive to intensive solar radiation. Past experience has shown us that the rays of the sun are now so aggressive that we at teutonia have to recommend that you park the pram in the shade. To ensure the bright colours of your buggy/pram lasting longer avoid unnecessary stays in blazing sun. It is not always possible to avoid colour differences in individual manufacturing batches. Unfortunately, such complaints cannot be accepted. We hope you will appreciate that improper use, possible rain stains or colour differences in materials as described above are not justified reasons for complaints. All metal parts of the buggy/pram require regular care in order for it to keep its high-quality looks. Clean and lightly lubricate the ends of the wheel axles approximately every 4 weeks. Your dealer can provide you with small kits for touching up any damaged paintwork at the chassis. We are convinced that by selecting this product you have made a good choice and your child will be safe in a teutonia buggy/pram. Please contact your dealer should you nevertheless have reason for complaint.
Your teutonia team
General safety information

WARNING:
IMPORTANT SAFETY NOTES
A child's safety is your responsibility.
Not complying with these notes can be detrimental to the safety of your child. Nevertheless, all possibly occurring conditions and unforeseeable situations cannot be covered. Common sense, caution and vigilance are factors this product cannot provide; they are taken for granted in persons using the buggy/pram. The person using the buggy/pram and its appropriate accessories should have understood all instructions. You should explain the operation of the buggy/pram to all persons using it and its appropriate accessories. Consult an authorised teutonia dealer if any of the instructions are incomprehensible and more detailed explanations are required, or if you have further queries.
●Never leave your child unattended.
●Always buckle up your child with the five-point harness. For details read the section “Using the Five-Point Harness” in these operating instructions.
- Prior to every use make sure that all locks are properly latched.
●This pram is intended for only one child.
- The seat unit or the carrycot may not be used as a child car seat.
●The buggy is designed for one child of from approx. 6 months to approx. 3 years (15 kg/33 lbs). We recommend that you do not transport your child in the buggy until it can sit up unaided. The carycot should be used for babies younger than 6 months.
- Carrycots, prams and buggies may be used only for transporting babies or children. Under no circumstances are they substitutes for a cot or a cradle.
●Always store the buggy/pram out of the reach of children, and do not allow children to play in or with the buggy/pram.
- Please never park the buggy/pram without first applying the brake.
- When using public transport take special care to ensure the pram/buggy stands firmly and safely.
●The brake should always be applied when you sit or lift your child in and out of the buggy/pram.
●Always avoid parking on slopes.
- Never use other spare parts or accessories than those supplied in the delivery scope or those approved by the manufacturer.
- Wheel the buggy/pram slowly and gently down and up steps.
- Do not hang bags or shopping or other heavy objects from the handle as this cam make the pushchair unstable.
●Never place objects on the folding top.
- The string bag can be loaded to a maximum of 5 kg (11 lbs). Please always place heavy objects in the centre of the shopping basket.
- Please note that using a pram or buggy for another than its typical purpose can be dangerous. This product is not suitable for jogging, running, skating or similar activities.
- When folding and unfolding the chassis make sure that you do not pinch any part of yourself or others.
●Make sure that no locks disengage while the buggy/pram is carried over obstacles (e.g. steps).
- When readjusting the buggy/pram make sure that your child is clear of moveable parts.
●The buggy/pram can be damaged or destroyed by overloading, improper folding or use of unapproved accessories.
Parking Prams/Buggies Provided with Air Wheels
CAUTION: It is possible for the tyres to stain floor coverings.
Related complaints or claims for compensation will not be admitted.
Cleaning the textile parts
To remove small stains, use a cloth dampened with clear water and carefully clean the spot. Avoid brisk rubbing (especially on dark fabrics). Normally, all removable fabric parts can be washed in the washing machine with a fine fabric detergent (no brightening agents) at 30 °C/85 °F (gentle cycle). Please check separate care labels on the fabric parts.
Removing the seat cover with fall-out protection
natural_image
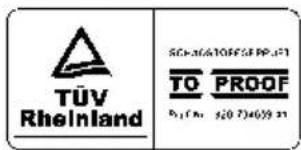
Close-up of a mechanical component with an arrow pointing to a feature (no visible text or symbols)The side covers provided beneath the armrests and attached to them with Velcro fasteners can be removed to improve ventilation. If slightly soiled, the seat cover with fall-out protection can be wiped with a damp cloth. In other cases, e.g. to wash it, it can be removed from the seat unit. Remove the press studs and pull the insertion pieces of the metal bar out of the armrests (snap lock). Then pull the metal bar out of the textile cover.
During assembly ensure that the insertion pieces are in the correct position.
Rain Cover
In rainy weather fit the rain cover over the entire buggy/pram before it starts to rain. CAUTION: The rain cover is not a toy! Never leave your child unsupervised. For the best possible ventilation of the buggy/pram we recommend using the rain cover only for the duration of the rain shower.
Removing the Hood Cover
text_image
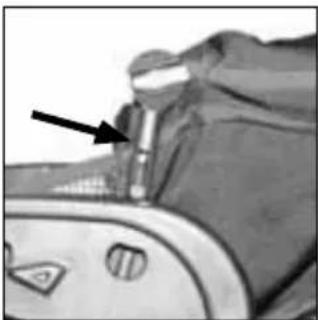
Exploded view diagram of a mechanical component with numbered parts for identificationBefore washing, the two hood bars have to be removed from the cover as follows (see sketch): 1. Use a coin to turn the covers 1 on the hood joints by 90° and remove them. 2. Separate the hood front bar 3 and the back bar 2, including the plastic bearings, from the push-in part 4. 3. Carefully pull the hood bars from the guide loops. After washing, reassemble in reverse order. In this process make sure that the front and back bars are not confused with each other.
Unfolding the Chassis

text_image
Diagram of a mechanical linkage system with labeled components 1, 2, and 3Pull up the folding handle 1 (hand grip) up as far as it will go. The handle lock 2 engages and the arrester lever 3 automatically moves over the tube as an additional safeguard. Prior to use make sure that all catches have latched.
Folding the Chassis

text_image
1 2Press both release buttons 1 so that the chassis can be folded. Release the arrester lever 2 (by raising it) and swivel the handle over to the other side. You can reduce the storage size further by folding down the top of the handle.
Assembling and removing the wheels

text_image
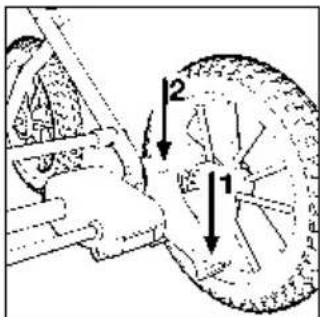
1 2Before assembling or removing the wheels, press the locking spring 1. When assembling the wheels, make sure that the locking spring engages properly.
Inserting and Fastening the Seat Insert
Place the seat insert in the seat unit. Pull the ends of the belt through the appropriate openings without twisting them. Fasten the buckles at the upper end of the back-rest to their counterparts on the seat insert. Place the additional crotch belt around the front safety bar and snap the press stud. The seat insert is reversible so that to suit weather conditions either the fabric or the fleece side can face upwards.
Erecting and folding up the carrycot
natural_image
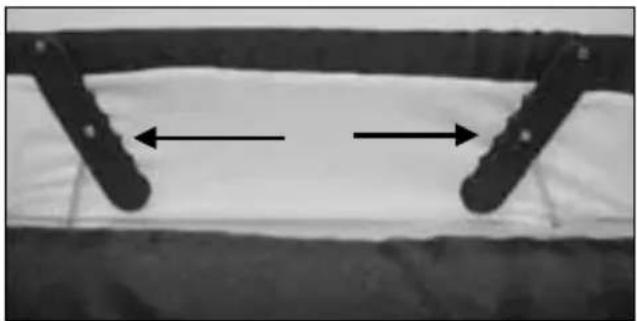
Close-up of a mechanical component with two black metal rods and bidirectional arrows indicating measurement or alignment (no text or symbols)To erect the carycot press outwards the safety lock for the folding mechanism on both sides until they engage with a “click”. Make sure that no fabric is caught.
To fold up the carrycot, press both safety locks inwards again.
Height-Adjustable, Foldable Handle

natural_image
Diagram of a mechanical tool with directional arrows indicating motion (no text or symbols)To change the height of the handle, press in the reflectors on both sides of the handle.
Applying the Parking Brake
text_image
Technical diagram showing mechanical components with numbered parts and directional arrows indicating motion or assembly.The brake is activated by pushing down the long brake lever 1. If it is difficult to apply the brake, wheel the buggy back and forth a few centimetres so that the brake bars engage properly in the wheel rim. The brake is released by pushing down the short brake lever at the top 2.
Fitting and Removing the Buggy Seat or the Carrycot (Buggy Top)
text_image
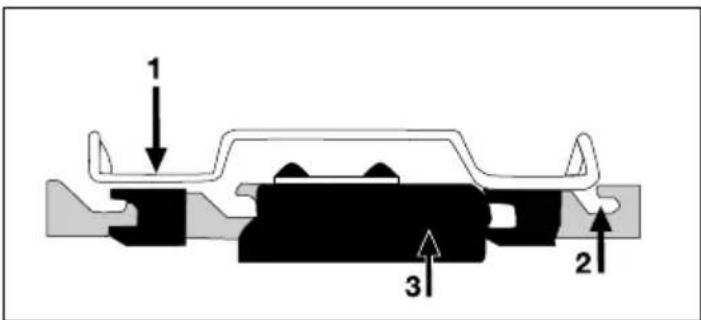
1 3 2Position the seat or carrycot on the chassis so that the bars 1 on each side engage in the provided four slots 2 and push in the seat or carrycot as far as they will go. The locks 3 will automatically latch. The buggy top is secured when the red section behind the locks is no longer visible. To remove the seat or carrycot press the locks down as far as it will go, then remove the seat or carrycot from the slots and lift off.
How to Use the Hood
Insert the plug-in parts of the hood joints in the appropriate armrest or carrycot openings and fasten the press studs to their corresponding counterparts. To remove the hood open the press studs, press in the clips from the outside and withdraw the joints from the openings. For ventilation open the zip fastener at the head-end of the hood and roll up the flap. By pressing down the centre of the front hood bar, keeping it depressed and adjusting the hood into its required position the hood joint enables you to adjust the hood without making a noise. The hood can also be adjusted without depressing the hood bar. The noise this makes does not affect function or wear.
Adjusting the Backrest

text_image
1 2Pull the grip 1 upwards and move the backrest 2 into the required position. Please make sure that the backrest re-engages properly.
When the backrest is lowered, the fall-out protection on the seat unit automatically comes into place.
Using the Five-Point Harness

text_image
1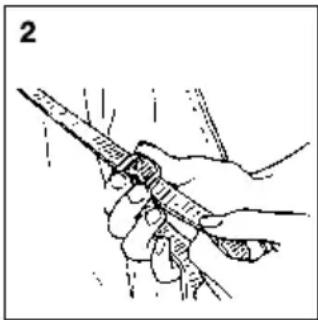
natural_image
Illustration of a hand holding a tool with a ruler, no text or symbols presentOpen the harness by pressing both sides of the buckle latches as shown in Figure 1. It is not necessary to separate the chest restraints from the crotch restraints. Sit your child in the buggy, move both its arms through the harness opening and insert the buckle latch into the crotch belt latch. Using the adjusters, adjust the harness as shown in Figure 2. Attaching points (D-ring) for a separate belt harness are provided at the outer ends of the crotch restraint.
Adjusting the Footrest
Lift the footrest and engage the bar in the required strut. Caution: There is a red safety hook at the footrest. When the footrest is horizontal this hook must be pushed onto the adjusting bar.
Using the Reclined Surface Extension (available as an accessory)
As required, the washable reclined surface extension can be attached to the foot end of the buggy seat with Velcro strips. At the Delta carrycot it can be fastened to the head end as a hood.
Front Safety Bar

natural_image
Diagram of a mechanical component with directional arrows indicating movement (no text or symbols)Insert the front safety bar in the slots in the armrests so that it engages (“clicks”) on both sides. Depending on space requirements, the front safety bar can be inserted in two different positions. To remove the front safety bar press the release hook 1 beneath the armrest to the rear.
WHEEL INFORMATION
ATTENTION: For safety-relevant reasons only the tested and approved combinations may be used. The possible types of wheels for the respective model are shown in the table below. CAUTION: The wheels, starting from the collection 2004, may not be used with products of previous years, as also the previous years wheels may not be used with the products of the collection 2004. In those cases the function of the parking device(s) would no longer be guaranteed. In case of doubt (replacement) contact your special dealer. Concerning our Air Wheels we would like to point out the following: 1. The optimal travelling comfort is achieved, when the wheel is filled with 1,5 – 2 bar (22 – 29 psi) of air pressure. CAUTION: Observe the maximum allowed air pressure written on the tyre. Excess pressure may cause accidents and injuries. 2. The air wheel is equipped with a car-tyre-valve, so that a possible air refill can take place e.g. at a petrol station. Attention: 2 bar of air pressure (or the maximum) is quickly reached. 3. In case the wheel needs repair or has to be patched, this is possible either with commercial bicycle patching things or also with a puncture spray (e.g. available for Mountain Bikes, motorbikes, etc.). The disassembly and assembly of the tyre will be best with two assembly levers, which come supplied with a good repair kit. If necessary the wheel has to be returned to us by your specialist dealer.
| wheel options 09 35 39 | |||
| Primus 04 x x x | |||
| Delta 04 x x x | |||
| Prestige 04 x x x | |||
| Mistral 04 x x x | |||
| Rocky 04 x x x | |||
| teutonia-Y2K System 04 | x* | x** |
* wheel set 32 on teutonia-Y2K System 04
** wheel set 40 on teutonia-Y2K System 04
Toutes nos félicitations!
natural_image
Close-up of a mechanical component with an arrow pointing to a detail (no visible text or symbols)text_image
Technical diagram of a mechanical component with numbered parts for identificationtext_image
Diagram of a mechanical device with labeled parts 1, 2, and 3, showing directional arrows indicating movement or force.natural_image
Close-up of a mechanical component with two vertical supports and bidirectional arrows indicating measurement or alignment (no text or symbols)natural_image
Technical line drawing of a mechanical component with directional arrows indicating motion (no text or symbols)text_image
Technical diagram showing mechanical components with labeled parts 1 and 2, likely illustrating a gear or cam mechanism.natural_image
Illustration of a hand holding a tool with a ruler, no text or symbols presentnatural_image
Diagram of a car handle with directional arrows indicating movement or force (no text or symbols)natural_image
Close-up of a mechanical component with an arrow pointing to a detail (no visible text or symbols)text_image
Technical diagram of a mechanical assembly with numbered parts for identificationtext_image
Diagram of a mechanical device with labeled parts 1, 2, and 3, showing directional arrows indicating movement or force.natural_image
Close-up of a mechanical component with two black brackets and two arrows indicating measurement or alignment (no text or symbols)natural_image
Technical line drawing of a mechanical component with directional arrows indicating motion (no text or symbols)text_image
Technical diagram showing mechanical assembly with labeled parts 1 and 2, likely illustrating a gear or cam mechanism.natural_image
Illustration of a hand holding a tool with a ruler, no text or symbols presentnatural_image
Diagram of a car handle with directional arrows indicating movement or force (no text or symbols)natural_image
Close-up of a sewing machine component with an arrow pointing to a detail (no visible text or symbols)text_image
Technical diagram of a mechanical component with numbered parts for identificationtext_image
Diagram of a mechanical linkage system with labeled components 1, 2, and 3natural_image
Close-up of a black U-shaped metal frame with two arrows indicating measurement or alignment (no text or symbols)natural_image
Technical diagram of a mechanical device with directional arrows indicating motion (no text or symbols)text_image
Technical diagram showing mechanical assembly with labeled parts 1 and 2, likely illustrating a gear or cam mechanism.natural_image
Illustration of hands connecting a cable to a connector (no text or symbols present)
natural_image
Illustration of a hand holding a tool with a ruler, no text or symbols presentnatural_image
Diagram of a hand tool with directional arrows indicating movement or force (no text or symbols present)natural_image
Close-up of a mechanical component with an arrow pointing to a detail (no visible text or symbols)text_image
Exploded view diagram of a mechanical component with numbered parts for identificationtext_image
Diagram of a mechanical linkage system with labeled components and directional arrows indicating motion or force.natural_image
Close-up of a mechanical component with two black brackets and directional arrows indicating measurement or alignment (no text or symbols)natural_image
Technical diagram of a mechanical device with directional arrows indicating motion (no text or symbols)text_image
Technical diagram showing mechanical components with labeled parts 1 and 2, likely illustrating a gear or cam mechanism.natural_image
Illustration of hands connecting a mechanical component with no visible text or symbols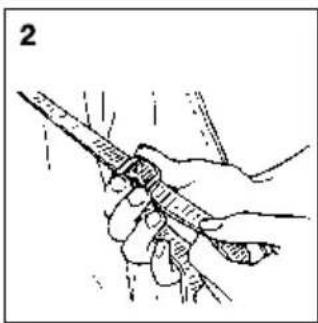
natural_image
Illustration of a hand holding a tool with a pointed tip, no text or symbols presentnatural_image
Diagram of a hand gripping a device with directional arrows indicating movement (no text or symbols)natural_image
Close-up of a mechanical component with an arrow pointing to a feature, no visible text or symbolstext_image
Technical diagram of a mechanical assembly with numbered parts for identificationtext_image
Diagram of a mechanical linkage system with labeled components and directional arrows indicating motion or force.natural_image
Close-up of a mechanical component with two black brackets and directional arrows indicating measurement or alignment (no text or symbols)natural_image
Technical line drawing of a mechanical component with directional arrows indicating motion (no text or symbols)text_image
Technical diagram showing mechanical assembly with labeled parts 1 and 2, likely illustrating a gear or cam mechanism.natural_image
Illustration of hands connecting a mechanical component with no visible text or symbols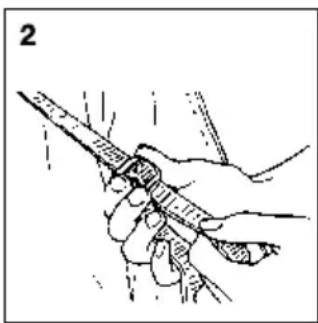
natural_image
Illustration of a hand holding a tool with a ruler, no text or symbols presentnatural_image
Diagram of a hand gripping a device with directional arrows indicating movement (no text or symbols)natural_image
Close-up of a mechanical component with an arrow pointing to a detail (no visible text or symbols)text_image
Technical diagram of a mechanical assembly with numbered parts for identificationtext_image
Diagram of a mechanical linkage system with labeled components and directional arrows indicating motion or force.text_image
Diagram showing two labeled mechanical or robotic components with directional arrows indicating motion or assembly.text_image
Diagram showing a circular structure with labeled arrows and directional arrows, possibly illustrating a physical or mathematical concept.natural_image
Close-up of a mechanical component with two black brackets and directional arrows indicating measurement or alignment (no text or symbols)natural_image
Technical line drawing of a mechanical component with directional arrows indicating motion (no text or symbols)text_image
Technical diagram showing mechanical components with numbered annotations 1 and 2 indicating parts of a gear or cam mechanism.natural_image
Illustration of hands connecting a cable to a mechanical component (no text or symbols)
natural_image
Illustration of a hand holding a tool with a ruler, no text or symbols presentnatural_image
Diagram of a hand gripping a device with directional arrows indicating movement (no text or symbols)natural_image
Close-up of a mechanical component with an arrow pointing to a feature (no visible text or symbols)text_image
Exploded view diagram of a mechanical component with numbered parts for identificationtext_image
Diagram of a mechanical device with labeled parts 1, 2, and 3, showing directional arrows indicating movement or force.natural_image
Close-up of a black metal frame with two side connectors and a double-headed arrow indicating width (no text or symbols)Trykk spennlåsene på begge sider inne i bagen utover til de låses med et «klikk». Pass på at stoffet ikke klemmes inn.
natural_image
Technical line drawing of a mechanical tool or device with directional arrows indicating motion (no text or symbols present)text_image
Technical diagram showing mechanical assembly with labeled parts 1 and 2, likely illustrating a gear or cam mechanism.natural_image
Illustration of a hand holding a tool with a ruler, no text or symbols presentnatural_image
Diagram of a hand tool with directional arrows indicating movement or force (no text or symbols)natural_image
Close-up of a mechanical component with an arrow pointing to a feature, no visible text or symbolstext_image
Technical diagram of a mechanical component with numbered parts for identificationtext_image
Diagram of a mechanical device with labeled parts and directional arrows indicating motion or forcenatural_image
Close-up of a mechanical component with two vertical supports and bidirectional arrows indicating measurement or alignment (no text or symbols)natural_image
Technical line drawing of a mechanical component with directional arrows indicating motion (no text or symbols)text_image
Technical diagram showing mechanical components with numbered annotations indicating parts of a gear or cam mechanism.natural_image
Illustration of a hand holding a tool with a ruler, no text or symbols presentnatural_image
Diagram of a mechanical component with directional arrows indicating movement (no text or symbols)natural_image
Close-up of a mechanical component with an arrow pointing to a detail (no visible text or symbols)text_image
Technical diagram of a mechanical component with numbered parts for identificationtext_image
Diagram of a mechanical device with labeled parts 1, 2, and 3, showing directional arrows indicating movement or force.natural_image
Close-up of a mechanical component with two vertical bars and bidirectional arrows indicating measurement or alignment (no text or symbols)natural_image
Technical line drawing of a mechanical component with directional arrows indicating motion (no text or symbols)text_image
Technical diagram showing mechanical components with numbered annotations indicating parts of a gear or wheel assembly.natural_image
Illustration of hands connecting a mechanical component with no visible text or symbols
natural_image
Illustration of a hand holding a tool with a ruler, no text or symbols presentnatural_image
Diagram of a hand gripping a device with directional arrows indicating movement (no text or symbols)natural_image
Close-up of a mechanical component with an arrow pointing to a feature, no visible text or symbolstext_image
Technical diagram of a mechanical component with numbered parts for identificationtext_image
Diagram of a mechanical linkage system with labeled components 1, 2, and 3natural_image
Close-up of a mechanical component with two vertical supports and a central horizontal bar, showing bidirectional arrows (no text or symbols)natural_image
Mechanical component diagram showing rotational motion with arrows indicating direction (no text or symbols)text_image
Technical diagram showing mechanical assembly with labeled parts 1 and 2, likely illustrating a gear or cam mechanism.natural_image
Illustration of a hand holding a tool with a ruler, no text or symbols presentnatural_image
Diagram of a car handle with directional arrows indicating movement or force (no text or symbols)What to do in the event of a complaint
RIGHTS IN THE EVENT OF JUSTIFIED COMPLAINTS
If you have grounds for complaint, you have statutory rights against your dealer, who has sold the pram to you, which are unaffected by the information below. To provide proof that your pram was purchased from your dealer, please retain the handover form you filled in and signed, together with your receipt, for the duration of the statutory warranty period. This period lasts 2 years and commences when the pram is handed over to you.
WHAT IS COVERED IN THE EVENT OF A COMPLAINT?
Claims under warranty cover any defective materials or workmanship apparent at the time of the handover. The warranty does not cover
- natural symptoms of wear and tear or damage due to excessive use
- damage due to unsuitable or incorrect use
- damage due to faulty assembly or use
- damage due to carelessness or poor maintenance of the pram
- damage due to incorrect modifications to the pram
Defects must be reported immediately to prevent consequential damage.
DO YOU HAVE GROUNDS FOR COMPLAINT OR NOT?
RUST:
the frame is provided with a protective coating. If it is not serviced or is treated badly, however, rust spots may form. This is not considered a defect.
SCRATCHES:
scratches are considered normal symptoms of wear and tear and not a defect.
MOULD:
textiles which have got damp and then not been dried properly (see instructions for use) may go mouldy and do not represent poor workmanship.
FABRICS FADING:
sunlight, sweat, cleaning agents, wear (especially at points within easy reach) or over-frequent washing can all lead to fading; fading is thus not considered a defect.
PILLING OF FABRICS:
pilling is possible and is not considered a defect. As in the case of woollen jumpers, you can treat fabrics with a clothes brush or a textile razor to eliminate the majority of the bobbles.
TORN SEAMS/
PRESS STUDS/FABRIC:
please check carefully on purchase, whether all fabric parts, seams and press studs are properly sewn and attached and whether all the zips work properly.
WHEELS:
worn wheels are natural symptoms of wear. Damage to pneumatic tyres due to external effects, sharp objects or use with the wrong air pressure (for max. air pressure, see tyre case) is not considered poor workmanship.
Our wheels are not balanced. Slight imbalance due to the production process can therefore not be ruled out and as a result, is not considered a defect.
WHAT YOU SHOULD DO WHEN PURCHASING
Please go through the handover form with us to rule out as far as possible your needing to make a claim under warranty.
PROCEDURE IN THE EVENT OF COMPLAINTS
If you subsequently find a defect, please report this to us, the dealer from whom you bought the pram, by telephone without delay so that we can discuss how to proceed. This ensures that justified complaints can be dealt with quickly and without great distances having to be covered.
USE, CARE AND MAINTENANCE
The pram is a means of transport for your child, and needs to be looked after and maintained in accordance with the instructions for use in order to maintain its original quality.
We draw your attention expressly to the fact that only original accessories and spare parts may be used.
Handover form
Name: ____
Street:
Town: ____
Postcode: ____
Telephone no. (incl. code): ____
e-mail:
Type of pram: ____
QA/Chassis no: ____
Colour (design) of fabric: ____
Accessories:
Handover form, to be filled in by customer
Product complete OK
Function checked OK
Folding mechanism OK
Ride characteristics OK
Wheels checked OK
Adjusting mechanisms checked OK
Brake safety checked OK
Suspension checked OK
Good condition
Check frame OK
(especially for damage to paintwork, scratches and other obvious defects)
Check fabric parts OK
(especially for tears, seams, press-studs)
Check plastic parts OK
Customer (signature)
Dealer (signature)
I have checked the pram and am satisfied that it has been supplied in its entirety and that all functions are working properly.
I have found the following defects:
These will be rectified either by:
□ repair □ replacement
I have received adequate information about the product and its functions prior to purchase, am aware of the care and maintenance instructions and most particularly, have obtained a copy of the instructions for use with the information they contain regarding my rights in the event of a complaint.
Date of purchase: ____
Dealer stamp

text_image
Babys first friend teutonia
text_image
Britax Childcare First class travel for childrenOne copy of the form to be retained by customer, the other by the dealer.
Übergabe-Check
Name: ____
Adresse:
PLZ: ____
Ort:
text_image
Britax ChildcareFirst class travel for children