
TR 951 - Cooker TEKA - Free user manual and instructions
Find the device manual for free TR 951 TEKA in PDF.
| Product type | Built-in ceramic hob |
| Brand | Teka |
| Model | TR 951 |
| Number of cooking zones | 4 cooking zones |
| Control type | Touch (sensitive keys) |
| Power supply | 230 V ~ 50/60 Hz |
| Main functions | Double and triple circuit, automatic start, Stop function, keep warm, timer, individual zone delay |
| Lock | Key lock and child safety (persistent lock) |
| Residual heat indicator | Yes (H/D display) |
| Safety | Automatic safety shutdown, overvoltage detection (message U400), disconnection in case of excessive temperature (E2) |
| Cleaning and maintenance | Special ceramic hob cleaner, scraper for baked-on residues, avoid abrasive products |
| Repairability | Interventions reserved for Teka technical service |
| Spare parts | Contact Teka after-sales service |
| Surface material | Ceramic glass |
| Dimensions (approximate) | Approximately 590 x 520 mm (standard cutout) |
| Weight (approximate) | Approximately 8 – 10 kg |
| Energy class | Not specified |
Frequently Asked Questions - TR 951 TEKA
User questions about TR 951 TEKA
0 question about this device. Answer the ones you know or ask your own.
Ask a new question about this device
Download the instructions for your Cooker in PDF format for free! Find your manual TR 951 - TEKA and take your electronic device back in hand. On this page are published all the documents necessary for the use of your device. TR 951 by TEKA.
USER MANUAL TR 951 TEKA
GB INSTALLATION INSTRUCTIONS AND RECOMMENDATIONS FOR USING AND MAINTAINING
CERAMIC HOT PLATES TOUCH CONTROL
ATTOOeI/MuHMaHpa3cTOrHH/Minimum mesafeeler
Minimalne odlegosci / Minimalis tavolsagok / Minimalni vzdá
lenosti / Minimalne vzdialenosti / Distante minime /
MHHMaJIbHbIe pacCTOHHa /MiHImaJIbHi BiDcTani/
Homo Teka / Forno TEKA / TEKA Oven / TEKA-Herd
Electrical connection
Electrical connection will be via an all-pole circuit breaker or plug, whenever accessible, in accordance with the current and with a minimum 3 mm distance between contacts. This ensures disconnection in emergencies and allows hot plate cleaning.
The connection must be earthed, in accordance with legislation in force.
Before you connect the hot plate to the mains, check that the voltage and frequency match those specified on the hot plate nameplate, which is attached underneath it, or on the technical data sheet, which you must keep together with this manual throughout the product's service life.
Only the TEKA official technical service can handle or repair the appliance, including replacement of the power cable.
Ensure that the inlet cable does not come into contact with the hot plate housing or the oven housing, if it is installed in the same unit.

Keep
the
Guara
tee
similar object to cover the recipient and suffocate the flame.
Certificate or the technical data sheet together with the instructions manual throughout the product's service life. These contain important technical information.
Use and Maintenance
Safety warnings
When the hot plate is on or after it has been on there will be hot surfaces that could cause burns. Keep children away.
If the ceramic glass breaks or cracks, immediately unplug the hot plate to avoid electric shocks.
Do not leave any objects on the hot plate surfaces while it is not in use. This prevents the risk of fire.
Never try to put out a flame using water! Use a lid, plate or
The appliance is not designed for use by people (including children) with physical, mental or sensory impairments. Neither must it be used by people inexperienced in or without knowledge of handling the appliance, except when supervised.
Make sure that children do not play with the appliance.
This appliance is not designed to work with an external timer (not built into the appliance) or a separate remote control system.
Instructions for Using the Touch Control
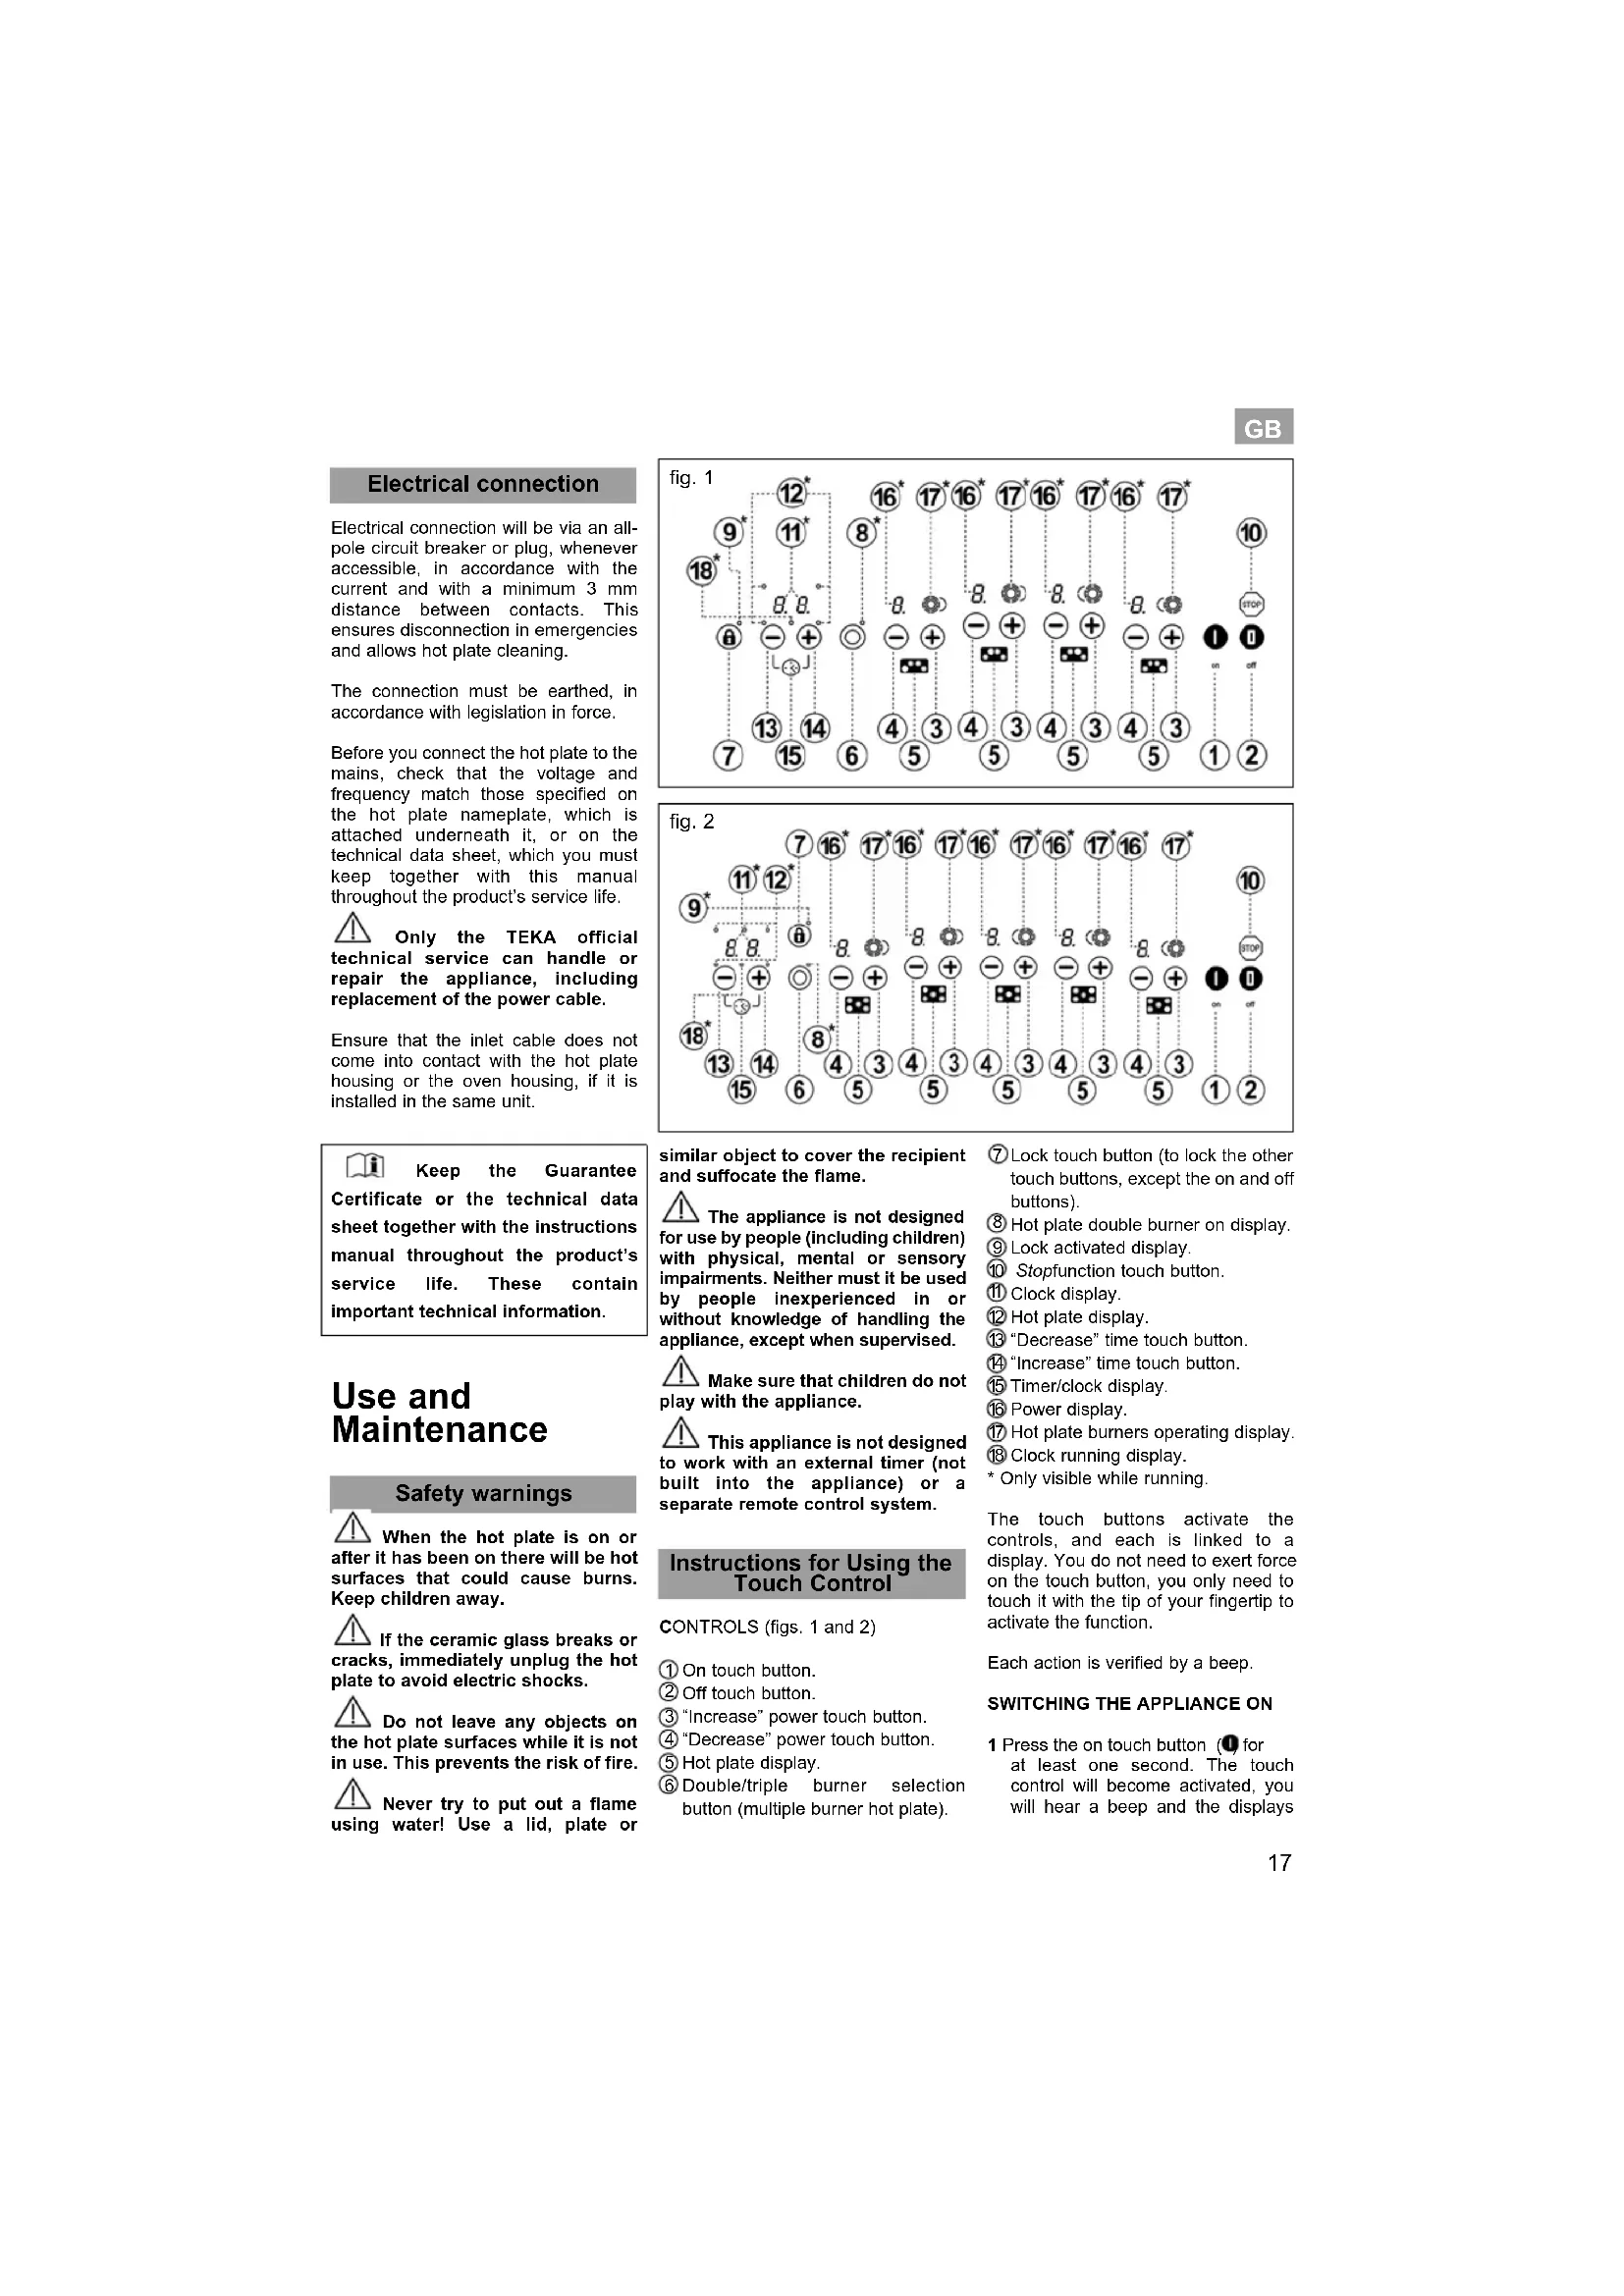
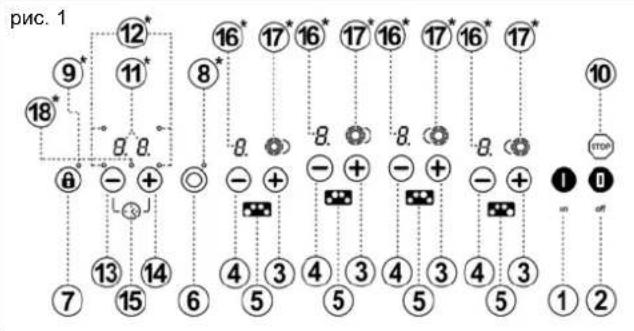
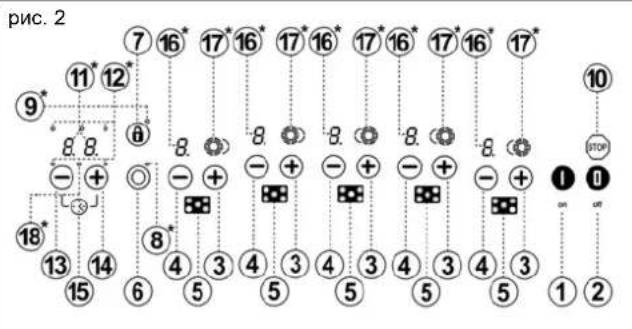
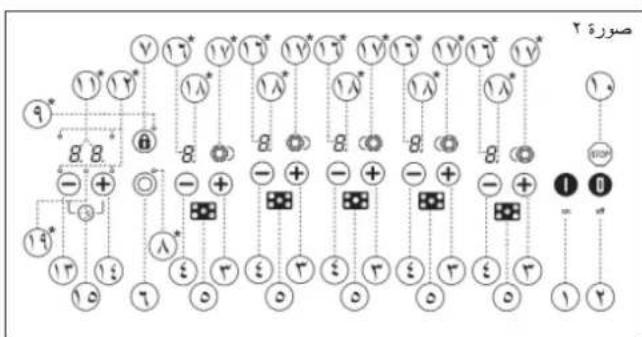
CONTROLS (figs. 1 and 2)
① On touch button.
② Off touch button.
(3) "Increase" power touch button.
(4)“Decrease” power touch button.
⑤ Hot plate display.
Double/triple burner selection button (multiple burner hot plate).
⑦ Lock touch button (to lock the other touch buttons, except the on and off buttons).
Hot plate double burner on display.
Lock activated display
Stopfunction touch button.
①Clock display.
Hot plate display.
"Decrease" time touch button
"Increase" time touch button.
15 Timer/clock display
6 Power display.
Hot plate burners operating display.
Clock running display.
* Only visible while running.
The touch buttons activate the controls, and each is linked to a display. You do not need to exert force on the touch button, you only need to touch it with the tip of your fingertip to activate the function.
Each action is verified by a beep.
SWITCHING THE APPLIANCE ON
1 Press the on touch button (O) for at least one second. The top control will become activated, will hear a beep and the disp
GB
will light up. If any surface is hot, the display will flash H and Q alternately.
If you do not take any action in the next 10 seconds the touch control will switch off automatically.
When the touch control is activated, you can disconnect it at any time by touching the touch button (1), even if it has been locked (lock function activated). The touch button (2) always has priority to disconnect the touch control.
ACTIVATING THE HOT PLATES
The hot plates will be deactivated, with their respective power displays (16) to , until a power level is selected. If all of the hot plates are at , you have 10 seconds to activate one of them, otherwise the touch control will switch off automatically.
Use the touch buttons and (4) to select a power level. If you press the touch button, the hot plate will change to 7 and the hot plate burner display (17) will light up. Keep pressing it to increase the power level. You can lower the power level using the touch button (4).
Quick switch-on at maximum power with the hot plate at _i press the touch button once. The hot plate will go straight to 9.
If you keep either of these two touch buttons (4) pressed down, they will repeat the action every half a second, without you needing to press them again.
SWITCHING THE HOT PLATES OFF
Using the touch button 4) lower the power to 0.
The hot plate will switch off automatically.
Quick switch-off: Regardless of the power level, if you press touch buttons and 4/3), the hot plate will switch off immediately.
RESIDUAL HEAT display
The power display will display an H when the glass surface reaches a temperature that could cause burning. When this risk disappears, the display switches off (if the appliance is disconnected), or displays a (if the appliance is still connected).
Switch the hot plate off before the cooking time ends to make the most of the residual heat and save on electricity.
Warning: If while the H is still displayed there is a power cut and the power returns immediately, the residual heat displays will not light up again, even though the cooking surfaces are still hot. Bear this in mind.
SWITCHING THE APPLIANCE OFF
You can disconnect the hot plate at any time by pressing the touch button 2). You will hear a noise and the power displays (16) will switch off, except for the H residual heat display, if necessary due to the surface temperature.
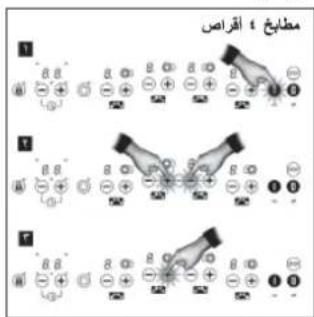
Double and Triple Burner Hot Plates
With double and triple burner hot plates you can use the inner ring, or the inner and the outer rings, depending on the size of the pan.
CONNECTING / SWITCHING THE DOUBLE BURNER HOT PLATE ON
1 Select the desired power (from 1 to 9) by pressing touch button or (3/4). The hot plate burner display (17) will light up.
2 Press the multiple burner hot plate touch button 6) and then the touch button (34) for the chosen hot plate. The hot plate display (17) will show the second ring.
DISCONNECTING/SWITCHING THE DOUBLE BURNER HOT PLATE OFF
1 Press the multiple burner hot plate touch button (6) and then the touch button (34) for the chosen hot plate. The second ring will disappear from the hot plate burner display (17).
CONNECTING / SWITCHING THE TRIPLE BURNER HOT PLATE ON
With triple burner models, if once the second burner has been switched on you press the multiple burner hot plate touch button (6) and then the touch button (34), instead of the second burner switching off, the third one will switch on.
DISCONNECTING / SWITCHING THE TRIPLE BURNER HOT PLATE OFF
To disconnect the third burner, press the multiple burner hot plate touch button (6) and then the touch button or (34). The third ring will disappear from the hot plate burner display (17).
If you repeat this step the second burner will be disconnected and the display will switch off (17).
STOP function
This function allows you to pause the cooking process. If the timer function is activated, it will also go into pause mode.
Activating the Stop function
1 The pans are on the cooking surfaces, which are on at a specific level.
2 Press the Stop touch button (10). The power displays (16) will display the letter S-T-O-P successively instead of the selected cooking levels. The function will be paused.
Deactivating the Stop function
1 Press the Stop touch button (6) and then any other, except the off button 1). The cooking process will resume with the same power levels and set as previously.
You must press the second touch button within 10 seconds or the function will be deactivated. The appliance will switch off if the cooking process is not resumed after a ten minute pause.
Function to keep a pan hot
You can use this function to keep food hot in a pan on the cooking surface.
1 There is a pan on one of the hot plates with a previously set cooking level.
2 Press the touch button 4 and keep it pressed down until the cooking level lowers to U. This is an intermediate level between O and I.
To disconnect this function, just press the minus button (4) until it reaches a . This function will only work for a maximum of 120 minutes, after which the appliance will switch off.
Safety switch off function
If due to an error one or several hot plates do not switch off, the appliance will be automatically disconnected after a set amount of time (see table 1).
Table 1
| Selected power | Maximum operating time (in minutes) |
| 1 | 520 |
| 2 | 402 |
| 3 | 318 |
| 4 | 260 |
| 5 | 212 |
| 6 | 170 |
| 7 | 139 |
| 8 | 113 |
| 9 | 90 |
When the "safety switch off" function has been activated, a O is displayed if the glass surface temperature is not dangerous for the user or an H if there is risk of burning.
To reconnect the appliance, switch it off by pressing the off button 2 and then on again.
Automatic cook start
This function makes cooking easier because you do not have to be present. The touch control preprogrammes the chosen hot plate at the maximum power and lowers it to the desired power (which you have selected) after a given amount of time (see table 2).
Table 2
| Selected power | Automatic Cook Start Function (Time In seconds) |
| 1 | 50 |
| 2 | 90 |
| 3 | 150 |
| 4 | 220 |
| 5 | 320 |
| 6 | 540 |
| 7 | 150 |
| 8 | 240 |
| 9 | — |
SWITCHING THE AUTOMATIC COOK START FUNCTION ON
1 Set a hot plate to power and then press the touch button. The power display will flash and R alternately. Lower the touch button to the desired cooking power (for example 6). The display will flash and R alternately.
Example:
You want to cook at power level and program a quick heat at the beginning.
Choose power level 9. Press the touch button again and the power display will flash 9 and R alternately. Then press the touch button lower it to power level 5. The system keeps the hot plate at power level 9 (maximum) for 540 seconds, flashing 5 and R alternately, and then (after 540 seconds) it automatically lowers to continuous cooking level 6.
CHANGING THE POWER LEVEL DURING AUTOMATIC COOK START
1 Use the touch button (8) to change the power level.
When the power is increased using the touch button (B) the time that has passed until then is taken into account
Example:
You have chosen power level 7 (50 seconds automatic cook start) and after 20 seconds you change it to 4 (220 seconds). The automatic cook start will be 200 seconds (220 minus 20).
DISCONNECTING THE AUTOMATIC COOK START FUNCTION
After at least 10 seconds have passed since the automatic cook start function was activated:
1 Press the touch button (4). The automatic cook start function will be deactivated.
Stopwatch function
This function allows you to set a time, after which a warning sound is heard.
To activate the function:
1 With the touch control on and the timer not set for any hot plate,
simultaneously press the clock touch buttons or (13/14).
2 The clock display switches on (11), displaying and the pilot light (19) will flash.
3 Press the touch buttons (13/14) again until you set the desired time. After a few seconds the decimal point will start to flash, showing that the countdown has begun.
Once the countdown is complete, you will hear a series of beeps, which you can stop by pressing any of the touch buttons.
If at any time during the countdown function all of the hot plates are at power level 0, the touch control will switch off after a few seconds, but the stopwatch will continue to the end of the countdown or until you stop it.
To stop the stopwatch, just set the remaining time to 00. Firstly, to select it, simultaneously press the touch buttons and (13/14).
Timer function
This function makes the cooking process easier because you do not have to be present: the timed hot plate(s) will switch off automatically after the set time has lapsed. There is a separate timer for each hot plate, which allows all of the hot plates to be timed simultaneously.
The function is controlled using the clock (15) increase/decrease time touch buttons and (134).
Timing ONE hot plate.
To activate the timer for one hot plate:
1 Connect the appliance and activate one or several hot plates at a set power level.
2 Simultaneously press the clock touch buttons (13/14).
3 The display comes on (11), displaying 0. The clock pilot light (19) will flash.
4 Press both touch buttons successively until the pilot light for the hot plate that you want to time switches on (12).
GB
GB
5 Use the clock or touch buttons (13/14) to select a cooking time between 1 and 99 minutes. The increase touch button (14) starts at 1, and the decrease button (15) at 30.
The timer will be set for the hot plate. Once the countdown is complete, the timed hot plate will switch off and you will hear a series of beeps, which you can stop by pressing any of the touch buttons.
Setting the timer for more than one hot plate.
Repeat the steps above.
Changing the programmed time.
You can change the time afterwards.
1 Simultaneously press the clock touch buttons or (13/14).
2 Press both touch buttons successively until the pilot light for the hot plate that you want to time switches on (12).
Now you can read and change the value. If you want to cancel the timer early, use the touch button 3) to set it to 00.
Remember that if during the countdown you switch the touch control off by pressing the off button (2) the countdown will be cancelled!
Locking the hot plate touch buttons
You can use the lock button to lock all of the buttons on the touch control panel. This prevents functions from being activated accidentally and children from playing with the controls.
To activate or deactivate the function, keep the touch button (7) pressed down for around 1 second. When the function is activated, the pilot light (9) lights up.
Remember that when the touch control is on, you can still switch it off using the off button even if the lock function is activated (pilot light 9 on). When you reconnect the cooker using the touch button , to be able to operate the touch control you must first deactivate the lock function by pressing the touch button (7) again.
Child safety
This function prevents children from connecting the appliance deliberately or accidentally.
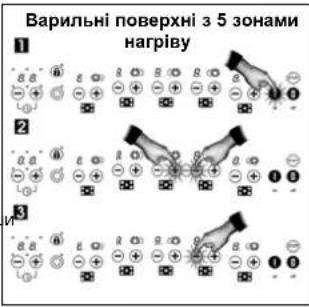
The safety function must be activated after the appliance has been connected, following the steps in figure A. Firstly press the on button (step 1). Then simultaneously press the touch buttons and shown in the figure (step 2). Next, press the power increase button (step 3). The touch buttons that you need to press vary depending on whether the appliance has four or five hot plates.
Figure A:
Once the function is activated, an L (for Locked) will appear on the power displays (15), to show that the control panel is locked.
The electronic control will remain locked, even after the control has been disconnected using touch button (1), as long as the user does not unlock it.
Unlocking to cook
If you want to unlock the touch control to cook, press the touch button
to activate the touch control. Then straight away press the touch buttons and 一 3/4 simultaneously, following steps 1 and 2 in figure A.
The L will disappear and you can operate the panel as usual. When you disconnect the control using the off button 0),the safety function will be reactivated and it will appear again the next time the touch control is activated.
Cancelling the safety function
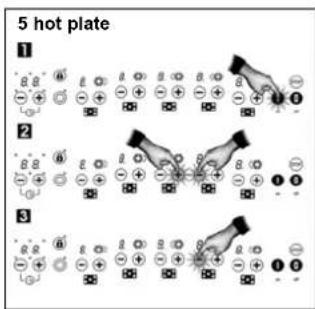
The safety function must be deactivated after the appliance has been connected, following the steps in figure B. Firstly press the on button (step 1). Then simultaneously press the touch buttons and shown in the figure (step 2). Next, press the power decrease button (step 3). The touch buttons that you need to press vary depending on whether the appliance has four or five hot plates.
When the control is reactivated, the appliance will be ready to start cooking. In the event of a power cut, the lock function (if activated) will be cancelled.
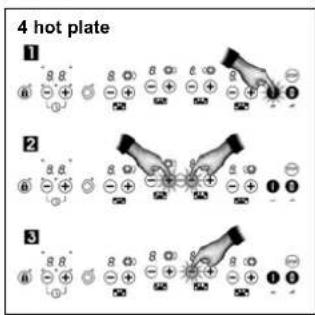
Figure B:
Power surges
When the touch control system is subjected to a higher voltage than the usual ranges allowed in power grids, the hot plates will disconnect and a continuous beep will be heard. The following message flashes on the hot plate displays *:
400
When the nominal voltage is re-established, the beeping stops and the message on the displays disappears. The hot plates remain disconnected and the indicating residual heat remains on the displays if these were on before the surge. The appliance is then ready to be used.
The touch control detects these power surges whenever the appliance is connected to the mains, even if it is not being used at that moment. The alarm described above might therefore be activated even when the touch control is switched off.
Unusually high power surges can damage the control system (like with any electrical appliance).
Tips for using ceramic hot plates
- Use pots and pans with a heavy and completely flat base.
- Pans with a smaller diameter than the shown heated area are not recommended.
- Do not slide pots and pans over the glass because they could scratch it.
- Although the glass can take knocks from large pots and pans without sharp edges, try not to knock it.
- To avoid damaging the surface, do not drag pots and pans over the glass and keep the underneath of them clean and in good condition.
Try not to spill sugar or products containing sugar on the glass because while the surface is hot they could damage it.
Cleaning and maintenance
To keep the appliance in good condition, clean it using suitable products and tools once it has cooled down. This will make the job easier and avoid the build-up of dirt Never use harsh cleaning products or tools that could scratch the surface, or
steam-operated equipment.
Light dirt not stuck to the surface can be cleaned using a damp cloth and a gentle detergent or warm soapy water. However, for deeper stains or grease use a special cleaner for ceramic hot plates and follow the instructions on the bottle. Dirt that is firmly stuck due to being burned repeatedly can be removed using a scraper with a blade.
Slight tinges of colour are caused by pots and pans with dry grease residue underneath or due to grease between the glass and the pot during cooking. These can be removed using a nickel scouser with water or a special cleaner for ceramic hot plates. Plastic objects, sugar or food containing a lot of sugar that have melted onto the surface must be removed immediately using a scraper.
Metallic sheens are caused by dragging metal pots and pans over the glass. They can be removed by cleaning thoroughly using a special cleaner for ceramic hot plats (Vitroclen, for example), although you may need to repeat the process several times.
Warning:
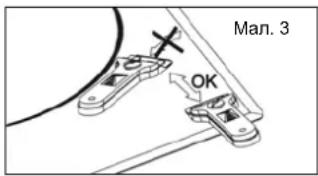
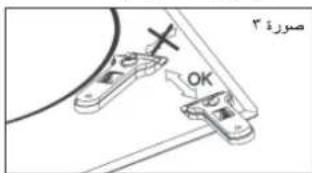
Handle the glass scraper carefully. The blade could cause injury!
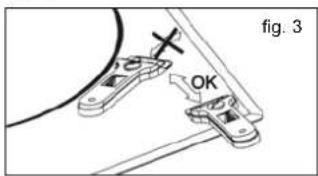
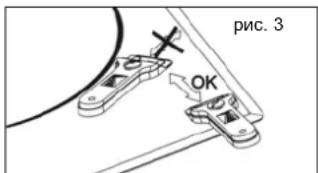
If you use the scraper incorrectly, the blade could break and a fragment could get caught between the surrounding trim and the glass. If this happens, do not try to remove it using your hands, carefully use tweezers or a knife with a fine edge. (See fig. 3)
Only use the blade on the ceramic surface, avoiding the scraper casing coming into contact with the glass because this could scratch it.
Use blades in perfect condition. Immediately replace the blade if it is damaged in any way.
GB
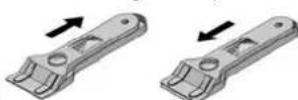
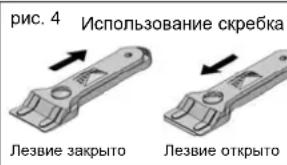
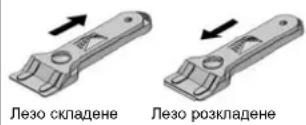
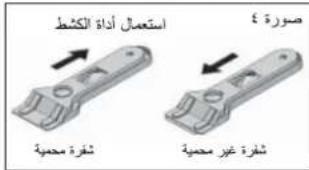
fig.4 Using the scraper
Blade protected Blade unprotected
After you have finished with the scraper, withdraw the blade and lock it. (See fig. 4)
A pot or pan may become stuck to the glass due to a product having melted between them. Do not try to lift the pot while the hot plate is cold! This could break the glass.
Do not step on the glass or lean on it as it could break and cause injury. Do not use the glass as a surface for placing objects.
TEKA INDUSTRIAL S.A. reserves the right to make changes to its manuals without affecting the product's essential features.
Environmental aspects
The symbol on the product or packaging means that this product cannot be treated like usual household waste. This product must be taken to a recycling collection point for electrical and electronic appliances. By ensuring that this product is disposed of correctly, you will avoid harming the environment and public health, which could happen if this product is not handled properly. For more detailed information about recycling this product, please contact your local authority, household waste service or the store where you purchased the product.
The packaging materials used are environmentally-friendly and can be recycled completely. Plastic components are marked >PE < >LD < >EPS < etc. Dispense of packaging materials, like household waste, in your local container.
Malfunctioning
Before you contact the Technical Service, please perform the following checks.
The appliance does not work:
Ensure that the power cable is plugged in.
GB
The pot sticks to the glass:
If there is molten material between the pot and the glass, set the hot plate to maximum power and try to separate them.
Message U400 and acoustic warning:
Power surge. Contact your electricity company.
Continuous beep,control disconnected and symbol on display:
There is an object or liquid on the touch control. Remove any object or liquid on the touch control.
A hot plate disconnects and message E2 appears on the display: If during cooking the temperature in the control electronics is excessive, the hot plates near the control might disconnex. A device displays
disconnect to avoid damages. Excessive temperature problems during cooking only occur in extreme cases (cooking at maximum power for a long time). In any case, leave the hot plate to cool down for a few minutes. If the problem persists, check that the appliance was installed in accordance with these manual instructions.
DE
ANENEPTONIOIHsH SYKEYH
MTopeite va attoouvdeete tnv nAektpkiEOTIA OE OTIOaONTOE OTiym, TATwVtAc TOIANTKPO aOg (2).Oa akouae Eevav xapaktnpiAtKO hXo kai oecoi Oboeocxuoc (16) 0a tATEVPyTOINBOUv, ME yovadikn eCaipoeN TIV EvEiN HmV O0vN UTOAEITMEVNS 0epuTnac, ev au To Elva atapalnto Aoyw auNevns ETIPaveiaKcN 0epukpaaic.
Eoties 110kai Tp110 kauoTnpa
TIS ETIEG DITIO KAI TPTIKAUATnpa MTOPEITE VA xnoiIOToHoe MVO TOV EOWTEPIKOBAKTUIO HOAVETEPIKO KAIVOTE EWTOPIO BAKTUIO TAOxPOVA, avaloya ME TO YEEOCTOU OKEUOG.
SYN△ESH / ENEPTONIOIHSEH THE EETIAIADIANAOY KAYETHPA
1 Eπiαεgτην επιθμηπιαχ (ατό 7 εως 9) πατωντος τολικτρο αρής + η (3/4). H oδovn kauστηρα εοιας (17) θα αυεύμει.
2 Natnate to TAnktpo aqns ngs eTiaac noaattau kauotnpa 6 KAI, tni uevexia, to TAnktpo aqns n ng (3/4) via nTv emiaevne eTia. H O6vN eTia (17) Ta eupavaiei to butepo Dakuio.
ANTOENAEH / ANENEPRONIOIHTHEETIAA KAYETHPA
1 PntnTo TnAKnTpo aqns nTs eAtias nollatlau kauatnpa 6) KAI, oTN auVexia, To TAnKtpo apNc 念 n (3/4) via tvN etiayevn Eaia. O deutepoc daKTuioC Ta Egaapavitei ato tv N oOovn kauatnpa eTiaac (17).
SYNAEH / ENEPTONIOIHHE THE EETIAIPTINAOY KAYETHPA
Me Ta oovtela TpITAAou KAOTnpa, eav otav Exei EepyoToinTe O deEtepc Kaotnpa TATNOTE To TAnKtpo TOnAattwv KauoTNPW Eotias 6) Ka, aTn ouvExia, To TAnKtpo apnC n (5/4), avi va yivei atnevepyoToin Tou Deupepo DaKtuIou, 0yive I evpyoToinTou TpIou.
ANOENADEH/ ANENEPRONIOHTHE EETIAE TPIAOY KAYETHPA
Tia va aTouovdeote Tov tpTO KAATnpa, TATnate To nAHTPO apnC TNS EOTIAC TAAATAOu KAATnpa 6)KAI, ATn OUVExeia, To nAHTPO apnC 念 (8/4)vi Tnv ENTAEyEvN eTIA. O pTIOg BAKTUAlOg oEgApVAtel eTTO TIV oOvN KAATnpa EOTIAC (17).
Eav enavaalabe auto to bna, 8a yivei atoouvdeon tou deutepou kauotipka kaltevepytoio noc oovnc (17).
Aetoupyia NAYsH
Autn aeioupyia oac einnpey va ataqamote npoupivn biadikacia ayepiapos. Eav n aeoupiya tou xpovoiaottn evai eveytoinueyn, 0a tai kai autn oe ioupiuyra taun
EvpyoToinn Tns Aetoupyias Nauns
1 Ta maayepiKa okeun Bpiokovtaoi otic etipavieC MaayepiEaTOC,oi OTOIE eivai puiaueeOe 0 evauykeipuveo etinTioxUoc.
2 Pntnate to nAnktpo apns Naoung 10.Hobvionxuoc(16)8a Eupavicia diaoxoka ta ypaunaT S-O-P, avti yia to eAeVeyevo EITIEBOIAYOOCyapeipaeatoc. H eIooupyla Tuv eTiwB aTTEIcE Taouon.
ATREVEpyoTOInaTns Aeioupyias Naouns
1 PAnote to nnKto apn Gauon 10) KAI, stuovexia, eva aAIO nnKto, EKToc ato To nnKto atepeyotoin 2. diokaiia yapeipatoc 8a uovxiei atto to idio etinieo 1axoc kai TE iC iepuoiie otus trponyouevwuc.
Oa TIPETEVAATNAETEO TEUETO PANKTO apnS EVTOS 10
DEUEPoAeTTWv, DApoePOTaVVEI ATAEVEPYOTIOINN TgAIEIOUPYiC. H OuaKEuH aTAEVEpyOTIOINeEAV DEV VVEI EITAVAPOPa TNS BIAOKAiaoc MAYepemuoC meta nTnauon Deka AETTTW.
Aeitoupyia yia diatnpn on evoc KEUous OE OuyKEpIevn EepoKpaia
Mtopeite va xpaiaotoinoiete autn tn
aetoupyia vla diaatnpnoetc zeto to
paynto e eva ekueoc nou pbiaketai
ETAWO uNTN EtnpavieaupeipjatoC.
1'Eva okeuoc bpoketai ae yla anto TcEeTis eEv aKaobopioevo EITTeIOxUOCaaypeiOAtOs.
2IaHTOteToTnKTO apnC KAI KpatnOte To TATnEvo mExpo To EITIEEO IOUoos MapeEepaTOV MEUWEI wO TO Auro evai Evva EVIOIAEEO EITIEEO mETAEIou O KaI TOI.
Tia aTevepyoToiOn autns ts
AeIoupyias, atwos nATnote to
TAnktpo meiwos 4) mExpi va
Φaoei OTo Aun n aeitoupyia Topei va Tapaueive EVePYOToinueyn Via eviot diapkeia 120 LeTTW, eTa Tny Otoia n ouakeun thA antEVEPOYTOIEiT autOmuia.
Aeitoupyia aTVEpyoTOinOns aQaaleia
Eav loyw katoiou opaiautos ia n TIEPOIOTEPc EOTc DEV attevepyoTIOAVtai, nooukeun BAtaOnouvBei autoda meta aToia mua oukyekpiueyn XPOVIKTI PEOO (BAETTE NIVAKa 1).
Nivakaç 1
Kato n3non3BATE CEH3OpEN 6yToH (4).HAMaJIeTe MOUHOCCTTHaO.
IIObT 1ue ce H3KIOUH ABTOMATNHO.
Bb30 m3KIOUbaHe: He3aBNCmoOT CTENEHTHa MOUHOCT, AOHATHCHEt e3c0pHNTe 6ytoHn (4/3), NNTbTJe CE 3KIOH Neu H3aBaHbO.
HIMKAtop 3a OCTATbYHA TOIINHA
INHdkaTOpBt 3a MOUHOCCT ue NOKaJKe H, KORATO cTBKNHeHATA NOBbXHOCT DOCTINHE TEMNHPATyPA, KOROTO MOKE da npEiDnBkA u3IapHne. Korato pNcKbT u3Ne3He, INHdkaTOpBt e u3KKnOvBa (ako ypeBt e u3KKnOeH) uIM NOKa3Ba D(aKOypeBt e BCE OSe BKnOeH).
N3KNOUeTe NnOta, npEa Da CbPwN BVPMeTO 3a RotBEHe, 3a Da Ce Bb3NO3BATE OT OCTaTbHATA TOnIIHa n CnecTIne EhePRn.
BHHMaHHe: Ako npn HanuHa HmHkaun H enektpnecKTo 3axpaHbane npeKbcne H ce Bb3ctahOBn He3a6BaHNO, HnHkaunra 3a ocaTbUHa TOnnHn HAma Da CBEThe OTHOBO, DOpN NOBbpXHOCTNE 3a rotBeHe da ca BCe Oue HAprrn. POMHete TOBA.
N3KJIIOUBAHE HA YPEDA
Mokete da N3KIOHTE nIOTA NO BCKO BPEMe, KATO HATNCHE TE CE3OEPH BYOT (2).Ue YteTe 3BvN INDKATOPbT 3a MOIOHOCT (16) Ue ce N3KIOHc OCEB H Na INDKATOPA 3octTaTHa TOnINHa, Ako Ce Hana ropaND Temnepatypa Ha NoobbXHOCTTA.
DBoHHN TpoHHHarpeBaTeHNn nNou
C DboHInTe N TpOHn HArpeBaTeHNn
IIOOy MoKeTe Da IINON3BATE
BbTpeShnpy INr, INb BbTpeSHnTe N
BbHUnHe pNfROBe, B 3aBNCIMOCT O
paMepa Ha cJa.
NYCKAHE / BKJIQUBAHE HA ДВОИHATA HAPPEBATEJIHA ПJOJA
1N36epeteKeNaHATA MoHocT (OT 9), KATO HATINCHETe CEH3OpEH 6yTOH NNN (3/4). INdkatopbTa Ha HarpeBaTeHNHATA nOVA (17) ue CBeThe.
2 Hatnchete ceH3OpHna 6ytoH na nIOTa c HnKOIO HarpeBaTeHH nIOu (6) nCtED TOBa ceH3OpHna 6yToH uN (3/4) 3a n36paHata HarpeBaTeHa nOHa. NmHkAtopbT Ha HarpeBateHATA nOoA (17) ue nOKae BTOPMr pHr.
H3TACBAHEM3KIOUBAHE HA DBOIHATA HAPPEBATEJHA IIOOVA
1HaTnCHete ceH3OpHH 6yToH Ha nIOTA c HRAKOIO HArpeBaTeHn HIOOHN (6) nCtED TOBc CEH3OpHH 6yToH nn (3/4) 3a n36paHATA HArpeBaTeHn HIOoA. BTOPIAT pINrH ue N3Ue3He O t HnIMKAtopa Ha HArpeBaTeHn HIOOa (17).
NYCKAHE/BKNIIOUBAHE HA TPOHATA HAPBEBATEJIHA IIOCHA
PnMoDennC TpOnHa HArpeBaTeHnHa nOa, Ako BTOprrn PnHr E BkNIOeH BeDbXk, HaNTChetE cH3OpHnB 6yTOH Na NToTa C HKnOKnO HArpeBaTeHn HnOu (6) nCne ToB a CeH3OpHn8 ByTOH mN (3/4), n BmecTo Da ce KKnOKn O BTPnR, nce Ce BKIOuY TpETnT.
I3TACBAHE / N3KIOUBAHE HA TPOHATA HATPEBATEJIHA IIOYA
3a da nKIOUHTe TpETn pHr, HATNCHETe CEH3OPHN6byTOH Ha NToA C HAKONKO HARPEBaTENH NIOuN (6) u cIe TOBA CEH3OPHN6byTOH NIN (3/4). TpeTnT pHrNtue N3ye3He OT HNDKATOPa HA HARPEBaTENHaT a nnoA (17).
Ako NOBTOPIE TaTc CTbIka, BTOPIR pHrIe Ce e3KJIIOH IN HnDnKaTOPbT ce Ce 3KIIIOH (17).
CTONФункця
Ta3n FyHKnna No3B0nBa npoccbT Ha rotBeHe da 6bne npeKbChAT BpMeHNo. Ako e aKTbUpaHa FyHKnraTa TaMbp, Ta cIoo IpeMHe B pexmm na3a.
AkTNBnPaHe Na yHKnCnCTon
1CbdoBete ca Bbpxy NOBbpxHOCTNTe 3a rotBEHe, KOINTO Ca Ha
BG
onpeeneHaTaCTeneH.
2HaTnChTe CeH3OpHn6yToH CTOn (10).NINKATopBt 3a MoUHocCT (16)ue nokaxe noceNoDBaTEHNO 6yKBITE S-T-O-P, BmecTOIbpaHnTe CTENEH 3a rotBeHe. FHyHuaTa 7e 6bde npekcbhata BpemehHO.
DekTbBpaHeHayHKcNCTOn
1 HaTnchete ceH30pen 6yToH Cton (10) IN cneT ToBa BcEKN Dpyr, C MKnIOUHeH E 6yToHa 3a N3KIOUOVABe H2).IPOueCbT Ha TOBHeE Ue Ce Bb3o6HOBN pNn CBsHTe CTENEH HA MOuHOT N HAcTOPOK KAKTO Ppei.
Tpba Da HATNCHETA STOPRA CEH3OPEN 6yTOH B pAMKITE Ha 10 cekyHN INI yHKINrta ue 6bJe Dea3AKTNBPAHA. YpeBt Ue Ce M3KNOu, AKO IpOueCtB HA rOTBeHe He E b3o6HObeH CnEi Ray3a OT DECTMHyTH.
A FOZOFELULETEK BEKAPCSOLASA
PoiKJIIOUeHHe K3JIeKTPoCeTn
IIOKIOHueHe nAHeJI N K 3NEKTOpcETn DIOJHO BbIIOJTHBc C NOMOUIbHO pybIbHHa NIN JVE, NO BO3MOXHOCTN, WITENCEJI N PO3EeK HEO6XQdHMo MOUHOCHTN, IMEOUHXPACCTORHHe MEyDJOKTAKMn HE MeHee 3 MM.3TO No3BOJNETbOCTPOOTKHOATb NaHEb OT cTeN B abapmHbIX CNTyaUxR, a TaIOE dN HCTKn.
PnnoKIOHcHmOBsAteBnHO HANHHe 3aemEnH, yOBDIeTOBPOJcero DeCTbYooHIM OHPMaN nPpABnM.
Ipeed BkIOHHeHmB aPoHOH NaHEni B CeTb y6eDNTecb B COOTBeTCTBn HApRAKHeH N uACToTb TOKA B CETn 3HaHEHnM, Yka3aHHbM Ha 3aBOcKOH TaBnUKe, HaxOJaEeCn HA HmKHeH CTOpOHe NaHEm, Nm3aNCAHHbM ETexHnCeckn Nacnopt, KOTOpB Heo6xOJIMO XpaHtB Bmcte C 3ToH nHTcpyMeB TteHHe Bcero cPoka CnyKbI N3dENr.
Texnueckoe 6cbnykbaHne n peMOHT 3toro 6bItoBOro npIb6pa, BKNIOyA 3aMeHy KaBEn NITAHNA, paaepaeTc BblIOINrB ToJIbKO B opNlALhBX CepBnCbx NpHKTx cipMb TEKA.
Pn noKIOHcHm Heo6xOIMO y6eBnTbC B TOM,TOKa6beNbPiTaHnA HcOpNKACAeTc C KOpTycom BapOCHn NaHeH, a TaQKe c KOpTycom DyXOBKn, ecn OHa YcTaHaBnBaETCp PdOM.

TapaHTMnHbI
HnTExNHuecknI nacnpoHaN3eJIne Heo6xOdmo XpaHntb Bmcte C hactoae HnCtpyKneB TceHe Bcero cpoKa erocnykb. B Hnx coepkata BaxhbleTexHHueckne CBedeHna.
IcnoJb3OBaHne I Texo6cnyXnBaHne
TexHnka 6e3OnaCHOCTN
BknHoueHHa nnTa nnnn nnn Ta cpa3y nocne BbKnHoueHHa - ropa. Cha moKet CTab npuHNOH oxorob. DepeTe deten noanbwe OT nTtbl.
HMeDneHNO OTKIOUHTe BApOHyIO Naenb OTeN,TO6bI M36ExaTb NopaxEHn 3NeKTPNueCKHM TOKOM,ecNa HHe NOBRTC TpeuHHb HnN OHa pa06bETcN.
He cTaBBTe Ha BapOCHyO naHb HnKakHe npEdMeBn BeuH, ecN Bl e He nonb3yeTeCb. 3To yctpaHReT onaChOCTb noXkapa.
He bIraTeCb racntb nIaMn BODo! BocNoIb3yIeTcb dIa 3TOr KpbIkwK kactpOnH, TaepNK mN DpyrIM NIO6BbIM npEdMetOM, KOptbIM Hado HApblb NcToCHK BOzopAHy, YTObIb nIaMa nOracNo 6e3 doTyna Bo3Dxa.
BbITOBn npnbop He npedhaaeh HnNCNb3oBaHn HnAmn (BKnOyAa DeTe) C pH3nHeckmH, nCXNHcEckmH HeDcTAtkamnn C yxydWeHHbM 3peHn n(Hn) cnyXOM. Hn He DonKhbl NOnb3oBaTbcn Ha, He MeoeUme DoctatoHoro OnbTa Hn 3HaHn No npmHenIO yCpOHTBA, 6e3doKHO pykoBDCTBA.
CdenaiTe TaK,HToBJI DeTn He MORTN Hrpatb C 6bTOnbIM PnH6Opom.
3TOT npHbOp He npedHa3HaueH
IpaPabToBb BmEcTe C BHeUHMn (He
BCTPOEHbM Pnp6Op) TAmpeom
HIN OTdEhOBn CHCTeOM
IMCTAHuOHHO ynpabHeN.
HCTpyKUma NO mCNOJIb3OBAHHIO
cehcohporo ynpabHeHHa
OPRAHbI YNPABNEHnA (pnc.1 n 2)
① CéncopHàn KhONka On (BKn).
② CechopnKa Khonka Off (Bkn)
CEHOPHAR KONKA "YBENHYT B MOUHOCTb.
④ CechopnKa KHONKa "YMeHbUnTb" MOUHOCTb.
⑤ DmcpneBapoHno nHaHn.
KHOHnKa BbIbOpa DboHoro / TpoHoro NoIporpema (y nAeHN C HecKeONbKMM PekmmN oNpoRba).
⑦ CenCupHn KaHnKa 6nOKmPoBKn KHOHOK ynpaBnHn (3aNpaET BCE KHOHKN KpOme KHOHKn on (BKn) n Off (BbIK)).
8HnDnKaTOp BKJIOUeHINr DBOHOroNoDorpeBa.
9 INHdkaTOp KHOJIKI 3a6nIOKIpOBAHbI
10 CeHcOpHa KHOJa FyHKmN Stop (cmn).
RU
11 yacbl.
12DnCnnBn BApOyHn NaHeM.
13 CechcopnKa KhONka "YMeHbunTb" BpEMr
CehcnpnKa KHONKa "YBENHHTb" BpEMr.
15 TaHMeP / Yacbl.
16 INHdkATOP MOUHOCTN.
17HnKaTOp pa6oTb KOHΦopok.
VHINKATop paOtaoUxuX yacOB. BnDEhTOnbKO pnp paOte.
UnpaBHeHne npOn3BODnTC nOMOuIbHO
CEHCOPHBX KHONK, KxKJdN 3KOTOpbX
HMeET NHIXaKoTOp. K CEHCOPbHM
KHONkAM He HyKHO pNkJIaDbIbTa
HnKaKHX yCunLI, DnB KJhOueHn4
HyKHOy FyHKUm DocTaTOH NIIuB
KOCHYbCn KHONK KOHNKOM NaIbLJa.
KaJdOe DeIcTBnE NOITBepKJaetc8 3ByKObblm CMHHaJIOM.
BKJIIOUCHENIEIPIIBOPA
1 HaKMMTe ha napy ckyHd ceHCOPHy0 KHOKNy ① (1). BKnIOHTcE cHcOpHoe ynpabHeHne, 6ydet noaan 38yKOBo CnHAn, HnDKaTObI 3acBETraC. EcnJ KaKHe-Jnbo KOHOpKn RoprHne, COoBTeCTBHyOuN mHnDKaTOp HAHTet MmRtB, nonepMeHHo NOK3aBBa HnO.
Ecnn nocne 3toR B TeueHne 10 cekyHne He 6byt npdnpnrHrbl Hnkakne DeiCTBn, CecHOpCHe ynpabTHe AOBTMATHEcN BblIOHOTTC.
BKnIOeHHoe ceHCOPHoe ynpabJIeHHe MOKHO B IIOBOOM MOMENT BblIOHTb, DnI Yero DOCTAOHHO HAXaTb CEHCOPHYO KONKHy 12,DAKe ECNI OHo 3AnepTo (3aJeCtTBOBAHa cyHKua 6bnOkPOBKn).CEHCOPHA KHONKa 1 IMeET DnI 3TOO DOCTAOHb npOpHTet.
BKJIOUeyHNE KOHΦOPOK
KoHΦopKn 6dyT OTKnIOUeHbI, a IN HnIKaTOBpIb6dyT NOKa3bIBaTb (16)Q, do BbIbopa KAKOr-Ni6o yOpBH MOnuOHCTN. Ecnn INhIKaTOBpIb BCEx KOHΦopok 6dyT NOKa3bIBaTb Q, To HxHO BKNIOHTb KAKyO-HN6yDb nHIX, HnAHe YpeE3 10KeYHb AOBtMaTHeckn OTKnIOHTcCEHCOPHOye npABnHEe.
ПльзутбсЕнсрсьнMHKONКAMN 4/3)ДгьБОпунНТУРОВСМоMuHOCTN.ПинHAЖATIN CEHCOPHOKONIKI (3),KOHΦOрКA 6JET HarpeBabcC MoMuHocTbToI a, HIMDKaTOP (17) KOHΦOрКnHaHET CBETMJB.CaKNoDE DoONNHHTeRbHo
KACAHE KONIKY BERNIHYBaET YPOBEHBOUHOCTN. YPOBEHBMOUHOCTN ONUHKAETC ECHOCOH KONIKO(4)
BbICTPOE BKNIOHHe MAKCMMAHBHO MOUHCn HArpeBa: PnKOHpOKe, BbCTABNEHHo H a, CneyDOnH pa3 HaxKaTb CeHCPHyKOHNky (2) KOHpOcKa BApOHH NaHEN cp3y BKNIOHTCn Ha 9- yPoBeHb HarpeBa.
EcHn HaxKaTb KaKyIO-NI60 I3 3TNX KHOK, GmN (42), n He OITyCKaTb, CMeHA yPOBnHarpeBa 6yDet npOxCoNDt KaKdIbe NONcKeyHb; OTnAaTee Heo6xOIMMoCTb HAXkMAtb KHONky HECKOJIbKO p3.
BbIKJIOUeHNE KOHΦOPOK BAPOUHOI PAHEJI
ABTomatueckoe Haayano npurotoBnHnNn
3TaФyHKUaYnPoUaETnPnIroTOBHeHne
MNIu,NOCKOJIbKyXo3HJKe PnT 3OM He
O6BaTeJIbHO HaxoINbCpaDmC. C
NOMOUsIO CeHCOPHO YnpABNeHnBa
MOHXO 3aPaHHee 3aOpRpaMMPOBaTB
HyKHYo KOHcOpky Ha BkInOHeHnHa
MAKcIMaJIbHYo MOUHOCTb C DaJIb-
HEuIM NIOHKeHHeM yPOBnHarpeBa Do
KeJAeMaHOrO (No CBOeMy BbIbOpy) No
PiOSeCTBM HeOBxOIMIMO BpEmEHn
(cm.Ta6nmu2)
Ta6nua 2
An HnpanBho npoCoCKpe6kOM neBm BoMeT cNoMaTbCn, n EOr ppaemt MOxET 3actpTa
MEXdy CTKnOM N OKpyKaIOUeIero OKAHTOBKO.B TAKOM Cnyuae He NBItaTecB BItaTuNTb OCKOLOK PYkAMN, BOCONb3yTecB NIOCKORY6aAMN HJIN HOXOM C TOHKIM JIe3BHeM. (CM.pnc.3)
KepaMHueckne NOBepXHocTn DOnJHbOuUaTbSOTIbKO ne3BnEM.KopnycCKpenKa He DOnJHE BXoNTb B KOHTAKTC oCTeKNOM, NocOKoMbky MOKeT eRfKO noapapanTa.
Npb3yntecb TOnbko KaeeCTBeHHbIMn Ne3BnMn. HEmeJeHHO 3ameHnTe NOpeK-DeHhle Ne3Bn.
!Nocne OKOHaHHpa60tBckpe6kOM,BdBnHbTeJe3BNEB Kopnyc n 3abokpyteero.CM. pnc.4)
Kactpnoa Hnckobopoda Moryt npctab K cTeKnly N3-3a TOrO, 4TO MeXy HmM Okazanc KaKoiNb6o pacnnaBnwnC npodkt. He bTaitecb noHnhtb nocny, noka BapouhA NOEPXHOCT XOnoHa! 3To moKet nobpeDnTb cTeKnlo.
He HacTynaiTe He OnnpaTne Ta CTeKlnHHyO NOBepXHOCTb NHTbI,NOTOMYTO OHA MOKET pa36NTCBN CTATb NPuHHoH TpaMBi. He KcNaDbIABaTe HA CTeKNo pa3NbIe npDeMtbI.
TEKA INDUSTRIAL S.A. OCTABJRE3a CO60I npabo BHOCINb IMMEHEHnB INCTpyKun 6e3 CepeB3hIX IN3MEHEHnI FyHUNOHAJIhBx XapAKTePNCIK CBOE IPODyUIM.
AcneKtbl oxpaHbOkpykaiooien cpebl
CNMBOJ Hn3deHn HnynyakOBKe 03Haayt,TO CdaHHbIM
RU
H3dennem HEnb3r ObpaataBc, KAc CobhHbIM 6bTObIM MycopoM. 3To H3dennie CnDeyet yTNIN3npoBaTb Ha cneuaIbHbX nyHKtax c6opa 3NeKtpuYeCKNX 3NeK-TopoHbIX np6opOB. PpaBnIbHO yTNIN3pyr erO, BbI He npuHHareTe BpeD OKpyKaIOeum Cpde N o6ueCTBeHHOMy 3DOpOBbIO, TTO MORNO 6bl CnyHTCB pNHecoBLODEHN npaBNI ObpaUeHNc OxOdaMn DnI nOnyEHN DOONNHTEbHO nOpboHm INHΦopMaun OB yTNIN3aUN 3TORO H3dennia ObpaauTeCb K MeCtBbIM BnactR, B cnyk6y yTNIN3aUN OTXODOB INB MaarH, B KOTOPOM H3dennie 6bINO npno6peTeHo.
NcnoB3yeMbI ynakobOuybIe MaTePnAbl JyRJHOTcMaTePnAanMM, He HaHOsczmm Bpe Da OKpykaohoe CpeE. X MoXHO NOnHOCTbO nepepaatbIBaTb.H NaactMaccOBbie DeTaN HHeceHa MapKpOBA >PE<,>LD<,>EPS<, H.T.D. YnakobOHybe MaTePnAbI MoXHO Bbi6pAcBtBaT B KOteHepbC b6IbTOBIM Mycopom.
HeinpabHoctn
Ipeed tem kak obaaatbcb a CnykbyTexHHeCKoro 06CNYKBAHINHeOboXoDMIOnpOBeCTnclyKOLNe IPOBepIK.
Pn6op He pa6oTaE:
y6eJntecb TOM, YTO cTeBOH shHyp NOKIOHcH K CETN.
Nocya npncTana K cTeKny:
ecnMekdyHDMONcYbI N CTeKTHHO NOBEPXHOCTbO k03aONocb KAKoE-TO pACNNABNHEOE BeueceTBO, BKNIOHTe BAPOpHYo NaHeNb Ha MAKCmAlbHy MOuHOCt bHarpeBa N ONbITAECTbIX PAsbEduINHTb.
Pn60p noka3bIbaet coo6eHne U400 nnoaatkyctneckm cnHan: 6pocok hnpraKeHHB CTeH. OpaTntEcB K NCTABUKNY 2EKTNDCTBA.
IocTOrHHb3 3ByKOBoi CNrHaJ, NIOKUOHeNc ynpaBnEHHu cMbON Ha DnCnpee:
Ha ceHcphom ynpabnenn HaxoNTcKaKoI-N6o npEomet nN KIKOCTb Y6epnte npEomet nN KIKOCTb c CEHCpHO r npAbeHH.
KoHΦOPKa OTKnIOUaETcA aHa
DnCnneBbIbOHTcCoobSeHMeE2:
ECIN BO BpEMe PnroTOBHeNn NmCn
TemNEpaTpy 3NeKTPOHHbX 3nEMeTOB
CnCTeMbY npPABNHeN 3NaUHTeNbHO
npBeBlaaet DoNyctMmBy ypoBeHb,
RU
KoHΦOpKn B 30He paCnIOJKeHnA 3NeMeHTOB ynpaBJIeHnMOrTy
OTKIOHATbC 3aHTb OT
NOBpeJHn. PIO6IeMbI INIINHNEI TEMpepatyM BOITY IPOCXOHTB NLIbB WIKJIIOHITIELbHbC CYNAHx
(PnIROTOBLeHHe PIIuHa MAKCMMABHO MOUHOCN DINTEbHOE
Bpem) Bnlo6om cnyae, Bapohon NoBepxHOCTn HAO dtb OctbHn HECKOJIKO MNHT. PnI NOBTOPHOM BO3NHKHOBEHm NPO6mBeHne6XoJIMO
y6bDnBcTBMTObTOBIOInpObYCTaHOBEN Co6bHOeHNMe npABIN,1NJOKHeHbIX B 30N HHTCPykMN.
UA
PiiknoueHndo enktpomepexi
IIKnIOHHeHH cnI BnKOHyBaTn 3a
DONOMORO 6aratonIOHOCHoro
BIMNKaHa, uo pOzpaOBOAHn Ha
BIDIOBHy NOTyXHCTb I MaC MihmAbHy
BIDCTaHB MkK KOHTAKTAMM 3 MM, a60
BIMNKaHa WTENCeNBHOrTO TNY, DOCTyn
do KATO 3ABKnMae 6yTN BInBH.
BIMNKaM 3aBe3neCyBuTa
BIMNKaHaBAPINbHOI NOBepxHI nI daac
ii YuHEHH Ta B ABapiHnx CNTayqix.
IiKnIOHnBnBnOHyBaTN 3 HaneKHMn3aemHeHnM,BlnOBIDHO Do IIOHx HOp.
IpeepiikKIOUeHHM BapnIbHOI NOBepxH Do eNkTPOMepeXI nepekoHaTeCg, 0o HAnpyra Ta Ta cactota B Mepexi BiNDoNbiAOTb DaHM, 0o 3a3HaueHi B Ta6nHcI 3 NaonopTHmH DAHM BapnIbHOI NOBepxH, po3aTsoBaHl B II NHXHI YACTHNI, Ta B rapaHTINMy TanoHI a6o Ha apkyui TexHnHex daHNx, kki cnid 36epiratn pao3 3 daHM NocihNKmIpOToRm ycbo TepMHy EeknnyatauII BapnIbHOI NOBepxH.
Byb-ki onepaui y BHTpiHni
actnni npnaady a6o horo pemont,
BKNIOaOHn 3AMHy Ka6eIO
XNBNEHHaMOTB BKNOHYBaTMc
nIiue nepcohanom ophiHoro
cepbcHORO CEHTpy TEKA.
Kaben JBNHe He NOBHe KOTAKYBaTn aHI 3 KOPNYCOM BAPINbHOI NOBExH, aHI 3 KOPNYCOM DxyBOI uPhiN, RkUO BOHN BCTAHOBENH I ODNH CekJI.
36epirate rapantHHn Tanoh 460, y pasi Horo BiccyHocI, apkyuTexHHnx daHHx, pazom 3 NocihNKOM 3BHKOPCTAHN npOTAMO yCBOrEO TepMHy eknnnyataui npnnay. Y HIXMCTBcR BaKNIbI TexHHi DaHI npnnay.
BukopncTaHnTa DOrJIaD
Ppabuna Texhikn 6e3nekn
Pi# qac poBTo 30H harpIy a6o nicna ix BnKOpNCTAHHa
BapnblHni nobepxhi e rapayi DInaHKn, DotNK Do JAnK MoKe npn3BecnD oOnikIB. He DO3BOJnAE DIAM Ha6NkXatncd DO BapnblHOI nobepxHI.
AaKIOCKIO NOBExHPO36nOcna 100 HbOMY 3'ABUNNc TpUHHN, HeraHNO BIDKNIOuHTB BAPINbHy NOBepxHO BID ENeKTpOMEpi, Oo6 yHNkHTy He6e3neyn ypaKeHHN ENEKTPNHIM CTpyMOM.
He HnwaHte Ha 3ohax HarpIBy BmKHeHOI BapNlBHOI NOBepXHi CTOpOHNI npEdMeT.N YnKaJIe The He63neKn NoKExi.
Hikon He HamaraTecn 3aracTN nOyM' BDOo! CkopctaTiec KpnKIO, Tapinko 60b iHMM NODi6HMM npedMTOM, 106 HAKPTN NOcyd Ta 3aracTN nOmy.
A DanHn npnlaH He npn3HaueHn
DnBnKOpNCtAHnOc0bAMN 3
OBMeXeHHMn 4i3HnHMn,
po3yMOBmN a6o ceHCOPHNMn
3dIOHOCTMa Ta dIbMn. Oc6b, Ri
He MAOTb DocBiDy BnKOpNCtAHnH
LbOro npnady A6o He3HaNoM i 3 Hm,
MOxYb KopNCtByaTcna PnpnADom
LnHe NiHnADom Oc6b, 0
Ybaral RaIcO, KOn CbiTbCn IIndKatop 3aHsKOBoro Tenna H, noDya eHeprHa KoPOTKn Yac npHnHtcb, nicB BIDHOBeHHN
noaui eheprii iHnKATOp He X yBIMKHeTbC 3HOBy, HABITb JAKIO KHaHarpIe 3aHnaeTbC rapAioo. PAm'raTne npO ce.
BIMKHEHHI PUNJADY
BapnblHy nobepxHIO moXHa y 6ydb
KmMoneHT BmHKHYTN HATMHCYBHN
Ha ceHCOPHy KHOKNy 2).Pn
bOMy npOlyHae 38YKOBN CnHAn,
IHNKaTopOn NotyKHOCT (16)
BmHKYbC, 3A BnHATKOM IHNkATOpIB
3aNIuKOBOTO TENNA (H), RKi
CBITNTMcyBc, DOKn NOBepxHn 30H
HarpBi HE OXONOHE
ДБOKOHTypHi Ta TpNKOHTypHi 30Hn HarpiBy
Ha DbKOHTpyHx Ta TpNKOTpyHx 30Hax HarpBy MOKHA BKNOPCTOBYBATn Imwe BHYtpiHNI KOHTyp a6o DoaTkoBO BMVKATO 30BHIuH KOTpy, BiNobIDHO DO pO3MIPy Nocdy.
YBIMKHEHHI BOKOHTYPHOI 3OHH HAPIBY
1.3aainTe 6axaHnpiBHe NotyKHOCTI 00H HarpBy (BID Ido 9) 3aONOMOHO CEHCOPHX KHONOK Ta 3/4). 3acBiTNTbC8 BIDNOIBHm IHdKaTop yBMKeHHA (17) 30HN HarpyB.
2.TopKHTbCSceHCOPHOI KHONKIN BnBOpby DpyTOrO YN TpeTbO KOHTpy 6), a NOTc HecOPHOI KONIKI + CH/4) NotPbHOI 30HN HarpBy. Ha IHdkatopi YBMkHeHNA 30HN HarpBy (17) 3acBtNTbCS pyrnn KOHTyp.
BIMKHEHHI BOKOHTYPHOI 3OHH HAPIBY
1.TopKHTbCn CeHCOPHO KHOPIK Bn6Opy DpyrOro U TpeBtOro KOHtPy 6)A,notIM HATCHIb CEHCOPHY KHOIIKY CH (3/4) NOTPi6HO 30HN HarpBiy. DpyrN KOHTyp Ha IHdMkopoTI yBIMKHeHHRA 30HN HarpBiY (17)3HHKHe.
YBIMKHEHH TPNKOHTYPHOJ 3OH HAPIBY
JaHo H BapnIbHn NobepxHi c TpIKoHTpyHa 30Ha HarpIby, 106 yBIMKHYTN TpeTNI KOHTyp, nCnra YBMKHeHHa DpyrOTo KOHTpy Tpe6a TopKHyTmCeHCOPHO KNKn Nb6opy DpyrOu NHtBorKOHTpy (6), a NOTIM CEHCOPHO KNKN 十 4(3/4) (3amictb toro, 506 BmKHyBCd pyrnn
KoHTyp, yBIMKHeTbCra TpeTt).
BIMKHEHH TPKOHTYPHOI 3OHH HAPIBY
Uo6BnMKNHTTpETI KOHTYPHARpIY, TOPKHIbCE CENCOHOH KONKN BINbOpy DpyrOTo HPTBTOKOHTy (6), a NOTIM KONKN (34).
Tperti KOHTyp Ha iHdkaTopi yBIMKHeHH 30HN HarpiBy (17) 3HkHe.
NoBToPnBn ci dii ue pa3, BN 3MOKeTe BMKNyDpyrN KOHTyp 3OHN HarpBy. BiNIOBHN IHNkATOp (17) nepeCTane CBITNTNC.
ФункцИ STOP
3aB4nuiyHKuII npoec
PnPOrYBaHHc TcPABn MoXHa
TMUACOBnpuHnHTn. kAIO
AKTHBOAHOyHKUIO TaMHepa,BlDnik
acy TeK 6ye npunHeHo.
AknBauiqyKnul Stop
- Nocyd yctahOBneHo Ha 30Hn Harpby, HanyTobaiHa neBHH pIbebnotyKHOCTi.
- TopKhitcbc ceHcoOpHoi KhoNKn Stop (10). Ha HndkaTopax NotyXhOCT (16) 3aMictb 3adaHnpx pibHIB NOTyXhOCT no cep3'raBnTbcR nItePn S-T-O-P. HarpBaHHa 3OH HarpBy 6ye npnnHeHO.
BIMKHeHHa yHKuT Stop
1.TopKHTbCcHcoHoi Khoi StOp (10),a nOTIM 6yDb-IAKOIHHOI Khoi, Kpim Khoi BIMKHeHHA (2). PnroTouBaHH CTPAB 6yde npoIOBKeHo BiNObiHO Ha HanaIHTyBaHb (piBeHb NToxHocTi, Yac Do BIMKHeHHO3OH HarpBiY),3aHaHX DO TMMACOBOro pnpinHeHHPO6oTn BapInbHOI NOePchi.
DpyroCEHCOPHO KHONK CND TOPKHNYTNC NPOTROM MEHUE 10 cekyHa, iKaHsE cyHKU BUMKHeBc. KIko Naay3a 3aTnBcBc 6bIbe Hk Ha 10 XbINHH BApINbHa NOBExH BIMKHeBcR.
ФункцлпдтрmaHHa Temnepatypn
3aBraKuI ΦHKUIMoXHa NiDTPMByATn rapHmN npOyKn y nocdy,po3TaioBaHOMy Ha ODiHi 3 3OH Harp iy.
1.HaOdiH 30Harpiy 3haoDnIbCnocy,3aAHH neBHPiPbeHbNOTyKHooCTi.
2.TopKHTbCcHcOpH KOHNK (4) Ta yTPMaIte T, DOKn pIBeH b NOTyXHOCT He 3Hn3MbCd O LpOMIXHM pIEbH Mk Ctra?
ДЯ BIMKHEHHAHOIФYHKU3HOBY TOpKHTbC6eCECOPHOH KONKu「MlHYcO ④,06H aIHnKaTOPIOTNYXHOCTI 3'ABNCB O.TpBaJIaTbc BIMKOPCTAHH DAHOIФYHKU5 06MeKyTeCB120XBUNHAMN,NOTIM BAPINbNAOBEPXBAIMNKAEbC.
3axnche BiDknoyenH
KIOO ONDHY KINbKa 3OH Harpiy
NOMIKKOHe BMMKHeo, Ype3
NEBHN NpOMIXOK YAc yBaPnIbHa
NOBExH ABOTMauHo
BIKDIOUacTbcra (DVB TabNo1).
Tabnuc1
| Задан рльец notукноctal | Мakc. Триваclь poбOTи, XB. |
| 1 | 520 |
| 2 | 402 |
| 3 | 318 |
| 4 | 260 |
| 5 | 212 |
| 6 | 170 |
| 7 | 139 |
| 8 | 113 |
| 9 | 90 |
Ypa3i 3axnCHOro BIDKIOUHHe Ha IHINKATOpI nOtJXHOCTI 3'ABNHTcBc CMBOB O, RkIo TEMNEpATypa NOBepxH cKnA E63neuHO DnR KOPNCyBaA, a60 CMBOB H, RkIo IChYe He63neKa oniKy.
ДЯ NOBTOPHORY YBMKHHeHH NpHnAHy BIMKHTb HrO 3a DOnOMoHO CECHOPHOI KHONIK BIMKHeHH 12) Ta 3HOBY YBMKHtB.
ABTomatnHm po3irpiB Ha noaTk npuroTyBaHH
Dana yHKJn nonerUy nproTyBaHH
CTPAB, 3HMAOHN nOte6y y Bauiln
npCYTHoCTI nopy 3 BapuBHoIO
NoBepxHeHO H NaouATky npoccy
nproTByaHH. 3a DonomoroHO
ceHCOPHO naHeni YnpabINHH ObpaHa
30HA HarpBY HanaTuObyETcRa H
MAKCMAnbHNI pIBeH NOTyKctO, a
Yepe3 NeBHn Yac (DMB.Tabmio2)
PIeBH NOTyKctO 3MeHwSytCBO da
3aHaHO BAMH
Ta6n2
106 BmKHyTN CnHnBnHn TaHmep, DOCTaTHbO BNCTaBHTN Yac, 10 NiMaTaCz Do 3aKInHeHHr BiNiky, Ha 00. Pepe Zm Nn BnOp Taimepa TpeBa ONoHaCHO TopKHyTncs CeHCOPHX XhONK (13914).
ФункцИВиMHKeHнг3a TaIMepOM
BnKopnCTHn DaHOI FyHJI nOerUye
npocn prrnoTyBaHH CTPaB,3HIMAOuH
nTpe6y Baui npCytHoCTi DnB
BmHKHeHH BapnBbHO NOBEXHi.
3anporpamBoHa Ha BmKHeHH 3a
TaIMePOM 30Ha HarpBpy ABOTAMTHIO
BmKHeTBn NICr 3akIHHeHH 3aDaHORo
cAc.Ha BapmBbHI NobepxHc E HezAeXhN
npCTPOI KOthpNO 3a YacOM Dn KOKHOI
30Hn HarpBly. Ldo30BnB Bam y pa3i
ntpe6n ZanporpamByt HmBmKHeHH
3a TaIMepom BC 30Hn HarpBpy ODHsCHO.
YnpabHHaHOO yHKJIeIO 3JINCHOEbC3aDONOMOROCEHCOPHIX KHONK 36IbIbSeHHaMHeHHa3aDaHOrO 4y@ (13/ NOHAHEHX CUMBOHON TaHMePA (15).
IporpaMyBaHHBIMKHeHHa 3a TaHMePOM ODIcI 30HN HarpiBy
ДлпnporpaMyBaHЯ BIMKHeHHa 3a TaimePoM OdHiC 3OHN HarpIBy BHKOHaTe Taki II:
1.YbIMKHiB BapnIbHy NOBepXHIO Ta 3aJaIte 6aJaanPiBHe NOTyKHOCTi OHI HN KJIbKOM 3OHAM HarpIby.
2. OdnHOaCHO TOpKHITbCcHcOPHHX KhoNOK i (13/14), BINIOBIAOt b TaMepy.
3.Ha IHdkatop1 (11) 3acBITbcs 00. KOthponhnn HIN IHdkatop TaHmepa (19) 3a6nMae.
4. HATNCHTb Ha oBdBi ceHcOphi KHOIIN KJIbKa pa3iB,doN He 3aCtBIITcBa KOHTpOBHn IHMDKAtOP 30HN HArpiBy (12),Aky Bn 6baKae 3anPorgaMyBatn HA BMKHHeHHa 3a TaHmepom.
5.3a donomorio cehcoHHx KhoNOK TaHmepe ta+13/14 3ada Yac npiroTybaHHc TpaBn BiD 1do 99 XbNHIN. KaIO HATiCHyTHa CEHCOPHY KHOKNy (IIIOc) (14) HA IHdIKatopI 3'NBIAETbcI, 1, KIOo HATiCHyTHa CEHCOPHY KHOKNY MlHyc (15)-30.
3Ony Harpipy 3anporpamBoHa Ha BIMKHeHH. KOni BiNk Yacy CkiHNbTcB,30Ha Harpipy BIMKHeTcBa Ta npOlyHaHOb KInbKa 3ByKOBnX CINHANI, KI MOKHa PpINNHITn HATNCHyBm Ha 6ydb-ky CEHCOPHY KONIKY.
PporpamyBaHHB BMMKHeHH 3a TaHMePOM KInbKOx 30H HarpiBy
NoBToPiB OImCaHI BmIe II KInbKa pa3iB.
3MiHa 3aHaHoro 4acy
Ypasi noTpe6n 3aHaHn Yac MoXHa 3MIHN.
1.OHOnaCHO TOpKHIbCB CnHcOpHnx KHONoK ① (13/14), ⅢO BiNIOBlaIaOTb TaIIMeP.
2. HatncHtB Ha o6nbI ceHCocPi KhoNk KibKa p3iB, DOKI He 3aCBITbCJ KOHTpOJIbHn IHMNkATOp 30HN HarPiy (12), Aky Bn 3aIporpamyBn HBMKHeHHa 3a TaIMePOM.
4Jenep BN MOKeTe nepeBipNTn 3aDaHn Hac Ta 3MiHTN Horo. RaIO BN XOyete CKacyBaTn BMMKHeHHra TaMmEPOM Do 3aKiHHeHH 3aDaHOrO Yacy, BNCtABTe Yac Ha Da DonomorOEOceHCOPHO KHONIK (13).
PiMa'raTae, 100, Raio nid yac
poBOTn TaHMepe BN BHMKHeTe
ceHcOpy NaHEny ynPabIIHHa
KHONKO BHMKHeHH (E), BiDNIk
yAc y6ye cKaCBOHaO!
BnokyBaHHceHcOpHnx KHOK BapunbHo' nobepxHi
Ua donomorho cehcohpoi KhoNkIbKoYBaHHaMOxHa3abNOyBaTHbciehcophi KHOnkaHneni HynpaalHHaLe MoKe 3ano6iHT He6axaHOMyBuaiaDkoBOMy yBMKHeHHo pi3HnxpyHKui a60 yBMKHHeHHo BapNJbHOI NOBepxH iDtBM.
ДЯakTBAJIч BIMKHeHHФуHKIJI 6bOKyBaHn DOCTaTHb TOpKHTNcER cHcOpHO KHONI) Ta yTPMAtu II npToTAR mPb6m3H OeKHyDn. KOJI 6bOKyBaHn yBMKHeHcCBITNTBCa KONTpObln HIndkATop (9).
TamaTaIte,山,K山cceHCOPHa
naHebynpabinHHyBIMKHeHa,
CEHCOPHa KONkBA MmKHeHH H2
DOBnRE BmHKHTY II HABITb NID qac
di6NkOyBaHHa (KoN KOHtPOhNB
IHKnATOp 9CBITMbC).KOnB3HOB
yBMKHETe BapInbHy NoBepxHIO 3a
DONOMOFO CEHCOPHO KNIKI
DnA kTNBaJI CEHCOPOI NaHeni
ynpaBNIHRA TpeBa 6yde BmMKHTy
fHyKlIO 6NOKyBaHH NOBtPOHO
HaNTCHyBm HA ceHCOPHY KONkY 8
(7).
3axnCTBiddirei
DanaФyHKJPI np3HaueHa DnA 3an06irAHn BnnaKOBOMy yuMCHOMY yBIMKHeHHo BapInbHoI NOBEPXH DIbMn.
Функюлaxиу BiДдгси cnig akTbByBnI nCnIy yBMKHeHHH BapinbHoi nobepxHi.ДЯUboro notpIbHO BHKoHATn DII, noKa3aHI ha MaHONky A.Ipeu 3a BCE, TopKHITbcra ceHCOHoi KhoKNy yBMkHeHHH (KPOK 1).NotIM ODHoHACHO TopKHITbcra ceHCOHNX KHONK, nKa3aHNX Ha MaHONky (KPOK 2), a NicrN zuBOrO HaTHCHITb Ha KhoNKy 36InbueHHH notyKHOCTi (KPOK 3).BzAnExHOcti BiD TorO, CkiKnBIOH HarpBiy e Ha Bauii BapinbHII nobepxHi (4 Ym 5), ceHCOPI KhoKNu, Ha Rki cnId HaTHCKATn dng AkrTNBaII 3axNcTy BiD dTei, BiDiP3HrytBCR.
ManhoHok A:

Tnraaknai fyHKu3axHcyBiditre H aHdkatopaxnotyKHOCTI (16) 3ABNTBC CMMBOI L(Bd AHTNcBkoLO Locked,3a6bKnOBAHO),RMkBa3ye Ha Te,io NaHb ynpabHHra6bKnOBAHO.
EneKtpoHnHa naHEnb ynpabInHn 6yde 3aBnOKoBAHa, DOKN Bn He po3bNOkyTe II, HABITb RkUO BmMKHyT BApINbHy NOBEPXHIO cEHcPOHO KhoNko 1
3HTT6KOBaHHN DnKOPcTyBaHHBAPuHbHO NOBepxHeo
Rkuo Bx oxepe po3bokyBatn
naHenb ynpablnHH, 106 KOpNCTaTHcR
BapnIbHOIO NOBEXHcO, TOPKHTbcra
ceHCOPHO KHONK (1) DnA
akTNBaUII ceHCOPHO naHeni
ynpabnHH. BiPp3y nicr IBOrO
oHooacyo TopKHTbcra CeHCOPHX
KHONK i (3/4), nobTOPNB
kponi 1 2, nokaahi Ha ManIOHKY A.
CunBON LHa IHnKaTOpax 3HnKHe, naHEnJIIO ynpaBnIHnHO MoXHa KOpICrtyBaTHcRk 3aBKn. KOHN Bn BmKHeTe NaHEnb ynpaBnIHnHAHTCHyBnHa KHONKY BMKHeHHA (2)FHyNt3axiCTy BiD JTeH 3HOBy yBMKHETCB Ta 6yde AKTNBHNO nIq cAc HACTynHOrO YbIMKHeHHCeHCOPHO naHEni ynpaBnIHn.
BmKHeHHyHkuJ3axNcty Blditee
Функюхaxmcty BiD ditei cnid BIMNKATNIcNByBIMKHEHNNBAPBIHO NOBEPXHI.ДЯ bTOO notpioho BIKOHATNI DII, NOK3aHHI HAMIOHNKY B.Ipeu 3a BCE, TOpKHITbCnCEHCOPHO KHONIK YBMKHEHNN (kPOK 1).NtIM ONoCHAOH TOKPHTbCe CECHOPHN KHOKN. NOKa3aHHx Ha MAnIOHky (kPOK 2), a NICN LbOro HATNCHTb HA KNOKN 3MeHNeHHN NOTyKHOCTI (kPOK 3).B3anekHOCTI BID TORO, CkblKn 3OH HarpBly e Ha BAJIIN BAPINbHI nobEPXHi (4 n5), CEHCOPHI KHOKN, Ha Rki CNiD HATNCKaTI DNRA AKTNBAUJI 3axmcty BiD dITEH, BIPd3HRHOCTBcR.
Picra 2b0rKoHcnpy naHeB ynpabnHH6yde 3HOBy YBMKeHcO, BapnHbHO NOpeXHEO MOxHa 6yde KOpCTyBaTHc. y pasi nepe6oIB y noaHI enEeepheepri nqacpobotn FHykui 3axcyT BID DITeN 6NOyBAHH 3HMAeTbc.
ManhoHok B:
Ipehanpyra BeneKtpomepexi
Kcso ceHocpa cHcTeMa ynpabnHna 3hXoDnTbcn pHanyroHO,ka nepeBnUy e HopMy, ane 3hXoDnTbcn y Mekx KOnBaHb, npNpyCTmMx B enEklpOmePexax, 30Hn HarpiBy BMnKaOToBc Ta NyHaC doBn n nepeBnUchtn 3byKOBn CnHn. Ha iHdkatopax 30H harpiBy bnnmae take NOBIDOMNeHHA:
400
Nicra BIDHOBENH HOPMaIbHOI Hanpyr 3BYKOBNI CNHAN BMNKaEcTcB, NOBIOMNEHH Ha IHINKaTOAPX 3HNKAE,ane 30HN HArp iy 3AnuAHTCBMKNKHeHMn (RkUO nepeD noATKOM CTp6K a HApnyr BOH npauoBALn,Ha IHINKaTOAPx CBITNTmETcB CMBOON 3AnuKOBORo Tenna H. BapinbHOIO NOBExHEO MOXHA KOPCTyBATNCIK 3ABXKn
CeHcOpHa naHeIb ynpabIIHHa
po3n13ae Taki cTp6Kn Hanyrnn
3aBxJn, KOJI BapINbIy NOBepXHO
niKIOUeHO de OeNEKtpOMepexi,
HABITb JkIO B DaHN MOMENT BOHA
He BUKOPCTOBYcTBc, TOMY
OncacHN Bnse aBapInH CNHAN
MOKe AKTNByBaTHc, HABITb KON
ceHCOpHa naHeIb BmKHeHO.
HaTTO BnCoka nepeHanyra MoKe np3BcTn Do NtKOdkHeHH CnCTEMn ynpabInHH (KJte TpAnrIbTa 36yDkRKMn enEeKTPoPnPaJamn).
TopaIuOIO npabNbHoro BIKOPNCTaHHKCKNOkepaMCHNXBapuNBHX NOBepXOHb
BukopncTOByTe Nocy 3 TOBCTUM i a6conIOTHO INOCKM HOM.
*HepeKMOHMeHyDcB BIKOPMCTOByBaTHNOCyD3JiAmETpOM,MeHHUIM3aMANIOHK,HAHECEHNI HA3OHYARHPYb.
*He nepecyBaIre nocyD no nobepxhi cna, Bn MOKe NOdpNAtn CNOkepaMiy.
UA
XOaBCKNo BnTPMmY ydpam BemnHx kactpnBy 6e3 roctpnx kpia8, HAMaraiTeec yhnKATI X.
A 3a06iHaHH NoKoKeHHCKIOEPAHHOI NOBExH HAMARAECHNepeCyBaTHocyD no Ckny Ta cnkiKyHe, uOb Dnoocdy BnyHMCTHM Ta HeuUKoDKeHM.
YHnKaIte NotpanHnHa Na CKnO Ukypy Nn npdykTIB, Rki MCTb Lykop, 60 BOHN MoKyTb 3peayBAtn 3 raprHM CKNOM Ta NOUKOJNTN HOro NoBepxHIO.
OuHHeHH Ta DOrJIA
ДлгTORO,UZ6уTpyMByHnBapmblHy NobepxHnyOyDobOpmyCTaHI,Uzpa3yNcIa II BkOpriTaHHN OUYuMaJIe TlPnAaTHMM ДлгсьОroMHOnMIM3ACoGAMn Ta pnpCTocyBaHHMn,3aYeKaBbU,DOKI BOHa OXIOHe.ТakmYuHOMBUnHnHete HakOnuHEnHb 6pydy NOnuEHnH NotpeByaTnIMMe HeMHe 3cYnbl.HKONHJHe BhKOpriCTOByIte arpeCmHbMIOnU3ac6b Ab0 3ac6b,LIO MOnKBytNoNtKpRaBAtn CKIo.Tak camO He MoHHa 3actocobyBatn napoB npinadn DnI YUHeHN
JIeni 3a6pydHHe, UO He npMnIMIN do NOBEXHI CKNa, MOXHa BIDANNTN BOIOTHO RAHHPKHO 3a DIOLOMORO MKORO MNOHO 3a060y H N TEOH IOBD 3 MIMO. OHNAD DnA CTIKKx PIIAM YIN PHORO 3a6pydHHeHH CnD IN BOKOPCTOBYBATN CneJIbA HMI NKHIV 3aCf DNN MHTTCKLOKepAMIK, DOpTMMyOHmB IHCTpykU BIVo6hKA. 3a6pydHHeHH, UO ZaneKIMHC Ha NOBEXHI CKNa, MOXHa BIDANNTN 3a DIOIMOHO UKpe6Ka 3 NE3OM.
Painyhi nIyMN BIKNIAe pnpCytHicb 3aunikBx np Hn ocydu a60 notpanJHHx npMix KcNOM Ta nocydom Npac npOTyBAHCTpaB. Ix MoKHa BNdAInT 3 nobepxHi cKa 3a donomoro HikeNeBO MOAnK 3 BOIO 60 cneJIaBHorO 3aco8y Dnra OuchuHEnr CkNoekamKi. PnactKoBI npedMeTH, yKOp a60 npOdyKTH 3 BnCOKM BMICTOM yKpy, Rki poNNabINsCA HA BapNblN nobepxHI, TpeBa HeraiNo BuaIANT 3a donomoro Wkpe6ka, dok BoH reparl.
IpeenBm MetaneBoro KOJIbOpy 3JBNIOBcB BID TepT MtneBoro nocdy ob nobepxHcKn. Ix MoKHa BNADnHn TLXnOM petEnbHO rueHHn CneuaIbnHM 3acobm dna CNKOpEApKi, XOa MoKInBO, IIO cIO np onepaio Tpe6a 6ynde NOBtOpIN KlnBa paiaB.
ybaral
BnKOpncObuyte uKpe6ok dIa
ckna nyxe obepeXno. Horo roctpnm ne30M MoKHNA npaHNTnca!
AkiH BHKOPCTOBYBATN
Ukpe6ok HaneXHM YHOM,Ne3O MOKe
3NAMACnT yyamKMOxytb
NotpanNT M6K 60KOBO pAMKO TO
ckOM. AaTOe TpAnITbc, He
HaMaraiTeC BnLYuHTy yAmKn
pykAM -CKOPCTaTEc nIHcETOM a60
HOxEM 3TOHHM KINcE (DM, Man.3).
CniKyIe, 6o6 cKIOKePamHoi NOBepXHI TopKaIOcTINbIKn Iezo,Ta YHKaIIe KOnTA KOpCy uKpe6ka 3I CkIOM, OckIbKn BIH MoKe NOKOJITN cKIOKePAMiKy.
BnKOpNCTOByTe HOBi, HeNoxKoDKeH Ie3a Ta HeraHOb 3M1HIOHTe Ne3a, KOIN BOHN 3HOsyIOTbcR.
MaI.4 BnKOpNCTaHHs uKpe6ka
Nicn 3aKINHnB NKOpNCtAnHH Wkpe6ka CKnadItbNeo Ta 3abNokyTe Noro (DVB.MAN.4).
A RIO MIX DHM NOCyTa CkNOM 10ocb po3nnabnOcna, nocyd MoKe PnCTATn Do cKa. He HAMaRaiTeCn BIDINTHNocyd, KOJI Bn BIX OXONHe! BN MOKete po3BNT knOKepamiky.
He ctabaIte Ha ckno Ta He cnupaiTecHa HbOrO.BoHO moKe 0p3nHcTa Tn npoAHHTn Bac.He BHKOPHCOTByTe Ckno kNlctabKy dny Po3MIeHNB CTOpOHIN PnpDMETiB.
Komnai TEKA INDUSTRIAL S.A.
Maé npabO BVOCHTY NociBHKN 3
BVKOPaCTHAN6yDb-RAI Heo6XiHNI CH
KOpCNI nonpABKN, 3aIIuHaQOn Y 6e3
3MlHIX OCHOBHI XapAKTePcHNTKN.
Ihopmaucipno oxopohbKnHbOre cepedouna
Cnmbon Hanecehen Ha npnaad Hnoro ynakobky, BkaycHa Te, 0o Ioro He Moxhna nepepo6nraTn Ra 3BnuahNIH nobytobi BiXoDn. DAnm npnndeNo6x1dNO 3aTn Do nyHKy T6bpy eNeKTPnuHHx Ta eNcKpOHHx npnabID nro nOdaBtuoi ytnni3auu. Np6abwn npTo te, 06 npnnd 6yTo ytnl3oBAHO haneXHM YNHOM, BN Donomoxete yHNKYTH HeratNBHorO BnBHy BA HABKOINHC cepEOBNIe Ta dApOpB'IIOei, RIKM MOxE Matn MUCe npn HenpaBunbHn ytni3auu npnady. Dn8 OTPMaHNN 6IbU detanBHO IHpopMaJI npo ytni3auio DaHOR npnpnda 3rJrkbcra 3 BaWIO MICeBOIO aDMHCTpaueco, cnykboIO 36bpTa nepeo6kn no6yTOBNX bIXxodib abo 3 Mara3HOM, DE Bn npndBaui uei npnnd.
MaTepiAnu, BnKOpHcTani dna yNakOBKn npnady, e ekONorHHmTa nIiIraOtB TOpNHn nepeo6ci. Npactmacoi enemeHTyNakOBKn Mapkobani abpebiatypamn PE,>LD, >EPSIT.HYaNkoBOnH MaTepiAn MoxHa BnKHyTu BiDnOBiDNH KOnTeHep Dn 360py No6yToBnx BiXoDIB.
YcyhenHHeNoJaO
Pepn HIX 3BepHyTcN Do cepBiCHoro
ueHtpy, DnIepeBpKn BkoKaHaiTe
BkAaHI HIXKHe QII.
BapInbHa NoBepxHne npaucoc: IpeBipTe, Yn KaebI npKnUeHmDo pOsetKn.
Iocyd npctae do cka:
KiIIO MIX NocyDOM Ta CKNOM E KIINCb pOHTNABENH MATEpIaY, YBIIMKHTb 3OHy HArPbYHa MaKcIMaNbHy NTOpYHKHCTb I cNoBpEy BIDinNTn IHO.
NoblOMnEHH U400 I 3byKOBH CINHAN:
Ipehenanpyra B eIeKtPomepexi. 3BepHIbCdo eIeKtPonocTaaJIbHOI KOMaHII.
JyHae TpBnBnn 3ByKOBn CnRHan, naHenb ynpaBnHH BMMKaCTbCnHa IHNkATOpax 3'ABnBtCB CNBMON Ha CeHcOpHi naHeni ynpaBnHH 3hAxOndCbAeknB ppeMet abo piDnHa. PnpBejt CtoPOnH-npeMet cnPiHy 3 naHeni ynpaBnHH.
Oda 3 0h haripy BWMnKaTbC, Ha ii iHnkaTopoI 3'8nBtcbNobIDmNEHNA E2:
Kaio nd pnpotryBaHH cTpaB eneKTPOnHc cnTeMa ynpabInHnnerpepriaeTaBcH, Hn5bNchi do NaenHynpapinHH 30HN HarpBy MoKyb BmKNHTnc, 0o6 yhnKHTn nowkoJxehnHcCTemn. Pno6nemn pepehBaHH nDac nproTByaHH cTpaB BnHKAOHbMuey BnNAkax HaTOI TEHCbHORO BnKOpNCtAHn BapInbHOI nobepxHi (dyke TprBaNoRarhpBaHH aHa KcimmaIbHMObPi bHI noTyXhoct). JaIO ce CTanocA, daJIte BapInbHI nobepxHi oxONohytn npotaROM kINbKOx XBINHJ. KaIO np6nema He 3NKJIa, nepeBipTe, cy BapInbHy nobepxHIO yctahOBNeHO 3rIdHO 3 hCTpyKziam DaHOro nociBHka.
UA
AR
4.4.15
1 1 1 1 1 1 1 1 1 1 1 1 1 1 1 1 1 1 1 1 1 1 1 1 1 1 1 1 1 1 1 1 1 1 1 1 1 1 1 1 1 1 1
i 1
a a a a a a a a a a a a a a a a a a a a a a a a a a a a a a a a a a a a a a a a a a a a a a a a a a a a a a a a aaa
1
1 1
Caiyia zao jie chuan li Caiyia bai
aillg pl
chuliy
A
gaiy jaiy jaiy jaiy jaiy jaiy jaiy jaiy jaiy jaiy jaiy jaiy jaiy jaiy jaiy jaiy jaiy jaiy jaiy jaiy jaiy jaiy jaiy jaiy jaiy jaiy jaiy jaiy jaiy jaiy jaiy jaiy jaiy jaiy jaliy jaliy jaliy jaliy jaliy jaliy jaliy jaliy jaliy jaliy jaliy jaliy jaliy jaliy jaliy jaliy jaliy
1
Jnnn nnnn nn nnnn nn nnnn nn nnnn nn nnnn nn nnnn nn nnnn nn nnnn nn nnnn nn nnnn nn nnnn nn nnnn nn nnnn nn nnnn nn nnnn nn nnnn nn nnnn nn nnnn nn nnnn nn nnnn nn nnnn nn nnnn nn nnnn nn nnnn nn nnnn nn nnnn
10
11
12
13
14
15
16
17
18
19
20
Kai jaii jaii ayaiy aiai iai
aayy y
· = 0
y
jaiy jaii aiaa 8 y 8
Cuaa
(1)
117 1
S-T-O-P
#
(1)
jie le jol jai jg jde bial
1
a 1
yll 1j jannnll (22)
y1
501y pJ 1
y
IMO2019 x^3y^3( mod P^2)
e 11
aillall gale biall lay aol o
sui jie jai jai jie oie 1
j 1
aai
Hjll jil jy
i 1
y 1
()
心山
y 1
a
H 3a j11j111111111111111
y g y
aaii iiaaiy yj jaiy
1
4
jie biyilai jai jai
()
(17)
yH j
a2011 1
Jaaai aaiiaai
aee aee eae ee eae
1
a
0+J 1
(1V) jai 0jia jao jao jao (2/4)
A
j()
j0j(t/)-
aill (1V)
4.1.1
Jaaal jai 1
(1)aaii jai jaa
(1/4)+
y
(IV)
j
Jia 1 (1) jaiill juaa jao yu
sill jyj y
y
yjyjy jyjy jyjy
j 1
S AOB = S AOB + S_ OBC
y 1
Saa
J 1
()0
(1)
Jalil 1ydydy(y)0
(20
gabal
y
10(17)
0 10
1
Saa
j(r/)+,-
mssll jda jia jil 5
1.555555555555555555555555555555555555555555555555555555555555555
(V)
j 1
(t)-
1.2
0 1
()
suiuie juii jiu
jpalal jle baiaiy Cuyai Jia
(/t)+
aaii
al al
jssg j()
0
y
hail 5 jai jia jia jia jia jia jia jia jia jia jia jia jia jia jia jia jia jia jia jia jia jia jia jia jia jia jia jia jia jia jia jia jia jia jia jia jia jia jia
(/)+
AR
Jg
1 1
Jusy jw.()- yssll Jyj w
cijai jie
y 1
Aii 1
Cuiy jiu yu yu yu yu yu yu yu yu yu yu yu yu yu yu yu yu yu yu yu yu yu yu yu yu yu yu yu yu yu yu yu yu yu
y(1)a#y y
Jus 1 Jus 1 Jus 1 Jus 1 Jus 1 Jus 1 Jus 1 Jus 1 Jus 1 Jus 1 Jus 1 Jus 1 Jus 1 Jus 1 Jus 1 Jus 1 Jus 1 Jus 1 Jus 1 Jus 1 Jus 1 Jus 1 Jus 1 Jus 1 Jus 1 Jus 1
jll jie jie
e 1000000000000000000000000000000000000000000000000000000000000000000000
joln joln joln joln joln joln joln joln joln joln joln joln joln joln joln joln joln joln joln joln joln joln joln joln joln joln joln joln joln joln joln joln joln joln j
yauu Juyu buaaui yuu uaiui oui 1 juiui iuiui uuiui uui (V) uuiui uuiu uui uui
gall gali jai jai jai jai 1
Cg i kady (y) 0 kady jay
s. (jai y jai jai jai) aai aan ayae
(1) 0 jay jay jay jay jay
Jad y, dy jay gali Jai Jai Jai
(2) 0 jay jay jay jay
J
J 1
e jll Jn Jy Jy Jy Jn Jy Jn Jn Jn Jn Jn Jn Jn Jn Jn Jn Jn Jn Jn Jn Jn Jn Jn Jn Jn Jn Jn Jn Jn Jn Jn Jn Jn Jn Jn Jn Jn Jn Jn Jn Jn Jn Jn Jn Jn Jn Jn Jn Jn Jn Jn Jn Jn Jn Jn Jn J n Jn Jn Jn Jn Jn Jn Jn Jn Jn Jn Jn Jn
A
1
y 1
a 1 a 1 a 1 a 1 a 1 a 1 a 1 a
(1/1)+
124 00 124 (11) 124 124 124
j 1
10
aaiy ay kay jll aag cay bao ay jauuuy gauell aol agal y gauy ay jauy qe daanlly klaay say ci jauy
201
gai laqiaol all jaiil scl
Jauahali cajll jai
AaJy JyJyCg yCg
+1
aie jia 1y jn aaii jepal o bae i
Jia jia jia jiang jao jie jia liang jian jian jian jian jian jian jian jian jian jian jian jian jian jian jian jian jian jian jian jian jian jian jian jian jian jian jian jian jian jian jian jian jian jian jian jian jian jian jian jian jian jian jian jian jian jian jian jian jian jian j
A 1
e 100000000000000000000000000000000000000000000
AR
1 1
1 1 1 1 1 1 1 1 1 1 1 1 1 1 1 1 1 1 1 1 1 1 1 1 1 1 1 1 1 1 1 1 1 1
A
1
yabaaal 151 jnnaa n agly
J 1
A
Jzj 1y jn 11 11 11 11 11 11
jill qal jbi jull jll gaii
A
2.2.11g
Ae aee eae ae eae eae eae eae eae eae eae eae eae eae eae eae eae eae eae eae eae eae eae eae eae eae eae eae eae eae eae eae eae eae eae eae eae eae eae eae eae eae eae eae eae eae eae eae eae eae eae eae eae eae eee
"for further information and updated contact addresses, please refer to the corporate website"