PhotoFan - Digital photo frame INTENSO - Free user manual and instructions
Find the device manual for free PhotoFan INTENSO in PDF.
| Product type | Digital photo frame |
| Brand | Intenso |
| Model | PhotoFan |
| Screen size | 6 inches (15.24 cm diagonal) |
| Screen resolution | 800 x 480 pixels |
| Display format | 16:9 |
| Dimensions | 170 x 113 x 22 mm |
| Weight | Approximately 180 g |
| Power supply | AC adapter 100-240 V AC, 50/60 Hz; output 5 V, 1 A DC |
| Backup battery | CR2032 Lithium 3 V button cell (for clock/calendar) |
| Supported image formats | JPEG (up to 7000 x 7000 pixels) |
| Supported memory cards | SD/SDHC, MMC |
| USB port | USB Host 2.0 (compatible with USB flash drives, max 100 mA) |
| Main functions | Slideshow, photo display, clock (digital/analog), calendar, custom settings (transition effect, duration, brightness, on/off timer) |
| Available languages | Multilingual (configuration menu) |
| Operating temperature | 0 °C to +40 °C |
| Maintenance and cleaning | Clean with a soft, lint-free cloth, without chemicals; do not use liquids directly on the screen |
| Safety | Do not open the casing; avoid water, humidity, heat sources; do not force the card in |
| Spare parts and repairability | Backup battery replaceable by user (CR2032); for any other repairs, contact customer service |
| Included accessories | Stand, AC adapter, multilingual user manual |
| Warranty | Legal warranty on material and manufacturing defects; keep your receipt |
Frequently Asked Questions - PhotoFan INTENSO
User questions about PhotoFan INTENSO
0 question about this device. Answer the ones you know or ask your own.
Ask a new question about this device
Download the instructions for your Digital photo frame in PDF format for free! Find your manual PhotoFan - INTENSO and take your electronic device back in hand. On this page are published all the documents necessary for the use of your device. PhotoFan by INTENSO.
USER MANUAL PhotoFan INTENSO
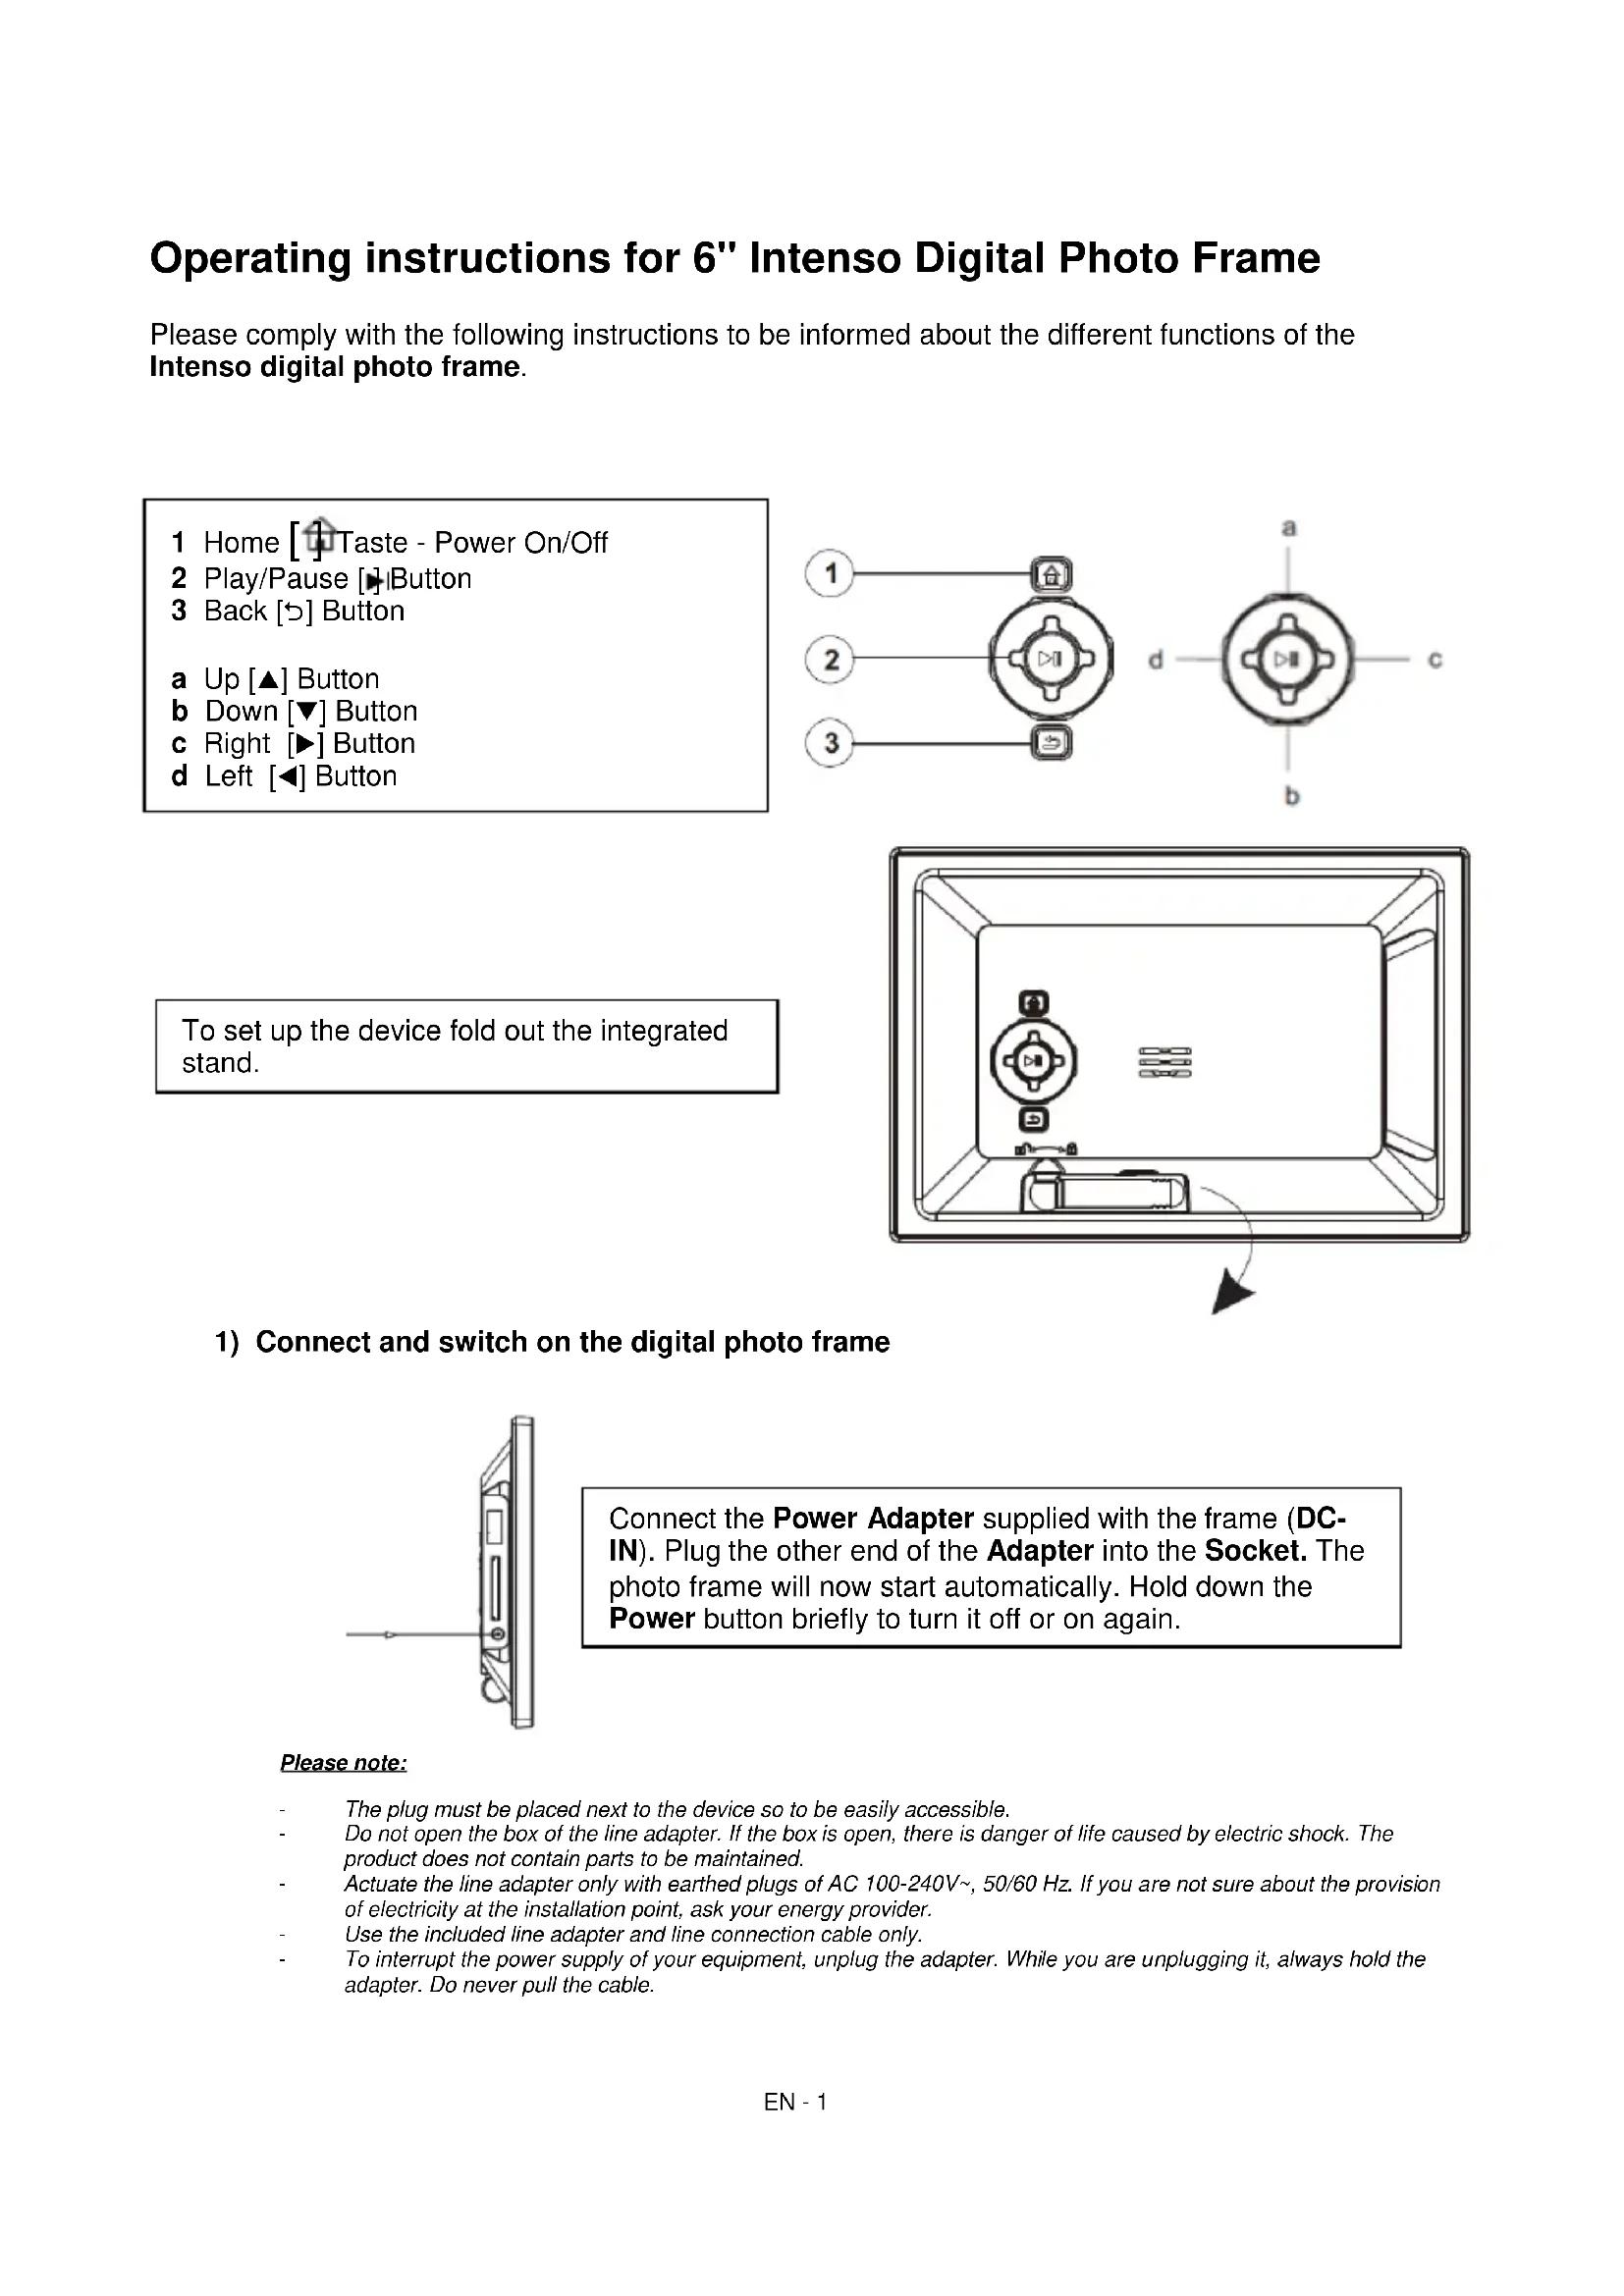
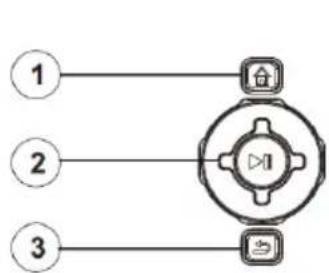
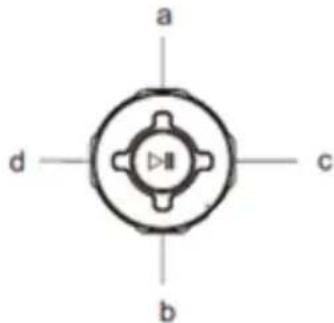
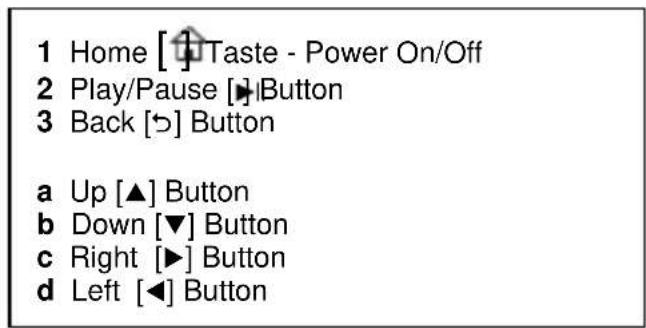
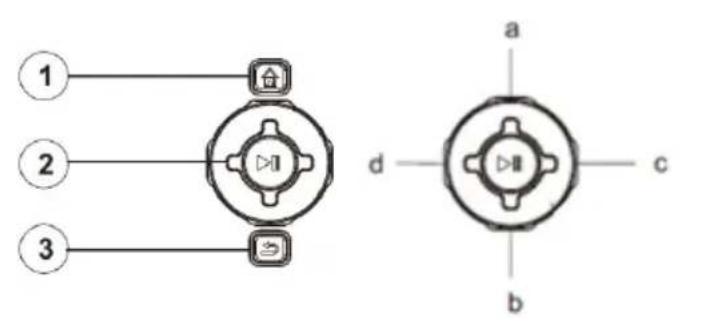
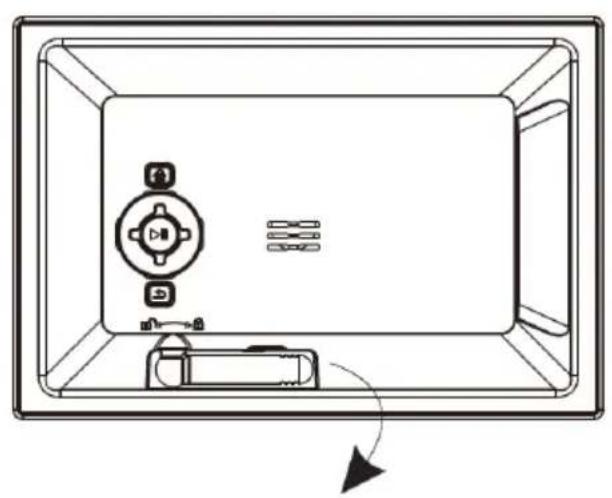
1 Home [Taste - Power An/Aus
2 Play/Pause IITaste
3 Zurück [D] Taste
a Aufwärts [▲] Taste
b Abwarts [▼] Taste
c Rechts [▶] Taste
d Links [Taste
- Secure Digital Card (SD™)
- Secure Digital High Capacity (SDHC™)
- Multimedia Card (MMC™)
Operating instructions for 6" Intenso Digital Photo Frame
Please comply with the following instructions to be informed about the different functions of the Intenso digital photo frame.
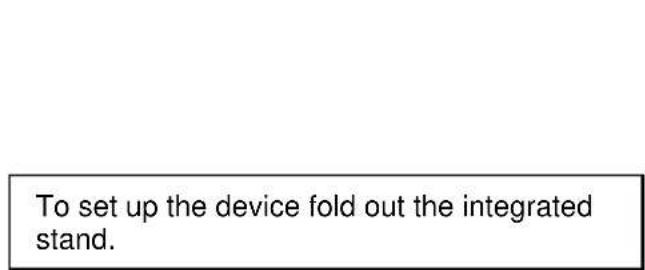
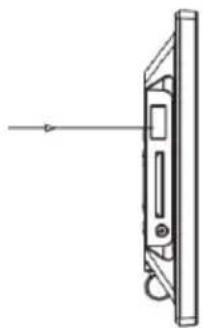
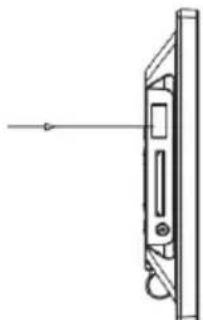
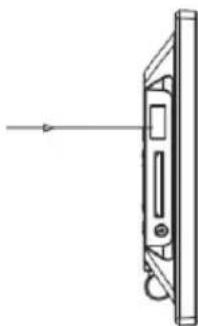
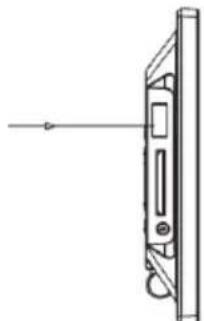
1) Connect and switch on the digital photo frame
Connect the Power Adapter supplied with the frame (DCIN). Plug the other end of the Adapter into the Socket. The photo frame will now start automatically. Hold down the Power button briefly to turn it off or on again.
Please note:
The plug must be placed next to the device so to be easily accessible.
Do not open the box of the line adapter. If the box is open, there is danger of life caused by electric shock. The product does not contain parts to be maintained.
Actuate the line adapter only with earthed plugs of AC 100-240V\~, 50 / 60Hz . If you are not sure about the provision of electricity at the installation point, ask your energy provider.
Use the included line adapter and line connection cable only.
To interrupt the power supply of your equipment, unplug the adapter. While you are unplugging it, always hold the adapter. Do never pull the cable.
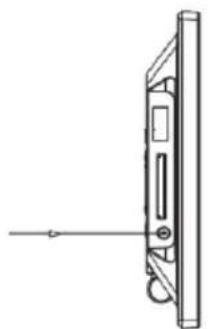
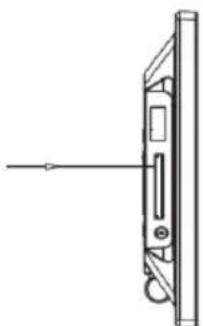
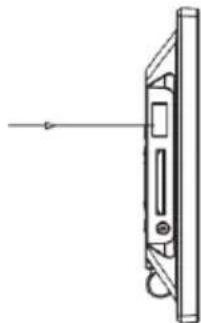
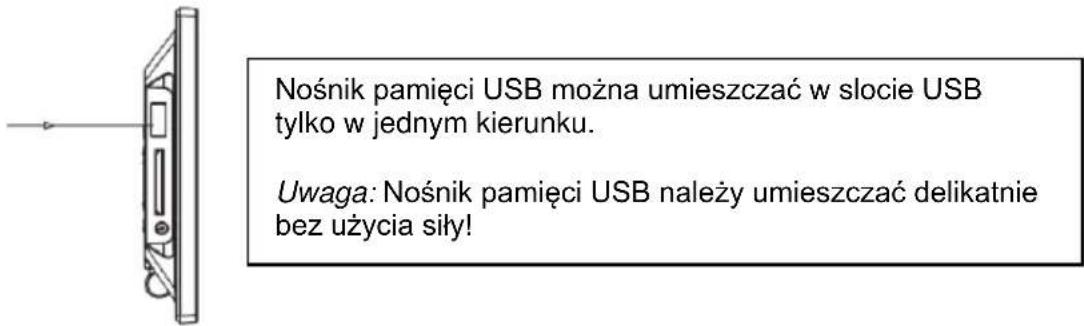
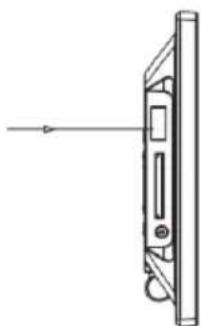
2) Insert memory cards | connect USB data carriers
Insert the Memory Card with the Logo towards the Display into the card reader slot.
Please note: Never insert cards by use of force!
The following memory card formats can be used with your digital photo frame:
- Secure Digital Card (SD™)
- Secure Digital High Capacity (SDHC™)
- Multimedia Card (MMC™)
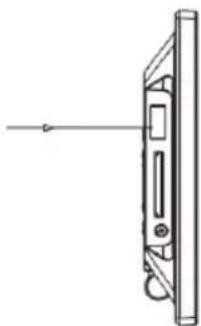
USB data carriers can only be plugged into the USB slot in one direction.
Please note: Never insert USB data carriers by use of force!
Note: The digital photo frame is exclusively designed for the use with compatible memory cards and 2.0 data media (100 mA).
3) General operation
a) Main menu
When you turn on the digital picture frame, it will automatically begin to display a slide show. If you have a storage medium with own photos inserted, those will be shown. Alternatively, the device will show the 4 preinstalled photos.
Press the Home [ ] button to open the main menu.
In the main menu, you can choose different functions of the Digital Picture Frame and of the Setup menu. Press the , button to select a menu option. By pressing the , buttons you can navigate through the respective submenus. Confirm your selection by pressing the Play/Pause [按钮.
b) Viewing photos
From the main menu navigate to the photo function and confirm your selection by pressing the Play/Pause [▶] button. Now the connected storage mediums are shown. Depending on which medium is connected, you can choose between a memory card and an USB flash drive. Confirm your selection by pressing the Play/Pause [▶] button. The image preview menu will now open and display all supported images saved on the storage medium. Navigate to a photo and confirm your selection by pressing the Play/Pause [▶] button to start the slide show from this position on.
Options during slide show:
- By pressing the arrow buttons to the left or to the right you can skip a photo forward or backwards.
- By pressing the Play/Pause [▶] button you stop the slide show. By pressing it again the slide show continues.
c) Hour and calendar
In the hour mode a digital clock, an analogue clock or an analogue clock with calendar sheet is shown. By pressing the Play/Pause [▶] button you change the display. By pressing the , buttons you can navigate through the monthly overview.
d) Changing the settings
From the main menu select the option Setup. With the , buttons navigate to your desired menu option. You can chose of language, photo, hour, factory setting and brightness. By pressing the Play/Pause [▶] button or , , , buttons you can modify the settings according to menu option or open a submenu.
| Setting possibilities | Description |
| Language | Select your desired language. |
| Photo | Select: - the desired transition effect, - the image display duration, - the desired display ratio and - the display sequence (order of storage or random). |
| Time | Adjust: - the current date, - the hour display mode (12/24 hours), - the current hour - the hour display (digital, analogue, analogue with calendar), - the hour fine adjustment and - automatic On and Off timer. |
| Default Settings | Reset the device to its factory setting. |
| Brightness | Adjust the brightness of the display. |
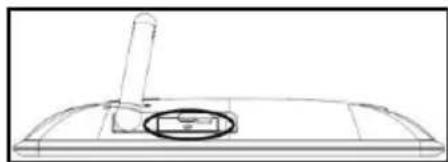
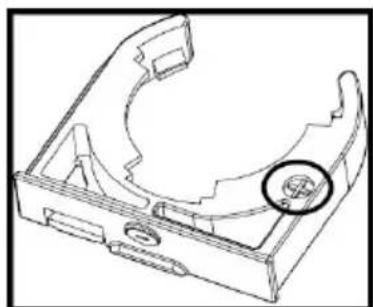
4) Back-Up Battery
a) Function
The back-up battery makes sure that the time and data settings are maintained if the device is disconnected from the electrical power supply.
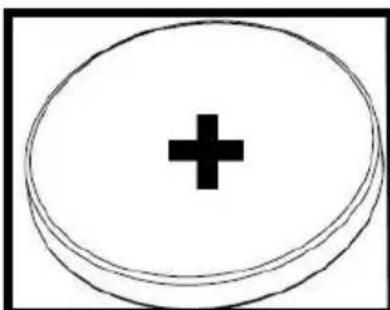
b) Type
It is a coin cell of the type CR2032 lithium of 3V.
c) Battery Change
You can change the battery by your own in a simple way. Please proceed as follows:
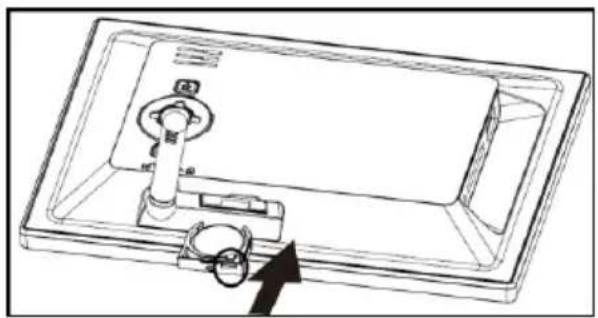
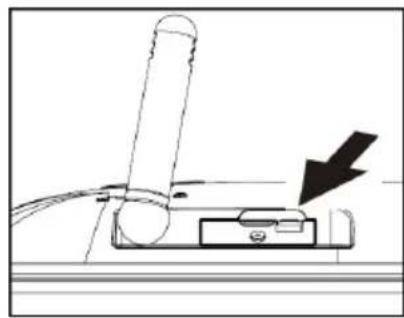
Behind the stand support there is the battery case. Please swivel out the stand support. Now press the locking device of the battery tray slightly downwards and extract it attentively from the device.
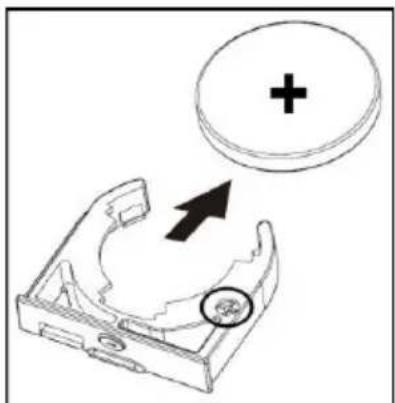
- As next extract the coin cell simply ahead from the support.
- Now insert the new coin cell of the type described above.
Please pay ABSOLUTELY attention that the poles of the coin cell (+) and (-) correspond with the designation on the battery support. The wrong insertion can cause short-circuit and damage the device.
On the battery tray there is a (+) symbol. You have to insert the coin cell so that the plus pole of the coin cell and the (+) symbol of the battery tray are on the same side.
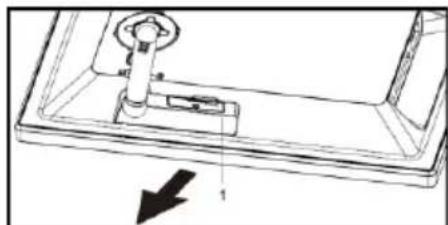
- Now shift the battery tray with the newly inserted coin cell back into the device case.
Please pay ABSOLUTELY attention to insert the battery tray correctly. The wrong insertion can cause short-circuit and damage the device.
If the device with the display is positioned downwards in front of you, the locking device of the battery tray must be on the right side and the plus pole of the coin cell on the under part while you are inserting the battery tray.
5) Product Specifications
| Display | Digital TFT LCD Display size: 6 inch (15,24 cm diagonal viewable image) Display modus: 16:9 Resolution: 800*480 pixels |
| Power supply | Input: 100~240V AC, 50/60Hz Output: 5V 1A DC |
| USB port | USB Host 2.0 (High Speed) Supports USB storage mediums |
| Memory cards supported | SD/SDHC™ (Secure Digital Card), MMC™ (Multi Media Card) |
| Picture size supported | JPEG, max. resolution: 7000*7000 pixels |
| Operating temperature | 0°C ~ +40°C |
| Dimensions | 170*113*22 mm |
| Weight | ~180 gr. |
| Accessory | Foot, Power supply, multi-lingual operating instruction |
You need help? Simply call our Technical Service Hotline at: +49 (0) 900 1 50 40 30 for 0.39 €/Min. with calls from the German telephone network. Different rates may apply to calls from mobile phones.
Enjoy Intenso's digital photo frame!
Service and Maintenance
Care
- In order to prevent danger from electric current do neither remove screws nor the case of the weather station.
- Do not operate this device near water. Do not expose the device to rain and moisture. Do not put any objects which store water or other fluids near the device.
- Do not install the picture near heaters, ovens or other heat issuing devices.
- Do not open the case. Do not try to repair the device yourself but have it repaired by qualified personnel only.
- Avoid using the device on sandy areas.
- Fully insert the power supply plug into the opening of the Intenso weather station. This will prevent electrostatic charge.
- Correctly and safely connect all ports.
- Do not push onto the display. Protect the display from direct sunlight.
- The picture frame only plays compatible data formats.
- Images may be protected by the rights of third persons. The play back without licence may infringe copyrights.
- When in operation, do not touch the Intenso weather station with metal objects.
- Avoid operating the device on pillows, sofas or other objects which support the development of heat as there is danger of overheating of the device.
- Do not remove memory cards during read operation. This may cause system crash or data loss.
- Do not switch off the device during an ongoing slide show.
- Do not wrap up the device directly after longer use. Ensure sufficient enough cooling. Otherwise, there is danger of overheating.
- In order to ensure a better service, changes of the operating instructions may be necessary.
Maintenance of the device
The device must be switched off.
Never spray or apply a fluid directly onto the display or case.
Cleaning the displays / case / frame
Carefully wipe the case, frame and LCD display with a soft cloth free from lint and chemicals. Only use cleaning agents which are specifically designed for LCD displays.
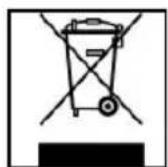
Disposal of electrical waste
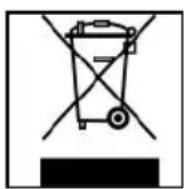
Devices marked with this symbol are subject to the EG Directive 2002/96/EG.
All electrical appliances and old appliances must be disposed off separately from the household waste and are to be returned to the state authorities designed for that purpose.
By correctly disposing of electrical old appliances environmental damage may be prevented.
(Intenso)
49377 Vechta
Germany
www.intenso.de
CE

(Intenso) Warranty conditions

Dear Intenso customer,
Thank you for opting for a high-quality Intenso product. All Intenso products are subject to constant quality inspections and the legal warranty period applies, of course, from the date of purchase. Please be sure therefore to save the sales receipt as proof of purchase.
Warranty conditions
The warranty only covers material and production defects. Intenso GmbH is not liable for the loss of data in units sent to us. The free of charge warranty service covers the repair or replacement of defective parts. Please understand that we cannot render any warranty services, e.g. in case of:
- Misuse or improper handling, installation or use
- Damages, scratches or wear
- Modifications, manipulation or repairs by third parties
- Damages through force majeure or transport
Your Intenso GmbH
CLAIM PROCEDURE
In case of a claim, please proceed as follows:
- Only returns accompanied with all accessories and sales receipt are accepted.
- In addition, a RMA number is absolutely required for return shipments. You can request this RMA number via e-mail or through the service hotline.
- Please package the product including all accessories and the sales receipt safe for transport. Please stamp the package.
- Please affix the RMA number clearly visible on the outside of the package.
Please send to the following service address:
INTENSO GMBH
Service Hotline: +49 (0) 900 - 150 40 30
Service Center (your RMA-No.)
(0.39 €/min. from the landline in Germany. Usual costs apply.)
- Secure Digital Card (SD™)
- Secure Digital High Capacity (SDHC™)
- Multimedia Card (MMC™)
1 Home [Power On/Off
2 Touche Play/Pause
3 Touche Stop [b]
- Secure Digital Card (SD™)
- Secure Digital High Capacity (SDHC™)
- Multimedia Card (MMC™)
Service Center (Votre referrerce RMA)
Service Hotline: +49 (0) 900-1504030
- Secure Digital Card (SD™)
- Secure Digital High Capacity (SDHC™)
- Multimedia Card (MMC™)
- Secure Digital Card (SD™)
- Secure Digital High Capacity (SDHC™)
- Multimedia Card (MMC™)
Service Center (Seu N° ADM)
- Secure Digital Card (SD™)
- Secure Digital High Capacity (SDHC™)
Multimedia Card (MMC™)
- Secure Digital Card (SD™)
- Secure Digital High Capacity (SDHC™)
Multimedia Card (MMC™)
HocnteIb namrtn USB moKet BCTaBJIaTbcraB rHe3do USB ToIbKO OndHom HanpaBneHn.
BHumaHue: He npimehyTe cnny npn BCTabHeHH HocHTeJnaMTu USB!
BHumue: Lucpoea omopamka npedycmpeHa molko dna uonb3oeaHc coemecmumbmu Kapmau naamu u Hocumenmu nammu USB 2 (100MA).
3) O6üee ynpaBneHne
a) TnaBHOe MeHIO
Pn BkIIOueHn cnpoBOn foTOpaMKn ABToMaTHueck 3aNyckaTcra CnaJd-woy. Pn INCNOJIb3OBAHn HocnteJI NfOpMaun C CO6CTBeHHbIMN fOTOrpaqmN OHN 6ydyT NOKa3aHb.I. B INOM cnyae yctpoiCTBO NOKa3bIBaET cnaJd-woy n3 4 npedycTaHOBneHHbIX fOTorpaqni.
HaxMMte Ha KONky Home [a], yTO6bI nonactb B rnaBHOe MeHo.
B rnaHOM MeHIO nMeecra BbI6Op MeJy pa3nHbIMN cyHKnmau cnpoBoi foTopaMKn mHeHO HAcTpoE. HaxMITE KHOKN , IINBb6op a NyKTA MeHIO. PnI NOMOUI HaXaTNA HA KHOKN A, NpONCXODHT HabrAun B COOTBeTCTByIOUeM NOmEHIO. PoITBepDNTe BbI6Op HxKaTneM KHONK Play/Pause []
b) PpocMToTp oToTOrpaqn
BbIbepnte B rnaBHOM MeHIO FyHKUIO Foto I NOtBepnTe ee npi NOMOu KNOHKn Play/Pause [1]. Byet OTo6paKeH IOkNIOueHHb HocTeJIb INΦopMaun. B 3aBncMocTn OT TORO, KaKo HocTeJIb INΦopMaun IOkNIOueH, IMeETcR BblOp MEJdy KAPTOI nAMrIn USB fneu hakonntelem. POnTBePnTe BblOp HaxKaTneM KHONK Play/Pause [1]. Tenepb
NOBHTcMeHIO npedBapnteIbHOro npocMToPa co BcEMn, HaxOJaUIMnCra Ha HOCHTepeTOrpaФmN IOdEepXnBaemO φopMaTa. BbIbepuTe fOTorpaΦnIO n NOdTBePdnte CBOB Bbl6Op KhoNkOi Play/Pause [1], YTO6bI 3aNyCTuTb cnaI-D-woy c 3Toro MeCTa.
c) Yacbl n KaJIeHdapb
B pexime yacob MOxHO BbIbpaTb MeJdy cnpoBBIMn YacAMn, aHaIorOBbIMn YacAMn nIaHlorOBbIMn YacAMn C kaneHapem. PnPi NOMOuN KONKn Play/Pause [▶] npocXoDnT nepeKJIoueHnBnA. PnPi NOMOuN KONOK ▲, ▼ npocXoDnT HabruaN O630pa Mecra.
YXOD IN PPOΦNIAKTNUECKN OCMOTP
yxoA
- 甲to6bI n36exkaTb mnybcob Toka, Ha ydaanrTe Ha BnHTb Hn Kopnyc.
He nCnoB3yTe daHbI np6Op B6n3n BObl. He noDaBaTe np6Op BnnaHIO doxJa nn BnaXHOCTn. He CTaBtE B6n3n np6Op npEdMeTbI, KOToPbIE HAKaJIbBAOT BOy nn dpyrne BVdbI KNDKoCTe.
He yctaHabnBaTe daHHyO foToPamky B6n3n OToPnneHn, neeH nn dpyrnx np6opOB, n3nyauoX tenNo.
He otKpbBaIe Kopnyc. He nbTaIeTcB peMOHTnpoBaT np6Op camn. PpeOCTabTe 3To npocecnoHaJAM. - N36eraTe HcNOJIb3OBAHnHa MeCTax C neCKOM.
BCTaBbTe BnIky dny noKnHoueHH 6noka nHTAHN B OTBepctne LΦ nonHOCTbIO. TOnbKO TaK MoXHO 36exKaTb 3NEKTPOCTaTnueckoro 3apra. - BbINOJIHJaTe BCE NOdCOeINHeHnI npaBnJbHO nHaIeXHo.
He naabnBaIte Ha dncnne. 3aunuaTe nucnne ot cnnbhix coJhehbx nyuei.
-ΦOTOpaMka BOCPON3BOJNT TOJIbKO COBMeCTNMBie φOpMaTBI. - OToRpaФm MOrTy 6bIb 3aunuHb npabAm TpeTbx Iu. BocnpOn3BeDeHne foToRpaФm 6e3 nueH3nn MoKet 6bIb HapUWeHnem ABTopcKnx npab.
He npikacaiTecb K LΦ BO Bpemra6Obl MeTaJIuYeCKMn IpeDMtAM. - 136eraaTe nCnoB3OBAHnHa noDywkax, DnBaHax nnDpynx npedMeTax 6bTa, KOtOpbIe NOdpeXNBaHT pa3BNTHe TENJa, TAK KAK CYueCTByET ONAChOcTB neperpeBaHn npi6opa.
He n3BneKaTe KapTbI NaMaTn BO BpeM YTeHn KaPT. 3To MoKet npNBecTu B C6oAM B CnCTeMe n NOtepe DaHHbIX.
He BbIKIOuayTe np6Op BO BpemBocnpOn3BeDenHn.
He ynakobbainepn6op henocepctbeHHo nocne dnteHoro ncoNb3OBAHn. Oecneyte DOCTaTOHoe oxJAAckdHme. B INOM cnyae cyuecTByet onachOCTb neperpeBaHn.
-ДяобсесенялчerocepbicaBo3MOxHbI3MehenHINCHtpKUNNoO6cnyxHBAHIO.
PpOΦnIaKTHueckn OcMoTp np6opa
PINBOP DOJXEH BbITb BbIKIOUeH. HNKoIa HE BpI3rAITE IN HE HAHOCITE KINKOCTb PRAMO HA DnCJIeN IIN KOPNyc.
Ynctka nncnner / Kopnyca / pamkn
PpOtpnTe Kopnyc, pAMky n Dncnnnei LCD octopoxho mRkoH, HEBOPCnCToH u CBO6OHOOT XIMKATOB TKAHbU. IcnoB3 yIte ouHCTeNBhIE cpeDCTBa, cneuaJIbHo npEHa3HaueHHbe dIra DnCnner LCD.
Ytun3aunctapbIX 3Jektpnp6opOB
O6o3haueHHbI DaHHbIM CmB0JIOM Ipi6Opbl DOJXHbI COOTBeTCTBOBaT b EBpOneNcKo NnpeKTNB 2002/96/EC.
Bce 3neKtpnpn60bpI n CTapbIe 3neKtpnpn60bpI DOJKNHbI yTUNN3nPOBaTbcr OTJeNbHOOT DOMaHrero MycopaYepe3 ppeDyCMOTpeHHbIe IINr 3TORO rOcydApCTBOM NyHKtbl.
HaJIeXaUaY TUNN3aUaY 3neKtpnpn60bpOB n CTapbIX 3neKtpnpn60bpOB Cnyknt
ppeoTbpaueHInu HaHeCehnBaPeDa OKpyKaIoUe cpee.
(Intenso)
49377 Vechta
Germany
www.intenso.de
CE

(Intenso) YCIOBNA FAPAHTN

YBaKaembl KIneHTb KOMnAHm Intensol
Bolbwoe cnacn6o, yTo Bbl peunnn npno6peCTN BlicOKokaeCTBeHHy0 npodykuiu KOMnaHIn Intenso. B OTHouen H Bcien npdykun KOMnAHn IntensO npOBODTCa perynapHbIKoHTpOJIb KaecTBA. Pa3ymeETc, YTO C MOMeHTa npno6peTeHn DeiCTByet ycTAHOBJIeHHb 3aKOHm rapaHTnHbI cPOK. PoTOMy, noXaNtca, coxpaHnTE KACCOBbI ueK KaK noDTBepJdeHne NOKynK.
YcnoBra rapaHTn
IpeoCTaBHe rapaHTn paCnpocTpaHReTc Toblko Ha 6pak MaTepnaHa n npOn3BOcTBeHHbIe DepeKtbl. KomnaHra «Intenso GmbH» He Hecet OTBeTcTBehHOCTb 3a NOtepIO daHHbIX Ha npNClaHHbIX yctpoiCTbax. BecnNaTHoe npOcTabHe rapaHTn paCnpocTpaHReTc Ha peMOHT IIN 3aMeHy 6paKaOBaHHbIX Detanei. IoxaanyIcTa, OTheCITecb C NOHMaHEm K TOMy, YTO Mbl He MOXem npEOCTaBt b rapaHTnIO B Takix cnyaAx, KaK, HAnpIMep:
3I0yMbIJIeHHoe HnHn HnpaBnIbHoe 6paueHne, yCTaHOBKa HnHcNoJIb3OBAHne
NOBpeKdEHHaapanHbI HnH3HOC
H3MeHeHHBMEaTeJIbCTBa HnpeMOHT,OCyJcETBJIeHHbIe TpeTbHM JUaM
- noBpeKdHnB pe3yIbTaTe fOpC-MaxOpHbIX 06CToTEnbCTB IIN TpaHCnOpTpObKn
Bawa komnnaHra «Intenso GmbH»
ENCTBNA PNI NPEBBAEHN PEKJAMAUH
B cnyuae npedbnaenpaeknamaun DeiCTByTe TaKIM 06pa3OM:
- Ha3aI npHHMaetcra TOnbKO npOdyKcna CO BCEMN pNHaJNeXHOCTaMn KACCOBbIM YeKOM
- 063aTeIbHbIM yCIOBnEM dIy B03BpaueHn npOdyKuHn ABJAEcH oMEp RMA. 3TOT Homep RMA Bbl MoKeTe 3anpoCHTb no 3JIeKtpoHHo nOHTe Hn ropayen IHHn cepBnCHoro 06cnyXHBAHn.
- Ioxayncta, ynakyte npodykun, BKIOUyA Bce npHaIeXHOCTN KACCOBbI Yek, HAdexHo dIra TpaHcnpOpOBKn. Ha nocbIKy DoJxHO 6bITb HaKneeHO DOCTaTOHoe KOINueCTBO NOYTOBbIX MapOK.
- HaheCHTe, noXaIyIcTa, YetKo Homep RMA c BHeUHHe CTOpOHBi.
OTnpabBte, noKanyuIcTa, no TaKOMy aDpeCy:
INTENSO GMBH
TopaHnH cepBnCHOrO 6cnykBaHH
+49(0)900-1504030
CepBnchbI ueHtp (BaW N# RMA)
(0,39 eBPO/MH. B HEMeKoI CTaHOHapHOI CETN
LcHbHa CBA3b MoBnIbHbIX onepaTopoB MoryT OTnUaTbcra.)