9.7" Media Designer - Digital photo frame INTENSO - Free user manual and instructions
Find the device manual for free 9.7" Media Designer INTENSO in PDF.
User questions about 9.7" Media Designer INTENSO
0 question about this device. Answer the ones you know or ask your own.
Ask a new question about this device
Download the instructions for your Digital photo frame in PDF format for free! Find your manual 9.7" Media Designer - INTENSO and take your electronic device back in hand. On this page are published all the documents necessary for the use of your device. 9.7" Media Designer by INTENSO.
USER MANUAL 9.7" Media Designer INTENSO
- Secure Digital Card (SD™)
- Secure Digital High Capacity (SDHC™)
- Multimedia Card (MMC™)
Operating instructions for Intenso Digital Photo Frame
Please comply with the following instructions to be informed about the different functions of the Intenso digital photo frame.

1) Assignment of keys rear of the unit
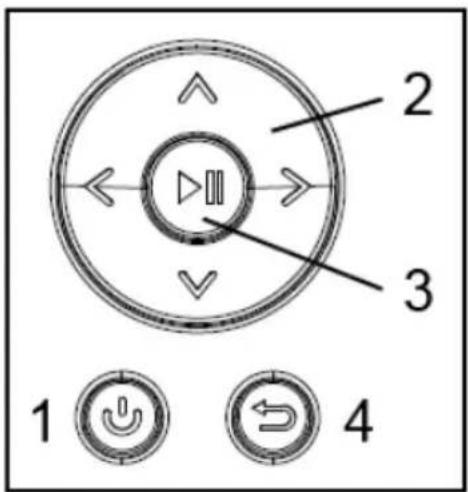
1 Power On / Off
2 Navigation keys
3 Play / Pause / OK key
4 Back key
2) Remote control
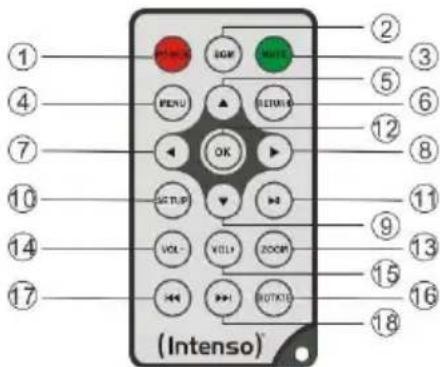
| 1 | POWER | Power On / Off |
| 2 | BGM | Start slide show with background music |
| 3 | MUTE | Muting |
| 4 | MENU | Displaying the starting screen |
| 5 | ▲ | Moves the cursor up |
| 6 | RETURN | Return to superordinate menu |
| 7 | ← | Moves the cursor left |
| 8 | ▶ | Moves the cursor right |
| 9 | ▼ | Moves the cursor down |
| 10 | SETUP | Display of all settings |
| 11 | [▶] | Play/Pause key |
| 12 | OK | Confirming the selected menu item |
| 13 | ZOOM | Enlarge the image in paused slide show |
| 14 | VOL - | Decrease volume |
| 15 | VOL + | Increase volume |
| 16 | ROTATE | Rotating 90° clockwise |
| 17 | ↔ | Previous track |
| 18 | → | Next track |
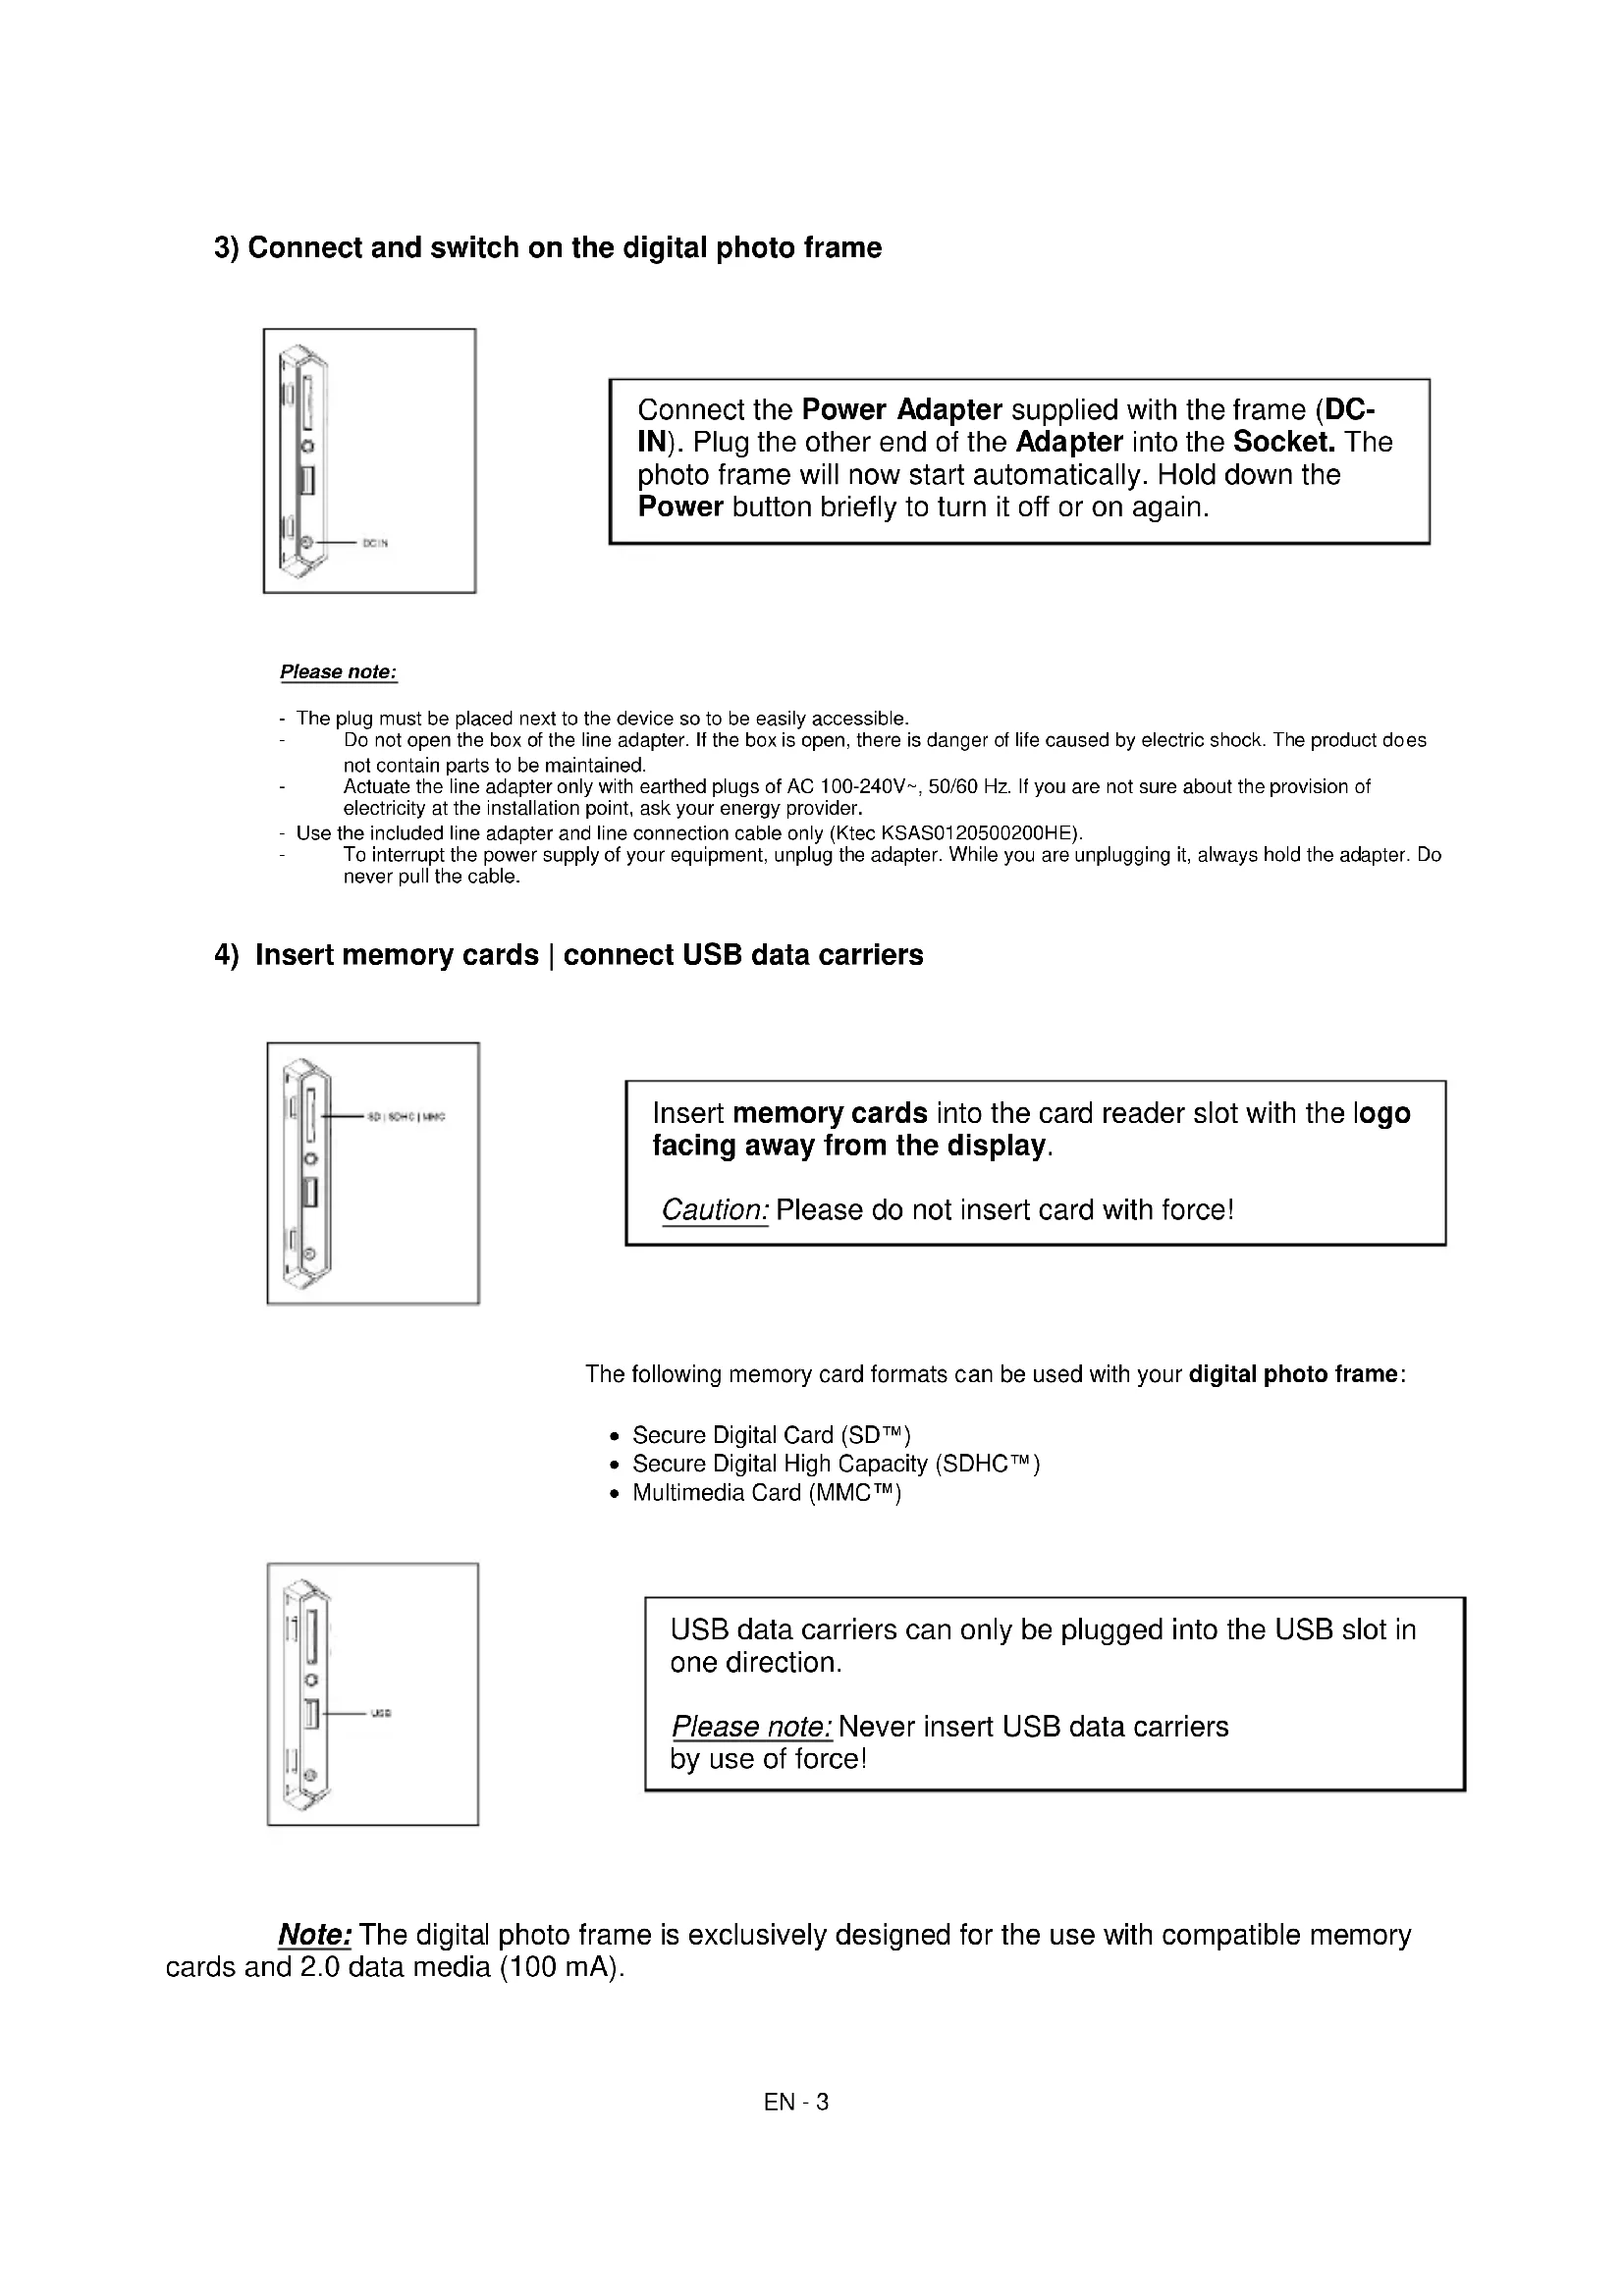
3) Connect and switch on the digital photo frame
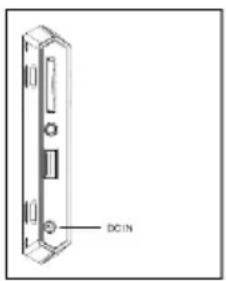
Connect the Power Adapter supplied with the frame (DCIN). Plug the other end of the Adapter into the Socket. The photo frame will now start automatically. Hold down the Power button briefly to turn it off or on again.
Please note:
- The plug must be placed next to the device so to be easily accessible.
- Do not open the box of the line adapter. If the box is open, there is danger of life caused by electric shock. The product does not contain parts to be maintained.
- Actuate the line adapter only with earthed plugs of AC 100-240V~, 50/60 Hz. If you are not sure about the provision of electricity at the installation point, ask your energy provider.
- Use the included line adapter and line connection cable only (Ktec KSAS0120500200HE).
- To interrupt the power supply of your equipment, unplug the adapter. While you are unplugging it, always hold the adapter. Do never pull the cable.
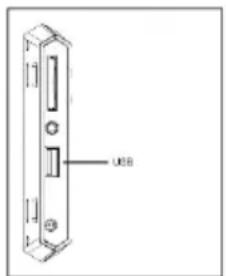
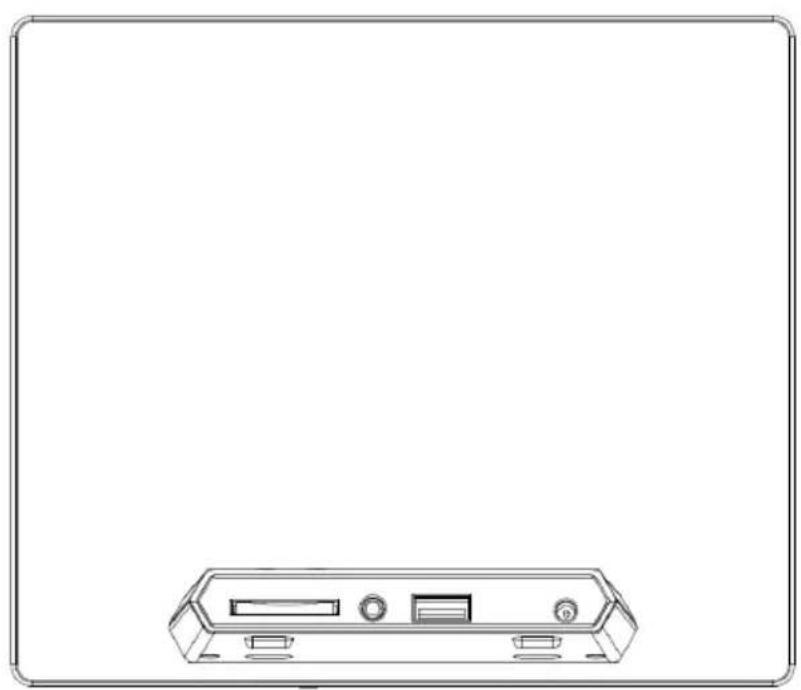
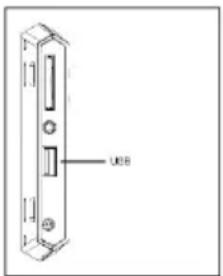
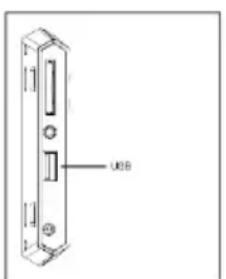
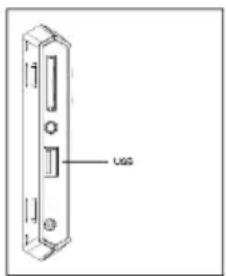
4) Insert memory cards | connect USB data carriers
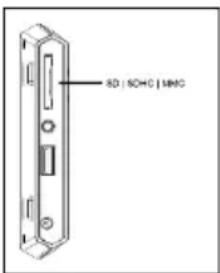
Insert memory cards into the card reader slot with the logo facing away from the display.
Caution: Please do not insert card with force!
The following memory card formats can be used with your digital photo frame:
- Secure Digital Card (SD™)
- Secure Digital High Capacity (SDHCTM)
- Multimedia Card (MMC™)

USB data carriers can only be plugged into the USB slot in one direction.
Please note: Never insert USB data carriers by use of force!
Note: The digital photo frame is exclusively designed for the use with compatible memory cards and 2.0 data media (100 mA).
5) General handling
Note: This device has an Eco Function. If it is activated (please open the settings for activation or deactivation), it automatically shuts down 4 hours after the last input. This function is already activated in the condition on delivery due to legal requirements.
a) Main menu
After starting up, the main menu appears.
In the main menu you can choose between multiple functions of the digital photo frame and the menu item settings. Press the cursor keys on the remote or the cursor keys on the unit to select a menu item. Confirm your selection with the Play / Pause / OK key on the remote or the OK key on the unit.
b) Selection of storage media
The RETURN key on the remote or the Menu key on the unit leads from the main menu to the selection of connected storage media. In this menu you can, if provided, choose between memory card and USB storage device. Confirm your selection with the OK key on the remote or the OK key on the unit. You then get back to the main menu automatically.
c) Displaying photos
If you already have inserted a storage medium with saved photos, the unit will automatically start a slide show of your photos. If no storage medium is inserted, the unit will start a slide show of pre-installed sample images (these cannot be changed). Press the menu key to get back to the main menu.
You can also start the slide show manually. To do that, navigate to the photo function in the main menu. Confirm your selection with the OK key on the remote or the Play / Pause key on the unit. The slide show will be started now. Alternatively you can press the Slideshow key on the remote to start a slide show from any other function directly.
Press the RETURN key on the remote or the RETURN key on the unit to leave the slide show and to call up the image preview menu. You can now navigate to a photo, confirm your selection with the OK key on the remote or the OK key on the unit and continue the slide show from this point directly. You can reach the respective super ordinate file folder by pressing the RETURN key in the image preview menu again. This is how you navigate easily between the various folders of your storage medium.
Functions during the slide show:
- You can switch a photo forward or back by pressing the cursor keys on the remote or the cursor keys on the unit right or left.
- You can stop a slide show by pressing the OK key on the remote or the Play / Pause key on the unit. The slide show is continued if you press the key again.
d) Calendar
Navigate to the calendar function in the main menu and confirm your selection with the OK key on the remote or the OK key on the unit.
In the calendar mode you can see the current time, the current calendar sheet and (with inserted storage medium with supported photo files) a slide show.
You can change the month and the year for the displayed calendar sheet by pressing the cursor keys on the remote or the cursor keys on the unit.
e) Playing music files
Navigate to the music function in the main menu and confirm your selection with the OK key on the remote or the OK key on the unit.
All supported music files (MP3 and WMA) will now be displayed. Navigate to a music file now and confirm your selection with the OK key on the remote or the OK key on the unit to play the selected file.
Functions during playback of a song:
- You can stop and continue the music by pressing the Play/Pause key on the remote or the OK key on the unit.
- You can set the volume with Vol-/Vol+ keys on the remote.
- Press the cursor keys on the remote right or left or keep pressing the cursor keys on the unit to fast-forward or rewind.
- Press the double arrow keys [K, K] on the remote or the cursor keys on the unit to jump to the next or previous track.
f) Playing video files
Navigate to the video function in the main menu and confirm your selection with the OK key on the remote or the OK key on the unit.
All supported video files (MPEG-1/4, M-JPEG and AVI) will now be displayed. Navigate to a video file now and confirm your selection with the OK key on the remote or the OK key on the unit to play the selected video file.
Functions during playback of a video
- You can stop and continue the video playback by pressing the Play/Pause key on the remote or the OK key on the unit.
- You can set the volume with Vol-/Vol+ keys on the remote.
- Press the cursor keys on the remote or keep pressing the cursor keys on the unit right or left to fast-forward or rewind.
- Press the double arrow keys [H, H] on the remote or the cursor keys on the unit to jump to the next or previous file.
g) File system
Navigate to the file function in the main menu and confirm your selection with the OK key on the remote or the OK key on the unit.
Now all folders and files of the selected storage medium will be displayed. Navigate to a subfolder using the cursor keys on the remote or the unit and confirm your selection with the OK key on the remote or the OK key on the unit. Now all files and folders within the selected folder will be displayed. You can go back to the superordinate folder by pressing the RETURN key on the remote or the RETURN key on the unit.
In order to open a file directly from the file system, navigate to the desired file and confirm your selection with the OK key on the remote or the Play / Pause key on the unit. The file will now be played.
In order to delete a file or an entire folder from the selected storage medium, navigate to the desired file and then press the right cursor key on the remote. You can now see a dialogue field, in which you have to confirm the deletion to prevent accidental deletion. Press the OK key and the selected file or the selected folder will be deleted. Press the Menu / RETURN key to get back to the file overview.
h) Changing the settings
Navigate to the settings function in the main menu and confirm your selection with the OK key on the remote or the OK key on the unit.
You now have the following setting options: Photo settings, calendar settings, and system settings. Navigate to the desired menu item and confirm your selection with the OK key on the remote or the OK key on the unit. Now all setting options will be displayed. You can navigate through the individual setting options with the Up / Down cursor keys on the remote or the cursor keys on the unit. You can customise the settings using the Left/Right cursor keys on the remote. To customise the settings without the remote please press the OK key on the unit. Now you can change the settings by pressing the cursor keys. Please confirm your selection with the RETURN key on the unit.
| Setting options | Description | |
| Photo Setup | Display Mode | Choose between slide show and thumbnail. |
| Music | Activation and deactivation of background music during a slide show (if supported music files are provided on the storage media). | |
| Photo Mode | Choose between original and full screen. | |
| Interval | Setting of display duration of individual slides during the slide show. | |
| Slideshow Repeat | Choose between a one-time display of an image or endless loop. | |
| Slideshow Effect | Select a specific transition effect or a random selection of transition effects. | |
| Slideshow Mode | Choose between displaying a single photo, or two, three, or four photos simultaneously. |
| Play Mode | Choose between displaying the images in the order of storage on the medium or a random order. | ||
| Calendar settings | Date | Setting the current date. | |
| Set time format | Setting the time format: 12 (AM / PM) hours or 24 hours. | ||
| Time | Setting the current time. | ||
| Alarm Status | Activate / deactivate the alarm. | ||
| Alarm Time | Setting the desired alarm time. | ||
| Alarm Ring volume | Set the desired volume (low, medium and high). | ||
| Alarm Frequency | Set the desired alarm repetition (every day, Monday to Friday, weekends, once). | ||
| Video Setup | Display Mode | Choose between original and full screen. | |
| Play Mode | Select the playback mode (once, repeat all, repeat track). | ||
| Music Setup | Play Mode | Once | All tracks will be played once. |
| Repeat track | Selected track will be repeated in endless loop. | ||
| Repeat all | All tracks will be repeated in endless loop. | ||
| Random | Selected track will be played in random order. | ||
| Show Spectrum | Select whether the spectrum should be faded in or out during music playback. | ||
| System settings | Language | Select the desired language. | |
| Brightness | Select the desired display brightness. | ||
| Contrast | Select the desired display contrast. | ||
| Saturation | Select the desired display chroma. | ||
| Hue | Change the display colouring. | ||
| Auto on | Activate/Deactivate automatic activation. | ||
| Turn on time | Select the automatic activation time. | ||
| Auto off | Activate/Deactivate automatic deactivation. | ||
| Turn off time | Select the automatic deactivation time. | ||
| Frequency | Set the frequency of automatic activation (every day, Monday to Friday, weekends, once). | ||
| Eco | If you activate this function, the device will automatically shut down 4 hours after the last input. If you wish to use this device for an extended period of time, please deactivate this function. | ||
| Default settings | Restore to factory settings. | ||
| Version | The current version number will be displayed | ||
| Update | Should a Firmware update be available on www.intenso.de, then you can install it in this menu item. | ||
| Autostart Mode | Select the function that will start upon unit activation (photo, music, video, and calendar). | ||
6) Product Specifications
| Display | Digital TFT LCD Display size: 9.7 inch (24,64 cm diagonal viewable image) Display modus: 4:3 Resolution: 1024 x 768 Pixel |
| Power supply | Input: 100~240V AC, 50/60Hz Output: 5V 2A DC |
| USB port | USB Host 2.0 (High Speed) Supports USB storage mediums |
| Memory cards supported | • Secure Digital Card (SD™) • Secure Digital High Capacity (SDHC™) • Multimedia Card (MMC™) |
| Picture size supported | JPEG, max. resolution: 9000*9000 pixels |
| Operating temperature | 0°C ~ +40°C |
| Dimensions | ~224*186*56 mm |
| Weight | ~370 gr. |
| Accessory | Remote control (incl. battery), Power supply (Ktec KSAS0120500200HE), multi-lingual operating instruction. |
You need help?
Simply call our Technical Service Hotline at:
+49 (0) 900 1 50 40 30 for 0.39 €/Min. with calls from the German telephone network. Different rates may apply to calls from mobile phones.
Enjoy Intenso's digital photo frame!
Service and Maintenance
Care
- In order to prevent danger from electric current do neither remove screws nor the case of the weather station.
- Do not operate this device near water. Do not expose the device to rain and moisture. Do not put any objects which store water or other fluids near the device.
- Do not install the picture near heaters, ovens or other heat issuing devices.
- Do not open the case. Do not try to repair the device yourself but have it repaired by qualified personnel only.
- Avoid using the device on sandy areas.
- Fully insert the power supply plug into the opening of the Intenso weather station. This will prevent electrostatic charge.
- Correctly and safely connect all ports.
- Do not push onto the display. Protect the display from direct sunlight.
- The picture frame only plays compatible data formats.
- Images may be protected by the rights of third persons. The play back without licence may infringe copyrights.
- When in operation, do not touch the Intenso weather station with metal objects.
- Avoid operating the device on pillows, sofas or other objects which support the development of heat as there is danger of overheating of the device.
- Do not remove memory cards during read operation. This may cause system crash or data loss.
- Do not switch off the device during an ongoing slide show.
- Do not wrap up the device directly after longer use. Ensure sufficient enough cooling. Otherwise, there is danger of overheating.
- In order to ensure a better service, changes of the operating instructions may be necessary.
Maintenance of the device
The device must be switched off.
Never spray or apply a fluid directly onto the display or case.
Cleaning the displays / case / frame
Carefully wipe the case, frame and LCD display with a soft cloth free from lint and chemicals. Only use cleaning agents which are specifically designed for LCD displays.
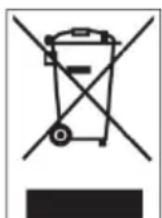
Disposal of electrical waste
Devices marked with this symbol are subject to the EG Directive 2002/96/EG.
All electrical appliances and old appliances must be disposed off separately from the household waste and are to be returned to the state authorities designed for that purpose.
By correctly disposing of electrical old appliances environmental damage may be prevented.
(Intenso)
49377 Vechta
Germany
www.intenso.de

(Intenso) Warranty conditions

Dear Intenso customer,
Thank you for opting for a high-quality Intenso product. All Intenso products are subject to constant quality inspections and the legal warranty period applies, of course, from the date of purchase. Please be sure therefore to save the sales receipt as proof of purchase.
Warranty conditions
The warranty only covers material and production defects. Intenso GmbH is not liable for the loss of data in units sent to us. The free of charge warranty service covers the repair or replacement of defective parts. Please understand that we cannot render any warranty services, e.g. in case of:
- Misuse or improper handling, installation or use
- Damages, scratches or wear
- Modifications, manipulation or repairs by third parties
- Damages through force majeure or transport
Your Intenso GmbH
CLAIM PROCEDURE
In case of a claim, please proceed as follows:
- Only returns accompanied with all accessories and sales receipt are accepted.
- In addition, a RMA number is absolutely required for return shipments. You can request this RMA number via e-mail or through the service hotline.
- Please package the product including all accessories and the sales receipt safe for transport. Please stamp the package.
- Please affix the RMA number clearly visible on the outside of the package.
Please send to the following service address:
INTENSO GMBH
Service Hotline: +49 (0) 900 - 150 40 30
Service Center (your RMA-No.)
(0.39 €/min. from the landline in Germany. Usual costs apply.)
- Secure Digital Card (SD™)
- Secure Digital High Capacity (SDHCTM)
Multimedia Card (MMCTM)

- Secure Digital Card (SD™)
- Secure Digital High Capacity (SDHC™)
Multimedia Card (MMC™)

Service Center (Votre referrerce RMA)
Service Hotline: +49 (0) 900-1504030
- Secure Digital Card (SD™)
- Secure Digital High Capacity (SDHC™)
- Multimedia Card (MMC™)
- Secure Digital Card (SD™)
- Secure Digital High Capacity (SDHC™)
- Multimedia Card (MMC™)
Service Center (Seu N° ADM)
- Secure Digital Card (SD™)
- Secure Digital High Capacity (SDHC™)
Multimedia Card (MMCTM)

BHumaHue: He BCTabJIte Ke KapTy c cnIOI!
LcfoBaA foToopamKa nOndepKnBaET cNe dyUoune fOpMaTbI KapTbI naRTt:
- Secure Digital Card (SD™)
- Secure Digital High Capacity (SDHC™)
Multimedia Card (MMC™)
HocnteNb namrtn USB moKeT BCTaBnTbcraB rHe3do USB TObko OndHom HappaBneHN.
BHumaHue: He npImeHЯTe cnIy npn BCTaBneHIn HocnteJnaMrtu USB!
BHumaHue: LcnpoBaJ FOToPamKa npedycmOTpeHa TOnbKO IJIg NcNoIb3OBaHnC COBMeCTHMbIMKapTaMn NaMaTn HocHTeJMyn NaMaTn USB 2 (100MA).
5) O6uHn npaDOK deiCTBn
Примechанe: Данhoe yctpoiCTBO IMeET Функию 3кo. Пpr eе akTиBaци (ДЯя AkTиBaци Либо OTКлioченя Функии 3кo пepeДNTe B MeHIO HAcTpoiKи) yctpoiCTBO aBTOMaTnueckN Выклioчаetcя чeр3 4 уса посе послпсд Hero BBOda DAHHbIX. CorlaCHO napaMeTpam пpon3BOДnteЯ Функия 3кo ужe akTиВиPoBaHa B yctpoiCTBE B COOTBETCTBи C правилами, yctahOBJIeHHbIMN 3akOHOM.
a) TnaBHOe MeHIO
PocJIe BkJIoueHn IOBJIaTeCra INaBHOe MeHIO.
B rnaHOM MeH y Bac eCTb Ha Bb6op pa3nHbIe cyHKuIN cHpOBOI FOtOpAMKn I NyHKT MeHIO "HaCToKn".ДЯ TOrO YTO6bI Bb6paTb ONpeJeHHbI NyHKT MeHIO, HaxIMaITe Ha KONK Co CTrpEJIkAmN, HaxOJaUeNcE Ha NylbTe INCTaHcUHOHORO ynpABJeHnI, IIN Ha ycToPcIcTBe. IoTBePdInTe CBoI Bb6op KONKOl "Play / Pause / OK", HaxOJaUeNcR Ha NylbTe DInCTaHcUHOHOrO ynpABJeHnI, IIN Ha ycToPcIcTBe.
b) Bb6op HocnteI INHOpMaun
KhONka "RETURN", HaxoJaAaCra Ha Nylte DnCTaHcNHOHor O npabHeHna, IIN K hONKa "Menu", HaxoJaAaCra Ha yctpoiCTBe, BbIOHT Bac n3 rNaBHOro MeHIO K Bbl6Opy npncOeDInHeHHbIX HocTeIeHnHΦopMaun. B daHOM MeHIO Bbl MoXeTe BblpaTb KapTy NaMRTn IIN HocTeIb HΦopMaun C pa3bEmom USB. POnTBepDnte CBOB Bbl6Op KhONKOl "OK", HaxoJaUeCra Ha Nylte DnCTaHcNHOHor O npabHeHna, IIN KhONKOJ "OK", HaxoJaUeCra Ha yctpoiCTBe. NocJe 3toro Bbl ABTomatNueckn ChOba IonaJaTe B rNaBHOe MeHIO.
c) ΠokazΦoTOrpaΦn
EcIn Bbyyke BCTaBnHn HocHTeNb Namrnc 3aHncaHHbIMn foTOrpaQnMn, TO yCTPOIcTBO aBTOMaTHueckn HaunHaet nx noka3. EcIn HocHTeNb Namrnc He BCTaBNeH, To yCTPOIcTBO HaunHaet noka3 3apaHee nHCTaJInpoBaHHbIX o6pa3OuB n3o6paxeHn (OHn He MOrYt 6bITb N3MeHehbl). IINrTOr YTO6bl nonactb B rnaBHOe MeHIO, HAKMITE Ha KHONky "Menu".
Bb mokeTe 3anyCTntb cnaI-woy TaKoe BpyHyIO. IJIaToro BOiDnTe B rNaBHOM MeHIO B cyHKnIO FoTo. IoITBepNTe CBOB Bb6op KhONKO "OK", HaxOJauecra Ha nyIbTe DnCTaHNoHHOrO ynpabHeHry, INI KhONKO "Play / Pause", HaxOJauecra Ha ycTroPocTBE. PnI 3Tom 3anyCkAetc cnaI-woy. IJIr TORO UTObI 3anyCTntb cnaI-woy HeNOCpeDCTBeHHO n3 IIOboI dpyroI cyHKnIN, Bbl MoKeTe aIbTEpHaTNBHO TaKoe HaxKaTb Ha KhONKy "Slideshow", HaxOJaouoCra Ha npIbTe DnCTaHNoHHOrO ynpabHeHry.
ДяТOrOчTo6bI BbIITn n3 peKIMa cnaI-d-woy n BbI3BaTb MeHIO npedBapnteBHoro npocmoTpa n306paxeHn, HaxMITE Ha KhoNky "RETURN", HaxOJaSyUocra Ha nyIbTe dInCTaHcNoHHoro ynpabLeHn, INn KhoNky "Menu", HaxOJaSyUocra Ha ycTpoiCtBe. Tenepb Bbl MOxKeTe NpeRrTH K kAcOJ-Ni6o φOTorpaФn, NOdTBePrtb CBOI BbI6Op KhoNko "OK", HaxOJaSeHcRA NaYbTe DnCTaHcNoHHoro ynpabLeHn, INn KhoNko "Play / Pause", HaxOJaSeHcRA NaYcTpoiCtBe, IN pOdoJXHTb cnaI-D-woy HenOCpeDCTBeHNO C 3TOrO MecTa. ПOBTopHbIM HaxaTneM Ha KhoNky "RETURN" inn HaxOJaDEHn B MeHIO npedBapnteBHoro npocmoTpa n306paxeHn Bbl nonaAete B nanky phaIIOB 6Oonee BbICOKoro nopAikKa. TakIM o6pa3OM, Bbl MOxTe ocuueCTBnAeTB HabRaCnIO no pa3JIuHbIM nankam BaWero HocHTeRn HhΦopMaun.
HaKaTHeMa KhoNk Co CTepeKo BnpaBO Nn BNeBO, HaxOJaUncEa Ha nylbTe DaCTaHcNoHHoro ynpabJeHn, Nn Ha KhoNk Co CTepeKo, HaxOJaUncEa Ha yctpoiCtBe, Bbl MoKeTe nepeeTu K cIeMyoue Nn npdeBldyuee foToIpaFm.
HaKaTnEM Ha KhoNky ,OK" , HaxoJyIOcH Ha NyIbTe DnCTaHcNOHOrO ynpabHeHna Ha KhoNky "OK", HaxoJyIOcH Ha ycToPcTBe, Bbl OctaHaBnBaete cnaD-woy. PpnoBTOphOM HaKATn CnAID-woy npoDOJXaeTcra.
d) KaJIeHApb
Ipeennte B rnaBHom MeHIO K cyHKunn KanEapb n noTBePnte CBOB BbI6op KhoNkoi "OK", HaxoJaueicn Ha npJIbTe dNCTaHcNOHHoro ynpabJeHn, nn KhoNkoi "OK", HaxoJaueicn Ha ycTpoCTBe.
B pexnme kaennapa Bam noka3bBAIOCTeKyuue Bpem, TeKyaan Kaenapna CtpaHua, a TaKke (npn Hauuun BCTabHeHHoro HocnteNn HOpMaun c paIamn FOToTpaFm B NOdepKINBaEMOM fOpMaTe) ocUeCTBIAETc NOKa3 cnaIDOB.
KhoIkamn co cTpeIknamn, HaxOJaIzMmCnHa NynbTe DnCTaHcNHOHoro ynpabHeHn Ha ycTpoIcTBe, Bbl MoKeTe n3MeHnTb Meecu n roHa oTo6paKaemn KaenHapHoI cTpaHnue.
e) Bocnpo3BedeHne My3bikalnbHbix paIIOB
Ipeennte B rnaBHom MeHIO K cyHKun My3bika n noTBePdTe CBOB BB6op KHONKo "OK", HaxoJauecra Ha npIbTe dncTaHcNHOHorO ynpaBneHn, IIN KhoNko "OK", HaxoJauecra Ha yctpoCTbe.
Tenepb Bam 6byt noka3aHbI BCE NOdepxNBAeMbIe My3bIkaJIbHbIe paJbI (MP3 u WMA). Iyra TOrO yTo6bl BocnpOn3BecTN BBipahHbIe paJn, Npeeynte K KaKOMy-Jnbo My3bIkaJIbHOMy paJny INoDTBePdTe CBOB BB6Op KHOKNo "OK", HaxoJauecra Ha npJIbTe DInCTAHIOHHO ynpabHeHna, INI KNHKOJ "OK", HaxoJauecra Ha yCTpoIcTBe.
KeJaem MHO rpaOCTn c npboB paMKo INHeco!
YXODI INPOΦNIAKTNUECKNI OCMOTP
yxo
- Yto6bI n36exkaTb NMnyJbcob Toka, Ha ydaJnTe Ha BnHTbI Hn Kopnyc.
He nCnoJIb3yIte daHbI np6Op B6n3n BObl. He noDaBaIe np6Op BnnaHIO doJxraBnXHOCTn. He cTabe T B6n3n np6opa npedMeTbI, KOtOpBie hakanJIbaIOT BOy IIN dpyrne BnDbl KNDKoCTeN.
He yctaHabnBaIte daHHyO foTOpamky B6n3n oToJIeHna, neey nJn dpyrnx np6opOB, n3nyauoXx tenNo.
He otKpbBaIe Kopnyc. He nbTaItecb peMOHTnpoBaTb np6Op camn. PpeOCTabTe 3To npoPeccuHaJam. - N36eraTe HcnoJIb3OBAHnHa MeCTax C neCKOM.
BCTaBbTe BnIky dIy noDkNIOUeHn 6NoKa nITaHn B OTBepctne LΦ nonHOCTbIO. TOnbKO TaK MoXHO 36exKAtb 3NEKTOPOCTATuHECKORO 3apra. - BbInOpHnIe Te BCE noDCoeHNHeHn npaBnIbHo nHaedJxHO.
He naabnbaaTe Ha dncnne. 3aunuaTe nCnneOT cnIbHbIX cOnHehbx nyuei. - ΦΟΤΟΡΑΜΚΑ BOCΠΡΟΥΝΙΤΟΥΚΟ COΒΜΕCTΗΜβε φρΟΜΑΤΙ.
- ΦOTorpaФиMOrTy 6bIb 3aUHSeHbI npabAMn TpeTbNx JnC. BocnpOn3BeDeHne φOTorpaФи 6e3 JnueH3nn MoKet 6bIb HapUHeHem ABTOPCKnx npab.
He npikacaiTeCb K LΦ BO Bpempa6oTbi MeaJIInuYeCKmIM npedMeTaMn. - 136eraaTe nCnoB3OBAHnHa noDyUkax, DnBaHax nnDpynx npEdMeTax 6bIta, KOTOpble noDnepXnBaHT pa3Btne TenJa, TaK kAc cyIeCTByeOnaChocTh nepepeBaHn np6opa.
He n3BlekaTe KapTbI pAmrTu BO Bpemr YTeHnA Kapr. 3To MoXeT npNBecTu B C6oM B CnCTeme n NOtepe DaHHbIX.
He BbIKIOuayTe np6Op BO BpemBocnpOn3BeDenHn.
He ynapobbainepn6op henocepndBeHHo nocJe dInteIbHoro nCnoJIb3OBaHn. ObecneBte DOCTaTOHoe OXJAAKdHHe. B INOM cnyae cyuectByet onaCHOCTb neperpeBaHn. - IJra o6ecneueHn JyUwero cepBnca Bo3MOxHbI n3MeHeHn IHCTpyKunn no 06cJyXnBaHnIO.
PpOΦnAaKTHueckn OcMoTp np6opa
ПИБОРДОЛЖЕНБыITБВБКЛIOΥEH.
HUKOITDAHE BpI3rAITE HHE HAHOCTE KIOKCTB PRAMO HA DINCPNEI INI KOPNUC.
Ynctka nncnner / Kopnyca / pamkn
PpOtpnTe Kopnyc, pAMky n Dncnnnei LCD octopoxho mRkoH, HEBOPCnCToH u CBO6oHNo OT XIMKATOB TkaHbU. Icnonb3yIte OuchnteJIbHbIe cpeCTBa, cneuaNbHO npedHa3NaeHHbIe dna dnCnner LCD.
YtunnaCtapbix 3Jektpnp6opOB
O6o3HaueHHbI DaHHbIM CmBOLOM np6Opbl DOJXHbI COOTBeTCTBOBaTb EBponeNCKO INpeKTNBE 2002/96/EC.
Bce 3neKtpnpn60pbI n CTapbIE 3neKtpnpn60pbI DOJKNHbI yTNIN3nPOBaTcBc OTeJIbHO OT DomaHrO Mycopa Upee3 npedyCMOTpeHHbI dInr 3TORO rOcydapCTBOM NHTbl.
HaJIeKaaJyTnIIN3aCJN 3JIeKTPponp6OpOB nCTapbIX 3JIeKTPponp6OpOB cnyKNT npDeOTBpaueHnO HAnecEHn BpeDa OkpyKaIOSei CpeJe.
(Intenso)
49377 Vechta
Germany
www.intenso.de

(Intenso) YCIOBNA FAPAHTN

YBaKaembl KIneHTb KOMnAHm Intensol
Bolbwoe cnacn6o, yTo Bbl peunnn npno6peCTN BlicOKokaeCTBeHHy0 npodykuiu KOMnaHIn Intenso. B OTHouen H Bcien npdykun KOMnAHn IntensO npOBODTCa perynapHbIKoHTpOJIb KaecTBA. Pa3ymeETc, YTO C MOMeHTa npno6peTeHn DeiCTByet ycTAHOBNEHbI 3aKOHm rapaHTHbI cPOK. PoTOMy, noXaNtca, coxpaHnTE KACCOBbI ueK KaK noDTBepJdeHne NOKynK.
YcnoBra rapaHTn
IpeoCTaBHe rapaHTn paCnpocTpaHReTc TOnbKO Ha 6paK MaTePnAna I npOu3BOcTBeHHbIe DepeKtbl. KomnaHra «Intenso GmbH» He Hecet OTBeTcTBehHOCTb 3a NOtepIO daHHbIX Ha npHCnAHHbIX yctpoiCTbax. BecnNaTHoe npEOCTaBHe rapaHTn paCnpocTpaHReTc Ha peMOHT INN 3aMeHy 6paKOBaHHbIX Detanei. IoxaanyIcTa, OTheCITecb C NOHMaHEm K TOMy, YTO MbI He MOXem npEOCTaBt b rapaHTnIO B TaKx CnyaX, KaK, HAnpIMep:
3I0yMbIJIeHHoe HnHn HnpaBnIbHoe 6paueHne, yCTaHOBKa HnHcNoJIb3OBAHne
NOBpeKdEHHaapanHbI HnH3HOC
H3MeHeHHBMEaTeJIbCTBa HnpeMOHT,OCyJcETBJIeHHbIe TpeTbHM JUaM
- noBpeKdHnB pe3yIbTaTe fOpC-MaxOpHbIX 06CToTEnbCTB IIN TpaHCnOpTpObKn
Bawa komnnaHra «Intenso GmbH»
ENCTBNA PNI NPEBBAEHN PEKJAMAUH
B cnyuae npedbnaenpaeknamaun DeiCTByTe TaKIM 06pa3OM:
- Ha3aI npHHMaetcra TOnbKO npOdyKcna CO BCEMN pNHaJNeXHOCTaMn KACCOBbIM YeKOM
- 063aTeIbHbIM yCIOBnEM dIy B03BpaueHn npOdyKuHn ABJAEcH oMEp RMA. 3TOT Homep RMA Bbl MoKeTe 3anpoCHTb no 3JIeKtpoHHo nOHTe Hn ropayen IHHn cepBnCHoro 06cnyXHBAHn.
- Ioxayncta, ynakyte npodykun, BKIOUyA Bce npHaIeXHOCTN KACCOBbI Yek, HAdexHo dIra TpaHcnpOpOBKn. Ha nocbIKy DoJxHO 6bITb HaKneeHO DOCTaTOHoe KOINueCTBO NOYTOBbIX MapOK.
- HaheCHTe, noXaIyIcTa, YetKo Homep RMA c BHeUHHe CTOpOHBi.
OTnpabBte, noKanyuIcTa, no TAKOMy aDpeCy:
INTENSO GMBH
TopaHnH cepBnCHOrO 6cnykBaHH
+49(0)900-1504030
CepBnchbI ueHtp (BaW N# RMA)
(0,39 eBPO/MH. B HEMeKoI CTaHOHapHOI CETN
LcHbHa CBA3b MoBnIbHbIX onepaTopoB MoryT OTnUaTbcra.)