Media Performer - Digital photo frame INTENSO - Free user manual and instructions
Find the device manual for free Media Performer INTENSO in PDF.
User questions about Media Performer INTENSO
0 question about this device. Answer the ones you know or ask your own.
Ask a new question about this device
Download the instructions for your Digital photo frame in PDF format for free! Find your manual Media Performer - INTENSO and take your electronic device back in hand. On this page are published all the documents necessary for the use of your device. Media Performer by INTENSO.
USER MANUAL Media Performer INTENSO
Intenso 8“ MEDIAPERFORMER
- Secure Digital Card (SDTM)
- Secure Digital High Capacity (SDHC™)
Multimedia Card (MMC™)
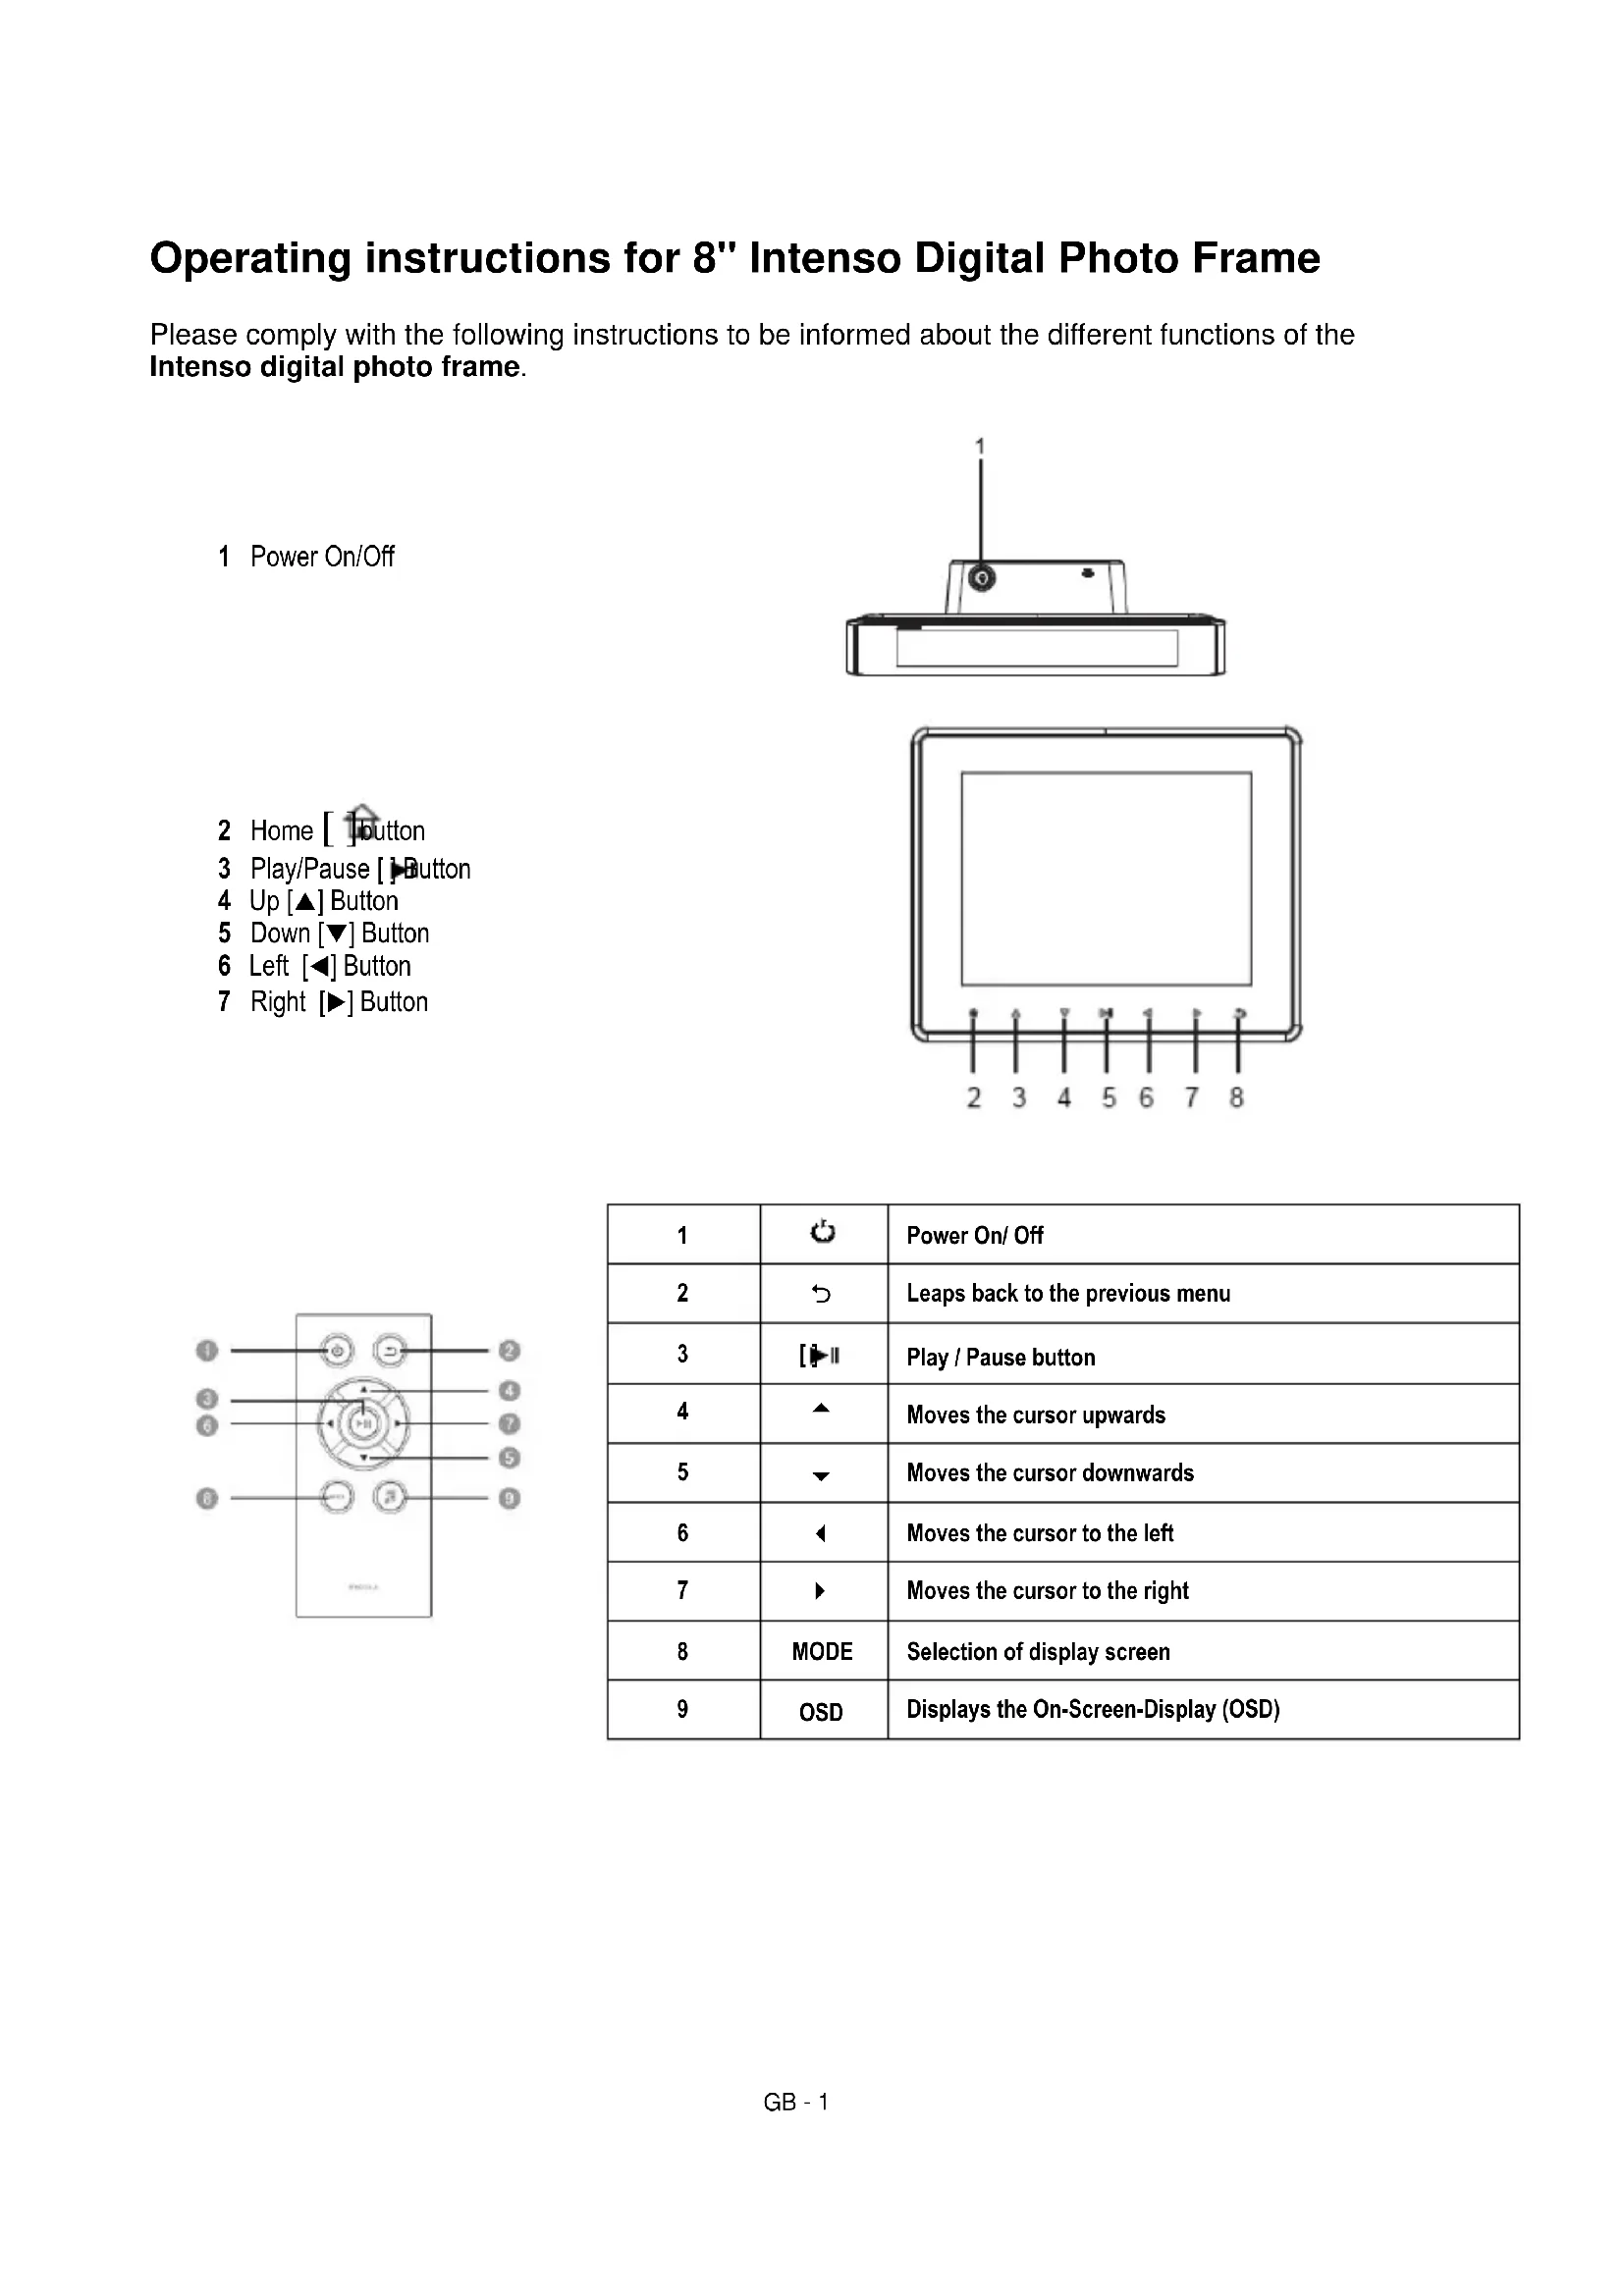
Operating instructions for 8" Intenso Digital Photo Frame
Please comply with the following instructions to be informed about the different functions of the Intenso digital photo frame.
1 Power On/Off
2 Home [ button
3 Play/Pause [ ] Button
4 Up [▲] Button
5 Down [▼] Button
6 Left [<] Button
7 Right [▶] Button
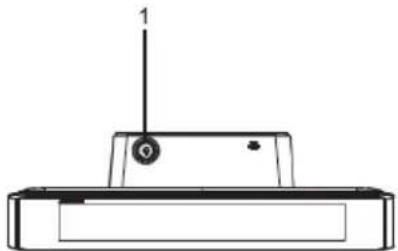
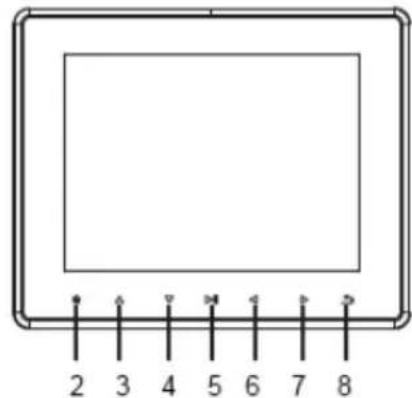

| 1 | Power On/ Off | |
| 2 | Leaps back to the previous menu | |
| 3 | Play / Pause button | |
| 4 | Moves the cursor upwards | |
| 5 | Moves the cursor downwards | |
| 6 | Moves the cursor to the left | |
| 7 | Moves the cursor to the right | |
| 8 | MODE | Selection of display screen |
| 9 | OSD | Displays the On-Screen-Display (OSD) |
1) Connect and switch on the digital photo frame
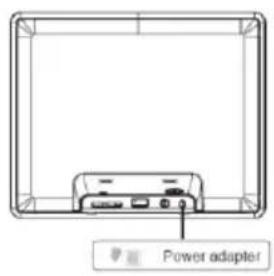
Connect the Power Adapter supplied with the frame (DC-IN). Plug the other end of the Adapter into the Socket. The photo frame will now start automatically. Hold down the Power button briefly to turn it off or on again.
Please note:
The plug must be placed next to the device so to be easily accessible.
Do not open the box of the line adapter. If the box is open, there is danger of life caused by electric shock. The product does not contain parts to be maintained.
Actuate the line adapter only with earthed plugs of AC 100-240V\~, 50 / 60Hz If you are not sure about the provision of electricity at the installation point, ask your energy provider.
Use the included line adapter and line connection cable only.
To interrupt the power supply of your equipment, unplug the adapter. While you are unplugging it, always hold the adapter. Do never pull the cable.
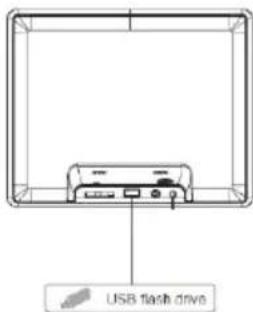
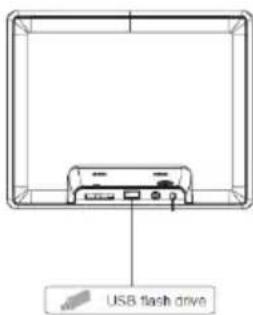
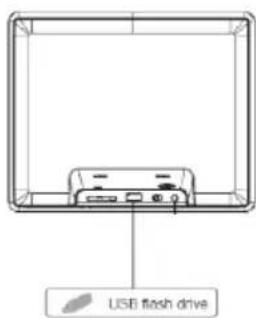
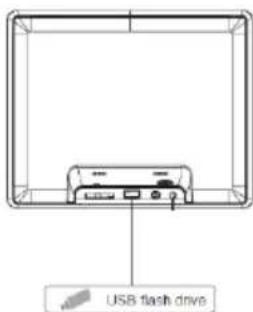
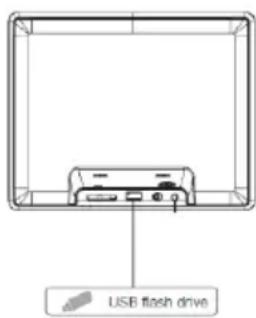
2) Insert memory cards | connect USB data carriers
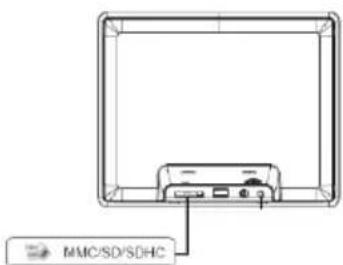
Insert the memory schedules with the logo facing the top into the schedules reader slot.
Please note: Never insert cards by use of force!
The following memory card formats can be used with your digital photo frame:
- Secure Digital Card (SD™)
- Secure Digital High Capacity (SDHC™)
Multimedia Card (MMC™)
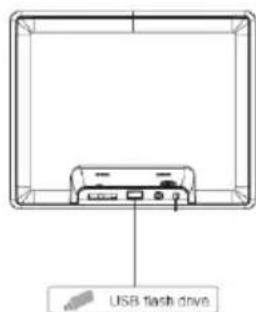
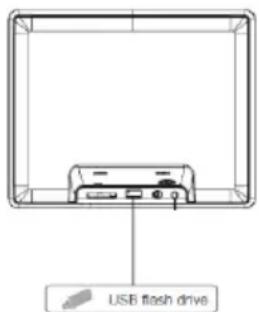
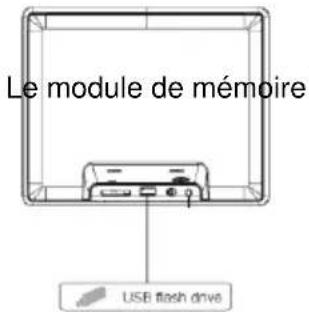
USB data carriers can only be plugged into the USB slot in one direction.
Please note: Never insert USB data carriers by use of force!
Note: The digital photo frame is exclusively designed for the use with compatible memory cards and 2.0 data media (100 mA).
3) General Operation
a) Main Menu
After powering on, the Main Menu appears.
In the Main Menu you have the choice between the Different Functions of the Digital Photo Frame and the Setup Menu. Tap the key , (arrow keys) on the photo frame or on the remote control to select the menu points. By taping the keys , (arrow keys) on the photo frame or on the remote control you browse in the respective under-menus. Confirm your selection by taping the key Play/Pause [▶] on the photo frame or on the remote control.
b) Viewing Photos
Navigate in the Main Menu to the function Photo. It will display the Connected Storage Devices. Depending on which storage device is connected, you will have the Choice between SD, MMC and USB. Confirm your selection with the Play/Pause [▶] button. Choose your desired Folder to reach the Image Preview Menu. Navigate now to a Photo and confirm with the Play/Pause [▶] button to start the Slideshow from here. In case you have already started a slide show using the storage medium selected, the digital photo frame will automatically continue with this slide show. If required, you need to manually adjust the view of the folders available and the picture preview menu. Please press the Back [▶] button to leave the slide show and to start the preview menu.
Functions during the slideshow:
- By pressing the Arrow Keys either Left or Right you can jump one picture Back or Forward.
- Pressing the Play/Pause [▶] button will Stop the Slideshow and display Detailed Information superimposed on the photo. Press the button again to continue the Slideshow.
- Keep the Play/Pause [▶] button pressed to open the OSD Menu. Here you may select the nature of the file copy, switch on or off the background music (if the supported music files are present in the memorised means), zoom in or turn the photo, set the lighting level, select transition effects, set the display duration of an image and scale the image display.
c) Calendar:
Calendar mode gives the possibility of selecting different views. Simply click the Play/Pause button on the picture frame or on the remote control.
Hold down the Play/Pause [▶] button to open the OSD Menu. You can therefore set the date and time, enable and/or disable the timer and/or alarm. Please run seperatry the settings for the timer and alarm through the settings menu.
d) Playing MP3 files
Navigate the main menu to get to the music function. The storage media are displayed online.
Depending on the storage medium connected, you may select between SD/MMC and USB.
Confirm your selection with the Play/Pause [按钮.
Now all the folders with supported MP3 files are displayed. Select the folder you want to enter the preview menu music. Now browse to an MP3 file and confirm your selection by pressing the Play/Pause [reg] play the selected MP3 file.
Functions while playing song:
Pressing and holding the Play/Pause button accesses the menu options. You can perform a variety of settings:
- File: select the musical copy list
- Setting the play mode
- Sequence of selection (sequence / random)
- Track forward / back
-Play/Pause - Proceed forward / backward
- Sets the length of the display light
e) Copying video files
Navigate the main menu to get to the video function. The storage media are displayed online. Depending on the storage medium connected, you may select between SD / MMC and USB. Confirm your selection with the Play/Pause button [▶].
Now all available folders are displayed. Select the desired folder to access the video preview. Now browse to a video file and confirm your selection by pressing the Play/Pause [▶] button to start the selected video files.
Functions while playing a song
Pressing and holding the Play/Pause button accesses the menu options. You can perform a variety of settings:
- Video up / down
-Play/Pause - Proceed forward / backward
- Go to: go to a specific point of the video
- Setting the repeat mode
- Setting the display format
- Set the light level of the display
f) Changing the Settings
In the main menu, select the Setup function. Navigate with the , to the desired menu item. There are General, ECO, Multimedia, and Watches | Date | Timer | Alarm Clock. Confirm your selection with the Play/Pause [▶] button to set your individual unit.
| Settings | Description | ||
| General Setup | Language | Select the desired language. | |
| Product Information | Displays the current firmware version. | ||
| Firmware Update | Should a firmware update be available at www.intenso.de the update can be installed through here. | ||
| Factory Settings | Reset the device to the factory settings. | ||
| Auto Run | Pick the mode your photo frame will begin on after turning on. (Photo, Calendar, Last used function). | ||
| Keyboard tone | Selection of the keyboard tone. | ||
| ECO | Brightness | Adjust the brightness of the TFT Display. | |
| Display Off | Set the amount of time of inactivity which will turn off the display. | ||
| Turn Off | Set the amount of time of inactivity which will turn off the photo frame. | ||
| Video | Repeat mode | Play all | All the supported video are played 1x. |
| Repeat all | All the supported videos are repeated as an infinite sequence. | ||
| Repeat the actual | The current selected video is repeated in an infinite sequence. | ||
| No repeat | The current selected video is played 1x. | ||
| Scalar | Setting the display format for the video mode (cinema, or the original full image). | ||
| Photo | File | Selection of list for the photo reproduction | |
| Background music | Turning the background music on or off (if music files are available incurred in storage media). | ||
| Diashow | Setting up of the passage effect | ||
| Display duration | Setting the display duration of each image during the slide show. | ||
| Scalar | Setting the display format for the photo mode. | ||
| A sequence of reproduction | Selecting between the normal and random sequence. | ||
| Music | File | Selection list to the music. | |
| A sequence of reproduction | Selecting between the normal and random sequence. | ||
| Repeat mode | Play all the titles once | All supported titles are played 1x. | |
| Repeat all titles | All titles are played in and endless sequence . | ||
| Repeat the current | The currently selected title is reproduced in infinite sequence. | ||
| Repeat once | The currently selected title is played 1x. | ||
| Clock | Date | Timer Alarm clock | Date | Set the current date. | |
| Time Format | Set the time format: 12 Hours (AM / PM) or 24 hours. | ||
| Time | Set the current time. | ||
| Clock correction | Adjustment details of the clock. | ||
| Timer | On / Off | Activate / Deactivate the automatic switching on / off. | |
| Turn On | Set the time for an automatic power on. | ||
| Turn Off | Set the time for an automatic power off. | ||
| Frequency | Set the frequency of the automatic power on / off. (Daily, Mon.-Fri., Weekends, Once) | ||
| Alarm clock | On/off | Turn on / off the alarm. | |
| Alarm timing | Set the desired alarm time. | ||
| Frequence | Set the desired repeat the alarm clock (every day, Mon - Fri, end of the week once). | ||
| Alarm clock tone | Select the alarm tone you want. | ||
4) Product Specifications
| Display | Digital TFT LCD Display size: 8 inch (20,32 cm diagonal viewable image) Display modus: 4:3 Resolution: 800*600 pixels |
| Power supply | Input: 100~240V AC, 50/60Hz Output: 5V 1A DC |
| USB port | USB Host 2.0 (High Speed) Supports USB storage mediums |
| Memory cards supported | SD/SDHC™ (Secure Digital Card), MMC™ (Multi Media Card) |
| Picture size supported | JPEG, max. resolution: 9000*9000 pixels |
| Video Formats | MPEG 1/4, MJPEG |
| Music Formats | MP3 |
| Operating temperature | 0°C ~ +40°C |
| Dimensions | 217*172*22 mm |
| Weight | ~420 gr. |
| Accessory | Remote control (incl. battery), Foot, Power supply, multi-lingual operating instruction |
You need help?
Simply call our Technical Service Hotline at:
+49 (0) 900 1 50 40 30 for 0.39 €/Min. with calls from the German telephone network. Different rates may apply to calls from mobile phones.
Enjoy Intenso's digital photo frame!
Service and Maintenance
Care
- In order to prevent danger from electric current do neither remove screws nor the case of the weather station.
- Do not operate this device near water. Do not expose the device to rain and moisture. Do not put any objects which store water or other fluids near the device.
- Do not install the picture near heaters, ovens or other heat issuing devices.
- Do not open the case. Do not try to repair the device yourself but have it repaired by qualified personnel only.
- Avoid using the device on sandy areas.
- Fully insert the power supply plug into the opening of the Intenso weather station. This will prevent electrostatic charge.
- Correctly and safely connect all ports.
- Do not push onto the display. Protect the display from direct sunlight.
- The picture frame only plays compatible data formats.
- Images may be protected by the rights of third persons. The play back without licence may infringe copyrights.
- When in operation, do not touch the Intenso weather station with metal objects.
- Avoid operating the device on pillows, sofas or other objects which support the development of heat as there is danger of overheating of the device.
- Do not remove memory cards during read operation. This may cause system crash or data loss.
- Do not switch off the device during an ongoing slide show.
- Do not wrap up the device directly after longer use. Ensure sufficient enough cooling. Otherwise, there is danger of overheating.
- In order to ensure a better service, changes of the operating instructions may be necessary.
Maintenance of the device
The device must be switched off.
Never spray or apply a fluid directly onto the display or case.
Cleaning the displays / case / frame
Carefully wipe the case, frame and LCD display with a soft cloth free from lint and chemicals. Only use cleaning agents which are specifically designed for LCD displays.
Disposal of electrical waste

Devices marked with this symbol are subject to the EG Directive 2002/96/EG.
All electrical appliances and old appliances must be disposed off separately from the household waste and are to be returned to the state authorities designed for that purpose.
By correctly disposing of electrical old appliances environmental damage may be prevented.
- Secure Digital Card (SD™)
- Secure Digital High Capacity (SDHC™)
Multimedia Card (MMC™)
- Secure Digital Card (SD™)
- Secure Digital High Capacity (SDHC™)
Multimedia Card (MMC™)
USB ne peut etre
- Secure Digital Card (SD™)
- Secure Digital High Capacity (SDHC™)
- Multimedia Card (MMC™)
- Secure Digital Card (SD™)
- Secure Digital High Capacity (SDHC™)
- Multimedia Card (MMC™)
- Secure Digital Card (SD™)
- Secure Digital High Capacity (SDHCTM)
Multimedia Card (MMC™)
BHumaHue: He npimehaTe npn BCTabJeHH KapTb ciNy!
LiopoBaA oToPamKa nOndepKINBaET cNeIyUcne fOpMaTbI KapTbI naMnT:
- Secure Digital Card (SD™)
- Secure Digital High Capacity (SDHCTM)
Multimedia Card (MMCTM)
Hocntelnb namrtn USB moKeT BCTabIaTbcraB rHe3do USB toIbKO oHOM HappaBneHN.
BHumaHue: He npimeHnTe cnIy npn BCTaBneHn HocnteJnaTn USB!
BHumHue: Lucpoea omopamka npedycmopeHa molko dna uonb30aHc c oemecmumbmu Kapmau nammu U Hocumenmu nammu USB 2 (100MA).
3) O6üee ynpaBneHne
a) TnaBHOe MeHIO
Pocne BkIoueHn np6opa nOBJareTcra TaBHOe MeHo.
B ΓλaBHOM MeH y Bac ecTb BbIbOp MExdy pa3HbIMN φyHKUmaM ΣΦpOBoN ΦOTopAMKn mEH NO HAcTPOKn. HaXMMTE Ha KHOKN , NaΦpOBoN ΦOTopAMKn, YTObBbIbPaTB NHyKT MeHIO. NODTBePdTe BaW BbIbOp, Haxab Ha KHOKN Play/Pause [▶] Ha ΣΦpOBoN ΦOTopAMKn. HAXMMTE Ha KHOKN , (CTpeJIKN) Ha ΣΦpOBoN ΦOTopAMKn NII HA DnCTaHcUHOHOM UnpaBHeHm MOxHO (CTpeJIKN) Ha ΣΦpOBoN ΦOTopAMKn NII HA DnCTaHcUHOHOM UnpaBHeHm MOxHO NpeDbNtAeB CooTBeTCTBeHHbIX NODMeHIO. NODTBePdTe BaW BbIbOp KHOKN Play/Pause [▶] Ha ΣΦpOBoN ΦOTopAMKn NII DnCTaHcUHOHOM UnpaBHeHm.
b) PpocMoTp pOToTorpapn
Bb6epnte B TJIaBHOM MeHIO cyHKUIO FOTorpaФn. Ha 3KpaHe NOB8rTc NOCDoeINHeHHbIE HocHTeNn NamrN. B 3aBNCIMOCtN OT TORO, KaKoH HocTeJb NaMRTn NOCDoeINHe, MOXHO Bb6paTb SD, MMC n USB. NODTBepDnTE BaW bIbOp c NOMOuH KONKn Play/Pause [▶]. Bb6epnte Heo6xOdmyu nAnKy, YTObI BOITN B MeHIO ppeBaPteJbHorO npocmotpa FOTorpaФn. Bb6epnte FOTorpaФnIO nOJTbePdNTe BaW bIbOp KONKOJ Play/Pause [▶], YTObI HaayTb CnaI-D-woy c DaHHORo MecTa.
B cnyuae ecn cnaid-woy yke 6bIIO 3anyueHO C BbIbpaHHo KApTbI, OHO ABTOMATUeCKN npoDOnJxAeTcR LcHpOBoi FOToPamKoI. Pn Heo6XoDMOCtN BbIBoH Na 3kpan NpeeyHr DOCTynhix napanK mEHIO npedBapntelbHorO npocMOTpa n3obpaKeHm OcyuectBJIaETcR BpyHyIO. HaxMtTe KhoNky Ha3aD [7], YTObI BbIHTn I3 peXIMa CnaI-D-woY N Bbl3BaTb MeHIO npedBapntelbHorO npocMOTpa.
ФУнкLIN BO BpemeI pOcMoTpa CJaIД-шоY:
C nOMOuKHOHOK co cTpeKo BnpaBO nn BneBO Bb moKeTe nepemeuaTbcra Ha odHy fOTorpaΦnIO BnepeN nn Ha3aD.
HaKaTHeM Ha KhoNky Play/Pause [MOxH0 octaHOBnTB cnaI-woy nNoJyHTb noDpo6HyO HOpMauno o foToRpaFnn, KOtopa NOKa3aHa Ha 3KpaHe. Ppni NOBTOPHOM Haxatm CnAid-woy npdoJXaeTcra.
- Depxknte HaxaTbIM KhoNky IrgpTaB/Naay3a [I] dIy OTKpbITnMa MeHIO OCD. 3deCb Bbl MoXe Tbe Bb6paTb 06naCTb BOCPON3BODmOro paIHa, BKIOUaTb NIN BBIKIOuATb FOHOByIO My3bIKy (pI IN HAJIYNI NOIDepxKnBaEmbIX oOpMaTOB Ha HocHTeJe), pIIN6JnxKaTb FOToRpaΦNIO IINI NOBopauNBaTb, HAcTPONTb JPKoCTb, Bbl6paTb nepeXODaIne 3ΦΦeKtbl, DIIteJIbHoCTb NOKa3a KapTHKNI HAcTPONTb NOKa3bIBaEmbI pa3Mep.
c) KaJIeHdApb:
B pexnme kaJIeHdApy y Bac cTb BO3MOXHOCTb Bbl6paTb pa3NHyIe BNDI. HaxmTe npocTo KhoNky Mrgatb/Naay3a [▶II] Ha pamKe IINHa IyIbTe ynpabNeHna. DepxnTe KhoNky Mrgatb/Naay3a [▶II] HaxaToI dIy OTKpbITnM MeHIO OCD. 3Decb Bbl MoxTe HAcTpOHTb DaTy IN BpeM, a TaKke akTNBnPoBaTb IIN DeakTNBnPoBaTb TaMep n 6dyNJbHnK. HAcTpOKn dIra TaMepa n 6byNJbHnKa BblONHnTe, NOxAnyIcTa, OTDeJIbHo Ype3 MeHIO HAcTpOeK.
d) Bocnpo3BeJeHne paJIOB MP3
Ipeennte B rnaBHOM MeHIO K cyHKuIN My3bika. IoBraTcN IOcOeHNHeHHbIe ycTpoiCTBa namrtn. B 3aBnCmocTN OT NOKHouEHHoro Tnna yctpoiCTBa, y Bac eCTb Bb6op Mekdy SD / MMC n USB. PoNTBepdnte Baaw Bb6op, Haxab Ha KNONky UrpaTb/Play3a [▶i].
IIOBbIyOTcBce nankn C noDdePknBaIOUIMM faiJamn MP3. Bblbepnte keJaemyo nanky DnI nepeXoDa B MeHIO npocMoTpa My3bIKn. KOrda Bbl BblbpaII JKeJaembl faiMP3, IODTBepdnte Bbl6Op C NOMOsbIO KHONKn HrpaTb/Play3a [▶] dIyBocnpOn3BeDeHnra faiJa MP3.