Media Creator - Digital photo frame INTENSO - Free user manual and instructions
Find the device manual for free Media Creator INTENSO in PDF.

User questions about Media Creator INTENSO
0 question about this device. Answer the ones you know or ask your own.
Ask a new question about this device
Download the instructions for your Digital photo frame in PDF format for free! Find your manual Media Creator - INTENSO and take your electronic device back in hand. On this page are published all the documents necessary for the use of your device. Media Creator by INTENSO.
USER MANUAL Media Creator INTENSO
Intenso 10“ MEDIACREATOR
- Secure Digital Card (SD™)
- Secure Digital High Capacity (SDHC™)
Multimedia Card (MMC™)
Memory Stick (MS™)

Please follow this quick guide to be informed about the most important functions of the Intenso Digital Photo Frame. A detailed instruction manual with a description of all settings for the Intenso Digital Photo Frame can be found on our Homepage:www.intenso.de
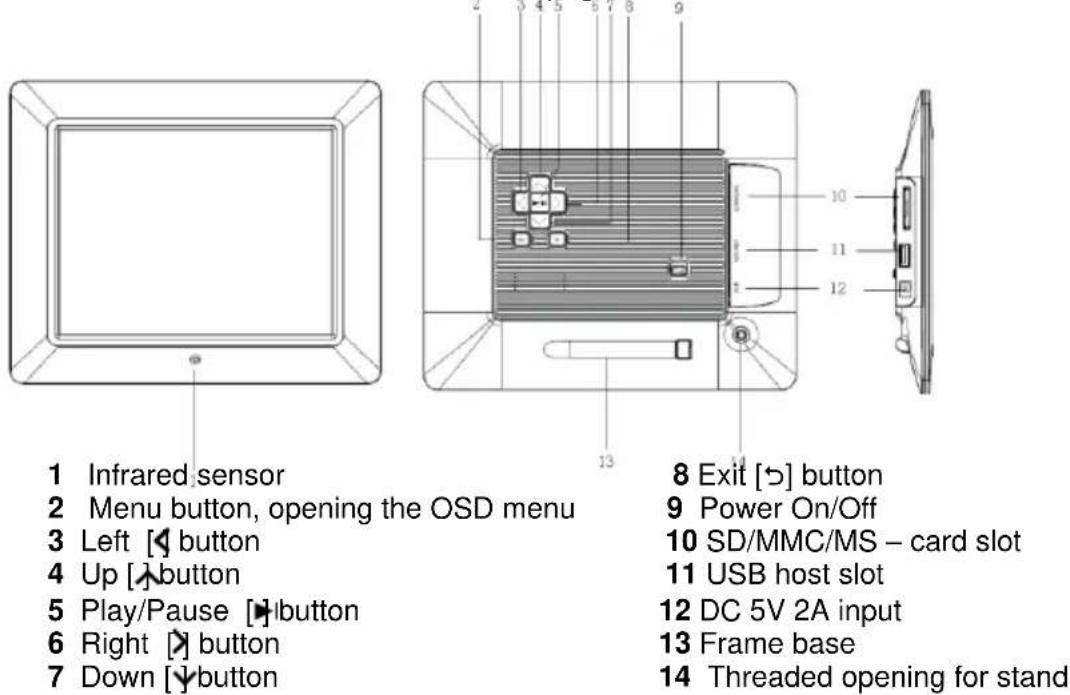

| 1 | Power On/Off | |
| 2 | ▲ | Moves the cursor upwards in the software menu |
| 3 | ▲ | Moves the cursor to the left in the software menu. |
| 4 | MENU | Starts the main menu |
| 5 | ▼ | Moves the cursor downwards in the software menu |
| 6 | ← | Reverse search while playing MP3 or video files |
| 7 | Zoom in | |
| 8 | 4:3/16:9 | Selection of display screen: 4:3, 16:9 |
| 9 | VOL+ | Turn up volume |
| 10 | SETUP | Starts the setup menu |
| 11 | OK | Confirms the selection. Start/pause of slide show, MP3 or video playback |
| 12 | Moves the cursor to the right in the software menu. | |
| 13 | OSD | Displays the On-Screen-Display (OSD) during slide show |
| 14 | Leaps back to the previous menu | |
| 15 | Forward search while playing MP3 or video files | |
| 16 | Starts the slide show with background music | |
| 17 | Start / stop of music during slide show | |
| 18 | VOL- | Turn down volume |
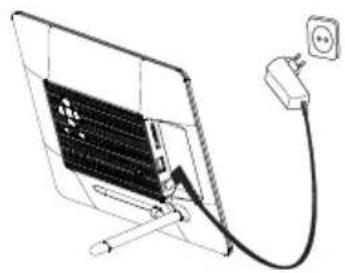
1) Connect and switch on the digital photo frame
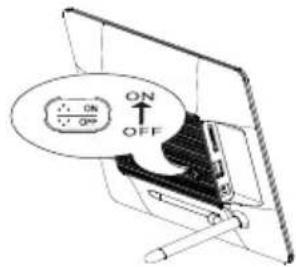
Connect the mains adapter provided with the digital photo frame. Plug the other end of the mains adaptor into the power outlet. Now move the slider of the digital photo frame into "On" position to switch on the photo frame.
Please note:
The plug must be placed next to the device so to be easily accessible.
Do not open the box of the line adapter. If the box is open, there is danger of life caused by electric shock. The product does not contain parts to be maintained.
Actuate the line adapter only with earthed plugs of AC 100-240V\~, 50 / 60Hz If you are not sure about the provision of electricity at the installation point, ask your energy provider.
- Use the included line adapter and line connection cable only.
2) Insert memory cards | connect USB data carriers
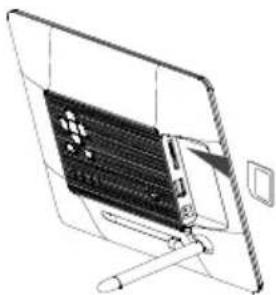
Insert memory cards into the slot with the manufacturer logo facing into your direction.
Please note: Never insert cards by use of force!
The following memory card formats can be used with your digital photo frame:
- Secure Digital Card (SD™)
- Secure Digital High Capacity (SDHC™)
Multimedia Card (MMC™)
Memory Stick (MS™)

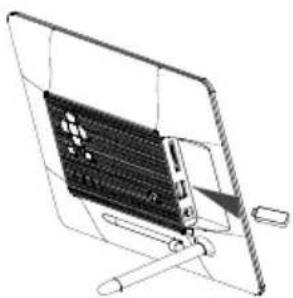
USB data carriers can only be plugged into the USB slot in one direction.
Please note: Never insert USB data carriers by use of force!
Note: The digital photo frame is exclusively designed for the use with compatible memory cards and 2.0 data media (100 mA).
3) General Operation
a) Main Menu
After powering on, the Main Menu appears. If you already have inserted a storage device loaded with photos, the slideshow will begin automatically.
You can exit the slideshow by pressing the Back [?] button on either the remote control or on the back of the photo frame. That will bring you to the Image Preview Menu. By pressing the Back [?] button again, you will enter the Main Menu. Alternatively, you can press the remote control Menu button to access the Main Menu.
In the Main Menu you can choose between the Connected Storage Devices, the clock or the Setup Menu. Press the [A], [V] buttons on the photo frame or the ▲,▼ buttons on the remote control to select your Desired Menu Item. Confirm your selection with the OK button on the remote control or the Play/Pause [▷] button on the photo frame.
b) Viewing Photos
From the Main Menu select from the Connected Storage Devices and then the function Photos. This takes you into the Image Preview Menu. Use the Arrow Keys to choose a photo and confirm your selection with the OK button on the remote control or the Play/Pause [▶] button on the back of the photo frame. The photo will be displayed.
- By pressing the Arrow Keys either Left or Right you can jump one picture Back or Forward.
- Press the OK button on the remote control or the Play/Pause [▶i] button on the photo frame to Stop the slideshow.
- Press the OSD button on the remote control or the Menu button on the photo frame to open the OSD Menu.
c) Playing Music Files
From the Main Menu select the Connected Storage Devices and then the function Music. It will now display all the Folders in the Connected Storage Devices. Select a Folder with the Arrow Keys and confirm your selection with the OK button on the remote control or the Play/Pause [▶] button on the photo frame. All the Music Files in the folder will be displayed. Use the Arrow Keys to choose a Title and confirm your selection with the OK button on the remote control or the Play/Pause [▶] button on the photo frame. Your selection will now be played.
- By pressing the Arrow Keys either Left or Right you can navigate the currently displayed OSD Menu. Confirm your selection with the OK button on the remote control or the Play/Pause [+] button on the photo frame.
The Volume can be adjusted by pressing the Arrow Keys either Up or Down.
d) Playing Video Files
From the Main Menu select the Connected Storage Devices and then the function Video. It will now display all the Folders in the Connected Storage Devices. Select a Folder with the Arrow Keys and confirm your selection with the OK button on the remote control or the Play/Pause [▶] button on the photo frame. All the Video Files in the folder will be displayed. Use the Arrow Keys to choose a Video and confirm your selection with the OK button on the remote control or the Play/Pause [▶] button on the photo frame. Your Video will now be Played.
- Pressing the Menu button on the frame or the remote control opens the OSD Menu. By pressing the Arrow Keys either Left or Right you can navigate the OSD Menu. Confirm your selection with the OK button on the remote control or the Play/Pause [▶] button on the photo frame.
The Volume can be adjusted by pressing the Arrow Keys either Up or Down.
e) File Menu
From the Main Menu select the Connected Storage Devices and then the function Files. It will now display all the Folders in the Connected Storage Devices. Select a Folder with the Arrow Keys and confirm your selection with the OK button on the remote control or the Play/Pause [▶] button on the photo frame. All the Files in the folder will be displayed. Use the Arrow Keys to choose a File and confirm your selection with the OK button on the remote control or the Play/Pause [▶] button on the photo frame. Your Desired File will now be Played/Displayed.
f)Clock Display
In the Main Menu select Clock to display the set Time, the Day of the Week, the Date and (with an inserted storage device) a Slideshow. For the Clock Display there are two different modes available. These can be chosen in the Setup Menu. You can also Set the time here.
g) Calendar Display
In the Main Menu select Calendar to display the set Time, the Date, a Month View and (with an inserted storage device) a Slideshow.
h) Changing the Settings
In the Main Menu select Setup to individually set up your device. Navigate with the Arrow Keys to the desired menu item. Confirm your selection with the OK button on the remote control or the Play/Pause [ ] button on the photo frame.
| Settings | Description | |
| Photo setup | Sliding show time | Select how long a picture is displayed during a slide show. Options: 3 sec., 5 sec., 15 sec., 1 min., 15 min. |
| Photo mode | Please decide whether the picture is shown as Full Screen Picture or with its original ratio using the Standart screen function. | |
| Transition effect | Select from random and continuous transition modes | |
| Date stamp | In full screen mode and during a slide show this function shows the picture's creation date | |
| Music setup | Music repeat mode | Repeat mode Off: Plays all songs in the selected directory Repeat mode On: Repeats the selected song Repeat mode All: Plays all songs on the selected storage medium |
| Video setup | Movie repeat mode | Repeat mode Off: Plays all videos in the selected directory Repeat mode On: Repeats the selected video Repeat mode All: Plays all videos on the selected storage medium |
| Clock / Calendar setup | Time mode | Please select the digital or analogous clock |
| Show photo | Select Slideshow during clock mode | |
| Clock Wallpaper | Select the colour of clock mode | |
| Set time | Adjusting the time. | |
| Set time format | Adjusts the time format to 12 hours (AM / PM) or 24 hours | |
| Set date | Adjusts the date | |
| Set date format | Please select the display format for your calendar, e.g. DD/MM/YYYY | |
| Alarm setup | Alarm 1 | Adjusts alarm, alarm tone and time |
| Alarm 2 | Adjusts alarm, alarm tone and time | |
| Alarm 3 | Adjusts alarm, alarm tone and time | |
| Alarm 4 | Adjusts alarm, alarm tone and time | |
| Ringtone volume | Adjusts the alarm volume. Options: 1,2,3,4,5,6 | |
| General setup | Language | Select your preferred language. |
| Brightness | Adjusts the brightness of the TFT display. Options: -3, -2, -1, 0, 1, 2, 3. | |
| Contrast | Adjusts the contrast of the TFT display. Options: -3, -2, -1, 0, 1, 2, 3. | |
| Saturation | Adjusts the colour saturation of the TFT display. Options: -3, -2, -1, 0, 1, 2, 3. | |
| Auto-run | Here you can select the mode your photo frame starts in after power on. ( Photo, main menu, clock, calendar ) | |
| Power-on | Enables automatic power-on. Off / once / daily | |
| Power-off | Enables automatic power-off. Off / once / daily | |
| Hint time | Specify how long the notification window of the key's functions is displayed in the slide show mode and the status II (pause) or ▲ (play) in the picture. Options: 0 sec., 5 sec., 10 sec., 20 sec. | |
| Default | Device is reset to factory settings. |
4) Product Specifications
| Display | Digital TFT LCD Display size: 10 inch (25,4 cm diagonal viewable image) Display modus: 4:3 Resolution: 1024*768 pixels |
| Mains adapter | Input: 100~240V AC, 50/60Hz Output: 5V 2A DC |
| USB port | USB Host 2.0 & USB Device 2.0 Supports USB storage mediums |
| Memory cards supported | SD/SDHCTM (Secure Digital Card), MMC™ (MultiMedia Card), MSTM(Memory Stick) |
| Picture size supported | JPEG, max. resolution:8000*8000 pixels |
| Operating temperature | 0°C ~ +45°C |
| Dimensions | 265.5*215*23 mm |
| Weight (g) | ~ 638.6g |
| Accessory | Remote control (incl. battery), foot, mains adapter, quick guides in morelanguages |
You need help?
Simply call our Technical Service Hotline at:
+49 (0) 900 1 50 40 30 for 0.39 €/Min. with calls from the German telephone network. Different rates may apply to calls from mobile phones.
Enjoy Intenso's digital photo frame!
Service
- To avoid risks of electric shocks please do not remove screws or the housing.
- Do not use the device in the vicinity of water. Do not expose the device to rain or moisture. Do not place any objects in the vicinity of the device that store water or any other liquids.
- Do not install this picture frame in the vicinity of heating systems, ovens or other heat emitting devices.
- Do not open the housing. Do not try to repair the device yourself. Leave any repairs to specialised personnel only.
- Avoid using your device on sandy places.
- Please do properly connect the plug of the mains adaptor to the existing opening of the DF. Thus, you can avoid electro-static charge.
- Plug in all connections correctly and safely.
- Please do not touch the display. Do not expose the display to direct sunlight.
- The picture frame only plays compatible file formats.
- Pictures might be protected by copyright law of third parties. Playing such pictures without licences might represent an infringement of such copyright laws.
- Please do not touch the DF with metallic object during operation.
- Please avoid operation on pillows, sofas or any other heat emitting home appliances since the device might overheat in such cases.
- Please do not remove memory cards while the device is reading. Otherwise this might result in abnormal system ends or loss of data.
- Please do not switch off the device with the slide show running.
- Please do not directly wrap the device after longer operating hours. Please make sure the device has cooled down properly. Otherwise the device might overheat.
- To guarantee better service this operating instruction is subject to alterations.
Device Maintenance
The Device must be switched off.
Never spray or apply liquid substances directly onto the display or the housing.
Cleaning the display / housing / frame
Clean the housing, frame and LCD display carefully with a soft cloth which is free of lint and chemicals. Only use cleaning agents which are suitable for cleaning LCD displays.
Disposal of WEEE (Waste Electrical and Electronic Equipment)

Devices marked with the WEEE logo are subject to the European Community Directive 2002/96/EC.
Waste Electrical and Electronic Equipment must be separated from household rubbish and disposed at sites that collect WEEE.
By orderly disposing WEEE you will avoid damage caused to the environment.
- Secure Digital Card (SD™)
- Secure Digital High Capacity (SDHC™)
Multimedia Card (MMC™)
Memory Stick (MS™)

- Secure Digital Card (SD™)
- Secure Digital High Capacity (SDHC™)
Multimedia Card (MMC™)
Memory Stick (MS™)
- Secure Digital Card (SD™)
- Secure Digital High Capacity (SDHC™)
- Multimedia Card (MMC™)
Memory Stick (MS™)

- Secure Digital Card (SD™)
- Secure Digital High Capacity (SDHC™)
Multimedia Card (MMC™)
Memory Stick (MS™)

- Secure Digital Card (SD™)
- Secure Digital High Capacity (SDHC™)
Multimedia Card (MMC™) - Memory Stick (MS™)

Bhumaue: He npimehraTe npn BCTabHeHn KaptbI cnly!
LiofoBaJ foToPamKa IOnIepeKnBaet CneDyUoune fOpMaTbI KapT naMrtN:
- Secure Digital Card (SD™)
- Secure Digital High Capacity (SDHC™)
Multimedia Card (MMC™)
Memory Stick (MS™)

Hocntenb namrtn USB moKet BCTabnTbcB rHe3do USB toIbKO oDHom HanpaBneHN.
BHumaHue:He npimehyte cnny npu BCTabneHH HocnteJn namrTn USB!
Bhumaue: Lcpobaa pomopamka npedycmompeta monko dna uonb3o8aun c coMecmumu karmu narnmu u Hocumela nu mru USB 2 (100MA).
3) O6üee ynpaBneHne
a) TnaBHOe MeHIO
Pocne BkNoeHn np6opa noBnEeTcraBHOe MeHIO. Ecn yXe BCTaBne HOCHTeJIb namrnc3anncAHbIMn oToTporpaonm, cnaI-d-woy HaunHaetcra ABtOMaTnueckn.
Ecnn cnaiD-woy hauanocb, HaxaTneM Ha KhoNky Ha3ad [°] Ha nctaHcnoHOM ynpabJeHHn nnHa o6paTHoI CTOpOHe FOOTopAMKn MOxHO BbInTu 3 cnaJd-woy. Ha 3KpaHe nOABnEeTcMeHIO npedBapntbHoro npocmoTa FOToRpaFm. HaxaB eue pa3 Ha KhoNky Ha3ad [°], Bbl nonaTe B INaBHOe MeHIO. AInbTePHTuBHO Bbl MoXeTe HaxaTb Ha KhoNky MeHIO Ha nCTaHcNoHHom ynpabJeHHn, YTO6bl BB3BaTb FNaBHOe MeHIO.
B ΓλaBHOM MeHIO MOxHOb BbIbpaTb NOKJIooyeHHbIe HocHTeNn NaMraTn, BpeMn Nn MeHIO HaCTpOKn. HaxMMte Ha KHOKN [A], [V] Ha FOToPamKe nnn ▲,▼ Ha DInCTaHcNoHHom ynpabJeHN, YTO6bl BbIbpaTb XeJaembl nyHKr MeHIO. IoNTBepdnte BaW BbIbop KHOKN OK Ha DInCTaHcNoHHom ynpabJeHNn Nn Play/Pause [▶]Ha FOToPamKe.
b) PnpocMoTp pOToTorpapn
BbIbepnte B ΓIaBHOM MeHIO ODNH N3 NOkJIoueHHbIX HocHTeJe n PAMrN I nocNe 3TOrO ΦyHKUHOΦOTorpaФn. TaK Bbl nonaTe B MeHIO npocMoTp aΦOTorpaФn. Bbl6epNTe φOTorpaФnIO C nOMoUbIO KhoNk co cTpeJkoN I NOdTBepDnTe BaW Bbl6op c NOMoUbIO KhoNk OK Na dNCTaHcUNOHOM ynpabNeHm INI KhoNk Play/Pause [▶] Ha φOTopamke. Ha 3KpaHe nOraBJIaERc ΦOTorpaФn.
C nOMOuKHOKN co cTpeIKoB BneBO uNn BnpaBO Bbl MOKeTe nepemeuaTbcra Ha odHy oTOrpaΦHnBnepeuHa3a.
C NOMOUIKHOKNOK Ha DCNTaHIOHHom ynpabHeHHn IIN Play/Pause [▶]HaΦOTOPAMKe CnaI-D-LOV OCTaHaBJIbAeTcR.
C NOMOUIKHOKNOSD Ha DCtAHUHOM ynpaBHeHN IIN KHOHN MeHnHaΦOTOPAMKE OTKpbIBAeTc MEHIO OSD.
c) PpOurpbIbAHHe My3bIkaJIbHbIx paIIOB
Bb6epnte B TnabHom MeHIO OIN H3 NOKJIooyeHHbIX HOCHTeNe IaMrtu I nocJe 3TOrO
fynkUo My3bika. Ha 3KpaHe NOBJOTcB Ce NaKN IOKJIooyeHHoro HocHTeNaMRTN.
Bb6epnte panky C NOMOUB KHOONK CO CTpeKoI IN ONDTBepDNTe BaW b6op C NOMOUB
KHOKN OK Ha DCtAHCUOHOM ynpabLeHm INI KNOKI Play/Pause [Ha oToPamKe. Ha
3KpaHe NOBJOTcB Ce My3bikalbHbIe paJIbI pankn. Bb6epnte PecHIO C NOMOUB KHOONK
co cTeKoI IN NOITBEpDNTe BaW b6Op C NOMOUB KHOKN OK Ha DnCTaHcuOHHom
ynpabLeHm INI KNOKI Play/Pause [Ha oToPamKe. BocpnOn3BeDeHne neChn
HaunHaetc.
C NOMOJIbIO KHOJOK CO CTpeJIKO BJeBO IIN BnpaBO MOKHO nepeBnRaTbcra NO BBICBeueHHOMy MeHIO OSD IOnTBepdTe BaW BbIbOp KHOJKOI OK Ha nCTaHcNHOHOM ynpaBHeHm IIN Play/Pause [Ha foTOpAMKe.
C nOMOuBIO KhoNOK co CtpeIKoB Bepx INBn MOKHO N3MeHrTb cnIy 3Byka.
d) PpOurpbIbAHne BnDeofoaJIOB
Bb6epnte B TlaBHOM MeHIO OIN H N OOKIQUeHHbIX HOCHTeJe NaMRTN I NOCTe 3TOrO cyHKUIO Bndeo. Ha 3KpaHe nOABJIOTcR Bce naKN I OIKNUOeHHORO HOCHTeJNaMRTN. Bb6epnte npKy c NOMOuBIO KHOONK CO CTpeLKO IN ONDTBEPdNTe BaW BbIOp C NOMOuBIO KHOONK OK HA DCtAHUOHOM ynpAbeHIn NII KHOONK Play/Pause [Ha oToPamKe. Ha 3KpaHe nOABJIOTcR BCE BnDeOpaJbI NaKN. Bb6epnte BnDEoopaJc NOMOuBIO KHOONK CO CTpeLKO IN ONDTBEPdNTe BaW BbIOp C NOMOuBIO KHOONK OK Ha DCtAHUOHOM ynpaBNeHN NII KHOONK Play/Pause [Ha oToPamKe. BnDeo npOnrpbBaETcR.
HaKaTHeM Ha KhoNky MeHNo Ha cIΦpOBo ΦOTopAmKe nIIN dIcTaHcUHOHOM ynpaBHeHn OTKpbIbAeTcR MaHIO OSD.C NOMoUc bIO KhoNOK co cTpeKoB BLeBO nIIN BnpaBO MOxHO nepeDbIratbcra No MeHIO OSD IoITBepdnte Baaw Bbl6Op KhoNkoJ OK Ha dIcTaHcUHOHOM ynpaBHeHn nIi Play/Pause [▶] HaΦOTopAmKe.
C nOMOuKho KhoNOK co cTpeKoB Bepx Nn Bn3 MoXHO 3MeHrTa cnly 3Byka.
e) MeHIO paJIIOB
BbIbepnTe B ΓIaBHOM MeHIO ODNIH N3 NOkNIOUeHHbIX HOCHTeJIe NAMrTH N NocJIe 3TOrO ΦyHKUIO Fain. Ha 3KpaHe NOBJrOTcR Bce nAnKn NODKIOUeHHOrO HOCHTeJIa NAMrTH. BbIbepnte nanky c NOMOsbIO KHOONK CO CTpeKNo I NOITBepdnte BaW bIbOp C NOMOsbIO KHOKN OK Ha INCTAHUNOHOM ynpabNeHN NIN KHOKN Play/Pause [▶] Ha foTOpamKe. Ha 3KpaHe NOBJrOTcR Bce faiNbI nanKn. BbIbepnte faiN C NOMOsbIO KHOKN Co CTpeKNo I NOITBepdnte BaW bIbOp C NOMOsbIO KHOKN OK Ha INCTAHUNOHOM ynpabNeHN NIN KHOKN Play/Pause [▶] Ha foTOpamKe. Ha 3KpaHe NOBJrETcR /npOnrPbIBaETcR HxKbI Fain.
f) HndkaunBpeMeHn
Bb6epnte B TlaBHOM MeHIO NyHKT BpeM, YTO6bI Ha 3KpaHe NOKa3bIbAJIncb BpeM, DeHb HeDenn, data n (ecn BCTabIeH HocHTeNb NaMrtu) cnaId-woy. IJRA HNDkaCmN BpeMeHN IMeOTc2 pa3hblx pexIma. IVX MOxHO Bbl6paTb B MeHIO HAcTpoKn. 3deCb TaKKe MoXHO npOBecTHn HAcTpoKy yacob.
g) Hdkauka kaneHdapra
Bb6epnte B TnabHom MeHIO npHKT KaenHapb, YTo6bl Ha 3KpaHe NOKa3bIBaJIncb BpeMra, DaTa, 0630p Mecuia n (ecnn BCTaBneH HOCHTeIb NaMRTn) cnaI-d-woy.
Keenaem MHO rpaOCTn C uPPOBOI paMKo IHTeHCO!
yxo
- 4To6bI n36eKaTb I mnyIbCoB TOka, Ha ydaIaIe He BA HNTbI HN Kopnyc.
He nCnoJIb3yIte daHHbI np6Op b6JIn3n BObl. He noDaaBaTe np6Op BnHnIO DoJxI INBnaXKnOCTn. He cTAbTe b6JIn3n np6Op npEdMeTb, KOToPbIe HAKaIIINBAOT BOdy IIN dpyrIe BNdbKuDKoCTe.
He yctaHabnBaTe daHHy oToTopaMky B6n3n OToJIeHna, neey nIIN dpyrnx np6opOB, 3nyauoXuX TenNO.
He OTKpbIbAaTe KOpnyc. He nbTaIaTecb peMoHTnpoBaTb np6op cam. IpeOCTaBbTe 3TO npocceccuHaJAM. - N36eraIte HcNOJIb3OBAHnHa MeCTax C NeCKOM.
BCTaBbTe BnKy dny noKnHoueHna 6noka nHTaHnB O TBepctne LΦ nonHoCTbIO. TOnbKO tAK MoXHO 36exKaT bNeKtpocTaTuYeCKOrO 3apJa. - BbInonHnIe BCE noDCoeHNHeHn npaBnIbHo nHaIeJxHO.
He hanaBnBaIe Ha nCnne. 3aunuaTe nCnneo TcNbHbIX cOnHehbx nyuei - ΦoTopamKa BOCPON3BODHT TOJbKO COBMeCTHMble φoPMaTbl.
-ΦotorpaΦnMoryT 6bITb3aunueHb npabAm TpeBnx JnC. Bocnpon3BeDeHne φotorpaΦn 6e3 nueH3nn MoKET 6bITb HapyuHeHem ABTOPCKNX npab.
He npukacaiTecsb K LΦ BO Bpempa6oTbI MeaJIInuYeCKmU npEIMeTaMn - I36eraTe nCnoB3OBAHnHa noDyUkax, DnBaHax nIIN dpyrnx npedMeTAX 6bIa, KOtOpbIe noDcEpxBaHT pa3BNTne TENla, Tak KAK cyuectByet Oanachocb neperpeBaHn npi6opa.
He n3BneKaJTe KapTbI namrN BO Bpemr YTeHnKapr. 3To MoKeT npUBeCTn B C6oM B CnCTeMe n notepe daHHbIX.
He BbIKIOaHTe np6Op BO BpemBocPon3BeDeHnA.
He ynaKOBbIaBte np6op HENocpeCTBeHHo nocJe dInTeJbHOrn cNoJIb3ObaHn. OecneYbTe DOctaToHoe oxJaXdEHNe. B INOM cIyuae cyueCTByeT onaCHOCTb neperpeBaHn. - Дя обесеньялушero сервica BO3MOxHbI Изменяинструкцип NO obcnyxmbaHIO.
PpOΦnIaKTHueckn oCMoTp npH6opa
PINBOPIOJXENbITbBbIKIOUeyH.
HINKOTDAHE BpI3rAITE HHE HAHOCTE KNDKOCTB PPRMO HA DNCJIEN NJIN KOPNYC.
YncTkdaicnnej /kopnyca/pamkn
PpOtpnTe KOpNc, pAMky n Dncnnei LCD octopoxho mKarKo, HEBOPcnCToN CBO6oHoi OT Xmukato TBkAhbIO. NcOnb3yIte OuncntteBhble cpeDCTBa, CneuaNbHO npedHa3NaueHHbIe dna Ducnnner LCD.
YtunnaaCtapbix 3Jektpnp6opOB

O6o3HaueHHbIe daHbIM CmBOLOM np60bpI DoJXhI COOTBeTCTBOBaTb eBPOneckOu DnpeKtInBe 2002/96/EC. BCE 3NeKtpOnpN60bpI n CTapBle 3NeKtpOnpN60bpI DOJXhI yTNIN3nPoBaTbcra OTDeJIbHO OT DomaHero Mycopa uepe3 npedycmOTpeHHbIe dnn 3TOr oCcydApCTBOM nyHKtbl.
HaJIeXaIaYyTIN3aIaIg 3JekTpOpi6OpOB n cTapbIX 3JekTpOpi6OpOB cLyKNT npedOTBpaueHnIO HaHeceHn BpeDa OKpykaIoSe CpeDe.