USER MANUAL AC3420 PHILIPS
m = 311 ;
一
1
m = 311
English 4
Cestina 32
Dansk 60
Deutsch 88
Eesti 118
Espanol 146
Français 175
Hrvatski 204
Italiano 232
Latviešu 261
Lietuviskai 289
Magyar 317
Nederlands 345
Norsk 374
Polski 402
Portugues 431
Romána 460
Shqip 489
Slovenscina 518
Slovensky 546
Srpski 574
Suomi 602
Svenska 630
Türkce 658
Eλληνικα 686
Българскn 715
MaKeDoHcKn 744
YkpaHcbka 773
a802
4 English
Important
Read this user manual carefully before you use the appliance, and save it for future reference.
To ensure the best performance, kindly suggest the firmware of your purifier is upgraded to the latest version. You can do this upgrade via the Air+ app.
Warning
- Check if the voltage indicated on the appliance corresponds to the local power voltage before you connect the appliance.
- If the power cord is damaged, you must have it replaced by Philips, a service center authorized by Philips, or similarly qualified persons in order to avoid a hazard.
- Do not use the appliance if the adaptor, the power cord, or the appliance itself is damaged.
- Only to be used together with the adaptor provided with the appliance.
- This appliance can be used by children aged from 8 years and above and persons with reduced physical, sensory or mental capabilities or lack of experience and knowledge if they have been given supervision or instruction concerning use of the appliance in a safe way and understand the hazards involved.
- Children shall not play with the appliance.
- Cleaning and maintenance shall not be made by children without supervision.
- Do not block the air inlet and outlet, e.g. by placing items on the air outlet or in front of the air inlet.
- Make sure that foreign objects do not fall into the appliance through the air outlet.
- Standard WiFi interface based on 802.11b/g/n/ax at 2.4GHz with a maximum output power of 64mW EIRP.
- We recommend people who are allergic to dust, pollen, pets or mold, not to replace filters by themselves or to take protective measures, such as mask and gloves.
Caution
Only use the original Philips filters specially intended for this appliance. Do not use any other filters.
Combustion of the filter may cause irreversible human hazard and/or jeopardize other lives. Do not use the filter as fuel or for similar purpose.
-
Be aware that high humidity levels may encourage the growth of biological organisms in the environment.
-
Do not permit the area around the appliance to become damp or wet. If dampness occurs, turn the output of the appliance down. If the appliance output volume cannot be turned down, use the appliance intermittently. Do not allow absorbent materials, such as carpeting, curtains, drapes, or tablecloths, to become damp.
-
Never leave water in the reservoir when the appliance is not use.
-
Empty and clean the appliance before storage. Clean the appliance before next use.
-
Avoid knocking against the appliance (the air inlet and outlet in particular) with hard objects.
-
Do not insert your fingers or objects into the air outlet or the air inlet to prevent physical injury or malfunctioning of the appliance.
-
Do not use this appliance when you have used indoor smoke-type insect repellents or in places with oily residues, burning incense, or chemical fumes.
-
Do not use the appliance near gas appliances, heating devices or fireplaces.
-
Always unplug the appliance when you want to move, clean appliance, fill the water, replace the filter or carry out maintenance.
-
When the appliance is not used for a long time, bacteria and mold may grow on the humidification filter. Check the filter before you start using the appliance again. If the humidification filter is very dirty with dark spots, replace it.
-
The appliance is only intended for household use under normal operating conditions.
-
Do not use the appliance in wet surroundings or in surroundings with high ambient temperatures, such as the bathroom, or in a room with major temperature changes.
-
The appliance does not remove carbon monoxide (CO) or radon (Rn). It cannot be used as a safety device in case of accidents with combustion processes and hazardous chemicals.
-
Only fill the water tank with cold tap water. Do not use ground water or hot water.
-
Do not put any substance other than water in the water tank. Do not add fragrance or chemical substance into the water.
-
Do not wash the humidification filter in a washing machine or dish washer, otherwise the humidification filter will be deformed.
-
If you do not use the appliance for a long time, clean the water tank and humidification filter, then dry the humidification filter.
-
If you need to move the appliance, disconnect it from the power supply first.
-
Make sure to promptly turn off the power and remove the water tank in case of overflow. When cleaning the appliance, avoid laying it down and keep nearby electrical outlets dry.
6 English
Electromagnetic fields (EMF)
This appliance complies with the applicable standards and regulations regarding exposure to electromagnetic fields.
Recycling

This symbol means that this product shall not be disposed of with normal household waste (2012/19/EU).
Follow your country's rules for the separate collection of electrical and electronic products. Correct disposal helps prevent negative consequences for the environment and human health.
The air purification filter is non-washable and non-recyclable, dispose of used filter units in accordance with local regulations.
The humidification filter is non-recyclable, dispose of used filter units in accordance with local regulations.
Hereby, DAP B.V. declares that the radio equipment type AC3420/AC3421 is in compliance with Directive 2014/53/EU. The full text of the EU declaration of conformity is available at the following internet address: www.philips.com.
Your 2-in-1 Air purifier and Humidifier
Congratulations on your purchase, and welcome to Philips!
To fully benefit from the support that Philips offers, register your product at www.philips.com/support.
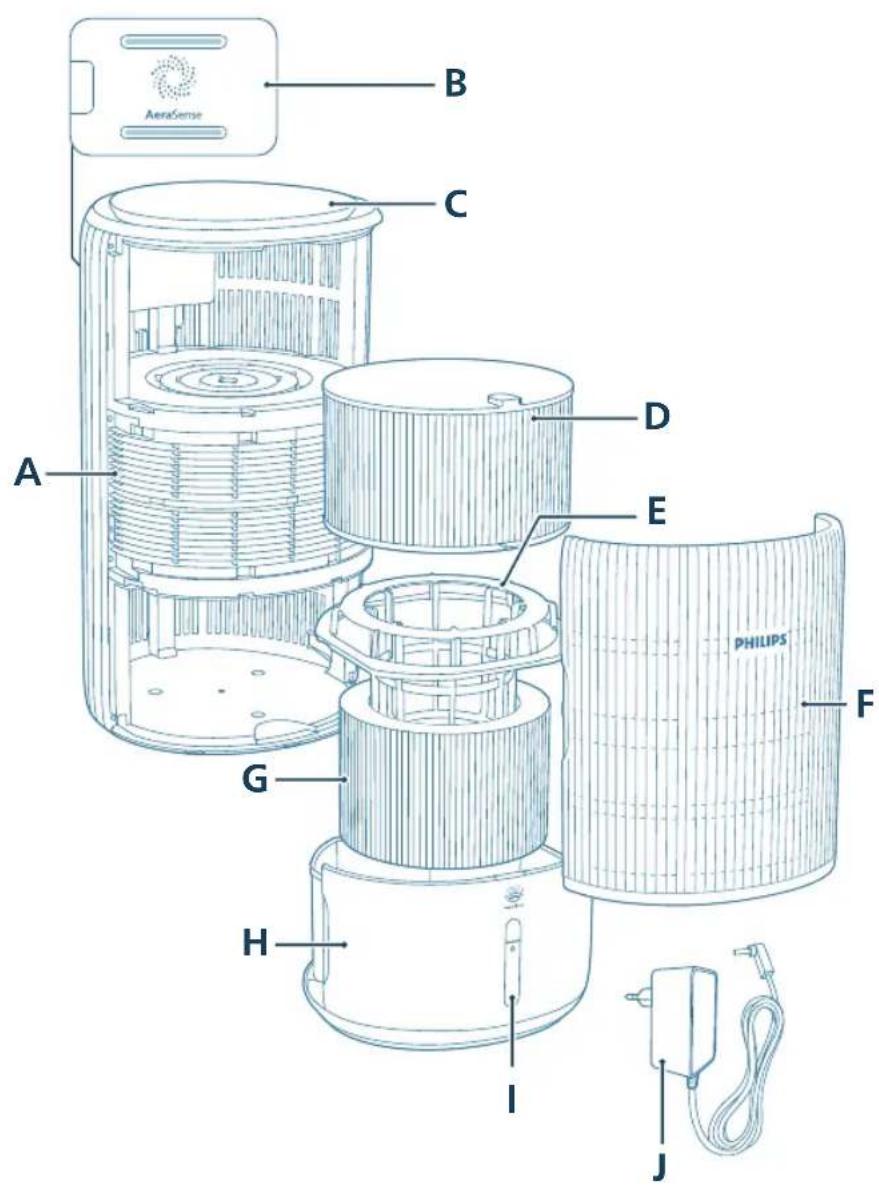
Product overview
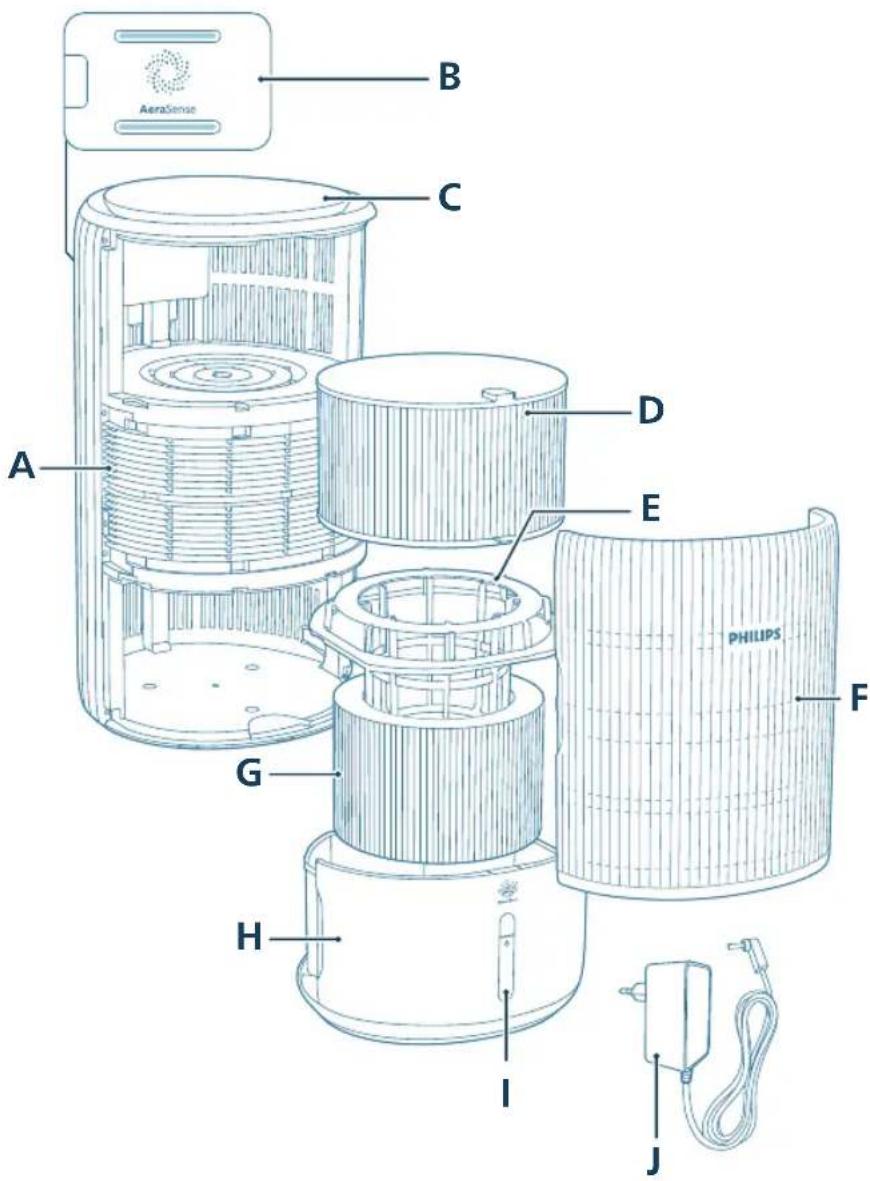
A Air outlet F Front cover
B Particle sensor G Humidification filter (FY3401)
C Control panel H Water tank
D Purification filter (FY3400) I Water level window
E Humidification filter bracket J Adapter (KA4801A-2402000EU)
8 English
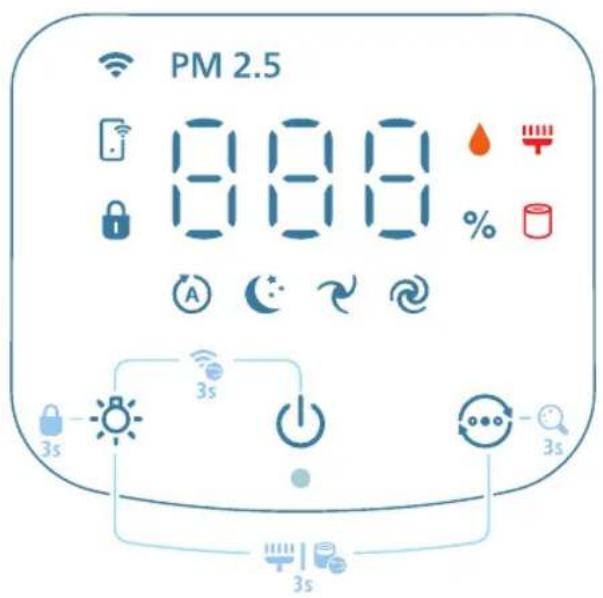
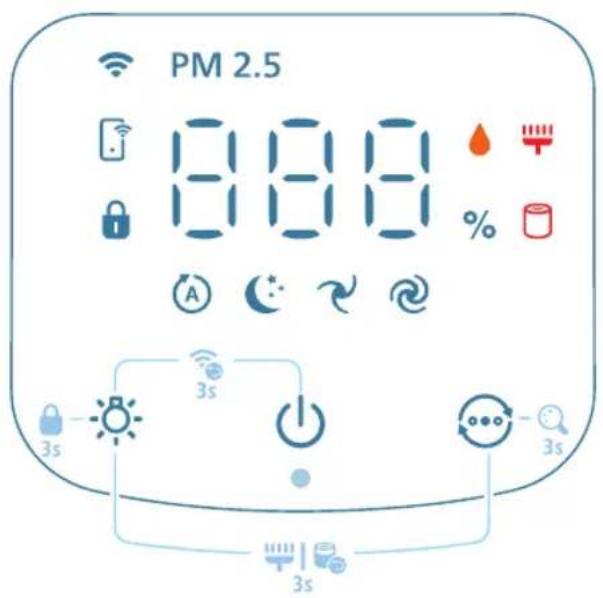
Controls overview
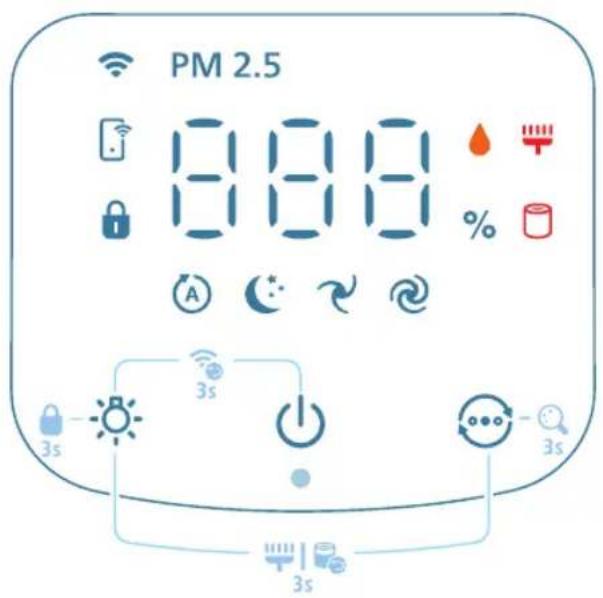
Control buttons:
| Power on/off button Light function button |
| Mode switch |
| Long press the button(s) for 3 seconds: |
| Child lock Wi-Fi reset | +0 |
| Display switch Filter reset | +0 |
| Display panel: |
| Auto mode Medium mode | |
| Sleep mode Turbo mode | |
| WiFi indicator PM2.5 display | PM2.5 |
| Humidification indicator App-operated mode |
| Child lock indicator Filter cleaning alert |
| Filter replacement alert |
Note:
The light sensor is located beneath the power button. Please ensure that it is not obstructed by any other objects.
Getting started
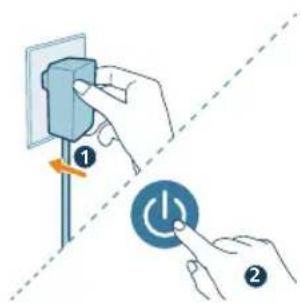
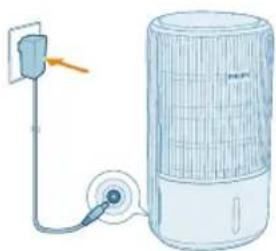
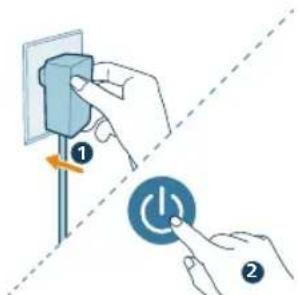
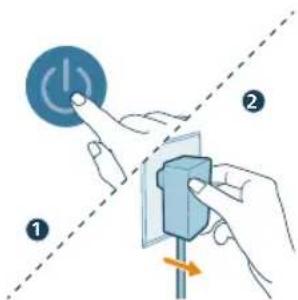
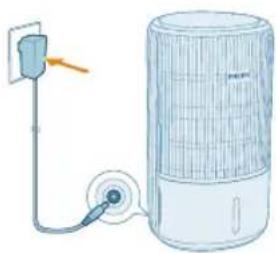
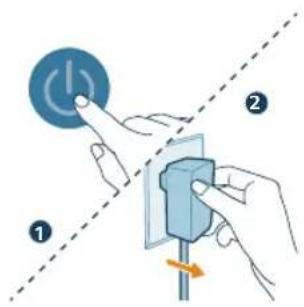
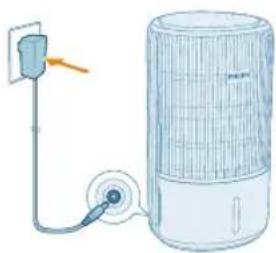
Connecting power
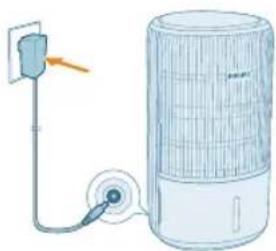
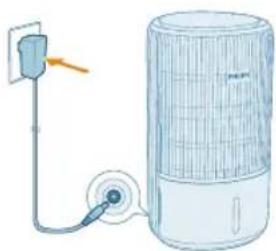
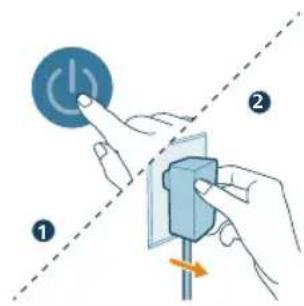
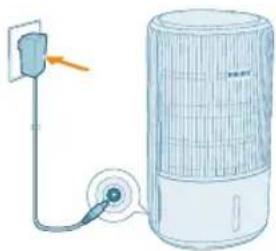
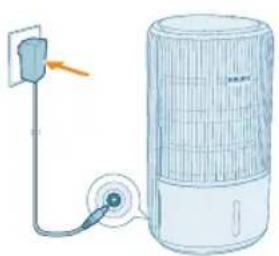
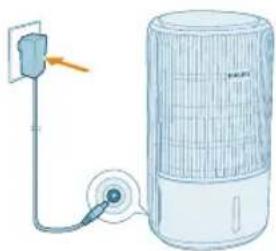
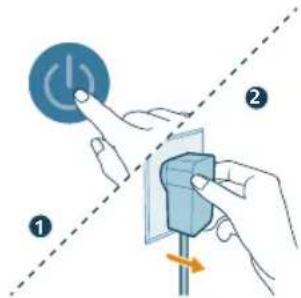
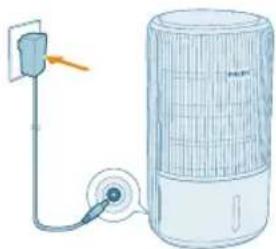
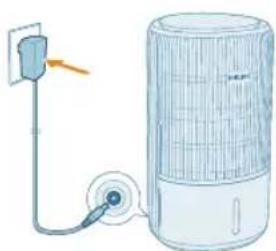
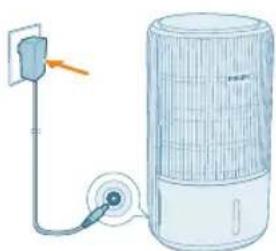
CAUTION: Risk of electric shock! When you unplug the power adapter, always pull the plug from the socket. Never pull the cord.
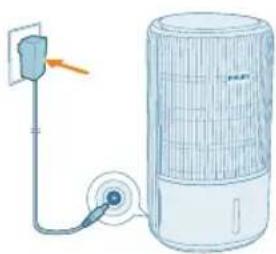
Connect the power adapter to:
- First, the power socket on the appliance.
- Then, the wall outlet.
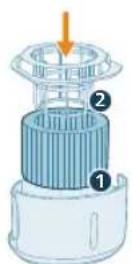
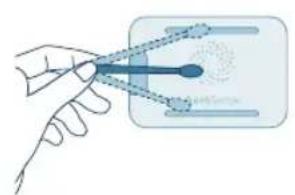
Installing the filters
Remove all packaging of the humidification filter and purification filter before use.
Note: Make sure the appliance is unplugged from the electrical outlet before installing the filters.
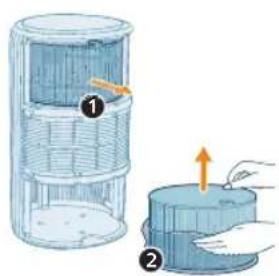
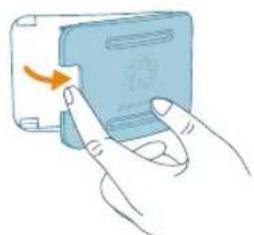
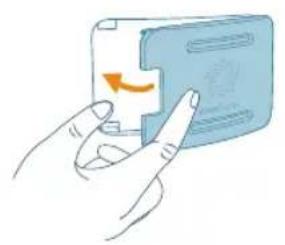
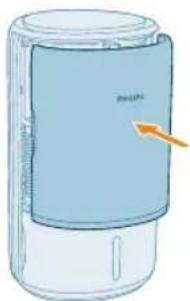
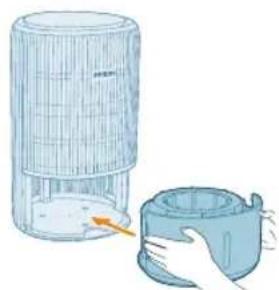
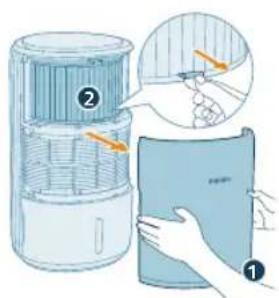
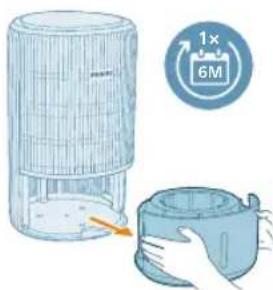
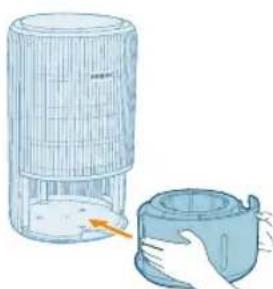
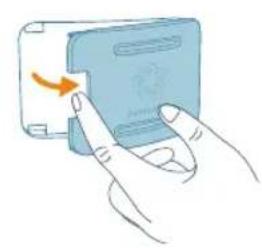
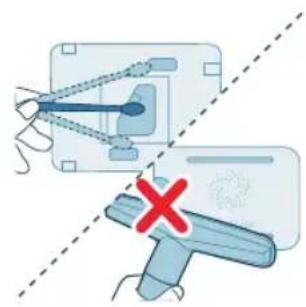
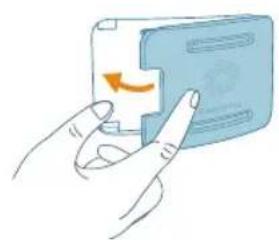
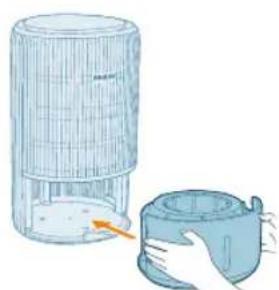
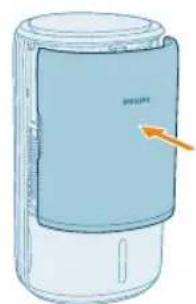
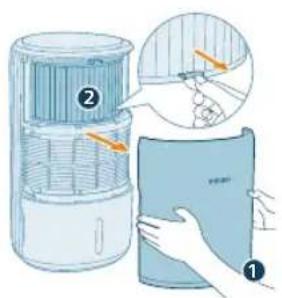
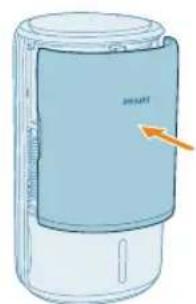
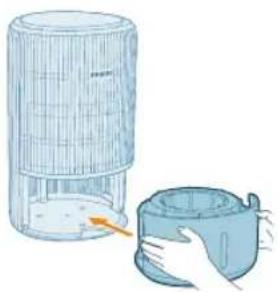
1 Pull out the front cover and water tank from the appliance.
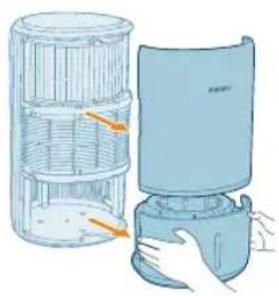
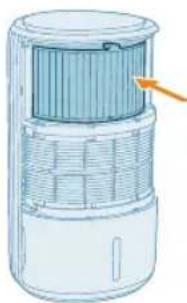
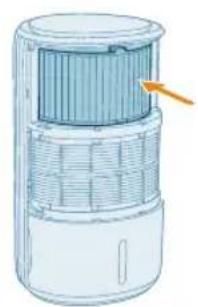
2 Pull the purification filter (FY3400) out from the appliance and remove all the packing materials.
10 English
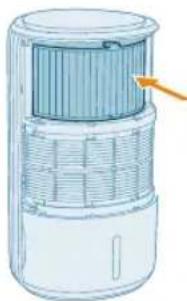
3 Put the purification filter back into the appliance.
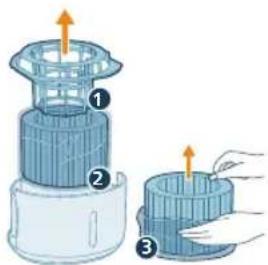
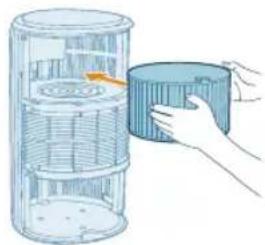
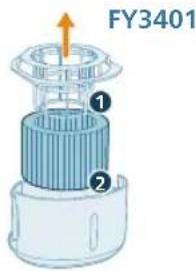
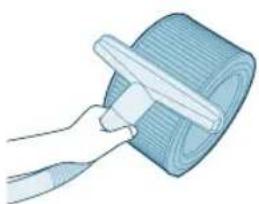
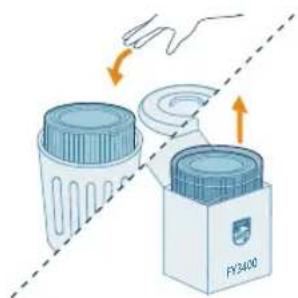
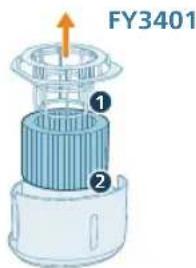
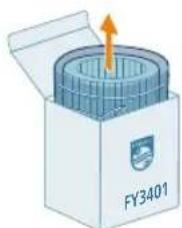
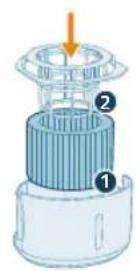
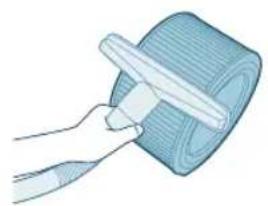
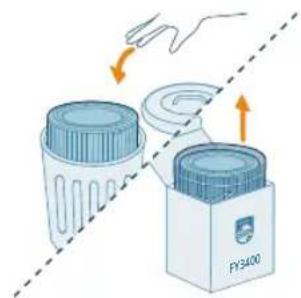
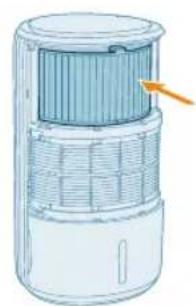
4 Remove the humidification filter bracket around the humidification filter (FY3401), and discard the packing materials.
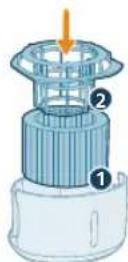
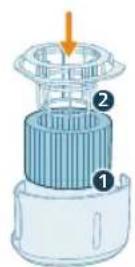
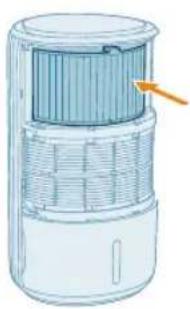
5 Properly install the humidification filter bracket around the filter before placing it back to the water tank.
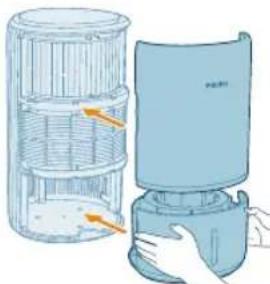
6 Reattach the front cover, place the water tank back to the appliance correctly.
Understanding Wi-Fi indicator
Wi-Fi icon status Wi-Fi connection status
Blink in orange Connecting to the smart phone
Stable in orange Connected to the smart phone
Blink in white Connecting to the server
Stable in white Connected to the server
Off Wi-Fi function disabled or device lights are off
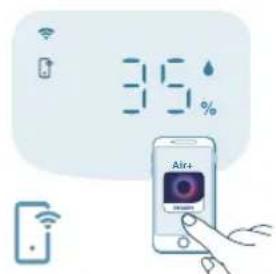
Wi-Fi connection

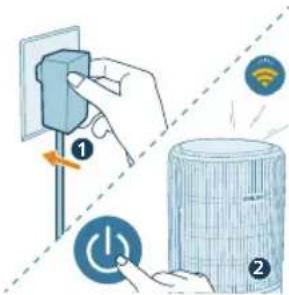
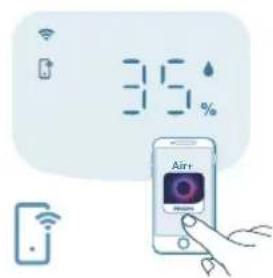
Setting up the Wi-Fi connection for the first time
1 Download and install the Philips "Air+ app from the App Store or Google Play.
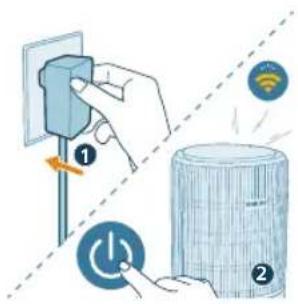
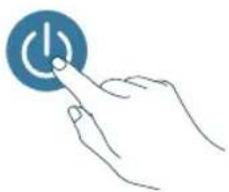
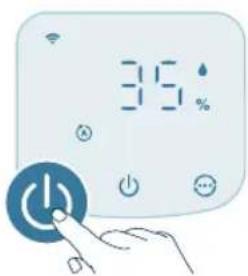
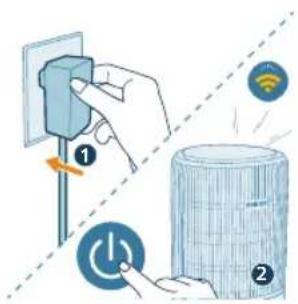
2 Put the plug of the appliance in the power socket and press the power button to turn on the appliance.
- The Wi-Fi indicator blinks orange for the first time.
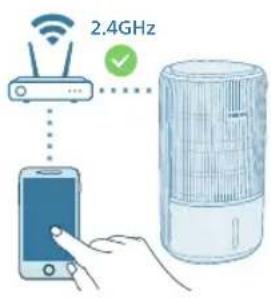
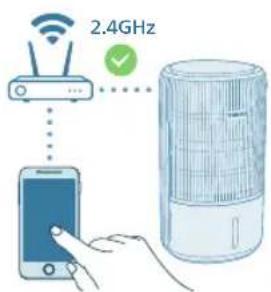
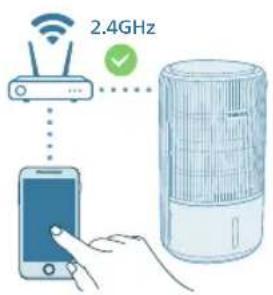
3 Make sure that your smart phone or tablet is successfully connected to your Wi-Fi network.
Note:
Please ensure your smartphone is connected to a 2.4GHz (home) Wi-Fi network instead of a 5GHz Wi-Fi network or public Wi-Fi. For a successful pairing, we suggest turning off your mobile data before initiating the pairing process.
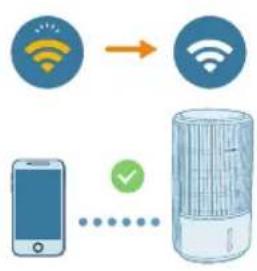
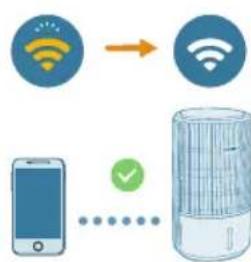
4 Launch the Philips "Air+?" app and click on "Add a device" or press the "+" button on the screen. Follow the on-screen instructions to connect the appliance to your network.
After a successful connection, the Wi-Fi indicator remains steady in white.
Note:
This instruction is only valid when the appliance is being set up for the first time. If the network has changed or the setup needs to be performed again.
If you want to connect more than one appliance to your smart phone or tablet, you can add the appliance in the app on additional smart phones without doing the Wi-Fi connection reset on the device.
Make sure that the distance between your smart phone or tablet and the appliance is less than 10 meters without any obstructions.
12 English
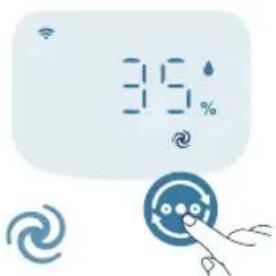
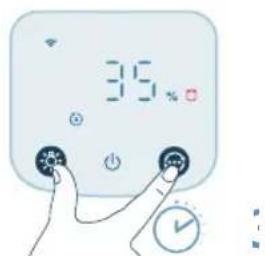
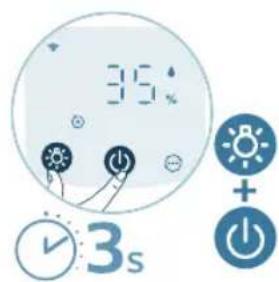
Reset the Wi-Fi connection
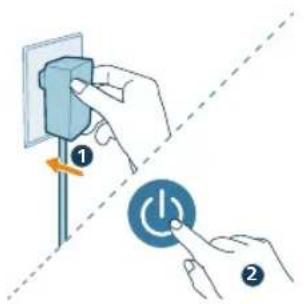
1 Put the adapter of the appliance in the power socket and press to turn on the appliance.
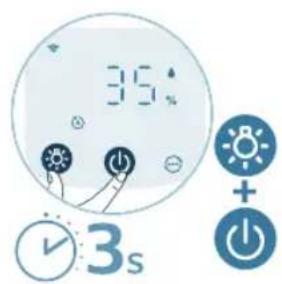
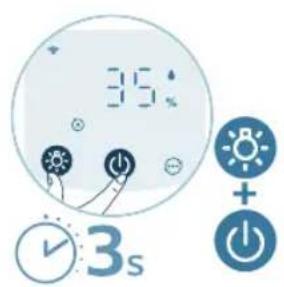
2 Long press and button for 3 seconds at the same time until you hear a beep.
The appliance goes to pairing mode.
The Wi-Fi indicator links orange.
3 Follow the steps 3-4 in "Setting up the Wi-Fi connection for the first time" section.
Using the 2-in-1 Air purifier and Humidifier
Understanding the humidification indicator
Relative humidity represents the amount of water vapor in the atmosphere.
The humidification indicator has four status levels:
Humidification indicator status What does it mean?
Blink in orange ( The water tank is not properly installed.
Stable in orange ( Insufficient water. Please refill the water tank.
Stable in white ( The appliance is humidifying the room.
Off ( ) The target humidity has been reached.
Note: The default target humidity is 50% RH you can set the desired target humidity in the app.
- If the humidification indicator is blinking orange, please check if the water tank is properly installed.
If the humidification indicator lights up white, it means that your room is being effectively humidified.
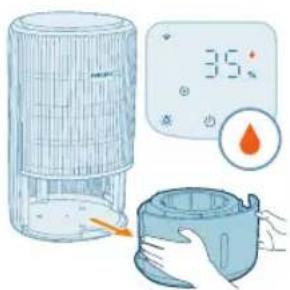
Filling water
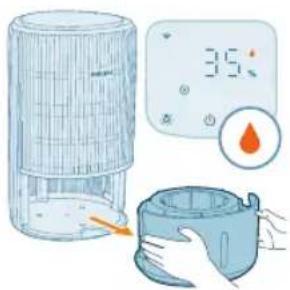
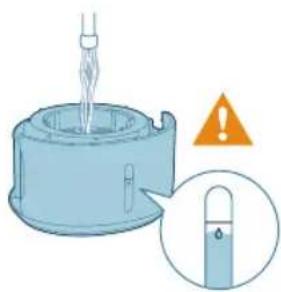
Note: Add water slowly to prevent splashing and avoid exceeding the maximum water level indicated on the appliance.
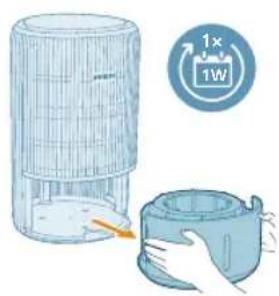
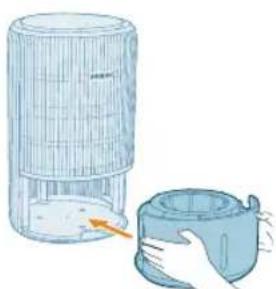
1 Pull out the water tank from the appliance.
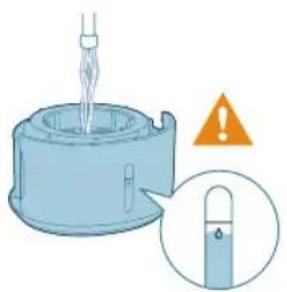
2 Fill the water tank with cold tap water. Monitor the water level through the transparent window on the water tank to prevent overfilling.
14 English

3 Put the water tank back into the appliance.
Understanding the air quality light
Once turned on, the 2-in-1 Air purifier and Humidifier will start scanning the air quality. After approximately 30 seconds, the particle sensor selects the color that corresponds to the surrounding air quality of airborne particles.
The color of the air quality light is determined by the PM2.5 level.
PM2.5
AeraSense sensing technology accurately detects and quickly responds to even the slightest particle change in the air. It provides you with reassurance with real-time PM2.5 feedback.
Most of the indoor air pollutants fall under PM2.5 – which refers to airborne particle pollutants smaller than 2.5 micrometers. Common indoor sources of fine particles are tobacco smoke, cooking, burning candles. Some airborne bacteria and the smallest mold spores, pet allergen and dust mite allergen particles also fall under PM2.5.
PM2.5 level Air quality color Air quality level
| ≤12 Blue Good |
| 13-35 Blue-purple Fair |
| 36-55 Purple-red Poor |
| >55 Red Very poor |
Turning on and off
Note:
For optimum purification and humidification performance, close doors and windows.
Keep curtains away from the air inlet or air outlet.
1 Put the adapter of the appliance in the power socket.

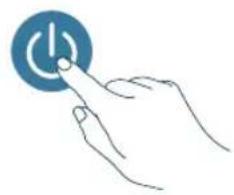
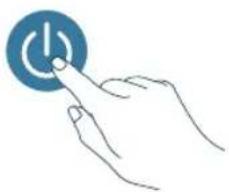
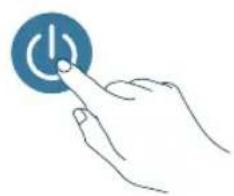
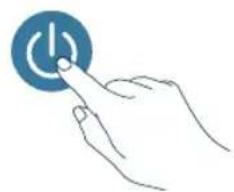
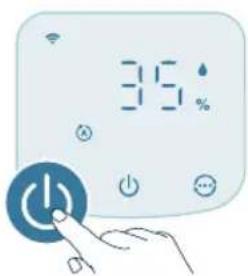
2 Press the power button to switch on the appliance.
The appliance beeps.
The displays on the screen during warming up.
- The appliance operates in the Auto mode with PM2.5 displayed on the screen.
3 Press the power button again to switch off the appliance.
Note: If the appliance stays connected to the electrical outlet after turning OFF, the appliance will operate under the previous settings when turned ON again.
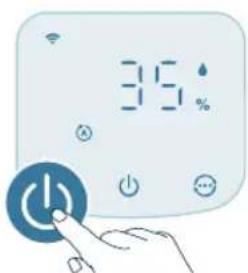
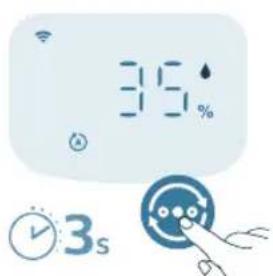
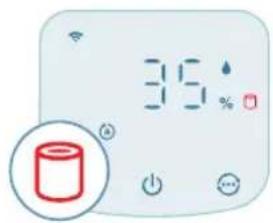
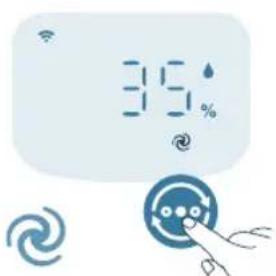
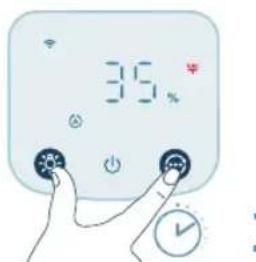
Display switch
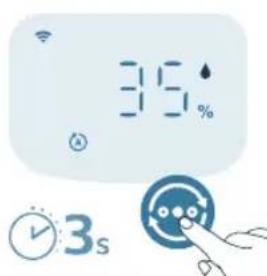
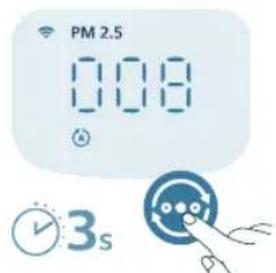
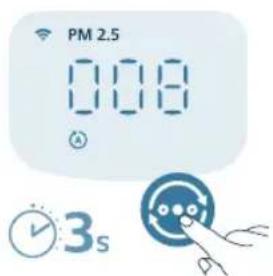
Note: The appliance displays the PM2.5 level by default.
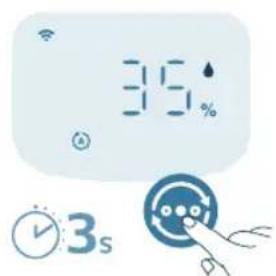
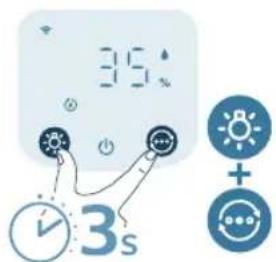
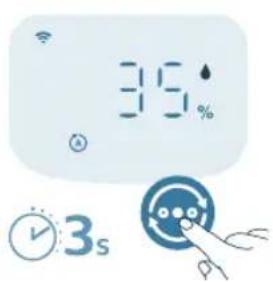
1 Press and hold button for 3 seconds to switch the display indicator to the ambient humidity level.
- It will automatically switch back to PM2.5 display after 5 seconds.
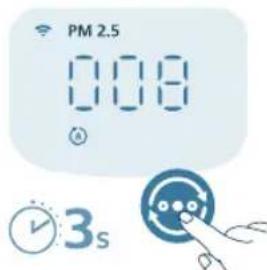
2 Press and hold button again to switch the display indicator back to the PM2.5 level.
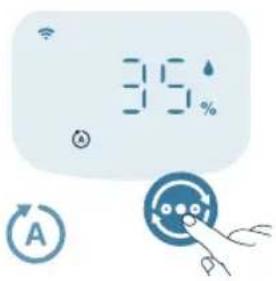
Changing the mode setting
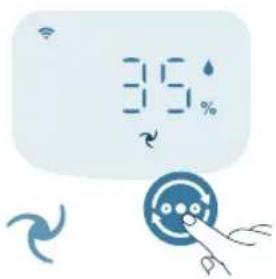
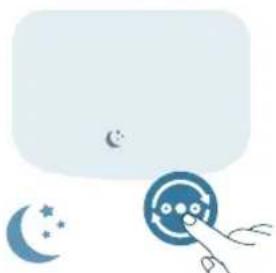
You can choose between the Auto mode, the Medium mode, the Turbo mode, or the Sleep mode by pressing the mode switch button. Additional operating modes can be selected in the Air+ app.
English
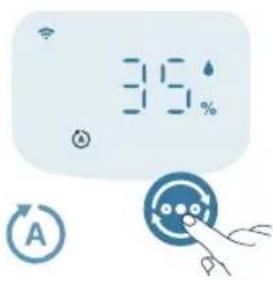
Auto mode (4). The appliance automatically adjusts the fan speed in accordance with the ambient air quality.
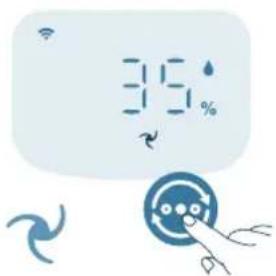
Medium mode (In the Medium mode, the appliance operates on a medium speed.
Turbo mode ( . The appliance operates on the highest speed.

Sleep mode (4): The appliance operates quietly at a low speed. After 3 seconds, the display lights turn off.
- Allergy Seep mode: This mode can be enabled in the Air+ app. Allergy Sleep mode turns your Sleep mode into a more powerful one when you need it. By enabling it, your Sleep mode automatically adapts the fan speed in a similar way with the Auto mode, while keeping the sound level low. This mode is ideal for people who want a higher performance at night vs. regular Sleep mode.
App-operated mode ( : The appliance is operating a mode that is only available through the app, such as additional manual fan speeds, target humidity or other modes that were customized in the app.
Note: The app-operated mode is available ONLY through the app after the Wi-Fi connection is successful.
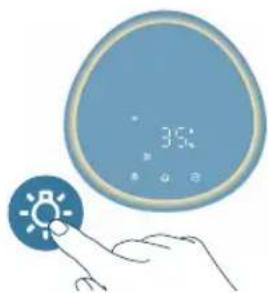
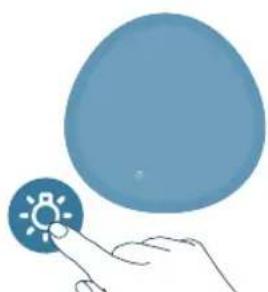
Using the light function

With the light sensor, the control panel can automatically adjust the brightness according to the ambient light.
The control panel will be dim when the ambient light is dark. You can press any button to wake up all lights. Then, if no further operation, all lights will be dim again to match with the ambient light.

You can press the light function button to switch to lamp mode: a cozy light ring around the control panel. Tailor the brightness of the cozy light in the Air+ app.

You can press the button to turn off all lights and the control panel. Press the button again to wake up all lights.
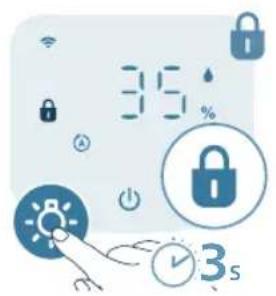
Setting the child lock

1 Press the button for 3 seconds to activate the child lock.
The displays on the screen.
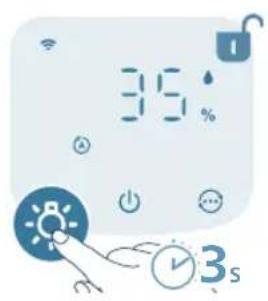
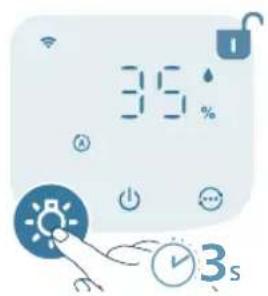
2 Press the button for 3 seconds again to deactivate the child lock.
The disappears from the screen.
Cleaning and maintenance
Note:
Always unplug the appliance before you clean it.
Avoid pouring water through the air inlets and outlets.
Never use abrasive, aggressive, or flammable cleaning agents such as bleach or alcohol to clean any part of the appliance.
Never use any liquids (including water) to clean the purification filter.
Do not attempt to clean the particle sensor with a vacuum cleaner.
Cleaning schedule
Frequency Cleaning method
When necessary Wipe the plastic part of the appliance with a soft, dry cloth
Clean the air outlet cover
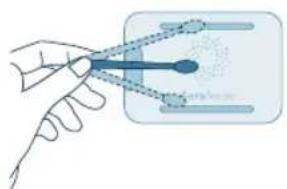
Every two months Clean the particle sensor with a dry cotton swab

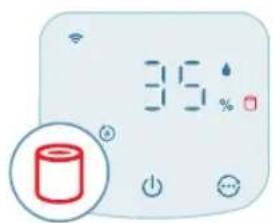
displays on the screen Clean the surface of the purification filter
Every week Clean the humidification filter
Cleaning the body of the appliance
Regularly clean the inside and outside of the appliance to prevent dust from collecting.
1 Use a soft, dry cloth to clean both the interior and exterior of the appliance.
2 The air outlet can also be cleaned with a dry, soft cloth.
Cleaning the water tank
1 Clean the water tank every week to keep it hygienic.
2 Take out the humidification filter.
3 Fill the water tank with water.
4 Add some mild washing-up liquid mixed with water in the water tank.
5 Clean the inside of the water tank with a soft clean cloth.
6 Empty the water tank into a sink.
7 Put the humidification filter back into the water tank.
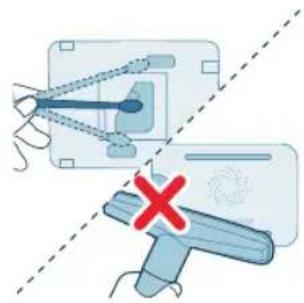
Cleaning the particle sensor
Clean the particle sensor every 2 months for optimal functioning of the appliance.
If the appliance is used in a dusty environment, it may need to be cleaned more often.
If the humidity level in the room is very high, condensation may develop on the particle sensor and the air quality light may indicate a more poor air quality even though the air quality is actually good. If this occurs, clean the particle sensor.

1 Switch off the appliance and unplug from the power socket.
2 Open the air quality sensor cover.
3 Clean the particle sensor with a damp cotton swab.
20
English

4 Dry all parts thoroughly with a dry cotton swab.
5 Close the air quality sensor.
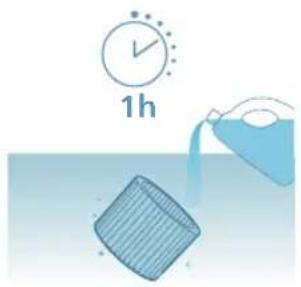
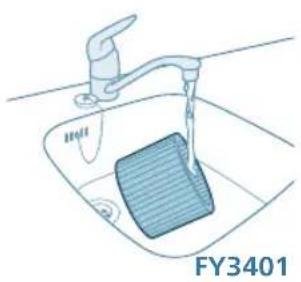
Cleaning the humidification filter
Clean the humidification filter (FY3401) every week to keep it hygienic.
1 Switch off the appliance and unplug from the power socket.
2 Pull out the water tank from the appliance.
3 Remove the humidification filter bracket from the humidification filter.

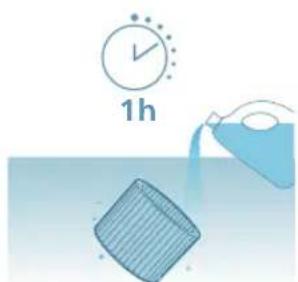
4 Soak the humidification filter with mild or acid cleanser (24g citric acid with 4L water or 100ml 6% white vinegar with 4L water) for 1 hour.

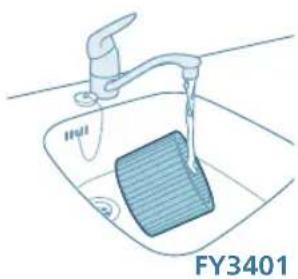
5 Rinse the humidification filter under a slowly running tap. Do not squeeze or wring the filter when cleaning.
6 Install the humidification filter bracket around the filter properly.
7 Put the water tank back into the appliance.
22 English
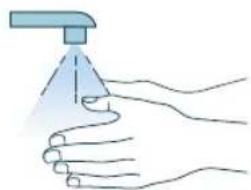
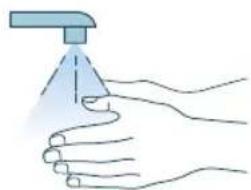
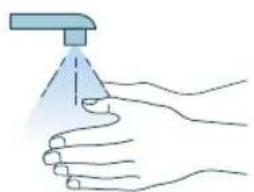
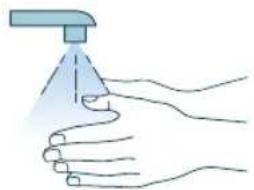
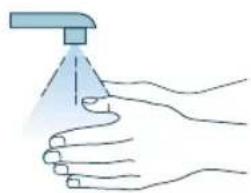
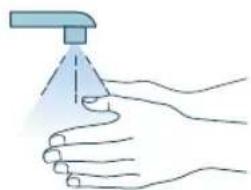
8 Wash your hands thoroughly after cleaning the filter.
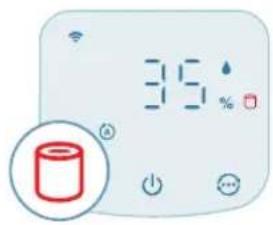
Cleaning the surface of the purification filter
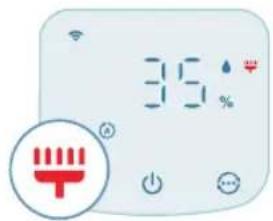
When the filter cleaning alert displays on the screen, clean the surface of the filter with a vacuum cleaner.
Note: We recommend people who are allergic to dust, pollen, pets or mold, not to replace filters by themselves or to take protective measures, such as wearing a mask and gloves.

1 Switch off the appliance and unplug from the power socket.

2 Pull the front cover and remove it from the appliance. Pull the purification filter out.
3 Clean the surface of the purification filter with a vacuum cleaner.
4 Put the filter back into the appliance.

5 Reattach the front cover.
6 Put the adapter of the appliance in the power socket.
7 Press the button to switch on the appliance.

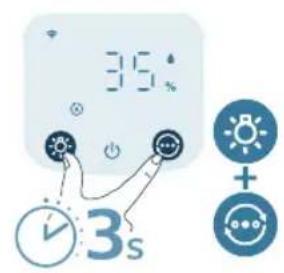
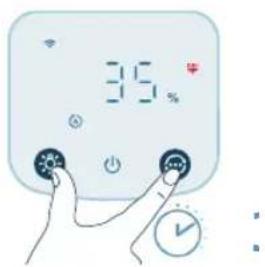
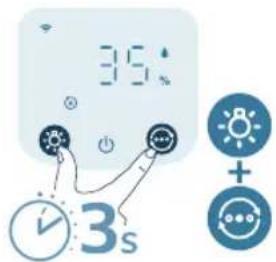
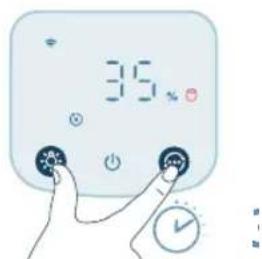
8 Press and hold the and button for 3 seconds to reset the filter cleaning time.
- You can also reset the filter cleaning time via the Air+ app.
After the reset is successful, the filter cleaning alert disappears from the screen.
24 English

9 Wash your hands thoroughly after cleaning the filter.
Replacing the filters
Understanding the healthy air protect lock
This appliance is equipped with a filter replacement indicator to make sure that the air purification filter is in optimal condition when the appliance is operating. When the filter needs to be replaced, the filter replacement alert lights up red. If the filter is not replaced in time, the appliance will stop operating and automatically lock to protect the air quality in the room. Replace the filter as soon as possible.
Replacing the purification filter
Note:
The purification filter (FY3400) is not washable or reusable.
Always turn off the appliance and unplug from the electrical outlet before replacing the filter.
When the filter replacement alert displays on the screen, replace the filter (FY3400).
Note: We recommend people who are allergic to dust, pollen, pets or mold, not to replace filters by themselves or to take protective measures, such as wearing a mask and gloves.

1 Switch off the appliance and unplug from the power socket.
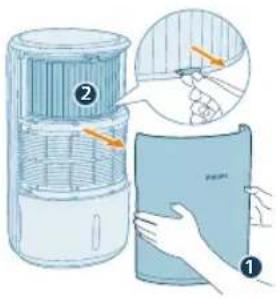
2 Pull the front cover and remove it from the appliance.Pull the filter out and discard the used filter.
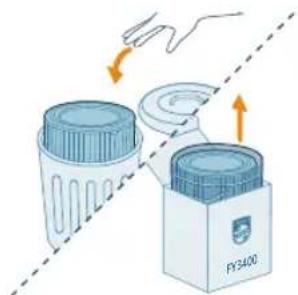
3 Remove all packaging materials of the new filter (FY3400).
4 Put the new filter back into the appliance.
5 Reattach the front cover.
6 Put the adapter of the appliance in the power socket.
26
English
7 Press the button to switch on the appliance.
8 Press and hold the and button for 3 seconds to reset the filter lifetime counter.
- You can also reset the filter lifetime via the Air+ app.
After the reset is successful, the filter replacement alert disappears from the screen.
9 Wash your hands thoroughly after replacing the filter.
Note: Do not smell the filter as it has collected pollutants from the air.
Filter reset
You can replace the purification filter even before filter replacement alert ( displays on the screen. After replacing filter, you need to reset the filter lifetime counter manually.

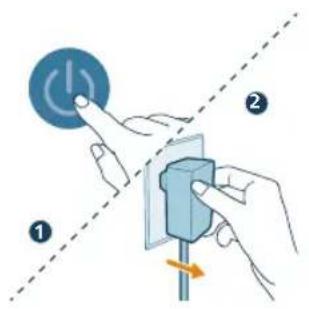
1 Press the button to turn off the appliance. Unplug the appliance.

2 Make sure the appliance is completely unplugged. Wait for at least 10 seconds before plugging the power adapter into the socket.
3 Within 15 seconds after power on, press and hold the button for 3seconds to reset the filter lifetime counter.
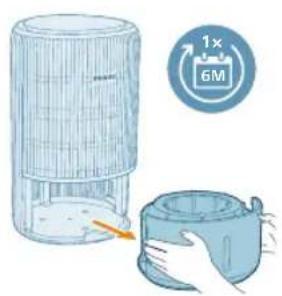
Replacing the humidification filter
Note:
Always unplug the appliance before you replacing the filter.
Use only Philips original humidification filter FY3401.
Replace the humidification filter every 6 months for optimal performance. If the filter is in good condition, you could use it for a longer period of time. Make sure to replace the humidification filter at least once a year.
1 Switch off the appliance and unplug from the power socket.
2 Pull out the water tank from the appliance.
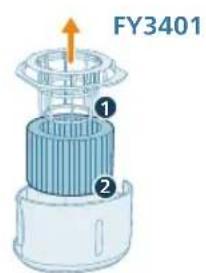
3 Remove the humidification filter bracket from the humidification filter. Discard the used filter.
28
English
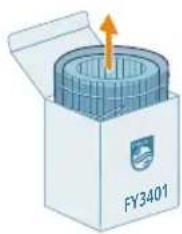
4 Remove all packing materials of the new filter (FY3401).
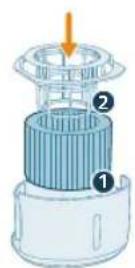
5 Install the humidification filter bracket around the filter properly.

6 Put the water tank back into the appliance.
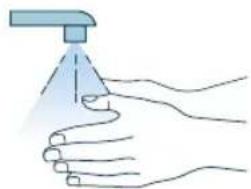
7 Wash your hands thoroughly after replacing the filter.
Storage
1 Turn off the appliance and unplug from the power socket.
2 Clean the appliance, humidification filter and the surface of the purification filter (see Chapter "Cleaning and Maintenance").
3 Let all parts air dry thoroughly before storing.
4 Wrap the filters in air tight plastic bags.
5 Store the appliance, filters in a cool, dry location.
6 Always thoroughly wash hands after handling filters.
Troubleshooting
This chapter summarizes the most common problems you could encounter with the appliance. If you are unable to solve the problem with the information below, contact the Consumer Care Center in your country.
Problem Possible solution
| The appliance does not work properly. Check if the water tank is properly installed. If not, for safety reason, the appliance will stop operating. |
| The filter replacement alert is on but you have not replaced the corresponding filter. As a result, the appliance is now locked. In this case, replace the filter and reset the filter lifetime counter. |
| There is no air humidification. Make sure that the water tank is filled with water, and the water tank and humidification filter are properly installed. |
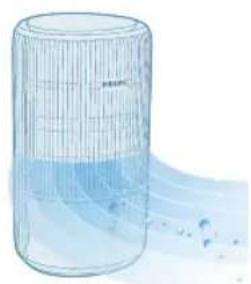
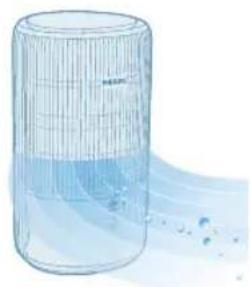
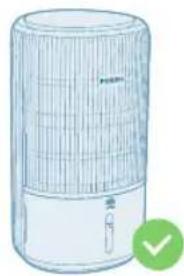
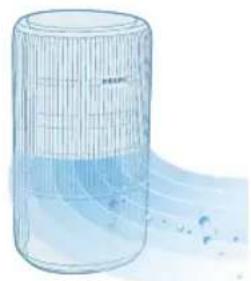
| The advanced cold evaporation system in 2-in-1 Purifier and Humidifier produces healthy moist air from the outlet without any visible water mist. Water vapor is invisible to the human eye. |
| When used in a dry environment, the moisture released by the 2-in-1 Purifier and Humidifier will be absorbed by surrounding objects such as walls and furniture, which can prolong the humidification time. To achieve optimal humidification, it is recommended to close doors and windows. |
| The water tank leaks. Make sure that the water does not exceed the maximum level. |
| Make sure that the water tank is well assembled every time after you clean it. |
| If the problem persists, contact the Consumer Care Center in your country. |
| There are some white deposits on the humidification filter. | The white deposits are called scale and they consist of minerals from the water. Scale on the humidification filter affects the humidifying performance, however it does not harm your health. Please follow the cleaning instructions in the user manual. |
| The humidification filter becomes yellowish after some time. | The yellow deposit is a natural effect of the filter material, and it has no impact on humidification performance. Clean the humidification filter frequently to remove the scale, and replace the humidification filter every 6 months. |
| The airflow that comes out of the air outlet is significantly weaker than before. | The surface of the purification filter is dirty. Clean the surface of the filter (see Chapter 'Cleaning and maintenance'). |
| The air quality does not improve, even though the appliance has been operating for a long time. | Check if the packing material is removed from the purification filter. |
| Make sure that the purification filter (FY3400) is properly installed. |
| Room size is large or the outdoor air quality is poor.
For optimum purification performance, please close the doors and windows when operating the appliance. |
| There are indoor pollution sources. For instances, smoking, cooking, incense. |
| Filters reach the end of life. Replace the purification filter with a new one. |
| The appliance produces a strange smell. The first few times you use the appliance, it may produce a plastic smell. This is normal. However, if the appliance produces a burnt smell even if removing the filter, contact your Philips dealer or an authorized Philips service center. The filters may produce smell after being used for a while because of the absorption of indoor gases. It's recommended that you put the filter in a well-ventilated place for a couple of hours to reduce the smell. |
| Clean the humidification filter (see Chapter 'Cleaning and maintenance'). |
| The appliance is extra loud. It's normal if the appliance runs at the Turbo mode. |
| In the Auto mode, the appliance will run in higher speed when the air quality is poor or when the ambient humidity is low. When using the appliance in a bedroom at night, choose the Sleep mode. |
| If there is abnormal sound, contact the Consumer Care Center in your country. |
| I do not see visible mist coming out of the appliance. Is it working? | When mist is very fine, it is invisible. This appliance has a NanoCloud humidification technology, which produces healthy humid air from the outlet area without formation of water mist. Therefore, you cannot see the mist. |
| The appliance still indicates that I need to replace filter, but I already did. | Perhaps you did not reset the filter lifetime counter. Switch on the appliance. Then touch and hold the and simultaneously for 3 seconds. |
| Error code "E1" displays on the screen. The motor has malfunctions. Contact the Consumer Care Center in your country. |
| The Wi-Fi setup is not successful. Please ensure your smart phone is connected to a 2.4GHz (home) Wi-Fi network instead of a 5GHz Wi-Fi network or public Wi-Fi. For a successful pairing, we suggest turning off your mobile data before initiating the pairing process. |
| Ensure to enable the following permissions: "Location", "Storage", and "Local Network" on your smart phone. After a successful Wi-Fi setup, you can change permission settings as desired. |
| Please verify that you have entered the correct Wi-Fi password. The password is case-sensitive, has a limit of 63 characters. Special symbols are not accepted. |
| Ensure the network name of your home Wi-Fi is correct. The network name is case-sensitive. |
| If you are using a VPN on your smart phone, please turn it off before starting the pairing process. |
| If your router has a whitelist set up to block pairing, please disable the whitelist to ensure successful connection. |
| Please ensure that both your device and smart phone are within 10 meters of the router. |
| Ensure the app has been updated to the latest version. |
| To ensure a strong Wi-Fi connection, avoid placing your device near other electronic devices, bright light sources, or signal stations that may cause interference. If you experience connectivity issues, move the device away from these sources and attempt to reconnect it to the Wi-Fi network. |
| Consult the help section in the app for extensive and up-to-date troubleshooting tips. |
Warranty and support
Versuni offers a two-year warranty after purchase on this product. This warranty is not valid if a defect is due to incorrect use or poor maintenance. Our warranty does not affect your rights under law as a consumer. For more information or for invoking the warranty, please visit our website www.philips.com/support.
Order parts or accessories
If you have to replace a part or want to purchase an additional part, go to your Philips dealer or visit www.philips.com/support.
If you have problems obtaining the parts, please contact the Philips Consumer Care Center in your country.
Repor a ligaçao Wi-Fi
Tia 8eIaIaIaIaIaIaIaIaIaIaIaIaIaIaIaIaIaIaIaIaIaIaIaIaIaIaIaIaIaIaIaIaIaIaIaIaIaIaIaIaIaIaIaIaIaIaIaIaIaIaIaa
Mny nlae Tc kouptive c oTo avoiyma eodou aepa n oTo avoiyma eodou aepa.
1 SuVδεοτe to tpoΦoδotikó tcns ouokueuσ otnypiεa.
2 Patnote to koupi Ieitoupyia c ia va evepyonoioeTe tn ouokneun.
Houokeun npayel eva nxtko onla.
Kata tn diapkeia tnc npoepmuavoc, ephiavietai n evdelta on oovn.
H oukeun eataaivei oe autouatn aeitoupyia kai ephiavietau n evdeiPM2.5 otyn ofoyn.
3 Natote gava to koupi Ieitoupyia cya va anevepyontohtoe t oukeun.
He noctabrayte Hnso Bbpxy ypeia.
He nocTabaIte ypeJa dInpeKTHo NOD KINMaTnK, 3a Ja npeIoTbpaTnTe KOHdEHaZnaO T KaNKn Bbpxu ypeJa.
He nblhhe Boa ot ropHaTa yacn Ha ypeJa.
-
YBepete ce, ye fnnTbpbT 3a npeeNCtBaHe Ha Bb3dyxa n fnnTbpa 3a OBlaXHRABe ca npabUNHO NOCTaBeHN, npeNi Da BKIOUHTe ypeHa.
-
I3noI3BaIte caMo opuHaJIHn HnIITpn Ha Philips, KOnTo ca npEJaHaueHn CneuaJIHo 3a To3n ypei. He nI3noI3BaIte HnKaKbN dpyIe HnIITpn.
-
I3rapaHTo Ha φnIbpa MoXe Da npuHn Heo6paTmAm OanCHOCT 3a YOBeka n/nnn Da 3acTaPawn DpyrN XNBOTn. He n3noJ3BaIte φnIbpa KaTO rOpINBO nn 3a noD6Ha ceI.
-
ImaTe npEbn, Ye BucOKnte HnBa Ha BnaXHOCT MOraT da CTmUyInpaTa3BnTneTo Ha 6NoJOnuHn OpraHn3Mn B OKoHaTa cpea.
He donyckaTe 30HaTa OKoNo ypeDa Da CTaHe BnaJHa NIn MOKpa. Ako ce IIOBn BlaRa, HamaIeTe n3XoDnHn OBem Ha ypeDa. Ako n3XoDnHn o6em Ha ypeDa He MoKe Da Ce HamaN, n3NoJIbBaIte ypeDa nepIoDnHo. He donyckaTe abCopbnpaun MaTePN, KaTo KInIMn, 3aBeCN NIn NOKpNBKn 3a Maca, da Ce OBlaXHnT.
-
Hnkora He octabry Te Boda B pe3epBoapa, KORATO ypeBt He ce n3nol3Ba.
-
I3npa3HeTe n noCteTe ypeDa npEi cBxpanHne. NocTeTe ypeDa npEi cnEBAa a ynoTpe6a.
-
N368BaIte yIapn CTBbpN npeMmTn no ypea (ocO6eHO NO OTBOpNTe 3a npITOK Ha Bb3dyx U 3a I3XoJAAuN Bb3dyx).
He 6bpkaiTe c npbCTn nnPipeDMeTn B OTBopa 3a n3XoJaU Bb3dyx nnOTBopa 3a npitOK Ha Bb3dyx, 3a da npedOTbpaTnTe fniuecko HapaHraBe nnIOBpeHa hypeDa.
He n3noI3BaIte ypeJa, Korato cTe yNoTpe6nIi cTaHn npenapaTn npotNB HaceKOMn Ha dIMHa OCHOBA nn Ha MeCTa C OCTaTBcN OT Ma3HnHa, ropAun CMOJn nn XmMueeCKn N3napeHn.
He n3noI3BaIte ypeDa B 6nI3OCTdo rA3OBu ypeDn,neKn nn KaMHN.
BnHaHn n3KnHuaIte ypea ot KOhtakTa, KOraTo nckate da ro npemecnte nn noocnte, da HanbHnTe Boga, da CMeHnte fNtbp a nn da n3BbPwnte noDnpkka.
Korato ypeBt He ce n3no3Ba DbIro BpeMe, e Bb3MOxHO da ce pa3BnT 6aKtePnn MyXbI no fNITbpa 3a OBaXHBAHe. IpOBepeTe fNITbpa, npEi Da 3aNoCHeTe Da n3no3BaTe ypeDa OTHOB. Ako fNITbPbT 3a OBaXHBAHe e MHO r 3aMbpcen C TbMHN PeHa, rO CMeHeTe.
- YpeIbTe npEiHa3HaueH cAmO 3a IOMaKInHcKn IeJI npHOpMaJIn yCIOBna Ha eKcPiLoaTaun.
He n3noI3BaIte ypeHa Ha MOKpn MeCTa NIn MeCTa C BnCoka OKoJHa TemnepaTpya, KaTo HApPmep B 6aHra, ToaJeTHata NIn KxHra, NIn B NOMeueHne C rOJIemN TempePaTyPhn pa3NIkn.
- YpeiBt He otctpaHЯBa BbIepoJeH OKnc (CO) nIn paOn (Rn). ToJ He moKe da Ce n3NoJI3Ba KaTo ycTpoIcTBo 3a 6e3OpanacHOCT B cIyuaJ Ha 3IOnOlyKu C TropNBn IpoUceCn I ONaCHN XIMUKaJI.
IbHHeTe BOHNnpe3epBOap cAmo CbC CTyEna YeuMHa BOda. He 3No3BaIte NOINoUBeHa UIn rOpeua BOda.
He cnaarTe BeueCTBa, pa3nunHn OT BODa, BBB BOHnpe3epBoap. He do6abTApOMaTn3aTop nIIN XmMuecko BeueCTBO BBB BoDaTa.
He nouchBaIte 0nltbpa 3a OBlaJHraBe B nepaIIH yIN CbIOmJIHa, TbN KaTO B npOTuBEN clyuaI ToI ue Ce deOpMnpa.
Ako Hma Da n3no3BaTe ypea Dblro Bpeme, nouchte Te BoHnpe3epBoap nΦnItbp 3a OBlaXHraHe, CneT OBa NOcCyWeTe ΦnItbpa 3a OBlaXHraBe.
Ako Tpra6Ba Da IDbNknte ypeDa, NbpBO rO n3KlOyTe OT eJeKtpnueckaTa MpeKa.
- Ybepete ce, ye cBoeBpeMeHNO CTe n3KJIIOUynI 3axpaHbaHeTo n CTe n3BaAnIIN BODnIpe3epBoap B cnUaH Na npelNahe. KoraTo nouCTBaTe ypeDa, n36yraBaiTe da ro noctabTte Ha 3emTa I noDlbpxaIte 6JIn3Knte eJeKtpnueckn KOHTaKTn cyxN.
ElektpomarHHTn noJeta (EMF)
To3n ypeE B cBcOTBeTCTBne C npNIOXIMNTe CTAHApTN n pa3nope6n OTHOCHO 3NaIarHeTO Ha eNEKTPomarHHTN NOJeta.
Peuzklnpahe

To3n cIMBOJ O3NaHauBa, Ye npOdyKbT He MoKe Da ce N3XbPna 3aENo C o6NKHOBeHIne 6ntOBu OTnabu (2012/19/EC).
CneBbAte npabnlaTa Ha nbpkaBaTa cn OTHcH Oa3dHnOTo c6bpaHe Ha eJekTpnuecknte n eJekTpoHNTe ypei. PpaBnHOTo n3XbPnIe nomara 3a npedotBpataBaHTo Ha NoteHuaJIH HeRaTINH NoCneDnU 3a OKONHaTa cpea n YOBWeKoTO 3dpaBe.
ΦnIITbpbT 3a npeuNCTBaHe Ha Bb3dUxa He MoKe Da ce Mne u peuKInpa,
n3XBpbJrTe n3PON3BaHInTe ΦnIITpN B CbOTBeTCTBne C MeCTHnTe pa3nope6n.
ΦnIITbpbT 3a OBnaJXHaBaHe He MoKe Da ce peuKInpa, n3XBpbJrTe
n3PON3BaHInTe ΦnIITbPHN KOMnJIeKTn B CbOTBeTCTBne C MeCTHnTe pa3nope6n
OnpocteHaTa EC deKnapaun 3a cboTBetCTBne
C hactoToDAP B.V.ДeКларupa,чpe paAnoo6OpyBaHetoTn AC3420/AC3421 eВ cBoTBetCTBne cДиpeKtNbA 2014/53/EC.LIIOCTHnT TeKCT Ha EC DeKlapaunraTa 3a CbOTBeTCTBne MOKe Da ce HamepHa CJIeHNHa INTePHT aDpec: www.philips.com.
Baшсят пеуностваTeXи OвлajхнITEел 3a Вьздух "2В 1"
Pon3dpabraBame Bn 3a nokyPkata n do6pe dooJn BB Philips!
3a da ce Bb3noJ3BaTe n3zraNo OT npedlaRaHata OT Philips noIpbkka, peNCTpnpaTe npOyKTA cn Ha www.philips.com/support.
06u npereHa npodykta
A N3XOJaIa Bb3dYuHa CTpy F PpeH Kanak
B CeH3Op 3a qacntuG Gnltbp 3a oblaqKHaBe (FY3401)
C KoHTpOJIeH nAHeH H BoJeiH pe3epBoAp
DФилтbp3a npeueuctBaHe (FY3400) Iпозорчea HnBOHaBoDAta
E KoH3OJa Ha φnIITbpa 3a OBnJaXHaBaHe J AanTepe (KA4801A-2402000EU)
063op Ha KoHTpOJInte
KoHTpoJIHn 6yToHn:
ByToH 3a BkJ./n3Kn. Ha 3axpaHbHeTo ByToH 3cBcETnnHHa cyHKuia
Pekmeh npeBknOyBaTeI
HaTnchTe npoDbJnxKnteJHo 6yToHa(nte) 3a 3cekyHn:
3aknouBaHe 3a deua HynipaHe Ha Wi-Fi
PpeBkIIOuBaTeHaIINcIIeHHyIpaHeHaΦn
PahenHaDncnne:
A ABTomatnueH pexm Cpeen pexim
TnxpekmTyp6o pekm
Wi-Fi nHnKaTOp nnCnne 3a PM2.5 PM2.5
HnkaTOp 3a OBnaXHraBe Pexm Ha pa6o c npuJoxeHe
HnDnKaTOp 3a 3akIouBaHe 3a deca IpeynpckneHne 3a noCtBaHe Ha
PpeDynpexKdeneHne3ape3epBEnΦnTbP
3a6eJexka:
CBeTnHHnT ceH3Op ce HAMnpa noi 6yToHa 3a BKIOUbaHe. YBepTe ce, ye Toi He e 3akpnt OT npYr npeDmetn.
3an03HaBaHe
Cbbp3BaHe KbM 3axpaHbaHeTo

IpeynpeKdHne: OnachOCT OT TOKOB yap! KoraTo n3KnIOyBaTe aanTepa 3a 3axpaHbAHe, BnHaru N3dbpNBAite uenCeLa OT KOHTaKaTa. HNKora He dbpNaTe Ka6ela.
Cbpxe3axpaHbuaa aanTep KbM:
- IbpBO, eJekTpuecknKoHTaKT Ha ypeJa.
CneToBa-KoHTaKaTa.
MuraB6yIcBb3BaHe cbcbpBba
722 BbIrapckn
CBETB6JIOOcbueCTBeHaeBpb3Ka CbCcbpBbpa
N3KIOueH Wi-Fi 4yHKUraTa eDe3aKTbUpaHa NIN CBETJINHInTe
Ha yCTpOInCTBTO Ca IN3KInOueHn
Wi-Fi Bpb3Ka

HactpoKa Ha Wi-Fi Bpb3kaTa 3a npbPNbT
1 N3terIe n HcTaNpaIe npInoXeHneTo "Air+" Ha Philips oT App Store nn Google Play.
2 NocTaBeTe ⅢeCenCeHa Ha ypeDa B rHe3IOTo 3a 3axpaHbAHe HHaTnChTe 6yToHa 3a 3axpaHbAHe, 3a Da BKJIouHTe ypeDa.
- INДикатopbT 3a Wi-Fi MuraВ ObaHxeBO 3a nbpBn nbT.
3 YBepete ce, ye cMapTfoHbT nn Ta6JIeTBn e ycneuHO CBbp3aH KbMa Bawata Wi-Fi mpeka.
3a6eJexka:
AknBnpaTe yHKunra Ta Bluetooth Ha cMapTfoHa cn, 3a da ocHypnte 6e3npo6IeMHO CDBOBAHe.
Moiy, ybepeTe ce. Ye cMapTfohBt Bn e Cbbp3aH KbM 2,4 GHz (DomaHa) Wi-Fi mpeKa, a He KbM 5 GHz Wi-Fi mpeKa nn ny6nUHa Wi-Fi mpeKa. 3a ycneHNO CDBOBAHe BV npenopbYBaMe da nKlouHTe MObHNHe cn DaHHN, npedn da 3anoyHe npoueca Ha CDBOBAHe.
4 CtapnapeTepnnoKeHneTo Philips "Air+" n npaKHeTe Bbpxy "Add a device" (IobabRHe Ha yctpoiCTBO) mHaHTncHeTe 6yToHa "+"Ha ekpaHa. CneBaIte HNCTpyKuNTe Ha ekpaHa, 3a Da CBbPxTe ypeDa KbMaBaaTa Mpeka.
CneI ycneuho Cbpb3BaHe Wi-Fi HnHnKaTOpbCT CBeTBa HenpeKbChaTO B6JNo.
3a6eJekka:
Ta3n nHctpyKzna e BalaHa cAmo KoraTo ypeBt ce KOhFHyprupa 3a nbpBn nbT. Korato MPexkata ce npomeHn, HactpoNkata Tpa6Ba Da ce N3BbPns OTHOBO.
Ako nckaTe da Cbpxkete NOBuee ot eHN ypei KbM CBOI cMapTfoH nn Ta6JIeT, Moxete Da do6aBte ypeia B npJIOXeHHeTo Ha dONBJHnTEJIHn CmapTfoHn, 6e3 da n3BbPbBaTe HynipaHe Ha Wi-Fi Bpb3kaTa Ha ycTroNCTBOTo.
YBepete ce, ye pa3ctoHneTo MeKdy BaShn cMapTfoH nn Ta6JIe T ypea e no-Manko ot 10 metpa 6e3 HnKaKn npenrTCTBna.
HylnpaHe Ha Wi-Fi Bpb3ka
1 BkIIOUeTe aIaItepa Ha ypeDa B eIeKtpnueckn KONTAKT I DOKOChete, da BkIOUHTe ypeDa.
2HaTnCHTe npOdbJxHteJHo 6yToHHe 3aCekyHn eHNOBpeMeHHo, DOKaTO yyeTe 3ByKOB CnHaJ.
YpeBbT npemHaBa B pexm Ha cDBoBaHe.
Wi-Fi nHnKaTopbT mRa B opaHxKeBO.
3 CneBaaTe cTbKn 3-4 B pa3eJa "HactpoKa Ha Wi-Fi Bpb3kata 3a nbpBn nblT".
Mura B opaHkeBo ( ) BoDnIaT pe3epBoap He e npaBnIHO noctaBeH.
CBeTn NoctoHHo B opaHKeBO ( HeIOCTaTbUHO KOJIueCTBO BOJa. MoJr, HAnbJIHeTe OTHOBO BOHNr pe3epBoap.
CBeTIOCTOARHNO B6JIo (UpeIbT OBJaXHRA NOMeueHHeNoTo.
N3Kn.()LeneBaTaBlaXHocTeIOCTurHaTa.
724 BbIrapckn
3a6eJek: IIO nOpa3bnpaHe cIeBbTa BlaXHocTe 50%RH, MoKte da 3aJaTe XeJHaHata cIeBa BlaXHocT B npINOxKeHneTo.
Ako INIkaTopbT 3a OBlaXHReBaHe Mnra B OpaHKeBO, npOBepTe daJIIN BOHNr pe3epBoap e npabUNHO NOCTABeH.
Ako INIkaTopbT 3a OBlaJXHraBaHe CBeTHe B6yIIO,TOBa O3HaayBa,Ye CTaTaBn Ce OBlaJXHraBa eΦeKtNBHO.
Пьленье на вора
3a6eIexka: BaBHO Do6aBeTe BOda, 3a Da npEDoTbPaTnTe npbckn n da
H36erHeTe npEbnBaHa Ha MaKcImaHOTo HnBO Ha BOdTa, NocOueHo Ha
ypeDa.
1 N3dbpnaTe BOdHnpe3epBoaop OypeHa.

2 HanbHHeTe BOHnpe3epBoap cbc cydeHa yeMHa BOa. CneJeTe HNBOTo Ha BOata npes npo3paHOTnpo3Opue Ha BOHNpe3epBoap, 3a da npedotBpatae npenbIbAHeTo My.

3 NocTaBete BOHnpe3epBOap OTHOBypeHa.
Pa36npaHe Ha cBeTInHaTa 3a KaueCTBO Ha Bb3dYxa
CleK KaTo Ce BkIouH, IpueNCTBaTeJrN OblaxHnTeJ 3a Bb3dyx "2B1" 3e 3aNoUHe Da npOBepraBa KaueCTBOTo Ha Bb3dyxa. Cnei OKoLo 30 cekyHnCeH3OpBt 3a qactuN u3bnpa UBeTa, CbOTBeTCTBaU Ha KaueCTBOTo Ha Bb3NyHnTe qactuN Ha OKoHNy Bb3dyX.
UBeTbHa CBeJIHHHn INIaKATOp 3a KaueCTBOTO Ha Bb3dyxa ce onpeJeIa OT HNBOTo Ha PM2.5.
PM2.5
Ceh3opHaTaTexHOrnAeraSenseOTKpNBaTOUHOpearnpa6bp3oHaDOpHn-He3NaHTeJIHnTe npomeHN Ha qactuNTe BbB Bb3dyxa.Ta BN OcNpyBaCnOKOCTBnE cO6paTHa Bpb3Ka BpeALHO BpeMe OTHOCHO PM2.5.
IobueyTo 3aBpcnteHa Bb3dyxa Ha 3akpnto cnaadat KbM PM2.5, Koeto ce OTHacr 3a npehacn H Bb3duuH O aactnHa 3ambpnteNo-maKn OT 2,5 MmKpometpa.YecTo CpeuaHnte n3touHnHa fHH uactnHa 3akpnto ca TOTHOBnT dIM, rOBeHTo, 3aapanHeHte Cbeun. HkON npehacn Bb3duuHo 6aktern Hn Hn-MaKnTe cnpn Ha Myxbl, aJepreHn OT DomaHn IIO6mU n anepreHn YactnO t akapn cbso cnaadat KbM PM2.5.
HnBO Ha PM2.5 UBeTHa HnDnKaun 3a KaueCTBOTO Ha Bb3dYxa
HnBO Ha KaueCTBO Ha Bb3dUyXa
BkIIOUbaHe n n3KJIIOUbaHe
3a6eJekka:
3a ONTUMaJIHn XapaKTePncIKN Ha IpeuNCTBaHeTo N OBlaXHRAHeTo 3aTBopeTe BpaNTe IN pO3OpLnte.
He onyckate na ima 3abecn 6bn3o do OTbopa 3a npntOK Ha Bb3dyx nn OTbopa 3a n3xoJraBb3dyx.
726
Былгарскn

1 BkIIOUeTe aadantepa Ha ypeBa eIeKtpnueckn KONTAKT.

2 Hatnche 6ytoHa 3a 3axpaHbAHe, 3a da BKnIOuHTe ypeJa.
- YpeIbT n3daBa 3ByKOB cHraJI.
- -ce noka3Ba Ha ekpaHa No BpeMe Ha 3aarpBaHe.
- YpeNbT pa60Tu B ABTOMaTUneH peXm, KaTo Ha ekpaHa ce noka3Ba PM2.5.
3 Hatnche 6ytoHa 3a 3axpaHbaHe OTHOBo, 3a n3KJIouHte ypeJa.
3a6eIexKa:Ako npOdyKbT OCTaBa Cbbp3aH KbM eJekTpueckn KaHTaKT cneI 3KJIIOUbaHe, ypeBt Ie pa60TN CbflacHO ppeiunHnTe HAcTPOkN, KOrato Ce BKJIIOH NOTHOBO.
PpeBkIouBaTeJHa DnCpJIeJ
3a6eJexkka: YpeBt noka3Ba HnBOTo Ha PM2.5 no noDpa36upaHe.
1ДokocheteиЗадрьхTe 6yToHa 3cekyHn,3aJa npeBknIOuHTe HnKAtopaHaДICJIpeR KbM HIBOTOHa BIAxHOCT Ha OKoJHaTa cpeJa. -Cne5cekyHnTOI aBTOMaTHO Ie ce BBpHe KbM NOKa3BaHe Ha PM2.5.

2 HaTnchHeTe 3aJpBxKTe 6yToHa OHOBO, 3a Da npeBKnIOuHTe HNdkKaTopa Ha nnCnner o6paTHo KbM HnBOTO Ha PM2.5.
4 NocyuTe HnblHO BCnKu YaCTn Cbc Cyx NaMyueH TaMnoH.
5 3aTbOpTe ceH3opa 3a KaueCTBO Ha Bb3dyxa.

3 CbaJIeTe KOH3OJaTa Ha 0nITbpa 3a OBJaxKHeBaHe OT 0nITbpa 3a OBJaxKHeBaHe.
4 HaKNCHeTe fHbpa 3a OBnaxHBAHe C HearpeCnBeH npenapaT nIi TaKbB HknceJIHHa OCHOBa (24 rJIMMOHeHa KnceJIHa c 4 I BOJa nI1 100 mI 6yI ouet c 4 I BOJa) 3a 1 Yac.
5 N3nJaKHeTe 0nIbpa 3a OblaxHnBaHe nOc cna6a BoDHa Ctpy. He CTnCKaTe H He n3BnBaIte 0nIbpa npn noocTbaHe.

6 MoHTnpaIte npaBnHIO KOH3OJaTa Ha 0nTbpa 3a OBJaxHЯBaHe OKoJIo 0nTbpa.
7 NocTaBete BOdHnpe3epBoaap OTHOBypeJa.
8 N3MnBaIe pBcTe Cn cTapaTeJHo Cne INoHCTBaHe Ha nJIbpa.
5 MoHTpaIte OTHOBO npedHnKaNaK.
6 BkIIOHeTe aIaNTepa Ha ypeDa B eIeKtpnueckn KONTaKT.
7 Hatnche6byToHa,ddaBKnIOHTe ypea.
8 DOKOCHETe 3aIpbXTe 6yToHnTe 3a3 cekyHn, 3a da HynpaTe BpeMeTo 3a NOuCTBaHe Ha fNtbpa.
- Moxete cIIO taka da hyJIpaTe BpeMeTo 3a noUcTbaHe Ha fIITpnte Upe3 npINOKeHneTo Air+.
CneI kaTo HynipaHHeTo e ycNeuHo, npeynpexKeHneTo 3a nouchBaHa Ha qnltpnte u3ye3Ba OT ekpaHa.
9 N3MnBaIte pBcTe Cn CTapaTeJIHO CneI NOUHCTBaHe HaΦNITbpa.
Смяна на сильтупт e
Pa36npaHe Ha 3aKJIIOUBaHe 3a 3aIHTa 3a 3dpabOCIOBEn Bb3dYX
To3n ypeE o6OpuyBaH cHnDnKaTOp 3a CmHa Ha fNtBpa, 3a da ce yBepnte, ye fNtBpBT 3a npueHCTBaHe Ha Bb3dUxHa e B ONTMaHNO CbCTOraHne, KOrato ypeBt E beknloatau. Korato fNtBpBT Tpr6Ba Da 6Be cMeHeH, npedynpexJeHNeTo 3a CmHa Ha fNtBpa BeTBa B cepBeHo.
AkoФиNTbPbT He 6bIe CmHeH HAppe,ypeIbT Ie cnppe pa6Ota n
aBTOMaTnUHO Iue Ce 3aKJIIOuN, 3a Ia Ce 3aIHTN KaYeCTBOTO Ha Bb3DyXa B CTaTa.
CmeHeTeФиNTbPa Bb3MOxH HoHa-CKopo.
CmHa HaΦnIbpa 3a OBlaXHЯBaHe
3a6eJekka:
ФИТьргЗаOBлжняBaHe(FY3400) He moxe da ce Mue nIu da ce nIIN3NoJ3Ba MHOROKpaTHO.
BnHaHn n3KnIouBaIte ypeDa n n3BaJdaIte ⅢeNcena oT eIeKtpueckn KaHTaKT, npdeI da CMeHrTe fIuITpIte.
Korato Ha ekpaHa ce noBn npEynpEeHneTo 3a cMaHa Ha fNITPte CmeHeTe fNITbpa (FY3400).
3a6eJekka: IpenopbUBaMe Ha xopaTa aIepnHn KbM npax, noJIeHN, domaun HIO6mucu nn nIeCen, da He 3aMeHrT pnte camu nn da B3emat 3aunTHmepKn, kaTo HapnpMep Da Hocrt MaCKaNp.

1 N3KJIIOUeTe ypea n IN3KJIIOUeTe IeNceNa OT KOHTaTa.
2 N3dbpnaTe npednna Kanakro cbaIeTe OTypea.N3dbpaTe funTbpa n 3XBpbIeTe 3NOJ3BaHnNfUINTp.
3 CbaJIeTe BCNUKn ONAKObUHN MaTePnaJN OT HOBIAI JNTbp (FY3400).
4CnoxTe HOBnIΦnTbp OpaTHo BypeHa.

5 MoHTnpaIte OTHOBO npednKa nak.
6 BkIIOHe TaIaTepa Ha ypeDa B eJIeKtpnueckn KaHTaKT.
7HaTnCHHe 6yToHa,daBKnIOuHTyepea.

8HaTnchTeH3aJpBxKTe 6yToHnTe 3a3cekyHn,3a Da HyInpaTe 6poya 3a ekCnloaTaunHOHe CPOK HaΦnItpnTe.
- Mojke Tc bio Ta Ka Da HyinpaTe 6poa 3a eknnoatauoh cpoK ype3 npinoxeHneTo Air+.
Cne KaTo HynipaHeto e ycneHo, npedynpexJeHHeTo 3a cmHa Ha cnItpnte n3ye3Ba ot ekpaHa.
9 N3MnBaIte pBcTe Cn CTapaTeJIHO CneCmHa Ha qNITbpa.
3a6eKka: He mnpuWeTe fuiTbpa, Tb KaTo e c6paJ 3aMbpCnTeJN OT Vb3dyxa.
HynipaHe Ha nIbP
Moxete da cmeHnte fntbpa dopn npedn noBaTa Ha npedynpexJeHne 3a cmHa Ha fntbp (Ha ekpana. Cnei cMaHa Ha fntbpa Tpr6Ba da HynPate pbuHO 6poya 3a ekcnloaatauOHeH cPOK Ha fntbpa.
1 Hatae 6ytoHa, da n3KIOHTe ypea. N3KIOHTe ypea ot KOHTa.

2 YBepTe ce, ye ypeIbTe n3KJIIOueH OT KOHTaKaT. N3yakaiTe nohe 10 cekyHn, npEi Da BKNIOUHTe 3axpaHbAun aanTep B KOHTaTa.
3BpaMKTe Ha 15cekyHn CJIeB KJIIOUBaHe Ha 3axpaHbAHeTo HATNCHeTn 3aIpbXte 6yTOHnTe 33cekyHn, 3aJa HyInpate 6poya 3a ekCnloatauHOHe CPOK HaΦnITPnTe.
CmHa HaΦnTbpa 3a OBJaXHЯBaHe
3a6eJIeJka:
BnHa n3KIOUbaTe ypeTa OT KOHTa, npEn da cMeHare foNTbpa.
I3noJ3BaTe caMo opuHnHaHe nΦnTbp 3a OBnJaXnBaHe FY3401 Ha Philips.
CmeHnIte fHbpa 3a OBnJXHbAHe Ha BceKn 6 Meceua 3a ONTmHa HpOIN3BOIDNTeHIOCT. Ako fHnITbPbTe B Do6po CbCToHne, MoKeTe Da rO IN3NoJ3BaTe 3a No-DbIbIr nepnoD OT BpeMe. NocTapaIte Ce da CmeHrTe fHtba 3a OBnJXHbAHe NOHe BeHNbX TOniShHO.
1 N3KJIIOUeTe ypea n N3KJIIOUeTe IeIeCeIa OT KOHTaTa.
2 N3nbpnaTe BoDnpe3epBoaop OypeJa.
3 CbaIeTe KOH30Jata Ha 9nITbpa 3a OBnaXnHBAhe OT nIITbpa 3a OBnaXnHBAhe. NxBpIeTe n3NoJ3BaHnA qnITbp.
4 CbaJIeTe BCNUKn ONAKObUHN MaTePnaJIn OT HOBnA nTbp (FY3401).
5 MoHTnpaTe npabUNHO KOH3OJaTa Ha 0nTbpa 3a OBnaXHBAHe OKoNo
6 NocTaBete BOHNHpe3epBOap OTHOBBypeHa.
740 BbIrapckn
7 N3MnBaIte pBcTe Cn CTapaTeJIHO CneIcmHa Ha qNITbpa.
CbxpaHne
1 N3KJIIOUeTe ypeDa n 3KJIIOUeTe UeIeCena OT KOHTaKaT.
2 NocTepe,ceH3opa 3a qactn u NOBbpxHOCTTa Ha fNtbp a 3a OBJAAKHBaHe (BHXTe rIaBa "NoocTbaHe n noDpBkKa").
3 Octabete BCnuku actn da n3cbxHaT npedn cbxpaHbAhe.
4YBnITeΦHJTPNTe BBB Bb3DyXHOHePOnHuaEMIJaCTMaOBoNIIJKOBe.
5 CbxaHraBaIte ypea n fntpTe Ha xlaHO u cyxo MRCTO.
6 BuHaHn 3MmBaIte CTapaTeJIHO pbIeTe cn cIeJ pa6Ota C hJITpn.
OTCTpaHЯBaHe Ha Hen3npaBHOCTN
B Ta3n rIaBa ca 06o6eHn Hau-HeCTO CpeuHaHTe Ipo6JeMn, Ha KOnTO MoKeTe Da ce HATbKHeTe npn NOr3BaHe Ha ypeJa. Ako He MoKeTe da pa3peuHte Ipo6JeMa c NOMoUta Ha INHΦopMaunraTaN-DJy, ce CBbpXeTe C LcHTbpa 3a O6cnyXBaHe Ha Notpe6nteJI BvB BaWata CTpHa.
PpO6JIeM Bb3MoXHo peSeHne
TapaHcIy I PoIdpbXkKa
Versuni npedoctabnBberoDnHa rapaun3a To3n npdykT OT daTata My Ha 3aknybahe. Ta3n rapaunHe e BaInIeH, aKO depeKtBe 3apadn He npabnHa ynoTpe6a nn Lo7a noDpBxka. Hauata rapaun He 3acra BaWnte 3akoHOBN npaba KaTO notpe6ntel. 3a NOBEue INHΦopMaun nn 3a No3OBaBaHe Ha rapaunTa NocTeTe Haunye Ye6caNT www.philips.com/support.
IopbkaHa qactn nI npHaJekHOCTN
Ako Tp6Ba Da 3aMeHnTe YacT NIn NsKaTe Da 3aKynTe DoNbHnTeJHa YacT,
O6bpHeTe Ce KbM TbproBeu Ha Philips NIn NoceteTe
www.philips.com/support.
Ako mate npo6nemc hAmnpaHeTo Ha qactn, MoJr, CbpxKeTe ce c LcHTbpa 3a o6cnyXBaHe Ha notpe6nteHn Ha Philips BbB BaWata CTpHa.
Baxkho
BhImaTeJIHO npOHTajTe ro OBA yNaTCTBO 3a KOpIcTeHbe npEi Da ro KOpIcTnte anapaTOT n 3aUyBaJte ro 3a NiDn NiTpe6n.
3a da obez6einte hajdo6pn nepfopmaHcN, npOBepTe daHn fnpMBepOT Ha Baunot npeuictyBaue e Hndrgpaeden co HajnoBata Bep3nja. Obaa Hndrgpa16a Mojete da ja n3Bpinte npeky annkaunjata Air+.
PpeynpeyBaHbe
- Ipei Da ro npiknyute anapaTOT npOBepTe daHn HanoHOT HaBeHnHa anapaTOT OndroBapa Ha HanoHOT Ha loKaJIHaTa eJNEKtpuHaMpexa.
Bo cnyaj ha owtetybahe, ka6eIOT 3a hanojybahe tpe6a da ro 3ameHn KomnaHnjaT Philips, odHocHO cepBuceH ceHTap OBnacteh od Philips nIu Iuca co cooDBETn KBaIIINKauin 3a da ce n36erHe onaCHOCT.
- HemojTe Ia ro KOpuncte anapaTOT aKO e OoTeteH aAnTepOT, Ka6eIOT 3a HanojyBaHe nnn CamnOT anapat.
- Da ce kopnCTn cmo co aanTepOT wTo ce nCnopoayBa co anapatOT.
- Oboj anapat moxe da ro kopncta Teca noctapn od 8 roHHn Iuua co orpaHueHn fI3uKn, ceH3OpHn IJn MeHTaJIHn cNoCo6HoCTn IJN Iuua co HeIOCTaTOK Ha NCKyCTBO n 3HaEHe, noD yCIOB da CE noD HAn3Op IJN da Do6nle yNaTCTBa 3a 6e36eJHO KopncTeHb e Ha anapaTOT n da rN pa36npaat MOxHInTe ONaCHOCTn.
- Deuata He Cmeat Da cn nIgpaat co anapatot.
- Deuata He CmeaT da ro qnctat N opjkyBaat anapaT0 6e3 Haan3Op.
- Hemojte da ro 6IoknpaTe OTBOPOT 3a BJIe3 IJIN I3JIe3 Ha BO3dYx, Ha np. co nOCTaByBaHBe IpeDMeTn Ha OTBOPOT 3a I3JIe3 Ha BO3dYx IJIN IpeD OTBOPOT 3a BJIe3 Ha BO3dYx.
BnImaBaJte da He naHaT haDbopeuHn npedMeTu BO anapaToT npeky 3ne3OT 3a BO3dyX.
- CtaHdapEn HInTepejc 3a Wi-Fi Bp3 ochoba Ha 802.11b/g/n/ax co 2,4 GHz makcmaHa n3Je3Ha MokHOCT o6 64 mW EIRP.
Bluetooth Bepnja 5.2 (LE) co ppekbeuja od 2,4 GHz n n3ne3Ha RF-MOKHOCT NOMaJa oD 10 mW EIRP.
Ha lyreTo KOI ce aIeprHn Ha npaB, NOJeh, DOMaHn MInJeHnCn IIN MyBla IM npenopayBaMe Da He rM MeHyBaat fNITpTe cam Nlnda Ce 3aHTiTAT CO MaCKa n paKaBnCn.
BHHMaHne
- Oboj anapaT He ro 3aMeHyBa COOdBETHOTo npoBeTpYaHbe, peoBHOTo YnCTeHbe Co npaBOcMyKaIka NII KOpNCteHbETo Ha KyJHcN acnnpaTop nIN BENTJIaTOP nprTOTBHeTo.
- Cekoraш поставajte и корисе то anapatot ha cyba,стилна, pamha n xopuzHTaHa NOBpshHa.
- Octabete HajmaKy 20 cm cnloboeH npocstop okoly anapatot n HajmaKy 30 cm cnloboeH npocstop Ha, anapatot.
HemojTe da ceiNe Te nn Da CTOnTe Bp3 anapaTOT.
He cTabajTe HnWTo Bp3 anapaTOT.
He noctaBybajte ro anapaTOT nipeKTHO NOKJIIMMaTH3ep 3a da cnpeuHTe KaneHe BODa BP3 anapaTOT npaDN KOHNDeH3aUNjata.
He noJIHHe BOda npEky roPHnOt JeI Ha anapaTOT.
- PpOBepeT aJIn fUnTePOT 3a npueHCTyBaHbe Ha BO3dyx N fUnTePOT 3a OBlaJcxBaHc Ce npabUNHO nOCTaBeHn nped Da rO BKnyuTe anapaTOT.
KopncTe camo opnHaJIHn HJNTpu OJ Philips 1TO ce cneJauHO HameHeTn 3a OBOJ anapat. HeMoJTe da KopncTe npyri HJNTpu.
CoropybaheTo Ha nItePOT MoKe Da npEi3Bnka HeonnpaBnBa onaCHOCT 3a lyTeTo n/nn da 3arpo3n dpyr nnKIBOTn. He KopncTeTe ro fItePOT kaKo TropNBO nn 3a CInuHa HameHa.
- ImajTe npeBnD nEka BnCOKnte HnBOa Ha BnAaXHoCT MoKe Ja NotTuKHaT pa3BoJ Ha 6NoIOnuOpraHn3Mn BO ONkpyXyBaHbTo.
He do3bonybajte noBpHnHaT a OKOy anapatot da ce HabnaKu nn HaMokpn. Ako ce nojabn Bnara, hAmaneTe ja jauHata ha anapatot. Ako jaunHata Ha anapatot He moKe da ce HamaN, KopncTeTe ro anapatot nobpeMeHo. He do3bonybajte ancop6upauchkTe MaTepuJaN, KaKO uTo ce KInlmm, 3aBeCn, npaneepnn nn YapwaФn, da ce HABnJaXaT.
-
Hnkoraaw He octabajte Boda Bo pe3epboapot Kora anapaTOT He ce KopnCTN.
-
Icnpa3HeTe nIcHcTeTe ro anapatot nped da ro cknaDnpaTe. IcHcTeTe ro anapatot nped cIeHaTa ynotpe6a.
-
N36eHryBaJte na ro yInpaTe anapaTOT (oco6eHO BJIe3OT n 3JIe3OT 3a BO3dux) co TBpIINpeIMeTu.
HemojTe Ia cTabaTe npCTn nnnpedMeTn BO n3Je3OT nnBn Bn3OT 3a BO3dyx 3a da cnpeuTe nobpeDu nn deΦeKT Ha anapaToT.
Hemojte da ro KopnCTnte anapaTOT aKO cTe KOpNCTeJe dIMHN cpeCTBa npotNB IHcEKN 3a BHaTpeWHa yNotpe6a IIN Ha MeCTa KaIe ITO mA OCTaTOU ON MaCNo, 3anaJeh TemjaH INN nCnapyBaHe Ha XEMNKaJIIN.
-
HemojTe da ro KopncTne anapaToT Bo 6JIu3nHa Ha nnHcKn anapatn, ypeiN 3a rpeeHe nIe KaMHn.
-
Cekoraш Исклунувajte ro anapatot od wtekep kora cakate da ro npemecHTe,ИсчNTe,нанOLHITe CO BODa I KORA cakate da ro 3amEnITEФntepOT nII DA n3BpHnTe ODPKyBaHbe.
HaФилтepOT 3aOBlaJxBaHbeMoKeJa ce pa3BnjaT 6akTepuN MyBna Kora anapatOT He ce KopncTn DoIro BpeMe. PpOBepeTe ro ФилтepOT nped da 3anOuHete Da Ro KopnCTnte anapatOT NOBtopHo. Ako ФилтepOT 3a OBlaJxBaHbe EMHOry HeuNCT Co TEMHn DAMKn, 3aMeHeTe Ro.
AnapaToTe HameHeT cAmO 3a yIOTpe6a BO IOMaKInHCTBa BO HopMaJIHN yCIOBn Ha pa6ota.
-
HemojTe da ro KopnCTnte anapaTOT BO BlaJxHn ONkpyKyaHa nIIN onkpyKyaHa co BnCoka am6neHTaJIHa TempepaTypa, KaK Ha npimep Bo 6aHa nIIN BO npocTopja co rOJEMn TempepaTyprn npomehn.
-
YpeIOT He OTCpaHyBa jarIepoJen MOHOKcN (CO) nJn paJOn (Rn). Toj He MoXe Da Ce KopuCTn KaKo 6e36eHocEn ypeI Bo clyaJ Ha HecpeKeN co IpoUeCN Ha corOpyBaHe n OnaChn XeMkaJIIn.
-
Pe3epBoaop 3a BOda noJHete ro cMo co JaHa BOda oJ ueMa. He KopnCTe nOTNoUBeHa BOda uJN BpeJa BOda.
Bo pe3epboaopT 3a BOda He cTabajTe npytn cyntaHun ocBEN BOda. He doabajTe napfemn nn XEMNCKn CynCTaHUN BO BOdaTa.
- HemojTe da ro nepeTe fuiTepo3a OBnaxyBaHbe BO MaunHa 3a aannTa nn 3a caIOBn, BO cnpOTnBHO fuiTepo3a OBnaxyBaHbe Ke ce n3o6nnu.
Ako He cte ro KopincteJe anapaTOT noDolro BpeMe, nCunCTeTe ro pe3epBoapot 3a BOda n fInItepot 3a OBnaJxBaHbe, a NToTa nCyWeTe rO fInItepot 3a OBnJaXBaHbe.
Ako cakaTe da ro npemecntte anapaTOT, npBO ncknyeTe ro od HanojyBaHeto.
Bo cnyaj Ha npelbeBaHe, BeHaunckLyte ro HanojyBaHbTo n OTCpaHete ro pe3epBoapot 3a B0da. Kora ro YnCTnte anapaTOT, N36erHyBajTe da ro IerHyBaTe u Ttekepnte Bo 6n3nHa Tpe6a Da 6nDat cyBn.
EleektpomarHeTHn noJNb(aEMF)
Oboj anapat ycorlaceh co BaxkeKnte cTahapn n npoHncn WTo Ce OndecyBaat Ha N3IOKeHoCTa Ha eJekTpomarHeTHn noJIbHa.
Peuzknapahe

OBoj cIm6oJn O3NaUyBa IeKa npOn3B0IoT He CMeE Ja ce 9pJa co 6bUnHnOT OTnAn oJ DoMaKInHCTBaTa (2012/19/EU).
Pnpdpkvybajte ce do 3aKOHTE BO BaWata 3emja 3a odJeHNO cO6npaHe Ha eJektpuHNTe n eJektpoHcKNTe npOn3BOiN. PpaBUNHO TO pPaJIbe nomara BO cnpeyuBaHBeTo HA HeratNBHTe NocIeNtU NO XINBOTHaTc CpeDInHa I YOBeKOBoTO 3dpaBe.
ΦnItePOT 3a npueNCTyBaHBe Ha Bo3dyx He ce nepe HHe ce peuKJnpa.
UcppJeTe rN nckOpNCTeHnte ΦnItpn BO corJaNHT Co loKaJnHTe npoNCS.
ΦnItePOT 3a OBlaJxBaHBe He ce peuKJnpa. UcpeJIte rN nckOpNCTeHnte
ΦnItpn BO corJaNCHCT co loKaJnHTe npoNCS.
IoeHocTaBeHa DeKnapaunja 3a ycorlaaceHoCT Ha EY
Bo oboj dokymeHT, kompaHnjaTa DAP B.V. n3jabyBa deKa paAnooPemata od TInoT AC3420/AC3421 e ycorIaceHa co NipeKtNbata 2014/53/EU. CJeNoCHNOT TEKT Ha DeKnapaunjata 3a ycorIaceHoCT Ha EY e DoctaneH Ha CneHata INTEpHET-aDpeca: www.philips.com.
HnBO Ha PM2,5 Boja Ha KBaJIntET Ha BO3dyx HnBO Ha KBaJIntET Ha BO3dyx
≤12 CnHa Do6po
13-35 CnHO-BnOJIeTOBa CpeiHo
36-55 BnOJTeBO-UpBeHa Hncko
55 LiPBeHa MHOrHy HnCKo
BknyBaHbe n NcKnyBaHbe
3a6eileuka:
3a onTImaJIHn nepΦopMaHcN Ha npeuNCTyBaHbe N OBlaKyaBaHbe, 3aTBOpTe rN BpaTne I npO3OpCnTe.
Iorpnjxte ce 3aBecnte da 6nDat noJaIeky OIN BJIe3OT nJIn n3JIe3OT 3a BO3dYx.
1 BmetheTo aanTepot Ha anapaT0 BO uTekepot.
2 PnTtncheTo KOuTeTo 3a HanojyBaHbe 3a da Ro BKJyuHTe anapatOT.
AnapatOTncnyuTa3ByeHcnrHaJI.
- PpN 3aRpeBaHbTo,HaekpaHotKe ce npikaxe
Anapatot pa60Tu BO ABTomatckn peXm co HnBOTo Ha PM2,5 npKkaHoh aekpaHot.
3 NOBTO npTnCHTe ro KonyeTo 3a HanojyBaHbe 3a da ro ncknyuTe anapaTOT.
3a6eNeuKa: ako anapaTOT ocTaHe npKnyeH BO 8TeKeP no NCKnyuBaHbeto, Toj Ke pa6oTu co npTeXoDnHTe NoCTabKn KOra NOBtOPho Ke r BknyuHte.
Помена на ппka3OT
3a6eileka: anapaTOT ro npkaKyBa HnBTo Ha PM2,5 cnopei 3aJaHeHnte NOCTABKN.
1PnTncheTe 3aepKteTo KOCheto 3cekyHn 3a Da To npomHeNTe HnKaTOPOHa ekpaHOT BO HNBOTo Ha aM6neHTaJIHa BnaXHOCT. ABtOMaTcKn Ke ce BpaTu Ha npka3OT Ha PM2,5 no 5 ckyHn.
2 NOBTOPOHnPNTUCHETe H3aPKeTe Ro KOnHeTo 3a Da Ro BpaTnTe INHdkaTopoT Ha ekpaHOT Ha HbTo 3a PM2,5.
A B T O M A T C K N P E X K M (9) a n a p a T O T A B T O M A T C K N J a n p i n c n o c o b y b a 6 p 3 n H a T h e H T N I N A T O P O T B O 3 a B U N C H O C T O D K B A J I N T E T O T H a a m 6 n E H T A L H N O T B O 3 d y x.
CpeH pexnM 3: BO CpeHNOT pexnM, anapaTOT pa60Tu co cpeHa 6p3nHa.
Typ6o pekum AnapaTOT pa60Tu co HajroJema 6p3Ha.
PeknHa MnyBaHe (AnapaTpa60TuBko Co MaJa 6p3Ha.CBeTnata Ha ekpaHOT ce NCKnyyBaA T No 3 ckyHn.
Aneprnckn pekim Ha MnyBaHe: Oboj pekim MoKe da ce OBO3MOKn BO anIkaunjaTa Air+. Aneprnckn pekim Ha MnyBaHe ro 3acNlyBa PekIMOT Ha MnyBaHe no Notpe6a. Co OBO3MOxyBaHe Ha NCTNOt, peKIMOT Ha MnyBaHe ABTomatcKn ja npncnoc6yBa 6p3Hata Ha BeHTnlaTOpOT Ha cnueH HauHH KAKO IN BO aBOMATCKNt peKIM, pnO odpxyBaHe Ha HnCKa jaHnHa 3Byk. Oboj pekim e ndeaJIeH 3a lyfTeO KOI cKaaT NOcINHn nepfopMaHCn Habeuep Bo Cnope6a co oBNUHnOT peKIM Ha MnyBaHe.
Pexn ynpabvban npeky anlkaunjata (a: npapatot pa6otn BO pekim To e docaneH cmo npeky anlkaunjata, kako doonohntenH paHn 6p3HH Ha BeHTnlaTopoT, CEHa BnaXhoCT Nn Dpyr npKIMu wTO ce npucnocobHn BO anlkaunjata.
3a6eneuka: pexnmoT ynpabvBaH npeky anlkaunjata e doctaneH CAMO npeky anlkaunjata otkako ycneuho ke ce nobp3e co Wi-Fi-mpeka.
KopncTeHbe Ha yHKunjaTa 3a CBETI0

Co ceH3opoT 3a CBeTJInHa, KOHTpOJHaTa Ta6Ja MoKe aBtOMaTCKn Da ja npncnoC6b OCBETJeHOCTa BO 3aBnCHOCT Od am6eHTaJHata CBetJInHa.
KoHTpOHaTa Ta6na Ke ce 3aTeMHn Kora npocTojuata e TeMa. Moxete da ro npTncHe TKe 6nlo KOnue 3a Da nakTbBpuate Cte CBeTna. IToa,doKoKy He BpUInTe DOnOHNtEnHn Oepauu, Cte CBeTna NOBTOpHO Ke ce 3aTeMHaT cNopeam6neHTaHaTa CBeTlnHa.
Moxete da ro npitnchete konheTo 3a cyHKunja Ha cBeTno 3a da ce npepnpnte BO pexmHa lam6a: npjateh CBetnoceH npcteh OKOly KOHTpolHaTa6na. Pincnoc6ete ja jauHata Ha npjatHa taCBttnHa BO aannkaunjata Air+.
Moxete da ro npTnchete koncheTo 3a da rN ncknyute cnte cbetna N KOHTPOHaTa Ta6la. NobTOpHO npTnchete ro konyeTo 3a da rN aKTINBpuTe CITE CBETla.
NocTaByBaHbe 3aKnyuYBaHbe 3a deca
1IpiTnCHete ro konyeTo Tpaehbe od 3 cekyHn 3a da ro akTNBnpaTe 3aknyBaHbeto 3a deua.
HaekpaHOTce npkaKyBa
2IIOBTOPO npTnCHTe ro konHeTo 80 TpaHbe o3 cekyn3a da ro DeakTNBnPaTe 3aknyBaHbeto 3a deca.
Ke nCue3He oD ekpaHOT.
YncteHbE n OdpjxUbaHe
3a6eileuka:
Cekoraawncknyuaybajre o anapaTOn od wTekep nped da ro uCTnte.
HemojTe da cnIyBaTe BOda npeky OTBOpHTe 3a BJIe3 nI3Je3 Ha BO3dYx.
3a qncTeHe Ha deIOBHTe Ha anapaTOT HNKORAH HeMoJTe Da KopnCTnte a6pa3NBn, arpeCBHn nn 3anaJIbN cpeIcTBa 3a qncTeHe KaKO ITO Ce 6eIINo nn aIKoxOJ.
Hnkoraaw He KopncTeTe TeuHocTn (BknyyBaJn n Boda) 3a da ro nCnuCTnte
fntepot 3a npueNCTyBaHe.
He ce 6nDyBaTe da ro nCTnte ceH3OpOT 3a yeCTnK co npaBOcMykaiKa.
PacnopeHa YnCTeHbe
3aueTeHoCT MeToHa YnIcTeHe
Kora e HeonxoJHo IV36pNiWeTe ro nlaCTnUHNoT JeI Ha anapaToT co MeKa u CyBa Kpna
IcnycteteToKaNAKOTHaN3JIe3OT3aBO3dyx
Cekon Dba Meceu NcncTeTe ro ceH3OpOT 3a ueCTnukn CO cyBO cTanue Co namyuEN BpB
Ke ce npikaxe Ha ekpaHOT IcuncteTe ja noBpUnHaTa Ha fntepoT 3a npueNCTyBaHe
Cekoja ceiMua IcHCTe ro fIJItePOT 3a OBJIaJxBaHBe
YncTeHe Ha KyKnWTeTo Ha anapaTOT
PepOBHO YnCTeTe rBHaTpeuHNoI HaBOpEuHNoT JeI Ha aIapaTOT 3a Da He ce Haco6epe npab.
1 KopncTeMeKa n cyBa Kpna 3a da nI NCHnCTNe BHaTpeHHaTa nHaDbOpewHaT a NobpwnHa Ha anapaTOT.
2 Co cyBa n MeKa KpNa MoKe Da ce YnCTn N OTBOPOT 3a N3JIe3 Na BO3dYx.
YncTeHe Ha pe3epBOapOT 3a BOda
1 YnCTeTe ro pe3epBoapOT 3a BOda cekoja ceMnua 3a da ja odpxyBaTe XnIHeHaTa.
2 N3BaTeTe roΦnTepo 3aOBnaKyBaHbE.
3 HanonHeTe ro pe3epBoapOT 3a BOJa co BOJa.
4IOnajTeMaNky6JIaraTeuHOC3aMneHeCaIOBnU3MeHaCoBOda BOpe3epBoapOT3aBOda.
5 NcHCTeJa BHaTpeuHocTa Ha pe3epBOaPOT 3a BOda Co MeKa n YnCTa Kpna.
6 Icnpa3HeTe ro pe3epBoapOT 3a BOda BO MjaJIHnK.
7 BpaTeTe ro ΦnItePoT 3a OBnaJxBaHbe Ha3aD Bo pe3epBoaPOT 3a BOJa.
YnCTeHBe Ha ceH3OpOT 3a YecTnUcKn
YHCTeTe rO ceH3OpOT 3a YecTnUckN cekOn 2 Meceu 3a ONTmAlHo pa6oTeHe Ha anapaTOT.
Ako anapatot ce KopnCTN BO npaBInBO onkpyyBaHe, moKe6n Ke Tpe6a noecTo da ce nCTn.
Ako HnBOTO Ha BnaXHOCT BO IpocTojata e MHOry BnCOKO, Ha CeH3OpOT 3a cheTnKMOxKe Da ce nojabN KOHeH3aUJa N CBeTnOTo 3a KBaJIITeT Ha BO3DyX MOxKe Da nOKaKe IocJa6 KBaIITeT Ha BO3DyXOT NaKO KBaJIITeTOT HA BO3DyXOT E BCuSHoCT Do6ap. Ako Ce cnYuToa, nCnCTeTe rO ceH3OpOT 3a YecTnKn.
760 MaKeIoHcKn

1 NckJyueTe ro anapaTOn n3BneueTe ro npNKJyuOKOT od uTekep.
2 OTbopete ro kanakot Ha ceH3OpOT 3a KBaJInTe HA BO3dyX.
3 NcHCTeTe ro ceH3OpOT 3a YecTnKo CO BnaJxHO CTanHe Co NaMyueH BpB.
4 Temenno ncyweTe rncnte neoBn co cyBO cTane co naMyeH BpB.
5 3aTbopeTe ro ceH3OpOT 3a KBaJIITeT Ha BO3dYx.
YnCTeHbHaΦnJItePoT 3aOBlaJxBaHbE
YnCTeTe ro fHInTePoT 3a OBnJaXyBaHe (FY3401) cekoja ceMnua 3a da ja oDpKyBaTe XnIneHaTa.
1 NcknyeTe ro anapaTOn n3BleYeTe ro npNKnyOkOT oI WTeKepe.

2 N3BneyeTe ro pe3epBoaopT 3a BOda oD anapaTOT.

3 OtrpaHete ro npkaHOT 3a fntepoT 3a OBnaKyBaHe oI fntepot 3a OBnaKyBaHe.
4IOToneTe ro fHnTepoT 3a OBlaJxBaHBe BO 6naRo nnKncEHHcKO cpeCTBO 3a YnCTeHe (24 g JImOnHcKa KncElnHa co 4 L BODa nn 100 ml 6en ouet co 4 L BODa) Bo Tpaehbe oD 1 yac.
762
MaKeDoHcKn
5 IcnilakheTo oIInTepot 3a OBnaxyBaHbe noI ymepeH Mna3 BOna. HEmoJTe Da ro CTnCKate nnueDInTe oINTepot kora ro YnCTnTe.
6 IpaBnHIO nOCTaBeTe rO npXaHOT 3a cHITepoT 3a OBlaXyBaHe OKOly cnItepot.
7 BpaTe ro pe3epBoaop 3a BOda BO anapaTOT.
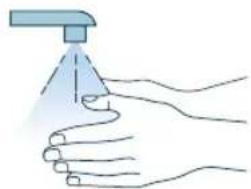
8 Temenho n3MnjTe rpaTe OTkako Ke ro nchnte fntepoT.
YnCTeHbHa NOBpUHaTa HaΦJItePOT 3a IpeuNcTyBaHbE
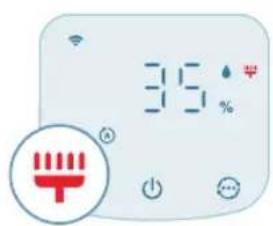
Kora ha ekpaHOT Ke ce npikaKe npdynpeyBaHbTo 3a uNCTeHa fNITepoT, nCnCTeJa noBpUnHaTa Ha fNITepoT co npaBOcMykaJka.
3a6eneuka:Ha lyreTo KOI ce aIepnHn Ha npab, noJeH, domaunm MInJeHnI nn MyBna I m npenopayBaMe da He rN MeHyBaat qntpnte camn nI da Ce 3aHTiTAT Co MaCKa n paKaBUN.
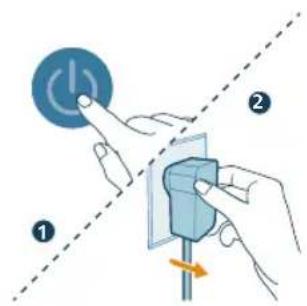
1 NckJyueTe ro anapaTOn n3BneueTe ro npNKJyuOKOT od uTekep.
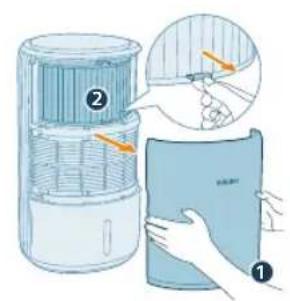
2 NobLeueTe ro npedHnot kanak n OTCpaHete ro od anapatot. 3BaTe ro cnTepo3a npeeuCTyBaHe.
3 NcHCTe je noBpHnHaTa Ha nItepot 3a npueNctyBaHe co npabocmykaKa.
4 BpaTeTe ro fntrepoT Bo anapatot.
5 NocTaBete ro npeHnO T kanak.
764
MaKeDoHcKn
6 BmTeTe ro aanTepoHa anapaTOT BO uTekepot.
7 PnTnCHETe Ro KOnyTe 1a Ro BKnyuTe anapatOT.

8IpnTnchete rKoynHbata n3dpKeTe 3cekyHn 3a da ro peceTnpate BpeMeTo 3a NcTeHe Ha qntepot.
- Moxete da ro pecetnpate BpeMeTo 3a YnCTeHb e Ha qntepot n BO annkaunjata Air+.
- Iyo ycneuHOTopeceTnpaHe, npeynpeyBaHbeto 3a uNCTeHe Ha cnItepoNTue3HyBaOd ekpaHOT.

9 Temenho n3mnjte rna paete oTKako Ke ro nucnctnte fntepot.
3aMeHa Ha Фиltpnte
ObjachyBaHbe 3a 6nKunjaTa 3a 6nKnpaHbe Ha anapaTOT nopaN 3aHTnTa OD HeuNCT Bo3dYX
Oboj anapat e onpeMeH co nHdkaTOp 3a 3aMeHa Ha fNlTePOr, To Ke OBO3MOxN fNlTePOr 3a npeHcTByBaHe Ha BO3DyX Da e BO ONTmAlHa COCToJ6a Kora pa6To anapatOT. Kora fNlTePOr Tpe6a Da ce 3aMeHN, PpeDynpedyBaHBeTo 3a 3aMeHa Ha fNlTePOr BBeTu CpBeHO.
AkoФиntepOT He ce 3aMeHn HabpeMe, anapaTOT Ke npctaHe da pa6otn n abTomatckn Ke ce 6Iokupa 3a Da ro 3aHTNTu KBaIHTeTOT Ha BO3dyXOT BO npocTopnjata. 3aMeHeTe ro ФиntepOT Haj6p3o wTo moKeTe.
3aMeHa HaФИТерOT 3aпpeuNTcTyBaHbE
3a6eJIeUka:
Филтетор за пешистуваье (FY3400) He ce nepe n He e 3a noBekekpaTHa ynotpe6a.
IpeДа n3BpUnTe 3aMeHa Na ΦnJItePoT, He 3a6OpabajTe da ro ncknyuTe anapaTOT n Da ro n3BaAnTe aanTpOToS uINHnOT wTeKeP.
Kora npdynpdyBaHbeto 3a 3ameHa Ha φnItepot e npkaKyBa Ha ekpaHot, 3ameHeTe ro φnItepot (FY3400).
3a6eneuka:Ha lyreTo KOe ce aIepnHn Ha npab, noJeH, domaunmMnneu nnn MyBna mnpenopayBaMe da He rMaHybaaT pntpe camn nn da ce 3aHTiTat Co MaKa n paKaBnC.

1 NcKnyeTe ro anapaTOn n3BJIeYeTe ro npNKnyOkOT oI, WTeKepe.
2 N3BJIeueTe ro npEHNOT KApA N OCTpaHete Ro oAnapaTOT. N3BaJeTe ro fIInTePOT n pPeTe ro NCKOpIcTeHNOT fIInTeP.
766
MaKeDoHcKn
3 OTepaheJe ja eJaTa aM6aJaxa oHOBnOT HJITep (FY3400).
4 CtabeTe ro HOBnot fHntep BO anapatOT.
5 NocTaBeTe ro npeHnO T kanak.
6 BmTeHeTe ro aanTepeoHa anapaTOT BO uTekeoT.
7 PnTNCHeTe Ro KOnyTeTo Da ro BKnyuTe anapaTO.
8IpnTnCHete rKoNunHbata n3a npKeTe rN 3cekyHn 3a da ro peceTpate 6pojaoh 3a pa6OteH BeK Ha qntepOT.
Moxete da ro pecetupate pa6oTHnoT BEK Ha qntepot n npeky annkaunjata Air+.
- No ycneuHOTo peceTupaHe, npdynpeyBaHbeto 3a 3aMeHa Ha qntepot Ke nche3He oJ ekpaHot.

9 TemeJIHO n3MnJTe rna paueTe oTKaKO Ke ro 3aMeHnte fHTepoT.
3a6eneuka: Hemojte na ro Mnpucate fntepot 6nnejkn co6upa 3araayBauknyechuynoDBO3dyxOT.
PecetnpaHe Ha nItepoT
ΦnItePOT 3a npeuHCTyBaHe MoKe Da rO 3aMeHnTe Dypn N ppeD a Ce npKae KpeDynpdYBaHbETo 3a 3aMeHa Na ΦnItePOT ( Ha ekpaHot. Kora Ke ro 3aMeHnTe ΦnItePOT, Notpe6Ho e paHNo Da rO peceTnpate 6pjoaOT 3a TpaHe H a ΦnItePOT.
1IpnTnCHete ro konyeTo da ro ncknyuHte anapatot. NcknyeTe ro anapatOT oJ wTekep.

2 PpOBepTe daHn anapatot e ncknyen od uTKepe. Nooekajte HajmaKy 10 cekyHn nped Da ro npuknyute aanTepo3a HanojyBaHe BO uTKepeoT.
3 Bo pok od 15 cekyHn no BKnyuBaHbeto, npntncheTe rK konHbata n 3aDpxKeTe rN 3 cekyHn 3a da ro peceTnpate 6pojaOT 3a TpaHe Ha fntrepot.
TapaHcNiJa N PoIdpShka
Versuni hydn iBHe roDnSHA rapaHcna je KnyBaHbTo Ha oOBJ npOn3BOD. Obaa rapaHcnaJa He e BaxeUka aKo HactaHe deΦeKT nopAin HenpaBnHO KopNCteHe nnI loWo odpxyBaHbe. Hauata rapaHcnaJa He rN orpaHcyBa BaUnTe 3aKoHcKn npaba KaKO NotpoWbAc. 3a nobEke INHΦopMaun nnI 3a aKTHBnPaHBe Ha rapaHcnujata, nocTeTe ja hawata Be6-CTpaHnca www.philips.com/support.
HapayBaBe deIOBn nIIN doaTOcN
Ако Треба за заменITE.DeДи саКATEДа КУпITE ДОПОЛНITEЕн DeI, KOТаКтирajte co npoДаВaЧТ ha npoɪЗВODи od Philips ИИnpocTeTe ja Be6-страMucaTa www.philips.com/support.
Ako Imate npo6JIem co Ha6aByBaHBe Ha JeIOBnTe, KOHTaKTnpajTe co cHTapOT 3a KopncnUka noDpUka Ha Philips Bo BaWaTa 3eMja.
BaxklnBa iHΦopMaця
Ipeep TmK BnKOpncTOBbATn npCtpi, yBaXHO npOHTaTe ue noci6HKn KOpNCyBaCa Ta 36epiraTe noTo ImaMai6yTHbOIO doBikn.
Дя haкраою роботи радимо onobHTи B6уObaHe nporpaMHe 3a6e3neueHЯ ouHyBaHa до octaHHbOi BepciI. L'ehOBJIeHЯ MoxHa BVKOHaTn uee3doTaK Air+.
PonepeJxKeHn
- Ipeep TmJ kIi'EDHyBAtn npictpi do eNeKtpomepexi, npebipTe, 36iraetbcra Hanpyra, Bka3aHa Ha npictpoi, 3 HanpyroIO B mepexi.
-Якшунухиьнгяпшкджс,在yнкнннн He6e3nekn noro Heo6xidno 3amHHTn y kompani Philips,3BepHybunc bdo cepbcHoro ceHTpy, ynoBHOBaxeHOro Philips,afo faxibic i3 haJexHoKbaniqicaio.
He BnKOpncToBvIe npncTpi, kIoo aIaITepe, HHyp XnBneHry Cu cam npncTpi noKoJKeHo.
BukopncToByuTe npncTpiJnIe 3 aadantepom, kN BxOaNTb y KOMnJIeKT.
- LIM npictpoem MOkytb KopnctyBaTncj dITN BIKOM Bi8 pOKIB a6o 6Ibwe cn oO6n i3 nocna6JIeHmN fI3uHmN Bi4yTTaMn a6o po3ymOBmN 3di6HOCTaMn, YI 6e3 HaleXHOrO DocBIDy Ta 3HaHb, 3a yMOBN, 00 KopnctyBaHHra Bi6yBaETbc nID HarglaDom, IM 6yNo npOBedeHO IHCTpyKTax JIO Do 6e3neUHO KOpNCtYBaHHra npICTPoEM Ta ix 6yNo nobIDomJeHo npo MoKJNBi pu3nKn.
He do3BolnaTe dtTm 6aBntncn npucTpoem.
He do3BoJyIe dIITM BVKOHyBaTn YIuEHHa Ta DOrJa, npucToIO 6e3 HargJyDopocnix.
He 6IokyuTe BxIDHn i BuxIDHn OTBOp nI na nobITpy, HApNKlaI, po3micTbBUn npEdmTu Ha BuxIDHomOy OTBopi nn nepeD BxIDHM OTBOPOM.
- CTeKTe, 106 B O TBiP IaBnXoDy nobITpy BCEpeDHy npicTpoH He nOTpaNNIc TcOpOHHi ppeMEn.
- CtaHdapTHn iInTepeHc Wi-Fi Ha 6a3i 802.11b/g/n Ha 2,4Γι i3 MaKcMaJIbHO BuxiDHO NToTyXHiCTIO 64 MBT EIRP.
- Bluetooth Bepci 5.2 (LE) i3 yactoto 2,4 ΓΓu, BuxiHa PPy notyxHicb MeHue 10 MBT EIRP.
- PekomeHnyeMo oco6am,Яki MaOTb aIepriIO Ha NNJ, NIIOK,DOMaunix TBapIN a6o nIiceHb, He 3aMIHOBATn φiJIbTpN cAmocTiHo a6O BxNBaTn 3axNCI 3axOdi, HApNIKlaD OJraTn MACKy n pykabuKN.
ybara!
- Léi npicpti He 3amHЯ HalejxHy BeHTnlaIciIO, 3BnuaHne BaKyyMHe np6bpaHHy N BuTJkky a60 BeHTnlaTOp niJ vac npiroToYbaHHa iXi.
- CtabTe i BnKOpNCToBMyTe npncTpI Ha cyxH, CTiIKi, pIBHi I rOpN3OHTaJIbHi NOBepxHi.
3aIiHTe 0HaHMeHwe 20 cm BiJbHoro Micu HaBKOIO npicToHO, a TaKoX 0HaHMeHwe 30 cm BiJbHoro Micu HAD HNM.
He cidaaTe HcctBaAte Ha npicTpi.
He cTaBTe HiUoro 3BepxHa npncTpi.
He ctabte npncptpi 6e3nocepndhbo nKoHnuciohepom dna 3anobirhackpanyBaHHIO KOHneHcaty Ha Hboro.
He 3aIbAitte Body 3ropn npictpoJ.
-
Nepsh hix ybimkhytn npncptpi, nepebipte, cn fiNbtp ouuueHHra nobitpr Ta fiNbTp dIy 3BOJIOXeHHBCTaHOBNeHO HaJeXHm YHOM.
-
BnKOpNCToBnyTe IiIe opuHaJIbHi JIbTpN Philips, npu3HaueHi nJra UboR npucpto. He BnKOpNCToBnyTe iHux JIbTpIB.
3aImaHnHaIbTpAmoKe npn3BecTn Do cepno3Hnx TpaBMyBaHb Ta/a60 IetaIbHnx HacIiKIB.He BnKOpncToBynte 1ipbtp Ra naiuBO nn Dny noi6Hnx ciJe.
- Nam'yaTae, 10 Bucokn pBeHb BOIoroCT MoKe CTmUyIbAtu pict 6ionoruiHnx opraH3MiB y HABKOINHbOMy cepeOBNi.
He do3BolnaIte, 06 o6Ibactb DOBkOla npicrpo CTaBaJa MOKpoI a6o BOIoroIO. Y pa3i BUNKHeHHa BOIoroCTI 3MeHHTe npOyKTnBHiCTb npictpoI. RaIoo 3MeHNITn pOdyKTnBHiciTb HEMOXJIuBO, BIKOPNCTOBYIte npicrpi i3 nepepbam. He onyckaIte, 06 taKi abcOp6yIoMiATEpiaII, kKJIMKn, UToPi, 3aBicn a6o cKaTePtnHn, CTaBaJIu BOIOrmN.
Hikon He 3aIIuAaTe BoDy y pe3epByapi, KOI npicTpii He BnKOpNCTOBvETbcra.
- Nepw Hix BiKlaCTn npncpti Ha 36epiraHna, cnopoxhItb i nounctbte noro. Nocntbe npncpti nepeid hactynm BnKOpncTahHm.
O6epiraIe npicptpi (3okpema, BxidHni i BuxiDn IOBOPn IJna NOBITP) Biyapib BaKkMnnpedMeTaMn.
ДлязANO6iraHнгТравMbAHnIOу36OIOBpo6OTnpICrpoIHeBCTaBnTe naIbci a6o iHni npEdmETu BuxiDnHn Yu BxIDn OTbip nObitpr.
He BnKOpNCTOByIte cei npncptiy npmiiueHhi nicJ3actocyBaHHaIMOBHX 3ac06IB iD KOMax, a TaKoX y Micqx i3 3aJIuHKamM MaCTnla,3aNaXAMn BiD KaIHNN YN XIMiYHMN BnnapamN.
He BnKOpncToBnyTe npucpii 6iJa ra3OBux npucptoB, o6irpiBauiB nn kamiHIB.
- 3aBxDn Bi'd'EnHyIe npncpti Bid eJeKtpomepexi, KOJn noTpioHo nepemicTNT, NOcHtNTu Ioro, DOJIHTN BOJN, 3aMInHTN fIlbTp uN BIKOHaTN iHwe o6cIyROvBaHHra.
-Якшпгл He BHKOPNCTOBYBaTN TpNBaHn Yac,Ha fiNbTpI dJa 3BOJoxeHH MoKyTB po3MHoxyBaTnc6 BaKTePi Ta nniceH. Nepu HIX 3HOBy KOpNCyBaTnc npNCtpoE M, nepeBipTe fIbTp. RaKso fIbTp dJa 3BOJoxeHH dyxe 6pydHn i3 TeHMnIM nJaMaMn, 3amHiTb NOrO.
- Pnpctpi npn3HaeHO BnKJIuOHO nIa NObyTOBO RnKOpNCtAHHra 3a HOpMaJIbHnx yMOB eKcNlyatauii.
He BnKopncToBnyTe npicTpiy y BoJorHx cepeOBouax nB cepeoBuaax i3 BnCOKO BOIoricto a6o BnCOKO TeMnepaTypoIO NOBITpy, HapnPKaIy y BaHHi KIMHaTI a6o npmiiueHHI 3 cyTTeBmN nepenadAm TEmnpaTypn.
-Ппстpiн He yCyBaeЧади ra3 (CO) Ta paOn (Rn).Иloro HemoxJNBO BnKOpncTOBvBaTuЯK 3axiChn npcTpiy pa3i ropinHЯ i BnKnUd Ye6e3neuHx ximiuHx peoyBuH.
- HanobHIOIte pe3epByap IJIy BOJI JIe XOJIoHO BOIO 3-niД kpaHa. He BIKOPNCOTByte rpyHTOBY uI rapAry BOy.
He hanoBIOItepe3epByap IJIa BOINJKOHNIMiHUNMpeOBNHAMn,HIX BOa.He daBaIte IO BOIN apomatN3yOci 3aco6n a6o ximuihi peOBNHN.
He MnIte fIbTp IaI 3BOIOxKeHH y npalbHi Nn NocydomnHm MaunHax, iHaKwe BIn DeΦopMyETbcra.
-Якwoи He nlaHyete KOpNCTyBaTnCnI npIcTpoEm npOTraGM TpNBaIoro Yacy, nouchte pe3epByap InBOni i fIbTp dIy 3BOJIOXeHHa, a NotIM BucCyuItb fIbTp dIy 3BOJIOXeHHa.
Jkso notpi6Ho nepemictn npicpti, cnoaTk y Bi'EnHaIte Ioro BiMepexixKuBHeHH.
- Y pa3i nepeJIbAHnI WBnIDKO BmKHiTb XnBHeHH I BnIMt b pe3epByap dIy BoI. Pid yac YnIeHH npncTpO HaMaraiTeca He KlaCTn Ioro i NIIbHyIte, 06 eJekTpNHi po3ETKn No6IIn3y 6yIn cyxImn.
Elektpomarhithi noj (EMI)
Cen npncptiB iDnOBiDae YHHNIM CTaHapTa m i npabOBm HopMaM,IO CTocyIOTbcra BnINBy eNeKtpomarHITnX nOJIb.
Iepepo6ka

Ue cnmboI 03naua, 10 ue Bpi6 He niDnaRae yTnla3auii 3i 3BnuaHmN no6yTOBUMn BiXOdaMn (2012/19/EU).
IotpmyTecb npabn po3dineHoro 360py eeneKtpuHnx Ta eeneKtpoHHnx npictpoiv BaWiin KpaiiHa. HanexHa ytniiaqir donomoxe 3ano6irtn HeraatNBHomy BnInBy Ha HABKOJINHc cepedobnue Ta 3doop'JIIOJe.
ΦiNbTpДЯЗВОLOXeHHЯ He MoXHa MNTn i 3dAbTaH Na nepepo6ky. YtNiI3yIte BnKOpuctaHi 6LoKn 3 ΦiNbTpAmn 3rIdHO 3 MiccEbUm npabuIamn.
ΦiNbTpДЯЗВОLOXeHHЯ He MoXHa MNTn i 3dAbTaH Na nepepo6ky. YtNiI3yIte BnKOpuctaHi 6LoKn 3 ΦiNbTpAmn 3rIdHO 3 MicueBmN npabunamn.
CnpoueHa 3aBa npo BiinobiHictb EC
LIM NOBIOMJIENHAM KOMNaHIA DAP B.V. CTBepJxye, 0o paiooojaHaHHaTny AC3420/AC3421 BiIOBiae BImoram IInpeKtBn 2014/53/EU. NobHnTEKCT 3aABn npo BiINOBiHicTh E C doctynn 3a TaKOIO aDpecoIO B lHTepHeTI: www.philips.com.
Baw Klimatnuch KOMPJIeKc
Bitaemobac i3 nokykoTa Jaackabo npocmo Do Kny6y Philips!
Lio6 y nobHm miPCKOpncTaTnCn iNtprMkoIy Kpy npOnHye KomnaHia Philips, 3apeectpynte Cbi Bnpi6 Ha Be6caNti www.philips.com/support.
776 YkpaIHcbka
OrnBnpo6y

A BuxiHnO TBiP F IpeHnKpnuKa
B DaTnK qactnHok G fInbTp dIa 3BOJoxKeHHy (FY3401)
C NaheJIb KepyBaHHH H Pe3epByap dIy BoDn
DΦijbTpДЯOuHcEHn(FY3400)INoKaJxNpBnBOU
E Tpmau fIbtpa dna 3B0LoXeHHn J AanTep (KA4801A-2402000EU)
OrnienemntiB kepyBaHHa
KhoNkKepyBaHHa:
He cBiITbCf OyHKciH Wo-Fi BmKHeHO a6o iNdkaTopu
npntpoIO He cBITbC
3'eɪdɪnɪŋ Wi-Fi

HanaWtbyBaHHa 3'eHaHHa Wi-Fi Bnepwe
1 3aBaHTaXTe i BCTaHOBITb IOnaTOK Philips Air+ i3 MaRa3nHy IOnaTkIB App Store a6o Google Play.
2 BCTaBTe UTeKep npucTpoU B po3eKy H aTuCHiTB KhoNky XnVBneHHra, Iio6 yBIMKHyTu npucTpi.
IHnkaTopWi-Fi 6IImaOpaHKeBIMCBITLOm nepu npa3.
3 Cmaptfoh a6o nlaanwet Mae 6ytu nnKIOueHO do Mepeksi Wi-Fi.
Ppumitka.
YbIMKHTb cyHKtio Bluetooth Ha cMapTfoHi IJnIJaBHoro cnapeHHa.
IpekeohaiTecra, 0o cMaprfoH nikKIOueHO do (DOMaunHbO) Mepexi Wi-Fi 2,4 Tua He do mepexi Wi-Fi 5 Tua a6o 3aralbnoocTynHOi Mepexi Wi-Fi. Iycnihoro 3'edHaHHB npapy pekomdyEMOBIMKHyTN MOibHi dahi nepeonoyatkOM npouecy cnapeHHa.

4 3anyctitbdoataok Philips Air+ i HATNCHTb Doatn npncpti a6o HATNCHTb KhoNky "+" Ha ekpaH. BkoHaTe Bka3IBKn Ha ekpaH, o6 nI'EDHaTn npncpti do BaWoi MepeXi.
Iicna ycniun Horo 3'eHaHHB npy iHnkaTop Wi-Fi cbitntumetbcra 6JIM CBITJOM 6e3 6JMaHHa.
PpIMITka.
Taka Bka3iBka diiHa y pa3i HalaTuBaHH npictpoBnephe.Keo Mepexy 3MiHeHO,Notpi6HO 3HOBy BkoHaTu HaalaTuBaHH.
KIO BxOeTe nIeHn 6JIbWe OndHO npCTPOo Do CBOr cMapToHa aO
IIaHseTa, BN MoKeTe DoaTn npCTpiy y DoaTKy Ha iHux cMapToHoax, He
BkoHyouc cnDaHHra 3'eHaHHra Wi-Fi Ha npCTpoi.
BiIcTaHb MIX BaWIM CMapTfoHOM a6o PnAHaWEtom i npiCtpoEM MaE cTaHOBHTn He 6ilbwe 10 MeTpib 6e3 6ydb-kynx nepeWKoJ.
CknDaHHa 3'ENHaHHaWi-Fi
1 BCTaBte aanTep npctpoB po3eKy nHaTnCHITb, 06 yBIMKHytn npncpti.
2 Hatncitb Ta ytpmyte KhoNknpTgrom 3 cekynd y toh qac, KOJI npOlyHae 3ByKOBn CunHaJ.
Ipiucpiinepeinypexim3'EdHaHHBnapy.
- IHNKATop Wi-Fi 7nmae opaHkeBm CBITLOM.
3 BukohaiTe Kpokn 3-4 y po3di "HaJauTyBaHHa 3'eHaHNN Wi-Fi Bnephe".
Bukopinstahня KlimatnuyHoro KomPleKcy
PozymiHnI HndkaTopa 3BOJoxeHHN
Bidnocha Bonoictb 03haaekilbkictb BonoB aTMocphi.
Indkatop 3BOJoxeHHMa cOTnp pBHi cTahy:
CTAH iHnkaTopa 3BOLKeHHIe O3Haaye?
Блима оразнке Вситлom ()He npabnJIbHO BcTabNeHo pe3epByap Дя ВОДи.
Cbitntboc opaHkeBn m Cbitlom HeoctaTbO Boi. HanobHtpe3epByap Ira Boi.
Cbitntb6iINM CBITNOM (Pnpctpi 3BOJIOKye KIMHaTy.
He cBtntbca () OocryHyTo ciNbBOoI BOJorOcti.
Примитka. Стандартацльба ВОлогістановы 50%RH, пpoTe в можete BCTaHOBNTIбьжануцльбу ВОлогісту дODаТКУ.
- RaKuo iHnKaTOp 3B0LoXeHHa 6IIMaO paHKeBm CbitlOM, nepeBipTe, HAnEHXNM YINHom BCTaHOBHeo pe3epByap dIy BOiN.
IHKIO iHnkaTOp 3BOJoxeHHa CbitntbC6iINM CbitlOM,ue O3Haaye,io BaHa KaMHATA ycnIHHO 3BOJoxyETbcra.
HanoBHeHHa BODn

PnIMtKa. NobIbHo DOJInTe BDOy, 0o6 3anO6irTu po36pn3kyBaHHIO i He nepeBnUyBaTm MaKcImaJIbHni PiBeHb BOu, Bka3aHn Ha npNCtpoi.
1 BnmiBt pe3epByap IJRA BOIN 3 npucTpoI.
2 HanobHitb pe3epByap nra BOiXoJIoHO BOIOIO 3-niKpaHa. CTeXte 3a pIBHeM BOiYepe3 npO3ope BiKoHcE Ha pe3epByapi nla 3ano6irAHnnepeJIiBaHHIO.
3 BCTaBTe pe3epByap nla BoDn Ha3aD y npncTpii.
3haeHnKaIohBopIB iHnKaTopa kOcTi nobITpr
Iicra BBIMKHeHH KImatuHn KOMnEKC NOUHe cKaHyBaTu kICTb NOBITpy.
Pn6n3Ho uepe3 30 ckyHd DaTnK qactnHOK BBepe KoIip, AKn BiNobidae
kocti cactoOc nobITpy y npimiueneHHi.
Kolip iHdkaTopa kocti nobITpy Bn3Haayetbc pyiBHeM PM2.5.
PM2.5
TexHOrIg po3n3HaBAAHAeraSense ToUHO BnBnE Ta WbNko pearye HabiTa Ha Haimenwi 3miHn O6cary yactuHOK y nobitpi. Nobidomlenn npo pibehb qactouok PM2.5 y peaIbHOMy yaci Hadae Bam BneBHeHoCTi.
BilbIcTB KIMHaTHNX 3a6pydHOBaiv nobITpy niJaNAOTb Ni dBn3HaueHHaPM2.5, 10 no3Haac 3a6pydHIOUci peoBHN y nobITpi po3mipom MeHwe 2,5 mKpometpa.TINOBUMi KIMHaTHMN dKepeJAMn Di6HNx qactOK y nobITpi e TIOHOBNI dIM, roTyBaHH iXi, rOpIHN CBvOK. DeaKi bakTeppi Ta haMeHwi cNOPu Zbini, aIepReHn DOMaunix TBapNH ta anepreHHi qactOCHN nIIOBHX KIIiIB TAKOX NiIpaAOTb Ni dBn3HaueHHa PM2.5.
Pibehb PM2.5 Kolip kocti nobitpr Pibehb kocti nobitpr
≤12 BlaakHTnXopoIsh
13-35 Blaakntn-nypnpobn 3aobinbni
36-55 Nypnpobu-epBOHn IoraHn
55 YepBoHn IyXe noraHn
YbIMKHeHH Ta BmKHeHHa
Ppumitka.
Iy ONTmAlbHOeKtBHOCTOuHnEHHa 3BOJoxeHHa 3akpuTe IBepi BIKHa.
TpmaIte 7tOpn noanai BiD BxIHnx uBxIHnx OTbopIB nOBiTPra.
1 BCTABTe aanTep npntpoB po3eKy.
2HaTnCHiB KONky XINBHeHHa,IO6 yBIMKHyTN npncptpi.
- Pnucpi Buae 3Bykovi ciHaJI.
-Пичасувimкненна ekpani BiOobpaKaetbciaHnkaia "
- Pnucpii npaioe B aBtOMaTHHOMy pexkmi, a Ha ekpaHi BiIO6paxaETbcra pibeh PM2.5.
3HaTnCHITb KONky KINBJIeHHa NOBTOPOHO, 06BmKHyTN npncTpI.
Ipnitka. Raio nia BmKHeHH npictpi He BiD'edHyBaTN BiEeKtpomepexi, To nia NobToPHorO yBIMKHeHH Bin npoobkntb po60Ty 3 nonepdHIMn HalaTuBaHHaMn.
Перемпач дислег
Ppumitka. Pnpctpi 3a 3amOByBaHHm noka3ye pBeHb PM2.5.
1 HaTnCHiB Ta yTpmyte KhoNky npToYrom 3 cekyH, IIO6 nepeMkHyTN iHdkaTOp Ha BiO6paXeHHBOJorOCTI HABKOJIuHbOro cepeNoBuHa.
Bih ABTomaTnHNOBepHeTbCIO BINO6paXeHHNPM2.5uepe3 5ceKHyN.
2 Hata ytpmyte KhoNky BTOPO, 06 nepemKHytn iHdkatop 3HOBy Ha BiO6paKeHHa PM2.5.
3miHeHHaHaTaTyBaHHpeXIMy
MoxHa Bn6paTn ABTomatnHnn peXm, NomipHn peXm, Typ6opexm a6o Pexm cHy, HATnCKaHOn KhONkY nepemKaHHra peXmIB. DoaTkObi peXmnp60tN MoXHa Bn6paTn BdoTaKy Air+.
A B T O M A T N H P E K M (P n p n c t p i n a B T O M a T N U H O H a I a W T O B Y E W B N D K I C T b B e H T N J A T O P A B I N O B I D H O D O J A K O C T I N O B I T P R H A B K O J O.

Pomipn pexm Y nomipHomy pexmi npicpi npaioe i3 cepenb0o WbnkiCTIO.
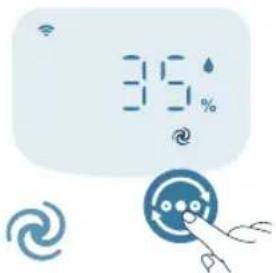
Typ6opexm (9) Pnictpi npaioe 3 NaBnIO IO WbNkICTIO.

Pekm cHy (Pnctpi npaioe Tnxo 3 Hn3bkoio wBnKictIO. Hepe3 3cekyndn dncne BumkaTbcra.
Pekm cHy 3 ycyHeHnAm aIepreHb: LepeKm MoXHa yBIMKHyTN Bdoatky Air+. Pekm cHy 3 ycyHeHnAm aIepreHb po6ntb po6Oy peKmMy cHy notyxhio, kOni ce noTpi6Ho. Y pa3i BBIMKHeHnpeKm cHy abTomaTHNO HanaSTOByBaTme WBNkICTb BEHTNlAToPA NOi6HO Do TOrO, RaC ce Bi6yBaETbcra B abTomaTHNOMy peKmMi, 36epiraOuN npu Cbomy Hn3bKn pIBeh b wmy. LepeKm iDeaNbHO nIXxOaNTb dIЯIIOe, KKM nOTpi6Ha BnUa npOdyKTINBHcTB yHocI nopIBHnHO 3I 3BnuaHNM peKmMOM cHy.
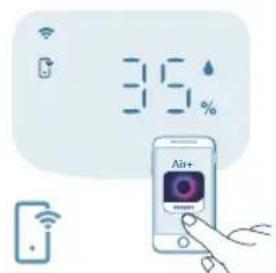
Pexmpo60tnyepe3doaTOK(PnncpiinpauoeBpexmi,akn IOCTyHNI LmIe yepe3 DoaTOK,de MOxHa BCTaHOBHTn DoaTkoBi pyHi HanauTyBaHHN WbUdKOCTi BEHTnlaTopa, cInboby BoNOrictb a6o iHwi peXmNi, kIyHn HanauToBaHI BdoATky.
Ppimitka. Pexmpo6otu cheepo doataok doctynHn IINUE Bdoatky nicna ycniHoro niKluohennr cheepa Wi-Fi.
BnKopncTaHnYyHKuii niDCbiUyBaHHa

3a DonomoroI DaTnka Cbitla NaHeIb KepyBaHH MoKe ABTomuHHO HanaToBvBaTu RcKpaBicTh BiNObiDHO Do 3OBHiUHbOro OCBiTneHH.
PanaHb KepyBaHHa 3MeHwye ackpaBicb y TempBi. MoxHa HATnCHTu 6yDb-ky KhoNkU, 0o6 akTnByBaTN Bc i INdkaTopn. JKIO nICJI zBOrO He 6yDe BVKOHHO XODHOi DII, yci INdkaTopn 3HOBy 3raChTy BiINOBiDHO Do 3OBHIuHbORO OCBITIeHHa.
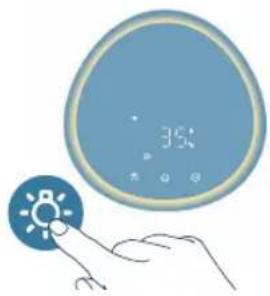
Moxha haTnCHyTN KhoNky fynKuii niCbiuyBaHnry, 06 nepeu Tn B pexm CbitnbHKnka N yBIMKHyTu 3aTuWHe KInbue 3 niCbitkoIO HABKOIO naHeli KepyBaHH. BiDpernyIIOHTe RCKpaBicTB 3aTuWHO nDCbiuyBaHH B DoTaKy Air+.

Moxha Hatachny KhoKy 06 BIMKHyTn Bci iHdkaTopn Ta naHeJIb kepyBaHHa. Hatncihb khoKy 3HOBy, 06 yBIMKHyTn Bci iHdkaTopn.
HaiaatyBaHnHa yHKci6lokyBaHHaBd iTei
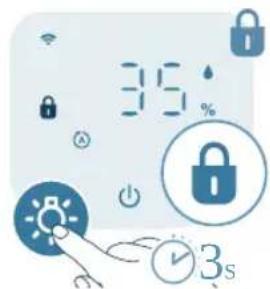
1Lio6akTnBvBaTn 6IokyBaHH BID iTei,HaTncHITb Ta yTpmyte KhONky npotraom3cekynd.
Haekpani Biio6paKaεTbc8
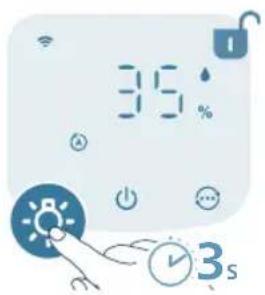
2 206 BnMKHyTn 6JIOkyBaHHraBid diteR, HATNCHITb Ta yTPMMyTe KONKy npotrrom 3 cekyHd. -Hnkaia HnKHe 3 ekpaHa.
UHsEHHa Ta DOrJaD
PpIMtKa.
IpepeuHnEHNm 3aBxNn BnMaTe wTeKe npncTpOIO i3 po3eTkn.
He hainbaIte BDOy uepe3 OTBOpn IJy BxOy N BxOy NOBITPra.
He nctbte kOndhy aactnHy npncptpo1o abpa3nBHMn, idkmmn 3aMnCTmN 3acobamn dny nuueneHH, HanpNKlaD BiDiIOBaHem CnnpTOM.
YxOJHOMy pa3i He yncTbTe fIbTp oUHHeHHaXoJHmPiINHaMn (3okpeMa, BOIOHO).
He YnCTbTe DaTUnK YactHnOK 3a DOnOMorOIO NINLOCOca.
TpaΦiK YnueHnY
Uactota Cnoci6 uHenn
3a Heo6xidnocti BHTnpaTe PnactNKOBI NOBepxHi M'koO cyxoio raHupKOIO
YnCTbTe KpnuKBy BuxiHoro OTBOpy
KoXHi Dba Micai IpoTnpaTe DaTnK YactnHOK CyxHM BaTHUM TaMNOHOM
BIDOpaKaεTbcaHaekpaHi.YncbTe NOBepXHIO φIbTpdaIryOuIeHHa
LToTHHnYnCTbTe fInbTp nIy 3BOLOXeHHN
Perylaepno YnCTbTe BHytpiHIO 30BHIuHIO qactHHI KOpnyca npictpoIo dna 3ano6irahHaKoONueHHIO nnly.
1ДЯчиш�ньВутpiшьоi 3OBHшьоi YactNH KOpnyca npnctpoBnKOpNCTOBynte M'ky cyxy raHypKy.
2 O'Tbip IaI BnXoIy NOBITp TaKox MoXHa npOTnpaTn M'koIO cyXOraHupKOIO.
5 BcTaHOBITb nepeHIO KpnuKy Ha Micue.

6 BCTaBTe aanTep npncToPOBpo3eKy.
7Lio6 yBIMKHyTn npCTpiH,HaTNCiHb KNONky
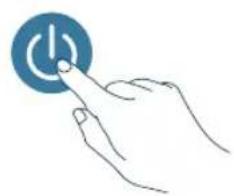

8 HaTnCHiB Ta yTpmyTe KhoNk Ta nPoTAROM 3 ckyH, uo6 cnHyTn daHI liuNbHka Te pmiHy ekcnnyataa fiNbtpa.
MoxHa cKHyTu dahi liuNbHnKa TepmiHy cLyXbTpBa DoaTkY Air+.
- Picna ycniun Horo cnndaHn cnoBieHH npo 3amHy fijbtpa 3HnKHe 3 ekpaHa.
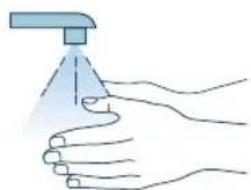
9Iicra 3aiminfojtbpa do6pe nomnTe pykn.
Pnmuitka. He HoxaTe fInbTp, ockinbKn B Hbomy 3i6paunca 3a6pydHIOUci peoBHH 3 NOBITp.
CkndaHHn daHnx npo pibtp
ΦiNbTp dIy OuyuHHeHH MoXHa 3aMHiTn HabItb Do nOraBn CNOBIeHH npo 3aMHy fInbTp aHa ekpaHI. Picra 3aMHi NfInbTp aNtpi6Ho BpyHy cKHyTu daHi IiunlbHnka TepMHy eKcnnyatauii fInbTp.a

1 HataHcHb KhoNky, 06 BmKHytn npncptpi. Bi'edHaTe npncptpi Bid mepeksi.
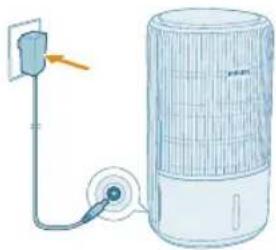
2PnCTpiMa6yTN NOBHCTIO BID'EDHaHbB IDpo3eKn. NOpekaTe npHauMHi 10 cekyn, nepw HIX BCTaBnTn aanTp KINBHeHH B po3eKy.
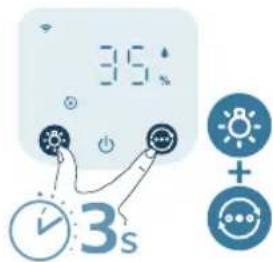
3 IpoTAROM 15 cekyHn nicra BBIMKHeHH HaTNCiTB Ta yTPmMyTe KHOKN TaIpoTAROM 3 cekyHn dnn CkndaHHaJIuNbHnKa TepMIny ekcnnyataii fiNbTpA.
3aMiHaΦIbTpAДЯ3BOLOXKeHHA
PpIMITka.
3aBxDn Bi'd'eHyTe npncptpi Bid MepeKi nepeTm, k3amHrTu pfIbtp.
BukopucToByte Iuhe opurHnBn HJIbTp Ia 3BoIoxeHHa Philips FY3401.
UcyHeHH HeCnpaBHOCTeH
U cybomy po3di i noaHO ochoBNI npo6lemn, kIO MOxTy bHnKHyTu niac BnKOpNCTaHHI npictpo. Jkso npo6lemy He Bdaetbc BnPiHTn 3a DOnOMorOIO IHopmaui, noaHOi HnXue, 3BepHITbcrdo UeHTpy O6cnyroByBaHH KJIeHTIB y CBOII KpaIH.
PpO6JIeMa MoXJIVe piWeHHra
j4x1g j3x1 30g j4x1 3g j3x1 30g 20 g
jla xlaa
j_4 = 21x ①
aL aTaoxl oaixl baiu yiaix dxjg.1gao So cui jao jao x
jLdX1 JcI 0 doxl diyix paia
jLx1 Jxu xJxu xJxu xJxu xJxu xJxu xJxu xJxu xJxu xJxu xJxu xJxu xJxu xJxu xJxu xJxu xJxu xJxu xJxu xJxu xJxu xJxu xJxu xJxu xJxu xJxu x
pssssx jgX11 gXgaxgX11 Philips 00 sXjxl sX pssssx jgsxjxl aXg/9 gJlai XaYbXjxl gJxl oP
aIlaoo 1g 1gogg jzjz1
aXg aagx1 1015x1 gao jae a xlaxl a gbjz1 algyo o
a228 803
Jg jgljgl 1s! aessy paaagb jgpb Jg .aag aag jgall gabiaal
Jio jaoxaiell alllgall x. gbaio Jia yixl liao paxiwljglal 5 aei jie
a.bj 2gblall abbj g jilwll gl
jglpl plssal pae aie gll clall fui jx
1111 plsswla jg jagll aabii paaaas jiaaagjaglglal y
a plu (aagolgall Jdo jg) jao
Jhao g aouo yol o 58 wjell sall ago glgll Jdo jolgl dlaol
j_4 = 1
gJslll gIlsuajauaal 1jlb Jgo cuaiaul jguiuuiu
aas aas gl Jaiaoo ggyggl cjjl o lae gss jll sloX
algall gl aiaill aggl gl jll lc Jaoi will agx 10 yjally jglll pax
y jg jilall jll g gl all aai g ada bgi al aia lae aill jao ge Jlglj
.
y jilall go gao. dugb ayial jglll plxwl pie ic ubjill lgc qalg yjicgaii
alilwolglwblaofo1jlesuuruyubjll jla 15 lla jy jll plss
aJell jaiil 0xla aao bai jiall pluiuill ae jzl lia
gplasll Jto aale abaaol oJyoll alj ylo ggl 1slo f g jaoaal paxi
aJaa
Jgoljglssolssol (Rn) gdl jgl (CO) gll jglll
aBssll aIgolg jlr21 olaoc gog
aill alall g aagall all paxwixx 2. baa jaiall no ayly alal olall jol
alall aololg jbe g2 alall ojx agalllg sfo
aagai 21g aalgl allwll g yubjld jua
aabjll jda cag a 1 aabjll jalg alall jz bai aybal jgal paaai pl
aBbIyJauoJuaoo 2gJdaJaa JaiuJl
aagjglal aabclg jagaiall Jgol all jajgaiall
aill aill llll llll alg 1c bao Jiu
(EMF) auiu bieogy jll
aaiablaagol jgall jayll aalall aalall aall gao jgal lia
ygl a!

(2012/19/EU) aaiell aaijiall caiiall go jaiill liao no alll puc uaj jolll iia
oalll cluy. alaoio aayy ayilgill aygiy lcllall gnddy dai ydoiaolll gial
a aag aall jaeauu wgel gio aaa aayab ayalill
jall clg g no jalll lgl g jgl lgl jlgl jgl gl aagai jil jol jol
alall glltog aousslll
aalllglll gaoosollall aln no aolll yaggldalejz jyabll
1 1
golgAC3420/AC3421 gixl no yLswxJyDAP B.V aD
. www.philips.com :wixxjy jz xxjxjgxxj
1 2 bxxg lgej aai jge
!Philips d y jog. dui ju l
. www.philips.com/support 1

a1 = 23,a2 = 43,b1 = 56,b2 = 78
(FY3401) 5j G caiu w juiiio B
olaljHg>1A>gC
a1sGwio a b (FY3400) uBjulds D
(KA4801A-2402000EU) ∫g∞ g ∑j=1n j=1n E
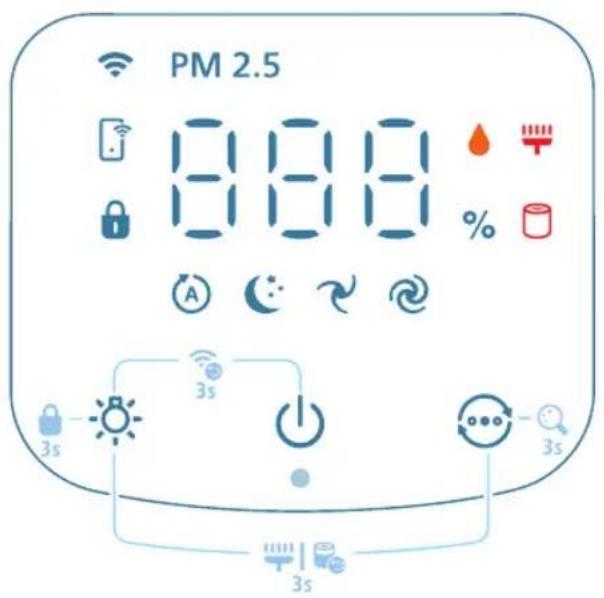
Bglll gge 00 wll lal aagall aagw baw jgll paa:
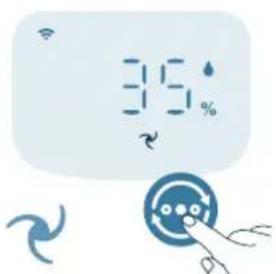
abwagacjglal Jao, bawgall gogll
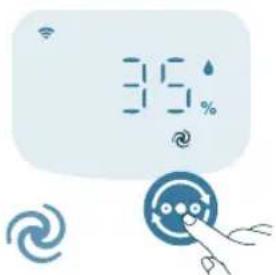
ssaaasll jaejssl Joo: (saaal aee
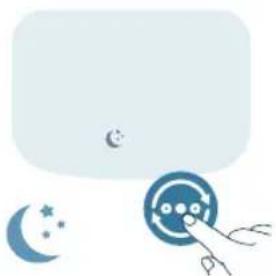
3 2 1 1 1 1 1 1 1 1 1 1 1 1 1 1 1 1 1 1 1 1 1 1 1 1 1 1 1 1 1 1 1 1 1 1 1 1 1 1 1 1 1 1 1 1 1 1
.
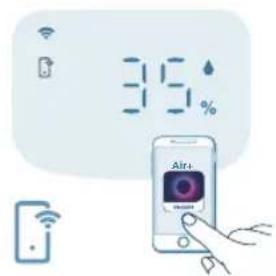
jio. qibill 1000 jg jg jao Joo: ( gibill abwgl dyaw p y gll g
Wi-Fi jJaiX! jaiy jaihill Jds co x! jaihill aalw gai ysi jaiy x: abxlo
gaaiaaagplssil
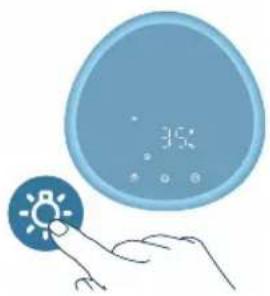
. 15 Jgai j jie bai diy .albo bai agai yloic aolc pai ay gai y

diay .paxial aagly baxiy gaoa :cluaaoxl gog yj gao xiaegaoxiaabg jbcdoai diocy Air+ qubi jolz1 cgaxl egbw ouasu
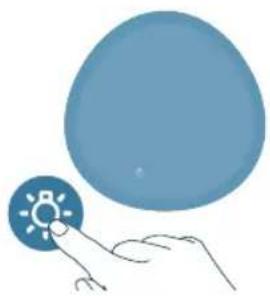
aaiyds aaiiSo abwgl claaxl jaiiuu Jgws
abillg
a#biill a#jbjgll
jIylll lto elly eliaowll yds 5 claywll jaiuio
- S_all = 0
5. 1 = 90^ = 90^ = 90^
abjll jlaa
aJbJIeblssllgJ5(FY3401)jbjill jla
1.aaaia
2.jlaolooal
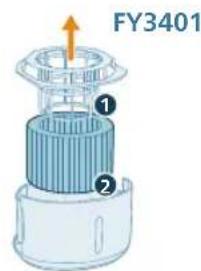
a2yall 819
3.12 < 23 < 4 且 2 ≤ 0.
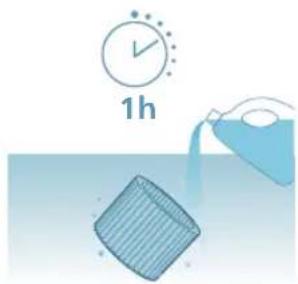
400 100g dl
aalg aclw aox (olax) go oljx 4 0o jy Jx
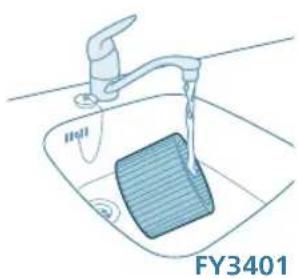
- bi = b1 + 2i 且 bi bj
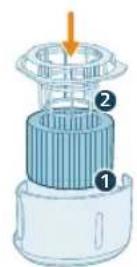
6.2000J5

7.j4 = x|,0.0 d0
820 a
8.11all a2b2 15
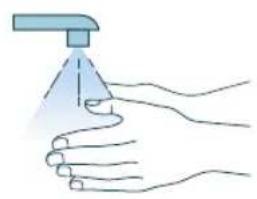
aaiill jilb w a
auii pluuiy jilai cbi aill ie
aaiy jaoi g aaijai ciilgall g llal g jaiell no ayauuuiuauo aaiuai yogj: abxdo .glagg cia jia jao. aiaag cia jaylgy jssiy g paaai jiall Jai
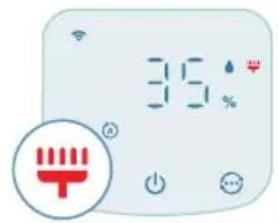
- a|b|2|l|s|o|c

2.aaij j
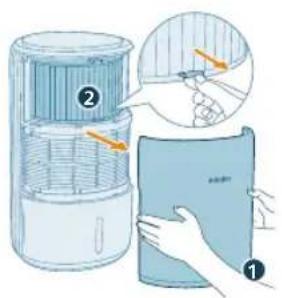
- a 与 b = p 无关.
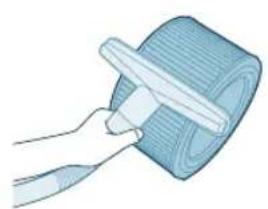
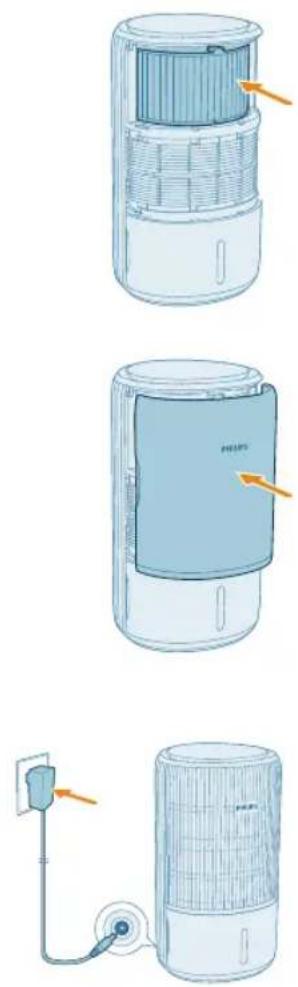
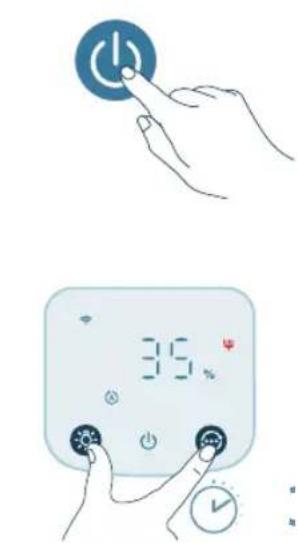
a22,21 821
-
4,5 , 8 , 9 , 10
-
a < 0 或 b > 1 且 ab ≥ 1
-
·
aagaaalalalalaoaog JaoaJgall aagaiuauauauauauauauauauauauauauauauauauauauauauauauauauauauauauauauauauauauauauauauauauauauau
aaiil jiljll
ab > 10
aJUuluJg(FY3400) aJull Jue
jlll jlll l aalll alall is to c alalg jaiill g jalll lal
(FY3400) jll l, aill Jc ll lll 1gab ic
PHILIPS and the Philips Shield Emblem are registered trademarks of Koninklijke Philips N.V. and are used under license.
This product has been manufactured by and is sold under the responsibility of Versuni Holding B.V., and Versuni Holding B.V. is the warrantor in relation to this product.
2025 © Versuni Holding B.V.