
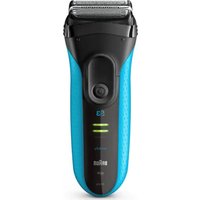
Series 9 9293s - Razor BRAUN - Free user manual and instructions
Find the device manual for free Series 9 9293s BRAUN in PDF.




| Product type | Electric razor |
| Brand | Braun |
| Model | Series 9 9293s |
| Shaving autonomy | Up to 50 minutes of cordless shaving |
| Full charge time | 1 hour |
| Recommended charging temperature | 5 °C to 35 °C |
| Power supply type | Special cord with integrated low-voltage adapter (492) |
| Cordless use | Yes, required for shaving |
| Use in bath/shower | Yes, rinseable under running water |
| Shaving system | Foil and cutter block (cassette) |
| Integrated trimmer | Yes, for long hairs (sideburns, mustache) |
| Travel lock | Yes, activation by pressing the switch for 3 seconds |
| MultiHeadLock (head lock) | Yes, 5 positions for difficult areas |
| Display | Display screen with charge and lock indicator |
| Cleaning and maintenance | Rinse with hot water and non-abrasive liquid soap; lubrication recommended if frequent water cleaning |
| Recommended replacement parts | Foil and cutter block 92S/92B, CCR cleaning liquid cartridge, Braun cleaning spray |
| Shaving parts replacement interval | Every 18 months |
| Warranty | 2 years from date of purchase |
| Maximum storage temperature | Do not expose to more than 50 °C for extended periods |
| Battery | Integrated rechargeable |
Frequently Asked Questions - Series 9 9293s BRAUN
User questions about Series 9 9293s BRAUN
0 question about this device. Answer the ones you know or ask your own.
Ask a new question about this device
Download the instructions for your Razor in PDF format for free! Find your manual Series 9 9293s - BRAUN and take your electronic device back in hand. On this page are published all the documents necessary for the use of your device. Series 9 9293s by BRAUN.
USER MANUAL Series 9 9293s BRAUN
(Sharecall charged at local rates)
www.service.braun.com
Deutsch
Our products are designed to meet the highest standards of quality, functionality and design. Thank you for your trust in Braun's quality, and we hope you enjoy your new Braun shaver.
Read these instructions completely, they contain safety information. Keep them for future reference.
Warning
Your appliance is provided with a special cord set, which has an integrated Safety Extra Low Voltage power supply. Do not exchange or tamper with any part of it, otherwise there is risk of an electric shock. Only use the special cord set provided with your appliance.
If the appliance is marked 492, you can use it with any Braun power supply coded 492-XXXX.

This appliance is suitable for cleaning under running water and use in a bathtub or shower. For safety reasons it can only be operated cordless.
Do not shave with a damaged foil or cord.
This appliance can be used by children aged from 8 years and above and persons with reduced physical, sensory or mental capabilities or lack of experience and knowledge if they have been given supervision or instruction concerning the safe use of the appliance and understand the hazards involved. Children shall not play with the appliance. Cleaning and user maintenance shall not be made by children unless they are older than 8 years and supervised.
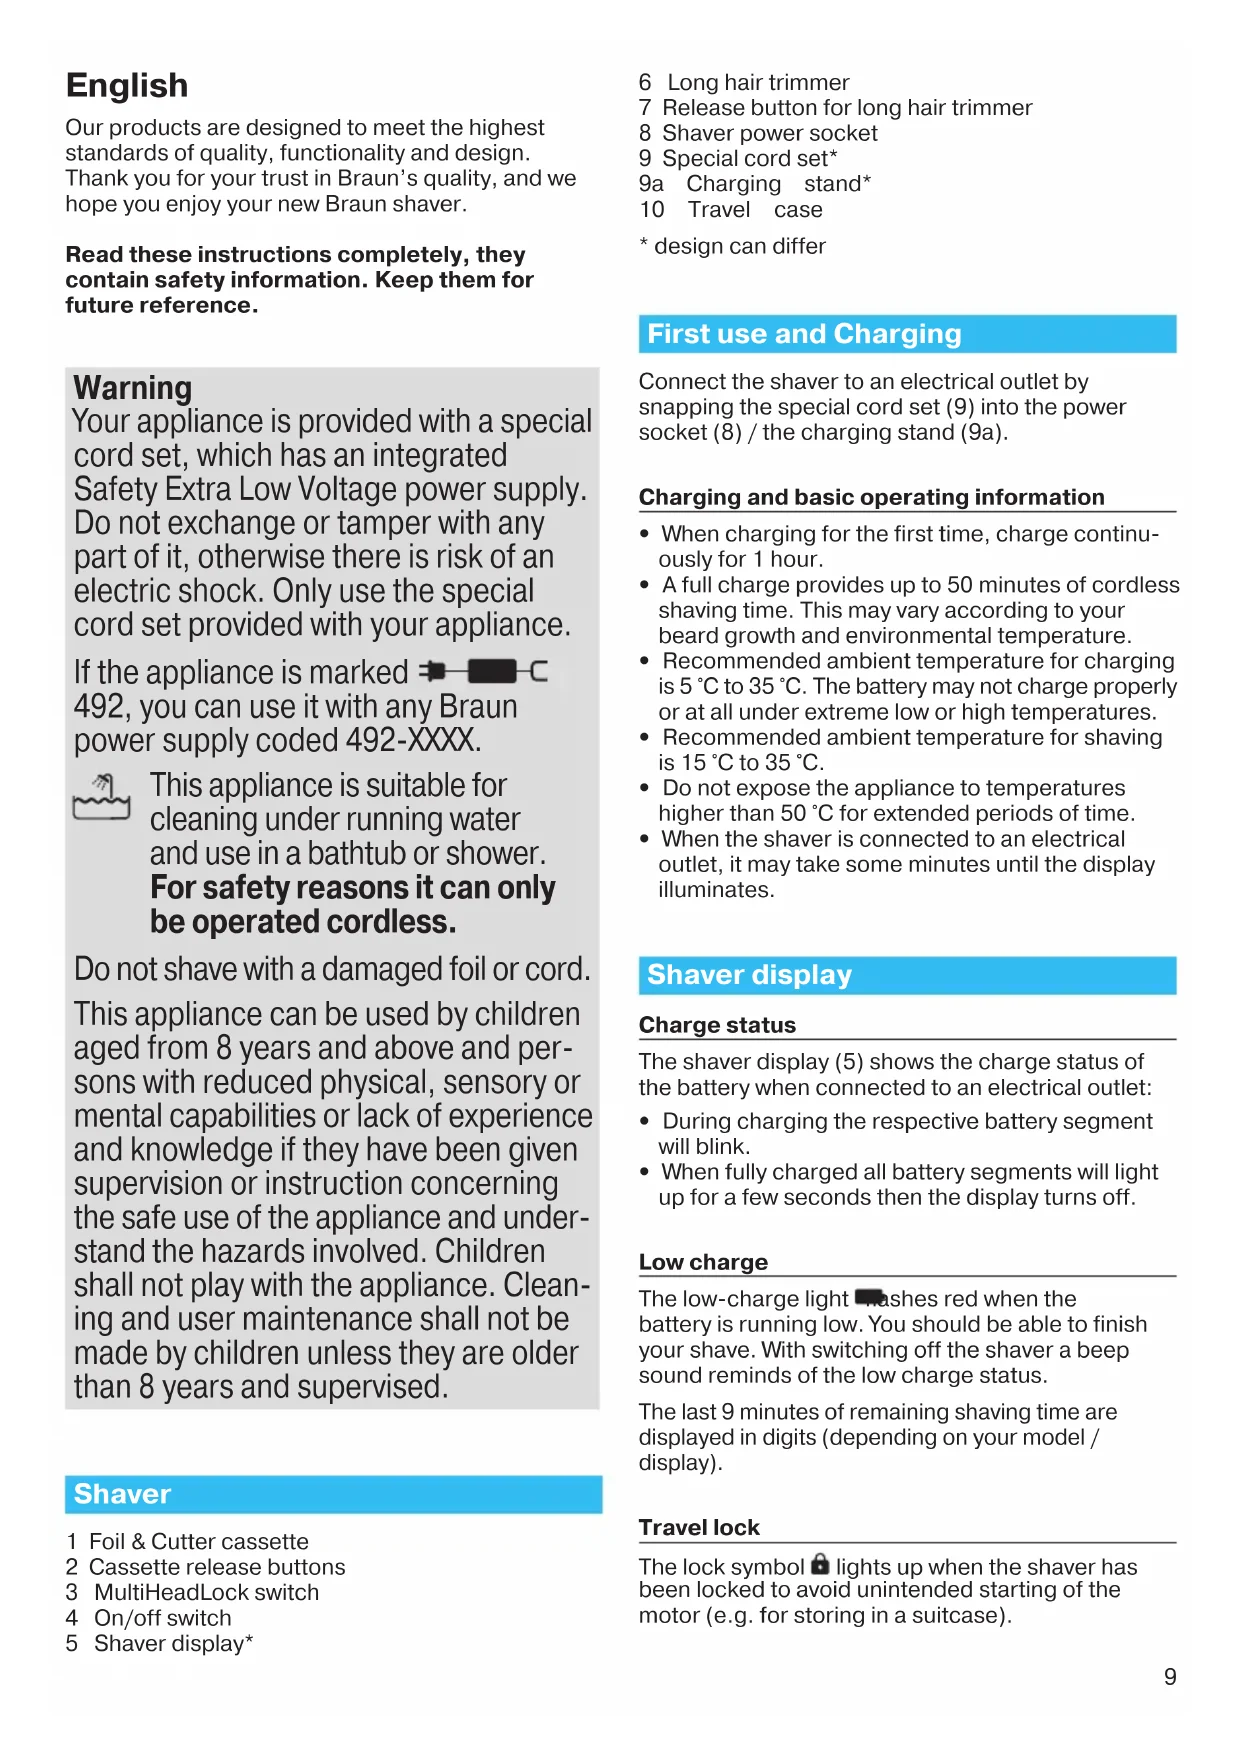
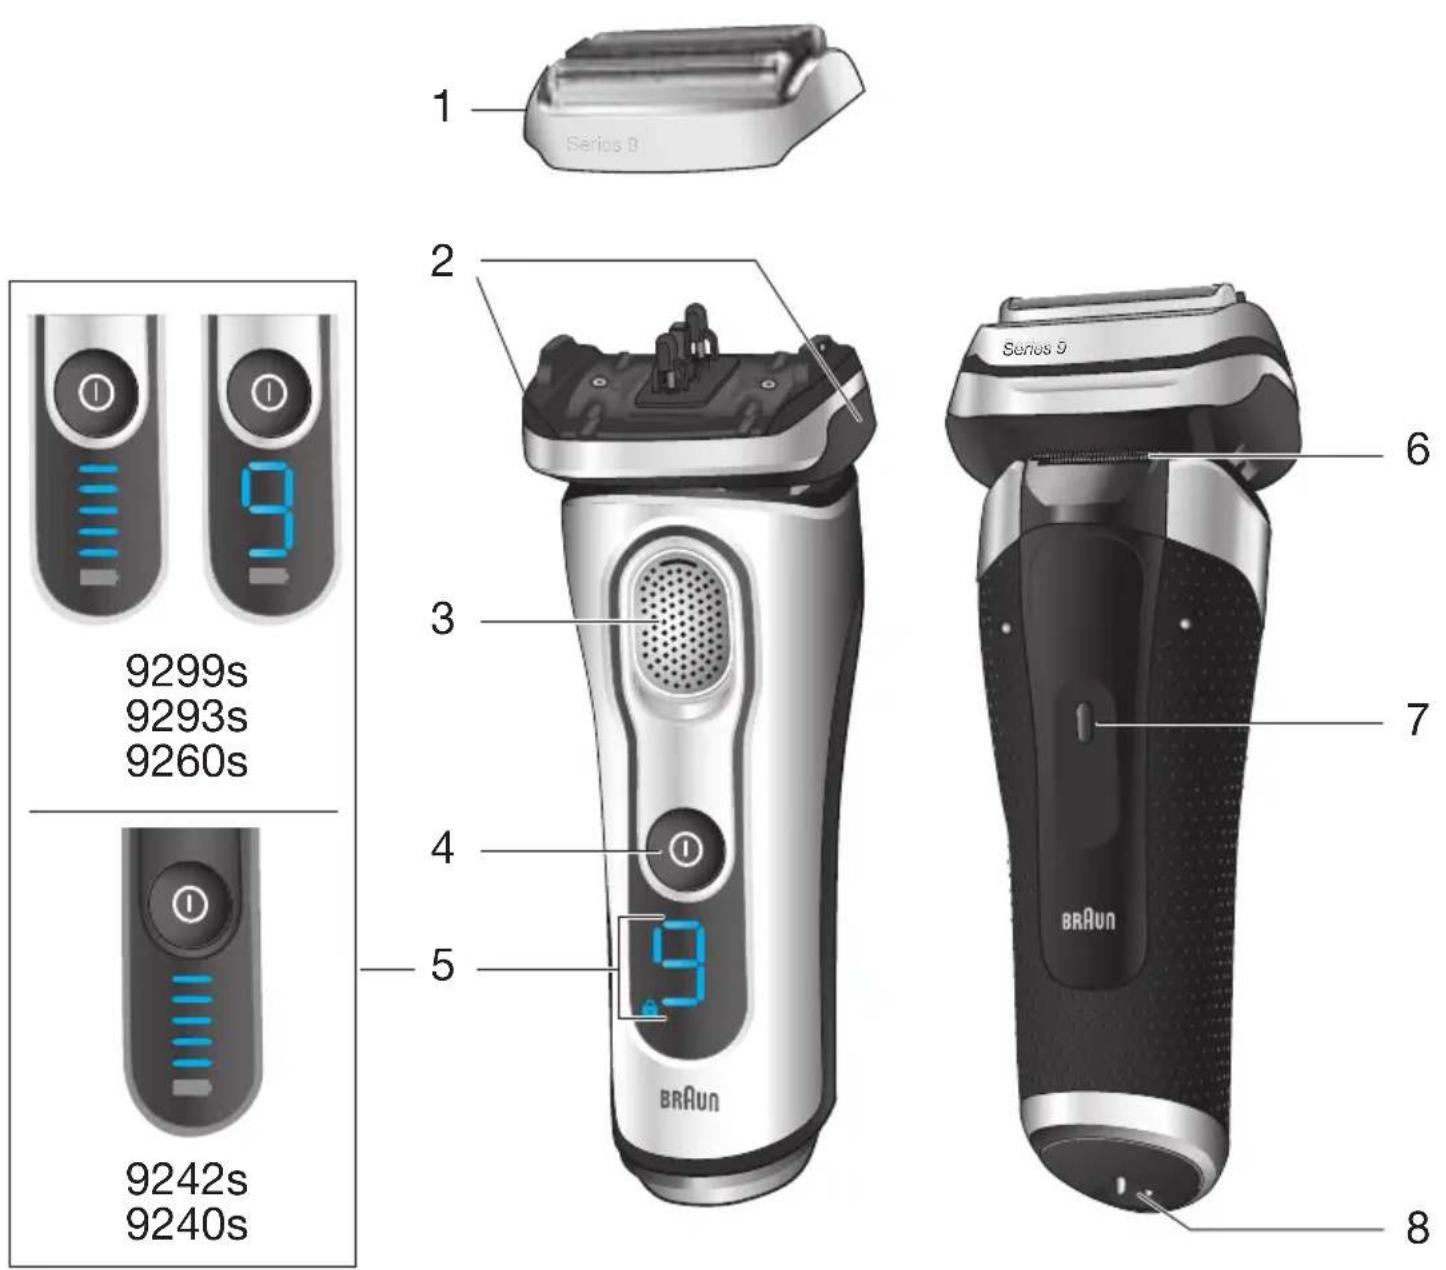
Shaver
1 Foil & Cutter cassette 2 Cassette release buttons 3 MultiHeadLock switch 4 On/off switch 5 Shaver display*
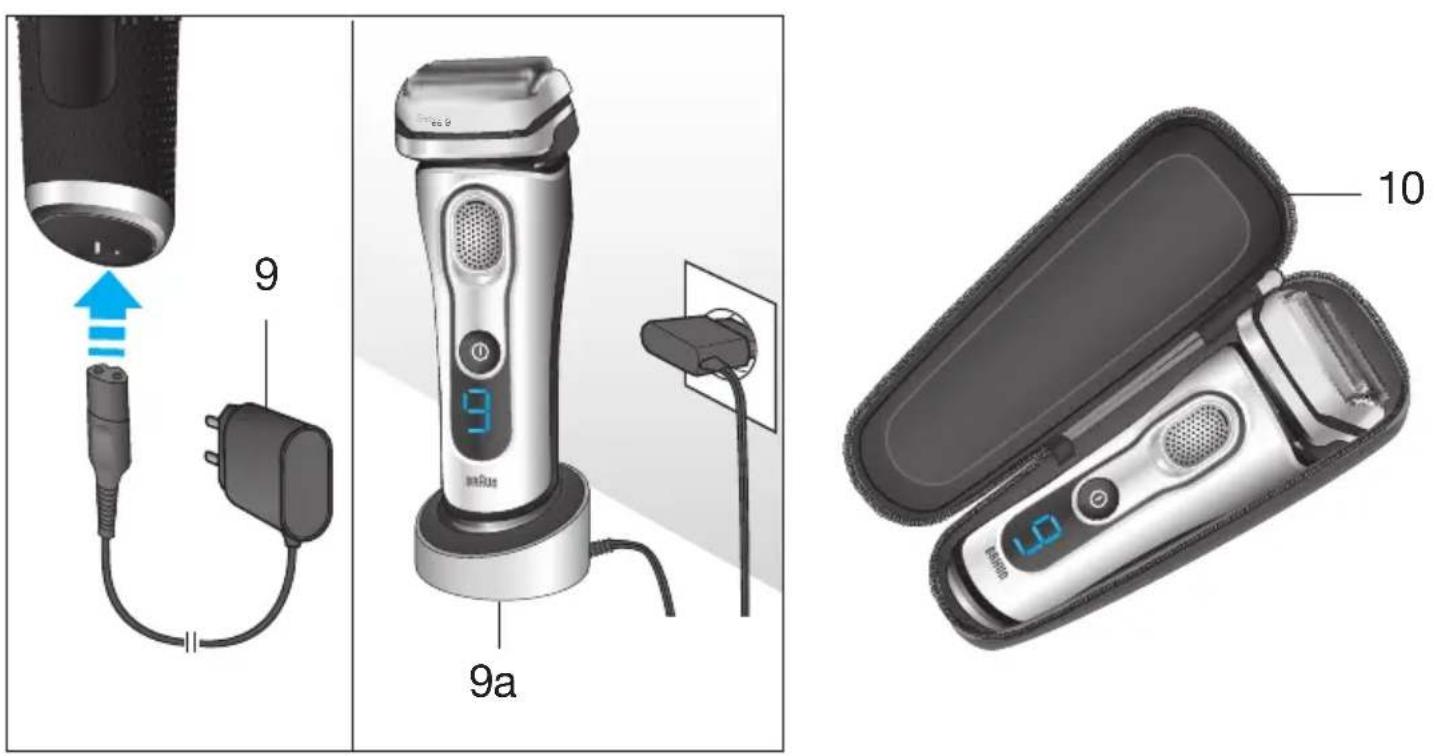
6 Long hair trimmer 7 Release button for long hair trimmer 8 Shaver power socket 9 Special cord set 9a Charging stand 10 Travel case * design can differ
First use and Charging
Connect the shaver to an electrical outlet by snapping the special cord set (9) into the power socket (8) / the charging stand (9a).
Charging and basic operating information
- When charging for the first time, charge continuously for 1 hour.
- A full charge provides up to 50 minutes of cordless shaving time. This may vary according to your beard growth and environmental temperature.
- Recommended ambient temperature for charging is 5°C to 35°C. The battery may not charge properly or at all under extreme low or high temperatures.
- Recommended ambient temperature for shaving is 15°C to 35°C.
- Do not expose the appliance to temperatures higher than 50°C for extended periods of time.
- When the shaver is connected to an electrical outlet, it may take some minutes until the display illuminates.
Shaver display
Charge status
The shaver display (5) shows the charge status of the battery when connected to an electrical outlet:
- During charging the respective battery segment will blink.
- When fully charged all battery segments will light up for a few seconds then the display turns off.
Low charge
The low-charge light flashes red when the battery is running low. You should be able to finish your shave. With switching off the shaver a beep sound reminds of the low charge status.
The last 9 minutes of remaining shaving time are displayed in digits (depending on your model / display).
Travel lock
The lock symbol lights up when the shaver has been locked to avoid unintended starting of the motor (e.g. for storing in a suitcase).
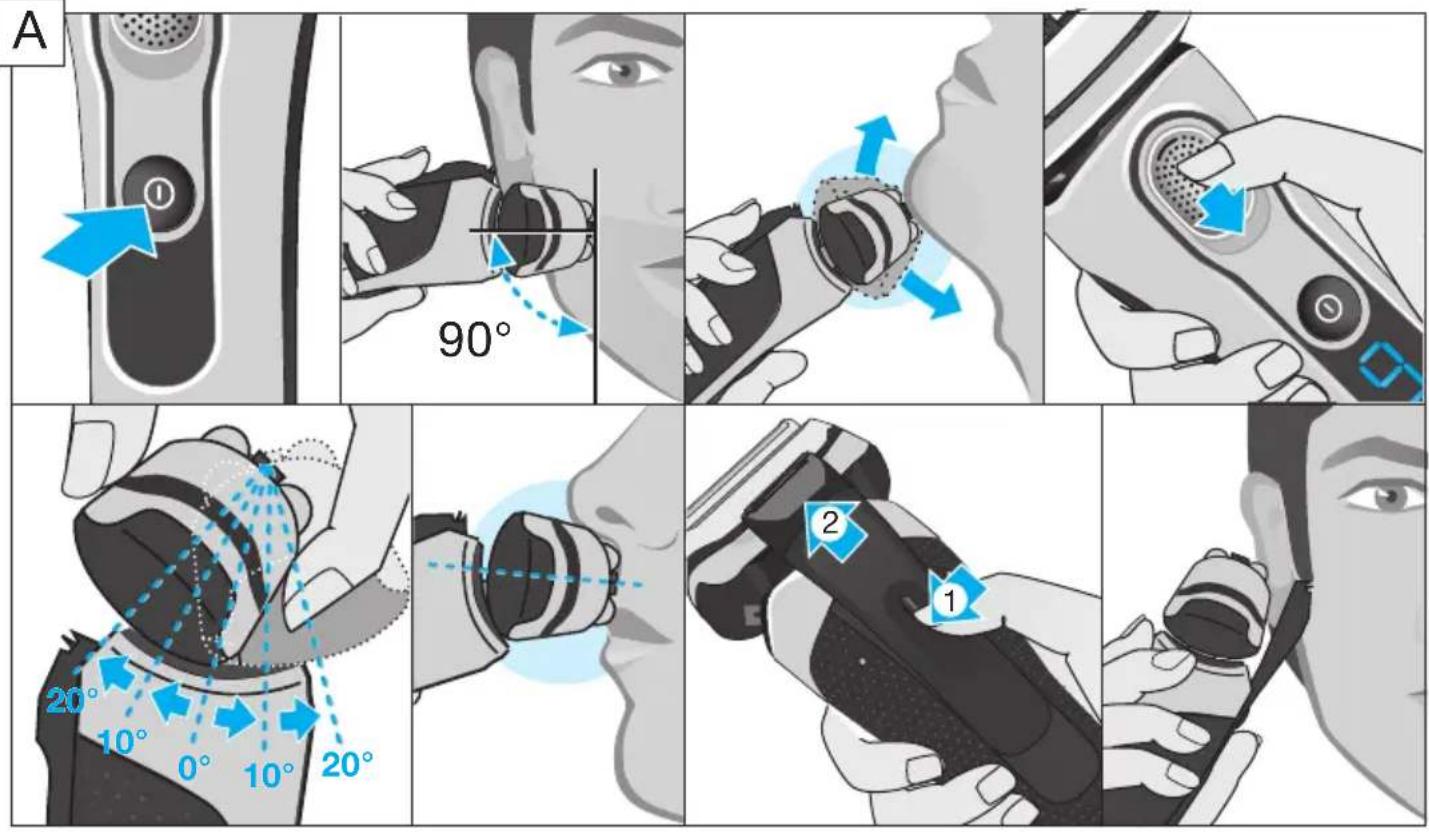
Using the shaver (see fig. A)
Press the on/off switch (4) to operate the shaver.
Tips for a perfect dry shave
- Always shave before washing your face.
- At all times, hold the shaver at the right angle (90°) to your skin.
- Stretch your skin and shave against the direction of your beard growth.
MultiHeadLock switch (head lock)
To shave hard-to-reach areas (e.g. under the nose) slide the MultiHeadLock switch (3) down to lock the shaver head. The shaver head can be locked in five positions. To change position, move the shaver head with your thumb and forefinger back or forth. It will automatically click into the next position.
Long hair trimmer
To trim sideburns, moustache or beard press the release button (7) and slide the long hair trimmer (6) upwards.
Travel lock
- Activation: By pressing the on/off switch (4) for 3 seconds the shaver is locked. This is confirmed by a beep sound and the lock symbol in the display. Afterwards the display turns off.
- Deactivation: By pressing the on/off switch for 3 seconds the shaver is unlocked again.
Manual cleaning of the shaver
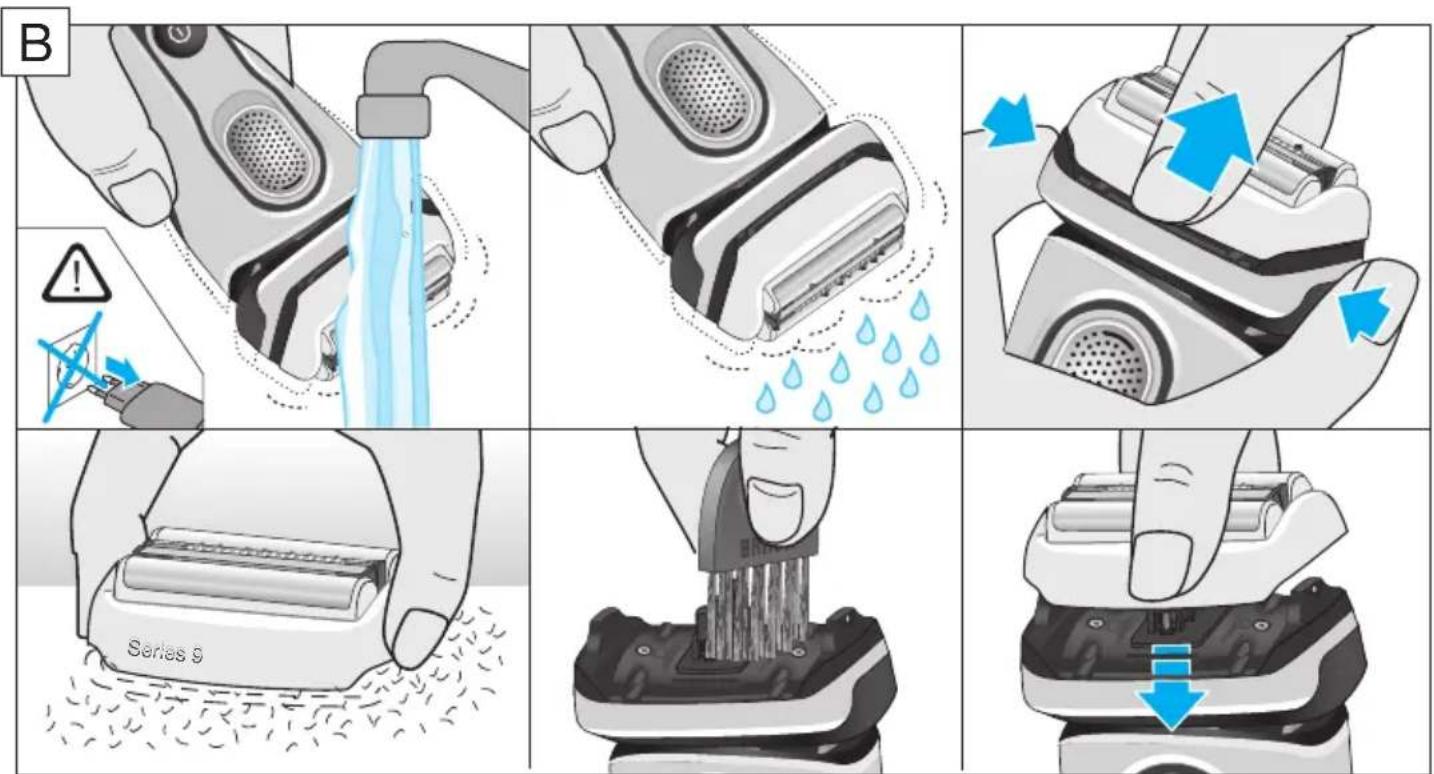
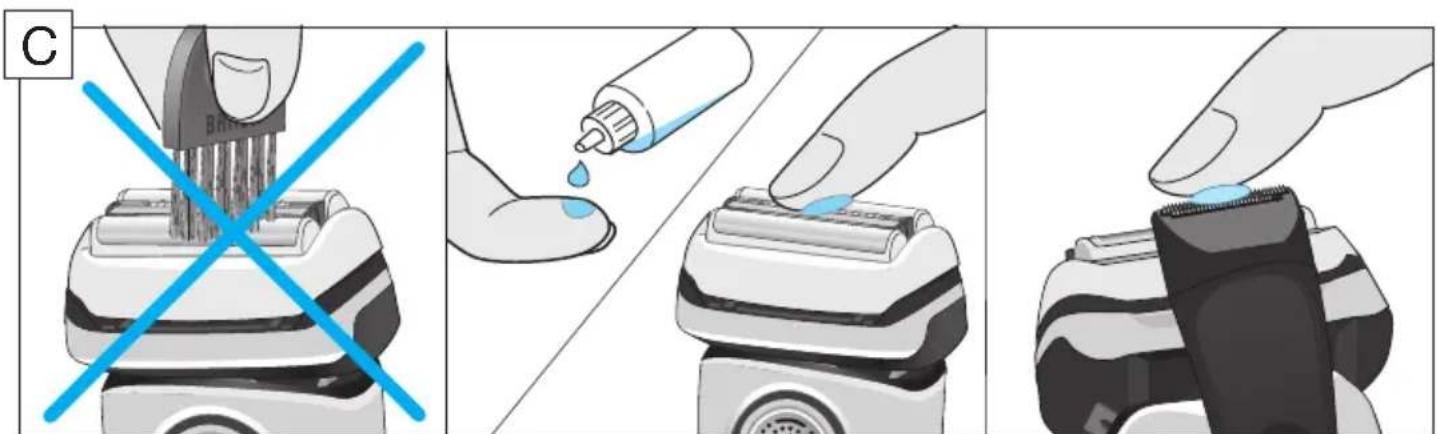
(see fig. B/C)
Cleaning under running water
- Switch on the shaver (cordless) and rinse the shaver head under hot running water until all residues have been removed. You may use liquid soap without abrasive substances. Rinse off all foam and let the shaver run for a few more seconds.
- Next, switch off the shaver, press the release buttons (2) to remove the Foil & Cutter cassette (1) and let it dry completely.
- If you regularly clean the shaver under water, then once a week apply a drop of light machine oil (not included) onto the long hair trimmer and Foil & Cutter cassette.
The shaver should be cleaned after each foam usage.
Cleaning with a brush
- Switch off the shaver. Remove the Foil & Cutter cassette (1) and tap it out on a flat surface. Using the brush, clean the inner area of the pivoting head. Do not clean the cassette with the brush as this may damage it!
The Foil & Cutter cassette can be attached either way. There is no impact on the shaving performance.
Accessories
Braun recommends changing your shaver's Foil & Cutter cassette every 18 months to maintain your shaver's maximum performance.
Available at your dealer or Braun Service Centres:
- Foil & Cutter cassette: 92S/92B
- Cleaning cartridge Clean&Charge Station: CCR
- Braun Shaver cleaner spray
Environmental notice
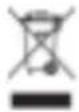
Product contains batteries and/or recyclable electric waste. For environment protection do not dispose of in household waste, but for recycling take to electric waste collection points provided in your country.
The cleaning cartridge can be disposed of with regular household waste.
Subject to change without notice.
For electric specifications, see printing on the special cord set.
Guarantee
We grant a 2 year guarantee on the product commencing on the date of purchase. Within the guarantee period we will eliminate any defects in the appliance resulting from faults in materials or workmanship, free of charge either by repairing or replacing the complete appliance at our discretion.
This guarantee extends to every country where this appliance is supplied by Braun or its appointed distributor.
This guarantee does not cover: damage due to improper use, normal wear and tear (e.g. shaver foil or cutter block) as well as defects that have a negligible effect on the value or operation of the appliance. The guarantee becomes void if repairs are undertaken by unauthorised persons and if original Braun parts are not used.
To obtain service within the guarantee period, hand in or send the complete appliance with your sales receipt to an authorised Braun Customer Service Centre (address information available online at www.service.braun.com).
For UK only:
This guarantee in no way affects your rights under statutory law.
Trouble-Shooting
| Problem: Possible reason: | ||
| Shaver does not start when pressing the start button. | 1. Travel lock is activated. 2. This appliance can only be operated cordless. | 1. Press the on/off switch for 3 seconds to unlock the shaver. 2. Unplug the shaver. |
| Shaver does not charge completely and keeps blinking. | Ambient temperature is out of valid range. | Recommended ambient temperature for charging is 5 °C to 35 °C. |
| Charging does not start when connected to power socket. | 1. Sometimes charging could start delayed (e.g. after long storage). 2. Ambient temperature is out of valid range. 3. Special cord set is not plugged in properly. | 1. Wait a few minutes, if charging will start automatically. 2. Recommended ambient temperature for charging is 5 °C to 35 °C. 3. Special cord set needs to snap into place. |
| Unpleasant smell from the shaver head. | Shaver head is cleaned with water. | When cleaning the shaver head with water only use hot water and from time to time some liquid soap (without abrasive substances). Remove Foil & Cutter cassette to let it dry. |
| Battery performance dropped significantly. | 1. Shaver head is regularly cleaned with water but not lubricated. 2. Foil and cutter are worn which requires more power for each shave. | 1. If the shaver is regularly cleaned with water, apply a drop of light machine oil on top of the foil once a week for lubrication. 2. Replace Foil & Cutter cassette. |
| Shaving performance dropped significantly. | 1. Shaving system is clogged. 2. Foil and cutter are worn. | 1. Soak the Foil & Cutter cassette in hot water with a drop of dish liquid. Afterwards rinse it properly and tap it out. Once dry apply a drop of light machine oil on the foil. 2. Replace Foil & Cutter cassette. |
| Shaver turns off with fully charged battery. | Foil and cutter are worn which requires more power than the motor can deliver. The appliance turns off. | - Replace Foil & Cutter cassette. - Regularly oil the shaving system, especially when cleaning with water only. |
François
MultiHeadLock switch
ELMIN, 48350, Durdevac, R. Boskoviča 20,
048813365
MAGRELvl.Grković Marko, 51211, Rijeka/Matulji
Frana Supila 11, 095 911 0009
RTV SERVIS KALAICA, 34310, Pleternica,
A.M.Relkovića 6, 034 252 000
SORIC ELEKTRONIKA, 44000, Sisak,
A.Starcevica 35, 044549117
MERC&DUJMOVIĆ, 21000, Split,
Alojzija Stepinca 6, 021 537 780
ELEKTRO OBRT MARKOVIC, 42000,
Varazdin, K.Filica 9, 042 210 588
ALTA, 23000, Zadar, Vukovarska 3c,
TROUBLESHOOTING
| Problem Moguci razlog Rješenje | ||
| Urežaj se ne uključuje kada se pritsne njegov prekidač. | 1. Uključeno je putno zakljucavanje.2. Iz sigurnosnih razloga urežaj se možePokreteni isključivo kada{nije spojen na priključni kabel. | 1. Pritisnite prekidač za uključivanje/isključivanje i držite ga tak 3 sekunde kako bist otključali urežaj.2. Iskopćajte priključni kabel. |
| Urežaj se ne puni do kraja l stalno bljeska. | Temperatura okoliša je izvan dopuštenog raspona. | Preporučena temperatura okoliša za punjenje je izmedu 5 °C i 35 °C. |
| Punjenje ne radi kada je spojen u utičnicu. | 1. Ponekad punjenje moze započeti malo kasnije (npr. akо se urežaj dugo nods koristio).2. Temperatura okoliša je izvan dopuštenog raspona.3. Posebni priključni kabel nods pravilno spojen. | 1. Pričekajte nekoliko minuta da vidite hoće li punjenje automatski započeti.2. Preporučena temperatura okoliša za punjenje je izmedu 5 °C i 35 °C.3. Posebni priključni kabel treba sjesti na svoje mesto. |
| Neugodan miris brijace glave. | Brijáca glava je Čišćena pod vodom. | Kada brijácu glavu Čište vodom, koristite isključivo vruću vodu i povremeno malo tekućeg sapuna (bez abrazivnih sastojaka). Skinite kazetu mrežice i bloka noža i pustite da se osuši. |
| Značajno lošiji rad baterije. | 1. Brijáca glava se redovito Čiši vodom, ali se ne podmazuje.2. Mrežica i bloc noža su istrošeni pa urežaj troši visë energije za svako brijanje. | 1. Ako se urežaj redovito Čišti pod vodom, Jednom tjedno u svruh podmazivanja nanesite kap mašinskog ulja na vrh mrežice.2. Zamijenite kazetu smrežicom i blokom noža. |
| Primjetno lošiji rezultati brijanja. | 1. Brijaci sustav je zaštopan.2. Mrežica i bloc noža su istrošeni. | 1. Ostavite kazetu smrežicom i blokom noža da se nameacute u vrućoj vodi, pa je nakon toga dobrosiperite i tapkanjem o ravnu površinu izbacite zaostale dlacice i kapi vode. Kada se osuši, na mrežicu nanesite kap mašinskog ulja.2. Zamijenite kazetu smrežicom i blokom noža. |
| Urežaj se isključuje iako mu je baterija u potpunosti napunjena. | Mrežica i bloc noža su istrošeni pa urežaj troši visë energije za svako brijanje. Urežaj se isključuje. | - Zamijenite kazetu smrežicom i blokom noža.- Redovito podmazujte brijaci sustav, pogotovo akse uredaj Čišti isključivo pod vodom. |
Slovenian
Our products are designed to meet the highest standards of quality, functionality, and design. We thank you for your trust in Braun quality and hope you will enjoy your new Braun shaver.
Removal of the shaver head
(see fig. A)
Press the on/off button (4) to switch the shaver on or off.
Tips for a perfect dry shave
- Shave before washing your face.
- Hold the shaver at a right angle (90°) to your skin.
- Stretch the skin and shave in the direction opposite to the direction of hair growth.
MultiHeadLock switch
(locking the head)
For shaving hard-to-reach areas (e.g., under the nose), press the MultiHeadLock switch (3) to lock the shaver head. The shaver head can be locked in one position. To change the position, move the shaver head back or forward with your thumb and the indicator. It will automatically click into the next position.
Example for trimming
To release the battery, press the release button (7) and use the trimmer for shaving (6).
Switching off
- Activation: The shaver switches off by holding the on/off button (4) for a second. This is confirmed by an audible signal and the switch-off symbol on the display. After that, the device switches off.
- Deactivation: The shaver switches off by pressing the on/off button again for a second.
Cleaning the shaver (see Fig. B/C)
User manual
Our products meet the highest quality, functionality, and design standards. Thank you for trusting the quality of our products. We hope you enjoy using our new shaver.
Please read this user manual carefully and completely before use, and keep it for future reference. It contains important information about safe use and maintenance of the device.
Warning
The shaver is supplied with a low-voltage plug-in power supply. Do not attempt to replace any parts of this device, otherwise you risk electric shock. Use only the low-voltage power supply provided with the device.
If the device has a label with 492, it can be used with any power supply unit marked 492-XXX.

The shaver can be cleaned under running water and used in the shower. For safety reasons, the device may only be used if it is disconnected from the power source.
Do not use the device if the shaving foil or the power supply cord is damaged.
This device can be used by children aged 8 and above and by persons with reduced physical, sensory, or mental capabilities or lack of experience and knowledge, if they have been given supervision or instruction concerning use of the device in a safe way and understand the hazards involved. Children shall not play with the device. Cleaning and user maintenance shall not be made by children unless they are older than 8 and supervised.
Shaver
Set of accessories
1 Shaver cassette can be easily replaced with the Foil & Cutter block
2 Cassette release button 3 On/off button for the shaver head 4 On/off button 5 Shaver display 6 Trimmer for long hair 7 Trimmer release button for long hair 8 Charging socket 9 Charger with cord* 9a Charging stand* 10 Storage pouch
- May differ in appearance from the illustration
First use and charging
Connect the shaver to the mains electricity supply using the special cord (9) with the mains adapter to the shaver socket (8) or to the charging stand (9a).
Information on charging and basic operations
- For the first charge, leave the device plugged into the mains for 1 hour. - A full charge takes 50 minutes and provides up to 60 minutes of cordless shaving time. The actual operating time may vary depending on beard density and ambient temperature. - The optimal ambient temperature for charging the shaver is between 5°C and 35°C. In extreme low or high temperatures, the battery may not charge at all or may not charge fully. - It is recommended to use the shaver at an ambient temperature between 15°C and 35°C. Do not expose the shaver to temperatures above 50°C for extended periods. - If the device is connected to the mains, it may take a few minutes for the display to turn on.
Shaver display
Charge level
When the device is connected to the mains, the display (5) shows the battery charge level indicator:
The illuminated segments of the charge scale indicate the charge level during charging. - When the battery is fully charged, all segments of the charge scale will light up for a few seconds on the display, and then the display will turn off.
All segments of the charge scale light up, after which the display turns off.
Low battery level
When the battery level is low, the corresponding indicator flashes red. When the shaver is switched off, a low battery level is indicated by an audible signal.
The remaining battery operating time will be displayed on the display briefly.
Recommendations for shaving
The lock indicator lights up when the shaver is locked to prevent accidental activation (e.g., in a suitcase).
Using the shaver (see figure A)
To switch the shaver on/off, set the switch (4) to the corresponding position.
Recommendations for dry shaving
1. Always shave before washing your face. 2. Always hold the shaver at a right angle (90°) to the skin. 3. Gently stretch the skin and move the shaver against the direction of hair growth.
Fixing the floating shaving head
For hard-to-reach areas (e.g., under the nose), press the lock button for the floating shaving head (3) to the lower position of the head lock. The shaving head can be fixed in one of five positions. To change the position of the shaving head, hold it with both thumbs and tilt it in the desired direction. When you release the position, a characteristic click is heard.
Trimmer for long hair
The cassette can be installed on either side. This does not affect the shaving quality.
Accessories
Braun recommends replacing the Foil & Cutter cassette used in your shaver every 18 months to maintain maximum performance of the shaver.
The following accessories are available at Braun regional distributors and service centers:
- Foil & Cutter cassette (shaving foil and cutter block): 92S/92B
- Replacement cartridges for the cleaning system Clean&Charge: CCR
- Installation and preparation in Braun
Environmental protection
The product contains rechargeable batteries. Disposal of waste electrical equipment. To protect the environment, do not dispose of the product with household waste. Take it to a collection point for electrical equipment in your country.
Used installation cartridges can be disposed of with normal household waste.
Contents may change without prior notice.
Electrical specifications are printed on the special label.
EAC
Electric shaver Braun Type 5791 with power supply unit Type 492-XXXX.
The power supply Type 492-XXXX means that you may only use a Braun power supply marked 492-XXXX.
If the product (on the housing) is marked with the number 492, you may only use it with a power supply marked with code 492-XXXX. The power supply Type 492-XXXX is a representative of the family of power supplies with identical technical characteristics.
The symbol "X" in the code replaces a digit from 0 to 9 and indicates different power supply models, which differ from each other only in the color of the information label.
100-240 volts, 50-60 hertz, 7 watts
Protection class against electric shock: II
Made in Germany BRAUN GmbH, Frankfurter Strasse 145, 61476 Kronberg, Germany / Braun GmbH, Frankfurter Strasse 145, 61476 Kronberg, Germany.
RU: Importer/Service consumer: LLC "Procter & Gamble Distributor Company", Russia, 125171, Moscow, Leningradskoye Shosse, 16A, bldg. 2. Tel. 8-800-200-20-20.
BY: Supplies to the Republic of Belarus: LLC "Electroservice and Co", Belarus, 220012, Minsk, st. Chernyakhovskogo, 10A, office 412A3. Service center: LLC "Katris", Belarus, 220012, Minsk, st. Chernyakhovskogo, 10A, office 1155.
To determine the year of manufacture, use the three-digit code on the product body along with the technical type of the product: the first digit = the last digit of the year, the following 2 digits = the serial number of the week of the production year. For example, code "345" means that the product was manufactured in the 45th week of 2013.
Warranty period/Service life: 2 years.
Warranty obligations of Braun.
This product is covered by a warranty for 2 years from the date of purchase. During the warranty period, we will free of charge eliminate any manufacturing defects caused by poor material or assembly quality by repairing, replacing parts, or replacing the entire product.
If repair is not possible during the warranty period, the product may be replaced with a new or equivalent one in accordance with the law "On Protection of Consumer Rights".
The warranty is valid only if the purchase date is confirmed by a receipt and the warranty card filled out by the dealer (store) on the last page of the original instruction manual, which serves as the warranty document.
These warranty obligations apply in all countries where the product is distributed by Braun itself or by an authorized distributor, and where no import restrictions or other legal provisions prevent the provision of warranty service. The warranty covers damage caused by improper use (see also the list below) and normal wear of consumable parts, as well as defects that have a negligible effect on the quality of the appliance's operation.
This warranty becomes void if repairs are carried out by unauthorized persons and if non-original Braun parts are used. In case of a claim under this warranty, please return the product complete with the warranty document to any Braun service center.
All other claims, including claims for compensation of damages, are excluded unless our liability is established by law.
Claims related to commercial contracts with the seller are not covered by this warranty.
Cases in which the warranty does not apply:
- Defects caused by force majeure circumstances;
- Use for professional purposes; violation of the requirements of the instruction manual and operating instructions;
- Unauthorized installation of voltage regulators into the mains (if required); - introduction of technical changes; - mechanical damage;
- Damage caused by animals, rodents and insects (including cases of rodents and insects inside the devices); - for devices operating from batteries - operation with unsuitable or exhausted batteries, damage caused by exhausted or leaking batteries (we recommend using only batteries protected against leakage);
Manufactured by Procter & Gamble Manufacturing GmbH in Germany: Procter & Gamble Manufacturing GmbH, Waldstrasse 9, D-74731 Walldurn, Germany.
Address in Ukraine: TOV «Prokter end Gembl Treid Ukraina», Ukraine, 04070, Kyiv, str. Naberezhno-Khreshchatyk, 5/13, building A. Tel. (0-800) 505-000. www.pg.com.ua
Manufacturer's warranty obligations
For all products, we provide a warranty for two years from the moment of purchase of the product or from the date of its manufacture, in case of absence or improper execution of the warranty card for the product.
During the warranty period, we will free of charge eliminate all defects caused by poor quality of materials or assembly, by repairing, replacing parts or replacing the entire product.
In case of impossibility of repair within the warranty period, the product may be replaced with a new one or an equivalent one in accordance with the Law of Ukraine «On Protection of Consumer Rights».
The warranty comes into force from the date of purchase, which is confirmed by the stamp and signature of the seller (store) on the warranty card or on the last page of the original instruction manual, and may also be a warranty card. This warranty is valid in any country where this product is supplied by the manufacturer's representative or authorized distributor, provided that local laws and regulations do not preclude the provision of warranty service.
The warranty for spare parts and accessories ends at the end of the warranty for the product itself. The warranty does not cover the following: damage caused by improper use, normal wear and tear (e.g., scratches on the housing or moving parts), defects that do not significantly affect the quality of operation of the device. The warranty becomes invalid if repairs are carried out by unauthorized persons and/or if non-original spare parts of the product are used.
The service life of Braun products is equal to the warranty period of two years from the moment of purchase or from the moment of manufacture, if the date of sale cannot be established.
In case of warranty claims under the terms of this warranty, please return the product in full set according to the description in the original instruction manual together with the warranty card to any service center officially authorized by the manufacturer's representative. All these expenses, together with the costs of returning the product, are not covered if the warranty liability is not established by law.
The warranty does not cover: - defects caused by force majeure circumstances; - use for professional purposes or for profit; - violation of operating instructions; - incorrect installation or connection (keyed); - making technical modifications; - mechanical damage; - for devices operating on batteries - working with unsuitable or worn-out batteries, any damage caused by worn-out or leaking batteries; - damage caused by animals, rodents, and insects (including cases of rodents and insects inside the devices); - damage from lightning or power surges.
Attention! The warranty period is extended in case of contacting the service center with a request for warranty repair. After the repair, the warranty period will be considered renewed from the date of the repair, with the service center stamp and the consumer's signature confirming receipt of the device from repair. The warranty period is extended for the time the product was in the service center for repair.
In case of questions regarding warranty and post-warranty service, please contact the information service of the manufacturer's representative in Ukraine.
Warranty hotline: 0 800 505 000. Calls from Ukraine from landline numbers are free. Calls from mobile phones are charged according to the tariffs of the respective operator.
You can also get detailed information on the manufacturer's service portal on the Internet at www.service.braun.com
Troubleshooting
| Пюоблema: Можлива ручна: Усанни несяп: | |
| Бр nutва не вида- сься пу ratи на ( kanнота на: Вимканн. | 1. Ybimkhene 6lokvbaHH. 2. Ддий писрий мося 6byt# ВИКОРИСТАно тільки в авTOHOMHOMу рechimi. |
| Бр nutва не зарджа- сься поны, iIndikatop батае' п探测овке влимати. | Tempepatура habkoilshьог середobишиа вхODINь за мени dOуctmoro diana3ohy. |
| При пidкlioочни do мереки сел: trpoЖиltеня Зардkaбр nutви не почи�я. Bicn. | 1. UdeякIx BINAkax зардka MOKE nootATNCS 3 zatprIM- KOLO (Hapr., Nicla TrpBaIoro Невиорustань). 2. Tempepatура habkoilsh- hboro cepeodobuissa BIXODINTB 3a Meki DiOnCTU- MORO diana3ohy. 3. Спeцалын Complekt п探测ови влим; неналжимч. HealajexHIMЧINOM. |
| Вд rolівки Бр nutви ВIDNUBAcTBС нелрісмнii зanax. | ГOLIBKу БрNTВи чstяв ВДОЮ. |
| Якstь робoti akumylarTopiВ pizko Bnala. | 1. ГOLIBKу БрNTВи ретуну прOMIBaOTь ВДОЮ, ane He 3mauzyOTb. 2. 3HOC citOryKДгЯ roJINHЯ i pijxUro 6lOKU, zuo Bumarae 6Ilbooi KILBOKTI eJeKTPoe- Heprii дny roJINHЯ. |
| Якstь rolінney Знauthо поршалacb. | 1. Систema дny roJINHЯ Заблаля. 2. 3HOC citOryKТа pijxUro 6lOKU. |
| Akymлаятор Зарджени, ane бр nutва РСЕОД ВIMNKaICTBSC. | 3HOC citOryKТа pijxUro 6lOKU, zuo BIMargae 6llooi KILBOKTI eJeKTPoeHeprii dny roJINHЯ. |
Country of origin: Germany
Year of manufacture
To determine the year of manufacture, refer to the 3-digit production code located near the type plate. The first digit of the production code refers to the last digit of the year of manufacture. The next two digits refer to the calendar week in the year of manufacture. Example: "201" - The product was manufactured in week 01 of 2012.
J 1
150
J 1
(5) 2.1
jz jie biaolg aalai Jue g, djj
(1) (2)
.1olai
1 1
)
aaii iiaai 1s jyglal jll
gblalglaljlllglb
4 1
,
Please note down the suggested replacement date (in 18 months from now) below replacement part reference number.
92S/92B

DE Please note the replacement date (18 months from today) below the spare part number. FR Please note the suggested replacement date (18 months from now) below the spare part number. ES Please write down the recommended replacement date (18 months from today) under the serial numbers of the spare parts. PT Please note the suggested replacement date (within 18 months) below the part numbers. IT Please note the replacement date (18 months from today) below the spare part numbers. NL Note the advised replacement date (within 18 months from now) below the part number. DK Note the suggested replacement date (18 months from today) below the spare part number. NO Please note the recommended replacement date (18 months from now) below the part numbers. SE If you write down the suggested replacement date (18 months from now) below the main part numbers, you won't forget it. FI Write down the recommended replacement date (18 months from now) below the part number. PL It is worth writing down the suggested replacement date (18 months from now) below the main part numbers. CZ Note the suggested replacement date (18 months from now) below the main part numbers. SK Note the suggested replacement date (18 months from now) below the main part numbers. HU Below the article numbers of the main parts, note the suggested replacement date (18 months from now). HR Please note the recommended replacement date (18 months from today) below the model numbers of the spare parts. SL Note the recommended replacement date (18 months from now) below the main part numbers. TR Please note the suggested replacement date (18 months from today) below the part numbers. RO Please note the suggested replacement date (18 months from today) below the identification number of the parts. GR Please note the suggested replacement date (18 months from today) below the part numbers. BG Please note the recommended replacement date (18 months from today) below the main part numbers. RU Please note the recommended replacement date (18 months from the start of use) next to the number of the corresponding key components on the diagram. UA Please note the recommended replacement date (18 months from now) below the main part numbers.

- DEUTSCH
- WARNING
- SHAVER
- FIRST USE AND CHARGING
- CHARGING AND BASIC OPERATING INFORMATION
- SHAVER DISPLAY
- CHARGE STATUS
- LOW CHARGE
- TRAVEL LOCK
- USING THE SHAVER (SEE FIG. A)
- TIPS FOR A PERFECT DRY SHAVE
- MULTIHEADLOCK SWITCH (HEAD LOCK)
- LONG HAIR TRIMMER
- MANUAL CLEANING OF THE SHAVER
- (SEE FIG. B/C)
- CLEANING UNDER RUNNING WATER
- CLEANING WITH A BRUSH
- ACCESSORIES
- ENVIRONMENTAL NOTICE
- GUARANTEE
- FOR UK ONLY
- FRANÇOIS
- MULTIHEADLOCK SWITCH
- TROUBLESHOOTING
- SLOVENIAN
- REMOVAL OF THE SHAVER HEAD
- EXAMPLE FOR TRIMMING
- SWITCHING OFF
- CLEANING THE SHAVER (SEE FIG. B/C)
- USER MANUAL
- SET OF ACCESSORIES
- INFORMATION ON CHARGING AND BASIC OPERATIONS
- CHARGE LEVEL
- LOW BATTERY LEVEL
- RECOMMENDATIONS FOR SHAVING
- USING THE SHAVER (SEE FIGURE A)
- RECOMMENDATIONS FOR DRY SHAVING
- FIXING THE FLOATING SHAVING HEAD
- TRIMMER FOR LONG HAIR
- ENVIRONMENTAL PROTECTION
- EAC
- WARRANTY OBLIGATIONS OF BRAUN
- CASES IN WHICH THE WARRANTY DOES NOT APPLY
- MANUFACTURER'S WARRANTY OBLIGATIONS
- COUNTRY OF ORIGIN: GERMANY
- YEAR OF MANUFACTURE
Brand : BRAUN
Model : Series 9 9293s
Category : Razor