512268 - Phone THOMSON - Free user manual and instructions
Find the device manual for free 512268 THOMSON in PDF.

User questions about 512268 THOMSON
0 question about this device. Answer the ones you know or ask your own.
Ask a new question about this device
Download the instructions for your Phone in PDF format for free! Find your manual 512268 - THOMSON and take your electronic device back in hand. On this page are published all the documents necessary for the use of your device. 512268 by THOMSON.
USER MANUAL 512268 THOMSON
natural_image
Close-up photo of a smiling woman with long dark hair, framed in a white digital tablet device (no text or symbols visible)
natural_image
Exterior view of a modern office building (no signage)
natural_image
Exterior view of a silver wireless device with a circular lens and antenna (no visible text or symbols)SOMMAIRE
A - CONSIGNES DE SÉCURITÉ 04
1 - PRÉCAUTIONS D'UTILISATION 04
2 - ENTRETIEN ET NETTOYAGE 04
3 - RECYCLAGE 04
B - DESCRIPTION DU PRODUIT 05
1 - CONTENU DU KIT 05
2 - MONITEUR 06
3 - PLATINE DE RUE 07
4 - ADAPTATEUR SECTEUR 07
5 - CD D'INSTALLATION 07
C - INSTALLATION 08
1 - ALIMENTATION DE LA PLATINE DE RUE 08
2 - INSTALLATION DE LA PLATINE DE RUE 11
3-INSTALLATION DU MONITEUR 12
D - CONFIGURATION 13
1 - DESCRIPTION GÉNÉRALE 13
2 - RÉGLAGES ET FONCTION ACCESSIBLES SUR LE MONITEUR 13
3 - RÉGLAGES DES CAMÉRAS 13
4 - GESTION DE L'ALARME ET DU VOLUME DU MONITEUR 13
5 - PARAMÉTRAGES DES ENREGISTREMENTS 14
6 - LECTURE D'UN FICHIER VIDÉO 14
7 - EFFACEMENT DE FICHIER VIDÉO 14
8 - MENU «FORMATAGE CARTE MÉMOIRE» 14
9 - ALARME SUR DÉTECTION DE MOUVEMENT 15
10 - SCAN DES CANAUX 15
11 - MENU «PARAMÈTRE SYSTÈME» 15
11.1 - Réglage date et heure 15
11.2 - Format vidéo 15
11.3 - Économiseur d'énergie 16
C - INSTALLATION
C - INSTALLATION
natural_image
Two-step diagram showing hand tool application on a device, with no visible text or symbols3 - INSTALLATION DU MONITEUR
natural_image
Line drawing of a device rear panel with cable and connector, no text or symbols presentAu mur
natural_image
Line drawing of two hands holding a tablet device with a scroll, showing a right-hand rule for change (no text or symbols)D - CONFIGURATION
1 - DESCRIPTION GÉNÉRALE
natural_image
Two grayscale images showing mechanical components: top image with cylindrical parts and a bracket, bottom image with a speaker-like head (no text or symbols)
natural_image
Two grayscale images showing a pen resting on a document and a surveillance camera with a curved lens (no text or symbols visible)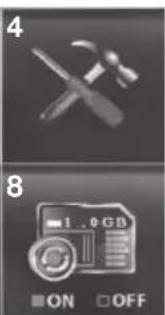
natural_image
Two grayscale product images: top shows a screwdriver and wrench, bottom shows a digital timer with ON/OFF buttons (no readable text or symbols)
natural_image
Simple 3D-rendered bed with a chair, displayed on a plain surface with no text or symbols.D - CONFIGURATION
9 - ALARME SUR DÉTECTION DE MOUVEMENT
natural_image
Grid of blue squares with white borders, no text or symbols visibleD - CONFIGURATION
natural_image
Two grayscale images: one showing a mechanical device with two cylindrical components, the other displaying a control panel with ON/OFF labels (no readable text or symbols)11.5 - Langues
natural_image
Pure diagram of a rectangular frame with no text, numbers, or symbols inside the frame (no readable text or symbols)
natural_image
Line drawing of a mounted radio or fog device with a bulb and antenna (no text or symbols)natural_image
Close-up photo of a smiling woman with long dark hair, framed in a white digital tablet device (no text or symbols visible)
natural_image
Exterior view of a modern office building (no signage)
natural_image
Exterior view of a silver wireless device with a circular lens and antenna (no visible text or symbols)
Easy to install - 2 wires
Installation (lacic 2 fis

Innovation Safe installation
Picture memory feature
A - SAFETY INSTRUCTIONS 04
1 - OPERATING PRECAUTIONS 04
2 - MAINTENANCE AND CLEANING 04
3 - RECYCLING 04
B - PRODUCT DESCRIPTION 05
1 - KIT CONTENTS 05
2 - MONITOR 06
3 - EXTERIOR PANEL 07
4 - MAINS ADAPTER 07
5 - INSTALLATION CD 07
C - INSTALLATION 08
1 - POWER FOR THE EXTERIOR PANEL 08
2 - INSTALLATION OF THE EXTERIOR PANEL 11
3 - INSTALLATION OF THE MONITOR 12
D - CONFIGURATION 13
1 - OVERVIEW 13
2 - SETTINGS AND FUNCTIONS ACCESSIBLE ON THE MONITOR 13
3 - CAMERA SETTINGS 13
4 - MANAGING THE ALARM AND THE MONITOR VOLUME 13
5 - SETTINGS FOR RECORDINGS 14
6-PLAYING A VIDEO FILE 14
7 - DELETING A VIDEO FILE 14
8 - 'MEMORY CARD FORMATTING' MENU 14
9 - MOVEMENT DETECTION ALARM 15
10 - CHANNEL SCAN 15
11 - 'SYSTEM SETTINGS' MENU 15
11.1 - Time and date settings 15
11.2 - Video format 15
11.3 - Energy-saver mode 16
11.4 - Period of inactivity 16
11.5 - Languages 16
E - OPERATION 17
1 - HOW IT WORKS 17
2 - SCREEN SYMBOLS 17
3 - BUTTONS AND FUNCTIONS 18
F-FAQ 19
G - ADD-ON PRODUCTS 21
1 - WIRELESS COLOUR CAMERA 512167 21
H - TECHNICAL AND LEGAL INFORMATION 22
1 - GENERAL CHARACTERISTICS 22
2 - FUNCTIONAL CHARACTERISTICS 22
3 - WARRANTY 23
4 - HELP AND SUGGESTIONS 23
5 - PRODUCT RETURNS/AFTER SALES SERVICE 23
6 - DECLARATION OF CONFORMITY 23
A - SAFETY INSTRUCTIONS
1 - OPERATING PRECAUTIONS
- Do not install the monitor in locations with high humidity and/or extreme temperatures, or where there is a risk that the equipment might rust or be exposed to dust.
- Do not install the monitor in cold locations or locations subject to large temperature fluctuations.
- The exterior panel must not be exposed to direct sunlight, rain or high humidity. Preferred locations are porches or covered areas.
- The exterior panel must not be installed where the lens filter may be vulnerable to scratching or dirt.
- Do not daisy-chain extension cords and/or multi-socket adapters.
- Do not install near acidic chemicals, ammonia or sources of toxic gases.
- Do not install in explosive environments or near volatile or inflammable products.
- Never put objects containing water on top of the device.
- Never cover the device.
- The monitor and mains adapter must only be used indoors.
2 - MAINTENANCE AND CLEANING
- Always unplug the product from the mains before carrying out any maintenance.
- Never use abrasive or corrosive substances to clean the products.
- Use a soft, slightly damp cloth.
- Never use an aerosol to spray the product as this may damage the internal workings.
3 - RECYCLING

Disposing of used batteries in household waste is strictly forbidden. Batteries/accumulators containing harmful substances are marked with symbols
(shown opposite) which indicate that it is forbidden to discard them in the household waste. The corresponding heavy metals are referred to as follows:
Cd= cadmium, Hg= mercury, Pb= lead.
You can dispose of these used batteries/accumulators at local waste treatment centres (centres for sorting recyclable materials), which are required to accept them. Keep batteries / button cells / accumulators out of reach of children and store them in a safe place not accessible to them. They could be swallowed by children or pets. Risk of death! In the event that a battery is swallowed, consult a doctor or go to A&E immediately. Never short-circuit the batteries, and do not burn or recharge them as they may explode!

This logo indicates that electrical and electronic waste must not be disposed of with household waste. They are likely to contain hazardous substances which are dangerous to both health and the
environment. Return the equipment to your local distributor or use the recycling collection service provided by your local council.

B - PRODUCT DESCRIPTION
1 - CONTENTS OF THE KIT
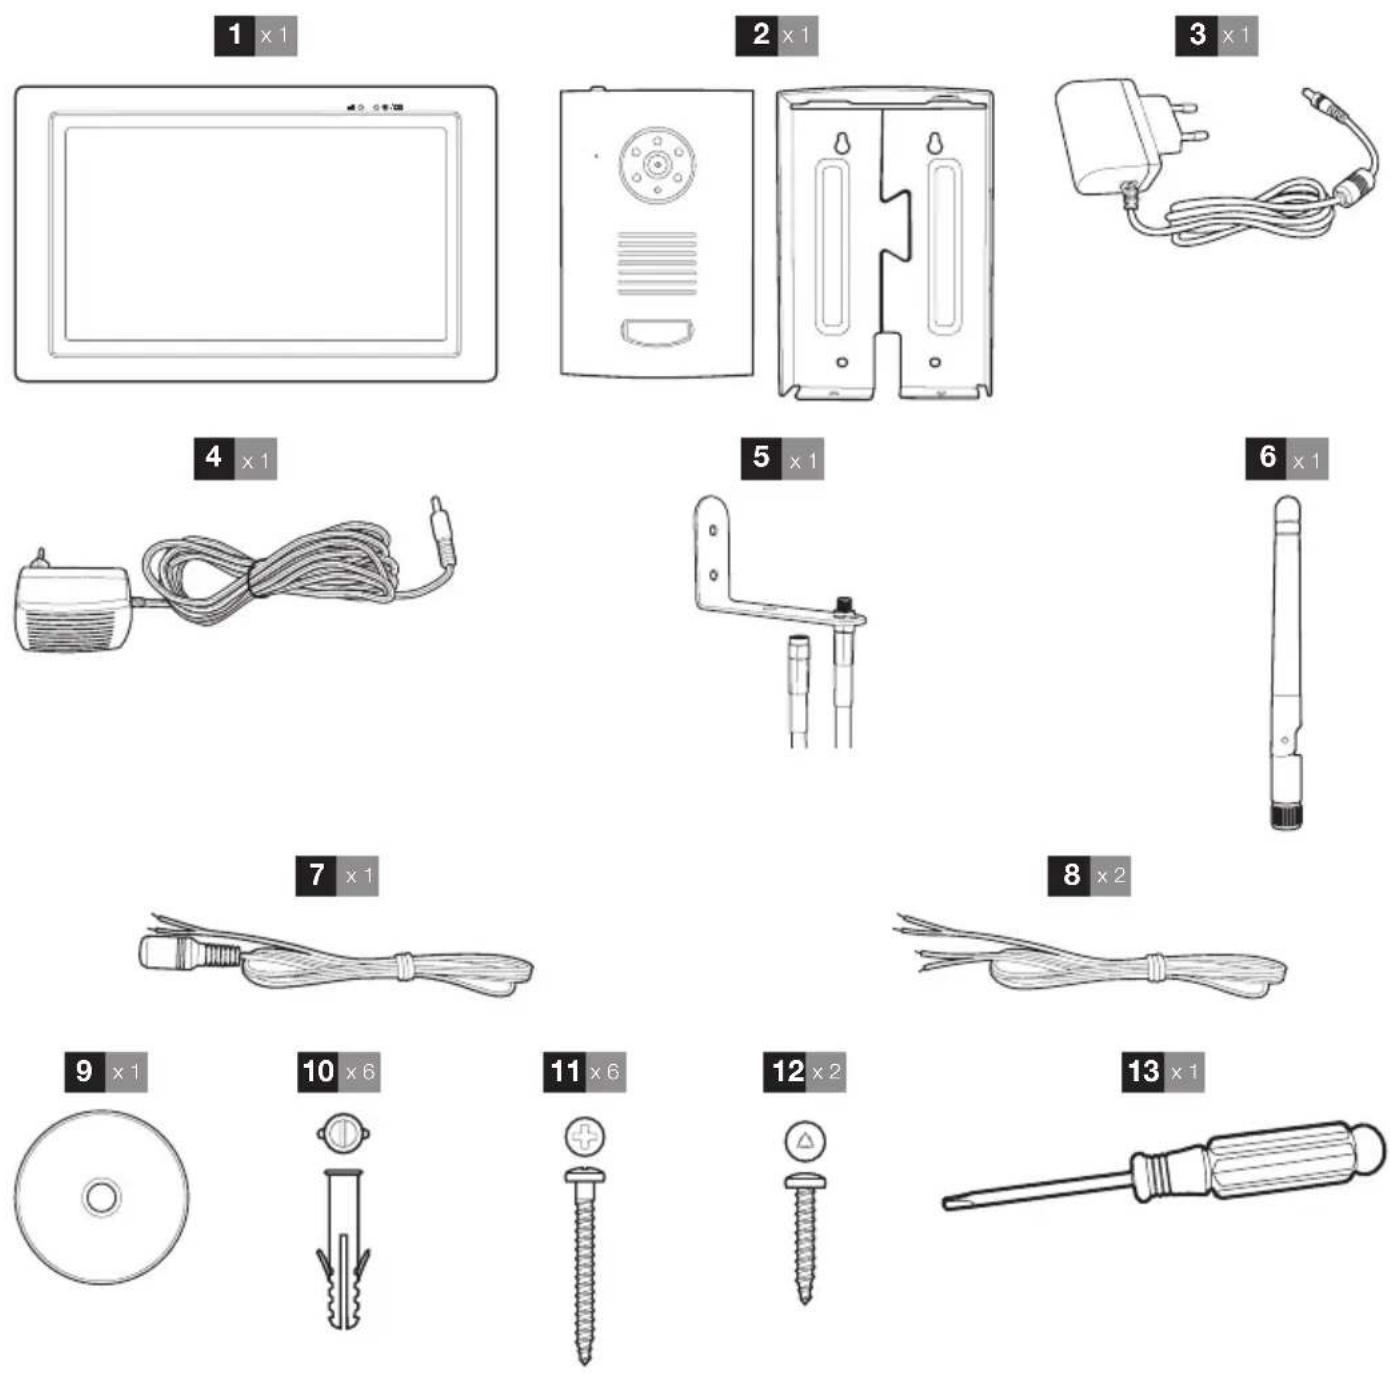
| 1 | Monitor |
| 2 | Exterior panel and protective shield |
| 3 | 5V DC 1A mains adapter |
| 4 | 12V DC 1A mains adapter |
| 5 | Aerial cable bracket |
| 6 | Aerial |
| 7 | Exterior panel mains power cord for the 12V DC adapter |
| 8 | Electric strike plate power wire / Dry contact or a gate motor |
9 Installation CD with software for playing video files
10 Wall plugs for mounting the exterior panel and the monitor
11 Screw for mounting the exterior panel and the monitor
12 Screw for securely mounting the exterior panel to its protective shield
13 Triangular screwdriver for the shield attachment screw
B - PRODUCT DESCRIPTION
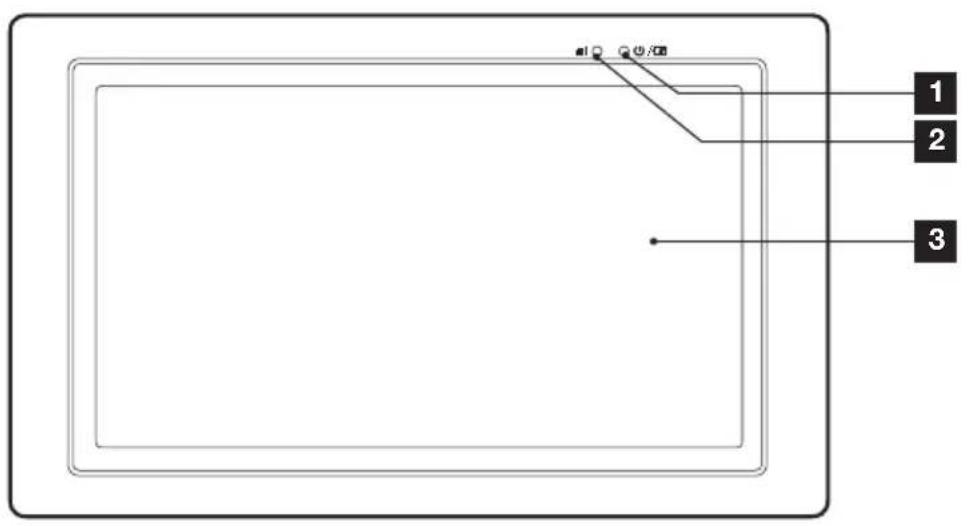
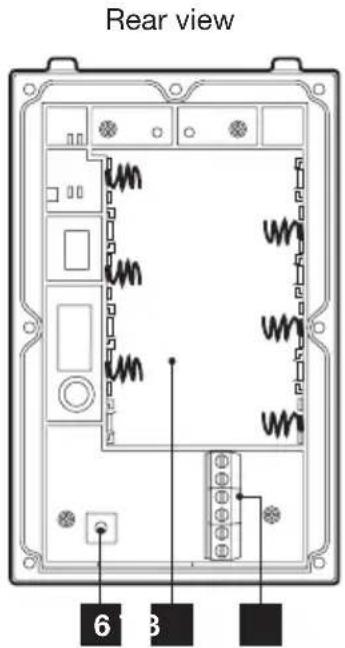
2 - MONITOR
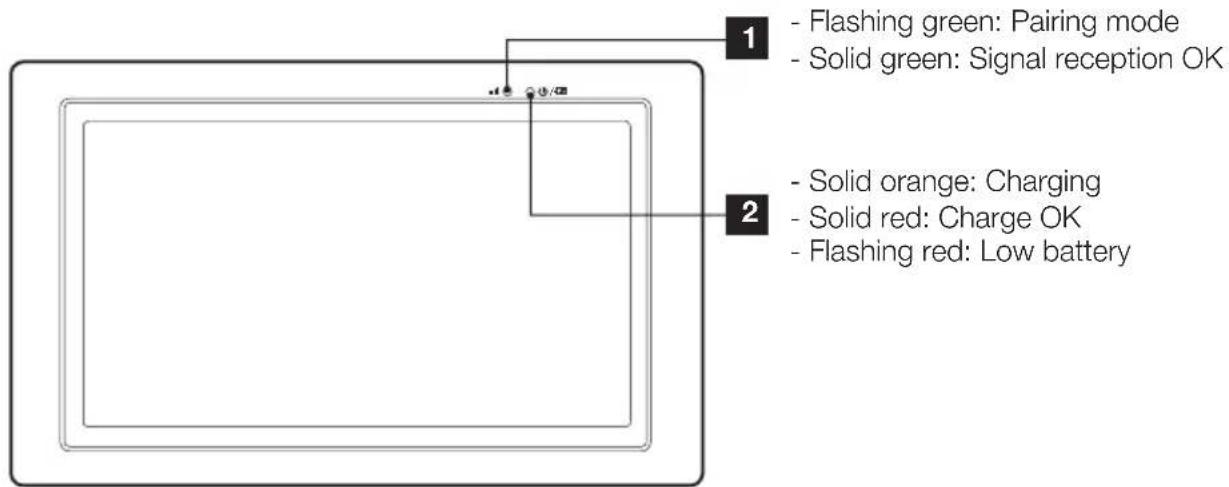
Front view
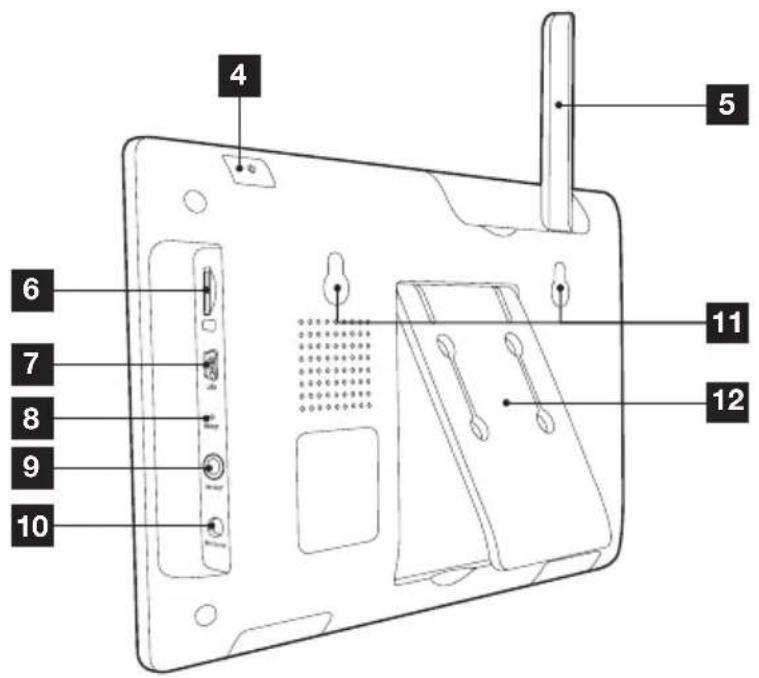
Rear view
| 1 | Battery charge indicator |
| 2 | Wireless signal indicator |
| 3 | LCD touchscreen |
| 4 | On/off button (hold 2 seconds) |
| 5 | Fold-down aerial |
| 6 | Micro SD memory card slot (card not included) |
| 7 | Mini USB port for connecting to a computer |
| 8 | Reset button |
| 9 | AV output |
| 10 | 5V power input |
| 11 | Holes for wall mounting |
| 12 | Foldable stand |
3 - EXTERIOR PANEL 4 - MAINS ADAPTERS
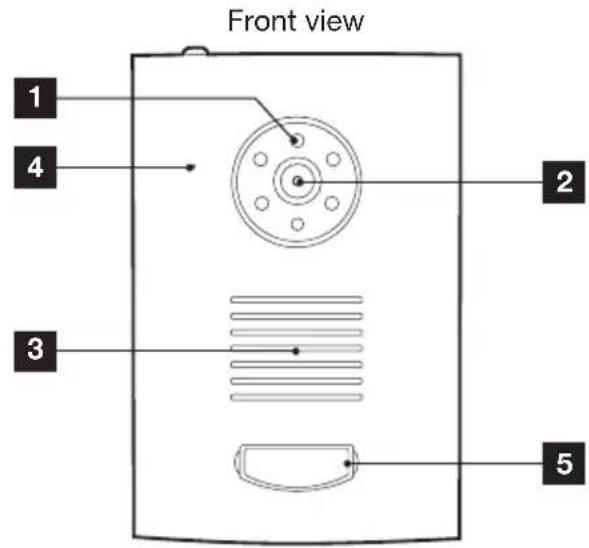
| 1 | Infrared light for night vision |
| 2 | Camera lens |
| 3 | Loudspeaker |
| 4 | Microphone |
| 5 | Call button + name plate |
| 6 | Pairing button |
| 7 | Battery compartment |
| 8 | Connection terminals |
B - PRODUCT DESCRIPTION
- A 230V AC 50 Hz/5V DC 1A mains adapter for powering the monitor is included in the kit.
- A 230V AC 50 Hz/12V DC 1A mains adapter for powering the exterior panel is included in the kit if you want to power an electric strike plate and have access to surveillance mode (the video can be viewed without a call from outside).
Do not use other power supplies as they could cause irreparable damage to the device and invalidate the warranty.
5 - INSTALLATION CD
The CD provided allows you to view on a computer video footage recorded on a memory card (not included) in the monitor.
C - INSTALLATION
1 - POWER FOR THE EXTERIOR PANEL
With batteries
- Open the battery compartment on the back of the exterior panel and insert six 1.5V LR6 batteries (not included).
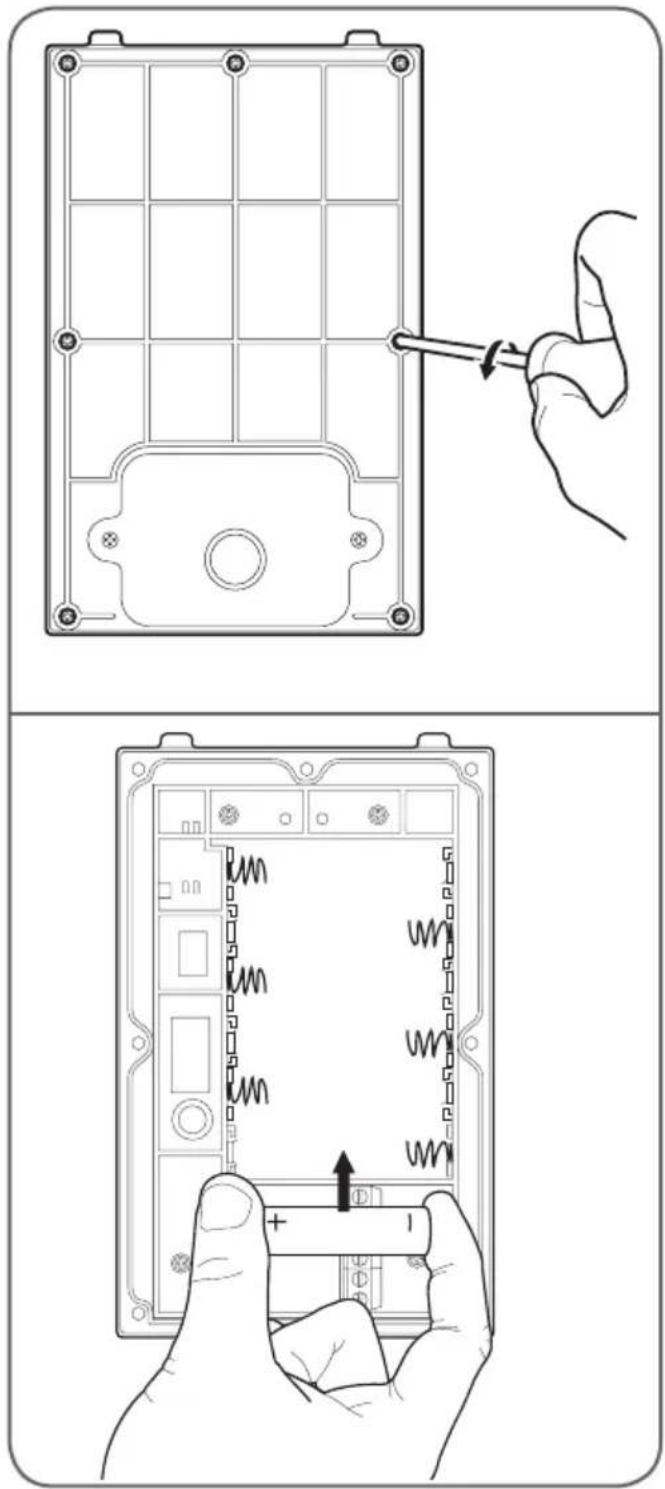
With mains adapter
- It is also possible to power the exterior panel with the 12V DC 1A mains adapter (provided) and the red and black power cord. In this case, no batteries should be inserted.
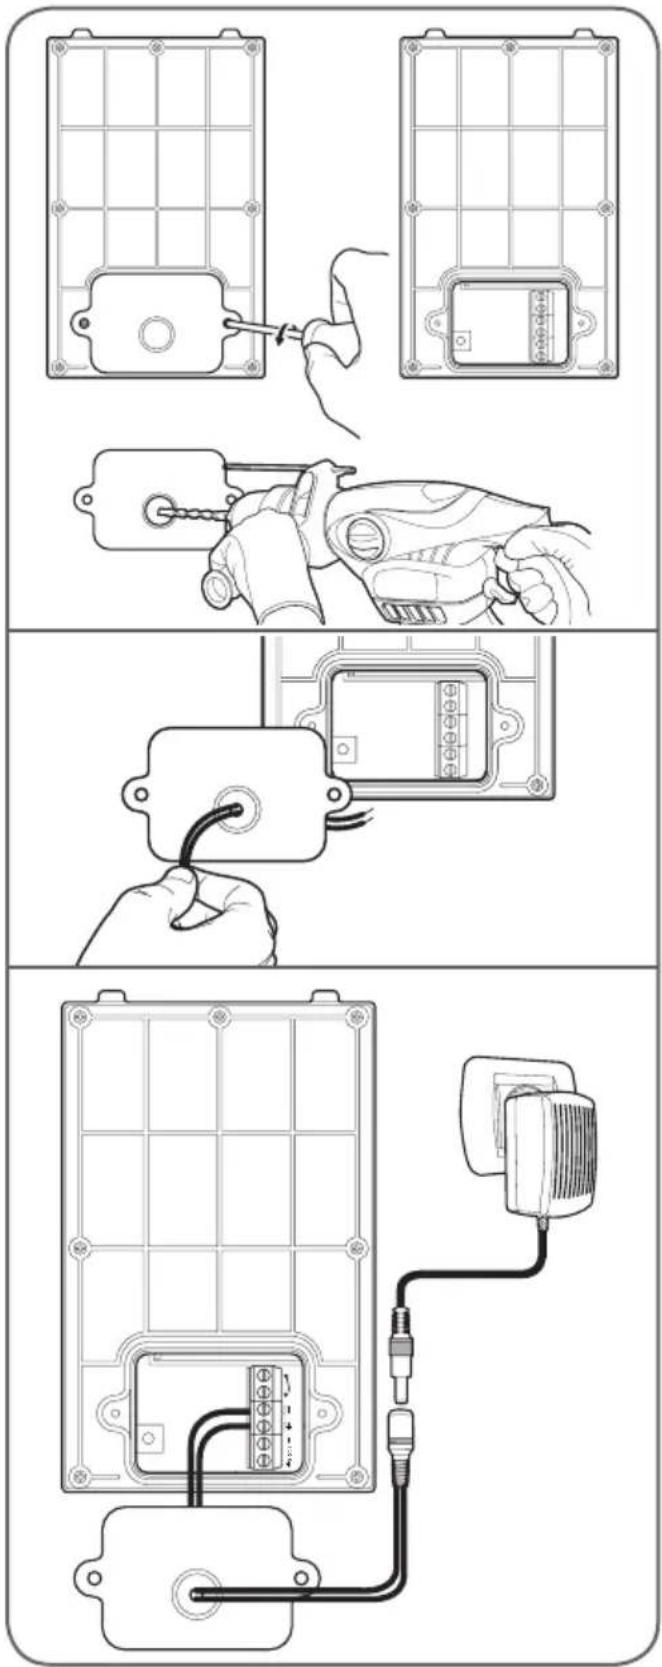
C - INSTALLATION
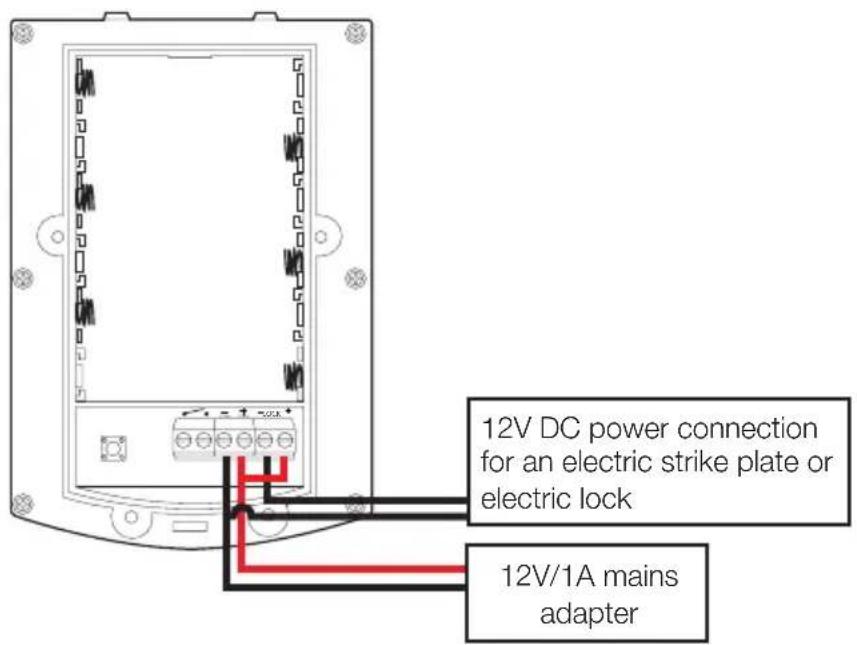
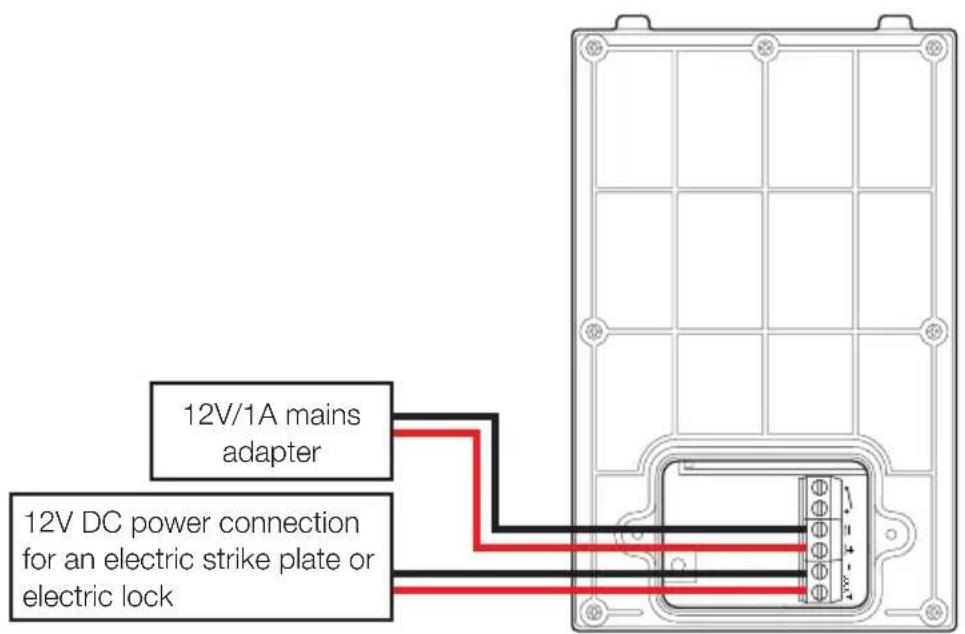
Install an electric strike plate
- If your exterior panel is powered with the 12V/1A mains adapter provided, you can remotely unlock a 12V DC electric strike plate or electric lock.
To connect your strike plate or lock, follow the diagrams below according to your model of exterior panel.
Model A
Model B
C - INSTALLATION
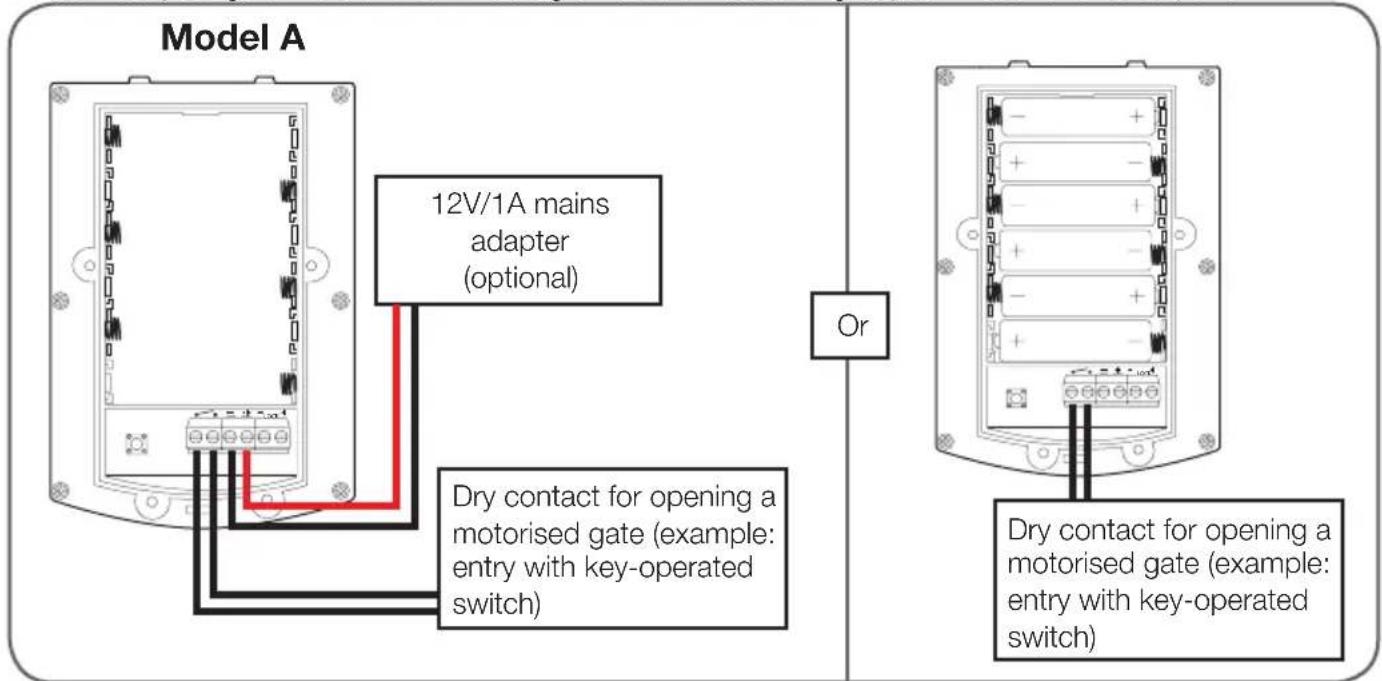
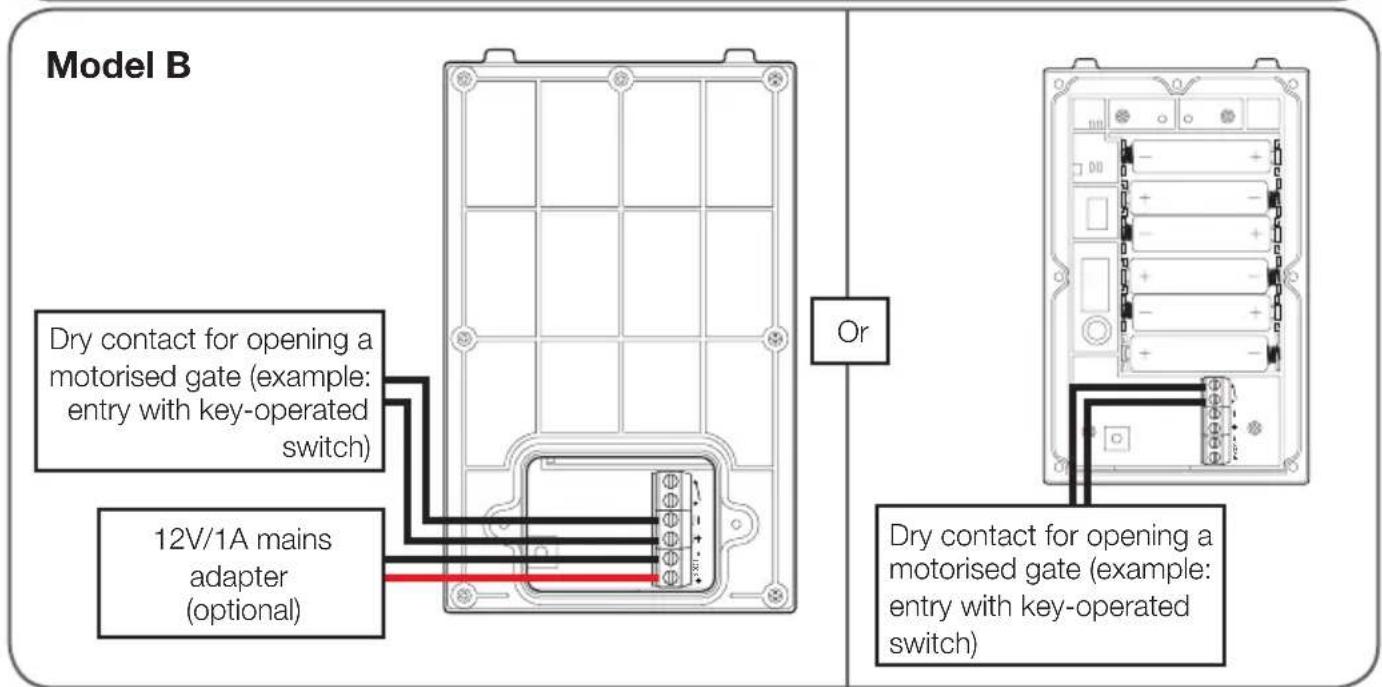
Control a gate motor
- Your exterior panel can either be powered with the 12V mains adapter provided or with batteries. You can remotely open a motorised gate.
To connect your gate motor, follow the diagrams below according to your model of exterior panel.
C - INSTALLATION
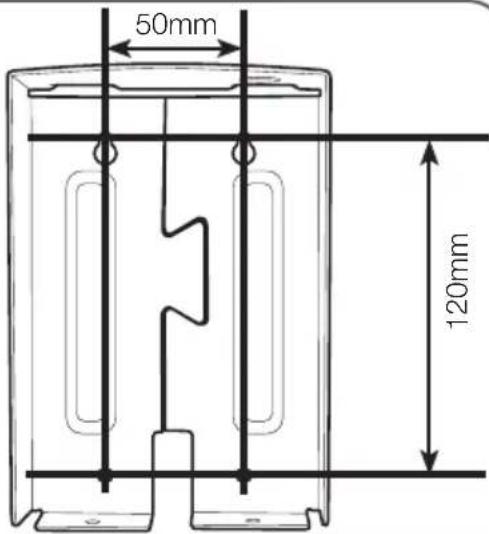
2 - INSTALLATION OF THE EXTERIOR PANEL
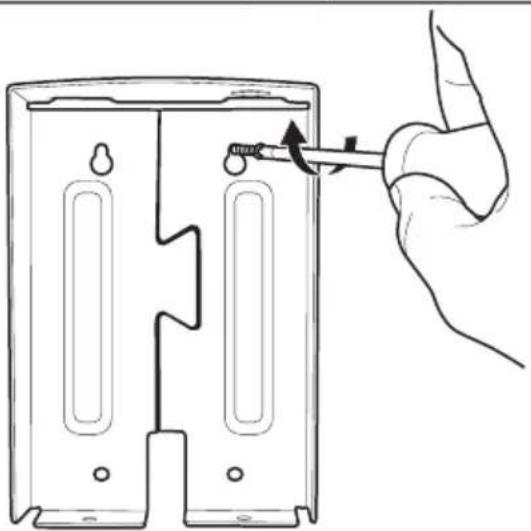
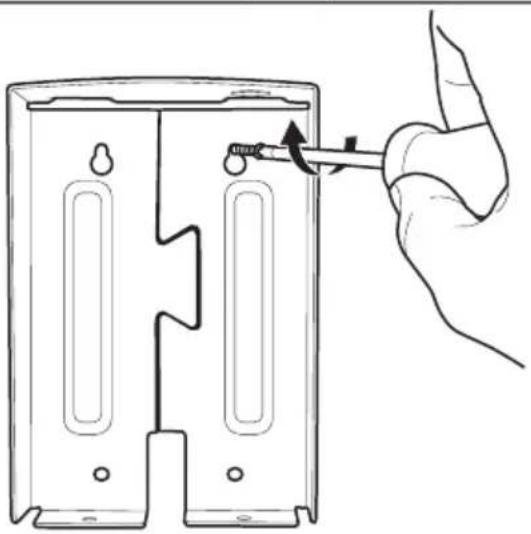
- Attach the shield for the exterior panel to your chosen outdoor location using the appropriate screws and wall plugs (the screws and plugs supplied are suitable for walls made of solid material).
- After installing the batteries and/or connecting the wires for the exterior panel, place it in its shield. Then, screw the exterior panel to the shield with the screws provided.

natural_image
Line drawing of a hand inserting a screw into a device housing (no text or symbols)
natural_image
Line drawing of a hand holding a rectangular device with a circular button and a scroll, showing a rotation arrow (no text or symbols)
natural_image
Line drawing of a hand holding a device with a scroll wheel and directional arrow (no text or symbols)
natural_image
Line drawing of a hand holding a pen above a device (no text or symbols)C - INSTALLATION
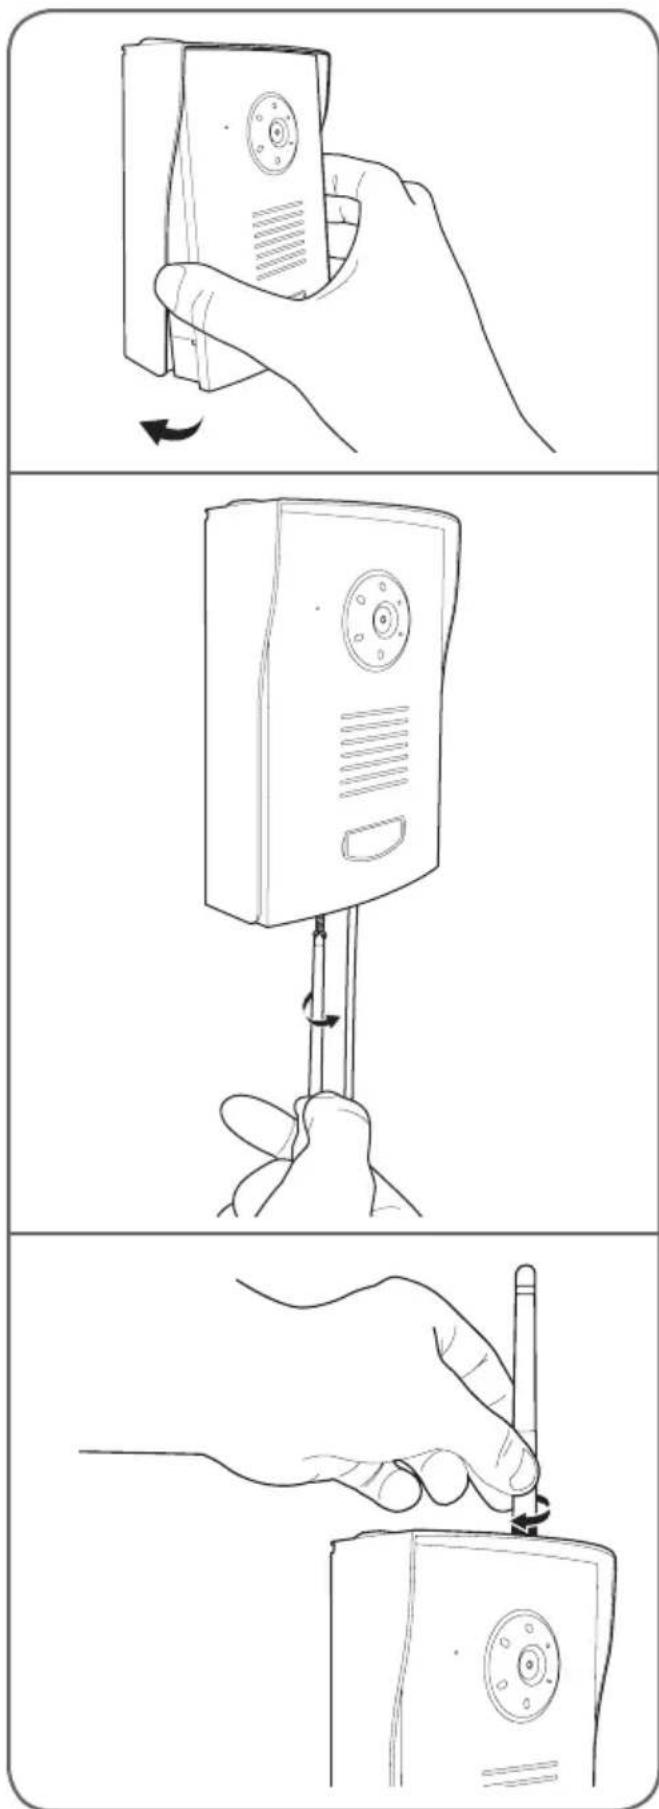
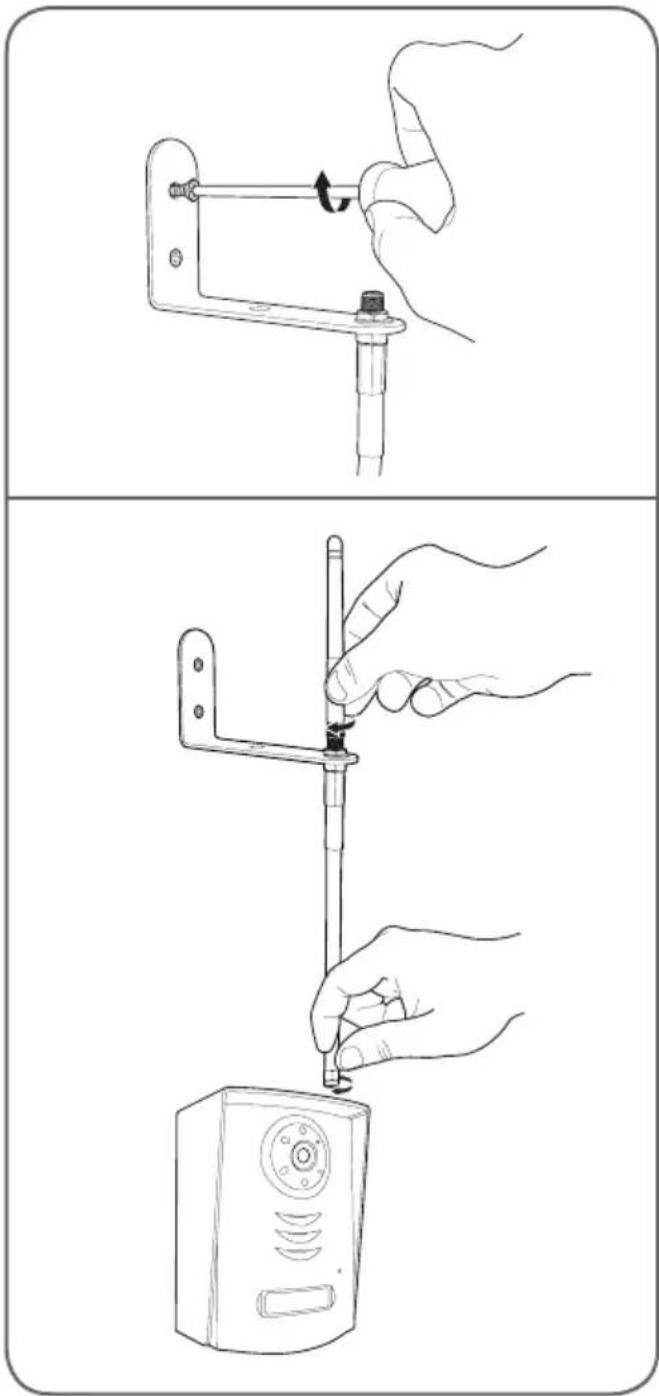
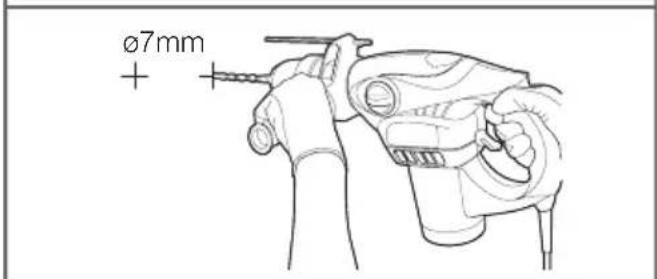
• Install the cable for the aerial if there is significant interference in the installed location.
natural_image
Illustration showing two-step installation: top shows hand holding tool, bottom shows hand adjusting a device (no text or symbols)3 - INSTALLATION OF THE MONITOR
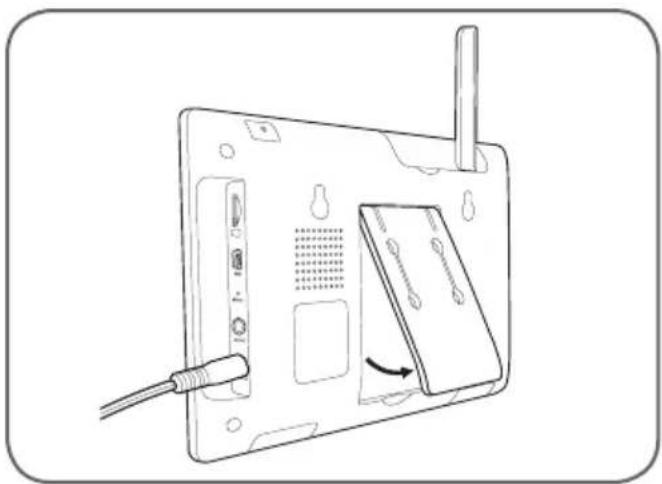
Important: The monitor must only be powered by the 5V DC/1A mains adapter (included). This adapter recharges the internal battery of the monitor for up to 3 hours of battery life.
On a flat surface
- Fold out the stand on the back of the monitor.
natural_image
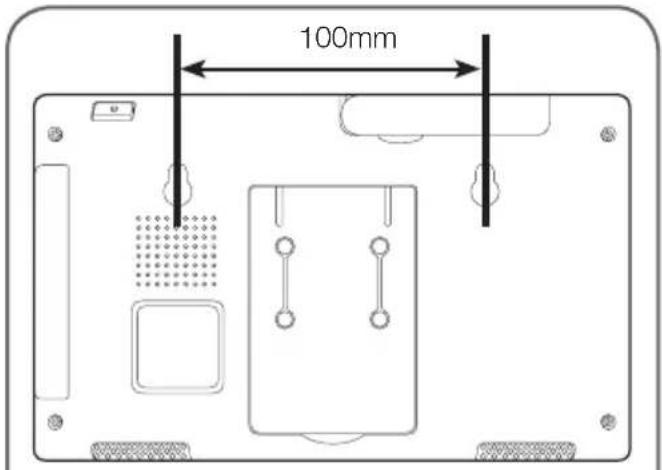
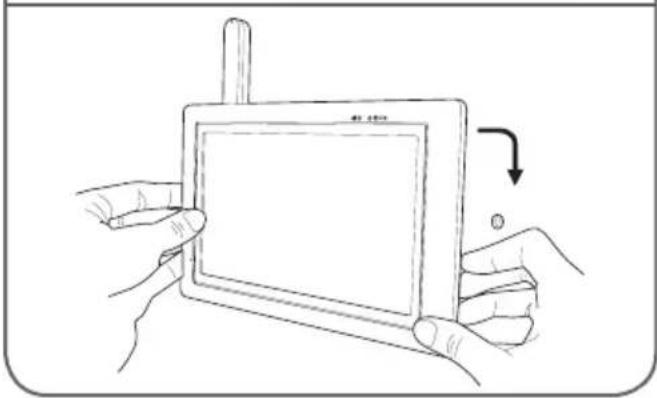
Line drawing of a device rear panel with cable and connector, no text or symbols presentWall mounting
- Attach the monitor to the wall using the appropriate screws and wall plugs (the screws and plugs included are suitable for walls made of solid material).
natural_image
Line drawing of two hands holding a tablet device with a scroll, showing a right-hand rule for change (no text or symbols)D - CONFIGURATION
1 - OVERVIEW
The Thomson colour touch screen video intercom is a high-end video intercom that allows you to see your visitors, communicate with them, and manage access to your property. It provides a doorbell for visitors to announce their presence, allows you to see visitors and talk with them, and lets you open an electric strike plate or motorised gate if you wish (not included).
The included exterior panel is designed to stand up to harsh weather and attaches to the surface of a pillar or property wall/fence. Its aluminium shield and the protection that it provides ensure that operation of the device is stable and long-lasting.
The exterior panel features infrared LEDs for night vision, which are controlled by a dusk-to-dawn sensor enabling black and white images of your visitors to be produced even in complete darkness. The monitor records a short video of your visitor on a memory card (not included) each time the doorbell is pressed on the exterior panel.
The use of wireless technology allows you to install this device in place of an existing wired doorbell, for example, without altering the existing installation.
You can add up to 3 additional wireless cameras (not included, ref. 512167) for internal or external usage. The cameras start recording when movement is detected in the view of one of the cameras. Recording can also be controlled manually.
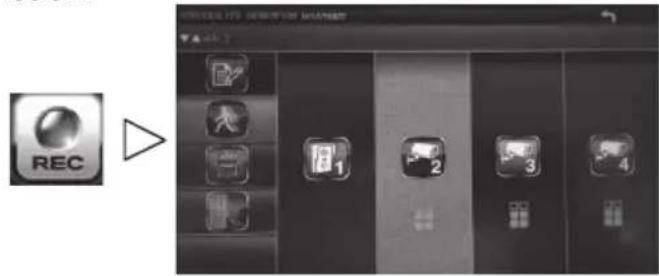
2 - MAIN MENU
To access the main menu, press the icon on the monitor.


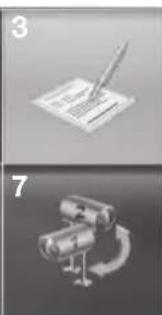
| 1 | Camera settings |
| 2 | Recording settings |
| 3 | Files (ordered by date and time slot) |
| 4 | System settings |
| 5 | Managing the alarm and monitor volume |
| 6 | Zoom |
| 7 | Camera scan |
| 8 | Protection of memory card formatting |
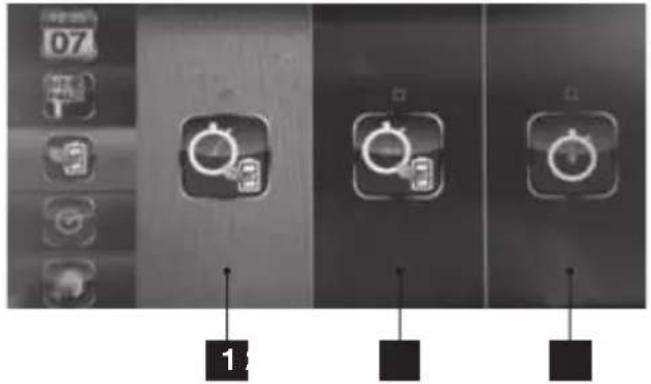
3 - CAMERA SETTINGS
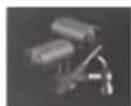
This menu enables you to activate or deactivate channels, pair additional cameras (not included, ref. 512167), and adjust the brightness of the cameras.
If you only have one exterior panel, deactivate channel 2 (active by default).


Your product has a total of 4 channels and your exterior panel is set to channel 1 by default. You can therefore add an additional 3 cameras for video surveillance.
Once your chosen channel is activated, begin pairing by pressing the button.
Warning: once this button lights up blue, you have 30 seconds to press briefly on the pairing button:
- Of the exterior panel, which is under the battery compartment
- Of the camera, which is on the power cord (camera not included, ref. 512167)
4 - MANAGING THE ALARM AND THE MONITOR VOLUME
To get to the menu for activating the alarm and managing the volume of the monitor, click on the following icon:

The menu that appears includes the following items:

Alarm activation

: Manage the ringtone volume of the monitor

Manage the communication volume of the

D - CONFIGURATION
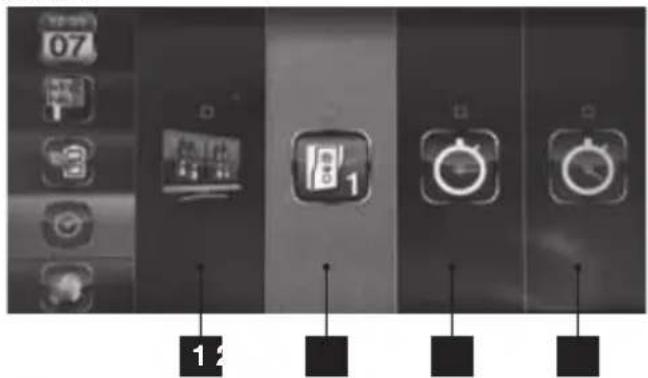
5 - SETTINGS FOR RECORDINGS
Important: to be able to record videos, the monitor must be equipped with a Micro SD memory card (not included). To play videos recorded on the memory card with your computer, software is included in the product box.
The configure the different recording modes, use the following buttons:

The day is broken up into time slots. For each slot, 3 modes are available:
M: Recording starts when movement is detected; available with external cameras (ref. 512167) S: Recording goes for 1 hour (during the time slot). X: Recording only starts when someone rings the doorbell on the exterior panel. To switch modes, press the desired time slot.
Information on a video recording: Minimum duration: 15 sec. Maximum duration: 60 sec.
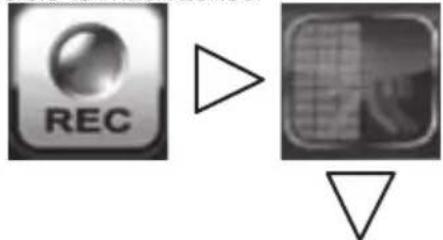
6 - PLAYING A VIDEO FILE
To play a video, simply press the icon of the video.
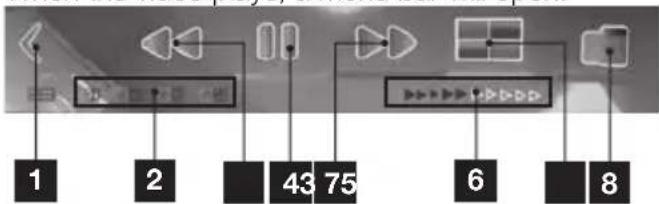
When the video plays, a menu bar will open:
flowchart
graph TD
    A["1"] --> B["2"]
    B --> C["43"]
    C --> D["75"]
    D --> E["6"]
    E --> F["8"]
| 1 | Reduce the menu bar |
| 2 | Number of channel displayed |
| 3 | Rewind |
| 4 | Play/Pause |
| 5 | Fast-forward |
| 6 | Progress bar |
| 7 | Multi-channel display (depending on availability) |
| 8 | Leave play mode / Return to files |
7 - DELETING A VIDEO FILE
To delete a video, simply press the icon of the video for 3 seconds.

• A notification will appear:


Deletes the video

Takes you out of the menu
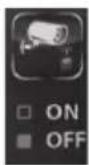
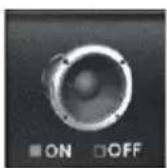
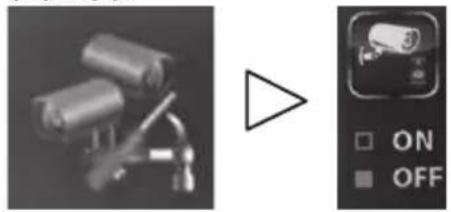
8 - 'MEMORY CARD FORMATTING' MENU
To be able to format the memory card, on the main menu, the icon must be set to ON as shown below:
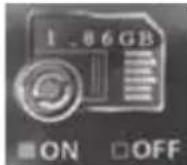
- If necessary, press the icon to go from OFF to ON. Once formatting is authorised, go to the REC menu: - Press the icon: 'Card + eraser'


natural_image
3D rendered image of a bed with a pillow, displayed on a plain surface (no text or symbols visible)D - CONFIGURATION
9 - MOVEMENT DETECTION ALARM
The menus below are useful only if you have an external camera. (ref. 512167) Your monitor will emit short beeps when movement is detected if:
- The icon on the lower left of the main menu is set to ON.
• The time slot is set to M:

The level of sensitivity for detection of movement can be adjusted using the icons below:
LV3=High sensitivity
LV2=Medium sensitivity
LV1=Low sensitivity
If you want to turn off movement detection for a portion of the image recorded by the camera, it is possible to mask zones:
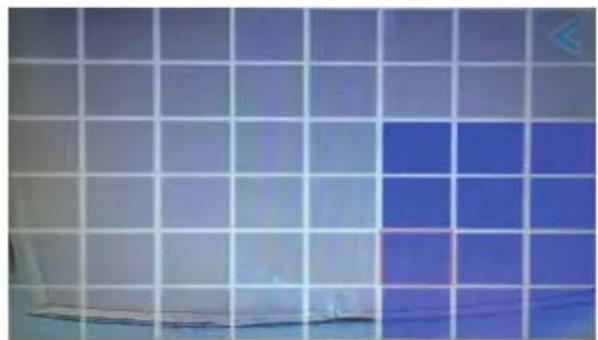
natural_image
Grid of blue squares with a small white object at the bottom left (no text or symbols)All boxes in bright blue will not detect movement.
10 - CHANNEL SCAN
The mode for scanning the different active channels can be accessed directly from the main menu
with this button:

11 - 'SYSTEM SETTINGS' MENU
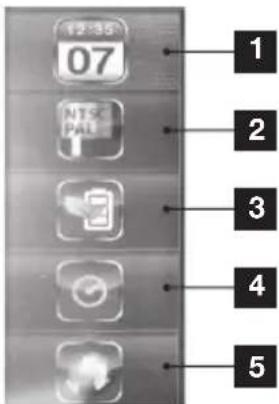
| 1 | Time and date settings |
| 2 | Video format |
| 3 | Energy saver |
| 4 | Period of inactivity |
| 5 | Languages |
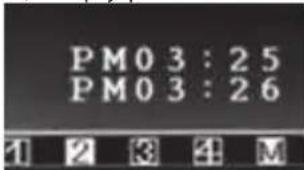
11.1 - Time and date settings
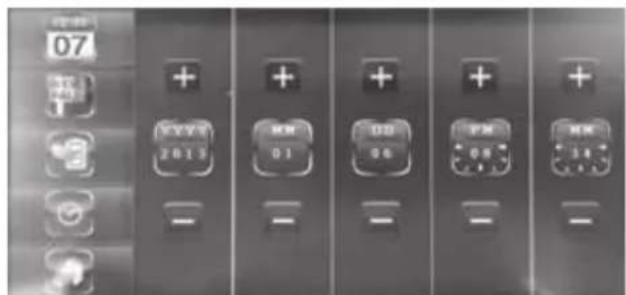
With the + and - buttons, change the date or time.
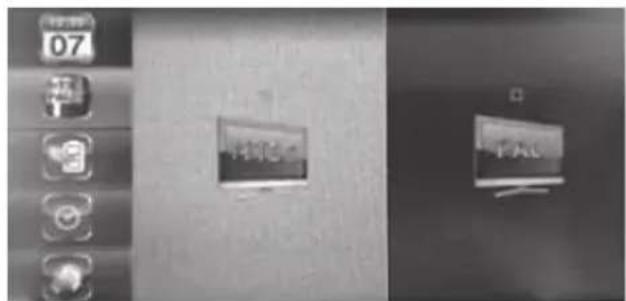
11.2 - Video format
You can choose between PAL or NTSC video format. In Europe, it is recommended that you use the PAL video format.
D - CONFIGURATION
11.3 - Energy-saver mode
Energy-saver mode turns off the screen after 5 or 10 minutes.
| 1 | 5 minutes |
| 2 | 10 minutes |
| 3 | Never |
11.4 - Period of inactivity
After 2 minutes of inactivity, the monitor goes to 'sleep' and activates one of these four modes:
| 1 | Display in quad mode after 2 min. |
| 2 | Display the exterior panel camera after 2min. |
| 3 | Scan activated channels with 5-sec. intervals |
| 4 | Scan activated channels with 10-sec. intervals |
Note: To activate or deactivate the different channels:
natural_image
Two grayscale images: one showing cylindrical batteries connected to a cable, the other showing a control panel with ON/OFF labels (no readable text or symbols)11.5 - Languages
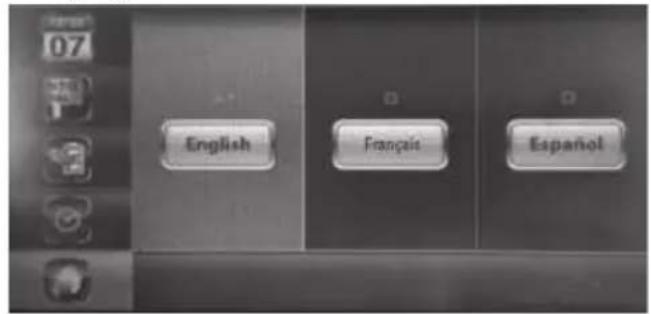
3 languages are available for this monitor
1 - HOW IT WORKS
The exterior panel can either be powered by 6 LR06 batteries or by a 12V mains adapter, included, which will allow you to:
- Open an electric strike plate (not included).
- Use surveillance mode so that video can be viewed without someone ringing the doorbell.
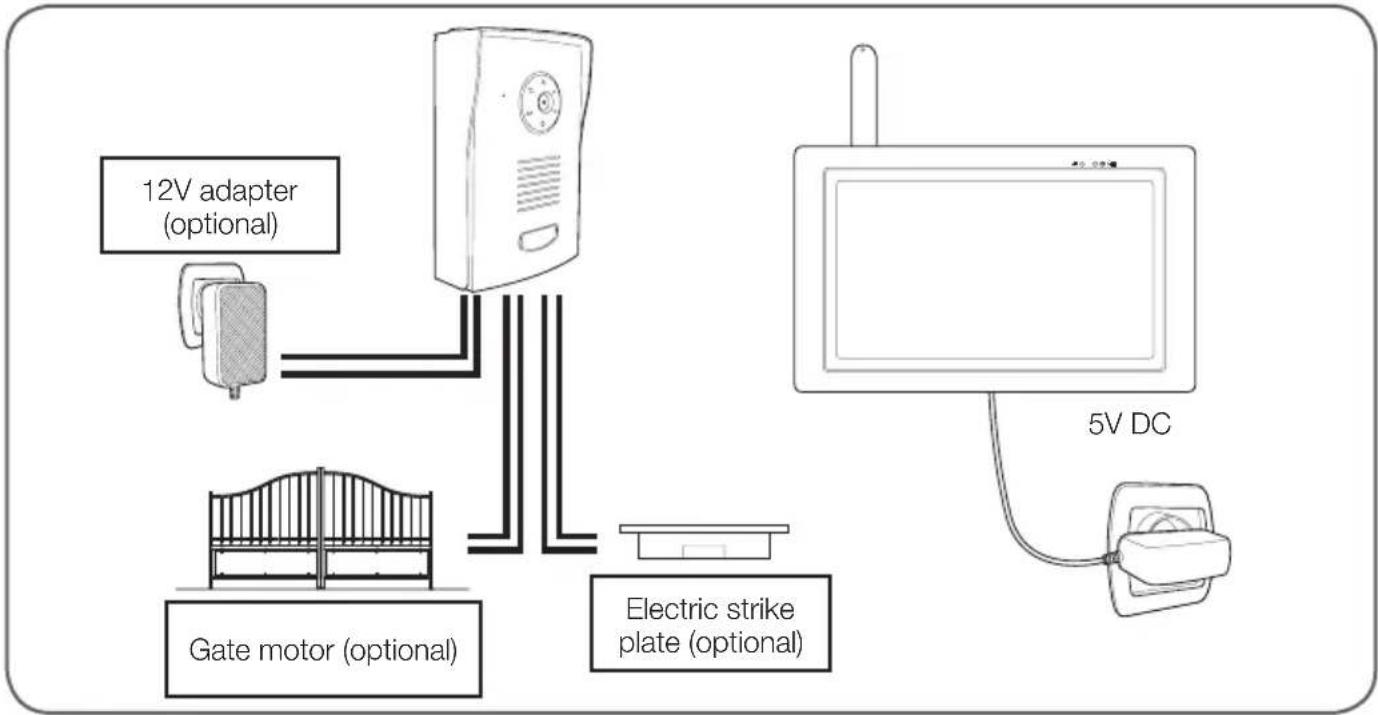
flowchart
graph TD
    A["12V adapter (optional)"] --> B["Gate motor (optional)"]
    B --> C["Electric strike plate (optional)"]
    C --> D["5V DC"]
    D --> E["Radio"]
- Pressing the name plate on the exterior panel makes the monitor ring 3 times.
• After the 3 rings, you can talk to your visitor using the button.
Note:

You must keep pressing the button for the visitor to hear you. You must let go of the button to hear your visitor's response.
- Let go of this button to hear your visitor's response.
- The conversation will automatically cut off after 60 seconds if the exterior panel is battery powered.
2 - SCREEN SYMBOLS
 | Signal quality indicator: according to distance between the exterior panel and the monitor. |
 | Battery indicatorBottom of the screen for the monitorTop of the screen for the exterior panel |
 | Full-screen mode. |
 | Quad mode: All active channels are visible. |
 | Scan mode: The monitor performs a scan of all active channels. |
 | Zoom x2 |
E - OPERATION
| [3600] | Volume indicator. |
| DAAS | Video recording indicator. |
3 - BUTTONS AND FUNCTIONS
Press the >> button to display the icons below:
 | Tap to change channels. As seen here, only channel 1 is available. |
 | Press and hold this button to speak and let it go to hear the response from your visitor. |
 | Use to activate the electric strike plate – available only if the exterior panel is powered by the 12V mains adapter (included). |
 | Use to activate the gate connected to the dry contact of the exterior panel. Available with the exterior panel powered by battery or by the mains adapter. |
 | Use to raise or lower the communication volume. |
 | Use to record a video or stop recording in process. |
 | Display mode: Use to change channels and display all 4 channels simultaneously. |
 | Use to access the main menu. |
If your problem is not covered below, please contact our technical support service.
| Symptoms Possible causes Solutions | ||
| The system does not turn on | The adapter is not connected to the mains/to the monitor (DC IN on the right side of the monitor). | Check that all power supply cables are correctly connected. |
| The monitor's battery is not charged. | Plug in the mains adaptor to the monitor. | |
| Memory card not detected (message 'SD ERR') | Memory card not detected or defective | Verify that the card is properly inserted and formattedReplace the cardVerify that the memory card is compatible |
| Cannot communicate with audio/video | Power supply not connected | Check that the monitor and exterior panel are properly connected to their power supplies |
| Not paired | Pair the exterior panel with the monitor. | |
| Too far away, interference, or too many obstacles between the camera and the monitor. | Move and/or bring the monitor closer to the exterior panel. | |
| Date and hour incorrect on recordings or live viewing | Date and time not set. | Set the time |
| Date and time reset after prolonged loss of power to the monitor. | ||
| No recording during a call from the exterior panel | No memory card in the monitor. | Verify that the card is properly inserted and formattedReplace the card |
| No recording when movement is detected by an additional camera (ref. 512167) | Recording deactivated. | Set recording to M and the right time slot    |
| Sensitivity improperly set. | Activate/correct the sensitivity setting for movement detection | |
| No memory card in the monitor. | Verify that the card is properly inserted and formattedReplace the card | |
| Unwanted alarm when movement is detected | The alarm is activated on the monitor. | Go to the main menu, access the alarm settings using the following buttons: This icon must be set to OFF.     |
F-FAQ
| Symptoms Possible causes Solutions | ||
| You can't control the electric strike plate and/or gate | The exterior panel is powered by battery instead of the 12V/1A mains adapter. | Modify installation and use the provided 12V/1A adaptor. |
| The strike plate or gate control are not properly connected. | Check the wiring. | |
| The electric strike plate never opens the door | The installed strike plate does not meet the specifications given in this guide (12V, 500 mA max.) | · Change the wiring· Change the wires· Change the model of strike plate |
| The screen does not display the image from the exterior panel when the screen is turned on | The exterior panel is powered by battery instead of the 12V/1A mains adaptor | Modify installation and use the provided 12V/1A mains adaptor |
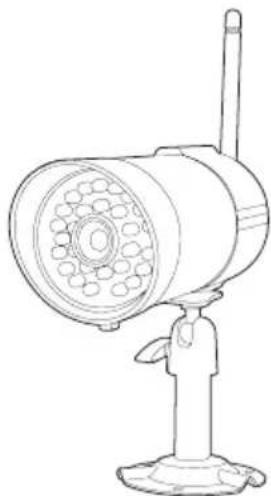
G - ADD-ON PRODUCTS
1 - WIRELESS COLOUR CAMERA 512167
natural_image
Line drawing of a vintage-style portable radio with antenna and circular lens (no text or symbols)If you have purchased additional cameras (up to 3 in total) to extend the surveillance of the product, each camera must be paired as was done for the exterior panel:
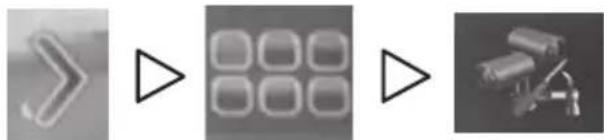
natural_image
Three grayscale icons showing a stylized arrow, a grid of squares, and a camera with a device (no text or symbols)This menu allows you to activate or deactivate channels, pair additional cameras (not included, ref. 512167), and adjust the brightness of the cameras.
Your product has a total of 4 channels and your exterior panel is assigned to channel 1 by default. You can then add 3 additional cameras in order to establish video surveillance.
Once your chosen channel is activated, begin pairing by pressing the button.
Note: once this button is shining bright blue, you have 30 seconds to briefly press the pairing button found on the power cord.
H - TECHNICAL AND LEGAL INFORMATION
1 - GENERAL CHARACTERISTICS
| Monitor | ||
| Screen | Size 7 inches diagonal | |
| Resolution 480 x 272 | ||
| Process for recording | Storage Micro SD memory card with capacity up to 32 GB | |
| Supply voltage | 230V AC 50Hz - 5V DC 1A | |
| Consumption | 800 mA (max.) | |
| Battery | 3.7V / 1800 mA Li-ion | |
| Operating temperature | 0 to +40°C | |
| Dimensions | L: 200 mm / W: 122 mm / H: 26 mm | |
| Exterior panel | |
| Sensor type | CMOS |
| Sensor size | 14 " |
| Viewing angle | H: 86° / V: 60° |
| Number of IR LEDs | 5 |
| Night vision range | 50 cm to 1 m |
| Power supply | 6 LR6 batteries (not included) or 12V/1A adapter (included) |
| Operation | indoor/outdoor use |
| Protection rating | IP44 |
| Operating temperature | -10°C to +50°C |
| Dimensions | L: 154 mm / W: 107 mm / H: 60 mm |
2 - FUNCTIONAL CHARACTERISTICS
Monitor
- Works with an exterior panel (included) and up to 3 wireless cameras (not included).
- Live display of one of the 4 cameras or display all 4 simultaneously.
- Control an electrical strike plate and/or a motorised gate from the monitor.
-
Option of recording on a Micro SD card (not included).
-
Video recording when a person rings the doorbell on the exterior panel or when movement is detected.
- View video recordings on the monitor or on a computer.
• Storage of recordings by date. - Option of a sound alert when movement is detected.
H - TECHNICAL AND LEGAL INFORMATION
Exterior panel
- Outdoor use: yes
- Mounting bracket: wall-mounted
• Anti-glare protective shield: yes
• Built-in microphone: yes
• Night vision: yes, from 5 to 8 metres
• Protection rating: IP55 - Power supply: 9V from 6 LR6 batteries (not included) or 12V DC/1A mains adapter (included)
3 - WARRANTY
- This product is guaranteed for parts and labour for 3 years from the date of purchase. It is essential to retain the proof of purchase for the duration of the warranty period.
- The warranty does not cover damage caused by negligence, knocks or accidents.
- This product must not be opened or repaired by any persons not employed by Smarthome France.
- The warranty will be void if the device is tampered with.
- Parts considered consumables, such as batteries, are not covered by the warranty.
4 - HELP AND SUGGESTIONS
- If, in spite of all of the care we have taken in designing our products and creating this leaflet, you encounter difficulties while installing your product, or if you have questions, you are strongly encouraged to contact our specialists, who are at your disposal to advise you.
- If you have operational problems during installation or after a few days of usage, it is imperative that you contact us while near your system so that one of our technicians can diagnose the cause of the problem, because it likely comes from an improper setting or improper installation. If the problem is caused by the product itself, the technician will give you a case number so that you can return the unit to the shop. Without this case number, the shop may refuse to exchange your product.
Contact our after sales service team technicians:
Monday to Friday, 9AM to 12PM and 2PM to 6PM CET.
5 - PRODUCT RETURNS - AFTER SALES SERVICE
If, despite the care we have taken in designing and manufacturing your product, it needs to be returned to our customer service centre, you can check the progress of the work on our website at the following address: http://sav.avidsen.com
Smarthome France undertakes to keep a stock of spare parts for this product throughout the contractual warranty period.
6 - DECLARATION OF CONFORMITY
Per the RED directive
Smarthome France hereby declares that the equipment designated below: Wireless video intercom, ref. 512168
Complies with the 2014/53/EU directive. Its conformity has been assessed pursuant to the applicable standards in force:
• EN 301 489-1 V2.2.0
• EN 301 489-17 V3.2.0
• EN 301 328 V2.1.1
• EN 60950-1:2006 + A11:2009 + A1:2010 + A12:2011 + A2:2013
• EN 62311: 2008
In Chambray-les-Tours, 17/05/2018 Alexandre Chaverot, Chairman

Visit our website to find out more about our Thomson range at
www.thomsonsecurity.eu
THOMSON is a TECHNICOLOR S.A. brand used under licence by:
Smarthome France - 32, rue Augustin Fresnel
37170 Chambray les Tours - France
THOMSON
Security
NL IZZY-768W2
Kleurenvideo-intercom 18cm
ref. 512268

natural_image
Close-up photo of a smiling woman with long dark hair, framed in a white digital tablet device (no text or symbols visible)
natural_image
Exterior view of a modern office building (no signage)
natural_image
Exterior view of a silver wireless device with a circular lens and antenna (no visible text or symbols)
Easy to install - 2 wires
Installation (lacic 2 fis

Innovation Safe installation
Picture memory feature
G - EXTRA PRODUCTEN 21
1 - DRAADLOZE KLEURENCAMERA 512167 21
H - TECHNISCHE EN WETTELIJKE INFORMATIE 22
1 - ALGEMENE EIGENSCHAPPEN 22
2 - FUNCTIONELE EIGENSCHAPPEN 22
3 - GARANTIE 23
4 - HULP EN TIPS 23
5 - RETOUR PRODUCT/SERVICE 23
6 - CONFORMITEITSVERKLARING 23
A - VEILIGHEIDSVOORSCHRIFTEN
1 - GEBRUIKSVOORSCHRIFTEN


natural_image
Line drawing of a hand inserting a screw into a device housing (no text or symbols)
natural_image
Line drawing of a hand holding a rectangular device with a circular button and ventilation grille, showing a rotation arrow (no text or symbols)
natural_image
Line drawing of a hand holding a device with a scroll wheel and directional arrow (no text or symbols)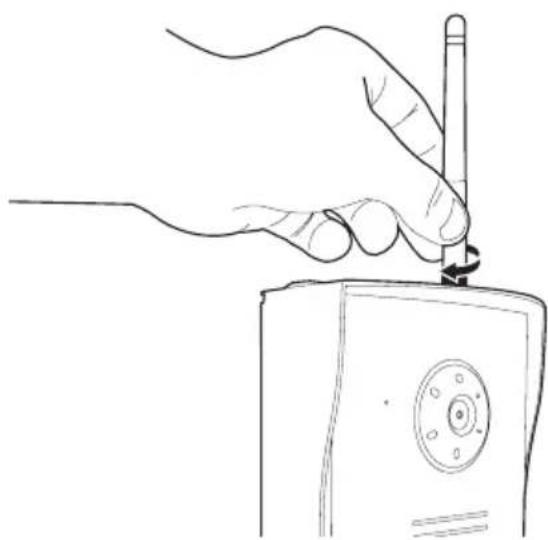
natural_image
Line drawing of a hand holding a pen above a device (no text or symbols)C - INSTALLATIE
natural_image
Two-step diagram showing hand tool application: top shows a mechanical component with rotation arrow, bottom shows a handheld device with a screwdriver (no text or symbols)3 - INSTALLATIE VAN DE MONITOR
natural_image
Line drawing of two hands holding a tablet device with a scroll, showing a right-hand rule for change (no text or symbols present)D - CONFIGURATIE
1 - ALGEMENE BESCHRIJVING
natural_image
Two grayscale images showing mechanical components: top image with cylindrical parts and a bracket, bottom image with a speaker emitting sound waves (no text or symbols)
natural_image
Two grayscale icons: top shows a pen writing on a document, bottom shows surveillance camera with curved arm (no text or symbols)

natural_image
Simple grayscale illustration of a bed with a chair, no text or symbols presentD - CONFIGURATIE
9 - ALARM BIJ BEWEGINGSDETECTIE
natural_image
Two grayscale images: one showing cylindrical objects with a handle, the other showing a control panel with ON/OFF labels (no readable text or symbols)11.5 - Talen
natural_image
Pure geometric diagram of a rectangle with nested inner rectangles and a small labeled point (no text or symbols)
- Groen knipperend: Koppelingsmodus
natural_image
Line drawing of a mounted radio or fog device with a bulb and antenna (no text or symbols)5 - RETOUR PRODUCT - SERVICE NA AANKOOP
natural_image
Close-up photo of a smiling woman with long dark hair, framed in a white digital tablet device (no text or symbols visible)
natural_image
Exterior view of a modern office building (no signage)
natural_image
Exterior view of a silver wireless device with a circular lens and antenna (no visible text or symbols)INHALT
5 - INSTALLATIONS-CD
Mit Netzadapter
ø7 mm

natural_image
Line drawing of a hand holding a tool, possibly a drill bit or drill cap, with no visible text or symbols.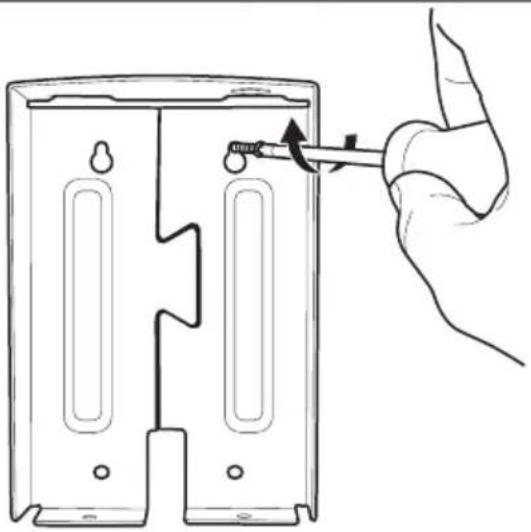
natural_image
Line drawing of a hand inserting a screw into a plastic electrical socket (no text or symbols)
natural_image
Line drawing of a hand holding a rectangular device with a circular button and a scroll, showing a rotation arrow (no text or symbols)
natural_image
Line drawing of a hand holding a device with a scroll wheel and directional arrow (no text or symbols)
natural_image
Line drawing of a hand holding a pen above a device with a circular dial (no text or symbols)C - MONTAGE
natural_image
Two-step diagram showing hand tool application: top shows a mechanical component with rotation arrow, bottom shows a handheld device with screwdriver (no text or symbols)3 - MONTAGE DES MONITORS
natural_image
Line drawing of a device rear panel with cable and connector, no text or symbols presentAn der Wand
natural_image
Line drawing of two hands holding a tablet device with a scroll, showing a right-hand rule for change (no text or symbols present)D - KONFIGURATION

Das Video löschen

Das Menü verlassen
8 - MENÜ "FORMATAGE CARTE MEMOIRE" (SPEICHERKARTE FORMATIEREN)
natural_image
Grid-patterned surface with blue and white squares, no text or symbols visible| 1 | 5 Minuten |
| 2 | 10 Minuten |
| 3 | Nie |
natural_image
Two grayscale images: one showing cylindrical objects and a triangular play button, the other displaying a control panel with ON/OFF labels (no readable text or symbols)11.5 - Sprachen
natural_image
Pure diagram of a rectangular frame with no text, numbers, or symbols inside the frame (no readable text or symbols)
natural_image
Line drawing of a mounted radio or fog device with a bulb and antenna (no text or symbols)flowchart
graph LR
    A["Start"] --> B["Arrow to grid"]
    B --> C["Grid of squares"]
    C --> D["△"]
    D --> E["Camera with camera"]
Weise
natural_image
Close-up photo of a smiling woman with long dark hair, framed in a white digital tablet device (no text or symbols visible)
natural_image
Exterior view of a modern office building (no signage)
natural_image
Exterior view of a silver wireless device with a circular lens and antenna (no visible text or symbols)ÍNDICE
C - INSTALACIÓN
C - INSTALACIÓN
natural_image
Two-step diagram showing hand tool application on a device, with no visible text or symbolsnatural_image
Line drawing of a device rear panel with cable and antenna, showing internal components and a directional arrow (no text or symbols)En la pared
natural_image
Line drawing of two hands holding a tablet device with a scroll wheel, showing a right-hand rule for change (no text or symbols)D - CONFIGURACIÓN
natural_image
Two grayscale images showing mechanical components: top image with cylindrical parts and a bracket, bottom image with a speaker emitting sound waves (no text or symbols)

natural_image
Two grayscale images showing a pen resting on a document and a mechanical device with a curved arrow (no text or symbols visible)
natural_image
Two grayscale product images: top shows a crossed hammer and screwdriver with a screwdriver, bottom shows a 1.0 GB camera with ON/OFF labels (no readable text or symbols)
Permite eliminar el vídeo

natural_image
Computer desktop with a 3D printer icon and a folder window on the left (no visible text or symbols)D - CONFIGURACIÓN
LV3 = Muy sensible LV2 = Medianamente sensible LV1 = Poco sensible
natural_image
Two grayscale photos showing a TV set on a wall, one with a logo and the other with a 'PALL' label (no readable text or symbols in the image)D - CONFIGURACIÓN
natural_image
Two grayscale images: one showing a cylindrical device with a lever, the other showing a play button labeled ON/OFF (no text or symbols on devices)11.5 - Idiomas
natural_image
Pure geometric diagram of a rectangular frame with nested rectangles and a small labeled point (no text or symbols)1
natural_image
Line drawing of a vintage-style portable radio with a mounted antenna (no text or symbols)natural_image
Three grayscale images showing progressive stages of a process: 3D arrow, 6x6 grid, and 10x10 camera (no text or symbols)natural_image
Close-up photo of a smiling woman with long dark hair, framed in a white digital tablet device (no text or symbols visible)
natural_image
Exterior view of a modern office building (no signage)
natural_image
Exterior view of a silver wireless device with a circular lens and antenna (no visible text or symbols)
Easy to install - 2 wires
Installation (lacic 2 fis

Innovation Safe installation
Picture memory feature

natural_image
Line drawing of a hand inserting a screw into a mechanical housing component (no text or symbols)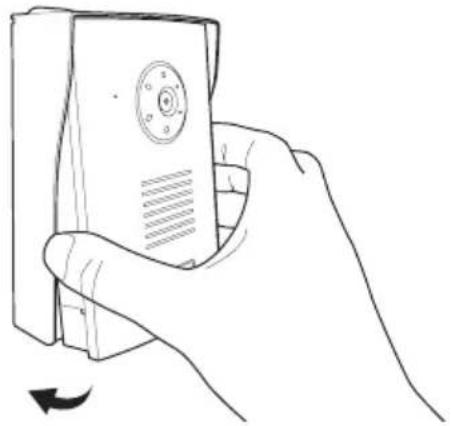
natural_image
Line drawing of a hand holding a rectangular device with a circular button and a scroll, showing a rotation arrow (no text or symbols)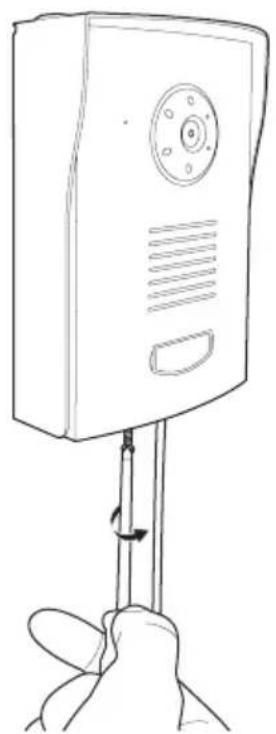
natural_image
Line drawing of a hand holding a device with a scroll wheel and directional arrow (no text or symbols)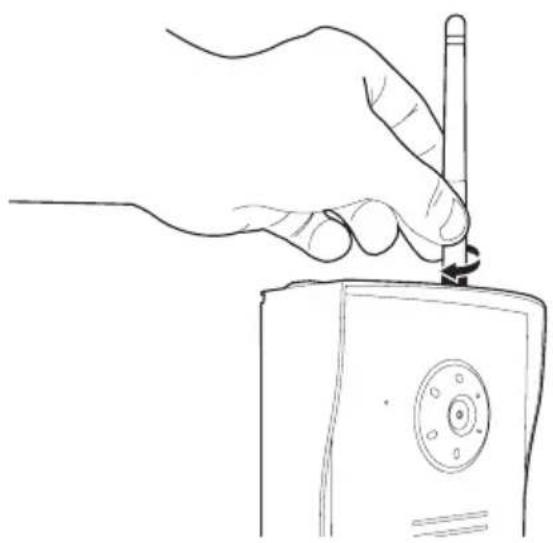
natural_image
Line drawing of a hand holding a pen above a device with a circular button (no text or symbols)C - INSTALAÇÃO
natural_image
Two-step diagram showing hand tool application: top shows a mechanical component with rotation arrow, bottom shows a handheld device with screwdriver (no text or symbols)natural_image
Line drawing of a device rear panel with cable and connector, no text or symbols presentNa parede
natural_image
Line drawing of two hands holding a tablet device with a scroll, showing a right-hand rule for change (no text or symbols present)D - CONFIGURAÇÃO
1 - DESCRIÇÃO GERAL

natural_image
Computer desktop with a 3D icon of a chair and book, no visible text or symbols on the device itself.D - CONFIGURAÇÃO
natural_image
Two black-and-white photos showing a TV set on a wall, one with a logo and the other with a 'KILL' display (no visible text or symbols on screens)D - CONFIGURAÇÃO
natural_image
Two grayscale images: one showing cylindrical objects and a triangular play button, the other with ON/OFF control buttons (no text or symbols on objects)11.5 - Idiomas
natural_image
Pure geometric diagram of a rectangular frame with nested rectangles and a small labeled point (no text or symbols)1
natural_image
Line drawing of a mounted radio or fog device with a bulb and antenna (no text or symbols)De segunda a sexta-feira entre as 9h e as 12h e entre as 14h e as 18h.
natural_image
Close-up photo of a smiling woman with long dark hair, framed in a white digital tablet device (no text or symbols visible)
natural_image
Exterior view of a modern office building (no signage)
natural_image
Exterior view of a silver wireless device with a circular lens and antenna (no visible text or symbols)
Easy to install - 2 wires
Installation (lacic 2 fis

Innovation Safe installation
Picture memory feature
C - INSTALLAZIONE


natural_image
Line drawing of a hand inserting a screw into a device housing (no text or symbols)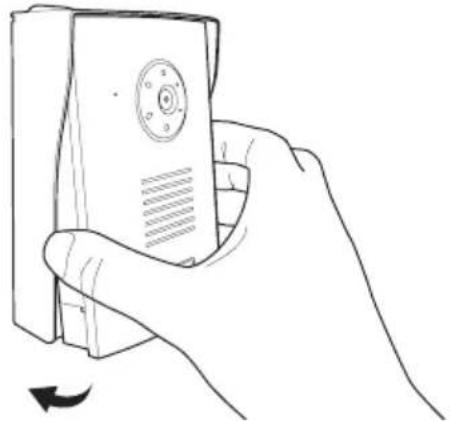
natural_image
Line drawing of a hand holding a rectangular device with a circular button and a scroll, showing a rotation arrow (no text or symbols)
natural_image
Line drawing of a hand holding a device with a scroll wheel and directional arrow (no text or symbols)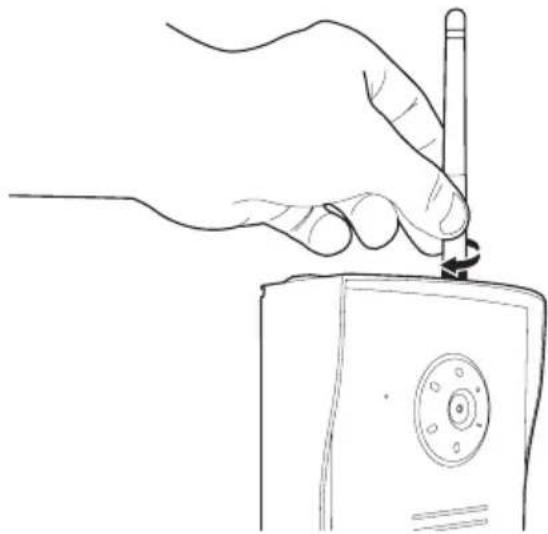
natural_image
Line drawing of a hand holding a pen above a device with a circular dial (no text or symbols)C - INSTALLAZIONE
natural_image
Two-step diagram showing hand tool application: top shows a mechanical component with rotation arrow, bottom shows a handheld device with screwdriver (no text or symbols)natural_image
Line drawing of a device rear panel with cable and connector, no text or symbols presentAl muro
D - CONFIGURAZIONE
natural_image
Two grayscale images showing mechanical components: top image with cylindrical parts and bracket, bottom image with speaker grille (no text or symbols)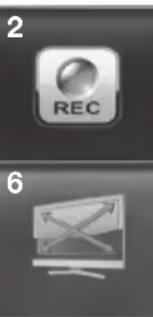

natural_image
Two grayscale images showing a pen resting on a document and a surveillance camera with a curved line (no text or symbols visible)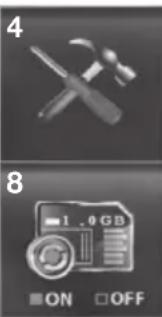

natural_image
Computer desktop with a 3D model of a chair or bench and a small icon on the left (no visible text or symbols)D - CONFIGURAZIONE
natural_image
Grid pattern with blue squares and white borders, no text or symbols visibleD - CONFIGURAZIONE
| 1 | 5 minuti |
| 2 | 10 minuti |
| 3 | Mai |