
Serea Combi - Telephone THOMSON - Free user manual and instructions
Find the device manual for free Serea Combi THOMSON in PDF.


| Product Type | Cordless Telephone with Answering Machine |
| Model | THOMSON Serea Combi |
| Technology | DECT |
| Frequency Band | 1.88 - 1.90 GHz |
| Number of Handsets | 1 (expandable up to 5) |
| Base Unit Dimensions (W x D x H) | Approx. 110 x 110 x 55 mm |
| Handset Dimensions (W x D x H) | Approx. 50 x 25 x 170 mm |
| Handset Weight | Approx. 130 g (without batteries) |
| Power Supply (Base) | AC/DC adapter 6V DC, 500 mA |
| Handset Battery Type | NiMH AAA 550 mAh (2 x AAA) |
| Battery Life (Talk) | Up to 10 hours |
| Battery Life (Standby) | Up to 100 hours |
| Display | Backlit LCD 1.5-inch |
| Range (Indoor) | Up to 50 m |
| Range (Outdoor) | Up to 300 m |
| Phonebook | Up to 100 contacts |
| Caller ID | Yes |
| Answering Machine | Digital recording up to 20 minutes |
| Handsfree | Yes |
| Intercom | Yes (between handsets) |
| Clock & Alarm | Yes |
| Keypad Backlight | Yes |
| Wall Mountable | Yes (base unit) |
| Cleaning Instructions | Wipe with dry or slightly damp cloth; do not use solvents |
| Safety Precautions | Do not expose to water or extreme temperatures; use only supplied adapter |
| Spare Parts Availability | Batteries and charger base available from THOMSON service centers |
Frequently Asked Questions - Serea Combi THOMSON
User questions about Serea Combi THOMSON
0 question about this device. Answer the ones you know or ask your own.
Ask a new question about this device
Download the instructions for your Telephone in PDF format for free! Find your manual Serea Combi - THOMSON and take your electronic device back in hand. On this page are published all the documents necessary for the use of your device. Serea Combi by THOMSON.
USER MANUAL Serea Combi THOMSON
Combo DECT: corded base with wireless handset
User Manual

Serea Combi
TH-540DRBLK

Please read and retain this instruction
For instruction manual in other languages, check online at http://www.thomsonphones.eu/
Summary
Getting started
| Important Safety Instruc ons | 4 |
| Installing the telephone base | 6 |
| Operang range of the handset | 6 |
| Signal strength | 6 |
| Installing and charging the ba eries | 6 |
| Low battery warning | 7 |
| Ba ery performance | 7 |
| Package contents | 9 |
Getting to know your phone
| Corded phone bu ons | 10 |
| DECT phone buttons | 11 |
| Cored phone display icons | 14 |
| Handset display icons | 15 |
| Corded phone menu map | 16 |
| DECT phone menu map | 16 |
Using your corded phone/DECT phone
| Switch the handset on/off | 17 |
| Make a call | 17 |
| Preparatory dialing (for DECT phone only) | 17 |
| End a call | 17 |
| Handsfree | 18 |
| Receiving calls | 18 |
| Dialing numbers quickly | 18 |
| Adjus ng the earpiece volume | 18 |
| Mute the speakerphone | 18 |
| Call mer | 18 |
| Flash | 18 |
| Redial | 19 |
Review / delete / call back incoming and outgoing numbers 19
Make a call from phonebook 19
Copy a number to phonebook 19
Additional handsets and bases
Internal call 20
Make an internal call 20
Receive an internal call 20
Transfer an external call 20
3-Way call 21
Phonebook
To review phonebook list 22
To add a phonebook memory 22
To edit a contact 22
To delete a contact 22
To delete all contacts 23
Reviewing phonebook memory status 23
Call log
View the call log 23
Copy a number / Delete a number / Delete all numbers 23
Settings
Delete handset 24
Ring setup 24
Dial mode 24
Flash time 25
Key tone 25
Language 25
Date & time 25
Modify system PIN 25
Base default 26
Using the answering machine (TAM)
Switch the answering machine on/off 27 Listening to your messages 27 Delete an answering message 27 Delete all answering messages 28 Record a memo 28 Select an Outgoing Message (OGM) 28 Listen to OGM 1 and OGM 2 28 Record your own OGM 29 Re-instate the pre-recorded OGM 29 Set a TAM alert 29 Answer delay 29 Select a language for answering machine 30 Set the TAM PIN code 30 Restore TAM default 30 Remote access 31
Functions for DECT phone only
Set the alarm 32 Handset name 32 Auto answer 32 Select base 32 Handset default 33
Troubleshooting 34
Declaration of conformity 35
Important safety instructions
Important
To reduce the risk of fire, electric shock and injury, always observe the following basic precautions when using your telephone:
• This appliance is intended for indoor use only. - Observe all markings on the product. - Do not expose your telephone to moisture and avoid contact with liquids. - To prevent electric shock, do not disassemble the handset or the telephone base. - Avoid interposing any metal objects (clip, key, etc.) between the battery contacts and charging contacts. - Your telephone may have a slight chance of being damaged by lightning. Unplug the telephone base from the mains and disconnect the telephone line during a thunderstorm. - Do not use the telephone in the vicinity of a gas leak. - Do not use the handset near any intensive care medical equipment. People with pacemakers should consult their doctor or cardiologist before using this telephone. - Clean your telephone with a dry, soft, lint-free cloth. Do not use any cleaning agents or solvents, especially aggressive ones. - Exchanges between the telephone base and handset being carried out by radio signals, wearers of hearing aids may be bothered by a small buzz. - Your telephone may interfere with other electrical appliances such as answering machine, television, radio, clock radio or computer when it is sufficiently close to such equipment. To avoid this, place the telephone base at least one meter away from other electrical appliances. - The receiver of the handset may attract small metal objects (staples, pins, etc). Be careful when placing the handset near these items. - Your telephone does not work in case of power failure and by consequence cannot be used for emergency calls. To avoid such inconvenience, always keep a traditional corded telephone in your home. - To prevent electric shock, do not use your telephone during a thunderstorm. Refer to the information printed on your telephone directory. - You can connect this product to a PSTN telephone line or an analog PBX extension port. Warning: Connecting this telephone to a digital PBX extension port may cause damage. - Do not overload wall outlets and extension cords as this may cause a fire or electric shock.
- To eliminate any voltage within the telephone, unplug the power cord from the mains.
- Observe the polarity indicated while installing the batteries.
- It is dangerous to use other battery types or non-rechargeable batteries: they can cause interference and/or damage to the product. The manufacturer shall not be liable for any damages caused by such non-compliance.
- Do not immerse a battery in water and do not throw it in a fire.
- The socket-outlet shall be installed near the equipment and shall be easily accessible.
- If the appliance is not used for a period of time, please unplug the adapter in order to save electricity.
- The external flexible cable of the adapter cannot be replaced, If the cord is destroyed, the adapter should be destroyed.
CAUTION
Please use the bundle adaptor for operates the device only. The adaptor model number: GCE060050C
Failure to observe the correct polarity or voltage of the adapter may cause damage to the telephone base.
For phone models TH-540DRBLK:
Adapter for the telephone base: GCE060050C
Input: 100-240V~ 50/60Hz 150mA
Output: DC 6V 500mA
Installing the telephone base
The telephone base should be placed at least 1 meter away from other electrical appliances in order to avoid interference. The handset exchanges radio signals with the telephone base. The strength of these signals depends on the position of the base. You can obtain a stronger signal by placing the base higher.
▶ Operating range of the handset
The operating range of your telephone is 300 meters outdoors without obstructions between the telephone base and handset. Obstructions reduce the operating range. When the telephone base is located indoors, while the handset is indoors or outdoors, the operating range is reduced to 50 meters. Thick concrete walls reduce the operating range significantly.
Signal strength
When the handset is within the operating range of the telephone base, it appears on the screen. It flashes when the handset is out of range. You should then get closer to the telephone base to turn off this indicator.
Installing and charging the batteries
Corded base:

Telephone Jack Adapter Jack
Wireless DECT phone base:

- Insert the plug of the supplied adapter into the back of the telephone base and the other end into an electrical outlet.
- Plug the telephone line cord into the back of the telephone base and the other end into a telephone wall jack. If necessary, we can provide you with a French telecom plug free of charge. Please contact us at sav@admea.com.
- Insert the rechargeable Ni-MH batteries supplied into the handset by following the correct polarity as indicated. Close the battery compartment.
- Place the handset on the telephone base and let the batteries charge for 24 hours before using it for the first time.
▶ Low battery warning
When the batteries are very low, the battery icon flashes on the handset screen and a warning beep will sound every minute to prompt you to recharge the batteries.
▶ Battery performance
When fully charged, the batteries offer approximately 8 hours of talk time and 120 hours of standby time under ideal conditions. Please note that a new battery reaches its full capacity after several days of normal use.
The battery capacity decreases over time, reducing the talk time and standby time. Replace the batteries if necessary.
The batteries and the handset will become hot during charging. This is normal.
Tip
When you are not using your handset, place it on the charger so that you can always have fully charged batteries.
WARNING
DO NOT USE STANDARD OR ALKALINE BATTERIES. THEY MAY EXPLODE AND CAUSE INJURY. ONLY USE RECHARGEABLE NI-MH BATTERIES AS INDICATED IN THIS USER MANUAL.
Risk of explosion if you use incompatible batteries.
Never use non-rechargeable batteries. Use only batteries that are identical to the ones supplied with your telephone.
- Never use alkaline or lithium batteries.
- Do not throw a battery into a fire.
- Do not open or damage batteries. Electrolyte is corrosive and can cause irritation to eyes and skin. It is also toxic and must not be swallowed.
- If you must handle the batteries, avoid them coming into contact with metal objects. This may cause short circuit or overheating and you may burn yourself.
- Do not attempt to recharge the batteries by heating. The battery electrolyte may leak, and may irritate your eyes or skin.
- Observe the polarity indicated. Reversing the polarity of the battery may result in electrolyte leakage and explosion.
- Remove the batteries if you do not intend to use your phone for several months.
- Do not use any other telephone base for charging the handset – the batteries can be damaged.

Warning: Danger of explosion if batteries are incorrectly installed. Use only Ni-MH batteries. The autonomy for the handsets indicated is based on the original capacity of the batteries.
Dispose of used batteries according to the instructions of your local authorities.
Package contents
| Quan ty | |
| Corded base | 1 |
| Wireless DECT phone base | 1 |
| Cordless handset | 1 |
| AC adapter | 2 |
| Telephone cable | 1 |
| User manual | 1 |
| Rechargeable 1.2V Ni-MH ba ery (600mAh) | 2 |
If necessary, we can provide you a French telecom plug free of charge. Please contact us at sav@admea.com.
Important:
YOU ARE USING A BROADBAND OR ADSL LINE
To ensure proper functioning of your telephone, you need to install a filter (not supplied) between the telephone wall jack and the telephone base. Without this filter, you may experience interference to the phone and loss of broadband signal. Consult the instructions to install the filter properly.
▶ Corded phone buttons

- NEW CALL LED
- PHONEBOOK / RETURN
- MEMO
- DOWN
- PLAY/PAUSE
- TAM ON/OFF
- R/C - FLASH / DELETE
- BIS – REDIAL NUMBER
- TALK / HANDSFREE
- LCD DISPLAY
- UP
- MENU/OK/MUTE
- NUMERIC KEYS
- INTERCOM - TRANSFER
- TELECOM RJ11 CABLE
- POWER INPUT
▶ DECT phone buttons

- NEW CALL LED
- PHONEBOOK / RETURN
- DOWN
- R/C - FLASH / DELETE
- BIS – REDIAL NUMBER
- TALK / HANDSFREE
- LCD DISPLAY
- UP
- MENU/OK/MUTE
- NUMERIC KEYS
- INTERCOM - TRANSFER
- POWER INPUT
- VOLUME UP
- HANDSET AMPLIFIER
- VOLUME DOWN
- END/ ON/OFF
1. NEW CALL LED
When there is a new call coming, this LED indicator flashes.
2. PHONEBOOK / RETURN
In standby/talk mode, press to enter the phonebook.
In menu mode, press to return to the previous menu.
3. MEMO
Press and hold this key to record a memo.
4. DOWN / OUTGOING
In standby mode, press to enter the outgoing list.
Scroll up through menu options, call lists and phonebook entries.
During a call, press to decrease the earpiece volume.
5. PLAY/PAUSE
Press this key to play the messages.
Press this key again to suspend the message playing.
6. TAM ON/OFF
Press and hold this key to switch the answering machine ON or OFF.
With TAM ON in standby mode, press this key to select OGM 1 or OGM 2.
7. R/C - FLASH / DELETE
Press the R/C key to use special functions provided by your telephone service provider such as call waiting and call forwarding.
In enter/edit mode, press to delete characters and digits.
When viewing the calls/redial lists, press to delete the displayed entry.
8. BIS-REDIAL NUMBER
Press 📄 / 📋 and BIS key, the last dialed number will be dialed.
When dialing/storing a number, press to enter a pause.
9. TALK / HANDSFREE
Press to dial or answer a call.
Press twice to use the handsfree function.
11. UP/ INCOMING
In standby mode, press to enter the incoming list.
Scroll up through menu options, call lists and phonebook entries.
During a call, press to increase the earpiece volume.
12. MENU / OK / MUTE
Press to open the menu.
Press to select menu options and to confirm a displayed option.
During a call by base, press this key to switch Mute on/off. When on, your caller cannot hear your voice.
13. NUMERIC KEYS, * (ASTERISK), # (HASH) KEYS
Press to enter a number/character, * sign or # sign.
For DECT phone:
* (ASTERISK) key in standby mode, long press to lock/unlock the keypad.
# (HASH) key in standby mode, long press to activate/deactivate the ringer.
2: To delete an answering machine message during playing. 4: To skip back to the previous message during playing answering machine messages. 5: To play answering machine messages or pause playing. 6: To skip back to the next message during playing answering machine messages. 8: To stop playing answering machine messages.
14. INTERNAL / TRANSFER
Use to make internal calls or transfer calls to other handsets registered, or establish a three-way call.
17. VOLUME UP
Use to increase the ringtone/earpiece/speaker volume.
18. HANDSET AMPLIFIER
Use to enlarge the handset volume by 15dB during a call conversation.
19. VOLUME DOWN
Use to decrease the ringtone/earpiece/speaker volume.
20. END / ON/OFF KEY
Press to end calls.
Press and hold to switch the handset on/off.
When viewing the redial/call lists or when editing, press to exit and return to standby mode.
▶ Corded phone display icons
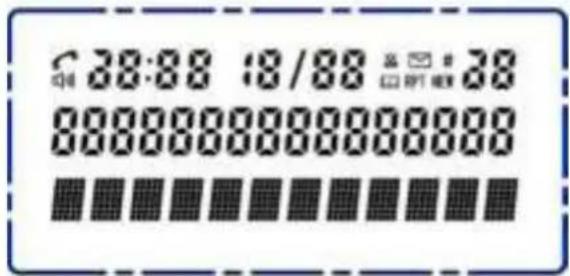
| Displays when the user pick up handset from base. | |
| Displays when external ring is set to o (the ring volume is set to OFF) | |
| Displays when phonebook is open. | |
| Displays when a new voice message is received from the network. | |
| RPT | Displays when the same calls received more than once. |
| NEW | Displays when a new call comes and hasn’t been viewed yet |
| # | Displays along with the digit to indicate the sequence of the call who scrolling or reviewing the incoming or outgoing numbers. |
| Display when the speakerphone is in use. |
If the LCD display shows as below in standby mode:

The first number indicates unread answering message or memo and the second number shows the total answering messages or memo.
In the case above, you have received a total of 2 answering messages or memo and there is 1 answering message or memo unread.
▶ Handset display icons

| Tll | Indicates for signal strength.Flashes when handset is not registered to the base or if you go out of range. |
| Displays when press key in idle screen. | |
| Displays when the handset keypad is locked. | |
| Displays when an alarm clock is set.Flashes when the alarm is triggered. | |
| Displays when external ring set to o . | |
| Displays when phonebook is open. | |
| Displays when a new voice message is received from the network. | |
| RPT | Displays when the same missed calls received more than once. |
| NEW | Displays when a new call comes and hasn’t been viewed yet. |
| Displays along with the digit to indicate the sequence of the call when press ∧or ∨ key directly to scroll and review the number. | |
| The icon will be displayed when press key during a call. | |
| Provides both a charging indica on and an indica on of the current ba ery status. |
▶ Corded phone menu map

PHONE BOOK
LIST
NEW ENTRY
EDIT RECORD
DELETE RECORD
DELETE ALL
MEMORY STATUS
CALL LOG
MISSED
RECEIVED
DIALED
SETTINGS
DELETE HANDSET
RING SETUP
DIAL MODE
FLASH TIME
KEY TONE
LANGUAGE
DATE&TIME
MODIFY PIN
BASE DEFAULT
REGISTRATION
BASE 1(2,3,4)
TAM
MESSAGE
DELETE ALL
MEMO
TAM SETTINGS
TAM ON/OFF
SET OGM
TAM ALERT
SET RING
TAM VOICE
TAM PIN
TAM DEFAULT
▶ DECT phone menu map

PHONE BOOK
LIST
NEW ENTRY
EDIT RECORD
DELETE RECORD
DELETE ALL
MEMORY STATUS
CALL LOG
MISSED
RECEIVED
DIALED
BASE SETTINGS
DELETE HANDSET
DIAL MODE
FLASH TIME
MODIFY PIN
BASE DEFAULT
HANDSET SETTINGS
ALARM
RING SETUP
TONE SETUP
LANGUAGE
HANDSET NAME
AUTO ANSWER
DATE&TIME
SELECT BASE
HANDSET DEFAULT
REGISTRATION
BASE 1(2,3,4)
TAM
MESSAGE
DELETE ALL
MEMO
TAM SETTINGS
TAM ON/OFF
SET OGM
SET RING
TAM VOICE
TAM PIN
TAM DEFAULT
Using your corded phone/DECT phone
Corded phone:
Press MENU button to open the menu.
Press ▲ or ▼ button to scroll the menu options.
Press MENU button to confirm menu selection or the setting displayed.
Press 📄 button to return to previous menu.
Lift the handset and put it back to exit a menu or cancel an operation at any time to return to standby mode.
DECT phone:
Press ✦ OK button to open the menu.
Press ∧ or ∨ button to scroll the menu options.
Press ✦ OK button to confirm menu selection or the setting displayed.
Press 📄 button to return to previous menu.
Press 📞 to exit a menu or cancel an operation at any time to return to standby mode.
▶ Switch the handset on/off
- When your handset is off, press and hold
- To switch off the handset, press and hold

When I the screen turns on.
When I the screen turns on.
Make a call
- Press / or lift the handset, and the screen display shows "LINE IN USE". When you hear the dial tone, dial the phone number.
▶ Preparatory dialing (for DECT phone only)
- Enter the phone number first. The number is shown on the display. If you make a mistake, press R/C key to delete a digit.
- Press to dial the number.
▶ End a call
On corded phone: Place the handset back on the corded phone to end the call, or press 📋 when in handsfree mode.
On DECT phone: Press 📞 to end the call or place the handset back on the corded phone/charger.
▶ Handsfree
On corded phone: You can press 📋 to make or answer a call in handsfree mode, and pick up the handset if you wish to switch to handset mode.
On DECT phone: You can press twice to make or answer a call in handsfree mode. When using the handset, press each time you wish to switch between handset and handsfree mode.
▶ Receiving calls
- When the phone rings, simply lift the handset or press / to answer the call.
Remark: If you would rather press a key after lifting the handset to receive a call, you will need to switch Auto-answer to off under handset settings menu.
▶ Dialling numbers quickly
Numbers can also be dialed directly from the phonebook, the calls list or the redial list.
▶ Adjusting the earpiece volume
- During a call, press ▲/▼ or ∧ / ∨ key to increase or decrease the handset volume.
▶ Mute the speakerphone
You can 'Mute' your handset to stop your caller from hearing you while you talk to someone else close by.
- During a call, press MENU or ✉OK. The handset microphone is muted and the display shows MUTE.
- Press MENU or ✦OK again to resume your call.
▶ Call timer
On corded phone: After the first 10 seconds of your call, the talking time is displayed.
On DECT phone: After the first 15 seconds of your call, the talking time is to display.
Flash
When dialing a number and the line is busy, press R/C and BIS key to dial it again.
Redial
- Press /
- Press BIS key, the last dialed number will be dialed.
▶ Review /delete /call back incoming and outgoing numbers
- Review: In standby mode, press ▲ or ∧ key once to enter the incoming list or press ▼ or ∨ key once to enter the outgoing list. Then scroll ▲/▼ or ∧ / ∨ key to view the records.
- Delete: When the desired number is displayed on LCD, press R/C key one time to delete it.
- Call back: When the desired number is shown, press 🔒 / key to dial the number.
▶ Make a call from phonebook
- In standby mode, press 📄 key, scroll ▲/▼ or ∧ / ∨ key through the phone list to the desired entry.
- Press the 🔒 / 🔒 key to dial the number.
▶ Copy a number to phonebook
- In standby mode, press ▲/▼ or ∧ / ∨ key once and scroll ▲/▼ or ∧ / ∨ key through the list to the entry you want.
- Press MENU or OK key. The display shows "ADD TO PB ?". Press MENU or OK key again. Use the keypad to enter the name, and press R/C to delete the wrong entry. Press MENU or OK to confirm.
- Edit the number if necessary, and then press MENU or OK key. MELODY 1 is displayed.
- Scroll ▲/▼ or ∧ / ∨ key to select a ringtone and press MENU or OK to confirm. The entry is stored.
Additional handsets and bases
Up to 5 handsets can be registered and operated from the base. Each handset can be registered with up to 4 bases.
If you buy a new handset to use with your base, it will have to be registered to the base before you can use it.
Internal call
- If you have more than one handset registered to your base, you can:
- Make internal calls between handsets
- Transfer an external call from one handset to another
- Hold a conference call between two internal handsets and an external call. Make an internal call between two handsets while a third is on an external call.
Make an internal call
In standby mode, press INT key then enter the handset number (1-5) you want, 0 for base.
Remark: If the base has only one cordless handset registered, it will immediately start calling that handset.
Receive an internal call
Pick up the handset or press the 📋 / 🔍 key to answer the call.
* The handset or base will stop ringing if not answering the internal call within 30 seconds.
▶ Transfer an external call
You can transfer an external call to another handset registered to your base.
- During an external call, press the INT key. Your caller is put on hold.
- Enter the number of the handset you want to transfer the call to.
If the other handset user does not answer:
You can reconnect to your external caller by pressing the INT key.
Or, if the other handset user does not answer after 30 seconds, you will be automatically reconnected to your external caller. When the other handset answers:
- Put the handset back on the corded phone or press the 🔒 key on the cordless handset when the other handset answers.
3-Way call
You can hold a three-way conversation between an external caller and another handset user.
- During an external call, press the INT key. Your caller is put on hold.
- Enter the handset number you want to invite.
- When the handset answers, press the *∞ key to connect all three callers. If the other handset does not answer, press the INT key to return to your external caller.
- Put back the handset or press the 🔒 key to quit the party conference, and the other 2 parties can also continue communication.
IMPORTANT
Most of the functions can be achieved via menu settings of the corded phone and DECT phone.
In the following paragraph, we will take the corded phone as an example to show you how to use this product.
You can use the DECT phone in a similar way as you want.
PHONE BOOK
You can store up to 150 name and number entries on each handset registered to your base.
Each name can be up to 12 characters long and each number up to 20 digits long.
For each entry you store, you can select one of 10 different ringtones.
▶ To review phonebook list
- Press MENU key, the display shows PHONE BOOK. Press MENU key to confirm.
- Scroll ▲/▼ key to select List. Press MENU key and ▲/▼ key to view the record, or search alphabetically by entering the first letter of the name. The first name that starts with this letter or the nearest letter in the alphabet will be displayed.
▶ To add a phonebook memory
- Press MENU key, the display shows PHONE BOOK. Press MENU key to confirm.
- Scroll ▲/▼ key to select NEW ENTRY. Press MENU key.
- The cursor is for the name. Use the keypad to enter the name and press the R/C key to delete a wrong entry. Press the MENU key to confirm the name.
- Use the keypad to enter the phone number and press the MENU key.
- The display shows MELODY 1. Press ▲/▼ to select the ringtone you want.
- Press the MENU key to confirm. NEW ENTRY is displayed. You can now enter your next name and number or press twice to return to standby.
▶ To edit a contact
- Press the MENU key, the display shows PHONE BOOK. Press the MENU key to confirm.
- Scroll with the ▲/▼ key to select EDIT RECORD. Press the MENU key.
- Scroll with the ▲/▼ key to select the designated record to change. Press the MENU key.
- Press the R/C key to delete the name if needed, enter the new name and press the MENU key.
- Edit the phone number and melody in the same way, and press the MENU key to confirm.
▶ To delete a contact
- Press the MENU key and the display shows PHONE BOOK. Press the MENU key to confirm.
- Scroll with the ▲/▼ key to select DEL RECORD, press the MENU key to enter.
- Scroll with the ▲/▼ key to scroll through the list until you see the contact you want to delete.
- Press the MENU key and the display will show "CONFIRM?", press MENU again to confirm.
▶ To delete all contacts
- Press MENU key and the display shows PHONE BOOK, press MENU key to confirm.
- Scroll ▲/▼ key to select DELETE ALL, then press MENU key to enter, and the display will show CONFIRM ?.
- Press MENU again to confirm. ALL contacts in your phonebook will be deleted.
▶ Reviewing phonebook memory status
- Press MENU key and the display shows PHONE BOOK, press MENU key to confirm.
- Scroll ▲/▼ key to select MEM STATUS. Press MENU key to enter. Then the LCD will show the phonebook memory space available, e.g. if you have saved 30 names and numbers in your phonebook, it would display 30/150.
CALL LOG
Caller Display shows who is calling and if the caller's number matches an entry stored in the phonebook, the number will alternate with the name.
To use Caller Display you must first subscribe to your network provider's caller Display service.
The call log stores details of the missed, received and dialed calls. When the call list is full, the most recent calls received automatically replace the oldest calls.
▶ View the call log
- Press MENU key. Scroll ▲/▼ and select CALL LOG. Press MENU key again.
- Scroll ▲/▼ and you will find MISSED, RECEIVED and DIALED. The LCD will show the last record. (If no entry is available, the LCD display shows EMPTY).
- Press ▲/▼ key to view other record.
Copy a number / Delete a number / Delete all numbers
- When viewing the call list, you can press the MENU key and scroll ▲/▼ to copy a phone number to the phonebook, delete a number, or delete all numbers from the call list.
SETTINGS
Delete handset
- Press the MENU key, scroll ▲/▼ key to select SETTINGS.
- Press the MENU key, the display shows DELETE HS.
- Press the MENU key and use the keypad to enter the PIN code (default 0000).
- Press the MENU key. Scroll ▲/▼ key to scroll through the handsets registered to the base and select the one you want to delete.
- Press the MENU key to confirm. The handset will be deleted from the registered handset list.
Ring setup
You can set different ringer melodies for internal and external calls and adjust the ring volume.
Choose from 10 melodies and 5 volume levels and off.
- Press the MENU key, scroll ▲/▼ key to select SETTINGS.
- Press the MENU key, scroll ▲/▼ key to select RING SETUP.
- Press the MENU key, scroll ▲/▼ key to select from INT RING and EXT RING.
- Press MENU key, scroll ▲/▼ key to select the MELODY and VOLUME.
1) If select MELODY: Press MENU key to confirm, scroll ▲/▼ key to select desired melody.
Press MENU key to confirm.
2) If select VOLUME: Press MENU key to confirm, scroll ▲/▼ key to select desired ringer volume level from 1 to 5, if you want to switch off select OFF. Press MENU key to confirm.
Note: If you select ring OFF for EXT RING, there will be a ringing off icon display on display. When there is an incoming call, the handset will not ring.
▶ Dial mode
- Press MENU key, scroll ▲/▼ key to select SETTINGS.
- Press MENU key, scroll ▲/▼ key to select DIAL MODE.
- Press MENU key, the display shows TONE. Scroll ▲/▼ key to select the TONE or PULSE. Press MENU key to confirm.
Flash time
- Press MENU key, scroll ▲/▼ key to select SETTINGS.
- Press MENU key, scroll ▲/▼ key to select FLASH TIME.
- Press MENU key, scroll ▲/▼ key to select the desired flash time among 100ms, 300ms, 600ms and 1000 ms.
- Press MENU key to confirm.
▶ Key tone
- Press MENU key, scroll ▲/▼ key to select SETTINGS.
- Press MENU key, scroll ▲/▼ key to select KEY TONE.
- Press MENU key, scroll ▲/▼ key to select ON or OFF.
- Press MENU key to confirm.
Language
- Press MENU key, scroll ▲/▼ key to select SETTINGS.
- Press MENU key, scroll ▲/▼ key to select LANGUAGE.
- Press MENU key. Press ▲/▼ key to select the language you want.
- Press MENU key to confirm.
Date & time
- Press MENU key, scroll ▲/▼ key to select SETTINGS.
- Press MENU key, scroll ▲/▼ key to select DATE & TIME.
- Press MENU key and the last two digits of the year flash.
- Edit the year, month, date and time by scrolling ▲/▼ key.
- Press MENU key to confirm.
Note: The date and time will be automatically set when the first caller ID message is received.
Modify system PIN
- Press MENU key, scroll ▲/▼ key to select SETTINGS.
- Press MENU key, scroll ▲/▼ key to select MODIFY PIN.
- Press MENU key, the display shows PIN?.
- Use the keypad to enter the current PIN code and press MENU to confirm.
- If the old code is valid, the display shows NEW PIN, enter a new PIN code (4 digits), press MENU to confirm. Then the display shows REPEAT. Enter the new PIN code again.
- Press MENU to confirm. The code will be stored to the base and a tone sounded.
***Note: The preset system PIN is 0000.
Base default
- Press MENU key, scroll ▲/▼ key to select SETTINGS.
- Press MENU key, scroll ▲/▼ key to select BS DEFAULT. Press MENU key to confirm.
- The display shows PIN? Enter the PIN code and press MENU key to confirm.
- If the PIN code is valid, all base settings will be returned to the factory default. The phonebook memory will not be erased.
REGISTRATION
Registration is the process to link a new handset to the base. A maximum of 5 handsets can be associated with this base. This base is compatible with Thomson's handset and other GAP-compatible handsets.
Handset batteries must be fully charged and you must be close to the base to register.
Handset that is supplied inside this package is already registered.
- At the base: Press MENU key, scroll ▲/▼ key to select REGISTRATION. Press MENU key. The display shows SEARCHING.
- At the handset: Press ✦ OK key, scroll ∧ or ∨ key to select REGISTRATION. Press ✦ OK key.
- Scroll ∧ or ∨ key to select base number. The base with a “+” to the right side of the base number on the display is already in use.
- Press ✦ OK key, the display shows PIN?. Enter the 4 digit PIN code (default 0000) for the base.
- Press ⇒ OK key to confirm, and the display shows SEARCHING 1 (or 2,3,4).
- After a few seconds, the handset will sound DI-DU-DU. The handset and base will register successfully.
It will automatically assign a number which is displayed on the handset and must be used for internal calls.
If the PIN code is incorrect, the handset returns to standby after 2 minutes. Try registering again.
USING THE ANSWERING MACHINE (TAM)
This product can digitally record up to 60 minutes of messages. As well as recording incoming messages, you can record memos for other users.
You can operate your answering machine from the handset, or remotely from other telephones.
You will need to set the correct date and time (if you have not already done so) so that you will know when each message was received. If you subscribe to Caller Display service, the date and time will be set on the phone automatically. If you need to set it manually, please reset it under SETTINGS.
▶ Switch the answering machine on/off
- Press MENU key, scroll ▲/▼ key to select TAM.
- Press MENU key, scroll ▲/▼ key to select TAM SETTINGS.
- Press MENU key, the display shows TAM ON/OFF.
- Press MENU key, the display shows ON. Press MENU key to confirm. Remark: You can press and hold ⏻/■ key for 2 seconds to switch the answering machine ON or OFF. When answering machine is off, the display shows TAM OFF.
▶ Listening to your messages
- Press MENU key, scroll ▲/▼ key to select TAM.
- Press MENU key, the display shows MESSAGE.
- Press MENU key to listen to the new and old messages.
Remarks:
- Press ▶ key to listen to the message and memo directly. Press ▶ key again to pause playing. The maximum pause time is one minute. If you do not quit from pause within one minute, it will quit the message playing automatically after one minute.
- During message playing, press ▲/▼ key to adjust the speakerphone volume.
- Press to stop playing message or memo.
▶ Delete an answering message
During the message playing, press R/C key on base. You will hear “message deleted” and the current message will be deleted, and the next message will start to play if there are more messages.
▶ Delete all answering messages
- Press MENU key, scroll ▲/▼ key to select TAM.
- Press MENU key, scroll ▲/▼ key to select DELETE ALL.
- Press MENU key, the display shows CONFIRM?
- Press MENU key, you will hear, "All message delete".
Remark: While the message is playing, press and hold R/C on base for 2 seconds to delete all old messages. You will hear, "all messages deleted", then all messages are deleted.
Record a memo
You can record memo message up to 120 seconds for other users which can be played back like normal messages.
- Press MENU key, scroll ▲/▼ key to select TAM.
- Press MENU key, scroll ▲/▼ key to select MEMO.
- Press MENU key, you will hear, "Please record the memo after the beep". You can now record your memos. Press MENU key to end recording.
Remark: Press and hold MEMO key to record a memo directly. Press ⏻/■ key to stop message recording.
Outgoing messages (OGMs)
The outgoing message is the message a caller first hears when the answering machine picks up their call. This product has two pre-recorded outgoing messages, OGM 1 is for answer & record and OGM 2 is for answer only, and you can also record your own.
▶ Select an Outgoing Message (OGM)
- After switching the answering machine on, scroll ▲/▼ key to select OGM 1 or OGM 2.
- Press MENU key to confirm.
▶ Listen to OGM 1 and OGM 2
- Press MENU key, scroll ▲/▼ key to select TAM.
- Press MENU key, scroll ▲/▼ key to select TAM SETTINGS.
- Press MENU key, scroll ▲/▼ key to select SET OGM.
- Press MENU key, scroll ▲/▼ key to select OGM1 or OGM 2.
- Press MENU key, the display shows PLAY. Press MENU key to listen to the OGM content.
Record your own OGM
- Press MENU key, scroll ▲/▼ key to select TAM.
- Press MENU key, scroll ▲/▼ key to select TAM SETTINGS.
- Press MENU key, scroll ▲/▼ key to select SET OGM.
- Press MENU key, scroll ▲/▼ key to select OGM1 or OGM 2.
- Press MENU key, scroll ▲/▼ key to select RECORD. You will hear, "Please record a new announcement after the beep. You can now record your own OGM by speaking to the phone. Press MENU key to end recording. The handset will play back the recorded OGM."
▶ Re-instate the pre-recorded OGM
- Press MENU key, scroll ▲/▼ key to select TAM.
- Press MENU key, scroll ▲/▼ key to select TAM SETTINGS.
- Press MENU key, scroll ▲/▼ key to select SET OGM.
- Press MENU key, scroll ▲/▼ key to select OGM1 or OGM 2.
- Press MENU key, scroll ▲/▼ key to select DEFAULT.
- Press MENU key, your own OGM would be restored to the pre-recorded OGM.
▶ Set a TAM alert
You can set a new message alert tone which is turned off by default. When the tone is turned on, you will hear the warning tone every 60 seconds when you have new messages.
- Press MENU key, scroll ▲/▼ key to select TAM.
- Press MENU key, scroll ▲/▼ key to select TAM SETTINGS.
- Press MENU key, scroll ▲/▼ key to select TAM ALERT.
- Press MENU key, scroll ▲/▼ key to select ON or OFF. Press MENU key to confirm.
Answer delay
Answer delay sets the number of times your product will ring before the answering machine picks up your call and starts playing the outgoing message.
You can change this setting to between 2-9 rings or Toll Saver. The default setting is 5 rings.
- Press MENU key, scroll ▲/▼ key to select TAM.
- Press MENU key, scroll ▲/▼ key to select TAM SETTINGS.
- Press MENU key, scroll ▲/▼ key to select SET RING.
- Press MENU key, scroll ▲/▼ key to select the number of rings required and press MENU key to confirm.
Toll saver
When you call from another phone to access your messages remotely, if your answering machine is set to toll saver, and you have new messages it will answer after 2 rings, if you do not have any new messages, it will ring after 5 rings. This means you can hang up after 3 rings knowing you have no new messages, saving you time and the cost of the call.
▶ Select a language for answering machine
- Press MENU key, scroll ▲/▼ key to select TAM.
- Press MENU key, scroll ▲/▼ key to select TAM SETTINGS.
- Press MENU key, scroll ▲/▼ key to select TAM VOICE.
- Press MENU key, scroll ▲/▼ key to select from ENGLISH, DEUTSCH and FRANCAIS, press MENU key to confirm.
▶ Set the TAM PIN code
- Press MENU key, scroll ▲/▼ key to select TAM.
- Press MENU key, scroll ▲/▼ key to select TAM SETTINGS.
- Press MENU key, scroll ▲/▼ key to select TAM PIN, press MENU key. The handset will display the current code.
- Enter a new code and then press MENU key to confirm.
- Press MENU key, scroll ▲/▼ key to select TAM.
- Press MENU key, scroll ▲/▼ key to select TAM SETTINGS.
- Press MENU key, scroll ▲/▼ key to select TAM DEFAULT.
- Press MENU key. The handset will display PIN? Enter the system PIN code (default 0000) and press MENU key to confirm. Then all the TAM settings would be restored to factory default as below. And the new TAM message would not be deleted.
- Ring setting: 5 • TAM ON
- OGM 1 • Security code: 1357
- TAM alert: OFF
***Note: The preset TAM PIN code is 1357.
▶ Remote access
You can operate your answering machine from another phone by calling your phone and entering the TAM PIN code (default 1357). Using a PIN code prevents other people from accessing your answering machine and messages without permission.
- Dial your telephone number. When you hear your outgoing message, press the * key. The machine will ask you to enter the TAM PIN code.
- Enter your 4-digit PIN code (default 1357) quickly. If the security code is correct, you will hear a voice prompt telling you that you have N messages, and it will automatically play new messages. If there are no new messages, you will hear, "you have no new message. You have N messages. Message 1...." Then it will play all messages. After playing all messages, you will hear, "end of messages".
Note: If you enter an incorrect PIN code, you will hear "wrong security code". It allows one further attempt; if it is still incorrect, you will hear "wrong security code" followed by a beep, and then your phone will hang up.
- When messages are playing, simply follow the instructions as indicated below:
- Press 2: To delete a message. You will hear, "message deleted".
- Press 4: To skip back to the previous message.
- Press 6: To skip forward to the next message.
- Press 5: To pause and restart the current message. The maximum pause time is one minute.
- Press 8: To stop playback.
- When in remote control while not playing messages, you can press keys for the following functions:
- Press 1: To play the main menu.
- Press 5: To play messages.
- Press 7: To switch the answering machine between OGM 1 and OGM 2.
- Press 9: To switch the answering machine OFF.
▶ Set the alarm
- Press the OK key, scroll the ∧ or V key to select HS SETTINGS.
- Press the OK key, the display shows ALARM.
- Scroll the ∧ or ∨ key to select ON or OFF, press OK to confirm.
- If you select ON, the display shows 00-00. Scroll the ∧ or ∨ key to set the time, e.g. 15-30 for 15:30.
- Press the OK key, then scroll with the ∧ or ∨ key to select SNOOZE ON or SNOOZE OFF.
- Press the OK key. The alarm icon shows on the display.
Note: When the alarm sounds, press any key except the camera key to silence it temporarily, or press the lock key to stop it. If you want to cancel the alarm, go to HS SETTINGS, then ALARM and choose OFF.
Handset name
- Press the OK key, then scroll with the ∧ or ∨ key to select HS SETTINGS.
- Press the OK key, then scroll with the ∧ or ∨ key to select HS NAME.
- Press the OK key. The display shows the current handset name.
- Use the keypad to enter the new handset name, press the R/C key to delete the wrong entry. Press the OK key to confirm.
Auto answer
Your phone is set to answer calls by lifting the handset off the base or charger. You can switch this feature off so that calls always have to be answered by pressing
- Press the OK key, then scroll with the ∧ or ∨ key to select HS SETTINGS.
- Press the OK key, then scroll with the ∧ or ∨ key to select AUTO ANSWER.
- Press the OK key, then scroll with the ∧ or ∨ key to select ON or OFF. Press the OK key to confirm.
Select base
If a handset is registered to more than one base, you can select the base with which the handset works.
- Press the OK key, then scroll with the ∧ or V key to select HS SETTINGS.
- Press the OK key, then scroll with the ∧ or V key to select SELECT BASE.
- Press the OK key, the display shows BASE 1 + , scroll with ∧ or ∨ to select base (BASE 1~4) or AUTO.
- Press the OK key, the display shows SEARCHING. After a few seconds, there is a confirmation sound from the handset and it returns to standby.
Remark: If you select AUTO, the handset will only link with the base number followed by a “+”.
▶ Handset default
- Press the OK key, then scroll with the ∧ or V key to select HS SETTINGS.
- Press the OK key, then scroll with the ∧ or V key to select HS DEFAULT.
- Press the OK key, the display shows PIN?. Enter the PIN code (default as 0000) using the keypad.
- If the PIN code is wrong, there is a reminder sound and the display returns to the previous menu. If the PIN code is valid, the handset settings will return to the factory default. Phonebook records will not be deleted.
Troubleshooting
No signal icon displayed on the display: The handset is out of range. Move it closer to the base. No dialing tone: Check your phone connections. The handset is out of range. Move it closer to the base. No docking tone: The handset is not placed properly on the base/charger. The charging contacts are dirty. Disconnect the power adaptor first and clean the contact with a proper damp cloth. The handset on the charger does not charge: Make sure the batteries are inserted correctly. Make sure the handset is placed properly on the base/charger. The charging contacts are dirty. Disconnect the power adaptor first and clean the contact with a proper damp cloth. Batteries are defective. Purchase new ones for replacement. No display: Make sure the batteries are charged. Make sure there is power input and the phone is connected. The handset no ring: Make sure it is not in mute. Make sure the handset ringtone is turned on. LCD becomes dim: Adjust LCD contrast. If the LCD is still dim, charge the batteries. Receive only: Check if you have set the barring number. If you want to dial out this number, reset the barring number. Remote control failed: Check if the caller presses * quickly before inputting the TAM PIN code. Most of the functions failed: Check if the batteries are strong enough; charge the batteries. If batteries are ok, remove the battery, unplug the lines and reinstall after 10 minutes.
Note:
If none of the above suggestions solves your problems, try unplugging the telephone base from the mains and removing the batteries from all handsets. Wait 15 minutes and then reconnect everything.
Declaration of conformity
This appliance complies with the essential requirements and other provisions of Directive 1995/5/EC.
The declaration of conformity is available at: http://www.thomsonphones.eu/

The European directive 2012/19/EU on Waste Electrical and Electronic Equipment (WEEE), requires that old household electrical appliances must not be disposed in the normal unsorted municipal waste stream.
Old appliances must be collected separately in order to optimize the recovery and recycling of the materials they contain and reduce the impact on human health and the environment. The crossed out “wheeled bin” symbol on the product reminds you of your obligation, that when you dispose of the appliance it must be separately collected. Consumers should contact their local authority or retailer for information concerning the correct disposal of their old appliance.
Imported by ADMEA, 12 Rue Jules Ferry, 93110 Rosny sous bois, France.
THOMSON is a trademark of Technicolor SA used under license by ADME



- COMBO DECT: CORDED BASE WITH WIRELESS HANDSET
- USER MANUAL
- SUMMARY
- GETTING STARTED
- GETTING TO KNOW YOUR PHONE
- USING YOUR CORDED PHONE/DECT PHONE
- ADDITIONAL HANDSETS AND BASES
- PHONEBOOK
- CALL LOG
- SETTINGS
- USING THE ANSWERING MACHINE (TAM)
- FUNCTIONS FOR DECT PHONE ONLY
- IMPORTANT SAFETY INSTRUCTIONS
- IMPORTANT
- CAUTION
- FOR PHONE MODELS TH-540DRBLK
- INSTALLING THE TELEPHONE BASE
- OPERATING RANGE OF THE HANDSET
- SIGNAL STRENGTH
- INSTALLING AND CHARGING THE BATTERIES
- CORDED BASE
- WIRELESS DECT PHONE BASE
- LOW BATTERY WARNING
- BATTERY PERFORMANCE
- TIP
- WARNING
- PACKAGE CONTENTS
- YOU ARE USING A BROADBAND OR ADSL LINE
- CORDED PHONE BUTTONS
- DECT PHONE BUTTONS
- NEW CALL LED
- PHONEBOOK / RETURN
- MEMO
- DOWN / OUTGOING
- PLAY/PAUSE
- TAM ON/OFF
- R/C - FLASH / DELETE
- BIS-REDIAL NUMBER
- TALK / HANDSFREE
- UP/ INCOMING
- MENU / OK / MUTE
- NUMERIC KEYS, * (ASTERISK), # (HASH) KEYS
- FOR DECT PHONE
- INTERNAL / TRANSFER
- VOLUME UP
- HANDSET AMPLIFIER
- VOLUME DOWN
- END / ON/OFF KEY
- CORDED PHONE DISPLAY ICONS
- HANDSET DISPLAY ICONS
- CORDED PHONE MENU MAP
- PHONE BOOK
- REGISTRATION
- TAM
- DECT PHONE MENU MAP
- BASE SETTINGS
- HANDSET SETTINGS
- CORDED PHONE
- DECT PHONE
- SWITCH THE HANDSET ON/OFF
- MAKE A CALL
- PREPARATORY DIALING (FOR DECT PHONE ONLY)
- END A CALL
- HANDSFREE
- RECEIVING CALLS
- DIALLING NUMBERS QUICKLY
- ADJUSTING THE EARPIECE VOLUME
- MUTE THE SPEAKERPHONE
- CALL TIMER
- FLASH
- REDIAL
- REVIEW /DELETE /CALL BACK INCOMING AND OUTGOING NUMBERS
- MAKE A CALL FROM PHONEBOOK
- COPY A NUMBER TO PHONEBOOK
- INTERNAL CALL
- MAKE AN INTERNAL CALL
- RECEIVE AN INTERNAL CALL
- TRANSFER AN EXTERNAL CALL
- WAY CALL
- TO REVIEW PHONEBOOK LIST
- TO ADD A PHONEBOOK MEMORY
- TO EDIT A CONTACT
- TO DELETE A CONTACT
- TO DELETE ALL CONTACTS
- REVIEWING PHONEBOOK MEMORY STATUS
- VIEW THE CALL LOG
- COPY A NUMBER / DELETE A NUMBER / DELETE ALL NUMBERS
- DELETE HANDSET
- RING SETUP
- DIAL MODE
- FLASH TIME
- KEY TONE
- LANGUAGE
- DATE & TIME
- MODIFY SYSTEM PIN
- BASE DEFAULT
- SWITCH THE ANSWERING MACHINE ON/OFF
- LISTENING TO YOUR MESSAGES
- REMARKS
- DELETE AN ANSWERING MESSAGE
- DELETE ALL ANSWERING MESSAGES
- RECORD A MEMO
- OUTGOING MESSAGES (OGMS)
- SELECT AN OUTGOING MESSAGE (OGM)
- LISTEN TO OGM 1 AND OGM
- RECORD YOUR OWN OGM
- RE-INSTATE THE PRE-RECORDED OGM
- SET A TAM ALERT
- ANSWER DELAY
- TOLL SAVER
- SELECT A LANGUAGE FOR ANSWERING MACHINE
- SET THE TAM PIN CODE
- REMOTE ACCESS
- SET THE ALARM
- HANDSET NAME
- AUTO ANSWER
- SELECT BASE
- HANDSET DEFAULT
- TROUBLESHOOTING
- NOTE
- DECLARATION OF CONFORMITY
Brand : THOMSON
Model : Serea Combi
Category : Telephone