
ST2022 - Telephone THOMSON - Free user manual and instructions
Find the device manual for free ST2022 THOMSON in PDF.


| Product Type | IP Phone (MGCP/SIP) |
| Model | Thomson ST2022 |
| Display | Full graphic LCD, 6 lines of 20 characters |
| Network Interfaces | 2 x RJ-45 10/100 Mbps (LAN & PC) |
| Power Supply | 9V DC, 800mA adapter or PoE (802.3af, Class 2) |
| Power Consumption | Less than 6W |
| Audio Features | Handset, speakerphone, headset (RJ9), mute, volume keys |
| Call Services | Handset, hands-free, headset, group listening modes |
| LED Indicators | Speaker, headset, mute, feature keys, system status |
| Keypad | Dial pad, memory keys (speed dial), softkeys, navigator keys |
| Configuration | Via LCD menu or web interface (HTTP) |
| Protocol Support | MGCP, SIP (configurable via web) |
| Firmware Upgrade | Via web interface (HTTP upload) |
| Dimensions (approx) | 250 x 200 x 100 mm |
| Weight (approx) | 1.0 kg |
| Compliance | CE, FCC Class B, EN55022/24 |
| Manufacturer | Thomson Telecom S.A.S. |
| Year of Release | 2005 |
Frequently Asked Questions - ST2022 THOMSON
User questions about ST2022 THOMSON
0 question about this device. Answer the ones you know or ask your own.
Ask a new question about this device
Download the instructions for your Telephone in PDF format for free! Find your manual ST2022 - THOMSON and take your electronic device back in hand. On this page are published all the documents necessary for the use of your device. ST2022 by THOMSON.
USER MANUAL ST2022 THOMSON
natural_image
Six colored rounded squares in orange, magenta, green, cyan, and yellow (no text or symbols)

natural_image
Black and white photo of a vintage office telephone with a digital display and keypad (no visible text or symbols on the device body)
Thomson Telecom
S.A.S with a capital of 130 037 460 €
RCS 390 546 059
Copyright © THOMSON 2005
All rights reserved
09/2005 - 1
www.speedtouchpartner.com
European Community Declaration of Conformity
This equipment complies with the requirements relating to electromagnetic compatibility, EN55022 Class B for ITE and EN55024.
This meets the essential protection requirements of the European Council Directive 89/336/EEC on the approximation of the laws of the Member States relating to electromagnetic compatibility.
Thomson Telecom declares that this ST2030 MGCP IP Phone is in compliance with the essential requirements and other relevant provisions of Directive 1999/5/EC.
You can download the declaration of conformity on www.speedtouchpartner.com
The CE logo involves the conformity of the product with the essential requirements of implemented directives.

Northern America Federal Communications Commission (FCC) Statement
This equipment generates, uses and can radiate radio frequency energy and, if not installed and used in accordance with the instructions in this manual, may cause interference to radio communications. This equipment has been tested and found to comply with the limits for a Class B digital device pursuant to Subpart J of Part 15 of FCC rules, which are designed to provide reasonable protection against radio interference when operated in a commercial environment. Operation of this equipment in a residential area is likely to cause interference, in which case the user, at his own expense, will be required to take whatever measures are necessary to correct the interface.
Copyright Notice & Trademarks
© Thomson 2005. All rights reserved. Thomson Telecom reserves the right to alter material or technical specification of its products without prior notice.
SpeedTouch and Thomson are registered trademarks. Various elements (including but not limited to trademarks, service marks, designs, logos and copyrighted material) shown on his Admin Guide are protected by intellectual property or other rights.
I. PRODUCT OVERVIEW AND CONNECTIONS .... 4
CONNECTIONS 4
CONNECTING TO THE NETWORK AND THE PC....4
POWERING UP THE PHONE 5
CONNECTED A HEADSET 5
PHYSICAL FEATURES....6
USER PANEL....6
DISPLAY KEYS 7
AUDIO KEYS....7
DIALING KEYS 8
DEFINITIONS OF LED 9
II. CALL SERVICES....10
TALKING MODE & OPERATIONS 10
5 KINDS OF COMMUNICATION MODE 10
CHARACTER INPUT- EDIT MODE....11
III. CONFIGURATION THROUGH LCD....12
ASSIGN AN IP ADDRESS TO THE PHONE 12
SETTING THE ADDRESS 12
CHECK THAT THE IP ADDRESS IS SET PROPERLY 14
RESET TO DEFAULT....14
IV. CONFIGURE PHONE USING WEB INTERFACE 15
FIND THE PHONE IP ADDRESS.... 15
ACCESS TO ADMIN HOMEPAGE (WEB INTERFACE) 15
SETUP THE CALL AGENT....16
UPGRADE FIRMWARE....20
I. Product overview and connections
Connections


Connecting to the Network and the PC
The ST2030 MGCP IP Phone has 2 RJ-45 ports that each support 10/100 Mbps full duplex Ethernet connection to external devices- Network port and access port (one for PC and one for LAN).
Network Port (10/100LAN)
Use the Ethernet cable to connect the LAN port to an Internet equipment, such as a hub, switch. Or directly to the Network. In Power over Ethernet (PoE) office environment, the IP phone can be powered from a switch via Ethernet cable, in which case the external power adaptor is not needed.
Access port (10/100PC)
Use the Ethernet cable to connect a network device, such as a computer to the PC port on the back of your phone.
Powering up the Phone
The ST2030 could be powered by either a main power unit, or PoE.
Its power consumption is under 6W.
Power Plug
The power plug is fed with 9VDC, 800mA, linear.
Power Over Ethernet
The Speed Touch 2030 supports PoE as defined by 802.3af Standard
It is class 2, and supports class negotiation (in order to plug as many devices as possible on a PoE hub). It can be powered with PoE up to 100 meters with category 5,5e or 6 cables.
Connected a headset
If you will use a headset, plug the RJ9 headset connector into the headset port on the left side of your IP Phone.
Physical Features
User panel
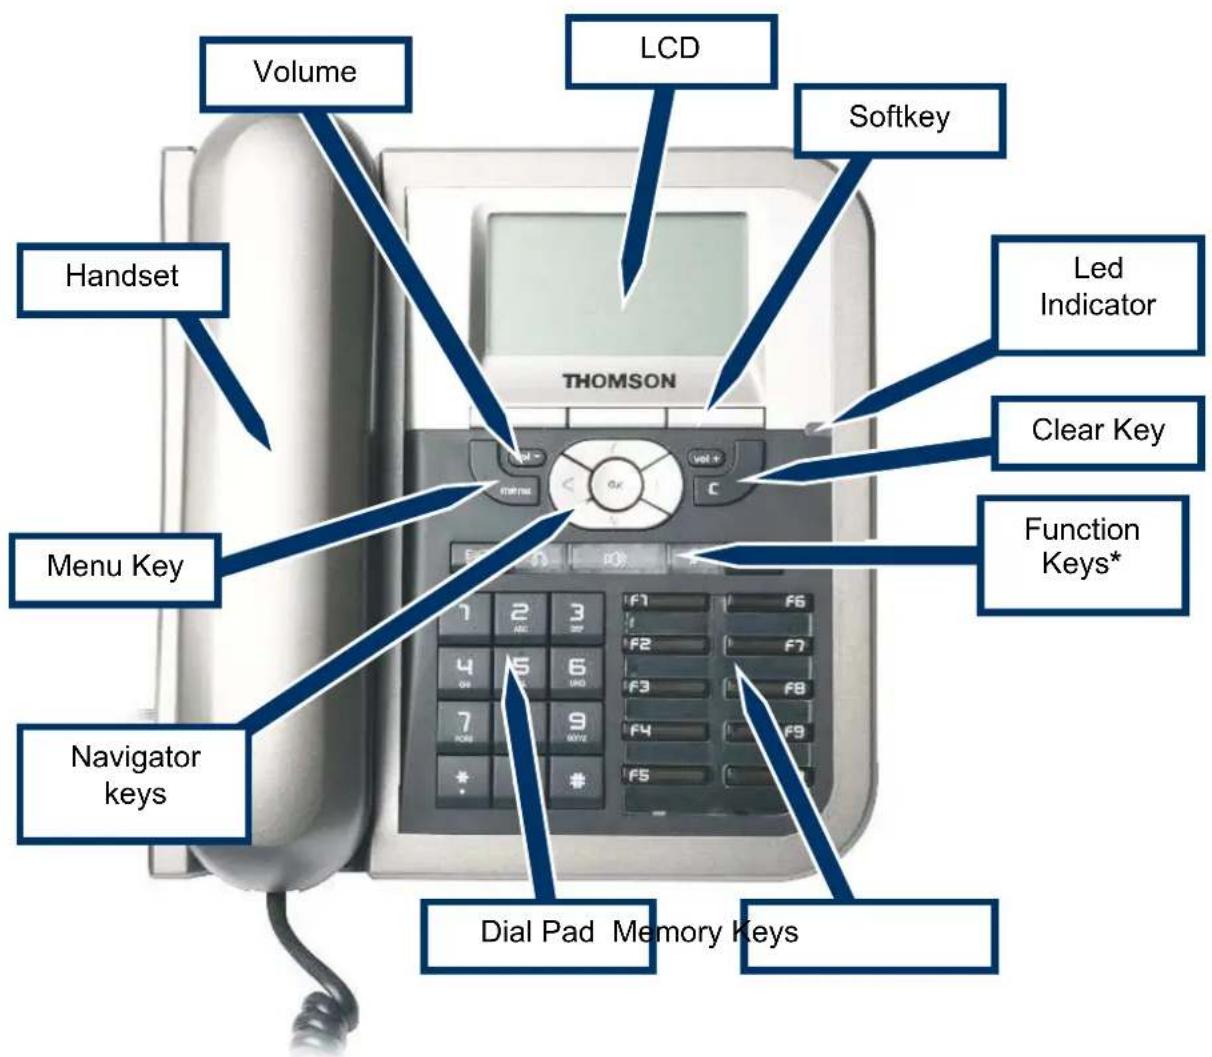
* Keys from left to right: phone book/ headset/ speaker/ mute and redial.
Display keys
 | OKkey:Confirms settings |
 | Navigator keys:Enable browsing setting options, display the latest 30 call numbers in standby mode and move among soft keys options in editing mode. |
 | Clearkey:Clear characters in editing mode or exit to standby display (long click) or return back to the previous page. |
 | Menukey:Enables access to menu |
 | Phone book key:Enables to access the phonebook and view the names and phone numbers the user wants to dial. |
 | 3 Soft keys:Activate the features described by the text message directly above on the LCD screen. |
 | LCD Screen:Displays information about the phone settings, such as the number dialing out or calling in, date, time, calls status, call duration timer etc.It is a full graphic display used with 6-line of 20 characters. |
Audio keys
 | Volume keys:Adjust the volume of the handset, headset, speaker phone, ringer phone. |
 | |
 | Speaker key:Activates/disables hands free or group-listing function and switch on/off the microphone |
 | Headset key:Activates headset mode during a call |
 | Mute key:Activates/deactivates mute function. |
Dialing keys
 | Dialing padPress the dial pad buttons to dial a number. Dial pad buttons work exactly like those on your existing telephone. In the editing mode, it can be used to input characters. |
 | Redial key:Calls the last number dialed. |
 | Memory keysAre used as Speed dial keys. |
|  | Handset:Makes and receives calls |
Definitions of LED
| LED Indicator | Condition Color Status | ||
| Speaker | Default OFF | Red | |
| During FW boot ON | |||
| Loudspeaker is activated during a call | ON | ||
| Headset | Default OFF | Red | |
| During FW boot ON | |||
| Headset or Headset group-listing mode is activated during call | ON | ||
| Mute | Default OFF | Red | |
| During FW boot ON | |||
| Mute is active | ON | ||
| Feature keys | Default OFF | Green | |
| During FW boot ON | |||
| Used for speed dial keys in standby mode OFF | |||
| Line appearance: standby mode OFF | |||
| Line appearance: a call is incoming Fast blinking | |||
| Line appearance: is active ON | |||
| Line appearance: hold or remote hold | Slow blinking | ||
| System | Boot: during FW boot Red ON | Blinking | |
| Boot: during DHCP process (if any) Red Slow | |||
| Boot: during SIP registration Red Fast blinking | |||
| Running mode: Ethernet connection is down | Red Slow blinking | ||
| Running mode: IP connection is down (e.g. no IP address allocated) | Red Slow blinking | ||
| Running mode: SIP connection is down (e.g. SIP registration or registration refresh failure) | Red Slow blinking | ||
| Auto-configuration: during configuration file download | Red Fast blinking | ||
| Auto-configuration: during firmware file download | Red Fast blinking | ||
| System is programming FLASH | Red ON | ||
| Ringing state | Green Slow blinking | ||
| Alert messages and missed calls | Green Slow blinking |
II. Call Services
Talking Mode & Operations
5 kinds of communication mode
- Handset mode
- Hands free mode
- Headset mode
● Handset group listening
● Headset group listening
Operation of off hook
There are four ways supported for Off Hook operation
● Picking up the handset: Handset mode
- Press Speaker key: Hands free mode
- Press Headset key: Headset mode
- Press F1 when phone is ringing
Operation of on hook
● Handset mode: replacing the handset
● Handset -Group-Listening mode: press Speaker key and replace the handset
● Hands free mode: press Speaker key
● Headset/Headset-Group-Listening mode: press Headset key
Operation of mode switch during call
| Handset | Hands free | Headset | Handset -GL | Headset-GL | |
| Handset | 1. Press Speaker key2. Replace handset | Press Headset key | Press Speaker key | N/A | |
| Hands free | Pick up handset | Press Headset key | 1. Pick up handset2. Press Speaker key | N/A | |
| Headset | Pick up Handset | 1. Press Speaker key2. Press headset key | N/A | Press Speaker key | |
| Handset -GL | Press Speaker key | Replace handset | N/A | Press headset key | |
| Headset-GL | N/A | Press headset key | Press Speaker key | Pick up Handset |
Character Input- Edit Mode
The editor is automatically activated whenever you are modifying content of configurable parameters. Apart from entering characters, you can use this editor to navigate through text or delete characters. Even though the maximal text length is not limited by the number of characters on the display because the text can be shifted to the left and right, there are limits for the certain scenarios. E.g. for phone book name, the limit is 15. For number, it is 31. For IP address, it is 15. The following overview shows all characters that can be entered. Number keys must be repeatedly pressed until the required letter appears; the cursor advances after a short delay (one second) or pressing any other key (0..9,*,#, up, down etc.) indicating that the required letter has been accepted.
| Key | Lower case Upper case | |
| 1 | 1.,=+-&^| | |
| 2 | abc2àáããâç | ABC2ÄÄÄÆ |
| 3 | def3èéêëDEF3É | |
| 4 | ghi4iíîîGHI4 | |
| 5 | jkl5JKL5 | |
| 6 | mno6ñòóôööøMNO6Ñ∅ | |
| 7 po | rs7PQRS7 | |
| 8 | tuv8ùúûTUV8Ü | |
| 9 | wxyz9ÿWXYZ9 | |
| 0 | 0 Space @%()[]<> | |
| * | *#?!:;“_/ | |
| # # | ||

Using # to Switch uppercase (with indicator “>ABC”), lowercase (with indicator “>abc”) and numeric (with indicator “>123”) when entering letters. All other symbol needed will be appended to “*” key.
III. Configuration through LCD
Assign an IP address to the phone
Setting the address
Using Fix IP address
-
Press menu key.
-
Choose Admin with softkeys.
-
The phone will prompt Input Password:
-
Make sure you have selected the right entry mode with the A>a>1 softkey.
-
Enter the admin password using the Dialing pad (default value is 784515) and choose OK with softkeys.
-
Select Networking with Navigator keys and choose Select with softkeys
-
The actual mode must now be highlighted. It can be DHCP, Fixed-IP or PPPoE. Choose Edit with softkeys
-
Choose Fixed-IP using the Navigator keys and choose Save with softkeys
-
Scroll down to the IP address using the Navigator keys and Choose Edit with softkeys
-
Erase the previous IP address with DelChr softkey
-
Enter the new one with the Dialing pad and then press the Save softkey
-
Press the Back softkey to return to previous menu.
-
Press the Back softkey once again to return phone idle mode.
-
Press menu key.
-
Choose Option with softkeys.
-
Use the Navigator keys to scroll down the menu to Reboot
-
Press Select softkey
-
The ST2030 displays Reboot?
-
Press OK softkey
-
Wait for ST2030 to reboot
-
The new IP address is set
-
Check that the IP address is set properly
Using DHCP
-
Press menu key.
-
Choose Admin with softkeys.
-
The phone will prompt Input Password:
Make sure you have selected the right entry mode with the A>a>1 softkey.
- Enter the admin password using the Dialing pad (default value is 784515) and choose OK with softkeys.
Select Networking with Navigator keys and choose Select with softkeys
-
The actual mode must now be highlighted. It can be DHCP, Fixed-IP or PPPoE. Choose Edit with softkeys
-
Choose DHCP using the Navigator keys and choose Save with softkeys
-
Press the Back softkey to return to previous menu.
-
Press the Back softkey once again to return phone idle mode.
-
Press menu key.
-
Choose Option with softkeys.
-
Use the Navigator keys to scroll down the menu to Reboot
-
Press Select softkey
-
The ST2030 displays Reboot?
-
Press OK softkey
-
Wait for ST2030 to reboot
-
The new IP address is set
-
Check that the IP address is set properly
Check that the IP address is set properly
- Press menu key
- Choose User with softkeys
- Use the Navigator keys to scroll down the menu to Information
- Press Select softkey
- The IP address is displayed
Once you know the IP address of the ST2030, you can start to configure the phone using its friendly web interface.
Reset to default
In order to reset the phone to its default configuration values (including passwords), perform the following actions:
- Unplug the phone from its power source
- Maintain the Mute and Headset keys pressed
- Without releasing the Mute and Headset keys, plug back the phone to its power source
- ST2030 will prompt "Reset to default !!!"
- The ST2030 is now reset to its default configuration values.
IV. Configure phone using web interface
Find the phone IP address
- Press menu key
- Choose User with softkeys
- Use the Navigator keys to scroll down the menu to Information
- Press Select softkey
- The IP address is displayed
Access to Admin Homepage (web interface)
- Open a web browser (Firefox, Internet Explorer, Safari...)
- Enter the ST2030 IP address in the address bar with /admin.html appended at the end of it. Ex: 10.0.0.1/admin.html

-
Enter the administrator login "administrator"
-
Enter the administrator password (default value is 784518)
- You will access the Homepage of the ST2030
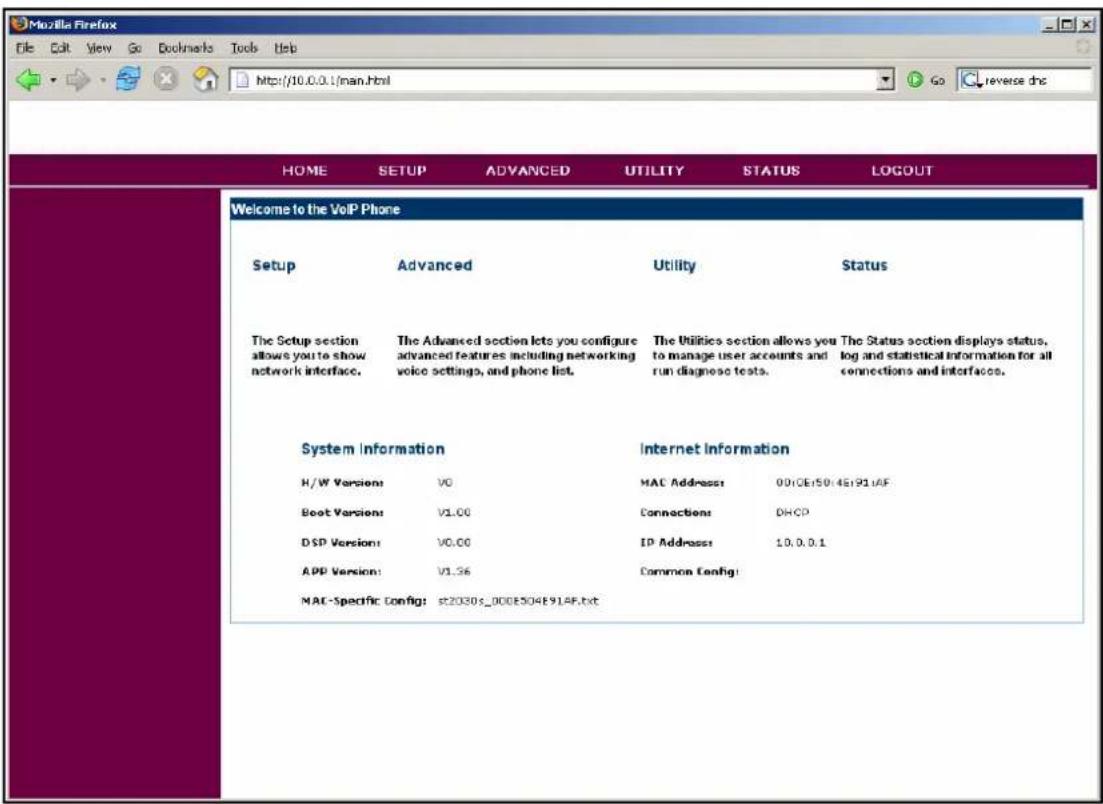
Setup the SIP configuration
- Once connected to the ST2030 Admin Homepage, go to the Utility page (Click on SETUP on the top menu of the Homepage.
- You will access the Setup Page
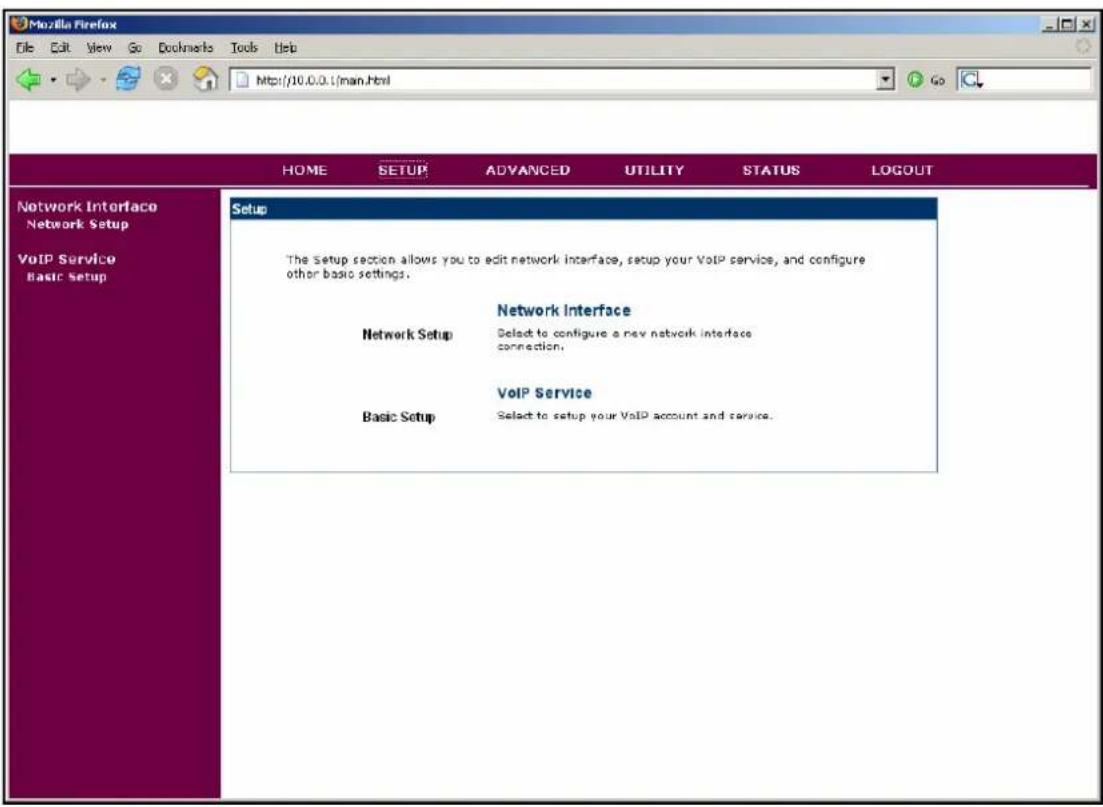
- Click on Basic Setup in the left menu
- You will access the Setup – Basic Setup page

- Click on the Edit button of the profile you want to edit.
- You will access the Profile Setup page.

- Fill in the SIP Servers properties and the User Accounts
- Click on Apply
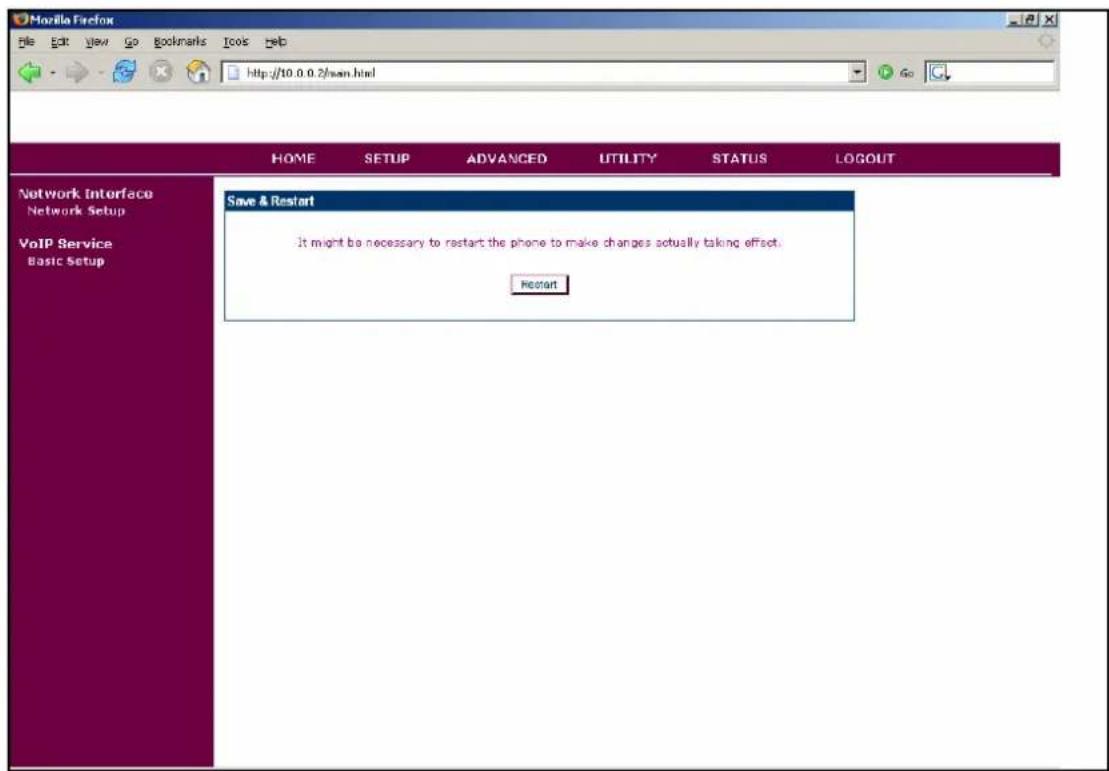
- Your changes have been taken into account
Upgrade firmware
- Once connected to the ST2030 Admin Homepage, go to the Setup page (Click on UTILITY on the top menu of the Homepage.
- You will access the Utilities Page

- Click on Firmware Update
- You will access the Utilities – Firmware Update page

- Browse to find the firmware file you want to upload

- The ST2030 will upload the firmware

- When the firmware file will be uploaded, the ST2030 will ask you to confirm the restart.

- Click on Restart.
- The ST2030 will reboot and the firmware will be updated


- Thomson Telecom
- European Community Declaration of Conformity
- Northern America Federal Communications Commission (FCC) Statement
- Copyright Notice & Trademarks
- PRODUCT OVERVIEW AND CONNECTIONS .... 4
- CONNECTIONS 4
- PHYSICAL FEATURES....6
- CALL SERVICES....10
- TALKING MODE & OPERATIONS 10
- CONFIGURATION THROUGH LCD....12
- ASSIGN AN IP ADDRESS TO THE PHONE 12
- CONFIGURE PHONE USING WEB INTERFACE 15
- FIND THE PHONE IP ADDRESS.... 15
- Product overview and connections
- Connections
- Connecting to the Network and the PC
- Network Port (10/100LAN)
- Access port (10/100PC)
- Powering up the Phone
- Power Plug
- Power Over Ethernet
- Connected a headset
- Physical Features
- User panel
- Call Services
- Talking Mode & Operations
- kinds of communication mode
- Operation of off hook
- Operation of on hook
- Character Input- Edit Mode
- Configuration through LCD
- Assign an IP address to the phone
- Setting the address
- Using Fix IP address
- Using DHCP
- Check that the IP address is set properly
- Reset to default
- Configure phone using web interface
- Find the phone IP address
- Access to Admin Homepage (web interface)
- Setup the SIP configuration
- Upgrade firmware
Brand : THOMSON
Model : ST2022
Category : Telephone