
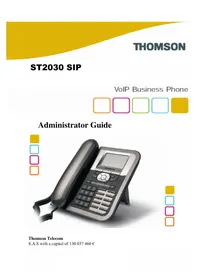
ST2030 - Telephone THOMSON - Free user manual and instructions
Find the device manual for free ST2030 THOMSON in PDF.


| Product Type | DECT Cordless Phone |
| Brand | Thomson |
| Model | ST2030 |
| Frequency | 1.88 - 1.90 GHz (DECT) |
| Range (Indoor) | Up to 50 meters |
| Range (Outdoor) | Up to 300 meters |
| Dimensions (Handset) | 170 x 50 x 30 mm (approx.) |
| Weight (Handset) | 120 g (approx.) |
| Power Supply | 2x AAA Ni-MH rechargeable batteries (1.2V, 550mAh) |
| Base Station Power | AC 230V, 50Hz |
| Display | Backlit LCD, 1.8 inch |
| Phonebook Capacity | Up to 100 entries |
| Caller ID | Yes (CLIP) |
| Redial List | Last 10 numbers |
| Handsfree Speakerphone | Yes |
| Ringtones | 10 polyphonic + 5 melody |
| Keypad Lock | Yes |
| Intercom | Yes (between handsets) |
| Conference Call | Up to 3 parties |
| Operating Temperature | 0°C to 40°C |
| Cleaning | Wipe with dry soft cloth; do not use solvents |
| Battery Life (Standby) | Up to 100 hours |
| Battery Life (Talk Time) | Up to 10 hours |
Frequently Asked Questions - ST2030 THOMSON
User questions about ST2030 THOMSON
0 question about this device. Answer the ones you know or ask your own.
Ask a new question about this device
Download the instructions for your Telephone in PDF format for free! Find your manual ST2030 - THOMSON and take your electronic device back in hand. On this page are published all the documents necessary for the use of your device. ST2030 by THOMSON.
USER MANUAL ST2030 THOMSON
Administrator Guide
RCS 390 546 059
Copyright © THOMSON 2009
All rights reserved
12/2009
www.thomsonbroadbandpartner.com
European Community Declaration of Conformity
This equipment complies with the requirements relating to electromagnetic compatibility, EN55022 Class B for ITE and EN55024.
This meets the essential protection requirements of the European Council Directive 89/336/EEC on the approximation of the laws of the Member States relating to electromagnetic compatibility. Thomson Telecom declares that this ST2030 IP Phone is in compliance with the essential requirements and other relevant provisions of Directive 1999/5/EC.
You can download the declaration of conformity on www.thomsonbroadbandpartner.com.
The CE logo involves the conformity of the product with the essential requirements of implemented directives.

Northern America Federal Communications Commission (FCC) Statement
This equipment generates, uses and can radiate radio frequency energy and, if not installed and used in accordance with the instructions in this manual, may cause interference to radio communications. This equipment has been tested and found to comply with the limits for a Class B digital device pursuant to Subpart J of Part 15 of FCC rules, which are designed to provide reasonable protection against radio interference when operated in a commercial environment. Operation of this equipment in a residential area is likely to cause interference, in which case the user, at his own expense, will be required to take whatever measures are necessary to correct the interface.
Copyright Notice & Trademarks
© Thomson 2009. All rights reserved. Thomson Telecom reserves the right to alter material or technical specification of its products without prior notice.
SpeedTouch and Thomson are registered trademarks. Various elements (including but not limited to trademarks, service marks, designs, logos and copyrighted material) shown on this Admin Guide are protected by intellectual property or other rights.
Contents
PART 1 SAFETY INFORMATION ....1
OPERATING CONDITIONS 1
LOCATION SAFETY INSTRUCTIONS....1
CARE 1
CONNECTIONS 1
QUALIFIED SERVICE 2
PART 2 PRODUCT OVERVIEW AND CONNECTIONS ....3
INTRODUCTION 3
NOTE AND CAUTION 3
PACKAGE CONTENTS 3
FIGURE 2.1 IP PHONE CABLE CONNECTIONS....3
Connecting to the Network and the PC....4
Powering up the Phone....4
Connected a headset 4
OVERVIEW 4
MAIN FEATURES 5
SUPPORTED FEATURES 5
SUPPORTED PROTOCOLS 6
ABBREVIATIONS 8
PART 3 PHONE OPERATIONS....9
GENERAL APPEARANCE 9
PHYSICAL FEATURES 10
FIGURE 3.1 THE IP PHONE USER PANEL....10
TABLE 3.1 THE IP PHONE PHYSICAL FEATURES....12
DISPLAY 13
DEFINITIONS OF SOFT KEYS....13
TABLE 3.2 DEFINITIONS OF SOFT KEYS 15
ICONS & INDICATORS 15
DEFINITIONS OF LED 16
TABLE 3.3 DEFINITIONS OF LED 16
EXTENSION MODULE 17
MEMORY 17
POWER SUPPLY 17
PART 4 CALL SERVICES....18
TALKING MODE & OPERATIONS....18
5 kinds of communication mode 18
Operation of off hook....18
Operation of on hook....18
Operation of mode switch during call 18
TABLE 4.1 OPERATIONS OF MODE SWITCH DURING CALL ....18
MAIN CALL FUNCTIONS 19
Make a call....19
Last number Redial: 20
Speed dial 20
Answer a call 21
Reject a call....21
Call back 21
Call forward 22
Transfer Message to Voice Mail 22
CALL FUNCTIONS DURING CONVERSATION 23
Hold and Retrieve a call 23
Call Transfer 23
Conference call....24
Options during a call 25
Volume adjustment 25
Mute: 25
Multi line 26
Display of Line/Call status 26
Pick up....27
Park up 28
PHONE BOOK & CALL LOG....28
Call logs 28
Phone book 30
CHARACTER INPUT- EDIT MODE....32
TABLE 4.2 CHARACTER INPUT METHOD TABLE 32
PART 5 CONFIGURATION THROUGH LCD....33
MENU LIST 33
FIGURE 5.1 OPERATION MENU LCD DISPLAY ....34
Detailed LCD menu settings 38
PART 6 CONFIGURATION VIA WEB INTERFACE ....48
CONFIGURATION THROUGH THE WEB INTERFACE 48
DETAILED WEB PAGES 48
PART 7 AUTO-PROVISIONING....73
AUTOMATIC PHONE PROVISIONING WITH TFTP 73
AUTOMATIC PHONE PROVISIONING WITH HTTP 77
PART 8 RINGTONES CONFIGURATION ....81
FIGURE 8.1 RINGTONE CONVERTER ....81
FIGURE 8.2 RINGTONE CONVERTER 82
FIGURE 8.3 RINGTONE COMPOSER....82
FIGURE 8.4 RINGTONE COMPOSER....83
PART 9 FEATURE OVERVIEW....87
ST20XX SIP NEW FEATURES (SG VX.69.2) 87
OVERVIEW 87
VENEZUELA NUMBERING PLAN 87
Feature Activation 87
A. Via APS....87
B. Via Telnet 88
LLDP 89
Feature Activation 89
A. Via APS....89
B. Via Telnet 89
MGC 90
Feature Activation 90
A. Via APS....90
B. Via Telnet 90
BLF 91
Feature Activation 92
A. Via APS....92
B. Via Telnet 92
ACR RESPONSE 93
Feature Activation 93
A. Via APS....93
B. Via Telnet 93
ATTEND TRANSFER 94
Feature Activation 94
A. Via APS....94
B. Via Telnet 94
PREFERRED IDENTITY 95
Feature Activation 95
A. Via APS....95
B. Via Telnet 95
DSCP OF DHCP 96
Feature Activation 96
A. Via Web GUI....96
B. Via APS....97
C. Via Telnet 97
INPUT MODE 98
ST20XX SIP NEW FEATURES (SG vx.68.5) 99
OVERVIEW 99
HUAWEI SOFT SWITCH 99
Feature Activation 102
C. Via APS....102
D. Via Telnet 103
CONFIG WITHOUT RELOAD 103
CCBS ENABLE/DISABLE 105
E. Via APS....105
F. Via Telnet 106
ST20XX SIP NEW FEATURES (SG vx.67.2) 106
OVERVIEW 106
SECURITY FEATURES 106
Feature Activation 107
G. Via WebGui....107 H. Via APS....108 I. Via Telnet 109
IMPROVE HTTPS APS FEATURE ....110
Feature Activation 110
A. Via WebGui....110
SUPPORT ENCRYPTION OF CONFIGURATION FILES IN APS....111
Feature Activation 113
A. Via WebGui....113 B. Via APS....114
CALL DIALING FROM WEBGUI....114
Feature Activation 114
SIP MESSAGE DURING CALL (RFC 3428)....118
Feature Activation 119
A. Via APS....119 B. Via Telnet 119
DNS QUERY ( CIRCULAR METHOD)....120
Feature Activation 120
A. Via APS....120 B. Via Telnet 121
SUPPORT REMOTE CALL LOGS FOR LOCAL USER 121
Feature Activation 123
A. Via WebGui....123 B. Via APS....123
ST20XX SIP NEW FEATURES (SG vx.66.2) 124
OVERVIEW 124
TRANSFER ON RINGING 124
Feature Activation 125
J. Via APS: 126 K. Via Telnet 126
CALL-HOLD "INACTIVE" METHOD....127
Feature Activation 128
A. Via APS: 128 B. Via Telnet 128
COMVERSE: LINE AND SERVICE SUPERVISION (REG & UA-PROFILE EVENT PACKAGE) 129
Feature Activation 133
A. Via WebGui: 134 B. Via APS: 139 C. Via Telnet: 140
COMVERSE: REDIRECTING IDENTITY AND NAME PRESENTATION ....141
Feature Activation 142 3. Via APS: 142 4. Via Telnet 142
ST20XX SIP NEW FEATURES (SG vx.65.1) 144
OVERVIEW 144
MULTI-REGISTRATION ON A SAME SERVER....144
Feature Activation 144
L. Via the web GUI: 144 M. Via APS: 145 N. Via Telnet 146
ST20XX SIP NEW FEATURES (SG VX.64.2)....147
OVERVIEW 147
SUPPORT PRIVATE NUMBER (ST2030 ONLY)....147
Feature Activation 148
SOFTKEY LEFT SCROLLING IN TALKING MODE (ST2030 ONLY)....149
Feature Activation 149
ST20XX SIP NEW FEATURES (SG vx.63) 150
OVERVIEW 150
INCOMING CALL DURING TRANSFER 150
1- Attended Transfer.... 150 2- Blind Transfer....154
NUMBER DISPLAY IN STANDBY 156
Feature Activation 156
LIST ORIENTED BLF V2 (ST2030 ONLY)....158
LED state: 158 User action....159 Call pickup (directed pickup) 159 Feature Activation 159
IMPROVED SHARED CALL APPEARANCE (SCA)....164
Feature Activation 165
ST20XX SIP NEW FEATURES (SG vx.62) 169
OVERVIEW 169
SECOND DIAL-TONE FOR PBX-LIKE ENVIRONMENTS. 169
Feature Activation 171
NEW SPECIFIC KEYS IN THE DIAL PLAN....173
Feature Activation 174
NEW ERROR MESSAGE DISPLAY FOR 403 RESPONSE....176
Feature Activation 176
SERVICES SUPERVISION FEATURE. 177
Feature Activation 180
STAR CODES. 183
Call Pick-Up Service....184
Feature Activation 184
Behavior 185
Call Forward Service....185
Feature Activation 185
Behavior 187
Do Not Disturb Service....188
Feature Activation 188
Behavior 189
Transfer to Voicemail Service....189
Feature Activation 189
Behavior 191
Call Park Service....191
Feature Activation 191
Behavior 192
Call Blocking Service....192
Feature Activation 192
Behavior 193
Privacy Call Service....194
Feature Activation 194
Behavior 195
Call Waiting Service 195
Feature Activation 195
Behavior 196
Special Services activation through DTMF 196
Feature Activation 196
Behavior 198
Other Special Services activation....198
Feature Activation 198
Behavior 200
ST20XX SIP NEW FEATURES (SG vx.61) 201
OVERVIEW 201
Ad-Hoc Conf (RFC 4579)....201
Feature Activation 203
SYLANTRO SIP-B 205
IDENTITY HEADER PRECEDENCE....205
Feature Activation 206
NAT KEEP ALIVE 208
Feature Activation 209
TRUSTED IP FOR NOTIFY "CHECK-SYNC" 211
Feature Activation 212
REBOOT ON NOTIFY "CHECK-SYNC; REBOOT=TRUE" 213
Feature Activation 215
MIXED PAGING REMOTE PHONEBOOK 218
Feature Activation 220
LOGIN/LOGOUT - DISABLE SUBSCRIBE TO DIALOG....221
Feature Activation 222
ST20XX SIP NEW FEATURES (SG VX.59) 224
OVERVIEW 224
TRACING TOOL 224
Feature Activation 225
DOWNLOAD AND UPDATE TONE AND LANGUAGE TABLES 227
How to get the Templates: 227
How to modify the Templates: 228
How to upload the Templates: 230
Feature Activation 232
ST20XX SIP NEW FEATURES (SG vx.58.6) 233
OVERVIEW 233
SIP MESSAGE SUPPORT (RFC 3428) FOR STATUS DISPLAY APPLICATIONS ....233
Feature Activation 234
DISABLE CALL WAITING TONE 234
Feature Activation 234
SOFT KEYS REORDERING 235
Feature Activation 235
EARLY MEDIA TYPE PARAMETER....236
Feature Activation 236
ST2030 SIP NEW FEATURES (SG v1.56) 238
OVERVIEW 238
LOGIN/LOGOUT 238
Feature activation 239
BROADSOFT SHARED CALL APPEARANCE 240
Enriched Display 240
Feature activation....240
ST20XX SIP NEW FEATURES (SG vx.54.2) 242
OVERVIEW 242
AUTOMATIC HANG UP 242
Feature activation....242
CALL PARK TYPE 243
Call Park/Retrieve Park implementation modes 244
Feature activation....244
APS UPGRADE BETWEEN SIP AND MGCP 245
Process and Requirements....245
RINGER IN THE HEADSET. (ST2030 ONLY)....245
Feature activation....246
RINGER OFF 246
Feature activation....246
IGNORING FIRMWARE UPDATE 246
ST20XX SIP NEW FEATURES (SGx.53) 247
OVERVIEW 247
CALL-INFO HEADER WITH ANSWER-AFTER PARAMETER ....247
NETWORK CONFERENCE 248
Feature activation 248
Managing Network Conference 248
CONFIGURABLE REFER-TO HEADER POPULATION 249
Feature activation 249
CHECK PHONEBOOK DOMAIN NAME 250
Feature activation 250
Phonebook entries recognition....251
APS IMPROVEMENT 252
TALK AND HOLD EVENT PACKAGES FOR CLICK-TO-ANSWER AND OTHER 3PCC SCENARIOS....252
Talk event 252
Hold event....252
PERSISTENT VLAN 253
ST2030 SIP NEW FEATURES (SG1.52.1)....254
OVERVIEW 254
LIST-ORIENTED BLF 254
Feature activation 254
A. Via Web GUI: 254
Keyword definition and usage....256
USER CLASS IDENTIFIER 257
Feature activation....257
ADDITIONAL SOFTKEY CONTROL....258
Feature activation....258
Keyword definition and usage....259
CALL PROGRESS INDICATION CONTROL....260
Feature activation....260
Keyword definition and usage....260
PHONE NUMBER DISPLAY IN IDLE MODE CONTROL....261
Feature activation....261
Keyword definition and usage....261
ST2030 SIP NEW FEATURES (SEG1.50T3)....262
OVERVIEW 262
AUTOMATIC CALL WHEN OFFHOOK....262
Feature activation 262
Keyword definition and usage 262
HIDE MISSED CALLS FLAG....263
Feature activation....263
Keyword definition and usage 263
AUTOANSWER DEVICE ROUTING 264
Feature activation....264
Keyword definition and usage 265
DAYLIGHT SAVING REFINEMENTS 266
Feature activation 266
Keyword definition and usage....267
NTP ADDRESS SOURCE CONFIGURATION....267
Feature activation 267
Keyword definition and usage 267
INFORMATION SHORTCUT-"MENU" LONG PRESS 268
ST2030 SIP MONITORING EXTENSION FEATURE (BLF) v1.47 269
1 SUBSCRIBE/NOTIFY SUPPORT FOR MONITORING EXTENSION STATES- OVERVIEW....269
2 FUNCTIONALITY 269
- BLF CONFIGURATION ....270
4 EXAMPLES WITH ASTERISK SIP SERVER AS NOTIFIER 273
ST2030 SIP DISTINCTIVE RINGING AND CWT USING ......276
OVERVIEW 276
- OVERVIEW 276
- HEADER AND RINGING MANAGEMENT....276
- HEADER AND CALL WAITING TONES MANAGEMENT ....277
- SYSTEM MELODIES AND CALL WAITING TONES DOWNLOAD....277
PART 10 - REMOTE PHONEBOOK SPECIFICATION....279
- DESCRIPTION OF THE SERVICE....279
- SERVER SPECIFICATIONS ....279
2.1 General structure....279
2.2 Phone query....280
2.3 XML Tags used by ST2030 280
2.4 Answer to the request from the server 281
2.4.1 No answers 281
2.4.2 Less than 32 results to the query....282
2.4.3 More than 32 results to the query .... 282
- ST2030 PHONE SPECIFICATIONS....283
3.1 Presentation....283
3.2 Configuration 283
3.3 Cancel Key 283
3.4 Accessing the Phonebooks 284
3.4.1 MGCP 284
One phonebook 284
Several phonebooks....284
3.4.2 SIP 284
3.5 Query Menu....284
3.6 Incoming call during search....285
3.7 Displaying empty phonebook 285
3.8 Displaying less than 32 results phonebook....285
3.9 Displaying more than 32 results phonebook 285
3.10 Displaying an entry in the phonebook....286
3.11 Calling an entry in the phonebook....286
3.12 Timeout 286
PART 11 TELNET ACTIVATION....287
INTRODUCTION 287
ENABLE TELNET SERVICE 287
OPEN A TELNET SESSION....288
TELNET COMMANDS 289
RESET TO DEFAULT 290
PART 12 TROUBLESHOOTING....291
PART 13 APPENDIX....292
CONFIGURATION AND COMMANDS 292
EXAMPLES OF FILES TO CONFIGURE AUTO PROVISIONING VIA TFTP 294
PART 14 FIGURES & TABLES....308
Part 1 Safety Information
Operating conditions
This telephone is to be operated on a local area network. The telephone must be equipped with the appropriate software version. This guide is written for the actual version of firmware v2.69, you can download the latest on:
http://www.thomsonbroadbandpartner.com

Read these instructions carefully before connecting the SIP phone to its power source.
Location safety instructions
Do not expose the IP Phone to fire, direct sunlight or excessive heat.
Do not expose the IP Phone to rain or moisture and do not allow it to come into contact with water.
Do not install the IP phone in an environment likely to present a THREAT OF IMPACT.
The IP phone must be installed at least 1 meter from radio frequency equipment, such as TVs, radios, hi-fi or video equipment (which radiate electromagnetic fields).
The IP phone is designed to work in temperatures from 0°C to 45°C.
Care
You may clean the IP phone using a fine damp cloth. Never use solvents (such as trichloroethylene or acetone), which may damage the phone's plastic surface and LCD screen.
Never spray the phone with any cleaning product whatsoever.
Connections
Equally, incorrect reassembly could cause electric shock on re-use of the appliance.
The IP Phone must be powered using the power adaptor provided with the package.
If you do use an alternative power adaptor, it must comply with the following standards:
- EN60950, CE mark, U/L
- Output: EU/AUS 9VDC/1000mA or 800 mA, UK/US 12VDC /1000mA.
Any damage caused to the IP Phone as a result of using unsupported power adaptors will not be covered by the manufacturer's warranty.
Do not connect the LAN/PC ports to any network other than an Ethernet network.
Do not work on the system or connect or disconnect cables during lightning storms.
Before working on any system fitted with an ON/OFF switch, turn OFF the power and unplug the power cord.
Qualified service
No repair can be performed by the customer. If you experience trouble with this equipment for repair or warranty information, please contact your administrator.
Thomson disclaims all responsibility in the event of use that does not comply with the present instructions.
Product disposal warning:
Ultimate disposal of this product should be handled in accordance with national laws and regulations.
Information regarding the products in this manual is subject to change without notice. This guide is believed to be accurate but is presented without warranty of any kind, express or implied. The usable services and features on the phone depend on the installed software release and on call manager. Therefore, the conformity of the admin guide cannot be guaranteed.
Part 2: Product overview and connections
Introduction
This administrator guide describes how to set up, connect cables, and configure your ST2030 SIP Phone. It also provides information on how to configure the Network settings and change the settings of your IP Phone. The administrator guide also includes the way to view and upgrade the firmware.
Note and Caution
Note and Caution in this manual are highlighted with graphics as below to indicate important information.
Note
Contains related information that corresponds to a topic.
Caution
Represents essential steps, actions, or messages that should not be ignored.
Package contents
- IP phone base unit
- Handset
- Coiled handset connecting cord
- Quick installation and user guide
- 1 Ethernet cable
- 1 Power supply
Not included: Ethernet cable to connect any PC to the telephone through its PC switch Optional: Extension module with 28 memory keys and headset

Figure 2.1 IP Phone Cable Connections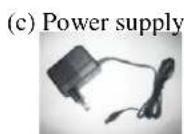
Connecting to the Network and the PC
The SIP Phone has 2 RJ-45 ports that each support 10/100 Mbps full duplex Ethernet connection to external devices- Network port and access port (one for PC and one for LAN).
▶ Network Port (10/100LAN)
Use the Ethernet cable to connect the LAN port to an Internet equipment, such as a hub, switch. Or directly to the Network. In Power over Ethernet (PoE) office environment, the IP phone can be powered from a switch via Ethernet cable, in which case the external power adaptor is not needed.
Access port (10/100PC)
Use the Ethernet cable to connect a network device, such as a computer to the PC port on the back of your phone.
Powering up the Phone
The ST2030 could be powered by either a main power unit, or PoE. Its power consumption is under 6W.
Power Plug
The power plug is fed with 9VDC, 800mA or 12VDC /1000mA liner/switching.
The power plug unit will be adapted specifically to the target country requirements:
• EU plug for Europe (ST2030 EU) - « American » plug for US (ST2030 US) - “UK” plug for UK (ST2030 UK)
Power Over Ethernet
The ST 2030 supports PoE as defined by 802.3af Standard. It is class 2, and supports class negotiation (in order to plug as many devices as possible on a PoE hub). It can be powered with PoE up to 100 meters with category 5, 5e or 6 cables.
Connected a headset
If you will use a headset, plug the RJ9 headset connector into the headset jack port on the left side of your IP Phone (see the figure 2.1).
Overview
The SpeedTouch 2030 SIP is a VoIP Phone that can be plugged directly into an IP Network and used very much like a standard private branch exchange (PBX) telephone. The SpeedTouch 2030 is an IP telephony instrument that can be used in a VoIP environment.
The ST2030 IP phone is compliant with SIP protocol.
Main Features
➢ 6-line LCD display ➢ Font supports ISO8859-2, ISO8859-5, ISO8859-8 Connectivity: Integrated 2 ports 10/100 Ethernet switch ▶ Phone services:
- Multilines (up to 9), Call Forward, Call Transfer (attended), Call Hold, Redial • Group listening, Hands free
- Message Waiting Indicator • Speed dial, Conference call
- Phonebook, Call logs
- Caller ID display
➢ Audio extension connection: Integrated headset RJ9 port Multiple power options: power over Ethernet 802.3af and external power supply adaptor ➢ VoIP Standard: SIP V2 (RFC 3261) ▶ Web browser interface for configuration
Note
This administrator guide is based on firmware v.2.69, you can download the latest administrator guide on:
Supported Features
In addition to the physical features illustrated in Figure 3.1 and Table 3.1, your Thomson ST 2030 also provides the following:
Technical specifications:
- An integrated 2-port Ethernet switch that allows the telephone and a computer to share a single Ethernet jack.
- A direct connection to a 10BaseT or 100BaseTX Ethernet (RJ45) network (half or full duplex connections are supported). • G.711, G.723, and G.729ab voice compression standards • In-band Dual-Tone Multi-Frequency (DTMF) support for touch-tone dialing
- Out-of-band DTMF signaling for codecs that do not transport the DTMF signaling correctly (for example, G729 or G729a)
Configuration:
- IP address configuration: manually configured via local setup menu, static or dynamic IP configuration (integrated Dynamic Host Configuration Protocol DHCP)
- Configuration support:
➢ Local & remote warm reboot
➢ Network startup via DHCP and TFTP (Trivial File Transfer Protocol)
▶ TFTP/HTTP server download
▶ Web browser management
➢ Password protection for configuration
Phone set function support and Call Options:
- Call hold, Call Transfer, Call Forward, Conference Call, Call Park and Call Pick-up.
- On-hook dialing, Dial from call log, multi line (9 lines) • Redial, Mute, Call log, phone book (30 entries), 10 Speed dial memory keys
- Hands free (full-duplex)
Supported Protocols
Your Thomson ST 2030 SIP Phone supports the following standard Internet protocols:
- Internet Protocol (IP)
IP is a network layer protocol that sends datagram packets between nodes on the Internet. IP also provides features for addressing, type-of-service (ToS) specification, fragmentation and reassembly, and security.
- User Datagram Protocol (UDP)
UDP is a simple protocol that exchanges data packets without acknowledgments or guaranteed delivery. SIP can use UDP as the underlying transport protocol. If UDP is used, retransmissions are used to ensure reliability.
- Trivial File Transfer Protocol (TFTP)
TFTP allows files to be transferred from one computer to another over a network.
• Dynamic Host Control Protocol (DHCP)
DHCP is used to dynamically allocate and assign IP addresses. DHCP allows you to move network devices from one subnet to another without administrative attention. If using DHCP, you can connect ST2030 IP phone to the network and become operational without having to manually assign an IP address and additional network parameters.
- Domain Name System (DNS)
DNS is used in the Internet for translating names of network nodes into addresses. SIP uses DNS to resolve the host names of end points to IP addresses.
• Hyper Text Transfer Protocol (HTTP)
HTTP is the underlying protocol used by the World Wide Web. It defines how messages are formatted and transmitted, and what actions Web servers and browsers should take in response to various commands.
- Simple Network Time Protocol (SNTP)
SNTP is a simplified version of NTP. SNTP can be used when the ultimate performance of the full NTP implementation described in RFC 1305 is not needed or justified.
• Network Time Protocol (NTP)
NTP is an Internet standard protocol that assures accurate synchronization to the millisecond of computer clock times in a network of computers. NTP sends periodic time requests to servers, obtaining server time stamps and using them to adjust the client's clock.
- Simple Network Management Protocol (SNMP)
SNMP is a set of protocols for managing complex networks. It works by sending messages, called protocol data units (PDUs), to different parts of a network. SNMP-compliant devices, called agents, store data about themselves in Management Information Bases (MIBs) and return this data to the SNMP requesters.
- Address Resolution Protocol (ARP)
ARP is a network layer protocol used to convert an IP address into a physical address (called a DLC address), such as an Ethernet address. A host wishing to obtain a physical address broadcasts an ARP request onto the TCP/IP network. The host on the network that has the IP address in the request then replies with its physical hardware address.
• Transmission Control Protocol (TCP)
TCP is one of the main protocols in TCP/IP networks. Whereas the IP protocol deals only with packets, TCP enables two hosts to establish a connection and exchange streams of data. TCP guarantees delivery of data and also guarantees that packets will be delivered in the same order in which they were sent.
- Session Description Protocol (SDP)
SDP is a protocol that defines a text-based format for describing streaming media sessions and multicast transmissions. SDP is not a transport protocol but a method of describing the details of the transmission. For example, a SDP file contains information about the format, timing and authorship of the transmission, name and purpose of the session, any media, protocols or codec formats, the version number, contact information and broadcast times.
Abbreviations
SIP: Session Initiation Protocol. An IP telephony signalling text-based protocol developed by the IETF.
DNS: Domain Name Server
DHCP: Dynamic Host Control Protocol
FTP: File Transfer Protocol
H323: An ITU standard for realtime voice and videoconferencing over packet networks, including LANs, WANs and the Internet.
LAN: Local Area Network
MGCP: Media Gateway Control Protocol
RFC 3261: Request For Comments. This document describes the specifications for business extended services under the MGCP protocol.
TFTP: Trivial File Transfer Protocol
XML: eXtensible Markup Language
DTMF: Dual Tone Multi-Frequency. The system used by touch-tone telephones. DTMF assigns a specific frequency (consisting of two separate tones) to each key so that it can easily be identified by a microprocessor.
Part 3: Phone operations
General appearance
The general appearance of the ST2030 is as below:


ST2030 with its extension module
Physical Features
Figure 3.1 and Table 3.1 illustrate the physical features of the ST2030 SIP Phone:
* Keys from left to right: phone book/headset/speaker/mute and redial.
Figure 3.1 The IP Phone User Panel

Confirmation key:

Clear key:
Clears characters in editing mode, exits to standby display (long press), or returns to the previous page.

Menu key:
Enables access to the menu.

Phone book key:
Enables access to the phonebook and displays the names and phone numbers the user wants to dial.

Scrolling and move keys:
Enable browsing of setting options, display the latest 30 call numbers in standby mode, and move among soft key options in editing mode.

3 Soft keys:
Activate the features described by the text message directly above on the LCD screen.

LCD Screen:
Displays information about the phone settings, such as the number dialing out or calling in, date, time, call status, call duration timer, etc. It is a 6-line, 20-character LCD screen.
Audio keys

Volume keys:
Adjust the volume of the handset, headset, speakerphone, and ringer.


Speaker key:
Activates/disables hands-free or group-listening function and switches the microphone on/off.

Headset key:
Activates headset mode during a call.

Mute key:
Activates/deactivates the mute function.
Dialing keys

Dialing pad
Press the dial pad buttons to dial a number. Dial pad buttons work exactly like those on your existing telephone. In editing mode, it can be used to input characters.

Redial key:
Calls the last number dialed.

Memory keys:
Are used as Speed dial keys.
Handset:
Makes and receives calls.
Table 3.1 The IP Phone physical features
Display
The product has a full dot matrix LCD screen with a resolution of 128*64 pixels. Its screen is monochrome and not backlighted.
The viewing area of the screen is 70.7x38.8 mm (active area: 66.52x33.24 mm).
It is able to display characters defined by “Thomson-CharDisplayRequirement-Ed01-03November2004.doc”.
Definitions of Soft Keys
The table 3.2 describes the main functions of each soft keys you can use on the SIP phone.
| Soft Key | Brief Description |
| A>a>1 | Input mode switch in edit state |
| Active | Activate option/service |
| Admin | Enter to administration sub-menu |
| Answer | Answer an incoming call |
| Anym | Shortcut to “Anonymous” |
| Autoan | Shortcut to “Auto Answer” |
| Back | Return to previous menu |
| CallLog | Shortcut to Call log |
| Cancel | Cancel an action or exit to previous menu without applying changes |
| CBack | Perform Callback function |
| CBlock | Shortcut to “Call Block” |
| CFwd | Shortcut to “call forwarding” |
| CidDis | Shortcut to “Number Display” |
| Change | Change phone password |
| Conf | Create a conference call. During a call/conference and another call is coming, press the soft key will join a conference |
| DelChr | Delete character in edit mode |
| Delete | Delete specific entry |
| Detail | Show detailed information |
| Dial | Dial an entered phone number |
| DNDst | Do Not Disturb |
| Down | Contrast adjustment |
| Dsub | Shortcut to “Dial Subscriber” |
| EndCal | Terminate active call |
| Edit | Edit parameter content |
| Exit | Return to previous menu |
| Format | Change display format of specific parameter, such like Date and Time etc. |
| Hold | Hold current active line |
| Join | Join several connected calls to create a conference call |
| Lock | Shortcut to lock phone |
| Dial to voice mail server | |
| MsCall | Shortcut to missed call list |
| NewCal | Make a new call |
| OFF | Set specific service OFF |
| OK | Confirm setting |
| ON | Set specific Service ON |
| Option | Shortcut to phone services |
| Park | Store a call using Call Park |
| PhBook | Shortcut to phone book |
| PickUp | Answer a call on another phone |
| Play | Play music or melody |
| Reject | Reject a call |
| Remove | Remove a conference participant |
| Resume | Resume to original call from call transfer |
| RtPark | Retrieve Park |
| Save | Save the chosen setting |
| Select | Select current item on the screen |
| Stop | Stop music or melody |
| Transf | Transfer a call |
| TrMail | Transfer call to voice mail system |
| UnHold | Unhold a held line |
| Up | Contrast adjustment |
| User | Enter to user submenu |
| View | Show details when data item content is more than LCD can display in one line |
Table 3.2 Definitions of soft keys
Icons & Indicators
The SIP Phone has a 6-line of 20 characters LCD display
● Line 1 : date/time and icons information ● Line 2 to Line 5: operation information ● Line 6 : Soft keys display

→ Network status is okay

→ SIP register that is okay

"Alarm" setting is enabled

Phone unlock
SIP Register not OK
-Network not OK
One or more of the following icons may be shown when a service or function is activated.
Definitions of LED
| LED Indicator | Condition | Color | Status |
| Speaker | Default | Red | OFF |
| During FW boot | ON | ||
| Loudspeaker is activated during a call | ON | ||
| Headset | Default | Red | OFF |
| During FW boot | ON | ||
| Headset or Headset group-listing mode is activated during call | ON | ||
| Mute | Default | Red | OFF |
| During FW boot | ON | ||
| Mute is active | ON | ||
| Feature keys | Default | Green | OFF |
| During FW boot | ON | ||
| Used for speed dial keys in standby mode | OFF | ||
| Line appearance: standby mode | OFF | ||
| Line appearance: a call is incoming | Fast blinking | ||
| Line appearance: is active | ON | ||
| Line appearance: hold or remote hold | Slow blinking | ||
| System | Boot: during FW boot | Red Green | Red ON |
| Boot: during DHCP process (if any) | Red Slow blinking | ||
| Boot: during SIP registration | Red Fast blinking | ||
| Running mode: Ethernet connection is down | Red Slow blinking | ||
| Running mode: IP connection is down (e.g. no IP address allocated) | Red Slow blinking | ||
| Running mode: SIP connection is down (e.g. SIP registration or registration refresh failure) | Red Fast blinking | ||
| Auto-configuration: during configuration file download | Red Fast blinking | ||
| Auto-configuration: during firmware file download | Red Fast blinking | ||
| System is programming FLASH | Red ON | ||
| Ringing state | Green Slow blinking | ||
| Alert messages and missed calls | Green Slow blinking |
Table 3.3 Definitions of LED
Extension module
The extension module features 28 keys. One can plug up to 2 extension modules in a row, leading to a total of 10 + 2 × 28 = 66 possible “multiline” keys.
Memory
The ST2030 has 4MB of Flash, and 16MB of RAM
Power supply
The ST2030 could be powered by either a main power unit or PoE.
The power plug and PoE can be plugged at the same time. The power plug has priority, and PoE takes over in case of power failure.
Its power consumption is under 6W.
Part 4 Call Services
Talking Mode & Operations
5 kinds of communication mode
- Handset mode
- Hands free mode
- Headset mode
- Handset group listening ● Headset group listening
Operation of off hook
There are four ways supported for Off Hook operation
- Picking up the handset: Handset mode
- Press Speaker key: Hands free mode
- Press Headset key: Headset mode
- Press F1 when phone is ringing
Operation of on hook
● Handset mode: replacing the handset ● Handset -Group-Listening mode: press Speaker key and replace the handset ● Hands free mode: press Speaker key ● Headset/Headset-Group-Listening mode: press Headset key
Operation of mode switch during call
| Handset | Hands free | Headset | Handset -GL | Headset-GL | |
| Handset | 1. Press Speaker key2. Replace handset | Press Headset key | Press Speaker key | N/A | |
| Hands free | Pick up handset | Press Headset key | N/A | N/A | |
| Headset | Pick up Handset | 1. Press Speaker key2. Press headset key | N/A | Press Speaker key | |
| Handset -GL | Press Speaker key | Replace handset | N/A | Press headset key | |
| Headset-GL | N/A | Press headset key | Press Speaker key | Pick up Handset |
Table 4.1 Operations of mode switch during call
Main Call Functions
Make a call
On-hook dialing
In standby mode, there are several ways to show dial number.
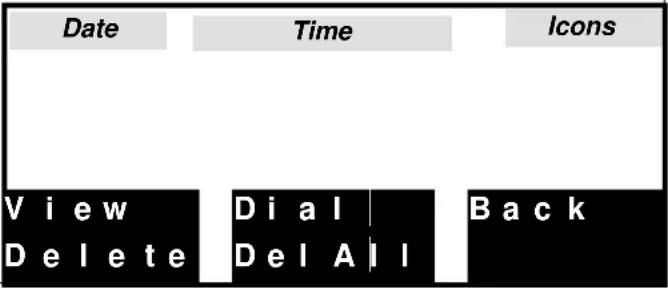
■ Press after / before pressing digital keys directly In standby mode, press “↑”, “↓” or “Redial” key to display the last 30 phone numbers you called
| Key Pressed | LCD display | ||
| “↑”, ”↓”: Scrolling and select number you desired. “←” or “→”: scrolling to view rest. Press View to get details (Date, Time) | Date | Time | Icons |
| View | D i a l | B a c k | |
| D e l e t e | D e l A l l | ||
| If number is stored in phone book, the associated name will be displayed. | |||
■ Press one of speed dial keys (i.e. feature keys) F1 – F10 to display number
■ Query phone book: press ■ Query call log (dialed, received, missed) ■ Query memory key (F1 - F10)
And then you can trigger dialing by any one of the following.
■ Press soft key Dial ■ Press OK key ■ Go off-hook
Off-hook dialing
Performing off-hook operation first, and then you can dial out by any one of the following ways.
■ Press digital keys ■ Press Redial key ■ Press any one of memory keys F1 to F10
Use the call log
| Key Pressed | LCD display | ||
| Press CalLog to showCall Log messagesScrolling and confirm by pressing Ok | Date | Time | Icons |
| Missed | Call | Log | |
| Received | Call | Log | |
| Dialled | Call | Log | |
| Delete | Call | Logs | |
| Select | Back | ||
 |  | ||
Use the phonebook
| Key Pressed | LCD display | ||
| PressorPhBookto show phone book information.“↑”,“↓”: Scrolling and press “Dial” or Ok | Date | Time | Icons |
| ViewAdd | Dial | DeleteBack | |
Last number Redial:

■ Pick up the handset and press

■ Press then

Speed dial
Save memory keys
■ Press any one of F1 – F10 in standby mode ■ Press Edit ■ Key in number you want to save ■ Press Save to store the entry
The memory keys could be modified too in a submenu.
Speed dialing – on-hook dialing
Press any one of F1–F10 in standby mode. On-hook dialing: go off-hook, re-press the feature key, or press the OK key.
Speed dialing – off-hook dialing
Perform off-hook action. Press any one of F1–F10 in dialing mode.
Answer a call
When a call is coming, the caller number and alias are displayed. If the caller number is stored in the phonebook, the associated name is displayed.
While the phone is ringing, you can perform off-hook action or press Answer to answer the call.
Note
Incoming call display is visible only when the phone is in talking state or in standby mode.
When the phone is ringing
| 1 | 2 | 3 | 4 | 5 | 6 | 7 | 8 | 9 | 10 | 11 | 12 | 13 | 14 | 15 | 16 | 17 | 18 | 19 | 20 |
| Date | Time | Icons | |||||||||||||||||
| Caller Name (Alias) | |||||||||||||||||||
| Caller Number/Name | |||||||||||||||||||
| Answer | Reject | Transf | |||||||||||||||||
Reject a call
Press Reject when the phone is ringing.
Call back
Executes Auto Call Back when the called party is busy or does not reply.
ringing on any other station within his own predefined "pickup group"
When you fail to make a call due to destination being “Busy”, you can activate the callback function to complete the call automatically in standby mode.
Press Menu and Option, then select "Dial Subscribe" to view the status.
You can make modifications by pressing Change to enter the phone number you want to auto call back, the time of the call, and the status.
Operation of Call Completion to Busy Subscriber (CCBS)
■ Place a call and you hear busy tone ■ Press soft key CBack ■ Replace handset (i.e., go on-hook, and CCBS is activated)
When CCBS is successful
■ The phone is ringing ■ Go off-hook. - You hear ring-back tone if party doesn't answer yet. Or start conversation if party answers the call. ■ The party will hear ring-back tone, if you don't go off-hook yet.
You can cancel CCBS function by any one of the following ways.
■ Go off-hook ■ Press any digital key
Call forward
The function of Call Forward processes the line forwarding to another phone number. The user can set the system to another phone number. When a call is coming, the system will forward the line to another phone number that is set previously. The system supports three kinds of ways to implement this function including "Unconditional", "Busy", and "No Answer".
Unconditional: Provided that a call is coming, the system will forward the line immediately.
Busy: A call is coming and the user is on a busy line. Then, the system will forward the calling line.
No Answer: On condition that the user does not respond to the calling for 30 seconds, the system will forward the line to another phone number.
Press Menu and Option and select "Call Forward" to view the status of Call Forward you have.
You can change this status by pressing Change.
Enter the phone number towards which you want to forward your calls.
Once this process is completed, press up/down of the cursor to the Call forward type.
Finally, press Save.
Transfer Message to Voice Mail
You can transfer all the calls you receive to your Voice Mail.
Press TrMail, then activate the transfer of your messages to your Voice Mail Box.
Press Change until obtaining "TrToVoiceMail-ON",
finally validate it by pressing OK
Call functions during conversation
Hold and Retrieve a call
■ During a call, press Hold to put a call on hold. ■ Press Unhold to retrieve a held call.
Call Transfer
During conversation mode, you can press the soft key Transf to activate Call-Transfer service.
Operation of "Blind" transfer
■ Press Transf ■ Dial the desired phone number to which you want to transfer the current call ■ Press Transf ■ Hang Up
Operation of "Attended" transfer
Press Transf. Dial the desired phone number to which you want to transfer the current call. Wait for the transfer recipient to answer. Press Transf if the recipient accepts the transferred call. Press Back if the recipient refuses the transferred call.
After pressing Transf once
1 2 3 4 5 6 7 8 9 10 11 12 13 14 15 16 17 18 19 20
Date Time Icons
Enter A Number
Dialed number display
PhBook CalLog Back
When the callee picks up
| 1 | 2 | 3 | 4 | 5 | 6 | 7 | 8 | 9 | 10 | 11 | 12 | 13 | 14 | 15 | 16 | 17 | 18 | 19 | 20 |
| Date Time Icons | |||||||||||||||||||
| Talking... | |||||||||||||||||||
| Transf | Back | ||||||||||||||||||
Conference call
The ST 2030 SIP phone allows a 3-way conference.
Start a conference by calling other party:
During conversation, press Conf. Dial the desired phone number (see the LCD display below). When the callee picks up, press Conf to add the first and second calls into the calling party.
Drop any one participant of the conference call:
Scroll to the line. Press Remove to drop the held participant.
End the conference call:
Clear each participant one by one.
When pressing Conf once.
| 1 | 2 | 3 | 4 | 5 | 6 | 7 | 8 | 9 | 10 | 11 | 12 | 13 | 14 | 15 | 16 | 17 | 18 | 19 | 20 |
| Date Time Icons | |||||||||||||||||||
| Enter A Number | |||||||||||||||||||
| Dialed number display | |||||||||||||||||||
| PhBook CalLog Back | |||||||||||||||||||
When a call/conference is active


When the callee picks up

Options during a call
Group Listening
Hands free
Volume adjustment

While the phone is ringing you can adjust ring volume by pressing the volume keys.
During conversation, you can also adjust volume of any of 5 modes by pressing volume keys.
Mute:

During conversation, press mute key to prevent the callee from hearing what you say.
Multi line
Display of Line/Call status
The IP phone supports up to 10 multi-lines that is configurable by administrator via Web-Page access. Each line can be separately operated various services, including answer, reject, hold, transfer and conference call etc. When the phone is in conversation mode, following is the Line/Call status displayed on LCD.

Note
If we have more than 2 lines connected, up and down arrows to display other lines.
Definition of Status
■ Talking ■ Hold: hold line ■ R-Bye: remote terminates the line ■ R-Hold: remote side holds the line ■ Conf: conference call
Switch Between Line/Call
The IP phone supports up to 10 multi-lines that is configurable by administrator. Each line can be switched by pressing line keys (i.e. keys F1 – F10). Besides the current active line, all others are held by IP phone and can be resumed by pressing associated line key or pressing proper soft key. And the first call is always assigned to line 1.
Press active line key will terminate the call.
When you are communicating with one party and wish to make a brief to another party.
■ Press a free line key (then you will hear dial tone, and the original call is held) ■ Key in number you want to call Or ■ Press NewCal (then you will hear dial tone, and the original call is held) ■ Key in number you want to call
Answer an incoming call when another call is active.
■ The phone will assign a free line dedicated to the incoming call, and the associated LED will blink fast. ■ Press the line key, and the original line is held by phone automatically Or ■ Scrolling the ringing line ■ Press Answer to answer the call
Switch between lines.
■ Press the line key you desire, and the original line is held by phone automatically Or ■ Scrolling to the line ■ Press UnHold to resume the call
Pick up
A station user may dial a special code to answer any incoming calls.
Use menu (table, tree structure). Use HD, SP, HD, adjust volume.
To pick up a call on another phone.
Press PickUp key in standby mode. Key in the phone number. You are connected with the caller. Press OK.
Park up
Somewhat similar to the Call Hold feature; however, once a call is placed in the “park” condition, any station within the system may retrieve it by either dialing the appropriate access code.
Park a call at the phone, and resume the call at another phone.
Set Call park
Press Park. Replace the handset.
Retrieve Call park on another phone.
Press RtPark in standby mode. Key in the parked phone number. Press OK.
Phone book & Call log
Call logs
Press CalLog to view, add, clear call logs and dial from call logs.
There are 3 kinds of call logs: Missed call logs, Received call logs and dialed call logs.
You can also dial from call logs by pressing OK on the selected call.
| Key Pressed | LCD display | ||
| Press CallLog to showCall Log messagesScrolling and confirm by pressing Select | Date | Time | Icons |
| Missed | Call | Log | |
| Received | Call | Log | |
| Dialled | Call | Log | |
| Delete | All | Log | |
| Select | Back | ||
Options list
| No. | Option Message | Comment |
| (1) | Missed Call Log | 30 entries supported |
| (2) | Received Call Log | 30 entries supported |
| (3) | Dialed Call Log | 30 entries supported |
| (4) | Delete all Logs |
Missed Calls
![graph LR A["Idle"] --> B["CalLog"] B --> C["Missed Call log"]](/content/2026/06/1313292/images/7143733877b71452088966f47c60721868f777ec2a223d273c1c4af05a011c28.jpg)
◆ Entry number is refreshed when pressing the scrolling key. ◆ Scroll by pressing the Up/Down key. ◆ Exit to higher-level menu by pressing C or "Back". If the number is stored in the phone book, the associated name will be displayed.

When pressing the feature key, the behavior is the same as in the Phone book.
During the query, you can press Delete to delete the displayed entry.
Press View to enter the sub-menu as follows.
When you have pressed View

When pressing the feature key, the behavior is the same as in the Phone book.
Content of missed call parameters
| Item Name | Data Format | Max. Length | Comment |
| Number | Numeric | 24 | While length of number is more than that LCD can display, press “←” or “→” to get remainder. |
| Alias (Phone name) | Alphanumeric | 20 | |
| Date Time | YY/MM/DD hh:mm |
Display when there are any messages or missed calls
| 1 | 2 | 3 | 4 | 5 | 6 | 7 | 8 | 9 | 10 | 11 | 12 | 13 | 14 | 15 | 16 | 17 | 18 | 19 | 20 |
| Date | Time | Icons | |||||||||||||||||
| Received x messages | |||||||||||||||||||
| Have X missed calls | |||||||||||||||||||
| MsCall | Back | ||||||||||||||||||

■ The reminding message "Received X messages" is always displayed in standby mode until you press the softkey Back or Cancel key. ■ The reminding message "Have X missed calls" is always displayed in standby mode until you press the softkey MsCall, Back, or Cancel key.
Received Call & Dialed Calls
Same as the operation of Missed Calls
Phone book

Press to access the phone book.
You can view, delete and add phone numbers in the phonebook.
You can also dial from phonebook.


ST2030s VoIP Business Phone
The user is able to search and retrieve a phone number without having to scroll between all the entries by typing on a letter. For instance, if the user presses quickly 2 times on key '2' (corresponding to "b" letter), the first name beginning with "b" will be displayed on top of screen.
When pressing feature key, then replace current memory display by item to be memorized is displayed. And corresponding softkeys Replace Edit and Back are displayed.
Edit function is for editing the feature key.
Content of Phone book entry
| Item Name | Data Format | Options List | Max. Length | Comment |
| Name | Alphanumeric | 20 | ||
| Number (TelNbr) | numeric | 24 | While length of number is more than that LCD can display, press “←” “→” to get rest. | |
| RingType (Bell) | Options | Ringer-1Ringer-2...Ringer-nMusic-1Music-2 |
Character Input- Edit Mode
The editor is automatically activated whenever you are modifying content of configurable parameters. Apart from entering characters, you can use this editor to navigate through text or delete characters. Even though the maximal text length is not limited by the number of characters on the display because the text can be shifted to the left and right, there are limits for the certain scenarios. E.g. for phone book name, the limit is 15. For number, it is 31. For IP address, it is 15. The following overview shows all characters that can be entered. Number keys must be repeatedly pressed until the required letter appears; the cursor advances after a short delay (one second) or pressing any other key(0..9,*,#, up, down etc.) indicating that the required letter has been accepted.
| Key | Lower case | Upper case |
| 1 | 1 . , = + - & ^ | | |
| 2 | a b c 2 à á å ã â ç | A B C 2 Ã Ä Â Æ |
| 3 | d e f 3 è é ê ë | D E F 3 É |
| 4 | g h i 4 i í í î | G H I 4 |
| 5 | j k l 5 | J K L 5 |
| 6 | m n o 6 ñ ò ó ô õ õ ø | M N O 6 Ñ Å |
| 7 | p q r s 7 | P Q R S 7 |
| 8 | t u v 8 ù ú û | T U V 8 Ü |
| 9 | w x y z 9 ÿ | W X Y Z 9 |
| 0 | 0 Space @ % () [ ] < > | |
| * | * # ? ! : ; ‘ “ _ / | |
| # | # |
Softkey ABab12 : Switch uppercase (with indicator “>ABC”), lowercase (with indicator “>abc”) and numeric (with indicator “>123”) when entering letters. Note All other symbol needed will be appended to ‘*’ key. Table 4.2 Character input method table
Part 5 Configuration through LCD
Menu list![graph TD A["Config"] --> B["Personalize"] A --> C["Alarm Clock"] A --> D["Contrast"] A --> E["PIN Setting"] A --> F["Shortcut"] A --> G["Memory Key"] A --> H["Information"] B --> I["Ringer"] B --> J["Date"] B --> K["Time"] B --> L["Language"] B --> M["Key Echo"] D --> N["Status"] D --> O["Time"] D -…](/content/2026/06/1313292/images/7c499e18464d0c2f9e33475247cd26da13f7f7a7baea4a667e008926fea2dcca.jpg)
![graph TD A["Admin"] --> B["Input Password: 784518 (select number with A>a>1)"] B --> C["Networking"] B --> D["PPPoE"] B --> E["NTP Setting"] B --> F["SIP Configuration"] B --> G["VLAN setting"] B --> H["Ethernet configuration"] B --> I["Emergency Dial Plan"] B --> J["Reset Default"] C --> K["Mode"]…](/content/2026/06/1313292/images/6e003164d426717bd6ea54295304360a1ba65a0516c04e28db141699daaa0141.jpg)
![graph TD A["Option"] --> B["Dial Subscribe"] A --> C["Call Blocking"] A --> D["Call Forward"] A --> E["Call Waiting"] A --> F["Anonymblock"] A --> G["Auto Answer"] A --> H["Auto Reject"] B --> I["Auto Stop"] C --> J["Auto HangUp"] D --> K["Number Display"] E --> L["DoNotDisturb"] F --> M["PhoneLock"…](/content/2026/06/1313292/images/085eec4a354040a5597eee5eb77dbd76f59f68157b0cf2117b9ed34ca549f677.jpg)
Figure 5.1 Operation Menu LCD Display
Operation menu display
Home operation menu display

Config Menu Display
![graph TD A["◆ Scroll by pressing Up/Down key"] --> B["◆ Select by pressing OK or "Select""] B --> C["◆ Return to idle state by pressing C or "Back""] D["Sub-MENU LIST"] --> E["Sub-MENU LIST"] E --> F["Sub-MENU LIST"] G["Select"] --> H["Back"]](/content/2026/06/1313292/images/fda119570313f0664bdd375da15b7a4752fdb67f6da29a9741d18525c5b3ae65.jpg)
Sub-menu list of User Setting
| No. | Option Message | Comment |
| (1) | Personalize | Set date/time format, Key-echo, language and Ringer type |
| (2) | Alarm Clock | Activate Alarm clock, set bell and time |
| (3) | Contrast | |
| (4) | PIN Setting | Change personal phone password |
| (5) | Shortcut | Shortcut setting |
| (6) | Memory Keys | Configure Speed dial keys |
| (7) | Information | Software Version, IP, MAC, Gateway, Mask |
Admin Menu Display

You have to input a password to access Admin settings: 784518. Don't forget to switch from uppercase to numeric (ABC to 123).
![graph TD A["◆ Scroll by pressing Up/Down key"] --> B["◆ Select by pressing OK or “Select”"] B --> C["◆ Return to idle state by pressing C or “Back”"] D["Line 1 Date Time Icon"] --> E["Sub-MENU LIST"] F["Line 2"] --> E G["Line 3"] --> E H["Line 4"] --> E I["Line 5"] --> E J["Line 6 Select"] --> K["Ba…](/content/2026/06/1313292/images/dd9d33b411312e9c5c31b8cbb08038614b001773b1ec3d5e7653f6e634d05dc0.jpg)
Sub-menu list of admin setting
| No. | Option Message | Comment |
| (1) | Networking | |
| (2) | PPPoE | Invisible when PPPoE function is disabled |
| (3) | NTP Setting | |
| (4) | SIP Configuration | |
| (5) | VLAN setting | |
| (6) | Ethernet configuration | . |
| (7) | Emergency Dial Plan | |
| (8) | Reset Default |
Option Menu Display
![graph LR A["Idle"] --> B["Menu"] B --> C["Option"] C --> D["Shortcut"]](/content/2026/06/1313292/images/0355915787de2dbe875655d464d00683f3850b7748d5862ef9afcaff0359455f.jpg)


Sub-menu list of admin setting
| No. | Option Message | Comment |
| (1) | Dial Subscribe | |
| (2) | Call Blocking | |
| (3) | Call Forward | |
| (4) | Call waiting | |
| (5) | Anonymblock | |
| (6) | Auto Answer | |
| (7) | Auto Reject | |
| (8) | Auto Stop | |
| (9) | Auto HangUp | |
| (10) | Number Display | |
| (11) | DoNot Disturb | |
| (12) | PhoneLock | |
| (13) | Reboot | You need to reboot for saving your modifications |
Content of Shortcut Parameters
| Item Name | Data Format | Comment |
| X | options | Dial Subscriber -> DsubCall Blocking -> CBlockCall Forward -> CFwdAnonymous -> AnymAuto Answer -> AutoAnNumber Display -> CidDisElse... |
Detailed LCD menu settings
![graph TD A["Idle"] --> B["Menu"]](/content/2026/06/1313292/images/a6225c9769aec534b2ecd157e985307f1d9a8d0e8d100ad18936e557e25f1133.jpg)
Home operation menu display

User Menu Display
![graph LR A["Idle"] --> B["Menu"] B --> C["Config"]](/content/2026/06/1313292/images/d1d49194cfbbe0b88a9415a9203d4f219abe302944657071a6ec75f0c6e8bfe2.jpg)
ST2030s VoIP Business Phone
Sub-menu list of User Setting
| No. | Option Message | Comment |
| (8) | Personalize | Set date/time format, Key-echo, language and Ringer type |
| (9) | Alarm Clock | |
| (10) | Contrast | |
| (11) | PIN Setting | Change personal phone password |
| (12) | Shortcut | Shortcut setting |
| (13) | Memory Keys | |
| (14) | Information | Software and hardware Version, IP, MAC, Gateway , Mask |
Personalize Setting![graph LR A["Idle"] --> B["Menu"] B --> C["Config"] C --> D["Personalize"]](/content/2026/06/1313292/images/0b957ecb9761abc15064f4596218deb6725bed958225590bfdfc076cc62f3ace.jpg)

Content of Phone Option/Parameters
| Item Name | Configurable | Data Format | Options List | Comment |
| Name | Yes | Alphanumeric | Max. length: 15 | |
| Ringer | Yes | Options | Ringer-1...Ringer-4CanonShuffle | You can press soft key Play when editing the content. |
ST2030s VoIP Business Phone
| Date | Yes (Configurable when NTP is disabled) | MM/DD/YY DD/MM/YY YY/MM/DD | You can press soft key format to change format.MM/DD/YY DD/MM/YY YY/MM/DD | |
| Time | Yes (Configurable when NTP is disabled) | hh:mm | hh:mm am hh:mm | You can press soft key format to change format.12 Hours24 Hours |
| Language (Lang) | Yes | Options | English French Spanish German Italian Portuguese Deutsch Norsk Russian Nederlands | |
| Key Echo (KeyEch) | Yes | Options | ON OFF |
Alarm Clock
![graph LR A["Idle"] --> B["Menu"] B --> C["Config"] C --> D["Alarm Clock"]](/content/2026/06/1313292/images/2dd0f4fde9d814e4b5a10ef6970f139fe164752e5fcd370ba37f0a4d2d2360ac.jpg)
◆ ItemName is refreshed when pressing scrolling key ◆ Scroll by pressing Up/Down key ◆ Exit to higher-level menu by pressing C or "Back"

Content of Alarm Parameters
| Item Name | Configurable | Data Format | Options List | Comment |
| Startup (Status) | Yes | Options | ONOFF | |
| Time | Yes | hh:mm | ||
| Type | Yes | Options | One Shot Periodic | |
| Bell Type (Bell) | Yes | Options | Ringer-1...Ringer-4CanonShuffle | You can press soft key Play to play option when editing the content of Bell Type. |
First activate alarm clock then change time.
Contrast
![graph LR A["Idle"] --> B["Menu"] B --> C["Config"] C --> D["Contrast"]](/content/2026/06/1313292/images/ddd2d9258dd856cf2c0ba7738fe0dc2f051c42fef072c13acb47756d9abb58bc.jpg)
◆ Scroll by pressing Up/Down key ◆ Exit to higher-level menu by pressing C ◆ Press "Down" or "Up" to adjust contrast ◆ Press "OK" to confirm and exit to higher-level menu. ◆ Press "Cancel" to cancel the setting.

PIN Setting
![graph LR A["Idle"] --> B["Menu"] B --> C["Config"] C --> D["PIN Setting"]](/content/2026/06/1313292/images/cf761dbf3207620acce2d6d4efce6b8921d3b88630653fddd5296db9e9e5b236.jpg)


The password is : 0000
Caution
![graph TD A["◆ Scroll by pressing Up/Down key"] --> B["◆ Select by pressing OK or "Select""] B --> C["◆ Return to idle state by pressing C or "Back""] D["Line 1 Date Time Icon"] --> E["Options list"] F["Line 2"] --> E G["Line 3"] --> E H["Line 4"] --> E I["Line 5"] --> E J["Line 6…](/content/2026/06/1313292/images/0360766733cc74876518e7ca43023c4bf16bef54583ef7e4f5c9a29464f3033d.jpg)
Options list
| No. | Option Message | Data Format | Comment |
| (1) | Flag | ON OFF | When Status is ON, the phone lock setting will be authorized by checking personal code.PressChange to enable/disable the item. |
| (2) | Change Code | Press soft key “Change” to change PSWThe default password is0000. |
Shortcut Setting
![graph LR A["Idle"] --> B["Menu"] B --> C["Config"] C --> D["Shortcut"]](/content/2026/06/1313292/images/7243208ed6318d89e5328960b3c6a4a3e23bb838e74d4ae9dd5ffe4576f0908c.jpg)
You can edit two shortcuts
Information
![graph LR A["Idle"] --> B["Menu"] B --> C["Config"] C --> D["Information"]](/content/2026/06/1313292/images/82941d3ce88d9bfa0cc1763db74a15a7194c97ae364f2006e9081e9536545c50.jpg)
Content
| Item Name | Configurable | Comment |
| FW version | No | Indicate to the user the firmware's version |
| HW version | No | Indicate to the use r the hardware's version |
| IP address | No | Indicate to the user the IP address |
| MAC address | No | Indicate to the user the MAC address |
| Gateway | No | Indicate to the user the gateway address |
| Mask | No | Indicate to the user the mask address |
Memory Keys Setting
![graph LR A["Idle"] --> B["Menu"] B --> C["Config"] C --> D["Memory Key"]](/content/2026/06/1313292/images/6e224fdd5b02805657e9aedaf9b48623b71ff237967c5dff92467ebbce08b101.jpg)

Menu of Admin Settings
![graph LR A["Idle"] --> B["Menu"] B --> C["Admin"]](/content/2026/06/1313292/images/495ea840cfa8b09c235340c69ee0a80e16d4d19e77c23118162768c5efe1d049.jpg)
Caution
You have to input a password to access Admin settings: 784518
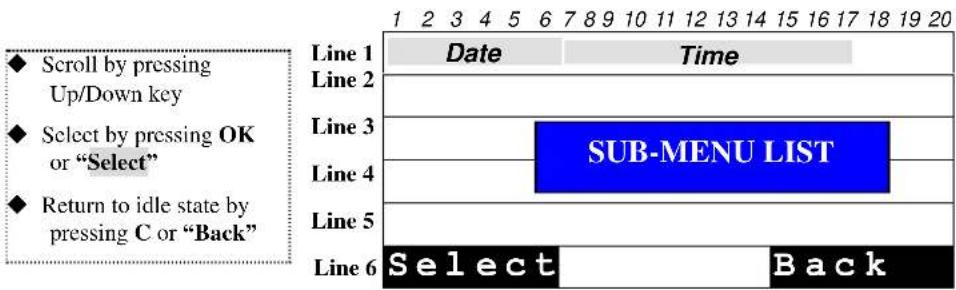
Sub-menu list of admin setting
| No. | Option Message | Comment |
| (7) | Networking | |
| (8) | PPPoE | Invisible when PPPoE function is disabled |
| (9) | NTP Setting | |
| (10) | SIP Configuration | |
| (11) | VLAN setting | |
| (12) | Ethernet configuration | |
| (13) | Emergency Dial Plan | |
| (14) | Reset Default |
Networking Configuration
![graph LR A["Idle"] --> B["Menu"] B --> C["Admin"] C --> D["Networking"]](/content/2026/06/1313292/images/8a1301bdbf1977940fdd85349afa0716dbd832ff01180a84777fb07bc53b6540.jpg)
![graph TD A["ItemName is refreshed when pressing scrolling key"] --> B["Scroll by pressing Up/Down key"] B --> C["Exit to higher-level menu by pressing C or "Back""] D["Line 1"] --> E["Date"] --> F["Time"] --> G["Item Name"] H["Line 2"] --> I["CONTENT"] J["Line 3"] --> I K["Line 4"] --> I L…](/content/2026/06/1313292/images/76740d4aecd1c14bc70ad61c87b62639c84aed186fa2dc2eb8585c5ce105a93b.jpg)
Content of Network Parameters
| Item Name | Configurable | Data Format | Options List | Max. Length |
| Mode | Yes | Options | Fix IPDHCPPPPoE | |
| IP | Yes(For Fix-IP only) | xxx.xxx.xxx.xxx | 15 | |
| MAC | No | xx:xx:xx:xx:xx:xx | ||
| Gateway (GW) | Yes(For Fix-IP only) | xxx.xxx.xxx.xxx | 15 | |
| Net mask (Mask) | Yes(For Fix-IP only) | xxx.xxx.xxx.xxx | 15 | |
| Pri DNS | Yes(For Fix-IP only) | xxx.xxx.xxx.xxx | 15 | |
| Sec DNS | Yes(For Fix-IP only) | xxx.xxx.xxx.xxx | 15 |
PPPoE Setting
Press Menu key in idle state triggers menu operation.
![graph LR A["Idle"] --> B["Menu"] B --> C["Admin"] C --> D["PPPoE"]](/content/2026/06/1313292/images/ececac7ef6c4c3094e42c27dbbbc4abdb59124abe14f89c7ac96121c9d87ab0b.jpg)

Content of PPPoE Parameters
| Item Name | Configurable | Data Format | Options List | Max. Length |
| ACC Name (Acc) | Yes | Alphanumeric | 63 | |
| PASSWORD (Pwd) | Yes | Alphanumeric | 31 |
NTP Setting
![graph LR A["Idle"] --> B["Menu"] B --> C["Admin"] C --> D["NTP setting"]](/content/2026/06/1313292/images/e08e976bbbd5bf53aa561358b097b4697b8a19b40918171faa638f9c5861ea2f.jpg)

Content of NTP Parameters
| Item Name | Configurable | Data Format | Options List | Max. Length |
| Status | Yes | Options | ONOFF | |
| IP | Yes | xxx.xxx.xxx.xxxDomain Name | 1563 | |
| Zone | Yes | Options | - 12:00 ~ +12:00 | |
| DST | Yes | Options | ONOFF |
SIP Configuration Setting
![graph LR A["Idle"] --> B["Menu"] B --> C["Admin"] C --> D["SIP Config"]](/content/2026/06/1313292/images/249bfde9181f7246a1199523309ffb430a9b2b342f9a61f619fa47061568fab8.jpg)
![graph TD A["Scroll by pressing Up/Down key"] --> B["Exit to higher-level menu by pressing C or "Back""] B --> C["Profile list"] C --> D["Time"] D --> E["Prof(n)"]](/content/2026/06/1313292/images/05f0d7118a241f2ecc811fc6b05afad3298fbcde89851bc5d3d27900c46450f9.jpg)
Profile List
| No. | Profile Name | Comment |
| (1) | Profile 1 | ◆ Profile name is configurable (refer to “3.4.1 SIP Profile Parameter”) ◆ Only one of profiles is active, and the active profile will be marked with “(ON)” |
| (2) | Profile 2 | |
| (3) | Profile 3 | |
| (4) | Profile 4 |
SIP Profile Parameters![graph LR A["Idle"] --> B["Menu"] B --> C["Admin"] C --> D["SIP Configuration"] D --> E["Select profile"]](/content/2026/06/1313292/images/228242c795567abdfd197bfe145ca2a1a60d811e8244184a789149cb18ef60bb.jpg)

Content of SIP Profile
| Item Name | Configurable | Data Format | Options List | Max. Length |
| ID | Yes | Alphanumeric | 15 | |
| PhoneName (Name) | Yes | Alphanumeric | 20 | |
| PxySrv | Yes | xxx.xxx.xxx.xxx DomainName | 15 127 | |
| RegSrv | Yes | xxx.xxx.xxx.xxx DomainName | 15 127 | |
| RegID | Yes | Alphanumeric | 63 | |
| RegPwd | Yes | Alphanumeric | 63 | |
| DomainName (Dname) | Yes | Alphanumeric | 127 | |
| TelNbr | Yes | Numeric | 24 | |
| 2ndPxy | Yes | xxx.xxx.xxx.xxx DomainName | 15 127 | |
| 2ndReg | Yes | xxx.xxx.xxx.xxx DomainName | 15 127 |
Part 6 Configuration via Web Interface
Configuration through the Web interface
The phone can also be configured using the web browser. It has a friendly web interface to set and modify parameters.
Step 1 – Before starting
The IP phone should be connected to the Network and then be powered it up before the connection to the web server.
Step 2 – Connect to the IP Phone web server
1) Start a web browser session 2) Input the phone's IP address into the address field. a. For example: http://10.0.0.139/admin.html 3) Enter the username (by default: administrator) 4) Enter the password (by default: 784518) 5) Once the process is completed, you can change the settings values to your convenience.
Step 3 – Reboot the phone
Some parameters will require the phone to be rebooted for changes to be operated.
The web pages below will be displayed once you have input the phone's IP address into the address field.
Detailed Web pages
Please find below the web pages related to the configuration of phone settings via web interface
CONNECTION PAGE

HOME PAGE

SETUP PAGE
SETUP: Network setup page (DHCP)
SETUP: Basic setup page
Profile edit
THOMSON

APS basic setup
ADVANCED PAGE
ADVANCED: STUN page

ADVANCED: UPnP

ADVANCED: SNTP
ADVANCED: SNMP
ADVANCED: QoS
ADVANCED: Ethernet connection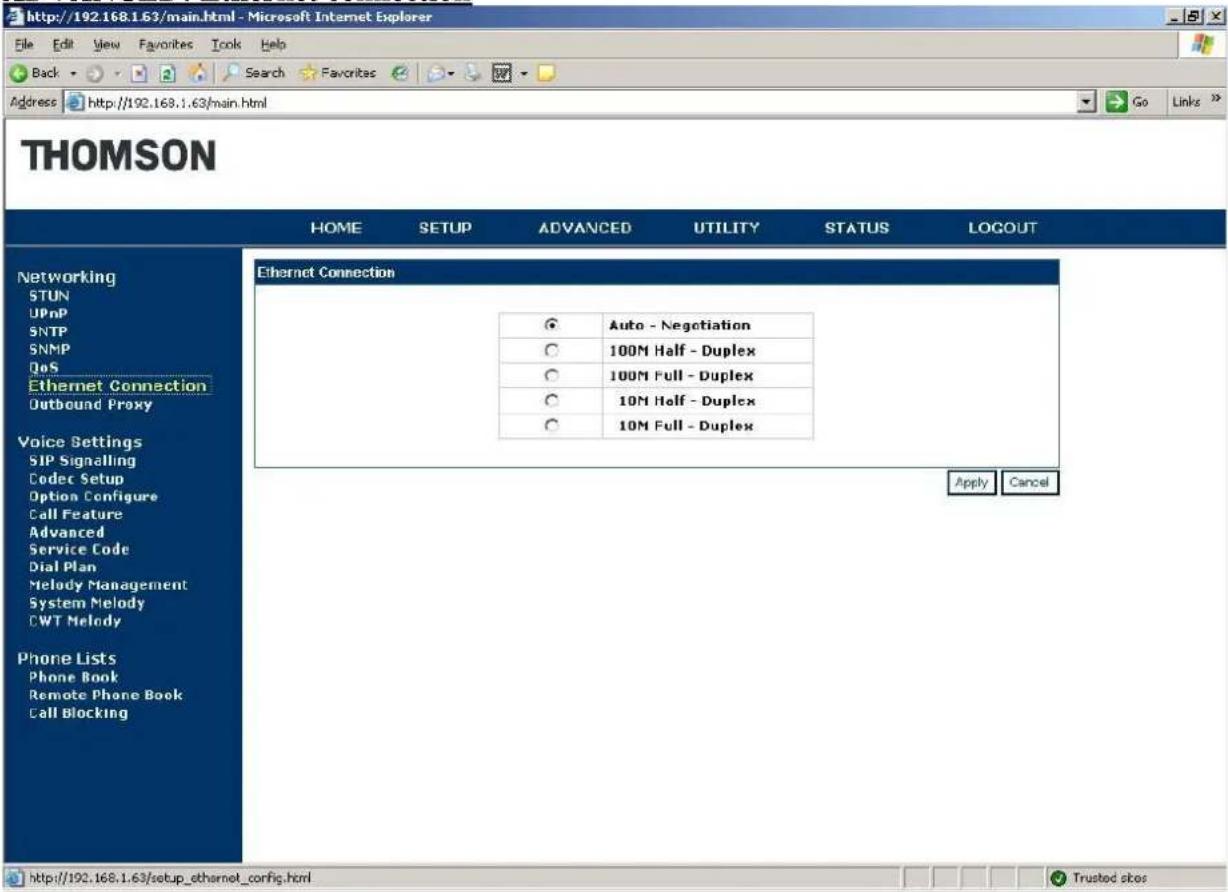
ADVANCED: Outband proxy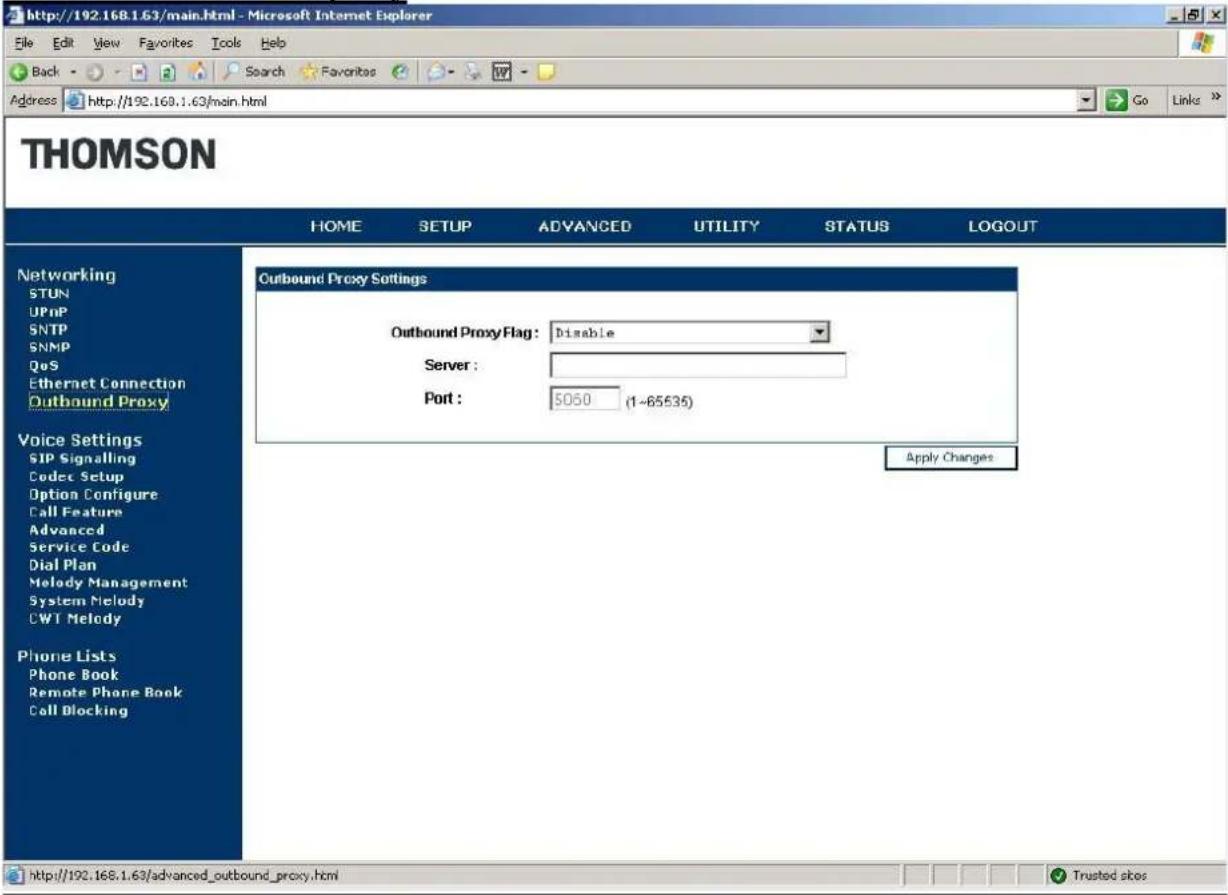
ADVANCED: SIP signalling
ADVANCED: Codec setup
ADVANCED: Option configure
ADVANCED: Call Features
ADVANCED: Advanced
ADVANCED: Service Code
ADVANCED: Dial plan![Screenshot of the Thomson router web interface at http://192.168.1.63/main.html. The page shows the Advanced > Dial Plan section with a left navigation menu as in other pages. The main area displays fields for VoIP Dial Plan: x.7, Emergency Dial Plan: |P11| 11x |1[2-8] |, PBX configuration: OFF, PBX…](/content/2026/06/1313292/images/12ff3ca900646b68128695f80ca941997a10a53c998eb24ec49016654dfaf2ee.jpg)
ADVANCED: Melody management
ADVANCED: System Melody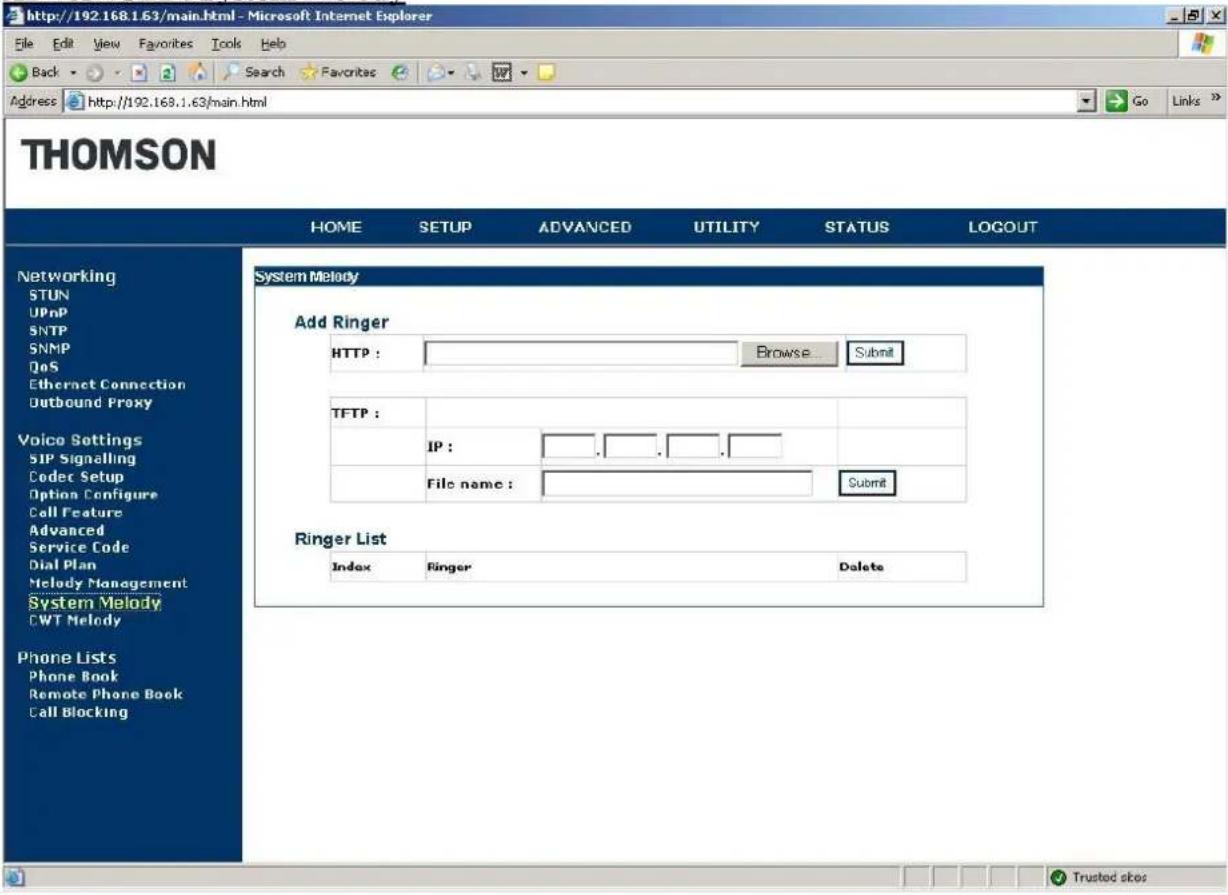
ADVANCED: CWT Melody
ADVANCED: Phone book
ADVANCED: Remote phone book
ADVANCED: Call blocking
UTILITY PAGE
UTILITY: Save & restart
UTILITY: Backup setting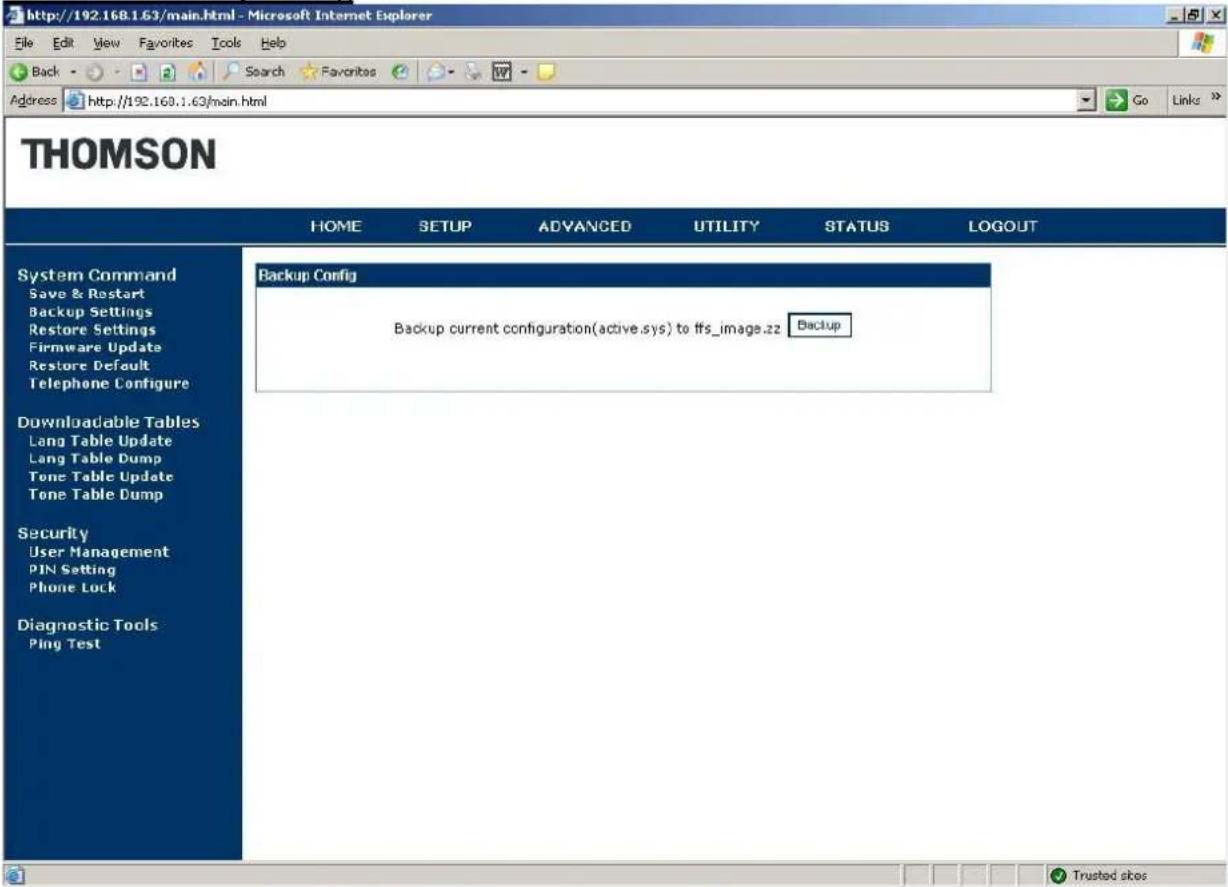
UTILITY: Firmware Update
UTILITY: Restore default
UTILITY: Telephone configure
UTILITY: LangTbl update
UTILITY: LangTb1 dump
UTILITY: ToneTbl update
UTILITY: ToneTbl dump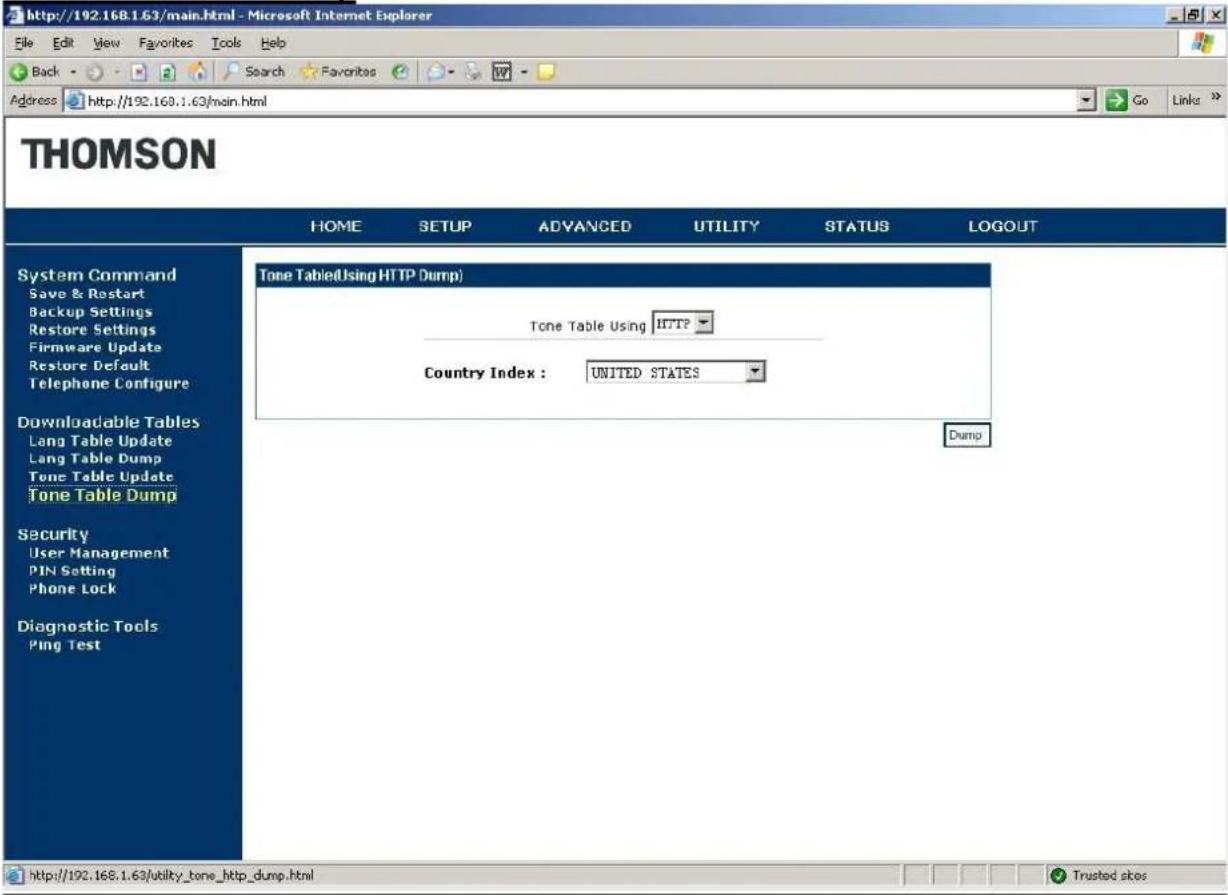
UTILITY: User management
UTILITY: PIN setting
UTILITY: Phone lock
UTILITY: Ping test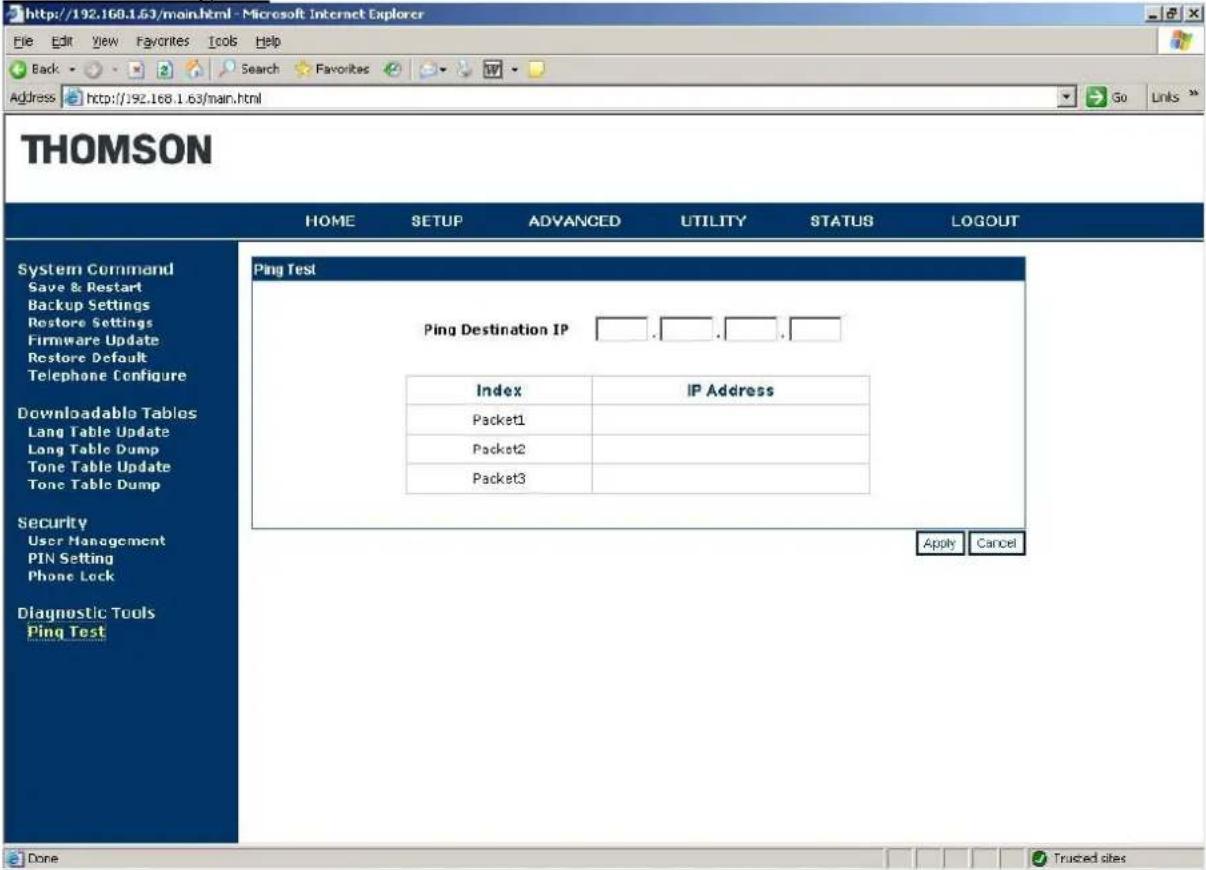
STATUS PAGE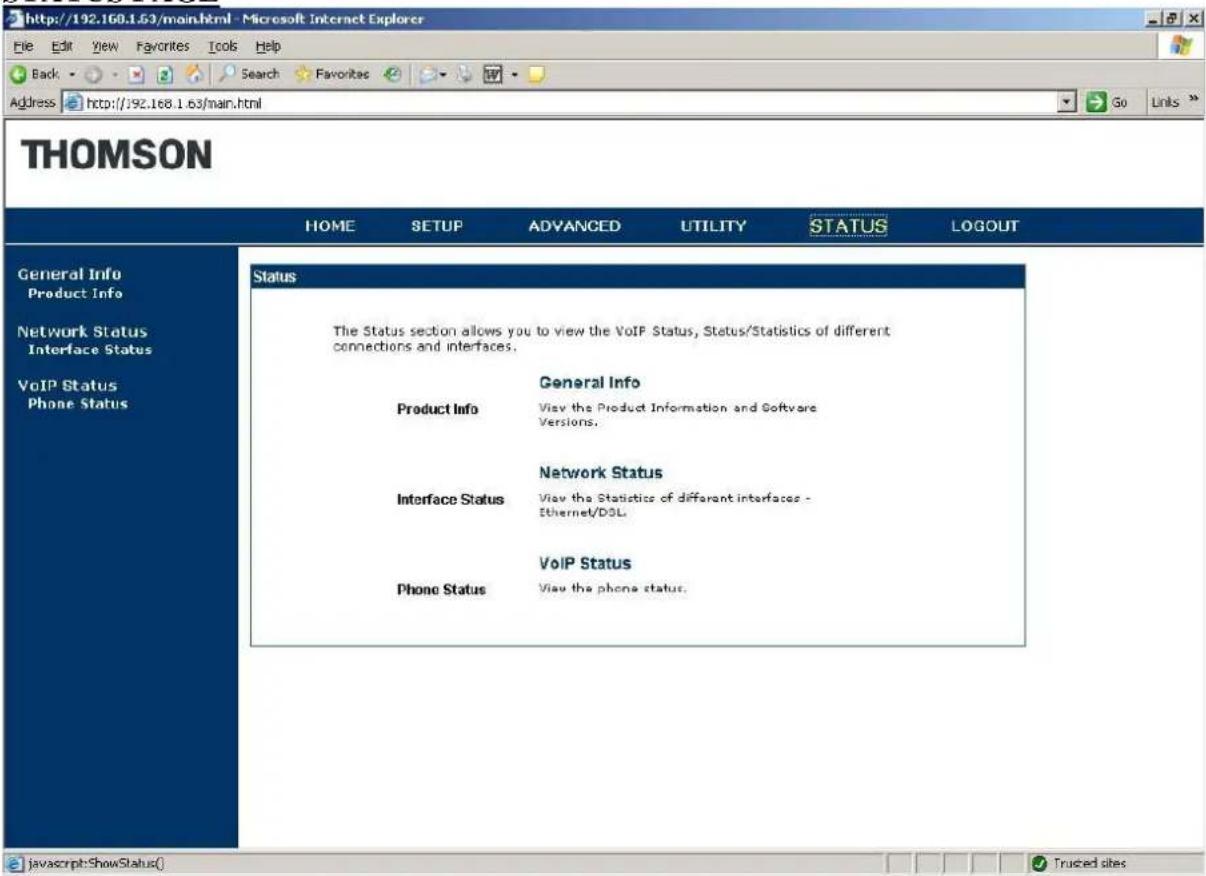
STATUS : Product info
STATUS : Interface Status
STATUS: Phone Status
Part 7 Auto-Provisioning
The automatic provisioning requires one DHCP server and one TFTP server.
Please find below the way to provision your IP Phone.
Automatic phone provisioning with TFTP
The automatic phone provisioning is particularly adapted to the provision of several phones at the same time, of any large-scale deployment environment. Auto-provisioning is achieved using 2 well-known protocols: Dynamic Host Control Protocol (DHCP) and Trivial File Transfer Protocol (TFTP).
Simply follow next steps to provision your IP Phone:
Needed:
1 DHCP server which one can manage the options
1 TFTP server
1 ST2030 (SIP or MGCP)
Several files which one can need (correctly filled) are:
SIP: File INF
Firmware
(See examples of these files in Appendix.)
The files:
File INF: (extension .txt or .inf) informs about the location of the various files to download (relative or absolute path).
Firmware: Version code that needs to be upgraded by the phone.
File “common_config”: (extension .txt) informs the phone about configurations that need to be upgraded at the network, SIP (or MGCP), auto provisioning, etc. levels.
File MAC: (extension .txt). Same as the “common_config” file, but its name is based on the phone’s MAC address that needs to be upgraded, and the configuration made inside will concern only the phone with that MAC address. It has priority if both files are on the TFTP server.
File “TelConf”: (extension .txt), a set of audio parameters that configures the phone for audio performance.
Files Deck: (ONLY MGCP) (extension .thd), allow the phone to know how to display certain flows (XML) on screen. Generally, these are files sent via the operator chosen for connection to the service.
We often provide only the upgrade firmware to the customer. The other files are normally managed by the administrator who handles the auto provisioning procedure.
DHCP option:
Option 66: IP address of the TFTP server where the files to be downloaded are located.
Option 67: Name of the INF file on the TFTP server.
Option 150: IP address of the TFTP server used if this option (optional) is in DHCP options.
Option 43: Used for HTTP upgrade. If options 66 or 150 are not present, option 43 will be selected.
Option Next server Address: IP address of the TFTP server used in some cases when the other options are not manageable but this one is.
Put in the following way in the DHCP configuration file (dhcpd.conf)
| option tftp-server-name "@IP serveur TFTP"; | ----> option 66 |
| option bootfile-name "nomDeFichierINF.txt"; | ----> option 67 |
| option provision-server-ip code 150 = text; | ---->option 150 is text, not binary mode |
| option provision-server-ip "@IP serveur TFTP "; | ----> next server address |
| option vendor-encapsulated-options "http://192.168.70.10/swupgrade_st2030m.txt" | ---->option 43 |
Installation of the platform
Installation of the DHCP server
To set up all the necessary options (option 66 and 67)
Installation of the TFTP server
To put in the repertory of the TFTP server the last version of the firmware
Provisioning process
Process of auto provisioning in theory:
At the time of the connection of a phone to the network, it will ask an IP address to DHCP server. This one will provide him an IP address but also the address of TFTP server where file INF is. This file will indicate on the phone the configuration file names which it must upgrade.
Process of auto provisioning in practice:
- Do not connect the phone with electricity. To put the cable (RJ45) in the Ethernet LAN port at the back of the phone.
- Restore the default parameters. With this intention, it is necessary to maintain inserted the keys "headset" (ear-phone) and "transfers" (dumb) of the phone.
- Connect phone with electricity.
Maintain the keys "headset" (ear-phone) and "transfers" (dumb) of the phone inserted, until seeing that the provisioning is carried out.
- The phone will start (it will recover an IP address by DHCP server, the IP address of TFTP server and the name of file INF which will be downloaded) and will begin the process of auto provisioning.
1. In the order:
Remote loading of file INF Remote loading of the firmware Reboot 2nd Remote loading of file INF Remote loading of the file TelConf Remote loading of the file Common_config Attempt of remote loading of the specific file MAC if he is Reboot Remote loading of file INF 2nd Attempt of remote loading of the specific file MAC if he is (Remote loading of the files Deck for MGCP)
- The phone is connected to the service of the operator.
Some precise details:
If phone doesn't receive an IP address, you need to check up that the parameter Mode -> DHCP is activated
The file "Common_config" will be downloaded only if the file's name has been changed compared to the last upgrade.
The specific file MAC is downloaded (if there exists) if his parameter "config_sg" was incremented.
It is imperatively necessary to download the file TelConf before returning it to the customer.
It is possible to pass from a phone SIP and quite simply to transform it into MGCP (but not the reverse) by providing on phone SIP a firmware corresponding to MGCP protocol as well as the good files which go with.
Automatic phone provisioning with HTTP
Also the provisioning can be carried out via HTTP. For that, it is necessary to follow following steps
Needed :
1 router DHCP
1 ST2030 (SIP or MGCP)
The last version of the firmware
Process of auto provisioning in theory:
When a phone connects to the network, it requests an IP address from the DHCP server. The server provides it with an IP address. While accessing the phone's web interface in admin mode, you can upgrade the firmware.
Process of auto provisioning in practice:
- Do not connect the phone to power. Connect one end of an Ethernet cable (RJ45) to the LAN port on the back of the phone, and the other end to the DHCP router.
- Restore the default settings. To do this, keep the "headset" (earphone) and "transfer" (blind) keys on the phone pressed.
- Connect the phone to power. Keep the "headset" (earphone) and "transfer" (blind) keys pressed until provisioning is complete.
- Since the phone has no provisioning or gateway to connect to at the moment, it will continue to blink.
- Find the phone's IP address (provided by the router's DHCP). So:
If MGCP phone:
- Press the menu key on the phone
- Press the admin softkey
- Press the OK button on the phone
- Select Network configuration using the arrow keys
- Select IP address and note the address shown
If SIP phone:
- Press the menu key on the phone
• Use the down button to move the cursor until you reach Information. Select Information and note the IP address shown.
- Open a web browser (Internet Explorer, Mozilla, etc.)
- In the address bar, enter: IPaddressofphone/admin.html
The IP address of the phone is the one noted in step (5). The web interface appears.
- Login: administrator. Password: 784518
- This page is displayed:

- Select "UTILITY".
ST2030s VoIP Business Phone
ST2030s VoIP Business Phone
- In the box Firmware Update Using leave "HTTP" and click on the button "Browse..." In the window which opens, select the version of the firmware to be installed.
- Press « Apply »
- The phone will normally reboot.
- Start again from step 7) to step 11). Select « Telephone Configure »

- In the box Firmware Update Using leave "HTTP" and click on the button "Browse..." In the window which opens, select the file TelConf to be installed.
- Press « Apply »
- The phone will normally reboot.
- Start again the process (find IP address, open WEB interface as admin). On the banner page of the WEB interface, you should see the firmware's version of the phone. Look in « System Information », at the line « APP Version ».
Caution: the main power supply must not be interrupted during the booting session. The phone could be damaged.
[Note]: when you want to upgrade the firmware or download a new configuration, you have to follow steps 1 and 2 and reboot the phone from its web-based interface.
Part 8 Ringtones configuration
1. Description
The ringtones which are integrated into the ST2030 use a RTTTL format. A ringing with RTTTL format looks like the following example:
Halloween:d=4,o=5,b=180:8d6,8g,8g,8d6,8g,8g,8d6,8g,8d#6,8g,8d6,8g,8g,8d6,8g,8g,8d6,8g,8d#6,8g,8c#6,8f#,8f#,8c#6,8f#,8f#,8c#6,8f#,8d6,8f#,8c#6,8f#,8f#,8c#6,8f#,8f#,8c#6,8f#,8d6,8f#
These ringtones can be created by the user and they can be also downloaded for free on Internet.
We give a series of specialized websites where you can find example of tones:
• didier.elo.free.fr/ringtones.html • www.xqsmonline.com/smartsmslogos.shtml - www.kortable.com/sonneries/sonneries-nokia-rtttl.asp
2. Make a melody
There is the software Ringtone Converter which is free and simple of use that we advise you.

Figure 8.1 Ringtone Converter
You can download this software here:
www.codingworkshop.com/ringtones/
This software allows the user to create their own melodies directly in RTTTL format. To do this, go to "File", "Ringtone composer", and finally "Open with new melody".

Figure 8.2 Ringtone Converter
The following screen is displayed and will allow the user to compose melodies according to their choice.

Figure 8.3 Ringtone Composer
Moreover, a database, already containing a large number of melodies in RTTTL format, is integrated into this software. To access these ringtones, perform the steps shown in the screenshot below.

Figure 8.4 Ringtone Composer
3. Integration of the ringtones with ST2030
In order to integrate new ringtones in RTTTL format into the phone, the user must first copy all these ringtones in RTTTL format into a file with a .txt extension. It is thus necessary to use software like Notepad.

Next, we need to find the phone's IP address. So:
If MGCP phone:
- Press the menu key on the phone
- Press the admin softkey
- Press the OK button on the phone
- Select Network configuration by scrolling down with the arrows
- Select IP address and note the address indicated
If SIP phone:
- Press the key menu on the phone, then use the down button to scroll to "Information".
- Select "Information" and note the IP address displayed.
Enter the IP address in a web browser (Mozilla, Internet Explorer, etc.) as follows: adresseIPduTelephone/admin.html
The following screen will be displayed:

Next, click on "Advanced":

Finally, select "Melody management" and enter the name of the file (with a .txt extension) that contains the ringtones, using the browser button.
ST2030s VoIP Business Phone
Part 9: Feature Overview
This section shows the number of new features implemented in each software release, up to version 2.69.
Note:
This administrator guide is based on firmware v2.69. You can download the latest administrator guide from:
www.thomsonbroadbandpartner.com
ST20XX SIP New Features (SG vx.69.2)
Overview
This document describes a set of new features included in ST2030 and S2022 SIP V2.69.2 and 4.69.2 respectively in order to improve their usability in different environments.
Venezuela Numbering Plan
Starting from this release, we have implemented the Venezuela Numbering Plan.
Feature Activation
Check_phonebook_domain_name=0
V_flag=1
V_state_prefix=212 (for example)
A. Via APS
APS in [sys] section of both Common and Specific-MAC config files with the new parameters - V_flag, V_state_prefix.
V_flag = 0/1, // 0: Disable Venezuela Numbering Plan (default)
// 1: Enable Venezuela Numbering Plan
V_state_prefix = (empty for default), prefix
[ipp]
...
Check_phonebook_domain_name=0
...
[sys]
...
V_flag=1
V_state_prefix=212
...
B. Via Telnet
To configure, open a command line console, and telnet the phone:
Example:
V_flag is set to enable (sys set V_flag 1)
[administrator]# sys set V_flag 1
[OK] Set OK

[administrator]#
V_state_prefix is set to 212 (sys set V_state_prefix 212)
[administrator]# sys set V__state_prefix 212
[OK] Set OK

[administrator]#
Check_phonebook_domain_name is set to disable (ipp set Check_phonebook_domain_name 1)
[administrator]# ipp set Check_phonebook_domain_name 0
[OK] Set OK

[administrator]#
Then type commit and then activate to apply the change.
After setting,
Example 1 - Received p-asserted-id (user part of sip uri): 582125671234
Number to be displayed for the incoming call: 5671234
Number to be stored in call log: 5671234
Matches with phonebook number entry: 5671234
Example 2 - Received p-asserted-id (user part of sip uri): +582461234567
Number to be displayed: 02461234567
Number to be stored in call log: 02461234567
Matches with phonebook number entry: 02461234567
Example 3 - Received p-asserted-id (user part of sip uri): +584147654321
Number to be displayed: 04147654321
Number to be stored in call log: 04147654321
Matches with phonebook number entry: 04147654321
LLDP
The following parameters are added for LLDP Service. This parameter is configurable in common config file and telnet.
lldpXFlag = 0/1 // 0: Disable LLDP function (Default)
// 1: Enable LLDP function
lldpTxPeriod = 5 - 32768 (30 default)
lldpTTL=120
lldpPortDesc=
lldpSysName=
lldpSysDesc=
lldpSysCap=2097184
lldpChassisID=4
lldpPortID=4
lldpXMediaCap=65539
lldpXNetPolicy=1
lldpXEndpLocIdenti=0
lldpXAssetID=
Feature Activation
A. Via APS
APS in [net] section of both Common and Specific-MAC config files with all LLDP parameters.
[net]
...
IldpXFlag=0
IldpTxPeriod=30
IldpTTL=120
IldpPortDesc=
IldpSysName=
IldpSysDesc=
IldpSysCap=2097184
IldpChassisID=4
IldpPortID=4
IldpXMediaCap=65539
IldpXNetPolicy=1
IldpXEndpLocIdenti=0
IldpXAssetID=...
...
B. Via Telnet
To configure, open a command line console, and telnet the phone:
Example:
lldpXFlag is set to enable (lldp set lldpXFlage 1)
[administrator]# lldp set lldpXFlag 1
[OK] Set OK

[administrator]#
Then type commit and then activate to apply the change.
MGC
In this release, a new parameter is added for MGC Service. This parameter is configurable in common config file and telnet.
For the flag for this feature
MGC_service = 0/1/2
// 0: disable (default)
// 1: HW_pstn
// 2: Cirpack MGC service
The following new parameters are added for Cirpack MGC service:
Dial Dtmf Code = '#5' (default)
Alternate Dtmf Code = '#2' (default)
Rel_Libretre_Dtmf_Code = '#0' (default)
Ans_Libretre_Dtmf_Code = '#1' (default)
Transfer_Dtmf_Code = '#4' (default)
Conference_Dtmf_Code = '#3' (default)
Feature Activation
A. Via APS
APS in [sys] section of both Common and Specific-MAC config files with all MGC parameters.
[sys]
...
MGC_service=2
Dial_Dtmf_Code=#5
Alternate_Dtmf_Code=#2
Rel_Libretre_Dtmf_Code=#0
Ans_Libretre_Dtmf_Code=#1
Transfer_Dtmf_Code=#4
Conference_Dtmf_Code=#3
...
B. Via Telnet
To configure, open a command line console, and telnet the phone:
Example:
Mgc_service is set to Cirpack MGC Service (sys set mgc_service 2)
[administrator]# sys set mgc_service 2
[OK] Set OK

[administrator]#
Then type commit and then activate to apply the change.
BLF
In this release, we have implemented the third BLF - Presence based BLF.
ST2030 already supports two types of BLF based on “dialog” event package: User and List-oriented.
For some other environments, it is desirable to support also a third flavour, based this time on a different subscribe/notify package: presence.
Since ST2022 does not support supervision, this document is not applicable.
Function keys will be used for this purpose. Limitation will be the same as for the other types of BLF: if phone is configured for multilines = m, then m+1 is the first function key to be used for BLF.
Presence information is provided by the server to subscribers for a presentity. ST2030 does not need to provide information about itself, neither will receive a subscription to declare its presence status. ST2030 will hence act only as a supervisor.
Once ST20xx has subscribed to a presentity, the server will notify changes in supervised party status by sending NOTIFY with application/cpim-pidf+xml content.
In order to supervise a certain sip uri, ST2030 will need to send a SUBSCRIBE towards the SIP proxy, with
From: supervisor
To: supervised party uri
Event: presence
Accept: application/cpim-pidf+xml
A NOTIFY will be received whose body will include the state of the different entities declaring presence for that URI.
No new parameters needed.
New values:
BLF type: add new value to existing parameter.
Reused values:
For FeatureKeyExtxx, S/ will be used
For FeatureOptKeyxx, its value should be ignored when BLFType for Presence BLF is selected.
ST2030s VoIP Business Phone
| Parameter name | Description | Values | Default value | CLI commands |
| BLFType | Type of BLF that is active | 0: User-Oriented BLF is active1: List-oriented BLF is active2: Presence based BLF is active | 0 | sys set blf_type[0(User-oriented BLF), 1(List-oriented BLF), 2(Presence-based BLF)] |
| FeatureKeyExt01 ..FeatureKeyExt66 | Configure feature key as line key or supervision key for monitor extension | L: Line KeyS: Supervision Key(Max:256 Supervision not applicable to ST2022)G: Sylantro Group PickupR: Sylantro last number recallB: Sylantro BLA extensionE:Extension Tekelec (not applicable to ST2022)D:DTMFV:ServiceU:Service SupervisionA: Broadsoft SCAM: multi-Registration | L/ | sys show fk 1..sys show fk 6 |
Feature Activation
A. Via APS
APS in [sys] section of both Common and Specific-MAC config files with BLFType parameter.
[sys]
...
BLFType=2
...
B. Via Telnet
To configure, open a command line console, and telnet the phone:
Example:
BLFType is set to Presence Based BLF (sys set blf_type 2)
[administrator]# sys set blf_type 2
[OK] Set OK

[administrator]#
ACR response
When an incoming call for ST20XX is Anonymous and the phone has ACR enabled, ST20XX sends as response message 603 – Declined, but some servers require the phone to send message 433 - Anonymity Disallowed.
Feature Activation
A. Via APS
APS in [sip] section of both Common and Specific-MAC config files with the new parameter - ACRResp.
ACRResp = 0 403 Forbidden
ACRResp = 1 433 Anonymity Disallowed
ACRResp = 2 603 Declined
[sip]
...
ACRResp=1
...
B. Via Telnet
To configure, open a command line console, and telnet the phone:
Example:
ACRResp is set to 433 (sip set acr_resp 1)
[administrator]# sip set acr_resp 1
[OK] Set OK

[administrator]#
Then type commit and then activate to apply the change.
Attend Transfer
- There is a hold action before sending REFER message with current behavior of attend transfer. However, the transfer behavior will be processed by some server. That's why some server will have the problem of attend transfer. Our solution is to not send the hold before REFER message. So it should have a flag to this feature to keep the former behavior and also meet this server requirement.
Feature Activation
A. Via APS
APS in [sip] section of both Common and Specific-MAC config files with the new parameter - Hold_bf_Att_Trans.
Hold_bf_Att_Trans = 0 with hold behavior in attend transfer
Hold_bf_Att_Trans = 1 without hold behavior in attend transfer
[sip]
...
Hold_bf_Att_Trans = 0
...
B. Via Telnet
To configure, open a command line console, and telnet the phone:
Example:
Hold_bf_atttrans is set to 1 (sip set hold_bf_attrans 1)
[administrator]# sip set hold_bf_atttrans 1
[OK] Set OK

[administrator]#
Then type commit and then activate to apply the change.
Preferred Identity
For some servers, when ST20XX is sending in INVITE header parameter P-Asserted-Identity (which is not assigned for CPE but for network), the phone should not use it. Instead, the phone should correctly send parameter P-Preferred-Identity.
A new parameter is added for INVITE header parameter. This parameter is configurable in common config file and telnet.
P_id_type = 0/1 (default 0: P-Asserted-Identity)
// 0: P-Asserted-Identity
// 1: P-Preferred-Identity
Feature Activation
A. Via APS
APS in [sip] section of both Common and Specific-MAC config files with the new parameter - P_id_type.
[sip]
...
P_id_type=1
...
B. Via Telnet
To configure, open a command line console, and telnet the phone:
Example:
P_id_type is set to P_Referred_Identity (sip set P_id_type 1)
[administrator]# sip set P_id_type 1
[OK] Set OK

[administrator]#
Then type commit and then activate to apply the change.
DSCP of DHCP
In this release, you can change DSCP of DHCP separately.
Feature Activation
A. Via Web GUI
- Login to ST20XX Web GUI
- Go to Advanced Page
3. Choose QoS

- In Diffserv, choose Voice.

- In DS Code Point for DHCP, change the value you want.

- Press Apply and restart the phone.
B. Via APS
APS in [qos] section of both Common and Specific-MAC config files with the new parameter - DSCP3.
DSCP3 = 0 \~ 63
[net]
...
DSCPflag=1
...
[qos]
...
DSCP3=0
...
C. Via Telnet
To configure, open a command line console, and telnet the phone:
Example:
[administrator]# net set dscp 1
[OK] Set OK

[administrator]# qos set dscp 3 0
[OK] Set OK
Then type commit and then activate to apply the change.
Input mode
In the release package, it is possible to change the input mode and char set used.
- LangTbl_x.69.2.zz (original English Language Table).
- LangTbl_x.69.2_Czech.zz (sample Czech Language Table – Still in English but with Czech input mode).
By editing the Language Table, we can have Czech Display and Edit mode.
- Edit language table by text editor
- Change the line for Country name. E.g. Czech
- Change the line for Character Set. E.g. Latin-2
- Change the EditModeInputKey. E.g.
<EditModeInputKey>
<Key0>0 @%([]&<></Key0>
<Key1>1.,=+-&^</Key1>
<Key2L>abc2 á č</Key2L>
<Key2U>ABC2 Á Č </Key2U>
<Key3L>def3d' é č</Key3L>
<Key3U>DEF3D É É </Key3U>
<Key4L>ghi4í </Key4L>
<Key4U>GHI4Í </Key4U>
<Key5L>jkl5l</Key5L>
<Key5U>JKL5L</Key5U>
<Key6L>mno6ň ó</Key6L>
<Key6U>MNO6Ñ Ó</Key6U>
<Key7L>pqrs7 ř š</Key7L>
<Key7U>PQRS7Ř Š</Key7U>
<Key8L>tuv8 t' ú ú</Key8L>
<Key8U>TUV8Ť Ú Ú</Key8U>
<Key9L>wxyz9 ž ý</Key9L>
<Key9U=WXYZ9 Ž Ÿ</Key9U>
<KeyStar>*#!:;""_</KeyStar>
<KeyPound>#</KeyPound>
</EditModeInputKey>
Remark: if your text editor (OS) is not Latin-2, after saving the file, you will lose your input. If it is the case, you need to edit by Hex Editor. For example, you can download a freeware HEX editor by:
- Using the APS to download Language table.
- Choose the language to this Language table.
ST20XX SIP New Features (SG vx.68.5)
Overview
This document describes a set of features included in ST2030 and S2022 SIP V2.68.5 and 4.68.5 respectively in order to improve their usability in different environments.
Hua Wei SoftSwitch
Starting with this new release, ST20xx have implement Softswitch (Hua Wei SoftX3000 V300R006) PSTN call handling including call waiting and switching.
Flow descriptions:
Below is a flow that shows PSTN 1 call to IP phone B in conversation, then PSTN 2 call to IP phone B.
![graph TD A["Server Phone B"] --> B["INVITE (with SDP1)"] B --> C["100 Trving"] C --> D["180 Ringing"] D --> E["200 OK (with SDP1)"] E --> F["ACK"] F --> G["INFO"] G --> H["200 OK"] H --> I["PSTN1 and phone B are in conversation"] I --> J["INFO: tone-type, duration, gap, times"] J --> K["Phone will p…](/content/2026/06/1313292/images/42ed919cd21d9359659c30c53d5765c0d4e9c110727609b6f6750ad90d517dd2.jpg)
[Answer] and [Reject] softkeys display on the screen.
ST2030s (Phone B)
| Date | Hour | Icons |
| 01 PSTN Call | ||
| Answer | Reject | |
ST2022s (Phone B)
| 01 | ||
| Answer | Reject | |

Press [Answer] to take the PSTN 2 call.
INFO: flashhook when press [Answer]
Remark: Go back to previous screen when [Reject] is pressed.
Server Phone B
| INVITE (no SDP) |
| 200 OK (with SDP) |
| ACK (with SDP) |
| INFO |
| 200 OK |
| INFO |
| 200 OK |
| INVITE (with SDP2) |
| 100 Trving |
| 200 OK (with SDP2) |
PSTN1 is on hold and B stops the call waiting tone
INFO: tone-type, duration, gap, times
Phone sends INFO to take the call, INFO: digit =2
Phone is able to talk with PSTN 2
ST2030s (Phone B)
| Date | Hour | Icons |
| 01 PSTN Call/phone number | ||
| Taking Duration | ||
| Hold | Switch | Conf |
ST2022s (Phone B)
| 01 PSTN Call/phone number | ||
| Talking Duration | ||
| Hold | Switch | Conf |
Remark: Pressing [Hold], [Conf] and [Transfer] will keep the same as current implementation.
Switch implementation
Requirement
- [Switch] softkey is required for caller parties to switch between callers during a conversation.
Below is a flow that shows IP Phone B calling IP Phone A and being in conversation, then PSTN 1 calls IP Phone B. B and PSTN 1 are in conversation. Phone B presses [Switch] to go back to Phone A and start a conversation.
Flow descriptions:
Phone A ←→ Phone B, operate in normal SIP protocol.
PSTN 1 → Phone B, call waiting tone is played, same as the call waiting flow above → call activated.
Phone B presses [Switch] to talk back with Phone A.
(PSTN 1 and Phone B are in conversation)
ST2030s (Phone B)
ST2022s (Phone B)
| Date | Hour | Icons |
| 01 PSTN Call/phone number | ||
| Taking Duration | ||
| Hold | Switch | Conf |
Transf >
| 01 PSTN Call/phone number | ||
| Talking Duration | ||
| Hold | Switch | Conf |
When [Switch] is pressed, switching is processed.
Server Phone B![graph TD A["INFO"] --> B["200 OK"] B --> C["INVITE (no SDP)"] C --> D["200 OK (with SDP)"] D --> E["ACK"] E --> F["INFO"] F --> G["200 OK"] G --> H["INFO"] H --> I["200 OK"]](/content/2026/06/1313292/images/53ddf4655d9d1c010d23c23af08c9da6b194225c09a2e2c5dc5f65598cabdf52.jpg)
Phone B presses [Switch] to start switching to the other party. INFO: flashhook
PSTN1 is on hold and B stops the call waiting tone
INFO: Tone-type=specialdial, dial-timer=0
Phone sends “2” to enable taking the call, INFO: digit=2
![graph TD subgraph Phone_A A1["INVITE (with SDP2)"] A2["200 OK (with SDP2)"] A3["ACK"] end subgraph Phone_B B1["INVITE (with SDP2)"] B2["200 OK (with SDP2)"] B3["ACK"] end A1 --> B1 A2 --> B2 A3 --> B3 B1 --> C1["Server invites phone A"] B2 --> C2["Server invites phone B"] B3 --> C3["Phone A hang up…](/content/2026/06/1313292/images/18c4c0adf0327693dba6eabe9ab2c8c0908414aaf571d11656f40ea4955a801e.jpg)
| Date | Hour | Icons |
| 01 PSTN Call/phone number | ||
| Taking Duration | ||
| Hold | Transf | Conf |
| 01 PSTN Call/phone number | ||
| Talking Duration | ||
| Hold | Transf | Conf |
Feature Activation
C. Via APS
APS in [sys] section of both Common and Specific-MAC config files with the new parameter - MGC_service.
MGC_service = 0 disable (default)
MGC_service = 1 Hua Wei Softswitch PSTN handling
[sys]
...
MGC_service=0 // Disable (default)
...
D. Via Telnet
To configure, open a command line console, and telnet the phone:
Example:
- MGC_service is set to disable (sys set mgc_service 0)
[administrator]# sys set mgc_service 0
[OK] Set OK

[administrator]#
- MGC_service is set to Hua Wei Softswitch PSTN handling (sys set mgc_service 1)
[administrator]# sys set mgc_service 1
[OK] Set OK

[administrator]#
Then type commit and then activate to apply the change.
Config without reload
Starting from this version, changing configuration/settings in SIP Signalling, Option Configure, Call Feature, and Advanced web pages does not require a reboot of the ST20XX.

Except for “RTP Starting Port Number” and “Minimum Session Timer”, all parameters changed in the SIP Signalling page are configured without reload.
ST2030s VoIP Business Phone
All parameters changed in the Option Configure page are configured without reload.

Except for “ACD”, “Shared Call Appearance”, “Conference Mode”, “Start Spare FK”, and “BLF Type”, all parameters changed in the Call Features page are configured without reload.

Apart from “Use Secure outgoing calls if possible”, “Silence Suppression”, “Acoustic Echo Cancellation (AEC)”, and “Packet Loss Compensation”, all parameters changed in the Advanced page are configured without reload.
CCBS Enable/Disable
A new parameter is added for the CallBack feature. This parameter is configurable in the common config file and via telnet.
autocb = 0 / 1
// 1: Enable CallBack feature
| Date | Hour | Icons |
| Remote Unavailable! | ||
| XXXXXXXXX | ||
| CBack | Back | |
// 0: Disable CallBack feature
| Date | Hour | Icons |
| Remote Unavailable! | ||
| XXXXXXXXX | ||
| Back | ||
The default value is 1.
E. Via APS
APS in [ipp] section of both Common and Specific-MAC config files with the new parameter - auto_cb.
[ipp]
...
auto_cb=1 // Enable (default)
...
F. Via Telnet
To configure, open a command line console, and telnet the phone:
Example:
- Auto_cb is set to enable (lcdui set auto_cb 1)
[administrator]# lcdui set auto_cb 1
LcdUi Set Command OK!
[administrator]#
- Auto_cb is set to disable. (lcdui set auto_cb 0)
[administrator]# lcdui set auto_cb 0
LcdUi Set Command OK!
[administrator]#
Then type commit and then activate to apply the change.
ST20XX SIP New Features (SG vx.67.2)
Overview
This document describes a set of features included in ST2030 and S2022 SIP V2.67.2 and 4.67.2 respectively in order to improve their usability in different environments.
Security Features
Starting with the new release, SG x.67.2, ST20xx have done a lot of improvements on the security implementation. In this section, you will know more about the operation of the features of SIPS/TLS/SRTP on the phone.
Overview:
Basically, SIPS/TLS/SRTP can be enabled/disabled separately by configuration.
Enabling means the feature is default option for outgoing actions only, and switching on-off mechanism is supported according to capability of remote side, no matter the feature is enabled or disabled.
SIPS
- Switching to SIPS if receiving SIP message contained uri type (sips:)
- Switching to SIPS if outgoing URI type is (sips): for example, speed dial a SIPS URI, etc.
TLS
- TLS would be activated together with SIPS.
- The cipher-suites of TLS are supported by the OpenSSL library (0.9.7d), and cipher-suites negotiation is supported according to the capability of the remote side.
- Switching transport layer to TLS while receiving SIP messages with any one of the following content:
- Transport parameter (transport=tls) in Contact and Record-Route headers, etc.
- URI type (sips:)
- Support the import/export of certification and private key via the web interface.
SRTP
- Switching to RTP or SRTP according to capability of remote side described on SDP.
- Supported crypto-suites:
- AES_CM_128_HMAC_SHA1_32 • F8_128_HMAC_SHA1_80
- AES_CM_128_HMAC_SHA1_80
- Crypto-suites negotiation is supported according to capability of remote side described on SDP
Feature Activation
G. Via WebGui
Visit the SETUP → Basic Setup → select Profile page, as shown like below: THOMSON

With the activation of SIPS + TLS, you are required to upload a Certificate and Private Key for authentication on the phone. Set port to be 5061. The certificate from trusted authorities can be imported to create an internal Certificate Authority (CA).
Visit the SETUP → Basic Setup → SIPS page, as shown like below:
THOMSON

H. Via APS
APS in [sip] section of both Common and Specific-MAC config files with the new parameters:
For SIPS, the parameters are URLTypeMP[profile_id] = and URLTypeBk[profile_id] = ,
where, 0 - sip URL type, (default)
1 - tel URL type,
2 - sips URL type
[sip]
...
URLTypeMP1=0    // sip url type for profile 1
URLTypeMP2=1    // tel url type for profile 2
URLTypeMP3=2    // sips url type for profile 3
URLTypeMP4=0    // sip url type for profile 4
URLTypeBK1=0    // sip url type for backup profile 1
URLTypeBK2=1    // tel url type for backup profile 2
URLTypeBK3=2    // sips url type for backup profile 3
URLTypeBK4=0    // sip url type for backup profile 4
...
For TLS, the parameters are TransportFlgMP[profile_id] = and TransportFlgBK[profile_id] = ,
where, 0 - UDP (default)
1 - TCP
2 - TLS
[sip]
...
TransportFlgMP1=0    // UDP for profile 1
TransportFlgMP2=1    // TCP for profile 2
TransportFlgMP3=2    // TLS for profile 3
TransportFlgMP4=2    // TLS for profile 4

TransportFlgBK1=0    // UDP type for backup profile 1
TransportFlgBK2=1    // TCP type for backup profile 2
TransportFlgBK3=2    // TLS type for backup profile 3
TransportFlgBK4=2    // TLS type for backup profile 4
...
APS in [sys] section of both Common and Specific-MAC config files with the new parameters:
For SRTP, the parameter is SRTPFlag= , where 0 disable (default), 1 - enable.
[sys]
...
SRTPFlag=1 // Disable (default)
...
I. Via Telnet
To configure, open a command line console, and telnet the phone: Example:
- SIPS URL type is set for profile 1.
[administrator]# sip set url_typemp 1 2
[OK] Set OK

[administrator]# sip show url_typemp 1
SIP : URL Type 1 = SIPS
- TEL URL type is set for backup profile 1.
[administrator]# sip set url_typebk 1
[OK] Set OK

[administrator]# sip show url_typebk 1
SIP : URL Type 1 = TEL
- Set TLS as SIP transport for profile 1.
[administrator]# sip set transportmp 1 2
[OK] Set OK

[administrator]# sip show transportmp 1
SIP : TransportMP20 = TLS
- Set SRTP ON.
[administrator]# sys set srtp 1
[OK] Set OK

[administrator]# sys show srtp
SRTP : ON
Improve HTTPS APS feature.
Now, starting with the new release, SG x.67.2, ST20xx HTTPS auto provisioning supports both client and server authentication using certificates. This improvement greatly enhances reliable and secure provisioning based on HTTPS requests from ST20xx to server and server to ST20xx.
With HTTPS, the file transfer between ST20xx and the provisioning server is protected. The encryption method for the data between ST20xx and server is based on symmetric key cryptography. This methodology uses a secret key, which is shared between ST20xx and the provisioning server over a secure channel. It ensures that the server and ST20xx cannot be interfered with by other devices on the network.
Moreover, server and client authentication is performed using public/private key encryption, with certificates containing the public key. Files encrypted with a public key can be decrypted only by its corresponding private key (and vice versa).
On the server side, you should have an SSL server certificate. ST20xx will recognize only the certificate on the server side and try to authenticate the certificate when connecting via HTTPS, or reject any server certificate if not valid.
Likewise, on the client side, ST20xx should also carry a unique client certificate which is used to identify information about each individual server.
Therefore, before doing HTTPS APS, the phone needs to have the certificate and the private key imported via web GUI. And the server certificate should also be ready as well.
Feature Activation
A. Via Web GUI
To import the client certificate in ST20xx, you can visit the SETUP → Basic Setup → HTTPS page, as shown below:
Click the import button to upload the certificate and private key files. Click the import button to upload the certificate authority root certificate.
You are also able to export the certificate by clicking Export.
Finally, press "Apply" to save the change.

Support Encryption of Configuration files in APS
In current implementation, file transfer via APS TFTP and HTTP is transparent, the confidential information, e.g. accounts, password, are not protected.
Therefore, starting with the new release, x.67.2, the transfer of encrypted configuration files is supported to prevent data exposure during APS.
Encrypted files support:
- Common configuration file (Comconfig file)
- MAC configuration file (MacConfig file)
Encryption method:
Symmetric method, advance encryption standard (AES) 128bit
Encryption/Decryption tools:
- Name: Window_Aes_cbc_128.exe (including in release package/ Decryption tool folder)
- Press F1 for get HELP window
In Window Platform
File name: Window_Aes_cbc_128.exe in ../Encryption Tool folder.
Select the Configuration file and input a 16-digit key for encryption. Press [Encrypt] to start the process. Press 'F1' to get help window for more information.
![AES_CBC_128 Source Folder Filter Show File Type: Text file(*.txt) ST2030_SG_v2[1].67_Release_package APS HTTP sample files APS TFTP sample files Trace for reference APS Params - differences between 1.66.2 - 2.67. ComConf2030SG R11.1.090213.2.67.1.txt README FIRST SG v2.67.2.txt ST2030S_000E504E88E0.…](/content/2026/06/1313292/images/d542ee364b5455db2120d71bf1ce647f8e33c650b6f49c5fe800e40df81267df.jpg)
In Linux Platform:
Filename: Linux_aes_cbc_128_bin.tar.gz ../Encryption Tool folder.
→ tar zxvf FileName.tar.gz → cd FileName -> ./aes_cbc_128 → '*.ser' file will be generated
![[root@localhost Encryptool]# ls ComConf2030SG.R11.1.090213.2.67.1_test.txt Linux aes_cbc_128_bin.tar.gz [root@localhost Encryptool]# tar zxvf Linux_aes_cbc_128_bin.tar.gz aes_cbc_128 [root@localhost Encryptool]# ls aes_cbc_128 ComConf2030SG.R11.1.090213.2.67.1_test.txt Linux_aes_cbc_128_bin.tar.gz […](/content/2026/06/1313292/images/130e38e7e83e93a64f5f815ca3abb06857999c9e4a1a5cff094ec24190c97f60.jpg)
Things to know:
The ComConfig/ MacConfig file should be encrypted with symmetric key offline before doing APS. The decryption will be handled on the phone by using the same key.
Feature Activation
A. Via WebGui
Visit the SETUP →, Basic Setup will be shown like below:

Input the decryption key (16 digits) in the field and confirm field. If the key is different with the key for confirmation, an error message will prompt you to input the key again.
Press the [Decryption key] to save the key settings in the phone. → Phone reboot.
If the key doesn't match with the key for encrypted files during APS, the files are not allowed to download to the phone.
You are recommended to check the APS log after doing APS to make sure its process is running correctly.
APS log (if Decryption key Match):
Begin Common Config download... AES decrypt common config file successfully! CommonConfig: ComConf2030SG.R11.1.090213.2.67.1.ser download successfully! Begin Mac config download... MacConfig: ST2030S_00147F00DFE4.ser download successfully! AES decrypt mac file successfully! Serial number is the same! Begin upgrading config file... Check config file syntax Check config file syntax successfully! Upgrading config file successfully!
APS log (if Decryption key not-Match):
Begin Common Config download...
AES decrypt common config file successfully!
CommonConfig: ComConf2030SG.R11.1.090213.2.67.1.ser download successfully!
Begin Mac config download...
MacConfig: ST2030S_00147F00DFE4.ser download successfully!
AES decrypt mac file successfully!
Error: Parse config file failed or config_sn tag not found!
Begin upgrading config file...
Check config file syntax
Error: Config file format error
On the MMI of the phone, you also be noted that the Provision Error! displaying on the screen when the .ser is failed to download.
B. Via APS
APS in [autoprovision] section of both Common and Specific-MAC config files with the new parameter:
Decryption_Key=Th0mson2\$8s8@9z! (Default)
[autoprovision]
...
Decryption_Key=Th0mson2$8s8@9z!
...
Call Dialing from WebGui
Currently, the feature of call dialing from web interface is not supported in ST20xx. For the new release today, x.67.2, the new feature is implemented. It provides the convenience for user to dial an outgoing call, reject and hang up incoming call on the web interface.
Feature Activation
Web interface
Enter the IP address of phone on the web browser Enter the Username and Password
- Username(default): administrator
- Password(default) : 784518
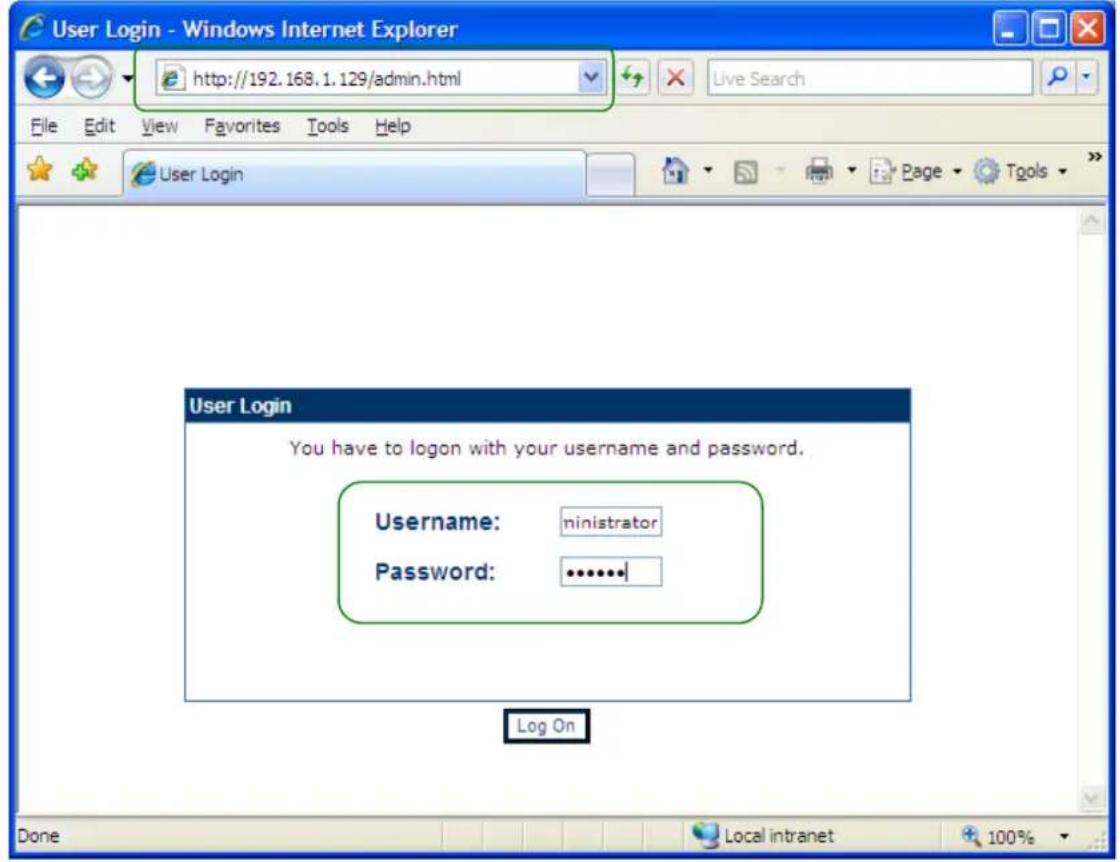
Visit the ADVANCED → Dialling Call page, the Dialling Call interface will be shown like below:
THOMSON

To make an outgoing call, you can just choose the active outgoing identity from the pull-down menu of Line Account, and input the telephone numbers or SIP URL in the field. Click the icon to make an outgoing call. A status will be shown on the screen to indicate the call is successfully dialed out. Hang up the call by clicking the icon.
The Dial key has the following behaviors:
If the number is valid in the field,
- In idle mode, dial out a call after pressing the key
- Incoming call mode (Ringing), Line 2 will be used to dial out a call after pressing the key
- In talking mode, the current call will be held and Line 2 will be used to dial out a call after pressing the key.
No action is taken if the field is empty.
Also, the EndCall key has the following behaviors:
- In dialing mode, stop the outgoing call and return to idle mode after pressing the key.
- In incoming call mode (ringing), reject the call and return to idle mode after pressing the key.
- In talking mode, hang up the call after pressing the key.
Call Logs
Same as the local phone, there are 3 call logs supported on the web interface, including Missed Call log, Received Call log, and Dialed Call log.
You can press the Call logs key from the Call dialing page or go to ADVANCED → Call Logs to access the page. Select the check logs by pulling down the Call log menu.
The maximum entries in each call log are 30.
In the call log page, you are allowed to delete an entry, save an entry, and call back to the entry if you want.
- Click to delete the entry.
- Click to save the entry in the phone book.
- Click G to access the call dialing page to make an outgoing call.
THOMSON

Phone Book
From the phone book page, the enhancement enables you to delete entries, modify entries, and call back to the entries you want.
You can press the button from the call dialing page or go to ADVANCED → Phone book to access the page.
- Click to delete the entry.
- Click to modify the entry's information.
- Click F to access the call dialing page to make an outgoing call.
THOMSON
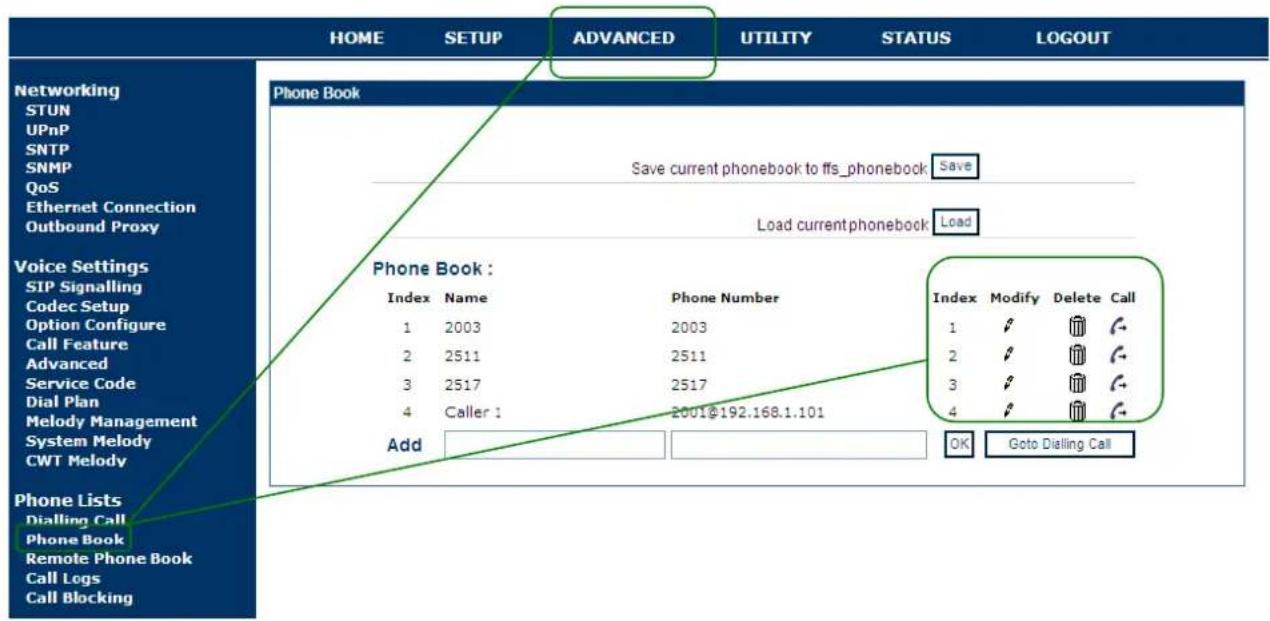
SIP Message during call (RFC 3428)
Currently, ST20xx supports the SIP MESSAGE method, but it is limited to idle status. In other words, the phone can only receive short messages pushed by the server in idle mode to indicate its current status.
Now, starting from the new release, SG x.67.2, ST20xx not only supports receiving messages in idle mode, but also in conversation mode.
The existing parameter is still kept to avoid attacks. Messages coming from other servers that were not the configured one on the parameter will be rejected.
From the network trace below, it shows that the phone receives the SIP message "ST2030s SIP Message testing" from the server side.
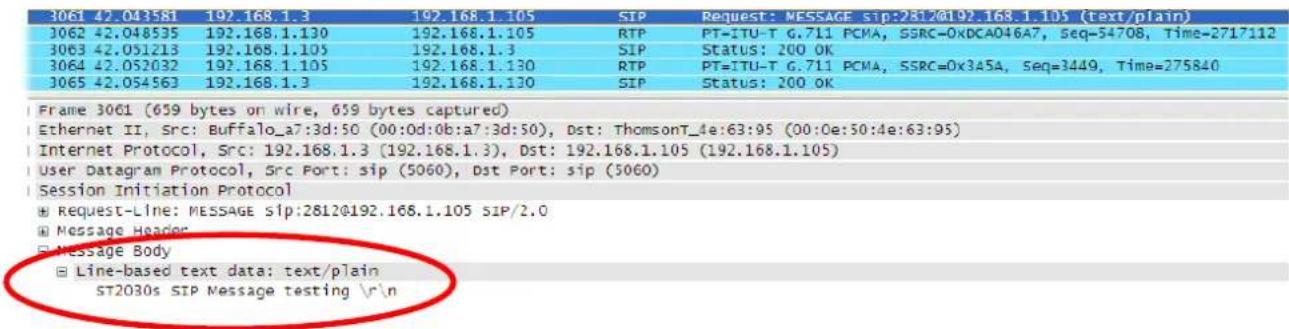
The text contained in the SIP MESSAGE body is displayed on the 4th line of the LCD for ST2030 and on the 2nd line of the LCD on the ST2022, same as previously.
SIP MESSAGE text location on ST2030:
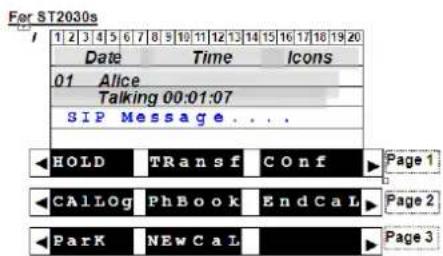
SIP MESSAGE text location on ST2022:

Feature Activation
Same as the current implementation. This feature does not need specific activation to be supported. With using the current parameter, it is to avoid messages attacks from non desired sources.
The parameter is AuthMessageServer. Default value is 0.0.0.0, which means phone accepts all messages received from everywhere. Otherwise, to limit from which server messages can be accepted, this parameter should contain either SIP messages server IP address or domain name.
A. Via APS
This parameter only can be configured in section [sip] of common or MAC config files.
For example:
[sip]
...
AuthMessageServer=192.168.1.1 (or AuthMessageServer=domain.com)
...
B. Via Telnet
DNS Query (Circular Method)
In the new release today, x.67.2, ST20xx have done an improvement on the mechanism of the DNS Query, which increases the efficiency on the DNS request.
Current Implementation (up to SG1.66)
For each SIP message sent from the ST20xx to the proxy server, it have to wait for the IP resolution done on the Pri DNS server. In case of the Pri DNS failed, after timeout, phone will request to the Sec DNS server afterwards.
Once the Pri DNS server resume and with the timeout of Sec DNS server, phone will request the Pri DNS agina for IP resolution. The mechanism will lower the processing speed of the call and the response of the phone in case the Pri DNS down for a long time.
New Implementation (SGx.67.2)
A new parameter "DNSFB" is introduced and found in Common and MAC configuration files.
If the value of the parameter is 0, the implementation is the same as the original one, like SG x.66.2, which the phone always queries to the Pri DNS server.
If the value of the parameter is 1, DNS queries will use a circular method, where the phone always starts with the DNS that provided the answer to the previous request. If that DNS fails, it tries the other. If the other answers, it uses the other in subsequent requests until this one fails, and so on.
The parameter is configurable via APS and Telnet.
Feature Activation
A. Via APS
In the [net] section of both Common and Specific-MAC config files, add the new parameter via APS:
[net]
DNSFLG=1
DNSFB=0
DSCPflag=0
ESWITCH_LAN=1
ESWITCH_PC=1
B. Via Telnet
To configure, open a command line console and telnet to the phone:
![********** ** ** IP Phone firmware U2.67 ** ** compiled on Feb 12 2009 at 18:26:59 ** ** ** IP Phone UPD1020-D49(S) ** ** ********** Login: administrator Password: ***** [administrator]# net show fbtimer fbtimer.(0) [administrator]# net set fbtimer 1 [OK] Set OK [administrator]# net show fbtimer fbt…](/content/2026/06/1313292/images/ca59e828e69f6aeaf7e50525a0038110413e9d13ef88c2843e0ce3fa0d3c2735.jpg)
Support Remote Call Logs for Local User
Remote call logs are currently supported for the login/logout function in ST20xx. However, they are not supported for normal users.
In this section, you will learn about the implementation of remote call logs for normal users in the new release SG x.67.2.
Implementation
Actually, the implementation of the remote call log is the same as the call log for login/logout, except for normal users this time.
The call-log file contains 3 sections: missed calls, received calls, and dialed calls. Each section can have up to 30 calls.
The calls shall be classified from the most recent to the oldest.
Each call is described by the phone number, phone name, date, and time of the call. The call-log will use the following XML format.
<ThomsonRemoteCallLog>
    <MissedCalls>
    <Call>
    <Name>John</Name>
    <Telephone>01234</Telephone>
    <Date>20070626</Date>
    <Time>0130PM</Time>
    </Call>
    <Call>
    <Name>Jack</Name>
    <Telephone>56789</Telephone>
    <Date>20070625</Date>
    <Time>0315PM</Time>
    </Call>
    <Call>
    <Name></Name> (name not available)
    <Telephone>98765</Telephone>
    <Date>20070620</Date>
    <Time>0915AM</Time>
    </Call>
    </MissedCalls>
    <ReceivedCalls>
    <Call>
    <Name>James</Name>
    <Telephone>34567</Telephone>
    <Date>20070627</Date>
    <Time>0845AM</Time>
    </Call>
    </ReceivedCalls>
    <DialedCalls>
    <Call>
    <Name>John</Name>
    <Telephone>01234</Telephone>
    <Date>20070625</Date>
    <Time>0245PM</Time>
    </Call>
    </DialedCalls>
    </ThomsonRemoteCallLog>
Each time the user enters the call log menu by pressing the "CalLog" softkey, the phone will download the relevant file from the server using the HTTP GET method.
A new parameter "RCallLogFlg" is introduced to decide whether to enable local call log or remote call log.
The default value is 0, which means the local call log is enabled, while a value of 1 means the remote call log is enabled.
In addition, the URL for this remote call log file is configurable using a new parameter: "RCallLogURL".
The data are stored on the phone until the user quits the call log menu by pressing the [Back] soft key or the "C" key, or the phone returns to the idle screen after a timeout.
Feature Activation
A. Via WebGui
Visit ADVANCED → advanced, click the "Support Remote call logs" check box. Enter the remote call log URL in the field.
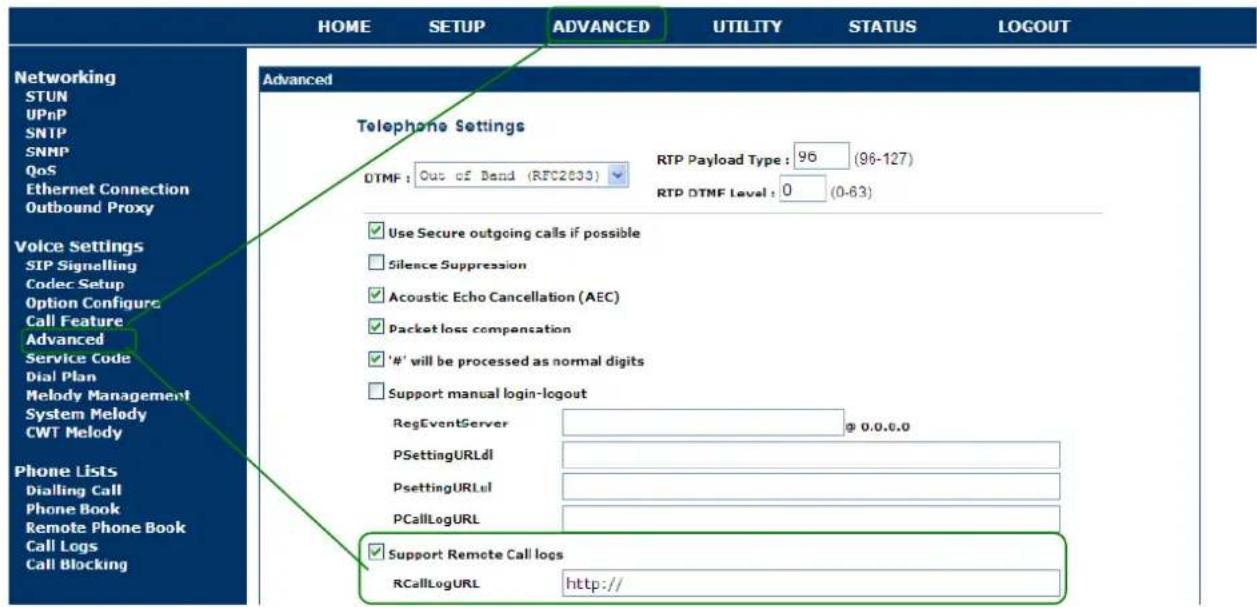
B. Via APS
An RCallLogFlg parameter is created and added in the [sys] section of both Common and Specific-MAC config files.
RCallLogFlg = 0 (by default), the local call logs will be in use. RCallLogFlg = 1, the remote call logs will be in use instead.
An RCallLogURL parameter should be added in the [sys] section.
This parameter is set with the URL used to download the file containing the remote call log.
Examples:
RCallLogURL=http://192.168.1.1/search.php?Name=call_log&number=#LOGIN&IP_addr=#IP&mac=#MAC&pass=#PASSWORD
RCallLogURL=https://192.168.1.1/search.php?Name=call_log&number=#LOGIN&IP_addr=#IP&mac=#MAC&pass=#PASSWORD
Where,
#LOGIN is the phone number of the active profile
#PASSWORD is the SIP password of the active profile
#IP is the IP address of the phone
#MAC is the MAC address of the phone
[sys]
...
RCallLogFlg=1 // the remote call logs is enabled
RCallLogURL=http://
...
ST20XX SIP New Features (SG vx.66.2)
Overview
This document describes a set of features included in ST2030 and S2022 SIP v1.66.2 and 3.66.2 respectively in order to improve their usability in different environments.
Transfer On ringing
[Transf] softkey should be able to show on ringing in MMI selectively with/without respect to the CallForward bit in parameter "OptionVisible".
Current implementation
Since x.61, [Transf] softkey enable/disable on ringing in MMI with respect to the call forward bit in parameter "OptionVisible" accordingly.
In other words,
CallForward bit in parameter "OptionVisible" = 1 → [Transf] softkey on ringing shows on the screen.
CallForward bit in parameter "OptionVisible" = 0 → [Transf] softkey on ringing NOT shows on the screen.
![[Transf] softkey enable/disable on ringing in MMI is directly followed the activation / deactivation of callforward bit accordingly.](/content/2026/06/1313292/images/542e9419edfb19cac2d0dd85c719c3ab1d4bdafc4b8327abb05feaa379e39a96.jpg)
New Implementation
A new parameter in Common and MAC configuration files is added to increase the flexibility to assign the [Transf] softkey on ringing shown in MMI with/without respect to the call forward bit in parameter "OptionVisible" accordingly.
TransfOnRingFlag = <0/1>, 0 is disable (by default), 1 is enable
TransfOnRingFlag = 0, [Transf] softkey is always enable without respect to the call forward bit in parameter "OptionVisible.
TransfOnRingFlag = 1, [Transf] softkey with respect to the call forward bit in parameter "OptionVisible" enable/disable. (Same as the current implementation above)
Table below describes the Enable/Disable of the [Transf] softkey on Ringing with Call forward bit in "OptionVisible".
| Call forward bit in "OptionVisible" = 0 | Call forward bit in "OptionVisible" = 1 | |
| TransfOnRingFlag = 0 | Enable | Enable |
| TransfOnRingFlag = 1 | Disable | Enable |
Feature Activation
A new parameter is needed to configure this function and with some additional definitions listed below.
J. Via APS:
APS in [ipp] section of both Common and Specific-MAC config files with the new parameter:
[ipp]
...
OptionVisible=8191
TransfOnRingFlag =0 //by default, transfer on ringing is always enabled
.....
K. Via Telnet
To configure, open a command line console, and telnet the phone:

Call-hold "inactive" method
To enhance the compatibility with different softswitches, a new call-hold method is introduced in this section.
Current implementation
Currently, ST20xx implements "send-only" method for holding a call, carried in SDP session.
Content-Type: application/sdp
Content-Length: 221

v=0
o=2215 1325412 1325413 IN IP4 192.168.1.102
s=-
c=IN IP4 192.168.1.102
t=0 0
m=audio 41000 RTP/AVP 18 96
a=rtpmap:18 G729/8000
a=fmtp:18 annexb=no
a=rtpmap:96 telephone-event/8000
a=fmtp:96 0-15
a=sendonly
Now, an alternative new call-hold method "inactive" has implemented in ST20xx to enhance the compatibility working on different softswitches.
Content-Type: application/sdp
Content-Length: 221

v=0
o=2215 1807412 1807413 IN IP4 192.168.1.102
s=-
c=IN IP4 192.168.1.102
t=0 0
m=audio 41000 RTP/AVP 18 96
a=rtpmap:18 G729/8000
a=fmtp:18 annexb=no
a=rtpmap:96 telephone-event/8000
a=fmtp:96 0-15
a=inactive
Feature Activation
A new parameter is needed to configure this function, with some additional definitions listed below.
call_hold_method=<0|1>, 0 is by default call_hold_method=0, "send-only" call-hold method is used call_hold_method=1, "inactive" call-hold method is used
A. Via APS:
APS in [sip] section of both Common and Specific-MAC config files with the new parameter:
[sip]
...
call_hold_method=0 // by default, "send-only" is in use
.....
B. Via Telnet
To configure, open a command line console, and telnet the phone:
![IP Phone firmware U1.66, compiled on Dec 10 2008 at 20:02:20. IP Phone UPD1020-D49(S). Login: administrator, Password: *****. [administrator]# sip show call_hold_method: call hold method = sendonly. [administrator]# sip set call_hold_method: sip set call_hold_method [0:sendonly;1:inactive]. [adminis…](/content/2026/06/1313292/images/330de1bac48ded29e1e9dc9d5c9f1c9622d2644b1a101cc0f659fe4c44b29982.jpg)
Comverse: Line and Service supervision (reg & ua-profile event package)
The purpose of this feature is to increase the ability of ST20xx to request and monitor the registration status, change user profile, and receive notifications related to a set of services of other supervised SIP phones in Converse environment, like:
- DND activation status
- Call Forward activation status
- Etc...
Busy Line Field (BLF)
Dialog event supervision
User-oriented BLF has already been supported in ST20xx. In Converse environment, this feature allows monitoring other line status, and speed dialing.
For each supervised phone, ST20xx generates an initial SUBSCRIBE request to the SIP server in order to be notified of the state of all dialogs for this specific agent.
Then, the network generates a NOTIFY request on any dialog update for the supervised PUI. The dialog states are "Early", "Confirmed", and "Void" (state not provided).
Upon reception of a NOTIFY request, the ST20xx updates the lamp associated with the supervised phone accordingly.
For User-oriented BLF service, please refer to the ST20xx SIP New Features SG vx.52.1 P.230
Registration event supervision with DND
One new feature is added in ST20xx for working in Converse environment. This feature allows ST20xx to monitor other line registration status with DND of the supervised phones.
For each supervised phone, ST20xx generates an initial SUBSCRIBE request to the SIP server in order to be notified of the state of all registrations for this specific phone.
Afterwards, the network generates a NOTIFY request on any registration update for the supervised PUI. The registration states are "Registered"
and "Unregistered". The service variable for DND supervision will be discussed in the next section.
Upon reception of a NOTIFY request, ST20xx updates the lamp associated with the supervised phone accordingly.
Implementation and configuration
The table below describes an overall ST20xx's behavior that is used for implementation, based on the Dialog and Registration and DND supervision of the same target:
| DND state | Registration State | Dialog state | Aggregated state | Lamp state | When BLF Key is pressed |
| Off | Registered | Void | Free | Off | Call initiate |
| Early | Ringing | Blinking fast | Call pick up | ||
| Confirmed | Busy | On | Call initiate | ||
| Unregistered | Any | Not available | Blinking slow | No action | |
| On | Any | Any | Not available | Blinking slow | No action |
If the user presses the function key:
- BLF Key is pressed in OFF state --> phone initiates a call toward the supervised SIP-URI
- BLF Key is pressed in STEADY ON state --> phone initiates a call toward the supervised SIP-URI
- BLF Key is pressed in BLINKING SLOW state --> NO action is taken
- BLF Key is pressed in BLINKING FAST (supervised phone is ringing) state --> phone launches a call Pickup of the supervised phone
Call pickup is launched by initiating a call toward a service code that includes the number to pickup. It can work with Soft Key or with Function key (user orientated BLF)
For call pick up service, please refer to "ST20xx SIP New Features SG vx.62 P. 145 → How to activate call Pick-up Service."
Remark:
If the status of the phone is in ringing, in communication and all others, except idle, function key should remain inactive if the user presses them. But, the supervision (LED blinking or other, including state change) should remain active during call.
Service variable supervision
Now, ST20xx has already implemented the service variable supervision, the "ua-profile" event package is supported. But working in Comverse environment, this feature has been enhanced, which not only allows supervising phone itself, but also supervised with other phones.
The service allows ST20xx to be periodically notified about the state of a set of services implemented by the network. As mentioned before, those are
- DND activation status
- Call Forward activation status
- Etc...
There are three stages for the profile delivery process, including Enrollment, Content retrieval and Change notification. This document will not go into detail. For more information, please refer to "St20xx SIP New Features SG vx.62 P. 145"
The service variables are defined in the below table:
| Name | Possible values | Description |
| cfu_on | Integer: { 0, 1 } | Activation state of the Unconditional Call Forward.0 means deactivated.1 means activated. |
| dnd | Integer: { 0, 1 } | Activation state of the Do Not Disturb feature.0 means deactivated.1 means activated. |
| sf_on | Integer: { 0, 1 } | Activation state of the Secretarial Filtering feature. Applicable only when a Manager line is supervised.0 means deactivated.1 means activated. |
| hg_rdy | Integer: { 0, 1 } | Indicates whether the CPE that initiated the supervision is ready on the supervised Hunt Group. Applicable only when a Hunting Group virtual line is supervised.0 means not ready.1 means ready. |
Where,
CallFwd service is linked to "cfu_on" variable. DND service is linked to "dnd" variable. SecFilter service is linked to "sf_on" variable. HuntGroup service is linked to "hg_rdy" variable.
When ST20xx receives the SIP NOTIFY message indicating successful profile enrollment, it makes it effective immediately and displays service status to the user. The duration of the subscription is 3600 by default.
Implementation and configuration
One function key will be assigned to each service. Depending on the state of the service, the corresponding function key's LED will be turned ON or OFF.
Referring to the above table, two statuses of service variable are well defined:
0 means Deactivation state
1 means Activation state
The table below describes lamp state with the corresponding variable state.
| Variable State | Lamp state |
| 0 | Off |
| 1 | On |
Service supervision is associated with a key of the phone; ST20xx provides the ability to change the variable state by pressing the key. In all cases, there exists one couple of activation/deactivation for each supervised service of the supervised phone.
Activation and deactivation consist in initiating a basic call toward the corresponding supervised phone, where the phone used depends on the current status of the service.
The table below describes the two services which are used for activation/deactivation for the supervised phone in Converse environment.
| Services | Variable State | Lamp state | When key is pressed | FCA |
| Secretarial Filtering | 0 | OFF | INVITE sip: *270x*@domain.com SIP/2.0From: <...>To: (Where x is the phone number of manager) | *270x* |
| 1 | ON | INVITE sip: *271x*@domain.com SIP/2.0From: <...>To: (Where x is the phone number of manager) | *271x* | |
| Hunting Group | 0 | OFF | INVITE sip: *70x#@domain.com SIP/2.0From: <...> | *70x# |
ST2030s VoIP Business Phone
| To: (where x is the hunt group extension) | ||||
| 1 | ON | INVITE sip: *71x#@domain.com SIP/2.0 From: <...> To: (where x is the hunt group extension) | *71x# |
Remark:
- Call Forward: it is only possible to activate/deactivate for the self phone. Not support for the supervision of other phone in this case.
- DND: it is also only possible to activate/deactivate for the self phone. Not support for the supervision of other phone in this case.
- SecFilter: It is supported to activate/deactivate for the supervised phone. The typical use case allows a secretary to have information on his/her phone by using a LED of the activation status of the Secretarial Filtering on the Line of the Boss. By pressing the feature key, the secretary can change the activation status of the secretarial filtering on the boss line.
- HuntGroup: It is supported to activate/deactivate for the supervised phone. The typical use case allows a Hunting Group Member to have information on his/her phone by using a LED of his/her logon status regarding a given Hunting Group. By pressing the feature key, the member can change the logon status in this Hunting Group.
Feature Activation
Below is the typical example, including the supervision of self phone and other phones, with making use of the governed parameters below:
- A (2001) is the self-phone number.
- B (2003 \~ 2005) supervised phone lines
- D (2007) is the Boss phone number
- E (2022) is the Hunt group number
FK1 & FK2: Line
FK3 to FK4: Use to supervise others phone with dialog, registration and DND services (Supervised phones: 2003 to 2004)
FK5 to FK6: Use to monitor the status of CFW and DND of the supervised phone (Supervised phones: 2005)
FK7: CFU (Self Phone) LED indicates ON/Off, Press Key for activation or Deactivation depends on the current status of the service.
FK8: DND (Self Phone) LED indicates ON/Off, Press Key for Activation or Deactivation depends on the current status of the Service.
FK9: Use to supervise other phone with SF service. LED indicates ON/Off, Press Key for Activation or Deactivation depends on the current status of the Service.
FK10: Use to supervise other phone with HG service. LED indicates ON/Off, Press Key for Activation or Deactivation depends on the current status of the Service.
A. Via WebGui:
First, reduce the number of Multiline to reserve the number of supervised lines in Function Key, in Advanced → Advanced. Change the Multiline to 2 and apply.

Then, go to Function key table through Advanced → Call feature → Function Key table.

Select the item in the "Type" drop-down menu: Supervised Line and enter the supervised phone numbers in the corresponding field of the function keys.
In this case, function keys 3 to 4 will monitor the dialog and registration with DND service for the corresponding supervised phones. Therefore, the boxes for dialog and regDND for each supervised phone are checked.
Likewise, function key 5 is to monitor the status of CFW and DND of the supervised phones; the ua-profile option must be checked. Click Change ST2030(S) to apply.
Then, click the Detail button to go into the sub-menu of the ua-profile.

Enable the cfu (Call Forward) and dnd (Do Not Disturb) services by highlighting the service and clicking the right arrow. Then, click Apply.
For Feature Key 9 and 10, the procedures are the same.

You can also press the up and down arrows to change the priority for the enabled services. The priority determines which service will be assigned to the first function key. The higher the priority, the first assigned function key will be used.
Therefore, the below feature key 5 is assigned with Call Forward service and feature key 6 is assigned with DND.

For the configuration of service supervision of self-phone, it can only be done by APS. Besides, it cannot be modified through either the MMI or the WebGui.
One of the important topics that need to be mentioned is the configuration of the starcode.
In this example, there are several starcodes involved. This document will give a brief description and make use of the starcodes working in Converse
ST2030s VoIP Business Phone
environment. For more detail, please refer to "ST20xx SIP New Features SG vx.62" P.145
Remark:
Now, if the Starcodes are used for self-phone, those will be denoted by SC. While, if the Starcodes are used for supervised phones, those will be denoted by SV.
Then, go to Advanced → Call feature; enter the Starcode for DND On/Off and Call Forward.

Under the call forward sub-menu, enter the starcode for Call-forward OFF and call-forward Always ON for the couple of activation/deactivation of the service. x represents the phone number to which the self-phone is forwarded.

A new page is added called Service code in Advanced -> Service code. All the Starcodes, which are used for monitoring the supervised phones, will be put there and be denoted by SV.
Enter the starcodes for SFOnSV, SFOffSV, HGOnSV and HGOffSV respectively and Apply.

B. Via APS:
In order not to conflict with the original user-oriented BLF, a new parameter will be added in Common and MAC configuration files to enable the feature of line supervision of registration and service supervision for each function key.
The existing parameters for user-oriented BLF will be used:
Current_Max_Multiline=10 (default)
FeatureKeyExtXX =S/
New parameter:
FeatureKeyOptXX=Dialog(1)regDND(0)ua-
profile(0:cfu(0)dnd(0)sf(0)hg(0)),
Where,
0 is disable, 1 is enable
XX is the number function keys used with supported extension modules, from Ext 01\~66.
Dialog - current BLF (Dialog only)
regDND - registration status with DND
cfu - Un-conditional call forward
dnd - Do Not Disturb
sf - Secretary filter
hg - Hunted group
Default setting:
FeatureKeyOptXX=dialog(1)regDND(0)ua-profile(0:cfu(0)dnd(0)sf(0)hg(0))
[sys]
...
Current_Max_Multiline=2
FeatureKeyExt03 =S/
FeatureKeyExt04 =S/
FeatureKeyExt05 =S/
FeatureKeyExt09 =S/
FeatureKeyExt10 =S/
FeatureKeyOpt03=dialog(1)regDND(1)ua-profile(0:cfu(0)dnd(0)sf(0)hg(0))
FeatureKeyOpt04=dialog(1)regDND(1)ua-profile(0:cfu(0)dnd(0)sf(0)hg(0))
FeatureKeyOpt05=dialog(0)regDND(0)ua-profile(1:cfu(1)dnd(1)sf(0)hg(0))
FeatureKeyOpt09=dialog(0)regDND(0)ua-profile(1:cfu(0)dnd(0)sf(1)hg(0))
FeatureKeyOpt10=dialog(0)regDND(0)ua-profile(1:cfu(0)dnd(0)sf(0)hg(1))
...
ServiceSupervisionStart=7
ServiceSupervisionOrder=CallFwd(1)DND(2)SecFilter(0)HuntGroup(0)
....
[sip]
.... CallFwdFlg=sc // StartCode for call forward (self phone) CallFwdOffSC=*211* CallFwdAlwaysSC=*21x* DNDFlg=sc // StartCode for DND (self phone) DNDOnSC=*31# DNDOffSC=*32# SFOnSV=*270x* // StartCode for SF (supervised phone) SFOffSV=*271* HGOnSV=*71x# // StartCode for HG (supervised phone) HGOffSV=*70x# ...
Remark:
- The default sequence of ua-profile can be changed, like dnd(0)cfu(0)hg(0)sf(0)
- ua-profile value should be set to 1 in order to activate the services supervision.
- 0 for disable, default value; 1 for enable; any other value (except 0 or 1) or empty is considered as disable
- if duplicated, cfu(0)cfu(1)dns(0)sf(0)hg(0), the first one is valid.
C. Via Telnet:
Below shows some significant telnet commands for this case. For more information, please refer to ST20XXS_Config File Syntax_V0034.pdf.
- Set the function key to be Supervised line with phone number
[administrator]# sys set fk 3 $/<sip:2003>
[OK] Set OK
- Enable the line supervision and service supervision
[administrator]# sys show fk_blf_opt 3
Feature Key BLF Option[3]:dialog=Enable; regDND=Disable;ua-profile=Disable
[administrator]# sys set fk_blf_opt 3 1 0 0
- Enter the starcodes flag with starcode
[administrator]# sip set DNDFlg sc
[OK] Set OK

[administrator]# sip set DNDOnSC *31#
[OK] Set OK

[administrator]# sip set DNDOffSC *32#
[OK] Set OK
Comverse: Redirecting identity and name presentation
Currently, the ST20xx do not support the "display-name" string of the Diversion header.
When working in a Converse environment, the feature of redirecting identity and name presentation allows its display on the terminating phone. The redirecting identity and name information is received in the initial INVITE request.
Therefore, this section addresses the implementation of the redirecting identity in ST20xx.
Let's see the example below:
A (calling): 84000532 "Alice"
B (redirecting): 81000541 "Bob the Manager"
C (called): 84000531 "Assistant"
For a basic incoming call, ST20xx will receive the following SIP INVITE message:
Initial INVITE from NETWORK received by C:
INVITE sip:84000531@10.165.2.31:5060 SIP/2.0
Via: SIP/2.0/UDP 10.165.2.200:5060;branch=z9hG4bK4901036f-6756-5198
Call-Id: CI_375_84000531_120
From: "Alice" <sip:84000532@10.165.2.200:5060>;tag=10.165.2.200-6745-8537
To: <sip:84000531@10.165.2.31:5060>
Max-Forwards: 70
Allow: REGISTER, INVITE, BYE, ACK, CANCEL, REFER, INFO, OPTIONS, SUBSCRIBE
Session-Expires: 120
CSeq: 375 INVITE
Contact: <sip:84000532@10.165.2.200:5060>
Supported: timer
Diversion: "Bob the Manager" <sip:81000541@10.165.2.200:5060>
Content-Type: application/sdp
Content-Length: 217

SDP
There are three states that need to be considered:
1. In Ringing (during call incoming) state
ST20xx displays the Caller and the Redirecting name alternatively on the screen, and the redirecting name will be displayed in reverse video. The time interval for the swap will be 1 second.
If the diversion header has the Redirecting party Name, the phone should display "Bob the Manager", but if it doesn't have the Redirecting party Name, the phone should display the Number "81000541".
2. In Talking state:
ST20xx displays the Caller name with number.
3. In Call log:
The call log list shows the detail of caller information.
Remark:
If the phone number of "Bob the manager" is saved in the phone book, the display should show the name from the phone book.
Only the top header is shown.
Feature Activation
3. Via APS:
A new parameter will be introduced to activate/deactivate the feature of redirecting identity and name presentation in the [sip] section of both Common and Specific-MAC config files.
DiversionHeaderFlag = <0|1>, where 0 is disable (default setting), 1 is enable.
[sip]
.....
DiversionHeaderFlag = 0    // by default, disable
DiversionHeaderFlag = 1    // Diversion header is supported
.....
4. Via Telnet
To configure, open a command line console and telnet to the phone:
![** ** IP Phone firmware ** compiled on ** ** ** IP Phone UPD1020-D49(S) ** ** ***** Login: administrator Password: ***** [administrator]# sip show diversion_header_flag diversion_header_flag = Disable [administrator]# sip set diversion_header_flag sip set diversion_header_flag [0:Disable!1:Enable] […](/content/2026/06/1313292/images/f6ae47ab745952d8ca8c45b57de601cc3492bd4d05de794949651b6b67fdcc51.jpg)
ST20XX SIP New Features (SG vx.65.1)
Overview
This document describes a set of features included in ST20xx vx.65.1 to improve their usability in different environments.
Multi-registration on the same server
ST20xx is able to support multi-registration on the same server.
Same as before, the main line will be the master.
"Registered" status icon will be driven by the main line registration status. Function key 1 will always be assigned to the main line. Multi registration can include Main line.
The phone behaviour will be the same for the main line and other registered lines for all features including register.
The phone supports multi-registration so that each line will register with server with different credential and extension number.
This document addresses the improvements to be done in ST20xx to enhance its support for this feature.
Feature Activation
A new parameter is needed to configure this function and with some additional definitions listed below.
L. Via the web GUI:
An additional item will be created in the roll down "Type" menu: Multi-registration. This roll down type will always be shown.
The function key assigned to multi-registration will have the following parameters separated by "I" (vertical bar):
- Line number
- Authentication username
- SIP password
- Phone Name (Optional)
Example:

M. Via APS:
APS in [sys] section of both Common or Specific-MAC config files with the new
Parameter:
M will be used to denote the option for multi-registration, like below:
[sys]
.....
Current_Max_Multiline=5 (available overall number of Multit-registration line is Multiline-1)
FeatureKeyExt02=M/:<sip:2001|username|password|PhoneName2001>
FeatureKeyExt03=M/:<sip:2002|username|password|PhoneName2002>
FeatureKeyExt04=M/:<sip:2003|username|password|PhoneName2003>
....
N. Via Telnet
To configure, open a command line console, and telnet the phone:
![IP Phone UPD1020-D49(S) Login: administrator Password: ***** [administrator]# sys show max_mtline Current Max Lines = 10 [administrator]# sys set max_mtline 5 [OK] Set OK [administrator]# sys show max_mtline Current Max Lines = 5 [administrator]# sys set fk 2 M/ NMM: ATPM not in Database update stat…](/content/2026/06/1313292/images/7c89c66204a8aa4060c61cb6a808c8257ab48d7cf9701a067a6ffcfa43734562.jpg)
ST20XX SIP New Features (SG vx.64.2)
Overview
This document describes a set of features included in ST20xx vx.64.2 in order to improve their usability in different environments.
Support Private Number (ST2030 only)
Our customer's architecture includes a private identifier (called "pn") in the INVITE message in order to notify the end-user with a more legible number notification.
Current Implementation (up to SG v1.63)
- "pn" parameter is currently ignored
New Implementation (SG v1.64)
For this purpose, a new parameter has been included in section [sip] of common or MAC config files in each profile.
Remark:
use_PrivateNumber=0 (default)
New policy:
If the header to be used for incoming call identity display (depending on CLIPPriorDisplay and received headers) contains a URI like this:
header: <sip: ;pn= @ , then
- if use_PrivateNumber is set to 0 (default),
- show and store in Call log @ , as current behaviour
- if use_PrivateNumber is set to 1,
- show in incoming call and talking screen
- show in call log,
- store the full @ , in call log, for dialing purposes
Feature Activation
A) Through APS:
In Common or Mac Config file, user can set enable or disable the use of private number to 0 or 1 respectively. Default value is 0
[sip]
...
use_PrivateNumber=0 (default)
use_PrivateNumber=1 (Notify the end-user with a more legible number)
...
B) Through Telnet:
To configure, open a command line console, and telnet the phone:
![IP Phone firmware U1.63. IP Phone UPD1020-D49(S). Login: administrator. Password: *****. [administrator]# sip show use_PrivateNbr_flag. SIP: user PrivateNbr flag = OFF. [administrator]# sip set use_PrivateNbr_flag. sip set use_PrivateNbr_flag [0 / 1].](/content/2026/06/1313292/images/4304a50ef25ff10b8dcbcdbc844348f208ac6a518ee3e26d86a42fcfdd48dbd6.jpg)


- EUROPEAN COMMUNITY DECLARATION OF CONFORMITY
- NORTHERN AMERICA FEDERAL COMMUNICATIONS COMMISSION (FCC) STATEMENT
- COPYRIGHT NOTICE & TRADEMARKS
- CONTENTS
- PART 1 SAFETY INFORMATION
- OPERATING CONDITIONS
- LOCATION SAFETY INSTRUCTIONS
- CARE
- CONNECTIONS
- QUALIFIED SERVICE
- PART 2 PRODUCT OVERVIEW AND CONNECTIONS
- INTRODUCTION
- NOTE AND CAUTION
- PACKAGE CONTENTS
- FIGURE 2.1 IP PHONE CABLE CONNECTIONS
- OVERVIEW
- MAIN FEATURES
- SUPPORTED FEATURES
- SUPPORTED PROTOCOLS
- ABBREVIATIONS
- PART 3 PHONE OPERATIONS
- GENERAL APPEARANCE
- PHYSICAL FEATURES
- FIGURE 3.1 THE IP PHONE USER PANEL
- TABLE 3.1 THE IP PHONE PHYSICAL FEATURES
- DISPLAY
- DEFINITIONS OF SOFT KEYS
- TABLE 3.2 DEFINITIONS OF SOFT KEYS
- ICONS & INDICATORS
- DEFINITIONS OF LED
- TABLE 3.3 DEFINITIONS OF LED
- EXTENSION MODULE
- MEMORY
- POWER SUPPLY
- PART 4 CALL SERVICES
- TALKING MODE & OPERATIONS
- TABLE 4.1 OPERATIONS OF MODE SWITCH DURING CALL
- MAIN CALL FUNCTIONS
- CALL FUNCTIONS DURING CONVERSATION
- PHONE BOOK & CALL LOG
- CHARACTER INPUT- EDIT MODE
- TABLE 4.2 CHARACTER INPUT METHOD TABLE
- PART 5 CONFIGURATION THROUGH LCD
- MENU LIST
- FIGURE 5.1 OPERATION MENU LCD DISPLAY
- PART 6 CONFIGURATION VIA WEB INTERFACE
- CONFIGURATION THROUGH THE WEB INTERFACE
- DETAILED WEB PAGES
- PART 7 AUTO-PROVISIONING
- AUTOMATIC PHONE PROVISIONING WITH TFTP
- AUTOMATIC PHONE PROVISIONING WITH HTTP
- PART 8 RINGTONES CONFIGURATION
- ST20XX SIP NEW FEATURES (SG VX.69.2)
- VENEZUELA NUMBERING PLAN
- LLDP
- MGC
- BLF
- ACR RESPONSE
- ATTEND TRANSFER
- PREFERRED IDENTITY
- DSCP OF DHCP
- INPUT MODE
- ST20XX SIP NEW FEATURES (SG VX.68.5)
- HUAWEI SOFT SWITCH
- CONFIG WITHOUT RELOAD
- CCBS ENABLE/DISABLE
- ST20XX SIP NEW FEATURES (SG VX.67.2)
- SECURITY FEATURES
- IMPROVE HTTPS APS FEATURE
- SUPPORT ENCRYPTION OF CONFIGURATION FILES IN APS
- CALL DIALING FROM WEBGUI
- SIP MESSAGE DURING CALL (RFC 3428)
- DNS QUERY ( CIRCULAR METHOD)
- SUPPORT REMOTE CALL LOGS FOR LOCAL USER
- ST20XX SIP NEW FEATURES (SG VX.66.2)
- TRANSFER ON RINGING
- CALL-HOLD "INACTIVE" METHOD
- COMVERSE: LINE AND SERVICE SUPERVISION (REG & UA-PROFILE EVENT PACKAGE)
- COMVERSE: REDIRECTING IDENTITY AND NAME PRESENTATION
- ST20XX SIP NEW FEATURES (SG VX.65.1)
- MULTI-REGISTRATION ON A SAME SERVER
- ST20XX SIP NEW FEATURES (SG VX.64.2)
- SUPPORT PRIVATE NUMBER (ST2030 ONLY)
- SOFTKEY LEFT SCROLLING IN TALKING MODE (ST2030 ONLY)
- ST20XX SIP NEW FEATURES (SG VX.63)
- INCOMING CALL DURING TRANSFER
- NUMBER DISPLAY IN STANDBY
- LIST ORIENTED BLF V2 (ST2030 ONLY)
- IMPROVED SHARED CALL APPEARANCE (SCA)
- STAR CODES
- SYLANTRO SIP-B
- NAT KEEP ALIVE
- TRACING TOOL
- PART 2: PRODUCT OVERVIEW AND CONNECTIONS
- CONNECTING TO THE NETWORK AND THE PC
- NETWORK PORT (10/100LAN)
- ACCESS PORT (10/100PC)
- POWERING UP THE PHONE
- POWER PLUG
- POWER OVER ETHERNET
- CONNECTED A HEADSET
- TECHNICAL SPECIFICATIONS
- CONFIGURATION
- PART 3: PHONE OPERATIONS
- CONFIRMATION KEY
- CLEAR KEY
- MENU KEY
- PHONE BOOK KEY
- SCROLLING AND MOVE KEYS
- SOFT KEYS
- LCD SCREEN
- AUDIO KEYS
- VOLUME KEYS
- SPEAKER KEY
- HEADSET KEY
- MUTE KEY
- DIALING KEYS
- DIALING PAD
- REDIAL KEY
- MEMORY KEYS
- HANDSET
- KINDS OF COMMUNICATION MODE
- OPERATION OF OFF HOOK
- OPERATION OF ON HOOK
- OPERATION OF MODE SWITCH DURING CALL
- MAKE A CALL
- ON-HOOK DIALING
- OFF-HOOK DIALING
- LAST NUMBER REDIAL
- SPEED DIAL
- SAVE MEMORY KEYS
- SPEED DIALING – ON-HOOK DIALING
- SPEED DIALING – OFF-HOOK DIALING
- ANSWER A CALL
- REJECT A CALL
- CALL BACK
- OPERATION OF CALL COMPLETION TO BUSY SUBSCRIBER (CCBS)
- WHEN CCBS IS SUCCESSFUL
- CALL FORWARD
- TRANSFER MESSAGE TO VOICE MAIL
- HOLD AND RETRIEVE A CALL
- CALL TRANSFER
- OPERATION OF "BLIND" TRANSFER
- OPERATION OF "ATTENDED" TRANSFER
- AFTER PRESSING TRANSF ONCE
- WHEN THE CALLEE PICKS UP
- CONFERENCE CALL
- START A CONFERENCE BY CALLING OTHER PARTY
- DROP ANY ONE PARTICIPANT OF THE CONFERENCE CALL
- END THE CONFERENCE CALL
- WHEN PRESSING CONF ONCE
- WHEN A CALL/CONFERENCE IS ACTIVE
- OPTIONS DURING A CALL
- VOLUME ADJUSTMENT
- MUTE
- MULTI LINE
- DISPLAY OF LINE/CALL STATUS
- DEFINITION OF STATUS
- SWITCH BETWEEN LINE/CALL
- ANSWER AN INCOMING CALL WHEN ANOTHER CALL IS ACTIVE
- SWITCH BETWEEN LINES
- PICK UP
- TO PICK UP A CALL ON ANOTHER PHONE
- PARK UP
- SET CALL PARK
- RETRIEVE CALL PARK ON ANOTHER PHONE
- CALL LOGS
- MISSED CALLS
- RECEIVED CALL & DIALED CALLS
- PHONE BOOK
- ST2030S VOIP BUSINESS PHONE
- OPERATION MENU DISPLAY
- HOME OPERATION MENU DISPLAY
- CONFIG MENU DISPLAY
- ADMIN MENU DISPLAY
- OPTION MENU DISPLAY
- DETAILED LCD MENU SETTINGS
- USER MENU DISPLAY
- ALARM CLOCK
- CONTRAST
- PIN SETTING
- SHORTCUT SETTING
- INFORMATION
- MEMORY KEYS SETTING
- MENU OF ADMIN SETTINGS
- NETWORKING CONFIGURATION
- CONTENT OF NETWORK PARAMETERS
- PPPOE SETTING
- NTP SETTING
- SIP CONFIGURATION SETTING
- STEP 1 – BEFORE STARTING
- STEP 2 – CONNECT TO THE IP PHONE WEB SERVER
- STEP 3 – REBOOT THE PHONE
- CONNECTION PAGE
- HOME PAGE
- THOMSON
- ADVANCED: STUN PAGE
- ADVANCED: UPNP
- NEEDED
- THE FILES
- DHCP OPTION
- INSTALLATION OF THE PLATFORM
- PROCESS OF AUTO PROVISIONING IN THEORY
- PROCESS OF AUTO PROVISIONING IN PRACTICE
- IN THE ORDER
- SOME PRECISE DETAILS
- IF MGCP PHONE
- IF SIP PHONE
- DESCRIPTION
- MAKE A MELODY
- INTEGRATION OF THE RINGTONES WITH ST
- PART 9: FEATURE OVERVIEW
- FEATURE ACTIVATION
- VIA APS
- VIA TELNET
- EXAMPLE
- VIA WEB GUI
- CHOOSE QOS
- HUA WEI SOFTSWITCH
- FLOW DESCRIPTIONS
- SWITCH IMPLEMENTATION
- REQUIREMENT
- (PSTN 1 AND PHONE B ARE IN CONVERSATION)
- SIPS
- TLS
- SRTP
- VIA WEBGUI
- ENCRYPTED FILES SUPPORT
- ENCRYPTION METHOD
- ENCRYPTION/DECRYPTION TOOLS
- IN WINDOW PLATFORM
- IN LINUX PLATFORM
- THINGS TO KNOW
- APS LOG (IF DECRYPTION KEY MATCH)
- APS LOG (IF DECRYPTION KEY NOT-MATCH)
- WEB INTERFACE
- DNS QUERY (CIRCULAR METHOD)
- CURRENT IMPLEMENTATION (UP TO SG1.66)
- NEW IMPLEMENTATION (SGX.67.2)
- IMPLEMENTATION
- EXAMPLES
- CURRENT IMPLEMENTATION
- NEW IMPLEMENTATION
- BUSY LINE FIELD (BLF)
- DIALOG EVENT SUPERVISION
- REGISTRATION EVENT SUPERVISION WITH DND
- IMPLEMENTATION AND CONFIGURATION
- REMARK
- SERVICE VARIABLE SUPERVISION
- FK5 TO FK6: USE TO MONITOR THE STATUS OF CFW AND DND OF THE SUPERVISED PHONE (SUPERVISED PHONES: 2005)
- THEN, CLICK THE DETAIL BUTTON TO GO INTO THE SUB-MENU OF THE UA-PROFILE
- IN RINGING (DURING CALL INCOMING) STATE
- IN TALKING STATE
- IN CALL LOG
- MULTI-REGISTRATION ON THE SAME SERVER
- VIA THE WEB GUI
- CURRENT IMPLEMENTATION (UP TO SG V1.63)
- NEW IMPLEMENTATION (SG V1.64)
- THROUGH APS
- THROUGH TELNET
Brand : THOMSON
Model : ST2030
Category : Telephone