FP 8500 - Screwdriver METABO - Free user manual and instructions
Find the device manual for free FP 8500 METABO in PDF.
| Product Type | Pneumatic grease pump |
| Brand | Metabo |
| Model | FP 8500 |
| Dimensions (L x W x H) | 385 x 190 x 70 mm |
| Weight | 1.55 kg |
| Power Supply | Compressed air |
| Maximum permissible pressure | 10 bar |
| Air consumption per stroke | 0.4 l |
| Sound power level (LWA) | 88 dB(A) |
| Sound pressure level (LPA) | 79 dB(A) |
| Main functions | Lubrication of machines, vehicles, industrial installations |
| Filling methods | Cartridge, drum, filling pump |
| Lubricant type | Non-corrosive grease for grease pumps |
| Safety | Trigger, safety catch, bleed valve |
| Maintenance | Pneumatic lubrication every 15 min, regular cleaning |
| Spare parts and accessories | Pneumatic oil 0.5 L, lubricator, swivel joint |
| Repairability | Repairs exclusively by professionals |
| General information | Professional use, compliant with EN ISO standards |
| Delivery contents | Grease tube, tubing, valve, compression head, trigger, handle, 1/4" fitting |
Frequently Asked Questions - FP 8500 METABO
User questions about FP 8500 METABO
0 question about this device. Answer the ones you know or ask your own.
Ask a new question about this device
Download the instructions for your Screwdriver in PDF format for free! Find your manual FP 8500 - METABO and take your electronic device back in hand. On this page are published all the documents necessary for the use of your device. FP 8500 by METABO.
USER MANUAL FP 8500 METABO
We herewith declare in our sole responsibility that this product complies with the following standards' in accordance with the regulations of the undermentioned Directives**
Director Innovation, Research and Development
Dokumentationsbevollmachtigter/ responsible person for documentation/ Chargé de la documentation
Metabowerke GmbH
Metabo-Allee 1
D-72622 Nurtingen

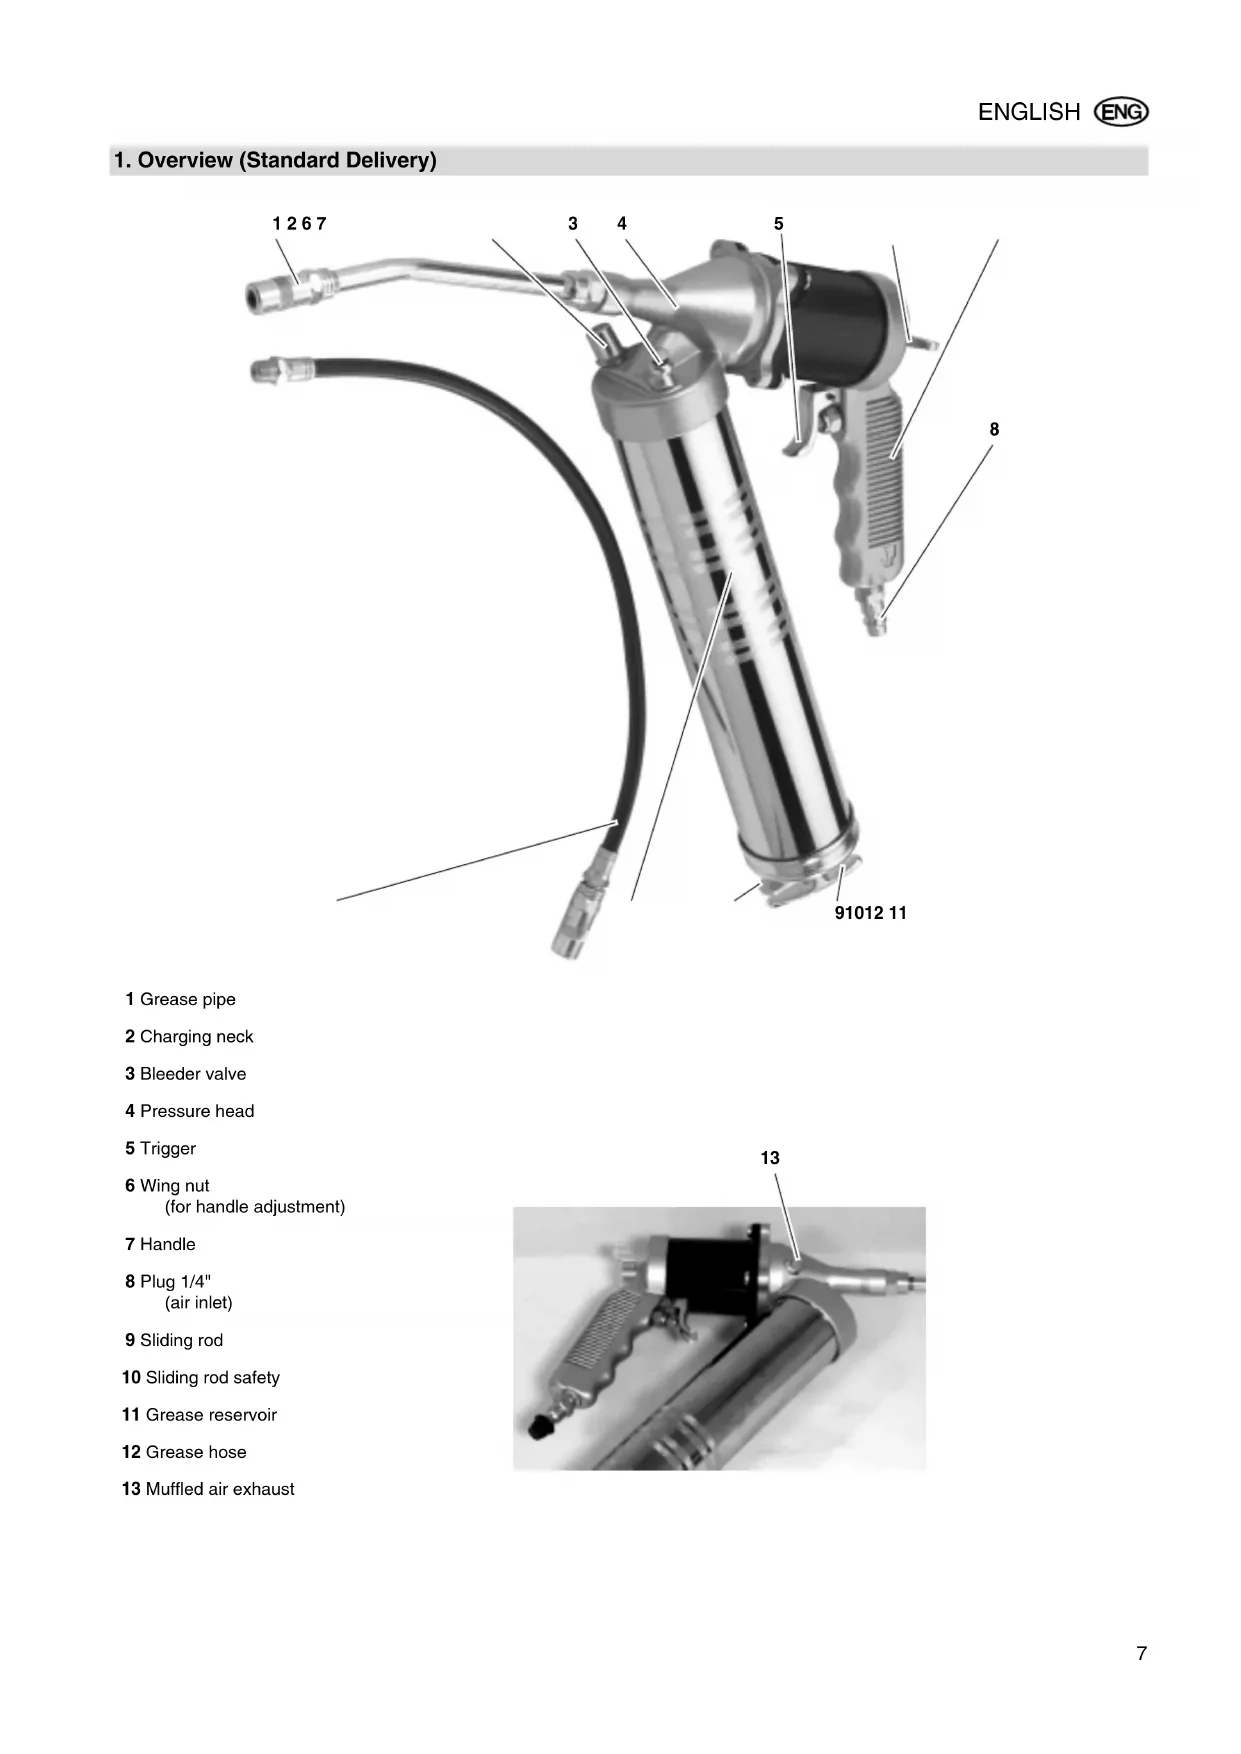
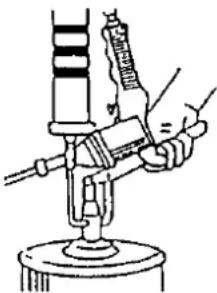
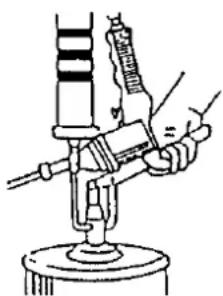
1 Grease pipe
2 Charging neck
3 Bleeder valve
4 Pressure head
5 Trigger
6 Wing nut (for handle adjustment)
7 Handle
8 Plug 1/4" (air inlet)
9 Sliding rod
10 Sliding rod safety
11 Grease reservoir
12 Grease hose
13 Muffled air exhaust
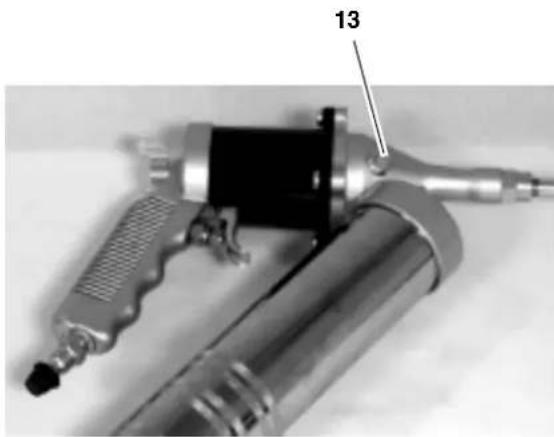
Table of Contents
- Overview (Standard Delivery) ....7
- Please Read First! 8
- Safety 8
3.1 Specified conditions of use .8
3.2 General safety instructions..8 - Operation 8
4.1 Before initial operation 8
4.2 Refilling the grease reservoir ....8
4.3 Using the tool 9 - Care and Maintenance. 9
- Available Accessories 9
- Repairs.. 9
- Environmental Protection .9
- Technical Specifications 10
2. Please Read First!
These instructions are written in a way to let you work with the tool quickly and safely. Here is how to use the instructions:
- Read these instructions fully before operating the tool. Pay special attention to the safety information.
- If you notice transport damage while unpacking, notify your supplier immediately. Do not operate the tool!
- These instructions are intended for individuals having a basic technical knowledge in the handling of tools like the one described herein. If you have no experience whatsoever with such tool, we strongly recommend to seek the advise of experienced individuals.
- Keep all documents supplied with this tool for future reference. Also, retain proof of purchase in case of a warranty claim.
- Should you rent or sell the tool, pass on all documents supplied with the tool.
The manufacturer is not liable for any damage arising from neglect of these operating instructions.
Information in these instructions is denoted as under:

Danger!
Risk of personal injury or environmental damage.

Caution!
Risk of material damage.

Note:
Additional information.
Numbers in illustrations (1, 2, 3, ...)
- denote component parts;
- are consecutively numbered;
- Instructions to be carried out in a certain sequence are numbered.
- Instructions which can be carried out in any sequence are indicated by a bullet () .
- Listings are indicated by an En Dash (-).
3. Safety
3.1 Specified conditions of use
This grease gun is an air-operated tool for use by craftsmen. It can be used for lubricating machines, motor vehicles, farm machinery, industrial equipment, as well as transport and conveying systems.
This tool shall only be powered by an air compressor. The max. permissible working pressure stated in the Technical Specifications must not be exceeded. This tool must not be operated with gases that are explosive, combustible or detrimental to health.
Any other use is not as specified. Use not as specified, modification of the tool or use of parts not approved by the equipment manufacturer can cause unforeseeable damage!
3.2 General safety instructions
- When using this air tool follow the safety instructions given below, to exclude the risk of personal injury or material damage.
- Please also observe the special safety instructions in the respective chapters.
- Observe the statutory accident insurance institution regulations and regulations for the prevention of accidents pertaining to the operation of air compressors and air tools, where applicable.
#
General hazards!
- Keep your work area tidy - a messy work area invites accidents.
- Be alert. Do not operate this tool while under the influence of drugs, alcohol or medication.
- Keep children and bystanders away from the work area.
- Store air tools out of the reach of children.
Always use a quick coupler to connect this air tool to a compressor. -
Disconnect from air supply before
-
filling the grease reservoir,
-servicing or -
when tool is left unattended.
-
Hold on to the sliding rod of a removed grease reservoir when releasing the sliding rod safety. Do not let the sliding rod leap back with a jerk.
-
When pulling the trigger grease will be ejected at high pressure.
-
Do not cover grease pipe or grease hose nozzle with your hand.
- Do not point grease gun against other persons or animals.
- Operate grease gun only when connected to a lubricating nipple.
- Hold the grease hose during the entire greasing operation to prevent it from jumping off the nipple.

Hazard generated by insufficient personal protection gear!
- Wear hearing protection.

Hazard generated by tool defects!
- Do not attempt to repair the tool yourself! Only trained specialists are permitted to service or repair compressors, pressure vessels and air tools.

Caution!
- Protect tool, the air inlet in particular, from dust and dirt.
- Make sure that the max. permissible working pressure stated in the Technical Specifications is not exceeded. The working pressure must be adjusted by a pressure regulator.
- Do not overload tool - use it only within the performance range it was designed for (see Technical Specifications).
4. Operation
4.1 Before initial operation
- Fit the plug nipple.
4.2 Refilling the grease reservoir

Caution!
- Refill the grease reservoir only with non-corrosive lubricants, approved for use in grease guns. Observe the manufacturer information.
- The piston may become contorted by the permanent use of cartridges. Changing the filling method afterwards could result in grease leakage. You should opt for only one filling method, if possible.

Note:
When changing to another
grease type, a genuine application can only be assured after thorough cleaning.
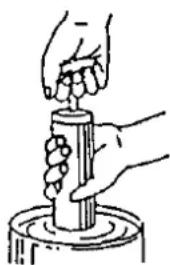
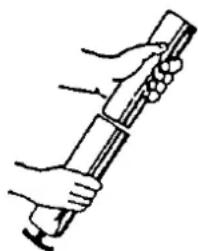
Loading a cartridge
- Turn grease reservoir counter-clockwise to remove.
- Insert cartridge with open end up into the grease reservoir and push it down.
- Attach grease reservoir, turning it clockwise. Do not overtighten.
- Push and hold sliding rod safety and push sliding rod in.
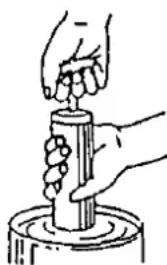
Loading from bulk
- Turn grease reservoir counter-clockwise to remove.
- Dip grease reservoir approx. 5 cm into grease and pull sliding rod slowly up against the stop.
- Attach grease reservoir, turning it clockwise.
- Push and hold sliding rod safety and push sliding rod in.
Loading by filling pump
- Pull sliding rod fully out.
-
Connect charging neck to filling pump.
-
Start filling pump and fill grease reservoir fully.
- Disconnect charging neck from filling pump.
- Push and hold sliding rod safety and push sliding rod in.
4.3 Using the tool

Caution!
To ensure a long service life of this tool, it needs to be supplied with sufficient quantities of pneumatic oil. This can be achieved by:
-a service unit with oiler at the compressor.
-a lubricator, installed in the air line or directly on the air tool.
- adding approx. 3-5 drops of pneumatic oil by hand every 15 minutes of use (constant operation) to the air inlet.
- Attach grease pipe or grease hose to pressure head by turning it in clockwise.
- Adjust working pressure at the compressor (see Technical Specifications for max. permissible working pressure).
- Connect tool with quick coupler to air supply.
- Set grease gun on lubricating nipple.
- Pull trigger to deliver grease.
- Release trigger as soon as a sufficient amount of grease has been delivered to the lubricating nipple.

Note:
Observe the manufacturer information for the device to be lubricated pertaining to pressure, interval, type and amount of lubricant.
5. Care and Maintenance

Danger!
Always disconnect from air supply before servicing. Repair and maintenance work other than described in this section must be carried out by qualified specialists only.
- Check all screwed connections for tightness, tighten if necessary.
- If the tool is not lubricated by a service unit or line lubricator, add 3-5 drops pneumatic oil to the air inlet every 15 minutes of use (constant operation).
- Do not store tool unprotected outdoors or in damp environment.
6. Available Accessories
Pneumatic oil 0.5 litre Special lubricant for air tools, service units and line oilers. Stock-no.0901008540
- Line oiler R3/8" female
For fitting directly to air tools. Oil level can always be checked through sight glass.
Stock-no. 090 105 4592
- Swivel-type air inlet
DKG 1/4"
For fitting directly to air tools.
Improves tool manoeuvrability.
Stock-no. 090 106 0991
7. Repairs
Danger! Repairs to air tools must be carried out by qualified specialists ONLY!
Air tools in need of repair can be send to the service centre in your country. See Spare Parts List for address.
Please attach a description of the fault to the power tool.
8. Environmental Protection
Use environmentally friendly lubricants.
Avoid uncontrolled dripping to prevent lubricants from polluting the environment.
The tool's packaging can be 100% recycled.
Worn out machines and accessories contain considerable amounts of valuable raw and plastic materials, which can be recycled.
These instructions are printed on paper produced with elemental chlorine free bleaching process.
- Technical Specifications
| Model FP 8500 | ||
| Air consumption l/stroke 0.4 | ||
| Max. permissible working pressure bar 10 | ||
| EN ISO 15744Sound power level LWA Sound pressure level LPA Uncertainty K | dB (A) dB (A) dB (A) | 88794 |
| Dimensions: length x width x height | mm | 385 x 190 x 70 |
| Weight kg 1.55 |
Opmerking: Let on do so
CBeDENB D aHHOM pyKOBOCTBE nOmeHeHcIeMyoMm 6pa30m:

Onachoctb! PpeynpekdeHne o TpaBmax n yuepe6e nn Okpykaoue cpebl.
BHMaHne! PpeDynpexKeHne o MaTePnaJIbHOM yuepe6.
Yka3aHHe: DOnoJIHnTeIbHa HOpMaun.
LHpHa npCynkax (1,2,3,...) 06o3HaAOT DetaIN; -MEOTCKBO3HyO HymepauNIO
Yka3aHnno pa6oTe,ДЯ KOTOpbIX CneJyET co6IIOdaTb onpeJeHHyIO NocleIOBaTeJIbHOCTb,CHa6XKeHbl Hymepaunei.
Yka3aHnI no pa6Ote c npOn3BOJbHOI NOcJeIOBaTeJIbHOCTbO 06o3HaueHbTOyKaMn.
IyHKtBcNCKOB 0603HaHeHbI YepTochAmn.
3. Be30NaCHOCTb
3.1 HndJIeXaUee npImMeHHeHne
Cma30HbI IUnpNt PpeCTabnEeT
c60B IINHEBMATUeCKN INCHTpymENT
dJI NpIMHeHEnB Mactepcknx. Ero
MOXHO HcONJb3OBA Tb dJI CMA3KN
CTAHKOB, ABTOMO6NIeN,
CEJIbCKOXO3RrCTBeHHbIX MaUNH,
IPOMBIuNEHbIX yCTaHOBOK,
TPaHCNOptHBix KOBBeHepbIX
yCTaHOBOK.
JaHHbI INHCTpyMeHT DOJXeH npINBOIDTcB B DeNCTBNE TOJIbKO KOMnpeccopom CxAtoro BO3dyxa. 3anpeaaetC npeBbIaTa npeJeNbHO donyctHMoe pa6Oee daBneHne, yKa3aHHOE B TexHnuecknx XapakTepeNCTkax. 3anpeaaetC nCNOJB3OBaTB INHCTpyMeHT C B3pbIBOOIacHBIM, rOpOCHMn IBpeDhbIM ra3amN.
JIIO6oe INHOe npIMMeHHe RAHETcH HeHaIeXaUIM. HeHaIeXaUee IcNoJIb3OBaHHe, MoINpIKaUNn HNHCtpyMeHTa UNu INCNOJIb3OBaHHe YacTeH, He IpOBepeHHbIX N He Odo6peHHbIX pON3BOJNTeLEm, MOrYT npINBeCTN K HEnpeDcKa3yEMOMy yuepe6y!
3.2 06uhe yka3aHnno TeXHnke 6e3oNaCHOCTN
PnncnoB3OBaHm HcTpymeHTa co6nOdaTb npBBeHHbIe Hxke yKa3AHnNo 6e3oNaChocTn, YTo6bl n36ExaTb OnaCHOCTN BO3HNKHOBEHn TpaBM NIM MaTePnaJbHorO yuep6a.
CobnOaTb cneuaNbHbyeKa3aHnNo 6e3oNaChocTu,npBedeHHbE B COOTBeTCTBYIOuxrnaBax.
Co6HIOdaTb BO3MOXHbIe OcO6be HOpMaTHBbI NO OxpaHe Tpyda INpeDoTbpaUeHNIO HeChactThbIX CnyaEB npn paBoTe c KOMPpeccopAMN INHeBMATuYeCKMm NHCTpyMeHTAmN.

Onachoctn oobero Tepa!
CoepKaTb paOoee MeCTOB nOpHKe-6ecnopnOK Ha paOoem MeCTe MoKet npBecTn K HeCyaCTbIM CnyaRM.
IpoBnTb BHIMATEnbHOCb. He NlB3yNTecb INCTpyMeHTOM,ecn BHe B COCToHnCocpeDToHTbCra.
He donyckaTb Detey n NOCTOPOHNX NnB pa6oyu 30Hy.
XpaHHTb NHEBMATUeCKNe INHCTpymEHTbB MecTe, He DOCTynHom dIa DeTei.
I OaKJIIOuHaTb HnCTpyMeHT K KOMnpecccopy ToIbkoYepe3 6bICTpoJeHCTByOuSyMyfTy.
OTcoeINHHTb HCTpyMeHT OT INHHN CxATORO BO3dyxa nepeD BbINONHeHNEM cneDyUOxnx pa60T:
-3aIOJIHeHne CMA3OuHOro pe3epByapa,
-ycTpaHHeH HeNCpPaBHOCTeI
-ecnIN INHCTpymEHT OCTaBnEETCA6e3HaD3opa.
PnOTcoeHHeHH CTOnopa
WATyHa PnpEepKuBaTb WATyH
OTBnHcHHO CMAOHTHO
pe3epByapa.He DonyckaTe
pe3kOro OTnpyKuHBaHH WATyHa
Ha3a.
PnOTcoeHHeHm CMA3OCHORo Wnpuca CMa3Ka BbIXOHT HApxKy NOB BbICOKM DaBJIeHEm.
He 3aKpbIbAaTe CMa3OHyIO Tpy6ky N CMa3OHyBII UHaHpyko.
He HanpaBnIe Cma3OHybI Wnpu Ha IIOJe N XNBOThbIX.
3anyckaTe Wnpu TolbKO TORda, KOrDa OH HacaXeH Ha CMA3OHyHnHNPeB.
-Kpenko ydepknaBaiTe Cma30uHbI uHaH BG BpeMa BCero npocecca Cma3Kn, YTo6bl OH He BbInan n3 pyK.

OnachocTb BCJeCDTBne
HeOCTaTOUHORO LNUHORO 3aUNTHORO ChapXKeHH!
HaedeBaTb 3aunTHbIe HayuHnK.

Onachoctb BCneCTBne depekTOB npnbopa!
He pemOHtnipoBaTb INHCTpyMeHT camOCToTeNbHO! PemOH T KOMnpeccopOB, HAnOpHBIX pe3epByapOB INHeBMaTHueckNX INHCTpyMeHTOB DOJIKeH BblONHATbCR TOJbKO CneuJaNtAmN.

BHIMAHne!
- O6eperaIte npnbop, oc06eHno natpy6ok dna ckaToro BO3dyxa, OT nbiln I rpa3n.
He npebbiataB npedeBho
DOnyuctnmoe paOoee daBneHne,
yKa3aHHoe B TexHuecknx
XapaKTepeNCTnKax.
PaOoee daBneHne cNe dyET
ycTaHaBnBaTb npi nOmoun
peDyKTopa. - N36eRaTb nepeRpy30K nHcTpymEHTa -NcNoJb3ObaTb erO TOnbKO B Dnana3OHe MoUHOCTH, yKa3aHHOM B TexHnueckx XapaKTePncTnKax.
4.3Kcnnyatauia
4.1 Ppepe npBbIM 3anyckOM
BbHTb BCTaBHOn HnneJIb.
4.2 3anonHeHne cma3oHoro pe3epByapa

BHHMaHHe!
3aONHnTe pe3epByap NCKIIOHTeJIbHO HEKOpO3IOHNbIMN CMA3OHTbIMN MaTePnaJAMN, pa3peUHeHHbIMN K PIPmEHeHIOB CMA3OHTbIX ⅢnpuaX. Co6JIoJaTte yKa3aHnI PpOn3BOJNTJI R CMA3OHTHO MaTePnaJa.
HaHrHeTaOuIINopWeHbMOKeT DeOpMnPoBaTbCnPn DInTeNbHOMNCNOb3OBAHn NaTPOHO.BnPi NocNeDuOSei CMeHe MeToDa 3aNoJIHeHnMa MOKeT BO3HNKHyTB HeRePMeTuHOCtB n PpOn3oITn BbIXoCm3Kn. IIO BO3MOxHOCTNuYcTaHOBNTe eDINHbIMeTOd 3aNoJIHeHn.

Yka3aHHe:
Pn Cmehe copTa Cma3Kn
ob3aTeNbHO Tpe6yeTc TuaTeNbHa 甲CTKa.
3anJHHeHne npn NMOOuN NaToHa
- OTBnHTnTb Cma3OHyb pe3epByap no HanpaBneHnIO npOTNB YacOBo CTpeKN.
- BCTaBnTb NaTPOH OTKpbItbIM KOHcOM BBePx NHaDaBnTb BHN3.
- BkpyTntb pe3epByap no yacobov cTpeIke. He 3aTARNBaTB cNIUKOM CNJIbHO.
- Ydepxkmbatb cTOnOp wAtyHa HaxKaTbIM 3aDbNHyTb wAtyH.
3aonJHHeHne H3 tapbl
- OTBnHTnTb Cma3OHyb pe3epByap no HnPaBneHnIO npOTNB YacBOB CTpeKN.
- TOrpy3nTb pe3epByap B MacNo Ha rny6nHy OKOIO 5 CM N MeDneHNO BblBnHyTb WAtyH Do yNopa.
- Bkpyntb pe3epByap no yacoboi cTpeIke.
- YdepxkBaTb cTOnOp wAtyHa HaxKaTbIM n 3aDbNHyTb wAtyH.
3anonHeHne npn nOmoHacoca
- BbIDBnHyTb wAtyH do ynopa.
- CoeHNHTb 3aIpaBOHbI WITyuepe c HAcOCOM.
-
BKIOHHTb HAcOC IN IIOHOCtBIO 3aIpaBnTb Cma3OHyI pe3epByap.
-
Pa3beDnHtB 3a npabOchbI WTuuep n Hacoc.
- YdepxknaBt cTOnop wAtyHa HaxKaTbIM 3aDbNHyTb wAtYH.
4.3 Pa6oTa c HcHcTpymeHTOM
BHIMaHHe!
IaIaIeBHOpa6oTbI
HNCtpymeHTa 3aINTb DOCTaTOHoe KOJIINcEeTBO MacJa DnI INHEBMaTuKn. 3TO MOxHO CdelaTb CJeDyUoUM 06pa3OM:
- Ypees cepBnchoe OTBepctne npn NOMOUs MacJeHKn Ha KOMnPcecope.
Yepe3 npctabHyIO macNeHky, yCTAHOBnEHyIO B MarncTpalb CxAtoro BO3dyxa NIN HENOCpeDCTBEHNO Ha INHEBMaTNUeCKOM IHCTpyMeHTe.
KaJbIe 15 MNHT pa60tBI (npn DInTeBHom NcNoJIb3OBaHIN) BpyHyB BBOdNTb 3-5 KanJIb PHeBMaTNeCKORo Macna B npncOeDnHeHne dJIr CxAtoro BO3dyxa. - 3aKpyTb Cma3OHyU Tpy6ky Nm Cma3OHyB mHaHr NO YacOBo CTpeIKe Ha HanOpHoi roJOBke.
- YcTaHOBnTb pa6OeE daBHeHne Ha KOMnPecCope (PpeJeBHo DOyCTmOe pa6OeE daBHeHne CM.BTexHueCKNX xapakTepcntkax).
- PpOuCOeINHnTH INHCTpyMeHT K INHm CxKaTOro BO3Dyxa Yepe3 6bICrpoJeIcTBYIOU MyΦTy.
- Ппставиьшпчк Смаз氧HINNEJIIO.
5.ДЯ NOДaЧи Cma3KN HaKaTbHa cnYcKObYIO cKo6y. - OTnyctntb ckoby, KaT ToIbKO Ha HnInneJIb 6yJeT NoDaHO DOCTaTOUHoe KOINueCTBO CMA3KN.
yka3aHHe:
Co6nOdaTb yka3aHn
Ipn3BOJNTeM CMA3bBAEMORo np60pa
No DaJIeHNO, IepNOuHOCTN CMA3KN, a
TAKKe TINy N KOJIueCTBy CMA3OuHOrO
MaTePnAna.
5. Texo6cnyxuBaHne uyOa
Onachoctb!
Ipeed BbINOJIHeHEm JIO6bIX
pa60tHa HnHCTpyMeHTe OTOeINHHTb NOaCy CkatoRO Bo3dyxa.
Pa60tbo nTo texo6cnyxuBaHnIO nn
peMOHTy, He ONmcaHHbIe B DaHHoI rJIaBe, DoJXHbI BbINOLHrTbcra TOJIbKO CneuaNtAm.
PpOBepnB pe3b60BbIE COeINHeHnHa npOuHOCtB, pNn Heo6xOIMOCTn NOITAHyTb.
EcnnnHCTpymEnHe Cma3bIBaETCB 6NOKom Texo6cnyxHBaHNn Nn npNCTabHOu MaCneHko, CneDyET KaKdIe 15 MInHyT pa60TbI (INNTeNbHOe NCnONb3OBaHHe) HAnocntb BpyHyIO 3-5 Kanelb INHEBMATNUeCKO RAMaB INPcNOeINHHeNE CxAtorO BO3dyxa.
He xpaHHTb HNCTpyMeHT 6e3 3aunTbHa OTKpbITOM BO3dyxe IIN BO BlaJxHcpeJe.
6.Bo3MOxHbIe npHaJdNeXHoCTn
Macno nI INHEBMATKU 0,5 IHTPOB CneuaHoe Macno nI INHEBMATNueCKNX INCTpyMeHTOB, 6nOKOB Texo6cnykubAHn npNCtABhIX MacNeHOK. ApTKyI 090 100 8540
ПиuctаВная MacJIeHka R3/8" BHyTp. pe3b6a ДЯ yCTaHOBKN HEnOcpeДCTBEHNO Ha nHEBMaTHUeCKNX INCTpyMeHTax. YpOBeHb macna NOCToHHBOuIeH Yepe3 rJa3OK. ApTKyI 090 090 105 4592
-ПОВОТHO-OTKINHOBO3dYxO3a6OpHbI HApHnDKG1/4"ДЯ yCTaHOBKn HENOCpeCDTBeHHoHa nHEBMaTnuecknxHnCTpyMeHTax.YnyuWeHHaNIOBnXHOCTb Pn NcNoJIb3OBAHNnHnCTpyMeHTa.ApTKyJ090 090 106 0991
7. PemOHr
Onachoctb! PeMOHT INHeBMATNuecknx HNCTpyMeHTOB DOJXeH INPOIN3BOIDNTbcr TOJbKO cneuaJIncTAMn!
HEnCnpaBnhe HNcTpymeHbMOxHO npCbJIaTb B cepBnchbO TdEN B Baewc cTpaHe. AApEc npBeDeH B cnCKe 3anaChbix qacteH.
PnBbCblke HcTpymenta npoc6a ONcaTb BO3HkUyIO HeCNpabHOCTb.
8. 3aunta okpykaioe npdebl
NcnoB3yTe 3KoJIoRnHeckn 6e3oNaChbIe CMA3OuHbIe MaTePnaJIbl.
PpeDToBpaaaiTe HeKoHTpOInpyEmoe KaJIeNaIeHne BO n36exKaHne IOnaIaHn Cma3Kn B OkpyKaIOuIcpey.
YnakoBouHbMATEpuaI DnI np6opa MoKeT 6bITb nepepa6oTaHa 100%
Otpa6oTaBwne MaunHbI npHaJnEeKHOCTn CoepKaT 60nbwoe KOJIueCTBO ueHHbIX NcXoJNbIX MaTePnaIOB INlactMaCC, KOTOpbie TaKKe MOrY T 6bITb NoDBeprHyTbI BToPnuHOn nepepa6oTke.
PykoBoCTBO HaneuTaHo Ha 6ymare, 6eHcHbIM Cnocobom.
- TexHnueckne xapaKTepeNCTNK