
LC 356VP - Electric mower HUSQVARNA - Free user manual and instructions
Find the device manual for free LC 356VP HUSQVARNA in PDF.


| Product Type | Rotary push mower with petrol engine |
| Brand | Husqvarna |
| Model | LC 356VP |
| Engine | Honda GCVx170 |
| Displacement | 166 cm³ |
| Rated engine power | 3.1 kW |
| Fuel | Unleaded petrol, octane rating min 90 |
| Fuel tank capacity | 0.9 L |
| Oil tank capacity | 0.4 L |
| Recommended engine oil | SAE 30 |
| Cutting system | Collection, BioClip® (mulching), side discharge |
| Cutting width | 560 mm |
| Adjustable cutting height | 25-75 mm |
| Forward speed | 3.0-4.5 km/h |
| Weight (empty tanks) | 35.1 kg |
| Sound power level (LWA) | 98 dB(A) |
| Sound pressure level at ear | 86 dB(A) |
| Spark plug | NGK BPR5ES |
| Electrode gap | 0.75 mm |
| Safety device | Engine brake, rear flap, side deflector |
| Standard blade (collection) | 598562701 |
| Accessory blade (shredding) | 598563601 |
Frequently Asked Questions - LC 356VP HUSQVARNA
User questions about LC 356VP HUSQVARNA
0 question about this device. Answer the ones you know or ask your own.
Ask a new question about this device
Download the instructions for your Electric mower in PDF format for free! Find your manual LC 356VP - HUSQVARNA and take your electronic device back in hand. On this page are published all the documents necessary for the use of your device. LC 356VP by HUSQVARNA.
USER MANUAL LC 356VP HUSQVARNA
EN Operator's manual 2-17
Transportation, storage and disposal.... 14
Technical data.... 15
EC Declaration of Conformity.... 17
Introduction
Product description
The product is a pedestrian-controlled rotary lawn mower. Attach the grass catcher to collect the grass. Attach the side discharge deflector for side discharge of the grass. Attach a mulch kit to cut the grass into fertilizer.
Intended use
Use the product to cut grass. Do not use the product for other tasks.
Product overview

- Handlebar
- Engine brake handle
- Drive bail
- Starter rope handle
- Rear cover
- Grass catcher
- Handle height knobs
- Cutting height lever
- Oil cap
- Side discharge cover
- Muffler
-
Spark plug
-
Fuel tank cap
- Symbols
- Cutting cover
- Air filter
- Speed control lever
- Side deflector
- Mulch plug (accessory)
- Operator's manual
Symbols on the product

WARNING! Be careful and use the product correctly. This product can cause serious injury or death to the operator or others.

Please read the operator's manual carefully and make sure that you understand the instructions before use.

Look out for thrown objects and ricochets.
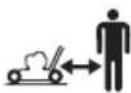
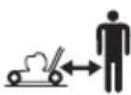
Keep persons and animals at a safe distance from the work area.
Warning: Keep hands and feet away from the rotating blade.
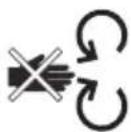
Warning: Keep hands and feet away from rotating parts.
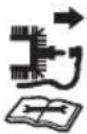
Stop the engine and remove the ignition cable before repairs or maintenance.

This product is in accordance with applicable EC directives.

Noise emission to the environment according to the European Community's Directive. The product's emission is specified in the Technical data chapter and on the label.
Note: Other symbols/decals on the product refer to certification requirements for some commercial areas.
Product liability
As referred to in the product liability laws, we are not liable for damages that our product causes if:
• the product is incorrectly repaired.
• the product is repaired with parts that are not from the manufacturer or not approved by the manufacturer.
• the product has an accessory that is not from the manufacturer or not approved by the manufacturer.
- the product is not repaired at an approved service center or by an approved authority.
Euro V Emissions

WARNING: Tampering with the engine voids the EU type-approval of this product.
Safety
Safety definitions
Warnings, cautions and notes are used to point out specially important parts of the manual.

WARNING: Used if there is a risk of injury or death for the operator or bystanders if the instructions in the manual are not obeyed.

CAUTION: Used if there is a risk of damage to the product, other materials or the adjacent area if the instructions in the manual are not obeyed.
Note: Used to give more information that is necessary in a given situation.
General safety instructions

WARNING: Read the warning instructions that follow before you use the product.
-
This product is dangerous if used incorrectly or if you are not careful. Injury or death can occur if you do not obey the safety instructions.
• This product produces an electromagnetic field during operation. This field may under some circumstances interfere with active or passive medical implants. To reduce the risk of serious or fatal injury we recommend persons with medical implants to consult their physician and the medical implant manufacturer before operating this product.
• Always be careful and use your common sense. If you are not sure how to operate the product in a special situation, stop and speak to your Husqvarna dealer before you continue. -
Keep in mind that the operator will be held responsible for accidents that involve other persons or their property.
- Keep the product clean. Make sure that you can clearly read signs and decals.
- Do not let a person use the product unless you make sure that they read and understand the contents of the operator's manual.
- Do not let a child operate the product.
- Keep children away from the work area. A responsible adult must be there at all times.
- Do not let a person, without knowledge of the instructions, operate the product.
• Always monitor a person, with decreased physical capacity or mental capacity, that uses the product. A responsible adult must be there at all times. - Do not use the product if you are tired, ill, or under the influence of alcohol, drugs or medicine. This has a negative effect on your vision, alertness, coordination and judgment.
- Do not use the product if it is defective.
- Do not change this product or use it if it is possible that it has been changed by others.
- Do not change the adjustment for the engine speed control.
Work area safety

WARNING: Read the warning instructions that follow before you use the product.
- Remove objects such as branches, twigs and stones from the work area before you use the product.
- Objects that hit against the cutting equipment can eject and cause damage to persons and objects. Keep bystanders and animals at a safe distance from the product.
- Never use the product in bad weather such as fog, rain, strong winds, intense cold and risk of lightning. To use the product in bad weather or in moist or wet locations is tiring. Bad weather can cause dangerous conditions, such as slippery surfaces.
- Look out for persons, objects and situations that can prevent safe operation of the product.
- Look out for obstacles, such as roots, stones, twigs, pits and ditches. Long grass can hide obstacles.
- To cut grass on slopes can be dangerous. Do not use the product on ground that slopes more than 15° .
- Operate the product across the face of slopes. Do not move up and down.
- Be careful when you go near hidden corners and objects that prevent a clear view.
Work safety

WARNING: Read the warning instructions that follow before you use the product.
- Use this product to cut grass lawns only. It is not permitted to use it for other tasks.
- Use personal protective equipment. Refer to Personal protective equipment on page 5.
- Make sure that you know how to stop the engine quickly in an emergency.
- Never start the engine in a closed space or near flammable material. The exhaust fumes from the engine are hot and can contain sparks which can start a fire.
- Do not operate the product unless the blade and all covers are attached correctly. An incorrectly attached blade can come loose and cause personal injury.
- Make sure that the blade does not hit objects such as stones and roots. This can do damage to the blade and bend the engine shaft. A bent axle causes heavy vibration and a very high risk that the blade becomes loose.
- If the blade hits an object or if vibrations occur, stop the product immediately. Disconnect the ignition cable from the spark plug. Examine the product for damages. Repair damages or let an authorised service agent do the repair.
- Never attach the engine brake handle permanently to the handle when the engine is started.
- Put the product on a stable, flat surface and start it. Make sure that the blade does not hit the ground or other objects.
• Always stay behind the product when you operate it. - Let all the wheels stay on the ground and keep 2 hands on the handle when you operate the product. Keep your hands and feet away from the rotating blades.
- Do not tilt the product when the engine is started.
- Be careful when you pull the product rearward.
- Never lift up the product when the engine is started. If you must lift the product, first stop the engine and disconnect the ignition cable from the spark plug.
- Do not walk rearward when you operate the product.
- Stop the engine when you move across areas without grass, for example paths made of gravel, stone and asphalt.
- Do not run with the product when the engine is started. Always walk when you operate the product.
- Stop the engine before you change the cutting height. Never make adjustments with the engine started.
- Never let the product stay out of view with the engine started. Stop the engine and make sure that the cutting equipment does not rotate.
Safety instructions for operation
Personal protective equipment

WARNING: Read the warning instructions that follow before you use the product.
- Personal protective equipment cannot fully prevent injury but it decreases the degree of injury if an accident does occur. Let your dealer help you select the right equipment.
- Use hearing protection if the noise level is higher than 85 dB.
- Use heavy-duty slip-resistant boots or shoes. Do not use open shoes or go with bare feet.
- Use heavy, long pants.
- Use protective gloves when necessary, for example when you attach, examine or clean the cutting equipment.
Safety devices on the product

WARNING: Read the warning instructions that follow before you use the product.
- Do not use a product with defective safety devices.
- Do a check of the safety devices regularly. If the safety devices are defective, speak to your Husqvarna service agent.
To do a check of the cutting cover
The cutting cover decreases vibrations in the product and decreases the risk of injury from the blade.
- Examine the cutting cover to make sure that there are no damages such as cracks.
To do a check of the engine brake handle
The engine brake handle stops the engine. When the engine brake handle is released, the engine stops.
- Start the engine and then release the engine brake handle. If the engine does not stop in 3 seconds, let an approved Husqvarna service agent adjust the engine brake.
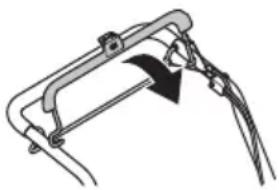
To do a check of the rear cover
The rear deflector decreases the risk that objects eject in the direction of the operator.
- Make sure that the rear cover is not damaged.
- Make sure that the springs that close the rear cover are not damaged.
- Replace damaged springs and damaged parts.
- Make sure that the rear cover can move smoothly on the hinges.
Muffler
The muffler keeps the noise levels to a minimum and sends the exhaust fumes away from the operator.
Do not use the product if the muffler is missing or defective. A defective muffler increases the noise level and the risk of fire.

WARNING: The muffler becomes very hot during and after use and when the engine operates at idle speed. Be careful near flammable materials and/or fumes to prevent fire.
To do a check of the muffler
- Examine the muffler regularly to make sure that it is attached correctly and not damaged.
Fuel safety

WARNING: Read the warning instructions that follow before you use the product.
- Do not start the product if there is fuel or engine oil on the product. Remove the unwanted fuel/oil and let the product dry.
- If you spill fuel on your clothing, change clothing immediately.
- Do not get fuel on your body, it can cause injury. If you get fuel on your body, use soap and water to remove the fuel.
- Do not start the product if the engine has a leak. Examine the engine for leaks regularly.
- Be careful with fuel. Fuel is flammable and the fumes are explosive and can cause injuries or death.
- Do not breathe in the fuel fumes, it can cause injury. Make sure that there is a sufficient airflow.
- Do not smoke near the fuel or the engine.
- Do not put warm objects near the fuel or the engine.
- Do not add the fuel when the engine is on.
- Make sure that the engine is cool before you refuel.
- Before you refuel, open the fuel tank cap slowly and release the pressure carefully.
- Do not add fuel to the engine in an indoor area. Not sufficient airflow can cause injury or death because of asphyxiation or carbon monoxide.
- Tighten the fuel tank cap fully. If the fuel tank cap is not tightened, there is a risk of fire.
- Move the product a minimum of 3m / 10 ft from the position where you filled the tank before a start.
- Do not fill the fuel tank fully. Heat causes the fuel to expand. Keep a space at the top of the fuel tank.
Safety instructions for maintenance

WARNING: Read the warning instructions that follow before you use the product.
• The exhaust fumes from the engine contain carbon monoxide, an odourless, poisonous and very dangerous gas. Do not start the engine indoors or in closed spaces.
- Before you do the maintenance on the product, stop the engine and remove the ignition cable from the spark plug.
- Use protective gloves when you do maintenance on the cutting equipment. The blade is very sharp and cuts can easily occur.
• Accessories and changes to the product that are not approved by the manufacturer, can cause serious injury or death. Do not change the product. Always use accessories that are approved by the manufacturer.
- If the maintenance is not done correctly and regularly, the risk of injury and damage to the product increases.
- Only do the maintenance as given in this owner's manual. All other servicing must be done by an approved Husqvarna service agent.
- Let an approved Husqvarna service agent do servicing on the product regularly.
- Replace damaged, worn or broken parts.
Assembly
Introduction

WARNING: Before you assemble the product, you must read and understand the safety chapter.

WARNING: Remove the spark plug cable from the spark plug before you assemble the product.
To assemble the handle
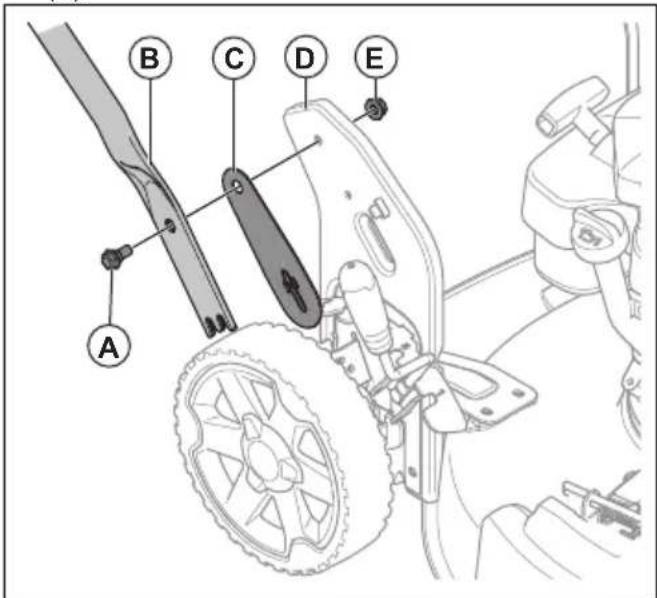
- Push the screw (A) through the handle (B), the plastic washer (C) and the handle support bracket (D).
-
Tighten the nut (E) fully.
-
Push the screw (F) through the washer (G) and the handle support bracket.
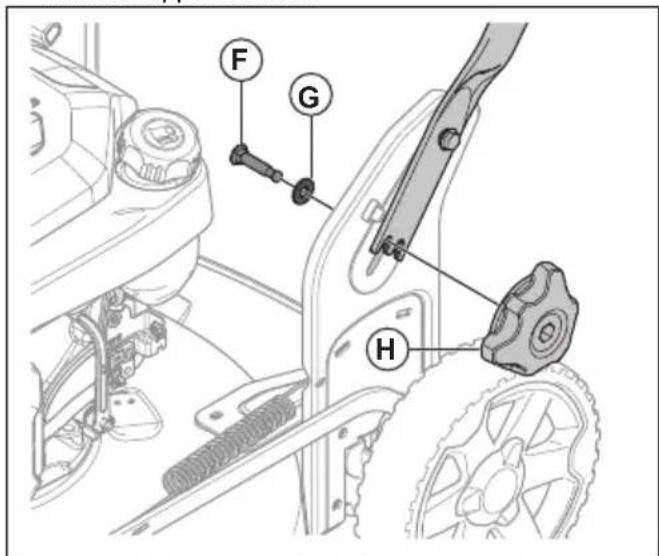
- Tighten the knob (H) fully.
To adjust the handle
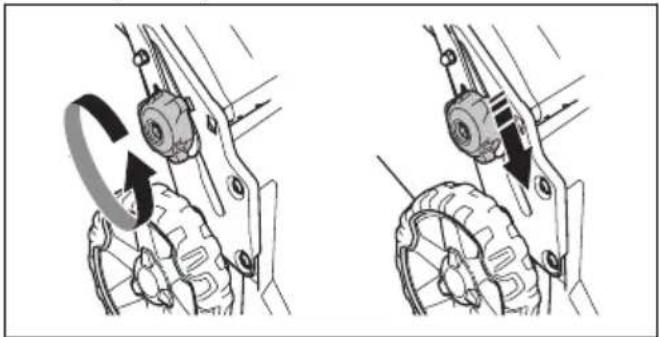
- Loosen the lower knobs.
- Move the knobs to the lower end of the grooves on the left and the right side of the product.
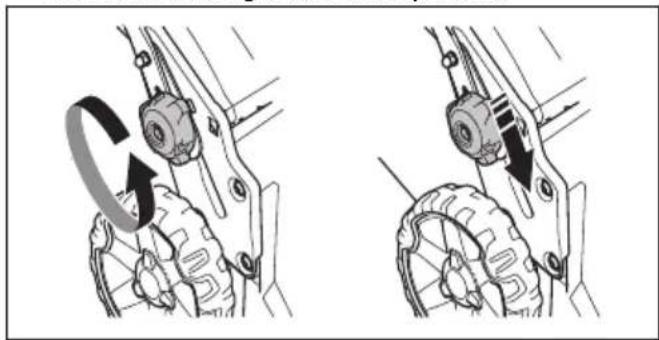
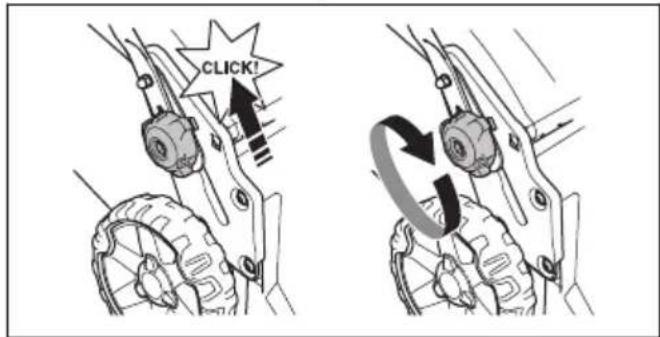
- Set the handle height in one of the 2 available positions.
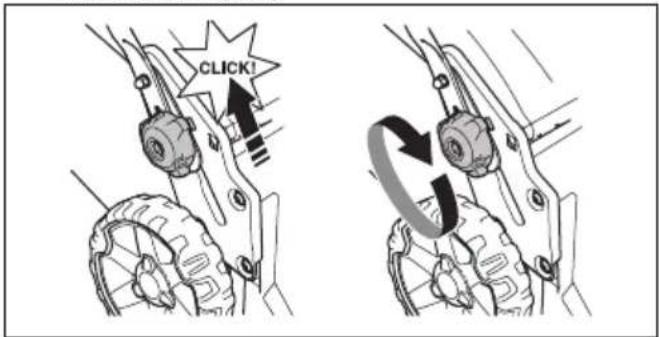
- Move the knobs up in the direction of the handle until they stop and you hear a click.
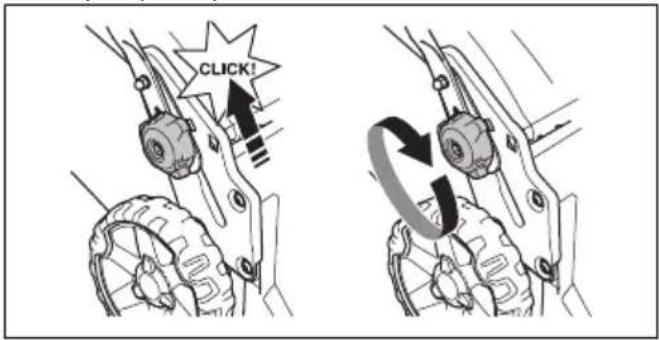
- Tighten the knobs fully.
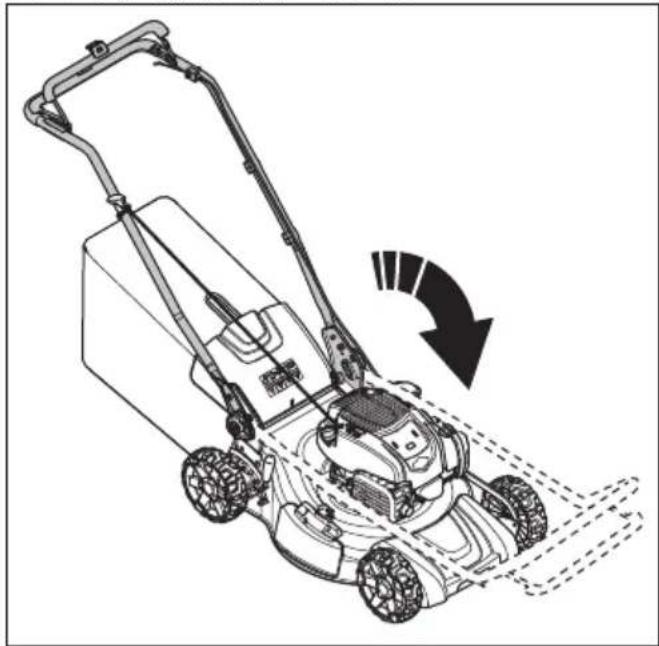
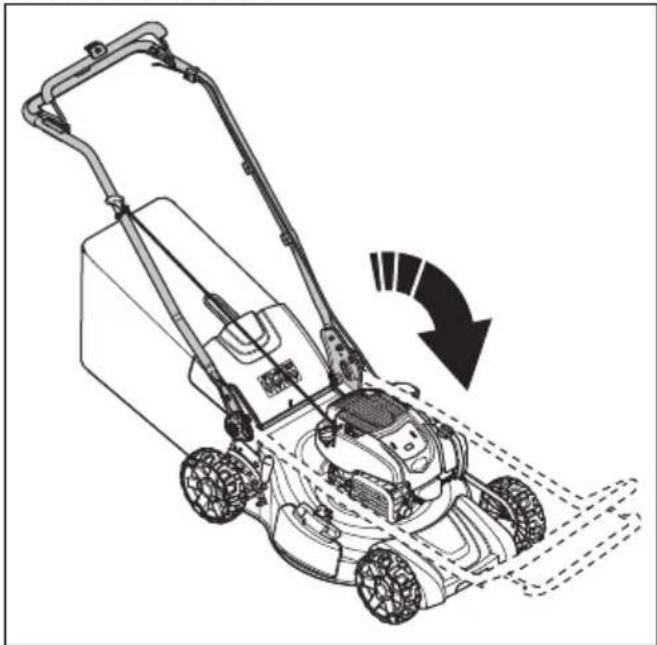
To set the product in transport position
- Remove the grass catcher (if installed).
- Loosen the lower knobs.
- Move the knobs to the lower end of the grooves on the left and the right side of the product.
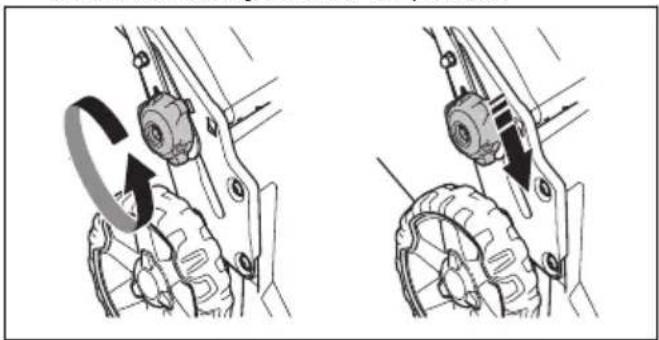
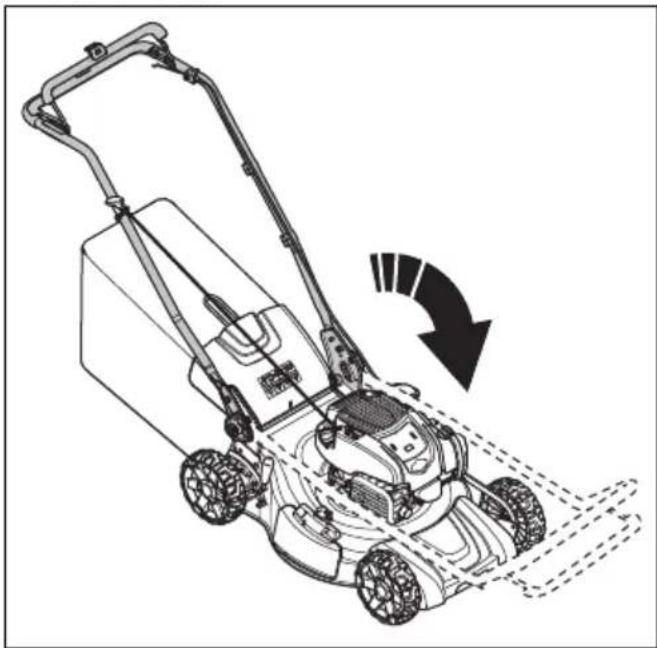
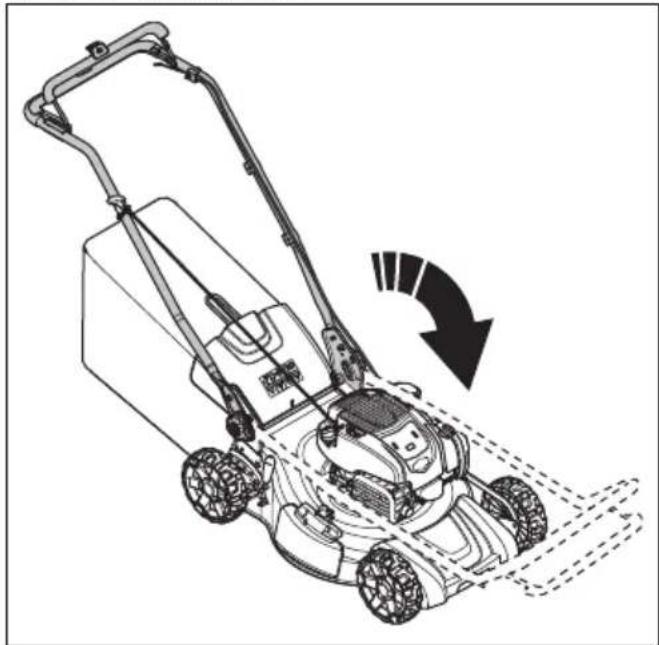
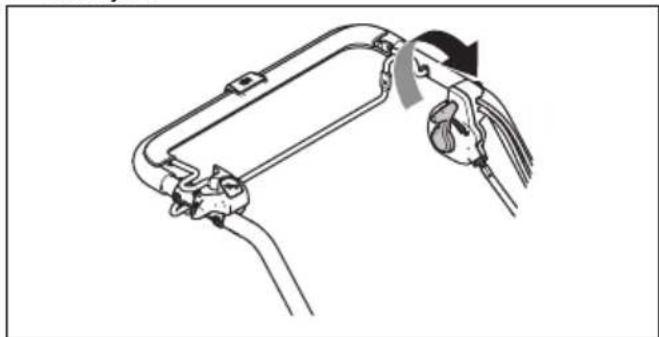
- Fold the handle forward.
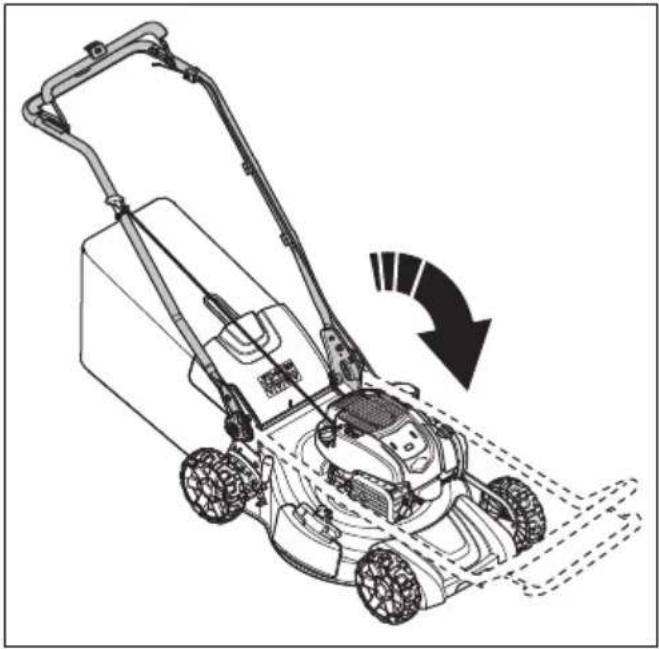
To set the product in operation position
- Fold the handle to upright position.
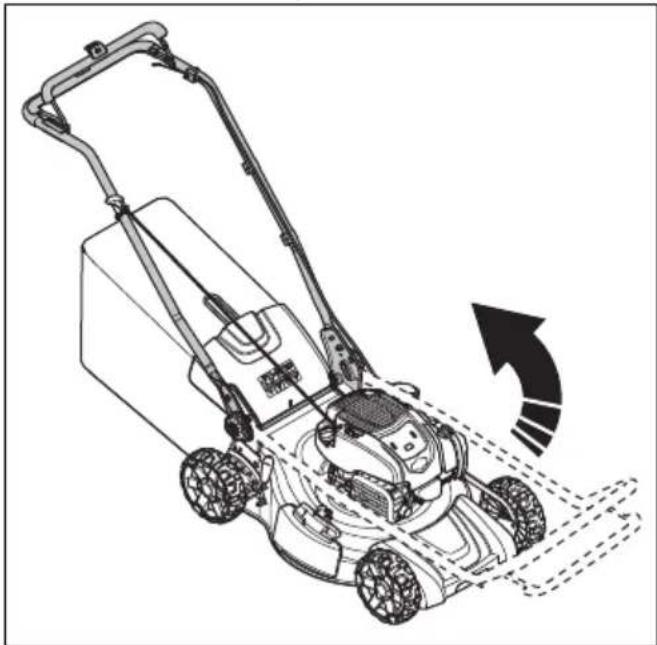
- Move the knobs up in the direction of the handle until they stop and you hear a click.
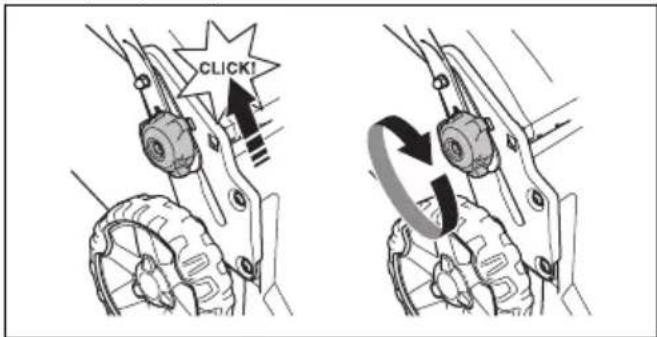
- Tighten the knobs fully.
To assemble the grass catcher
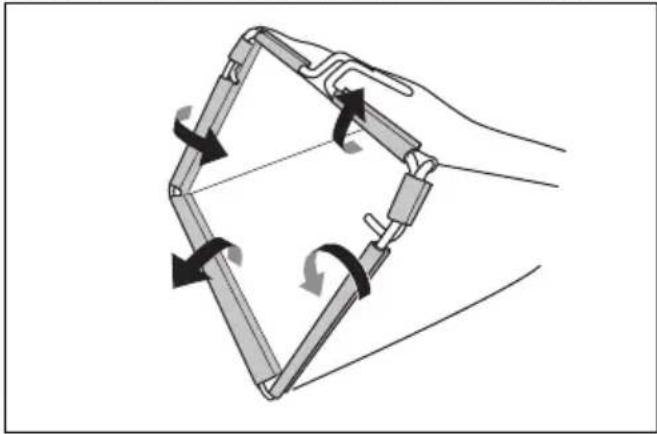
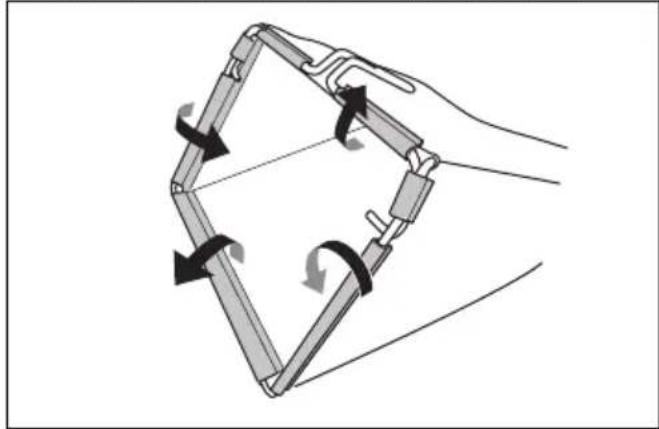
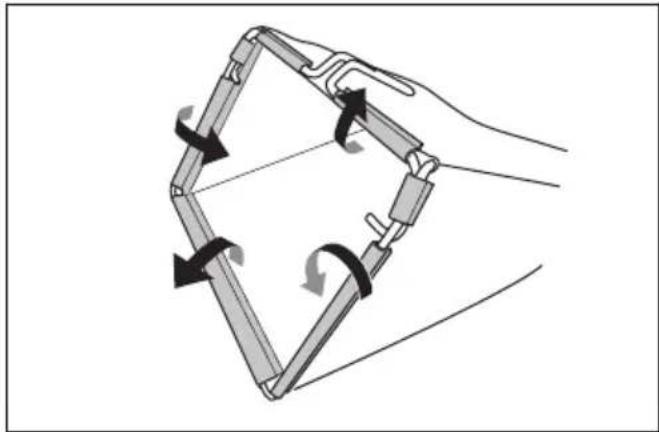
- Attach the grass catcher frame to the grass bag with the rigid part of the bag on the bottom. Keep the handle of the frame out of the top of the bag.
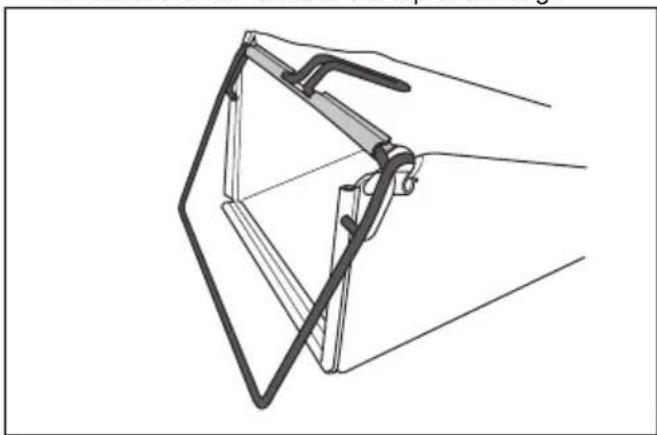
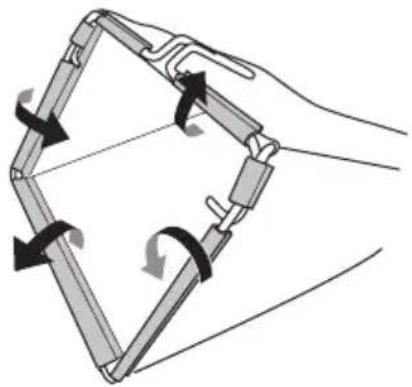
- Attach the grass bag to the frame with the clips.
Operation
Introduction

WARNING: Before you operate the product, you must read and understand the safety chapter.
Husqvarna Connect
Husqvarna Connect is a free app for your mobile device. The Husqvarna Connect app gives extended functions for your Husqvarna product:
• Extended product information.
• Information about, and help with, product parts and servicing.
To start to use Husqvarna Connect
- Download the Husqvarna Connect app on your mobile device.
- Register in the Husqvarna Connect app.
- Do the instruction steps in the Husqvarna Connect app to connect and register the product.
Before you operate the product
- Read the operator's manual carefully and make sure that you understand the instructions.
- Examine the cutting equipment to make sure that it is correctly attached and adjusted. See To examine the cutting equipment on page 11.
- Fill the fuel tank. See To fill fuel on page 8.
- Fill the oil tank and do a check of the oil level. See To do a check of the oil level on page 12.
To fill fuel
If available, use low-emission/alkylate gasoline. If low-emission/alkylate gasoline is not available, use good quality unleaded gasoline or leaded gasoline with octane number not less than 90.

CAUTION: Do not use gasoline with an octane number less than 90 RON (87 AKI). This can cause damage to the product.
- Open the fuel tank cap slowly to release the pressure.
- Fill slowly with a fuel can. If you spill fuel, remove it with a cloth and let remaining fuel dry off.
- Clean the area around the fuel tank cap.
- Tighten the fuel tank cap fully. If the fuel tank cap is not tightened, there is a risk of fire.
- Move the product a minimum of 3 m (10 ft) from the position where you filled the tank before a start.
To set the cutting height
- Move the cutting height lever rearward to increase the cutting height.
- Move the cutting height lever forward to decrease the cutting height.
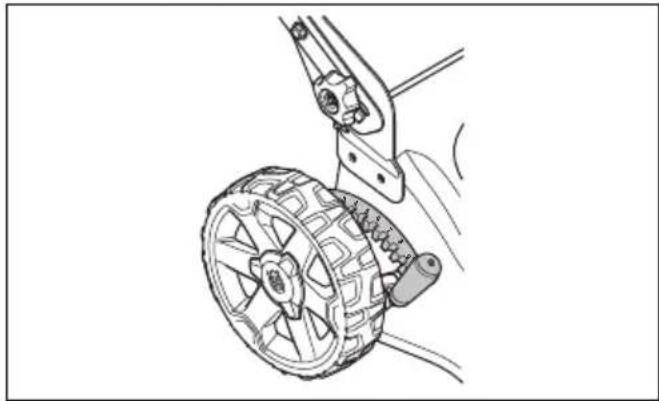

CAUTION: Do not set the cutting height too low. The blades can hit the ground if the surface of the lawn is not level.
To start the product
- Make sure that the ignition cable is connected to the spark plug.
- Stay behind the product.
- Hold the engine brake handle against the handlebar.
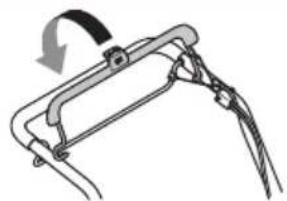
- Hold the starter rope handle with your right hand.
- Slowly pull out the starter rope until you feel some resistance.
- Pull with force to start the engine.

WARNING: Do not twist the starter rope around your hand.
To use the drive on the wheels
- Start the drive on the wheels with the speed control lever on the left side of the handle. Move the speed control lever forward to increase the speed and rearward to decrease the speed.
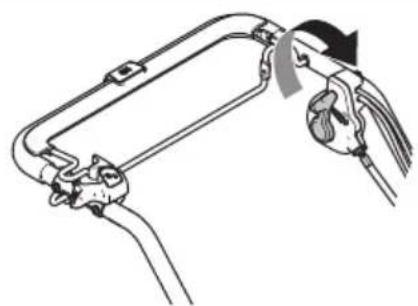
- Before you pull the product rearward, disengage the drive and push the product forward approximately 10 cm.
- Release the drive bail to disengage the drive, for example when you go near an obstacle.
To stop the product
• To stop the drive only, release the drive bail.
• To stop the engine, release the engine brake handle.
To use the product with the grass catcher

WARNING: Do not operate the product without a grass catcher installed or without the rear cover closed. Objects can eject and cause injury to the operator.
- Lift the rear cover and remove the mulch plug if it is installed.
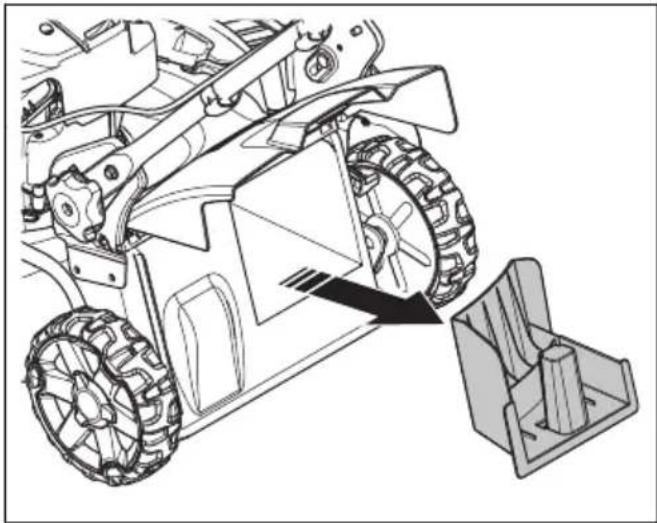
- Assemble the grass catcher, refer to To assemble the grass catcher on page 7.
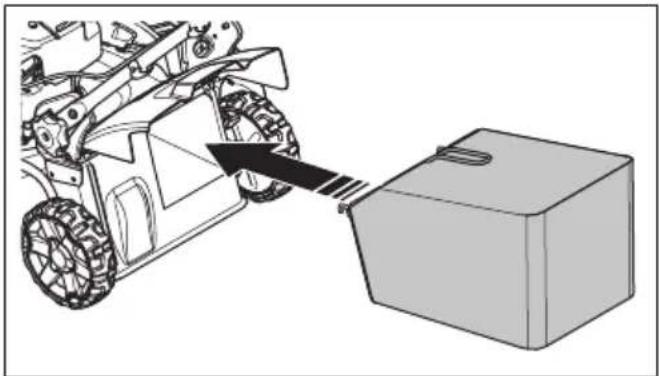
- Put the grass catcher on the bracket.
- Release the rear cover and put it on top of the grass bag frame.
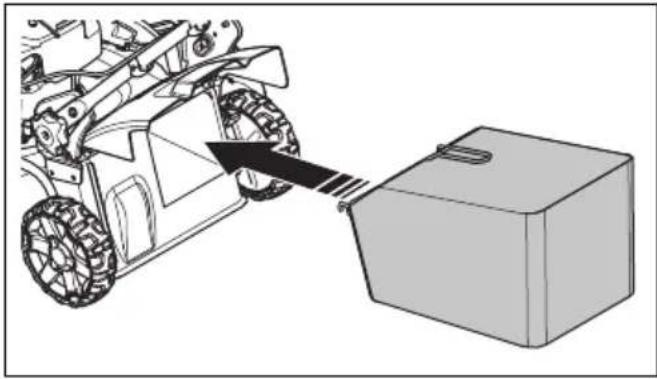
To change the product to mulch mode
Make sure the engine is off before you change the product to mulch mode.
- Lift the rear cover and remove the grass catcher, if it is installed.
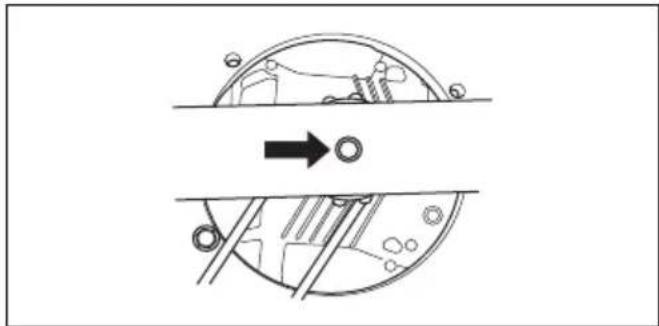
- Put the mulch plug into the discharge channel.
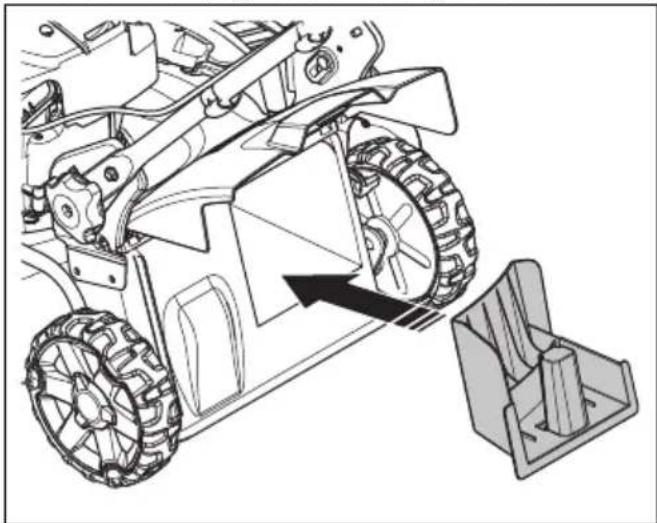
- Close the rear cover and make sure that it is tightly closed against the mulch plug.
- Replace the blade with the mulch blade that is supplied in the mulch kit. Refer to To replace the blade on page 12.
To change the product to side discharge mode
- Lift the rear cover and remove the grass bag, if it is installed.
- Close the rear cover and make sure that it is tightly closed against the product.
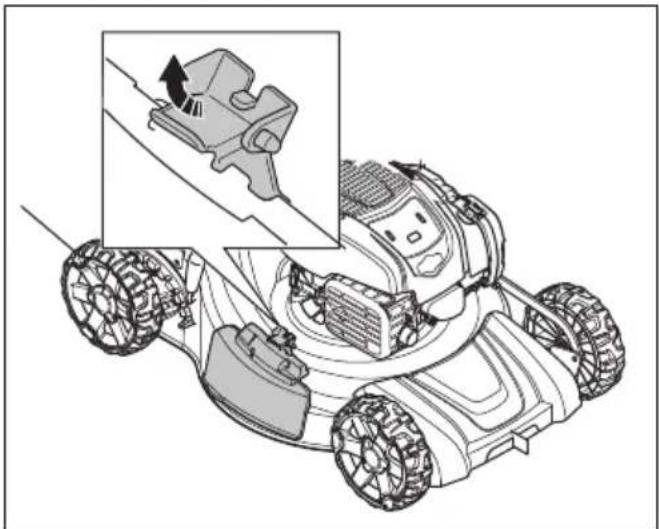
- Lift the discharge lock.
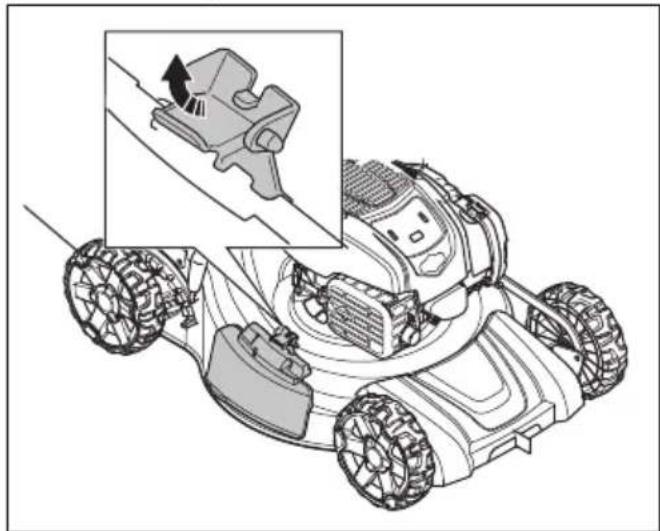
- Open the side discharge guard and install the side discharge deflector onto the support pins.
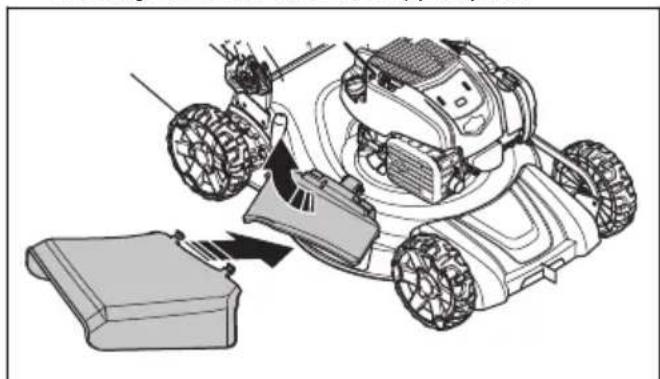
- Let the side discharge guard close against the side discharge deflector. Make sure that the side discharge deflector is tightly in position before you operate the product.
To empty the grass catcher

CAUTION: Lift the grass catcher when you move it to prevent wear.
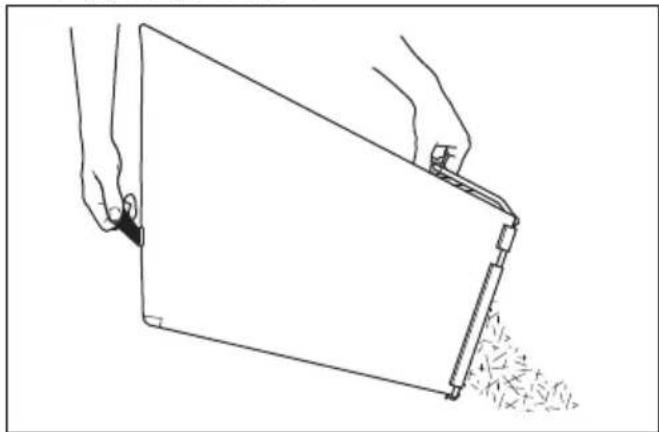
- Lift the grass catcher with the frame handle.
- Use the frame handle and the bag handle when you empty the grass catcher.
To get a good result
• Always use a sharp blade. A blunt blade gives an irregular result and the cut surface of the grass becomes yellow. A sharp blade also uses less energy than a blunt blade.
- Do not cut more than 1/3 of the length of the grass. Use the highest cutting height when you start to cut the grass. Examine the result and lower the cutting height to an applicable level. If the grass is very long, operate slowly and cut 2 times if it is necessary.
- Cut in different directions each time to prevent stripes in the lawn.
- Lift the rear cover and remove the grass catcher.
- If a mulch plug and a mulch blade are attached, remove them.
- Close the rear cover before you operate the product. When you operate the product, the cut grass discharges below the rear cover.
Maintenance
Introduction

WARNING: Before you do maintenance, you must read and understand the safety chapter.
For all servicing and repair work on the product, special training is necessary. We guarantee the availability of professional repairs and servicing. If your dealer is not a service agent, speak to them for information about the nearest service agent.
Maintenance schedule

CAUTION: Make sure that the air filter is up and not against the ground when you tilt the product. Risk of engine damage.
The maintenance intervals are calculated from daily use of the product. The intervals change if the product is not used daily.
For maintenance identified with * refer to instructions in Safety devices on the product on page 5.
| Maintenance Daily Weekly Monthly | |||
| Do a general inspection X | |||
| Examine the oil level X | |||
| Clean the product X | |||
| Examine the cutting equipment X | |||
| Examine the cutting cover * X | |||
| Examine the engine brake handle * X | |||
| Examine the blade brake control * X | |||
| Examine the muffler * X | |||
| Examine the spark plug X | |||
| Replace the oil (the first time after 5 h of use, then after each 50 h of use) | X | ||
| Clean or replace the air filter X | |||
| Examine the fuel system X |
To do a general inspection
- Make sure that all nuts and screws on the product are tightened correctly.
To clean the product externally
- Use a brush to remove leaves, grass and dirt.
- Make sure that the air intake on the top of the engine is not blocked.
- Do not use a high pressure washer to clean the product.
- If you use water to clean the product, do not flush water directly on the engine.
To clean the inner surface of the cutting cover
- Empty the fuel tank.
- Put the product on its side with the muffler down.

CAUTION: If the product is put with the air filter down, the engine can become damaged.
- Hose down the inner surface of the cutting cover with water.
To examine the cutting equipment

WARNING: To prevent accidental start remove the ignition cable from the spark plug.

WARNING: Use protective gloves when you do maintenance on the cutting equipment. The blade is very sharp and cuts can easily occur.
- Examine the cutting equipment for damage or cracks. Always replace a damaged cutting equipment.
- Look at the blade to see if it is damaged or blunt.
Note: It is necessary to balance the blade after it is sharpened. Let a service center sharpen, replace and balance the blade. If you hit an obstacle that causes the product to stop, replace the damaged blade. Let the service center estimate if the blade can be sharpened or must be replaced.
To replace the blade
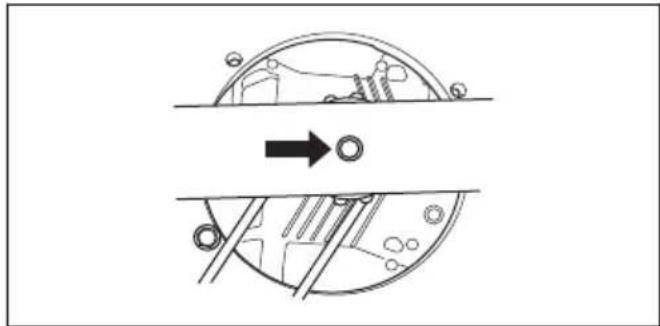
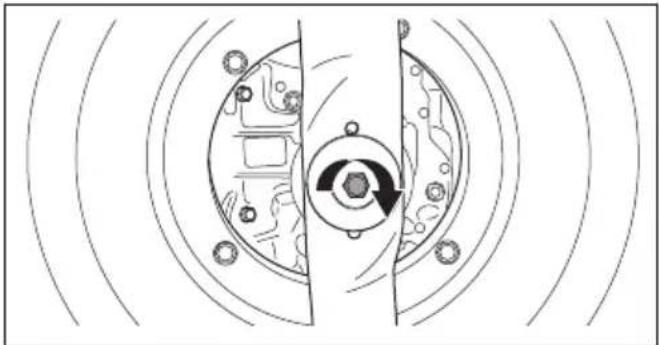
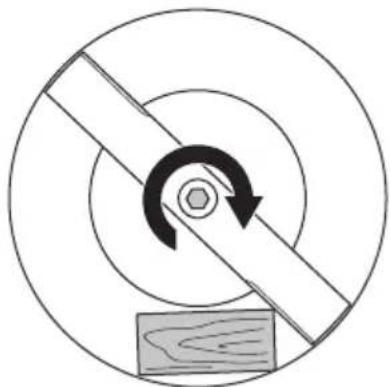
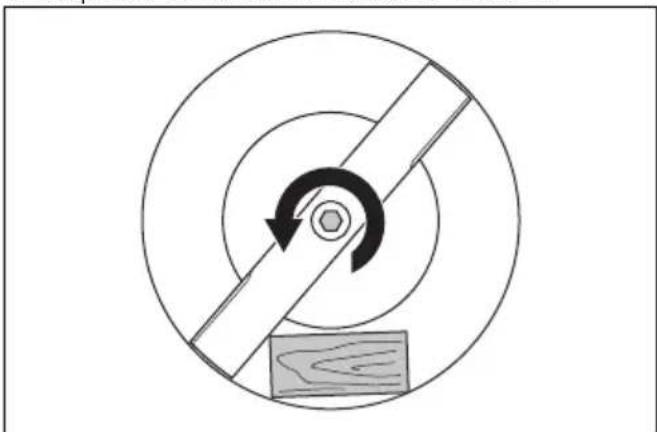
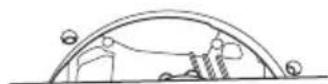
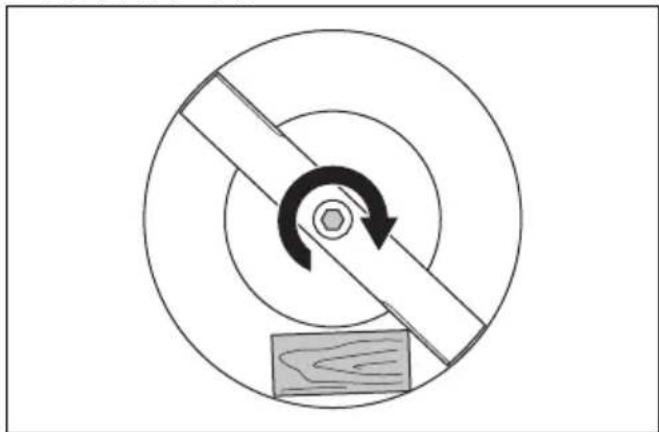
- Lock the blade with a block of wood.
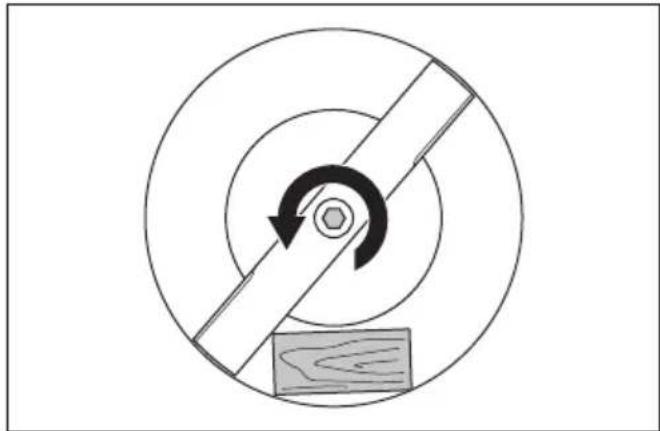
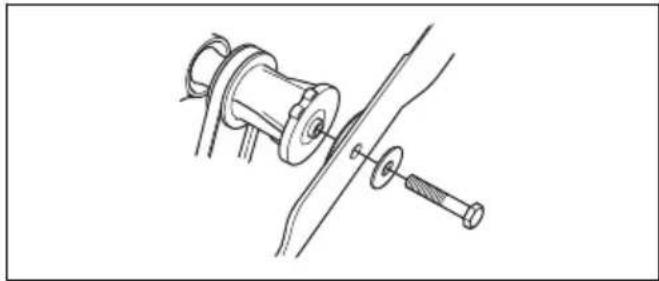
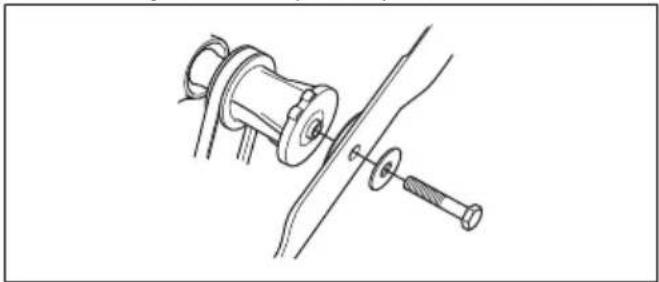
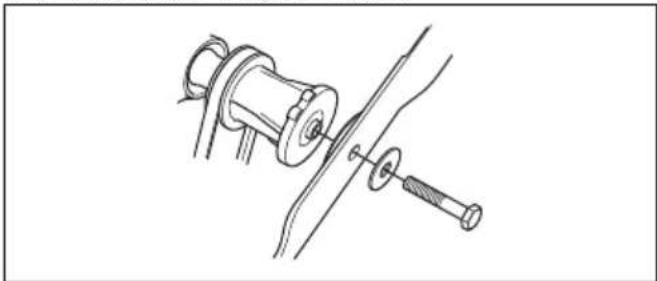
- Remove the blade bolt, the spring washer and the blade.
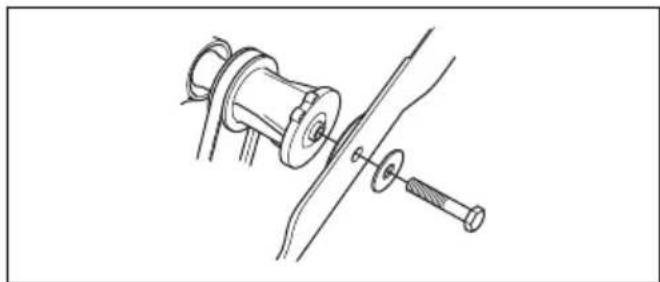
- Examine the blade support and blade bolt for damages.
a) If you replace the blade or the blade support, also replace the blade bolt, the spring washer and the friction washer.
-
Examine the engine shaft to make sure that it is not bent.
-
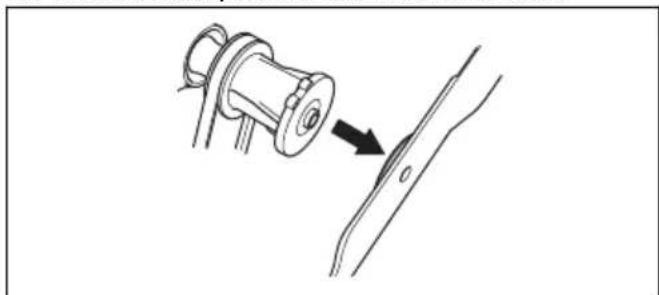
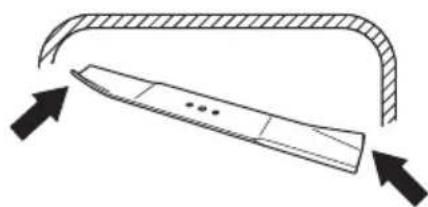
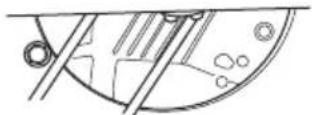
When you attach the new blade, make sure that the bent ends point in the direction of the cutting cover.
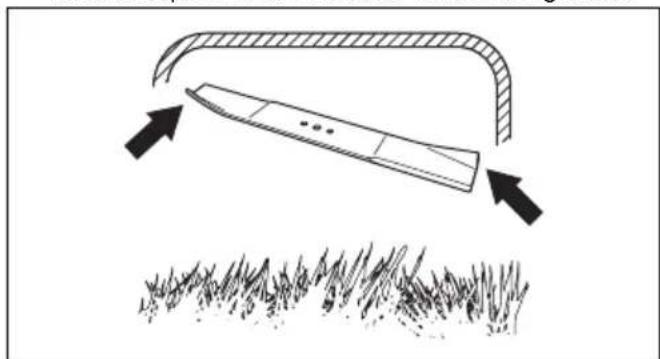
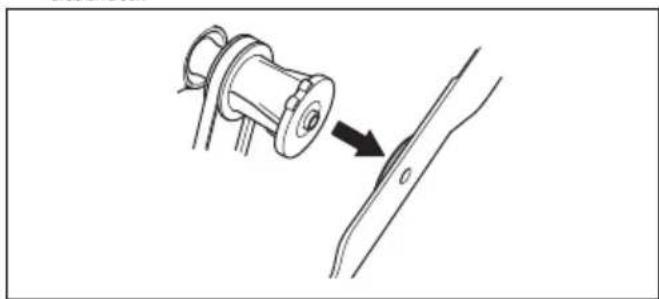
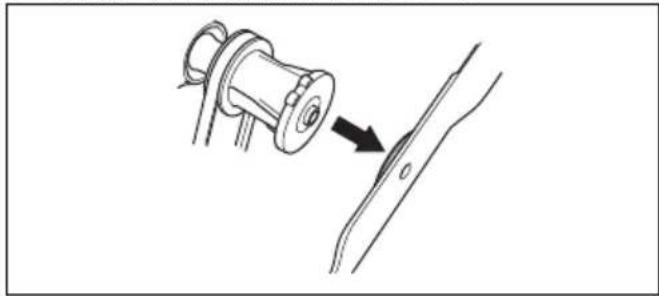
- Put the friction washer and the blade against the blade support.
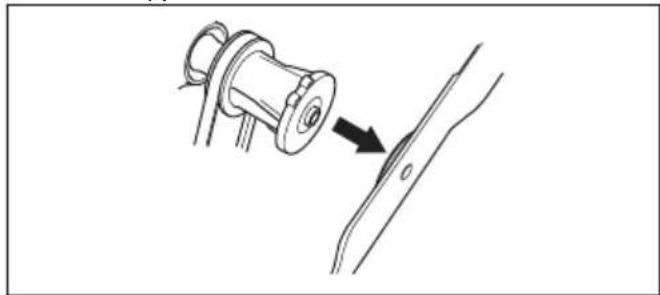
- Make sure that the blade aligns with the center of the engine shaft.
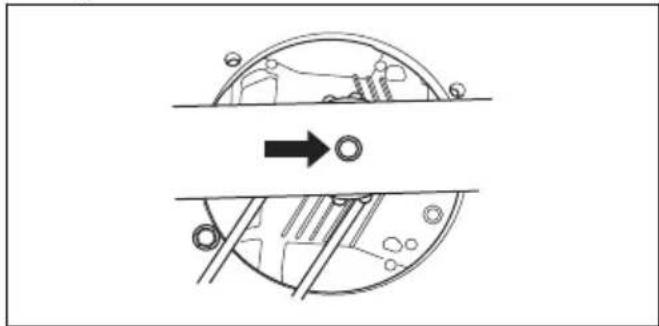
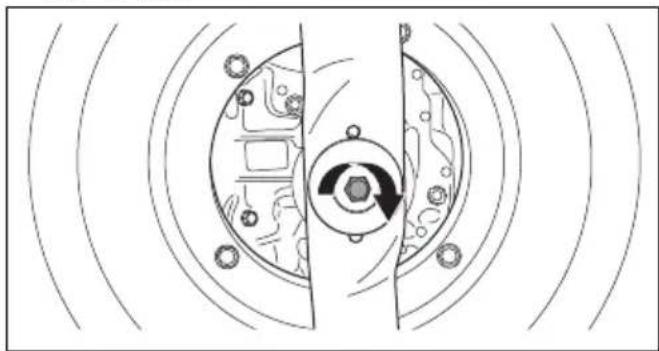
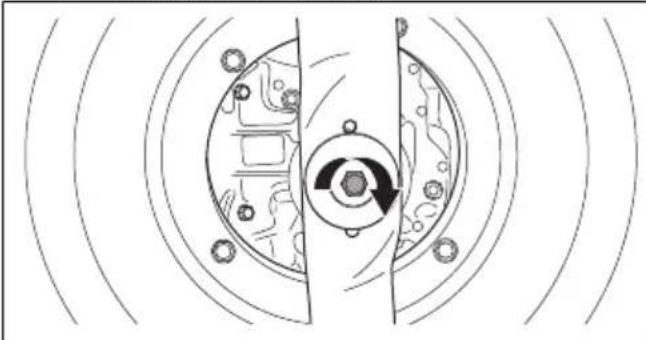
- Lock the blade with a block of wood.
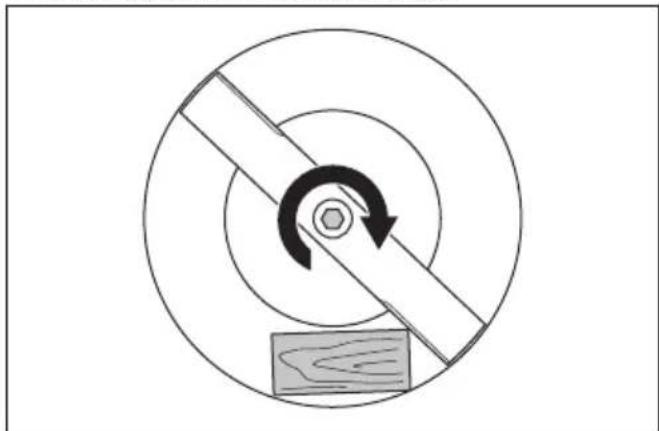
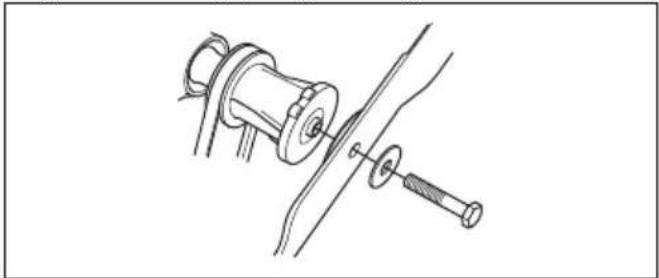
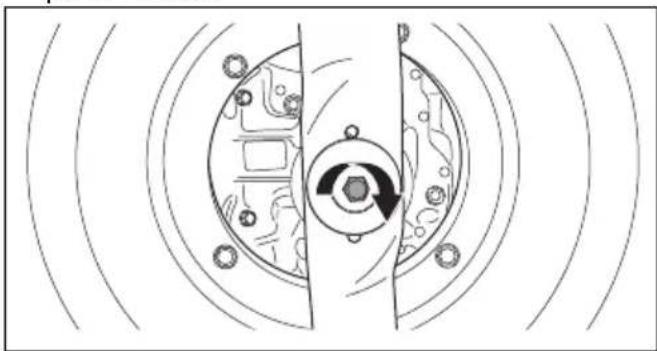
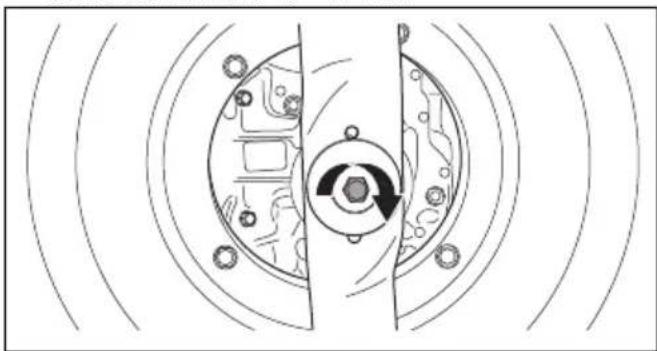
- Attach the spring washer and tighten the bolt with a torque of 43 - 47 Nm.
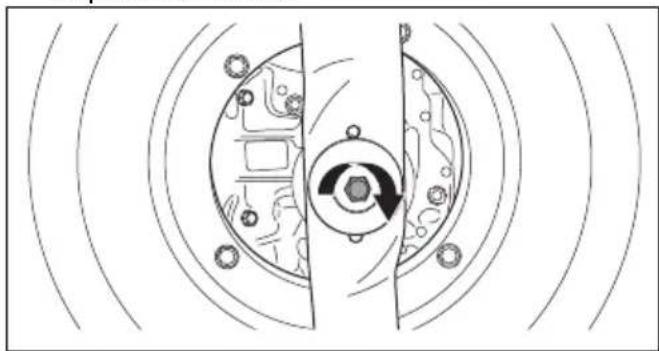
- Pull the blade around by hand and make sure that it turns freely.

WARNING: Use protective gloves.
The blade is very sharp and cuts can easily occur.
- Start the product to do a test of the blade. If the blade is not correctly attached, there is vibration in the product or the cutting result is unsatisfactory.
To do a check of the oil level

CAUTION: A too low oil level can do damage to the engine. Do a check of the oil level before you start the product.
-
Put the product on level ground.
-
Remove the oil tank cap with the attached dipstick.
-
Clean the oil from the dipstick.
- Put the dipstick fully into the oil tank to give a correct picture of the oil level.
- Remove the dipstick.
- Examine the oil level on the dipstick.
- If the oil level is low, fill with engine oil and do a check of the oil level again.
To replace the engine oil

WARNING: Engine oil is very hot directly after the engine is stopped. Let the engine become cool before you drain the engine oil. If you spill engine oil on your skin, clean with soap and water.
- Operate the product until the fuel tank is empty.
- Remove the ignition cable from the spark plug.
- Remove the oil tank cap.
- Put a container below the product to collect the engine oil in.
- Tilt the product to drain the engine oil from the oil tank.
- Fill with new engine oil of the type recommended in Technical data on page 15.
- Do a check of the oil level. Refer to To do a check of the oil level on page 12.
To examine the spark plug

CAUTION: Always use the recommended spark plug type. Incorrect spark plug type can cause damage to the product.
- Examine the spark plug if the engine is low on power, is not easy to start or does not operate correctly at idle speed.
- To decrease the risk of unwanted material on the spark plug electrodes, obey these instructions:
a) Make sure that the idle speed is correctly adjusted.
b) Make sure that the fuel mixture is correct.
c) Make sure that the air filter is clean. - If the spark plug is dirty, clean it and make sure that the electrode gap is correct, refer to Technical data on page 15.
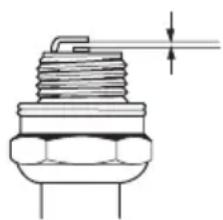
- Replace the spark plug if it is necessary.
To clean the air filter
A dirty air filter can cause the engine to be damaged or not operate correctly. Do maintenance on the air cleaner more frequently in dusty conditions.
See Maintenance schedule on page 11 for information about when to replace the air filter.
- Remove the air filter cover and remove the filter.
- Clean the filter by hitting it against a flat surface. Do not use solvent with petroleum, kerosene or compressed air to clean the filter.
Note: Air filters in operation for a long time cannot be cleaned fully. Replace the air filter at regular intervals. Damaged air filters must always be replaced.
- When you assemble the air filter, make sure that it fully seals against the filter holder.
To do a check of the side discharge deflector
The side discharge deflector is attached to the side discharge opening of the product. It decreases the risk of objects to eject in the direction of the mow position of the operator.
- Make sure that the side discharge deflector is not damaged.
- Examine the side discharge deflector. Make sure that you do not see defects, such as cracks or broken springs that push the door to close.
- Replace the side discharge deflector or the springs if they are damaged.
To examine the fuel system
- Examine the fuel tank cap and the seal for the fuel tank cap to make sure that there are no damages.
- Examine the fuel hose to make sure that there are no leaks. If the fuel hose is damaged, let a service agent replace it.
To adjust the clutch wire
For the situations that follow, it is necessary to decrease the length of the clutch wire:
- The drive of the wheels does not engage when you pull the drive bail or the speed control lever.
- The product moves slowly when the drive of the wheels is engaged.
For the situations that follow, it is necessary to extend the length of clutch wire:
- The product moves when the drive of the wheels is not engaged.
- Adjust the clutch wire.
a) To decrease the length of clutch wire, turn the adjuster screw counterclockwise.
b) To extend the length of the clutch wire, turn the adjustment screw clockwise.
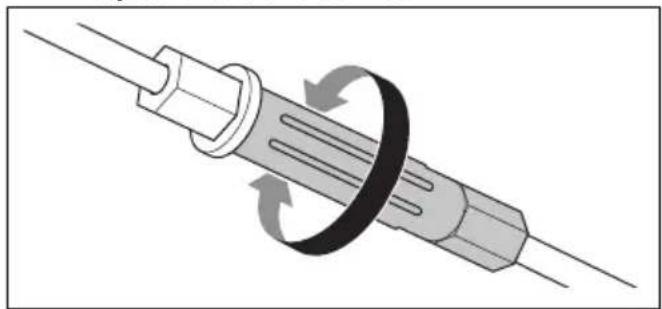
If the product continues to drive unsatisfactory after the adjustment, speak to you servicing dealer
Transportation, storage and disposal
Transportation and storage
- For storage and transportation of the product and fuel, make sure that there are no leaks or fumes. Sparks or open flames, for example from electrical devices or boilers, can start a fire.
• Always use approved containers for storage and transportation of fuel. - Empty the fuel tank before you put the product in storage for a long period of time. Discard the fuel at an applicable disposal location
- Safely attach the product during transportation to prevent damage and accidents.
- Keep the product in a locked area to prevent access for children or persons that are not approved.
- Keep the product in a dry and frost free area.
Disposal
- Obey the local recycling requirements and applicable regulations.
- Discard all chemicals, such as engine oil or fuel, at a service center or at an applicable disposal location.
- When the product is no longer in use, send it to a Husqvarna dealer or discard it at a recycling location.
Technical data
Technical data
| LC 356VP | |
| Engine | |
| Brand Honda | |
| Engine model name GCVx170 | |
| Displacement, cm 3 | 166 |
| Speed, rpm 2800 | |
| Nominal engine output, kW 1 | 3.1 |
| Ignition system | |
| Spark plug NGK BPR5ES | |
| Electrode gap, mm 0.75 | |
| Fuel and lubrication system | |
| Fuel, unleaded, minimum octane number 90 | |
| Fuel tank capacity, liter 0.9 | |
| Oil tank capacity, liter 0.4 | |
| Engine oil SAE 30 | |
| Weight | |
| With empty tanks, kg 35.1 | |
| Noise emissions 2 | |
| Sound power level, measured dB (A) 98 | |
| Sound power level, guaranteed LWA dB (A) 98 | |
| Sound levels 3 | |
| Sound pressure level at the operator's ear, dB (A) 86 | |
| Vibration levels 4 | |
| Handle, m/s 2 | 5.9 |
| Cutting equipment | |
| Cutting height, mm 25–75 | |
| Cutting width, mm 560 | |
| Cutting system Collection / BioClip | ® / Side discharge |
| Blade - standard Collection 598562701 | |
| Blade - Accessory Mulch 598563601 | |
| Drive | |
| Speed, km/h 3.0 - 4.5 | |
EC Declaration of Conformity
EC Declaration of Conformity
Husqvarna AB, SE-561 82 Huskvarna, Sweden, tel:
+46-36-146500, declares that the lawn mowers
Husqvarna LC 356VP from the serial numbers 2019 and onwards comply with the requirements of the
• of May 17, 2006 "relating to machinery" 2006/42/EC
- of February 26, 2014 "relating to electromagnetic compatibility" 2014/30/EU
- of May 8, 2000 "relating to the noise emissions in the environment" 2000/14/EC
- of June 8, 2011 on the "restriction of use of certain hazardous substances in electric and electronic equipment" 2011/65/EU
Information relating to noise emissions, see Technical data.
The following standards have been applied:
EN ISO 5395-1:2013/A1:2018, EN ISO 5395-2:2013/
A2:2017, EN ISO 14982:2009
If not otherwise stated, the above listed standards are the latest published versions.
Notified body: 0404, RISE SMP Svensk Maskinprovning AB, Box 7035, SE-750 07 Uppsala, Sweden has issued reports regarding the assessment of conformity according to annex VI of the COUNCIL'S DIRECTIVE of May 8, 2000 "relating to the noise emissions in the environment" 2000/14/EC.
Huskvarna, 2021-11-30
Δ · 2 m
Claes Losdal, Development Manager/Garden Products (Authorized representative for Husqvarna AB and responsible for technical documentation)
Съдържание
Въведение.... 18
Безопасност....19
Монтаж....22
Операция.... 25
Поддръжка....28
Операция
Въведение


Provoz
Úvod


Drift
Indledning


- Sørg for, at klingen flugter med motorakslens centrum.
Betrieb
Einleitung


Λειτουργία
Εισαγωγή


Funcionamiento
Introducción


Tagumise katte kontrollimine
Töö
Sissejuhatus


Toote seadistamine multšimisrežiimile
- Kinnitage vedruseib ja pingutage polti momendiga 43 – 47 Nm.
- Taita kahva eteen.
Käyttö
Johdanto


HUOMAUTUS: Älä aseta
Attention : projections et ricochets.
Utilisation
Introduction


- Zategnite kotačić (H) do kraja.
Prilagodba ručke
-
Otpustite donje vijke.
-
Pomaknite kotačiće u donji dio utora na lijevoj i desnoj strani proizvoda.
-
Postavite visinu ručke u jednu od dva dostupna položaja.
-
Pomičite kotačiće gore u smjeru ručke dok se ne zaustave uz škljocaj.
Rad
Uvod

UPOZORENJE: Prije rada s proizvodom morate pročitati i usvojiti poglavlje o sigurnosti.
Husqvarna Connect
Husqvarna Connect besplatna je aplikacija za mobilni uređaj. Aplikacija Husqvarna Connect pruža vam dodatne funkcije za proizvod Husqvarna.

Za dobar ishod
- Skinite vijak noža, podlošku opruge i nož.

- Postanite tarnu podlošku i nož na nosač noža.
- Postavite elastični rasječeni prsten i zategnite vijak na zatezni moment od 43 – 47 Nm.
Ako nakon podešavanja i dalje niste zadovoljni pogonom proizvoda, obratite se servisnom distributeru
Prijevoz, spremanje i zbrinjavanje
- Húzza meg teljesen a gombot (H).
Üzemeltetés
Bevezető


- Serrare completamente la manopola (H).
Utilizzo
Introduzione


リヤカバーの点検
- ノブ(H)を完全に締め込みます。
ハンドルの調節方法
- ハンドルを前側に折り畳みます。
製品を操作位置にセットする方法
Operation (動作)
はじめに


マルチモードへの変更
良好に芝を刈る方法
- ブレードを木製ブロックでロックします。
Galinio gaubto patikra
Naudojimas
lvadas


- Ranka pasukite peilj ir patikrinkite, ar jis laisvai sukasi.

Lietošana
levads


- Iznemiet asmens skrūvi, atsperi, noņemiet paplāksni un asmeni.
- Pārbaudiet, vai naža adapteris un asmens skrūve nav bojāti.
- Novietojiet berzes paplāksni un asmeni pret asmens atbalstu.
- Piestipriniet atsperpaplāksni un piegrieziet skrūvi ar 43 – 47 Nm griezes momentu.
- Ja nepieciešams, nomainiet aizdedzes sveci.
WAARSCHUWING: Lees de
- Draai de knop (H) volledig vast.
Werking
Inleiding


- Controleer de messteun en de mesbout op beschadigingen.
• Vervang de bougie indien nodig.
- Styre
- Motorbremsehändtak
- Sikkerhetsbøyle
- Händtak på startsnoren
- Bakdeksel
- Oppsamler
- Knotter for justering styrehøyde
- Spak for regulering av klippehøyde
- Oljelokk
- Sideutkastdeksel
- Lyddemper
- Tennplugg
-
Drivstofflokk
-
Symboler
- Klippedeksel
- Luftfilter
- Spak for turtallsregulering
- Sidedeflektor
- Finfordelingsplugg (tilbehør)
- Bruksanvisning
Slik kontrollerer du det bakre dekselet
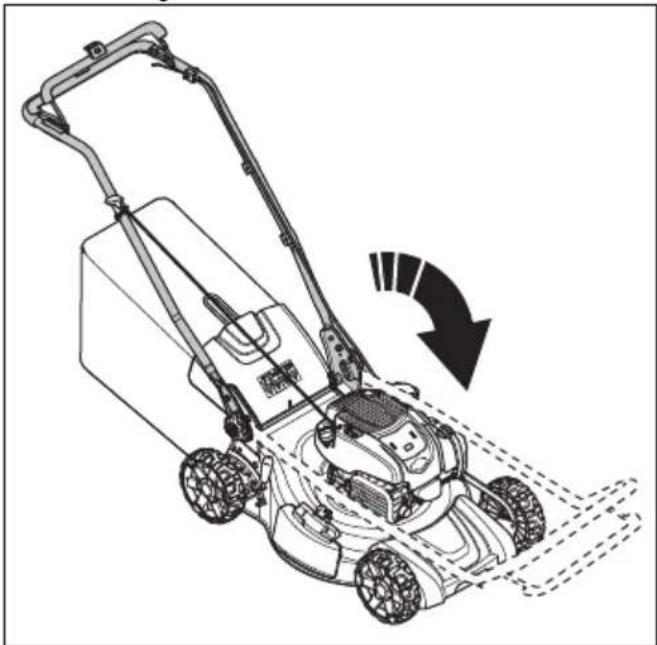
- Vipp styret forover.

Slik setter du produktet i driftsstilling
Drift
Innledning

ADVARSEL: Før du bruker produktet, må du lese og forstå kapittelet om sikkerhet.
Husqvarna Connect
Husqvarna Connect er en kostnadsfri app for mobilenheten din. Husqvarna Connect-appen gir utvidede funksjoner for Husqvarna-produktet ditt:

- Lukk det bakre dekselet, og kontroller at det sitter tett inntil finfordelingspluggen.
- Skift ut kniven med finfordelingskniven fra finfordelingssettet. Se Slik bytter du kniven på side 301.
- Fjern knivbolten, sprengskiven og kniven.
- Fest sprengskiven, og trekk til bolten med et moment på 43 – 47 Nm.
Hvis produktet fortsatt går på en lite tilfredsstillende måte etter justeringen, må du ta kontakt med serviceforhandleren.
Przeznaczenie
Wstęp

• Extended product information.
• Information about, and help with, product parts and servicing.

- Fixe o saco de relva à estrutura com os grampos.
Funcionamento
Introdução


Para obter bons resultados
- Strângeti complet rozeta (H).
Functionarea
Introducere


Эксплуатация
Введение


- Gombík (H) utiahnite na doraz.
Nastavenie rukoväti
- Skopte držadlo dopredu.
- Posuňte gombíky nahor smerom k rukoväti, kým sa nezastavia a nebudete počut' kliknutie.
- Gombíky utiahnite na doraz.
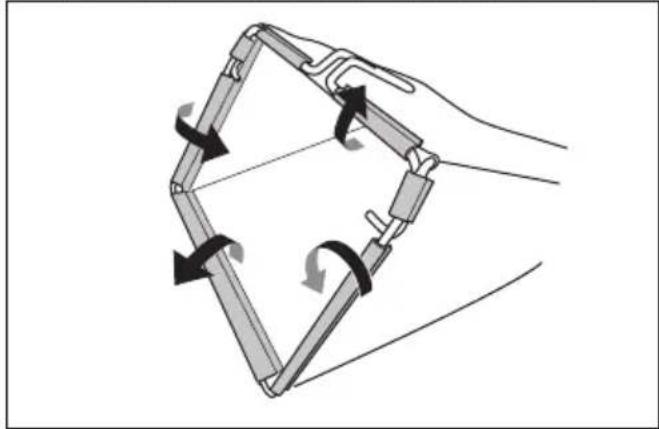
- Pripevnite vak na trávu do rámu pomocou svoriek.
Prevádzka
Úvod


- Počkajte, kým ochranný kryt bočnej výsypky neklesne na bočný vyhadzovací deflektor. Kým sa začne výrobok používat', skontrolujte, či je bočný vyhadzovací deflektor pevne na svojom mieste.
- Demontujte skrutku noža, pružnú podložku a čepel.
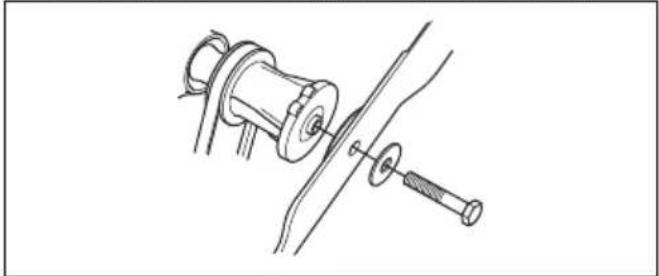
- Umiestnite treciu podložku a čepel na podpera čepele.
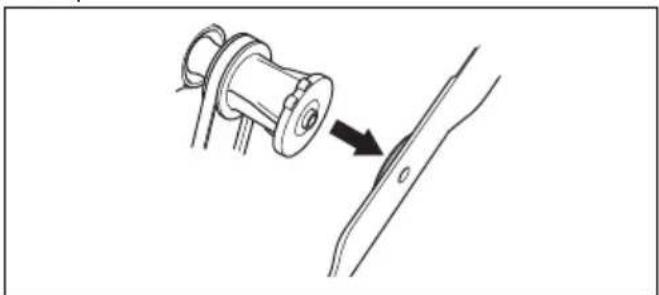
- Pripevnite pružnú podložku a utiahnite skrutku na ut'ahovací moment 43 – 47 Nm.
Preprava, skladovanie a likvidácia
Preverjanje zadnjega pokrova
- Vrečo za travo s sponkami pritrdite na ogrodje.

Delovanje
Uvod

OPOZORILO: Pred uporabo izdelka morate prebrati in razumeti poglavje o varnosti.
Husqvarna Connect

POZOR: Ne nastavite višino rezanja prenizko. Rezila lahko trčijo ob tla, će površina travnika ni ravna.
Zagon izdelka
- Z desno roko držite ročico zaganjalne vrvice.
- Zaganjalno ročico počasi izvlecite, da začutite nekoliko upora.
- Močno povlecite, da zaženete motor.

OPOZORILO: Zaganjalne vrvice ne navijajte okoli zapestja.
Za pogon koles
- Sestavite zbiralnik za travo, glejte Namestitev zbiralnika za travo na strani 400.
- Na nosilec namestite zbiralnik za travo.
- Sprostite zadnji pokrov in ga namestite na ogrodje vreče za travo.
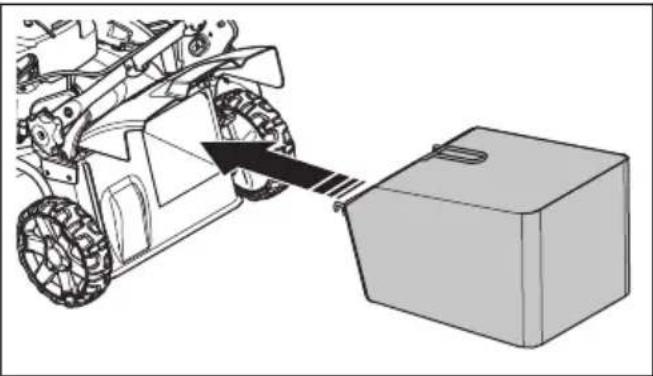
Priprava izdelka za mulčenje
- Zaprite zadnji pokrov in se prepričajte, da se tesno prilega ob vložek za mulčenje.
- Rezilo zamenjajte z rezilom za mulčenje, priloženo kompletu za mulčenje. Glejte poglavje Zamenjava rezil na strani 405.
Priprava izdelka za stranski izmet
- Dvignite zadnji pokrov in odstranite vrečo za travo, će je nameščena.
- Zaprite zadnji pokrov in se prepričajte, da se tesno prilega ob izdelek.
- Dvignite blokado izmeta.
Kako doseči dober rezultat
- Odstranite vijak rezila, vzmetno podložko in rezilo.
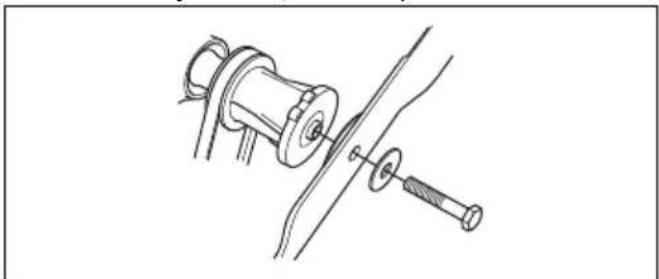
- Preverite, ali sta nosilec rezila in vijak rezila poškodovana.
- Torno podložko in rezilo namestite na nosilec rezila.
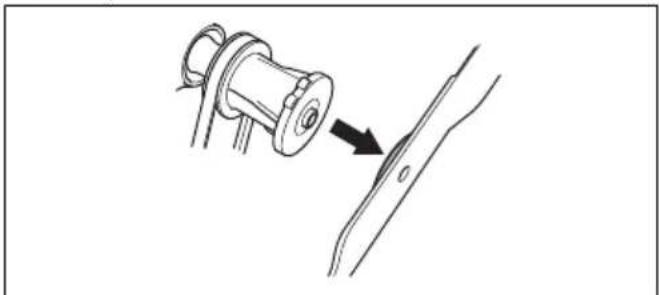
- Pritrdite vzmetno podložko in privijte vijak z zateznim momentom 43 – 47 Nm.
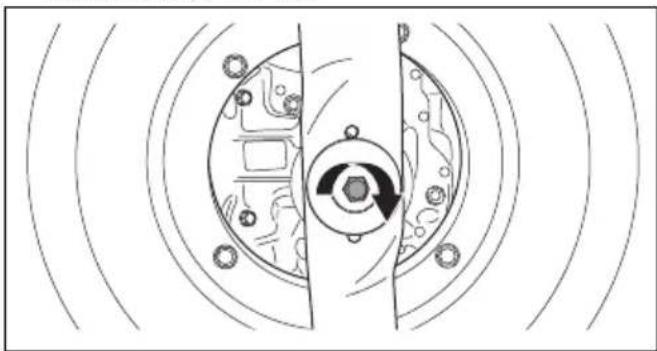
- Ročno zavrtite rezilo in se prepričajte, da se prosto obrača.

- Upravljačka drška
- Ručica kočnice motora
- Pritiskivač pogona
- Ručica užeta startera
- Zadnji poklopac
- Hvatač trave
- Dugmad za podešavanje visine ručice
- Poluga visine košenja
- Poklopac za ulje
- Poklopac bočnog pražnjenja
- Prigušivač
-
Svećica
-
Poklopac rezervoara za gorivo
- Simboli
- Poklopac košenja
- Filter za vazduh
- Ručica komande brzine
- Bočni usmerivač
- Priključak za usitnjavanje (oprema)
- Korisničko uputstvo
Simboli na proizvodu

UPOZORENJE! Budite pažljivi i koristite proizvod na pravilan način. Ovaj proizvod može prouzrokovati teške povrede ili smrt rukovaoca i drugih osoba.

Provera zadnjeg poklopca
Zadnji usmerivač smanjuje rizik da predmeti budu izbačeni u smeru rukovaoca.
- Uverite se da zadnji poklopac nije oštećen.
- Uverite se da opruge koje zatvaraju zadnji poklopac nisu polomljene.
- Zamenite polomljene opruge i oštećene delove.
- Uverite se da se zadnji poklopac može slobodno pomerati na šarkama.
Prigušivač
Prigušivač održava nivoe buke na minimumu i šalje izduvne gasove od rukovaoca.
- Stavite ručku u jedan od 2 položaja za visinu.
- Pomerite dugmad nagore u smeru ručke dok se ne zaustave i ne čujete klik zvuk.
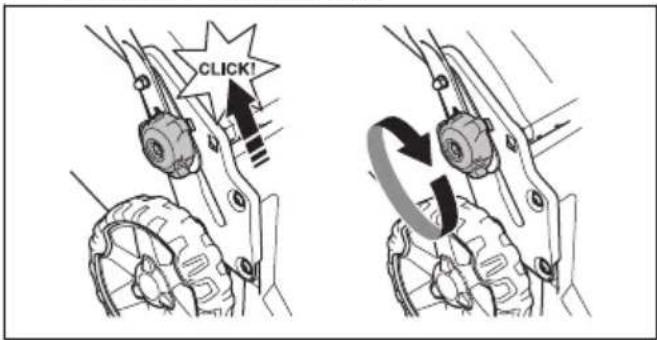
- Potpuno zategnite dugmad.
- Sklopite ručku unapred.
- Pomerite dugmad nagore u smeru ručke dok se ne zaustave i ne čujete klik zvuk.
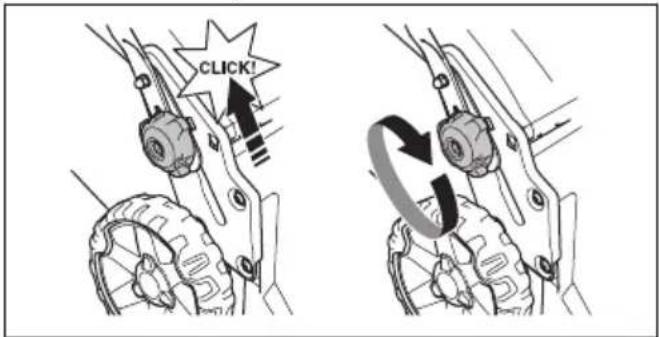
- Potpuno zategnite dugmad.
Sklapanje hvatača trave
- Postavite vreću za travu na ram pomoću spojnica.
Rukovanje
Uvod


- Držite ručicu užeta startera desnom rukom.
- Lagano izvlačite uže startera dok ne osetite otpor.
- Snažno povucite da biste pokrenuli motor.

UPOZORENJE: Nemojte namotavati uže startera oko ruke.
Korišćenje pogona na točkićima
- Pokrenite pogon točkova ručicom za kontrolu brzine na levoj strani ručke. Pomerite ručicu kontrole brzine unapred da povećate brzinu a unazad da je smanjite.
- Pre nego što povučete proizvod unazad, odvojte pogon i gurnite proizvod ka napred približno 10 cm.
- Otpustite pritiskivač pogona da biste deaktivirali pogon, na primer, kada se nalazite blizu prepreke.
Zaustavljanje proizvoda
- Da biste zaustavili samo pogon, oslobodite pritiskivač pogona.
- Da biste zaustavili motor, pustite ručicu kočnice motora.
- Sklopite hvatač trave, pogledajte Sklapanje hvatača trave na stranici 417.
- Postavite hvatač trave na držač.
- Otpustite zadnji poklopac i postavite ga na vrh rama vreće za travu.
- Zatvorite zadnji poklopac i uverite se da dobro naleže na zapušač za usitnjavanje.
- Zamenite nož nožem za usitnjavanje iz kompleta za usitnjavanje. Pogledajte Zamena sečiva na stranici 421.
- Otvorite štitnik za bočno pražnjenje i postavite bočni usmeravač na osovinice.
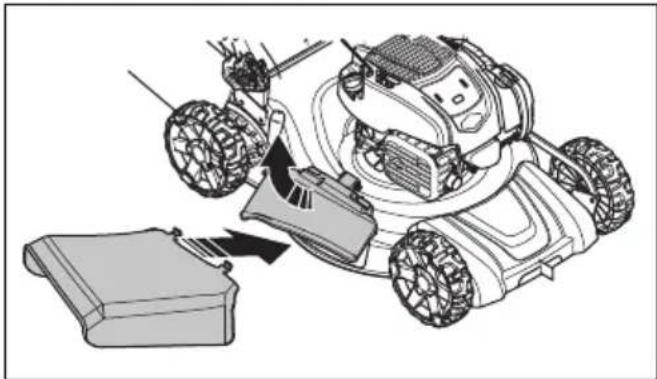
- Neka se štitnik za bočno pražnjenje nasloni na usmeravač. Uverite se da usmeravač bočno izbacivanje dobro naleže na mesto pre korišćenja proizvoda.
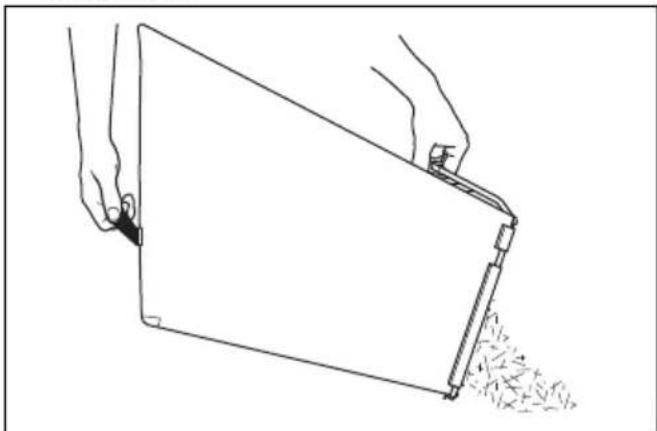
Pražnjenje hvatača trave

OPREZ: Podignite hvatač trave kada ga pomerite da biste sprečili habanje.
- Podignite hvatač trave sa ručkom rama.
- Upotrebite ručku rama i ručku trave kada praznite hvatač trave.
Za dobre rezultate
- Uvek koristite oštro sečivo. Tupo sečivo daje neujednačeni rezultat i pokošena površina trave postaje žuta. Oštro sečivo takođe koristi manje energije nego tupo sečivo.
-
Nemojte kositi više od 1/3 dužine trave. Kad počnete da kosite travu, koristite najveću visinu košenja. Pregledajte rezultat i spustite visinu košenja na prihvatljivi nivo. Ako je trava veoma visoka, vozite polako i kosite 2 puta ako bude potrebno.
-
Kosite u različitim smerovima svaki put da biste izbegli pruge na travnjaku.
- Podignite zadnji poklopac i uklonite hvatač trave.
- Ako su postavljeni zatvarač za usitnjavanje i nož za usitnjavanje, uklonite ih.
- Zatvorite zadnji poklopac pre rada proizvodom. Kad koristite proizvod, pokošena trava se izbacuje ispod zadnjeg poklopca.
Održavanje
Uvod

- Uklonite vijak sečiva, opružnu podlošku i sečivo.

- Pregledajte da li su potpora sečiva i vijak sečiva oštećeni.
a) Ako zamenite sečivo ili potporu sečiva, zamenite i vijak sečiva, opružnu podlošku i podlošku za trenje. - Pregledajte osovinu motora kako biste se uverili da nije savijena.
- Kada postavite novo sečivo, uverite se da su savijeni krajevi okrenuti u smeru poklopca mehanizma za košenja.
- Postavite podlošku za trenje i sečivo uz potporu sečiva.
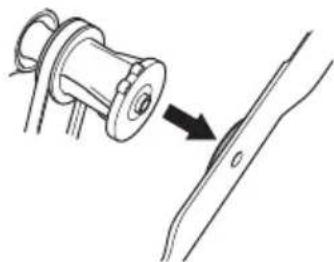
- Pobrinite se da je sečivo poravnato sa sredinom osovine motora.
- Postavite opružnu podlošku i zategnite vijak na moment pritezanja od 43 – 47 Nm.
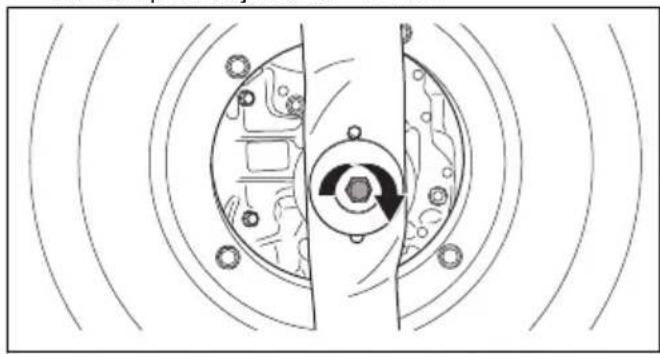
- Povucite sečivo rukom da biste proverili da li se slobodno okreće.

UPOZORENJE: Koristite zaštitne rukavice. Sečivo je veoma oštro i lako dolazi do posekotina.
- Pokrenite proizvod kako biste testirali sečivo. Ako sečivo nije ispravno postavljeno, pojaviće se vibriranje proizvoda ili rezultat košenja neće biti zadovoljavajući.
Provera nivoa ulja

OPREZ: Previše nizak nivo ulja može da ošteti motor. Proverite nivo ulja pre pokretanja proizvoda.
- Stavite proizvod na ravno tlo.
- Uklonite poklopac rezervoara za ulje sa šipkom za merenje.
- Obrišite ulje na šipki za merenje.
- Stavite šipku za merenje do kraja u rezervoar za ulje da biste tačno izmerili nivo ulja.
- Uklonite šipku za merenje.
- Očitajte nivo ulja na šipci.
- Ako je nivo ulja nizak, despitee motorno ulje i ponovo proverite nivo.
Zamena motornog ulja

UPOZORENJE: Motorno ulje je vrelo neposredno nakon zaustavljanja motora. Pustite da se motor ohladi pre odlivanja motornog ulja. Ako prospete motorno ulje na kožu, sperite ga sa tela sapunom i vodom.
- Pustite proizvod da radi dok se rezervoar za gorivo ne isprazni.
- Uklonite kabl za paljenje sa svećice.
- Uklonite poklopac rezervoara za ulje.
- Stavite posudu za skupljanje ulja ispod proizvoda.
- Nagnite proizvod da biste ispustili motorno ulje iz rezervoara za ulje.
- Sipajte novo motorno ulje tipa preporučenog u Tehnički podaci na stranici 424.
- Proverite nivo ulja. Pogledajte Provera nivoa ulja na stranici 422.
Pregled svećice

OPREZ: Uvek koristite preporučeni tip svećice. Neodgovarajući tip svećice može da ošeteti proizvod.
• Zamenite svećicu ako je potrebno.
Čišćenje filtera za vazduh
Prljav filter za vazduh može da izazove kvar ili nepravilan rad motora. Održavajte filter za vazduh češće ako radite u prašnjavim uslovima.
Ako se proizvod i posle podešavanja ne kreće kako bi trebalo, obratite se serviseru
Kontrollera den bakre käpan
- Vik handtaget framåt.
Drift
Introduktion


Få ett bra resultat
Çalışma
Giriş


İyi sonuç alma
Експлуатація
Вступ


检查后盖
- 完全拧紧旋钮 (H)。
调节手柄
- 向前折叠手柄。
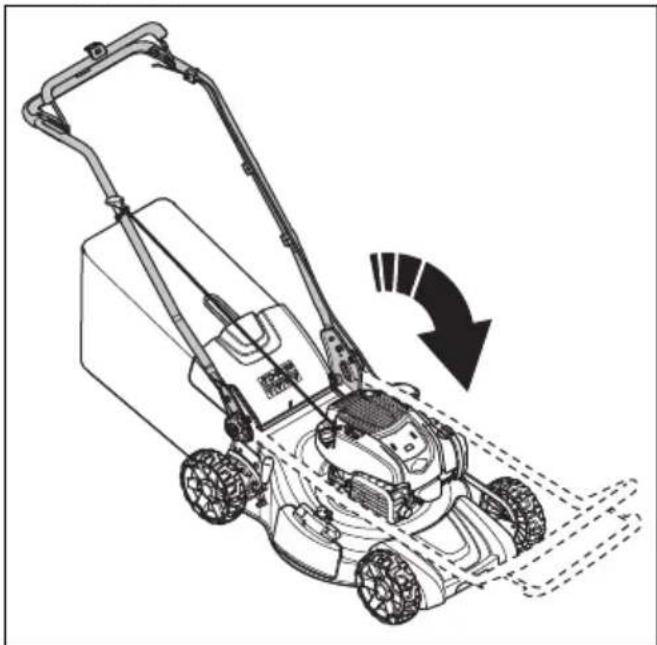
将产品设置在工作位置
- 将手柄折起到竖直位置。
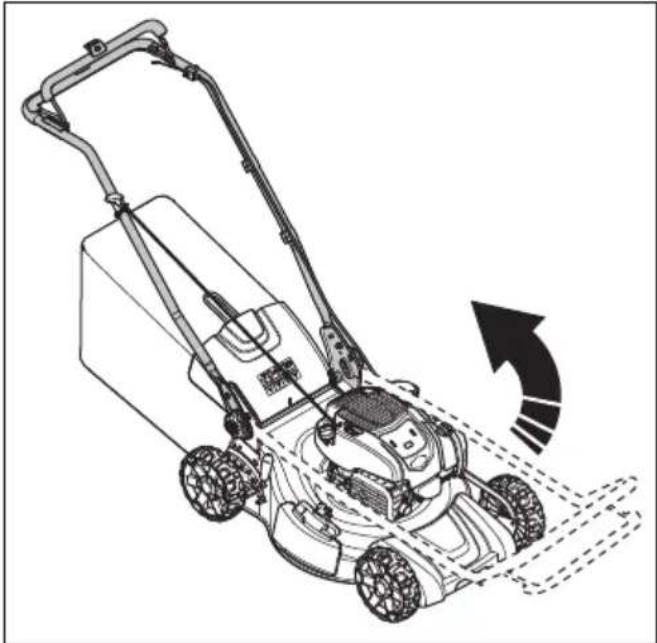
- 用夹子将草袋连接至框架。
操作
引言


将产品更改为地面覆盖模式
为获得良好的作业效果
- 拆下刀片螺栓、弹簧垫片和刀片。
- 将摩擦垫片和刀片紧靠在刀片支架上。
- 确保刀片与引擎轴中心对准。
- 使用木块卡住刀片。
- 用手拉住刀片旋转,确保刀片转动自如。

- 必要时请更换火花塞。
清洁空气滤清器
运输、存放和废弃处理
运输及存放




- INTRODUCTION
- PRODUCT DESCRIPTION
- INTENDED USE
- PRODUCT OVERVIEW
- SYMBOLS ON THE PRODUCT
- PRODUCT LIABILITY
- EURO V EMISSIONS
- SAFETY
- SAFETY DEFINITIONS
- GENERAL SAFETY INSTRUCTIONS
- WORK AREA SAFETY
- WARNING: READ THE WARNING INSTRUCTIONS THAT FOLLOW BEFORE YOU USE THE PRODUCT
- WORK SAFETY
- SAFETY INSTRUCTIONS FOR OPERATION
- PERSONAL PROTECTIVE EQUIPMENT
- SAFETY DEVICES ON THE PRODUCT
- TO DO A CHECK OF THE CUTTING COVER
- TO DO A CHECK OF THE ENGINE BRAKE HANDLE
- TO DO A CHECK OF THE REAR COVER
- MUFFLER
- TO DO A CHECK OF THE MUFFLER
- FUEL SAFETY
- SAFETY INSTRUCTIONS FOR MAINTENANCE
- ASSEMBLY
- TO ASSEMBLE THE HANDLE
- TO ADJUST THE HANDLE
- TO SET THE PRODUCT IN TRANSPORT POSITION
- TO SET THE PRODUCT IN OPERATION POSITION
- TO ASSEMBLE THE GRASS CATCHER
- OPERATION
- HUSQVARNA CONNECT
- TO START TO USE HUSQVARNA CONNECT
- BEFORE YOU OPERATE THE PRODUCT
- TO FILL FUEL
- TO SET THE CUTTING HEIGHT
- TO START THE PRODUCT
- TO USE THE DRIVE ON THE WHEELS
- TO STOP THE PRODUCT
- TO USE THE PRODUCT WITH THE GRASS CATCHER
- TO CHANGE THE PRODUCT TO MULCH MODE
- TO CHANGE THE PRODUCT TO SIDE DISCHARGE MODE
- TO EMPTY THE GRASS CATCHER
- TO GET A GOOD RESULT
- MAINTENANCE
- MAINTENANCE SCHEDULE
- TO DO A GENERAL INSPECTION
- TO CLEAN THE PRODUCT EXTERNALLY
- TO CLEAN THE INNER SURFACE OF THE CUTTING COVER
- TO EXAMINE THE CUTTING EQUIPMENT
- TO REPLACE THE BLADE
- TO DO A CHECK OF THE OIL LEVEL
- TO REPLACE THE ENGINE OIL
- TO EXAMINE THE SPARK PLUG
- TO CLEAN THE AIR FILTER
- TO DO A CHECK OF THE SIDE DISCHARGE DEFLECTOR
- TO EXAMINE THE FUEL SYSTEM
- TO ADJUST THE CLUTCH WIRE
- TRANSPORTATION, STORAGE AND DISPOSAL
- TRANSPORTATION AND STORAGE
- DISPOSAL
- TECHNICAL DATA
- EC DECLARATION OF CONFORMITY
- СЪДЪРЖАНИЕ
- ОПЕРАЦИЯ
- ВЪВЕДЕНИЕ
- PROVOZ
- ÚVOD
- DRIFT
- INDLEDNING
- BETRIEB
- EINLEITUNG
- ΛΕΙΤΟΥΡΓΊΑ
- ΕΙΣΑΓΩΓΉ
- FUNCIONAMIENTO
- INTRODUCCIÓN
- TAGUMISE KATTE KONTROLLIMINE
- TÖÖ
- SISSEJUHATUS
- TOOTE SEADISTAMINE MULTŠIMISREŽIIMILE
- KÄYTTÖ
- JOHDANTO
- HUOMAUTUS: ÄLÄ ASETA
- UTILISATION
- PRILAGODBA RUČKE
- RAD
- UVOD
- ZA DOBAR ISHOD
- PRIJEVOZ, SPREMANJE I ZBRINJAVANJE
- ÜZEMELTETÉS
- BEVEZETŐ
- UTILIZZO
- INTRODUZIONE
- リヤカバーの点検
- ハンドルの調節方法
- 製品を操作位置にセットする方法
- OPERATION (動作)
- はじめに
- マルチモードへの変更
- 良好に芝を刈る方法
- GALINIO GAUBTO PATIKRA
- NAUDOJIMAS
- LVADAS
- LIETOŠANA
- LEVADS
- WAARSCHUWING: LEES DE
- WERKING
- INLEIDING
- SLIK KONTROLLERER DU DET BAKRE DEKSELET
- SLIK SETTER DU PRODUKTET I DRIFTSSTILLING
- INNLEDNING
- PRZEZNACZENIE
- WSTĘP
- FUNCIONAMENTO
- INTRODUÇÃO
- PARA OBTER BONS RESULTADOS
- FUNCTIONAREA
- INTRODUCERE
- ЭКСПЛУАТАЦИЯ
- ВВЕДЕНИЕ
- NASTAVENIE RUKOVÄTI
- PREVÁDZKA
- PREPRAVA, SKLADOVANIE A LIKVIDÁCIA
- PREVERJANJE ZADNJEGA POKROVA
- DELOVANJE
- ZAGON IZDELKA
- ZA POGON KOLES
- PRIPRAVA IZDELKA ZA MULČENJE
- PRIPRAVA IZDELKA ZA STRANSKI IZMET
- KAKO DOSEČI DOBER REZULTAT
- SIMBOLI NA PROIZVODU
- PROVERA ZADNJEG POKLOPCA
- PRIGUŠIVAČ
- SKLAPANJE HVATAČA TRAVE
- RUKOVANJE
- KORIŠĆENJE POGONA NA TOČKIĆIMA
- ZAUSTAVLJANJE PROIZVODA
- PRAŽNJENJE HVATAČA TRAVE
- ZA DOBRE REZULTATE
- ODRŽAVANJE
- PROVERA NIVOA ULJA
- ZAMENA MOTORNOG ULJA
- PREGLED SVEĆICE
- ČIŠĆENJE FILTERA ZA VAZDUH
- KONTROLLERA DEN BAKRE KÄPAN
- INTRODUKTION
- FÅ ETT BRA RESULTAT
- ÇALIŞMA
- GIRIŞ
- İYI SONUÇ ALMA
- ЕКСПЛУАТАЦІЯ
- ВСТУП
- 检查后盖
- 调节手柄
- 将产品设置在工作位置
- 操作
- 引言
- 将产品更改为地面覆盖模式
- 为获得良好的作业效果
- 清洁空气滤清器
- 运输、存放和废弃处理
- 运输及存放
Brand : HUSQVARNA
Model : LC 356VP
Category : Electric mower