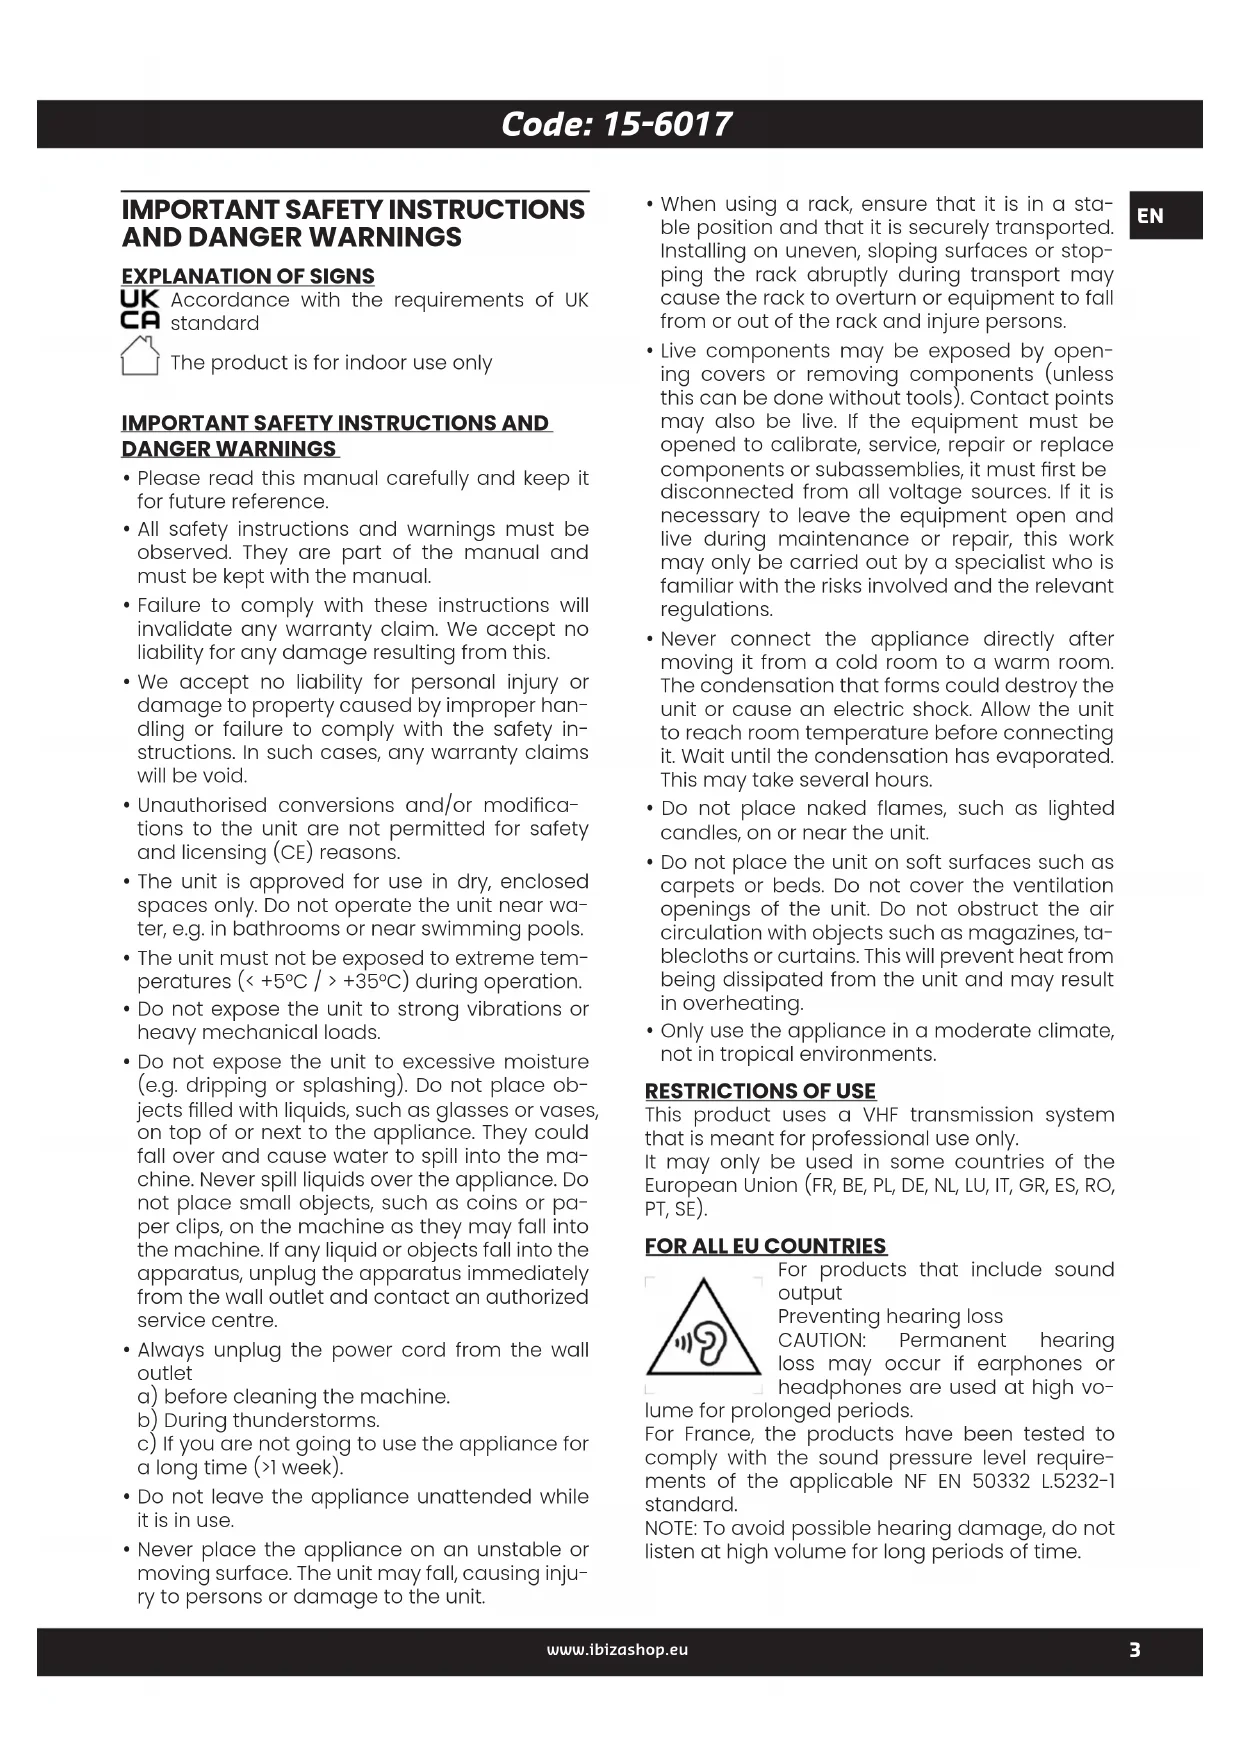
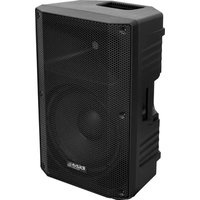
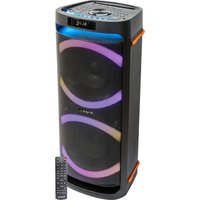
USER MANUAL PORT8VHFBT IBIZA SOUND
IMPORTANT SAFETY INSTRUCTIONS AND DANGER warnings
EXPLANATION OF SIGNS
UK accordance with the requirements of UK CA standard

The product is for indoor use only
IMPORTANT SAFETY INSTRUCTIONS AND DANGER warnings
- Please read this manual carefully and keep it for future reference.
- All safety instructions and warnings must be observed. They are part of the manual and must be kept with the manual.
- Failure to comply with these instructions will invalidate any warranty claim. We accept no liability for any damage resulting from this.
- We accept no liability for personal injury or damage to property caused by improper handling or failure to comply with the safety instructions. In such cases, any warranty claims will be void.
- Unauthorised conversions and/or modifications to the unit are not permitted for safety and licensing (CE) reasons.
- The unit is approved for use in dry, enclosed spaces only. Do not operate the unit near water, e.g. in bathrooms or near swimming pools.
The unit must not be exposed to extreme temperatures (< +5^ / > +35^) during operation.
- Do not expose the unit to strong vibrations or heavy mechanical loads.
- Do not expose the unit to excessive moisture (e.g. dripping or splashing). Do not place objects filled with liquids, such as glasses or vases, on top of or next to the appliance. They could fall over and cause water to spill into the machine. Never spill liquids over the appliance. Do not place small objects, such as coins or paper clips, on the machine as they may fall into the machine. If any liquid or objects fall into the apparatus, unplug the apparatus immediately from the wall outlet and contact an authorized service centre.
Always unplug the power cord from the wall outlet
a) before cleaning the machine.
b) During thunderstorms.
c) If you are not going to use the appliance for a long time (>1 week).
- Do not leave the appliance unattended while it is in use.
-
Never place the appliance on an unstable or moving surface. The unit may fall, causing injury to persons or damage to the unit.
-
When using a rack, ensure that it is in a stable position and that it is securely transported. Installing on uneven, sloping surfaces or stopping the rack abruptly during transport may cause the rack to overturn or equipment to fall from or out of the rack and injure persons.
- Live components may be exposed by opening covers or removing components (unless this can be done without tools). Contact points may also be live. If the equipment must be opened to calibrate, service, repair or replace components or subassemblies, it must first be disconnected from all voltage sources. If it is necessary to leave the equipment open and live during maintenance or repair, this work may only be carried out by a specialist who is familiar with the risks involved and the relevant regulations.
- Never connect the appliance directly after moving it from a cold room to a warm room. The condensation that forms could destroy the unit or cause an electric shock. Allow the unit to reach room temperature before connecting it. Wait until the condensation has evaporated. This may take several hours.
- Do not place naked flames, such as lighted candles, on or near the unit.
- Do not place the unit on soft surfaces such as carpets or beds. Do not cover the ventilation openings of the unit. Do not obstruct the air circulation with objects such as magazines, tablecloths or curtains. This will prevent heat from being dissipated from the unit and may result in overheating.
- Only use the appliance in a moderate climate, not in tropical environments.
RESTRICTIONS OF USE
This product uses a VHF transmission system that is meant for professional use only.
It may only be used in some countries of the European Union (FR, BE, PL, DE, NL, LU, IT, GR, ES, RO, PT, SE).
FOR ALL EU COUNTRIES

For products that include sound output
Preventing hearing loss
CAUTION: Permanent hearing loss may occur if earphones or headphones are used at high vo
lume for prolonged periods.
For France, the products have been tested to comply with the sound pressure level requirements of the applicable NF EN 50332 L.5232-1 standard.
NOTE: To avoid possible hearing damage, do not listen at high volume for long periods of time.
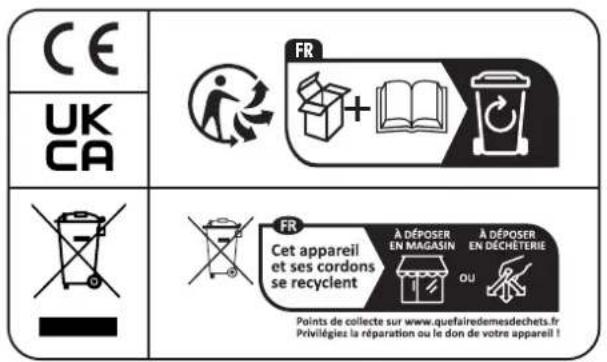
WEEE NOTICE


The Directive on Waste Electrical and Electronic Equipment (WEEE), which came into force as European law on 14/02/2014, has resulted in a major change in the treatment of electrical equipment at the end of its life.
The main objective of this Directive
is to prevent waste of electrical and electronic equipment (WEEE) and to promote the reuse, recycling and other forms of recovery of such waste in order to reduce its disposal.
The WEEE logo on the product or on its box indicating collection of electrical and electronic equipment consists of the crossed out wheeled bin, as shown below.
This product must not be disposed of with your other household waste. It is your responsibility to dispose of your waste electrical and electronic equipment at a designated collection point for recycling to help conserve natural resources. To find out more about correct recycling and collection points, please contact your local authority, household waste disposal service or the shop where you purchased the product.
ROHS COMPLIANCE
This product complies with Directive 2011/65/EU of the European Parliament and of the Council of 8 June 2011 on the restriction of the use of certain hazardous substances in electrical and electronic equipment.
FOR ALL PRODUCTS EXCEPT THOSE WITH WIRELESS OPERATION
LOTRONIC International hereby declares that this equipment is in compliance with EMC 2014/30/EU Directive, LVD 2014/35/EU Directive. The declaration of conformity may be consulted in the support section of our Web Site, accessible from www.lotronic.net.
FOR ALL PRODUCTS WITH WIRELESS OPERATION
LOTRONIC International hereby declares that this equipment is in compliance with the essential requirements and other relevant provisions of Directive 2014/53/EU. The declaration of conformity may be consulted in the support section of our Web Site, accessible from www.lotronic.net.
RECOMMENDATIONS FOR BATTERIES

This symbol indicates that used batteries should not be disposed of with household waste but deposed correctly in accordance to our local regulations.
Batteries shall not be exposed to excessive heat such as sunshine, fire or the like.
When the internal batteries are not to be used, remove them to avoid damage caused by battery leakage or corrosion.
ATTENTION: Danger of explosion if battery is incorrectly placed. Only replace by the same or equivalent type.
WARNING: Do not swallow the battery. Danger of chemical burns. Keep new and old batteries out of the reach of children.
If the battery compartment doesn't close properly, stop using the product and keep it out of the reach of children.
If you are in doubt whether the batteries have been swallowed or introduced into any other part of the body, contact immediately a doctor.
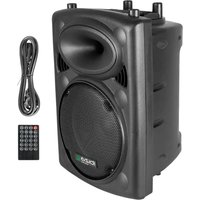
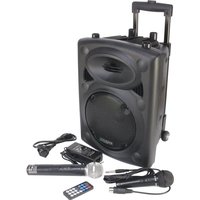
WHAT'S IN THE BOX
- Main unit
Handheld VHF mic (207.5MHz)
Wired mic
Remote control
Protection cover
- Mains adaptor
- Quick Start Guide
PRODUCT OVERVIEW / REAR PANEL
Connect a USB storage device that contains MP3 files (format: exFat32).
2. SD card slot
Connect an SD card that contains MP3 files (format: exFat32).
3. Screen
Shows information about the current mode, track, timer, equalizer, number of tracks on the device, etc.
4. Next
- Skip to the next track of the USB/SD player.
- Long press to increase the volume of the USB/SD player.
5. Mode
Select from Bluetooth (standard), USB, SD, Line (toggles only among active inputs).
Long press to enter the menu.
Navigate through the menu using Previous/ Next buttons.
Use Play to enter a menu.
Use Mode to exit.
Main menu: MUSIC - AUDIO INPUT - SET
MUSIC:
Cyclic mode: All, folder, single, random.
EQ mode: Normal, Pop, Rock, Classic, soft, subwoofer.
File browsing: Browse through folders and files..
AUDIO INPUT: change the source.
SET:
Display On Time:0-240s.
Language:CN,EN,FR,DE,ES.
Tools:PowerOff:0-90min.
Firmware version : shows version.
Factory settings : reset to default.
6. Previous
Skipping to the previous track of the USB/SD player. Long press to decrease the volume of the USB player.
7. REC indicator
Glows orange when recording.
8. PLAY indicator
Goggles blue when speaker is on and during recording. Blinks blue when USB/SD player is playing.
Starts/stops microphone recording when a USB/SD device is connected. Press and hold to delete the file. Use the PLAY/PAUSE button to pause and resume recording.
10. Play/Pause/BLUETOOTH
Press to Play/Pause/Resume a track of the USB/SD player.
SOUND CONTROLS
11. Treble control
Adjusts the treble level.
12. Bass control
Adjusts the bass level.
13. MIC VOLUME
Adjusts the volume of the wired MIC inputs.
14. Echo control
Adjusts the echo effect of the microphones.
15. Master volume control
Controls the overall volume of the USB/SD player and VHF mics.
16. Voice control (VOX/VCV)
ON/OFF switch. When this is set to ON, the volume of the music will decrease when someone speaks into the microphone.
Input for wired microphone 1 or guitar: 1/4 mono input jack for connecting a wired microphone or guitar.
Input for wired microphone 2: 1/4 mono input for another wired microphone.
19. MIX OUT / RCA OUT
Connect the left and right channel outputs to the input of a mixer, amplifier or second speaker.
20. LINE IN / RCA IN
Connect to an external audio device using an RCA left and right audio cable (not supplied).
21. AUX IN / 3.5mm jack
Connect to an external audio device using a 3.5mm audio cable (not supplied).
WIRELESS SECTION
22. MIC Volume control
Adjusts the volume of the 207.5MHz VHF MIC (supplied with the handheld microphone).
23. RF MIC channel LED
Glows light green when paired with the 207.5MHz microphone.
24.VHF POWER LED
Glows red when VHF function is ON.
25. VHF ON/OFF switch
Press to switch the VHF function on/off on the speaker.
ELECTRICAL CONNECTIONS
25. Power LED
Glows green when the speaker is switched on. Glows red when switched on with a low battery.
27. Charge LED indicator
Glows red when the battery needs charging. Glows orange when the battery is being charged. Glows green when the battery is fully charged.
- Main power switch
Press to the ON position to turn on the speaker.
- AC Fuse Compartment
Contains a 250V 1A fuse. If the fuse is blown, only replace with a fuse of the same type.
30.DC power input
Connect an external 15V = 4A power supply.
POWER SUPPLY: BATTERY & MAINS OPERATION
FIRST CHARGE
Before using this system for the first time, insert the supplied mains adaptor into the player's DC power socket and plug the other end into a suitable wall outlet. Make sure the "CHARGE INDICATOR" is lit for 14 hours continuously.
Please charge the battery when the CHARGE indicator (27) lights up in red.
Please charge the battery regularly after each use, don't wait until it is discharged!
Plug one end of the mains adaptor into the DC socket (30) on the rear panel and the other end into a suitable wall socket.
During charging, the LED indicator will be orange. It will turn green when the battery is fully charged.
NOTE: Please turn off the power switch when you have finished using the system.
IMPORTANT NOTE ON LEAD-ACID BATTERIES
-
BEFORE using the unit for the first time, fully charge the battery without interruption.
-
Charge the battery regularly after each use. Don't wait until the battery is flat!
-
DON'T allow the battery to become completely discharged, as this will cause it to lose 20% of its capacity or even be completely damaged! If the voltage is too low, the internal circuits will not be powered and it will be impossible to recharge the battery!
-
If you don't use the unit for a long time, it is recommended to charge it once a month.
The life of the battery depends on following these recommendations.
** BATTERIES ARE NOT COVERED BY THE WARRANTY **
WE CANNOT BE HELD RESPONSIBLE FOR DAMAGED BATTERIES FURTHER TO THE NON-OBSERVANCE OF THESE BASIC RULES.
REMOTE CONTROL
INSTALLING THE BATTERIES IN THE REMOTE CONTROL
The battery of the remote (CR2025) is included and in place, simply pull the plastic strip out for the remote to work.
REMOTE CONTROL FOR USB/SD PLAYER
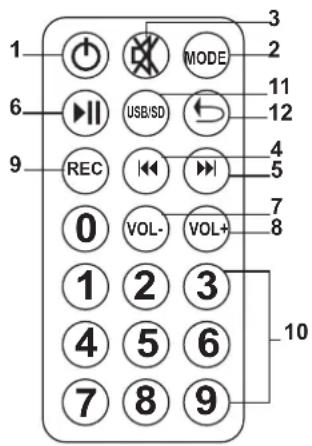
Please note that the remote control controls only the Multimedia player, not the other input sources of the unit. If the volume is set to minimum on the multimedia player, there will be no sound output, even if the Master volume control of the speaker box is set to maximum.
- ON/OFF: Turns the player on and off.
- MODE: Press until the desired mode is displayed.
- MUTE: Mutes or resumes the volume.
- : Return to the previous track.
- : Skip to the next track.
- Play/Pause: Press to play/pause/resume a track on the USB/SD player.
- VOL: Decreases the volume of the multimedia player.
- VOL: Increases the volume of the USB/SD player
- REC: Press to start/stop recording when a USB/SD device is connected.
- Number buttons: Select the desired track
- USB/SD select button: Press to select one of the two input sources when both devices are connected
- REPEAT: Press to change repeat mode: one, all tracks, no repeat.
USING YOUR PORT
HOW TO PAIR BLUETOOTH WITH DEVICES
Activate the Bluetooth search function on your Bluetooth enabled device and select "IBZA-PORT" in the list of found devices.
You are now ready to enjoy your music.
Once connected to a device in BT, you can use the MODE button to switch from Line to BT. The MODE button only works between active and connected sources.
You can play/pause the music on the speaker using the play/pause button (10).
We recommend that you set the volume of the paired device to maximum and adjust it on the speaker itself.
USB/SD PLAYER
Insert a USB memory stick (1) or SD card (2) into the appropriate socket.
The USB key must be formatted in exFat or FAT32 to be recognised. If the high-capacity storage device does not work on the speaker, use a lower-capacity storage device.
The unit will automatically switch to USB/SD player when a device is detected and start reading.
You can switch between connected devices and inputs using the MODE button (5).
Select a track using the or buttons on the speaker or remote control, and press (4) to pause or resume playback.
To adjust the volume of the USB/SD Speaker, there are 2 separate volumes:
LINE IN/OUT CONNECTION (RCA)
Connect an RCA plug to the LINE IN sockets (20). If LINE is not displayed by default, press the MODE button (5) until LINE is displayed.
Adjust the line source volume control (15).
You can connect any line device (mixer, amplifier, another active speaker, TV, etc.) to this RCA input.
AUX IN CONNECTIONS (JACK3.5mm)
Connect any device with a 3.5mm plug, such as a computer, smartphone or tablet, to play your content on the PORT.
If LINE/AUX is not displayed by default, press the MODE button (5) until LINE is displayed.
Connect wired microphones to the 1/4'' jack inputs (17 or 18) for singing or speaking, or a guitar to MIC1 (17) to play your guitar using the PORT as an amplifier.
The volume of the wired microphones and the guitar can be adjusted using the dedicated MIC
volume knob (13).
VHF MICROPHONE
Press the VHF power button (25) to switch on the wireless microphone function.
Switch on the wireless microphone.
Adjust the volume on the loudspeaker to the desired level using the dedicated volume control (23). If either volume control is set to minimum, no sound will be output.
SINGING ALONG
If you want to sing along with the music, switch on the wireless microphone function (25) and the switch on the wireless microphone, or connect a wired microphone to MIC INPUT (17 or 18). Adjust the volume of the wired microphone using the MIC VOL control (13). Adjust the volume of the wireless microphone using the button (22).
USING THE VOX FUNCTION (SPEECH)
When the VOX function is activated, the music level decreases when someone speaks into one of the microphones. The music level returns to normal when the user stops speaking into the microphone.
To activate this function, set the VCV switch (16) to on. To disable this function, set the switch to off.
RECORD FUNCTION (REC)
Please note that ONLY THE SOUND OF THE MICROPHONE(s) (wireless mic, connected wired mic(s) and/or guitar) can be recorded. You can only record on a USB or SD device.
To start recording, press the RECORD button (9) on the speaker or the RECORD button on the remote control. The PLAY indicator goes out and the REC indicator turns orange.
A file is created on your USB key or SD card (in a specific folder at the root of the USB/SD device). To stop recording, press the RECORD button again. The REC indicator will turn off and the PLAY indicator will turn blue.
To listen to your recording, select the track on the SD card or USB key.
Note that you can't use the same USB/SD device to play and record at the same time.
VOLUME CONTROLS
Each input section (multimedia player, wired microphones, wireless microphone) has its own volume controls, which must be adjusted on the back of the speakers, except for the multimedia player, which can be adjusted with the remote control.
If these controls are set to minimum, there will be no sound even if the master volume is set to maximum.
Set the Master volume to an appropriate level and adjust the volume of the individual inputs using their respective volume controls.
CARE
Unplug the machine before cleaning. Do not use aggressive detergents. Use a clean cloth to wipe off any dust or dirt from the product. We are not liable for damage caused by incorrect handling, improper use or wear and tear. We reserve the right to make technical changes without notice.
SPECIFICATIONS
Woofer. 8/20cm
Tweeter. 1/25mm compression driver
Sensitivity 96dB±2dB
Max.SPL. 105dB
Impedance. 4 Ohms
Freq. range. 60-20,000Hz
Built-in battery. 12V/2.3Ah LEAD-ACID
Spare battery ref. .BAT-PORT2.3A - 15-6013
USB format.. .FAT32
Supported format.mp3,wma,wav
Bluetooth frequency. 2402-2480MHz
BT max. RF power. -2.32dBm
VHF handheld mic freq. 207.5MHz
VHF hand mic replace.....PORTHAND12- 15-6005D
VHF MIC battery needed /mic.2 x AA battery
Max. RF power handheld mic. 0.79dBm
Max. RF power headset mic.. 2.66dBm
Remote control battery needed..
Input power. 15V=4A
Product dimensions. 300x235x410mm
Net Weight. 8.04kg
Packaging dimensions. 330x320x490mm
Gross Weight. 9.16kg
TROUBLESHOOTING
SYSTEM
The speaker does not turn on
- The battery is empty and the AC adaptor is not connected properly.
BATTERY
LED is still red
- Check that the mains connector is inserted properly.
Battery is still low after hours of charging
- A battery that is too old or hasn't been charged according to the battery warnings may not be able to be charged. The speaker needs a new battery.
SOUND
No sound when turned on
- Connect a device to the speaker (USB/SD, AUX IN jack 3.5mm, RCA) and make sure it's playing.
- Check the volume control on the speaker and the volume of the connected source device.
Volume is very low
- Check the volume control on the speaker and the volume of the connected source device.
- If you're playing a USB/SD device, also check the volume of the internal player by pressing and holding the Next button.
USB/SD PLAYER
USB key/SD card doesn't read music
- Check that the USB device is formatted in exFAT/FAT32.
- Check that the USB/SD device is correctly inserted.
- Check the main volume (15) and the volume of the MP3 player (4 - long press).
- The USB input doesn't work with a USB device such as a computer. To play music via USB, please insert a USB stick.
BLUETOOTH
BT disconnect
Try moving the device you want to connect closer to the speaker.
PORT not found by BT device
- Check the BT function of your device.
- Check that no other device is currently connected to the speaker.
MICROPHONE
Microphone does not connect
- Check that the VHF function on the speaker is switched ON.
- Check that the microphone is switched on.
- Replace the current battery in the microphone.
REMOTE CONTROL
Not working
- Check the battery of the remote (CR2025)
Try and aim directly at the IR receiver positioned on the rear panel of the speaker.
Note that the remote only controls the USB/SD player
MISSED ITEMS
Some items are missing
- Check all openings of the box, some items are placed in the foam at the top and bottom of the product/box.
- Check that all components, foam and protective materials have been removed from the box.
CONSIGNES DE SECURITE IMPORTANTES
SIGNIFICATION DES SYMBOLES

Conforme aux normes CE

Langue:CN,EN,FR,DE,ES.
Tools: Arret: 0-90min.
Touches sonores : ON/OFF.
FUNCTION VOX (DISCOURS)
Tweeter/25mm a compression
Freq. Bluetooth 2402-2480MHz
Puissance RF max. BT. -2.32dBm
Freq.VHF micro main. 207.5MHz
Micro main repl. .PORTHAND12- 15-6005D
Piles/micro. 2 x LR6 (AA)
Puisance RF max. micro main. 0.79dBm
Dimensions emballage. 330x320x490mm
Poids brut. 9.16kg
DIAGNOSTIC DE DEFAILLANCE
SYSTEME
Akku 12V/2.3AhBlei-Saure
Ersatzakku. .BAT-PORT2.3A - 15-6013
USB Format.. .FAT32
VOOR ALLE PRODUCTEN BEHALVE PRODUCTEN MET DRAADLOZE BEDIENING
Taal: CN, EN, FR, DE, ES.
Contrast: 0-20 (standard is 10).
Lingua: CN, EN, FR, DE, ES.
Strumenti: Spegnimento : 0- 90 min.
Toni tastiera: ON/OFF.
CONNECTION LINE IN/OUT (RCA)
Språk: CN, EN, FR, DE, ES.
Verktyg: Avstängning : 0- 90min.
Knappljud: PÁ/AV.
Kontrast: 0-20 (standard ar 10).
Firmwareversion: visar version.
Fabriksiinstallninger: Aterstall till standard.
- Föregäende
NÄR SKA PORTHÖGTALAREN LADDAS?
Ladda batteriet nar CHARGE-indikatorn (27) lyser rott.
ANVANDA VOX-FUNKTIONEN (TAL)
Idioma: CN, EN, FR, DE, ES.
ZLACZE LINE IN/OUT (RCA)
Ekranin Açilma Suresi: 0-240s.
Dil:CN,EN,FR,DE,ES.
Araglar:GugKapatma:0-90dk.
Tus Takimi Tonlari: AÇİK/KAPALI.
Kontrast: 0-20 (varsayilan 10'dur).
Donanim yazilimi surumu:surumu gosterir.
Fabrika ayarli: Varsayilana sifirlayin.
6. Onceki
BT maks. RF gucu -2,32dBm
VHF el mikrofonu frekansi. 207.5MHz
VHF el mikrofonu .PORTHAND12- 15-6005D'yi degistirin
VHF MIC pili gerekli / mikrofon 2 x AA pil
PENTRU TOATE PRODUSELE, CU EXCEPTIA CEOR CU FUNCTIONARE WIRELESS
Limba: CN, EN, FR, DE, ES.
CONEXIUNE LINE IN/OUT (RCA)
Conectati o mufa RCA la prizele LINE IN (20).
Baterie incorporaţă 12V/2.3Ah PLUMB-ACID
Baterie de rezervä ref. ....BAT-PORT2.3A - 15-6013
Format USB .FAT32
Format acceptat .mp3,wma,wav
Frecventa Bluetooth 2402-2480MHz
Puterea maxima RF a Bluetooth .-2,32 dBm
Idioma: CN, EN, FR, DE, ES.

Download the manual in other languages

Any question or problem?
Contact us via facebook

IBIZALIGHTSOUND
Follow us on Instagram
Assembled in PRC · Designed by LOTRONIC S.A.
https://ibizashop.eu/