
EFE2018 - Fireplace QLIMA - Free user manual and instructions
Find the device manual for free EFE2018 QLIMA in PDF.
| Brand | Qlima |
| Model | EFE2018 |
| Product type | Electric fireplace (convector) |
| Dimensions (W x D x H) | 660 x 95 x 520 mm |
| Weight | 13.5 kg |
| Power supply voltage | 220-240 V / 50 Hz |
| Maximum heating power | 1800 W |
| Heating levels | 2 (900 W / 1800 W) |
| Nominal current | 8.1 A |
| Recommended room volume | Up to 70 m³ |
| Installation type | Permanent wall mounting |
| Minimum mounting height | 300 mm from the floor (recommended 600 mm) |
| Minimum distance to ceiling | 1500 mm |
| Control | Control panel and remote control |
| Remote control | Yes (AAA batteries not included) |
| Adjustable timer | Up to 23 h 50 |
| Thermostat range | 15 °C to 30 °C |
| Flame effect | Yes, with adjustable brightness |
| Warranty | 24 months |
| Recommended cleaning | Soft damp cloth, without abrasives |
Frequently Asked Questions - EFE2018 QLIMA
User questions about EFE2018 QLIMA
0 question about this device. Answer the ones you know or ask your own.
Ask a new question about this device
Download the instructions for your Fireplace in PDF format for free! Find your manual EFE2018 - QLIMA and take your electronic device back in hand. On this page are published all the documents necessary for the use of your device. EFE2018 by QLIMA.
USER MANUAL EFE2018 QLIMA
natural_image
Black and white photo of a Qlima gas stove burner with flame patterns and pebbles on the base (no text or symbols on main image)guarantee
YEARS
| D | GEBRAUCHSANWEISUNG | 2 |
| DK | BRUGSANVISNING | 12 |
| E | INSTRUCCIONES DE USO | 22 |
| F | MANUEL D'UTILISATION | 32 |
| FIN | KÄYTTÖOHJE | 42 |
| GB | OPERATING MANUAL | 52 |
| I | ISTRUZIONI D'USO | 62 |
| N | BRUKSANVISNING | 72 |
| NL | GEBRUIKSAANWIJZING | 82 |
| P | MANUAL DE INSTRUÇÕES | 92 |
| PL | INSTRUKCJA OBSŁUGI | 102 |
| S | BRUKSANVISNING | 112 |
| SLO | NAVODILA ZA UPORABO | 122 |

Abb. 1.
HAUPTKOM- PONENTEN
natural_image
Pure technical line drawing of a mechanical component or assembly without any text, numbers, or symbolsAbb. 6
Wandmontage
natural_image
Pure electrical circuit lines without any symbols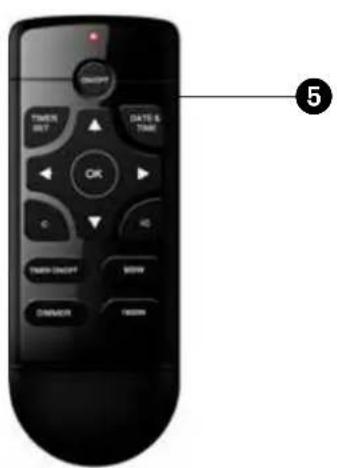
Fig. 1.
HOVEDKOM- PONENTER
natural_image
Simple diagram showing a rectangular frame with a small arrow pointing downward from its bottom, no text or symbols present.Fig. 5

natural_image
Pure technical line drawing of a mechanical component without any text, numbers, or symbolsFig. 6
Vægmontering
natural_image
Pure electrical circuit lines without any symbols
Fig. 1.
COMPONENTES-PRINCIPALES
natural_image
Technical line drawing of a mechanical part with a downward arrow and label 'Fig. 6' (no readable text or symbols)E
The appliance is supplied with a 24-month guarantee, commencing on the date of purchase.
natural_image
Pure electrical circuit lines without any symbols
Fig.1.
PRINCIPAUX COMPOSANTS
natural_image
Pure technical line drawing of a mechanical component or assembly without any text, numbers, or symbolsFig. 6
Installation murale
DÉCLARATION DE CONFORMITÉ CE
CONDITIONS DE GARANTIE
natural_image
Pure electrical circuit lines without any symbolsHyvä asiakas

Kuva 1
PÄÄKOMPO- NENTIT
natural_image
Simple diagram showing a rectangular object with a downward arrow pointing to it, above a horizontal line (no text or symbols)
natural_image
Pure technical line drawing of a mechanical component or assembly without any text, numbers, or symbolsKuva. 6
Congratulations with you purchase of the electrical heater. You have purchased a quality product which you will enjoy for years to come, provided tha you use it responsibly. Read this user manual first to ensure the optimal performance life of your heater.
We give you on behalf of the manufacturer a two year warranty for any defects in material and workmanship.
We wish you all the comfort with your heater.
With kind regards,
PVG Holding B.V.
Customer service department
1 PLEASE READ THE USER'S MANUAL FIRST.
2 IF YOU HAVE ANY DOUBTS, CONSULT YOUR DEALER.

Fig. 1.
MAIN COMPONENTS
① Faceplate
② Cold air inlet
③ Control panel
④ Hot air exit
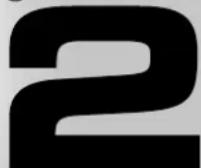
⑤ Remote control
SAFETY REGULATIONS
Read this user manual carefully before using the appliance and keep it for future reference. Install this device only when it complies with local/national legislation, ordinances and standards. This product is intended to be used as a mobile heater in residential houses and is only suitable for use in normal household conditions, indoors in living room, kitchen, and garage. This unit is only suitable for earthed sockets, connection voltage 220-240 V. / \~50 Hz.

GENERAL
After unpacking, check the appliance for any damages. When in doubt, do not use the appliance, but contact customer service at your local dealer's. Keep the packaging materials (plastic bags, etc.) away from children, as they may cause hazardous situations to children.
DANGER
- Do not immerse the appliance in water and do not let water run into it.
- Never open the appliance to prevent electric shock.
WARNING
- The installation must be completely in accordance with local regulations, ordinances and standards.
- Check if the voltage indicated on the type plate corresponds to the local mains voltage before you connect the appliance.
- The appliance is suitable for mains voltages
ranging from 220V to 240V.
- If the mains cord is damaged, you must have it replaced by a service centre authorised by Qlima or similarly qualified persons in order to avoid a hazard.
• Always return the appliance to a service centre authorised by Qlima for examination or repair. - Repair by unqualified people could cause an extremely hazardous situation for the user.
- Do not attempt to repair the appliance yourself, otherwise your guarantee becomes invalid.
- Keep the mains cord away from hot surfaces.
- This appliance is not intended for use by persons (including children) with reduced physical, sensory or mental capabilities, or lack of experience and knowledge, unless they have been given supervision or instruction concerning use of the appliance by a person responsible for their safety.
- Children should be supervised to ensure that they do not play with the appliance.
- The plug must be accessible at all times.
- Do not insert objects into the openings of the device.
- Do not use this heater in the immediate surroundings of a bath, a shower or a swimming pool.
- The device must not be located immediately below a socket outlet.
- In order to avoid overheating, do not cover the device.
CAUTION
- Switch off the appliance and disconnect it from the mains immediately if it produces a strange smell or an abnormal noise. Take the appliance to an authorised Qlima service centre.
- Switch off the appliance and unplug it according to the user instructions before you move or clean it.
- Make sure the appliance and the mains cord are always out of reach of babies (at least one metre away).
- Do not use the appliance if not IPX4 protection class (see type plate) in damp places or close to water. Only IPX4 class appliances are suitable for these circumstances.
- Do not use the appliance in places where the humidity level exceeds 95%.
- Do not expose the appliance to extreme heat or cold or to direct sunlight.
- Do not use the appliance outdoors.
- Do not use any extension cords or multi-socket adapters.
- Always take the plug out of the socket when the device is not in use.
- Children of less than 3 years should be kept away unless continuously supervised.
- Children aged from 3 years and less than 8 years shall only switch on/off the appliance provided that it has been placed or installed in its intended normal operating position and they have been given supervision or instruction concerning use of the appliance in a safe way and understand the hazards involved.
- Children aged from 3 years and less than 8 years shall not plug in, regulate and clean the appliance or perform user maintenance.
- CAUTION: Some parts of this product can become very hot and cause burns. Particular attention has to be given where children and vulnerable people are present.
- CAUTION: In order to avoid a hazard due to inadvertent resetting of the thermal cutout,
this appliance must not be supplied through an external switching device, such as a timer, or connected to a circuit that is regularly switched on and off by the utility.
- This appliance can be used by children aged from 8 years and above and persons with reduced physical, sensory or mental capabilities or lack of experience and knowledge if they have been given supervision or instruction concerning use of the appliance in a safe way and understand the hazards involved.
- Cleaning and user maintenance shall not be made by children without supervision.
INSTALLING THE HEATER
- Carefully remove the heater from the box.
- Remove all packing material. Keep all packing material out of the reach of children.
- Place the heater on a solid flat surface.
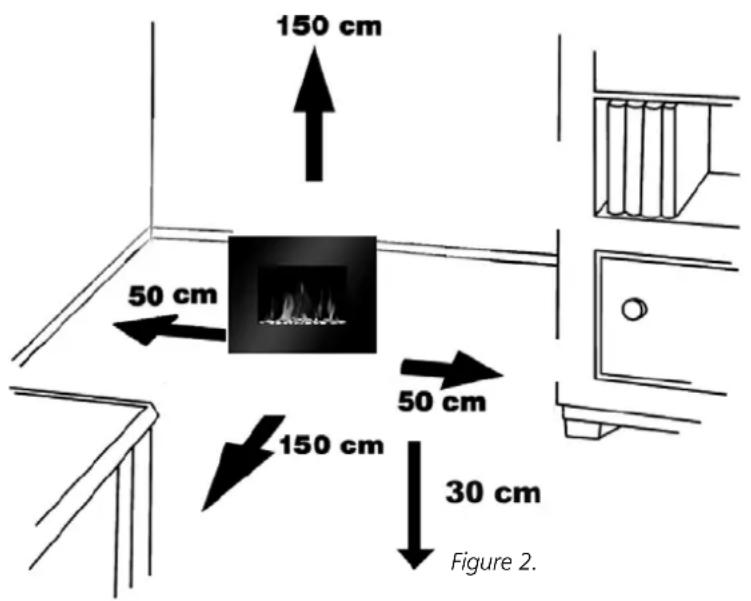
- Make sure there is enough free space around the heater. See figure 2.
- This appliance is only intended for well isolated places or occasional use.
Wall Installation
- Do not connect the appliance to electricity until properly fixed to the wall and the instructions are read fully.
- The minimum distances must be observed (see fig 2).
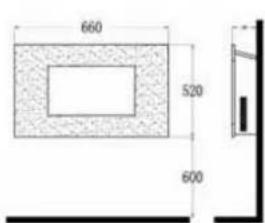
Fig. 3
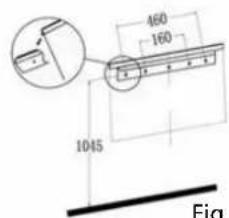
Fig. 4

natural_image
Simple diagram showing a rectangular object with a downward arrow pointing to it, no text or symbols present.Fig. 5
natural_image
Pure technical line drawing of a mechanical component without any text, numbers, or symbolsFig. 6
- Installing the heater to a wall can be viewed on a video. Please check:
- For installation of the appliance, care must be taken not to damage concealed cables in the wall. Be careful while drilling the holes.
- The heater is heavy and voluminous: when lifting and mounting the appliance and/or the glass surround always do this with at least 2 persons
- This appliance is designed to be permanently fixed to a wall at a minimum height of 300mm. The wall bracket must be fitted horizontally and the electrical cable routed to the bottom right of the heater.
- A height of 600mm from bottom of heater to floor is recommended for optimum viewing of fuel bed (see Fig.3 for recommend fixing dimensions).
- Keep top of heater at least 1500mm away from ceiling or other objects for optimum heat ventilation.
- For optimum viewing, mark the top four screws fixing positions on wall in accordance with the recommend fixing dimensions- see Fig.4..
- Mount the long wall bracket using the plugs and screws provided.
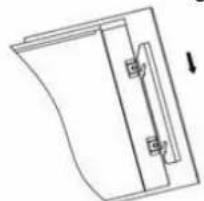
- Carefully lift the heater up ensuring that the top rear ledge of heater engages the long wall bracket (see Fig.4 in circle) and is sitting centrally.
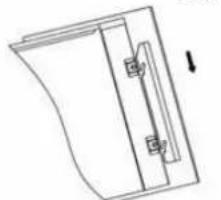
• Gently bring the heater level with the wall. - Mark the 2x bottom holes position for the lower small/short support bracket (see Fig.5, marked with arrow pointer), remove the heater.
- Mount the small/short wall bracket using the plugs and screws provided.
- Refit the heater to the long wall fixing bracket.
- Mount the bottom small/short wall bracket to the wall and use the screws provided to permanently fix the heater in place.
- Unpack the pebbles from the bag and place them along the light unit in the desired position.
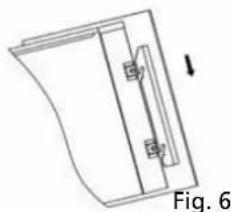
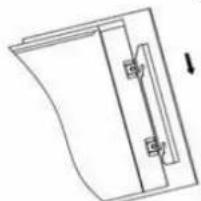
- Place the front glass surround over the front of the fire aligning the slots in the brackets at each side of the glass panel with the lugs on the sides of the fire-see Fig.6.
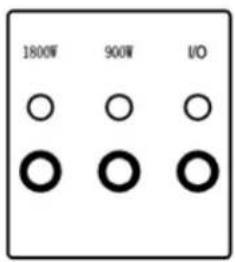
DESCRIPTION OF THE CONTROL BUTTONS
The appliance can be controlled with the remote control and the buttons on the appliance.
In stand-by modus the on/off symbol the timer symbol will be on.

will be on. When the timer function is enabled
The timer function can be activated with the timer button.
On the appliance the date/time, temperature and brightness can be set. The heating function only works if the set temperature
is higher then the room temperature.
Manual control
- Press the on/off button to turn the appliance on. Press and hold this button 5 seconds to change the brightness. If you want to use the heating function with the light effect, push the required button (900W / 1800W). With these buttons the function can also be turned off.

Remote control
Activate het stand-by mode. Press the on/off button on the remote control to activate the light effect. The brightness can be changed with the 'Dimmer' button.
The two heating modes can be activated with the button '900W' and '1800W'.
The desired temperature can be set (15-30°C) with the + and - buttons. The standard setting is 20°C.
The timer function can be (on/off) set with the button 'Timer set'.
The date and time can be set with the date/time button. The date can be set with the arrow buttons. The hours and minutes can be set with the + and - buttons. Press the 'ok' button after changing the date or time to confirm the settings.
There are ten settings possible for the timer function. Each setting has a date, 'on' time and 'off' time. The maximum time is 23hour and 50 minutes.
Press the Timer set button. Select the 'on' time with the + and - buttons. The 'off' time can be selected with the 'arrow up' button. A set value can be deleted with the 'C' (Cancel) button.
By pressing die IC (Intelligent Control) button the heating mode for the planned time (timer function) can be activated, depending on the difference between the actual and desired temperature. The heating mode can also be changed automatically when the circumstances give rise to such action. This is to reach the desired temperature in a timely manner.
MAINTENANCE AND STORAGE

Wait for the product to cool down completely before service of storage.
Make sure the product is in the "O" OFF position and the het power cord is disconnected before starting the cleaning activities.
- Make sure the housing of the appliance is fully intact and mounted before each use.
- Do not touch hot surfaces. Always use the handle of the appliance. Use protective gloves to avoid serious burns or other injuries.
- Clean the exterior of the appliance with a soft, moist cloth.

WARNING:
Do not let water or other fluids enter the product, this can cause fire and / of an electrical hazard.
- Do not us abrasives or solvents, these can damage the appliance.
- Store the product in a clean dry place when it is not being used.
TECHNICAL SPECIFICATIONS
Model EFE 2018
| Heating capacity (max.) W 1800 | |
| Number of heating levels 2 (900W / 1800W) | |
| Ampere A 8.1 | |
| Voltage V / Hz / Ph 220-240/50/1 | |
| Weight kg 13.5 | |
| Dimensions(W x D x H) | mm 660 x 95 x 520 |
| Suited for spaces to m^3 70 | |
| Batteries remote control 2x AAA |
EC DECLARATION OF CONFORMITY
The appliance is designed, constructed and distributed conform the safety regulations of the EC directives. The appliance is intended for normal household use and the described purposes only.
WARRANTY CONDITIONS
The appliance is supplied with a 24-month guarantee, commencing on the date of purchase.
All material and manufacturing defects will be repaired or replaced free of charge within this period. The following rules apply:
- We expressly refuse all further damage claims, including claims for collateral damage.
- Repairs to or replacement of components within the guarantee period will not result in an extension of the guarantee.
- The guarantee is invalidated if any modifications have been made, non-genuine parts are fitted or repairs are carried out by third parties.
- Components subject to normal wear, such as lamps and heating elements are not covered by the guarantee.
- The guarantee is valid only when you present the original, dated purchase invoice and if no modifications have been made.
- The guarantee is invalid for damage caused by neglect or by actions that deviate from those in this instruction booklet.
- Transportation costs and the risks involved during the transportation of the appliance or components of the appliance shall always be for the account of the customer.
- Damage caused by not using suitable spare parts is not covered by the guarantee.
To prevent unnecessary expense, we recommend that you always first carefully consult the instructions for use. Take the appliance to your dealer if these instructions do not provide a solution.
Electrical appliances should not be removed with household waste. Bring them to recycling point if such are present. Ask your local government or dealer for advice regarding recycling.
Egregio signore, gentile signora,

Fig. 1.
COMPONENTI PRINCIPALI
natural_image
Pure technical line drawing of a mechanical component without any text, numbers, or symbolsFig. 6
natural_image
Pure electrical circuit lines without any symbolsTil kunden,

Fig. 1.
HOVEDKOM- PONENTER
① Frontplate
② Inntak for kaldluft
③ Kontrollpanel
④ Utgang for varmluft
⑤ Fjernkontroll
SIKKERHETSADVARSLER
natural_image
Simple diagram showing a monitor with an arrow pointing to it, labeled 'Fig. 5' (no text or symbols on the diagram itself)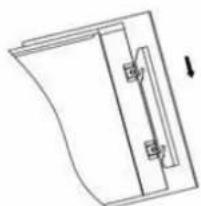
natural_image
Pure line drawing of a folded paper or sheet with no text, numbers, or symbolsFig. 6
VEDLIKEHOLD OG LAGRING


Afb. 1.
KERN- COMPO- NENTEN
natural_image
Simple diagram of a rectangular frame with a dotted border and an arrow pointing to the bottom line (no text or symbols)Fig. 5
natural_image
Diagram of a mechanical component with labeled parts and an arrow indicating direction (no text or symbols present)
Fig. 1.
COMPONENTES PRINCIPAIS
natural_image
Simple diagram showing a rectangular frame with a downward arrow pointing to its bottom (no text or symbols)Fig. 5
natural_image
Pure technical line drawing of a mechanical component without any text, numbers, or symbolsFig. 6
natural_image
Pure electrical circuit lines without any symbols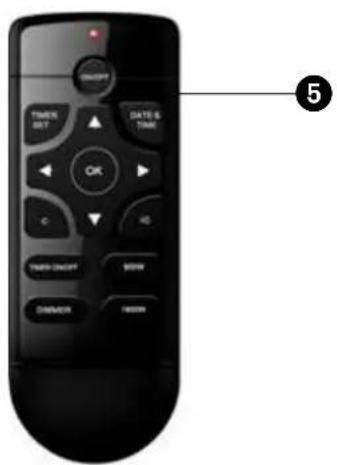
Rys. 1.
GŁÓWNE PODZESPO- ŁY
natural_image
Pure technical line drawing of a mechanical component or assembly (no text or symbols)Rys. 6
DEKLARACJA ZGODNOŚCI WE
natural_image
Pure electrical circuit lines without any symbolsBästa Herr/ Fru

Figur. 1.
HUVUD- KOMPONENTER
natural_image
Pure technical line drawing of a mechanical component without any text, numbers, or symbolsFigur 6
Vägginstallation
natural_image
Pure electrical circuit lines without any symbolsSpoštovana gospa, spoštovani gospod,

Sl. 1.
GLAVNI SESTAVNI DELI
natural_image
Simple line drawing of a rectangular object with an arrow pointing to it, no text or symbols present.sl. 5
natural_image
Simple line drawing of a door with handle and door lock (no text or symbols)sl. 6
natural_image
Simple line drawing of a trash bin with no text or symbols| Modelkennung(en) / Identificador(es) del modelo / Référence(s) du modèle / Model identifier(s) / Identificativo del modelo / Identificador(es) de modelo / Identifikacija oznaka modela-ov | EFE 2018 | ||||
| Angabe / Partida / Caractéristique / Item / Dato / Elemento / Postavka | Symbol / Símbolo / Symbole / Symbol / Simbolo / Simbolo / Simbol | Wert / Valor / Valeur / Value / Valore / Valor / Vrednost | Einheit / Unidad / Unità / Unidade / Enota | Angabe / Partida / Caractéristique / Item / Dato / Elemento / Postavka Einheit / Unidad | / Unité / Unit / Unità / Unidade / Enota |
| Wärmeleistung / Potencia calorífica / Puissance thermique / Heat input / Potenza termica / Potência calorífica / Izhodna toplotna moč | Nur bei elektrischen Speicher-Einzeiraumheizgeräten: Art der Regelung der Wärmezufuhr (bitte eine Möglichkeit auswählen) / Tipo de aportación de calor, unicamente para los aparatos de calefacción local eléctricos de acumulación (seleccione uno) / Type d'apport de chaleur, pour les dispositifs de chauffage décentralisés électriques à accumulation uniquement (sélectionner un seul type) / Type of heat input, for electric storage local space heaters only (select one) / Tipo di potenza termica, solo per gli apparecchi per il riscaldamento d'ambiente locale eletrici ad accurulo (indicare una sola opzione) / Tipo de potência calorífica, apenas para os aquecedores de ambiente local eléctricos de acumulação (selecionar uma opção) / Našn dovajanja toplotne moč, samo za lokalne elektricăe acumulacijke grelnike (überite eno možnost) | ||||
| Nennwärmeleistung / Potencia calorífica nominal / Puissance thermique nominale / Nominal heat output / Potenza termica nominale / Potência calorífica nominal / Nazivna izhodna toplotna moA | Pnom | 1.8 kW | manuelle Regelung der Wärmezufuhr mit integriertem Thermostat / control manual de la carga de calor, con termostato integrado / contrôle thermique manuel de la charge avec thermostat intégré / manual heat charge control, with integrated thermostat / controllo manuale del carico termico, con termostato integrato / Comando manual da carga térmica, com termóstato integrado / RoAno uravnavanje dovajanja toplote z vgrajenim termostatom | [inel] / [no] / [non] / [no] / [no] / [não] / [ne] | |
| Mindestwärmeleistung (Richtwert) / Potencia calorífica mínima (indicativa) / Puissance thermique minimale (indicative) / Minimum heat output (indicative) / Potenza termica mínima (indicativa) / Potência calorífica mínima (indicativa) / Mini-maina izhodna toplotna moA (okvimo) | Pmin | 0.9 kW | manuelle Regelung der Wärmezufuhr mit Rückmeldung der Raum- und/oder Außentemperatur / control manual de la carga de calor con respuesta a la temperatura interior o exterior / contrôle thermique manuel de la charge avec réception d'informations sur la température de la pièce ev/ou extérieure / manual heat charge control with room and/or outdoor temperature feedback / controllo manuale del carico termico con riscontro della temperatura ambiente e/o esterna / Comando manual da carga térmica, com retroação da temperatura interior e/o exterior / RoAno uravnavanje dovajanja toplote s povratno informació o temperaturi v prostoru in/ai na prostem | [inel] / [no] / [non] / [no] / [no] / [não] / [ne] | |
| Maximale kontinuierliche Wärmeleistung / Potencia calorífica máxima continuada / Puissance thermique maximale continue / Maximum continuous heat output / Massima potenza termica continua / Potência calorífica contínua máxima / NayeAjá trajna izhodna toplotna moA | Pmax, c 1.8 kW | elektronische Regelung der Wärmezufuhr mit Rückmeldung der Raum- und/oder Außentemperatur / control electrónico de la carga de calor con respuesta a la temperatura interior o exterior / contrôle thermique électronique de la charge avec réception d'informations sur la température de la pièce ev/ou extérieure / electronic heat charge control with room and/or outdoor temperature feedback / controllo eletrónico del carico termico con riscontro della temperatura ambiente e/o esterna / Comando eletrónico da carga térmica, com retroação da temperatura interior e/o exterior / Elektronsko uravnavanje dovajanja toplote s povratno informació o temperaturi v prostoru in/ai na prostem | [inel] / [no] / [non] / [no] / [no] / [não] / [ne] | ||
| Hilfsstromverbrauch / Consumo auxiliar de electricidad / Consommation d'électricité auxiliaire / Auxiliary electricity consumption / Consumo auxiliario di energia eletrica / Consumo de eletricidade auxiliar / Dodatna potreba po elektricni moč | Wärmeabgabe mit Geblaseumbt | Erstützung / potencia calorífica assistida por ventiladores / puissance thermique régulable par ventilateur / fan assisted heat output / potenza termica assistita da ventilatore / Potência calorífica com ventilador / Uravnavanje izhodne toplotne moá s pomoÃjo ventilatorja | [inel] / [no] / [non] / [no] / [não] / [ne] | ||
| Bei Nennwärmeleistung / A potencia calorífica nominal / À la puissance thermique nominale / At nominal heat output / Alla potenza termica nominale / À potência calorí fica nominal / Pri nazivni izhodni toplotni moAI | elmax | 0.014 | kW | Art der Wärmeleistung/Raumtemperaturkontrolle (bitte eine Möglichkeit auswählen) / Tipo de control de potencia calorífica/de temperatura in terior (seleccione uno) / Type de contrôle de la puissance thermique/de la température de la pièce (sélectionner un seul type) / Type of heat output/room temperature control (select one) / Tipo di potenza termica/ controllo della temperatura ambiente (indicare una sola opzione) / Tipo de potência calorífica/comando da temperatura interior (selecionar uma opção) / Našn uravnavanja izhodne toplotne moá s pomoÃjo ventilatorja | [inel] / [no] / [non] / [no] / [no] / [não] / [ne] |
| Bei Mindestwärmeleistung / A potencia calorífica mínima / À la puissance thermique minimale / At nominal heat output / Alla potenza termica mínima / À potência calorí fica mínima / Pri nazivni izhodni toplotni moAI | elmin | 0.014 kW | einstufige Wärmeleistung, keine Raumtemperaturkontrolle / potencia calorífica de un solo nivel, sin control de temperatura interior / contrôle de la puissance thermique a un palier, pas de contrôle de la température de la pièce / single stage heat output and no room temperature control / potenza termica a fase única senza controllo della temperatura ambiente / Potência calorífica numa fase única, sem comando da temperatura interior / Z enostopenjskim uravnavanjem izhodne toplotne moá, brez uravnavanja temperature v prostoru | [inel] / [no] / [non] / [no] / [no] / [não] / [ne] | |
| Im Bereitschaftszustand / En modo de espera / En mode veille / In standby mode / In modo stand-by / Em estado de vigi lla / V stanju pripravljenosti | else | 0.48 | W | zwei oder mehr manuell einstellbare Stufen, keine Raumtemperaturkontrolle / Dos o más niveles manuales, sin control de temperatura interior / contrôle à deux ou plusieurs paliers manuels, pas de contrôle de la température de la pièce / Two or more manual stages, no room temperature control / due o più fasi manuali senza controllo della temperatura ambiente / Em duas ou mais fases manuais, sem comando da temperatura interior / Z dvema al veA roAnimi stopnjami, brez uravnavanja temperature v prostoru | [inel] / [no] / [non] / [no] / [no] / [não] / [ne] |
| Raumtemperaturkontrolle mit mechanischem Thermostat / con control de temperatura interior mediante termostato mecânico / contrôle de la température de la pièce avec thermostat mécanique / with mechanic thermostat room temperature control / con controllo della temperatura ambiente tramite termostato meccanico / Com comando da temperatura interior por termóstato mecânico / Z uravnavanjem temperature v prostoru z mehanskim termostatom | [inel] / [no] / [non] / [no] / [não] / [ne] | ||||
| Sasonale Energie-Effizienz der Raumheizung / Eficiencia energética de la calefacción estacional / Efficacité énergétique saisonnière du chauffage des locaux / Seasonal space heating energy efficiency / Efficienza energetica stagionale per il riscaldamento degli spazi / Eficiência energética do aquecimento do espaço sazonal / Sezonskia energetska učinkovitost ogrevanja prostorov | 36% | mit elektronischer Raumtemperaturkontrolle / con control electrónico de temperatura interior / contrôle électronique de la température de la pièce / with electronic room temperature control / con controllo eletrónico della temperatura ambiente / Com comando eletrónico da temperatura interior / Com comando eletrónico da temperatura interior e temporizador diário / Z elektronskim uravnavanjem temperature v prostoru | [inel] / [no] / [non] / [no] / [não] / [ne] | ||
| elektronische Raumtemperaturkontrolle und Tageszeitregelung / control electrónico de temperatura interior y temporizador diário / contrôle électronique de la température de la pièce et programmateur journalier / electronic room temperature control plus day timer / con controllo eletrónico della temperatura ambiente e temporizzatore giornaliero / Com comando eletrónico da temperatura interior e temporizador diário / Z elektronskim uravnavanjem temperature v prostoru z dnevnim Āasovnikom | [inel] / [no] / [non] / [no] / [não] / [ne] | ||||
| elektronische Raumtemperaturkontrolle und Wochentagsregelung / control electrónico de temperatura interior y temporizador semanal / contrôle électronique de la température de la pièce et programmateur hebdomadaire / electronic room temperature control plus week timer / con controllo eletrónico della temperatura ambiente e temporizzatore settimanale / Com comando eletrónico da temperatura interior e temporizador semanal / Z elektronskim uravnavanjem temperature v prostoru s tedenskim Āasovnikom | [ja] / [si] / [oui] / [yes] / [si] / [sim] / [da] | ||||
| Sonstige Regelungsoptionen (Mehrfachnennungen möglich) / Otras opciones de control (pueden seleccionarse varias) / Autres options de contrôle (sélectionner une ou plusieurs options) / Other control options (multiple selections possible) / Altre opzioni di controllo (è possibile selezionare più opzioni) / Outras opções de comando (seleção múltipla possível) / Druge možnosti uravnavanja (überete lahko več možnosti) | |||||
| Raumtemperaturkontrolle mit Präsenzerkennung / control de temperatura interior con detección de presencia / contrôle de la température de la pièce, avec dé tecteur de présence / room temperature control, with presence detection / controllo della temperatura ambiente con rilevamento di presenza / Comando da temperatura interior, com deteção de presença / Z uravnavanjem temperature v prostoru z zaznavanjem prisotnosti | [nein] / [no] / [non] / [no] / [no] / [não] / [ne] | ||||
| Raumtemperaturkontrolle mit Erkennung offener Fenster / control de temperatura interior con detección de presencia / contrôle de la température de la pièce, avec dé tecteur de fenêtre ouverte / room temperature control, with open window detection / controllo della temperatura ambiente con rilevamento di finestre aperte / Comando da temperatura interior, com deteção de janelas abertas / Z uravnavanjem temperature v prostoru z zaznavanjem odprtega okna | [nein] / [no] / [non] / [no] / [no] / [não] / [ne] | ||||
| mit Fembedienungsoption / control de temperatura interior con detección de presencia / option contrôle à distance / with distance control option / con opzione di controllo a distanza / Corn opção de comando à distância / Z možnosijo uravnavanja na daljavo | [nein] / [no] / [non] / [no] / [no] / [não] / [ne] | ||||
| mit adaptiver Regelung des Heizbeginns / control de temperatura interior con detección de presencia / contrôle adaptatif de l'activation / with adaptive start control / con controllo di avviamento adattabile / Com comando de arranque adaptativo / S prilagodljivim uravnavanjem zaAetka delovanja | [ja] / [si] / [oui] / [yes] / [si] / [sim] / [da] | ||||
| mit Betriebszeitbegrenzung / control de temperatura interior con detección de presencia / limitation de la durée d'activation / with working time limitation / con limitazione del tempo di funzionamento / Com limitação do tempo de funcionamento / Z omejitvijo Āasa delovanja | [nein] / [no] / [non] / [no] / [no] / [não] / [ne] | ||||
| mit Schwarzkugelsensor / con sensor de lâmpara negra / capteur à globe noir / with black bulb sensor / con termometro a globo nero / Com sensor de corpo negro / Z globus senzorjem | [nein] / [no] / [non] / [no] / [no] / [não] / [ne] | ||||
| Kontaktangaben / Detalles de contacto / Coordonnées de contact / Contact details / Contatti / Elementos de contacto / Kontaktni podatki | PVG Holding BV, P.O. Box 96, 5340 AB OSS, Kanaalstraat 12c, 5347 KM OSS, THE NETHERLANDS | ||||

Distributed in Europe by PVG Holding B.V.
Benötigen Sie weitere Informationen oder treten Probleme auf, besuchen Sie bitte unsere Website www.qlima.com, oder setzen Sie sich mit unserem Kundendienst in Verbindung (Telefonnummer auf www.qlima.com).
For alle yderligere oplysninger eller ved eventuelle problemer med apparatet henvises til www.qlima.com eller det lokale Kundecenter (telefonnumre findes i www.qlima.com).
Si necesita información o si tiene algún problema, visite nuestra página Web www.qlima.com, o póngase en contacto con el servicio cliente (hallará el número de teléfono en www.qlima.com).
Si vous souhaitez obtenir des informations supplémentaires ou si vous rencontrez un problème, rendez-vous sur notre site Web (www.qlima.com) ou contactez notre service client (vous trouverez l'adresse et numéro de téléphone sur www.qlima.com).
FHN Jos haluat huoltoapua, lisätietoja tai laitteen kanssa tulee ongelmia, tutustu verkkosivustoon osoitteessa www.qlima.com tai kysy neuvoa PVG kuluttajapalvelukeskuksesta (www.qlima.com).
⑥ If you need information or if you have a problem, please visit the our website (www.qlima.com) or contact our sales support (you find its phone number on www.qlima.com)
Per informazioni e in caso di problemi, visitate il sito Web www.qlima.com oppure contattate il Centro Assistenza Clienti (per conoscere il numero di telefono, consultate www.qlima.com).
Hvis du trenger informasjon, eller hvis du har et problem med produktet, kan du gå til nettsidene www.qlima.com. Alternativt kan du kontakte med PVG' forbrukertjeneste (telefonnummeret i www.qlima.com).
Als u informatie nodig hebt of als u een probleem hebt, bezoek dan de onze website (www.qlima.com) of neem contact op met de afdeling sales support (adres en telefoon op www.qlima.com).
Se necessitar de informações ou se tiver problemas, visite o Web site www.qlima.com ou contacte o Centro de Assistência (número de telefone o www.qlima.com)
W przypadku problemów i w celu uzyskania szczegółowych informacji odwiedź stronę internetową Qlima dostępną pod adresem www.qlima.com lub skontaktuj się z Centrum kontaktów Qlima (www.qlima.com)
Om du behöver service eller information eller har problem med apparaten kan du besöka www.qlima.com eller kontakta Qlima kundtjänst (du hittar telefonnumret på www.qlima.com).
Če želite dodatne informacije, obiščite spletno mesto podjetja na naslovu www.qlima.com ali pokličite na telefonsko (www.qlima.com).
Daha fazla bilgiye ihtiyaç duyarsanız veya bir sorunla karşılaşırsanız, www.qlima.com adresindeki Qlima Internet sitesini ziyaret edin veya ülkenizde bulunan Qlima müşteri merkeziyle iletişim kurun (telefon numarasını: www.qlima.com).
☐ Dieses Produkt ist nur für gut isolierte Räume oder für den gelegentlichen Gebrauch geeignet.
DK Dette produkt er kun beregnet til brug i velisolerede områder eller lejlighedsvist brug.
⑧ Este producto está indicado únicamente para lugares bien aislados o para una utilización ocasional.
© Ce produit ne peut être utilisé que dans des locaux bien isolés ou de manière occasionnelle.
FIN Tämä tuote sopii hyvin eristettyihin tiloihin tai satunnaiseen käyttöön.
GB This product is only suitable for well-insulated spaces or for occasional use.
① Il presente prodotto è adatto solo a ambienti correttamente isolati o ad un uso occasionale.
N Dette apparatet er kun beregnet for godt isolerte steder eller til sporadisk bruk.
NL Dit product is uitsluitend geschikt voor goed geïsoleerde ruimtes of voor incidenteel gebruik.
© Este produto destina-se apenas a espaços bem isolados ou a uma utilização ocasional.
PL Produkt nadaje się wyłącznie do montażu w izolowanych miejscach lub użytku okazjonalnego.
⑤ Denna produkt är endast lämplig för välisolerade utrymmen eller tillfällig användning.
⑤u0 Ta izdelek je primeren samo za dobro izolirane prostore ali občasno uporabo.

- HAUPTKOM- PONENTEN
- Wandmontage
- HOVEDKOM- PONENTER
- Vægmontering
- COMPONENTES-PRINCIPALES
- PRINCIPAUX COMPOSANTS
- Installation murale
- DÉCLARATION DE CONFORMITÉ CE
- CONDITIONS DE GARANTIE
- PÄÄKOMPO- NENTIT
- MAIN COMPONENTS
- SAFETY REGULATIONS
- GENERAL
- DANGER
- WARNING
- CAUTION
- INSTALLING THE HEATER
- Wall Installation
- DESCRIPTION OF THE CONTROL BUTTONS
- Manual control
- Remote control
- MAINTENANCE AND STORAGE
- WARNING:
- TECHNICAL SPECIFICATIONS
- EC DECLARATION OF CONFORMITY
- WARRANTY CONDITIONS
- COMPONENTI PRINCIPALI
- SIKKERHETSADVARSLER
- VEDLIKEHOLD OG LAGRING
- KERN- COMPO- NENTEN
- COMPONENTES PRINCIPAIS
- GŁÓWNE PODZESPO- ŁY
- DEKLARACJA ZGODNOŚCI WE
- HUVUD- KOMPONENTER
- Vägginstallation
- GLAVNI SESTAVNI DELI
- Distributed in Europe by PVG Holding B.V.
Brand : QLIMA
Model : EFE2018
Category : Fireplace