
WHSS 62F LT K - Basket WHIRLPOOL - Free user manual and instructions
Find the device manual for free WHSS 62F LT K WHIRLPOOL in PDF.
| Product type | Extractor hood / recirculation hood |
| Brand | Whirlpool |
| Model | WHSS 62F LT K |
| Width (cm) | 89.8 |
| Depth (cm) | 32 |
| Height (cm) | 110 - 129.5 |
| Exhaust duct diameter (cm) | 15 |
| Number of speeds | 5 (including 2 timed 5 min) |
| Special functions | 6th sense (auto mode), night lighting, variable intensity |
| Lighting | LED (main and night) |
| Grease filter type | Washable metal (monthly) |
| Activated carbon filter | Optional, replacement max every 4 months |
| Power supply | See rating plate (standard) |
| Installation | Extractor (duct) or recirculation (accessory kit required) |
| Minimum distance from cooktop | 50 cm (electric) / 65 cm (gas or mixed) |
| Controls | Touch (7 buttons) |
| Maintenance | Clean exterior with a damp cloth and mild detergent |
| Material | Not specified (likely stainless steel) |
| Energy class | Not specified |
Frequently Asked Questions - WHSS 62F LT K WHIRLPOOL
User questions about WHSS 62F LT K WHIRLPOOL
0 question about this device. Answer the ones you know or ask your own.
Ask a new question about this device
Download the instructions for your Basket in PDF format for free! Find your manual WHSS 62F LT K - WHIRLPOOL and take your electronic device back in hand. On this page are published all the documents necessary for the use of your device. WHSS 62F LT K by WHIRLPOOL.
USER MANUAL WHSS 62F LT K WHIRLPOOL
EN Instructions for use
BG Pьковорстvo 3a уnotpe6a
CS Návod k použití
-
Before any cleaning or maintenance operation, disconnect hood from the mains by removing the plug or disconnecting the mains electrical supply.
-
Always wear work gloves for all installation and maintenance operations.
-
This appliance can be used by children aged from 8 years and above and persons with reduced physical, sensory or mental capabilities or lack of experience and knowledge if they have been given supervision or instruction concerning use of the appliance in a safe way and understand the hazards involved.
Children shall not be allowed to tamper with the controls or play with the appliance.
-
Cleaning and user maintenance shall not be made by children without supervision.
-
The premises where the appliance is installed must be sufficiently ventilated, when the kitchen hood is used together with other gas combustion devices or other fuels.
-
The hood must be regularly cleaned on both the inside and outside (AT LEAST ONCE A MONTH).
-
This must be completed in accordance with the maintenance instructions provided. Failure to follow the instructions provided regarding the cleaning of the hood and filters will lead to the risk of fires.
-
Do not flambe under the range hood.
-
Do not remove filters during cooking.
-
For lamp replacement use only lamp type indicated in the Maintenance/Replacing lamps section of this manual.
The use of exposed flames is detrimental to the filters and may cause a fire risk, and must therefore be avoided in all circumstances.
Any frying must be done with care in order to make sure that the oil does not overheat and ignite.
CAUTION: Accessible parts of the hood may become hot when used with cooking appliances.
- Do not connect the appliance to the mains until the installation is fully complete.
- With regards to the technical and safety measures to be adopted for fume discharging it is important to closely follow the regulations provided by the local authorities.
The air must not be discharged into a flue that is used for exhausting fumes from appliance burning gas or other fuels. - Do not use or leave the hood without the lamp correctly mounted due to the possible risk of electric shocks.
- Never use the hood without effectively mounted grids.
- The hood must NEVER be used as a support surface unless specifically indicated.
- Use only the fixing screws supplied with the product for installation or, if not supplied, purchase the correct screws type.
- Use the correct length for the screws which are identified in the Installation Guide.
- In case of doubt, consult an authorized service assistance center or similar qualified person.
WARNING!
- Failure to install the screws or fixing device in accordance with these instructions may result in electrical hazards.
- Do not use with a programmer, timer, separate remote control system or any other device that switches on automatically.
Very young children (0-3 years) should be kept away from the appliance. Young children (3-8 years) should be kept away from the appliance unless continuously supervised.
CAUTION: The appliance is not intended to be operated by means of an external switching device, such as a timer, or separate remote controlled system.
This appliance is not for professional use. Do not use the appliance outdoors.
The appliance must be handled and installed by two or more persons-risk of injury.
Installation, including water supply (if any), electrical connections and repairs must be carried out by a qualified technician.
Once installed, packaging waste (plastic, styrofoam parts etc.) must be stored out of reach of children - risk of suffocation.
Do not use the appliance when you are wet or barefoot.
Never use steam cleaning equipment - risk of electric shock.
The packaging material is 100% recyclable and is marked with the recycle symbol
The hood can look different to that illustrated in the drawings in this booklet. The instructions for use, maintenance and installation, however, remain the same.
Closely follow the instructions set out in this manual. All responsibility, for any eventual inconveniences, damages or fires caused by not complying with the instructions in this manual, is declined. This appliance is intended to be used in household and similar application such as: - staff kitchen areas in shop, offices and other working environments; - farm houses; - by clients in hotels, motels and other residential type environments; - bed and breakfast type environments.
It is important to conserve this booklet for consultation at any moment. In the case of sale, cession or move, make sure it is together with the product.
- Read the instructions carefully: there is important information about installation, use and safety.
- Do not carry out electrical or mechanical variations on the product or on the discharge conduits.
Before proceeding with the installation of the appliance verify that there are no damaged all components. Otherwise contact your dealer and do not proceed with the installation.
The minimum distance between the supporting surface for the cooking equipment on the hob and the lowest part of the range hood must be not less than 50cm from electric cookers and 65cm from gas or mixed cookers.
If the instructions for installation for the gas hob specify a greater distance, this must be adhered to.
ELECTRICAL CONNECTION
The mains power supply must correspond to the rating indicated on the plate situated inside the hood. If provided with a plug connect the hood to a socket in compliance with current regulations and positioned in an accessible area, after installation. If it not fitted with a plug (direct mains connection) or if the plug is not located in an accessible area, after installation, apply a double pole switch in accordance with standards which assures the complete disconnection of the mains under conditions relating to over-current category III, in accordance with installation instructions.
WARNING!
Before re-connecting the hood circuit to the mains supply and checking the efficient function, always check that the mains cable is correctly assembled.
If the cable is not fitted with a plug, connect the wires according to the following table:
Mains voltage and frequency
Refer to the rating indicated on the plate inside of the hood.
Wire connection
N:blue
L:brown
Replacing the power cable
The hood is provided with a special power cable ; if the cable is damaged, request a new one from Technical Service.
AIR VENT
(for the suction versions)
Connect the hood and discharge holes on the walls with a diameter equivalent to the air outlet (connection flange).
Using the tubes and discharge holes on walls with smaller dimensions will cause a diminution of the suction performance and a drastic increase in noise.
Any responsibility in the matter is therefore declined.
! Use a duct of the minimum indispensable length.
! Use a duct with as few elbows as possible (maximum elbow angle: 90^ ).
! Avoid drastic changes in the duct cross-section.
! The company declines any responsibility whenever these regulations are not respected.
FILTERING OR DUCTING?
! Your cooker hood is ready to be used in suction version.
To use the hood in filtering version the special ACCESSORY KIT must be installed.
Check on the first pages of this manual if the ACCESSORY KIT is furnished or must be bought separately.
Note: If furnished, in certain cases, the additional activated carbon filtering system may be installed on the hood. Information about the conversion of the hood from suction version to filtering version is present in this manual.
Ducting version
In this case the fumes are conveyed outside of the building by means of a special pipe connected with the connection ring located on top of the hood.
CAUTION!
The exhausting pipe is not supplied and must be purchased apart.
Diameter of the exhausting pipe must be equal to that of the connection ring.
CAUTION!
If the hood is supplied with active charcoal filter, then it must be removed.
Filter version
The aspirated air will be degreased and deodorised before being fed back into the room.
In order to use the hood in this version, you have to install a system of additional filtering based on activated charcoal.
CONTROLS
The hood is fitted with a control panel with aspiration speed selection control and a light switch to control cooking area lights.

T1

T2

T3

T4

T5

T6

T7
T1. Fan motor OFF / Decrease speed
T2. Fan motor ON / Increase speed
T3. Grease/charcoal filter alarm-reset
T4. 6th sense function (AUTO mode) ON/OFF
T5. Night Light (Ambient light)
T6. Main Light OFF / Decrease intensity
T7. Main light ON / Increase intensity
CAUTION! This hood has an automatic operation system (see below "T4. 6th sense function (AUTO mode) ON/OFF"). Calibration occurs automatically each time the hood is reconnected to the electrical network (e.g.: the first time it is installed after a blackout). It can also be performed manually (see paragraph "Sensor set up"). During calibration, which lasts for 5 minutes, T4 will flash and lights can be used.
T1. FAN MOTOR OFF / DECREASE SPEED
Press to decrease speed and switch the extraction motor OFF.
Press and hold to directly switch the extraction motor OFF.
T2. FAN MOTOR ON / INCREASE SPEED
Press to switch the extraction motor ON and increase speed.
Press and hold to set 5th speed directly.
Please note: 4th and 5th speed last for 5 mins. Then the hood go back to 3rd speed.
T3. GREASE/CHARCOAL FILTER ALARM/RESET
At regular intervals, the hood signals the need to perform filter maintenance.
Please note: The indicators will only work when the hood is on.
T3 lit: Carry out maintenance on the grease filter.
T3 flashing: carry out maintenance of the charcoal filter.
Resetting the filter saturation indicators:
Please note: This must be done with the hood switched on.
Press and hold T3.
The reset of the Grease Filter and Charcoal Filter is performed using the same key. If both filters alarms are active, the reset procedure will reset the counter one by one, with priority to the Charcoal.
Activating the carbon filter saturation indicator
Please note: This must be done with the extraction motor switched off.
This indicator is usually deactivated - press and hold T6 and T7 simultaneously to activate the function: both will light up to indicate activation.
To deactivate the function, press and hold the same buttons again: Both will flash briefly and then switch off to indicate deactivation.
T4.6TH SENSE FUNCTION (AUTO MODE) ON/OFF
The hood set the extraction speed automatically if the sensor in the hood detects changing on ambient conditions.
Please note: to make sure this function is used correctly first configure sensor (see "Sensor set up" below).
Please note: if you change any other functions that control the speed, the "6th sense" function will switch off.
Sensor set up
This can be done when the hood is OFF.
In normal ambient conditions press T4 for 5secs, T4 flashes for 5 mins to indicate hood is performing sensor calibration, then switches off to indicate the calibration has ended.
Setting cooktop: Press and hold T1 and T2 simultaneously. Both lit to indicate hood is ready to accept cooktop parameter calibration.
Press T1 to choose Gas hob (T1 starts to flash for 3 secs to indicate hood parameters are set for gas hob).
Press T2 to choose Induction hob (T2 starts to flash for 3 secs to indicate hood parameters are set for induction hob).
Press to switch the soft background lighting on or off.
T6. MAIN LIGHT OFF / DECREASE INTENSITY
Press to decrease intensity and to switch OFF light.
Press and hold to directly switch OFF.
T7. MAIN LIGHT ON / INCREASE INTENSITY
Press to switch ON and to increase light intensity.
Press and hold to directly switch ON.
MAINTENANCE
Cleaning
Clean using ONLY a cloth dampened with neutral liquid detergent. DO NOT CLEAN WITH TOOLS OR INSTRUMENTS. Do not use abrasive products. DO NOT USE ALCOHOL!
Maintenance of the anti-grease filters
Traps cooking grease particles.
This must be cleaned once a month (or when the filter saturation indication system - if envisaged on the model in possession - indicates this necessity) using non aggressive detergents, either by hand or in the dishwasher, which must be set to a low temperature and a short cycle.
When washed in a dishwasher, the grease filter may discolor slightly, but this does not affect its filtering capacity.
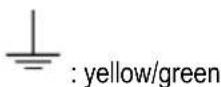
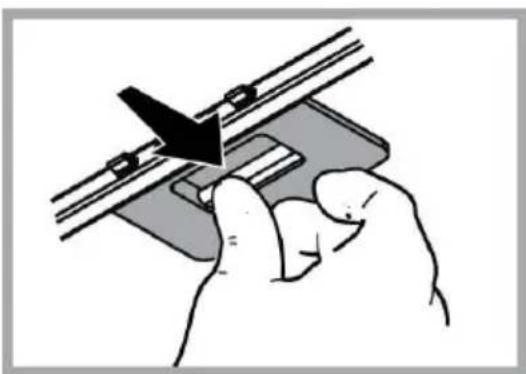
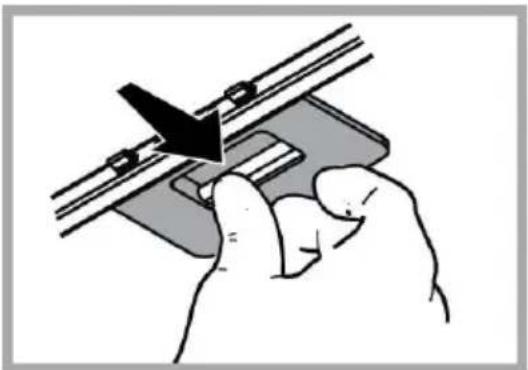
To remove the grease filter, pull the spring release handle.
Maintenance of the charcoal filter It absorbs unpleasant odors caused by cooking.
The saturation of the charcoal filter occurs after more or less prolonged use, depending on the type of cooking and the regularity of cleaning of the grease filter.
In any case it is necessary to replace the cartridge at least every four months (or when the filter saturation indication system - if envisaged on the model in possession - indicates this necessity). The charcoal filter may NOT be washed or regenerated.

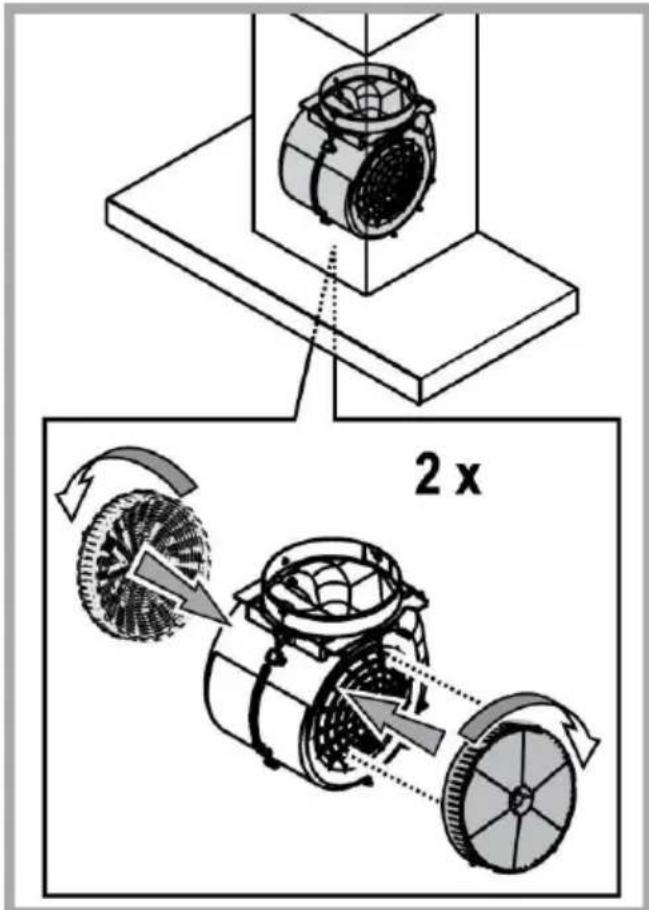
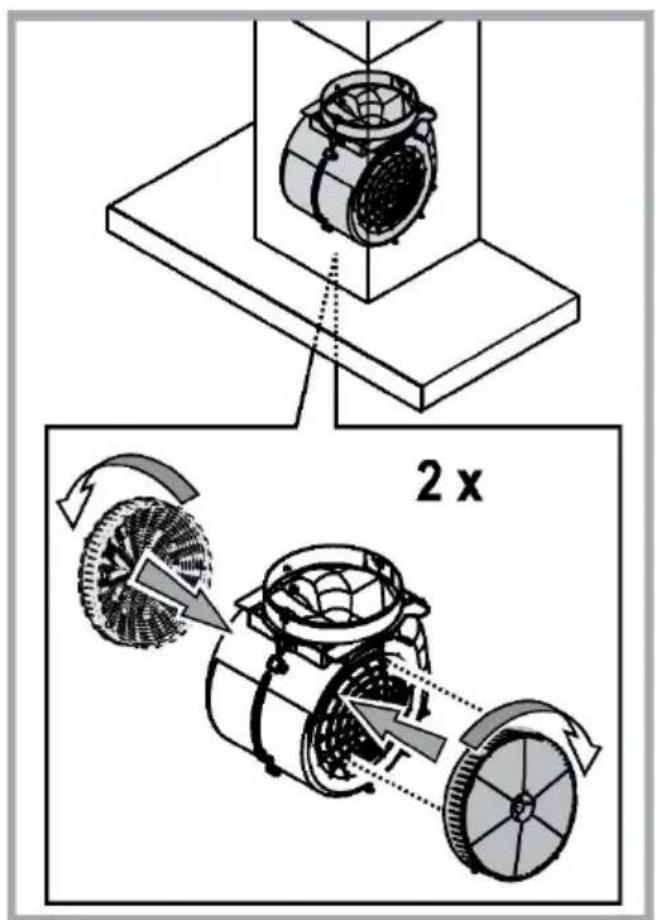
Replacing lamps
The hood is equipped with a lighting system based on LED technology.
The LEDs guarantee an optimum lighting, a duration up to 10 times longer than the traditional lamps and allow to save 90% electrical energy.
To replace lights, contact authorised spare part center.
DISPOSAL
- This appliance is marked according to the European directive 2012/19/EC on Waste Electrical and Electronic Equipment (WEEE).
- By ensuring this product is disposed of correctly, you will help prevent potential negative consequences for the environment and human health, which could otherwise be caused by inappropriate waste handling of this product.
- The symbol on the product, or on the documents accompanying the product, indicates that this appliance may not be treated as household waste. Instead it should be taken to the appropriate collection point for the recycling of electrical and electronic equipment. Disposal must be carried out in accordance with local environmental regulations for waste disposal.
- For further detailed information regarding the process, collection and recycling of this product, please contact the appropriate department of your local authorities or the local department for household waste or the shop where you purchased this product.
Appliance designed, tested and manufactured according to:
- Safety: EN/IEC 60335-1; EN/IEC 60335-2-31, EN/IEC 62233.
- Performance: EN/IEC 61591; ISO 5167-1; ISO 5167-3; ISO 5168; EN/IEC 60704-1; EN/IEC 60704-2-13; EN/IEC 60704-3; ISO 3741; EN 50564; IEC 62301.
- EMC: EN 55014-1; CISPR 14-1; EN 55014-2; CISPR 14-2; EN/IEC 61000-3-2; EN/IEC 61000-3-3. Suggestions for a correct use in order to reduce the environmental impact: Switch ON the hood at minimum speed when you start cooking and kept it running for few minutes after cooking is finished. Increase the speed only in case of large amount of smoke and vapor and use boost speed(s) only in extreme situations. Replace the charcoal filter(s) when necessary to maintain a good odor reduction efficiency. Clean the grease filter(s) when necessary to maintain a good grease filter efficiency. Use the maximum diameter of the ducting system indicated in this manual to optimize efficiency and minimize noise.
MALFUNCTIONS
If something appears not to be working properly, do the following simple checks before calling Technical Service:
- If the hood is not working:
Check that: - The power has not been disconnected.
- A speed has been selected.
- If the hood performs inefficiently:
Check that:
- The motor speed selected is sufficient for the amount of smoke and vapours released.
- The kitchen is sufficiently ventilated to allow air intake.
- The charcoal filter is not worn (hood in filtering version).
- If the hood has turned off during normal functioning:
Check that:
- The power has not been disconnected.
- the omnipolar disconnection device has not tripped.
If the hood fails to operate correctly, briefly disconnect it from the mains power supply for almost 5 sec. Then connect it in again and try once more before contacting the Technical Assistance Service.
TECHNICAL DATA
| Height (cm) | Width (cm) | Depth (cm) | Ø of the exhaust tube (cm) |
| 110-129,5 | 89,8 | 32 | 15 |
CE
Components not provided with the product

You can download the Safety Instructions, User Manual, Product Fiche and Energy data by:
- Visiting our website docs.whirlpool.eu
- Using QR Code
- Alternatively, contact our After-sales Service (See phone number in the warranty booklet). When contacting our After-sales Service, please state the codes provided on your product's identification plate.
BG
OBU4A BE3OПАСHОCT
- Прази Ка КВ Р И Д А БИО ONЕ рачь, CBьрЗАн C NOчИСТВаHETо ИП N IOДРьЖКATA, ИЗКЛЮЧЕ acпраTopа OT eЛ. МржКATA, KATO ИЗВадиTe UцЕСЕа OT KOHTaKТА ИПИ ИЗКЛЮЧЕ ГЯВНЯ ПрЕКьСВач В JИЛИЧЕТО.
- При n3BbPшВаHe Na BCnUckn Opepaun CBbp3aHn C nHCTaJInpaHETo n NOДдрБЖКATA, n3NoJ3BaIte pa6OTHn pBkAbuCi.
- UpeiBt MoKe Da 6bIe N3NoJ3BaH OT Deca Ha Bb3pact He No-HnCKa OT 8 roDnHn OT IInCa C OrpaHnueHn Fm3UeCKn, CETNBn IIn YMCTBeHn Bb3MOXHOCTn IIn Xopa 6e3 ONIT IIn HEO6xOdIMTe P03HaHnry, HO npN yCIOBne Ye ca nOd Ha6JIIOHeHne IIn cJeI KaTO Ca IOnyUnn Heo6xOdIMTe INcTpyKcun 3a 6e3ONaCHO I3NoJ3BaHe Ha UpeDa n CBbp3AHnte C Hero OnaCHOCTn.
He no3B0JBAIte Ha decaTa da cn irpaT cypea! - Почиствано и подрьжkaту He Трава да се ИЗвршва OT Deca 6e3 HabioideHneTo Ha Вьзразсг.
-Помешино Трябва д pa3пола rca ДОCTаТьчна BeHTиlaцma Korato acnnpaTOpbT ce n3no3Ba eHOBpeMeHNO C dpyr n ypei Ha ra3 nIIN dpyr BnD ropnBO.
- AcnnpaTopbT Tp6Ba Da ce nouchTaBa yeCTO KaKTo OTBbTpE TaKa N OTBbH (IOHE BEdHbX B MECELA).
-Придьржайтес Кьм Инструкципг РОсчЕнВ Нарьчнka 3a подрьжka!
- Hecna3BaHeTo Ha nHCTpyKuInTe 3a NouchTbaHe Ha acnnpatopa n 3a noMraHa nNouchTbaHe Ha qnItpTe BODn Do pNCK OT NOxap.
- Ctrporo 3a6paHHe o nprirotBHeTo Ha JCTnA fJ lambe nOd acnnpaTopa.
3a da NOIMeHnTe IamnTe, n3noJ3BaIte cMo Te3n, KOnTO ca NocOueHN B pa3deI ,NoDpBxKka/NoMraHa Ha IaMnTe", KaKTo e NocOueHO B HactoIyHapbYHk 3a ekCnloatau.
I3noJ3BaHeTo Ha OTKpNT PnAmbKe e BpeJHo 3a QnITpnte N MoKe Da npEiN3BnKa NOXap, 3aTOBa Tp6Ba Ha BCa ZeHa Da ce N36rBa.
PnroTBaHTo Ha nbpXeHN XpaHn Tp6Ba Da ce N3BbPbWA NOd HabJIIOHeHne, TbKATO CROpeSeHOTO OINo MOKe Da Ce Bb3PNaMeHn.
BHHMAHHe: Korato roTbapcknT pIoT pa6OtN, DocbHnTe qAcTn Ha acnnpaTopa MORaT da ce HaropeuT.
He cBbP3BaIe ypeDa KbM eI. MpeXaTa DOKaTO He CTe PpNKJIouHIn OkOHuaTeJIHO C MOHTaJa.
- Βо ce OTHacrdo TexHnuecknte pa3Mepn u MepKnte 3a 6e30anachocT, KOtO Tp8Ba da npednpneMeTe 3a OTBexdaHeTo Ha dmHnte ra3Obe HabbH, Bn npenopbUbaMe da ce npidbpXkate ctpNKTHo KbM npabnlaTa, npedBndeHn B perIamentte Ha KOMNEETHTHNTe MeCTHN Bnactn.
- AcnpnpaHnT B3dyx He Tpr6Ba Da ce Haco7y KaM Tpb6oPBOOHTe, KOITc Ce N3noJ3BaT 3a OTBeKdHe Ha DmHnTe Ra3OBe, OTJeIaN c npu n3noJ3BaHTo Ha ypei pa6oTeUc raz IIN dpyr BND ropBO.
- He n3noI3BaIte n He octabrye acnnpaTopa 6e3 npabuJHO MOHTnpaHn IamnnuKn npaDn eBENTyaJIen pNCK OT TOKOB yIap.
- HnKora He n3non3BaIte acnPapota 6e3 npabJInHO MOHTnpaHa peWeTka!
- AcnnpaTopbT He Tp86Ba HNKOFA da ce n3non3Ba KaTo onopeH nIoT oCbeH aKO ToBa He e cneuaHNO yka3aHo.
-ПиMoNTажИЗнOLBAIte CamO ФИКСИРаUITE 6ОТоBE,КоТо CaДOCТаБЕН 3aEДHc CуpeDA ИЛN aKO HЯМa TAKINBA,3aKynTeNoxODAUXI 6OToBE.
- 3n0n3BaIte 6oJIToBe C nOxOJa ⅡbJIXHa, KaKTo e NocOueHO B HapbYHnKa 3a INCTaJInpaHe.
OTBEXDAHE HA Bb3dYXA
(3a acnnpupaaBepcn)
Cbpxte acnnapota KbM Bb3dyxOBOHn Tpb6n n OTBOpB CTeHa. DnaMeTbPbT Ha Tpb6nte Tpr6Ba da CbOTBeTcBa Ha DnaMeTbPa Ha CbeDHHTeHNHn FnaHeu 3a OTBeKdaHe Ha Bb3dyxa.
Cbbp3BaHeTo KbM Bb3dYxOBoHn Tpb6n n OTBOpn C no-MaNbK DnaMeTbp HamaJIbBa KanaIITeTa Ha acnnpipaHe n yBeJIuHaBa 3HaHTeHNo UyMa No BpeMe Ha pa6ota.
B Te3n cIyuaH pMaTa He Noema HnKaKbA OTROBOPHOCT.
!N3non3BaIte Tpb6a C Heo6xOdImata DbJIkHa.
! 13noi3BaITe Tpb6a C Bb3MOxHO HAI-MaIKO Tpb6Hn KOJeHa (CMKcIMaJIeH bIbI Ha I3BvBka: 90^
!He npomeHaIte p3Ko ceehnTo Ha Tpb6nte!
! HnmuTa He Noema HnKaBa OTROBOpHOCT B CnyaHa Hecna3BaHe Ha HactoUTe HOPMn.
DnAmetbpt Ha Bb3dyxOBoHaTa Tpb6a Ta OTROBapr Ha DnAmetbpa Ha CbeINHInJIHHn npbcTeH.
BHUMAHNE!
Akoacnnpatopbt ccha6dene C cnItpncakTINBEH BbIPOCHNTe Tp6Ba da bdaT OCTpaHeH.
Фильтураца Версан.
AcnnpnpaHnT B3dyX ce npeHnCTBa N OCBexaba npEn Da Bne3e OTHO B 06pbueHne B NOMEeHneTo. 3a da n3non3BaTe acnpaTopa B To3n BapnaHT Ha pa6ba Da INcTaInpate DoNbInHeJIHa FInTPpaua CnCTema Ha 6a3ata Ha FInTPn C AKTNBeH BfJleH.
KOMAHДN
AcnpaOpbTe cHa6dE h c KOMaHDo Ta6Jc Bb3MOxHocT 3a peryIpaHe ckopocTtHa acnnpaHe n ppeBKnOyBaTeI Ha OCBETneHmTo Ha roTbapckn Pnot.

T1

T2

T3

T4

T5

T6

T7
T1. IN3KJI. Ha MOTopa Ha BeHTnlaTopa / HaMaJIraBaHe Ha CKOpocTTa
T2.BKJI. Ha MOTopa Ha BeHTnlaTopa /YBeJIuHaBaHe Ha CKOpocTTa
T3.HyInpHaHe Ha aIapMaTa 3aФnITbpa 3a Ma3HHN/ФnITbpa CakTNBEH BblIeH
T4. BKJI./I3KJI. Ha Φункцята 6th sense (pexim AUTO)
T5.HoIHOOCBETJIeHne (aM6nEHTHOOCBETJIeHne)
T6. IN3KJI. Ha OCHOBHOTO OCBETJHeH /HaMaJIBaHe Ha INHTeH3NtTeTa
T7.BKJI.Ha OCHOBHOTOCBETNeHHe/YBeJIuYBaHe Ha INHTeH3nTeTa
BHIMAHNE! To3n acnpaTop pa3nonara cbc cnctema 3a abTomatnuHa pa6oTa (BIXTe no-dony "T4. BKJI./M3KJI. Ha cyHKnraTa 6th sense (pekm AUTO)). KaHbPpHaTo ce n3BbPwBa aBTOMATNUHO BCEKN pT KOrATo acnpaTopbT 6bJe Cbbp3ah OTHO BO KbM eJektpuYeckata Mpeka (Hanp.: npn PbBOHaJHnMAOHTAX mIn CNpaHe Ha 3axpaHBAHeTo).
Kanibpaphe To Moke cBto TaKa da ce n3Bbpiu ABTomatHNO (BnKTe pa3dien "HaCtpoBaHe Ha DaTnka").IIO BpeMe H KaN6bpapHeTo, KoETo Tpae 5 MInHyTu, T4 ue npemrBa u OCBetJeHneTo MoKe da ca n3noJ3Ba.
T1. IN3KJI. HA MOTOPA HA BEHTINATOPA / HAMAJIBAHE HA CKOPOCTTA
HaTnCHete,3a Da HamaJIte CKOpOCTTa N Da N3KNIOHTe MOTopa 3a ekCTpaKUra.
HaTnCHeTe 3aDpBxKTe, 3a Da N3KJIIOHITe DnpeKTHO MoTopa 3a ekCTpaKzna.
T2.BKJI.HA MOTOPA HA BEHTNIATOPA /YBEJIINUABAHE HA CKOPOCTTA
HaTnCHeTe, 3a da BKNIOHTe MOTopa 3a ekCTpaKuN y 3a da yBENHtE CKOPoCTTa. HATnCHeTe N 3aDpBXkTe, 3a da 3aJaTe DnpeKTHO 5a ckopocT.
Mon, mai Te npedn: 4Ta n 5a ckopoc pa60rT 3a haMHO 5 MNHTN, cne KoeTo acnpaTOpBc Ce Bpua Ha 3Ta ckopoCT.
T3.HYINPAHE HA AJAPMATA 3A ΦNJITbPA 3A MA3HHH/ ΦNJITbPA C AKTIBEH B'JIEN
Ha paBn INIteBaIIOn O TBpeMe acInpaTOpbT cInHaIIIm3npa 3a HxJda O T ObcIpyKbaHe Ha qIITbpa.
MOnIa, mMaTe npEbnI: HnDnKaTOpNTe Ie pa6OraT cMo aKo acnnpaToPbTe BkJIouHeN.
T3CBETn:IV3BbPwTe 06cnyXBaHe HaФnITbpa 3a Ma3HHH.
T3 npemrBa: Heo6xOIMO e 06cIyKbaHe Ha qnlTBpa cAkTIbEh BByIeH.
HyinpaHe Ha HndkaTopTe 3a HacnlaHe Ha qnItpnte:
MOnr, mMaTe npEaBvI: To3n npOce ce n3BbPbBa cAmo npi pa6oTeu acnnpaTOp.
HaTnCHeTe n 3aDpBxTe T3.
HynlpaHTo Ha qnlbpa 3a Ma3HHn Ha qnlbpa c aKtNBc H bIeH Ce n3BbPwBa C eINH N cbuN 6yTOH. Ako anapMITE n Ha DaBata qnlbpa ca aKTNBH, IpOueDypata no HynlpaHe Ie n3BbPwH ynlpaHe Ha 6pOyHte eINH no eINH, c PpeIMCTBO 3aHnTbpa c aKtNBcH BblneH.
AknBpuane Ha HndkaTopa 3a Hacnlae Ha BbIneHOBn qnnTbp
MOnr, mMaTe npedBnD: To3n npouec ce n3BbPwBa cAmo npu n3KJIoueH MToP 3a ekCTpaKJna.
O6nKHOBeHo To3n INHnKAtOp e DeaKTHBnPaH - HATNCHeTe eHOBpeMeHHo 3aApbXkTe 6yToH N T7, 3a da aKTHBnPaTe cyHKznyTa: I Dbata 1ue CBeTHaT, 3a Da nOTBbPdT aKTHBnPaHTo.
3a Da DeakTNBupate cyHKnraTa, OTHOB HATNCHEte 3aDpXkTe cbuHTE 6yToH: I Dbata ue npemrHaT eHOKpaTHo n Ue N3raChaT, KOETO NTbPckDaBA DeakTNBupaHeTO.
T4. BKJI./N3KJI. HA ΦΥHKUJRA 6TH SENSE (PEXIM AUTO)
Acnnpatopb3aaba aBOMATNUHO CKOPoCTTHa ekCTpakun, aKo daTuNKbT 3aceye npomraBa 3ao6nkaJrIe To yCIOBna.
MOnr, mMaTe npedBnD; 3a da cTe cnrypHn, ye fynkunra ce n3noJ3Ba npabuJHo, npbBO KOHfpynpaTe daTnuKa (BVXTE "HaCtpoBaHe Ha daTuKa" no-HaDony).
MOnI, mAmTe npedBnD: aKO npomEnTe HraKoR OT ocTaHaJIte fynKcN, KOTo ynpabJraBat ckopocTta, fynKcNraTa "6th sense" ce n3KnIOuH.
HactpoiBaHe Ha DaTUnka
ToBa ce npaBn npn n3KnHoueH acnnpaTOp.
Ipn HopmaHn 3ao6kajn yCJbNna HATNCHe T 3aPbKTe T4 3a 5 cekyHn, T4 mra B npOdbJkeHne Ha 5 MmHytn, 3a da ykaKe, ye acnpaTopbT nBbPwBa kainbpupaHa DaTnKa, cnei Koeto n3racBa, 3a da ykaKe, ye kaN6pupaHTo e 3abbpHnIo.
HactpoBaHe Ha rotBapckn nnot: HataChete n 3aDpXTe eHOBpeMeHHo T1 n T2. N DbTa CBeTbA, 3a da yKaXaT, ye acnnpaTopb t e rTOB da npneMe kaN6pnaHTo Ha napameTpnte Ha rotBapckn nnot.
HaTnchete T1, 3a da n36epete rata0b nnoua 3a roTbeHe (T1 mIra B npOdbJxKeHne Ha 3 cekyHn, 3a da ykaKe, He npaMeTpTe Ha acnpaTopa ca 3aadaeHn 3a rata0ba nnoua).
HaTnchete T2, 3a Na n36peTe INyKUHOHHa nIOu 3a roTBeHe (T2 Mrra B npOJbJKeHne Ha 3 cekHyn, 3a da yKaJe, Ye napameTpnte Ha acnpapota ca 3aadaEHn 3a INyKUHOHHa nIOuA).
T5. HO OCBETJEHNE (AMBNEHTHO OCBETJEHNE)
HaTnCHeTe 3a BKJIOUbaHe/U3KJIIOUbaHe Ha MEKOTo ΦOHOBO OCBETneHIE.
T6.ИЗКЛ.HA OCHOBHOTO OCBETJIЕHNE / HAMAJRAHE HA ИNTETA
HaTnCHeTe, 3a Da HamaJNTe INHTeH3NTeTa N 3a Da IN3KJIHOUYte OCBETJeHMeTO.
HaTnCHete n 3aDpBxKTe, 3a Da n3KJIIOUHTe DmpeKTHOOCBeTJeHneTO.
T7. BKJI. HA OCHOBHOTO OCBETJEHNE / YBEJINUYABAHE HA INHTEH3NTETA
HaTnCHeTe, 3a Da BKNIOUHTe N 3a Da yBENuHTe INHTeH3NTeTa Ha OCBETJeHMeTO.
HaTusheTe I 3aDpBxTe, 3a Da BkHIOUHTe DInpeKTHO OCBETHeHMeTO.
ПОДДРБЖKA
Почистванe
3a NOUCTBAHETo N3NoJ3BaIte EINHCTBEHO Kbpna, HABnaxHeHa C HeyTpajHn TeuH NoUcTBAu npenapatn. HE N3NOJ3BAIte IHCTPYMEHTN IIN PNUBOPN 3A NOUCTBAHE!
I36raBte npenapatN, KOITcBdbpxaT a6pa3nBn Yactu. HE N3PON3BAITE CnPT!
PpKaHa qnTpTe 3a
Ma3HHN
ΦHnTbPbT 3aIbPxa Ma3HNTe Yactn, OTdJIaHH npn IOTBeHe.
Ja ce NOcHCTBa BeHbX MeCeHNo IIN KOrATo INHdkaTOpbT 3a IpEHaCnIaHe Ha QnITpIe ro Noka3Ba (pa3bnpa ce B Cnya, Ye MoDeIbT, KOITo CTe 3akynIn e Cha6dEh C TaKbB INHdkaTOp).
H3no3BaTe He MHOrO CnHn MmHn PpenapTu n OoHCTBaTe pBcHo Hn B CbDOMnHa MaHnHa, Ho Ha HnCKa TEMpepaTpa N KpaTBk peKIM Ha H3MnBaHe.
Pn MneHe Ha MeTaHnHa QnTbP 3a Ma3HnHnTe B CbDOMNnHata MaunHa e Bb3MOxHO ToJ Da Ce Obe3UBeTn, HO TOBa NO HnKaBcnyaH He HamaJIbBa Bb3MOxHOCTnTe My 3a QnITpnpaHe.
3a da pa3rno6nte cnnTbpa 3a Ma3HnHnTe, npnHeTe dpkKaTc npKHeMexHaN3bM.
IopdpbXka Ha qnTbpac aKTNBeH BbIeH
3aIbpxKa HnnpnTHHTe Mnpn3Mn, KOITc Ce OTdJIaT npn IpbxKeHe.
ΦnntbpbctcakTNBHeH BByrHeH ce 3anyuBa np6n3ntHo CneI bIbI rpeNoH Ha n3noN3BaHe B 3aBNCIMoCT OT HauHa HA rotBeHe IOT TOBA KOKQ YecTo NOUCTBaTe Φnntbpa .
BbB BCEk cnuyaH e Heo6xOJMo Da NODMeHrTe fNtbpca cAKTINBEH BbyIeH Ha BCEk YETnP Meceua NN KOrato INdkaTopbT 3a 3acnUaHe Ha FInTPnTe (pa3bnpa ce aKOBaWnT MoJe Pa3NoIra C TaKbB) NOKa3Ba, Ye e Heo6xOJMo.
He ce MNE HnTO MoKe Da ce n3PON3Ba NOBTOpHO.
IopMaHa Ha JAmnnte
AcnnpaTopbT pa3noIara c ocBETeHnHa cnCTema cbc CBETOIOI.
CBETOIOODITE rapaHTnpat ONTmAMnHO OCBETJIeHne,do 10 nI NO-CNIHO OT TpaNIOOHnTE NaMn I N03BOJBAr 90% INKOHOMHa eNEKTPoeHepn.
3a da noDmeHnte lamnTe, moJra CBbpxeTe COTOpuHaHnCePbN3 3a pe3epBn Yactn.
PELUKJIIPAHE
To3n ypeo OTROBAPHa n3NCKBaHnra Ha :
- Ebponeckata dupekTnBa 2012/19/EC
- Waste Electrical and Electronic Equipment (WEEE).
YBepraaKe Ce, Ye To3n ypei 6bJe peuKInpaH No Ndo6abaunr 3a TOBa HauH, Bne DopnpHaCte 3a ONa3BaHeTo Ha OKoJIHaTa Cpea n BaWeTo 3dPaBe.

CmBOnbT Bbpxu ypea nIIN B npIpykabaata Ta DOkyMeHTaun IocOyBa, He TO3n IpoDyKT He Tp86Ba da 6bJe CUnTaH 3a DOMaWeH OTnAdbK, a Tp86Ba da 6bJe ppeaaden H CneuaJHO npedHa3NaueHte 3a TOBA NHyKTOBE 3a peuknnpaHe ha eNektpnuecka n EeKTPoHHa Texnka. PnPdbPkaTe ce KbM MeCTHnte HopMaTbN 3a npepa60tKa Ha OTnaDbU. 3a no-nOp6Ha INΦopMaucn BvB Bp3ka C npedabaneTo, CbnpaHTo n peuknnpaHTo Ha TO3n IpoDyKT BN CbBeTBaMe Da Ce O6bPrHe KbM KOMTeHTHnTe MeCTHn Cnyk6n, Cnyk6nte 3a CbnpaHe Ha DOMaHn OTnAdbU nIIM Maar3nHbT, B KOITo CTe 3akynlTo3n en. ypei.
YpeBt e npoeKtnpaH, TcTeBaH n npOn3BeDeH B CbOTBeTCTBNE C
- BezonaachocT: EN/IEC 60335-1; EN/IEC 60335-2-31, EN/IEC 62233.
- Pa6oTHn xapaKTepeuTnK: EN/IEC 61591; ISO 5167-1; ISO 5167-3; ISO 5168; EN/IEC 60704-1; EN/IEC 60704-2-13; EN/IEC 60704-3; ISO 3741; EN 50564; IEC 62301.
- EMC - EneKtpomarHHTha cbbMecTmocT: EN 55014-1; CISPR 14-1; EN 55014-2; CISPR 14-2; EN/IEC 61000-3-2; EN/IEC 61000-3-3.
Ipeidloxhenia 3a npabnHa ynopt6a, 3a da ce hamaHbB3deJCTBHeTO Bbpyx OkonHata cpea: BkIOyete (ON) acnpatopa Ha MNHMaHa CKOPOCT, KOrato 3anoyhe Ta rotBnTe nTo octabeTe da paobTN HAKoIKo MInHyTn CJIeN pRiknOuBaHe Ha rotBeHTo. YBeiunabaiteCKOpocTtca camo B cnuyaHa rONMaKOINueCTBO dIMn Napn N3NO3BaTe yBeneHne CKOpocTc Camo BeektpemHn CNTyaUHN. CmeHnTe fNITbpa/fNITPnPte C AKTNBEH BByIeH, KOrato e Heo6XOnMo, 3a da NoDlbpxKe Tdo6pa eEeKTHBHOCT Ha HamaJIbaHe Ha MmPn3MaTa. IOnCtBaTe fNITbpa/fNITPnPte 3a Ma3HHn, KOrato e Heo6XOnMo, 3a da NODlbpxKeTdo6pa eEeKTHBHOCT Ha fNITbpa 3a Ma3HHnTE. N3NO3BaTe MAKCMaHn JdAmETbp Ha CNCTeMaTa 3a OTBeXJaHe Ha Bb3dyxa, Iocouen B TOBa pbKOBOCTBO 3a ONTMn3IpaHe Ha eEeKTHBHOCTTA n 3a HamaJIbaHe Ha Wyma.
HEN3PABHOCT BbB ΦYHKUOHNPAHETO
Ako HeIoo He cyHKUOHnpa KaKTo Tp6Ba, Ppei Da Ce CBbpxKeTe C TexHnueckoto 6cLyXbaHe, HappaBeTe HAKo cemnn npOBepKn:
AkoacnpaTopbTHeФyHKUHnHa:
PpOBepeTe daJI:
- He e npekbcnTOKa;
-e3aadaeHaHraKaKBaCKOpocT.
Ako acnnpaTopbT He 3acmykBa doctaTbH0:
PpOBepeTe daJI:
- N36paHaTcCKOpOCTe NOxOJaBaB3aBNCIMoCt OT OTeNeHOTo KOJIneHcTBO IIMI npa.
-Дали Кухнэта ce npobetprba DoctaTbUHO,3a da ce ocinrypu O6mHa Ha Bb3dyxa.
-ΦnntbpbTcakTNBHeN BbIeH He e n3HOceH (ΦnntpnpauaBepcn).
Ako acnnpaToBt e n3rachan no Bpeme Ha pa6ota:
Поберета дади:
- He e npekbcnTOKa;
-MHORONOLIOCHNATPpeKbCBaue He e N3KJIIOHIN.
B cnuyaHa HEn3npabHocT BvB fynKUHOHpaHeTo, npdI da ce obpheTe KbM TexHNueckn cepBu3, n3KnOyete acnpaTopo ot Mpekata Ha-MAkO 3a 5 ckyHn, KaTO n3BaAnTe Uencela, CneI KoETo rO CBpXeTe OTHOB. B cnyaI, Ye Heu3npaBHOCTTa BCE oSe e Haniue, obpHeTe ce KbM rapaHcNoHHn cepBu3.
TEXHnueCKn DAHHN
T2. VENTILATORMOTOR AAN / SNELHEID VERHOGEN
T4.6TH SENSE FUNCTION (AUTO-MODUS) AAN/UIT
Controller of: Controller dat:
Controller of: Controller dat:
Controller of: Controller dat:
OBUNE INPABUNA TEXHNI B3OPACHOCTN
- Перед Началов Каков Лобо onepaци по чinctе Льн обслухиваню, оTKлочь Вытяжу OT Зелктуческов сети, Вынмая Вилку ИЗ розелки Льн облочь Вылочьпомешина. Д�� BCex onepaци по установке и обслухиваню Исплб3OBаТpbabochne rykaВицbl.
- Прибор может быт bИСпОьЗOBан DeТьМн He Младше 8 Лет И Лицамс CO CHINJEXHbIMN cH3NueCKIMN, CEHCOPHbIMN IJIY yMCTBEHHbIMN CnOCO6HOCTaMn, IJIY JKe C HeIOCTaTOUHbIM ONbITOM, eCIn HaxOДЯТСЯ NOД KOHTPOJeM, IJIY eCIn 6blI IN OByeHbI NCNoIb3OBaTb Пriбор 6e3ОаСьHbIM OБpa3OM n eCIn IOHIMaOT CBЯ3aHHbIe C 3TIN M OnaCHOCTN.
- DeTN DoJXHbI 6bITb NOd KOHTPOJeM I He DoJXHbI INpTaTb C npnbOpom.
-Операци по чicitке и облухиваню He должны повороться Deъмп 6e3 Ндзopa - Помешиные дожны иmetь достатуни вентлици, когда кухоная Вытяжка, нсплбзует с одноюся с дугимприборам, работюшим на raze пл dpyrnx toplnibus.
- BbIgka DoJxHa qacto OunuataBcK KaK BHyTpN, TaK n ChapyKn (XOTa Bbl OINH PA3 B MECAL), npndepxNBaRcB TOrO, yTo yKa3aHO B INHCTpyKUnxNo o6CnyKBaHnO.
- HecobIIOJeHHe HOpM YNCTKn BbITJXKN 3aMeHbI N YNCTKn FJIbTPOB yBeJIuHBAeT PnCK BO3ROPaHn.
Ctporo 3anpeueho npiroTOBHeHne eIbHa OTKpbITOM OrHe NOD BbitxkoN.
-ДяЗamHeIЯMNoUKNOCBeIeHnIcNoJIb3OBAbTOJIbKO TINJaMNoUKN yKa3aHHbI B pa3dJeO6CnyKBaHn/3aMeHbIЯMNoUKN 3TOrO pyKOBODCTBa.
IcnoIb3OBAHne OTKpbIToro PnAmEH HaHocNT yuepe6 pInbTpam N MOKeT npNBecTN K 3aRopAHm, PO3OMy DOJXHO N36eRaTbcB JIO6OM cnyan.
KapeHbe DoJxHo IPOBOuNTbCn IOd Hau3OpOM, YTO6bl N36eKaTb BO3MOXHOCTN BO3ROPaHnPaCKaJIeHHOrO NOcONHeUHOro MacJa.
BHIMAHHE: Korda Bapouhaj noBepxHocTb pa6oTaET, doCTyHbIe qactN BbitjXKMOVT HarpeBaTbCra.
He nodknouatb npnbop K 3neKtpnuecko CETn Do Tex nop, noka yctaHOBka NOHOCTBIO He 3aKOHyeha.
To To KaacatexHnueckmep Mepe3oNaCHOCTB nPImHeHmdo c6pocapapOB cTporo npIepKbTaBCrTO TPO PEPVCMATPnBaetcno HOPMaMIOKaNbHbIX KOMNTeHTHBIX OPAHOB.
BcacsbIaembI Bo3dyx He IOnJKeH BbIpyckaTbcra B Tpy6y, nCIOJIb3yeMyIO JnI Bbl6pocOB IbIMOB npN6opamn, pa6OtaHOUMn Ha rase HIN Dovnx ToPnIBax.
He nCnOJIb3OBaTb INIIOCTABJrB BbITJkKy 6e3 JAMNooE K npabNJbHO yCTaHOBNEHHbIX C pNCKOM NOLyUHTb yIap 3JIeKTPuYeCKIM TOKOM. - HNKOrda He IcNoIb3ObAtb BbITaRkky 6e3 npaBnIbHO yCTaHOBJeHHo peWetK!
- BbIyKka HIKOgDA He DoJxHa NcNoJb3ObaTbCay, KaK OnpHn NOBepXHOCTb, ecN ToJbKO He Yka3aHO HAHe.
- IcnoB30BaTb TOnbKO BnHTbI dIa fIKCnpOBaHnB KOMnEKeT C npOyKToM dIa yCTaHOBKn Hn, eCm Het B KOMnJIeKTe, npo6pcttn BnHTbI npaBnBHorO Tnna.
- IcnoIb3OBAbI npaBnJIbHyIO dINHy BnHTOB, yKa3aHHyIO b pYKOBOCTBE NO YCTAHOBKe.
B cIyae comHeHn, KOHCytbTnpoBaTbcra B aBTOpn3npoBaHHOM ceHTpe no o6cIyKbAHIO nIN C KBaINΦnCIpOBAHHbIM nepcoHaON.
BHUMAHNE!
- HeycTaHOBka COOTBETCTBYUxN BINTOB I npucnOco6neHm dIy qKcnpoBaHra B COOTBETCTBn C 3TUMN HHTpyKzmaM MOKeT pNBecTN K pNCAM 3JIeKTpueeCKO r pONCXoXJDeHn.
He nCnoB3yIe yctpoIcBO c nporpaMMaTOpOM, TaIeMepOM, OTdJIbHbIM NpIbTOM dNCTaHcNOHHORO ynpabJIeHnR nn IIO6bIM dpYrIM YcTPOIcTBOM, KOTOPOE BKJIHOaETcABTOMaTHueCKN.
He noDnyckaIe K np6bpy Detey MnaIwe 3 neT. Be3 noCToHnHO Hnd3opa co cToPOhB BApocJIbIX K np6bpy HeIb3a DOnyckaTb DeTei MnaIwe 8 neT.
BHIMAHHE: np6op He npedHa3HaeH dIy BkIoueHn npn nOmoU BHeuHX yCTpoiCTB mNtDeIbHO rNCTaHIOHOrO ynpabNeHn.
3ToT np6op He npedHa3NaeH dny npocecnoHaBHoro npmeHeHn. He nCNoIb3yIte np6op BHe nomeHn.
Bo n36exkanHe TpaBm, np6op DoJkeH nepemeuaTbca u yctaHaBnBaTbca cnIaM He MeHee DByx YenOBek.
YcTaHOBka, BkHoua NOKJIIOHe Hne BOOIpOBoHO Cetn (ecn TaKoe npedyCMOTpeHO) n 3JeKtpueeckne CoEINHeHna, a TAKKe peMOHTbIe Oepauu, DOJXHbI BblONHrTbcra KBAJINpUPOBaHHbIMn CneuaJIInCTAMN.
IIO 3aBepseHn yctaHOBKn, XpaHnTe ynaKOBouHbIe MaTePnAbl (IIaCTNKOBbIe, nonIcTupoNObIe DetaJIu N T.I.) B HeIoCTyHOM IINr DeTeMecTe BO n36exHaHne INUdEHTOB C ydyubem..
He noIb3yItecB npI6Opom, 6dyuM MOKpbIMn IJN C 6OcBIMn HOramn.
HnKoIa He npImeHЯTe np6Op dJa YnCTKn NapOM - pNCK yDapa 3JIeKTPnueCKM TOKOM.
YnakoobHyMaTeepHAn MoKeT Ha 100% nCNoB3ObaTbCBA TOpuHO m MapKnpoBaH COOTBeCTBvIOUm 3HauchKOM BTopepea60TKI

BbITXkMA MoKET IMeTb Dn3aH, OTJNUaUOuNcRcOT BbITXKK NOKa3aHHoHa pncyHKax DaHHORo pyKOBOdCTBa, TEM He MeHee, pyKOBOdCTBO NO 3KcnJyatauN, TexHnueckoe ObcnyxBaHne uYctAHOBka OCTaOTcTe Xe.
H3deue XO3uCmEHHo-6bIMo8o2o Ha3HaueHua. PpON3BOJNTeJIb CHImaET C Ce6B CByKIO OTBeTCTBeHHOCtB 3a HeNoJaIK, yUep6 nnnoXap, KOtOpBIE BO3HKnI npn IcNOJb3OBaHN npN6opA BCNEdCTBne HecO6JIHODeHn IHCTpykui, npNBedeHHbIX B daHHOM pyKOBoDCTBE. BbITJKA cIyXHT dJIra BCacBIBAHNA dbIMA n npa npn pnproTOBHeHn NIIuN nppeHa3HaueHa TOnbKO dJIa 6bIToBOrIO NCnOJB3OBaHN.
OueHbaxHo coXpaHntb 3Tu HcTpyKuHIO, yTO6bl MoXHO 6blIO o6paTtbcra K HeB B IIO6o MOMeHT. EcIn n3dJIne npOdaetca, nepeedaetcnn peheHocntcra obecneHT, yTO6bl HcTpyKuNBAcerda 6bla C Hm.
BHNMaTeJIbHo npOHTaIe HNCTpyKcIIO. B Hei HaxoIITcBaJHaa HNΦOpMaZnno yCTaHOBe, 3KcPnyatauim n6e3OnacHOCTn.
3anpeuaeTcBbIOJHrTBn3MeHeHnB 3eKtpUeCKoN JIn MExaHueCKO uactn n3deJnN B Tpy6ax paccenBaHn.
- Ipeed NaHaiom yCTaHOBKn O6OpyIOBaHnY bEeINTeB cIeIOCTHOcTN i COxpaHHOCTN BcEx KOMNoHETOB. Ipn HauuHnJIIObIX NOBpeKdEHn O6pATInTeB K NOCTaBUnKy i Hn B KOem Cnyuae He HauHHaTe MONTax O6OpyIOBaHnR.
PacctoHne HnKHe IpaHb BbITaKKn HAD ONOpHO NIOCKOCTbO NOI COcyDbHa KxOHHO IIITe DOJXHO 6bITb He MeHee 50cm - nIe3NEKTPuuecknx PIIIT, n He MeHee 65 cm dIraTaOBBix INN KOM6HNpOBAHbIX PIIIT.
Ecnn B nHctpyKunx no yctahOBKe ra3oBOI nnTbI OROBOpHo 60JIbWee pacCTOHNHe, to yUHTne 3TO.
3JIeKTPnueCKOE COeINHHeHne
HapjkeHe cTe NdoJxHO COOTBeCTBOBaT HapjKeHIO, Yka3aHHOMy Ha Ta6nueKc TeXnuecknx DaHHbIX, KOtOpA pa3MeueHa BHyTp n np6op. EcNn BbITkKa Ch6keHa BILKO, NOKIOUHTe BbITkKy K WTeNCJIbHOMy pa3beMy. OH DoJKeH OTBeuATb DeIcTBYIOUM npabINam N 6bITb pacNOLOKeH B IerKOIOCTynHom MceTe. BKIOHTB Po3ETKY MOxHO NocNe yCTaHOBKn. Ecn J Ke BbITkKa He Ch6keHa BILKO (PpAmOE NOKIOUeHNA K cTeN), INL WTeNCJIbHbI pa3bEm He paONIOKeH B DOCTynHom MceTe, TAcKe I NocLe yCTaHOBKn, TO NCNoJIb3yIte NaIpeKAsm DByXIOIOCHbI BIKIOUaTeNb, ObecneNuBAOUsI NOnHOe pa3MbIAKHe cTe N pRn BO3HNKHOBEHIn YcNOBn NepeHApJKeHnra 3-ei KaTEROpnB, B COOTBeCTBN C IHCTpyKzmaMn No yCTaHOBKe.
BHUMAHNE!
IpeKJde Yem NOkNIOUHTb K cETn NITaHn 3JIeKTPuYeCKyHO CnCTeMy BbITaKKn I npOBepNTb NCpABHOe yHKUHOHPOBAHne ee yBeiNTecb B TOM, YTO Ka6eNb NITaHn PpaBnIbHO CMOHTnpoBaHn.
EcniKa6eBHeoChaueHBnIko,noCoEInHtEnpOoBaBCOTBeCTBmCocJeDyIOeTae
Hapjxehne u yactota cetn
CM. BENHnbl, yKa3aHHbIe B HAKneKe C TexHueCKMn XapakTePncTukamN BHyTpN KOJINaKa.
LBeTxNJIbI

JxelTb/3eJeHbI
N:CNHNI
L:KopuHHeBbI
3aMeHa 3JIeKTpoko6eJia
BbTgKkA mMeet cneuaJIbHbI Ka6eIb 3JIeKTPoNTaHnI; B clyuae nobpeJdeHna Ka6eI, Heo6xOIMo 3aKa3aTb erO B cLyX6e no TexHnueckomy o6cIyKnBaHnIO.
BbIbPOC BO3dUXA
T4.ФYHKUN6THSENSEFUNCTION(ABTOPEXKM)BKJI/BbIKJI
BbITJXk a bTOMaTnueckn yCTaHaBnBaet ckopocTB paOToI, ecn DaTcNk B BbITJxke onpeJeTe r3MeHeHne OkpykaIOxuX yCNoBm.
O6paTHe BHMaHHe: YTo6bI y6eDnTbcra, YTO 3Ta 0yHKpIg NcNoJIb3yeTc npaBnIbHO, ChaJaHa HAcTpOte DaTtIK (CM. pa3deJ «HaCtpoKa DaTtKka» HnKe).
PpmeaHne: ecn n3MeHnTb IIO6bIe dpyIe cyHKm, peryInpyIOue cKopocTb, cyHKuY 6th sense function OTKIOHTcra.
Hactpoinka daTnka
Ee MoXHO BbIOnHHTb, KOrDa BbITaKa BbIKJ.
B HopMaIbHbIX yCNoBnX OkpyKaHOSe Cpebl HaxmMaIte T4 B TeueHne 5 CeKHyD, T4 6yTeM MRaTb 5 MNHyT, NOKa3bIBaR, YTO BBITRAKK BAINONHReT KAN6POBky DaTHNka, a 3ATEM BIKNHOHTcR, NOKa3bIBaR, YTO KANI6PbOBKa 3aKOHUnAcB.
HacpoKa BapOuHOI naHeN: OndOBpeMeHHo HaxMnte u ydePknBaTe KhoNk T1 n T2. Obe KhoNk 3aropaOTc, yka3bBaHa To, YTO BBITAKKA rOToBA npHnTb KaII6pOBky napaMeTPOB BapOuHOI naHeN.
HaXMMTE T1, YTO6bI Bb6paTb rAOByO BApOHyIO NaHEb (T1 6yTeM MIRaTb B TeueHne 3 cekyHn, NOKa3bIBaR, YTO napaMeTpBbYJIKN yCTaHOBJIeHb IINr Ra3OBi BApOHyI NaHEnn).
HaxmTe T2, yTo6bI Bb6paTb INdyKUHOHHyBOAPOHyIO NaHeB (T2 6yTe MIRaTb B TeeHne 3 cekyH, noka3bIBa, yTO npaMeTpbl BBITRAKK yCTaHOBHebl DnA INdyKUHOHHoB APOOHNo HEnN).
T5. HOUHAR NOIDCBETKA (OBUCEE OCEBUEHNE)
HaxmTe, yTo6bI BKIOHTb IIN BbIKIOHTb MfKyIO oHOByIO NOcBETky.
T6. OCHOBHON CBET BbIKI / YMEHbUeHNE INHTECNBHOCTN
Haxmnte, yTo6bl yMeHbIHTb HHTeHCNBHOCTb N BblKJI CBET.
Hakmte n ydepknaBaiTe, TTo6bl BbIKJ.
T7. OCHOBHON CBET BKJI/YBEBINUHNE INHTEHCBHOCTN
Haxmte, yTo6bI BKn uYbeJIuHTb INTHcHbHOCTb CBeta.
HaxmTe u yedeKuBaIe, UTo6bl BKJ.
TEXHnueCKOE OBCJyXnBAHne
OuInCTka
Дя Oунстkn Испьзугte TОьк Cпeцальнычу Трпку, Cмоунну HeИтраиьнIM КИдКIM MOОшm СрсдТВOM. HE MСПОЛБ3УITE HNKAKNE NHCTPyMEHTbI ДЯ OЧNTkn. He npimehaite cpeDCTBa, copepkaшne abpa3nBble MaTePnaJIbI. HE ПРМЕHAITE CnNPT!
06cnykBaHne KInpoBbIX qNJIbTpOB
YdepxnBaet Yactu bI Xnpa, NcXoJnne OT nIITbI.
HnIbTp cIeDyET YnCTnTb exMeCeyHO (NIN KOrDa CnCTema
HnIkaun HaCbIeHn yIbTPOB, eCNn OHa IMeTcB B
Baew Moen, yKa3bIaEaT Ha DaHHyIO Heo6xOIMocTb)
HearpeCCNBbIMM MOUIMM CpeCDTBAMN, BpyHyIO NIN B
NoCyDoomoeHoi MaHnHe PpN Hn3KoTempePte N
3KOHOUMHOM LkNE MbITbI.
PnMbITBe B NocydoMOeHOn MaUNHe MoXeT NMeTb MeCTO HEKOTOpoe oBecuBcUBaHne FInIbTp a3aepKKn KInpa, Ho eTo FInIbTpYIOua XapakTePncTnKa OCTaETcA bCOJHTHO HEN3MehHO.
IJIa CHTINJXHPOBOrO cNbTpTa NOTAHnTe K Ce6e IOnpPyKHeHHyO pyKy OTcENJIeHnA qNbTpA.
O6cnyxHbAHne yroIbHoro qnIbTpap YdaJrET HnprTHbIe 3anaxn KuxHn.
HacbIeHne yrobnHOO fNtBtpa npoCXoNT no nCTeHn 60Jee nn MeHee dntteBHOrO nepnoDa 3KcNpyaTauu, npedoppeJeemoro TINOM KxHN n nepnoDnHocTbO ouNCTKn fNtBPOB 3aepkKn Jnpa. B NIObom cnyae, 3aMeHnTe KapTpUxK NO KpaHn Mepe yepe3 KaXdble 4 Mecra (nn Korda cnCTema INHdkauHn HacblseHn fNtBPOB, ecn OHa NmEETCB BaWe moDen, yka3bIbaet Ha daHHyIO Heo6XoDMocTb).
YroIbHbI ΦnIbTp HE nOdIeXHT MoKe IIn pereHepaun.
3aMeHa JAmn
BbITAAKcOBOpYIOBaHaOCBeUeHEm Ha CBeToNDaX LED. CBeTOnObl ObecneuBaIOT ONTMaJIbHOe OCBeUeHHe, IN cPOK cnJkb1 B 10 pa3 npEbIaAet cPok pa6oTbI TpaNtioHHbIX JAmNoueK, N No3BOJIaOT 3KOHOMHTb 90% 3JIeKTPo3Heprnn.
ДяЗamHeBICBEToHNOOBO6paTntEcB aABTOpN3nPOBaHHbI CepBnCHbI ueHtp.
YTNIN3AUIN
YcTpoIcTBpa3pa6oTaHO,NCbItaHO uN3rOToBJeHO B COOTBeTCTBnC:
- Be3onachocTb: EN/IEC 60335-1; EN/IEC 60335-2-31, EN/IEC 62233.
- 3KcnnyaTaunHbIe xapaKTepeNtKn: EN/IEC 61591; ISO 5167-1; ISO 5167-3; ISO 5168; EN/IEC 60704-1; EN/IEC 60704-2-13; EN/IEC 60704-3; ISO 3741; EN 50564; IEC 62301.
EMC:EN 55014-1; CISPR 14-1; EN 55014-2; CISPR 14-2; EN/IEC 61000-3-2; EN/IEC 61000-3-3. Празвильною Испльзовая В селих снжени BOЗдемость на okружадуоусpeу: Bклочte Bыгхног колпak Ha MNHIMаьн сокорst, KOrda NaHnHaete rOToBt, N OCTaБТе erO pa6oTaTb B TeueHne HeCKOBKx MNHyT NOcTe TOrO, KaK 3aKOHHTe rOToBt. YBeNunBaIte cokopctb ToIbKO B Cnyuae BoIbWoTO KoINUeCTBa DbMa n npa, N npi6eRaTe K IcNoJIb3OBaHnIO NobIiEHHbIX cOKOpCTe TOIbKO B 3KCTpeMaJIbHbIX CNTyaцЯx. 3aMeHЯTe yrOlhBiФЛtp(bI), KOrda 3TO Heo6XODIMO,Дяп IOdpeJaxAHnX OpoшЕ 3ФФeKTNBHOCTn UMeHbWeHЯ 3anaxOB. OChuaite JxipOBoi/BleФЛtp(bI), KOrda 3TO Heo6XODIMO,Дяп IOdpeJaxAHn XopoшЕ 3ФФeKTNBHOCTn JxipOBoroФЛtpa.ИСПОЛБ3yIte MaKcIMaJIbHbIДиamETp CnCTembl BO3dYxOBODOB,Уka3aHHbВDAHHom pyKOBODCTBE,Дя ONTNIM3aUHN 3ФФeKTNBHOCTn MInHMIma3aUN yPOBHR Shyma.
AHOMAJINBPAEOTE
EcnuTO-To He pa6oTaET DoJXHbIM o6pa3OM, npei TEM KAK o6paTntbC B CnyK6y no TexHnueckomy 06cnyKnBaHHIO, BblONHITe cIeNyUOUIne npocTbe npOBepkn:
- ECIN BbITaKa He pa6oTaet:
PpOBepuTb:
-уTo6bI He 6bIa npepBaHa noJaTa Toka.
- yTO 6blbIa BblbpaHa ckopoCTb.
- Ecnn BbITaKka nIOxo pa6oTaet:
PpOBepuBtB:
- YTO BBIbpaHHa CKOpocTb DnBnTaTeJI DoCTaToUHa IIN BbIPA6oTaHHORO KOJInueCTBa DbIMa nnapa.
- YTO KUxHr DOCTaTOuHO IPOBETpeHa DnA TORO, YTO6bl BbITXKa MOrra BbINOHHTb 3a6Op BO3dyxa.
- yTO yROJIbHbI ΦnIbTp He Otpa6oTaH (BbITJgKa BpeKmE CpeUpKyIaIeN Bo3dyxa).
EcIN BbITJXKa BbIKNIOHJaCb BXOe HopMaIbHOpa6oTbI:
PpOBepntb:
- YTO He IpepBaHa NodaHa ToKa.
- YTO He cpaobotan ODHONOIOCHbI BbIKIOaIOu annapaT.
B cnyuae BO3MOxHbIX aHOMaIN B pa6oTe, nepeT TEM KAK o6paNTbcra B cnykby Texnueckoro 06cnyKUBAHN OTKIOUHTb OT 3JIeKtpOniTahnA annapat MInHMym Ha 5 ckyHd, BbIHmam BnIKy I NOTOM NOcOeHNHTb erO cHOBA. EcnI aHOMaIN B pa6oTe npOJXaET cyseCTBOBaTb o6paNTbcra B cnykby texo6cnyKUBAHN.
TEXHnueCKNE DAHHbIE
T5. LUZ NOCTURNA (LUZ AMBIENTAL)
(for utsugsversioner)
T2. VENTILATORMOTOR ON / ØG HASTIGHED
ailllll lalwlll yil jaiy Jaa Jaa a
:Joo 2 Jbcl jS b
a_i = 70%
y1 = - 43x + 1 y2 = 43x + 2
aJyjai
aiaiaia baiaiie 15s ciis
Aii jao jaozi
i j 1111111111111111111111
1 1
(1) (2)
:Jalll Jaiil jaiil jaiil jaiil
:ai jia jao
- x1 = 43 x2 = - 43 . y_1 = 43 - 1
Jae 1e 1e 1e 1e
5 5 5 5 5 5 5 5 5 5 5 5 5 5 5 5 5 5 5 5 5 5 5 5
S OBC = S COD + S_ BOC
a a a a a a a a a a a a a a a a a a a a a a a a a a a
1.
aai 8 ab a5 al aie a jiaai ai
1Jg
gaaaijia
a aae
aill pbi yloie g) j5 oalg a bii 1y
jogai ci la lla - cai rall qyol
playi (lqblty pail 0g 1y 1y 1y
jblll allie g jk yglge
a
-
- = ( x1,y1) , = ( x2,y2)
y

LED 11 ygki 1p gdiol 1 pki baii 10 10 90
Jaiell aaiai jyrally aiil
a aae
a 1 a 1 1 1 1 1 1 1 1 1 1 1 1 1 1 1 1 1 1 1 1 1 1 1 1 1 1 1 1 1 1 1 1 1 1 1 1 1 1 1 1 1
( 12,12,0,12)
aluzio 互1
(a) "sense 6th" a yolal Jyai / Jyai .T4" a bail jil) siojgl jia pI bai Ie a yalai o. (AUTO
5
ailll a jll lgl Jaoi Ilaal 5 5d 5 dai 5
y/0g#d all! 1a#b#d!/jT3
aaiy aay yaaay aaiy aaiy aaiy aaiy
afo blllgl jai gao Jiaai yao
j0aT3 j0
. 3j
clalallgglxalyaillcrlgRESETbuae
Jia 1iIi 1i
T3 aydoaio
y 1
a
yss
Lalb Haill l jyog aolll oia i j yj
T7 T6 1
e 1
a + b = 1
(AUTO 6TH)
y
(《yununall yin, bina》 jiali) yununall 1ai: iiny, bina oynally f, yiy, ayolal ojgl yunall pia x: abx
"sense 6thAaalal Jae aai! aie aai gaiy ai yaii
aiee
1iio 1
a 5 5 T4 5 T4
oJyall aIac pail gll oJy jaii y
aalll 5gall aay aolll
3 1 1 1 1 1 1 1 1 1 1 1 1 1 1 1 1 1 1 1 1 1
(1) a5 = a1 + 3d a_5 = 32
3 3 2)
(1)
(a) (a) a. T5
0jnnnll aayall selal / jneel bina
gai jia /jie1.T6
Jalilgaii iay gao oolz jiljia lka
.5jlaegiali jai:Jalall
gai 1 gai aai j / 3i.7
a 1
. 5 jiu o giul a gai y jghall

T1

T2

T3

T4

T5

T6

T7
J 1
y

jssll 100%
50 50 50 50 50 50 50 50 50 50 50 50 50 50 50 50 50 50 50 50 50 50 50 50 50 50 50 50 50 50 50 50 50 50 65
1 1
A
22
1 1
j: N
L
y
AR
palei jolalg d
Jj jll 1iall Jg jll
Joc 1joo
8 n nn nnnn nn n nn
i 1
J 1
aall jbiy y ggi yjgll
jlll 1y y jabla
J 1
.
()
e 100
a
i 1
J 1
i 1
1
.
aiai biai i jai jai jai jai jai jai jai jai jai jai jai jai jai jai jai jai jai jai jai jai jai jai jai jai jai jai jai jai jai jai jai jai jai jai jai jai jai jai jai jai jai jai jai jai jai jai jai jai jai jai jali
y
a
- = - + ①
()
Jaiiaall gll jaiil jaii kai jao jaiu oai ai jai
1 2
aJ 1
alolall gsi jil aed Jo Jl jill jiaell 0e eell y

- WARNING!
- ELECTRICAL CONNECTION
- Replacing the power cable
- AIR VENT
- FILTERING OR DUCTING?
- Ducting version
- CAUTION!
- Filter version
- CONTROLS
- T1. FAN MOTOR OFF / DECREASE SPEED
- T2. FAN MOTOR ON / INCREASE SPEED
- T3. GREASE/CHARCOAL FILTER ALARM/RESET
- Resetting the filter saturation indicators:
- Activating the carbon filter saturation indicator
- T4.6TH SENSE FUNCTION (AUTO MODE) ON/OFF
- Sensor set up
- T6. MAIN LIGHT OFF / DECREASE INTENSITY
- T7. MAIN LIGHT ON / INCREASE INTENSITY
- MAINTENANCE
- Cleaning
- Maintenance of the anti-grease filters
- Traps cooking grease particles.
- Maintenance of the charcoal filter It absorbs unpleasant odors caused by cooking.
- Replacing lamps
- DISPOSAL
- MALFUNCTIONS
- TECHNICAL DATA
- CE
- BG
- OBU4A BE3OПАСHОCT
- OTBEXDAHE HA Bb3dYXA
- BHUMAHNE!
- Фильтураца Версан.
- KOMAHДN
- T1. IN3KJI. HA MOTOPA HA BEHTINATOPA / HAMAJIBAHE HA CKOPOCTTA
- T2.BKJI.HA MOTOPA HA BEHTNIATOPA /YBEJIINUABAHE HA CKOPOCTTA
- T3.HYINPAHE HA AJAPMATA 3A ΦNJITbPA 3A MA3HHH/ ΦNJITbPA C AKTIBEH B'JIEN
- HyinpaHe Ha HndkaTopTe 3a HacnlaHe Ha qnItpnte:
- AknBpuane Ha HndkaTopa 3a Hacnlae Ha BbIneHOBn qnnTbp
- T4. BKJI./N3KJI. HA ΦΥHKUJRA 6TH SENSE (PEXIM AUTO)
- HactpoiBaHe Ha DaTUnka
- T5. HO OCBETJEHNE (AMBNEHTHO OCBETJEHNE)
- T6.ИЗКЛ.HA OCHOBHOTO OCBETJIЕHNE / HAMAJRAHE HA ИNTETA
- T7. BKJI. HA OCHOBHOTO OCBETJEHNE / YBEJINUYABAHE HA INHTEH3NTETA
- ПОДДРБЖKA
- Почистванe
- PpKaHa qnTpTe 3a
- Ma3HHN
- IopdpbXka Ha qnTbpac aKTNBeH BbIeH
- IopMaHa Ha JAmnnte
- PELUKJIIPAHE
- HEN3PABHOCT BbB ΦYHKUOHNPAHETO
- TEXHnueCKn DAHHN
- T2. VENTILATORMOTOR AAN / SNELHEID VERHOGEN
- T4.6TH SENSE FUNCTION (AUTO-MODUS) AAN/UIT
- OBUNE INPABUNA TEXHNI B3OPACHOCTN
- 3JIeKTPnueCKOE COeINHHeHne
- Hapjxehne u yactota cetn
- LBeTxNJIbI
- 3aMeHa 3JIeKTpoko6eJia
- BbIbPOC BO3dUXA
- T4.ФYHKUN6THSENSEFUNCTION(ABTOPEXKM)BKJI/BbIKJI
- Hactpoinka daTnka
- T5. HOUHAR NOIDCBETKA (OBUCEE OCEBUEHNE)
- T6. OCHOBHON CBET BbIKI / YMEHbUeHNE INHTECNBHOCTN
- T7. OCHOBHON CBET BKJI/YBEBINUHNE INHTEHCBHOCTN
- TEXHnueCKOE OBCJyXnBAHne
- OuInCTka
- 06cnykBaHne KInpoBbIX qNJIbTpOB
- O6cnyxHbAHne yroIbHoro qnIbTpap YdaJrET HnprTHbIe 3anaxn KuxHn.
- 3aMeHa JAmn
- YTNIN3AUIN
- AHOMAJINBPAEOTE
- TEXHnueCKNE DAHHbIE
- T5. LUZ NOCTURNA (LUZ AMBIENTAL)
- (for utsugsversioner)
- T2. VENTILATORMOTOR ON / ØG HASTIGHED
- AR
- palei jolalg d
Brand : WHIRLPOOL
Model : WHSS 62F LT K
Category : Basket