
HWT450 - Soundbar SAMSUNG - Free user manual and instructions
Find the device manual for free HWT450 SAMSUNG in PDF.
| Product Type | Soundbar with wireless subwoofer |
| Brand | Samsung |
| Model | HW-T450 |
| Soundbar dimensions (W x H x D) | 860.0 x 54.0 x 74.0 mm |
| Soundbar weight | 1.5 kg |
| Subwoofer dimensions (W x H x D) | 181.5 x 343.0 x 272.0 mm |
| Subwoofer weight | 4.3 kg |
| Power supply | AC mains (see product label for exact values) |
| Output power (soundbar) | 35 W x 2 (at 6 ohms) |
| Output power (subwoofer) | 130 W |
| Audio inputs | 1 optical (DIGITAL AUDIO IN), 1 USB (5V/0.5A), Bluetooth |
| Sound modes | Standard, Surround Sound, Game, Smart |
| Main features | Bluetooth, audio sync, voice control, wireless subwoofer, firmware update via USB |
| Bluetooth compatibility | Yes, unspecified version, supports SBC (44.1/48 kHz), A2DP (AV) |
| Supported audio formats | LPCM 2 channels, Dolby Audio, DTS; MP3, WMA, AAC, OGG, FLAC, WAV, AIFF files via USB |
| Maintenance and cleaning | Unplug the device before cleaning; use a soft, dry cloth. Do not use liquid or abrasive products. |
| Safety | Do not open the cover (risk of electric shock). Protect from moisture, heat, and magnetic fields. Unplug during thunderstorms or malfunction. |
| Spare parts and repairability | Contact Samsung customer service for spare parts. Repair by a qualified professional. |
| General information | Operating temperature: +5°C to +35°C; humidity: 10% to 75%. Standby consumption: 2 W. |
Frequently Asked Questions - HWT450 SAMSUNG
User questions about HWT450 SAMSUNG
0 question about this device. Answer the ones you know or ask your own.
Ask a new question about this device
Download the instructions for your Soundbar in PDF format for free! Find your manual HWT450 - SAMSUNG and take your electronic device back in hand. On this page are published all the documents necessary for the use of your device. HWT450 by SAMSUNG.
USER MANUAL HWT450 SAMSUNG
Thank you for purchasing this Samsung product.
To receive more complete service, please register
your product at www.samsung.com/register
SAFETY INFORMATION
SAFETYWARNINGS
TO REDUCE THE RISK OF ELECTRIC SHOCK,DO NOT REMOVE THE COVER (OR BACK).
NO USER-SERVICEABLE PARTS ARE INSIDE.
REFER SERVICING TO QUALIFIED SERVICE
PERSONNEL.
Refer to the table below for an explanation of symbols which may be on your Samsung product.
| 4 | CAUTION RISK OF ELECTRIC SHOCK. DO NOT OPEN. | ! |
| 5 | This symbol indicates that high voltage is present inside. It is dangerous to make any kind of contact with any internal part of this product. | |
| 1 | This symbol indicates that this product has included important literature concerning operation and maintenance. | |
| Class II product: This symbol indicates that it does not require a safety connection to electrical earth (ground). If this symbol is not present on a product with a power cord, the product MUST have a reliable connection to protective earth (ground). | ||
| ~ | AC voltage: This symbol indicates that the rated voltage marked with the symbol is AC voltage. | |
| = | DC voltage: This symbol indicates that the rated voltage marked with the symbol is DC voltage. | |
| Caution, Consult instructions for use: This symbol instructs the user to consult the user manual for further safety related information. | ||
WARNING
- To reduce the risk of fire or electric shock, do not expose this appliance to rain or moisture.
CAUTION
- TO PREVENT ELECTRIC SHOCK, MATCH WIDE BLADE OF PLUG TO WIDE SLOT, FULLY INSERT.
- This apparatus shall always be connected to a AC outlet with a protective grounding connection.
- To disconnect the apparatus from the mains, the plug must be pulled out from the mains socket, therefore the mains plug shall be readily operable.
- Do not expose this apparatus to dripping or splashing. Do not put objects filled with liquids, such as vases on the apparatus.
- To turn this apparatus off completely, you must pull the power plug out of the wall socket. Consequently, the power plug must be easily and readily accessible at all times.
PRECAUTIONS
- Ensure that the AC power supply in your house complies with the power requirements listed on the identification sticker located on the bottom of your product. Install your product horizontally, on a suitable base (furniture), with enough space around it for ventilation (7 10~cm) . Make sure the ventilation slots are not covered. Do not place the unit on amplifiers or other equipment which may become hot. This unit is designed for continuous use. To fully turn off the unit, disconnect the AC plug from the wall outlet. Unplug the unit if you intend to leave it unused for a long period of time.
- During thunderstorms, disconnect the AC plug from the wall outlet. Voltage peaks due to lightning could damage the unit.
- Do not expose the unit to direct sunlight or other heat sources. This could lead to overheating and cause the unit to malfunction.
-
Protect the product from moisture (i.e. vases), and excess heat (e.g. a fireplace) or equipment creating strong magnetic or electric fields. Unplug the power cable from the AC wall socket if the unit malfunctions. Your product is not intended for industrial use. It is for personal use only. Condensation may occur if your product has been stored in cold temperatures. If transporting the unit during the winter, wait approximately 2 hours until the unit has reached room temperature before using.
-
The battery used with this product contains chemicals that are harmful to the environment. Do not dispose of the battery in the general household trash. Do not expose the battery to excess heat, direct sunlight, or fire. Do not short circuit, disassemble, or overheat the battery. Danger of explosion if the battery is replaced incorrectly. Replace only with the same or equivalent type.
ABOUT THIS MANUAL
The user manual has two parts: this simple paper, USER MANUAL and a detailed FULL MANUAL you can download.

USER MANUAL
See this manual for safety instructions, product installation, components, connections, and product specifications.
FULL MANUAL
You can access the FULL MANUAL on Samsung's on-line customer support centre by scanning the QR code. To see the manual on your PC or mobile device, download the manual in document format from Samsung's website. (http://www.samsung.com/support)
Design and specifications are subject to change without prior notice.
CONTENTS
01 Checking the Components 2
Inserting Batteries before using the Remote Control (AA batteries X 2) 2
02 Product Overview 3
Front Panel / Top Panel of the Soundbar 3
Bottom Panel of the Soundbar 4
03 Connecting the Soundbar 5
Connecting Electrical Power 5
Connecting the Soundbar to the Subwoofer 6
- Automatic connection between the Subwoofer and the Soundbar 6
- Manually connecting the Subwoofer if automatic connection fails 7
Connecting an SWA-8500S (Sold Separately) to your Soundbar
04 Connecting to your TV 10
Method 1. Connecting with a Cable 10
- Connecting using an Optical Cable 10
Method 2. Connecting Wirelessly 11
- Connecting a TV via Bluetooth 11
05 Connecting an External Device 13
Connecting using an Optical Cable 13
06 Connecting a USB Storage Device 14
07 Connecting a Mobile Device 16
Connecting via Bluetooth 16
08 Using the Remote Control 19
How to Use the Remote Control 19
Adjusting the Soundbar volume with a TV remote control 22
Using the Hidden Buttons (Buttons with more than one function) 23
Output specifications for the different sound effect modes 23
09 Installing the Wall Mount 24
Installation Precautions 24
Wallmount Components 24
10 Software Update 26
Update Procedure 27
If UPDATE is not displayed 27
11 Troubleshooting 28
12 Licence 29
13 Open Source Licence Notice 29
14 Important Notes About Service 29
15 Specifications and Guide 30
Specifications 30
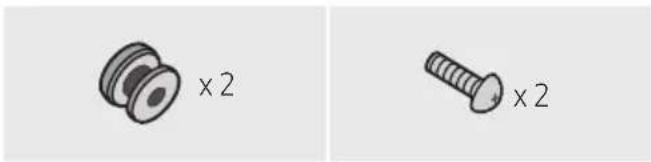
01 CHECKING THE COMPONENTS


Soundbar Main Unit Subwoofer Remote Control / Batteries
Power Cord (Subwoofer, Soundbar)

Holder-Screw Screw
- For more information about the power supply and power consumption, refer to the label attached to the product. (Label: Bottom of the Soundbar Main Unit)
- To purchase additional components or optional cables, contact a Samsung Service Centre or Samsung Customer Care.
- The appearance of the accessories may differ slightly from the illustrations above.
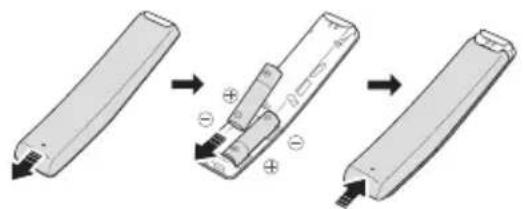
Inserting Batteries before using the Remote Control (AA batteries X 2)
Slide the back cover in the direction of the arrow until it is completely removed. Insert 2 AA batteries (1.5V) oriented so that their polarity is correct. Slide the back cover back into position.
Bracket-Wall Mount
02 PRODUCT OVERVIEW
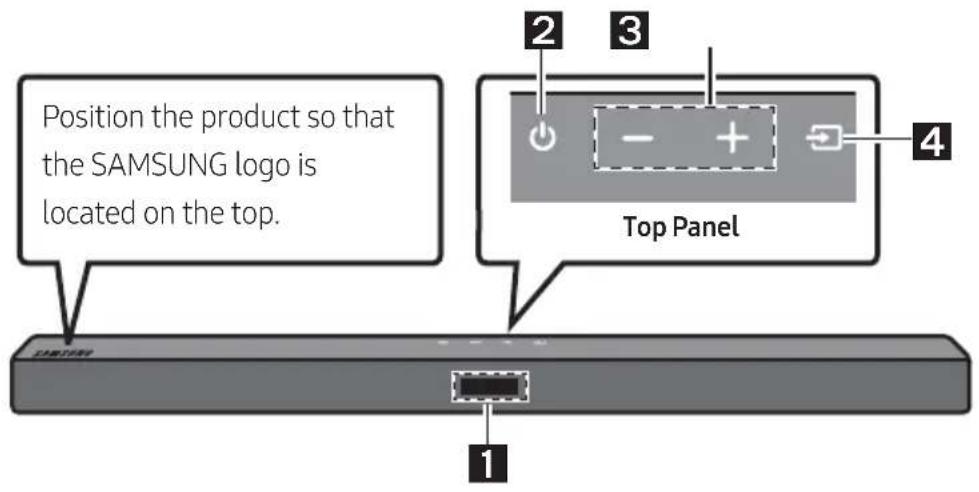
Front Panel / Top Panel of the Soundbar
| 1 | Display Displays the product's status and current mode. | |
| 2 | (Power) Button Turns the power on and off. • Auto Power Down Function The unit turns off automatically in the following situations: - In D.IN / BT / USB Mode: If there is no audio signal for 18 minutes. | |
| 3 | + (Volume) Button Adjusts the volume. • When adjusted, the volume level appears on the Soundbar's front display. | |
| 4 | (Source) Button Selects the source input mode. | |
| Input mode Display | ||
| Optical Digital input D.IN | ||
| BLUETOOTH mode BT | ||
| USB mode USB | ||
| To turn on "BT PAIRING" mode, change the source to "BT" mode, and then press and hold the (Source) button for more than 5 seconds. | ||
- When you plug in the AC cord, the power button will begin working in 4 to 6 seconds.
- When you turn on this unit, there will be a 4 to 5 second delay before it produces sound.
- If you want to enjoy sound only from the Soundbar, you must turn off the TV's speakers in the Audio Setup menu of your TV. Refer to the owner's manual supplied with your TV.
Bottom Panel of the Soundbar
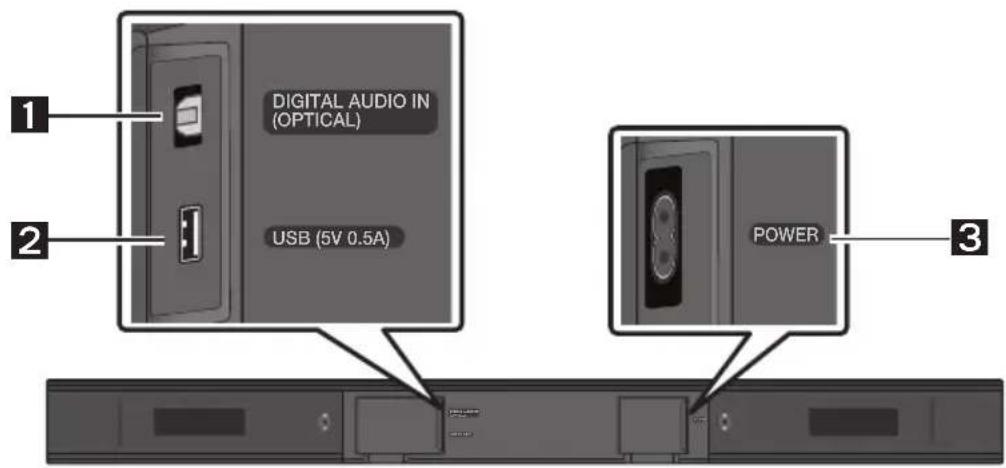
| 1 | DIGITAL AUDIO IN (OPTICAL) Connect to the digital (optical) output of an external device. |
| 2 | USB (5V 0.5A) Connect a USB device here to play music files stored on the USB device through the Soundbar. |
| 3 | POWER Connect the Soundbar's AC power cable. |
- When disconnecting the power cord from a wall outlet, pull the plug. Do not pull the cable.
- Do not connect this unit or other components to an AC outlet until all connections between components are complete.
03 CONNECTING THE SOUNDBAR
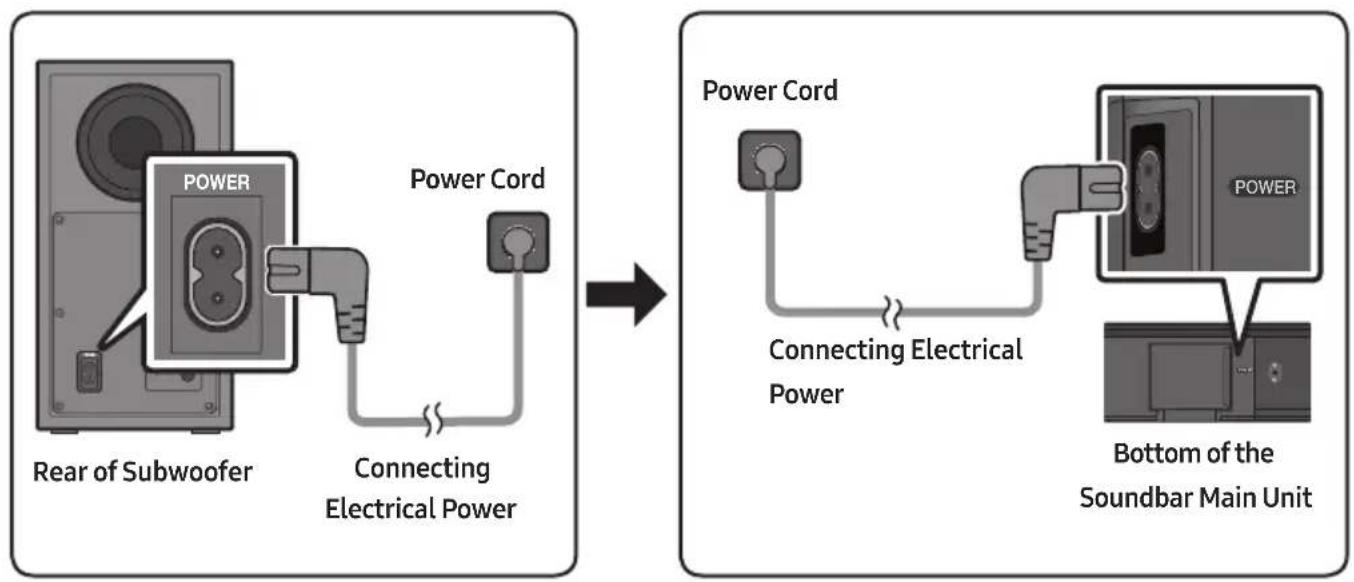
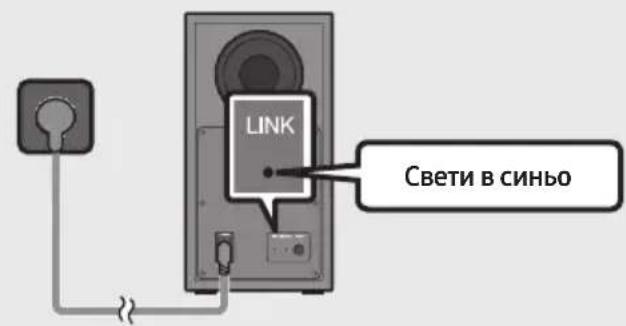
Connecting Electrical Power
Use the power components to connect the Subwoofer and Soundbar to an electrical outlet in the following order:
- Connect the power cord to the Subwoofer.
- Connect the power cord to the Soundbar.
See the illustrations below.
- For more information about the required electrical power and power consumption, refer to the label attached to the product. (Label: Bottom of the Soundbar Main Unit)
Connecting the Soundbar to the Subwoofer
When the subwoofer is connected, you can enjoy rich bass sound.
Automatic connection between the Subwoofer and the Soundbar
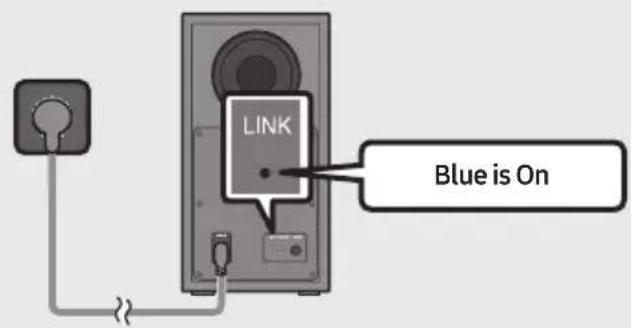
When you turn the power on after connecting the power cables to the Soundbar and subwoofer, the subwoofer is automatically connected to the Soundbar.
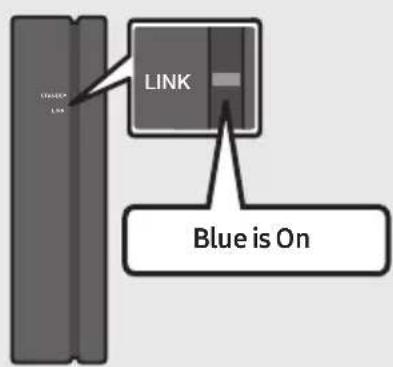
- When auto pairing is complete, the blue indicators at the rear of the subwoofer turn on.
LED Indicator Lights on the Rear of Subwoofer
| LED Status Description Resolution | |||
| Blue | On | Successfully connected (normal operation) | - |
| Blinking Recovering the connection | Check if the power cable attached to the main Soundbar unit is connected properly or wait about 5 minutes. If blinking persists, try manually connecting the subwoofer. See page 7. | ||
| Red On | Standby (with the Soundbar main unit turned off) | Check if the power cable attached to the main Soundbar unit is connected properly. | |
| Connection failed | Connect again. See the instructions for manual connection on page 7. | ||
| Red and blue | Blinking Malfunction | See the contact information for the Samsung Service Centre in this manual. | |
Manually connecting the Subwoofer if automatic connection fails
Before performing the manual connection procedure below:
- Check whether the power cables for the Soundbar and subwoofer are connected properly.
Make sure that the Soundbar is turned on.
-
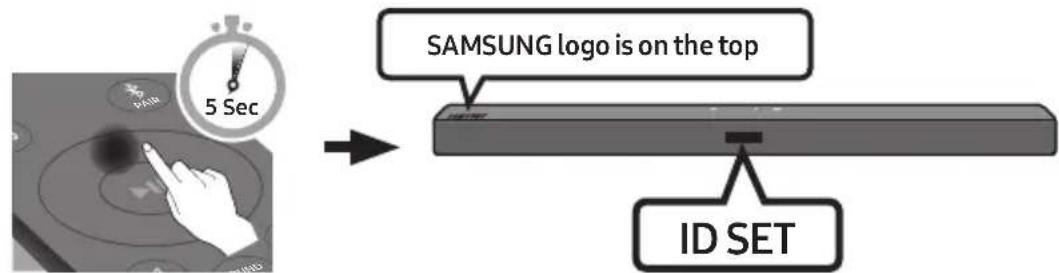
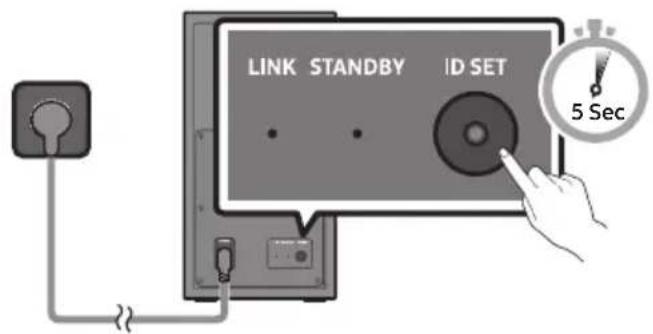
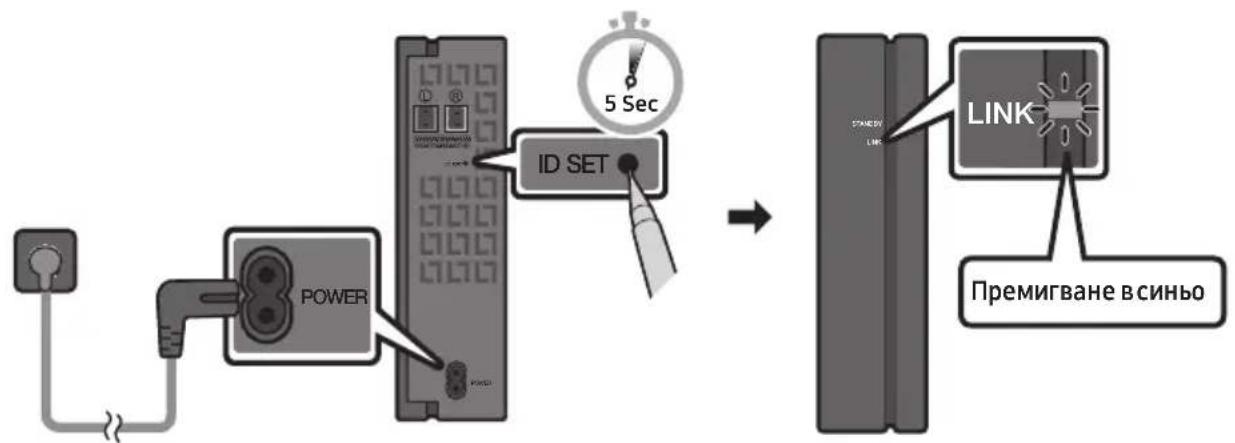
Press and hold ID SET on the rear of the subwoofer for at least 5 seconds.
-
The red indicator on the rear of the subwoofer turns off and the blue indicator blinks.
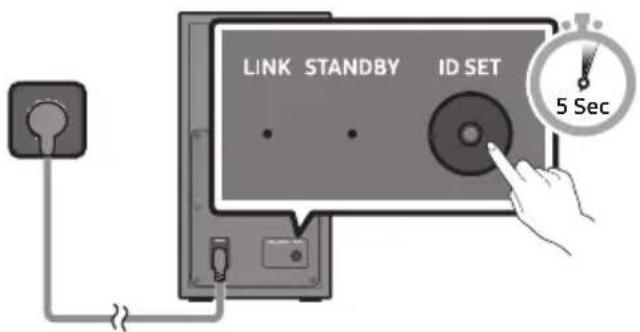
Rear of Subwoofer
-
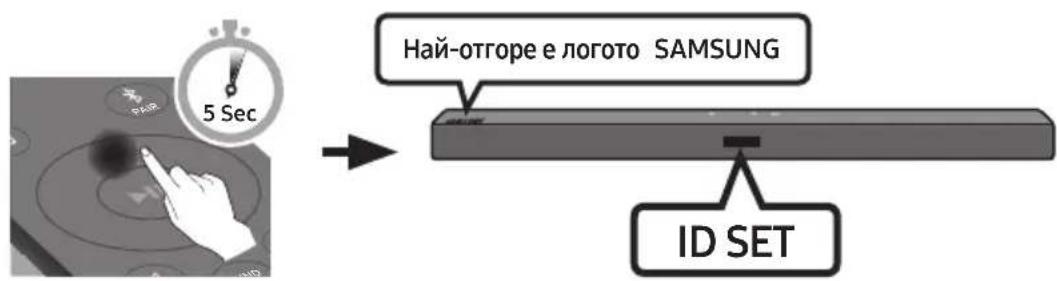
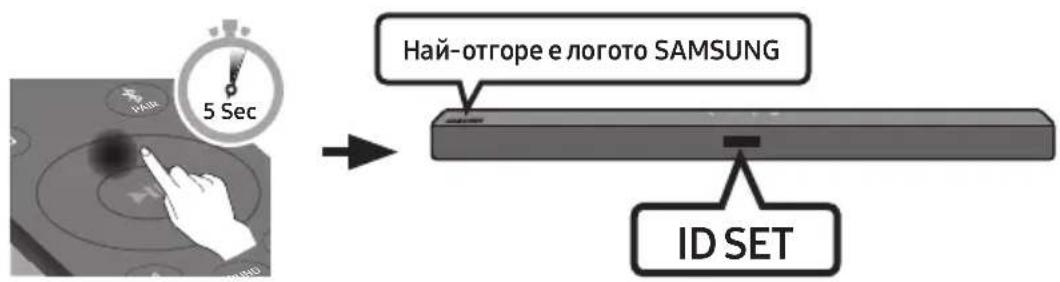
Press and hold the Up button on the remote control for at least 5 seconds.
-
The ID SET message appears on the display of the Soundbar for a moment, and then it disappears.
- The Soundbar will automatically power on when ID SET is complete.
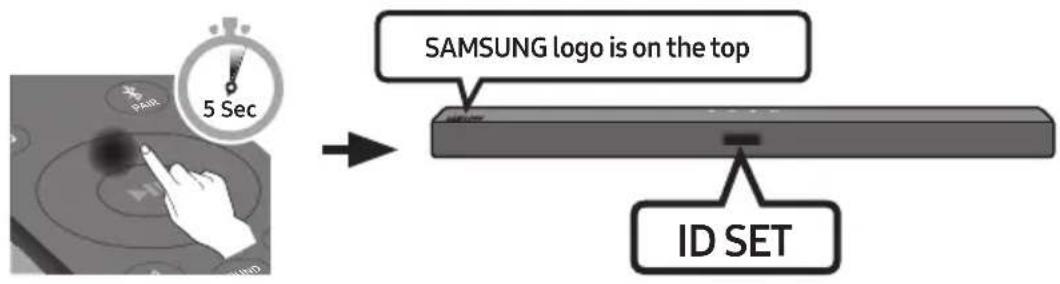
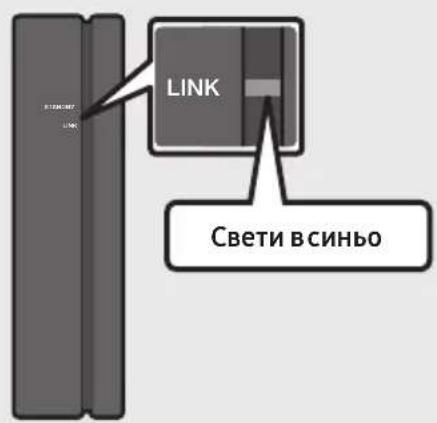
- Check if the LINK LED is solid blue (connection complete).
The LINK LED indicator stops blinking and glows a solid blue when a connection is established between the Soundbar and the Wireless Subwoofer.
NOTES
- Do not connect the power cord of this product or your TV to a wall outlet until all connections between components are complete.
- Before moving or installing this product, be sure to turn off the power and disconnect the power cord.
- If the main unit is powered off, the wireless subwoofer will go into stand-by mode and the STANDBY LED on the rear of the sub-woofer will turn red after blinking in blue several times.
- If you use a device that uses the same frequency (5.8GHz) as the Soundbar near the Soundbar, interference may cause some sound interruption.
- The maximum transmission distance of the main unit's wireless signal is about 10m , but may vary depending on your operating environment. If a steel-concrete or metallic wall is between the main unit and the wireless subwoofer, the system may not operate at all because the wireless signal cannot penetrate metal.
PRECAUTIONS
- Wireless receiving antennas are built into the wireless subwoofer. Keep the unit away from water and moisture.
- For optimal listening performance, make sure that the area around the wireless subwoofer and the Wireless Receiver Module (sold separately) is clear of any obstructions.
Connecting an SWA-8500S (Sold Separately) to your Soundbar
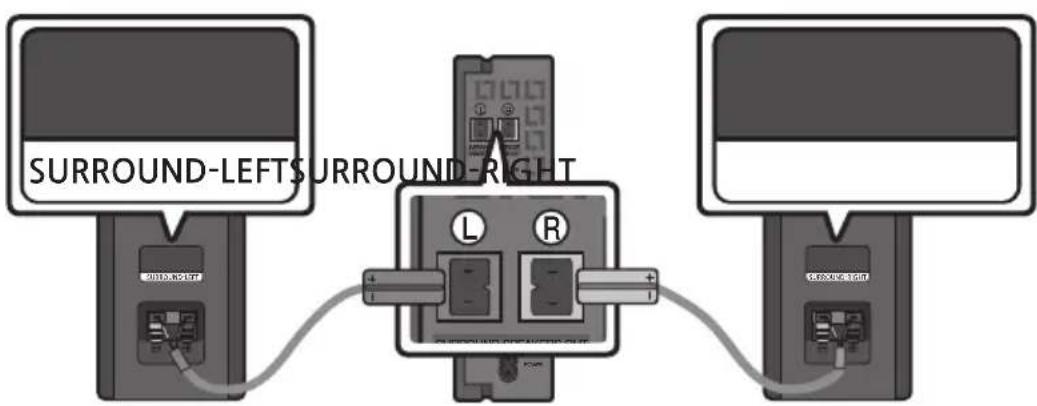
Expand to true wireless surround sound by connecting the Samsung Wireless Rear Speaker Kit (SWA-8500S, sold separately) to your Soundbar.
-
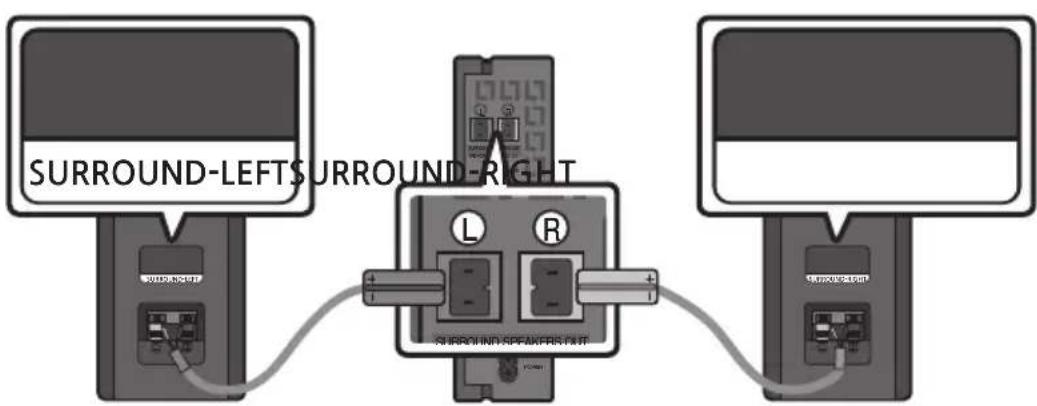
Connect the Wireless Receiver Module to 2 Surround Speakers.
-
The speaker cables are colour coded.
-
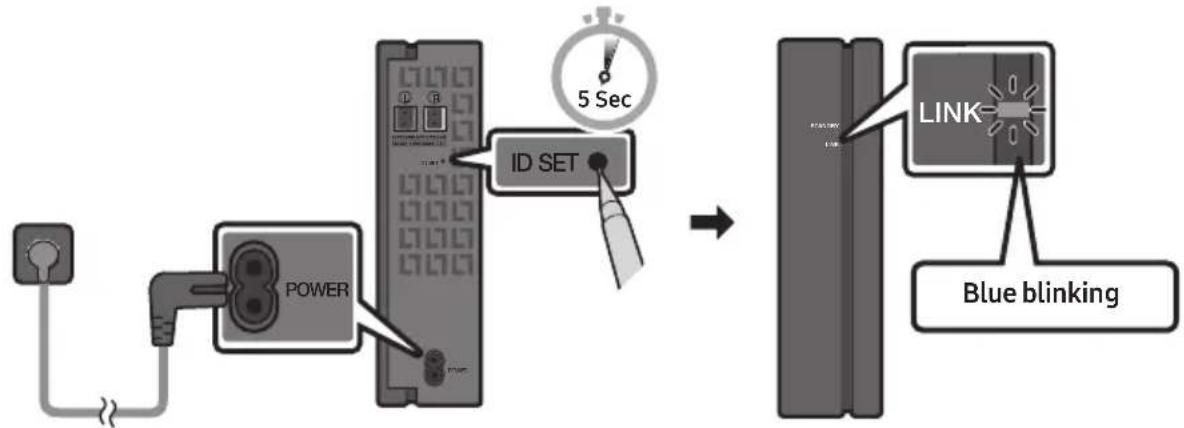
Check the standby status of the Wireless Receiver Module after plugging it into an electrical outlet.
-
The LINK LED indicator (blue LED) on the Wireless Receiver Module blinks. If the LED does not blink, press the ID SET button on the back of the Wireless Receiver Module with a pen tip for 5~6 seconds until the LINK LED indicator blinks (in Blue). For more about the LED, please refer to the SWA-8500S user manual.
-
Press and hold the Up button on the remote control for at least 5 seconds.
-
The IDSET message appears on the display of the Soundbar for a moment, and then it disappears.
- The Soundbar will automatically power on when ID SET is complete.

CAUTION
-
If your Soundbar was playing music when it connects to the SWA-8500S, you may hear some stuttering from the woofer as the connection finalises.
-
Check if the LINK LED is solid blue (connection complete).
The LINK LED indicator stops blinking and glows a solid blue when a connection is established between the Soundbar and the Wireless Receiver Module.
- If the SWA-8500S is not connected, repeat the procedure from Step 2.
04 CONNECTING TO YOUR TV
Hear TV sound from your Soundbar through wired or wireless connections.
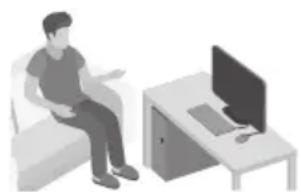
-
When the Soundbar is connected to selected Samsung TVs, the Soundbar can be controlled using the TV's remote control.
-
This feature is supported by 2017 and later Samsung Smart TVs that support Bluetooth when you connect the Soundbar to the TV using an optical cable.
-
This function also allows you to use the TV menu to adjust the sound field and various settings as well as the volume and mute.
Method 1. Connecting with a Cable
When the audio in a broadcast is encoded in Dolby Digital and the "Digital Output Audio Format" on your TV is set to PCM, we recommend that you change the setting to Dolby Digital. When the setting on the TV is changed, you will experience better sound quality. (The TV menu may use different words for Dolby Digital and PCM depending on the TV manufacturer.)
Connecting using an Optical Cable
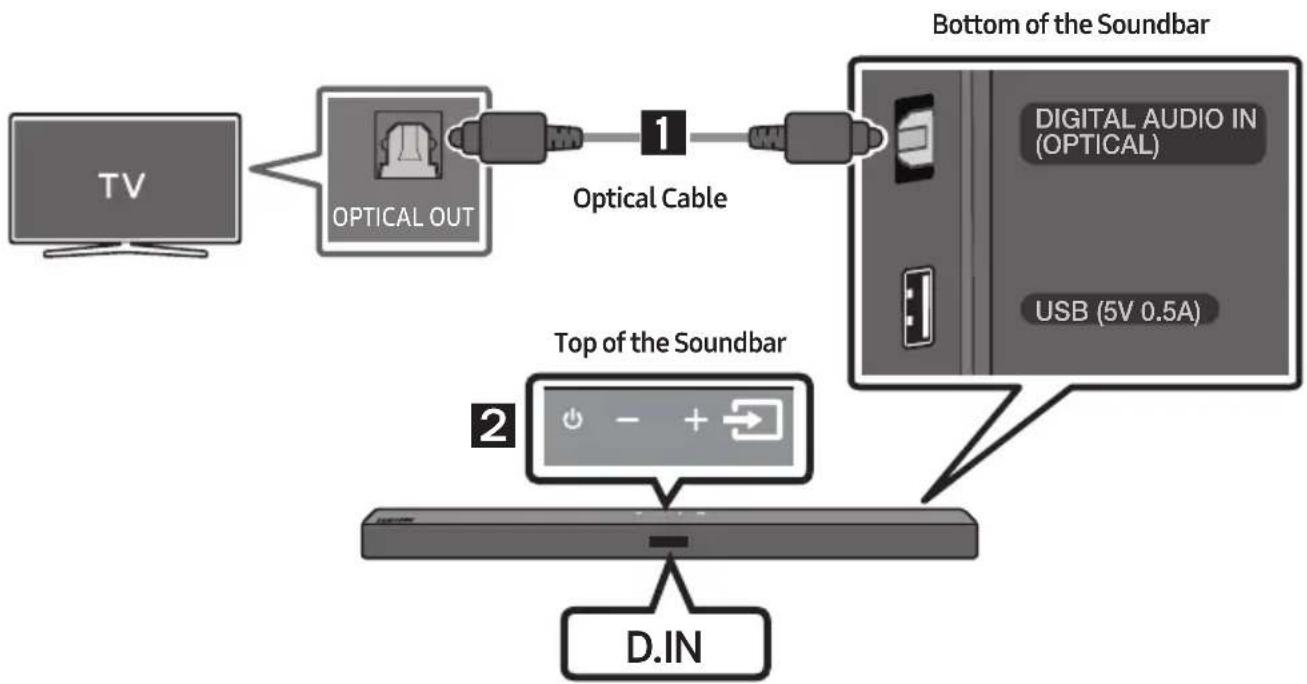
- Connect the DIGITAL AUDIO IN (OPTICAL) jack on the Soundbar to the OPTICAL OUT jack of the TV with a digital optical cable.
- Press the (Source) button on the top panel or remote control, and then select the "D.IN" mode.
Method 2. Connecting Wirelessly
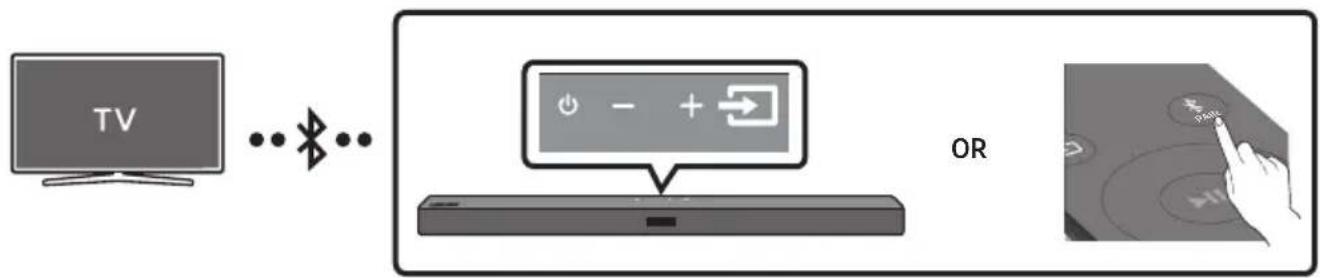
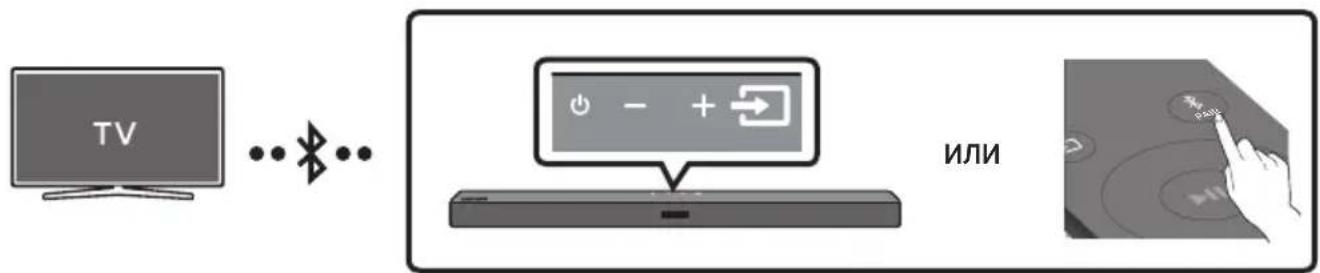
Connecting a TV via Bluetooth
When a TV is connected using Bluetooth, you can hear stereo sound without the hassle of cabling.
- Only one TV can be connected at a time.
The initial connection
- Press the PAIR button on the remote control to enter the "BT PAIRING" mode.
(OR) a. Press the (Source) button on the top panel and then select "BT".
"BT" changes to "BT PAIRING" in a few seconds automatically or changes to "BT READY" if there is a connect record.
b. When "BT READY" appears, press and hold the (Source) button on the top panel of the Soundbar for more than 5 seconds to display "BT PAIRING".
- Select Bluetooth mode on the TV. (For more information, see the TV's manual.)
- Select "[AV] Samsung Soundbar T4-Series" from the list on TV's screen.
An available Soundbar is indicated with "Need Pairing" or "Paired" on the TV's Bluetooth device list. To connect the TV to the Soundbar, select the message, and then establish a connection.
-
When the TV is connected, [TV Name] "BT" appears on the Soundbar's front display.
-
You can now hear TV sound from the Soundbar.
If the device fails to connect
- If a previously connected Soundbar listing (e.g. "[AV] Samsung Soundbar T4-Series") appears in the list, delete it.
- Then repeat steps 1 through 3.
NOTE
- After you have connected the Soundbar to your TV the first time, use the "BT READY" mode to reconnect.
Disconnecting the Soundbar from the TV
Press the (Source) button on the top panel or on the remote control and switch to any mode but "BT".
- Disconnecting takes time because the TV must receive a response from the Soundbar. (The time required may differ, depending on the TV model.)
- To cancel the automatic Bluetooth connection between the Soundbar and TV, press the Left button on the remote control for 5 seconds with the Soundbar in "BT READY" status. (Toggle On Off)
What is the difference between BT READY and BT PAIRING?
- BT READY: In this mode, you can search for previously connected TVs or connect a previously connected mobile device to the Soundbar.
- BT PAIRING: In this mode, you can connect a new device to the Soundbar. (Press the PAIR button on the remote control or press and hold the Source) button on the top of the Soundbar for more than 5 seconds while the Soundbar is in "BT" mode.)
NOTES
- If asked for a PIN code when connecting a Bluetooth device, enter <0000> .
- In Bluetooth connection mode, the Bluetooth connection will be lost if the distance between the Soundbar and the Bluetooth device exceeds 10m .
- The Soundbar automatically turns off after 18 minutes in the Ready state.
-
The Soundbar may not perform Bluetooth search or connection correctly under the following circumstances:
-
If there is a strong electrical field around the Soundbar.
- If several Bluetooth devices are simultaneously paired with the Soundbar.
-
If the Bluetooth device is turned off, not in place, or malfunctions.
-
Electronic devices may cause radio interference. Devices that generate electromagnetic waves must be kept away from the Soundbar main unit - e.g., microwaves, wireless LAN devices, etc.
05 CONNECTING AN EXTERNAL DEVICE
Connect to an external device via a wired connection or Bluetooth connection to play the external device's sound through the Soundbar.
Connecting using an Optical Cable
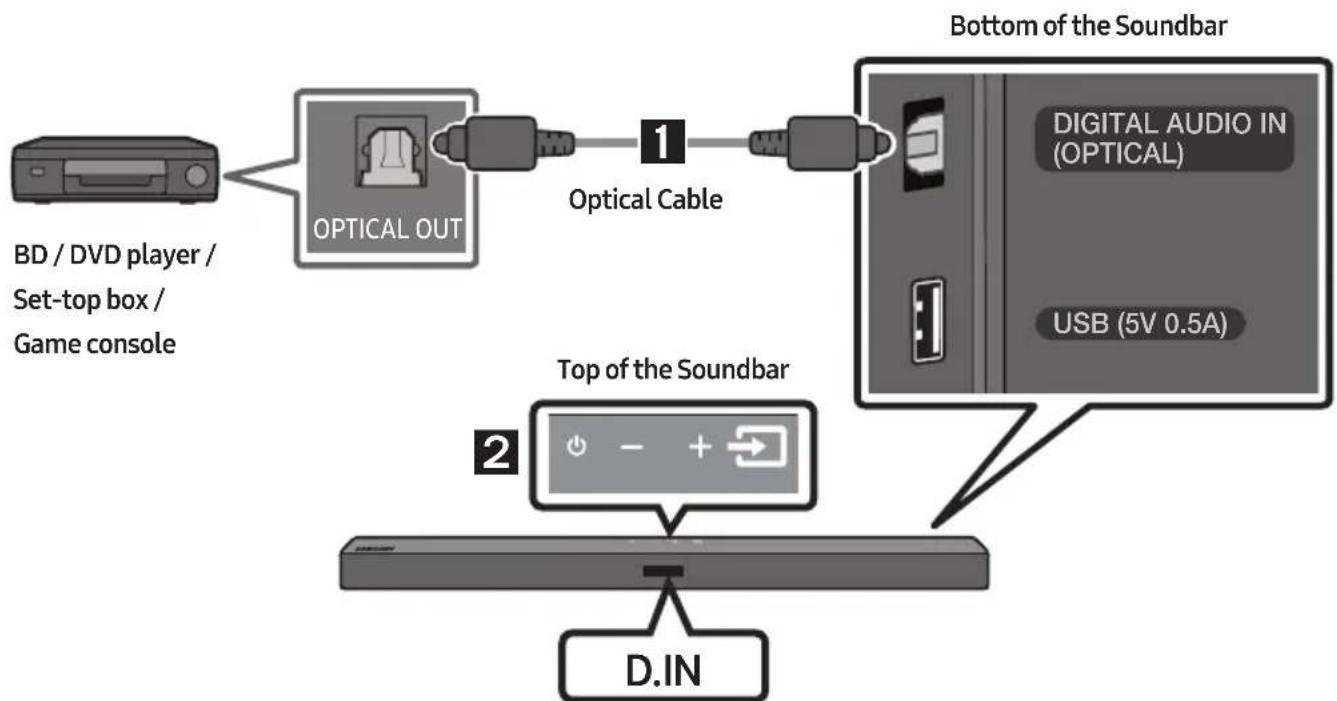
- Connect DIGITAL AUDIO IN (OPTICAL) on the main unit to the OPTICAL OUT jack of the Source Device using a digital optical cable.
- Select "D.IN" mode by pressing the (Source) button on the top panel or on the remote control.
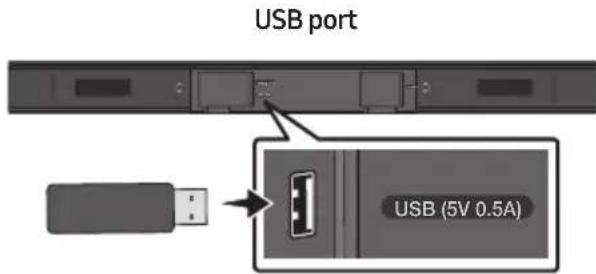
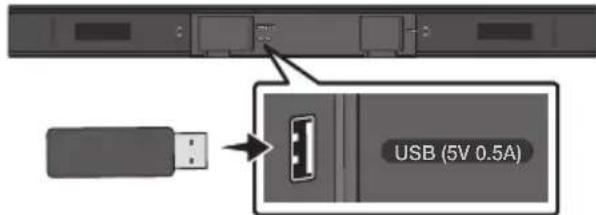
06 CONNECTING A USB STORAGE DEVICE
You can play music files located on USB storage devices through the Soundbar.
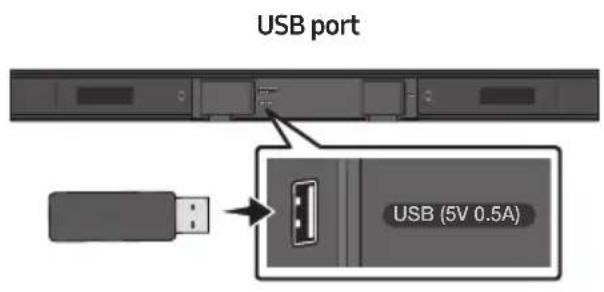
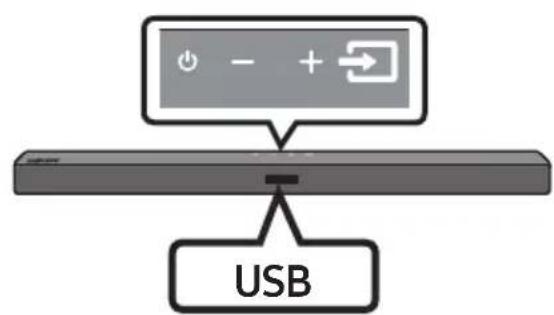
- Connect the USB device to the USB port on the bottom of the product.
- Press the (Source) button on the top panel or on the remote control, and then select "USB".
- "USB" appears in the display screen.
-
Play music files from the USB storage device through the Soundbar.
-
The Soundbar automatically turns off (Auto Power Down) if no USB device has been connected for more than 18 minutes.
File Format Type Compatibility list
| Extension | Codec | Sampling Rate | Bit Rate |
| *.mp3 MPEG1 | Layer2 32kHz ~ 48kHz 32kbps~320kbps | ||
| MPEG 1 Layer3 32kHz ~ 48kHz~Hz 32kbps~320kbps | |||
| MPEG 2 Layer3 16kHz ~ 24kHz~Hz 8kbps~160kbps | |||
| MPEG 2.5 Layer3 8kHz ~ 12kHz~Hz 8kbps~160kbps | |||
| *.wma | WMA7/8/9/STD | 8kHz ~ 48kHz | 32kbps~320kbps |
| *.aac | AAC | 8kHz ~ 96kHz | <1728kbps |
| AAC-LC | |||
| HE-AAC | |||
| *.ogg | Vorbis codec | (8, 16, 22.05, 32, 44.1, 48)kHz | unsupported ogg: 1. block size 0 < 256, block size 0 > 1024 2. block size 1 < 512, block size 1 > 4096 3. codebook counter > 64 4. codebook entry > 640 5. floor counter > 2 6. floor type 0 7. residua counter > 2 8. dimension != 2 9. mapping counter > 2 10. mode couter > 2 11. residue type != channel number |
| *.flac | - | 8kHz ~ 192kHz | <5Mbps |
| *.wav | PCM/LPCM/IMA_ADPCM/MPEG/MULAW | 8kHz ~ 192kHz < 5Mbps | |
| *.AIFF | Compression type: alwa, ulaw, swt | (8, 16, 22.05, 32, 44.1, 48, 96, 192)kHz ≤ 2 channels | <5Mbps |
- If there are too many folders and files stored on the USB device, it may take the Soundbar sometime to access and play files.
07 CONNECTING A MOBILE DEVICE
Connecting via Bluetooth
When a mobile device is connected using Bluetooth, you can hear stereo sound without the hassle of cabling.
- You cannot connect more than one Bluetooth device at a time.

The initial connection
- Press the PAIR button on the remote control to enter the "BT PAIRING" mode.
(OR) a. Press the (Source) button on the top panel and then select "BT". "BT" changes to "BT PAIRING" in a few seconds automatically or changes to "BT READY" if there is a connect record.
b. When "BT READY" appears, press and hold the (Source) button on the top panel of the Soundbar for more than 5 seconds to display "BT PAIRING".
-
On your device, select "[AV] Samsung Soundbar T4-Series" from the list that appears.
-
When the Soundbar is connected to the Bluetooth device, [Bluetooth Device Name] "BT" appears in the front display.
-
Play music files from the device connected via Bluetooth through the Soundbar.
If the device fails to connect
-
If a previously connected Soundbar listing (e.g. "[AV] Samsung Soundbar T4-Series") appears in the list, delete it.
-
Then repeat steps 1 and 2.
NOTE
- After you have connected the Soundbar to your mobile device the first time, use the "BT READY" mode to reconnect.
What is the difference between BT READY and BT PAIRING?
- BT READY: In this mode, you can search for previously connected TVs or connect a previously connected mobile device to the Soundbar.
- BT PAIRING: In this mode, you can connect a new device to the Soundbar. (Press the PAIR button on the remote control or press and hold the Source) button on the top of the Soundbar for more than 5 seconds while the Soundbar is in "BT" mode.)
NOTES
- If asked for a PIN code when connecting a Bluetooth device, enter <0000>.
- In Bluetooth connection mode, the Bluetooth connection will be lost if the distance between the Soundbar and the Bluetooth device exceeds 10m .
- The Soundbar automatically turns off after 18 minutes in the Ready state.
-
The Soundbar may not perform Bluetooth search or connection correctly under the following circumstances:
-
If there is a strong electrical field around the Soundbar.
- If several Bluetooth devices are simultaneously paired with the Soundbar.
-
If the Bluetooth device is turned off, not in place, or malfunctions.
-
Electronic devices may cause radio interference. Devices that generate electromagnetic waves must be kept away from the Soundbar main unit - e.g., microwaves, wireless LAN devices, etc.
The Soundbar supports SBC data (44.1kHz, 48kHz). - Connect only to a Bluetooth device that supports the A2DP (AV) function.
- You cannot connect the Soundbar to a Bluetooth device that supports only the HF (Hands Free) function.
-
Once you have paired the Soundbar to a Bluetooth device, selecting "[AV] Samsung Soundbar T4-Series" from the device's scanned devices list will automatically change the Soundbar to "BT" mode.
-
Available only if the Soundbar is listed among the Bluetooth device's paired devices.
(The Bluetooth device and the Soundbar must have been previously paired at least once.)
- The Soundbar will appear in the Bluetooth device's searched devices list only when the Soundbar is displaying "BT READY".
- The Soundbar cannot be paired to another Bluetooth device if already in Bluetooth mode and paired to a Bluetooth device.
Bluetooth Power On (SOUND MODE)
If a previously paired Bluetooth device tries to pair with the Soundbar when the Bluetooth Power On function is on and the Soundbar is turned off, the Soundbar turns on automatically.
- Press and hold the SOUND MODE button for more than 5 seconds on the remote while the Soundbar is turned on.
- "ON-BLUETOOTH POWER" appears on the Soundbar's display.
Disconnecting the Bluetooth device from a Soundbar
You can disconnect a Bluetooth device from the Soundbar. For instructions, see the Bluetooth device's user manual.
- The Soundbar will be disconnected.
- When the Soundbar is disconnected from the Bluetooth device, the Soundbar will display "BT DISCONNECTED" on the front display.
Disconnecting the Soundbar from the Bluetooth device
Press the (Source) button on the top panel or on the remote control, and then change to any mode except "BT".
- Disconnecting takes time because the Bluetooth device must receive a response from the Soundbar. (Disconnection time may differ, depending on the Bluetooth device)
- When the Soundbar is disconnected from the Bluetooth device, the Soundbar will display "BT DISCONNECTED" on the front display.
NOTES
- In Bluetooth connection mode, the Bluetooth connection will be lost if the distance between the Soundbar and the Bluetooth device exceeds 10m .
- The Soundbar automatically turns off after 18 minutes in the Ready state.
More About Bluetooth
Bluetooth is a technology that enables Bluetooth-compliant devices to interconnect easily with each other using a short wireless connection.
- A Bluetooth device may cause noise or malfunction, depending on usage, if:
- A part of your body is in contact with the receiving/transmitting system of the Bluetooth device or the Soundbar.
- It is subject to electrical variation from obstructions caused by a wall, corner, or office partition.
- It is exposed to electrical interference from same frequency-band devices including medical equipment, microwave ovens, and wireless LANs.
- Pair the Soundbar with the Bluetooth device while they are close together.
- The further the distance between the Soundbar and Bluetooth device, the worse the quality is. If the distance exceeds the Bluetooth operational range, the connection is lost.
- In poor reception areas, the Bluetooth connection may not work properly.
- The Bluetooth connection only works when it is close to the unit. The connection will be automatically cut off if the Bluetooth device is out of range. Even within range, the sound quality may be degraded by obstacles such as walls or doors.
- This wireless device may cause electric interference during its operation.
08 USING THE REMOTE CONTROL
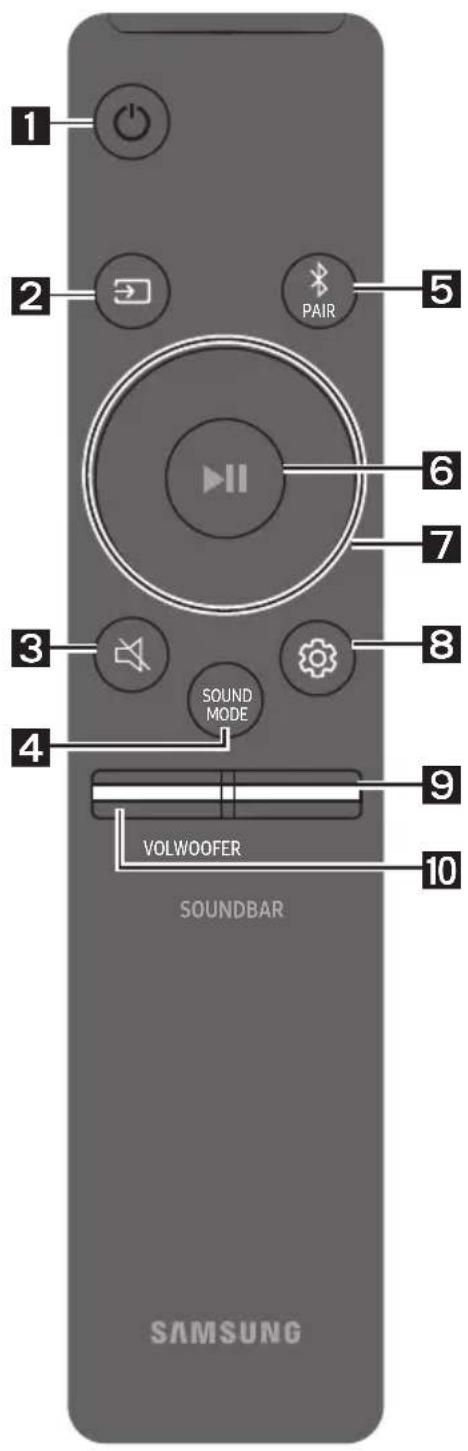
How to Use the Remote Control
| 1 | Power | Turns the Soundbar on and off. |
| 2 | Source | Press to select a source connected to the Soundbar. |
| 3 | Mute | Press the (Mute) button to mute the sound. Press it again to unmute the sound. |
| 4 | SOUND MODE | You can select the desired sound effect by choosing STANDARD, SURROUND SOUND, GAME, or SMART. - STANDARD Outputs the original sound. - SURROUND SOUND Provides a wider sound field than standard. - GAME Provides stereoscopic sound to immerse you in the action while gaming. - SMART Analyzes the content in real time and automatically provides the optimal sound field based on the characteristics of the content. - DRC (Dynamic Range Control) Lets you apply dynamic range control to Dolby Digital tracks. Press and hold the SOUND MODE button while the Soundbar is powered off to turn DRC (Dynamic Range Control) on or off. With the DRC turned on, loud sound is reduced. (The sound may be distorted.) |
| • Bluetooth Power This feature automatically turns the Soundbar on when it receives a connection request from a previously connected TV or Bluetooth device. The setting is On by default. - Press and hold the SOUND MODE button for more than 5 seconds to turn off the Bluetooth Power function. | ||
| 5 | PAIR Bluetooth PAIR | Press the PAIR button. "BT PAIRING" appears in the Soundbar's display. You can connect the Soundbar to a new Bluetooth device in this mode by selecting the Soundbar from the Bluetooth device's search list. |
| 6 | Play / Pause | Press the button to pause a music file temporarily. When you press the button again, the music file plays. |
| 7 | Up/Down/ Left/Right | Press the indicated areas to select Up/Down/Left/Right. Press Up/Down/Left/Right on the button to select or set functions. • Repeat To use the Repeat function in "USB" mode, press the Up button. • Music Skip Press the Right button to select the next music file. Press the Left button to select the previous music file. • ID SET Press and hold the Up button for 5 seconds to complete ID SET (when connecting to an accessory item). • Volume Restriction function To protect your hearing, the Volume Restriction function restricts the volume to 20 if you turn on the Soundbar when the volume is set higher than 20. - The default value for the Volume Restriction function is Off. You must turn it on to activate it. - When turned on, the Volume Restriction function stays on even when the power is turned off. - To turn Volume Restriction on or off, press and hold the Down button on the remote control for 5 seconds in standby mode. With Volume Restriction off, "V FREE" appears on the front display. With the function on, "V LOCK" appears. |
| 8 | Sound Control | You can select TREBLE, BASS, or AUDIO SYNC. • To control the volume of the treble or bass sound, press the Sound Control button to select TREBLE or BASS and then adjust the volume between -6~+6 by using the Up/Down buttons. • Press and hold the 3 (Sound Control) button for about 5 seconds to adjust the sound for each frequency band. 150Hz, 300Hz, 600Hz, 1.2kHz, 2.5kHz, 5kHz, and 10kHz are selectable using the Left/Right buttons and each can be adjusted to a setting between -6 to +6 using the Up/Down buttons. • If the video on the TV and audio from the Soundbar are not synchronised, press the Sound Control button to select AUDIO SYNC and then set the audio delay between 0~300 milliseconds by using the Up/Down buttons. (Not available in “USB” mode.) • AUDIO SYNC is only supported for some functions. |
| 9 | WOOFER | Rock the WOOFER button forward or backward to adjust the volume of the subwoofer to -12 or between -6 to +6. To set the subwoofer volume level to 0, press the button in. |
| 10 | VOL | Rock the VOL button forward or backward to adjust the volume. • Mute Press the VOL button in to mute the sound. Press it in again to unmute the sound. |
Adjusting the Soundbar volume with a TV remote control
If you have a Samsung TV, you can adjust the Soundbar's volume using the IR remote control that came with your Samsung TV.
First use the TV menu to set the TV audio on your Samsung TV to external speakers, then use your Samsung remote to control the Soundbar's volume. For more information, see the TV's user manual. The default mode for this function is control by a Samsung TV remote. If your TV is not a Samsung TV, follow the directions below to change the settings of this function.
- Turn Off the Soundbar.
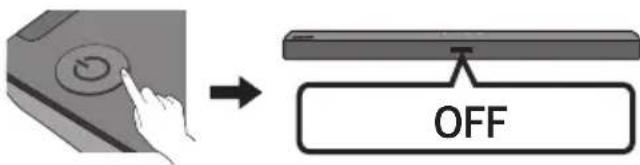
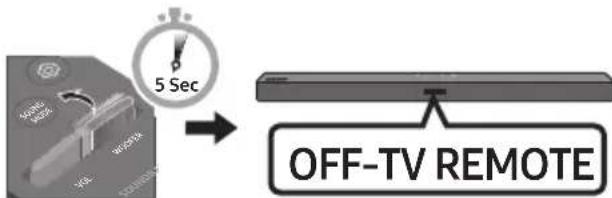
- If you do not want to use this function, push up and hold the WOOFER button for 5 seconds repeatedly until "OFF-TV REMOTE" appears in the display.
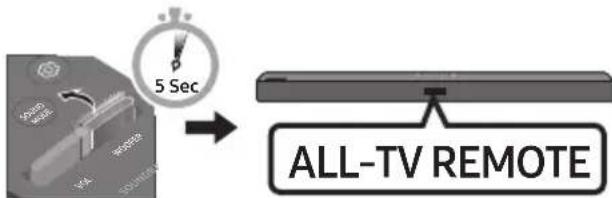
- If you want to control the Soundbar with your TV's remote, push up and hold the WOOFER button for 5 seconds repeatedly until "ALL-TV REMOTE" appears in the display. Then, use your TV's menu to select external speakers.
- If you want to return the Soundbar to the default mode (control by a Samsung TV remote), push up and hold the WOOFER button for 5 seconds repeatedly until "SAMSUNG-TV REMOTE" appears in the display.
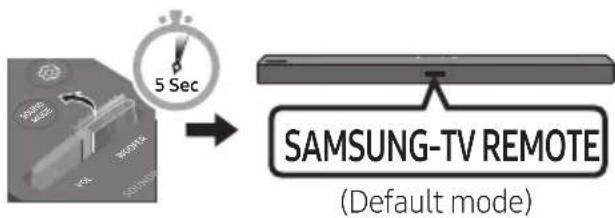
Each time you push the WOOFER button up and hold it for 5 seconds, the mode switches in the following order: "SAMSUNG-TV REMOTE" (Default mode) "OFF-TVREMOTE" "ALL-TV REMOTE".
- This function may not be available, depending on the remote control.
- Manufacturers supporting this function: VIZIO, LG, Sony, Sharp, PHILIPS, PANASONIC, TOSHIBA, Hisense, RCA
Using the Hidden Buttons (Buttons with more than one function)
| Hidden Button | Reference page | |
| Remote Control Button Function | ||
| WOOFER (Up) | TV remote control On/Off (Standby) | page 22 |
| II (Play / Pause) | Initialise (Standby) | page 27 |
| Left | TV Auto connect On/Off (BT Ready) | page 12 |
| Up | ID SET (Standby) | page 20 |
| Down | Volume Restriction On/Off (Standby) | page 20 |
| (Sound Control) | 7 Band EQ page 21 | |
| SOUND MODE | DRC ON/OFF (Standby) page 19 | |
| Bluetooth Power page 20 | ||
Output specifications for the different sound effect modes
| Effect | Input | Output | ||
| Without Wireless Rear Speaker Kit | With Wireless Rear Speaker Kit | |||
| SOUND MODE | STANDARD | 2.0 ch | 2.1 ch | 4.1 ch |
| 5.1 ch | 2.1 ch | 4.1 ch | ||
| SURROUND SOUND | 2.0 ch | 2.1 ch | 4.1 ch | |
| 5.1 ch | 2.1 ch | 4.1 ch | ||
| GAME | 2.0 ch | 2.1 ch | 4.1 ch | |
| 5.1 ch | 2.1 ch | 4.1 ch | ||
| SMART | 2.0 ch | 2.1 ch | 4.1 ch | |
| 5.1 ch | 2.1 ch | 4.1 ch | ||
- The Samsung Wireless Rear Speaker Kit can be purchased separately. To purchase a Kit, contact the vendor you purchased the Soundbar from.
09 INSTALLING THE WALL MOUNT
Wallmount Components

Wall Mount Guide

Holder-Screw Screw
Bracket-Wall Mount
-
Place the Wall Mount Guide against the wall surface.
-
The Wall Mount Guide must be level.
- If your TV is mounted on the wall, install the Soundbar at least 5 cm below the TV.
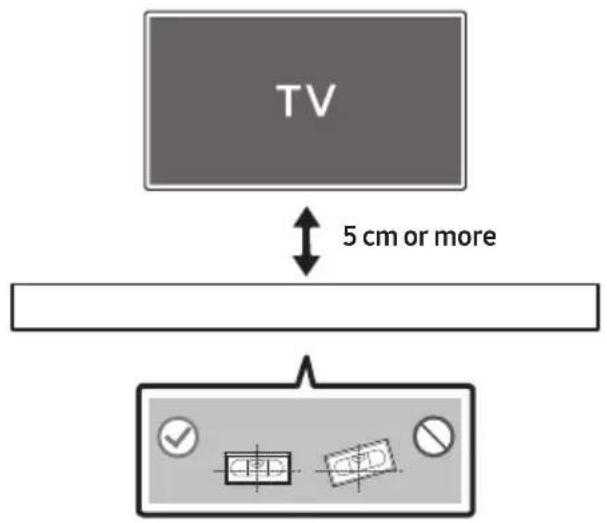
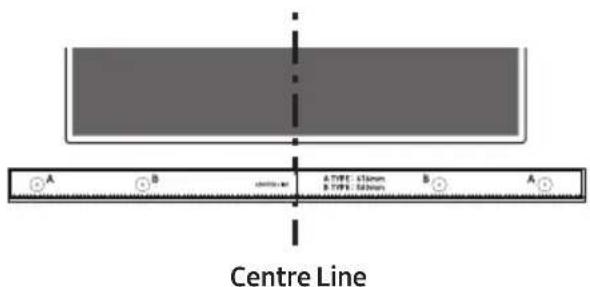
- Align the Wall Mount Guide's Centre Line with the centre of your TV (if you are mounting the Soundbar below your TV), and then fix the Wall Mount Guide to the wall using tape.
If you are not mounting below a TV, place the Centre Line in the centre of the installation area.
- Push a pen tip or sharpened pencil tip through the centre of the B-TYPE images on each end of the Guide to mark the holes for the supporting screws, and then remove the Wall Mount Guide.
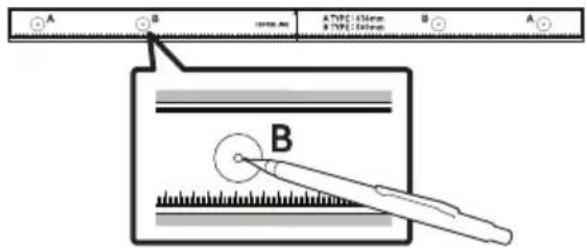
-
Using an appropriately sized drill bit, drill a hole in the wall at each marking.
-
If the markings do not correspond to the positions of studs, make sure you insert appropriate anchors or mollies into the holes before you insert the support screws. If you use anchors or mollies, make sure the holes you drill are large enough for the anchors or mollies you use.
-
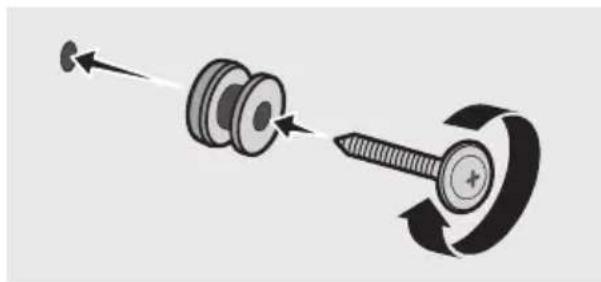
Push a screw (not supplied) through each Holder-Screw, and then screw each screw firmly into a support screw hole.
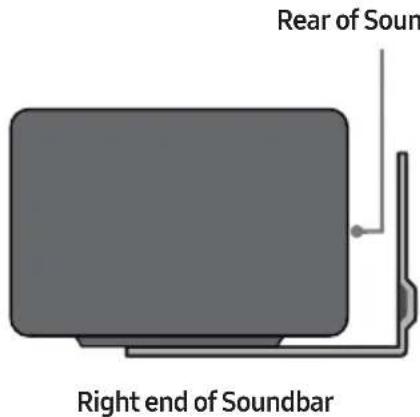
- Install the 2 Bracket-Wall Mounts in the correct orientation on the bottom of the Soundbar using 2 Screws.
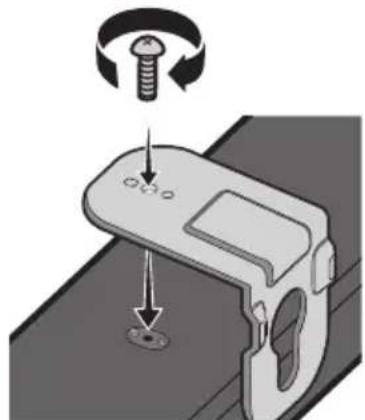
- When assembling, make sure the hanger part of the Bracket-Wall Mounts are located behind the rear of the Soundbar.
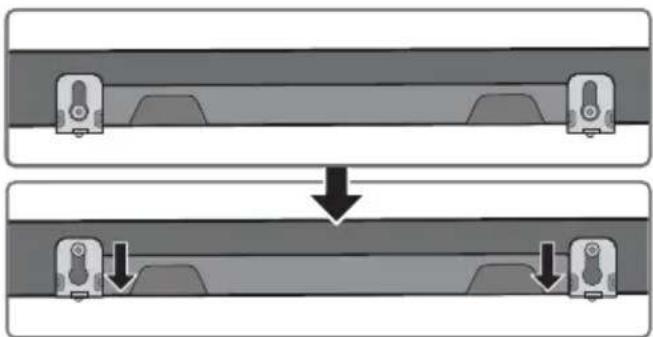
- Install the Soundbar with the attached Bracket-Wall Mounts by hanging the Bracket-Wall Mounts on the Holder-Screws on the wall.

-
Slide the Soundbar down as shown below so that the Bracket-Wall Mounts rest securely on the Holder-Screws.
-
Insert the Holder-Screws into the wide (bottom) part of the Bracket-Wall Mounts, and then slide the Bracket-Wall Mounts down so that the Bracket-Wall Mounts rest securely on the Holder-Screws.
10 SOFTWARE UPDATE
Samsung may offer updates for the Soundbar's system firmware in the future.
If an update is offered, you can update the firmware by connecting a USB device with the firmware update stored on it to the USB port on your Soundbar. For more information about how to download update files, go to the Samsung Electronics website at
www.samsung.com Support.
Then, select the product type or enter the model number of your Soundbar, select the Software & Apps option, and then Downloads. Note that the option names can vary.
Update Procedure
Important: The updating function erases all user settings. We recommend you write down your settings so that you can easily reset them after the update. Note that updating the firmware resets the subwoofer connection too.
- Connect a USB thumb drive to the USB port on your computer.
Important: Make sure there are no music files on the USB thumb drive. This may cause the firmware update to fail.
- Go to the Samsung website (samsung.com) select Enter Model Number and enter the model of your Soundbar. Select manuals and downloads and download the latest software file.
- Save the downloaded software to a USB stick and select "Extract Here" to unzip the folder.
- Turn off the Soundbar and connect the USB stick containing the software update to the USB port.
- Turn on the Soundbar and source change to "USB" mode. Within 3 minutes, "UPDATE" is displayed and updating begins.
-
When the update finishes, the Soundbar turns off (or turns off by press the power) button). Press the button on the remote control for 5 seconds. "INIT" appears on the display and then the Soundbar turns off. The update is complete.
-
This product has a DUAL BOOT function. If the firmware fails to update, you can update the firmware again.
-
Restore your settings on the Soundbar.
If UPDATE is not displayed
- Turn off the Soundbar, disconnect and then reconnect the USB storage device that contains the update files to the Soundbar's USB port.
- Disconnect the Soundbar's power cord, reconnect it, and then turn on the Soundbar.
NOTES
- The firmware update may not work properly if audio files supported by the Soundbar are stored in the USB storage device.
- Do not disconnect the power or remove the USB device while updates are being applied.
- After the update is completed, the user setup in the Soundbar is initialised so you can reset your settings. We recommend you write down your settings so that you can easily reset them after the update. Note that updating firmware resets the subwoofer connection too.
If the connection to the subwoofer is not re-established automatically after the update, refer to page 6.
If the software update fails, check if the USB stick is defective.
- Mac OS users should use MS-DOS (FAT) as the USB format.
- Updating via USB may not be available, depending on the USB storage device manufacturer.
11 TROUBLESHOOTING
Before seeking assistance, check the following.
| The unit will not turn on. |
| Is the power cord firmly plugged into the wall outlet?→ Unplug and reconnect the power cord to the wall outlet to make sure the connection is secure. |
| A function does not work when the button is pressed. |
| Is there static electricity in the air?→ Disconnect the power plug and connect it again. |
| Sound dropouts occur in BT mode. |
| → See the Bluetooth connection sections on pages 11 and 16. |
| Sound is not produced. |
| Is the Mute function on?→ Press the (Mute) button to cancel the mute function. |
| Is the volume set to minimum?→ Adjust the Volume. |
| The remote control does not work. |
| Are the batteries drained?→Replace with new batteries. |
| Is the distance between the remote control and Soundbar main unit too far?→ Move the remote control closer to the Soundbar main unit. |
| The red LED on the subwoofer blinks and the subwoofer is not producing sound. |
| This issue can occur if the subwoofer is not connected to the Soundbar main unit.→ Try to connect your subwoofer again. (See page 6.) |
| The subwoofer drones and vibrates noticeably. |
| Try to adjust the vibration of your subwoofer.→ Rock the WOOFER button on your remote control forward or backward to adjust the subwoofer level. (to -12, or between -6 ~ +6). |
12 LICENCE

DOLBY
AUDIO
Manufactured under license from Dolby Laboratories. Dolby, Dolby Audio, and the double-D symbol are trademarks of Dolby Laboratories.


2.0 Channel
For DTS patents, see http://patents.dts.com. Manufactured under license from DTS Licensing Limited. DTS, the Symbol, DTS in combination with the Symbol, and DTS 2.0 Channel are registered trademarks or trademarks of DTS, Inc. in the United States and/or other countries. © DTS, Inc. All Rights Reserved.

Bluetooth
The Bluetooth® word mark and logos are registered trademarks owned by the Bluetooth SIG, Inc. and any use of such marks by Samsung Electronics Co., Ltd. is under license. Other trademarks and trade names are those of their respective owners.
13 OPEN SOURCE LICENCE NOTICE
To send inquiries and requests regarding open sources, contact Samsung via Email (oss.request@samsung.com).
14 IMPORTANT NOTES ABOUT SERVICE
- Figures and illustrations in this User Manual are provided for reference only and may differ from actual product appearance.
- An administration fee may be charged if either
(a) an engineer is called out at your request and there is no defect with the product (i.e. where the user manual has not been read).
(b) you bring the unit to a repair centre and there is no defect with the product (i.e. where the user manual has not been read).
- You will be informed of the administration fee amount before a technician visits.
15 SPECIFICATIONS AND GUIDE
Specifications
| Model Name HW-T450 | |
| USB 5V/0.5A | |
| Weight 1.5 kg | |
| Dimensions (W x H x D) 860.0 x 54.0 x 74.0 mm | |
| Operating Temperature Range +5°C to +35°C | |
| Operating Humidity Range 10 % ~ 75 % | |
| AMPLIFIER Rated Output power 35W x 2, 6 ohm | |
| Supported play formats (DTS 2.0 sound is played in DTS format.) | LPCM 2ch, Dolby Audio™ (supporting Dolby® Digital), DTS |
| WIRELESS DEVICE OUTPUT POWER BT max transmitter power SRD max transmitter power | 100mW at 2.4GHz – 2.4835GHz 25mW at 5.725GHz – 5.825GHz |
| Subwoofer Name PS-WT45T | |
| Weight 4.3 kg | |
| Dimensions (W x H x D) 181.5 x 343.0 x 272.0 mm | |
| AMPLIFIER Rated Output power 130W | |
| WIRELESS DEVICE OUTPUT POWER SRD max transmitter power | 25mW at 5.725GHz – 5.825GHz |
| Overall Standby Power Consumption (W) | 2.0W |
| Bluetooth Port deactivation method | Press and hold the SOUND MODE button for more than 5 seconds to turn off Bluetooth Power function. |
NOTES
Samsung Electronics Co., Ltd reserves the right to change the specifications without notice.
- Weight and dimensions are approximate.
- Hereby, Samsung Electronics, declares that this equipment is in compliance with Directive 2014/53/EU.
The full text of the EU declaration of conformity is available at the following internet address: http://www.samsung.com go to Support > Search Product Support and enter the model name.
This equipment may be operated in all EU countries.

[Correct disposal of batteries in this product]
(Applicable in countries with separate collection systems)
This marking on the battery, manual or packaging indicates that the batteries in this product should not be disposed of with other household waste at the end of their working life. Where marked, the chemical symbols Hg, Cd or Pb indicate that the battery contains mercury, cadmium or lead above the reference levels in EC Directive 2006/66.
If batteries are not properly disposed of, these substances can cause harm to human health or the environment.
To protect natural resources and to promote material reuse, please separate batteries from other types of waste and recycle them through your local, free battery return system.
Correct Disposal of This Product
(Waste Electrical & Electronic Equipment)
(Applicable in countries with separate collection systems)
This marking on the product, accessories or literature indicates that the product and its electronic accessories (e.g. charger, headset, USB cable) should not be disposed of with other household waste at the end of their working life. To prevent possible harm to the environment or human health from uncontrolled waste disposal, please separate these items from other types of waste and recycle them responsibly to promote the sustainable reuse of material resources.
Household users should contact either the retailer where they purchased this product, or their local government office, for details of where and how they can take these items for environmentally safe recycling.
Business users should contact their supplier and check the terms and conditions of the purchase contract. This product and its electronic accessories should not be mixed with other commercial wastes for disposal.
For information on Samsung's environmental commitments and product specific regulatory obligations e.g. REACH, WEEE, Batteries, visit:
http://www.samsung.com/uk/aboutsamsung/samsungelectronics/corporatecitizenship/data-corner.html
PbHcBb3BaHe Ha cy6yepa, aKO aBTOMaTnHOTo CBbp3BaHe e HeycneHHO
Ipei n3PbJIHeHne Ha npOeDypaTa 3a pbUHO CBbp3BaHe no-dOny:
-
PpOBepeTe daJIIN 3axpaHbauIte Ka6eJIHa Soundbar n Ha cy6yepa ca Cbbp3aHn npaBnHO.
-
YBepete ce, Ye Soundbar e BkIouen.
-
Hatahe 3aapbke ID SET B 3aHaTa yact Ha cy6yepa Han-Malko 3a 5 cekyni.
-
YepBENHrT INNkAToP O3aI Ha cy6yfepa Ce n3KJIOUBa I CINHrT INNkAToP IpemrBa.
3aHa qact Ha cy6yfepa
- HATINCHETe 3aIpbXTe 6yToHa Harope Ha INCTaHcNOHOTO ynpabHeHne Hn-MaIKo 3a5 cekyn.
Ha nscnne Ha Soundbar 3a MOMENT ce n3Bexka cbo6eHHeTo ID SET n cIeT TOBa n3Ye3Ba.
Soundbar ce BkIIOUba aBtOMaTnUHO, KOraTo ID SET 3aBbPSh.
- Поберета Ддн LED Индikatopbt 3a CBbp3BaHe CBETN NOCTOARHNO B CINHbO (3aBbpseho CBbp3BaHe).
LED INIINKATOpbT 3a Cbbp3BaHe cnpa da npemrBa n CBETBa NOCTOARHBO B CnHbO, KOrato e yctaHOBeHa Bpb3Ka MExdY Soundbar n 6e3xuHnry cy6yep.
BENEXKNI
He cBbp3BaIte 3axpaHbAunia Ka6eHa To3n IpoDyKT nIn Baunr TeJeBn3Op KbMeJekTpueckn KOHTaK, DOKATO BCNUK IN Bp3KN MEXky KOMNOHEHTnte He 6bDat 3abbpweH.
- Прети да пемechтite Или Инсталпат To3n npodykT, Тр6ba Да ce уberite, Ye 3axpaHbaHeto e n3KJIIOUeHO n 3axpaHbAunr Ka6e He e CBbp3aH KbM eJekTPuYeCKN KOHTaKT.
- Ako OCHOBHnT MoDyI e n3KJIoueH, 6e3KuHnT cy6yΦep Ie npemHe B peKIM Ha rTOBHOCT n CBetoIOnbT STANDBY B 3aHaTa Yact Ie CBeTHe B UepBeHo, CneI KaTo e npemrHaI HraKoI Ko IIbTN B CnHbO.
- Ako n3no3BaTe yctpoiCTBO, Koeto n3no3Ba cbuata YeCTOTA (5,8 GHz), KaKTo Soundbar, B6n3ocT JoSoundbar. cmyueneHraTa MORaT da npunHr TpeKbCbaHe Ha 3BVka.
- MakcimamHoto pa3ctoHne Ha npedabaHe Ha 6e3KnHnCnHaI Ha OCHOBnHa MOnyI e OkOIO 10 MeTpa, Ho MoKe Ida Bapnpa B 3abncmocT OT BaWata pa6oTHa CpeJa. Ako MeJy OCHOBnHa MOnyI n 6e3KnHnCy6yep Ima CTOMaHO6eTOHHa IIn MetaHa CTeHa, CNCTemata MoKe I3o6uO da He pa6oTn. 3aHTo 6e3KnHnT CnHaJI He MoKe Ja PPOHnKHe Ppe3 MetaJI.
PNEIa3HIMEPKIN
B 6e3xuHn cy6yep nMa Brgaedn aHTeHN 3a npneMahe Ha 6e3xuHc nRHaI. CbxaHraBaIte MOvnte daJeY OT BOJa N Blara.
3a da cn ocHpynte ONTmamHo KaueCTBO npn Cnyuane, yBepete ce, ye B 3oHaTa OKOIO 6e3xNCHNA BUCOKOROBOpTeI 3a HNCN YeCTOTn I MoDyna Ha 6e3xNCHNpniemHNK (npoDaBa ce OTJeHNO) HMA PpeTCTBn.
Cbbp3BaHe Ha SWA-8500S (npo#aBe ce otdeIHo) KbM Soundbar
3aДа постиггелу Истиггели 6e3жчен CBpayнд 3Byk, CBbpxkeTe KOMплкта OT 6e3жчни 3адни Високоговител Ha Samsung (SWA-8500S - прдава ce оТ徳но) кьm Soundbar.
- CbpxkTe 6e3xHnHn npneMaU MOyJ KbM 2 cbpayH BUCOKOROBOpTeJI.
Ka6eIte Ha BvcoKoROBOpTeIte Ca UBeTHO KoIpaHn.
- CnEi BkIIOUBaHe Ha 6e3KuHnI npHemaI MOnyI B eIeKtpueeCKn KOHTaKT npOBepTe daJIe E B CbCTOHa H N3aKBAHe.
LED INHINKATOPbT 3a Cbpb3BaHe (CnH LED) Ha 6e3xuHnI npHemaTeIeH MOyI npemirBa. Ako LED He npemIRBa, HATncHete 6yToHa ID SET Ha rbp6a Ha 6e3xuHnI npHemaTeIeH MOyI C BbpxHa XHMkAa 3a 5~6 cekyni, DOKATO LED INHINKAtopbT LINK npemirHe (B cnHbo). 3a OSe INHOpMaUra OTHOcHo LED BnKte pkoBOCTBOTO Ha nOtp6nteHa SWA-8500S.
- HatncheTe 3aDpBxTe 6yToHa Harope Ha nCTaHcHOnHOTo ynpabHeHne Hau-MaIKo 3a 5 cekyHn.
Ha nscnner Ha Soundbar 3a MOMENT ce n3Bexda cbo6eHHeTO ID SET n cJeT TOBa n3ye3Ba.
Soundbar ce BkHouBa aBTOMaTHUHO, KORAto ID SET 3aBbprn.

BHIMAHNE
- Ako Baunay Soundbar n3nblna My3nka, dokato ce cBbP3Ba KbM SWA-8500S, moke da
-
yBaTe n3BeCTHn CmUeHn O7 BacOBn BnCOKOrOBOpHTen, dokato ce yCTaHOBn Bp3KaTa.
-
Поберете далn LED ИндikatopbT 3a CBbp3BaHe CBETN NOCTOHHO B CINHbO (3aBbpseHo CBbp3BaHe).
LED nHnKkatopt3a Cbbp3BaHe cnnpa da npemrBa n CBETBa NOCTOARHO B CnHbO, KOrato ce yCTaHOBn Bpb3ka MeJdy Soundbar n 6e3xuHnI npneMaU MoDyI.
5.Ako SWA-8500S He ce cBbpxke, noBTope Te npoueDypata ot CTbnka 2.
04 CBbP3BAHE KbM BALUNA TEJIEBN3OP
MoxkeTe da cnlyaTe 3ByKa Ha TeIeBn3opa oT cBoa Soundbar ue3 Ka6eJHa nn6e3Ku7Ha Bpb3ka.
Korato caynd6apbTe cBbp3an KbM n36paHn TeneBn30pn Samsung, toJ moKe da ce ynpabnaBa nocpeiCTBOM dNCTaHcUOHHOynpabNeHne Ha TeneBn30pa.
- Ta3n φункця ce noДьрka ot 2017 r n ot no-HOBIne TeIeBn3Opn Samsung Smart, konTo noДьрkaT Bluetooth, korato CBpKete Soundbar KbM TeIeBn3Opa nocpeDCTBOM onTNUeH Ka6eN.
Ocben TOBa Ta3n FyHKuIg Bn N03B0JIbA Da n3NOJ3BaTe MeHIO Ha TeJIeBn3Opa, 3a Da 3aJaBaTe INoJETo Ha 3ByKa n pa3JIuHn HAcTPOIKN, KaKTO n CINaTa Ha 3ByKa n 3aRnyJUbaHeTo Ha 3ByKa.
MeToI 1. Cbbp3BaHe ue3 ka6eI
Korato n3lbvbanthe cnHan ca Dolby Digital, a hactpoikata Ha TeleBn3opa 3a „Lncpobn3xoJeH aydno fopmat" e PCM, npenopbya ce da npomeHte hactpoikata, taKa ye da 6bnde Dolby Digital. Korato hactpoikata ce npomeHn, moKeTe da cnyuatae 3Byk c no-do6po kaueCTBO. (MeHHTo Ha TeleBn3opa moote da n3noJ3Ba pa3nunHn dymn 3a Dolby Digital n PCM B 3abucmocT ot npOn3BOndTeIHa TeleBn3opa.)
Cbbp3BaHe ype3 onTnueH ka6eI
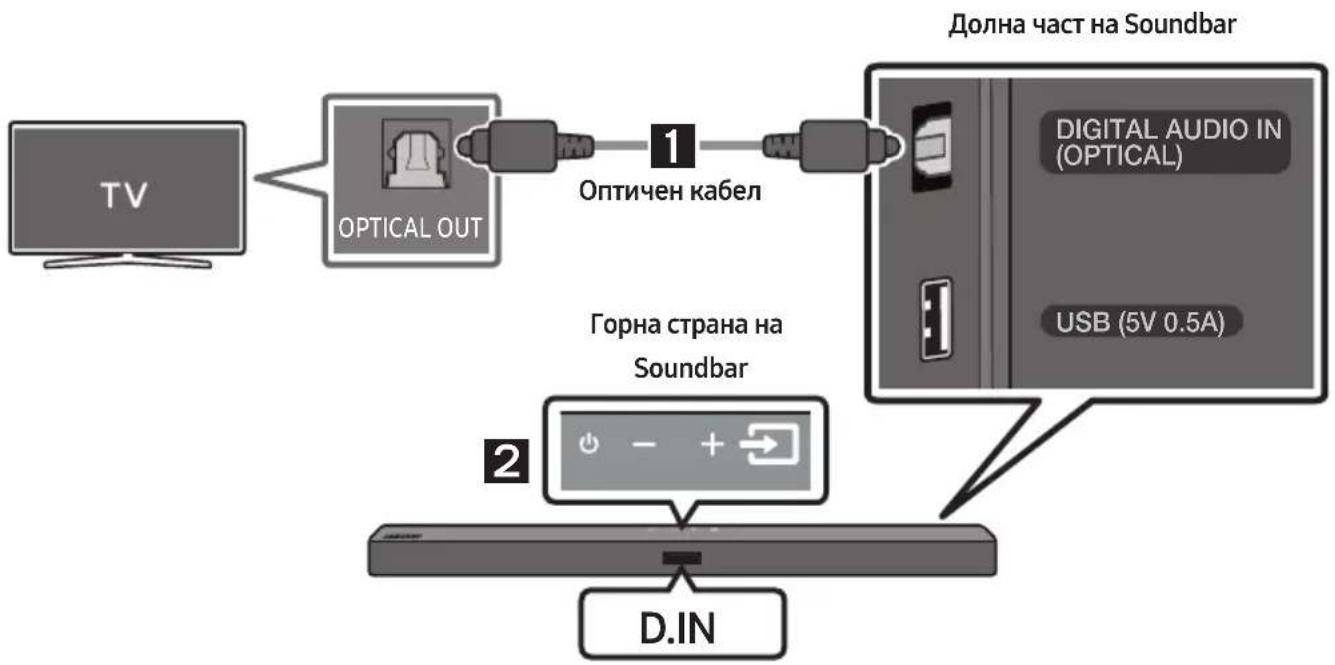
- Cbpxe Te kaka DIGITAL AUDIO IN (OPTICAL) Ha Soundbar KbM Jka OPTICAL OUT Ha TeneBn3opa Ype3 uipob onTneH Ka6en.
- Hatachete 6ytoHa (N3ToCHNK) Ha rophna nane Ha dntaHOnHOTo ynpabneHne, cne ToBa n36epTe peKIM ,D.IN".
Metod 2. Be3xuHcBbP3BaHe
CБьрЗВане на телевизор уретBluetooth
Korato TeleBn3OpbTe cBbP3aH Upe3 Bluetooth, moKeTe da cnUwate cTpeo 3Byk, 6e3 da nma xaoc Ka6eInte.
- Camo einn TeineBn3Op MoKe Ia 6bIe CbbpHaH BdaHeH MOMeHT.
PbboHaayalHo Cbbp3BaHe
- HATINCHETe 6yToH PAIR Ha nctaHcnoHHoTO yCTpoIcTBO, 3a da Bne3eTe B peKIM ,BT PAIRING".
(NJN) a. Hatnche 6byToHa (N3toHnK) Ha rOpHnaHe, cIeJ KoETo n36epTe ,BT". "BT" aBtOMaTHUHO ce npOMEHa ,BT PAIRING" cIeJ HЯKOJIko cekyHdIn nIIi ce npOMEHa ,BT READY", aKO Ima 3aIINC 3a Cbbp3BaHe.
b. Korato ce n3BeTe „BT READY", HaTnChTe n 3aApBjKe 6yToHa (N3ToUHnK) Ha roPnnaH en Soundbar 3a noBee oT 5 cekyn, 3a da n3BeTe „BT PAIRING".
2.ИЗбете рекиma Bluetooth Ha TeileBn3opa.(3aДопьнгелнаифорmaцявжтepьковдстботаHa TeileBn3opa.)
-
Изберетe „[AV] Samsung Soundbar T4-Series" ot спська на ekрану на телевизра. Налун rat Soundbar ce обознaya в с „Need Pairing" и „Paired" в спськa на Bluetooth устрий CBТВATA на телевизра. 3a за свържete Soundbar, Изберетe сьошению и установete ВрьЗкa.
-
Korato TeleBn3OpbT ce CbByKe, [Ime Ha TeleBn3Op] "BT" ce NoYBa Ha npEHNy DnCnNeHa Soundbar.
-
Beue mokeTe da cyBaTe 3Byka Ha TeIeBn3opa ot Soundbar.
Ako yctpoiCTBOTO He ycnee da ce CBbpke
- Ako npeIxOJHO cBbP3aHnT Soundbar (HaIp. [AV] Samsung Soundbar T4-Series") ce noRbV B CnCbKa, n3TOnrTe rO
ClenTOBa NOBTOpe CTbNk O1 1o3.
3ABEJIENKKA
CneI KaTO 3a NpBn NbT CbPKeTe Soundbar KbM TeNeBn3Opa, n3noJ3BaIe peKIM "BT READY" 3a NOBTOPHO CbP3BaHe.
Ako He ce nokajke UPDATE
1.ИЗклю悔eSoundbar,ИЗвадеTeиСБьржete OTHOBOSUBCTNka,KoITOcBdRpKa Φайноьe TCakTuayan3aun,KbMUSB npota HaSoundbar.
2.ИЗклочete зхранвашия кавел на Soundbar, сед това го CBьржete OTHOBOи ВКлочete Soundbar.
BENEXKNI
- Aktyалларанeto Na Фырмуера може за не равOTи павилно,akO aydnoфайLOBete подьржанOT Soundbar, ca cbxpanenc USBстka.
He n3KlIOUBaIte 3axpaHbAHeTo n He n3BaJdaIte USB yctpoiCTBoto,doKaTo ce n3PbJIHbAT aKtyaIIN3aCInTe. - Cnéд като akтуаллзацята e npиключILA,notpe6nteLckata NaHCTpoiKa B Soundbar eHHUaJIIN3npaHa, Taka Ye MoKTe DaBb3CTaHOBInTe BaIInTe HAcTPOkN.
IpeopbYBaMe da cn 3aHWeTe BaHNTe
HaCTpOKn, taKa ye IecHO da MoKeTe da rN
Bb3CTaHOBtce CneiakTuAIn3aunia.
ImaIte npedBnD, ye akTuAIn3nPaHeTo Ha
Φbpmyepa Hynipa CbUo N Bpb3kata KbM
cy6yepa.Ako Bpb3kata KbM cy6yepa He
ce Bb3CTaHOBn ABTomATNuHo Cnei
akTuAIn3aunra, BVXTe cTpaHnua 6.
Ako akTuAIn3aunraHa coΦTyepa e
HeycneuHa, npOBepTe daHn USB CTNKBT He
e DeΦeKTeH.
- Потpe6nteIteHa Mac OS trpa6Ba da n3noI3BaT MS-DOS (FAT) kaTo USB φopMaT.
- AktyализиранetoЧрз USB може за не сони В зависноCT OT пОНЗВОДИТЕЯ на USB снka.
11 OTCTPAHЯBAHE HA HEN3ПРABHOCTN
Ipei da nonckate cepBn3no 6cnyXbaHe, npOBepTe cJeHTo.
| Уст保險BOTO He se ВКлиочь. |
| Зхранвашит Кабел Добре Ли e ВКлиочень B С themselves COINTAKT?→ Излоче и ВКлиоче OTHOB 3axpaнвашия Кабел B С themselves COINTAKT, за ду STe спгуни, чeВрьзкata e надождна. |
| Дадени Функуся He pa6otи, koratoсо се натушес he 6утоьт. |
| Има ли Stатчно селкову се Вв Вьдуха?→ Излоче сцеса на зхранвашия Кабел OT COINTAKТ a След TOВ a Г ВКлиоче OTTOBO. |
| В ржим BT ce поныват пекьсваньna Ha 3byka. |
| → Вожte pa3дени Зa Bluetooth сбьрзвае на стравици 11 n 16. |
| He se Вьзпponизвешда 3byk. |
| Актыврана ли e Функуся за заглушаве Ha 3byka?→Наточete 6утоN (Заглшаве Ha 3byka) за OTмяна Ha Функуся за заглшаве. |
| Настоен ли e 3byкьт КьМ минимуm?→Настойе сnilata Ha 3byka. |
| Дистанцонно упавlenne He pa6otи. |
| Изтошени ли са 6atepinite?→Заменete с Нови 6atepin. |
| Разстаяно мөждүдэstanцонно упавlenne и оснobното устрист BO Ha SoundbarTBьрдүламо ли e?→Доближete дисанцонно упавlenne до оснobното устрист BO Ha Soundbar. |
| Черveинял TED Иndikatop Ha cy6yфера пемигва, ho ТОи He позИЗвexдд 3byk. |
| ТозИ позбlem може дa вьзникне, akO cy6yфера NT He e CBvрзан КьM Oснobното устрист BO HaSoundbar.→Опайтда сььржete cy6yфера OTTOBO. (Вижte стравица 6.) |
| Су6уфера 6рьмчи и Вибрпра забileжимо. |
| Опitaи te сда рergларе вибрацята Ha cy6yфера.→Прizдвжete 6утона WOOFER Ha Baшето дисанцонно упавlenne напр徳 илп Ha3aД, за дa рergларе сnilata Ha 3byka Ha cy6yфера. (До -12 ил мөжд -6 ~ +6). |
12JIINCEH3

DOLBY
AUDIO
Manufactured under license from Dolby Laboratories. Dolby, Dolby Audio, and the double-D symbol are trademarks of Dolby Laboratories.


2.0 Channel
For DTS patents, see http://patents.dts.com. Manufactured under license from DTS Licensing Limited. DTS, the Symbol, DTS in combination with the Symbol, and DTS 2.0 Channel are registered trademarks or trademarks of DTS, Inc. in the United States and/or other countries. © DTS, Inc. All Rights Reserved.

Bluetooth
The Bluetooth® word mark and logos are registered trademarks owned by the Bluetooth SIG, Inc. and any use of such marks by Samsung Electronics Co., Ltd. is under license. Other trademarks and trade names are those of their respective owners.
13 БЕLEЖKA 3A ЛИЦЕНЗА 3A OTBOPEH KOD
3a n3npaanshe Ha 3aINTBaHnI N 3aBKN BbB Bpb3Ka C n3TOUHNiTe C OTBOpEN KOD Ce CBpKTe cbc Samsung ype3 ImeJ (oss.request@samsung.com).
14BAJKHN BENEJKN3A OBCJIyXBAHETO
- LüΦpnte n nIIOCTpaunite B TOBa pbkoBODCTBO 3a NOTpe6nteJra Ca npeIOCTaBeHn cAmO 3a CnpabKa i MoRaT da ce pa3JIuHaBt OT DeIcTBNTeJIHHa n3dJIneTo.
- XeДа ce NaHcNt TaKca 3a aДMuHnICTpnpaHe, aKO:
(a) e n3BnKaH TexnK NO BaIe HaCToBaHe n HЯMa DeΦeKT B npOyKta (T.e. He cTe npOyei PbKOBOdCTBOTO 3a NOTpe6ntela)
(b) 3aHecTe ypeDa B cepBn3eH ceHTbp n HЯMa DeΦeKT B npOdyKTA (T.e. He cTe npOyei pBkoBOdCTBOTO 3a notpe6ntela).
Cymata 3a Ta3n TaKc3a aMmHnCTpnpaHe
Ie Bn 6bIe Cbo6uHa, Ppei Da ce
I3BbPun KaKBaTO I da e 6nlo pa6oTa nn
NoceUe HBe.
Ako 6atepuNTe He ce n3xBpIaT npabuHIO, Te3n BeIeCTBa MoIa Da IpeiN3BnKaT yBpeKdaHe Ha OBeuKOTO 3dpaBe Nn Ha OKoJHaTa CpeJa.
3a da npednata nte npnpoHnTe pecypcn 3a da cbdeNCTBaTe 3a MHOROKpaTHaTa ynoTpe6a Ha MaTePnAaHnTe pecypcn, moJra OTdEJaTe 6aTePnIe OTpyrIne BnuOBe OTnaDbuHn PPOyKTu I ne peunknapaTe nocpeDCTBOM BaWata lokaHa cncTeMa 3a 6e3PnLaTHo BpbuaHe Ha 6aTePnn.
IpaBnHTo TpeTnpaHe Ha n3denneto Cnei KpaHa eKcnnoatauOHnMy XHBOT (OtnaDbu, npedctablaBaun eJektpnuecko n eJektpoHNo 06OpyDbaHe)
(HaIInuHO B CtpaHn CbC CnCTeMn 3a pa3JeHNO CMeTOcb6HpAne)
To3n 3HaK, noCTaBeH Bbpyx n3dEJIneTe, HeROBn npHaJNeJXHO tI I neaTHN MaTePnaJI, O3NaUaBa, Ye npOyKTbT n npHaJdLeJXHOCTHe (HaNPmep 3apAIDHO yCTPOIcTBO, cLyuaIKN, USB ka6eI) He 6nBa da ce n3XBbPnT 3aeIHO C dpyrIne 6bTOBn OTnAdbuN, KORATO n3Teue ekCnloaTaUOnHHnT My XNBOT. OTdJIaTe Te3n yCTPOIcTBa OT dpYrIne BVIOBn OTnAdbuN I rI npEDAbaTe 3a peuKnipaHe. Cna3BaIKN TOBa npABNuNo He n3laRatHe Ha OnaCHO TdPaBETo Ha dpyrN Xopa n ppeDnA3BaTe OKoJHaT a CpeDa ot 3aMbpcaBaHe, PpeDn3BnuKaHo OT 6e3KOHTpOJIHO n3XBbPnAHe Ha OTnAdbuN. OCBEN TOBa, nOdo6Ho OTROBOPHO NOBeJeHHe Cb3daBa Bb3MOXHOCT 3a NOBtOpHO (ekOLOrHuHO cbO6pa3Ho) n3noJ3BaHe Ha MaTePnaJIHnTe pecypcn.
ДомашнITEnotpe6nteItrp6Ba da ce cBbpxaT cTbproBecaHa Jpe6Ho,OT KOrTo ca 3aKynIIN3deJIneTO,IIIN CbC CbOTBeTHaMeCTHa DpbKabHa aReHcNIA,3a Da nolUyat noDpo6Hn HnCTpyKcN INKDeI IN KORA MOrAT da 3aHeCat Te3N yCTpoiCTBa 3a peuNKInpaHe,6e3OnaCHO 3a OKoJHaTa CpeJa.
KopnpaTHBnTe IOTpe6nteJIcIeBa Da ce CbBykaT c DoCTaBvHka Cn I Da IpOBeprT yCNOBnTa Ha
IIOROBpa 3a NOKyNk. ToBa n3dJIeNne I HeROBte eJeKtpoHn PpHaJdJIeXHocTn He 6NBa Da ce CMeCTBaT C
Dpyrnte OTNaDbuHa TbprOBCKOTO ppeIppraTne.
3a Информачи оТносно anraжименте на Samsung по оТношенье на okолна среда и спесифчнite за пюкта ретулаторни зальоженя, наразимер REACH, WEEE, 6atepin, noceteTe: http://www.samsung.com/uk/aboutsamsung/samsungelectronics/corporatecitizenship/data-corner.html
SIGURNOSNE INFORMACije
SIGURNOSNA UPOZORENJA
DA BISTE SMANJILI OPASNOST OD ELEKTRICNOG UDARA, NE ODSTRANJUJE POKLOPAC (ILI POLEDINU).
U UNUTRAŠNJOSTI NEMA DIJELOVA KOJE MOZE SERVISIRATI KORISNIK. PREPUSTITE SERVISIRANJE KVALIFICIRANOM SERVISNOM OSOBLJU.
Objašjenje simbola koji se mogu nalaziti na vašem proizvodu Samsung potražite u donjoj tablici.
| 4 | OPREZ OPASNOST OD ELEKTRICNOG UDARA NE OTVARAJTE | |
| 4 | Ovaj simbol znači da je struja u unutrašnjosti visokog napona. Opasno je dolaziti u bilo kakav doticaj s unutarnjim sklopopova proizvoda. | |
| ! | Ovaj simbol naznačuje da je uz urežaj priložena važna dokumentacija o njejgovom radu i odžavanju. | |
| Proizvod II. razreda: Ovaj simbol označava da.nije potrebna sigurnosna veza s uzemljenjem. Ako se taj simbol ne nalazi na proizvodu s kabelom za napajanje, proizvod MORA imati pouzdan spoj na zašitno uzemljenje. | ||
| ~ | AC napon: Ovaj simbol označava da nazivni napon označen navenelim simbolom predstavlja AC napon. | |
| --- | DC napon: Ovaj simbol označava da nazivni napon označen navenelim simbolom predstavlja DC napon. | |
| i | Oprez, pogledajte upute za upotrebu: Ovaj simbol upićuje korisnika da potraži dodatne informacije u pogledu sigurnosti u korisničkom prisćniku. | |
UPOZORENJE
- Da biste smanjili opasnost od požara ili elektricnog udara, ne izlažite uredaj kisi ili vlazi.
OPREZ
DA BISTE SPRIJEČILI ELEKTRICNI UDAR, NAMJESTITE ŠIROKE KONTAKTE UTIKAÇA U SIOK UTOR, UMETNUT DO KRAJA.
- Ovaj uredaj treba uvijek biti spojen na uticnicu izmjenične struje sa zašitnim uzemljenjem.
- Da biste isključili urežaj iz struje, morate izvuči utikač iz strujne utičnice. Stoga strujni utikač treba biti spreman za rad.
- Ne izlažite ovaj uredaj kapanju ili prskanjutekućina. Ne stavljaje predmete punetekućine, poput vaza, na uredaj.
- Da bist potpuno isključili ovaj uredaj, morate izvuci utikač za napajanje iz zidne uticnice. Stoga utikač mora uvijek biti lako dostupan.
MJERE OPREZA
- Osigurajte da napajanje izmjeničnom strujom u kuci bude kompatibilno sa zahtjevima napajanja navedenim na identifikacijskoj naljepnici na dnu proizvoda. Proizvod postavite vodoravno na prikladnu povrsinu (namještaj) s dovoljno prostora za ventilaciju 7~10 cm. Pobrinite se da ventilacijski otvori ne budu prekriveni. Ne postavlajte Jedinicu na pojacala ili drugu opremu koja se gije. Ova jedinica dizajnirana je za neprekidnu uporabu. Za potpuno isključivanje jedinice izvucite strujni utikač iz zidne utičnice. Ako ne namjeravate upotrebljavati jedinicu dulje vrijeme, izvucite utikač.
- Za vrijeme olujnog nevremena izvucite utikač za napajanje izmjeničnom strujom iz sidne uticnice.Vrsni naponi zbog munja mogu ošetiti uredaj.
- Ne izlažite uredaj izravnoj suncevoj svjetlosti ili drugim izvorima topline. To moze dovesti do pregrijavanja i kvara uredaja.
-
Zašitite proizvod od vlage (npr. vaze) i prekomjerne topline (npr. kamin) ili od opreme koja stvara jaka magnetska ili elektricna polja. Isključite kabel za napajanje iz izvora napajanja izmjeničnom strujom ako judinica neispravno radi. Proizvod njenamijenjen za industrijsku uporabu. On je namijenjen samo za osobnu uporabu. Ako su proizvod ili disk pohranjeni na niskim temperaturama, može doci do kondenzacije. Ako tijekom zime prenosite judinicu, prčekajte oko 2 sata kako bi judinica prije uporabe dosegnula sobnu temperaturu.
-
Baterije korištene s ovim proizvodom sadržavaju kemikalije koje su štete za okolis. Ne odlažite baterije s opadom kućanstva. Baterije nemojte bacati u vatru. Nemojte krako spajati, rastavlji, ili pregrijavati baterije. U slučaju zamjene neodgovarajućim baterijama postoji opasnost od eksplozije. Baterije mistrjenjate samo baterijama iste ili ekvivalentne vrste.
O OVOM PRIRUČNIKU
Korisnički prisćnik ima dva dizela: ovaj\ jednostavni KORISNIČKI PRIRUCNIK i detaljni\ POTPUNI PRIRUCNIK koji možete preuzeti.

KORISNICKI PRIRUCNIK
Pogledajte ovaj prisucnik za sigurnosne upute, instalaciju proizvoda, komponente, povezivanje i specifikacione proizvoda.

POTPUNI PRIRUÇNIK
POTPUNI PRIRUČNIK možete pristupiti putem web-centra sluzbe za korisnike tvrtke Samsung skeniranjem QR koda. Za pregled priručnika na računalu ili mobilnom urežaju preuzmite priručnik u formatu dokumenta s web-stranice tvrtke Samsung. (http://www.samsung.com/support)
Dizajn i specifikacije mogu se promijeniti bez prethodne najave.
SADRžAJ
01 Provjera Komponenti 2
Umetanje baterija prije upotrebe daljinskog upravljača (AA baterije X 2) 2
02 Pregled Proizvoda 3
Prednja ploca / gornja ploca sustava Soundbar 3
Donja ploča uredaja Soundbar 4
03 Spajanje Ureăja Soundbar 5
Spajanje na dovod elektriche energije 5
SamsungUNCTS Samsung iPhone 5, 6, 7, 8, 9, 10, 11, 12, 13, 14, 15, 16, 17, 18, 19, 20, 21, 22, 23, 24, 25, 26, 27, 28, 29, 30, 31, 32, 33, 34, 35, 36, 37, 38, 39, 40, 41, 42, 43, 44, 45, 46, 47, 48, 49, 50, 51, 52, 53, 54, 55, 56, 57, 58, 59, 60, 61, 62, 63, 64, 65, 66, 67, 68, 69, 70, 71, 72, 73, 74, 75, 76, 77, 78, 79, 80, 81, 82, 83, 84, 85, 86, 87, 88, 89, 90, 91, 92, 93, 94, 95, 96, 97, 98, 99
USB priključak
Ako je ponudeno ažuriranje, možete ažurirati opremu povezivanjem uredaja USB na kojem je pohranjeno ažuriranje s priključkom za USB na vašem uredaju Soundbar. Za više informacija o preuzimanju dokumenata za ažuriranje pogledajte mrežnu stranicu Samsung Electronics na (www.samsung.com → Support).
Zatim odaberite tip proizvoda ili unesite broj
modela sustava Soundbar, odaberite opciju
Softver i aplikacije, a zatim opciju Preuzimanja.
Imajte na umu da se nazivi opcija mogu
razlikovati.
Postupak ažuriranja
Vazno: Funkcjom ažuriranja brišu se sve korisnicke postavke. Preporucjemo da zapišete sve svoje postavke kako biste ih mogli Jednostavno ponovno postaviti nakon ažuriranja. Imajte na umu da se ažuriranjem firmvera resetirai priključak subwoofera.
- Spojite USB štapić na USB priključak na računalu.
Manufactured under license from Dolby Laboratories. Dolby, Dolby Audio, and the double-D symbol are trademarks of Dolby Laboratories.


2.0 Channel
For DTS patents, see http://patents.dts.com. Manufactured under license from DTS Licensing Limited. DTS, the Symbol, DTS in combination with the Symbol, and DTS 2.0 Channel are registered trademarks or trademarks of DTS, Inc. in the United States and/or other countries. © DTS, Inc. All Rights Reserved.

Bluetooth
The Bluetooth® word mark and logos are registered trademarks owned by the Bluetooth SIG, Inc. and any use of such marks by Samsung Electronics Co., Ltd. is under license. Other trademarks and trade names are those of their respective owners.
13 OBAVIJESTO LICENCIZA UPORABU SOFTVERA OTVORENOK KODA
Za slanje upita i zahtjeva u vezi otvorenih izvora obratite se tvrtki Samsung putem e-poste (oss.request@samsung.com).
14 VAŽNA NAPOMENA VEZANA UZ SERVIS
- Slike u ovom korisničkom priručniku služe kao samo kao referencec i mogu se razlikovati od stvarnog izgleda proizvoda.
- Moguca je naplata administrativne pristoje u slučaju
(a) poziva inżenjera na vaš zahtjev, a nema oštećenja na proizvodu (tj. ako niste pročitali korisnički prirucnik)
(b) da做一些te Jedinicu na popravak u servis, a nema ostecenja na proizvodu (tj. akoniste proci tali korisniicki prisucnik)
- S visinom administrativne pristoje bit cete upoznati prije poduzimanja bilo kakvih radnji ili kućnog posjeta.
15 TEHNICKI PODACI I VODIC
Tehnicki podaci
| Naziv modela HW-T450 | |
| USB 5V/0,5A | |
| Težina 1,5 kg | |
| Dimenzije (Š x V x D) 860,0 x 54,0 x 74,0 mm | |
| Raspon radne temperature +5°C do +35°C | |
| Raspon vlažnosti 10 % ~ 75 % | |
| POJACALO Nazivna izlazna snaga | 35W x 2, 6 ohm |
| Podržani formati za reprodukciju (Zvuk DTS 2.0 se reproducira u formatu DTS.) | LPCM 2ch, Dolby Audio™ (podržava Dolby® Digital), DTS |
| IZLAZNA SNAGA BEŽICNOG UREDAJA Maks. snaga BT odašiljača Maks. snaga SRD odašiljača | 100mW pri 2,4GHz - 2,4835GHz 25mW pri 5,725GHz - 5,825GHz |
| Naziv subwoofera PS-WT45T | |
| Težina 4,3 kg | |
| Dimenzije (Š x V x D) 181,5 x 343,0 x 272,0 mm | |
| POJACALO Nazivna izlazna snaga | 130W |
| IZLAZNA SNAGA BEŽICNOG UREDAJA Maks. snaga SRD odašiljača 25mW | pri 5,725GHz - 5,825GHz |
| Ukupna potrošnja energia u stanju mirovanja (W) | 2,0W |
| Bluetooth Način isključivanja ulaza | Pritisnite i držite gumb SOUND MODE dulje od 5 sekundi da biste isključili funkcjju Bluetooth Power. |
NAPOMENE
Samsung Electronics Co., Ltd pridržava pravo promjene specifikacija bez prethodne obavijesti.
Težina i dimenzije su priblizni.
- Tvrtka Samsung Electronics ovime izjavljupe da je ovaj proizvod uskladen sa zahtjevima Direktive 2014/53/EU.
Potpuni tekst Izjave o usklaedenosti sa zahtjevima EU-a dostupan je na sljedećoj web-adresi: http://www.samsung.com, idite na Podrška > Pretraživanje podrške za proizvod i unesite naziv modela.
Ova oprema smije se upotreblavati u svim zemljama EU-a.

Manufactured under license from Dolby Laboratories. Dolby, Dolby Audio, and the double-D symbol are trademarks of Dolby Laboratories.


2.0 Channel
For DTS patents, see http://patents.dts.com. Manufactured under license from DTS Licensing Limited. DTS, the Symbol, DTS in combination with the Symbol, and DTS 2.0 Channel are registered trademarks or trademarks of DTS, Inc. in the United States and/or other countries. © DTS, Inc. All Rights Reserved.

Bluetooth
The Bluetooth® word mark and logos are registered trademarks owned by the Bluetooth SIG, Inc. and any use of such marks by Samsung Electronics Co., Ltd. is under license. Other trademarks and trade names are those of their respective owners.
13 POZNÁMKA K LICENCI OTEVRENEHO SOFTWARE
Das Benutzerhandbuch hat zwei Teile:这其中, there are two basic concepts. The first is the concept of a handbuch. It is a book that has been written by a number of authors and which includes a description of the basic concepts and their definitions. The second is a text about how to use these concepts.

BENUTZERHANDBUCH
Manufactured under license from Dolby Laboratories. Dolby, Dolby Audio, and the double-D symbol are trademarks of Dolby Laboratories.


2.0 Channel
For DTS patents, see http://patents.dts.com. Manufactured under license from DTS Licensing Limited. DTS, the Symbol, DTS in combination with the Symbol, and DTS 2.0 Channel are registered trademarks or trademarks of DTS, Inc. in the United States and/or other countries. © DTS, Inc. All Rights Reserved.

Bluetooth
The Bluetooth® word mark and logos are registered trademarks owned by the Bluetooth SIG, Inc. and any use of such marks by Samsung Electronics Co., Ltd. is under license. Other trademarks and trade names are those of their respective owners.
13 BEKANNTMACHUNG ZU OPEN SOURCE LIZENZEN
Manufactured under license from Dolby Laboratories. Dolby, Dolby Audio, and the double-D symbol are trademarks of Dolby Laboratories.


2.0 Channel
For DTS patents, see http://patents.dts.com. Manufactured under license from DTS Licensing Limited. DTS, the Symbol, DTS in combination with the Symbol, and DTS 2.0 Channel are registered trademarks or trademarks of DTS, Inc. in the United States and/or other countries. © DTS, Inc. All Rights Reserved.

Bluetooth
The Bluetooth® word mark and logos are registered trademarks owned by the Bluetooth SIG, Inc. and any use of such marks by Samsung Electronics Co., Ltd. is under license. Other trademarks and trade names are those of their respective owners.
13 AVATUD LÄHTEKOODI LITSENTSI TEATIS
Manufactured under license from Dolby Laboratories. Dolby, Dolby Audio, and the double-D symbol are trademarks of Dolby Laboratories.


2.0 Channel
For DTS patents, see http://patents.dts.com. Manufactured under license from DTS Licensing Limited. DTS, the Symbol, DTS in combination with the Symbol, and DTS 2.0 Channel are registered trademarks or trademarks of DTS, Inc. in the United States and/or other countries. © DTS, Inc. All Rights Reserved.

Bluetooth
The Bluetooth® word mark and logos are registered trademarks owned by the Bluetooth SIG, Inc. and any use of such marks by Samsung Electronics Co., Ltd. is under license. Other trademarks and trade names are those of their respective owners.
13 AVIS DE LICENCE LIBRE
IpoaiyaepcEiO8ou yia tic diapoeClambdaoupyiec Ee' hou 23
09 Eykataaotaon 3aocstoixou 24
Ipofouλεic ykataoan 24
Eapntnmaata tooOeTtnoc stov toixo 24
Manufactured under license from Dolby Laboratories. Dolby, Dolby Audio, and the double-D symbol are trademarks of Dolby Laboratories.


2.0 Channel
For DTS patents, see http://patents.dts.com. Manufactured under license from DTS Licensing Limited. DTS, the Symbol, DTS in combination with the Symbol, and DTS 2.0 Channel are registered trademarks or trademarks of DTS, Inc. in the United States and/or other countries. © DTS, Inc. All Rights Reserved.

Bluetooth
The Bluetooth® word mark and logos are registered trademarks owned by the Bluetooth SIG, Inc. and any use of such marks by Samsung Electronics Co., Ltd. is under license. Other trademarks and trade names are those of their respective owners.
13 NYICT FORRASKODU LICENC MEGJEGYZES
Manufactured under license from Dolby Laboratories. Dolby, Dolby Audio, and the double-D symbol are trademarks of Dolby Laboratories.


2.0 Channel
For DTS patents, see http://patents.dts.com. Manufactured under license from DTS Licensing Limited. DTS, the Symbol, DTS in combination with the Symbol, and DTS 2.0 Channel are registered trademarks or trademarks of DTS, Inc. in the United States and/or other countries. © DTS, Inc. All Rights Reserved.

Bluetooth
The Bluetooth® word mark and logos are registered trademarks owned by the Bluetooth SIG, Inc. and any use of such marks by Samsung Electronics Co., Ltd. is under license. Other trademarks and trade names are those of their respective owners.
13 AVVISO DI LICENZA OPEN SOURCE
http://www.samsung.com/it/aboutsamsung/sustainability/environment/our-commitment/data/
DROŠIBAS INFORMÁCIJA
DROŠIBAS BRIDINAJUMI
LAI SAMAZINATU ELEKTRISKAS STRAVAS
TRIECIENA RISKU, NENONEMIET PARSEGU (VAI KORPUSA AIZMUGURI).
11 PROBLEMU NOVER'SANA
Manufactured under license from Dolby Laboratories. Dolby, Dolby Audio, and the double-D symbol are trademarks of Dolby Laboratories.


2.0 Channel
For DTS patents, see http://patents.dts.com. Manufactured under license from DTS Licensing Limited. DTS, the Symbol, DTS in combination with the Symbol, and DTS 2.0 Channel are registered trademarks or trademarks of DTS, Inc. in the United States and/or other countries. © DTS, Inc. All Rights Reserved.

Bluetooth
The Bluetooth® word mark and logos are registered trademarks owned by the Bluetooth SIG, Inc. and any use of such marks by Samsung Electronics Co., Ltd. is under license. Other trademarks and trade names are those of their respective owners.
13 PAZINOJUMS PAR ATVERTA PIRMKODA LICENCI
Manufactured under license from Dolby Laboratories. Dolby, Dolby Audio, and the double-D symbol are trademarks of Dolby Laboratories.


2.0 Channel
For DTS patents, see http://patents.dts.com. Manufactured under license from DTS Licensing Limited. DTS, the Symbol, DTS in combination with the Symbol, and DTS 2.0 Channel are registered trademarks or trademarks of DTS, Inc. in the United States and/or other countries. © DTS, Inc. All Rights Reserved.

Bluetooth
The Bluetooth® word mark and logos are registered trademarks owned by the Bluetooth SIG, Inc. and any use of such marks by Samsung Electronics Co., Ltd. is under license. Other trademarks and trade names are those of their respective owners.
13 ATVIROSIOS PROGRAMINES IRANGOS LICENCIJOS PRANEŠIMAS
Noredami siusti uzklausas ir prasymus, susijusius su atviraja programine jranga, susisiekite su "Samsung" el. pastu (oss.request @samsung.com).
14 SVARBI PASTABA APIE TECHNINE PRIEŽIÜRÅ
Manufactured under license from Dolby Laboratories. Dolby, Dolby Audio, and the double-D symbol are trademarks of Dolby Laboratories.


2.0 Channel
For DTS patents, see http://patents.dts.com. Manufactured under license from DTS Licensing Limited. DTS, the Symbol, DTS in combination with the Symbol, and DTS 2.0 Channel are registered trademarks or trademarks of DTS, Inc. in the United States and/or other countries. © DTS, Inc. All Rights Reserved.

Bluetooth
The Bluetooth® word mark and logos are registered trademarks owned by the Bluetooth SIG, Inc. and any use of such marks by Samsung Electronics Co., Ltd. is under license. Other trademarks and trade names are those of their respective owners.
13 INFORMACJA O LICENCJI OPEN SOURCE
Manufactured under license from Dolby Laboratories. Dolby, Dolby Audio, and the double-D symbol are trademarks of Dolby Laboratories.


2.0 Channel
For DTS patents, see http://patents.dts.com. Manufactured under license from DTS Licensing Limited. DTS, the Symbol, DTS in combination with the Symbol, and DTS 2.0 Channel are registered trademarks or trademarks of DTS, Inc. in the United States and/or other countries. © DTS, Inc. All Rights Reserved.

Bluetooth
The Bluetooth® word mark and logos are registered trademarks owned by the Bluetooth SIG, Inc. and any use of such marks by Samsung Electronics Co., Ltd. is under license. Other trademarks and trade names are those of their respective owners.
13 NOTIFICARE DE LICENTÀ OPEN SOURCE
SIGURNOSNE INFORMACije
SIGURNOSNA UPOZORENJA
DA BISTE SMANJILI OPASNOST OD
ELEKTRICNOG UDARA, NE SKIDAJTE POKLOPAC (ILI ZADNJU PLOCU).
UNUTRA SE NE NALAZE DELOVI KOJI SE MOGU SERVISIRATI. SERVISIRANJE POVERITE KVALIFIKOVANOM OSOBLJU SERVISA.
Manufactured under license from Dolby Laboratories. Dolby, Dolby Audio, and the double-D symbol are trademarks of Dolby Laboratories.


2.0 Channel
For DTS patents, see http://patents.dts.com. Manufactured under license from DTS Licensing Limited. DTS, the Symbol, DTS in combination with the Symbol, and DTS 2.0 Channel are registered trademarks or trademarks of DTS, Inc. in the United States and/or other countries. © DTS, Inc. All Rights Reserved.

Bluetooth
The Bluetooth® word mark and logos are registered trademarks owned by the Bluetooth SIG, Inc. and any use of such marks by Samsung Electronics Co., Ltd. is under license. Other trademarks and trade names are those of their respective owners.
13 OBAVEŠTENJE O LICENCI OTVORENOG IZVORNOG KODA
Svoje upite i zahteve u vezi sa otvorenim izvornim kodovima možete uputiti kompaniji Samsung putem e-poste (oss.request@samsung.com).
14 VAŽNA NAPOMENA O SERVISIRANJU
- Slike i ilustracije koje su upotrebljene u ovom korisničkom uputstvu date su samo kao reference i mogu se razlikovati od vašeg proizvoda.
- Administrativni troškovi mogu biti naplaceni u sledecim slučajevima:
11 RIESENIE PROBLEMOV
Manufactured under license from Dolby Laboratories. Dolby, Dolby Audio, and the double-D symbol are trademarks of Dolby Laboratories.


2.0 Channel
For DTS patents, see http://patents.dts.com. Manufactured under license from DTS Licensing Limited. DTS, the Symbol, DTS in combination with the Symbol, and DTS 2.0 Channel are registered trademarks or trademarks of DTS, Inc. in the United States and/or other countries. © DTS, Inc. All Rights Reserved.

Bluetooth
The Bluetooth® word mark and logos are registered trademarks owned by the Bluetooth SIG, Inc. and any use of such marks by Samsung Electronics Co., Ltd. is under license. Other trademarks and trade names are those of their respective owners.
13 POZNÁMKA K LICENCI S OTVORENÍM ZDROJOVÍM KÓDOM
Manufactured under license from Dolby Laboratories. Dolby, Dolby Audio, and the double-D symbol are trademarks of Dolby Laboratories.


2.0 Channel
For DTS patents, see http://patents.dts.com. Manufactured under license from DTS Licensing Limited. DTS, the Symbol, DTS in combination with the Symbol, and DTS 2.0 Channel are registered trademarks or trademarks of DTS, Inc. in the United States and/or other countries. © DTS, Inc. All Rights Reserved.

Bluetooth
The Bluetooth® word mark and logos are registered trademarks owned by the Bluetooth SIG, Inc. and any use of such marks by Samsung Electronics Co., Ltd. is under license. Other trademarks and trade names are those of their respective owners.
13 OBVESTILO O ODPRTOKODNIH LICENCAH
© 2020 Samsung Electronics Co., Ltd. All rights reserved.
Contact SAMSUNG WORLD WIDE
If you have any questions or comments relating to Samsung products, please contact the SAMSUNG customer care Centre.
| Area Contact Centre | Web Site |
| ■Europe | |
| UK 0330 SAMSUNG (7267864) | www.samsung.com/uk/support |
| IRELAND (EIRE) 0818 717100 | www.samsung.com/ie/support |
| GERMANY 06190 77 555 77 | www.samsung.com/de/support |
| FRANCE 01 48 63 00 00 | www.samsung.com/fr/support |
| ITALIA 800-SAMSUNG (800.7267864) | www.samsung.com/it/support |
| SPAIN 91 175 00 15 | www.samsung.com/es/support |
| PORTUGAL 808 207 267 | www.samsung.com.pt/support |
| LUXEMBURG 261 03 710 | www.samsung.com/be_fr/support |
| NETHERLANDS 088 90 90 100 | www.samsung.com/nl/support |
| BELGIUM 02-201 24-18 | www.samsung.com/be/support (Dutch)www.samsung.com/be_fr/support (French) |
| NORWAY 216290 99 | www.samsung.com/no/support |
| DENMARK 707 01 970 | www.samsung.com.dk/support |
| FINLAND 030-6227 515 | www.samsung.com/fi/support |
| SWEDEN 0771 726 786 | www.samsung.com/se/support |
| POLAND 801-172-678* lub +48 22 607-93-33*Specialistyczna infolinia do obstugi zapytań dotycznych Telefonów komórkowych: 801-672-678* (oplata wedlug taryfya operadora) | http://www.samsung.com/pl/support/ |
| HUNGARY 0680SAMSUNG (0680-726-7864) | www.samsung.com/hu/support |
| AUSTRIA 0800 72 67 864 (0800-SAMSUNG) | www.samsung.com/at/support |
| SWITZERLAND 0800 726 786 (0800-SAMSUNG) | www.samsung.com/ch/support (German)www.samsung.com/ch_fr/support (French) |
| Area Contact Centre | Web Site | |
| CZECH | 800 - SAMSUNG (800-726786) | www.samsung.com/cz/support |
| SLOVAKIA | 0800 - SAMSUNG (0800-726 786) | www.samsung.com/sk/support |
| CROATIA | 072 726 786 | www.samsung.com/hr/support |
| BOSNIA | 055 233 999 | www.samsung.com/support |
| NORTHMACEDONIA | 023 207 777 | www.samsung.com/mk/support |
| MONTENEGRO | 020 405 888 | www.samsung.com/support |
| SLOVENIA | 080 697 267 (brezplačna števíka) | www.samsung.com/si/support |
| SERBIA | 011 321 6899 | www.samsung.com/rs/support |
| ALBANIA 045 620 | 202 | www.samsung.com/al/support |
| BULGARIA | *3000 Lěha na edin rpadák párazovop 0800 111 31 Bežnateh 3a BCSKIN opepatörn | www.samsung.com/bg/support |
| ROMANIA | *8000 (apel in retea) 08008-726-78-64 (08008-SAMSUNG) Apel GRATUIT Atentje: Dacă efectuţi apelu din rețeaua Digi (RCS/RDS), va rugâmă ne contactăi formân'd numărul Telverde fãră ultimate două cîfre, astfel: 0800872678. | www.samsung.com/ro/support |
| CYPRUS | 8009 4000 only from landline, toll free | www.samsung.com/gr/support |
| GREECE | 80111-SAMSUNG (80111 726 7864) only from land line (+30) 210 6897691 from mobile and land line | |
| LITHUANIA 8-800 | 00-7777 | www.samsung.com/lt/support |
| LATvia | 8000-7267 | www.samsung.com/lv/support |
| ESTONIA | 800-7267 | www.samsung.com/ee/support |