DRVA601WDP - Dashboard camera KENWOOD - Free user manual and instructions
Find the device manual for free DRVA601WDP KENWOOD in PDF.
| Product type | Dashboard camera |
| Brand | Kenwood |
| Model | DRVA601WDP |
| Recording resolution | 2560 x 1440 pixels (3.7 Megapixels) |
| Image sensor | CMOS 1/2.8" |
| Frame rate | 30 frames per second |
| Recording format | H.264 (MOV) |
| Lens | F2.0, fixed focus |
| Horizontal field of view | 129° |
| Vertical field of view | 66° |
| Diagonal field of view | 161° |
| Operating voltage | 5.0 V DC |
| Power consumption | 120 mA |
| Operating temperature | -10°C to 60°C |
| Dimensions (L x H x D) | 63 x 66 x 36 mm |
| Weight | 334 g |
| Rear camera cable length | 8 m |
| Rear camera included | Yes |
| Mounting type | Adhesive mount on windshield |
| Included accessories | Rear camera, 8 m mini USB cable, adhesive mount, adhesive pads |
| Care and cleaning | Use a soft, lint-free cloth; for the lens, gently wipe with a slightly damp cloth. Avoid volatile products. |
| Safety | Do not use or operate while driving; do not obstruct airbags; install within the windshield wiper area. |
Frequently Asked Questions - DRVA601WDP KENWOOD
User questions about DRVA601WDP KENWOOD
0 question about this device. Answer the ones you know or ask your own.
Ask a new question about this device
Download the instructions for your Dashboard camera in PDF format for free! Find your manual DRVA601WDP - KENWOOD and take your electronic device back in hand. On this page are published all the documents necessary for the use of your device. DRVA601WDP by KENWOOD.
USER MANUAL DRVA601WDP KENWOOD
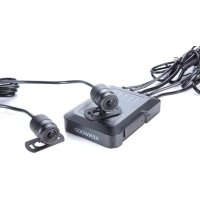
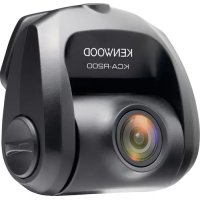
Rear Camera for Dashboard Camera
INSTRUCTION MANUAL
JVCKENWOOD Corporation
- Updated information (the latest Instruction Manual, etc.) is available from https://www.kenwood.com/cs/ce/.
For your records
Record the serial number, found on the back of the unit in the spaces designated on the warranty card, and in the space provided below. Refer to the model and serial numbers whenever you can upon your KENWOOD dealer for information or service on the product.
Model KCA-R200
Serial Number
US Residents Only
Register Online
Register your KENWOOD product at www.kenwood.com/usa
Contents
EN
Before Use.... 01
Precautions for Use.... 01
Accessories 03
Parts Name 03
Installation and Connection 04
Specifications 08
Before Use
- The screen images and operation examples in this document were created for explaining the operating procedures.
- There may be screen images that differ from the actual screens or examples of operations not actually performed.
Disclaimer
- Please note that JVCKENWOOD shall not be responsible for any damages suffered by the customer or a third party as a result of incorrectly using this product, a failure during use of this product, or other trouble, or due to the use of this product, unless such liability is acknowledged by law.
Copyrights
- Recorded video, image, and audio content cannot be used for other than personal enjoyment without the consent of the copyright holder as specified in the Copyright Act.
- Please note that the recording of an event such as a show, performance, or exhibition may be restricted even when doing so for personal enjoyment.
Precautions for Use
Precautions and notices
Warning! Do not operate the device while driving. Using this product does not change the requirement for a driver to take full responsibility for his or her behavior. This responsibility includes observing all traffic rules and regulations in order to avoid accidents, personal injury or property damage.
- For your own safety, do not operate the controls of the product while driving.
- Make sure to place your cable, so as not to obstruct the driver's view or deployment of airbags.
- Do not attempt to service the unit. There are no serviceable parts inside. Replace the unit if it is damaged or exposed to excess moisture.
Caring for your device
Taking good care of your device will ensure trouble-free operation and reduce the risk of damage.
- Keep your device away from excessive moisture and extreme temperatures.
- Avoid exposing your device to direct sunlight or strong ultraviolet light for extended periods of time.
- Do not place anything on top of your device or drop objects on your device.
- Do not drop your device or subject it to severe shock.
- Do not subject your device to sudden and severe temperature changes. This could cause moisture condensation inside the unit, which could damage your device. In the event of moisture condensation, allow the device to dry out completely before use.
- Never clean your device with the power on. Use a soft, lint-free cloth to wipe the screen and the exterior of your device.
- Never attempt to disassemble, repair or make any modifications to your device. Disassembly, modification or any attempt at repair could cause damage to your device and even bodily injury or property damage and will void any warranty.
- Do not store or carry flammable liquids, gases or explosive materials in the same compartment as your device, its parts or accessories.
- To discourage theft, do not leave the device and accessories in plain view in an unattended vehicle.
• Overheating may damage the device.
Precautions for installation
• Install the device in a position where it will not block the view of the driver.
- Install the device within the wiping range if equipped the wiper.
• Take care not to install the device over the vehicle inspection sticker or other sticker.
• Take care not to install the device where it will interfere with driving or airbag operation.
- If the device is installed incorrectly, event recording or parked recording may not work correctly.
- Refer to "Installation and Connection" for the installation orientation, angle, and other information and then install the device correctly.
- Do not install the device near a digital terrestrial television antenna or an electrical component. Otherwise it may reduce receiver sensitivity or cause flickering and noise.
- When fixing the device with the adhesive mount, use a commercially available cleaning cloth or the like to wipe off all dirt and grease on the mounting surface. If the device is re-affixed or mounted using, for example, general-purpose double-sided tape, the adhesion strength may weaken and cause the device to fall.
- After mounting the device, leave it for 24 hours before use to enable the mounting strength of the adhesive mount to improve. Failing to do so may result in the adhesion of the adhesive mount becoming weak and the device falling.
- Fix the cord in place with tape or the like so that it does not interfere with driving.
Precautions for use
- Do not block the camera lens, get dirt on it, or place a reflective object near it.
- When LED traffic lights are recorded, video in which they appear to be flickering or flashing may be recorded. JVCKENWOOD assumes no responsibility with regard to the distinguishing or recording of traffic lights.
- If coating is used on the windshield of the vehicle, recording quality may be affected.
- There is no guarantee that the device can record video in all conditions.
Cleaning the device
- When the device is dirty, wipe it with a dry silicone cloth or other soft cloth. If the device is very dirty, remove the dirt with a cloth with neutral cleaner on it then wipe off the cleaner. Wiping the device with a hard cloth or using a volatile substance such as thinner or alcohol may cause scratches, deformation, deterioration or other damage.
- When the lens is dirty, gently wipe it with a soft cloth dampened with water. Rubbing the lens strongly with a dry cloth may cause scratches.
If you notice a problem with the device, turn off the power of the device and then contact your dealer or nearest JVCKENWOOD service center.
Accessories
Before you get started, check you have everything below.
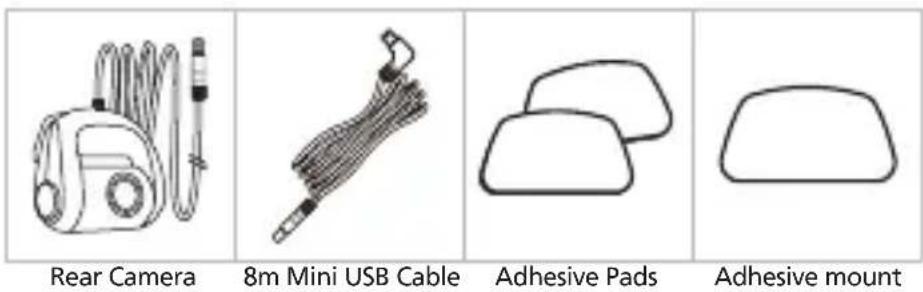
* Product appearance may differ slightly from that shown above.
Parts Name
Rear Camera
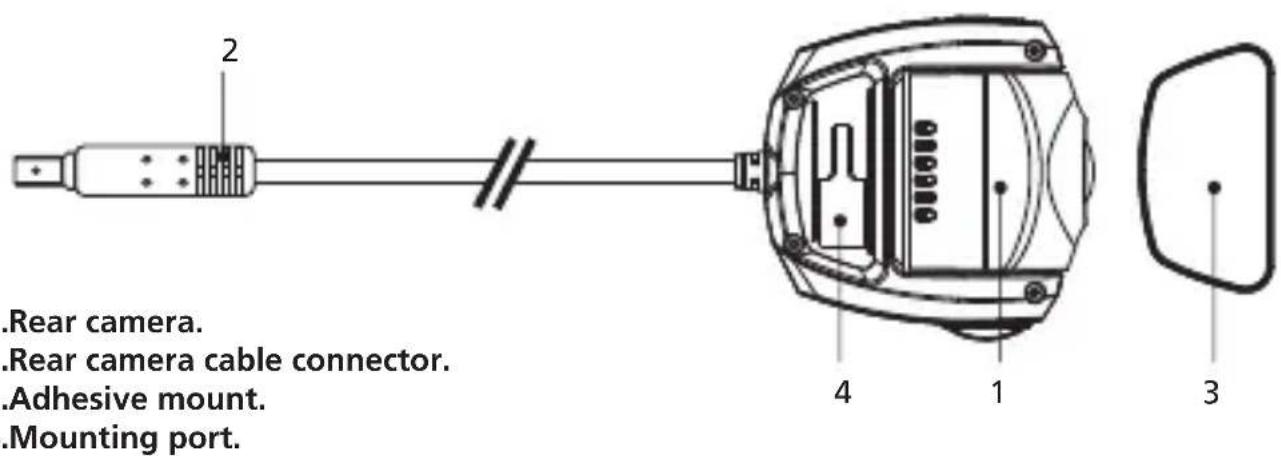
text_image
.Rear camera. .Rear camera cable connector. .Adhesive mount. .Mounting port.Rear Camera Cable

text_image
5 65.Cable connector.
6.CAM-IN connector.
Recommended installation position
• Install the device in a position where it will not block the view of the driver.
• Install the device within the wiping range if equipped the wiper.
Caution
When passing the power cord through the front pillar or another part, observe the points below when performing the wiring work.
- Wire the power cord farther forward or farther rearward than the airbag so that it does not interfere with the airbag.
- In the case of a vehicle in which the pillar cover is fixed in place with special clips or the like, the clips may need to be replaced after you remove the pillar cover. For how to remove the pillar cover, the availability of replacement parts and other information, contact the vehicle dealer.
- Fix the power cord in place with commercially available tape or the like so that it does not interfere with driving.

natural_image
Pure technical line drawing of a mechanical component or housing with no text, numbers, or symbolsRear windshield
For the first installation, follow the instructions below:
Step 1: Locate the Rear Camera.
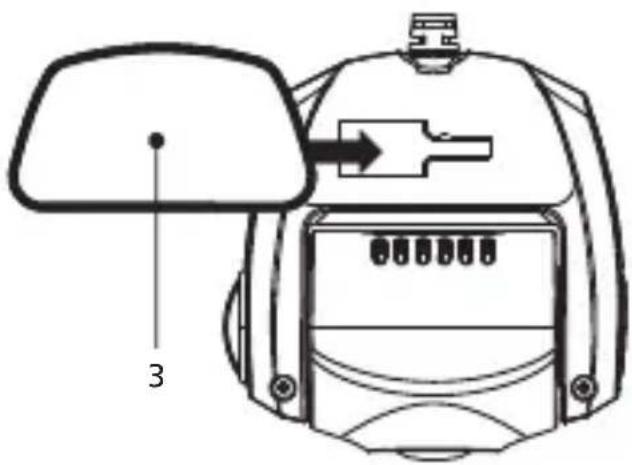
1.1 Connect the device to the adhesive mount
Attach the device onto (3) the adhesive mount.
Make sure you align the device within the adhesive mount for proper installation.
text_image
31.2 Connect Rear Camera Cable Connector
Connect (2) Rear Camera connector to (5) cable connector. Be sure the male and female pins is align when connecting.
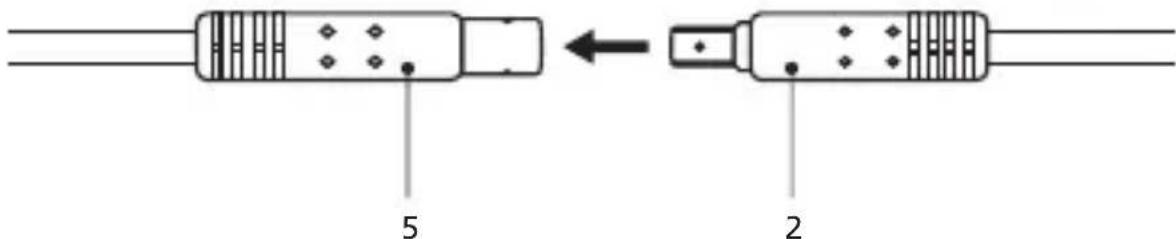
text_image
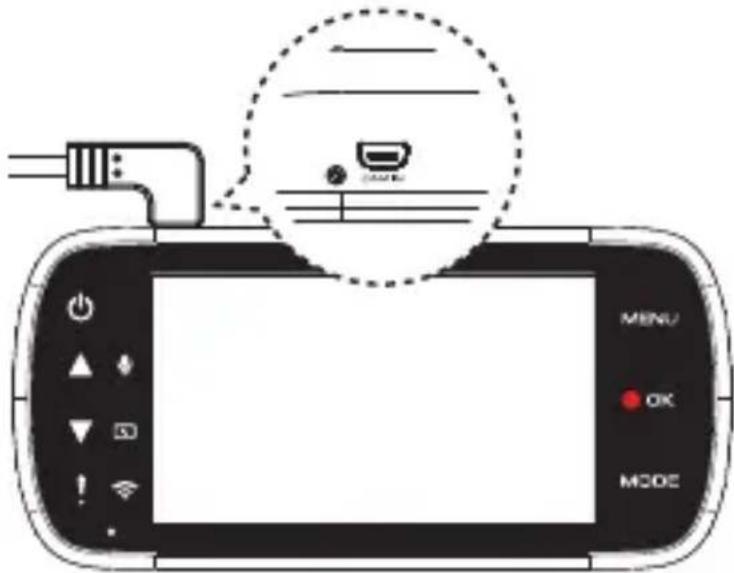
5 21.3 Connect the Rear Cam
Insert (6) CAM-IN connector into the CAM-IN port on compatible dashboard camera.
text_image
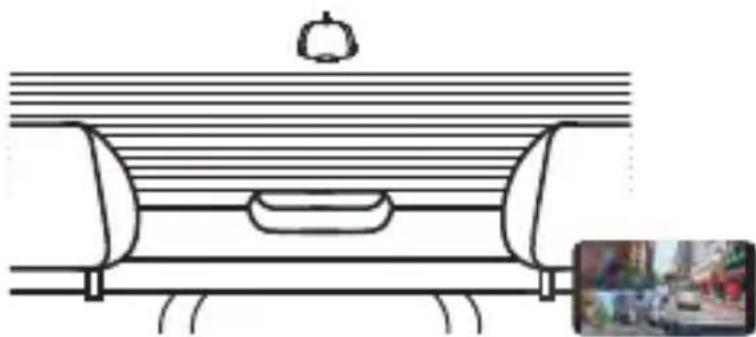
Diagram showing a device with an attached plug and a dashed circle highlighting a device with a switch, alongside its screen displaying menu, OK, and MODE buttons.1.4 Select installation position
Start the engine to power up the rear cam, then turn on Wireless Link mode to connect with mobile device. Using the App to view the image and adjust the installation position.
natural_image
Technical line drawing of a mechanical component with a top view and a close-up inset showing a close-up of a device (no text or symbols)Note:
Device will automatically turn on and start recording once power has been made available from the 12 V outlet.
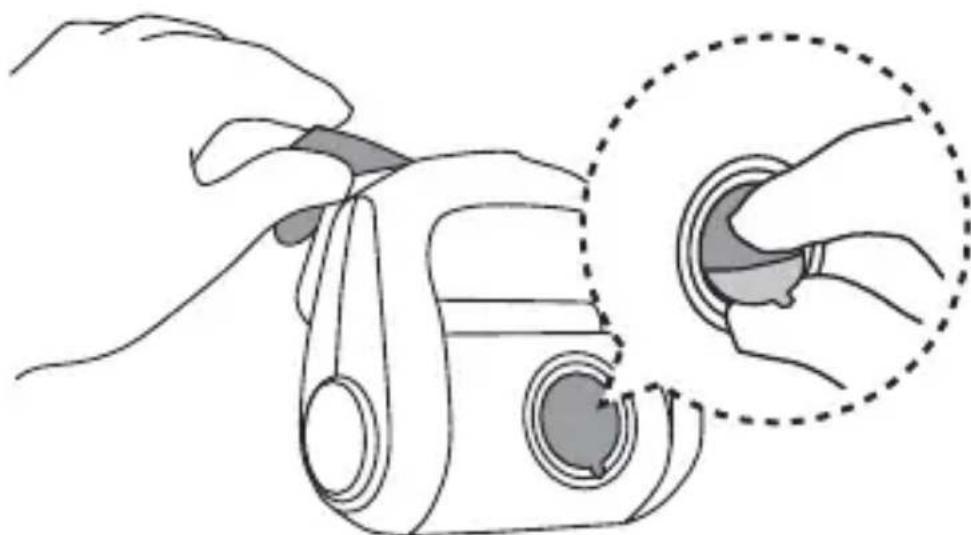
1.5 Putting on an adhesive mount
After selecting the best installation position and angle, remove (3) Adhesive protective film and protective lens film, stick it on the rear windshield, keep press and add pressure for 30 seconds.
natural_image
Illustration of a hand holding a camera with a close-up inset showing the lens (no text or symbols)TIP
- Make sure that Cable can be connected at the installation location.
- Windshield should be thoroughly cleaned and mounting area is wiped dry and at room temperature before applying the adhesive (Avoid under direct sunlight).
- Allow 24 hours to get the best adhesion effect.
1.6 Evaluate Cable Routing Location
Installation of the rear camera cable needs careful planning for the cable run and the final position of the camera within the vehicle. See the device manual for optimum front dash camera position. Study the vehicle for the most appropriate cable run towards the front windshield.
1.7 Cable Installation
Tucking the cable into the headliner of the vehicle and hide exposed cable to pillar trim and rubber strips, use a panel removal tool to loosen any trim and hide the cable if necessary.
Note:
- Ensure that the routing of the cable does not affect airbags.
- Find the right place to hide excessive cable.
- Consult a professional installer or vehicle technician to start the installation instead of doing it yourself.
Specifications
| Image Sensor | 1/2.8" CMOS Sensor |
| Frame Rate | 30fps |
| Recording Resolution | 2560 x 1440 (3.7M) |
| Recording Format | H.264 (MOV) |
| Lens | F=2.0 Fixed Focus Lens |
| Field of View | Horizontal :129° / Vertical: 66° / Diagonal: 161° |
| Operating Voltage | DC5.0V |
| Current Consumption | 120mA |
| Operating Temperature | -10°C to 60°C |
| Dimensions | 2-1/2" x 2-5/8" x 1-7/16"63mm x 66mm x 36mm |
| Weight | 11.8oz / 334g |
| Cable Length | 26'-3" / 8m |
Inhalt
DE
Vor dem Einsatz 01
natural_image
Pure technical diagram of a mechanical component with no text, numbers, or symbolsHeckscheibe
text_image
Diagram showing a device with a switch, battery, and a close-up of a device with a logo and status indicators including MENU, OK, and MODE.natural_image
Diagram of a mechanical or architectural component with horizontal lines and a small inset image (no text or symbols)Hinweis:
natural_image
Illustration of a hand holding a camera with a close-up inset showing the camera's lens (no text or symbols present)TIPP
natural_image
Four-panel line drawing showing different types of medical or cosmetic devices: a vacuum cleaner, a medical device, a rounded rectangle, and a flat outline (no text or symbols)natural_image
Pure technical line drawing of a mechanical component or housing with no text, numbers, or symbolsPare-brise arrière
text_image
Diagram showing a device with an attached plug and a dashed circle highlighting a device with a switch, alongside its screen displaying menu, mode, and OK/ON buttons.natural_image
Diagram of a vehicle interior with horizontal stripes and a central rectangular object, showing no text or symbols.Remarque :
natural_image
Illustration of a hand holding a camera with a close-up inset showing the camera's lens (no text or symbols present)CONSEIL
natural_image
Pure technical diagram of a mechanical component with no text, numbers, or symbolsAchterruit
text_image
Diagram showing a device with a switch, battery, and a close-up of a device with a logo and status indicators including MENU, OK, and MODE.1.4 De installatiestand selecteren
natural_image
Technical line drawing of a mechanical component with a top view and a close-up inset showing a close-up of a device (no text or symbols)Opmerking:
natural_image
Illustration of a hand using a camera to adjust a circular component, with no text or symbols present.TIP
natural_image
Pure technical diagram of a mechanical component with no text or symbolstext_image
Diagram showing a device with a switch, battery, and a close-up of a device's screen displaying status indicators including MENU, OK, and MODE.natural_image
Line drawing of a mechanical component with a top view and a close-up inset showing a close-up of a device (no text or symbols)Nota:
natural_image
Illustration of a hand using a camera to adjust the lens, showing the lens being inserted into a circular inset (no text or symbols present)Consigli
natural_image
Pure technical diagram of a mechanical component with no text or symbolsParabrisas trasero
text_image
Diagram showing a device with a switch, battery, and a close-up of a device with a 'MENU' button, highlighting a warning or notification.natural_image
Technical line drawing of a mechanical component with a top view and a close-up inset showing a close-up of a device (no text or symbols)Nota:
natural_image
Illustration of a hand holding a camera with a close-up inset showing the camera's lens (no text or symbols present)SUGERENCIA
natural_image
Four line drawings of household items: a washing machine, a medical device, two plastic containers, and a dome-shaped object (no text or symbols)Câmara traseira Cabo mini USB
de 8 mm
Discos adesivos Suporte adesivo
natural_image
Pure technical diagram of a mechanical component with no text, numbers, or symbolsVidro traseiro
text_image
Diagram showing a device with an attached plug and a dashed circle highlighting a device with a switch, alongside its screen displaying menu, OK, and MODE buttons.natural_image
Technical line drawing of a mechanical component with a top view and inset photo (no text or symbols)Nota:
natural_image
Illustration of a hand using a camera to adjust the lens, showing the lens being inserted into a circular inset (no text or symbols present)SUGESTÃO
natural_image
Pure technical diagram of a mechanical component with no text or symbolsЗаднее стекло
text_image
Diagram showing a device with an attached plug and a dashed circle highlighting a device with a switch, alongside its screen displaying menu, mode, and OK button.natural_image
Technical line drawing of a mechanical component with a circular top and internal slot, shown with a close-up inset (no text or symbols)Примечание
natural_image
Illustration of a hand using a camera to adjust the lens, showing the lens being removed (no text or symbols present)COBET
natural_image
Pure technical diagram of a mechanical component with no text, numbers, or symbolsSzyba tylna
text_image
Diagram showing a device with a switch, battery, and a close-up of a device with a logo and control buttons labeled MENU, OK, and MODE.natural_image
Line drawing of a mechanical component with a top view and a close-up inset showing a close-up of a device (no text or symbols)Uwaga:
natural_image
Illustration of a hand using a camera to adjust the lens, showing the lens being inserted (no text or symbols present)WSKAZÓWKA
natural_image
Four-panel line drawing showing different household appliances: a vacuum cleaner, a medical device, two plastic containers, and a large container (no text or symbols)natural_image
Pure technical line drawing of a mechanical component or housing with no text, numbers, or symbolsZadní sklo
text_image
Diagram showing a device with an attached plug and a dashed circle highlighting a device with text lines and icons.natural_image
Technical line drawing of a mechanical component with a top view and inset photo (no text or symbols)Poznámka:
natural_image
Illustration of a hand holding a camera with a close-up inset showing the lens (no text or symbols present)TIP
natural_image
Four-panel line drawing showing different household appliances: a vacuum cleaner, a medical device, two plastic containers, and a rounded rectangle (no text or symbols)Camera spate Cablu mini
USB 8mm
Tampoane adezive Montaj adeziv
* Produsul poate diferi uşor de imagine de mai sus
Părțile componente
Camera spate
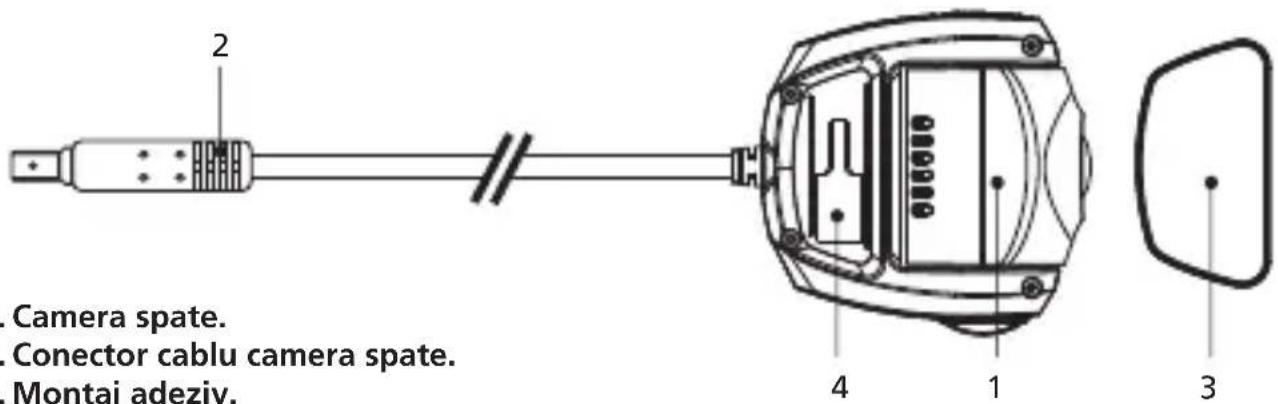
text_image
2 Camera spate. Conector cablu camera spate. Montaj adeziv. 4 1 3- Port montare.
Cablu cameră spate

text_image
5 6- Conector cablu.
- Conector CAM-IN.
natural_image
Pure technical line drawing of a mechanical component or housing with no text, numbers, or symbolsLunetă
text_image
Diagram showing a device with a switch, battery, and a close-up of a device's screen displaying status indicators including MENU, OK, and MODE.natural_image
Technical line drawing of a mechanical component with a top view and a close-up inset showing a close-up of a device (no text or symbols)Notă:
natural_image
Illustration of a hand holding a camera with a close-up inset showing the camera's lens (no text or symbols present)TIP
Information on Disposal of Old Electrical and Electronic Equipment (applicable for countries that have adopted separate waste collection systems)
Products with the symbol (crossed-out wheeled bin) cannot be disposed of as household waste.
Old electrical and electronic equipment should be recycled at a facility capable of handling these items and their waste by products.
Contact your local authority for details in locating a recycle facility nearest to you.
Proper recycling and waste disposal will help conserve resources while preventing detrimental effects on our health and the environment.

Declaration of Conformity with regard to the EMC Directive 2014/30/EU
Declaration of Conformity with regard to the RoHS
Directive 2011/65/EU
Manufacturer:
JVCKENWOOD Corporation
3-12, Moriyacho, Kanagawa-ku, Yokohama-shi,
Kanagawa 221-0022, JAPAN
EU Representative:
JVCKENWOOD Europe B.V.
Amsterdamseweg 37, 1422 AC UITHOORN, THE
NETHERLANDS
This equipment may generate or use radio frequency energy. Changes or modifications to this equipment may cause harmful interference unless the modifications are expressly approved in the instruction manual.
The user could lose the authority to operate this equipment if an unauthorized change or modification is made.
FCC NOTE
- This equipment has been tested and found to comply with the limits for a Class B digital device, pursuant to Part 15 of the FCC Rules. These limits are designed to provide reasonable protection against harmful interference in a residential installation.
- This equipment may cause harmful interference to radio communications, if it is not installed and used in accordance with the instructions. However, there is no guarantee that interference will not occur in a particular installation. If this equipment does cause harmful interference to radio or television reception, which can be determined by turning the equipment off and on, the user is encouraged to try to correct the interference by one or more of the following measures:
- Reorient or relocate the receiving antenna.
- Increase the separation between the equipment and receiver.
- Connect the equipment into an outlet on a circuit different from that to which the receiver is connected.
- Consult the dealer or an experienced radio/TV technician for help.
CAN ICES-3(B)/ NMB-3(B)
IC (Industry Canada) Notice
This device contains licence-exempt transmitter(s)/receiver(s) that comply with Innovation, Science and Economic Development Canada's licence-exempt RSS(s). Operation is subject to the following two conditions:
-
This device may not cause interference.
-
This device must accept any interference, including interference that may cause undesired operation of the device.
CAUTION
This equipment complies with FCC/IC radiation exposure limits set forth for an uncontrolled environment and meets the FCC radio frequency (RF) Exposure Guidelines and RSS-102 of the IC radio frequency (RF) Exposure rules. This equipment has very low levels of RF energy that is deemed to comply without maximum permissive exposure evaluation (MPE). But it is desirable that it should be installed and operated keeping the radiator at least 20 cm or more away from person's body.
Pour le Canada
Note de 'IC (Industrie Canada)
Supplier's Declaration of Conformity
Trade Name: KENWOOD
Products: Rear Camera
Model Name: KCA-R200
Responsible Party:
JVCKENWOOD USA CORPORATION
2201 East Dominguez Street,
Long Beach, CA 90810, U.S.A.
PHONE: 310 639-9000
THIS DEVICE COMPLIES WITH PART 15 OF THE FCC RULES. OPERATION IS SUBJECT TO THE FOLLOWING TWO CONDITIONS:
(1)THIS DEVICE MAY NOT CAUSE HARMFUL INTERFERENCE, AND
(2) THIS DEVICE MUST ACCEPT ANY INTERFERENCE RECEIVED, INCLUDING INTERFERENCE THAT MAY CAUSE UNDESIRED OPERATION.