
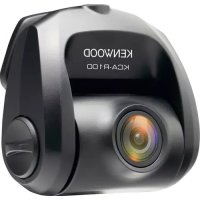
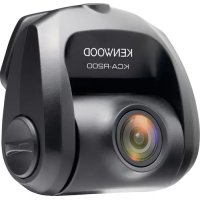
DRV410 - Dashboard camera KENWOOD - Free user manual and instructions
Find the device manual for free DRV410 KENWOOD in PDF.
| Product type | Dashboard camera |
| Brand | KENWOOD |
| Model | DRV410 |
| Screen | TFT monitor 1.5 inches, 110,000 pixels |
| Image sensor | CMOS color 1/3 inch |
| Lens | Wide angle, aperture: 2.0 |
| Viewing angle | Horizontal: approx 117°, vertical: approx 63°, diagonal: 128° |
| Maximum video resolution | 2,304 × 1,296 (1296P) |
| Maximum photo resolution | JPEG 2,304 x 1,296 |
| Frame rate | 27 fps |
| Recording modes | Continuous, event, manual, parking |
| Recording duration before/after impact | 10 s before, 15/30/60 s after |
| Recording media | microSDHC card 8 to 32 GB (Class 6 or higher) |
| Built-in GPS | Yes |
| Accelerometer | Yes, sensitivity -4.0G to +4.0G in 0.1G increments |
| Power supply | 12 V (8.5 to 16 V) |
| Power consumption | 200 mA (max 720 mA) |
| Operating temperature | -10°C to +60°C |
| Dimensions | Height with fixed mount: 93 mm |
| Weight | Approx 81 g (with microSDHC card) |
| Included accessories | Power cord (3.5 m), mounting bracket (double-sided adhesive) |
| PC software | KENWOOD DRIVE REVIEWER (downloadable) |
| Driving assistance functions | Forward collision warning, lane departure warning, preceding vehicle departure warning |
| Maintenance and cleaning | Clean with a dry soft cloth; lens with a soft cloth dampened with water; do not use solvents |
| Safety | Do not operate while driving; install behind the rearview mirror without obstructing view or airbags |
| Spare parts and repairability | No user-serviceable parts; contact dealer or JVC KENWOOD center |
Frequently Asked Questions - DRV410 KENWOOD
User questions about DRV410 KENWOOD
0 question about this device. Answer the ones you know or ask your own.
Ask a new question about this device
Download the instructions for your Dashboard camera in PDF format for free! Find your manual DRV410 - KENWOOD and take your electronic device back in hand. On this page are published all the documents necessary for the use of your device. DRV410 by KENWOOD.
USER MANUAL DRV410 KENWOOD
GPS Integrated Dashboard Camera
INSTRUCTION MANUAL
Declaration of Conformity with regard to the RE Directive 2014/53/EU
Declaration of Conformity with regard to the RoHS Directive 2011/65/EU
Manufacturer:
JVC KENWOOD Corporation
3-12, Moriya-cho, Kanagawa-ku, Yokohama-shi, Kanagawa, 221-0022, Japan
EU Representative:
JVCKENWOOD NEDERLAND B.V.
Amsterdamseweg 37, 1422 AC UITHOORN, The Netherlands
English
Hereby, JVCKENWOOD declares that the radio equipment "DRV-410" is in compliance with Directive 2014/53/EU.
The full text of the EU declaration of conformity is available at the following internet address:
http://www.kenwood.com/cs/ce/eudoc/
Français
Precautions for Use 7
How to Install 8
How to Wire 10
Names and Functions of Parts 11
Before Using the Driving Support Function 12
Basic Operations 13
Recording 16
Playback 17
Protecting or Deleting Files 18
Various Settings. 19
Using the PC Application 24
Troubleshooting 28
Appendix 31
Specifications 34
- The screen images and operation examples in this document were created for explaining the operating procedures. There may be screen images that differ from the actual screens or examples of operations not actually performed.
- Unless otherwise specified, microSDHC cards are referred to as SD cards in this document.
- The latest instruction manual, firmware update information, etc. are available at the JVC KENWOOD website. Please visit the following website. http://www.kenwood.com/cs/ce/
Disclaimer
- Please note that JVC KENWOOD shall not be responsible for any damages suffered by the customer or a third party as a result of incorrectly using this product, a failure during use of this product, or other trouble, or due to the use of this product, unless such liability is acknowledged by law.
Copyrights
- Recorded video, image, and audio content cannot be used for other than personal enjoyment without the consent of the copyright holder as specified in the Copyright Act.
- Please note that the recording of an event such as a show, performance, or exhibition may be restricted even when doing so for personal enjoyment.
Precautions and notices
Warning! Do not operate the device while driving. Using this product does not change the requirement for a driver to take full responsibility for his or her behavior. This responsibility includes observing all traffic rules and regulations in order to avoid accidents, personal injury or property damage.
- For your own safety, do not operate the controls of the product while driving.
- A window mount is needed when using the recorder in a car. Make sure that you place the recorder in an appropriate place, so as not to obstruct the driver's view or deployment of airbags.
- Make sure that no object is blocking the camera lens and no reflective material is placed near the lens. Please keep the lens clean.
- If the car's windscreen is tinted with a coating, it may impact the recording quality.
- Connect the charger to a proper power source. The voltage requirements are found on the product case and/or packaging.
- Do not use the charger if the cord becomes damaged.
- Do not attempt to service the unit. There are no serviceable parts inside. Replace the unit if it is damaged or exposed to excess moisture.
Caring for your device
Taking good care of your device will ensure trouble-free operation and reduce the risk of damage.
- Keep your device away from excessive moisture and extreme temperatures.
- Avoid exposing your device to direct sunlight or strong ultraviolet light for extended periods of time.
- Do not place anything on top of your device or drop objects on your device.
- Do not drop your device or subject it to severe shock.
- Do not subject your device to sudden and severe temperature changes. This could cause moisture condensation inside the unit, which could damage your device. In the event of moisture condensation, allow the device to dry out completely before use.
- The screen surface can easily be scratched. Avoid touching it with sharp objects. Nonadhesive generic screen protectors designed specifically for use on portable devices with LCD panels may be used to help protect the screen from minor scratches.
- Never clean your device with it powered on. Use a soft, lint-free cloth to wipe the screen and the exterior of your device.
- Do not use paper towels to clean the screen.
- Never attempt to disassemble, repair or make any modifications to your device.
Disassembly, modification or any attempt at repair could cause damage to your device and even bodily injury or property damage and will void any warranty.
- Do not store or carry flammable liquids, gases or explosive materials in the same compartment as your device, its parts or accessories.
- To discourage theft, do not leave the device and accessories in plain view in an unattended vehicle.
- Overheating may damage the device.


Information on Disposal of Old Electrical and Electronic Equipment and Batteries (applicable for countries that have adopted separate waste collection systems)
Products and batteries with the symbol (crossedout wheeled bin) cannot be disposed as household waste.
Old electrical and electronic equipment and batteries should be recycled at a facility capable of handling these items and their waste by products.
Contact your local authority for details in locating a recycle facility nearest to you.
Proper recycling and waste disposal will help conserve resources whilst preventing detrimental effects on our health and the environment.
Notice: The sign "Pb" below the symbol for batteries indicates that this battery contains lead.
Precautions for Installation
- Install the device in a position where it will not block the front view of the driver (position where hidden by the rear-view mirror).
- Install the device so that it is within the wiping range of the wiper.
- Install the device in a position where it will not interfere with the movement of the rear-view mirror.
- Take care not to install the device over the vehicle inspection sticker or other sticker.
- Take care not to install the device where it will interfere with driving or airbag operation.
- When installing the device in a vehicle equipped with a driving support system, check the instruction manual of the vehicle and then select an installation location that will not interfere with the driving support system.
- If the device is installed incorrectly, event recording or parking recording may not work correctly. Refer to "How to Install" for the loosening of fixing knob, installation orientation, installation angle, and other information and then install the device correctly. ( P. 8)
- Do not install the device near a digital terrestrial television antenna or an electrical component. Doing so may reduce television receiver sensitivity or cause flickering and noise.
- Use a commercially available cleaning cloth or the like to wipe off all dirt and grease on the mounting surface and then fix the mount base in place. If the device is re-affixed or mounted using, for example, general-purpose double-sided tape, the adhesion strength may weaken and cause the device to fall.
After mounting the device, leave it for 24 hours before use to enable the mounting strength of the mount bracket to improve. Failing to do so may result in the adhesion of the mount bracket becoming weak and the device falling.
Fix the cord in place with tape or the like so that it does not interfere with driving.
Precautions for Use
- Do not block the camera lens, get dirt on it, or place a reflective object near it.
- When LED traffic lights are recorded, video in which they appear to be flickering or flashing may be recorded. JVC KENWOOD assumes no responsibility with regard to the distinguishing or recording of traffic lights.
- If coating is used on the windshield of the vehicle, recording quality may be affected.
- There is no guarantee that the device can record video in all conditions.
Cleaning the Device
- When the device is dirty, wipe it with a dry silicone cloth or other soft cloth. If the device is very dirty, remove the dirt with a cloth with neutral cleaner on it and then wipe off the cleaner. Wiping the device with a hard cloth or using using a volatile substance such as thinner or alcohol may cause scratches, deformation, deterioration, or other damage.
- When the lens is dirty, gently wipe it with a soft cloth dampened with water. Rubbing the lens strongly with a dry cloth may cause scratches.
If You Notice a Problem with the Device
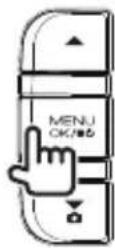
If you notice a problem with the device, first refer to "Troubleshooting" ( .28) and check whether there is a way to resolve the problem. If you are unable to find a way to resolve the problem, press the [MENU/OK] button on the device for at least 25 seconds to reset the device. When the power turns off after resetting the device, press the [MENU/OK] button for at least 1 second to turn on the power. ( .11) If the device does not return to normal after the reset, turn off the power of the device and then contact your dealer or nearest JVC KENWOOD service center.
Installation Procedure
Check that the vehicle is parked on a level surface.
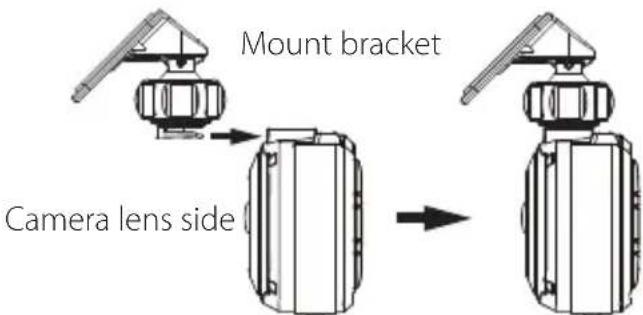
1. Attach the device to the mount bracket. (accessory)
Insert the mount bracket into the bracket attachment part of the device and attach it to the device.
2. Determine where to mount the device.
Determine the mounting position in reference to "Recommended installation position."
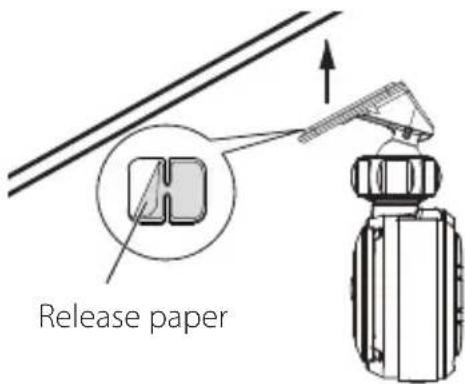
3. Clean the mounting surface and then affix the device to the windshield.
Use a commercially available cleaning cloth or the like to wipe off all dirt and grease on the mounting surface. Peel off the release paper of the double-sided tape on the mount bracket and push the bracket against the windscreen to affix it in place. Leave the device for 24 hours before use to enable the mounting strength of the mount bracket to improve.
4. Perform the cord wiring work.
Refer to "How to Wire" and then perform the wiring work. ( P.10)
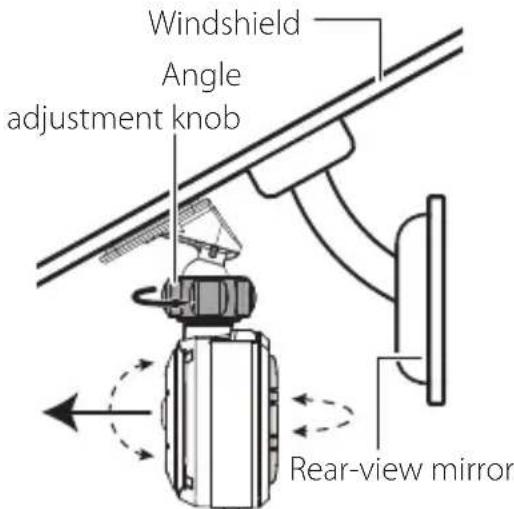
5. Adjust the installation angle of the device and then fix the device in place.
Turn the angle adjustment knob clockwise before adjustment. When adjusting the installation angle, check that the camera field of view is parallel to a level ground surface and that the ratio of the sky and ground are the same. After adjusting the installation angle, turn the angle adjustment knob of the adjustment bracket counterclockwise to fix the device in place.
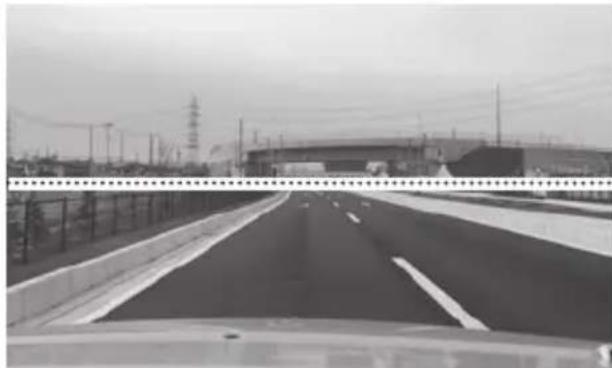
Adjustment example

If you will use the driving support function, you need to make the adjustments described in "Adjusting the Settings to Match the Vehicle." ( P.12)
Make the adjustments described in "Adjusting the Settings to Match the Vehicle" in a location with a level surface and a sight distance of about 200 m. (→P.12)
Recommended installation position
- Install the device in a position where it will not block the front view of the driver (position where hidden by the rear-view mirror).
- Install the device so that it is within the wiping range of the wiper.
- Mounting the device to the center of the windshield behind the rear-view mirror will facilitate optimal video recording.
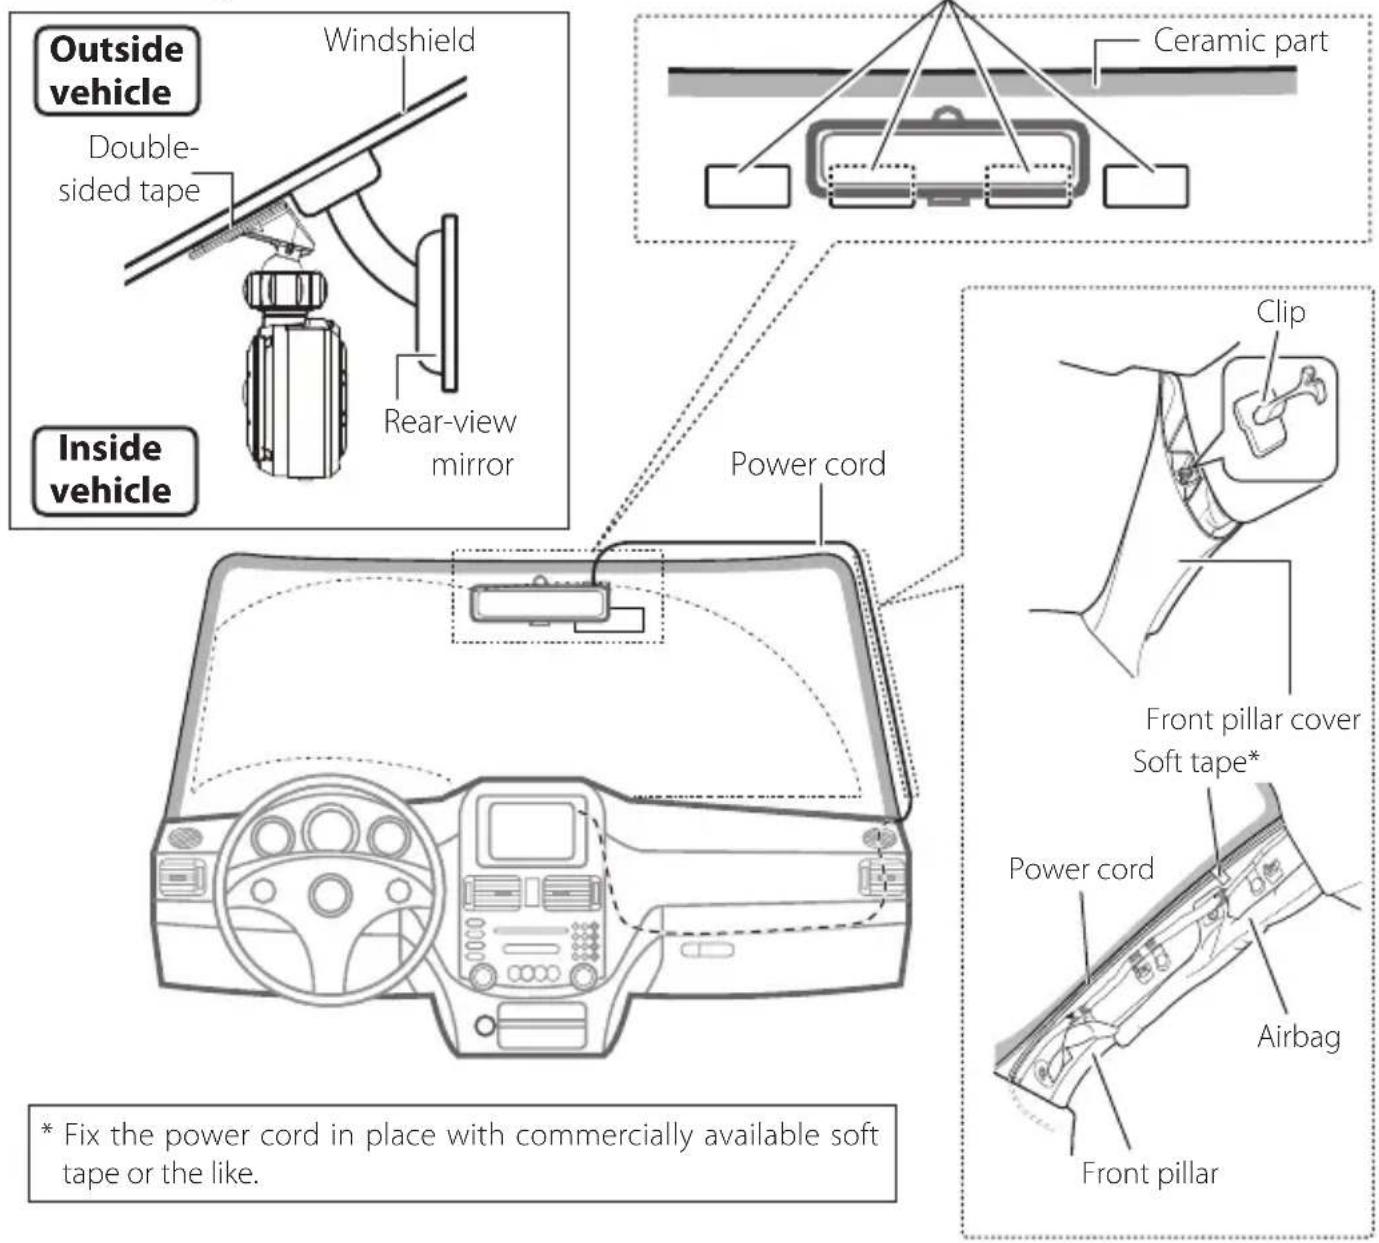

CAUTION
When passing the power cord through the front pillar or another part, observe the following points when performing the wiring work.
- Wire the power cord farther forward or farther rearward than the airbag so that it does not interfere with the airbag.
- In the case of a vehicle in which the front pillar cover is fixed in place with special clips or the like, the clips may need to be replaced after you remove the front pillar cover. For how to remove the front pillar cover, the availability of replacement parts, and other information, contact the vehicle dealer.
Fix the power cord in place with commercially available soft tape or the like so that it does not interfere with driving.
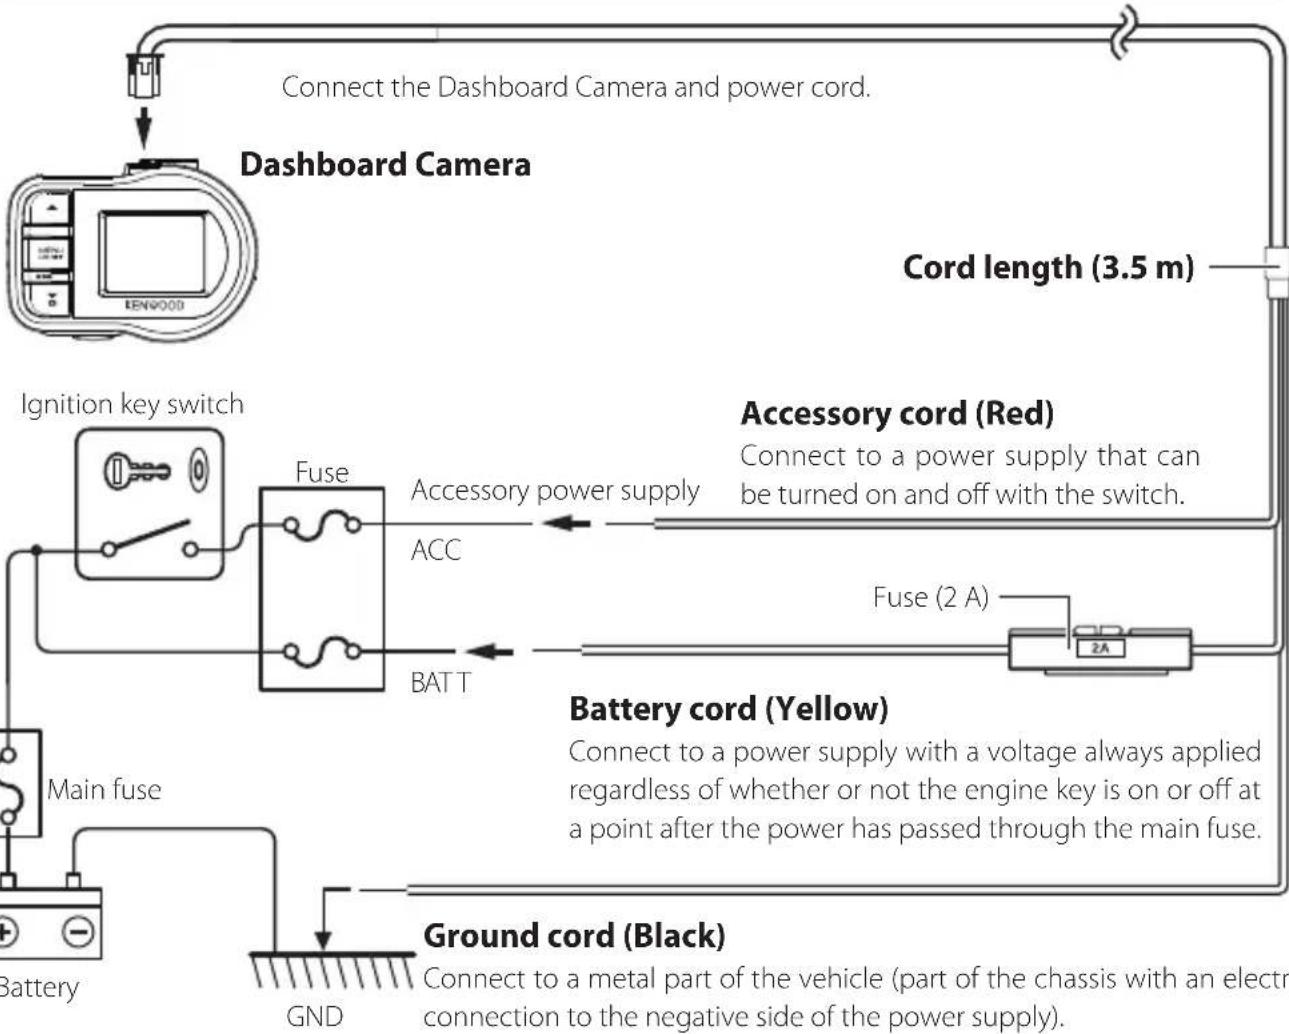
Power cord for Dashboard Camera (accessory)

CAUTION
Before performing the connection work, first check that the engine key is removed and then be sure to disconnect the negative terminal of the battery to prevent a short accident.
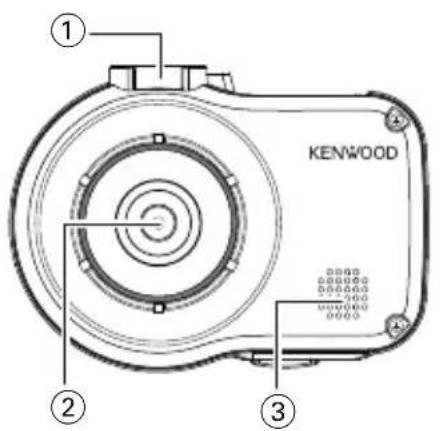
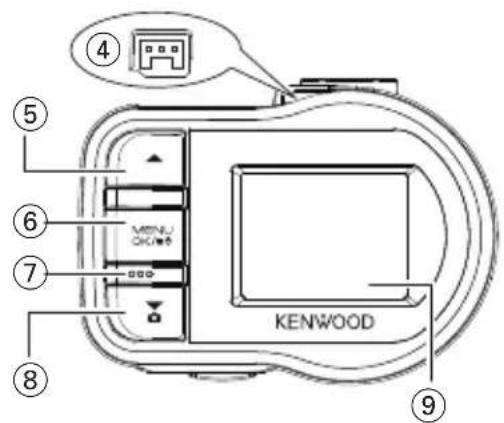
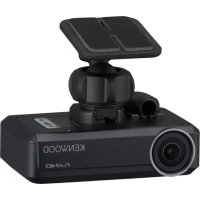
① Bracket attachment part
Attach the supplied mount bracket.
② Camera lens
③ Speaker
Outputs voice guidance, warning sounds, and file playback audio.
④ Power cord connector terminal
Connect the supplied cigarette lighter plug cord or the Dashboard Camera power cable.
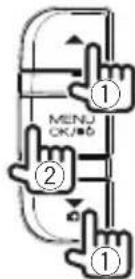
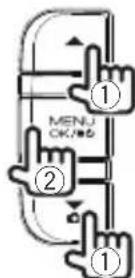
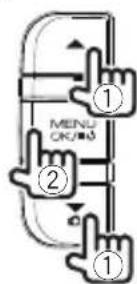
(5)▲button
- Press this button during playback to play the previous file.
- Hold down this button during playback to rewind, and hold it down while playback is paused to play slowly in the reverse direction. Release this button during rewinding to play, and release it during reverse slow playback to pause.
- Press this button during menu display to return to the previous item.
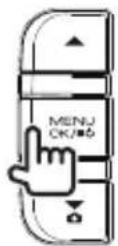
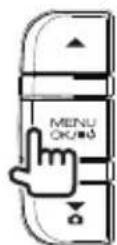
6 MENU/OK button
- Hold down this button to turn on or off the power of the device.
- Press this button to display the MENU screen.
- This button functions as the OK button during menu display.
- Hold down this button for at least 25 seconds to reset the device.
⑦ Microphone
Records audio.
⑧▼ button
- Press this button during continuous recording to take a photo.
- Press this button during playback to play the next file.
- Hold down this button during playback to fast-forward, and hold it down while playback is paused to play slowly in the forward direction. Release this button during fast-forwarding to play, and release it during forward slow playback to pause.
- Press this button during menu display to go to the next item.
⑨ Monitor screen
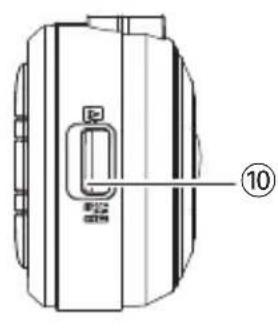
SD card slot
Insert an SD card for recording.
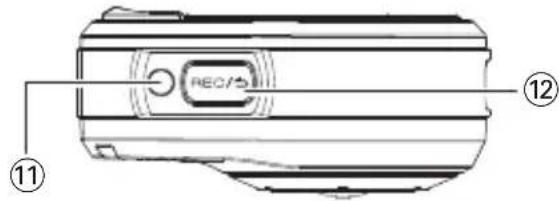
⑪ Indicator
Lights when the power of the device turns on.
12 REC/5 button
- Press this button during continuous recording to start manual recording.
Each press of this button during playback switches between the paused and playback states. - Press and hold this button during playback or menu setting to return to continuous recording.
- This button functions as the cancel, back, or exit button during menu display.
Before Using the Driving Support Function
Adjusting the Settings to Match the Vehicle
Before using the driving support function, set the mounting height of the device from the road surface and adjust the horizon and bonnet front edge position settings to match the vehicle.
1. Press the [MENU/OK] button.
MENU appears.
![KENWOOD DRV410 - Press the [MENU/OK] button. - 1](/content/2026/03/430686/images/e28a5fbdddffe71c01afc0607f3631ca5b7175bdea070713ccfd01a74d9cd22a.jpg)
![KENWOOD DRV410 - Press the [MENU/OK] button. - 2](/content/2026/03/430686/images/475e24cbc912cb0cecc0a1e4eda3e525d652661b9444b0ba5563b20de13d7bb4.jpg)
- Use the [] / [] buttons to select
and then press the [MENU/OK] button.
![KENWOOD DRV410 - Press the [MENU/OK] button. - 3](/content/2026/03/430686/images/908b078e9b1e3cd73d86cc99af7b3fe92963febfb1dce6a42f51269b74296fad.jpg)
![KENWOOD DRV410 - Press the [MENU/OK] button. - 4](/content/2026/03/430686/images/6a6256e00b5d1fe81b6aad4abba0d06ff7c3b3da91d6c5163a09628fcad2325e.jpg)
- Use the [] / [] buttons to select
and then press the [MENU/OK] button.
![KENWOOD DRV410 - Press the [MENU/OK] button. - 5](/content/2026/03/430686/images/30b285520226442018bc920482399cb4c91e512fecef445a88f0e8a2fdb7f0a6.jpg)
![KENWOOD DRV410 - Press the [MENU/OK] button. - 6](/content/2026/03/430686/images/5f4eddc922fa762edebbf72d7f9203bf78fb8cb12f8a10d1481a7ceff2bbc222.jpg)
- Use the [] / [] buttons to select the mounting height from the road surface and then press the [MENU/OK] button.
![KENWOOD DRV410 - Press the [MENU/OK] button. - 7](/content/2026/03/430686/images/b14258cd2405ec110da4b15cae78a24818c114f14f1a3e00dcea5f98852f6c17.jpg)
![KENWOOD DRV410 - Press the [MENU/OK] button. - 8](/content/2026/03/430686/images/66f8316da95512eee4abba92d8de18d4c856c2d4eaa6126953724c679fb92133.jpg)
- Use the [] / [] buttons to select
and then press the [MENU/OK] button.
![KENWOOD DRV410 - Press the [MENU/OK] button. - 9](/content/2026/03/430686/images/97bc4bbaec2b0bfc9a57e2bb8b556787389aebb7e1bff33975838d5e8f2027e1.jpg)
![KENWOOD DRV410 - Press the [MENU/OK] button. - 10](/content/2026/03/430686/images/77c5b5d814c06fb23583596a3903df33b176db951a1c1e597eb6fa5790a3f674.jpg)
- Press the [MENU/OK] button, use the [ ] / [ ] buttons to align the guide line with the horizon, and then press the [MENU/OK] button.
Adjust as shown in the figure.
![KENWOOD DRV410 - Press the [MENU/OK] button. - 11](/content/2026/03/430686/images/5002e05a5e0c621352dc57a64267c7f7b3d7f58194ed63f60b212fae01afd239.jpg)
![KENWOOD DRV410 - Press the [MENU/OK] button. - 12](/content/2026/03/430686/images/7db6a8035c697e2132660d6f94c33e8af4551238eca020292fc37b3a3d89b0bf.jpg)
- Press the [MENU/OK] button, use the [ ] / [ ] buttons to align the guideline with the bonnet front edge, and then press the [MENU/OK] button.
Adjust as shown in the figure.
![KENWOOD DRV410 - Press the [MENU/OK] button. - 13](/content/2026/03/430686/images/c46a8e1e48a510a6937d9c7019b5cbbc6222507d4a1d63a7ebfc5bfd05cd143a.jpg)
![KENWOOD DRV410 - Press the [MENU/OK] button. - 14](/content/2026/03/430686/images/bb160d199a2156b737fdf99a4ec20c22af5b787c6b5c10b719defea71e143950.jpg)
- Hold down the [Pbntto end the procedure.
![KENWOOD DRV410 - Press the [MENU/OK] button. - 15](/content/2026/03/430686/images/c13b67f825b441b8b88594926272c08755bba0f50ac310941a1dba2555678f5b.jpg)
![KENWOOD DRV410 - Press the [MENU/OK] button. - 16](/content/2026/03/430686/images/025142cebb0e14f7c2fd0189ceee0b42c9e46d86924020b16c902bf8e4e7bf76.jpg)
- For the mounting height setting, set the nearest height among the setting options.
- In the case of a vehicle for which the bonnet front edge cannot be seen, lower the guide line to the lowest position at which the center of the road surface is not hidden by the body or a part of the vehicle and then set the setting.
The driving support function is set to "OFF" by default ( P.21)
Inserting and Removing an SD Card
Turn off the power of the device and then insert an SD card into the SD card slot until you hear a clicking sound. Be careful with regard to the orientation of the card.
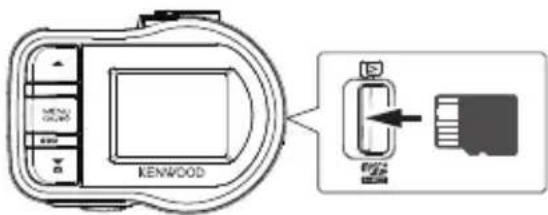
To remove the SD card, turn off the power of the device and then press the SD card so that it pops up and remove the SD card by pulling it out.

- Be sure to format an SD card with the device.
- When an SD card is formatted, all files including protected files are deleted.
Turing the Power On/Off
Turning on the accessories power (ACC) switch or starting the engine of the vehicle turns on the power of the device and starts continuous recording. Turning off the accessories power (ACC) turns off the power of the device and switches to parking recording mode.
To Turn the Power On/Off Manually
When the accessories power (ACC) is on, the power of the device can be turned on or off manually.
- Hold down the [MENU/OK] button for at least 3 seconds while the device is on to turn off the power.
- Hold down the [MENU/OK] button for at least 1 second while the device is off to turn on the power.

- When the power has been turned off manually, power is consumed because the device is in standby.
- There are vehicle models such as some imported vehicles for which the power to the cigarette lighter is not cut off even when the engine is turned off. To protect the battery, remove the cigarette lighter plug when you get out of the vehicle.
Formatting an SD Card
Before using an SD card, first format (initialize) it with the device.
- Insert the SD card into the SD card slot.
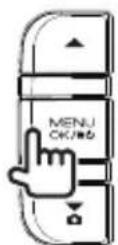
- Press the [MENU/OK] button.
MENU appears.

- Use the [] / [] buttons to select
and then press the [MENU/OK] button.
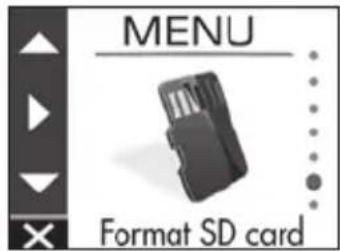
- Use the [] / [] buttons to select
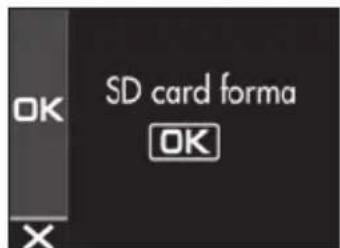
and then press the [MENU/OK] button.
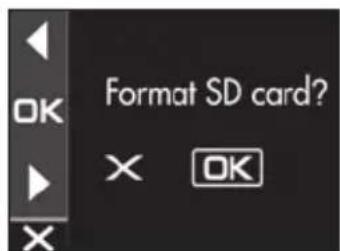
- Press the [MENU/OK] button to end the procedure.
Recording Modes
The device has four recording modes. Turning on the power of the device starts continuous recording. The recorded video is recorded as files to the SD card. The recording files are sorted into a separate folder for each recording mode.
Continuous recordings
Turning on the power of the device starts continuous recording. In continuous recording mode, files are deleted in order from the oldest to record when there is no recording area remaining.
Continuous Elapsed time recording

- The recording data is saved to the continuous recordings folder.
- The recording time of one file can be set in "Continuous recording file length" (→P.20).
Manual recording
Pressing the [REC/3] button on the device during continuous recording starts manual recording. The recording time of manual recording is the 10 seconds before manual recording plus the time set in "Manual recording time" ( P.20) . If you wish to extend the recording time, press the [REC/3] button again. When manual recording ends, the mode returns to continuous recording.
Manual recording (If the button is pressed during manual recording, the recording time is extended from that point by the amount of recording time set for manual recording.)


- The recording data is saved to the manual recordings folder.
- The recording time of one file is a maximum of one minute. If the recording time exceeds one minute, the file is split to record.
- When 10 files will be exceeded, manual recording cannot be performed (when 8 GB SD card). When "Overwrite (manual)" is set to "ON," files are deleted in order from the oldest to record ( .20) . Back up the recording data you wish to keep to a PC or other device if necessary.
Event recording
The detection of a sudden collision, unexpected collision, or other event during continuous recording starts event recording. The recording time of event recording is the 10 seconds before collision detection plus the time set in "Event recording time" ( P.20) . When event recording ends, the mode returns to continuous recording.

Records 10 seconds before Event recording (set time) collision detection

- The recording data is saved to the event recordings folder.
- The recording time of one file is a maximum of one minute. If the recording time exceeds one minute, the file is split to record.
- If a collision is detected during event recording, event recording is extended.
- When five files will be exceeded, event recording cannot be performed (when 8 GB SD card). When "Overwrite (event)" is set to "ON," files are deleted in order from the oldest to record ( P.20) . Back up the recording data you wish to keep to a PC or other device if necessary.
Parking recording
Turning off the accessories power (ACC) turns off the power of the device and switches to parking recording mode to perform vehicle collision monitoring. If the vehicle is subjected to a collision, the power of the device turns on and parking recording starts. When parking recording ends, vehicle collision monitoring resumes.


- The recording data is saved to the parking recordings folder.
- Parking recording starts a few seconds after the vehicle is subjected to a collision.
- The monitor screen is not displayed during parking recording.
- When 20 files will be exceeded, parking recording cannot be performed (when 8 GB SD card). Delete any unnecessary data or back up the recording data you wish to keep to a PC or other device if necessary. You can confirm whether there is an excess number of files with the "⑧ Number of files exceeded" indicator on the recording screen ( P.16).
- If parking recording is performed, a notification on the screen informs you that parking recording has been performed when the power turns on.
- Parking recording cannot be performed when "Recording time" is set to "OFF" (→P.20).
- Parking recording may sometimes be performed as a result of detecting vibration when a door is closed.
Recording at Any Location (Manual Recording)
Pressing the [REC/] button on the device during continuous recording allows you to record manually whenever you wish.
1. Press the [P] button
Manual recording starts and then the mode returns to continuous recording after the time set for the recording time of manual recording elapses.
![KENWOOD DRV410 - Press the [P] button - 1](/content/2026/03/430686/images/55b3721435b6cf451b2ce3d3dc335d2b5806e506d2897b518ab3c0a19712d014.jpg)
![KENWOOD DRV410 - Press the [P] button - 2](/content/2026/03/430686/images/a2ac71fe2a61a12dc595c8ded51ffb7d39e11fc0ff8336490194ab9f64947490.jpg)
![KENWOOD DRV410 - Press the [P] button - 3](/content/2026/03/430686/images/34ff0b1352f7ebbe3cbe6947f4ba81c87437d700e585c4b9e54cf31c6bfd594d.jpg)
If you wish to extend the recording time, press the button again.
The recording time of manual recording is the 10 seconds before manual recording plus the time set in "Manual recording time." ( P.20)
- Recording cannot be performed during folder or file selection, playback, deletion, and setting.
Recording at Any Location (Forcibly Recording)
Forcibly start recording even during playback or menu display.
1.Hold down the [B] button
Playback or menu display stops and continuous recording resumes.
![KENWOOD DRV410 - 1.Hold down the [B] button - 1](/content/2026/03/430686/images/8bfc6e266fe5f6ee9d0ae2932b01b76eca3c64378b9cb5aaf9d870b3ad94717f.jpg)
![KENWOOD DRV410 - 1.Hold down the [B] button - 2](/content/2026/03/430686/images/c61ff7a6b07ecd807394902a93fb7ae784c7c93bbc01eafb6393a6d172ca28e1.jpg)
Taking a Photo
Pressing the [▼] button on the device during continuous recording allows you to take a photo whenever you wish.
1. Press the [▼] button.
![KENWOOD DRV410 - Press the [▼] button. - 1](/content/2026/03/430686/images/ad2ae01e0d686c35a5bf681b61875d463a473a2139327fb4a8c5c7c23766a539.jpg)
![KENWOOD DRV410 - Press the [▼] button. - 2](/content/2026/03/430686/images/b4dc50158d546cfea77d700d6b89708bbf1b5ff8f5a1320acdb69dbca6c9eb25.jpg)
![KENWOOD DRV410 - Press the [▼] button. - 3](/content/2026/03/430686/images/130c72ff1dee0ed8564ab87119ebab93de70d7e65d07f7a9d1be6eabcebcb2fb.jpg)
If you wish to take another photo, press the [▼] button again.
- A photo cannot be taken when the device is not recording such as during playback or when configuring menu settings.
Recording screen indicators
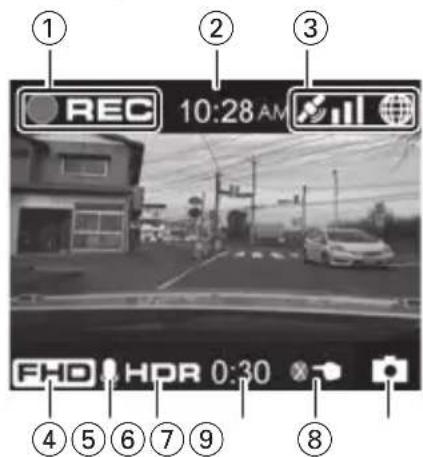
① Recording mode
② Time
③ GPS reception state
④ Resolution (3M: 2304x1296, FHD: 1920x1080, or HD: 1280x720)
⑤ Audio recording
⑥ HDR recording
⑦ Remaining manual recording or event recording time
Number of files exceeded (manual recording, event recording, parking recording, or photos)
(9) Photo taking
Playing Files
Select a file such as a recording file or photo and start playback.
1. Press the [MENU/OK] button.
MENU appears.
![KENWOOD DRV410 - Press the [MENU/OK] button. - 1](/content/2026/03/430686/images/36d9d5454567f51c79972c5ac5f660f1216f3a80456ec5deb6f281bcb40f696d.jpg)
![KENWOOD DRV410 - Press the [MENU/OK] button. - 2](/content/2026/03/430686/images/4d42553d1e0a6dc0287defb4983be4f3bab89a7909a6cc1e953caf739f2ec534.jpg)
2. Use the [] / [] buttons to select and then press the [MENU/OK] button.
![KENWOOD DRV410 - Use the [] / [] buttons to select and then press the [MENU/OK] button. - 1](/content/2026/03/430686/images/49e7cdee1fd8c36d960edd4911b972dca2d0fddd95f7447da4a9aeabcf25a274.jpg)
![KENWOOD DRV410 - Use the [] / [] buttons to select and then press the [MENU/OK] button. - 2](/content/2026/03/430686/images/fffdb9ab1f6c7391d6dc3804f99bd2708b56afe8f0ff1e5cd96654c3f23318bb.jpg)
3. Use the [] / [] buttons to select the folder you wish to play and then press the [MENU/OK] button.
The video for the most recent file in the selected folder is displayed.
![KENWOOD DRV410 - Use the [] / [] buttons to select the folder you wish to play and then press the [MENU/OK] button. - 1](/content/2026/03/430686/images/11dbdb2cbe9b3699f463656baa4bc982649d88313a50472eefd78a1571aa05aa.jpg)
![KENWOOD DRV410 - Use the [] / [] buttons to select the folder you wish to play and then press the [MENU/OK] button. - 2](/content/2026/03/430686/images/35c184ed967cec5b055c66491097e4f29621bfb0d3834e49b37bbb24cdc29a83.jpg)
| Continuous recordings | There are continuous recording files. |
| Manual recordings | There are manual recording files. |
| Event recordings | There are event recording files. |
| Parking recordings | There are parking recording files. |
| Still images | There are still image files. |
4. Use the [] / [] buttons to select the file you wish to play and then press the [MENU/OK] button and press the [REC/ ] button.
Playback of the selected file begins.
![KENWOOD DRV410 - Use the [] / [] buttons to select the file you wish to play and then press the [MENU/OK] button and press the [REC/ ] button. - 1](/content/2026/03/430686/images/4ca4921924dcbdbead92bc3a371d2e81766d95a27d17811a3388f3c002daf12b.jpg)
![KENWOOD DRV410 - Use the [] / [] buttons to select the file you wish to play and then press the [MENU/OK] button and press the [REC/ ] button. - 2](/content/2026/03/430686/images/acd90391182427777d5d6bbf47cc0df9a1e5004475ae1f0e6f3b1718339fd0f6.jpg)
Pressing the [▲] or [▼] button during playback plays the previous or next file or photo.
To return to continuous recording
Hold down the

- Files are listed in their recording or capture order.
- Recording is stopped while selecting a folder or file and during playback. Also, manual recording using the [REC/] button does not work.
Playback screen indicators

① Recording file playback state or photo file indication
② Play time
③ Play position
④ Recording file name, date, and time
⑤ File protection
Number of file playing/total number of files
Protecting or Deleting Files
Operation with the Playback Menu
Protect or delete files such as event recording files or photos. You can also delete all of the files in a folder.
- Select a file or photo to play.
- Press the [MENU/OK] button, use the [ ] / [ ] buttons to select an item, and press the [MENU/OK] button.
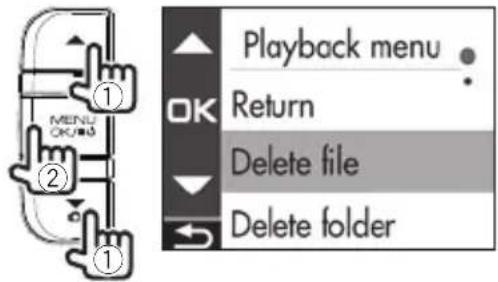
| Return Returns | to folder selection. |
| Delete file Deletes a file that is not protected. | |
| Delete folder | Deletes all files in the folder that are not protected. |
| Protect file | Protects the file so that it will remain even if an attempt to overwrite or delete it is made. |
| Remove file protection | Removes file protection. |
- Use the [] / [] buttons to select
and then press the [MENU/OK] button.

- Press the [MENU/OK] button to end the procedure.
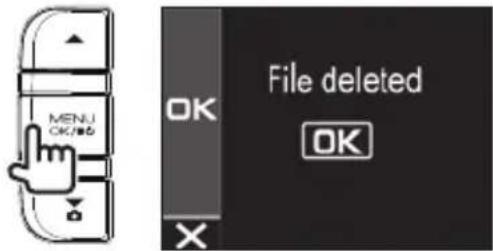

- Continuous recording files cannot be protected.
- To delete a protected file, remove file protection.
- When an SD card is formatted, all files including protected files are deleted.
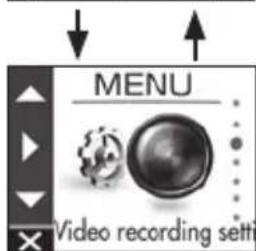
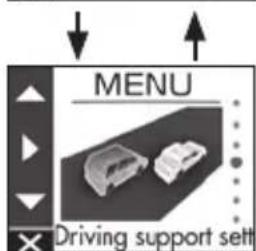
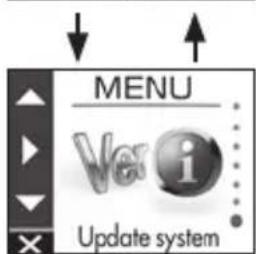
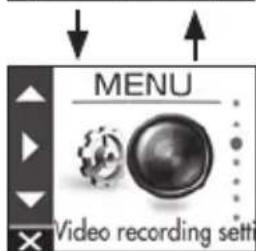
Operation with MENU
Perform operations such as playback and con guring video recording settings on the MENU screen.
1. Press the [MENU/OK] button.
MENU appears.
![KENWOOD DRV410 - Press the [MENU/OK] button. - 1](/content/2026/03/430686/images/d7f1adf2b906b50d0ca9769e6a26218edb09f240be00cd2de42d53b50054ffe8.jpg)
![KENWOOD DRV410 - Press the [MENU/OK] button. - 2](/content/2026/03/430686/images/143ab6d823bc994b4aacddd40c18cec1564a0657294433d5a5886e480ff7a16f.jpg)
2. Use the [] / [] buttons to select an item and then press the [MENU/OK] button.
![KENWOOD DRV410 - Use the [] / [] buttons to select an item and then press the [MENU/OK] button. - 1](/content/2026/03/430686/images/39f62459c14dd54f2b134f0c3db57fd05da079beecc30fc2c4d979a6af7b013b.jpg)
![KENWOOD DRV410 - Use the [] / [] buttons to select an item and then press the [MENU/OK] button. - 2](/content/2026/03/430686/images/abe679c8308141e2b5ede4820c7af9d066b65378f6c4261fecd39a2c9a4ca8fa.jpg)
Repeat the same operation according to the selected item.
3. Hold down the [P] button to end the procedure.
![KENWOOD DRV410 - Hold down the [P] button to end the procedure. - 1](/content/2026/03/430686/images/e0620074182853c47f0df8c4d155cf0941845d6c97339d9e0d1f6ef3c7b6f885.jpg)
![KENWOOD DRV410 - Hold down the [P] button to end the procedure. - 2](/content/2026/03/430686/images/747fb866d7ffcf0b415e68ba61058b69da98050ae9fecb891f3a3d1c4b6137a2.jpg)
Except for the recording described in "Recording at Any Location (Forcibly Recording)," recording is not possible while the menu is displayed. ( P.16)
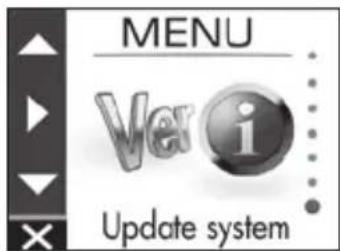
The MENU screen of step 2 changes in the following order.
![KENWOOD DRV410 - Hold down the [P] button to end the procedure. - 3](/content/2026/03/430686/images/1d2e04a5d1bcdad958d66fd6055343760956d10582bc6d9c25658640ed13f1b1.jpg)
Playback
Parking recording settings
Video recording settings
Driving support settings
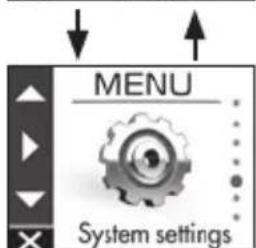
System settings
Format SD card
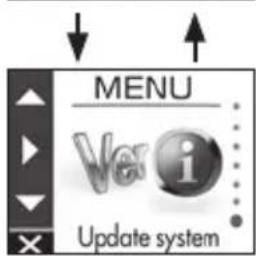
Update system
MENU
*Factory default settings
| Playback | |
| Continuous recordings | Select the desired folder from the list screen and play a file. (→P.17)Files can also be protected or deleted during playback. (→P.18) |
| Manual recordings | |
| Event recordings | |
| Parking recordings | |
| Still images | |
| Parking recording settings | |
| Recording time OFF/10 sec*/2 | 0 sec/30 secSet the recording time for parking recording after collision detection. |
| Overwrite ON*/OFF | Set whether or not to overwrite old files when the maximum number of recording files will be exceeded. |
| Sensitivity settings | 1(Low)/2/3(Mid)*/4/5(High)Set the sensitivity for detecting a vehicle collision while parked.1: Detects large collisions, 3: Standard, 5: Detects small collisions |
| Video recording settings | |
| Audio recording ON*/OFF | Set whether or not to record audio with the microphone during recording. |
| Continuous recording file length | 1 min*/2 min/3 minSet the recording time for continuous recording. The recording is divided each time the recording time elapses. |
| Manual recording time 15 sec* | 30 sec/1 minSet the recording time for manual recording. The recording time for before manual recording is set to 10 seconds. |
| Event recording time 15 sec* | 30 sec/1 minSet the recording time for after collision detection. The recording time for before vehicle collision detection is set to 10 seconds. |
| Overwrite (manual) ON/OFF* | Set whether or not to overwrite old files when the maximum number of recording files will be exceeded. |
| Overwrite (event) ON/OFF* | Set whether or not to overwrite old files when the maximum number of recording files will be exceeded. |
| Resolution | 3M (2304x1296)/1920x1080*/1280x720Set the resolution for recording. |
| HDR recording ON*/OFF | Setting this to ON records subjects by reducing overexposure and loss of dark detail even when capturing scenes with high light-dark contrast. HDR cannot be set to ON when the resolution is 3M. |
| Sensitivity settings | 1(Low)/2/3(Mid)*/4/5(High)Set the sensitivity for detecting a vehicle collision.1: Detects large collisions, 3: Standard, 5: Detects small collisions |
| Driving support settings | |
| Forward collision warning ON/OFF*Detects the distance between your vehicle and the vehicle in front and notifies with a warning sound to prevent a collision with the vehicle in front if a safe distance is not maintained. This operates at 30 km/h and faster. | |
| Lane departure warning ON/OFF*Detects the lane your vehicle is driving in and notifies with a warning sound when your vehicle is departing from the current lane. This operates at 60 km/h and faster. | |
| Departure delay warning ON/OFF*When your vehicle is stopped behind the vehicle in front and then the vehicle in front begins moving, a warning sign notifies if your vehicle is late to begin moving. A warning sound is also output when, for example, your vehicle moves backward. | |
| Detection range settings | Before using the driving support function, adjust the horizon and bonnet front edge position settings to match the vehicle. (→P.12) |
| Mounting height settings 1.2 | m*/1.35 m/2 mSet the mounting height of the device from the road surface. (→ P.12) |
| System settings | |
| Date/time Automatic*/Manual | Set the date and time automatically or manually. (→P.22) |
| Daylight saving time OFF*/+1 | hr./+30 minSet daylight saving time. |
| Notification volume Set the nomenclature | nomenclature volume to any of six levels (mute to maximum). |
| Playback volume Set the recording | ording video playback volume to any of six levels (mute to maximum). |
| Monitor display timer Always | on*/10 sec/1 min/3 minSet the screen display time. |
| Language English*/Deutsch | Français/Nederlandslitaliano/Espanol/Português/Polski/Norsk/Svenska/Suomi/Český/Magyar/PüccskiiChange the display language for the MENU screen, etc. |
| Select units km/h*/MPH | Switch to kilometer or mile display. |
| Factory reset Reset the device | settings to the factory default state. |
| System version | Display the version of the device firmware. |
| Format SD card | Delete all files and format the SD card. (→P.13) |
| Update system | Update the device firmware. (→P.23) |
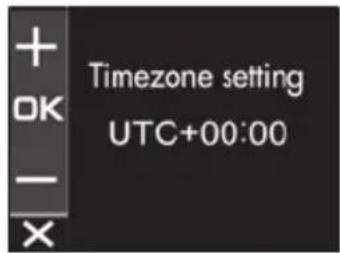
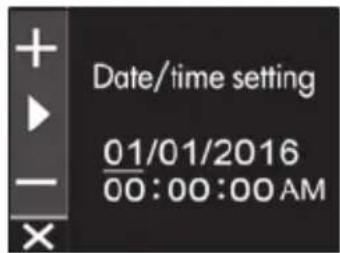
Setting the Date and Time
Set the date and time of the device.
1. Press the [MENU/OK] button.
MENU appears.
![KENWOOD DRV410 - Press the [MENU/OK] button. - 1](/content/2026/03/430686/images/4268e642661826b374b97e56b6947a9e550e5a4c988fae8bf3cddf2db8e9f84b.jpg)
![KENWOOD DRV410 - Press the [MENU/OK] button. - 2](/content/2026/03/430686/images/622802e46bf949a2dc344829d8eb2e0cd2414079f228fe93a502564227a9e435.jpg)
2. Use the [] / [] buttons to select and then press the [MENU/OK] button.
![KENWOOD DRV410 - Use the [] / [] buttons to select and then press the [MENU/OK] button. - 1](/content/2026/03/430686/images/481335d1e2869e9dab512edc5117dbaa7890f962a99be18f76d7fd8ce9e6b2d9.jpg)
![KENWOOD DRV410 - Use the [] / [] buttons to select and then press the [MENU/OK] button. - 2](/content/2026/03/430686/images/95a60c62215a8ca737e1897325da0135d20ed95f3853eeeddd35360135043406.jpg)
3. Use the [] / [] buttons to select and then press the [MENU/OK] button.
![KENWOOD DRV410 - Use the [] / [] buttons to select and then press the [MENU/OK] button. - 1](/content/2026/03/430686/images/d6f71998eec25ae8710fb6c09faf1849f5b0c19d967b61f0a99eb58161936586.jpg)
![KENWOOD DRV410 - Use the [] / [] buttons to select and then press the [MENU/OK] button. - 2](/content/2026/03/430686/images/756d79ae81365f1b969fd182c484ac4de68264c210ca01a682d2f6e9e36663db.jpg)
4. Use the [] / [] buttons to select an item and then press the [MENU/OK] button.
![KENWOOD DRV410 - Use the [] / [] buttons to select an item and then press the [MENU/OK] button. - 1](/content/2026/03/430686/images/2b6c5374c691da238305a5c0386b480a3094de38327c907da4b607c75ebf4074.jpg)
![KENWOOD DRV410 - Use the [] / [] buttons to select an item and then press the [MENU/OK] button. - 2](/content/2026/03/430686/images/84147b102bcdaa2855bd5cfece3bb8ba7663c6151739d2cf68c0c1f89376dbf9.jpg)
| Automatic | Set the date and time automatically using the time received from a GPS satellite. |
| Manual Set the date and time manually. | |
5. Set thetimezone setting or date/time setting.
Use the [] / [] buttons to select the time zone or date and time and then press the [MENU/OK] button.
When automatic was selected, thetimezone settings is displayed.

When manual was selected, the date/setting is displayed. Repeat the same operation to set the date and time.

6. Press the [R] button to end the procedure.
![KENWOOD DRV410 - Press the [R] button to end the procedure. - 1](/content/2026/03/430686/images/d8342d029ee47b98e7da03b40a98ee79b3fbec0d5cc83064f10d1c09a3b738e6.jpg)
![KENWOOD DRV410 - Press the [R] button to end the procedure. - 2](/content/2026/03/430686/images/eb7ebb753b6f15f3fa781cab417feb39a0add5cd55a6b3b2267e9bd83f57d099.jpg)
- The device sets the date and time automatically using the coordinated universal time (UTC) received from a GPS satellite.
- If the date and time are set automatically, setting the correct time may not be possible until a GPS satellite signal can be received normally.
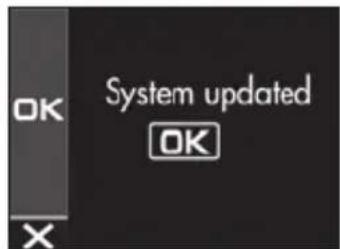
Updating the System
Update the system firmware of the device. For information regarding updates, visit the JVC KENWOOD website at http://www.kenwood.com/cs/ce/.
- Copy the system update file to the SD card and then insert the SD card into the SD card slot.
- Press the [MENU/OK] button.
MENU appears.

- Use the [] / [] buttons to select
and then press the [MENU/OK] button.
- Use the [] / [] buttons to select
and then press the [MENU/OK] button.

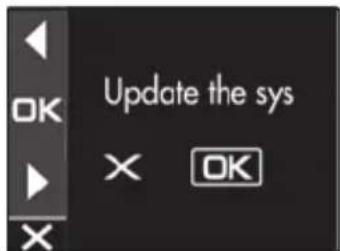
The firmware is updated.
- Press the [MENU/OK] button to end the procedure.

- Do not turn off the power of the device, start the engine of the vehicle, or remove the SD card during the update.
- When the firmware update is finished, the device restarts.
KENWOOD DRIVE REVIEWER is a PC application for displaying video recorded with the device. The application can be downloaded from the JVC KENWOOD website at http://www.kenwood.com/cs/ce/.
Installing the Software
- Double-click
of the application software downloaded to the PC and following the on-screen instructions to install KENWOOD DRIVE REVIEWER.
Playing Files
- Remove the SD card from the device, insert it in the SD card adapter (commercially available), and then connect it to the PC using a card reader (commercially available).
- Start KENWOOD DRIVE REVIEWER.
- Select the
drive for the SD card with - Select and play the file you wish to play from the [FILE] or [EVENT] tab.
| FILE Displays all files. | |
| EVENT | Displays the event recording, manual recording, and parking recording files. |
- To exit the application, select the [X] button or
from the File (F) menu.
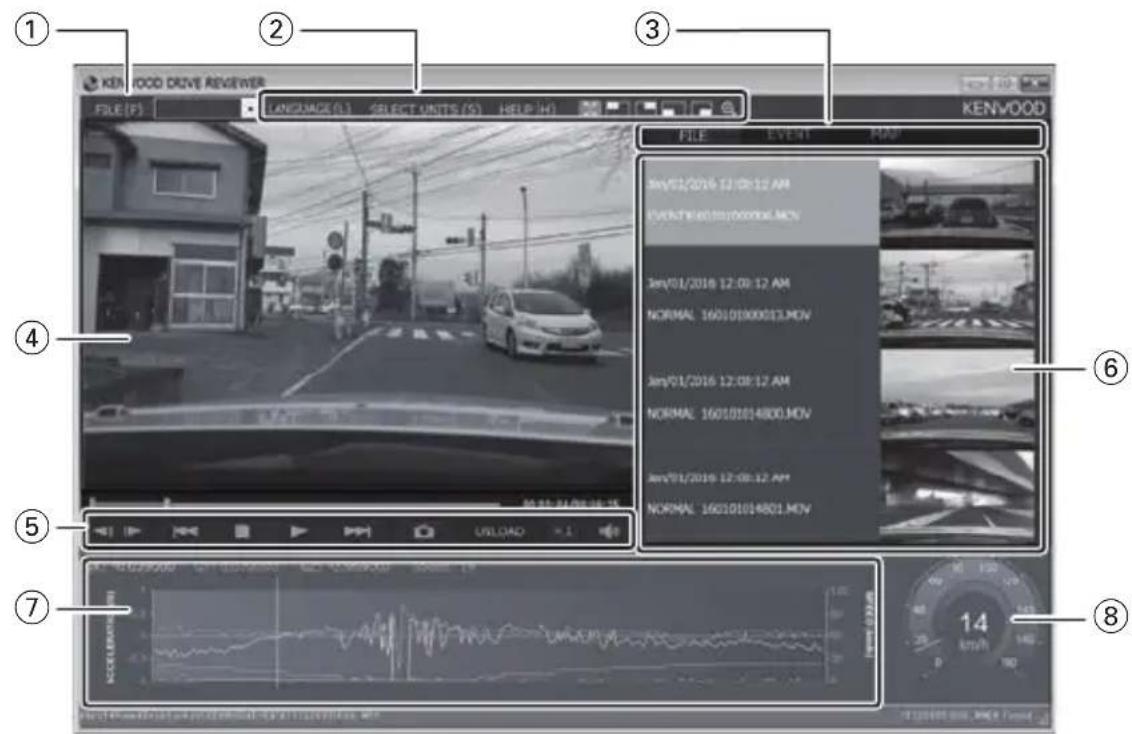
KENWOOD DRIVE REVIEWER screen
① File operations
Perform file operations such as selecting files and backing up the SD card files to your PC.
| SELECT FOLDER (S) | Select the <JVCKENWOOD> drive for the SD card. |
| EXPORT kmz/kml (E) | Output a driving information file (kml/kmz) that can be used with the GoogleMaps™ map service or GoogleEarth™ map service. |
| BACKUP (B) | Back up the SD card data to the hard disk of a PC, etc. |
| EXIT (X) Exit the | PC application. |
② Video playback screen selection
Display the top right, top left, bottom right, or bottom left of the screen enlarged or display an arbitrary location enlarged.
| When the top right, top left, bottom right, or bottom left of the screen is displayed enlarged, press this to return to the normal screen. | |
| Display the top right, top left, bottom right, or bottom left of the screen enlarged. | |
| Move the displayed frame to display an arbitrary location enlarged to a maximum of five times the size. Press [RESET] to display at actual size (1x). | |
| LANGUAGE | Selects the display language for the MENU screen, etc. |
| SELECT UNITS | Selects kilometer or mile display. |
③ Selection tabs
Display a list of all files or display a list of the event recording, manual recording, and parking recording files. Select MAP to display a map for the video currently playing.
④ Video screen
Displays the video of the selected file. Operate the playback bar to move to any location. Also, double-click the video screen during playback to switch to full screen display. Each click of the screen during full screen display switches between the paused and playback states. Double-click the screen to return to the normal screen.
⑤ Operation buttons
These buttons are for operations such as playing and stopping video.
| Displays the previous or next frame of the video. | |
| Displays the previous or next file. | |
| Stops playback. | |
| Pressing this during playback pauses playback. Pressing it again resumes playback. | |
| Captures an image at the point pressed. | |
| PLAY | Indicates operating states such as the playback state. |
| PAUSE | |
| ×1 | Changes the playback speed. |
| Adjusts the volume. |
⑥ File list
Displays a list of the files and thumbnails selected with a selection tab.
G-sensor chart
Displays waveforms of acceleration for movement in the forward/backward (X), left/right (Y), and up/down (Z) directions of the vehicle.
⑧ Speed meter
Displays the speed of the vehicle.
Outputting a Still Image from Video
Capture video at any location from the video currently playing as a still image.
- Start KENWOOD DRIVE REVIEWER.
- Select the
drive for the SD card with - Select and play the file you wish to play.
- Press the button.
- Select the backup destination folder and enter a file name.
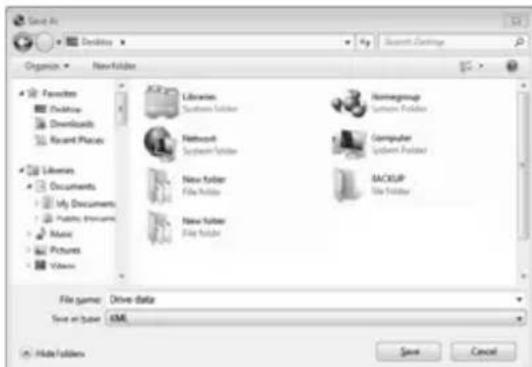
- Press the [Save] button.
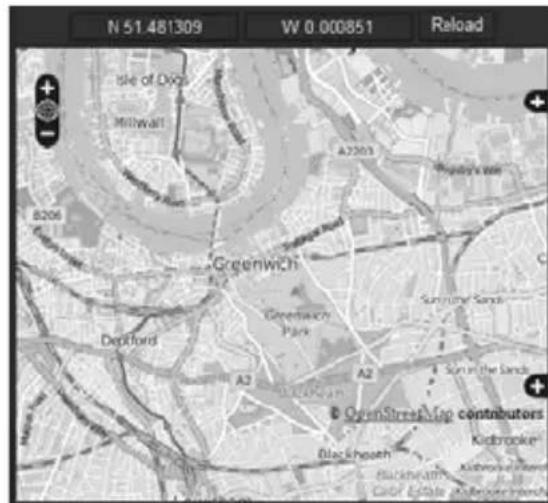
Using MAP
Display a map for the location of a recorded video. An Internet connection is required to use MAP.
- Start KENWOOD DRIVE REVIEWER.
- Select the
drive for the SD card with - Select and play the file you wish to play.
- Press the [MAP] tab.
Outputting Driving Information
Output a driving information file (kml/kmz) that can be used with the GoogleMapsTM map service or GoogleEarthTM map service.
- Start KENWOOD DRIVE REVIEWER.
- Select the
drive for the SD card with - Select
from FILE (F). - Select the backup destination folder, select the file type (kml/kmz), and enter a file name.
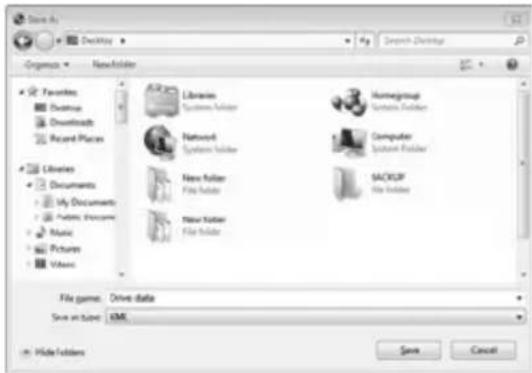
5. Press the [Save] button.
![KENWOOD DRV410 - Press the [Save] button. - 1](/content/2026/03/430686/images/e30ffec7a729620a9fdab7d24a3e31f25260503ad07d3be8b9cfbea96d9f8542.jpg)
- For how to use the file, see the help of the GoogleMaps™ map service or GoogleEarth™ map service.
Backing Up Files
Back up the SD card data to the hard disk of a PC, etc.
- Start KENWOOD DRIVE REVIEWER.
- Select the
drive for the SD card with - Select
from FILE (F). - Select the backup destination folder.
- Select the files to back up by selecting check boxes for the files you wish to save.
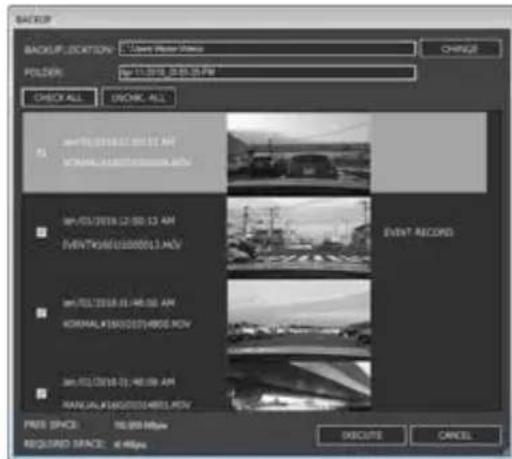
- Press the [EXECUTE] button.
Find the corresponding symptom in the following table and then resolve the problem. If you are unable to find a solution, contact your dealer or a JVC KENWOOD service center.
Common
| Symptom Cause/Solution | |
| Power does not turn on. | ·The power of the vehicle cigarette lighter socket is not on. Turn on the accessories power (ACC) switch of the vehicle or start the engine of the vehicle. Check the insertion state of the cigarette lighter plug. ·The fuse has blown. Check the cords are not shorted and then replace the fuse with one of the same capacity. ·The connections of the power cord are incorrect. Confirm the connections with the dealer. ·The power does not turn on even though there is no problem with the fuse and wiring. Refer to "If You Notice a Problem with the Device" and then reset the device.(→P. 7 ) |
| ·Cannot record. | ·An SD card is not inserted. ·An SD card of a size other than 8 GB to 32 GB is inserted. ·An SD card that does not comply with the SDHC standards is inserted. ·The SD card is not formatted. Insert an SD card that can be used with the device into the SD card slot. If necessary, format the SD card with the device. ·The internal temperature of the device is high. Reduce the temperature inside the vehicle. The protection circuit operation will be canceled and recording will become possible. |
Displayed Messages and Voice Guidance
If any of the following messages appears, resolve the problem as described in the table below. Voice guidance is also played for messages with the * mark.
| Message Cause/Solution | |
| No SD card inserted* | The power was turned on while no SD card was inserted. The SD card was removed during recording. Refer to "Cards supported by this device" and then insert an SD card that can be used with the device into the SD card slot. (→P.32) |
| SD card error* | An SD card that cannot be recognized is inserted. Refer to "Cards supported by this device" and then insert an SD card that can be used with the device into the SD card slot. (→P.32) |
| SD card requires formatting* | ·The SD card is not formatted in a format that can be recognized. ✓necessary, refer to " Formatting an SD Card" and then format the SD card with the device. (→P.13) |
| Formatting failed | ·The SD card has malfunctioned. ✓replace the SD card with a new one. SD cards have a product lifespan, such as the number of times that writing can be performed. |
| Uncompatible SD card | ·An SD card with a capacity less than 8 GB or more than 32 GB is inserted. Refer to "Cards supported by this device" and then insert an SD card that can be used with the device into the SD card slot. (→P.32) |
| Recording has stopped* | ·The SD card was removed during recording. ·Recording became no longer possible due to a failure of the SD card. ·Recording stopped due to some problem occurring. ·Recording may stop if an SD card of an incompatible speed class is used. Reinsert the SD card. Replace the SD card with a new one. Change the overwrite setting of the "Video recording settings". (→P.20) Replace the SD card with a compatible one. |
| No space on the SD card | ·The free space required to start continuous recording is not available on the SD card. ·The free space required to record up to the file limit for manual recording or event recording is not available. Refer to "Protecting or Deleting Files" and then delete unnecessary files. (→P.18) Back up any necessary data to a PC or other device, refer to " Formatting an SD Card," and then format the SD card with the device. (→P.13) |
| Event recording failed (file limit exceeded) | ·"Overwrite (event)" is "OFF" and the file limit of the folder for event recordings has been reached. When "Overwrite (event)" is set to "ON," old files are deleted to record. (→P.20) |
| Manual recording failed (file limit exceeded) | ·"Overwrite (manual)" is "OFF" and the file limit of the folder for manual recordings has been reached. When "Overwrite (manual)" is set to "ON," old files are deleted to record. (→P.20) |
| Still image recording failed (file limit exceeded) | ·The file limit for still images has been reached. Refer to "Protecting or Deleting Files" and then delete unnecessary files. (→P.18) |
Troubleshooting
| Message Cause/Solution | |
| File cannot be played | ·A file that cannot be played was recorded for some reason. ·Data can no longer be read due to a failure of the SD card. Pack up any necessary data to a PC or other device, refer to " Formatting an SD Card," and then format the SD card with the device. (→P.13) |
| Recording stopped due to high temperature | ·Recording was not possible due the temperature of the device rising. ·Reduce the temperature inside the vehicle. The protection circuit operation will be canceled and recording will become possible. |
| System will turn off due to high temperature | ·The power was turned off for safety reasons due to the temperature of the device rising. ·Reduce the temperature inside the vehicle. The protection circuit operation will be canceled and recording will become possible. |
| No update file available | ·There is no firmware data in the SD card. Insert firmware data for the device in the SD card. ·The update file in the SD card is the same as or older than the current firmware version. Insert the latest firmware data. ·the SD card contains the latest firmware data, an update is not necessary because the firmware of the device is up to date. |
| System update failed | ·The update file could not be read properly from the SD card. ·The update file is damaged. Format the SD card in the device, copy the update data to the SD card again, and then perform the update operation again. |
Driving Support Function
- The driving support function is for providing driving support to drivers and not for preventing accidents. Furthermore, it does not provide notifications of all hazards.
- Please observe the traffic rules to ensure safe driving by paying attention to the distance to the vehicle in front, your surroundings and driving conditions, and applying the brakes when necessary. Furthermore, operation is not completely guaranteed even when the device is used correctly as described in the instruction manual. Please note that JVC KENWOOD bears no responsibility whatsoever for any losses incurred as a result.
- Due to the specifications of the device, a warning sound is also played when you change lanes on roads because the lane departure warning function is not linked to the turn signals.
-
The driving support function may not operate correctly in the following cases.
-
Location where GPS signals cannot be received correctly, such as in tunnels or where there are many tall buildings
- When lanes cannot be correctly recognized as a result of deterioration of the road surface, reflection during rain, etc.
- When the vehicle in front cannot be recognized as a vehicle due to its shape or paint color, changes in the amount of light, etc.
- Changes due to weather (rain, snow, heavy fog, etc.), time of day (early hours of the morning, evening, night, etc.), light from behind, and traffic conditions (traffic jams, pedestrians, etc.)
Monitor Screen
- Do not apply a strong impact to the screen part. Doing so may cause a failure.
- Prevent direct sunlight from shining on the screen. Prolonged use while direct sunlight shines on the screen will result in the screen becoming hot, causing it to fail.
- If the temperature becomes extremely high or low, display may become slow or dark, or afterimages may be seen. These phenomena are characteristics of LCD screens and are not an indication of a failure. The monitor will recover when the temperature inside the vehicle returns to normal.
-
Small dots may appear on the screen. This phenomenon is typical of LCD screens and is not an indication of a failure.
-
Display may be difficult to see depending on the angle at which the LCD is viewed due to the characteristics of LCD screens, but this is not an indication of a failure.
GPS
GPS positioning begins when the power of the device turns on. Positioning may take about 5 minutes to complete depending on the GPS positioning conditions.
- GPS satellite signals cannot pass through solid materials (except glass). GPS positioning cannot be used in tunnels and buildings. Signal reception may be affected by conditions such as bad weather and dense overhead obstacles (e.g., trees, tunnels, viaducts, and tall buildings). Speed, position, and other information will not be displayed correctly when GPS satellite signals cannot be received.
GPS positioning data is reference values.
GPS is managed by the U.S. government, which assumes full responsibility for its performance. Changes to the GPS system may affect the accuracy of all GPS devices.
Important Notices Regarding Trademarks and Software
- microSDHC logo is a trademark of SD-3C, LLC.
- @2015 Google Inc. All rights resolver. GoogleMaps™ and GoogleEarth™ are registered trademarks of Google Inc.
This product is licensed only for the following applications based on the AVC Patent Portfolio License.
1) Consumers recording video (hereinafter referred to as AVC Video) compliant with the MPEG-4 AVC standard for personal use and non-profit purposes.
2) Playing AVC Video (video consumers recorded for personal use and non-profit purposes or video recorded by a provider that has obtained a license from MPEG LA)
For details, refer to the MPEG LA, LLC. website. http://www.mpegl.com/
Important notices regarding software
This product uses software components (licensed software) in accordance with the software license agreements granted by third parties. For details, view the support information for this product at http://www.kenwood.com/cs/ce/.
SD Cards
Cards supported by this device
| Standard microSDHC | |
| Size 8 GB to 32 GB | |
| Speed class Class 6 or higher | |
| File system FAT32 | |
- Up to the Class 10 speed class is supported.
Precautions for using SD cards
- When using a commercially available SD card, also check the instructions supplied with the SD card.
- Be sure to format (initialize) an SD card with the device before use.
- SD cards have a product lifespan, such as the number of times that writing can be performed. It is recommended to replace the SD card with a new one regularly depending on the usage conditions.
- When inserting and removing an SD card, confirm the orientation, do not bend it, and do not apply a strong force or impact to it.
- Do not directly touch the contact part with a hand or metal. The stored data may be damaged or lost due to static electricity.
- Be sure to back up (copy) the required files in the SD card to a PC or other device. The saved data may be lost due to the usage conditions of the SD card. Please note that JVC KENWOOD cannot compensate for any damages arising from the loss of saved files.
Requests Regarding Disposal or Transferring Ownership of an SD Card
- Using the SD card format and deletion functions of this device or formatting with a function of a PC just changes the file management information and does not completely delete the data in a SD card. We recommend either physically destroying the actual SD card or using commercially available PC data deletion software or the like to completely delete the data in the SD card before disposal or transfer of ownership. Manage the data in SD cards at your own responsibility.
Folder and File Structure
Recorded data is organized into a folder for each item, and file names are assigned automatically in order using dates and file numbers.
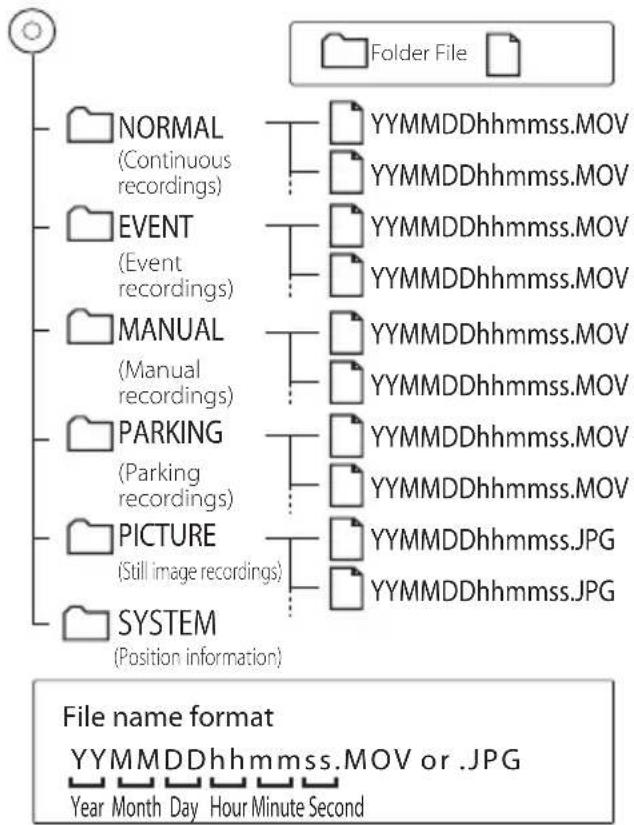
Root folder (JVCKENWOOD)

Do not change or delete the files in the SD card using a PC or other device. The files may become no longer playable with the device or the PC application.
Recording Times
| Recording quality | Card size | ||
| 8 GB 16 GB 32 GB | |||
| 3M (2304x1296) 50 minutes | 100 minutes | 210 minutes | |
| 1920x1080 70 minutes | 140 minutes | 280 minutes | |
| 1280x720 100 minutes | 200 minutes | 400 minutes | |
- The above recording times are the totals (maximums) for continuous recordings, manual recordings, event recordings, and parking recordings.
- The recording times are estimates. They may become shorter depending on the recording scene.
Number of Recording Files
| Recording mode | Card size | ||
| 8 GB 16 GB 32 GB | |||
| Event recording 5 files 10 files 20 files | |||
| Manual recording 10 files 20 files 40 files | |||
| Parking recording 20 files 40 files 80 files | |||
| Still image recording 100 files 200 files 400 files | |||
- The number of continuous recording files differs depending on the number of recorded event recordings, manual recordings, and parking recordings.
- For event recording, manual recording, and parking recording, old files are deleted for recording when the overwrite setting for each file type is set to "ON." Back up required files to a PC or other device.
System Requirements for KENWOOD DRIVE REVIEWER
| OS | Windows 7 with Service Pack 1 (32-bit/64-bit) |
| Windows 8.1/8.1 Pro (32-bit/64-bit) | |
| Windows 10 (32-bit/64-bit) | |
| Screen resolution 1280x800 or higher | |
| CPU Core i3 2 GHz or faster | |
| Memory 2 GB or higher | |
| HDD | 500 MB or more of free space |
| Other | .NET Framework 4.0 or 4.5 must be installed (.NET Framework is already installed with the standard installation of Windows 7/8/10) |
Screen size
1.5-inch, 110,000 pixels, full-color TFT
Image sensor
1/3-inch color CMOS
Maximum recording angles of view
Horizontal: Approx. 117 degrees,
Vertical: Approx. 63 degrees
(Diagonal 128 degrees)
Lens
Wide-angle, F-number 2.0
Recording resolution (maximum)
Video maximum 2.98 million pixels
2304x1296(1296P)
1920x1080 (1080P)
1280x720(720P)
Frame rate
27 fps
Recording modes
Continuous recording, event recording, manual recording, parking recording
Recording time before and after collision detected
10 seconds before, 15, 30, or 60 seconds after (maximum 70 seconds)
Continuous recording file length
1, 2, or 3 minutes
Audio recording
Available (ON/OFF possible)
Recording files
Video
Recording format: MOV
Video: H.264, MPEG-4 AVC
Audio: Linear PCM
Still image
JPEG (maximum 2304x1296)
Recording video playback method
Unit or Windows standard Window Media
Player,QuickTime,etc.
Supports dedicated viewer software (download from JVC KENWOOD website)
Recording media
microSDHC card
8 to 32 GB supported (Class 6 or higher)
GPS
Built-in
G-sensor
Built-in
Collision sensitivity
-4.0 G to +4.0 G (in 0.1 G increments)
Power voltage
12 V (8.5 to 16 V)
Current consumption
200 mA (maximum 720 mA)
Operating temperature range
-10°C to +60°C
External dimensions (W) x (H) x (D)
77 × 56 × 35 mm (excluding protrusions)
Height when bracket attached: 93 mm
Weight When microSDHC card inserted
Approx. 81 g (excluding cord)
Accessories
Power cord (3.5 m) x1
Mount bracket (double-sided tape) x1
-
The monitor is manufactured with high-precision technology, but there may still be some stuck or dead pixels. (Please note that this is not a malfunction.)
-
The specifications and design are subject to change due to technological developments.
TABLE DES MATIÈRES
4. Procedez aux raccordements.
Parking recording settings
Video recording settings
Driving support settings

System settings

Format SD card
Update system
(maximum 70 seconds)
Dimensions externes (L) x (H) x (P)
77× 56× 35mm (hors saillies)
Parking recording settings
Video recording settings

Driving support settings
System settings

Format SD card
Update system
MENU
* Ajustes predeterminados de fabrica
1920× 1080 (1080P)
1280 × 720 (720P)
- INSTRUCTION MANUAL
- Declaration of Conformity with regard to the RE Directive 2014/53/EU
- Declaration of Conformity with regard to the RoHS Directive 2011/65/EU
- Manufacturer:
- EU Representative:
- English
- Français
- Disclaimer
- Copyrights
- Precautions and notices
- Caring for your device
- Information on Disposal of Old Electrical and Electronic Equipment and Batteries (applicable for countries that have adopted separate waste collection systems)
- Precautions for Installation
- Precautions for Use
- Cleaning the Device
- If You Notice a Problem with the Device
- Installation Procedure
- Attach the device to the mount bracket. (accessory)
- Determine where to mount the device.
- Clean the mounting surface and then affix the device to the windshield.
- Perform the cord wiring work.
- Adjust the installation angle of the device and then fix the device in place.
- Recommended installation position
- CAUTION
- Power cord for Dashboard Camera (accessory)
- ① Bracket attachment part
- ② Camera lens
- ③ Speaker
- ④ Power cord connector terminal
- (5)▲button
- MENU/OK button
- ⑦ Microphone
- ⑧▼ button
- ⑨ Monitor screen
- SD card slot
- ⑪ Indicator
- REC/5 button
- Before Using the Driving Support Function
- Adjusting the Settings to Match the Vehicle
- Press the [MENU/OK] button.
- Inserting and Removing an SD Card
- Turing the Power On/Off
- To Turn the Power On/Off Manually
- Formatting an SD Card
- Recording Modes
- Continuous recordings
- Continuous Elapsed time → recording
- Manual recording
- Event recording
- Parking recording
- Recording at Any Location (Manual Recording)
- Press the [P] button
- Recording at Any Location (Forcibly Recording)
- 1.Hold down the [B] button
- Taking a Photo
- Press the [▼] button.
- Recording screen indicators
- Playing Files
- Use the [] / [] buttons to select and then press the [MENU/OK] button.
- Use the [] / [] buttons to select the folder you wish to play and then press the [MENU/OK] button.
- Use the [] / [] buttons to select the file you wish to play and then press the [MENU/OK] button and press the [REC/ ] button.
- To return to continuous recording
- Playback screen indicators
- Protecting or Deleting Files
- Operation with the Playback Menu
- Operation with MENU
- Use the [] / [] buttons to select an item and then press the [MENU/OK] button.
- Hold down the [P] button to end the procedure.
- Setting the Date and Time
- Use the [] / [] buttons to select and then press the [MENU/OK] button.
- Use the [] / [] buttons to select an item and then press the [MENU/OK] button.
- Set thetimezone setting or date/time setting.
- Press the [R] button to end the procedure.
- Updating the System
- Installing the Software
- ① File operations
- ② Video playback screen selection
- ③ Selection tabs
- ④ Video screen
- ⑤ Operation buttons
- ⑥ File list
- G-sensor chart
- ⑧ Speed meter
- Outputting a Still Image from Video
- Using MAP
- Outputting Driving Information
- Press the [Save] button.
- Backing Up Files
- Common
- Displayed Messages and Voice Guidance
- Troubleshooting
- Driving Support Function
- Monitor Screen
- GPS
- Important Notices Regarding Trademarks and Software
- Important notices regarding software
- SD Cards
- Precautions for using SD cards
- Requests Regarding Disposal or Transferring Ownership of an SD Card
- Folder and File Structure
- Recording Times
- Number of Recording Files
- System Requirements for KENWOOD DRIVE REVIEWER
- Screen size
- Image sensor
- Maximum recording angles of view
- Lens
- Recording resolution (maximum)
- Frame rate
- Recording time before and after collision detected
- Continuous recording file length
- Audio recording
- Recording files
- Video
- Still image
- Recording video playback method
- Recording media
- G-sensor
- Collision sensitivity
- Power voltage
- Current consumption
- Operating temperature range
- External dimensions (W) x (H) x (D)
- Weight When microSDHC card inserted
- Accessories
- TABLE DES MATIÈRES
- Procedez aux raccordements.
- Dimensions externes (L) x (H) x (P)
Brand : KENWOOD
Model : DRV410
Category : Dashboard camera