KCAR100 - Dashboard camera KENWOOD - Free user manual and instructions
Find the device manual for free KCAR100 KENWOOD in PDF.
User questions about KCAR100 KENWOOD
0 question about this device. Answer the ones you know or ask your own.
Ask a new question about this device
Download the instructions for your Dashboard camera in PDF format for free! Find your manual KCAR100 - KENWOOD and take your electronic device back in hand. On this page are published all the documents necessary for the use of your device. KCAR100 by KENWOOD.
USER MANUAL KCAR100 KENWOOD
- Updated information (the latest Instruction Manual, etc.) is available from https://www.kenwood.com/cs/ce/.
For your records
Record the serial number, found on the back of the unit in the spaces designated on the warranty card, and in the space provided below. Refer to the model and serial numbers whenever you can upon your KENWOOD dealer for information or service on the product.
Model KCA-R100
Serial Number
US Residents Only
Contents
EN
Before Use. 01
Precautions for Use 01
Accessories 03
Parts Name 03
Installation and Connection 04
Specifications 08
- The screen images and operation examples in this document were created for explaining the operating procedures.
- There may be screen images that differ from the actual screens or examples of operations not actually performed.
Disclaimer
- Please note that JVCKENWOOD shall not be responsible for any damages suffered by the customer or a third party as a result of incorrectly using this product, a failure during use of this product, or other trouble, or due to the use of this product, unless such liability is acknowledged by law.
Copyrights
- Recorded video, image, and audio content cannot be used for other than personal enjoyment without the consent of the copyright holder as specified in the Copyright Act.
- Please note that the recording of an event such as a show, performance, or exhibition may be restricted even when doing so for personal enjoyment.
Precautions for Use
Precautions and notices
Warning! Do not operate the device while driving. Using this product does not change the requirement for a driver to take full responsibility for his or her behavior. This responsibility includes observing all traffic rules and regulations in order to avoid accidents, personal injury or property damage.
- For your own safety, do not operate the controls of the product while driving.
- Make sure to place your cable, so as not to obstruct the driver's view or deployment of airbags.
- Do not attempt to service the unit. There are no serviceable parts inside. Replace the unit if it is damaged or exposed to excess moisture.
Caring for your device
Taking good care of your device will ensure trouble-free operation and reduce the risk of damage.
- Keep your device away from excessive moisture and extreme temperatures.
- Avoid exposing your device to direct sunlight or strong ultraviolet light for extended periods of time.
- Do not place anything on top of your device or drop objects on your device.
- Do not drop your device or subject it to severe shock.
- Do not subject your device to sudden and severe temperature changes. This could cause moisture condensation inside the unit, which could damage your device. In the event of moisture condensation, allow the device to dry out completely before use.
- Never clean your device with the power on. Use a soft, lint-free cloth to wipe the screen and the exterior of your device.
- Never attempt to disassemble, repair or make any modifications to your device. Disassembly, modification or any attempt at repair could cause damage to your device and even bodily injury or property damage and will void any warranty.
- Do not store or carry flammable liquids, gases or explosive materials in the same compartment as your device, its parts or accessories.
- To discourage theft, do not leave the device and accessories in plain view in an unattended vehicle.
- Overheating may damage the device.
Precautions for installation
- Install the device in a position where it will not block the view of the driver.
- Install the device within the wiping range if equipped the wiper.
- Take care not to install the device over the vehicle inspection sticker or other sticker.
- Take care not to install the device where it will interfere with driving or airbag operation.
- If the device is installed incorrectly, event recording or parked recording may not work correctly.
- Refer to "Installation and Connection" for the installation orientation, angle, and other information and then install the device correctly.
- Do not install the device near a digital terrestrial television antenna or an electrical component. Otherwise it may reduce receiver sensitivity or cause flickering and noise.
- When fixing the device with the adhesive mount, use a commercially available cleaning cloth or the like to wipe off all dirt and grease on the mounting surface. If the device is re-affixed or mounted using, for example, general-purpose double-sided tape, the adhesion strength may weaken and cause the device to fall.
- After mounting the device, leave it for 24 hours before use to enable the mounting strength of the adhesive mount to improve. Failing to do so may result in the adhesion of the adhesive mount becoming weak and the device falling.
Fix the cord in place with tape or the like so that it does not interfere with driving.
Precautions for use
- Do not block the camera lens, get dirt on it, or place a reflective object near it.
- When LED traffic lights are recorded, video in which they appear to be flickering or flashing may be recorded. JVCKENWOOD assumes no responsibility with regard to the distinguishing or recording of traffic lights.
- If coating is used on the windshield of the vehicle, recording quality may be affected.
- There is no guarantee that the device can record video in all conditions.
Cleaning the device
- When the device is dirty, wipe it with a dry silicone cloth or other soft cloth. If the device is very dirty, remove the dirt with a cloth with neutral cleaner on it then wipe off the cleaner. Wiping the device with a hard cloth or using a volatile substance such as thinner or alcohol may cause scratches, deformation, deterioration or other damage.
- When the lens is dirty, gently wipe it with a soft cloth dampened with water. Rubbing the lens strongly with a dry cloth may cause scratches.
If you notice a problem with the device, turn off the power of the device and then contact your dealer or nearest JVCKENWOOD service center.
Accessories
Before you get started, check you have everything below.
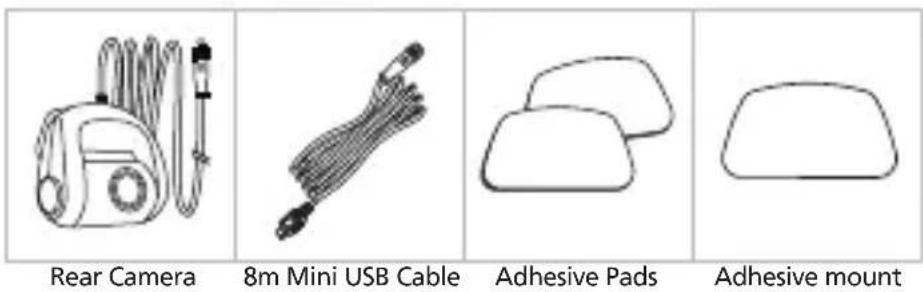
- Product appearance may differ slightly from that shown above.
Parts Name
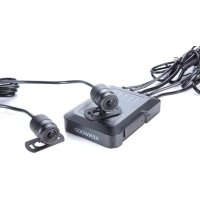
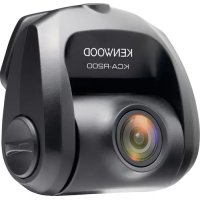
Rear Camera
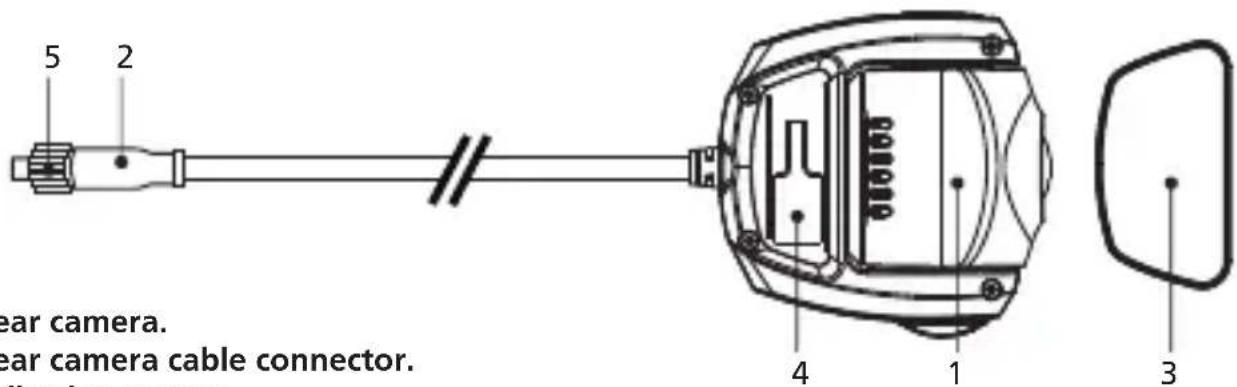
1.Rear camera.
2.Rear camera cable connector.
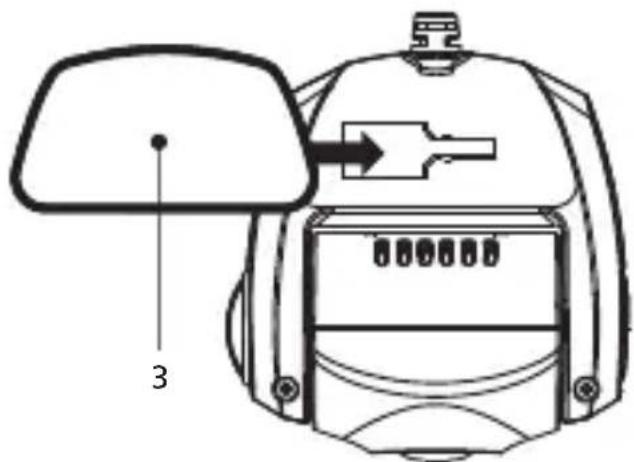
3.Adhesive mount.
4.Mounting port.
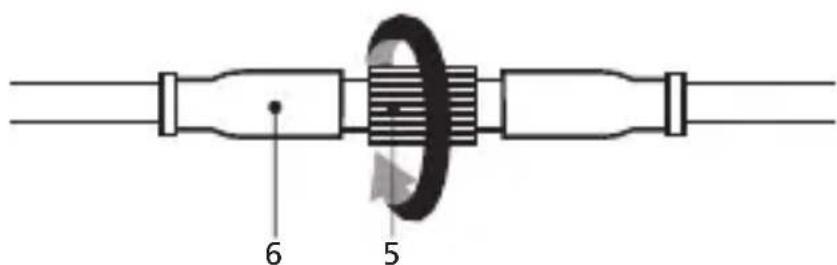
5.Locking ring.
Rear Camera Cable
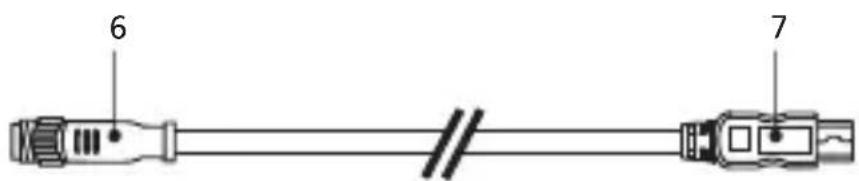
6.Cable connector.
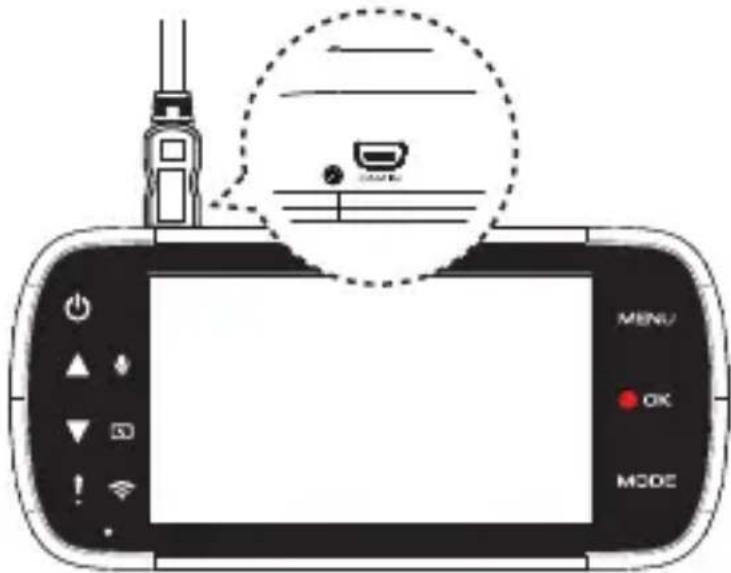
7.CAM-IN connector.
Recommended installation position
- Install the device in a position where it will not block the view of the driver.
- Install the device within the wiping range if equipped the wiper.
Caution
When passing the power cord through the front pillar or another part, observe the points below when performing the wiring work.
- Wire the power cord farther forward or farther rearward than the airbag so that it does not interfere with the airbag.
- In the case of a vehicle in which the pillar cover is fixed in place with special clips or the like, the clips may need to be replaced after you remove the pillar cover. For how to remove the pillar cover, the availability of replacement parts and other information, contact the vehicle dealer.
Fix the power cord in place with commercially available tape or the like so that it does not interfere with driving.
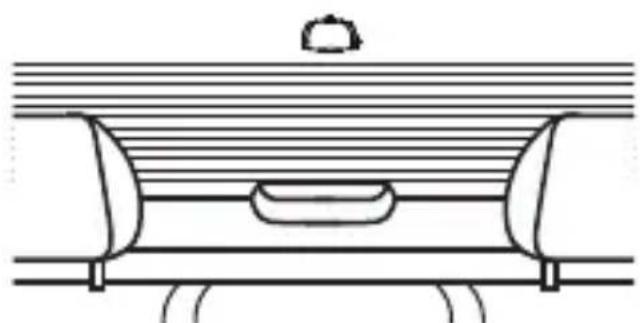
Rear windshield
For the first installation, follow the instructions below:
Step 1: Locate the Rear Camera.
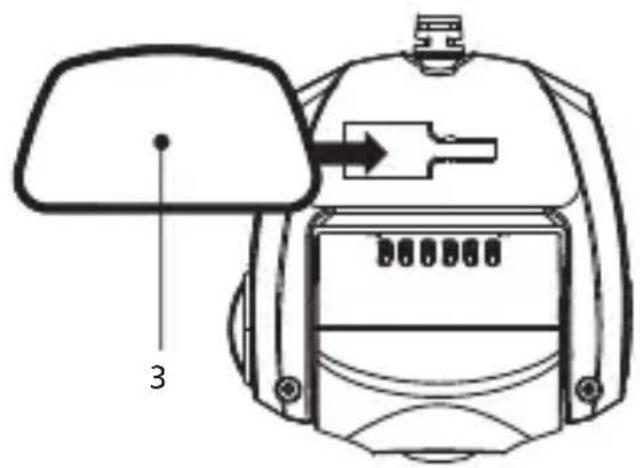
1.1 Connect the device to the adhesive mount
Attach the device onto (3) the adhesive mount.
Make sure you align the device within the adhesive mount for proper installation.
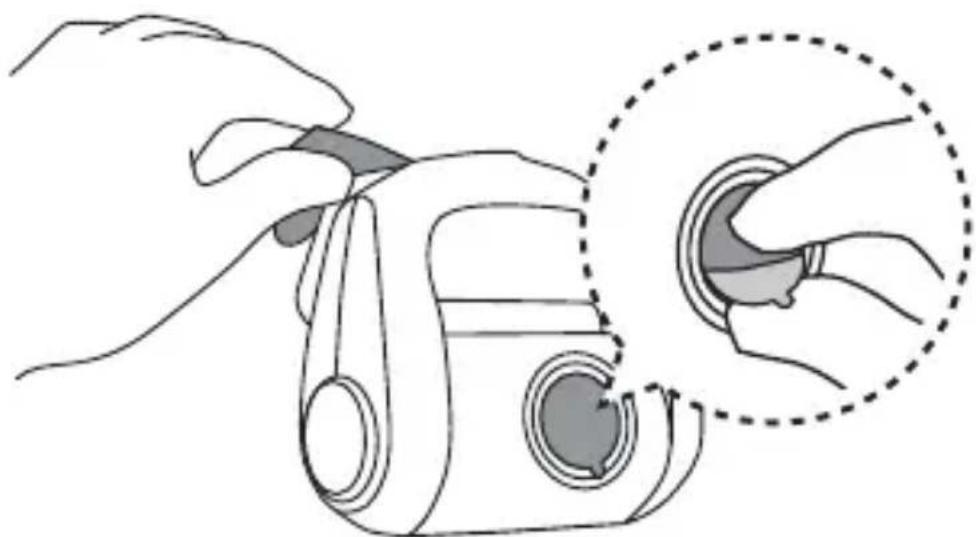
1.2 Connect Rear Camera Cable Connector
Connect (2) Rear Camera connector to (6) cable connector. Be sure the male and female pins is align when connecting, turn (5) Locking ring clockwise to secure cable.
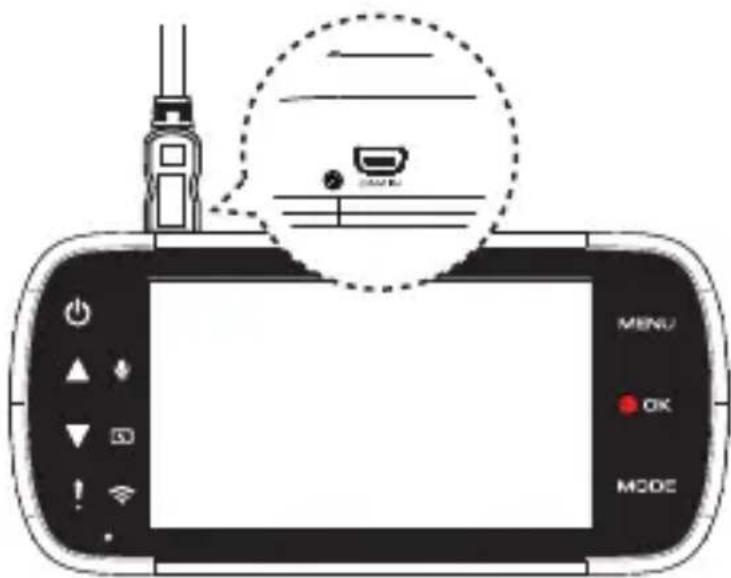
1.3 Connect the Rear Cam
Insert (7) CAM-IN connector into the CAM-IN port on compatible dashboard camera.
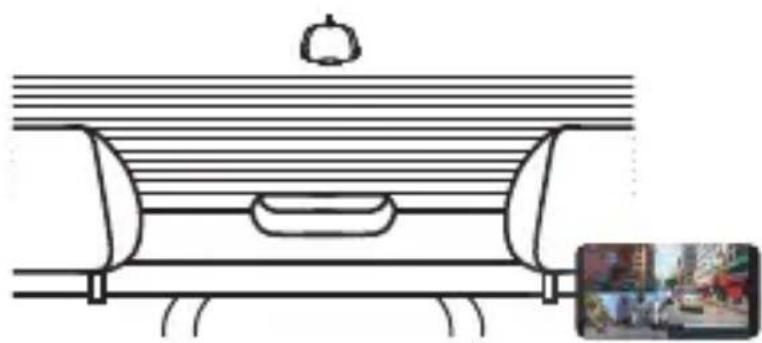
1.4 Select installation position
Start the engine to power up the rear cam, then turn on Wireless Link mode to connect with mobile device. Using the App to view the image and adjust the installation position.
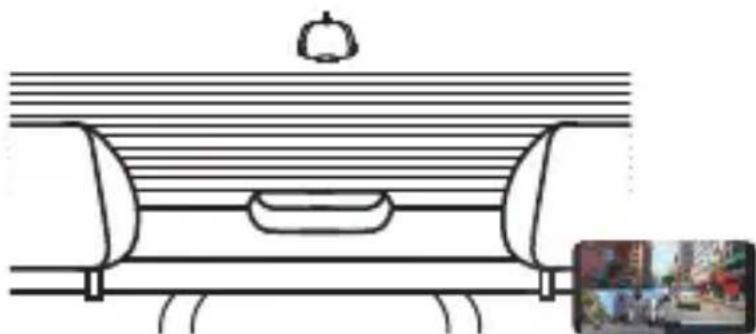
Note: Device will automatically turn on and start recording once power has been made available from the 12 V outlet.
1.5 Putting on an adhesive mount
After selecting the best installation position and angle, remove (3) Adhesive protective film and protective lens film, stick it on the rear windshield, keep press and add pressure for 30 seconds.

TIP
- Make sure that Cable can be connected at the installation location.
- Windshield should be thoroughly cleaned and mounting area is wiped dry and at room temperature before applying the adhesive (Avoid under direct sunlight).
- Allow 24 hours to get the best adhesion effect.
1.6 Evaluate Cable Routing Location
Installation of the rear camera cable needs careful planning for the cable run and the final position of the camera within the vehicle. See the device manual for optimum front dash camera position. Study the vehicle for the most appropriate cable run towards the front windshield.
1.7 Cable Installation
Tucking the cable into the headliner of the vehicle and hide exposed cable to pillar trim and rubber strips, use a panel removal tool to loosen any trim and hide the cable if necessary.
Note:
- Ensure that the routing of the cable does not affect airbags.
Find the right place to hide excessive cable. - Consult a professional installer or vehicle technician to start the installation instead of doing it yourself.
Specifications
| Image Sensor | 1/2.8" CMOS Sensor |
| Frame Rate | 30fps |
| Recording Resolution | 1920 x 1080 (2.0M) |
| Recording Format | H.264 (MOV) |
| Lens | F=2.0 Fixed Focus Lens |
| Field of View | Horizontal :129° / Vertical: 66° / Diagonal: 161° |
| Operating Voltage | DC5.0V |
| Current Consumption | 110mA |
| Operating Temperature | -10°C to 60°C |
| Dimensions | 2-1/2" x 2-5/8" x 1-7/16" 63mm x 66mm x 36mm |
| Weight | 11.8oz / 334g |
| Cable Length | 26'-3" / 8m |
Inhalt
DE
Vor dem Einsatz 01
Mepblnpedoctopoxhoctn npn nCnoB3OBaHHN
MepbippeoTOPOKHOCTn yBeOMJeHn
BhImaHHe! He nonb3yITeCb DaHHbIM yCTpoiCTBOM BO Bpem ynpabJIeHn aBTOMO6JneM.
IcnoJIb3OBAHHe DaHHoro yCTpoiCTBa He CHIMaeT C BOINTeJRA OTBETCTBEHHOCHTn 3a CBOI DeICTBna.
BoDnteB o63aH co6IIOaT npabnA IopoxHO rBIXeHn BO n36exKaHne abapn, a TaKKe npuHHeHn BpeDa 3dOpOBbTO JIOJe N mUyecTBy.
B UeJx Co6CTBeHHoH 6e3OnaHocTn He NcNoIb3yIte OprAhbl ynpabHeHnaHHbIM YcTPOiCTBOM BO BpeM ynpabHeHn aBTOMO6UInem.
- IpOIoXInTe Ka6eIb TaK, UTo6bI OH He 3aRopaxnBaI O63Op BoOnTeNIO H He npenTCTBOBaI paCKpbITnIO NoDyweK 6e3oNaCHOCTN.
- He nbItaTecb OTPeMOHTnpoBaTb yCTpoiCTBO. BHyTpN daHHoro yCTpoiCTBa Het DeTale, npedHa3HaueHHbIX dna 06cnykuaHn. Ecn yCTpoiCTBO NOBpeJdeHO nIIN NOBeprIocb BO3dEChTBn BOIaRn, 3aMeHnte erO.
yXoD 3a yCTpoNCTBOM
HaIeXaun yxOa 3a yCToPcTbOM o6ecneuH ero 6e30Ka3HyO pa6Otu n COKpaNT pNCK nobpeJeHn.
- He xpaHnTe yCTpoIcTBO B YcNObNax NOBbIeHHoB BlaXHoCTn N KpaIHe Hn3Knx Nnn BbCOKNX TempePaTp.
He noDBepraTe yCTpoiCTBO dInTeNbHOMy BO3deIcTBIO npMORO cINHeuHOro CBeta Nn CnBHorO yIbTpapHoneTOBoro n3nyeHn.
He nomeuauTe Hn He 6pocaiTe Ha yctpoiCTBO npedMeTbI. - He poHraTe yCTpoiCTBO n He noDBepraIe erO BO3dEeCTBnIO CnIbHbIX yDapOB.
He noDBepraIte yCTpoINCTBO BHe3aHbIM I 3HaunTeNbHbIM nepenadam TemnepaTpybl. 3TO MOKeT npNBecTN K 6pa3OBAHIO KOHNHeHCATA BHTPN YCTPOINCTBA, YTO MOKeT npNBecTN K erO nobpeXJeHIO. B cnyae o6pa3OBAHnKoHdeHcata nepeJ EKCNyatauNeiyeCTPOINCTBA He06xOdmo DaTb Emy NIOHOCTbO BbICOXHyTb.
He BbIOnHnIe OunCTky yCTpoiCTBa, KOrDa OHO BKJIouyeHo. IJr OUnCTKn 3KpaHa n KopnyCa yCTpoiCTBa nCnOJIb3yIte MmRkyIO 6e3BOPCOByIO TkAHb.
He nbItaeb pa3o6paTb, otpeMOHTnpOBaTb nIN MoINHnIUPOBaTb yCTpoIcTBo. Pa360pKa, moINHnKaUg INI nonBtKa peMOHTa yCTpoIcTBa MoryT npIBeCTN K erO NOBpeXdEHNIO, pInuHneHNIO BpeDa 3DOpOBbIO INI INMyIecTBA, a TaKke K aHHynIpOBaHnIO rapaHTnn.
He xpaHnTe n He nepeHOCnTe IeKOBocnMaMeHJeOuIeCe JxNkOCTn, Ra3bl NII B3pbBOOnaChbIe MaTePnAbI pyOMC yCTpoINCTBOM,ero DeTajmN npHaJNeJXHOCTMn.
-Дя снжспя риcke Кражи He octabлг Te yctpoiCTBO n ero npHaJIeXHOCn Ha BnDy B OCTaBJIeHHOM 6e3 npIcMoTpa abTomO6nile.
-Перегов может пиевск К порждению усточва.
Mepblnpedoctopoxkhoctn npu yctaHOBKe
- UcTaHOBInTe yCtpoINCTBO TaKIM O6pa3OM, YTO6bl OHO He 3aRopaxkBaNo O63Op BoDInTeJIHO.
- YctaHOBIne yCTpOInCTBO B 30He DeINCTBnA CTeKINOOnHCTInTeJI, ecNI OH npeDyCMOTpeH.
BHNMaHHe: He yctaHaBnBaIte ycTpoIcTBO HaI nacnopTHo Ta6nUko ABTomO6nJIa I npYHMn HAKNeiKaMn.
BHNMaHHe: He yctaHaBnBaIte yctpoIcTBO B TakOM MeCTe, rJe OHO 6yIeT MeIaTb ynpabJIeHIO ABTomO6NJem IIN packpbItNU IOdyUeK 6e3OnaCHOCTN.
B cnyuae HeKOppeKTHoYcTaHOBKn yCTpoiCtBa MoKeT He pa6oTaTb 0yHKunr 3aHnCn Co6bltn n 3aHnCn Ha napKOBKe. - Ipepe yctaHOBKO yCTPOIcTBA o63aTeJIbHO O3HaKoMbTeCb CO CBeDeHnMn 06 opneHTaUN, paKypce n DpyrNx npaMeTpax yCTaHOBKN B pa3dene «YCTaHOBKA n NOkJIIOueHne».
- He yctaHabnBaIte yCTPOiCtBO pAIDOM C TeJIeBn3IOHHo aHTeHHo N 3JIeKtpnueckmN arpeRaTaMn. 3TO MoKeT npIBecTN K CHINKeHNIO YyBCTBnTEJbHOCTN, MePcaHInO IN Wymax Ha N3O6paKeHN.
- Ipeed 3akpenneHnem yctpoicTbHa Na KIeKOM OCHOBaHn C NOMOyIO IMeIOUeC8 B npoJaxe YnCTauee caPcETKn nnnoDobHO MaTePnAna y6epnte BCE 3arpy3HeHn I MacnHnCTbIe pa3BOdbl C yctahOBouHoi NOBepxHocTn. B cnuyae nobTopHO yCTaHOBkn nn 3akpenneHn yctpoiCTBa, HApnpMeP, C NOMOsbIO o6bYHoro DByCTOpOHHeRo cKOTua CoedInHeHne MOKeT OCna6HyTB, n yCTpoiCTBO MOKeT yNactb.
- Iocne yctaHOBKn ycTpoiCTBa BbIepKHTe erO B TeueHne 24 YacOB, YTO6bl KJIeIKoe OCHOBaHne OKOHyateJIbHO 3aKePENIOCb. EcIN 3TOrO He CdeJaTb, CoeDInHeHne MOKeT OcJaN6HyTb, N yCTPOiCTBO MOKeT yNaCTb.
3aKpeHnTe Ka6bI c nOMOu bIO KneKOJIeHTbI IIN NOo6HO npncoc6JeHn, YTo6bl OH He MeWan ynpabNeHnO aBtOMo6Hnem.
MepblnpedocTopoxKHOCTn npnncnoB3OBaHm
- He 3aropaxnBaIte o6bekTnB KaMepbl, He dOnyckaIte ero 3aRpa3HeHnI H He NOMEaIte pIdom C HIM OtpaxkaUcne npedMeTbI.
- Ppi BnDEOCbEMKe CBETOJNOHbIX CBETOpOB Ha BnDEoN3o6paXeHne MOxet MepuTaB, INI IN3o6paXeHne CBETOpOB MoXeT MIRaTb. KomnaHra JVCKENWOOD He Hecet HnKaKoI OTBETCTBEHHOCTn 3a pa3JIINuHMocTb INI BO3MOXHOCTb BnDEOCbEMKn CBETOpOB.
- Ecnn Ha cTeKne aBToMObnIa NMeetc nokpbItne, KaueCTBO BnDeoN3O6paXeHnRA MoKeT CHN3NTbcra.
- Het rapaHTn, YTO yCTpoIcTBO CMOKeT BcTeN BuJeocbEmky B IHObIx ycNoBnX.
OuNTka yctpoicTba
- EcIn yctpoNCTBO 3aRpa3HnIOcB, npOTpnte erO cyXoI cunIKHOBO caIΦeTKoI INI dpyroM MrgKoI TkaHbIO. EcIn yctpoNCTBO CINbHO 3aRpa3HeHO, ydaJIte 3aRpa3HeHrC NOMOcIbTO TkaHN C HeITpAlbHbIM YnCTAIZmCpeCDTBOM, a 3aTeM ydaJInte OCTaTKu YnCTAIZero CpeDCTBa C NOBepxHOCTN yctpoNCTBa. IPOtnpAHne yctpoNCTBa rpyob TKaHbIO n NCNoJIb3OBaHne arpeccNBbIX BeueCTB, TaNK KAK pACTBOPHTeB n CnIPT, MoKET npINBeCTN K O6pa3OBaHIO Ha yctpoNCTBe zapAnHH, DeΦopMaun KOpNyca n DpyrIM NOBpeKdEHNAM.
Bcnyae 3aqr3HeHnO obekTbBa ocToPOxHO npoTpne erO mRKO TkaHbIO, CMOeHHo BOdoI. IpotpahHe o6bekTbBa cyuHnem cyXOH TkaHbIO MoKet npnbecTu K Obpa3OBAHnIO Ha HEM LapanH.
B cnlyuae Hnnoiaok B pa6oTe yctpoiCTBa, BblKnIOHTe erO n o6paTntecb K npOdaBu y cTPOIcTBa. nnB 6JInKaun aBtOpN3OBaHHb i cepBnchb I eHTp KENWOOD.
PpHaJnEJXHocTn
IpeedemKacNcnoJb3OBAyUcTPOINCTBO,yIOCTOBepbTeCBHaJIuHnnepeuNCleHHbIXHNXe npEdMeTOB.
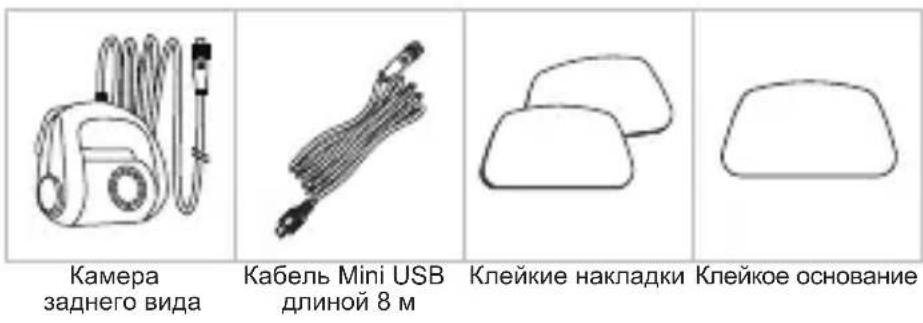
*BHeuHn BnI N3eJnna MoKet HeCKoJIbKO OTJNuHaTbcr O T NOKa3aHHOro Bblie.
IpeueHb KOMnoHeHToB
Kamepa 3aHero Bnda
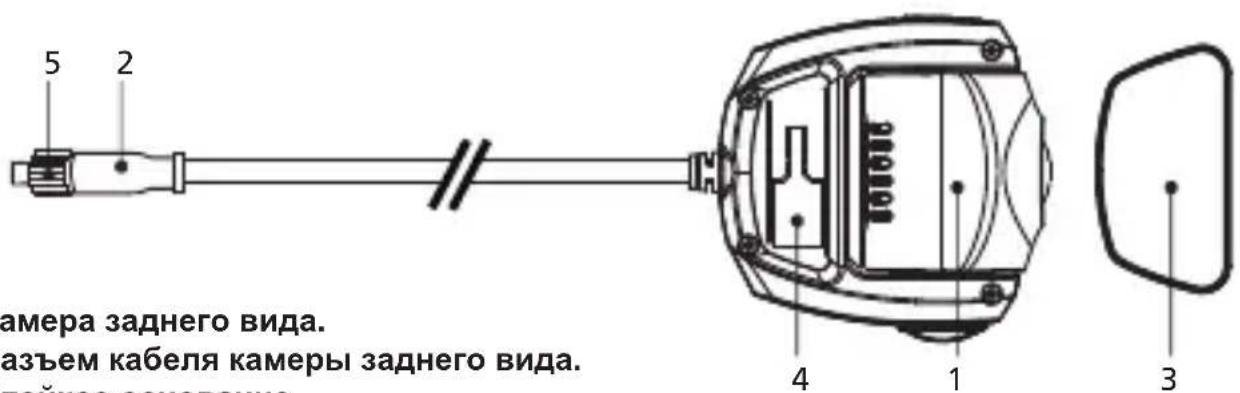
- Kamepa 3aДнero BnДa.
- Pa3bem Ka6eJn KaMepbl 3aHero Bnda.
- Kneikoe ochobahne.
- MoTaxHoe OTBepCTne.
5.Фиксypуюше кольculo.
Ka6enb kamepbI 3aHero BnDa
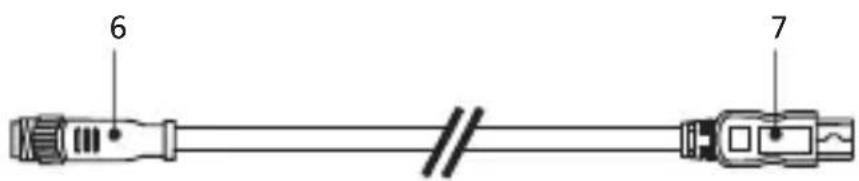
- Pa3bem ka6eJra.
- Pa3bem CAM-IN.
PekomeHnyeMoE MeCTO yCTaHOBKn
- YctaHOBInTe yCTpOInCTBO TaKIM O6pa3OM, YTO6bI OHO He 3arOpaxnBaIIO 063Op BOINTEJIHO.
- YctaHOBInTe yCTPOINCTBO B 3OHe DeINCTBnA CTEKNOOCHNTeJI, ECIN OH npeDyCMOTpeH.
BHHMaHne!
Pnp npoknaKe Ka6eNaNnno npeDne CToKe N dpyrmM DeTaJMa ABTomObHnco6IouaTe npBedeHHbIe Hxke yka3aHn.
- IpoIoxKe Ka6eJIb NITaHnHa HeKOTOpom pacCTOaHn Nepei NOyUkaMn 6e3oNaChOcTn Hn No3aHn Hnx, YTO6bI OH He MeuAn paKpbItNo NOyUweK 6e3oNaChOcTn.
- Ecnn O6wnBka nepeDnei CToKN aBTOMOBnla 3aKpePnIeHa Ha cNeuaJIbHbIX KInncax NIN NOO6hblx fNkCaTOpax, MoKeT NOTpe6oBaTbcN X3aMeHa NocNe CHrTna O6WNBKn. 3a CBeDeHNMa O ChrTnN O6WNBKn CToKN i HaJIuNN 3aNaChbIX YacTei, a TAKKe C DpyrHMn BOnpocAmn O6paAaTEcB K PPODaBuV aBTOMOBnIy.
3akpenTe Ka6enb NITaHnC NOMOsbIO NMeUoSeIcB NpoJaKe KNeKoJ JeHTbI INN NOOBHO npncnocobHeH, YTObIo OH He MeaJynpabHeHIO ABTomObHJEM.
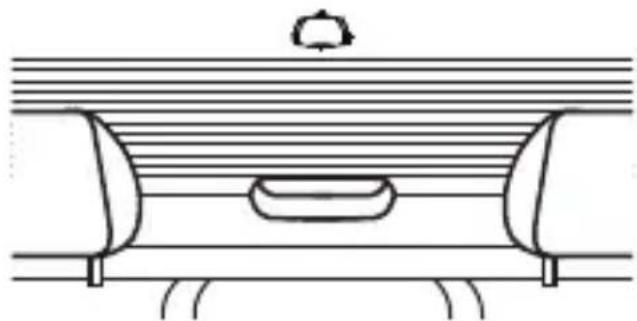
3aDHee cTeKIO
Pn nepBOy yCTaHOBKe BbIIOJIHNTe npNBEdeHHbIe HNKe INHcTpkyuIN.
Uar 1. YctaHObKa KaMepbl 3aHrero Bnda
1.1 CoBmecTe yCtpoiCTBO c KJIeKIM OCHObaHNem
3aФИKcHpyTe yCTpoIcTBo Ha KJIeIKOM OCHOBAHN (3).
ДЯ habлесашу YCTaHOBKn TuaTeNbHO COBMeCTnTe yCTpoIcTBO C KJIeIKM OCHOBAHNEM.
1.2 NooknueHne pa3bema Ka6eNa Kamepb 3aAdHero Bna
IopKnHouHTe pa3bem KaMepbl 3aHero Bnda (2) K Ka6eJbHomy pa3bemy (6).Pnp IOpKnHoyenu yOCTOBepbTecb, YTO WTEKepeCobMeueH C rHe3dOm, a 3aTeM NOBepHnte fHKcnpuyoee KoIbco (5) no yacoboi cTpeJIke, YTo6bl 3akpeNtB Ka6eJIb.

1.3Подклоченke kamepbi 3aДнero Bnda
IopcoeHnTe (7) pa3bem CAM-IN K npTy CAM-IN Ha COBmecTmOM BnDeoperncTaTope.
1.4 Bb6op meCTa yCTaHOBKn
3aNyCTte DbIraTeJIb aBTOMo6nJIa, yTO6bl BKnIOHTb KaMepy 3aHero BVda, 3aTeM BKNIOHTe peXIM 6ecnpoBOJHO nCBzN Wireless Link, yTO6bl ycTaHOBtB coEINHeHne C MObIbHbIM ycTpoIcTBOM. IpOcMaTpNBa n3O6paXeHne c NOMOuI npNJIOKeHnA, BBI6epNTe IOxODJaee MeCTO yCTaHOBKn.
PpimmeaHne
YcTpoIcTBo aBTOMaTHUeCKN BKNHouHTcR N HaUHeT BeCTN 3aNNcB NOcNe IOnaUn NITaHnHa 12-B po3eTKy.
1.5ФИКСАЦЯHA KЛЕйКOM OCHOВАнN
Bb6paB ONTImaIbHoe MeTo n OpneHTaUIO yCTaHOBKn, ydaJIte 3aUHTHyIO pJeHKy c KJIeIKoRO OCHOBaHnra (3) n 3aUHTHyIO pJeHKy C o6BeKTHBa, npNKpeNITe OCHOBaHnne K 3aDHeMy cTeKJy n pRiXMaIte erO B TeueHne 30 ceKyHd.
COBET
- YDOCTOBEPbTECb, yTO B MECTe yCTaHOBKN YCTPOINCTBa BO3MOXHO IOnKJIIOUHTb Ka6eJIb.
- Heo6xOIMO TuaTeNbHO OunchTb CTeKIO HAcyxo npoTepeTb oJNaCTb KpeJIeHnI npi KomHaTHo TEMpepaType, npexde Yem npHKpeJIaTb KNeKoe OCHOBaHne (He DeJaTe 3TOrO IOB O3DeIcTBnEM pIpMOrO cOnHeuHoro CBeta).
- YTo6bI oBecneuTb HauNyUeep npKneBaHne, noJoxnTe 24 yaca.
Information on Disposal of Old Electrical and Electronic Equipment (applicable for countries that have adopted separate waste collection systems)
Products with the symbol (crossed-out wheeled bin) cannot be disposed of as household waste.
Old electrical and electronic equipment should be recycled at a facility capable of handling these items and their waste by products.
Contact your local authority for details in locating a recycle facility nearest to you.
Proper recycling and waste disposal will help conserve resources while preventing detrimental effects on our health and the environment.

Declaration of Conformity with regard to the EMC Directive 2014/30/EU
Declaration of Conformity with regard to the RoHS
Directive 2011/65/EU
Manufacturer:
JVCKENWOOD Corporation
3-12, Moriyacho, Kanagawa-ku, Yokohama-shi,
Kanagawa 221-0022, JAPAN
EU Representative:
JVCKENWOOD Europe B.V.
Amsterdamseweg 37,1422 AC UITHOORN, THE
NETHERLANDS
This equipment may generate or use radio frequency energy. Changes or modifications to this equipment may cause harmful interference unless the modifications are expressly approved in the instruction manual.
The user could lose the authority to operate this equipment if an unauthorized change or modification is made.
FCC NOTE
- This equipment has been tested and found to comply with the limits for a Class B digital device, pursuant to Part 15 of the FCC Rules. These limits are designed to provide reasonable protection against harmful interference in a residential installation.
- This equipment may cause harmful interference to radio communications, if it is not installed and used in accordance with the instructions. However, there is no guarantee that interference will not occur in a particular installation. If this equipment does cause harmful interference to radio or television reception, which can be determined by turning the equipment off and on, the user is encouraged to try to correct the interference by one or more of the following measures:
- Reorient or relocate the receiving antenna.
- Increase the separation between the equipment and receiver.
- Connect the equipment into an outlet on a circuit different from that to which the receiver is connected.
- Consult the dealer or an experienced radio/TV technician for help.
CANICES-3(B)/NMB-3(B)
IC (Industry Canada) Notice
This device contains licence-exempt transmitter(s)/receiver(s) that comply with Innovation, Science and Economic Development Canada's licence-exempt RSS(s). Operation is subject to the following two conditions:
- This device may not cause interference.
- This device must accept any interference, including interference that may cause undesired operation of the device.
CAUTION
This equipment complies with FCC/IC radiation exposure limits set forth for an uncontrolled environment and meets the FCC radio frequency (RF) Exposure Guidelines and RSS-102 of the IC radio frequency (RF) Exposure rules. This equipment has very low levels of RF energy that is deemed to comply without maximum permissive exposure evaluation (MPE). But it is desirable that it should be installed and operated keeping the radiator at least 20cm or more away from person's body.
Pour le Canada
Note de 'IC (Industrie Canada)
Supplier's Declaration of Conformity
Trade Name: KENWOOD
Products: Rear Camera
Model Name: KCA-R100
Responsible Party:
JVCKENWOOD USA CORPORATION
2201 East Dominguez Street,
Long Beach, CA 90810, U.S.A.
PHONE: 310 639-9000
THIS DEVICE COMPLIES WITH PART 15 OF THE FCC RULES. OPERATION IS SUBJECT TO THE FOLLOWING TWO CONDITIONS:
(1)THIS DEVICE MAY NOT CAUSE HARMFUL INTERFERENCE, AND
(2)THIS DEVICE MUST ACCEPT ANY INTERFERENCE RECEIVED, INCLUDING INTERFERENCE THAT MAY CAUSE UNDESIRED OPERATION.